Parts List. RevA _85609INST
|
|
|
- Todd Gordon
- 5 years ago
- Views:
Transcription
1 Parts List (1) Air Oil Separator (1) Billet Clamp (1) Stainless Steel Mount (1) Stainless Steel Tab (1) 90 degree barbed fitting (1) Straight Barbed Fitting (2) 30 Long ½ I.D. Hose (4) ¼ x 20 x 5/8 SHCS (1) 6mm x 1.0mm x 20mm HHCS (1) 6mm Flat Washer (2) 8mm x 1.25mm x 20mm HHCS (2) 8mm Flat Washer (1) ¼ x 20 x 5/8 (1) ¼ x 20 Nylock Nut RevA _85609INST


2 Step 1: Remove mass airflow sensor plug. Step 2: Loosen air intake tube clamp.


3 Step 3: Unscrew / Remove air box mounting hardware. Step 4: Remove air box top from vehicle.


4 Step 5: Remove air filter.


5 Step 6: Remove vacuum line from air intake tube as shown.


6 Step 7: Remove PCV line from valve cover.


7 Step 8: Remove air box from vehicle as shown.
8


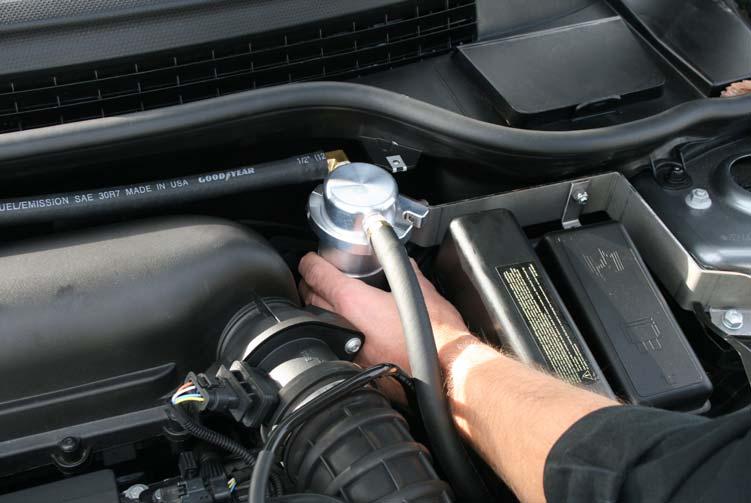
9 Step 9: Remove by-pass valve from vehicle as shown.
10


11 Step 10: Remove other end of PCV line located on throttle body.


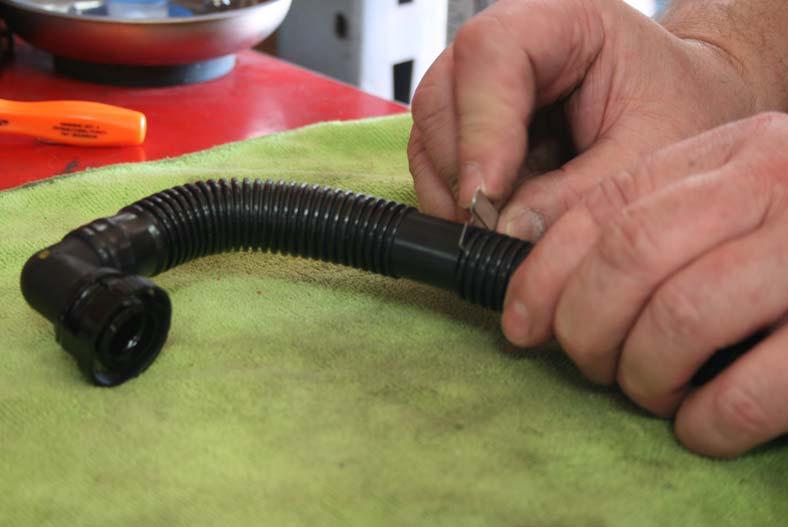
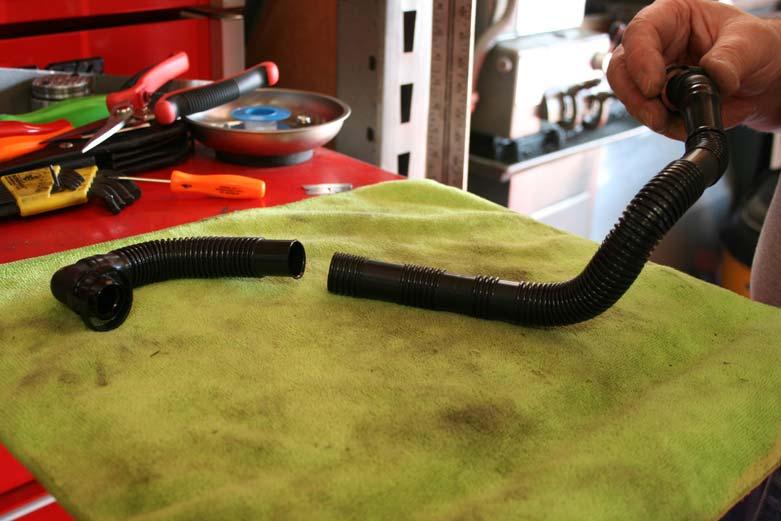
12 Step 11: Remove PCV line from vehicle. Step 12: Cut outer wrapping from PCV line as shown.


13 Throttle Body / 90 degree end of PCV line Step 13: Using a razor blade or utility knife cut as shown.
14


15 Gently warm this area of PCV line with hair dryer or heat gun Step 14: Insert ¾ x ½ coupling into throttle body / 90 degree side of PCV line. PCV line will need to be gently warmed with a hair dryer or heat gun prior to inserting coupling.


16 Step 15: Twist fitting 180 degrees as shown. Step 16: Insert ½ side of coupling into 30 length of ½ ID hose.


17 Step 17: Cut valve cover end of PCV line as shown.


18 Gently warm this area of PCV line with hair dryer or heat gun Step 18: Insert ¾ x ½ coupling into valve cover side of PCV line. PCV line will need to be gently warmed with a hair dryer or heat gun prior to inserting coupling.


19 Step 19: Insert ½ side of coupling into 2 nd 30 length of ½ ID hose.


20 Step 20: Using Fitting / hose assembly from step 16 (With 90 degree end) re-install fitting over throttle body nipple.


21 Step 21: Route hose as shown. Step 22: Re-install by-pass valve.
")

22 Step 23: Using Fitting / hose assembly from step 19 (With straight end) re-install fitting over valve cover nipple. Step 24: Route hose as shown and re-install air box.


23 Step 25: Re-install air filter. Step 26: Re-install air box top and mass airflow sensor plug.


24 Step 27: Assemble 90 degree and straight barbed fittings into air oil separator using Teflon tape as shown.


25 Step 28: Assemble billet clamp and billet clamp assembly to stainless mounting bracket, using (4) ¼ x 20 x 5/8 SHCS. Top of billet clamp (No Reliefs)


26 Bottom of billet clamp (With Reliefs) Step 29: Using ¼ x 20 x 5/8 HHCS and nylock nut assemble small mounting tab to stainless mount, do not tighten.
")

27 Step 30: Remove (2) support bolts from strut tower

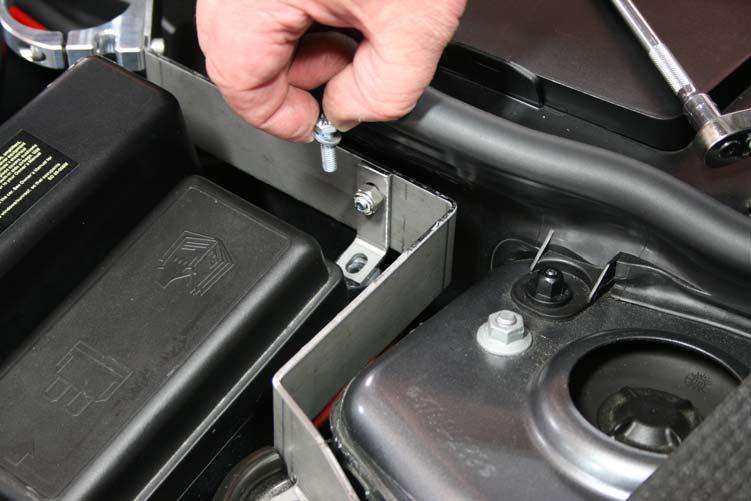
 8mm x 20mm")
28 Step 31: Remove fuse box mounting bolt. Step 32: Install mounting bracket with (2) 8mm x 20mm HHCS and (1) 6mm x 20mm HHCS


29 (Tighten strut tower support bolts before installing fuse box tab bolt)

30


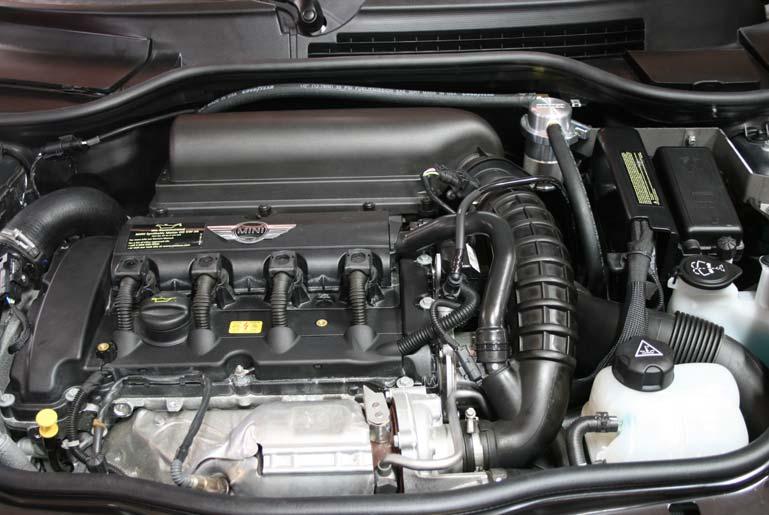
31 Step 33: Tighten fuse box tab hardware. Step 34: Install Air Oil Separator into billet clamp with 90 degree barb facing passenger side of vehicle.


32 Step 35: Set Air Oil Separator in clamp 1 to 1 1/8 from top of billet clamp to top of air oil separator and tighten.


33 Step 36: Route valve cover hose to Air Oil Separator and install hose over 90 degree barbed fitting.


34 Step 37: Route throttle body hose to air oil separator and install hose over straight barbed fitting.
35 Installation Complete
.")
36 To empty Air Oil Separator un-screw bottom cup, dump collected oil / fluids and re-install. Draining of Air Oil Separator is needed; this will depend on driving conditions (i.e.) normal day to day driving check every 1,000 miles until a baseline is established. A good baseline is to drain the Air Oil Separator when it is about HALF full. This will vary with temperatures (cold winters vs. hot summers). For track usage Air Oil Separator will need to be drained after every outing
JOHN DEERE GATOR HPX/XUV 2 PASSENGER HEATER INSTALLATION INSTRUCTIONS (p/n: 9PH20S30)
") P. 1 of 12 JOHN DEERE GATOR HPX/XUV 2 PASSENGER HEATER INSTALLATION INSTRUCTIONS (p/n: 9PH20S30) Item: Qty: Description: 1 2 1 x 1 x 5/8 Tee Fitting 2 2 Plastic Snap-in Hose Grommet 3 4 1-1/2" Hose Clamps
P. 1 of 12 JOHN DEERE GATOR HPX/XUV 2 PASSENGER HEATER INSTALLATION INSTRUCTIONS (p/n: 9PH20S30) Item: Qty: Description: 1 2 1 x 1 x 5/8 Tee Fitting 2 2 Plastic Snap-in Hose Grommet 3 4 1-1/2" Hose Clamps
A HEATER KIT With Diesel Engine Connection Fittings
 A-12142 HEATER KIT With Diesel Engine Connection Fittings Figure 1 (General Layout and Parts I.D.) Page 1 of 6 Read these instructions and identify all components. Please retain these instructions for
MOUNTING INSTRUCTIONS
 A-12093 JDX 2014 HEATER KIT With Gas Engine Connection Fittings 2014 and Newer ROPS Cabs A-12098 (Kit A-12092, Diesel Engine Connection Fittings are sold separately for diesel models) 12VDC, 2-Speed, 15,000
BUILT-IN DISHWASHER INSTALLATION INSTRUCTIONS
 BUILT-IN DISHWASHER INSTALLATION INSTRUCTIONS PLEASE READ COMPLETE INSTRUCTIONS BEFORE YOU BEGIN LEAVE INSTALLATION INSTRUCTIONS AND USER'S GUIDE WITH OWNER ALL ELECTRIC WIRING AND PLUMBING MUST BE DONE
INSTALLATION INSTRUCTIONS UNDERCOUNTER DISHWASHERS
 INSTALLATION INSTRUCTIONS UNDERCOUNTER DISHWASHERS VIKING 111 Front Street Greenwood, Mississippi 38930 USA (662) 455-1200 IMPORTANT - PLEASE READ AND FOLLOW Before beginning - please read these instructions
Fillmore Small Pendant Assembly and Installation Instructions
 CAUTION: Fillmore Small Pendant Assembly and Installation Instructions BEFORE INSTALLING FIXTURE, MAKE SURE THE POWER TO THE CIRCUIT IS TURNED OFF AT THE MAIN FUSE BOX / CIRCUIT BREAKER UTILITY BOX. Important
1 of 3 5/4/ :44 AM
 Expansion Block/Orifice Tube Service and Repair, Removal and Repla... http://repair.alldata.com/alldata/article/display.action?componentid=35&... 1 of 3 5/4/2016 11:44 AM Air Conditioning Evaporator Thermal
IMPORTANT INFORMATION. Revised Dishwasher Installation Instructions
 IMPORTANT INFORMATION Revised Dishwasher Installation Instructions To obtain a revised copy of the entire Dishwasher User s Manual, go to www.eurotechappliances.com. SPECIAL EDITION 11-20-02 SAVE THESE
PARTS LIST RALLY 220 SAVE THESE INSTRUCTIONS
 PARTS LIST RALLY 220 SAVE THESE INSTRUCTIONS OVERVIEW OVERVIEW ITEM PART NO. DESCRIPTION QTY 1 4099011 CORD WRAP, (SET FOR ONE CORD, FASTENERS NOT INCLUDED) 1 2 9120935 1/4 WASHER,.268 ID x.5 OD x.060
Service Parts for models UF424 and UN324
 Service Parts for models UF and UN This is the illustrated parts list for Scotsman ice maker models UF and UF. They were manufactured as either air or water cooled models, plus the air cooled models were
Can Am Commander 1000 Radiator Relocation Installation Instructions
 Can Am Commander 1000 Radiator Relocation Installation Instructions What comes with the kit 2 CNC Machined Aluminum mounting brackets 2 pcs M6 x 1.0 x 60mm long SHCS 2 pcs M6 x 1.0 x75mm long SHCS 4 pc
Parts & Material Included
 O² Hydro Well System Installation, Use & Care Guide Parts & Material Included 1. Funnel 11. Drain Line 21. Air Head 2. Media Tank Distributer Tube 12. Air Release 22. Drain Fitting 3. Air Tank Distributer
INSTALLATION INSTRUCTIONS
 INSTALLATION INSTRUCTIONS Accessory Application Publication No. HEATER KIT P/N 0SE01-HL3-102 (SXS700M2/M4) P/N 0SE01-HL3-103 (SXS700M2D/M4D) SXS700M2/M2D/M4/M4D MII 14607-15172 Issue Date REVISED: June
INSTALLATION INSTRUCTIONS John Deere One Series; 1023E, 1025R and 1026R Models A HEATER KIT. Figure 1 (General Layout and Parts I.D.
 A-11978 HEATER KIT Figure 1 (General Layout and Parts I.D.) Read these instructions and identify all components. Please retain these instructions for future reference and parts ordering information. Refer
UNIVERSAL 750 PRE-MIX DISPENSER
 Anoka, MN. 0 - Telephone -00--00 Facsimile -00--0 MODEL NO. xxx xxx Universal 0 of Control Code A Manual Part No. 00 -- Revised: -- ªIMI Cornelius Co., - Anoka, MN. 0 - Telephone -00--00 Facsimile -00--0
INSTALLATION INSTRUCTIONS
 Accessory Application Publication No. INSTALLATION INSTRUCTIONS HEATER KIT P/N 0SE01-HL3-101 SXS700M4/M2 Honda Dealer: Please give a copy of these instructions to your customer. PARTS LIST REPAIR KIT (P/N
LG G2 Super Cool C7 Radiator
 LG G2 Super Cool C7 Radiator THE MOST POWERFUL HEADERS ON THE PLANET Brought to you by LG Motorsports 972-429-1963 Parts Inventory: 1. Radiator 2. 170 thermostat (optional) Tools Needed: 1. Drain pan 2.
HX Field Replacement Kit
 Quantity Kit Part Number Description PE 110 Natural Gas Stainless Steel Condensate Pan PT 110 Natural Gas Polypropylene Condensate Pan Model PE 110 LP Stainless Steel Condensate Pan PT 110 LP Polypropylene
Catch Cans. What makes the RX performance the most effective oil separating catchcan on the market?
 R X Catch Cans (For the 5 th Gen Camaro, L99 A6 V8) What makes the RX performance the most effective oil separating catchcan on the market? There are several factors that come into play to effectively
INSTALLATION MANUAL. Manufactured by AQUA-AIR MANUFACTURING. (801) or (800) FAX (801)
 or (800) FAX (801)") INSTALLATION MANUAL Manufactured by AQUA-AIR MANUFACTURING 542 W. 47 Confluence East 800 South, Ave., Salt Ivins, Lake Utah City, 84738 Utah 84123 (801) 265-9699 or (800) 916-5777 FAX (801) 268-3856 (435)
INSTALLATION MANUAL Manufactured by AQUA-AIR MANUFACTURING 542 W. 47 Confluence East 800 South, Ave., Salt Ivins, Lake Utah City, 84738 Utah 84123 (801) 265-9699 or (800) 916-5777 FAX (801) 268-3856 (435)
INSTALL INSTRUCTIONS KK-S-HVAC SPRINTER VAN REAR HVAC SYSTEM
 INSTALL INSTRUCTIONS KK-S-HVAC-2 2007-2014 SPRINTER VAN REAR HVAC SYSTEM TOOLS REQUIRED: Aeroquip (#FT1357) Pliers A/C Refrigerant Charging machine Refrigerant Hose Cutter Open-end wrench set (up to 1
Handshower, Hose & Handshower Accessories
 P24443, P24445, P24446, P24452, P24453, P24456 1 of 6 INSTALLATION INSTRUCTIONS Thank You For Choosing KALLISTA We appreciate your commitment to KALLISTA quality products. Please take a moment to review
Ceiling Fan Blade Arm Replacement
 Ceiling Fan Blade Arm Replacement Urgent Action Required The steps listed in this document are critical in ensuring safe operation of your ceiling fan. Failure to complete these steps can lead to property
SAN JUAN FRESH WATER COOLING SYSTEMS
 SAN JUAN FRESH WATER COOLING SYSTEMS 4.3-5.7 GI VOLVO Block Only Cooling, Mounted Off Engine Kit #V-111 Installation Instructions San Juan Engineering Heat Exchangers provide thermostatically controlled
CHAPTER 7 PARTS LISTS, SCHEMATIC DIAGRAMS AND WARRANTY
 CHAPTER 7 PARTS LISTS, SCHEMATIC DIAGRAMS AND WARRANTY Parts List - Trailer Assembly 01 180721 Frame Assembly 02 188671 Bushing, 1.02" ID x 1.25" OD x.75l 03 188781 Support, Axle, 1" 04 188381 Plate, Axle
CHAPTER 7 PARTS LISTS, SCHEMATIC DIAGRAMS AND WARRANTY
 CHAPTER 7 PARTS LISTS, SCHEMATIC DIAGRAMS AND WARRANTY Parts List - Trailer Assembly 01 190331 Frame Assembly w/plugs 02 180741 Bracket, Axle, Trailer 03 180751 Axle, Trailer 04 180641 Washer,.8" ID, 1.5"
Ceiling Fan Installation Instructions
 Ceiling Fan Installation Instructions Model #: AC-10842 Please Read and Save SAFETY PRECAUTIONS 1. To ensure the success of the installation, be sure to read the instructions and review the diagrams thoroughly
VENTURI AIR SPRAYERS WRAP AROUND BOOM D SERIES
 VENTURI AIR SPRAYERS WRAP AROUND BOOM D SERIES Parts Manual For TS512MC55D12 Boom For T55E2-2000 Form: TS512MC55D12_D_Boom.indd June 2013 TABLE OF CONTENTS SECTION DESCRIPTION PAGE 1 Complete Frame...1-6
FLOOD KING 120V. 2. Keep all filters clean. Do not operate the machine if the filters are clogged.
 FLOOD KING 120V INFORMATION & OPERATING INSTRUCTIONS DO NOT OPERATE THE MACHINE UNTIL YOU HAVE READ ALL SECTIONS OF THESE INSTRUCTIONS. IMPROPER USE OF THE MACHINE WILL VOID THE WARRANTY 1. Always be sure
COMPRESSED AIR DRYER. SAFETY... Page 2 MAINTENANCE... Page 5. INSTALLATION... Page 3 PARTS AND KITS... Page 6
 OWNERS MANUAL BOSS COMPRESSED AIR DRYER Distributed by Air & Vacuum Process, Inc. Phone: 281-866-9700 Fax: 281-866-9717 Email: sales@airvacuumprocess.com SAFETY... Page 2 MAINTENANCE... Page 5 INSTALLATION...
52 CEILING FAN READ AND SAVE THESE INSTRUCTIONS FAN RATING AC 120V.
 Irene 52 CEILING FAN READ AND SAVE THESE INSTRUCTIONS FAN RATING AC 120V. 60Hz TABLE OF CONTENTS Tools and Materials Required... 1 Package Contents... 1 Safety Rules... 2 Mounting Options... 3 Hanging
AJ-44 Rack Conveyor Dishmachine Maintenance Instructions. Changing Conveyor Direction
 AJ-44 Rack Conveyor Dishmachine Maintenance Instructions Changing Conveyor Direction 07610-003-04-72 A March 30, 2005 The Jackson model AJ-44 series dishmachine has the ability to have its direction of
Click here for a labelled version of above
 Click here for a labelled version of above Download Of This Page: Click Here to download this whole page. (773 Kb Adobe Acrobat File) Biodiesel Processor Diagram: Click Here to download a detailed diagram
Safety. Rinse Kit for Multi-Pro 1200 and 1250 Turf Sprayers Model No Safety and Instructional Decals. Installation Instructions
 Rinse Kit for Multi-Pro 1200 and 1250 Turf Sprayers Model No. 106-4842 Form No. 3353-529 Rev B Installation Instructions Note: Determine the left and right sides of the machine from the normal operating
JOHN DEERE X465, X475, X485, X495, X575, X585
 JOHN DEERE X465, X475, X485, X495, X575, X585 and X595 X700 SERIES (X700, X720, X720se, X724, X728, X728se, X729, X740, X744, X748, X748se, X749) CAB MOUNTING INSTRUCTIONS A-11271 Manufactured by: BOX
HEAT/ COOL/ DEFROST FORD THUNDERBIRD
 specializing in AIR CONDITIONING, PARTS AND SYSTEMS for your classic vehicle PERFECT FIT IN-DASH HEAT/ COOL/ DEFROST 1964-66 FORD THUNDERBIRD CONTROL & OPERATING INSTRUCTIONS The controls on your new Perfect
WARNING. Tighten strain relief screws to secure cable. Make sure screw heads are facing up when tightening conduit nut.
 WARNING Electrical Shock Hazard Electrically ground dishwasher. Connect ground wire to green ground connector in terminal box. Do not use an extension cord. Failure to follow these instructions can result
Questions? Call 800.GE.CARES ( ) or visit our Web site at: GEAppliances.com In Canada, call or visit
 or visit our Web site at: GEAppliances.com In Canada, call or visit") Installation Instructions Electric Dryer 01 Questions? Call 800.GE.CARES (800.432.2737) or visit our Web site at: GEAppliances.com In Canada, call 1.800.561.3344 or visit www.geappliances.ca BEFORE YOU
Installation Instructions Electric Dryer 01 Questions? Call 800.GE.CARES (800.432.2737) or visit our Web site at: GEAppliances.com In Canada, call 1.800.561.3344 or visit www.geappliances.ca BEFORE YOU
Heat Exchanger Block Replacement Instructions
 Series 1-4 Gas-fired water boiler Heat Exchanger Block Replacement Instructions Ultra-80 S1-4 Heat Exchanger Block Replacement Kit, Part No. 383-500-773 Ultra-105 S1-4 Heat Exchanger Block Replacement
Heater with Air Conditioning. E-Series Ford Aeromaster
 Service Guide Heater with Air Conditioning E-Series Ford Aeromaster Contents Blower Motor...2 Plenum Removal...3 Control Module...6 Servo Motors...8 Coolant Valve and Servo Motor...8 Evaporator Recirculation
BMW E36 Thermostat Removal And Coolant Flush
 BMW E36 Thermostat Removal And Coolant Flush Disclaimer: The cooling system is critical to the proper operation of your car. Failure to properly install all of the components of the cooling system could
Installation instructions for condenser tumble dryer DOMESTIC. Dear Customer,
 Dear Customer, Read these instructions carefully and completely before you install the machine. The installation should be carried out by a qualified person who is familiar with all local codes and ordinances
Radiator Coolant Flush
 Radiator Coolant Flush Should be done every couple years. Fairly easy job, need a Phillips head screwdriver, 10mm deep socket, couple gallons of water, a gallon of silicate free anti-freeze, needle nose
NOTICE: The information contained on the following page(s) was produced prior to May 1, On that date Reznor became part of Nortek, Inc.
 was produced prior to May 1, On that date Reznor became part of Nortek, Inc.") NOTICE: The information contained on the following page(s) was produced prior to May 1, 2014. On that date Reznor became part of Nortek, Inc. References to any other company affiliations are no longer
NOTICE: The information contained on the following page(s) was produced prior to May 1, 2014. On that date Reznor became part of Nortek, Inc. References to any other company affiliations are no longer
1. SAFETY RULES WARNING WARNING. 8. Avoid placing objects in the path of the blades.
 1 1. SAFETY RULES 1. To reduce the risk of electric shock, insure electricity has been turned off at the circuit breaker or fuse box before beginning. 2. All wiring must be in accordance with the National
Dyna-Star HP or HF Pump 35# Pail Kit and Follower Plate
 Instructions Dyna-Star HP or HF Pump 35# Pail Kit and Follower Plate 332517B EN For adapting a 60# Dyna-Star Pump for use with a 35# bucket. For professional use only. Part No.: Important Safety Instructions
XTREME ICE MAKER (1230 SERIES)
") XTREME ICE MAKER (0 SERIES) MODEL NO. 00 00 00 00 00 00 0 XTREME ICE (0) of Manual Part No. 00IPL 00 IMI Cornelius Co., 00 XTREME ICE MAKER (0 SERIES) FIGURE. GENERAL ASSEMBLY (AIR CONDENSER SHOWN) 00
XTREME ICE MAKER (0 SERIES) MODEL NO. 00 00 00 00 00 00 0 XTREME ICE (0) of Manual Part No. 00IPL 00 IMI Cornelius Co., 00 XTREME ICE MAKER (0 SERIES) FIGURE. GENERAL ASSEMBLY (AIR CONDENSER SHOWN) 00
SuperKlean Washdown Products
 DURAREEL DR8 & DR8S INSTALLATION AND MAINTENANCE INSTRUCTIONS **DO NOT THROW AWAY AFTER INSTALLATION** **SAVE AND DISPLAY PROMINENTLY WHERE THIS EQUIPMENT IS USED** GENERAL WARNINGS High pressure and hot
Installation Electric Dryers Instructions 01
 Installation Electric Dryers Instructions 01 Questions? Call 800.GE.CARES (800.432.2737) or visit our Web site at: GEAppliances.com This is the safety alert symbol. This symbol alerts you to potential
IMAGE V. Parts and Service Manual
 IMAGE 0V Section II Parts and Service Manual (88B) CLARKE TECHNOLOGY Image Operator's Manual Page AUTHORIZED PERSONNEL MAINTENANCE To Access Pump Motor. Remove brush housing from machine. See "Brush Motor
690 and Power Fishing Systems
 INSTRUCTION MANUAL 690 and 690-22 Power Fishing Systems Includes Serial Number AAR 3800 and higher (120 volt model) Includes Serial Number AAT 00500 and higher (220 volt model) Read and understand all
Owner s Manual FS-10/FreshSpa
 Owner s Manual FS-10/FreshSpa Table of Contents Product Features................ Page 2 Parts List....................... Page 3 Configuration................... Page 4 Installation.....................
Page 1 of 18. Part# /5/2013
 Part# 1002655-06 8/5/2013 This manual contains important information concerning the installation and operation of the gun washers listed above. Read manual thoroughly and keep for future reference INSTRUCTIONS
Electrical cable Water supply tube Fittings for tube Coupler Teflon tape. Hole saw min. 2½" bit
 Installation Parts and Tools Parts not Provided Electrical cable Water supply tube Fittings for tube Coupler Teflon tape Air gap Wire nuts for 6-gauge wiring Hose clamp ⅞" UL approved strain relief Electrical
1350 & AMMCO Brake Washer Systems. Installation and Operating Instructions With Safety and Maintenance Instructions and Parts Identification
 1350 & 1450 AMMCO Brake Washer Systems Installation and Operating Instructions With Safety and Maintenance Instructions and Parts Identification READ these instructions before placing unit in service.
INSTALLATION & OWNER S MANUAL
 Rev. A, p. 1 of 8 INSTALLATION & OWNER S MANUAL HONDA PIONEER 700-2 AND 700-4 HEATER INSTALLATION p/n: 9PH20S64 The contents of this envelope are the property of the owner. Be sure to leave with the owner
OPERATION MANUAL ODS 300 ODS 310
 300 Series Oil Disposal Shuttle OPERATION MANUAL ODS 300 ODS 310 FM07-635J Table of Contents Safety... iii Chapter 1 Introduction...1 1.1 Introduction...1 1.2 Technical Support...1 1.3 Model Configuration
Please read the following installation instructions first after purchasing this product or transporting it to another location.
 9 Installation Overview Please read the following installation instructions first after purchasing this product or transporting it to another location. 1 Unpacking your refrigerator 2 Choosing the proper
54" Skye. Instruction Manual Customer Service :30 AM to 5:00 PM EST, Monday - Friday A Kichler Decor ceiling fan
 54" Skye TM 300167 A Kichler Decor ceiling fan Includes wall mount control system Kichler Lighting 7711 East Pleasant Valley Road P.O. Box 318010 Cleveland, Ohio 44131-8010 Instruction Manual Customer
Camaro A/C Install Instructions
 1967-1968 Camaro A/C Install Instructions This kit is designed for the 1967-1968 non A/C equipped Camaro. This kit can be used with or without Astro vents Step One Remove the following factory components:
Instructions Apply For Model PHTT-6P-KFC. Panel Shelf Is Removed to install warming drawers
 Installation Tips and Procedure For OTR-KFC Table Assembly And Auto-Fill Connection Instructions Apply For Model PHTT-6P-KFC TO DETERMINE TABLE PLACEMENT: Faces Front: Control Side of the units. APPROVED
Installation Instructions
 www.aquanta.io Aquanta by Sunnovations Inc. www.sunnovations.com Installation Instructions For online instructions go to: https://portal.aquanta.io/setup 1 Tools Needed: Phillips screw driver Flathead
MISHIMOTO TECHNICAL SPECS
 MISHIMOTO TECHNICAL SPECS RESEARCH RESEARCH & DEVELOPMENT DEVELOPMENT Subject: Objectives Design a high-end oil/air separator that is universal and can be installed in most vehicles. Design must function
Electric Automatic Carpet Extractor. Operator and Parts Manual. Model No.: Rev. 00 (11-99)
") 1520 Electric Automatic Carpet Extractor Model No.: 607649 Operator and Parts Manual TENNANT COMPANY Commercial Products 12875 RANSOM STREET HOLLAND MI 49424 U.S.A. FAX: 1 800 678 4240 CUSTOMER SERVICE:
1520 Electric Automatic Carpet Extractor Model No.: 607649 Operator and Parts Manual TENNANT COMPANY Commercial Products 12875 RANSOM STREET HOLLAND MI 49424 U.S.A. FAX: 1 800 678 4240 CUSTOMER SERVICE:
HD 5/11 C Plus. Automatic pressure cut-off. Pump technology
 HD 5/11 C Plus Compact cold-water high pressure cleaner. With its compact dimensions, robust construction and greatest possible manoeuvrability, this unit is a credit to the compact class. 1 Automatic
CapraLite. Owner s Manual. Milking Machines. Built by: Apparatus Mfg., Inc. 13 Commerce St Poughkeepsie, NY 12603
 CapraLite Milking Machines Owner s Manual www.capralite.com Built by: Apparatus Mfg., Inc. 13 Commerce St Poughkeepsie, NY 12603 Page 2 Getting your Machine ready Your machine is almost ready to use. For
PUREFIRE PF-50, PF-80, PF-110 & PF-140 PF-50, PF-80, PF-110 & PF-140
 4 PB Heat, LLC Repair Parts Trade Price List (R-11) - Effective June 1, 2011 Description PUREFIRE Quantity Required Stock Code 1 Front Door Panel with Ball Studs 1 54168 $168 2 Control Lens 1 54167 $57
General System Layout Sketch
 General System Layout Sketch EZ-37 Solar Panels PV panel Glycol Fill Valve Expansion Tank ` 1 Introduction This document describes how to install a Heliatos GH type solar water heating system. These systems
51AKB / 51 AKC OWNER S MANUAL
 51AKB / 51 AKC OWNER S MANUAL This manual applies to the following models 51AKB 009 51AKB 012 51AKC 009 51AKC 012 Read this instruction manual thoroughly before using the air conditioner. Control panel
Dirt Dragon. Operator and Parts Manual WOOD FLOOR CLEANING MACHINE
 Dirt Dragon WOOD FLOOR CLEANING MACHINE Operator and Parts Manual 1001 Brown Avenue Toledo, Ohio 43607-0127 Customer Service: 800-441-1934 Fax: 800-942-2007 Technical Service: 877-856-5954 www.basicoatings.com
C-IV 60 CEILING FAN READ AND SAVE THESE INSTRUCTIONS. FAN RATING AC 120V. 60Hz
 C-IV 60 CEILING FAN READ AND SAVE THESE INSTRUCTIONS FAN RATING AC 120V. 60Hz Please do not use any electric or battery powered tools in the assembly and installation of this or any Matthews Fan Company
Pentz EF5 Installation Guide
 Pentz EF5 Installation Guide Clear Vue Cyclones 145 Nix Road Liberty, SC 29657 888-299-0221 www.clearvuecyclones.com Disclaimers & Warnings WARNING: All persons, by purchasing a motorized dust collection
Product Support Bulletin
 MODEL: SUBJECT: CONVENTIONAL, W/ C7 CAT ENGINE WEBASTO TSL-17 HEATER Body DATE: APRIL 13, 2004 INDEX: 6 PAGE: 1 OF 16 Before you start this procedure, perform Freightliner Service Bulletin #20-7 first.
PREDATOR CX3 IMPORTANT SAFETY INSTRUCTIONS READ AND UNDERSTAND ALL INSTRUCTIONS BEFORE OPERATING OR SERVICING MACHINE
 DANGER! PREDATOR CX3 IMPORTANT SAFETY INSTRUCTIONS READ AND UNDERSTAND ALL INSTRUCTIONS BEFORE OPERATING OR SERVICING MACHINE Failure to Observe These Instructions Can Cause Personal Injury to Machine
Electric Dryer Installation Instructions
 Electric Dryer Installation Instructions Table of Contents DRYER SAFETY...2 Installation Requirements...3 Tools and Parts... 3 Location Requirements... 3 Electrical Requirements... 4 Install Leveling Legs...
INSTALLATION and OPERATING MANUAL TYPE: 120 VOLT IVD660-F IN-WALL INSTALLATION 66XF THE COMPACT CENTRAL VACUUM SPECIALIST. rev.:
 RECORD THIS INFORMATION FOR FUTURE REFERENCES MODEL NUMBER DATE OF PURCHASE THE COMPACT CENTRAL VACUUM SPECIALIST PLACE OF PURCHASE Manual # M13 rev.: date: 1-6-17 INSTALLATION and OPERATING MANUAL TYPE:
Horizon Ice Machine Models with RIDE Technology Installation Instructions for Vision
 Stock Module Identification Plate Module No. Product Service No. 208264 MODEL REFRIGERANT VOLTS AMPS AMPS U R PART NO CHARGE LOW SIDE C HZ U L R NSF SINGLE PHASE OZ PSIG MADE IN THE USA Horizon Ice Machine
42 Kevlar. Instruction Manual. Kichler Lighting 7711 East Pleasant Valley Road P.O. Box Cleveland, Ohio
 42 Kevlar Kichler Lighting 7711 East Pleasant Valley Road P.O. Box 318010 Cleveland, Ohio 44131-8010 Customer Service 866.558.5706 8:30 AM to 5:00 PM EST, Monday - Friday Instruction Manual 1 1. SAFETY
Dual Billet Bottle Bracket Assembly Instructions
 Nitrous Outlet 5427 N ST HWY 6 SUITE 1 WACO TX 76712 Dual Billet Bottle Bracket Assembly Instructions This product should only be installed by a professional who has extensive experience with nitrous systems.
1. SAFETY RULES. 8. Avoid placing objects in the path of the blades.
 1 1. SAFETY RULES 1. To reduce the risk of electric shock, insure electricity has been turned off at the circuit breaker or fuse box before beginning. 2. All wiring must be in accordance with the National
60" Tulle PatioTM. Instruction Manual. A Kichler Select ceiling fan
 60" Tulle PatioTM A Kichler Select ceiling fan cul Certified for Wet Location Kichler Lighting 7711 East Pleasant Valley Road P.O. Box 318010 Cleveland, Ohio 44131-8010 Customer Service 866.558.5706 8:30
Harvey Chemiclave EC Series Sterilizers
 BARNSTEAD THERMOLYNE CORPORATION CHEMICLAVE EC SERIES STERILIZERS Harvey Chemiclave EC Series Sterilizers PARTS CATALOG LT1121x 12/10/98 1 Final Assembly - Refer to Figure 1 Figure Page 1 Final Assembly
PERFECT FIT IN-DASH HEAT/ COOL/ DEFROST PLYMOUTH BELVEDERE
 PERFECT FIT IN-DASH HEAT/ COOL/ DEFROST 1966-67 PLYMOUTH BELVEDERE CONTROL & OPERATING INSTRUCTIONS The controls on your new Perfect Fit system. Offers complete comfort capabilities in virtually every
Revised 9/05. Model X-750 Subassembly Parts List
 Revised /0 Model Subassembly Parts List Blade Belt Tensioner 0 PART NUMBER DESCRIPTION QTY. -G0-0-0 SHSB, / x / -G0-0-0 SHSB, / x / -X-0-00 Arm, Belt Tensioner -G0-0-00 Washer, Flat /" -0-0-0 Washer, Split
INSTALLATION MANUAL FOR MODELS: SOVANNA, BREZZA, TERRACINA, VENADO
 INSTALLATION MANUAL FOR MODELS: SOVANNA, BREZZA, TERRACINA, VENADO 1 STRADA, TERCERA, SEDONA, MARVIN STEAM SHOWERS SPECIFICATION SHEET 87.8 30 24 SOVANNA, VENADO, BREZZA, TERRACINA STEAM SHOWER UNIT DIMENSIONS
DRAIN WATER TEMPERING INSTALL
 ! WARNING! CAUTION DRAIN WATER TEMPERING INSTALL DRAIN WATER TEMPERING KIT - 06401-004-60-64 WARNING! This kit should be installed only by qualified service personnel to reduce the risk of electric shock,
Arctica Solar 1500 Series Heater Installation Manual
 Arctica Solar 1500 Series Heater Installation Manual A wall mounted Arctica Solar 1500 series solar heater + PV panel demonstration wall The 1500 Series Solar Air Heater from Arctica Solar is designed
kk21 installation Kk21-WF21 Things you might need for the installation: vessel sink,
 Kk21-WF21 Things you might need for the installation: vessel sink, plumber's putty(home depot), liquid nails(home depot), Bucket silicone caulk(home depot), Putty knife Plumber's putty Pipe wrench Channel-lock
60" Lyndon Patio. Instruction Manual Customer Service :30 AM to 5:00 PM EST, Monday - Friday A Kichler Decor ceiling fan
 60" Lyndon Patio TM 310140 A Kichler Decor ceiling fan Includes wall mount control system Kichler Lighting 7711 East Pleasant Valley Road P.O. Box 318010 Cleveland, Ohio 44131-8010 Instruction Manual Customer
CBT LW MAINTENANCE GUIDE
 CBT LW MAINTENANCE GUIDE PICTOGRAMS Each Signifier displayed here is specific to this User Manual. Menu Previous Advance Note Tip Example Powder Feeder Mixing Bowl Weigh Scale CBP Tanks Control Panel PSD
Smart Water Heater Controller
 Smart Water Heater Controller Installation Instructions Version 1.0 2016 1 Introduction Congratulations on the purchase of your Aquanta Smart Water Heater Controller! The Aquanta retrofittable water heater
D400A/W Ice Machine. Installation Manual. D400A ice machine. D400W ice machine. Order parts online.
 Order parts online www.follettice.com D400A/W Ice Machine Installation Manual D400A ice machine D400W ice machine 801 Church Lane Easton, PA 18040, USA Toll free (877) 612-5086 (610) 252-7301 www.follettice.com
/99 USA. Installation Manual SU Save These Instructions!
 46992 7/99 USA Installation Manual SU 160-200 Save These Instructions! TABLE OF CONTENTS 1 General Guidelines 3 2 Technical Data and Tank Connections 4 3 Transportation and Placement 5 4 Installation 6
V. (Versus ) Bare Floor Vacuum
 Bare Floor Vacuum") V. (Versus ) Bare Floor Vacuum USER S GUIDE 76T8 SERIES 3 Safety Instructions 4 Product View 5 Assembly 6 Operation 7-8 Maintenance and Care 9 Troubleshooting 10 Consumer Services 11 Replacement Parts
V. (Versus ) Bare Floor Vacuum USER S GUIDE 76T8 SERIES 3 Safety Instructions 4 Product View 5 Assembly 6 Operation 7-8 Maintenance and Care 9 Troubleshooting 10 Consumer Services 11 Replacement Parts
Horizon Elite Ice Machine Models with RIDE Technology Installation Instructions for Vision
 Horizon Elite Ice Machine Models with RIDE Technology Installation Instructions for Vision HCD/HMD710AVS, HCC/HMC/HCE/HME1010AVS, HCC/HMC/HCE/HME1410AVS, HCC/HMC/HCE/HME1010WVS, HCC/HMC/HCE/HME1410WVS,
Operating Instructions for the BBO-1 and BBO-2 Basket Blasters
 Operating Instructions for the BBO-1 and BBO-2 Basket Blasters 2101 West Cabot Boulevard Langhorne, PA 19047-1893 www.empire-airblast.com Page 2 Model Number: Serial Number: Date of Purchase: Date of Installation:
PERFECT FIT SERIES IN-DASH HEAT/ COOL/ DEFROST CHEVROLET CHEVELLE/ EL CAMINO NOTE: INSTRUCTIONS DEPICT CHEVELLE
 specializing in AIR CONDITIONING, PARTS AND SYSTEMS for your classic vehicle PERFECT FIT SERIES IN-DASH HEAT/ COOL/ DEFROST 1964-65 CHEVROLET CHEVELLE/ EL CAMINO NOTE: INSTRUCTIONS DEPICT CHEVELLE CONTROL
DRAIN WATER TEMPERING INSTALL
 208/230 V DRAIN WATER TEMPERING KIT - 06401-002-59-99 460 V DRAIN WATER TEMPERING KIT - 06401-004-56-12 WARNING WARNING This kit should be installed only by qualified service personnel to reduce the risk
Installation Instructions. For the 18 Built-In Dishwasher and Front Color Panels
 Installation Instructions For the 18 Built-In Dishwasher and Front Color Panels Printed in USA 154232102 Before You Begin DO NOT INSTALL DISHWASHER UNTIL YOU HAVE READ ALL INSTRUCTIONS. FOR YOUR SAFETY,
PUREFIRE PF-50, PF-80, PF-110 & PF-140 PF-50, PF-80, PF-110 & PF-140
 PF-50, PF-80, PF-110 & PF-140 PF-50, PF-80, PF-110 & PF-140 4 PB Heat, LLC Repair Parts List (R-11) - Effective December 19, 2011 PF-50, PF-80, PF-110 & PF-140 PUREFIRE PF-50, PF-80, PF-110 & PF-140 1