THANK YOU. For purchasing the VMI HYBRID TM
|
|
|
- Melina Mosley
- 5 years ago
- Views:
Transcription

1
2 THANK YOU For purchasing the VMI HYBRID TM VenMill Industries, Inc 36 Town Forest Road Oxford, MA USA USA No. Am Intl Fax This unit is intended to clean/repair the following discs: Blu-Ray, CD-ROMs, Music CDs, Data CDs, DVDs, HD-DVDs, Computer Discs, Game Discs, Books on disc, all recordable CDs and DVDs, and doublesided discs. SAVE ALL PACKING MATERIALS. FAILURE TO USE PACKAGING DESIGNED FOR THIS UNIT MAY CAUSE DAMAGE TO THE UNIT AND WILL VOID WARRANTY. FOR MORE INFO CONTACT 2014 VenMill Industries, Inc. All rights reserved. Under the copyright laws, this manual may not be copied, in whole or in part, without the written consent of VenMill. Every effort has been made to ensure that the information in this manual is accurate. VenMill is not responsible for printing or clerical errors. Names and designs are trademarks of VenMill Industries, Inc. Artwork and Design 2014 VenMill Industries, Inc. All Rights Reserved. The maximum amount of repairs per bottle may vary based on cleaning cycle usage. See for more information. CAUTION: Units and consumables are designed for use in specific regions. Your warranty will be voided if you purchase the equipment and/or consumables outside of your designated region. Purchase only through Authorized Distributors found on our website at If uncertain, please contact 2
3 READ BEFORE OPERATING EQUIPMENT SECTION 1 Unpacking...4 SECTION 2 Getting to Know Your Unit...5 SECTION 3 Initial Setup...7 SECTION 4 Quick Start SECTION 5 Modes of Operation SECTION 6 Notifications SECTION 7 Standard Maintenance How to Replace the Buffing Pads How to Replace the Center Hub How to Refill the Water Bottle How to Replace the Buffing Solution Bottle When to Empty the Catch Tray How to Clean the Catch Tray How to Replace the Consumable Counter Chip (C-H Chip) SECTION 8 Repacking SECTION 9 VMI Hybrid TM FAQs SECTION 10 Specifications

. 3.")
4 SECTION 1: Unpacking SAVE ALL PACKING MATERIALS. FAILURE TO USE PACKAGING DESIGNED FOR THIS UNIT WILL CAUSE DAMAGE TO THE UNIT AND WILL VOID WARRANTY. Parts that need to be saved are as follows: VMI Hybrid Shipping Box Top Cardboard Inserts Left & Right Side Packing Foams Protective Plastic Bag Locking Cap for Buffing Solution Bottle There is a charge plus shipping for packing materials, if they are discarded. UNPACKING: 1. Open the Shipping Box. 2. Remove the Support Documents, Power Cord, and the Consumable package (included inside: 6 Sets of Buffing Pads, 6 Center Hubs, 2 Bottles of Buffing Solutions, 1 Jet Nozzle Plug, and 1 C-H Chip). 3. Remove the Top Cardboard Inserts. 4. Remove the VMI Hybrid from the Shipping Box. 5. Remove the Left and the Right Side Packing Foams. 6. Take the VMI Hybrid out of the plastic bag. 4


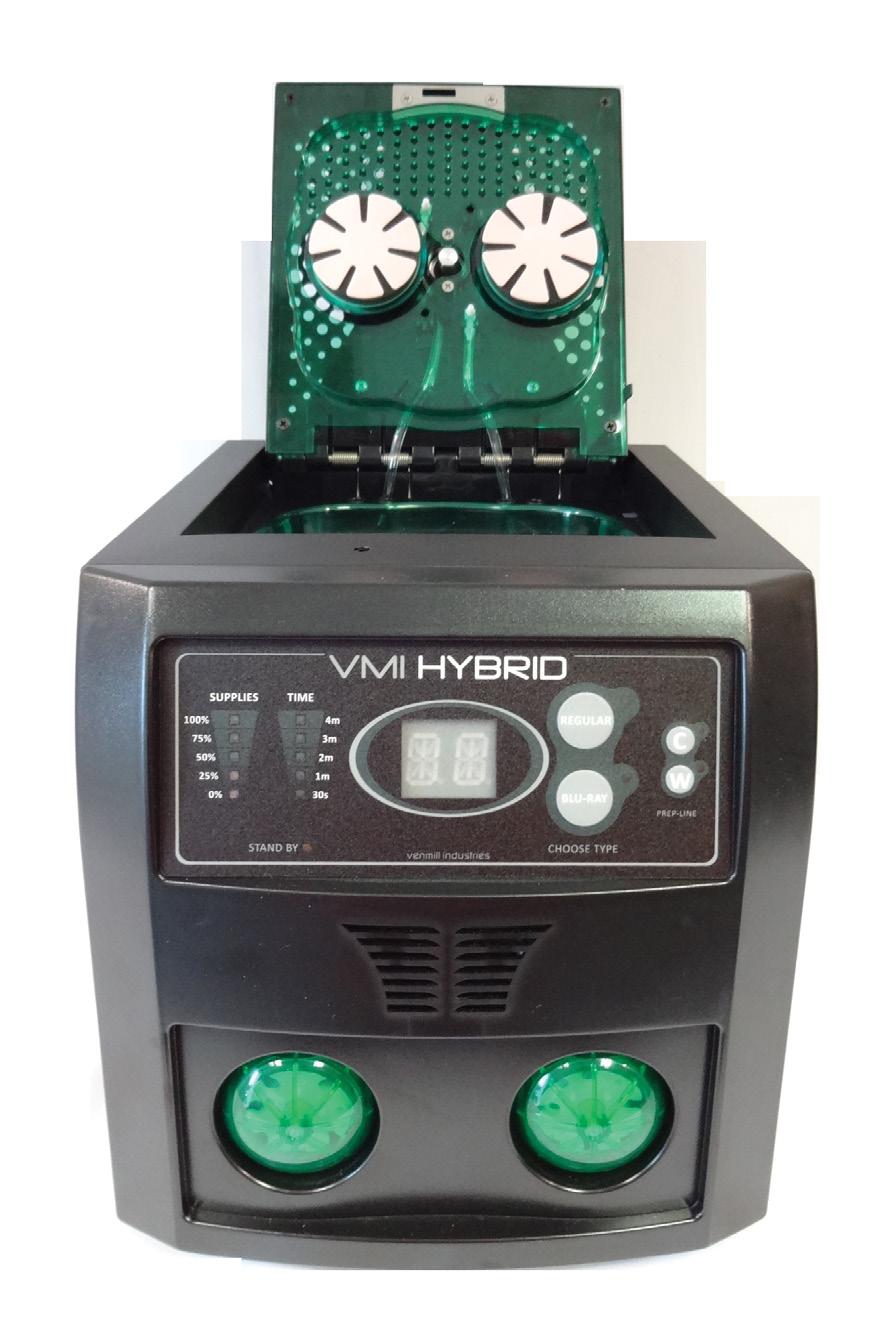
5 SECTION 2: Getting to Know Your Unit Nozzle Buffing Pads Center Hub Rubber Platter Catch Tray Keypad Pumps Compound C-H Chip On/Off Switch Water Power Inlet Back Panel Door 5


6 Operation minutes per set of supplies: Buffing Pads: 84 minutes of operation Center Hub: 84 minutes of operation Water Bottle: 100 minutes of operation Buffing Solution: 250 minutes of operation C-H Chip: 500 minutes of operation 6


7 SECTION 3: Initial Setup 1. Install Counter Chip: Locate the Back Panel Door on the backside of the machine. Pull down on this door to access the RS-232 port. Take the C-H Chip, which has been provided with your machine, and install it into this port. The Hybrid unit will recognize this chip, once the unit is powered on. Keep the Back Panel Door in the Open position. 2. Install Water Bottle: Find the Water bottle, located inside the back opening of the machine. Remove the Water bottle from the machine and fill as shown in the corresponding picture. Note: This bottle can be filled with any potable water. Also included inside the opening, on the back of the machine, will be signs indicating which tube is for the Buffing Solution and which tube is for the Water. Locate the Water tube. Feed the designated tube through the Water bottle cap. Note: Make sure the tube reaches the bottom of the bottle and make sure not to pinch the tube. 3. Install Buffing Solution Bottle: Find the Bottle of Buffing Solution which has an opening for tubing on its cap. Note: Only one of the two bottles of Buffing Solution contains a cap with an opening for tubing. This cap must be saved for reuse. 7


8 Before installation, it is essential, to shake this bottle well. Once the bottle has been shook, unscrew the top cover, and remove the safety seal. Note: Please keep this safety seal! Inside the opening, on the back of the machine, locate the Buffing Solution tube. Feed the designated tube through the opening on the Buffing Solution bottle cap. Note: Make sure that the tube reaches the bottom of the bottle and make sure not to pinch the tube. Close the back panel door. Reminder: Please keep the Shipping Cap & Safety Seal! Should the machine need to be sent in for servicing, the Buffing Solution bottle must be removed. To ensure that the Solution will not cure, you will need to make sure that the bottle is sealed and capped. 4. Install Power Cord: Insert the power cord into the power inlet on the back of the machine. Take the other end of the power cord and plug it into a wall outlet. On the back side of the machine, turn the ON/OFF switch to the ON position. The machine will power ON and the Top Cover will automatically open. Leave the Top Cover in this position. 5. Prep Buffing Solution and Water Lines: Warning: Failure to prep the Buffing Solution & Water lines will cause damage to both the disc and the Buffing Pads! Make sure the Top Cover is in the Open position. Have a paper towel or small container ready, in order to catch the Buffing Solution and the Water, which will come from the tube nozzles during the prepping process. 8


9 Locate the two smaller buttons, labeled C & W, on the front User Keypad. C = Buffing Solution & W = Water. To activate the prepping process, press either the C or the W button. Note: Both lines can be prepped at the same time. Once the prepping process has been activated, tilt the Top Cover down toward you, at about a 45 degree angle. This will help the Buffing Solution and the Water to drip out of the nozzles, onto the napkin, instead of running down the inside cover. Once the Buffing Solution and the Water comes out of the designated tube nozzles and there is no more air left in the lines, press the C and the W button to stop the prepping process. Leave the Top Cover in the Open position. 6. Install the Center Hub: Locate the metal Hex shaped post, between the two Buffing Pad holders. Take one of the Center Hubs and line up the Hex shaped opening on the hub with the Hex shaped post. Push the Center Hub into place. Spin the Center Hub by hand, to make sure that the hub is centered. If needed, make the proper adjustment. Leave the Top Cover in the Open position. 9


10 7. Install the Buffing Pads: Locate the two Buffing Pad Holders. Take one set of new Buffing Pads. Each Buffing Pad has been marked on the back side with an L or an R, to indicate which Buffing Pad should go on which Buffing Pad Holder. Note: Orientation of the machine is from the prospective of the Operator facing the front of the unit. The R (RIGHT) Buffing Pad is larger in size than the L (LEFT) Buffing Pad. Install each Buffing Pad onto the Buffing Pad Holder. Make sure that each Buffing Pad is centered and fully seated on the Buffing Pad Holder. Caution: It is essential to keep the Top Cover in the Open position when the machine is in the Stand By mode & when the machine is not in use! This will ensure that the Buffing Pads will not become flat. If you would like to keep the Top Cover closed, when the machine is not in use, make sure to remove the Platen Assembly. Your VMI Hybrid unit is now ready to be used! 10


11 SECTION 4: Quick Start How to Use Your Machine 1. Turn ON power to the unit by pressing the ON/OFF switch to the ON position, located in the rear of the unit. The Top Cover will open automatically after a few seconds. 2. Select which type of disc you would like to repair, by selecting either the Regular or Blu-Ray option, located on the User Keypad. 3. Select the amount of time that you would like to repair your disc for, depending on the severity of damage. To do this, press either the Regular or the Blu- Ray button (depending on what option you chose in step # 2) until the LED next to the desired amount of time, is illuminated. 4. Place the DVD/CD/Blu-Ray onto the platter, with LABEL SIDE OF DISC FACING DOWN! 5. Close the Top Cover and the cycle will start automatically. 6. Once the cycle has completed, the Top Cover will open automatically. Remove your disc. 11


12 SECTION 5: Modes of Operation Regular: This option encompasses any of the following types of discs: CD-ROMs, Music CDs, Data CDs, DVDs, HD-DVDs, Computer Discs, Game Discs, Books on Disc, all recordable CDs and DVDs, & double-sided discs. Press the Regular button located on the User Keypad to activate this operation. A Solid Green LED will appear next to this option. The User Keypad will then prompt the User to select a length of time. The User will have an option of time ranging from 30 seconds to 4 minutes, depending on the severity of damage on the disc. When the User Keypad prompts the Operator to select a repair time, all the available time for this option will flash on the Time Fuel Gauge. To select the desired time, press the Regular button to the desired time option. When this is done the lights will stop flashing and only a solid light will appear next to the time that has been selected. Next, close the Top Cover, and the machine will start automatically. Blu-Ray: This option encompasses any of the following types of discs: Blu-Ray, PS3, and Wii U discs. Press the Blu-Ray button located on the User Keypad to activate this operation. A Solid Green LED will appear next to this option. The User Keypad will then prompt the User to select a length of time. The User will have an option of time ranging from 1 minute to 4 minutes, depending on the severity of damage on the disc. When the User Keypad prompts the Operator to select a repair time, all the available time for this option will flash on the Time Fuel Gauge. To select the desired time, press the Blu-Ray button to the desired time option. When this is done the lights will stop flashing and only a solid light will appear next to the time that has been selected. Next, close the Top Cover, and the machine will start automatically. 12
13 Emergency Stop: A situation may present itself in which an Operator may desire to stop a cycle prematurely. At any time during the cycle, the User may press any button on the User Keypad to stop the cycle. Once the button is pressed, the cycle will stop, and the Top Cover will open automatically. The Main Screen will then display the ER error message indicating that the Emergency Stop function has been successfully accomplished. Once the unit has reset to the Main Function, the ER error message will disappear and the User can now continue with operation. 13

14 SECTION 6: Notifications Replace All Consumables: The C-H Chip has been designed to monitor the consumables used within your VMI Hybrid, to ensure that each disc is repaired to the same standard, and to decrease any downtime that may result from not having replacement consumables on hand. The consumables originally provided with the VMI Hybrid and the VMI Hybrid Combo Packs are all rated for 500 minutes of operation. Each configuration is accompanied by the C-H Chip, which informs the unit that the consumables have be replaced, and installed. The amount of consumable usage time is displayed on the Supplies Fuel Gauge located on the User Keypad. As the consumables deplete over time, the fuel gauge will expire down in percentage as follows. 100% = 500 minutes 75% = 375 minutes 50% = 250 minutes 25% = 125 minutes 0% = 0 minutes Once the consumable level has reached 25%, the Green LED will switch over to Yellow, and the 0% Green LED will turn over to Red and will blink every two seconds. At this point the Operator should make plans to obtain more consumables. Once the C-H Chip has reached 0%, the flashing Red LED will stop and a solid Red LED will appear. At this point the RC error message will appear on the Main Screen. The machine will not allow for any other operations, until a new C-H Chip is installed. Once a new C-H Chip has been installed, the RC error message on the Main Screen will disappear and the Supplies Fuel Gauge will display 100%. The User can now resume operation. 14

15 Error Messages: E1: Top Cover Closed / Switch still Activated. E2: Main Motor is not achieving enough current. E3: Main Motor is achieving too much current. E4: Buffing Solution Pump is not working. E5: Water Pump is not working. ER: Emergency Stop Required Actions: AW: Add Water and Empty Catch Tray CC: Replace Buffing Solution & Clean Catch Tray CP: Replace Buffing Pads & Center Hub ER: Emergency Stop RC: Replace all Consumables 15


16 SECTION 7: Standard Maintenance How to Replace the Buffing Pads The machine will notify the Operator to replace the Buffing Pads by displaying the CP message after 84 minutes of machine operation. 1. Make sure the Top Cover is in the Open position. 2. Locate the Buffing Pads. 3. Pull back gently with your finger on any outside edge of the Buffing Pad. Pull the Buffing Pad away from the Buffing Pad Holder, until the pad is completely detached. 4. Repeat step #3 for the second Buffing Pad. 5. Each Buffing Pad has been marked on the back side with an L or an R, to indicate which Buffing Pad should go on which Buffing Pad Holder. NOTE: THE R (RIGHT) BUFFING PAD IS LARGER IN SIZE THAN THE L (LEFT) BUFFING PAD. Take your new Buffing Pad and line it up with the corresponding Buffing Pad Holder. It is essential that the Buffing Pad is CENTERED on the Buffing Pad Holder. Make sure that the new Buffing Pad is fully seated on the Buffing Pad Holder by pressing gently on the entire surface of the pad. 6. Repeat step #5 for the second Buffing Pad. 7. If the Buffing Pads were replaced due to the RC error code, no further action is required with the Buffing Pads. 8. If the Buffing Pads were replace due to the CP error code, press the Regular and then the Blu-ray buttons on the User Keypad, to inform the machine that the pads were replaced. 9. Please continue to How to Replace the Center Hub on the next page. FAILURE TO USE CONSUMABLES DESIGNED FOR THIS UNIT WILL CAUSE DAMAGE TO BOTH UNIT AND DISC THEREBY VOIDING YOUR WARRANTY. FOR AUTHORIZED DISTRIBUTORS VISIT 16


17 How to Replace the Center Hub The Center Hub must be replaced at the same time as the Buffing Pads, when the machine gives off the CP message, this will occur after about 84 minutes of machine operation. 1. Make sure the Top Cover is in the Open position. 2. Locate the Center Hub, positioned between the two Buffing Pad Holders. 3. Pull the worn Center Hub off of the Hex shaped post with your Index Finger and Thumb. 4. Take the new Center Hub and line up the Hex shaped opening on the hub with the Hex shaped post. 5. Push the Center Hub onto the post. 6. Spin the Center Hub by hand to make sure the Hub is centered. 7. If needed, make the proper adjustment. 8. If you are replacing the Center Hub due to the RC message, then there are no other steps that need to be performed. 9. If you are replacing the Center Hub due to the CP message, make sure to also replace the Buffing Pads, and then press the Regular and then the Blu-ray buttons on the User Keypad to notify the unit that both the Buffing Pads and the Center Hub have been replaced. 10. Resume normal operation. FAILURE TO USE CONSUMABLES DESIGNED FOR THIS UNIT WILL CAUSE DAMAGE TO BOTH UNIT AND DISC THEREBY VOIDING YOUR WARRANTY. FOR AUTHORIZED DISTRIBUTORS VISIT 17

18 How to Refill the Water Bottle The machine will notify the Operator to replace the Water, after about 100 minutes of machine operation, by displaying the AW message. This action is to be preformed at the same time as emptying the catch tray. 1. Pull down on the Back Panel Door to expose both the Buffing Solution and Water Bottles. 2. Pull out the Water Bottle with your finger tips, until you can tip the bottom of the bottle, out towards yourself. 3. Wipe down the Water tubing with a paper towel to remove any excess water left on the tubing. 4. Fill the Water Bottle with any potable water. 5. Please fill the bottle as shown in the corresponding picture. 6. Once filled, proceed to feed the designated water tubing through the cap. CAUTION: MAKE SURE THE TUBING REACHES THE BOTTOM OF THE BOTTLE AND MAKE SURE NOT TO PINCH THE TUBING! 7. Now that the water has been replaced, proceed by closing the Back Panel Door. 8. Press the Regular and then the Blu-ray buttons on the User Keypad to notify the unit that the Water has been replaced. 9. Resume normal operation. How to Replace the Buffing Solution Bottle The machine will notify the Operator to replace the Buffing Solution, after about 250 minutes of machine operation, by displaying the CC message. At this time, it is recommended that the Catch Tray be cleaned out. 1. Pull down the Back Panel Door to expose both the Buffing Solution and Water Bottles. 18

19 2. Pull out the Buffing Solution bottle with your finger tips, until you can tip the bottom of the bottle, out towards yourself. 3. Wipe down the Buffing Solution tubing with a paper towel to remove any excess solution left on the tubing. 4. WARNING: BEFORE INSTALLING THE NEW BOTTLE OF BUFFING SOLUTION IT IS ESSENTIAL TO SHAKE THE BUFFING SOLUTION BOTTLE WELL! Once mixed, remove the safety seal from the bottle by unscrewing the bottle cap. Once the safety seal has been removed, reattach the bottle cap, and then proceed to feed the designated buffing solution tubing through the cap. NOTE: ONLY ONE OF THE TWO BOTTLES OF BUFFING SOLUTION CONTAINS A CAP WITH AN OPENING FOR THE TUBING. THIS CAP MUST BE SAVED FOR REUSE! 5. CAUTION: MAKE SURE THE TUBING REACHES THE BOTTOM OF THE BOTTLE AND MAKE SURE NOT TO PINCH THE TUBING! 6. NOTE: PLEASE KEEP THIS SHIPPING CAP AND SAFETY SEAL! SHOULD THE MACHINE NEED TO COME IN FOR SERVICING, THE BUFFING SOLUTION BOTTLE MUST BE REMOVED. TO ENSURE THAT THE COMPOUND DOES NOT CURE YOU WILL NEED TO MAKE SURE THAT THE BOTTLE IS SEALED AND CAPPED. 7. Now that the Buffing Solution has been replaced, proceed by closing the Back Panel Door. 8. Press the Regular and then the Blu-ray buttons on the User Keypad to notify the unit that the Buffing Solution has been replaced. 9. Resume normal operation. When to Empty the Catch Tray The machine will not notify the Operator when to actually empty the Catch Tray. It is suggested that this action be performed when the machine displays the AW message to add water to the Water bottle. An operator need not wait for a que from the machine to empty the Catch Tray of liquid. If visual observations show an excess of fluid in the Catch Tray, please empty the Catch Tray immediately. Failure to do so can result in damage. 19


20 How to Clean the Catch Tray The machine will notify the Operator to clean the Catch Tray, after about 250 minutes of machine operation, by displaying the CC message. This action is to be performed at the same time as replacing the Buffing Solutions Bottle. 1. Make sure the Top Cover is in the Open position. 2. Pull off the Platen from the Main Motor shaft. 3. Locate the removable Catch Tray. 4. Pull up on the outer edges of the tray. 5. Remove tray from machine. 6. Rinse under warm water. Wipe away any buildup of Buffing Solution with a wet paper towel, napkin, or by hand. 7. Clean tray until all visible signs of solution are removed. 8. Make sure that the Catch Tray is dry before reinstalling into the machine. 9. Install the Catch Tray. 10. Reinstall the Platen onto the Main Motor shaft. 11. Press the Regular and then the Blu-ray buttons on the User Keypad. CAUTION: ONLY PERFORM THIS ACTION IF THE BUFFING SOLUTIONS BOTTLE HAS ALSO BEEN REPLACED! If the Catch Tray is cleaned prior to the CC message, then no further action is required. 12. Resume normal operation. 20

21 How to Replace the Consumable Counter Chip (C-H Chip) The machine will notify the Operator to replace the C-H Chip, after 500 minutes of machine operation, by displaying the RC message. All consumables must be replaced at this time! 1. Turn Off power to the unit. 2. Open the Back Cover by pulling down on the Back Panel Door, to expose both the Buffing Solution and Water Bottles. 3. Locate the C-H Chip positioned between these two bottles. 4. Grab the C-H Chip with your Index Finger and Thumb, by pulling out towards yourself, and completely remove the depleted C-H Chip. Note: For easier access, remove either the Buffing Solution Bottle or the Water Bottle. 5. Install a new C-H Chip. 6. In order for the reset to take place, you must turn On power to the unit. 7. Once a new C-H Chip has been installed, the RC error message on the Main Screen will disappear, and the Supplies Fuel Gauge will display 100%. The User can now resume operation. What to do when the Hybrid will not be used for an extended period of time 1. Take the red Jet Nozzle Cap and place it over the tips of the Buffing Solution and the water jet nozzles, located on the inside of the machine. 2. Make sure to keep the Top Cover in the Open position. This will ensure that the Buffing Pads will not become flat. CAUTION: PADS THAT HAVE BECOME FLAT WILL PRODUCE INFERIOR RESULTS AND MAY CAUSE COMPLICATIONS. 3. Note: If you desire to keep the Top Cover in the Closed position while not in use, remove the Platen from the machine. 21


22 SECTION 8: Repacking 1. Remove the Buffing Pads and the Center Hub from the inside of the VMI Hybrid. 2. Remove the Water and the Buffing Solution Bottles from the inside of the VMI Hybrid. 3. Wipe any excess Buffing Solution and/or Water, from the corresponding tubes, with a paper towel 4. Drain both the Water and the Buffing Solution tubing. Note: For the Buffing Solution line, fill the Water Bottle with hot water. Place the Buffing Solution tubing into the hot water. Press the C button on the front User Keypad. Make sure to have a small container ready to catch the draining Buffing Solution. Wait until all the Buffing Solution is drained from the tubing. You will know when this happens, since water will come out of the nozzle. Press the C button on the front User Keypad to stop the drainage. Remove the Buffing Solution tubing from the warm water. Press the C button on the front User Keypad to drain out the remaining water from the Buffing Solution tubing. Once the water is removed from the tubing, press the C button on the User Keypad to stop the drainage. Make sure to apply the two Jet Nozzle Caps on the front Buffing Solution Nozzle Tips and to apply the one Cap on the back end of the Buffing Solution tubing. For the Water line, press the W button on the front User Keypad. Have a small container ready to catch the draining water. Once all the water has been drained, press the W on the front User Keypad to stop the drainage. WARNING: FAILURE TO REMOVE CONSUMABLES AND FAILURE TO DRAIN THE LINES FOR SHIPPING WILL RESULT IN POTENTIAL DAMAGE TO YOUR VMI HYBRID! 22


 to troubleshoot the unit.")
23 5. Turn off power to the machine. 6. Close the Top Cover. 7. Remove power cord. 8. Place VMI Hybrid into protective plastic bag. 9. Place machine into the left and the right foams. 10. Place the VMI Hybrid that has been encased within the foams and protective plastic bag into the Shipping Box. 11. Place the cardboard inserts back into position. 12. Insert anything else that has been required by the Technical Support Department. 13. Close and tape the Shipping Box. 14. Write provided RMA number on the outside of the Shipping Box. Note: In order to send a machine in for servicing, a customer must call Technical Support first ( ) to troubleshoot the unit. If an authorized technician deems that the machine is in need of servicing, they will provide the customer with an RMA form to fill out. Any machine sent in without authorization may be denied delivery and will be returned to the customer at their expense. 23
24 Section 9: VMI HYBRID FAQs For further assistance with questions not included please refer to our website at Why do I have to keep the Top Cover in the open position when my VMI Hybrid is not in use? Leaving the Top Cover in the closed position for a prolonged period of time, without running the machine, will cause the Buffing Pads to become flat. When this happens the Buffing Pads will not be able to repair the discs properly. If you would like to keep the Top Cover closed, when the machine is not in use, remove the Platen Assembly from the machine. Can I repair a 3 inch disc? Yes! However, you will need to call to order this special adapter. The adapter available on our webstore is not the correct adapter for the VMI Hybrid. Can I repair a Blu-ray disc? Yes! Can I repair a Double-Sided disc? Yes! Can I repair a disc that is warped or cracked? No! How long will a bottle of Buffing Solution last? If used properly, one bottle of Buffing Solution will last 250 minutes of machine operation. You may order consumables through VenMill directly at or through one of our current distributors located on our website under the Distributors tab. If you have any questions, please contact us at / Intl. or Sales@venmill.com. 24
25 How long will a set of Buffing Pads last? If used properly, one set of Buffing Pads will last 84 minutes of machine operation. You may order consumables through VenMill directly at www. venmill.com, or through our current distributors located on our website under the Distributors tab. If you have any questions, please contact us at / Intl. or Sales@venmill.com. When should I replace my Platen Assembly? There is no set life expectancy for the Platen Assembly. If you notice any imperfections, such as rips, tears, nicks, gouges, worn spots, and/or missing material then the Platen Pad should be replaced. You may order consumables through VenMill directly at or through one of our current distributors located on our website under the Distributors tab. If you have any questions, please contact us at / Intl. or Sales@venmill.com. Can I run my VMI Hybrid over 500 minutes without replacing the C-H Chip? No! Once the C-H Chip is depleted the unit will not allow for any more cycles to be run. Once a new C-H Chip has been installed, the machine will continue with normal operation. Why do I have to remove the Water and the Buffing Solution Bottles from the machine for shipping? Since VenMill Industries cannot control how your VMI Hybrid is handled when in transit, we ask that you remove these bottles to ensure that no Water or Buffing Solution is leaked into the machine during the shipping process, which could cause damage to the unit. What can I do if there is leftover Buffing Solution on my Blu-ray disc? Each machine has been supplied with a free gift, a Cleaning Kit. This Kit is intended to be used with your discs. Because of the nature of Blu-ray discs, there will be left over Buffing Solution on the disc when coming out of the VMI Hybrid. Spray the disc with the Cleaning Solution and then wipe it dry with the provided micro fiber cloth. This will remove the left over residue and will render your discs with a mirror finish. 25

26 SECTION 10: Specifications Disconnect unit from supply circuit before opening Déconnecter du circuit dálimentation avant dóuvrir Warnings and Cautions: You are cautioned that any changes or modifications not expressly approved in this manual could void your warranty. Operating room temperature is 72 F(22 C) +/- 12 F(7 C) To prevent fire or shock hazard, do not expose the unit to rain or moisture. If you have any questions about this product, you may call VenMill Industries Customer Service at USA, or N.Ameri. Special Feature: Emergency Quick Release If at any time you need to manually release the top cover, you can use any object such as a pencil or pen to release the latch to the door. PATENT PENDING 26
27 Safety features: Removable power cord ON/OFF switch Process controlled to prevent operation when top cover is the opened position Fan operates when the unit is running Emergency stop with any buttons or opening of the top cover Specifications: Unit operates on 24 Volt DC Power and maximum of 4 Amps Weight:15lbs Dimension: 10.9 L x 8.42 W x 8.5 H Power: Safe DC Power Part Number: PNV7000 Supplies used with unit: Buffing pads, Buffing Solution, Center Hub, and Platen Pad Warranty: 1 Year Limited 27
28 FOR SUPPORT INFORMATION or TOLL FREE FOR NON-NORTH AMERICAN SERVICE PLEASE CALL YOUR REGIONAL DISTRIBUTOR If you are not sure who your regional distributor is please contact MAILING ADDRESS: VenMill Industries, Inc. 36 Town Forest Road Oxford, MA RE-ORDER INFORMATION FOR (ONLY FOR THE NORTH AMERICA) CONSUMABLES USED WITH THE VMI HYBRID Hybrid Combo Pack... PN7001 (6 sets of Pads, 2 Bottles of Buffing Solution, 6 Center Hubs, 2 jet nozzle caps, and 1 C-H Chip) Hybrid Platen Assembly... PN REVA
User s Manual. Covers setup, getting to know your machine, alerts & warning, repairing an optical disc, safety & cleaning, and FAQs. Rev 1.
 User s Manual 2.0 Covers setup, getting to know your machine, alerts & warning, repairing an optical disc, safety & cleaning, and FAQs Rev 1.1 VenMill Industries, Inc 36 Town Forest Road Oxford, MA 01540
Light to Mid-Commercial Use Maximum recommended daily use of 50 repair cycles
 Light to Mid-Commercial Use Maximum recommended daily use of 50 repair cycles THANK YOU For purchasing the VMI 2500/2550i Buffer TM This unit is intended to clean/repair the following discs: Blu-Ray, CD-ROMs,
VMI 2500 Buffer. User s Manual. Light to Mid-Commercial Use Maximum recommended daily use of 50 repair cycles
 TM VMI 2500 Buffer User s Manual Covers setup, getting to know your machine, alerts & warnings, repairing an optical disc, safety & cleaning, and FAQs For models 2500 and 2550i Light to Mid-Commercial
EDR Series. Model. Instruction Manual. Rev 5.0. Thank you for purchasing the EDR Auto Smart.
 EDR Series Model Instruction Manual Rev 5.0 Thank you for purchasing the EDR Auto Smart. Please read this Instruction Manual thoroughly before using this machine. Please carefully read and thoroughly understand
QIAcube HT Unpacking and Installation Instructions
 QIAcube HT Unpacking and Installation Instructions Unpacking the QIAcube HT Important points before starting If you have any questions about the unpacking procedure, contact QIAGEN Technical Services or
Instructions for set-up, use and cleaning
 Nice job reading the instruction manual cover-to-cover! Here are a few extra tips to keep you & your Formula Pro Advanced happy. Push the drip tray firmly against the base to make sure it fits securely.
ALLERGEN MIXING ASSISTANT
 ALLERGEN MIXING ASSISTANT User Manual 9495 SW Locust Street Suite E Portland, OR 97223 (503) 379-0110 Fax: (503) 715-1378 www.xtractsolutions.com SM026R2 Welcome to Xtract Solutions Thank you for purchasing
CLEAN MIST SMART HUMIDIFIER TABLETOP & FLOOR STANDING WITH REMOTE CONTROL. Instruction Manual and Warranty Information
 CLEAN MIST SMART HUMIDIFIER TABLETOP & FLOOR STANDING WITH REMOTE CONTROL Instruction Manual and Warranty Information IM0034A READ AND SAVE THESE INSTRUCTIONS Contents Safety Instructions... 1 Unpacking
Ultrasonic Humidifier
 Ultrasonic Humidifier Use and Care Manual IMPORTANT! READ AND SAVE THESE INSTRUCTIONS Cool Mist for Relief of Cold and Flu Symptoms Whisper Quiet 20 Hours Operation Between Fillings If you have any questions
PAP Disinfecting Device User Guide. For all PAP Devices (Positive Airway Pressure) CPAP, APAP, Bi-PAP
 CPAP, APAP, Bi-PAP") PAP Disinfecting Device User Guide For all PAP Devices (Positive Airway Pressure) CPAP, APAP, Bi-PAP Thank You! Thank you for your purchase of the SoClean 2 PAP disinfecting system. Please familiarize
PAP Disinfecting Device User Guide For all PAP Devices (Positive Airway Pressure) CPAP, APAP, Bi-PAP Thank You! Thank you for your purchase of the SoClean 2 PAP disinfecting system. Please familiarize
Setup Guide. Thank you very much for purchasing this product.
 Setup Guide Thank you very much for purchasing this product. To ensure correct and safe usage with a full understanding of this product's performance, please be sure to read through this manual completely
P.O.D. Pressure On Demand
 P.O.D. Pressure On Demand OWNERS MANUAL & INSTRUCTIONS Please! Read all these instruction carefully before use and save these instructions for future reference. SAFETY INSTRUCTIONS NEVER open the Pressure
Important Safeguards. Save these instructions for future reference. (continued on next page)
") User Guide 2. Important Safeguards WARNING To reduce the risk of fire, electric shock or other injury, read and follow the safety precautions and instructions in this User Guide. Save these instructions
User Guide 2. Important Safeguards WARNING To reduce the risk of fire, electric shock or other injury, read and follow the safety precautions and instructions in this User Guide. Save these instructions
Step 1: Entering maintenance mode and cap wiper clean menu.
 GT-541 MAINTENANCE CLEANING Maintaining GT541 Head Cap Rubbers and Wiper Keeping the Rubber Caps and Wiper on your machine clean is the most important part of maintaining your GT541. The caps and wiper
USER MANUAL WARNING! CONTENTS MODEL SPECIFICATIONS READ ALL INSTRUCTIONS BEFORE PROCEEDING
 MODEL Premier Series 3000 USER MANUAL Non-Programmable Single Stage Heat/Cool Digital Thermostat Compatible with low voltage single stage gas, oil or electric heating or cooling systems, including single
8070 Mytee Lite. Instructions for. Please read before use. Register your product at support/register.
 Instructions for 8070 Mytee Lite Please read before use. Register your product at http://www.mytee.com/ support/register Model # Serial # Form # ADP-8070 06-16 1 GENERAL INFORMATION Dear Customer: Congratulations
CLEAN MIST SMART HUMIDIFIER Instruction Manual and Warranty Information IM0031B READ AND SAVE THESE INSTRUCTIONS
 CLEAN MIST SMART HUMIDIFIER Instruction Manual and Warranty Information IM0031B READ AND SAVE THESE INSTRUCTIONS Contents Safety Instructions... 1 Unpacking / Specifications... 2 Parts & Contents... 3
Manual. Snow machine S-2
 Manual Snow machine S-2 Table of contents 1. Safety instructions... 3 1.1. Instructions for a safe and efficient operation... 3 1.2. More information on safe use... 4 2. Introduction... 4 2.1. Product
OWNER S MANUAL COMMERCIAL COLD PRESS JUICER
 COMMERCIAL COLD PRESS JUICER REV.3 Introduction WARNING: To limit risk of personal injury and material damage, all users must read these instructions in their entirety and follow them strictly. MACHINE
Manual for MC21A SETUP INSTRUCTIONS
 Manual for MC21A SETUP INSTRUCTIONS Evaporative cooling works on the principle of heat absorption by moisture evaporation. Simply put, heat is removed from the air as water evaporates. You feel this principle
Operator s Manual. Wet/Dry Vacuum with Detachable Blower 12 Gallon Model No. VBV1210 FOR YOUR SAFETY
 Wet/Dry Vacuums Operator s Manual Wet/Dry Vacuum with Detachable Blower 12 Gallon Model No. VBV1210 FOR YOUR SAFETY Read and understand this manual before use Keep this manual for future reference www.vacmaster.com
CLEAN MIST SMART HUMIDIFIER Instruction Manual and Warranty Information IM0002E READ AND SAVE THESE INSTRUCTIONS
 CLEAN MIST SMART HUMIDIFIER Instruction Manual and Warranty Information IM0002E READ AND SAVE THESE INSTRUCTIONS Contents Safety Instructions... 1 Unpacking / Specifications... 2 Parts & Contents... 3
I N ST R UC T I ON. MODEL HAB500 AroMatic TM BREAD SLICERS MODEL FORM (4-99) AROMATIC BREAD SLICER 701 S. RIDGE AVENUE TROY, OHIO
 AROMATIC BREAD SLICER 701 S. RIDGE AVENUE TROY, OHIO") I N ST R UC AROMATIC BREAD SLICER T I ON S MODEL HAB500 AroMatic TM BREAD SLICERS MODEL HAB500 ML-104845 701 S. RIDGE AVENUE TROY, OHIO 45374-0001 FORM 34198 (4-99) TABLE OF CONTENTS GENERAL..........................................................
I N ST R UC AROMATIC BREAD SLICER T I ON S MODEL HAB500 AroMatic TM BREAD SLICERS MODEL HAB500 ML-104845 701 S. RIDGE AVENUE TROY, OHIO 45374-0001 FORM 34198 (4-99) TABLE OF CONTENTS GENERAL..........................................................
Operations and Safety Manual
 Tuffy Jr. Heated Soil Extractor Operations and Safety Manual BEFORE YOU START: SAFETY OPERATION SERVICE PARTS TROUBLESHOOTING RETURN GOODS POLICY! READ and UNDERSTAND this material before operating or
Notices. Safety Notices. 2 Restek Corporation
 Notices Safety Notices Restek Corporation 207-07-005 Rev. Date: 7/16 Printed in USA Restek Corporation Bellefonte, PA USA A CAUTION notice warns of a hazard. It calls attention to an operating procedure,
Installation and Operation Manual
 1645 Lemonwood Dr. Santa Paula, CA 93060 USA Toll Free: 1 (800) 253-2363 Tel: 1 (805) 933-9970 Fax: 1 (805) 933-9160 www.thecoolboss.com Cool Boss Portable Evaporative Air Cooler Installation and Operation
Cleaning the internal optics surfaces
 Cleaning the internal optics surfaces The face of the fiber-optic assembly and the lens are directly exposed to sample fluids inside the analyzer s flow cell. Automatic rinse cycles use high-pressure rinse
457LAVBP10QT LAVEX HEPA BACKPACK VACUUM CLEANER
 457LAVBP10QT LAVEX HEPA BACKPACK VACUUM CLEANER IMPORTANT SAFEGUARDS When using an electric appliance, basic precautions should always be followed, including the following: READ ALL INSTRUCTIONS BEFORE
MANUAL VERSION SERIAL # X-1 MINI PRO OWNER S MANUAL ASSEMBLY & OPERATOR INSTRUCTIONS 1.0
 SERIAL # MANUAL VERSION 1.0 Introduction WARNING: To limit risk of potential injury and material damage, all users must read these instructions in their entirety and follow them strictly. Check our YouTube
WAILEA OWNER S MANUAL
 WAILEA OWNER S MANUAL The blades in each pack are matched for equal weight to assure smooth fan operation. If more than one fan is being installed, be careful not to mix blades from different cartons.
Tips. Tips for Successful Vacuum Packaging. Tips on Sealing a Bag. Tips on Removing Air from a Bag. Tips on Storage
 Tips for Successful Vacuum Packaging For more usage tips and safety information, please refer to the FoodSaver Reference Guide or visit our website at www.foodsaver.com. Tips on Sealing a Bag Make sure
KD-CLN-LP200 Ultrasonic Vinyl Record Cleaner User s Manual English v1.2 Printed in Korea
 TM TM www.klaudio.com KD-CLN-LP200 Ultrasonic Vinyl Record Cleaner User s Manual English v1.2 Printed in Korea s are updated regularly. Please be sure to check our support page for a newer version of this
SSS Speedster 600 (Model SP-600, #56001) SSS Speedster 1000 OPERATION SERVICE PARTS CARE. SSS Speedster 1000 SSS Speedster 600
 SSS Speedster 1000 OPERATION SERVICE PARTS CARE. SSS Speedster 1000 SSS Speedster 600") SSS Speedster 600 (Model SP-600, #56001) SSS Speedster 1000 (Model SP-1000, #56003) OPERATION SERVICE PARTS CARE SSS Speedster 1000 SSS Speedster 600 105500/0405 For your convenience record this important
SSS Speedster 600 (Model SP-600, #56001) SSS Speedster 1000 (Model SP-1000, #56003) OPERATION SERVICE PARTS CARE SSS Speedster 1000 SSS Speedster 600 105500/0405 For your convenience record this important
CLEAN MIST ULTRASONIC HUMIDIFIER. Instruction Manual and Warranty Information READ AND SAVE THESE INSTRUCTIONS IM0036A
 CLEAN MIST ULTRASONIC HUMIDIFIER Instruction Manual and Warranty Information IM0036A READ AND SAVE THESE INSTRUCTIONS Contents Safety Instructions... 1 Unpacking / Specifications... 2 Parts & Contents...
CLEAN MIST ULTRASONIC HUMIDIFIER. Instruction Manual and Warranty Information READ AND SAVE THESE INSTRUCTIONS IM0040A
 CLEAN MIST ULTRASONIC HUMIDIFIER Instruction Manual and Warranty Information IM0040A READ AND SAVE THESE INSTRUCTIONS Contents Safety Instructions... 1 Unpacking / Specifications... 2 Parts & Contents...
Operation and Maintenance Manual BLIZZARD50 CS6-50-VD 120V/60HZ
 Operation and Maintenance Manual BLIZZARD50 CS6-50-VD 120V/60HZ CS6-50-VD Operation & Maintenance Manual Table of Contents: 1.0 Introduction 1 2.0 Unpacking your COOL- SPACE 1 3.0 Set-up of COOL-SPACE
WARNING Important Safety Information
 Builder Series Non-Programmable Thermostats MODEL 1000 MODEL 0 1 2 3 4 Single Stage Heat / Cool Conventional and Heat Pump Multi-Stage 2 Heat / 1 Cool Conventional and Heat Pump Before Installing, Programming
Operation and Maintenance Manual 120V/60HZ
 Operation and Maintenance Manual 120V/60HZ GLACIER CS5-16-VD CS5-16-VD-TB CS5-18-VD CS5-18-VD-TB AVALANCHE CS6-36-1D CS6-36-VD BLIZZARD CS6-50-VD Operation & Maintenance Manual 60HZ Models Table of Contents:
DEHUMIDIFIER USER MANUAL 11 PINT FOR MODEL: 3PAD11 COMFORT...BUILT TO LAST
 COMFORT...BUILT TO LAST 11 PINT DEHUMIDIFIER USER MANUAL FOR MODEL: 3PAD11 Before using your dehumidifier, please read this manual carefully and keep it for future reference, along with your receipt. CONTENTS
Operation and Maintenance Manual GLACIER TALL BASE CS5-16-VD-TB CS5-18-VD-TB2 120V/60HZ
 Operation and Maintenance Manual GLACIER TALL BASE CS5-16-VD-TB CS5-18-VD-TB2 120V/60HZ Operation & Maintenance Manual Table of Contents: 1.0 Introduction 1 2.0 Unpacking your COOL- SPACE 1 3.0 Set-up
SimpleVIS Viscometer Reference Guide P
 SimpleVIS Viscometer Reference Guide P82.0090 Run Status Indicator Lamps Sample/Solvent Port Waste Bottle Dust Cover Temperature Calibration Port Touch Screen Display RS-232 Serial Port Exhaust Muffler
INSTRUCTION BOOKLET. Electric Steam Sterilizer
 INSTRUCTION BOOKLET Electric Steam Sterilizer CS-6 SERIES For your safety and continued enjoyment of this product, always read the instruction book carefully before using. IMPORTANT SAFEGUARDS When using
Manual for MC37/MFC3600
 Manual for MC37/MFC3600 SETUP INSTRUCTIONS Evaporative cooling works on the principle of heat absorption by moisture evaporation. Simply put, heat is removed from the air as water evaporates. You feel
OWNER'S MANUAL. FRY Holding Unit (FHU) MODELS FHU1 FHU2. Duke Manufacturing Company
 MODELS FHU1 FHU2. Duke Manufacturing Company") OWNER'S MANUAL FRY Holding Unit (FHU) Patent(s) Pending MODELS FHU FHU IMPORTANT INFORMATION, READ BEFORE USE. PLEASE SAVE THESE INSTRUCTIONS. This manual is Copyright 04 Duke Manufacturing Company. All
OWNER'S MANUAL FRY Holding Unit (FHU) Patent(s) Pending MODELS FHU FHU IMPORTANT INFORMATION, READ BEFORE USE. PLEASE SAVE THESE INSTRUCTIONS. This manual is Copyright 04 Duke Manufacturing Company. All
Navigator Upright Vacuum NV70 Series
 Navigator Upright Vacuum NV70 Series OWNER S GUIDE IMPORTANT SAFETY INSTRUCTIONS FOR HOUSEHOLD USE ONLY PLEASE READ CAREFULLY BEFORE USE If the plug does not fit fully into the outlet, reverse the plug.
MANUAL OWNER S. Operating and Servicing Instructions IMPORTANT: READ CAREFULLY BEFORE ASSEMBLY AND USE.
 OWNER S MANUAL Operating and Servicing Instructions www.hoover.com.hk HW-FM-HKA IMPORTANT: READ CAREFULLY BEFORE ASSEMBLY AND USE. THIS PRODUCT IS INTENDED FOR HOUSEHOLD USE ONLY. IF USED COMMERCIALLY
Hand Vac. Owner s Manual. Review this manual before operating cleaner. English pp. 1-7 Español pág Français p.
 TM Owner s Manual English pp. 1-7 Español pág. 8-11 Français p. 1-16 Hand Vac Thank you for selecting a HOOVER product. This cleaner was inspected and packaged carefully before being shipped from the factory.
I N ST. MODEL 2912PS AUTOMATIC SLICER... with Portion Scale 701 S. RIDGE AVENUE TROY, OHIO
 I N ST R UC 2912PS SLICER T I ON S MODEL 2912PS AUTOMATIC SLICER... with Portion Scale MODEL 2912PS ML-104966 Previous models covered by this manual: 2912PS ML-104833 701 S. RIDGE AVENUE TROY, OHIO 45374-0001
WARNING Important Safety Information
 1 Specifications Premier Series Non-Programmable Thermostats MODEL 3000 MODEL 3200 1 2 3 4 Specifications Installation Testing Your New Thermostat Programming User Settings WARNING Important Safety Information
Sanitise Syrup Lines & Valves. Taylor PH61 Cleaning every 14 days
 Taylor PH61 Cleaning every 14 days Drain the Syrup Lines Remove each syrup feed tube from syrup bottle and let excess syrup drain from the feed tube back into the syrup bottle. When flow of syrup from
Diamond Whirlpool/Air pool INSTALLATION & OPERATION INSTRUCTION
 Diamond Whirlpool/Air pool INSTALLATION & OPERATION INSTRUCTION WARNING When using this unit, precautionary steps should be followed to prevent electrical shock or personal injury. 1. Do not permit children
INSTALLATION MANUAL ICE/BEVERAGE DISPENSER MODEL: ENDURO-200/250
 INSTALLATION MANUAL ICE/BEVERAGE DISPENSER MODEL: ENDURO-200/250 Release Date: March 24, 2004 Publication Number: 92181INS Revision Date: April 07, 2014 Revision: G Visit the Cornelius web site at www.cornelius.com
CLEAN MIST DUAL TANK SMART HUMIDIFIER. Instruction Manual and Warranty Information TABLETOP & FLOOR STANDING WITH REMOTE CONTROL
 CLEAN MIST DUAL TANK SMART HUMIDIFIER TABLETOP & FLOOR STANDING WITH REMOTE CONTROL Instruction Manual and Warranty Information IM0036B READ AND SAVE THESE INSTRUCTIONS Contents Safety Instructions...
BAG ON A ROLL SYSTEM USING THIS MANUAL UNPACK AND INSPECT uline.com READ MANUAL FIRST SAFETY INFORMATION
 BAG ON A ROLL SYSTEM 18002955510 ulinecom USING THIS MANUAL READ MANUAL FIRST IMPORTANT: Please read this manual and familiarize yourself with the equipment before use The manual contains valuable information
USER GUIDE. Hot Water Dispenser. KA-HWD02 Series. Contents ,
 USER GUIDE Hot Water Dispenser KA-HWD0 Series Contents Introduction Parts Included Important Safeguards Using the Appliance Cleaning Technical Specifications Environmental Info and Support, Introduction
Instructions for set-up, use and cleaning. babybrezza.com 2017 Baby Brezza Enterprises LLC
 Customer Service If you are experiencing problems with your BabyBrezza Formula Pro, please contact your reseller, or Customer Service at babybrezza@gamin-tout-terrain.com so that we can offer you our best
Air Cleaning Equipment, Inc. 303 N. Main St. Broadway, NC iers.com
 Read and Save These Instructions Horizon Galaxy - Installation and Operations Manual Air Cleaning Equipment, Inc. 303 N. Main St. Broadway, NC 27505 www.horizondehumidif iers.com 1 Safety Notes: The Horizon
STORM. Bottom-Load. Water Dispenser User Manual
 STORM Bottom-Load Water Dispenser User Manual 1 3 2 4 6 5 7 8 9 1.Indicator lights - Red (Top) Replace Bottle Alarm Light - Blue (Bottom) Replace SmartFlo SF-1 Water Cartridge Alarm Light 2.Cold Water
Unpacking, Assembly, and Installation Guide ENGLISH. Page 1 to 10
 FJ-500 * FJ-400 Unpacking, Assembly, and Installation Guide ENGLISH Page 1 to 10 1 Contents About This Manual... 1 1 How to Unpack the FJ-500/400... 2 1-1 Overview of Packed Materials... 2 1-2 Open the
Agilent Electronic Crimping and Decapping Tools Operating Guide. Agilent Technologies
 Agilent Electronic Crimping and Decapping Tools 5190-3188 5190-3189 5190-3190 5190-3191 Operating Guide Agilent Technologies Notices Agilent Technologies, Inc. 2011 No part of this manual may be reproduced
Classic Bubbler Premix Cold Beverage Dispensers Operation Manual
 Classic Bubbler Premix Cold Beverage Dispensers Operation Manual D Series E Series Table of Contents Unpacking & Installation Instructions... 3 Assembly... 4 Product Preparation... 5 Disassembly... 6 Routine
HEDMAN DI-50. Endorser Instructions. Hedman DI-50 Operators Guide
 HEDMAN DI-50 Endorser Instructions Hedman DI-50 Operators Guide 25-0132-20 TABLE OF CONTENTS 1. INTRODUCTION...1 1.1 DI-50 Description...1 1.2 Items Included...1 1.3 Safety Terms...2 1.4 Safety Precautions...3
Food Slicer Visit our website at:
 Electric Food Slicer 42787 Set up And Operating Instructions Visit our website at: http://www.harborfreight.com Read this material before using this product. Failure to do so can result in serious injury.
Operation and Maintenance Manual 120V/60HZ
 Operation and Maintenance Manual 120V/60HZ GLACIER CS5-18-VD CS5-18-VD-TB AVALANCHE CS6-36-1D CS6-36-VD BLIZZARD CS6-50-VD Contents 1.0 INTRODUCTION... 1 2.0 UNPACKING YOUR COOL-SPACE UNIT... 1 3.0 SET-UP
Instruction Manual. Nacho Cheese Dispenser and Warmer
 Instruction Manual Nacho Cheese Dispenser and Warmer 10700 Medallion Drive, Cincinnati, Ohio 45241-4807 USA 2013 Gold Medal Products Co. Part No. 36060 SAFETY PRECAUTIONS Page 2 INSTALLATION INSTRUCTIONS
Ultra Quiet USE AND CARE MANUAL IMPORTANT!
 Ultra Quiet Cool Mist Humidifier USE AND CARE MANUAL Quiet output won t disturb sleep Adjustable mist control Includes free demineralization cartridge to help trap impurities in the water If you have any
Ultrasonic Humidifier
 USE & CARE INSTRUCTIONS Guardian Technologies LLC 26251 Bluestone Blvd. Euclid, Ohio 44132 1.866.603.5900 www.guardiantechnologies.com 20015 Guardian Technologies LLC Refurbished Ultrasonic Humidifier
Service Manual for X9.5 and Older Models
 Service Manual for X9.5 and Older Models I. Common Issues... 2 A. Direct Air Motor... 2 A.1. Direct Air Motor will not run.... 2 A.2. Direct Air Motor is making a squealing sound.... 2 B. Full Bag Indicator
PRE INSTALLATION PROCEDURES
 PRE INSTALLATION PROCEDURES DANGER! ELECTRICAL SHOCK HAZARD. Only qualified personnel who have read and understand this entire manual should attempt to install, or service this WL250 Water Treatment System,
If you have any problems with this product, please call BEFORE returning it to your retailer.
 CP35 PORTABLE EVAPORATIVE COOLER USE & CARE GUIDE Read and Save These Instructions If you have any problems with this product, please call 1-800-643-8341 BEFORE returning it to your retailer. NOTICE: This
WET & DRY VACUUM CLEANER
 VMVK1520SIWC / 1500W / 20L WET & DRY VACUUM CLEANER VMVK1520SIWC table OF CONTENTS SECTION page Warranty 3 Safety Instructions and Warnings 3 Specifications 4 Unpacking and Checking Carton Contents 4 General
Mobile Evaporative Cooler. Use & Care Guide MC18M INDEX
 INDEX Safety Rules... 1 Quick Start.... 2 Features...3 Maintenance......4 Cooler Parts......5 Warranty......6 Trouble Shooting...7 Mobile Evaporative Cooler Use & Care Guide MC18M Safety Safety Rules 1.
AGITATOR V DO NOT OPERATE THE MACHINE UNTIL YOU HAVE READ ALL SECTIONS OF THESE INSTRUCTIONS IMPROPER USE OF THE MACHINE WILL VOID THE WARRANTY
 AGITATOR 20 120V INFORMATION & OPERATING INSTRUCTIONS DO NOT OPERATE THE MACHINE UNTIL YOU HAVE READ ALL SECTIONS OF THESE INSTRUCTIONS IMPROPER USE OF THE MACHINE WILL VOID THE WARRANTY 1. Always use
USER MANUAL myvacbot SN500 Robot Vacuum
 USER MANUAL myvacbot SN500 Robot Vacuum CONTTS 01 SAFETY INSTRUCTIONS... 6 02 PARTS... 9 03 PRODUCT OVERVIEW... 10 04 CHARGING STATION... 11 05 PRODUCT INSTALLATION... 12 06 PRODUCT CLEANING MODE... 12
Mobile Evaporative Cooler. Use & Care Guide MC37 / MC61 INDEX
 INDEX Safety Rules... 1 Quick Start.... 2 Features...3 Maintenance......4 Cooler Parts......5 Warranty......6 Trouble Shooting...7 Mobile Evaporative Cooler Use & Care Guide MC37 / MC61 Safety Safety Rules
Manual update 2016 MC37/MFC3600
 Manual update 2016 MC37/MFC3600 SETUP INSTRUCTIONS Evaporative cooling works on the principle of heat absorption by moisture evaporation. Simply put, heat is removed from the air as water evaporates. You
K-COMPACT Use & Care Guide. Get the most from your new Keurig brewer
 K-COMPACT Use & Care Guide Get the most from your new Keurig brewer Before You Brew 1 Plug & Place 2 Rinse & Fill Remove packing tape from brewer and plug into a grounded outlet. Place a large mug (10
HMT-D30-A HMT-D45E-A HMT-D70E-A. Model Numbers: HMT-D30-A HMT-D45E-A HMT-D70E-A. Portable Dehumidifier Operating Instructions V.
 HMT-D30-A HMT-D45E-A HMT-D70E-A Model Numbers: HMT-D30-A HMT-D45E-A HMT-D70E-A Portable Dehumidifier Operating Instructions 3119233 V.141217 General Dehumidifier Information RECOMMENDED HUMIDITY LEVELS
BEFORE FIRST USE: TABLE OF CONTENTS
 Chill Out Ice Maker BEFORE FIRST USE: To prevent any internal damage, it is very important to keep refrigeration units (like this one) upright throughout their journey. Please leave it standing upright
Summit Series Bar blender Operation Manual (2) Mélangeur de bar série Summit Manuel d utilisation (10)
 Mélangeur de bar série Summit Manuel d utilisation (10)") GB FR ES PT IT DE NL DK SE NO GR RU TU BR CN JP Summit Series Bar blender Operation Manual (2) Mélangeur de bar série Summit Manuel d utilisation (10) Mezcladora para bar Summit Manual de operación (18)
GB FR ES PT IT DE NL DK SE NO GR RU TU BR CN JP Summit Series Bar blender Operation Manual (2) Mélangeur de bar série Summit Manuel d utilisation (10) Mezcladora para bar Summit Manual de operación (18)
NACECARE SOLUTIONS. Jet Vac 2000
 NACECARE SOLUTIONS Jet Vac 2000 SI Specification NOTE: As with all electrical equipment, care and attention must be exercised at all times during its use, in addition to ensuring that routine and preventative
Reliability in Laboratory Centrifuges Since Operator s Manual. Models 614B, 614L, 614U/UL and 614V/VL Laboratory Centrifuge. Rev. 5.
 Reliability in Laboratory Centrifuges Since 1932 Rev. 5.0 Operator s Manual Models 614B, 614L, 614U/UL and 614V/VL Laboratory Centrifuge Description: Intended Use: The Drucker model 614 is a low-cost,
When using electrical appliances, especially when children are present, basic safety precautions should always be taken, including the following:
 IMPORTANT SAFETY INSTRUCTIONS When using electrical appliances, especially when children are present, basic safety precautions should always be taken, including the following: READ ALL INSTRUCTIONS BEFORE
Users Manual & Operation Guide
 NTCA3 A3 Thermal-Copier Manual (V10.081) Users Manual & Operation Guide Thank for your purchase of an A3 Thermal-Copier. This guide is for Series A3AU models, indicated by A3AU-0000 to A3AU-9999 serial
IMpORTANT SAFETy INSTRUcTIONS
 Table of contents SAFETy SETUp OpERATION MAINTENANcE Safety... 2 Specifications... 4 Setup... 4 Operation... 6 WARNING SyMBOLS AND DEFINITIONS Maintenance... 9 Parts List and Diagram... 10 Warranty...
Quick Setup. November 30, 2006 Ver1.3
 Quick Setup November 30, 2006 Ver1.3 1901 E. 5th Street, Tempe, Arizona USA Support Line: 480-929-2937 Email: support@usscreen.com Web: www.screenprinters.net copyright 2006 Industrial Bulk Ink System
OPERATIONAL & MAINTENANCE MANUAL
 Security Engineered Machinery Co., Inc OPERATIONAL & MAINTENANCE MANUAL SEM Model 0101 Hard Drive Crusher 110 volt or 220 volt (Serial Numbers 2000 and up) Contents IMPORTANT SAFETY PROCEDURES... 3 INSTALLATION
Instruction Manual. Release Urn. For the Care & Handling. of your new
 Instruction Manual For the Care & Handling of your new Release Urn 3901 Aviation Way, Suite C Caldwell, ID 83605 Phone: 1-87-Peaceful About the AngelAire Urn For an overview, and introduction as to the
Epson Stylus. Pro GS6000 QUICK REFERENCE GUIDE
 Loading, Removing, and Configuring Media Checking and Cleaning the Print Head Maintaining the Printer Control Panel Maps and Menus Ordering Supplies and Getting Help Media Configuration Log Epson Stylus
PRESSURE WASHER MODEL NO: JETSTAR 1750 OPERATION & MAINTENANCE INSTRUCTIONS. WARNING Read the instructions before using the machine PART NO:
 WARNING Read the instructions before using the machine PRESSURE WASHER MODEL NO: JETSTAR 1750 PART NO: 7333230 OPERATION & MAINTENANCE INSTRUCTIONS LS0711 INTRODUCTION Thank you for purchasing this CLARKE
A) Take your VMI Cleaner Disc and place the label side down onto loading tray.
 Take your VMI Cleaner Disc and place the label side down onto loading tray.") Maintaining Your Buffing Wheels The VMI 3550i will indicate when it is time to run a cleaning cycle for the buffing wheels. After 15 cycles the USE CLEANER DISC lights will flash indicating that after
Maintaining Your Buffing Wheels The VMI 3550i will indicate when it is time to run a cleaning cycle for the buffing wheels. After 15 cycles the USE CLEANER DISC lights will flash indicating that after
Administration of AMBISOME Using the GemStar Pump
 1 1-800-862-2731 Administration of AMBISOME Using the GemStar Pump Drug Name: Volume and Rate: Schedule: FLUSHING: Dextrose Ambisome Dextrose Heparin KEY POINTS: 1. Always wash your hands with an antibacterial
Manual. Fazer DFZ-800
 Manual Fazer DFZ-800 Table of contents 1. Safety instructions... 3 1.1. Instructions for a safe and efficient operation... 3 1.2. More information on safe use... 4 2. Introduction... 4 2.1. Product description...
Contents. Product Description. Features. Quick Guide. Touch Panel Operation. Instruction. How to change the filter. Warning.
 Contents Product Description 1 Features 6 Quick Guide 7 Touch Panel Operation 9 Instruction 11 How to change the filter 19 Warning 20 Troubleshooting 21 Specifications 23 Maintenance Records 24 Product
WARNING: Warns of health hazards and identifies possible risks of injury. CAUTION: Indicates possible dangers to the machine or other objects.
 VBT3ASV USER GUIDE SAFETY INFORMATION About this user guide Read this user guide completely before using the machine. Keep this user guide for reference. If you pass your machine on to third parties, it
SW-2 SNOW MACHINE. Item ref: UK User Manual
 SW-2 SNOW MACHINE Item ref: 160.565UK User Manual Caution: Please read this manual carefully before operating Damage caused by misuse is not covered by the warranty Introduction Thank you for choosing
MANUFACTURING NUMBERS: CORN CAROUSEL. Model CC-19 Series P/N /99. Owner s Manual
 MANUFACTURING NUMBERS: 9500410 9500412 C US Model CC-19 Series 9500400 P/N 1010730 10/99 Owner s Manual A.J. Antunes & Co. Owner Information...1 General...1 Warranty Information...1 Service/Technical Assistance...2
Operator s Manual. Floor Vac Model No. VF408 FOR YOUR SAFETY. Read and understand this manual before use Keep this manual for future reference
 Wet/Dry Vacuums Operator s Manual Floor Vac Model No. VF408 FOR YOUR SAFETY Read and understand this manual before use Keep this manual for future reference www.vacmaster.com Cleva North America 44 Parkway
Use & Care Guide. Get the most from your new Keurig brewer
 Use & Care Guide Get the most from your new Keurig brewer ADD DESCALE MAX. ADD DESCALE ADD DESCALE ADD DESCALE Before You Brew 1 Plug & Place Rinse & Fill 2 Remove packing tape from brewer and plug into
A few simple steps to ensure perfect water, every time.
 A few simple steps to ensure perfect water, every time. Use and Care Guide MODELS: A4BLWTRCLR Registration Please visit the website below to register your new water cooler within the first 30 days of purchase.