HSA GB LT LV SL D FR. Instruction for use. Naudojimosi instrukcija. Lietošanas instrukcija. Navodila za uporabo. Gebrauchsanweisung
|
|
|
- Della Gilbert
- 5 years ago
- Views:
Transcription


1 HSA GB LT LV SL D FR Instruction for use Naudojimosi instrukcija Lietošanas instrukcija Navodila za uporabo Gebrauchsanweisung Instructions d'utilisation
 you must")
2 WARNING! In order to ensure a normal operation of your refrigerating appliance, which uses a completely environmentally friendly refrigerant the R600a (flammable only under certain conditions) you must observe the following rules: Do not hinder the free circulation of the air around the appliance. Do not use mechanical devices in order to accelerate the defrosting, others than the ones recommended by the manufacturer. Do not destroy the refrigerating circuit. Do not use electric appliances inside the food keeping compartment, other than those that might have been recommended by the manufacturer. DöMESIO! Kad užtikrintum te normalų jūsų šaldytuvo veikimą, kuris naudoja draugišką aplinkai šaldymo agentą R600a (užsidega tik tam tikromis sąlygomis) jūs privalote laikytis šių nurodymų: leiskite laisvai cirkuliuoti orui aplink prietaisą; nenaudokite jokių kitų priemonių, nor dami atitirpinti šaldytuvą ar šaldiklį, naudokite tik tas, kurias rekomenduoja gamintojas; nekeiskite šaldytuvo elektros grandin s; nenaudokite elektros prietaisų šaldytuvo viduje. UZMANĪBU! Lai garantētu jūsu sasaldēšanas iekārtas (kura izmanto viedei nekaitīgu dzesēšanas vielu R600a uzliesmojošs tikai pie noteiktiem apstākĝiem), ir nepieciešams ievērot sekojošo: Netrauciet gaisa cirkulācijai ap iekārtu. Neizmantojiet nekādas mehāniskās iekārtas atkausēšanas paātrināšanai. Nesabojājiet dzesēšanas ėēdi. Nodalījumā pārtikas produktu glabāšanai neizmantojiet nekādas mehāniskās iekārtas, ja ražotājs to neiesaka. OPOZORILO! Za normalno delovanje vaše zamrzovalne naprave, ki uporablja naravi prijazno hladilno sredstvo R600a (vnetljivo samo pod določenimi pogoji), je treba upoštevati naslednja pravila: Ne zadržujte prostega pretoka zraka okoli naprave. Za hitrejše odtajanje, ne uporabljajte mehanskih naprav, ki jih ni priporočil proizvajalec. Ne uničujte hladilnega kroženja. V prostoru za hrano ne uporabljajte električnih naprav, ki jih ni priporočil proizvajalec. WARNUNG! Ihr Gerät verwendet ein umweltverträgliches Kältemittel, R600a (nur unter bestimmten Umständen brennbar). Um einen einwandfreien Betrieb Ihres Gerätes sicherzustellen, beachten Sie bitte folgende Vorschriften: Die Luftzirkulation um das Gerät darf nicht behindert sein. Verwenden Sie außer der vom Hersteller empfohlenen, keine mechanischen Hilfsmittel, um den Abtauprozess zu beschleunigen. Der Kältemittelkreislauf darf nicht beschädigt werden. Verwenden Sie im Lebensmittelaufbewahrungsbereich Ihres Gerätes keine elektrischen Geräte, es sei denn, sie sind vom Hersteller empfohlen. ATTENTION! Pour assûrer un fonctionnement normal de votre appareil qui utilise un agent frigorifique complètement écologique, R600a (infammable seulement dans certaines conditions) vous devez respecter les règles suivantes: N empêchez pas la libre circulation de l air autour de l appareil. N utilisez pas des dispositifs mécaniques pour accélérer le dégivrage, autres que ceux récommendés par le fabriquant. Ne détruissez pas le circuit frigorifique. N utilisez pas des appareils électiques à l intérieur du compartiment pourconserver les denrées, apart celles qui sont éventuellement récommendés par le fabriquant.
3 EN Advice for recycling of the old appliance /1 Packing Recycling /2 Transport instructions /2 Warnings and special advice /2 Setting up /3 Electric connection /3 Switching off /4 Appliance description /4 Freezer operation /4 Advice for food conservation /5 Defrosting of the appliance /5 Cleaning of the appliance /6 Replacing the interior light bulb /6 Defects finding guide /6 Appliance data sheet /7 LT Content Sveikiname su Jūsų pasirinkimu /8 Pakartotinas pakuot s panaudojimas /9 Gabenimas /9 Įsp jamai ir bendrosios nuorodos /9 Prietaiso paruošimas /10 Pajungimas /10 Išjungimas /11 Prietaiso naudojimas /11 Prietaiso aprašymas /11 Šaldymo programos /11 Šaldytų maisto produktų laikymas /12 Atitirpinimas /13 Vidaus valymas /13 Išor s valymas /13 Apšvietimo lemput s keitimas /13 Gedimų šalinimas /14 Techniniai duomenys /14 LV Turinys Saturs Apsveicam ar jusu izveli! /15 Iepakojuma utilizešana /16 Transportešanas instrukcijas /16 Bridinajumi un visparigie Padomi /16 Uzstadišana /17 Elektriskie savienojumi /17 Izslegšana /17 Ekspluatacija /17 Iekartas apraksts /18 Saldetavas izmantošana /18 Padomi par partikas Glabašanu /18 Iekartas atkausešana /19 Lampas nomaiħa /19 Iekšejo dalu tirišana /20 Arejo dalu tirišana /20 Tehniska specifikacija /20 SL Nasveti za recikliranje stare naprave /21 Recikliranje embalaže /22 Navodila za prevoz /22 Opozorila in posebni nasveti /22 Priprava /23 Električna povezava /23 Izklapljanje /24 Opis naprave /24 Delovanje zamrzovalnika /24 Nasveti za shranjevanje hrane /25 Odtajanje naprave /25 Čiščenje naprave /26 Zamenjava notranje žarnice /26 Vodič za iskanje napak /26 Podatkovni list naprave /27 D Vsebina Empfehlungen zum Recycling Ihres alten Gerätes /28 Recycling der Verpackung /29 Transportvorschriften /29 Allgemeine Vorsichtsmaßnahmen und Empfehlungen /29 Die Umgebungstemperatur /30 Anschließen an das Spannungsnetz /30 Inbetriebnahme /31 Beschreibung des Gerätes /31 Einstellen der Temperatur /31 Tiefgefrieren von Lebensmitteln /32 Empfehlungen für das Enteisen des Gerätes /32 Innere Reinigung /33 Äußere Reinigung /33 Erneuern der inneren Glübirne /33 Fehlersuchplan /33 Technische Daten /34 FR Inhalt Table de matieres Recyclage de votre ancien appareil /35 Recyclage de l'emballage /36 Instructions de transport /36 Avertissements et conseils /36 Installation /37 Raccordement au réseau électrique /37 Mise en fonctionnement /38 Description de l'appareil /38 Fonctionnement du congélateur /38 Conseils pour conserver les denrées /38 Dégivrage de l'appareil /39 Nettoyage de l'appareil /40 Remplacement de la lampe /40 Dysfonctionnements /40 Caractéristiques techniques /41
4 1


5
6 EN Instruction for use Congratulations for your choice! The chest freezer you have purchased is one in the BEKO products range and represents a harmonious joinng between the refrigeration technique with the aestetical outlook. It has a new and attractive design and is built according to the European and national standards which guarantee its operation and safety features. At the same time, the used refrigerant, R600a, is environment-friendly and it does not affect the ozone layer. In order to use the best your freezer, we advise you to read carefully the information in these user instructions. Advice for recycling your old appliance If your newly purchased appliance replaces an older appliance, you must consider a few aspects. The old appliances are not valueless scrap. Their disposal, while preserving the environment, allows the recovery of important raw materials. Make your old appliance useless : - disconnect the appliance from the supply; - remove the supply cord (cut it); - remove the eventual locks on the door to avoid the blocking of children inside, while playing, and the endangering of their lives. The refrigerating apliances contain insulating materials and refrigerants which require a proper recycling. This appliance is not intended for use by person with reduced physical, sensory or mental capabilities or lack of experience and knowledge unless they have been given supervision or instruction concerning use of the appliance by a person responsible for their safety. Children should be supervised to ensure that they do not play with the appliance. 1
7 EN Packing Recycling W A R N I N G! Do not allow children to play with the packing or with parts of it. There is the risk of suffocation with parts of corrugated cardboard and with plastic film. In order to get to you in good condition, the appliance was protected with a suitable packing. All the materials of the packing are compatible with the environment and recyclable. Please help us recycle the packing while protecting the environment! I M P O R T A N T! Before putting the appliance in operation, read carefully and entirely these instructions. They contain important information concerning the setting up, use and maintenance of the apliance. The manufacturer is free of any responsibility if the information in this document are not observed. Keep the instructions in a safe place in order to reach them easily in case of need. They can also be useful subsequently by another user. A T T E N T I O N! This appliance must be used only for its intended purpose, (household use), in suitable areas, far from rain, moisture or other weather conditions. Transport instructions The appliance must be transported, as much as possible, only in vertical position. The packing must be in perfect condition during transport. If during transport the appliance was put in horisontal position (only according to the markings on the packing), it is advised that, before putting it into operation, the appliance is left to rest for 12 hours in order to allow the settling of the refrigerating circuit. The failure to to observe these instructions can cause the breakdown of the motorcompressor and the cancellation of its warranty. Instruction for use Warnings and general advice Do not plug in the appliance if you noticed a failure. The repairs must be done only by qualified personel. In the following situations please unplug the appliance from the mains: - when you defrost completely the appliance; - when you clean the appliance. To unplug the appliance, pull by the plug, not by the cable! Ensure the minimum space between the appliance and the wall against which it is placed. Do not climb on the appliance. Do not allow the children to play or hide inside the appliance. Never use electric appliances inside the freezer, for defrosting. Do not use the appliance near heating appliances, cookers or other sources of heat and fire. Do not leave the freezer door open more than it is necessary to put in or take out the food. Do not leave the food in the appliance if it is not working. Do not keep inside products containing flammable or explosive gases. Do not keep inside fizzy drinks (juice, mineral water, champagne, etc.) in the freezer: the bottle can explode! Do not freeze drinks in plastic bottles. Do not eat ice cubes or icecream immediately after having taken them out of the freezer because they may cause freezer burns. Never touch cold metal parts or frozen food with wet hands because your hands can quickly freeze on the very cold surfaces. For the protection of the appliance during warehousing and transport, it is provided with spacers between the door and the cabinet (in the front and rear side). These spacers will be removed before putting the appliance into operation. 2
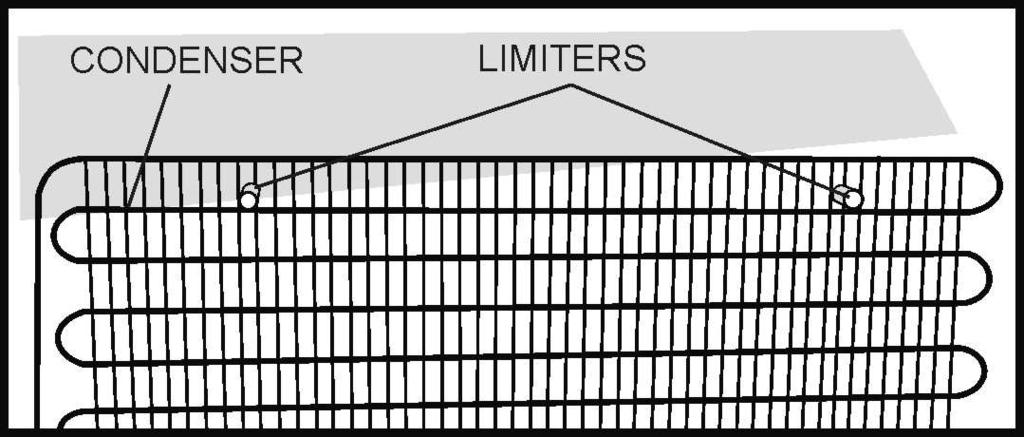
8 EN Excess deposit of ice on the frame and the baskets should be removed regularly with the plastic scraper provided. Do not use any metal parts to remove the ice. The presence of this ice build-up makes impossible to close the door correctly. If you do not use your appliance for a few days, it is not advisable to switch it off. If you do not use it for a longer period, please proceed as follows : - unplug the appliance; - empty the freezer; - defrost it and clean it; - leave the door open to avoid the formation of unpleasant smells. The supply cord can be replaced only by an authorised person. If your appliance has a lock, keep it locked and store the key in a safe place, out of the reach of children. If you are discarding an appliance with lock, make sure that, is made ineffective. This is very important so as to avoid children being trapped inside, which may cause their loss of life. Setting up This appliance was designed to operate at an ambient temperature between C and C (SN/T class). If the ambient temperature is above C, inside the appliance the temperature can increase. Set up the appliance far from any source of heat and fire. Placing it in a warm room, the direct exposure to sunbeams or near a heat source (heaters, cookers, ovens), will increase the energy consumption and shorten the product life. Please observe the following minimun distances: 100 cm from the cookers working with coal or oil; 150 cm from the electric and gas cookers. Ensure the free circulation of the air around the appliance, by observing the distances shown in Item 2. Assemble on the condenser (in the rear side) the supplied spacers. (Item 3). Place the appliance in a perfectly even, dry and well ventilated place. Assemble the supplied accessories. Electric connection Instruction for use Your appliance is intended to operate at a single-phase voltage of V/50 Hz. Before plugging in the appliance, please make sure that the parameters of the mains in your house (voltage, currect type, frequency) comply to the operation parameters of the appliance. The information concerning the supply voltage and the absorbed power is given on the marking label placed in the back side of the freezer. The electric installation must comply with the law requirements. The earthing of the appliance is compulsory. The manufacturer has no responsibility for any damage to persons, animals or goods which may arise from the failure to observe the specified conditions. The appliance is endowed with a supply cord and a plug (European type, marked 10/16A) with double earthing contact for safety. If the socket is not the same type with the plug, please ask a specialised electrician to change it. Do not use extension pieces or multiple adapters. 3
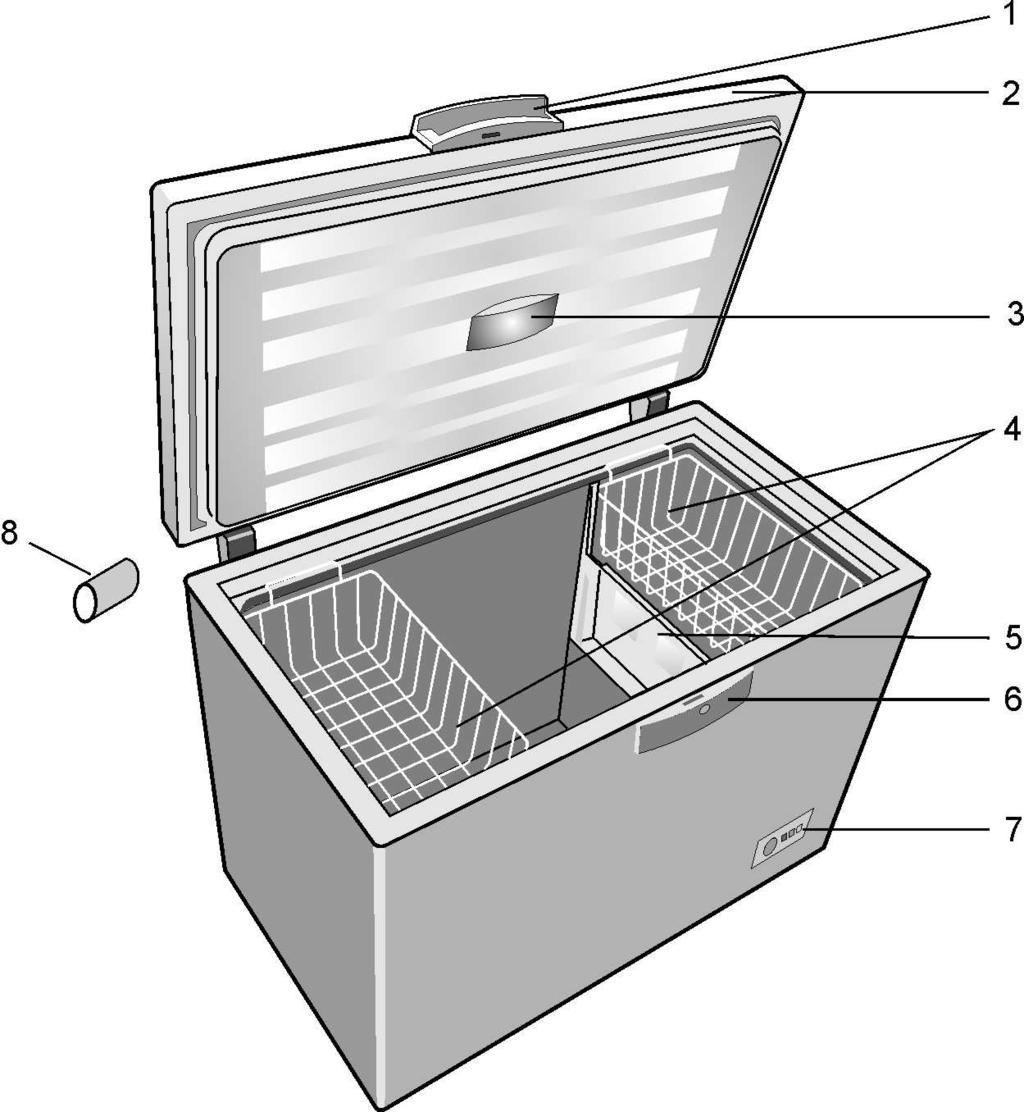
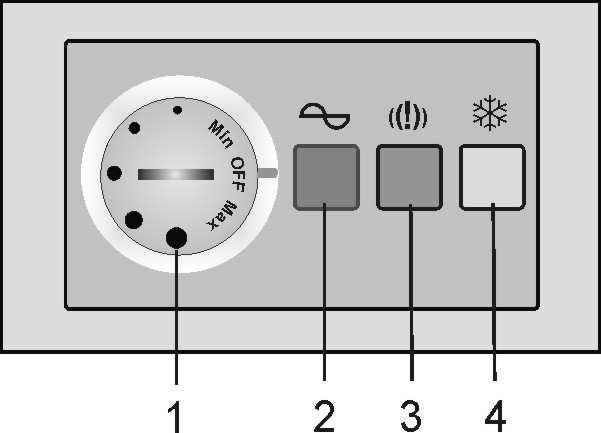
9 EN Switching off The switching off must be possible by taking the plug out of the socket or by means of a mains two-poles switch placed before the socket. Operation Before putting into operation, clean the inside of the appliance (see chapter Cleaning"). After finishing this operation please plug in the appliance, adjust the thermostat knob to an average position. The green and red LEDs in the signalling block must light. Leave the appliance work for about 2 hours without putting food inside it. The freezing of the fresh food is possible after min. 20 hours of operation. Appliance description (Item. 1) 1. Door handle 2. Door 3. Lamp housing 4. Baskets 5. Try 6. Lock housing 7. Thermostat box 8. Spacer for transport Freezer operation Instruction for use Temperature adjustment The temperature of the freezer is adjusted by means of the knob assembled on the thermostat (item. 4), position MAX being the lowest temperature. The achieved temperatures can vary according to the conditions of use of the appliance, such as: place of the appliance, ambient temperature, frequency of door opening, extent of filling with food of the freezer. The position of the thermostat knob will change according to these factors. Normally, for an ambient temperature of approx C, the thermostat will be adjusted on an average position. The signalling system is placed on the front side of the freezer (Item 5). It includes: 1. Thermostat adjustment knob the inside temperature is adjusted. 2. green LED shows that the appliance is supplied with electric energy. 3. red LED damage lights if the temperature in the freezer is too high. The LED will operate minutes after the putting into operation of the freezer, then it must go off. If the LED goes on during the operation, this means that defects have occurred. 4. Orange button fast freeze by pushing it the orange led goes on, showing that the appliance entered into the "fast freeze" mode. The exit of this mode is done by pushing the button again, and the orange led goes off. The three LEDs give information about the mode of operation of the freezer. 4
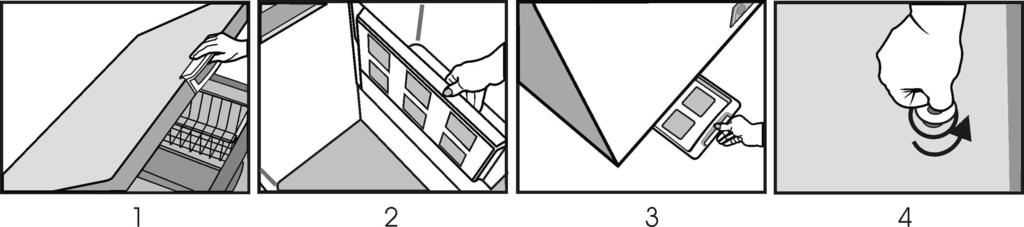
10 EN Advice for food conservation The freezer is intended to keep the frozen food for a long time, as well as to freeze fresh food. One of the main elements for a successful food freezing is the packing. The main conditions that the packing must fulfill are the following: to be airtight, to be inert towards the packed food, to resist to low temperatures, to be proof to liquids, grease, water vapours, smells, to be able to be washed. These conditions are fulfilled by the following types of packings: plastic or aluminium film, plastic and aliminium vessels, waxed cardboard glasses or plastic glasses. I M P O R T A N T! - For freezing the fresh food please use the supplied baskets of the appliance. - Do not place into the freezer a too large quantity of food at a time. The quality of the food is best kept if they are deeply frozen as quickly as possible. This is why it is advisable not to exceed the freezing capacity of the appliance specified in the "Appliance data sheet" (page 7). In order to reduce the freezing time, push the button for fast freeze. - The fresh food must not come into contact with the food already frozen. - The frozen food you have bought can be placed into the freezer without having to adjust the thermostat. - If the freezing date is not mentioned on the packing, please take into consideration a period of max. 3 months, as a general guide. - The food, even partially defrosted, cannot be frozen again, it must be consumed immediately or cooked and then refrozen. - The fizzy drinks will not be kept in the freezer. - In case of a power failure, do not open the door of the appliance. The frozen food will not be affected if the failure lasts less than 67 hours. D O N O T F O R G E T! After 24 hours since the food was placed inside, please cancel the "fast freeze" mode by pushing again the button 4, when the orange led goes off. 5 Instruction for use Defrosting of the appliance We advise you to defrost the freezer at least twice a year or when the ice layer has an excessive thickness. The ice build-up is a normal phenomenon. The quantity and the rapidity of ice buildup depends on the ambient conditions and on the frequency of the door opening. We advise you to defrost the appliance when the quantity of frozen food is the least. Before defrosting, adjust the thermostat knob to a higher position so that the food stores more cold. - Unplug the appliance. - Take out the frozen food, wrap it in several sheets of paper and put them in refrigerator or a cool place. Take the separator panel and put it under the freezer in the direction of the dripping tube. Take out the obstructing plug. The water which results will be collected in the special tray (separator panel). After the melting of the ice and the run-off of the water please wipe with a cloth or with a sponge, then dry well. Put the obstruction plug back in its place. (Item. 6) For a fast thaw please leave the door open. Do not use sharp metal objects to remove the ice. Do not use hairdriers or other electric heating appliances for defrosting.
11 EN Inside cleaning Before starting the cleaning, unplug the appliance from the mains. It is advisable to clean the appliance when you defrost it. Wash the inside with lukewarm water where you add some neutral detergent. Do not use soap, detergent, gasoline or acetone which can leave a strong odour. Wipe with a wet sponge and dry with a soft cloth. During this operation, avoid the excess of water, in order to prevent its entrance into the thermal insulation of the appliance, which would cause unpleasant odours. Do not forget to clean also the door gasket especially the bellow ribs, by means of a clean cloth. Outside cleaning Clean the outside of the freezer by means of a sponge soaked in soapy warm water, wipe with a soft cloth and dry. The cleaning of the outside part of the refrigerating circuit (motorcompressor, condenser, connection tubes) will be done with a soft brush or with the vacuum-cleaner. During this operation, please take care not to distort the tubes or detach the cables. Do not use scouring or abrasive materials! After having finished the cleaning, replace the accessories at their places and plug in the appliance. Instruction for use Replacing the interior light bulb If the lamp burns out, disconnect the appliance from the mains. Take out the lamp trim. Make sure the lamp is screwed correctly. Plug in the appliance again. If the lamp still does not go on, replace it with another one model E14-15W. Mount back the lamp trim in its place. Defects finding guide The appliance does not work. There is a power failure. The plug of the supply cord is not inserted well into the socket. The fuse is blown. The thermostat is in OFF position. The temperatures are not low enough(red LED on). The food prevents the door closing. The appliance was not placed correctly. The appliance is placed too close to a heat source. The thermostat knob is not in the correct position. Excessive ice build-up The door was not closed properly. The inside lighting does not work The lamp is blown. Unplug the appliance from the mains, take out the lamp and replace it with a new one. The following are not defects Possible noddings and cracks coming from the product: circulation of the refrigerant in the system. 6
12 EN Noises during operation In order to keep the temperature at the value you have adjusted, the compressor of the appliance starts periodically. The noises which can be heard in such situation are normal. They are redced as soon as the appliance reaches the operation temperature. The humming noise is made by the compressor. It can become a little stronger when the compressor starts. Instruction for use The bubbling and gurgling noises coming from the refrigerant circulating in the pipes of the appliance, are normal operating noises. Warning! Never try to repair yourself the appliance or its electric components. Any repair made by an unauthorised person is dangerous for the user and can result in the warranty cancellation. Appliance data sheet BRAND MODEL HSA APPLIANCE TYPE CHEST FREEZER Total gross volume (l) 232 Total useful volume (l) 230 Freezing capacity (kg/24 h) 12 Energy efficiency class (1) A++ Energy consumption (kwh/an) (2) 169 Autonomy (hours) 67 Noise (db (A) re 1 pw) 41 Ecological refrigerating agent R600a (1) Energy classes : A... G (A = economical... G = less economical) (2) The real power consumption depends on the using conditions and on the appliance location. The symbol on the product or on packaging indicates that this product may not be treated as household waste. Instead it shall be handed over to the applicable collection point for the recycling of electrical and electronic equipment. By ensuring this product is disposed of correctly, you will help prevent potential negatyve consequences for the environment and humann health, which could otherwise be otherwise be caused by inappropriate waste handling of this product. For more detailed information about recycling of this product, please contact your local city office, you household waste disposal service or the shop where you purchased the product. 7
13 LT Naudojimo instrukcija Sveikiname su Jūsų pasirinkimu! Jūsų pasirinktas BEKO šaldiklis reprezentuoja harmonijos junginį tarp šaldymo technikos ir estetin s išvaizdos. Jis turi naują patrauklų dizainą ir yra sukurtas pagal tarptautinius europinius standartus, kurie garantuoja saugų ir ilgametį prietaiso tarnavimą. Taip pat šiame prietaise naudojamas šaldymo agentas R600a, kuris yra nekenksmingas aplinkai ir nedaro žalos ozono sluoksniui. Tam, kad gal tum te saugiai ir teisingai naudotis prietaisu, atidžiai perskaitykite instrukciją nuo pradžios iki galo. Seno prietaiso utilizavimas Nor dami pakeisti seną prietaisą nauju, atkreipkite d mesį į šias nuorodas. Seną prietaisą der tų atiduoti perdirbimo ar utilizavimo įmonei. Juose esamos medžiagos, gali būti perdirbamos. Taip jūs apsaugosite gamtą. Paruoškite seną prietaisą utilizavimui: -išjunkite prietaisą iš elektros maitinimo tinklo; -pašalinkite laidą (nupjaukite); -pašalinkite visus galimus pavojingus priedus (spynas, rankenas), kad žaidžiantys vaikai neužsidarytų prietaiso viduje ir jų gyvybei negr stų pavojus. Šaldymo prietaisų viduje yra izoliacin s ir šaldomosios medžiagos, kurias galima pakartotinai panaudoti. Šis prietaisas n ra skirtas naudoti vartotojams su fizine ar protine negalia, padidintu jautrumu ar patirties bei žinių stoka; nebent jie privalo, prieš pradedant naudoti prietaisą, būti supažindinti (atsakingo asmens) su naudojimo instrukcija ir informuoti apie prietaiso vartojimą bei jo saugą. Taip pat užtikrinant vaikų saugumą jie privalo būti įsp ti, jog su prietaisu žaisti negalima. 8
14 LT Pakartotinas pakuot s panaudojimas ĮSPöJIMAS! Neleiskite vaikams žaisti su pakuote ar jos dalimis. Jie gali uždusti neatsargiai elgdamiesi su kartono ar plastiko pl vel s dalimis. Kad prietaisas saugiai pasiektų jus, jis yra supakuojamas į atitinkamą, saugią pakuotę. Visos pakuotei naudojamos medžiagos yra nekenksmingos aplinkai ir pakartotinai perdirbamos. Prašome pasirūpinti pakuot s pakartotinu perdirbimu ir taip apsaugoti aplinką! SVARBU! Prieš naudodamiesi prietaisu atidžiai ir nuosekliai perskaitykite instrukciją. Joje nurodoma svarbi informacija apie prietaiso pastatymą, naudojimą ir jo eksploataciją. Gamintojas neprisiima jokios atsakomyb s, jei nebuvo laikomasi instrukcijoje pateiktais nurodymais. Laikykite instrukciją saugioje, lengvai pasiekiamoje vietoje. Ją perduokite kartu su prietaisu, jei sugalvotum te šaldiklį parduoti. DöMESIO! Šis prietaisas privalo būti naudojamas tik pagal paskirtį, namų sąlygomis, šildomose patalpose, apsaugotas nuo lietaus, dr gm s ar kitokio atmosferos poveikio. Gabenimas Prietaisas privalo būti gabenamas vertikalioje pad tyje. Transportavimo metu pakuot negali būti pažeista. Jei gabenant prietaisas buvo pastatytas į horizontalią pad tį (tik jei tai pažym ta ant pakuot s), informuojame, kad prieš įjungiant prietaisą, pastatykite jį ir 12 valandų palikite stov ti nejungdami į elektros tinklą, kad nusistov tų skysčiai šaldymo sistemoje. Nepaisant instrukcijoje pateiktų nurodymų, prietaisas gali sugesti ir tokiems gedimams netaikomas nemokamas techninis aptarnavimas garantiniu laikotarpiu. Naudojimo instrukcija Įsp jamai ir bendrosios nuorodos Nejunkite prietaiso jei pasteb jote gedimą. Netaisykite prietaiso patys, kreipkit s į įgaliotą servisą. Išjunkite prietaisą iš elektros tinklo jei: - norite prietaisą atitirpinti; - norite prietaisą išvalyti. Išjungdami prietaisą, laikykite už kištuko, o ne už laido! Tarp prietaiso ir sienos palikite vietos orui laisvai cirkuliuoti. Nelipkite ant prietaiso. Neleiskite vaikams žaisti ar sl ptis prietaiso viduje. Nenaudokite jokių elektrinių prietaisų šaldiklio viduje pagreitinti atitirpinimą. Nenaudokite prietaiso šalia šildymo prietaisų, viryklių ar ugnies šaltinių. Nepalikite atidarytų šaldiklio durelių. Jos gali būti atidarytos tik tol kol įdedate ar išimate maisto produktus. Nepalikite maisto šaldiklyje, jei jis neveikia. Nelaikykite šaldiklio viduje degių, prisotintų angliarūgšte produktų. Nelaikykite viduje putojančių g rimų (sulčių, mineralinio vandens, šampano). Šaldiklyje buteliai gali sprogti! Nešaldykite g rimų plastikiniuose buteliuose. Nevalgykite ką tik išimtų iš šaldiklio ledų ar ledo kubelių, nes jie gali būti per šalti. Niekada nelieskite šaltų metalo dalių ar šaldytų produktų šlapiomis rankomis, nes jūsų rankos gali greitai prišalti prie įšalusio paviršiaus. Tam, kad prietaisas būtų apsaugotas sand liavimo ir gabenimo metu, pateikiami tarp durų ir korpuso (priekin je ir galin je pus se) dedami tarpikliai. Prieš eksploatuojant prietaisą šiuos tarpiklius reikia išimti. 9
15 LT Su pateiktu plastikiniu grandikliu reguliariai reikia nuvalyti ant r mo ir krepšelių susiformavusias ledo sankaupas. Ledui valyti nenaudokite jokių metalinių priemonių. Ledo sankaupos trukdo tinkamai uždaryti duris. Jei nesinaudojate prietaisu keletą dienų, jo nebūtina išjungti. Tačiau jei nenaudojate prietaiso ilgesnį laiką, vadovaukit s šiomis nuorodomis: -išjunkite prietaisą iš tinklo; -išimkite visus produktus iš šaldiklio; -atitirpinkite ir išvalykite jį; -palikite dureles atidarytas, kad išsiv dintų nemalonūs kvapai. Prietaiso laidą gali pakeisti tik įgalioto serviso meistrai. Jei jūsų šaldymo prietaisas turi užraktą, laikykite jį užrakintą, o raktą laikykite saugioje, vaikams nepasiekiamoje vietoje. Jeigu jūs išmetate šaldiklį. Kuris turi užraktą, būtinai prieš tai sugadinkite užraktą, kad jis nerakintų. Tai yra labai svarbu, nes vaikai gali įlysti į vidų, užsitrenkti ir numirti. Prietaiso paruošimas Šis prietaisas pritaikytas veikti +10ºC - +43ºC temperatūroje (SN/T klimato klas ). Jei aplinkos temperatūra yra aukštesn nei +43ºC, šaldiklio viduje temperatūra gali padid ti. Laikykite prietaisą toli nuo kaitinimo ar ugnies šaltinių. Prietaisą statykite šildomoje patalpoje, atokiau nuo tiesioginių saul s spindulių ar kaitinimo prietaisų ( radiatorių, viryklių, krosnių), nes tai gali sutrumpinti prietaiso veikimo laiką ir padid tų šaldytuvo funkcijų įtampa. Prašome laikytis nurodomų minimalių atstumų: -100 cm nuotolis nuo anglinių ar žibalinių viryklių; -150 cm nuotolis nuo elektrinių ir dujinių viryklių. Pasirūpinkite, kad aplink šaldiklį būtų pakankamai vietos orui cirkuliuoti (2 pav.). Ant kondensatoriaus, kuris yra prietaiso galin je dalyje, pritvirtinkite atstumo laikiklius (3 pav.). Šaldiklį statykite lygioje, sausoje ir v dinamoje patalpoje. Pritvirtinkite visas prietaiso papildomas dalis. Pajungimas Naudojimo instrukcija Šis prietaisas pritaikytas veikti elektrin s srov s stiprumu 230 V/50Hz. Prieš prijungiant prietaisą prie elektros tiekimo, patikrinkite, ar Jūsų namų įtampa ir dažnis atitinka šaldiklio pajungimo parametrus, nurodytus techninių duomenų lentel je. Visa informacija apie prietaiso elektrinius parametrus yra nurodyta duomenų lentel je, kuri pritvirtinta galin je prietaiso dalyje, apačioje, dešin je pus je. Elektros instaliacija turi pilnai atitikti nustatytus reikalavimus. Šio šaldiklio įžeminimas yra privalomas. Gamintojas neprisiima jokios atsakomyb s d l netinkamo elgesio su prietaisu (žmonių, gyvūnų ar pan.). Prietaisas turi laidą su kištuku (europinio tipo, pažym tu 10/16 A) su dvigubu įžeminimu. Jei kištukas netelpa į rozetę, iškvieskite įgaliotą elektriką, kuris jums pakeis rozetę. Nenaudokite prailginamojo laido ar daugialypio adaptoriaus. 10
16 LT Išjungimas Prietaisą galima išjungti traukiant jungiklį iš elektros tinklo, arba tiesiogiai, jungtuku atjungus elektros padavimą į elektros lizdą. Prietaiso naudojimas Prieš naudodami prietaisą, jį išvalykite (žiūr kite į nuorodą Valymas ). Išvalius, įjunkite prietaisą ir nustatykite termostato rodyklę ties vidutine pad timi. Žalias ir raudonas mygtukai turi šviesti. Palikite prietaisą įjungtą apie 2 valandas ir tik tuomet sud kite maistą. Šviežią maistą užšaldyti bus galima ne anksčiau kaip po 20 valandų įjungus šaldiklį. Prietaiso aprašymas (1 pav.) 1. Durų rankena 2. Durys 3. Lempos gaubtas 4. Krepšeliai 5. Pad klas 6. Spynos gaubtas 7. Termostato d žut 8. Atstumo laikikliai Šaldymo programos Naudojimo instrukcija Temperatūros reguliavimas Šaldiklio vidaus temperatūra reguliuojama termostato ranken le (4 pav.). MAX tai žemiausios temperatūros nustatymas. Temperatūra gali svyruoti priklausomai: nuo vietos kur prietaisas yra pastatytas, aplinkos temperatūros, durelių varstymo dažnumo, nuo patalpinto šaldiklyje maisto produktų kiekio. Atsižvelgiant į išvardintus veiksnius galima keisti termostato ranken l s pad tį. Paprastai vidaus temperatūra yra apytiksliai 43ºC, kai termostato rodykl nustatyta ties vidutine žyma. Signalines lemputes rasite šaldiklio priekin je dalyje (5 pav.). 1. Reguliuojama termostato ranken l, kuria nustatoma temperatūra šaldiklio viduje. 2. žalia signalin lemput rodo energijos tiekimą. 3. raudona signalin lemput rodo trukdžius. Ji užsidega, kai šaldiklio temperatūra viduje yra per aukšta. Įjungus šaldiklį ši lemput dega apie min., tada užgęsta. Jei lemput įsijungia šaldikliui beveikiant kurį tai laiko tarpą, reiškia atsirado gedimas. 4. oranžiniu mygtuku įjungiamas - greitas maisto užšaldymas. Jei greito užšaldymo funkcija jums jau nebereikalinga, paspauskite dar kartą šį oranžinį mygtuką ir oranžin lemput nustos švietusi. Visos trys signalin s lemput s parodo nuolat veikiančio šaldiklio funkcijas. 11
17 LT Šaldytų maisto produktų laikymas Šis šaldiklis pad s jums išlaikyti šaldytus maisto produktus ilgą laiką, be to, jame galite sušaldyti ir laikyti šviežius maisto produktus. Teisingas maisto produktų įpakavimas užšaldant, pad s išsaugoti produktus ilgesnį laiką ir pasiekti norimų rezultatų. Įpakavimas tur tų atitikti šias nuorodas: nepraleisti oro, turi būti įterpiamas tarp supakuoto maisto, atsparus minusinei temperatūrai, nepralaidus skysčiui, riebalams, oro garams ir kvapams, tinkamas plauti. Įpakavimas tur tų būti iš plastiko ar aliuminio folijos, plastiko ar aliuminio buitinių indų, kartoninių ar plastiko, hermetiškai atsparių indų. Svarbu! - Šviežių maisto produktų užšaldymui naudokite tik tam skirtus indus. - Vienu metu nešaldykite didelio kiekio maisto produktų. Maisto kokyb bus geriausia, jei visą sušaldysite per kuo trumpesnį laiką. Tod l patartina naudoti maksimalią temperatūrą neperpildžius šaldiklio talpos. Norint pasiekti šalčiausios temperatūros šaldiklio viduje per kuo trumpesnį laiką, paspauskite mygtuką greitas užšaldymas. - Nesumaišykite šaldytų ir šviežių maisto produktų. - Dedant į šaldiklį sušalusius maisto produktus, nereikia reguliuoti termoreguliatoriaus ranken l s. - Saugaus maisto užšaldymo nuorodas galite rasti ant šaldiklio vidinių durelių. Jei ant produkto pakuot s nenurodyta produkto laikymo data, tuomet maistą šaldiklyje laikykite ne ilgiau kaip 3 m nesius. - Atitirpintas maistas negali būti v l užšaldomas. Jis privalo būti nedelsiant suvartotas arba pagaminamas ir v l užšaldomas. Naudojimo instrukcija - Šaldiklyje negalima laikyti putojančių g rimų. - Jei nutrūko elektros energijos tiekimas, neatidarykite durų. Sušaldytas maistas neprad s atitirpti, jei elektros energijos tiekimo gedimas netruks ilgiau nei 67 valandos. NEPAMIRŠKITE! Pilnai sušalus šviežiems maisto produktams (po 24 valandų), reikia atšaukti greito užšaldymo funkciją dar kartą paspaudžiant 4 mygtuką., tada oranžin lemput išsijungia. 12
18 LT Atitirpinimas Šaldiklį atitirpinkite du kartus per metus arba kai susiformuoja storas ledo sluoksnis. Ledo kaupimasis aplink sieneles yra normalus reiškinys. Ledo sluoksnio kaupimasis priklauso nuo šaldomų produktų kiekio ir kaip dažnai yra varstomos šaldiklio durel s. Šaldiklį patartina atitirpinti tada kai lieka nedidelis kiekis užšaldytų maisto produktų. Prieš atitirpinimą, pasukite termostato ranken lę iki šalčiausio temperatūros taško. Taip produktai išliks ilgesnį laiką šaltesni. - Išjunkite prietaisą. - Visus maisto produktus susukite į laikraštį ir pad kite v siai (pavyzdžiui į sand liuką ar šaldytuvą). Paimkite pad klą ir pad kite jį po šaldikliu tiesiogiai po varvančiu vamzdeliu. Išvalykite užsikimšusią angas, kad netrukdytų b gti atitirpusiam vandeniui. Vanduo, kuris kaupiasi tirpstant ledui, turi būti kaupiamas į specialų pad klą. Po to, kai ledas atitirpsta, o vanduo išb ga, išvalykite skudur liu ar kempine ir tada dar kartą nuvalykite labai sausai. Tada atgal pad kite pad klą (žr. 6 pav.) Negramdykite ledo aštriais metaliniais daiktais. Nem ginkite atitirpinimo proceso paspartinti elektriniu plaukų džiovintuvu, elektriniu radiatorium ar panašiais elektriniais prietaisais. Vidaus valymas Prieš pradedant valyti prietaisą, išjunkite jį iš elektros tinklo. Valykite prietaisą tuo pat metu kada jį atitirpinate. Plovimui naudokite šiltą neutralų vandenį. Tam nenaudokite muilo, skalbimo miltelių, benzino ar acetono. Tai gali palikti stiprų kvapą šaldiklio viduje. Atitirpusį vandenį išvalykite kempine ar švaria šluoste. Valant prietaisą, žiūr kite, kad vanduo nepatektų tarp sienelių izoliacines medžiagos ar į valdymo skydelį. Vandeniui patekus tarp izoliacin s medžiagos gali atsirasti nemalonūs kvapai. Nepamirškite išvalyti durelių sandarinimo gumų. Jas reik tų labai gerai nusausinti. Išor s valymas Naudojimo instrukcija Šaldiklio išorę valykite su šiltu muiluotu vandeniu minkšta pašluoste ir nusausinkite. Išorinių dalių valymui (tokių kaip kompresorius, kondensatorius) naudokite švelnų šepetį ar dulkių siurblį. Būkite atsargūs valydami išorines dalis, nes galite pažeisti radiatoriaus vamzdelius ar prisiliesti prie laido. Nenaudokite jokių aštrių ar abrazyvinių valymo priemonių. Pabaigus valyti, sud kite atgal visas papildomas detales ir įjunkite prietaisą. Apšvietimo lemput s keitimas Jei lemput perdega, išjunkite prietaisą. Pasižiūr kite, ar lemput tvarkinga (gera). Įsitikinkite, kad lemput prisukta teisingai. Įjunkite prietaisą. Jei lemput vis tiek nedega, pakeiskite ją (modelis E14-15 W). Įsukite gerą lemputę į tą pačią vietą. 13
19 LT Gedimų šalinimas Jei prietaisas neveikia patikrinkite ar: nedingusi elektros energijos srov. jungiklis iki galo įjungtas į rozetę. neperdegęs saugiklis. termoreguliatoriaus ranken l n ra ties pad timi OFF. Jei temperatūra n ra pakankamai žema (dega raudona lemput ), gali būti kad: šaldiklio durel s uždarytos nesandariai. durel s neužsidaro d l per daug prid to į šaldiklį maisto. prietaisas yra pastatytas per arti kaitinimo šaltinių. yra blogai nustatyta termoreguliatoriaus ranken l. Jei susikaup per didelis kiekis ledo: nesandariai uždarytos durel s. Nedega apšvietimo lemput : lemput yra perdegusi. Išjunkite prietaisą, pakeiskite lemputę. Tai n ra gedimas jei: sprags jimas ir burzgimas sklinda iš prietaiso vidaus. Šiuos garsus sukelia sistemoje cirkuliuojantis šaldymo skystis. Veikimo garsai Naudojimo instrukcija Kad būtų išlaikyta jūsų pasirinkta temperatūra, prietaise esantis kompresorius įsijungia periodiškai. Tokioje situacijoje atsirandantys garsai yra visiškai normalūs. Jie nurimsta tada, kai prietaisas pasiekia efektyvią temperatūrą. Ūžiančius garsus sukelia kompresorius. Šie garsai gali būti šiek tiek garsesni, kai įsijungia kompresorius. Burbuliavimas ir kliuks jimas yra normalūs garsai, atsirandantys iš šaldiklio. ĮSPöJIMAS! Niekada netaisykite ar nekeiskite elektros detalių prietaiso patys. Taip galite sukelti pavojų savo gyvybei ir netekti teis s į nemokamą garantinį aptarnavimą. Techniniai duomenys Prekinis ženklas Modelis HSA Prietaiso tipas ŠALDYMO DöŽö Bendra talpa (ltr.) 232 Naudinga talpa (ltr.) 230 Užšaldymo galingumas (kg/24h) 12 Energijos klas (1) A++ Elektros energijos sunaudojimas (kwh/metus ) (2) 169 Saugus laikas nutrūkus el.energijos tiekimui (h) 67 Triukšmingumo lygis (db re 1 pw) 41 Ekologiškas šaldymo agentas R 600a (1) Energijos klas s: A...G (A= ekonomiškiausia...g = mažiausiai ekonomiška) (2) Realios elektros energijos sąnaudos priklauso nuo naudojimo sąlygų ir pastatymo vietos. Ant prietaiso arba pakuot s esantis simbolis nurodo, kad su šiuo prietaisu negalima elgtis kaip su buitin mis šiukšl mis. Jį reikia perduoti atitinkam surinkimo punktui, kad elektros ir elektronikos prietaisas būtų perdirbtas. Tinkamai išmesdami šį gaminį, prisid site prie apsaugos nuo galimo neigiamo poveikio aplinkai ir žmonių sveikatai, kuris gali būti padarytas šį gaminį netinkamai išmetant. D l išsamesn s informacijos apie šio gaminio perdirbimą, prašom kreiptis į savo miesto valdžios instituciją, buitinių atliekų išvežimo tarnybą arba parduotuvę, kurioje pirkote šį prietaisą. 14
20 LV Lietošanas instrukcija Apsveicam ar jusu izveli! Saldetava, ko jus esat iegadajušies ir viens no BEKO produktiem un harmoniski kombine sevi lielisku darbspeju un estetisku arejo izskatu. Tai ir jauns pievilcigs dizains un ta ir konstrueta, ieverojot Eiropas un nacionalos standartus, kas garante saldetavas drošibu. Bez tam lietota saldetava nekaite apkartejai videi un neietekme ozona slani. Lai pareizi izmantotu jusu saldetavu, uzmanigi izlasiet šo lietošanas instrukciju. Padoms par jusu vecas iekartas utilizaciju Ja jusu iegadata iekarta aizvietos veco, tad jums ir jaievero daži aspekti. Vecas iekartas nav liekie krami. To utilizacija lauj pasargat apkartejo vidi, ka ari atkartoti izmantot noteiktus materialus. Padariet jusu veco iekartu nelietojamu: - atsledziet jusu iekartu no barošanas; - nonemiet barošanas vadu (nogrieziet to); - nonemiet durvis sledžus, lai berni, spelejoties, neaizvertu sevi iekša. Saldešanas iekartas satur izolacijas materialus un dzesejošas vielas, kurus nepieciešams pareizi utilizet. Šī ierīce nav paredzēta, lai to izmantotu persona ar ierobežotām garīgām un fiziskām spējām, bez pieredzes un zināšanām, un arī ja viħš nav apmācīts. Šī ierīce jālieto tikai tā cilvēka klātbūtnē, kurš atbildīgs par personas drošību. Bērni šo ierīci drīkst lietot tikai tā cilvēka klātbūtnē, kurš par tiem ir atbildīgs, lai novērstu nelaimes gadījumus un to, lai bērni ar ierīci nespēlētos. 15
21 LV Iepakojuma utilizešana BRI DINAJUMS! Nelaujiet berniem speleties ar iepakojumu vai ta sastavdalam. Pastav risks iegriezt sev ar plastika dalam vai filmam. Lai iekartu varetu jums nogadat laba stavokli, ta tika iepakota. Visi iepakojuma materiali nekaite apkartejai videi un tos var utilizet. Ludzu, palidziet mums utilizet iepakojumu un pasargat apkartejo vidi! SVARI G I! Pirms iekartas lietošana kartigi izlasiet šo lietošanas instrukciju. Ta satur svarigu informaciju par iekartas uzstadišanu, lietošana un apkalpošanu. Ražotajs nav atbildigs par jebkuriem zaudejumiem un jebkuram traumam, ja lietotajs nav izlasijis lietošanas instrukciju. Saglabajiet šo lietošanas instrukciju turpmakam uzzinam. Ta var noderet ari nakamajam ši iekartas lietotajam. UZMANI B U! Šo iekartu drikst izmantot tikai tiem uzdevumiem, kuriem ta ir paredzeta (majas apstaklos) un noteiktas vietas, nepaklaujot to mitrumam. Transportešanas instrukcijas Iekartu ir japarvada pec iespejas vertikalaja stavokli. Parvadajuma laika iekartas iepakojumam jabut perfekta stavokli. Ja parvadajot iekartu, ta tika novietota horizontali (tikai saskana ar markejumiem uz iepakojuma), tad ir iesakams atstat iekartu vertikalaja stavokli uz 12 stundam un šaja laika to nepieslegt pie barošanas. Šo prasibu neieverošana var izraisit kompresora bojašanos un garantijas atcelšanu. Lietošanas instrukcija Bridinajumi un visparigie Padomi Ja jus konstatejat iekartas bojašanos, nepiesledziet to pie barošanas. Visus remontdarbus var veikt tikai kvalificetie specialisti. Ludzu, atsledziet iekartu no barošanas sekojošos gadijumos: - ja jus atkausejiet iekartu; - ja jus tiriet iekartu; Atsledzot iekartu no barošanas, velciet aiz kontaktdakšas, nevis aiz vada! Atstajiet nelielu atstarpi starp iekartu un sienu, kurai blakus iekarta tiek uzstadita. Nestaviet uz iekartas. Nelaujiet berniem speleties vai slepties iekartas iekša. Nekad neizmantojiet elektriskas ierices iekartas atkausešanai. Neizmantojiet iekartu siltumiekartu vai citu siltuma avotu tuvuma. Neatstajiet durvis atvertas uz ilgu laiku. Neglabajiet produktus saldetava, ja ta nestrada. Neglabajiet produktus, kas satur uzliesmojošas vai spragstošas vielas. Neglabajiet saldetava dzerienus. Pudeles var uzspragt! Nesasaldejiet dzerienus plastika pudeles. Neediet ledus kubinus vai saldejumu, kas bija tikko izvilkts no saldetavas, jo var iegut ledus apdegumus. Nepieskarieties aukstiem metaliskiem priekšmetiem, ja jusu rokas ir slapjas. Iekārtas aizsardzībai uzglabāšanas laikā noliktavā un transportējot starp tās durvīm un korpusu atrodas starplikas. Pirms iekārtas izmantošanas sākšanas šīs starplikas tiks izħemtas. 16
22 LV Ledus, kas pārāk biezā kārtā izveidojies uz saldētavas sienām un grozos, regulāri jānotīra ar komplektā ietilpstošo plastmasas kasīkli. Ledus nokasīšanai nekādā gadījumā neizmantojiet metāla priekšmetus. Šīs biezās ledus kārtas dēĝ nav iespējams kārtīgi aizvērt durtiħas. Ja jus nelietosiet iekartu dažas dienas, tad mes iesakam to izslegt. Ja jus to neizmantosiet vel ilgaku laiku, izdariet sekojošo: - atsledziet iekartu no barošanas; - iznemiet visus produktus no saldetavas; - atkausejiet to un nomazgajiet; - atstajiet durvis atvertas, lai nerastos nepatikamas smakas. Barošanas vadu var samainit tikai kvalificets specialists. Ja jusu iekarta ir aprikota ar sledzi, turiet to aizvertu un atslegu glabajiet droša, berniem nepieejama vieta. Ja jus gribat izmest veco iekartu, kas aprikota ar sledzi, tad salauziet sledzi. Tas ir loti svarigi, jo citadi berni nejauši var sevi aizvert saldetavas iekša, kas var novest pie naves. Uzstadišana Dota iekarta ir konstrueta darbibai pie C C (SN/T klase) apkartejas vides temperaturas. Ja apkarteja vides temperatura ir lielaka par C, tad temperatura iekartas iekša var but augstaka par normalo. Uzstadiet iekartu talu no siltuma avotiem vai kamina. Uzstadot to silta telpa, uz tiešajiem saules stariem vai tuvu siltuma avotam (silditajiem, plitim, krasnim), energijas paterinš klus lielaks un iekartas kalpošanas laiks isaks. Ludzu, ieverojiet sekojošs minimalus attalumus: 100 cm no plitim, kas strada ar ellu vai oglem; 150 cm no elektriskajam un gazes plitim. Nodrošiniet iekartai nepieciešamu ventilaciju, ieverojot iepriekš minetas distances. Uzstadiet uz kondensatora (aizmugure) komplekta esošas starplikas. (elements 3). Uzstadiet iekartu uz perfekti gludas virsmas sausa un labi ventilejama telpa. Piestipriniet komplekta esošos aksesuarus. 17 Elektriskie savienojumi Jusu iekarta ir paredzeta darbam 230V/50 Hz elektrotikla. Pirms pieslegt iekartu pie barošanas, parliecinieties, ka elektrotikla parametri (spriegums, stravas tips, frekvence) atbilst iekartas prasibam. Informacija par barošanas spriegumu un patereto jaudu ir dota markejuma, kas atrodas uz iekartas aizmugurejas sienas. Elektriskie savienojumi javeic saskana ar likumdošanas prasibam. Iekarta ir obligati jaiezeme. Ražotajs nav atbildigs par jebkuriem zaudejumiem un traumam, kas tika iegutas mineto nosacijumu neieverošanas del. Iekarta ir aprikota ar barošanas vadu un kontaktdakšu (Eiropas variants, marketa ar 10/16A) ar dubulto izemešanas kontaktu jusu drošibas labad. Ja komplekta esoša kontaktdakša nav savietojama ar jusu rozeti, tad griezieties pie kvalificeta elektrika, lai vinš to samainitu pret citu. Neizmantojiet vadu pagarinatajus vai vairakus adapterus. Izslegšana Lai izslegtu iekartu, atvienojiet barošanas vadu no rozetes vai uzstadiet divpolu parsledzeju, kas izsledz rozeti, un izmantojiet to. Ekspluatacija Lietošanas instrukcija Pirms sakt iekartas ekspluataciju, iztiriet to (sadala Tirišana). Pec tirišanas piesledziet iekartu pie barošanas un uzstadiet termostatu uz videjo poziciju. Iedegsies zalš un sarkans indikatori. Dodiet iekartai pastradat bez produktiem vismaz 2 stundas. Svaigo produktu sasaldešana ir iespejama tikai pec vismaz 20 stundam.
23 LV Iekartas apraksts (elements 1). 1) 1. Rokturis 2. Durvis 3. Lampa 4. Grozi 5. Paplāte 6. Slēdži 7. Termostats 8. Starplika transportēšanai Saldetavas izmantošana Temperaturas regulešana Temperatura saldetavas iekša tiek reguleta ar riteni uz termostata (elements 4), kur MAX apzime viszemako temperaturu. Temperaturas limenis var but dažads atkariba no iekartas izmantošanas apstakliem, tadiem, ka: Uzstadišanas vieta, apkartejas vides temperatura, durvju atveršanas biežums, produktu daudzums. Termostata ritena stavoklis mainisies atkariba no minetajiem apstakliem. Parasti, ja apkartejas vides temperatura ir apmeram C, tad termostata ritenis ir jauzstada uz videjo poziciju. Signalizacijas sistema atrodas saldetavas priekšpuse (elements 5). Ta sastav no: 1. Termostata regulešanas ritena, kas regule saldetavas iekšejo temperaturu; 2. zala indikatora, kas norada uz to, ka iekarta ir pieslegta pie barošanas; 3. sarkana indikatora, kas iedegas, kad iekšeja temperatura ir parak augsta; Šis indikators degs pirmas minutes pec iekartas ieslegšanas un pazudis, kad temperatura sasniegs pietiekami zemu limeni. Ja šis indikators deg visu laiku, tad iekarta ir bojata. 4. Oranža poga. Nospiediet to, lai ieslegtu atras sasaldešanas funkciju. Lai izslegtu šo režimu, nospiediet pogu velreiz. Tris gaismas indikatori sniedz informaciju par saldetavas darba režimu. Lietošanas instrukcija Padomi par partikas glabašanu Saldetava ir paredzeta sasaldetu produktu glabašanai, ka ari svaigu produktu sasaldešanai. Viens elements, kas nodrošina labu sasaldešanu, ir iepakojums. Galvenie nosacijumi, kuriem jaatbilst iepakojums ir sekojoši: tas jabut hermetisks, izturigs pret zemam temperaturam, izturigs pret škidrumiem, tvaikiem, smakam, ka ari tam jabut mazgajamam. Šiem nosacijumiem atbilst sekojošie iepakošanas materiali: plastika vai aluminija folija vai trauki. SVARI G I! - Svaigu produktu sasaldešanai izmantojiet komplekta esošos grozus. Neielieciet saldetava parak daudz produktu vienlaicigi. Produktu kvalitates tiek pasargatas jo labak, jo stiprak produkti ir sasaldeti. Tapec ir svarigi neparsniegt iekartas sasaldešanas kapacitati, kas dota iekartas tehniskaja specifikacija. Lai samazinatu sasaldešanas laiku, nospiediet atras sasaldešanas pogu. - Svaigie produktiem nedrikst pieskarties sasaldetiem. - Saldetus produktus, kurus jus iegadajaties veikala, var glabat saldetava, neregulejot termostatu. 18
24 LV - Ja uz produktu iepakojuma nav noradits glabašanas terminš, tad atcerieties, ka produkts nedrikst glabat saldetava ilgak par 3 menešiem. - Atkausetus produktus nedrikst sasaldet atkartoti. - Saldetava nedrikst glabat dzerienus. - Ja notiek elektribas zudumi, neatveriet saldetavas durvis. Šaja gadijuma produktus var glabat vel 67 stundas. NEAIZMIRSTI ET! Pec 24 stundam atras sasaldešanas režimu obligati jaizsledz, nospiežot oranžo pogu. Lietošanas instrukcija Iekartas atkausešana Mes iesakam atkauset saldetavu vismaz divas reizes gada vai kad ledus slanis klust parak biezs. Ledus veidošanas ir normals efekts. Ledus daudzums un ta veidošanas intensitate ir atkarigi no apkartejas vides apstakliem un no ta, cik bieži tiek atvertas durvis. Mes iesakam atkauset saldetavu, kad taja ir maz produktu. Pirms atkausešanas iestatiet viszemako temperaturu, lai produkti dzilak sasaldetos. - Atsledziet iekartu no barošanas; - Iznemiet saldetus produktus un apvelciet tos ar dažam papira lapam, tad ielieciet to ledusskapi vai auksta vieta. Panemiet paplati un uzlieciet to zem udens izliešanas snipja. Iznemiet snipja vacinu. Udens noteces paplate. Pec atkausešanas noslaukiet saldetavu ar mikstu lupatu. Uzstadiet snipja vacinu atpakal. Lai ledusskapis atrak klutu sauss, atstajiet durvis atvertas. Neizmantojiet asus metaliskus priekšmetus ledus kasišanai. Neizmantojiet matu fenu vai citus elektriskus sildišanas ierices saldetavas atkausešanai. Lampas nomaiħa Ja lampu ir nepieciešams nomainīt, vispirms atslēdziet saldētavu no barošanas. NoĦemiet lampas apvalku. Pārliecinieties, ka lampa tiek pieskrūvēta pareizi. Pieslēdziet saldētavu pie barošanas. Ja lampa joprojām nestrādā, tad nomainiet to pret jaunu E14-15W lampu. Piestipriniet lampas apvalku. 19
25 LV Iekšejo dalu tirišana Pirms tirišanas atsledziet ierici no barošanas. Mes iesakam tirit saldetavu, kad ta tiek atkauseta. Iztiriet iekšejas dalas ar siltu udeni. Var ari izmantot kadu neitralu mazgašanas lidzekli. Neizmantojiet ziepes, benzinu vai acetonu, jo šis vielas var atstat stipru nepatikamu smaržu. Noslaukiet ar mitru lupinu un pec tam ar sausu lupatu. Neizmantojiet parak daudz udens, jo tas nedrikst noklut pari izolacijai. Neaizmirstiet iztirit durvis blivlenti, izmantojot tiru lupatu. Arejo dalu tirišana Lietošanas instrukcija Arejas virsmas var tirit ar lupinu, samitrinatu udeni ar ziepem. Pec tam noslaukiet ar sausu lupatu. Dzesešanas kedes arejie mezgli (kompresors, kondensators, savienošanas caurules) tiek tiriti ar mikstu birsti vai puteklu suceju. Ši proceduras laika esiet uzmanigi, lai neatvienotu nekadas caurules vai kabelus. Neizmantojiet abrazivus tirišanas lidzeklus! Pec tirišanas uzstadiet atpakal visus aksesuarus un piesledziet saldetavu pie barošanas. Tehniska specifikacija MARKA MODELIS HSA IEKARTAS TIPS SALDETAVA Kopejais bruto tilpums (l) 232 Kopejais lietderigais tilpums (l) 230 Sasaldešanas kapacitate (kg/24 h) 12 Energoefektivitates klase (1) A++ Ener Energijas paterinš (kwh/an) (2) 169 Autonoms darbs (stundas) 67 Trokšnu limenis (db (A) re 1 pw) 40 Ekologiski nekaitiga dzesejoša viela R600a (1) Energoefektivitates klase : A... G (A = ekonomisks... G = mazak ekonomisks) (2) Realais energijas paterinš ir atkarigs no apkartejas vides apstakliem un vietas, kura iekarta ir uzstadita. Simbols uz produkta vai tā iepakojuma norāda, ka jūs nedrīkstiet no tā atbrīvoties kā no mājsaimniecības atkritumiem. Tā vietā šis produkts jānogādā attiecīgajā savākšanas punktā, kurā tiek pieħemtas elektriskās un elektroniskās iekārtas otrreizējai izejvielu pārstrādei. Pareizi atbrīvojoties no šī produkta, jūs palīdzēsit novērst tā potenciālo negatīvo ietekmi uz vidi un cilvēku veselību, kas var rasties tad, ja neatbrīvosities no šī produkta pareizā veidā. Lai saħemtu sīkāku informāciju par šī produkta otrreizējo pārstrādāšanu, lūdzu, sazinieties ar savu vietējo pilsētas biroju, savu mājsaimniecības atkritumu savākšanas dienestu vai veikalu, kurā jūs šo produktu iegādājāties. 20

26 SL Navodila za uporabo Čestitamo vam za vašo izbiro! Zamrzovalna skrinja, ki ste jo kupili, je ena izmed izdelkov iz serije izdelkov ter predstavlja harmonično združenje tehnologije hlajenja z estetskim videzom. Ima novo in privlačno obliko ter je zgrajena po evropskih in državnih standardih, kar zagotavlja njeno delovanje in varnost. Hkrati pa je uporabljen hladilni sistem R600a okolju prijazen in nima negativnih učinkov na ozonski plašč. Za pravilno uporabo vašega zamrzovalnika vam svetujemo, da si previdno preberete informacije v teh navodilih. Nasveti za recikliranje vaše stare naprave Če bo kupljena naprava zamenjala vašo staro napravo, je treba upoštevati nekaj vidikov. Vaša stara naprava ni odpadek brez vrednosti. Ob tem, da njeno uničenje ohranja okolje, prav tako omogoča obnovitev pomembnih surovin. Onesposobite svojo staro napravo na naslednji način: - izklopite napravo iz elektrike; - odstranite napajalni kabel (odrežite ga); - odstranite morebitne ključavnice in preprečite, da bi se otroci med igranjem zaklenili noter ali se poškodovali. Zamrzovalna skrinja vsebuje izolacijske materiale in hladilna sredstva, ki zahtevajo pravilno recikliranje. Uporaba te naprave ni namenjena osebam s slabšimi fizičnimi, senzornimi ali duševnimi zmožnostmi ter osebam, ki nimajo potrebnih izkušenj in znanja, razen če so prejele navodila za uporabo ali so pod nadzorom osebe, ki je odgovorna za njihovo varnost. Otroci se ne smejo igrati z napravo. 21
27 SL Recikliranje embalaže OPOZORILO! Otroci se ne smejo igrati z embalažo ali njenimi deli. Obstaja nevarnost zadušitve z valovito lepenko ali s plastičnim trakom. Da je naprava dostavljena nepoškodovana, jo zavarujemo s primerno embalažo. Vsi materiali embalaže so združljivi z okoljem in primerni za recikliranje. Varujte okolje in nam pomagajte reciklirati embalažo. POMEMBNO! Pred uporabo naprave, previdno in v celoti preberite ta navodila. Vsebujejo pomembne informacije glede priprave, uporabe in vzdrževanja naprave. Proizvajalec ni odgovoren, če teh navodil ne upoštevate. Hranite navodila na varnem in vidnem mestu, kjer jih lahko čim prej uporabite. Pozneje so lahko uporabna še za drugega uporabnika. POZOR! Napravo lahko uporabljate samo za določene namene (gospodinjska raba) in na primernih območjih, brez dežja, vlage ali drugih vremenskih vplivov. Navodila za prevoz Če se le da, je napravo treba prevažati v navpičnem položaju. Med prevozom mora biti embalaža v brezhibnem stanju. Če je bila naprava med prevozom dana v vodoravni položaj (kot kažejo oznake na embalaži), je priporočljivo, da pred uporabo, počiva 12 ur, da se ponovno nastavi tok hlajenja. Neupoštevanje teh navodil lahko pripelje do okvare motornega kompresorja in preklica njegove garancije. Navodila za uporabo Opozorila in splošni nasveti Če ste zasledili napako, naprave ne priklapljajte. Popravila lahko izvede samo usposobljeno osebje. Izklopite napravo iz napetosti, ko: - popolnoma odtajate napravo; - čistite napravo. Ko izklapljate napravo, povlecite za vtič in ne za kabel. Zagotovite, da bo med napravo in steno, pred katero stoji, čim manj prostora. Ne obešajte se na vrata naprave. Otrokom ne dovolite, da se igrajo z napravo. Za odtajanje notranjosti zamrzovalnika nikoli ne uporabljate električnih naprav. Naprave ne uporabljajte v bližini naprav za ogrevanje, kuhalnikov ali drugih virov toplote in ognja. Zamrzovalnika ne puščajte odprtega dlje kot je treba, ko vanj dajete hrano in jo jemljete ven. Ne puščajte v napravi hrane, če naprava ne deluje. V zamrzovalniku ne shranjujte izdelkov, ki vsebujejo vnetljive ali eksplozivne pline. V zamrzovalniku ne shranjujte pijač z mehurčki (sokovi, mineralna voda, šampanjec itd.), saj lahko plastenka eksplodira. Ne zamrzujte pijač v plastenkah. Kock ledu ali sladoleda ne jejte takoj po tem, ko jih vzamete iz zamrzovalnika, saj lahko povzročijo ozebline. Z mokrimi rokami se nikoli ne dotikajte kovinskih delov ali zamrznjene hrane, saj lahko vaše roke hitro zamrznejo na zelo mrzli površini. Med skladiščenjem in prevozom naprave poskrbite za njeno varnost in uporabite distančnike med vrati in predalnikom (na sprednji in zadnji strani). Pred uporabo distančnike odstranite. 22
28 SL Odvečen led na okvirju in košari je treba s priloženim plastičnim strgalom redno odstranjevati. Za odstranjevanje ledu ne uporabljajte kovinskih delov. Zaradi prevelike količine ledu se vrata ne zapirajo pravilno. Če naprave ne uporabljate nekaj dni, je ni priporočljivo izklopiti. Če je ne uporabljate dalj časa, naredite naslednje: - izključite napravo; - izpraznite zamrzovalnik; - odmrznite in očistite ga; - pustite vrata odprta, da se ne pojavijo neprijetne vonjave. Kabel za elektriko lahko zamenja samo pooblaščena oseba. Če ima vaša naprava ključavnico, jo zaklenite in shranite ključ na varnem mestu, izven dosega otrok. Če želite odvreči napravo s ključavnico, jo onesposobite. To je zelo pomembno, saj se izognete, da bi se otroci ujeli v napravo in tako ogrozili svojo varnost. Priprava Ta naprava je oblikovana za delovanje v prostoru s temperaturo med C in C (razred SN/T). Če je temperatura prostora nad C, se lahko zviša tudi temperatura v napravi. Napravo postavite daleč vstran on vseh virov toplote in ognja. Če napravo postavite v toplo sobo, jo izpostavite sončnim žarkom ali kakšnemu drugemu viru toplote (ogrevalniki, kuhalniki, pečice), bo poraba energije večja in življenjska doba izdelka krajša. Upoštevajte naslednje najmanjše razdalje: 100 cm od kuhalnika na premog ali olje; 150 cm od električnega in plinskega kuhalnika. Zagotovite prost pretok zraka okoli naprave, kot prikazuje slika 2. Na kondenzator (na zadnji strani) namestite priložene distančnike. (slika 3). Napravo položite na raven in suh prostor z dobrim zračenjem. Namestite priložene dodatke. Električna povezava Navodila za uporabo Vaša naprava deluje pri enofazni napetosti V/50 Hz. Preden priklopite napravo, se prepričajte, da vsi parametri glavnega električnega omrežja v vašem gospodinjstvu (napetost, tip toka, frekvenca) ustrezajo delujočim parametrom naprave. Podatki o napajalni napetosti in absorbirani moči se nahajajo na nalepki na zadnji strani zamrzovalnika. Električna napeljava mora ustrezati zahtevam zakona. Ozemljitev naprave je obvezna. Proizvajalec ne odgovarja za kakršne koli poškodbe ljudi, živali ali dobrin, ki so nastale zaradi neupoštevanja določenih pogojev. Zaradi varnosti je naprava opremljena s kablom in vtikačem (evropski tip, označen z 10/16A) z dvojnim ozemljitvenim stikom za varnost. Če vtičnica ni istega tipa kot vtikač, prosite specializiranega električarja, da ga zamenja. Ne uporabljajte podaljškov ali večnamenskih prilagojevalnikov. 23
29 SL Izklapljanje Napravo izklopite tako, da odstranite vtikač iz vtičnice ali iz stikala z dvema poloma, ki se nahaja pred vtičnico. Delovanje Pred uporabo očistite notranjost naprave (glejte poglavje»čiščenje«). Po čiščenju vklopite napravo in nastavite gumb za termostat na sredino. Zelena in rdeča svetleča dioda na signalni plošči morata zasvetiti. Naprava naj deluje približno 2 uri, preden vanjo spravite hrano. Svežo hrano lahko zamrznete po najmanj 20 urah delovanja. Opis naprave (Slika 1) 1. Kljuka 2. Vrata 3. Ohišje luči 4. Košare 5. Pladenj 6. Ohišje ključavnice 7. Ohišje termostata 8. Distančnik za prevoz Navodila za uporabo Delovanje zamrzovalnika Nastavitev temperature Temperatura se nastavi s pomočjo gumba na termostatu (slika 4), pri tem položaj»max«predstavlja najvišjo temperaturo. Dosežena temperatura se razlikuje glede na pogoje uporabe, kot so npr.: položaj naprave, temperatura prostora, pogostost odpiranja vrat, preobilno polnjenje zamrzovalnika s hrano. Glede na te dejavnike se položaj gumba na termostatu spreminja. Če je temperatura prostora okoli 43 0 C, se bo termostat nastavil na srednji položaj. Sistem signaliziranja se nahaja na sprednji strani zamrzovalnika (slika 5). Vključuje: 2. Nastavitveni gumb na termostatu nastavi temperaturo v notranjosti. 2. Zelena dioda kaže, da se naprava napaja z električno energijo. 3. Rdeča dioda napaka zasveti, če je temperatura v zamrzovalniku previsoka. Dioda bo svetila minut po začetku delovanja zamrzovalnika, nato se mora ugasniti. Če dioda sveti med delovanjem, je prišlo do napake. 4. Oranžen gumb hitro zamrzovanje s pritiskom na ta gumb zasveti oranžna luč, kar pomeni, da je naprava v načinu»hitrega zamrzovanja«. Ta način izklopite s ponovnim pritiskom na gumb in oranžna luč se bo ugasnila. Tri diode dajejo podatke o načinu delovanja zamrzovalnika. 24
30 SL Nasveti za shranjevanje hrane Zamrzovalnik je namenjen za daljše shranjevanje zamrznjene hrane kot tudi za zamrzovanje sveže hrane. Eden od osnovnih elementov za uspešno zamrzovanje je embalaža. Osnovi pogoji, ki jih mora imeti embalaža, so: biti mora nepropustna za zrak, ne sme vplivati na hrano, biti mora odporna na nizke temperature, tekočine, maščobo, vodno paro, vonjave in mora se dati čistiti. Te pogoje izpolnjujejo naslednje embalaže: plastični ali aluminijasti film, plastična ali aluminijasta posoda, kozarci iz povoskane lepenke ali plastični kozarec. POMEMBNO! - Za zamrzovanje sveže hrane uporabite košare, ki so priložene napravi. - Ne dajajte v zamrzovalnik prevelike količine hrane naenkrat. Kakovost hrane se najbolje ohrani, če je ta globoko zamrznjena v čim krajšem času. Zato ni priporočljivo preseči zmožnosti zamrzovanja naprave, ki je točno določena na»podatkovnem listu naprave«(stran 28). Če želite zmanjšati čas zamrzovanja, pritisnite gumb za»hitro zamrzovanje«. - Sveža hrana ne sme priti v stik z že zamrznjeno hrano. - Če ste kupili že zamrznjeno hrano, jo lahko spravite v zamrzovalnik brez nastavljanja termostata. - Če datum zamrzovanja ni omenjen na embalaži, vzemite za osnovno merilo obdobje največ treh mesecev. - Hrane, tudi delno odmrznjene, ne smete ponovno zamrzniti. Treba jo je takoj uporabiti ali skuhati in nato ponovno zamrzniti. - Pijače z mehurčki se v zamrzovalniku ne bodo ohranile. - V primeru izpada elektrike, ne odpirajte vrat naprave. Zamrznjena hrana ne bo prizadeta, če izpad traja manj kot 67 ur. NE POZABITE! Ko ste hrano položili v zamrzovalnik, počakajte 24 ur in ko se oranžna dioda ugasne, izklopite način hitrega zamrzovanja s pritiskom na gumb 4. Odtajanje naprave Navodila za uporabo Priporočamo, da odtajate zamrzovalnik vsaj dvakrat na leto ali ko je debelina plasti ledu prevelika. Nastajanje ledu je normalen pojav. Količina in hitrost nastajanja ledu je odvisna od prostorskih pogojev in pogostosti odpiranja vrat zamrzovalnika. Priporočamo, da napravo odtajate, ko je količina zamrznjene hrane najmanjša. Pred odtajanjem nastavite gumb na termostatu na višji položaj, da se hrana shrani bolj mrzla. - Izključite napravo. - Odstranite zamrznjeno hrano, jo zavijte v več plasti papirja in jo postavite v hladilnik ali v hladen prostor. Vzemite ploščo za ločevanje in jo postavite v zamrzovalnik v smeri kapalne cevi. Odstranite zapiralni čep. Voda se bo zbirala na posebni pladenj (plošča za ločevanje). Ko se led odtali in voda odteče, obrišite s krpo ali gobo in pustite, da se dobro posuši. Vrnite zapiralni čep na njegovo mesto. (Slika 6) Za hitrejše odtajanje pustite vrata odprta. Za odstranjevanje ledu ne uporabljajte ostrih kovinskih delov. Za odtajanje ne uporabljajte sušilnikov za lase ali drugih električnih naprav za segrevanje. 25
31 SL Notranje čiščenje Pred začetkom čiščenja, izklopite napravo iz električnega napajanja. Napravo je priporočljivo čistiti po odtajanju. Notranjost očistite z mlačno vodo, kateri ste dodali nekaj nevtralnega čistilnega sredstva. Ne uporabljajte sredstev, ki puščajo močan vonj, kot so milo, pralna sredstva, bencin ali aceton. Obrišite z mokro gobo in posušite z mehko krpo. Pri tem ne uporabljajte preveč vode, saj se lahko izlije v toplotno izolacijo naprave in povzroči neprijetne vonjave. Ne pozabite s čisto krpo očistiti tudi tesnila na vratih, še posebej pod rebri. Zunanje čiščenje Zunanjost zamrzovalnika očistite z gobo, namočeno v toplo milnico, jo obrišite z mehko krpo in pustite, da se posuši. Zunanje dele hladilnega sistema (motorni kompresor, kondenzator, cev za povezavo) očistite z mehko krtačko ali s sesalnikom. Pri tem pazite, da ne poškodujete cevi ali izključite kablov. Ne uporabljajte čistilnih ali abrazivnih sredstev. Po čiščenju postavite dodatke na njihovo mesto in vključite napravo. Navodila za uporabo Zamenjava notranje žarnice Če žarnica pregori, izključite napravo iz električnega napajanja. Odstranite okrov žarnice. Prepričajte se, da je luč žarnica privita. Ponovno vključite napravo. Če luč še vedno ne sveti, jo zamenjajte z drugo, model E14-15W. Privijte okrov žarnice na svoje mesto. Vodič za iskanje napak Naprava ne deluje. Napaka pri napajanju. Vtikač na napajalnem kablu ni dobro vstavljen v vtičnico. Varovalka je pregorela. Termostat je na položaju»off«. Temperatura ni dovolj nizka (sveti rdeča dioda). Hrana preprečuje zapiranje vrat. Naprava ni pravilno postavljena. Naprava je postavljena preblizu toplotnega vira. Gumb na termostatu ni na pravem položaju. Pretirano nastajanje ledu Vrata niso pravilno zaprta. Notranja luč ne deluje Žarnica je pregorela. Izklopite napravo iz napeljave, odstranite žarnico in jo zamenjajte z novo. Naslednje napake niso dejanske napake: Zvoki in hrup, ki prihaja iz naprave: kroženje hladila v sistemu. 26
32 SL Hrup med delovanjem Da bi temperatura ostala takšna, kot ste jo nastavili, se mora kompresor naprave občasno vključiti. Hrup, ki se ob tem sliši, je povsem normalen. Hrup se zmanjša, ko naprava doseže temperaturo delovanja. Kompresor oddaja brneči zvok. Ob vklopu kompresorja lahko postane zvok močnejši. Navodila za uporabo Šumenje in klokotanje, ki ga povzroča kroženje hladila v napravi, je povsem normalen pojav pri delovanju. Opozorilo! Naprave ali njenih električnih delov nikoli ne popravljajte sami. Popravila, ki jih izvede nepooblaščena oseba, so nevarna za uporabnika in pomenijo preklic garancije. Podatkovni list naprave ZAŠČITNA ZNAMKA MODEL HSA TIP NAPRAVE ZAMRZOVALNA SKRINJA Celotna prostornina (l) 232 Uporabna prostornina (l) 230 Zmogljivost zamrzovanja (kg/24 h) 12 Razred energijske učinkovitosti (1) A++ Poraba energije (kwh/leto) (2) 169 Samouprava (ure) 67 Hrup (db(a) re 1 pw) 41 Ekološko hladilno sredstvo R600a (1) Energijski razredi: A.. G (A = varčen... G = manj varčen) (2) Dejanska poraba energije je odvisna od pogojev uporabe in položaja naprave. Če se na izdelku ali embalaži nahaja znak, to pomeni, da z izdelkom ne smete ravnati tako kot z ostalimi gospodinjskimi odpadki. Napravo morate oddati na primernem zbirališču za recikliranje električnih in elektronskih naprav. Nepravilno odlaganje izdelka lahko pripelje do negativnih učinkov na okolje in zdravje ljudi, kar pa lahko preprečite s pravilnim odlaganjem vaše stare naprave. Za podrobne informacije o recikliranju tega izdelka se obrnite na lokalni mestni urad, komunalno službo ali trgovino, kjer ste izdelek kupili. 27
33 D Item 8 Gebrauchsanweisung Herzlichen Glückwunsch für Ihre Entscheidung! Die von Ihnen erworbene waagerechte Tiefkühltruhe ist unser neuestes BEKO Produkt in der Baureihe. Sie hat ein neues ansprechendes Design, und wurde entwickelt, um den europäischen und nationalen Vorschriften zu entsprechen, was die beste Funktion und Sicherheit bietet. Der Betrieb mit nur einem Kompressor, das Steuer- und Regelsyste mit einem einzigen Thermostat sichern einen guten Temperaturabgleich und einen geringen Energiebedarf. Hinzu sei erwähnt, daß das Kühlmittel R600a, welches in diesen Anlagen verwendet wird, umweltfreundlich ist und nicht die Ozonschicht der Atmosphäre beeintrachtigt. Um dieses Gerät optimal zu nutzen, empfehlen wir ihnen, diese Betriebsanleitung aufmerksam durchzulesen. Empfehlungen zum Recycling Ihres alten Gerätes Sollte das neu erworbene Gerät ein altes ersetzen, bitten wir Sie, folgendes zu beachten: Die gebrauchten Geräte sind nicht wertlose Abfälle. Deren umweltfreundliche Entsorgung erlaubt die Rückgewinnung von wichtigen Rohstoffen. Das alte Gerät kann unter Einhaltung folgender Schritte entsorgt werden: - Gerät vom elektrischen Netz abschließen - Spannungsversorgungskabel entfernen (abtrennen); - Eventuell vorhanden Schlösser entfernen, um das Einschließen von verhindern (z.b. Kinder) - Lebensgefahr. Die Kühlgeräte enthalten Dämmmaterialien und Kühlmittel, welche besonderen Entsorgungsmethoden bedürfen. Dieses Gerät ist nicht dafür bestimmt durch Personen (einschließlich Kinder) mit eingeschränkten physischen, sensorischen oder geistigen Fähigkeiten oder mangels Erfahrung und/oder mangels Wissen benutzt zu werden, es sei denn, sie werden durch eine für ihre Sicherheit zuständige Person beaufsichtigt oder erhielten von ihr Anweisungen, wie das Gerät zu benutzen ist. 28
34 D Recycling der Verpackung Vorsicht! Gestatten Sie den Kindern nicht, mit der Verpackung oder mit Teilen der Verpackung zu speilen. Es besteht Erstickungsgefahr durch Wellpapier oder Kunststoffolie. Um eine Beschädigung des Gerätes beim Transport zu verhindern, wurden alle Materialien der Verpackung entsprechend den Vorschriften zur umweltfreundlichen Entsorgung entwickelt. Wir empfehlen die Verwertung der Verpackung, um die Umwelt zu schonen! WICHTIG! Lesen Sie diese Anweisungen vollständig vor der Inbetriebnahme des Gerätes. Sie beinhalten wichtige Informationen zu der Aufstellung, dem Betrieb und der Wartung Ihres Gerätes. Bewahren sie die Gebrauchsanweisungen sicher auf, um auch später leicht zugänglich zu sein, Sie sind auch weiteren Benutzern des Gerätas sehr behilflich. WICHTIG! Dieses Gerät ist nur für die vorgesehenen Zwecke zu betreiben (Haushalt), in entsprechenden Räumen, vor Regen, Feuchtigkeit oder anderen Umwelteinflüssen geschützt. Transportvorschriften Wir empfehlen, das Gerät auch beim Transport nur in waagerechter Position zu halten. Während dem Transport muß die Verpackung unbeschädigt sein. Vor der Inbetriebnahme lassen Sie das Gerät für 12 Stunden stehen. Beim Transport sollte jedwelche Einwirkung auf den Kühlkreislauf vermieden werden (Gefahr von Verformungen an den Leitungen). Die Nicheinhaltung dieser Vorschriften kann zu Schäden an dem Motorkompressor führen und zum Erlöschen der Gewährleistung für das Gerät. Gebrauchsanweisung Allgemeine Vorsichtsmaßnahmen und Empfehlungen Nehmen Sie das Gerät nicht in Betrieb, wenn ein Fehler daran bemerkt wurde. Vermeiden Sie die Verformung des Kühlmittelkreislaufes (Leitungen) beim Transport und bei der Aufstellung des Gerätes. Die Tiefkühltruhe sollte nur zur Aufbewahrung von tiefgefrorenen Lebensmitteln, das Tieffrieren von frischen Lebesmitteln und für die Herstellung von Eiswürfeln verwendet werden. Lassen sie dei Türe des Gerätes nicht länger offen, als zum Herausnehmen oder Einlegen von Lebensmitteln notwendig ist. Im inneren dürfen keine Produkte gehalten werden, welche brennbare oder explisive Gase enthalten. Verzehren Sie nicht Eiswürfel gleich nachdem sie aus der Tiefköhltruhe geholt wurden. Sie können Frostbiss verursachen. Berühren Sie niemals kalte metallische Teile oder tiefgefrorene Lebensmittel mit freuchten Händen. Ihre Hand kann sehr schnelll an die sehr kalten Oberflächen anfrieren. Verbieten Sie den Kindern, sich hinter dem Gerät zu verstecken oder da zu spielen. Vor jedwelcher Reinigungsarbeit ist das Gerät von dem Spannungsnetz zu trennen. Um das Gerät vom Netz zu trennen, ziehen Sie an dem Stecker, nicht am Kabel! Steigen Sie nicht auf das Gerät. Betreiben Sie nicht das Gerät in der Nähe von Heizkörpern, Kochöfen oder anderen Hitzequellen oder neben Feuer. Zum Schutz des Gerätes bei Lagerung und Transport befinden sich Distanzstücke zwischen Tür und Gehäuse (vorne und hinten). Diese Distanzstücke werden entfernt, bevor das Gerät in Betrieb genommen wird. Überschüssiges Eis an Rahmen und Ablagen sollte regelmäßig mit dem mitgelieferten Plastikschaber entfernt werden. Nutzen Sie keine Metallgegenstände zur Eisentfernung. Durch Eisansammlung lässt sich die Tür nicht mehr richtig schließen. 29
35 D Lassen Sie keine Lebensmittel in dem Gerät wenn es nicht in Betrieb ist. Wird das Gerät nur für ein paar Tage nicht genutzt, ist es ratsam, es gar nicht abzustellen. Sollten Sie es für einen längeren Zeitraum nicht benutzen, gehen Sie wie folgt vor: - Ziehen Sie den Stecker des Netzkabels aus der Steckdose - Leeren Sie die Tiefkühltruhe; - Entfrosten Sie diese und reinigen Sie sie.; - Lassen Sie den Deckel offen um unangenehme Geruchsentwicklung zu vermeiden. Das Netzkabel darf nur von einer entsprechend ausgebildeten un geprüften Person durchgeführt werden. Die Umgebungstemperatur Das Gerät ist vorgesehen, seine Funktion zu gewährleisten mit der Einhaltung der Betriebskenndaten (lt. Betriebsanleitung und Kennplättchen) soweit die Umgebungstemperatur im Bereich 10 0 C bis 43 0 C liegt, (Klimaklasse SN/T) Bei Umgebungstemperaturen unter der Minimalgrenze oder über der Maximalgrenze können Störungen im Betrieb des Gerätes auftreten. Bei Umgebungstemperaturen über der Maximalgrenze von 43 0 C, umso mehr diese Temperatur überschritten wird, verkürzen sich die Pausen in dem Betrieb des Gerätes, dieses hat die Tendenz, ständig zu laufen, die inneren Temperaturen steigen an wie auch der Energieverbrauch. Das Gerät ist weit von jedwelches Hitze- und Feuerquelle aufzustellen. Das Aufstellen in einen warmen Raum oder in der Nähe von Hitzequellen (Heizkörper, Kochöfen, Backöfen usw.) führen zu einem erhöhten Stromverbrauch und mindern die Lebensdauer des Gerätes. Bei der Aufstellung des Gerätes in Ihrer Wohnung, sind folgende minimale Abstände einzuhalten: cm von den Kochöfen, welche mit Kohle oder Öl geheizt werden; cm von den elektrischen Kochöfen und/auch Gasöfen. 30 Gebrauchsanweisung Sichern Sie die freie Luftzirkulation in der Umgebung des Gerätes indem Sie die Abstände einhalten, welche im Abb. 2 eingetragen sind. Bauen Sie an den Kondensator die mitgelieferten Distanzstücke ein (Abb. 3). Der Boden oder das Gerüst, auf welches das Gerät aufgebaut wird, hat perfekt flach zu sein. Bauen Sie das mitgelieferte Zubehör ein. Anschließen an das Spannungsnetz Ihr Gerät ist gebaut, um unter Wechselstrom, bei V/50 Hz. betrieben zu werden. Bevor Sie das Gerät an das Netz anschließen, überprüfen Sie die Kenndaten des Stromnetzes (Spannung, Art des Stromes, Frequenz) und deren Übereinstimmung mit den Kenndaten des Gerätes. Informationen zu der Versorgungsspannung und die Leistungsabnahme finden Sie auf dem Typenschild auf der Rückseite des Gerätes. Die elektrische Anlage muß den gesetzlichen Vorschriften entsprechen. Es ist gesetzlich vorgeschrieben, daß das Gerät nur an eine Steckdose mit Schutzkontakt (Erdung) erlaubt ist. Der Hersteller zieht sich aus jedwelcher Haftung zurück in Fällen, in denen Sachschäden oder Verletzungen an Tieren oder Personen wegen Nichteinhaltung der o.g. Vorschriften auftreten. Das Gerät ist mit einer elektrischen Anschlußschnur und einem Stecker nach europäischen Normen. Der Stecker trägt die Markierung 10/16A und hjat doppelten Schutzkontakt für die Erdung. Sollte die Steckdose nicht zu diesem Stecker passen, ist ein autorisierter Elektriker mit dem Tausch der Steckdose zu beauftragen. Es wird empfohlen, das Gerät nicht über Verlängerungskabel oder Adapter anzuschließen. Sollte das Gerät zwischen zwei Möbelstücken eingebaut sein, vergewissern Sie sich, daß diese nicht den Anschlußkabel zerquetschen.
36 D Trennen vom Stromversorgungsnetz Die Trennung von dem Netz sollte immer gegeben sein, entweder durch das Abziehen des Steckers aus der Steckdose oder durch einen zweiadrigen Netz- Trennschalter vor der Steckdose. Inbetriebnahme Vor der Inbetriebnahme ist der Innenteil des Gerätes zu säubern. (näheres dazu unter Kapitel "Wartung und Reinigung des Gerätes"). Nach Beendung dieses Arbeitsschrittes schließen Sie das Gerät an das Stromversorgungsnetz und drehen Sie den Thermostatregler in eine mittlere Position. Die grüne und die rote LED im Warnungsblock müssen aufleuchten. Lassen Sie das Gerät für etwa 2 Std. laufen, ohne Lebensmittel hineinzulegen. Das Tiefgefrieren der frischen Lebensmittel ist erst nach mindestens 20 Std. Funktion gewährleistet. Appliance description (Abb. 1) 1. Griff 2. Tür 3. Glühbirne Innenbeleuchtung 4. Körbe 5. Trennwand 6. Schloß 7. Anzeigeblock 8. Abstandhalter für Transport Gebrauchsanweisung Einstellen der Temperatur Die Temperatur der Tiefkültruhe wird über den Drehknopf Thermostat geregelt (Abb. 4). MAX bedeutet niedrigste Temperatur. Die erzielten Temperaturen können unterschidlich sein, je nach der umgebungstemperatur, Aufstellungsort des Gerätes, Häufigkeit der Öffnung der Tür, Befüllungsgrad mit Lebensmitteln. Die Einstellung an dem Drehknopf Thermostat hat nach diesen kriterien stattzufinden.. Gewöhnlicherweise ist bei einer Außentemperatur von ca C, der Drehknopf auf eine mittlere Stellung zu bringen. Das Anzeigesystem ist an der vorderen Seite des Gerätes angebracht (Abb. 5). Es beinhaltet: 1. Drehknopf Regelung Thermostat - Innentemperatur wird eingestellt 2. LED grün - Bestätigt, daß das Gerät Spannungsversorgung hat. 3. LED rot - Störung - leuchtet auf, wenn die Temperatur im Inneren zu hoch ist. Die LED wird nach dem Einschalten des Gerätes für ca Minuten aufleuchten, danach muß sie aber erlöschen. Sollte die LED während des Betriebes leuchten, deutet dises auf einen Störung hin. 4. TASTE orange schnelles Tieffrieren - beim Druck auf diese Taste leuchtet die orangefarbene LED auf, wodurch das Gerät in den Betriebszustand Schnelles Tieffrieren. Dieser Betriebszustand kann auch unterbrochen werden, wobei die LED erlöscht. Die drei LED liefern die Informationen über den Betriebzustand des Gerätes. 31
37 D Tiefgefrieren von Lebensmitteln Die Tiefkühltruhe dient zur zeitmäßig langen Aufbewahrung von tiefgefrorenen Lebensmitteln. Wichtig für das erfolgreiche Tiefgefrieren der Lebensmittel ist die Verpackung. Anbei die wichtigsten Merkmale einer guten Verpackung für tiefgefrorene Lebensmittel: diese sollten dicht sein, nicht mit den beinhalteten Lebensmitteln reagieren, tiefen Temepraturen standhalten, undurchlässig für Flüssigkeiten, Fette, Wasserdämpfe, Gerüche sein und acuh waschbar sein. Diese Bedingungen werden von folgenden Arten von Verpackungen erfüllt: Folie aus Aluminium oder Kunststoff, Gefäße aus Kunststoff, Gefäße aus Aluminium, Becher auch Wachskarton oder Kunststoff. Wichtig Laden Sie die Tiefkühltruhe nicht auf einmal mit einer zu großen Menge an Lebensmitteln. Die Lebensmittel sollten möglichst schnell un vollständig tiefgefroren werden, da nur auf diese Weise der Vitamingehlat, der Nahrungswert, das Aussehen und der Geschmack erhalten bleiben. Deshalb sollte die Tiefgefrierlesting nicht überschritten werden. Diese ist auf dem Typenschild des Gerätes eingetragen (Seite 34). Um das Tiegefrieren zu beschleunigen, ist die Taste Schnelles Tieffrieren zu drücken. 24 Stuinden nach dem Hinenlegen der Lebensmittel ist das schnelle Tieffrieren zu deaktivieren, indem man erneut die Taste 4 drückt, wodurch auch die orangefarbene LED erlischt. - Beim Tiefgefrieren von frischen Lebensmitteln sind die Körbe in dem Gerät zu verwenden.. - Heiße Lebensmittel sind vor den Tiefgefrieren bis auf Raumtemperaturabkühlen zu lassen. - Frische lebensmittel sollten nicht mit tiefgefrorenen in Berührung kommen. Gebrauchsanweisung - Die tiefgefrorenen Lebensmittel, welche man aus dem Fachhandel bezogen hat, können direkt in die Tiefkühltruhe gelegt werden, ohne daß eine Einstelllung am Thermostat durchzuführen wäre. - Sollte auf der Verpackung nicht das Datum der Tieffrierens eingetragen sein, kann man eine maximale Frist von 3 Monaten in betracht nehmen (als Richtwert). - Lebensmittel, welche nach dem Tiefrieren auch nur teilweise aufgetaut sind, dürfen nicht mehr tiefgefroren werden. Es ist sofort zu gebrauchen oder nach dem Kochen, als Fertigpräparat wieder tiefzufrieren. - Sprudelgetränke sind nicht in der Tiefkühtruhe aufzubewahren. - Bei einem Stromausfall ist die Tür des Gerätes nicht zu öffnen. Tiefgefrorene Lebensmittel sind nicht beeinträchtigt, wenn der Stromausfall nicht länger als 67 Stunden dauert. Empfehlungen für das Enteisen des Gerätes Die Bildung einer Eisschicht ist normal. Die Menge und die Geschwindigkeit der Ablagerung von Eis hängt von der Umgebungstemperatur ab und der Häufigkeit, mit der die Tür geöffnet wird. Wir empfehlen: - die Tiefkühltruhe wenigstens 2 mal im Jahr komplett auftauen zu lassen, odera auch jedes mal wenn die Eisschicht zu dick wrd. - die Enteisung dann durchzuführen, wenn die Menge von Lebensmitteln am geringsten ist. Wenigstens 2 Stunden vor der Enteisung sollte die Taste Schnelles Tiefgefrieren (4) gedrückt werden, damit die Lebensmittel eine möglichst große Menge an Kälte aufnehmen können.. - Trennen Sie das Gerät von dem Netz. - Entnehmen Sie alle tiefgefrorenen Lebensmittel, Wickeln Sie deise in mehrere lagen Papier und legen Sie diese in einen Kühlschrank oder an eine kühlen Ort. 32
38 D - Nehmen Sie die Trennwand und Legen Sie diese unter die Tiefkühltruh, unter die Abflußleitung. Ziehen Sie den Verschlußstopfen. Das abgefangene Wasser wird in die Tafel der Trennwand aufgenommen. Nach dem Schmelzen des Eises un Abtropfen des Wassers, wischen Sie das Gerät mit einem Lappen oder einem Schwamm und trocknen Sie es gut ab. Stecken Sie den Verschlußstopfen zurück in die Ablaufleitung. - Um das Auftauen zu beschleunigen, lassen Sie die Türe offen. Es dürfen niemals spitze metallische Gegenstände für die Entfernung der Eiskruste verwendet werden. Es dürfen nicht Haartrockner (Föne) oder andere gleichartigen Heizgeräte zum beschleunigten Auftauenverwendet werden. Innere Reinigung Vor dem Reinigen schalten Sie das Gerät vom Netz ab. Es ist empfehlenswert, das Gerät bei dem Auftauen auch zu reinigen. Die inneren Flächen werden mit lauwarmem Wasser und einem neutralen Spülmittel gewaschen. Verwenden Sie keine Seife, Waschmittel, Benzin oder Azeton, da sie einen Prägnanten Geruch hinterlassen. Wichen Sie mit einem feuchten Schwamm und wischen Sie mit einem weichen Tuch.. Dabei ist ein Überschuß an Wasser zu vermeiden, um es zu verhindenr, daß dieses in die Wärmeisolation des Gerätes dringt. Dieses könnte zu vermehrter Geruchsentwicklung beitragen. Vermeiden Sie den Wassereintritt in die Kiste der Innenbeleuchtung! Vergessen Sie nicht, auch die Dirchtung der Tür mit einem reinen Lappen zu wischen. 33 Gebrauchsanweisung Äußere Reinigung Die äußeren Bereiche des Gerätes wischen Sie mit einem feuchten Schwamm, in Spülmittellösung getränkt. Die Reinigung der äußeren Teile der Kühlanlage (Motorkompressor, Kondensator, Leitungen) erfolgt mit einer weichen Bürste oder mit dem Staubsauger. Dabei ist zu beachten, daß. Dabei ist Vorsicht zu tragen, um nicht die Leitungen zu verbiegen oder den Leitungssatz zu beschädigen. Es darf kein Reinigungsand oder Scheuermittel verwendet werden! Nach dem Reinigen ist das ganze Zubehör zurück einzubauen. Erneuern der inneren Glübirne Sollte die Glühbirne durchbrennen, trennen sie zu erst das Gerät von dem Netz. Bauen Sie die Lechteinheit aus. Vergewissern Sie sich zu erst, ob dei Brine richtig eingeschraubt war. Schließen Sie das Gerät wieder an. Sollte die Brine trotzdem nicht leuchten, ist sie durch eine vom Typ E14-15W erneuern. Bauen Sie dei Dacheinheit ein. Fehlersuchplan Sollte ihr Gerät nicht funktionieren, dan ist folgendes zu überprüfen: Stromversorgung unterbrochen. Stecker des Anschlußkabels richtig in Steckdose gesteckt. Der Stecker des Anschlußkabels ist richtig in die Steckdose gesteckt. Sicherung durchgebrannt Thermostat auf OFF. Temperatur nicht niedrig genug (rote LED leuchte). Lebensmittel verhidern das vollständige Schließen der Tür. Gerät nicht ordnungsgemäß aufgestellt. Gerät zu nahe an einer Wärmequelle. Thermostatregeldreher nicht in der richtigen Position. Übermäßige Eisbildung Tür nicht richtig geschlossen. Innenbeleuchtung hat keine Funktion. Glühbirne durchgebrannt. Automatischer Schalter in der Tür defekt.
39 D Geräusche im Betrieb Um die eingestellte Temperatur zu halten, muß der Motorkompressor von Zeit zu Zeit starten. Die dabei entstehenden Geräusche sind normal. Sie mindern sobald das Gerät die Betriebtemperatur erreicht hat. Technische Daten Gebrauchsanweisung Summen wird verursacht von dem Motorkompressor. Das Geräusch ist etwas lauter, wenn der Kompressor startet. Gurgeln und Zurren werden vin dem Kältemittel verursacht, wenn dieser durch die Leitungen der Kühlanlage rinnt. Diese Geräusche sind als normale Betriebsgeräusche zu betrachten.. Jedes mal wenn das Thermostat ein- oder ausschaltet, ist ein metallisches Klingeln zu hören. BEKO MARKE MODELL HSA GERÄTETYP HORIZONTALE GEFRIERANLAGE Gesamtvolumen brutto (l) 232 Gesamtvolumen nutz. (l) 230 Tiefgefrierleistung (kg/24 h) 12 Energetische Wirtschaftlichkeitsklasse (1) A++ Energieverbrauch (kwh/an) (2) 169 Selbstfunktion (Std.) 67 Geräusch (db (A) re 1 pw) 41 Kühlmittel R600a (1) Energetische Klasse: A... G (A = wirtschaftlich... G = wenig wirtschaftlich) (2) Der effektive Energieverbrauch ist durch die Betriebsbedingeungen bedingt, sowie durch die Gegebenheiten in der Aufstellung des Gerätes. Bedeutung des Symbols Mülltonne Schonen Sie unsere Umwelt, Elektrogeräte gehören nicht in den Hausmüll. Nutzen Sie die für die Entsorgung von Elektrogeräten vorgesehenen Sammelstellen und geben dort Ihre Elektrogeräte ab die Sie nicht mehr benutzen werden. Sie helfen damit die potenziellen Auswirkungen, durch falsche Entsorgung, auf die Umwelt und die menschliche Gesundheit zu vermeiden. Sie leisten damit Ihren Beitrag zur Wiederverwertung, zum Recycling und zu anderen Formen der Verwertung von Elektro- und Elektronik-Altgeräten. Informationen, wo die Geräte zu entsorgen sind, erhalten Sie über Ihre Kommunen oder die Gemeindeverwaltungen. In vielen Ländern der EU ist die Entsorgung von Elektro- und Elektronik-Altgeräten über den Hausund/oder Restmüll ab verboten. In Deutschland ab
40 FR Instructions d'utilisation Félicitations pour votre choix! Le congélateur que vous avez acheté est un des produits de la marque. Construit conformément aux standards européens et internationaux, cet appareil a été conçu dans le respect de l environnement et la recherche de performances pour vous apporter la plus grande satisfaction. Pour une meilleure utilisation de votre congélateur, nous vous conseillons de lire attentivement cette notice. Recyclage de votre ancien appareil Si l'appareil que vous venez d'acheter remplace un ancien appareil, vous devez tenir compte de ce qui suit pour vous en débarasser. Les anciens appareils ne sont pas des déchets sans valeur. Leur recyclage permet la récupération des matières premières importantes tout en préservant l environnement. Rendez inutilisable votre ancien appareil: - débranchez l'appareil du réseau électrique; - enlevez le cable d'alimentation (coupez-le); - enlevez les éventuels blocages de la porte pour éviter que des enfants puissent restés enfermés dans le congélateur et mettre en danger leurs vies. Les appareils frigorifiques contiennent des materiaux d'isolation et des agents frigorifiques qui ont besoin d'un recyclage adapté. Cet appareil ne sera pas utilisé par des personnes ayant capacites physiques, sensorielles ou mentales réduites, ou sans experience concernant l'utilisation de l'appareil, si une personne responsable de leur sécurité ne les a pas instruites pour ce but. Les enfants doivent être surveillés pour avoir la certitude qu'ils ne jouent pas avec l'appareil. 35
41 FR Recyclage de l'emballage A T T E N T I O N! Ne laissez pas les enfants jouer avec l'emballage. Des pièces de carton ondulé ou film en plastique peuvent provoquer la suffocation. Pour vous parvenir dans de bonnes conditions, l'appareil a été protégé avec un emballage approprié. Tous les matériaux de l'emballage sont compatibles avec l'environnement et recyclables. Respectez la collecte de déchets recyclables, en vous renseignant auprès des authorités locales. Instructions de transport L'appareil doit être transporté, si possible, en position verticale. L'emballage doit être en condition parfaite pendant le transport. Si pendant le transport l'appareil a été placé en position horizontale (conformément aux marquages sur l'emballage), nous vous recommandons de laisser reposer l appreil durant 12 herures avant la mise en fonctionnement, pour permettre la stabilisation du circuit frigorifique. Si ces instructions ne sont pas respectées, cela peut provoquer le déréglage du compresseur et l annualtion de la garantie. Avertissements et conseils I M P O R T A N T! Avant la mise en fonctionnement de l'appareil, lisez attentivement et entièrement ces instructions. Elles contiennent des informations importantes concernant l installation, l'utilisation et l'entretien de l'appareil. Le fabricant se dégage de toute responsabilité si les informations contenues dans ce document ne sont pas respectées. Gardez cette notice dans une place sûre pour le consulter en cas de besoin. Si l appareil est cédé à une tierce personne, cette notice doit accompagner l apppareil. Instructions d'utilisation A T T E N T I O N! Cet appareil doit être utilisé seulement dans le but pour lequel il a été conçu (utilisation domestique), dans des lieux adéquats, loin de la pluie et de l humidité. Ne branchez pas l'appareil si vous avez constaté un défaut. Les réparations doivent être effectuées exclusivement par une personne qualifiée. Dans les situations suivantes nous vous prions de débrancher l'appareil: - quand vous dégivrez complètement l'appareil; - quand vous nettoyez l'appareil. Pour débrancher l'appareil, tirez sur la fiche, non pas le câble! Assurez l'espace minimum entre l'appareil et le mur. Ne montez pas sur l'appareil. Ne permettez pas aux enfants de jouer ou se cacher dans l'appareil. N'utilisez en aucun cas d appareils électriques dans le congélateur pour le dégivrage. N installez pas le congélateur prés des appareils de chauffage, cuisinières ou autres sources de chaleur. Ne laissez pas la porte du congélateur ouverte plus qu'il est nécessaire pour y introduire ou enlever des denrées. Ne laissez pas les denrées dans l'appareil s'il ne fonctionne pas. Ne mettez pas dans le congélateur de produits inflammables ou explosives. Ne mettez pas de boissons acidulées (jus, eau minérale, champagne, etc.) dans le congélateur; la bouteille peut exploser! Ne congelez pas de boissons dans des bouteilles en plastique. Ne mangez pas des cubes de glace ou de la glace immédiatement après les avoir sortis du congélateur. Ne touchez jamais les parties métaliques froides ou les denrées congelées avec les mains humides. Pour la protection de l'appareil pendant le stockage et le transport, il est prevu avec des pièces d'écartement entre la porte et le cabinet (dans la partie avant et arrière). Ces pièces d'écartement seront enlevées avant de mettre l'appareil en fonction. 36
42 FR Instructions d'utilisation L'accumulation excessive de glace sur le cadre et sur les paniers doit être enlevée regulièrement à l'aide de la palette en plastique livrée avec l'appareil. Cette accumulation de glace a pour conséquence l'impossibilité de fermer correctement la porte. Si vous n'utilisez pas votre appareil sur une longue période, nous vous conseillons de procéder comme suit: - débranchez l'appareil; - videz l'appareil; - dégivrez-le et nettoyez-le; - laissez la porte ouverte pour éviter la formation d odeurs désagréables. Le cordon d'alimentation doit être remplacé exclusivement par une personne compétente. Gardez votre appareil fermé à clé et rangez la clé dans un lieu sûr, loin de la portée des enfants. Si vous recyclez un appareil avec une serrure, assurez-vous que le système de blocage soit inutilisable. Cela est très important pour éviter que des enfants puissent rester enfermés dedans. Installation Cet appareil a été conçu pour fonctionner à une température ambiante comprise entre C et C (classe SN/T). Si la température ambiente est supérieure à C, la température peut augmenter à l intérieur l'appareil. Installez l'appareil loin de toute source de chaleur et de feu. L installation dans une chambre chaude ou près d'une source de chaleur (réchauds, cuisinières, fours, etc.), ou encore l'exposition directe aux rayons du soleil vont augmenter la consommation d'énergie et raccourcir la durée de vie du congélateur. Nous vous prions de respecter les distances minimales suivantes (figure2): 100 cm des cuisinières à charbons ou a l'huile; 150 cm des cuisinieres électriques ou a gaz. Mettez sur le condenseur (dans la partie arrière) les limiteurs livrés avec l'appareil. (figure 3). Installez l'appareil sur un sol parfaitement plan et horizontal dans un lieu sec et bien aéré. Montez les accessoires livrées. 37 Raccordement au réseau électrique Votre appareil est conçu pour fonctionner à une tension monophasique de V / 50 Hz. Avant de brancher l'appareil, vérifiez que les paramètres du réseau de votre maison (tension, type de courant, fréquence) correspondent aux paramètres de fonctionnement de l'appareil. Les informations concernant la tension d'alimentation et la puissance se trouvent sur la plaque signalétique située dans la partie arrière du congélateur. L'installation électrique doit être conforme à la réglementation. La mise à la terre de l'appareil est obligatoire. Le fabricant ne peut être tenu pour responsable de tout incident sur les personnes, animaux ou biens, si ces conditions ne sont pas respectées. L'appareil est muni d un cordon d'alimentation et d une fiche (type européen, marque 10/16A) avec un contact double de mise a la terre pour sécurité. Si la prise de courant n'est pas du même type que la fiche, nous vous recommandons de la faire remplacer par un électricien. N'utilisez pas de rallonge ou multiprise. La mise hors tension de l'appareil doit être possible en débranchant la fiche de la prise de courant ou par un interrupteur de réseau a deux pôles placé avant la prise. Mise en fonctionnement Avant la mise en fonctionnement, nettoyez l'intérieur de l'appareil (voir le chapitre Nettoyage"). Branchez l'appareil, et réglez le bouton du thermostat à une position moyenne. Les voyants verts et rouges du bloc de signalisation doivent s'allumer. Laissez l'appareil fonctionner pendant environ 2 heures sans y mettre de denrées. La congélation des denrées fraîches est possible après un minimum de 20 heures de fonctionnement.
43 FR Instructions d'utilisation Description de l'appareil (fig. 1) 1 - Poigné de porte 2 - Porte 3 - Lampe 4 - Paniers 5 - Panneau de séparation 6 - Serrure 7 - Signalisations 8 - Écarteur pour le transport Fonctionnement du congélateur Réglage de la température Le réglage de la température du congélateur se fait au moyen du bouton du thermostat (fig. 4), MAX étant la position pour une température la plus basse possible. La température peut varier en fonction des conditions d'utilisation de l'appareil, comme la place de l'appareil, la température ambiante, la fréquence d'ouverture de la porte ou le niveau de remplissage. Positionnez le bouton du thermostat en tenant compte de ces facteurs, afin que la température interne reste inférieure ou égale à -18 C. Le dispositif de signalisation se trouve à l avant du congélateur (fig. 5). 1. Bouton de réglage du thermostat 2. Voyant vert indique que l'appareil est sous tension. 3. Voyant rouge s'allume si la température dans le congélateur est trop élevée. A la mise en fonctionnement, le voyant s allume 15 à 45 minutes après. Il s'éteint lorsque l appareil atteint une température de fonctionnement normale. 4. Bouton orange congélation rapide. En appuyant sur ce bouton, vous sélectionnez un mode de focntionnement qui permettra à l appareil d atteindre plus rapidement la température de réglage. Le voyant orange indique ce mode est actif. Appuyez à nouveau sur ce bouton pour arrêter le mode de congélation rapide. 38 Conseils pour la conservation des denrées Le congélateur sert à conserver les denrées congelées pour une longue periode de temps, ainsi que pour congeler les denrées fraîches. Un des éléments principaux pour une bonne congélation des denrées est l'emballage. L'emballage doit être imperméable à l'air, aux liquides, graisses, vapeur d'eau et odeurs. Elle doit également être inerte pour les denrées emballées et resistante à des températures basses. I M P O R T A N T! - Pour placer les denrées fraîches, utilisez les paniers livrés avec l'appareil. - Ne mettez pas dans le congélateur une quantité trop importante de denrées à la fois. La conservation des denrées est meilleure si elles sont congelées en profondeur et rapidement. Nous vuos recommandons de ne pas dépasser la capacité de congélation de l'appareil, indiquée dans les "caractéristiques techniques" (page 41). Pour réduire le temps de congélation, appuyez le bouton orange de congélation rapide. - Les denrées fraîches ne doivent pas entrer en contact avec les denrées déjà congelées. - Les denrées congelées achetées en magasin peuvent être mises dans le congélateur sans toucher au réglage du thermostat. - Si la date de congélation n'est pas indiquée sur l'emballage, nous vous conseillons de considérer une période maximale de 3 mois pour la conservation. - Les denrées, même partiellement décongélées, ne peuvent pas être congélées à nouveau. Elles doivent être consomées immédiatement ou préparées et ensuite congelées.
44 FR - En cas d'interruption du courant, n'ouvrez pas la porte de l'appareil. Les denrées congelées ne seront pas affectées si l'interruption dure moins de 67 heures. N ' O U B L I E Z P A S! 24 heures après l'introduction des denrées, annulez le mode de "congélation rapide". Instructions d'utilisation Dégivrage de l'appareil Nous vous conseillons de dégivrer le congélateur au moins deux fois par an, ou quand la couche de glace est trop epaisse. La formation de glace est un phénomène normal. La quantité et la rapidité de formation de la glace dépend des conditions ambiantes et de la fréquence d'ouverture de la porte. Nous vous conseillons de dégivrer l'appareil quand la quantité de denrées est la faible. Avant le dégivrage, réglez le bouton du thermostat dans une position supérieure, pour permettre aux denrées d'accumuler plus de froid. Débranchez l'appareil. Enlevez les denrées congelées, enveloppez-les dans plusieurs feuilles de papier et mettez-les dans un réfrigérateur ou autre place froide. Prenez le panneau de separation et mettez-le sous le congélateur dans la direction du tube d'écoulement. Enlevez le bouchon d'obturation. L'eau qui resulte sera collectée dans le plateau special (paneau separateur). Après la fonte de la glace et l'ecoulement de l'eau, nous vous prions de l'essuyer avec un chiffon ou une eponge, ensuite sechez bien. Mettez a sa place le bouchon d'obturation (Item. 6) Pour une fonte rapide, laissez la porte ouverte. N'employez pas des objets métalliques pointus pour enlever la glace. N'utilisez pas de séchoirs éélectriques ou d'autres appareils de chauffage pour le dégivrage. 39
45 FR Nettoyage de l intérieur Avant de commencer le nettoyage, débranchez l'appareil. Nous vous recommandons de nettoyer l'appareil quand vous le dégivrez. Nettoyez l'intérieur avec de l'eau tiède et du détergent neutre. N'utilisez pas du savon, du détergent, de l essence, de l acétone au tout autre nettoyant qui pourrait laisser une odeur persistante. Nettoyez avec une éponge humide et essuyez avec un chiffon mou. Durant cette opération, évitez l'excès d'eau. L eau peut s introduire dans l'isolation thermique de l'appareil et provoquer des odeurs désagréables. N'oubliez pas de nettoyer aussi le joint de la porte, et en particulier les nervures du soufflet avec un chiffon propre. Nettoyage de l extérieur Nettoyez l'extérieur du congélateur à l aide d une éponge avec de l'eau chaude et du savon. Essuyez ensuite avec un chiffon mou et sec. Le nettoyage de la partie exterieure du circuit frigorifique (compresseur, condenseur, tubes de connection) sera fait avec une brosse molle ou avec l'aspirateur. Pendant cette opération, nous vous prions de faire attention de ne pas deformer les tubes ou détacher les cables. N'utilisez pas de poudres abrasives! Après avoir fini le nettoyage, mettez les accessoires à leurs places et branchez l'appareil. Instructions d'utilisation Dysfonctionnements L'appareil ne fonctionne pas L'alimentation électrique a été coupée. La fiche du câble d'alimentation n'est pas bien introduite dans la prise de courant. Le fusible a sauté. Le thermostat est en position OFF. Les températures ne sont pas assez basses (le vo yant rouge s'allume) Les denrées empêchent la porte de se fermer. L'appareil n'est pas placé correctement. L'appareil est placé trop près d'une source de chaleur. Le bouton du thermostat n'est pas dans la position correcte. Formation excessive de glace La porte n'a pas été bien fermée. L'éclairage intérieure ne fonctionne pas La lampe est grillée. Procédez à son remplaement comme indiqué plus haut. Remplacement de la lampe Si la lampe est grillée, débranchez l'appareil. Détachez l'ornement de la lampe. Assurezvous que la lampe soit vissée correctement. Branchez l'appareil. Si la lampe ne s'allume pas, remplacez-la avec une autre, modèle E14-15W. Mettez l'ornement de la lampe a sa place. 40
46 FR Bruits pendant le fonctionnement Pour maintenir la température à la valeur que vous avez reglée, le compresseur de l'appareil se met en marche périodiquement Les bruits que vous entendez dans cette situation sont normaux. Ils diminuent en intensité à mesure que l'appareil atteint la température de fonctionnement. Le bruit de bourdonnement est dû au compresseur. Il peut devenir un peu plus fort quand le compresseur démarre. Les cliquetis de l'agent frigorifique qui circule dans les tubes de l'appareil, sont des bruits normaux. Instructions d'utilisation A t t e n t i o n! N'essayez jamais de réparer vous-même l'appareil ou tout composant électrique. Toute réparation effectuée par une personne qui n'est pas autorisée est dangereuse pour l'utilisateur et peut avoir comme conséquence l annulation de la garantie. Caractéristiques techniques MARQUE MODELE HSA TYPE D'APPAREIL CONGÉLATEUR HORISONTAL Volume brut (l) 232 Volume utile (l) 230 Capacité de congélation (kg/24 h) 12 Classe énergetique (1) A++ Consommation d'énergie (kwh/an) (2) 169 Autonomie (heures) 67 Bruit (db (A) re 1 pw) 41 Agent frigorifique ecologique R600a (1) Classes d'energie: A++... G (A++ = très economique... G = moins economique) (2) La consommation réelle d électricité dépend des conditions d'utilisation et de l'emplacement de l'appareil. Recyclage Ce produit est marqué du symbole du tri sélectif, relatif aux déchets d'équipements électriques et électroniques. Cela signifie que ce produit doit être pris en charge par un système de collecte sélectif conformément à la directive européenne 2002/96/CE, afin de pouvoir être recyclé ou démantelé dans le but de réduire tout impact sur l'environnement. Attention les produits électroniques n'ayant pas fait l'objet d'un tri sélectif sont potentiellement dangereux pour l'environnement et la santé humaine en raison de la présence potentielle de substances dangereuses. 41

47
CHEST FREEZER HS225523
 CHEST FREEZER HS225523 WARNING! In order to ensure a normal operation of your refrigerating appliance, which uses a completely environmentally friendly refrigerant the R600a (flammable only under certain
Chest Freezer HSA46330
 Chest Freezer HSA46330 WARNING! In order to ensure a normal operation of your refrigerating appliance, which uses a completely environmentally friendly refrigerant the R600a (flammable only under certain
HSA24530 GB FR LV LT SL SK. Instruction for use. Instructions d utilisation. Lietošanas instrukcija. Naudojimosi instrukcija. Navodila za uporabo
 HSA24530 GB FR LV LT SL SK Instruction for use Instructions d utilisation Lietošanas instrukcija Naudojimosi instrukcija Navodila za uporabo Návod na používanie WARNING! In order to ensure a normal operation
HOW TO OPERATE THE FREEZER COMPARTMENT PAGE 15 HOW TO DEFROST THE FREEZER COMPARTMENT PAGE 17
 GB CONTENTS BEFORE USING THE REFRIGERATOR PAGE 13 SAFEGUARDING THE ENVIRONMENT PAGE 13 PRECAUTIONS AND GENERAL RECOMMENDATIONS PAGE 14 HOW TO OPERATE THE REFRIGERATOR COMPARTMENT PAGE 15 HOW TO OPERATE
HOW TO OPERATE THE FREEZER COMPARTMENT PAGE 17 HOW TO DEFROST THE FREEZER COMPARTMENT PAGE 19
 33056-GB.fm5 Page 13 Saturday, January 16, 1999 8:47 AM TABLE OF CONTENTS GB BEFORE USING THE APPLIANCE PAGE 14 SAFEGUARDING THE ENVIRONMENT PAGE 14 PRECAUTIONS AND GENERAL HINTS PAGE 15 HOW TO OPERATE
User manual. Fridge Freezer ZRT18100WA
 EN User manual Fridge Freezer ZRT18100WA Contents Safety instructions 2 Before first use 4 Daily use _ 4 Hints and tips _ 5 Safety instructions Before the installation and use of the appliance, carefully
User Manual. Chest Freezer ZFC26500WA
 EN User Manual Chest Freezer ZFC26500WA Contents Safety information 2 Safety instructions 3 Operation 5 Before first use 5 Daily use 5 Hints and tips 6 Care and cleaning 7 Troubleshooting 8 Installation
UPRIGHT FREEZER FSA14921
 UPRIGHT FREEZER FSA14921 GB Index Safety first /1 Electrical requirements /2 Transportation instructions /2 Installation instructions /2 Temperature control and adjustment /3 Before operating /3 Freezer
HOW TO USE THE FREEZER COMPARTMENT PAGE 16
 33051-gb.fm5 Page 12 Tuesday, December 22, 1998 3:52 PM GB CONTENTS BEFORE USING THE APPLIANCE PAGE 13 SAFEGUARDING THE ENVIRONMENT PAGE 13 PRECAUTIONS AND GENERAL RECOMMENDATIONS PAGE 14 HOW TO USE THE
USING THE REFRIGERATOR COMPARTMENT
 USING THE REFRIGERATOR COMPARTMENT Switching the appliance on Starting the appliance Insert the plug. The light, located under the control panel or inside the product (depending on model) comes on when
Contents. For your safety About your product Installing your appliance Using your appliance Care & cleaning...
 USER GUIDE TF5517S Contents For your safety..................................................... 1 About your product.................................................. 3 Installing your appliance...............................................
BEFORE USING THE REFRIGERATOR PAG. 9 PROTECTING THE ENVIRONMENT PAG. 9 PRECAUTIONS AND GENERAL SUGGESTIONS PAG. 9
 GB CONTENTS BEFORE USING THE REFRIGERATOR PAG. 9 PROTECTING THE ENVIRONMENT PAG. 9 PRECAUTIONS AND GENERAL SUGGESTIONS PAG. 9 HOW TO USE THE REFRIGERATOR COMPARTMENT PAG. 10 HOW TO USE THE LOW TEMPERATURE
Index BEFORE USING THE APPLIANCE Safety Instructions... 2 Recommendations... 3 Switching On the Appliance... 4 HOW TO OPERATE THE FREEZER...
 Index BEFORE USING THE APPLIANCE... 2 Safety Instructions... 2 Recommendations... 3 Switching On the Appliance... 4 HOW TO OPERATE THE FREEZER... 5 Thermostat Setting... 5 Display Panel... 5 FOOD STORAGE
PRODUCT DESCRIPTION CONTROLS
 PRODUCT DESCRIPTION A. Refrigerator Compartment 1. Crisper drawer 2. Shelves / Shelf area 3. Thermostat control knob/light 4. Door trays 5. Bottle rack 6. Removable bottle restraint 7. Rating plate (at
LEC L6014W/S User Manual
 LEC L6014W/S User Manual Safety Information Important Please read these instructions fully before installation Before use The installation of this appliance is best carried out by 2 people. Dispose of
User Instruction &)+ 4: CFH110QB
+ 4: CFH110QB") User Instruction &)+ 4: CFH110QB 10 Safety Information In the interest of your safety and to ensure the correct use, before installing and first using the appliance, read this user manual carefully, including
User Instruction &)+ 4: CFH110QB 10 Safety Information In the interest of your safety and to ensure the correct use, before installing and first using the appliance, read this user manual carefully, including
Bauknecht AG, Industriestrasse 36, 5600 Lenzburg,
 Instructions for use UVI 1340/A Bauknecht AG, Industriestrasse 36, 5600 Lenzburg, www.bauknecht.ch Verkauf Telefon 0848 801 002 Fax 0848 801 017 verkauf@bauknecht.ch Kundendienst Telefon 0848 801 001 Fax
User manual. Chest Freezer ZFC627WAP
 EN User manual Chest Freezer ZFC627WAP Contents Safety instructions 2 Operation _ 4 Control panel _ 4 First use 5 Daily use 5 Helpful hints and tips _ 5 Safety instructions Care and cleaning _ 6 What to
User Manual. Refrigerator ZRG16605WA
 EN User Manual Refrigerator ZRG16605WA Contents Safety information 2 Safety instructions 3 Operation 4 First use 5 Daily use 5 Hints and tips 5 Care and cleaning 6 Troubleshooting 7 Installation 9 Technical
to give you service for many years. CHEST FREEZER CFA1300W PERFORMANCE
 Congratulations on your choice of a to give you service for many years. quality Appliance which has been designed WARNING! This appliance is not intended for use by person with reduced physical, sensory
55CM Wide Freestanding Under Counter Freezer Instruction Manual
 55CM Wide Freestanding Under Counter Freezer Instruction Manual Model Number: RHUCFZ1 Please read these instructions carefully and keep them for future reference For Customer Services, Spare Parts & Manufacturer
IMPORTANT: RETAIN FOR FUTURE REFERENCE
 FREESTANDING TABLE TOP LARDER FRIDGE USER S GUIDE Model number: RHTTLF1/RHTTLF1B For Customer Services & Spare Parts please call 0845 208 8750 Opening times: Monday - Friday 8am IMPORTANT: RETAIN FOR FUTURE
For Models FF2310APS, FF2310APW, FF2310APB 55cm FREESTANDING FRIDGE FREEZER. Instruction Manual
 For Models FF2310APS, FF2310APW, FF2310APB 55cm FREESTANDING FRIDGE FREEZER Instruction Manual Please read these instructions carefully before use and retain for future reference. Before switching on your
Built-under fridge with ice box instruction manual RBR6. Contact Caple on or for spare parts
 Built-under fridge with ice box instruction manual RBR6 Contact Caple on 0117 938 7420 or for spare parts www.caple.co.uk CONTENTS Warnings 3 Installation warnings 7 Before using your fridge 10 How to
1. SAFETY WARNINGS INSTALLTION Location Reversing the Door Swing Levelling the Unit... 3
 Contents 1. SAFETY WARNINGS... 1 2. INSTALLTION... 2 2.1 Location... 2 2.2 Reversing the Door Swing... 2 2.3 Levelling the Unit... 3 2.4 Cleaning Before Use... 3 2.5 Before Using Your Unit... CE BC108
User manual. Freezer ZFT10210WA
 EN User manual Freezer ZFT10210WA Contents Safety instructions 2 Control panel _ 4 First use 5 Daily use _ 6 Helpful Hints and Tips 6 Safety instructions Care and cleaning 7 What to do if 8 Technical data
User Manual. Freezer ZFT11112WE
 EN User Manual Freezer ZFT11112WE Contents Safety information 2 Safety instructions 3 Operation 4 First use 6 Daily use 6 Hints and tips 6 Care and cleaning 7 Troubleshooting 9 Installation 10 Technical
Whirlpool Switzerland, Bauknecht AG, Industriestrasse 36, 5600 Lenzburg,
 Instructions for use ARC 5200 Whirlpool Switzerland, www.whirlpool.ch Bauknecht AG, Industriestrasse 36, 5600 Lenzburg, www.bauknecht.ch Verkauf Telefon 0848 801 002 Fax 0848 801 017 verkauf@bauknecht.ch
REFRIGERAT A OR USE DF1-15 F ridge
 REFRIGERATOR USE DF1-15 Fridge BEFORE USING THE APPLIANCE. Your new appliance is designed exclusively for domestic use. To ensure best use of your appliance, carefully read the operating instructions which
User manual. Freezer ZFU23400WA
 EN User manual Freezer ZFU23400WA Contents Safety instructions 2 Product description _ 4 Control panel _ 5 Daily use _ 5 First use 6 Helpful hints and tips _ 6 Safety instructions Care and cleaning 7 Troubleshooting
RCB53724MW RCB53724MX RCB53724VW RCB53724VX. User Manual Fridge Freezer USER MANUAL
 RCB53724MW RCB53724MX RCB53724VW RCB53724VX EN User Manual Fridge Freezer USER MANUAL 2 www.aeg.com CONTENTS 1. SAFETY INFORMATION... 2 2. SAFETY INSTRUCTIONS...4 3. CONTROL PANEL... 6 4. DAILY USE...
Notice d'utilisation. Benutzerinformation. Gebruiksaanwijzing User Manual. Weinkühlschrank-/ Wijnkelder Vriezer. Cave à vin et congélateur
 Gebruiksaanwijzing User Manual Notice d'utilisation Benutzerinformation Wijnkelder Vriezer Wine Cellar Freezer Cave à vin et congélateur Weinkühlschrank-/ Gefrierschrankkombination WF354LX 16 CONTENTS
ABE68821LS. User Manual Freezer USER MANUAL
 ABE68821LS EN User Manual Freezer USER MANUAL 2 www.aeg.com CONTENTS 1. SAFETY INFORMATION... 2 2. SAFETY INSTRUCTIONS...4 3. OPERATION...5 4. DAILY USE... 7 5. HINTS AND TIPS...7 6. CARE AND CLEANING...8
This handbook is designed to help you through each step of owning your new appliance, from installation to use.
 USER GUIDE U50262W Thank you for buying this high quality appliance This handbook is designed to help you through each step of owning your new appliance, from installation to use. Please read through
Bar Fridge USER MANUAL MB46W
 Bar Fridge USER MANUAL MB46W CONTENTS Safety information... 2-3 Identifying parts of the fridge... 4 Transporting... 5 Installation... 5 Reversing the door... 6 Operating instructions... 7 Cleaning &
FELIX STORCH, INC. SUMMIT APPLIANCE DIVISION
 FELIX STORCH, INC. SUMMIT APPLIANCE DIVISION INSTRUCTION MANUAL FOR MODEL: FFAR-10 Thank you for your trust and for buying this appliance. It s designed to refrigerate your fresh foods, while adding an
Instruction Manual 1.1 CU. FT. Upright Freezer UF-114W (WHITE) UF-114SS (STAINLESS STEEL)
 UF-114SS (STAINLESS STEEL)") Instruction Manual 1.1 CU. FT. Upright Freezer UF-114W (WHITE) UF-114SS (STAINLESS STEEL) SAFETY WARNINGS 1) WARNING Keep ventilation openings, in the appliance enclosure or in the built-in structure,
Instruction Manual 1.1 CU. FT. Upright Freezer UF-114W (WHITE) UF-114SS (STAINLESS STEEL) SAFETY WARNINGS 1) WARNING Keep ventilation openings, in the appliance enclosure or in the built-in structure,
Chest Freezer Instruction Manual
 Chest Freezer Instruction Manual Model number: RHCF200 IMPORTANT: RETAIN FOR FUTURE REFERENCE Contents Safety Instructions. 3-4 Electrical Safety. 4 Before switching on. 5 Unit & Spare Parts. 5 Transportation
KF Fridge / Freezer User Guide
 KF3135-90 Fridge / Freezer User Guide Please read this manual first! Dear Customer, Your product has been produced in modern plants and checked under the most meticulous quality control and we hope that
Thank you for buying this refrigerator-freezer. To ensure that you get the best
 Dear customer: Thank you for buying this refrigerator-freezer. To ensure that you get the best results from your new refrigerator-freezer, please take time to read through the simple instructions in this
Built-under larder fridge instruction manual RBL4. Contact Caple on or for spare parts
 Built-under larder fridge instruction manual RBL4 Contact Caple on 0117 938 7420 or for spare parts www.caple.co.uk CONTENTS Warnings 3 Installation warnings 7 Before using your fridge 10 How to operate
AGN58210F0 FREEZER USER MANUAL
 AGN58210F0 FREEZER USER MANUAL 2 CONTENTS 4 SAFETY INFORMATION 7 PRODUCT DESCRIPTION 8 CONTROL PANEL 10 FIRST USE 11 DAILY USE 12 HELPFUL HINTS AND TIPS 13 CARE AND CLEANING 15 WHAT TO DO IF 17 INSTALLATION
JLCH200 JLCH300 JLCH400 Chest Freezer. Instruction manual
 JLCH200 JLCH300 JLCH400 Chest Freezer Instruction manual Safety information It is most important that this instruction book should be retained with the appliance for future reference. Should the appliance
HR6BF170R HR6BF170B HR6BF170G
 HR6BF170R HR6BF170B HR6BF170G 9 Hisense Refrigerator Do not place food products directly against the air outlet on the rear wall. Store pre-packed frozen food in accordance with the frozen food manufacture
PC87 American Style Double Door Fridge Freezer Manual for Installation, Use and Maintenance
 PC87 American Style Double Door Fridge Freezer Manual for Installation, Use and Maintenance 1 Customer Care Department The Group Ltd. Harby Road Langar Nottinghamshire NG13 9HY T : 01949 862 012 F : 01949
BEFORE USING THE APPLIANCE
 BEFORE USING THE APPLIANCE. Your new appliance is designed exclusively for domestic use. To ensure best use of your appliance, carefully read the operating instructions which contain a description of the
LARDER Instruction booklet
 TM LARDER Instruction booklet RTL266WHA+ Index BEFORE USING YOUR FRIDGE... 2 General warnings... 2 Old and out-of-order fridges... 4 Safety warnings... 4 Installing and Operating your Fridge... 5 Before
HOW TO OPERATE THE REFRIGERATOR COMPARTMENT
 HOW TO OPERATE THE REFRIGERATOR COMPARTMENT Switching on the appliance 1. Plug in the appliance 2. When the appliance is plugged in, it is normally factory set to a temperature of 5 C. Adjusting the temperature
User manual. Freezer ZFU25200WA
 EN User manual Freezer ZFU25200WA Contents Safety instructions 2 Product description _ 5 Control panel _ 5 Daily use _ 6 First use 7 Helpful hints and tips _ 7 Safety instructions Care and cleaning 8 Troubleshooting
User manual. Freezer ZFT11110WA
 EN User manual Freezer ZFT11110WA Contents Safety instructions 2 Control panel _ 4 First use 6 Daily use _ 6 Helpful Hints and Tips 6 Safety instructions Care and cleaning 7 What to do if 8 Technical data
ERY1201FOW. EN Refrigerator User Manual
 ERY1201FOW EN Refrigerator User Manual 2 www.electrolux.com CONTENTS 1. SAFETY INFORMATION...2 2. SAFETY INSTRUCTIONS...4 3. INSTALLATION... 6 4. OPERATION...7 5. DAILY USE... 8 6. HINTS AND TIPS... 9
CHEST FREEZER USER GUIDE LEC CF61LW
 CHEST FREEZER USER GUIDE LEC CF61LW Thank you for buying this high quality appliance This handbook is designed to help you through each step of owning your new appliance, from installation to use. Please
Argos Value Tabletop Fridge
 Argos Value Tabletop Fridge Installation & User Instructions Please keep for future reference 481/0423 Important Please read these instructions fully before installing or using These instructions contain
EC2200AEW EN CHEST FREEZER USER MANUAL
 EC2200AEW...... EN CHEST FREEZER USER MANUAL 2 www.electrolux.com CONTENTS 1. SAFETY INSTRUCTIONS.................................................. 3 2. PRODUCT DESCRIPTION.................................................
FELIX STORCH, INC. SUMMIT APPLIANCE DIVISION
 FELIX STORCH, INC. SUMMIT APPLIANCE DIVISION INSTRUCTION MANUAL FOR MODEL(S): All Variations of the FF-6 All Variations of the FF-7 & All Variations of the SCR-600L/SCR-600BL ALL-REFRIGERATOR Write the
User Manual Freezer AGN58220F1
 EN User Manual Freezer AGN58220F1 2 www.aeg.com CONTENTS 1. SAFETY INFORMATION...3 2. SAFETY INSTRUCTIONS... 4 3. OPERATION... 6 4. FIRST USE... 7 5. DAILY USE...7 6. HINTS AND TIPS... 8 7. CARE AND CLEANING...
Gebruiksaanwijzing. Notice d'utilisation. Benutzerinformation. User manual. Kühlschrank. Refrigerator. Réfrigérateur. Koelkast IKU1590-1
 User manual Notice d'utilisation Gebruiksaanwijzing Benutzerinformation Koelkast Refrigerator Réfrigérateur Kühlschrank IKU1590-1 12 Contents Safety information 12 Operation 14 First use 14 Daily use 14
FROST FREE FRIDGE FREEZER INSTRUCTION MANUAL. Model No.: PRT260FFSL/ PRT260FFW
 FROST FREE FRIDGE FREEZER INSTRUCTION MANUAL Model No.: PRT260FFSL/ PRT260FFW This booklet contains the information you will require to install and operate your new appliance. It is important and worthwhile
CFA 350 A+ GB IT LV. Instruction for use. Istruzioni per l'uso. Lietošanas instrukcija
 CFA 350 A+ GB IT LV Instruction for use Istruzioni per l'uso Lietošanas instrukcija WARNING! In order to ensure a normal operation of your refrigerating appliance, which uses a completely environmentally
User Manual FRCF185W CONTENTS. Safety information...2 Safety instructions... 4 Product description...6 Operation...7 Daily use...9
 User Manual FRCF185W Safety information...2 Safety instructions... 4 Product description...6 Operation...7 Daily use...9 CONTENTS Care and cleaning... 11 Hints and tips...12 Troubleshooting...13 Installation...
Instruction Manual Refrigerator-freezer
 Instruction Manual Refrigerator-freezer MODEL:EFD635SX Please read carefully before using our products. Please keep this operation instruction properly for future reference. INFORMATION ON ENVIRONMENT
CONTENTS SAFETY INFORMATION. Electrical connection 6. Safety information 1. Environmental concerns. Customer service and spare parts
 CONTENTS Safety information 1 Control panel 3 Operation 3 Maintenance Customer service and spare parts 5 6 SAFETY INFORMATION It is most important that this instruction book should be retained with the
ENN2801EOV. EN Fridge Freezer User Manual
 ENN2801EOV EN Fridge Freezer User Manual 2 www.electrolux.com CONTENTS 1. SAFETY INFORMATION...2 2. SAFETY INSTRUCTIONS...4 3. OPERATION...6 4. DAILY USE... 6 5. HINTS AND TIPS... 8 6. CARE AND CLEANING...9
Double Door - Dual Zone Wine Cooler
 THE PERFECT BALANCE OF FUNCTION, STYLE AND RELIABILITY LAUNDRY - DISHWASHING - COOKING - COOLING Installation and Operating Manual Double Door - Dual Zone Wine Cooler WS38SDDX Stainless Steel Please read
Operating Instructions REFRIGERATOR/FREEZER COMBINATION
 LEX85 XX X LECO85 XXX X English Operating Instructions REFRIGERATOR/FREEZER COMBINATION Operating Instructions, 1 Assistance, 2 Description of the appliance, 3 Reversible doors, 8 Installation, 4 Start-up
70/30 Integrated Fridge-Freezer
 70/30 Integrated Fridge-Freezer User & Installation Guide LAM6800 Please read this manual first! Dear Customer, Congratulations on your choice of a LAMONA quality Appliance which has been designed to give
INSTRUKCIJA ŠALDYTUVAS / ŠALDIKLIS CA 55, BAN; BAAN; BAAAN- 10; 12; 13; 14; 34 VT TURINYS
 INSTRUKCIJA ŠALDYTUVAS / ŠALDIKLIS CA 55, BAN; BAAN; BAAAN- 10; 12; 13; 14; 34 VT TURINYS MONTAVITAS 2 Pastatymas ir sujungimai 2 Apsukamos durys 2 PRIETAISO APRAŠYMAS 3 Bendras vaizdas 3 PRIEDAI 4 PALEIDIMAS
Refrigerator. Thank you for your trust and for buying this appliance. We hope it will successfully serve the purpose for many years.
 Refrigerator EN Thank you for your trust and for buying this appliance. We hope it will successfully serve the purpose for many years. Refrigerator is for domestic use only and is intended for storing
48cm UNDER COUNTER FRIDGE INSTRUCTION MANUAL. MODEL No.: PF120WD
 48cm UNDER COUNTER FRIDGE INSTRUCTION MANUAL MODEL No.: PF120WD Please read this instruction manual carefully before operation Keep these instructions in a safe place for future reference CONTENTS Part
User Manual Refrigerator SKS58210F1
 EN User Manual Refrigerator SKS58210F1 2 www.aeg.com CONTENTS 1. SAFETY INFORMATION...3 2. SAFETY INSTRUCTIONS... 4 3. OPERATION... 5 4. FIRST USE... 6 5. DAILY USE...6 6. HINTS AND TIPS... 7 7. CARE AND
User Manual Fridge Freezer SCS51813F1
 EN User Manual Fridge Freezer SCS51813F1 2 www.aeg.com CONTENTS 1. SAFETY INFORMATION...3 2. SAFETY INSTRUCTIONS... 4 3. OPERATION... 6 4. FIRST USE... 7 5. DAILY USE...7 6. HINTS AND TIPS... 8 7. CARE
HR6BMFF320 HR6BMFF320S
 HR6BMFF320 HR6BMFF320S 2 3 5 7 8 10 10 12 14 16 Brief introduction Thank you for your choosing our products. We are sure you will find your new appliance a pleasure to use. Before you use the appliance,
Instruction / Installation Manual. Fridge Freezer LFC60W13
 Instruction / Installation Manual Fridge Freezer LFC60W13 Contents Safety Warnings... 3 Unpacking... 5 Installation... 6 Location...6 Levelling the Unit...6 Installing the Spacers...6 Free Space Requirements...6
Operating Instructions FREEZER
 UIAA 1x (UK).1 UIAA 1x x (UK).1 English Operating Instructions FREEZER Operating Instructions, 1 Assistance, 2 Description of the appliance, 3 Reversible doors, 4 Installation, 5 Start-up and use, 5 Maintenance
FRIDGE FREEZER USER MANUAL
 FRIDGE FREEZER USER MANUAL HD-220RWN HD-220RWNS Issue 2-03/05/10 Safety Warning For your own safety, please read all instructions before use and keep for future reference. General safety This manual contains
CZ51202 Larder fridge
 CZ51202 Larder fridge USER INSTRUCTIONS Please read these instructions carefully before using this product and keep them safe for future reference. Page contents Before use................................................2
Instruction Manual. Refrigerator. Model: HS-65L
 Instruction Manual Refrigerator Model: HS-65L General This refrigerator is widely used in places such as hotels,offices, student dormitories and houses. It is small size, lightweight, low electric consumption
Instruction Manual. Chest Freezer Model: CF.142L
 Instruction Manual Chest Freezer Model: CF.142L CONTENTS Safety warnings Meaning of safety warning symbols 1 Electricity related warnings 2 Related warnings for use 2 Warnings related to placing items
FR-031DDRVBE1 FR-031DDRVWE
 FR-031DDRVBE1 FR-031DDRVWE Contents 1. SAFETY WARNINGS... 1 2. INSTALLTION... 2 2.1 Location... 2 2.2 Reversing the Door Swing... 2 2.3 Door Space Requirements... 3 2.4 Levelling the Unit... 4 2.5 Cleaning
Lemair. Model FR-90V INSTRUCTION MANUAL. 82L freezer
 Lemair Model FR-90V 82L freezer INSTRUCTIN MANUAL Thank you for your purchase of this Freezer. This instruction manual explains the features and functions of the device. There is a troubleshooting section
USER GUIDE R5010W/R5010B R5510W/R5510B/R5510S
 USER GUIDE R5010W/R5010B R5510W/R5510B/R5510S Introduction Thank you for buying this high quality appliance! This handbook is designed to help you through each step of owning your new appliance, from installation,
Glass Table Top Fridge Instruction Manual
 Glass Table Top Fridge Instruction Manual Model number(s): RHGWC1 (B) (R) & RHGWC3SS IMPORTANT: RETAIN FOR FUTURE REFERENCE Contents Safety Instructions. 3-4 Electrical Safety. 4 Transportation & Handling.
FRIDGE-FREEZER USER S MANUAL TFP120A
 FRIDGE-FREEZER USER S MANUAL TFP120A PLEASE READ THIS USER S OPERATION MANUAL CAREFULLY BEFORE USING NAMES OF PARTS Freezer compartment Freezer door Thermostat and lamp assembly Door racks Glass shelves
ST NF60188W ST NF60188STA
 ST NF60188W ST NF60188STA Contents Safety Warnings... 4 Unpacking... 6 Installation... 7 Location... 7 Levelling the Unit... 7 Free Space Requirements... 7 Reversing the Door Swing... 8 Cleaning Before
FR-1020ARW FR-1020ARS
 FR-1020ARW FR-1020ARS Dear customer: Thank you for buying this refrigerator-freezer. To ensure that you get the best results from your new refrigerator-freezer, please take time to read through the simple
REFRIGERATOR - FREEZER OPERATION MANUAL
 REFRIGERATOR - FREEZER OPERATION MANUAL Device of this mark is a trademark of Sharp Corporation. Plasmacluster is a registered trademark or a trademark of Sharp Corporation. CONTENTS WARNING... CAUTION..................................
Hisense Refrigerator
 RF697N4ZS1 Contents Safety and warning information...2 Helpful hints and tips...16 Installing your new appliance...7 Cleaning and care...17 Description of the appliance....9 Troubleshooting......18 Display
Notice d'utilisation. Benutzerinformation. Gebruiksaanwijzing User Manual. Kühlschrank. Refrigerator. Réfrigérateur. Koelkast S7212LS2P
 Gebruiksaanwijzing User Manual Notice d'utilisation Benutzerinformation Koelkast Refrigerator Réfrigérateur Kühlschrank S7212LS2P 16 CONTENTS Safety information 16 Safety instructions 17 Operation 18 Daily
Instruction Manual. 200L Chest Freezer L200CFW14
 Instruction Manual 200L Chest Freezer L200CFW14 Contents Safety Warnings... 4 Unpacking... 6 Location...7 Free Space Requirements...7 Installing the Door Handle...7 Cleaning Before Use...7 Before Using
DOUBLE DOOR COMPACT REFRIGERATOR. User Manual MODEL:KSTRC312BW KSTRC312BB
 DOUBLE DOOR COMPACT REFRIGERATOR User Manual MODEL:KSTRC312BW KSTRC312BB SERIAL/MODEL # S - IMPORTANT SAFETY INSTRUCTIONS Read and Save These Instructions This Owner s Guide provides specific operating
Contents Safety Warnings... 4 Unpacking... 6 Installation... 7 Product Overview Operation Cleaning Maintenance...
 U5517W/S/B Contents Safety Warnings... 4 Unpacking... 6 Installation... 7 Location... 7 Levelling the Unit... 7 Installing the Spacers... 7 Free Space Requirements... 7 Reversing the Door Swing... 8 Cleaning
EN3441JOW EN FRIDGE FREEZER USER MANUAL EN3441JOX
 EN3441JOW EN3441JOX EN FRIDGE FREEZER USER MANUAL 2 www.electrolux.com CONTENTS 1. SAFETY INFORMATION... 3 2. SAFETY INSTRUCTIONS... 4 3. PRODUCT DESCRIPTION...6 4. OPERATION...7 5. DAILY USE...7 6. HINTS
Model No. NR-BU303 Series
 RBD / PGF / GULF Operating Instructions Refrigerator For Household Use Model No. NR-BU303 Series NR-BU343 Series Contents Safety precautions...2 Installation...4 Parts identification...5 Specification...5
IMPORTANT: RETAIN FOR FUTURE REFERENCE
 Freestanding 55 cm Wide 173 cm High Frost Free 60/40 Fridge Freezer User Guide Model number: RH55FF173 (B) (R) (SS) IMPORTANT: RETAIN FOR FUTURE REFERENCE Contents Safety Instructions. 2-3 Before Switching
200L Chest Freezer / GVATCS20Q. Instruction Manual
 200L Chest Freezer / GVATCS20Q Instruction Manual 1 200L Chest Freezer What your 12 months warranty means Great care has gone into the manufacture of this product and it should therefore provide you with
This handbook is designed to help you through each step of owning your new appliance, from installation to use.
 USER GUIDE R50262W Thank you for buying this high quality appliance This handbook is designed to help you through each step of owning your new appliance, from installation to use. Please read through
Istruzioni per l uso. User Manual. Frigo-Congelatore. Fridge Freezer UKC3170P
 User Manual Istruzioni per l uso Fridge Freezer Frigo-Congelatore UKC3170P 2 CONTENTS Safety information 2 Safety instructions 3 Operation 5 First use 5 Daily use 5 Hints and tips 6 Care and cleaning 8
BUILT IN REFRIGERATOR Fridge - Freezer User manual
 EN BUILT IN REFRIGERATOR Fridge - Freezer User manual BHBS 172 UKT Index PRECAUTIONS... 3 General warnings...3 Safety warnings...7 Installing and operating your fridge...8 Before using your fridge...9
Electrical Double Oven
 0 0 0 Electrical Double Oven Operating & Installation Instructions -Please keep for future reference AE66DCW AE66DCA AE66DCSS Important - Please read these instructions fully before using These instructions
smeg LARDER Instruction booklet
 smeg LARDER Instruction booklet Index BEFORE USING YOUR FRIDGE... 2 Safety Instructions... 2 Safety warnings... 3 Installing and Operating your Fridge... 4 Before Using your Fridge... 4 USAGE INFORMATION...