...1. Congratulations
|
|
|
- Angelica Wilson
- 5 years ago
- Views:
Transcription
1
2 ... Congratulations Congratulations on the purchase of your new Matsui Dishwasher. Before commencing the installation and set up, please check that you have all the items and familarise yourself with this Instruction Manual. ControlPanel... Dishwasher Features WashCycleTable... TurningOntheAppliance... Salt... Detergent...5 RinseAid... 6 Loading the Dishwasher Rack FilteringSystem...0 CaringfortheDishwasher... This manual contains Safety Instructions, Operating Instructions, Installation Instructions and Hints and Tips. Carefully read it before using the dishwasher. It will help you to use and maintain the dishwasher properly. AboutElectricityconnection... Before calling for service ,5 Faultcodes...6
3 This appliance must be earthed. In the event of a malfunction or breakdown, earthing will reduce the risk of electric shock by providing a path of least resistance for electric current. This appliance is equipped with a cord having an equipment-earthing conductor and an earthing plug. The plug must be plugged into an appropriate outlet that is installed and earthed in accordance with all local standard and requirements. Improper connection of the equipmentearthing conductor can result in a risk of electric shock. Check with a qualified electrician or service representative if you are in doubt whether the appliance is properly earthed. Do not modify the plug provided with the appliance. If the plug does not fit properly to the outlet, please have a qualified electrician to install a proper outlet. Do not abuse, sit on, or stand on the door or dish rack of the dishwasher. Do not operate your dishwasher unless all enclosure panels are properly in place. Open the door very carefully if the dishwasher is operating, there is a risk of water squirting out. Do not place any heavy objects on the door when it is open. The appliance could tip forward. When loading items to be washed: ) Locate sharp items so that they are not likely to damage the door seal; ) Warning: Knives and other utensils with sharp points must be loaded in the basket with their points down or placed in a horizontal position. Check that the detergent receptacle is empty after completion of the wash cycle. Do not wash plastic items unless they are marked dishwasher safe or the equivalent. For plastic items not so marked, check the manufacturer's recommendations. Use only detergent and rinse additives designed for an automatic dishwasher. Never use soap, laundry detergent, or hand washing detergent in your dishwasher. Keep these products out of the reach of children. Other means for disconnection from the supply must be incorporated in the fixed wiring with at least mm contact separation in all poles. If the supply cord is damaged, it must be replaced by the manufacturer, its service agent, or similarly qualified persons in order to avoid a hazard. Keep children away from detergent and rinse aid, keep children away from the open door of the dishwasher, there could still be some detergent left inside. Children should be supervised to ensure that they do not play with the appliance. This appliance is not intended for use by persons (including children) with reduced physical, sensory or mental capabilities, or lack of experience and knowledge, unless they have been given supervision or instruction concerning use of the appliance by a person responsible for their safety. Dishwasher detergents are strongly alkaline, they can be extremely dangerous if swallowed. Avoid contact with skin and eyes and keep children away from the dishwasher when the door is open. The door should not be left in the open position since this could present a tripping hazard. If the supply cord is damaged, it must be replaced by the manufacturer or its service agent or a similarly qualified person in order to avoid a hazard. Remove the door to the washing compartment when removing an old dishwasher from service or discarding it. Please dispose of packing materials properly. Use the dishwasher only for its intended function. During installation, the power supply cord must not be excessively or dangerously bent or flattened. Do not tamper with controls. The appliance is to be connected to the water mains using new hose sets. Old hose-sets should not be reused. The maximum number of place settings to be washed is. The maximum permissible inlet water pressure is Mpa. The minimum permissible inlet water pressure is 0.0Mpa.
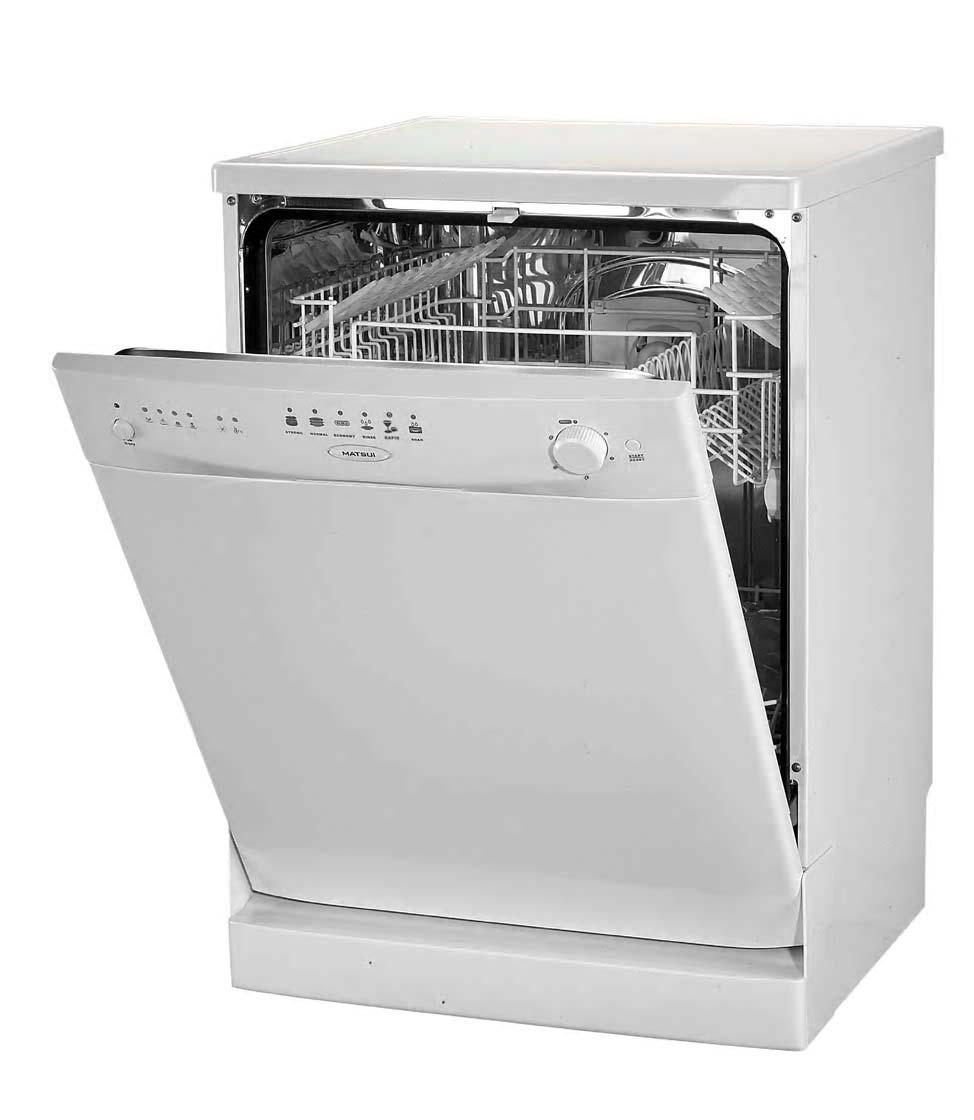
4 To get the best performance from your dishwasher, read all operating instructions before using it for the first time. 9 0 STRONG NORMAL ECONOMY RINSE RAPID SOAK 6 8 Pre-rinse light: To illuminate when pre-rinse. Wash light: To illuminate when wash. Rinse light: To illuminate when rinse. Drying light: To illuminate when drying. 5 Door Handle: To open the door. 6 Start / Reset Button: To start or pause the dishwasher, the one of four program lights will illuminate when start. Washing Program Selector: Turn the dial clockwise to select washing cycles. 8 ON/OFF Button: To turn ON/OFF the dishwasher. 5 NOTE: This model features an unique washing program memory system. The current wash program will not be cancelled despite disconnecting the dishwasher from the mains power. Please see the section entitled "change a program". 9 Power Light : To illuminate when the dishwasher is power on. 0 Salt Warning Light : To illuminate when the softener needs refilling. Rinse Aid Warning Light :To illuminate when the rinse aid dispenser needs refilling Upper Rack Spray Arms Lower Rack 5 6 Salt Reservoir Main Filter Detergent Dispenser 8 9 Cup Shelf Cutlery Basket Coarse Filter 0 Rinse Aid Reservoir Drain hose connector Inlet hose connector
5 Strong Pots, plates, casserole dishes. Dishes that have been sitting with dried food on them for awhile. Pre-wash Pre-wash( 50 ) Wash (50 ) Rinse Rinse (0 ) Drying Pre-wash(5 g) Main wash(5 g) Normal Normal Wash (EN 50) Pots, plates, glasses and lightly soiled pans. Normally soiled. Pre-wash Pre-wash Wash ( ) Rinse (0 ) Drying Pre-wash(5 g) Main wash(5 g) Plates. glasses, and bowls. Wash (0 ) Economy Lightly soiled. Rinse (60 ) Main wash(5 g) Drying Rinse For dishes that need to be rinsed and dried only. Wash (5 ) Rinse (0 ) Drying Main wash(5 g) Rapid Ashorterwashforlightly soiled loads that do not need drying. Wash (0 ) Rinse Rinse (55 ) Main wash(0 g) X Soak To rinse dishes that you plan to wash later that day. Pre-wash X X Water is pour into the Dishwasher to perform testing at the time of shipment from the factory, so there may be drops of water or condensation in the appliance. This is not an indication of a malfunction. Select Rapid programme. Run the dishwasher for the first time without any detergent or dishes to rinse out any residue or moisture. Pull out the lower and upper racks, load the dishes and push the racks back. It is recommended to load the lower rack first, then the upper one. Pour in the detergent (see the sections for Salt, Detergent and Rinse Aid ). Make sure the door is closed properly. Insert the mains plug into the mains socket. The mains supply is 0-0VAC 50Hz. Make sure that the water supply is turned on to full pressure Press the ON/OFF button. Select your desired wash program by turning the dial to the respective washing cycle. Press the Start/Reset button to start washing cycle. Press ON/OFF button again to turn off the dishwasher when the washing cycle is completed. If all the lights are blinking, the machine is out of order. Please turn off the dishwasher, disconnect it from the mains power and disconnect it from the water inlet. Call a qualified technician.


6 Please follow the steps below to change the wash programme once the washing cycle has already started.. Open the door slightly to check if the unit has dispensed of the detergent or detergent tablet. This will depend on how long the washing cycle was running for.. If the detergent dispenser lid is opened, we suggest you to allow the wash cycle to finish.. If the detergent dispenser lid is still closed, press Start/Reset button for more than seconds. This will cancel the current programme.. Close the dishwasher door and re-select the washing program by turning the program dial. 5. Press Start/Reset button again to start washing. NOTE: If you open the dishwasher's door during the washing cycle and then close it, the dishwasher will continue the current washing programme after 0 seconds. However, if the door is not closed correctly after minute, the dishwasher will make an audible sound at minute intervals. The control panel shows the status of the dishwasher. a) All the program lights are off when the unit is on stand by mode. b) When the Program light is on but not blinking, the unit is on pause. c) When the Program light is blinking, the unit is running. If the water in your area is hard, deposits will form on your dishes and utensils. This appliance contains a salt reservoir for you to reduce the hardness of water. Please follow the steps below to pour the salt into the salt reservoir. It must be set to correspond with the water hardness level in your area. Fig Fig. Remove the lower basket and unscrew the reservoir cap. (Fig ). Fill the reservoir with approximately 500ml of water (first use only).. Place the funnel provided over the salt reservoir. (Fig ). Place approximately.kg of salt depending on the brand used. 5. Clean any excess salt from around the reservoir opening and then screw the cap on firmly. 6. Run the rapid wash programme immediately (without any crockery in the dishwasher) to remove any traces of salt from the compartment.. The salt warning light will illuminate when the reservoir is running out of salt and requires re-filling.. The salt warning light will cease to illuminate within a few days depending on how quickly the salt dissolves.. Be careful not to overfill the reservoir. Wipe up any spills.

 0~8 0~ 0~0 0~. / 0 / 8~ ~9 0~8.~.9-0 60 ~5 9~80 8~56.9~8 Mid 0 0 >5 >80 >56 >8 + 60 0 dh(german degree) =.5mmol/l fh(french degree) = 0.88mmol/l clark(british degree) =.")
7 To optimise and customise the level of salt consumption, please follow the steps below to adjust the salt consumption.. Remove the lower basket and unscrew the reservoir cap.. There is an arrow shaped indicator in the reservoir, which allows you to turn. You may turn it to the "-" or "+" settings based on the water hardness in your area. It is recommended that adjustments should be made in accordance with the following chart. dh fh WATER HARDNESS Clark mmol/l Selector Position Salt consumption (gram/cycle) Auto nomy (cycles/.kgs) 0~8 0~ 0~0 0~. / 0 / 8~ ~9 0~8.~ ~5 9~80 8~56.9~8 Mid 0 0 >5 >80 >56 > dh(german degree) =.5mmol/l fh(french degree) = 0.88mmol/l clark(british degree) =.8mmol/l Only use detergents specifically designed for use in dishwashers. No countertop detergent or bleach can be used. To be more environmentally friendly, please use no more than the correct amount of detergent. Main wash detergent chamber Pre-wash detergent chamber Adding the detergent or detergent tablet Please follow the steps below to fill the detergent dispenser.. Push the button on the lid of the detergent dispenser in the direction of the arrow until the flap springs open.. Fill the detergent dispenser with detergent powder or insert the detergent tablet. The markings indicates the dosing level. TIP: You can choose to add a detergent tablet alone or to add detergent power to both main wash detergent chamber and the pre-wash detergent chamber for your selected wash cycle. Dishwasher detergent and detergent tablet are irritants. Please keep out of the reach of children. -Irritatingtoeyes. - Avoid contact with eyes. In case of contact with eyes, rinse immediately with plenty of water and seek medical advice. - If swallowed, seek medical advice immediately.. All programmes with prewash need an additional detergent dosage (please refer to the wash cycle table) that must be placed in the pre-wash detergent chamber. This detergent will take effect during the pre-wash phase.. Close the lid firmly so that it clicks into place. 5


8 Fig Rinse aid helps to ensure water does not cling and leave marks on crockery during the drying phase and helps crockery to dry faster after it has been washed. Only pour rinse aid that is for domestic dishwashers into the reservoir. This model is designed to use liquid rinse aids only. Fig Please follow the steps below to pour the rinse aid into the storage reservoir, and the amount will dispense automatically.. Turn the cap and open as indicated in Fig.. When the cap open marking is aligned, you may lift the cap up.. Pour in the rinse aid until the level indicator turns completely black in colour and close the cap. Be careful not to overfill the reservoir. Wipe up any spills. The approximate volume of the rinse aid reservoir is 0ml. NOTE: If the water hardness in your area is soft, you may not need to use rinse aid as it may cause white film to develop on your dishes. Fig Rinse aid warning light will illuminate when the reservoir is running out of rinse aid and requires re-filling. Alternatively, you can judge the amount of rinse aid by checking the rinse aid indicator right next to the reservoir's cap. When the indicator is black, it means it is full. When it is clear, it means it is almost empty. The rinse aid reservoir has 6 settings. Both the recommended setting and the factory setting is "." If the dishes are not drying properly or are spotted, adjust the dial to the next higher number until your dishes are spot-free. If there is no rinse aid warning light in the control panel, you can judge the amount of rinse aid by the following means. The black dot on the rinse aid dispenser indicates the amount of rinse aid in the dispenser. As the rinse aid diminishes, the size of the black dot decreases. You should never let the rinse aid get below / full. As the rinse aid diminishes, the size of the black dot on the rinse aid level indicator changes, as illustrated below. Full /full /full / full - Should refill to eliminate spotting Empty 6


9 Scrape off any large amounts of left-over food. It is not necessary to rinse the dishes under running water. Place objects in the dishwasher in the following way:.items such as cups, glasses, pots/pans, etc. are placed upside down..curve items, or those with recesses, should be at a slant so that water can run off..they are stacked securely and cannot tip over..they do not prevent the spray arms from rotating while washing takes place. Very small items should not be washed in the dishwasher as they could easily fall out of the rack. Removing the dishes To prevent water dripping from the upper rack onto the dishes in the lower rack, we suggest that you empty the lower rack first and then the upper rack. The upper rack is designed to hold more delicate and lighter dishware such as glasses, coffee and tea cup and saucers, as well as plates, small bowls and shallow pans(as long as they are not too dirty). Position the dishes and cookware so that they will not get moved by the spray of water. The height of the upper rack can be adjusted by increasing/decreasing the heightofthewheelsalongtherails. For the placement method of the upper rack, please refer to the illustrations in "Adjusting the Upper R ack" section. 5 Cups Small serving bowl Large serving bowl Glasses 5 Saucers 6 6 Dish Dessert dishes The height of the upper rack can be adjusted in order to create more space for large utensils both for the upper/ lower rack. The upper rack can be adjusted for height by placing the wheels on different height of the rails. Long items, serving cutlery, salad servers and knives should be placed on the shelf so that they do not obstruct the rotation of the spray arms. The shelf can be folded back or removed when not required for use.


10 We suggest that you place large and difficult to clean items into the lower rack: such as pots, pans, lids, serving dishes and bowls, as shown in the figure below. It is preferable to place serving dishes and lids on the side of the rack in order to avoid blocking the rotation of the top spray arm. Please note: Pots, serving bowls, etc, must always be placed upside down. Deep pots should be slanted to allow water to flow out. The bottom features folding spikes so that larger or more pots and pans can be loaded. For better stacking of pots and pans, the spikes can be folded down as picture below. Items such as cups, glasses, pots, pans, and etc. should stand upside down. Curved items or those with recesses should be at a slant so that water can runoff. Please stack your dishes securely and ensure they will not tip over. Ensure your dishes will not prevent the spray arms from rotating while washing takes place. Very small items should not be washed in the dishwasher as they could easily fall out of the rack. 9 9 Dessert dishes 8 Oval platter 8 9 Dinner plates 0 Soup plates 0 0 Silverware basket 8

11 Cutlery should be placed in the cutlery basket with handles at the bottom. If the rack has side baskets, the spoon should be loaded individually into the appropriate slots, especially long utensils should be placed in the horizontal position at the front of the basket as shown Forks 5 Knives Soup spoons 6 Dessert spoons Gravy ladles Teaspoons 8 Serving spoons Serving forks Do not let any item extend through bottom. Wooden cutlery and utensils-these will leach out and become unsightly. Sensitive ornamental glasses, craft utensil and vases, special antique or irretrievable utensils. These ornaments are not dishwasher-proof. Plastic parts sensitive to hot water. Copper and tin utensils. Utensils which are soiled with ash, wax, lubricating grease or ink. Absorbent materials such as sponges and cloths. Aluminium and silver parts have a tendency to discolour and fade during the wash cycle. Even some types of glass may turn cloudy after many wash cycles. Consider buying utensils which are identified as dishwasher-proof. Possible causes: Type of glass or manufacturing process. Chemical composition of detergent. Water temperature and duration of dishwasher programme. Suggestions: Use glassware or porcelain dishes that have been marked 'dishwasher-proof' by the manufacturer. Use a mild detergent that is described as 'kind to dishes'. If necessary, seek further information from detergent manufacturers. For particular items, select a low temperature programme. To prevent damage, take glass and cutlery out of the dishwasher as soon as possible after the programme has ended. 6 When the working cycle has finished, a tone will sound for for 8 seconds. Turnofftheappliance by pressing the ON/OFF button and open the door of the dishwasher. Wait a few minutes before unloading the dishwasher to avoid handling the dishes and utensils while they are still hot and more susceptible to breakage. They will also dry better. 9
12 The filter prevent larger remnants of food or other objects from getting inside the pump. This residue can occasionally clog up the filters. The filter system consists of a coarse filter,a flat (Main filter) And a microfilter(fine filter). Main filter Food and soil particles trapped by this filter are pulverized by a special jet on the lower spray arm and washed down the drain. Coarse filter Larger items, such as pieces of bone or glass, that could clog the drain are trapped in the coarse filter. To remove an item caught in this filter, gently squeeze the taps on the top of this filter and lift it out. Fine filter This filter holds food residue in the sump area and prevents it from being redeposited on the dishes during a cycle. - Inspect the filters for obstructions every time the dishwasher has been used. - By unscrewing the coarse filter, you can remove the filter system. Remove any food remnants and clean the filters under running water. step:unscrew the C oarse filter, and then gently lift it up step:gently lift the Main filter up step : Gently lift the Fine filter up NOTE: To install the filter system back, please do the following:. Gently insert the Fine filter back to the Filtering System.. Gently insert the Main Filter back to the Filtering System.. Gently insert the Coarse Filter back to the Filtering System, and screw back the Filter Cylinder securely. 0

13 If your dishwasher is left in an unheated place over the winter, ask a service technician to: Cut off electrical power to the dishwasher. Turn off the water supply and disconnect the water inlet pipe from the water valve. Drain water from the inlet pipe and water valve. (Use a pan to catch the water.) 5 Reconnect the water inlet pipe to the water valve. Remove the filter in the tub the bottom and use a sponge to soak up water in sump. It is necessary to clean the spray arms regularly for hard water chemicals will clog the spray arm jets and bearings. Remove the upper spray arm To remove the upper spray arm, screw off the nut clockwise then remove the arm. Remove the lower spray arm To remove the lower spray arm, pull out the spray arm upward. Wash the arms Wash the arms in soapy and warm water and use a soft brush to clean the jets. Replace them after rinsing them thoroughly. To clean the edge around the door, you should use only a soft warm, damp cloth. Toavoid penetration of water into the door lock and electrical components, do not use a spray cleaner of any kind. Also, never use abrasive cleaners or scouring pads on the outer surfaces because they will scratch the finishing. Some paper towels may also scratch or leave marks on the surface. Never use a spray cleaner to clean the door panel as it may damage the door lock andelectrical components. Abrasive agents or some paper towel should not be used because of the risk of scratching or leaving spots on the stainless steel surface. After every wash, turn off the water supply to the appliance and leave the door slightly open so that moisture and odours are not trapped inside. Before cleaning or performing maintenance, always remove the mains plug from the mains socket. To clean the exterior and rubber parts of the dishwasher, do not use solvents or abrasive cleaning products. Only use a cloth with warm soapy water. To remove spots or stains from the surface of the interior, use a cloth dampened with water with a little white vinegar, or a cleaning product made specifically for dishwashers. It is recommended that you run a wash cycle with the dishwasher empty and then remove the plug from the mains socket, turn off the water supply and leave the door of the appliance slightly open. This will help the door seals to last longer and prevent odours from forming within the appliance. If the appliance must be moved, try to keep it in the vertical position. If absolutely necessary, it can be positioned on its back. One of the factors that cause odors to form in the dishwasher is food that remains trapped in the seals. Periodically clean the seals with a damp sponge to prevent this from occurring.
14 Please see the rating label to know the rating voltage and connect the dishwasher to the appropriate power supply. Use required fuse amp. Fused electrical supply is required-copper wire only. Time delay fuse or circuit breaker recommended and provide separate circuit serving only this appliance. Outlet should be placed in adjacent cabinet. Ensure the voltage and frequency of the power being used correspond to thoseon the rating plate. Only insert the plug into an electrical socket which is earthed properly. If the electrical socket to which the appliance must be connected is not appropriate for the plug, replace the socket, rather than using a adaptors or the like as they could cause overheating and burns. Condensation strip For all the built-in models and some free standing models(when you take off the top board and put the unit into the cabinet), a condensation strip must be fitted to the underside of the worktop above your dishwasher to protect it against any moisture. Its purpose is to deflect steam rising from your appliance to protect your worktop's underside. The strip is located inside your dishwasher. Ensure the surface is clean prior to sticking to underside of the worktop. Separate the backing paper from the strip. Stick to the underside of the worktop. Note: Failure to attach strip could result in damage to the underside of your work surface! Connect the cold water supply hose to a threaded /(inch) connector and make sure that it is fastened tightly in place. If the water pipes are new or have not been used for an extended period of time, let the water runs to make sure that the water is clear and free of impurities. If this precaution is not taken, there is a risk that the water inlet can get blocked and damage the appliance. Connector of ModelⅡ The water supply to the appliance can also be connected to the house hot waterline ( centralised system, heating system), as long as it does not exceed a temperature of 60 C. In this case, the wash cycle time will be shortened by about 5 minutes and thewash efficiency slightly reduced. The connection must be made to the hot water line following the same procedures as those for the connection to the cold water line.
15 Position the appliance in the desired location. The back should rest against the wall behind it, and the sides, along the adjacent cabinets or wall. The dishwasher is equipped with water supply and drain hoses that can be positioned to the right or the left to facilitate proper installation. Once the dishwasher is positioned, adjust the screws at the bottom of the dishwasher to level and to adjust the height of the appliance. The appliance should not be inclined more than. Insert the drain hose to the drainage pipe with a minimum diameter of cm, or let it run into the sink. Ensure the water inlet and drain hoses are not kinked or squashed. Use the U-shaped drain hose holder to secure your drain hose and to avoid bending. The free end of the hose must be at a height between 0 and 00cm and must not be immersed in water. φcm If the sinkis 00cm or higher from the floor, the excess water in hoses cannot be drained directly into the sink. It will be necessary to drain excess water from hoses into a bowl or suitable container that is held outside and lower than the sink. The waste pipe must only be connected to the foul drains and not the surface water drainage system.
16 ' ' Fuse blown, or the circuit is disconnected Power supply is not turned on Water pressure is low Overflow Some audible sounds are normal Utensils are not secure in the baskets or something small has dropped into the basket Motor hums Improper detergent Replace fuse or reset circuit breaker. Remove any other appliances sharing the same circuit with the dishwasher Make sure the dishwasher is turned on and the door is closed securely. Make sure the power cord is properly plugged into the mains socket. Check that the water supply is connected properly and the water is turned on. The system is designed to detect an overflow. When it does, it shuts off the circulation pump and turns on the drain pump. Please contact a qualified technician for assistant. Sound from sprayers and detergent cup opening. Ensure everything is secured in the dishwasher. Dishwasher has not been used regularly. If you do not use it often, remember to set it to fill and pump out every week, which will help keep the seal moist. Use only the special dishwasher detergent to avoid suds. If this occurs, open the dishwasher and let suds evaporate. Spilled rinse agent Detergent with colorant was used Rinse agent dispenser is empty Improper program Improper rack loading Always wipe up rinse agent spills immediately. Make sure that the detergent used is without colorant. Make sure that the rinse agent dispenser is filled. Select program with heavy cleaning option. Make sure that the action of the detergent dispenser and spray arms are not blocked by large dishware. Extremely hard water Low inlet temperature Overloading the dishwasher Improper loading Old or damp powder detergent Empty rinse agent dispenser Incorrect dosage of detergent To remove spots from glassware: Take out all metal utensils out of the dishwasher. Do not add detergent. Choose the longest cycle. Start the dishwasher and allow it to run for about 8 to minutes, then it will be in the main wash. Open the door to pour cups of white vinegar into the bottom of the dishwasher. Close the door and let the dishwasher complete the cycle. If the vinegar does not work: Repeat as above, except use / cup (60 ml)of citric acid crystals instead of vinegar.
17 Combination of soft water and too much detergent Tea or coffee stains Iron deposits in water can cause an overall film Use less detergent if you have soft water and select a shorter cycle to wash the glassware. Using a solution of / cup of bleach and cups warm water to remove the stains by hand. You have to call a water softener company for a special filter. ' Hard water minerals Dial is not in the OFF position Dishes block detergent cups Normal phenomenon To clean the interior, use a damp sponge with dishwasher detergent and wear rubber gloves. Never use any cleaner other than dishwasher detergent for the risk of foaming or suds. Turn the Dial to the OFF position and slide the door latch to the left. Re-load the dishes properly. There is some steam coming through the vent by the door latch during drying and water draining. Aluminum utensils have rubbed against dishes Use a mild abrasive cleaner to eliminate those marks. This is normal Overfill dispenser or rinse aid spills Dishwasher isn' t level A small amount of clean water around the outlet on the tub bottom at the back of the tub keeps the water seal lubricated. Be careful not to overfill the rinse aid dispenser. Spilled rinse aid could cause oversudsing and lead to overflowing. Wipe away any spills with a damp cloth. Make sure the dishwasher is level. 5
18 RATED VOLTAGE: 0V / 50Hz RATED POWER: 90W A RATED ENERGY EFFICIENCY A RATED WASH PERFORMANCE A RATED DRYING PERFORMANCE PLACE SETTINGS 6 WASH PROGRAMMES TWO-SPRAY ARMS ELECTRONIC CONTROL HEIGHT ADJUSTABLE UPPER BASKET DIMENSION: 600X580X80(MM) Drying light flicker Rinse light flicker Wash light flicker Possible Causes * Water tap is not turned on. * Low water pressure (<0.0MPa). * Flow meter is broken. * The wire terminal which connect the flow meter is loosen. * Drain hose kinked. *Filterclogged. * The tank is leaking * The hose is leaking. * The temperature sensor is broken. * Heater element is broken. * The wire terminal connected to the heater is loosen. * The wire terminal connected to the temperature sensor is broken. Remedy Turn on the water tap. Turn on the water tap and ensure full opening position. * Disconect from the mains. * Disconnect the water inlet. *CalltheService. Check drain hose (see section 'Drain hose connection'). Clean the filter (see section 'Filtering System'). * Disconect from the mains. * Disconnect the water inlet. *CalltheService. This symbol on the product or in the instructions means that your electrical andelectronic equipment should be disposed at the end of its life separately from your household waste. There are separate collection systems for recycling in the EU. For more information, please contact the local authority or your retailer where you purchased the product. 6
19
The manufacturer, following a policy of constant development and up-dating of the product, may make modifications without giving prior notice. ...
 ADP6000WH/ADP6000IX .................. This manual contains sections of Safety Instructions,Operating Instructions, Installation Instructions and Troubleshooting Tips etc. Carefully reading it before using
SD-9239SS-Stainless Steel. SD-9293W-White
 SD-99SS-Stainless Steel SD-99W-White...... ControlPanel... DishwasherFeatures...... WashCycleTable... Detergent...... RinseAid......... All-in- Program......... LoadingtheDishwasherRack...... SilverwareBasket...8
The manufacturer, following a policy of constant development and up-dating of the product, may make modifications without giving prior notice. ...
 IDW0 .................. This manual contains sections of Safety Instructions,Operating Instructions, Installation Instructions and Troubleshooting Tips etc. Carefully reading it before using the dishwasher
The manufacturer, following a policy of constant development and up-dating of the product, may make modifications without giving prior notice. ...
 HDS M-80 .................. This manual contains sections of Safety Instructions,Operating Instructions, Installation Instructions and Troubleshooting Tips etc. Carefully reading it before using the dishwasher
User Manual. Dishwasher ZDM17301SA ZDM17301WA
 EN User Manual Dishwasher ZDM17301SA ZDM17301WA Contents Safety information 2 Safety instructions 3 Product description 4 Control panel 5 Programmes 6 Daily Use 7 Hints and tips 10 Care and cleaning 11
SKY Stainless Steel Compact Dishwasher. Instructions
 SKY4313 - Stainless Steel Compact Dishwasher Instructions Please retain these instructions for future reference. Notice: Do not allow children to operate this appliance. Keep appliance out of reach of
Instruction Manual DW60
 Instruction Manual DW60 .................. This manual contains sections of Safety Instructions,Operating Instructions, Installation Instructions and Troubleshooting Tips etc. Carefully reading it before
Error alarm Fault codes display would inform the user of abnormal status of the machine.
 ...... ControlPanel... DishwasherFeatures...... WashCycleTable... Detergent...... RinseAid......... Loading the Dishwasher Rack............... SilverwareBasket... FilteringSystem...... TurningOntheAppliance......8
Safety Is a Good Habit to Get Into
 Safety Is a Good Habit to Get Into NOTICE Carefully read the instructions contained in this manual, as they provide important information which is essential to safe and proper installation, use and maintenance
table contents 2~3 know your Kenwood dishwasher 4 safety information 5~8 disposal of the dishwasher 9
 Dishwasher KDW243A DSG Retail Limited is responsible for after sales service. If you have a query about the product please contact our product support line 0844 56 6263 (Currys) and 08700 8 7 (Pixmania).
For detailed operating method read the corresponding content on the instruction manual.
 L45W/L45X For detailed operating method read the corresponding content on the instruction manual. Switch on the appliance Press the On/Off button to switch on the appliance, Open the door. Fill the detergent
M24DB9373HSS M24DB9373HBB M24DB9373HWW
 MDB9HSS MDB9HBB MDB9HWW ...... ControlPanel... DishwasherFeatures...... WashCycleTable... Detergent...... RinseAid......... LoadingtheDishwasherRack (0 placesettings)...... SilverwareBasket... LoadingtheDishwasherRack.........
DISHWASHER INSTALLATION / INSTRUCTION MANUAL CID60B10 CID60B10_IB_ indd 1 4/26/11 7:21 PM
 DISHWASHER INSTALLATION / INSTRUCTION MANUAL CID60B10 CID60B10_IB_110426.indd 1 CID60B10_IB_110426.indd 2 Contents Unpacking... 5 Installation... 6 Location... 6 Product Overview... 12 Internal View...12
User Instruction Book. for INDESIT. Dishwasher. Model: DI 6
 User Instruction Book for INDESIT Dishwasher Model:. DI 6 Safety Is a Good Habit to Get Into NOTICE Carefully read the instructions contained in this manual, as they provide important information which
Dishwasher KID60S10. installation / instructions manual
 Dishwasher KID60S10 installation / instructions manual KID60S10_IB_110426.indd 1 4/27/11 5:46 PM KID60S10_IB_110426.indd 2 4/27/11 5:46 PM contents unpacking... 5 Installation... 6 location... 6 product
instruction manual Dishwasher
 instruction manual Dishwasher Model number:dw101wa Dear Customer, Please carefully reading it before using the dishwasher will help you to use and maintain the dishwasher properly. Keep it to refer to
USER MANUAL 12 PLACE DISHWASHER
 USER MANUAL 12 PLACE DISHWASHER TDW12X IMPORTANT // Please ensure that you read through this user manual prior to installation and use. This manual contains important information to ensure optimal performance
Dishwashers. Instruction Manual SAVE THESE INSTRUCTIONS. Built-In Dishwasher DDW1802W. Write the model and serial numbers here: Model # Serial #
 Built-In Dishwasher Dishwashers Write the model and serial numbers here: Model # Serial # You can find them on the tub wall just inside the door or the lower part of the back. Instruction Manual DDW80W
Dishwasher. Instructions for installation and use D 61
 Dishwasher Instructions for installation and use D 61 D 61 Dishwasher Installation and use Safety Is a Good Habit to Get Into NOTICE Carefully read the instructions contained in this manual, as they
Slimline Dishwasher KDW45X10. installation / instructions manual
 Slimline Dishwasher KDW45X10 installation / instructions manual Contents unpacking... 4 installation... 5 location... 5 product overview... 9 front view... 9 rear view... 9 upper basket... 10 lower basket...
Instruction Manual. Dishwasher SDW60B10
 Instruction Manual Dishwasher SDW60B0 Contents Unpacking...3 Product Overview...4 Internal View...4 Rear View...4 Control Overview...5 Installation...6 Location...6 Before Operating...6 To open the door...6
Dear Customer, Please read this User Manual carefully and keep it to refer to at a later date. Pass it on to any subsequent owner of the appliance.
 Dear Customer, Please read this User Manual carefully and keep it to refer to at a later date. Pass it on to any subsequent owner of the appliance. This manual contains sections of Safety Instructions,
USER MANUAL DISHWASHER TDW9AX TDW12AX.
 USER MANUAL DISHWASHER TDW9AX TDW12AX IMPORTANT // Please ensure that you read through this user manual prior to installation and use. This manual contains important information to ensure optimal performance
Dishwashers SAVE THESE INSTRUCTIONS. Portable Dishwasher. Instruction Manual DDW1805W. Write the model and serial numbers here: Model # Serial #
 Portable Dishwasher Dishwashers Write the model and serial numbers here: Model # Serial # You can find them on the tub wall just inside the door or the lower part of the back. SAVE THESE INSTRUCTIONS Instruction
GETTING STARTED? EASY.
 User Manual GETTING STARTED? EASY. ZDF26001WA ZDF26001XA EN User Manual Dishwasher SAFETY INFORMATION Before the installation and use of the appliance, carefully read the supplied instructions. The manufacturer
FAVORIT DISHWASHER USER MANUAL
 FAVORIT 77000 DISHWASHER USER MANUAL 2 CONTENTS 4 SAFETY INFORMATION 6 PRODUCT DESCRIPTION 7 CONTROL PANEL 8 PROGRAMMES 10 OPTIONS 11 BEFORE FIRST USE 14 DAILY USE 17 CARE AND CLEANING 18 TROUBLESHOOTING
Freestanding Dishwasher KDW60X16. installation / instructions manual
 Freestanding Dishwasher KDW60X16 installation / instructions manual Contents safety warnings... 5 unpacking... 8 installation... 9 location... 9 product overview... 13 front view... 13 rear view... 13
euro EDS845SX 10 place settings
 euro EDS845SX 10 place settings For detailed operating method read the corresponding content on the instruction manual. Switch on the appliance Press the On/Off button to switch on the appliance, Open
Installation and Operating Instructions. Models: PD6-PIT-2
 Installation and Operating Instructions Models: PD6-PIT-2 727626072018 p: 09 573 5678 f: 09 573 5699 e: sales@parmco.co.nz w: www.parmco.co.nz Parmco Appliances extended 5 year warranty New Zealand Owned
User manual. Dishwasher ZDI12001
 EN User manual Dishwasher ZDI12001 Contents Safety information 2 Product description _ 3 Control panel 3 Programmes 4 Before first use _ 4 Daily use 7 Care and cleaning 9 Troubleshooting 9 Technical information
User manual. Dishwasher ZDT12041FA
 EN User manual Dishwasher ZDT12041FA Contents Safety instructions 2 Control panel 3 Programmes _ 4 Options _ 4 Before first use _ 5 Daily use _ 7 Hints and tips 9 Care and cleaning 9 Troubleshooting 10
INSTRUCTION MANUAL DISHWASHER CID45B13
 INSTRUCTION MANUAL DISHWASHER CID45B13 Contents Unpacking... 8 Installation... 9 Location... 9 Product Overview... 15 Internal View...15 Upper Basket...15 Rear View...15 Lower Basket...15 Control Panel...16
FAVORIT W0P. EN User manual
 FAVORIT 88419 W0P EN User manual 2 www.aeg.com CONTENTS 1. SAFETY INSTRUCTIONS...................................................... 3 2. PRODUCT DESCRIPTION.....................................................
FAVORIT W0P. EN User manual
 FAVORIT 77000 W0P EN User manual 2 www.aeg.com CONTENTS 1. SAFETY INSTRUCTIONS...................................................... 3 2. PRODUCT DESCRIPTION.....................................................
ED-D60CM 12P WH, ED-D60CM 12P SS
 ED-D60CM P WH, ED-D60CM P SS For detailed operating method read the corresponding content on the instruction manual. Switch on the appliance Press the On/Off button to switch on the appliance, Open the
Installation and Operating Instructions
 Installation and Operating Instructions Model: PD45-SLIM-SS PD45-SLIM-W As part of Parmco Appliances commitment to improving and updating product ranges, we reserve the right to alter, change and update
FAVORIT34502VIO. EN User Manual
 FAVORIT34502VIO EN User Manual 2 www.aeg.com CONTENTS 1. SAFETY INFORMATION...3 2. SAFETY INSTRUCTIONS... 4 3. PRODUCT DESCRIPTION... 6 4. CONTROL PANEL...6 5. PROGRAMMES... 7 6. SETTINGS... 8 7. BEFORE
User manual. Dishwasher ZDT15010FA
 EN User manual Dishwasher ZDT15010FA Contents Safety instructions 2 Control panel 3 Programmes _ 4 Options _ 5 Before first use _ 6 Daily use _ 7 Hints and tips 9 Care and cleaning _ 10 Troubleshooting
User manual. Dishwasher ZDF14001WA ZDF14001KA ZDF14001SA
 EN User manual Dishwasher ZDF14001WA ZDF14001KA ZDF14001SA Contents Safety instructions 2 Control panel 4 Programmes _ 4 Options _ 5 Before first use _ 6 Daily use _ 7 Hints and tips 9 Care and cleaning
User manual. Dishwasher ZDT15002
 EN User manual Dishwasher ZDT15002 Contents Safety information 2 Product description _ 3 Control panel 4 Programmes 4 Options _ 5 Before first use _ 5 Daily use 7 Care and cleaning 9 Troubleshooting 10
FAVORIT 34502VI0. EN User manual
 FAVORIT 34502VI0 EN User manual 2 www.aeg.com CONTENTS 1. SAFETY INSTRUCTIONS...................................................... 3 2. PRODUCT DESCRIPTION.....................................................
BDW45X. 10 place settings Half-load function
 BDW45X 10 place settings Half-load function For detailed operating method read the corresponding content on the instruction manual. Switch on the appliance Press the On/Off button to switch on the appliance,
user manual Dishwasher ESL 46510
 user manual Dishwasher ESL 46510 2 electrolux CONTENTS Electrolux. Thinking of you. Share more of our thinking at www.electrolux.com Safety information 2 Product description 5 Control panel 5 Use of the
INSTRUCTION MANUAL TABLETOP DISHWASHER CDWTT13
 INSTRUCTION MANUAL TABLETOP DISHWASHER CDWTT13 Contents Safety Warnings... 5 Unpacking... 8 Installation... 9 Location...9 Product Overview... 12 Front View...12 Rear View...12 Dishwasher Basket and Cutlery
PROline DISHWASHER. 4 Place Settings OWNER S MANUAL MODEL: CDW400P
 PROline 4 Place Settings DISHWASHER OWNER S MANUAL MODEL: CDW400P Please read this manual carefully before operating your dishwasher. Retain it for future reference 1 Table of Contents Unit Parts 3 Important
User manual. Dishwasher ZDI12010XA
 EN User manual Dishwasher ZDI12010XA Contents Safety instructions 2 Control panel 4 Programmes _ 4 Before first use _ 5 Daily use _ 7 Hints and tips 9 Care and cleaning 9 Troubleshooting 10 Technical information
Installation & User Instructions Please keep for future reference 478/ /3594
 Integrated Dishwasher Dishwasher Installation & User Instructions Please keep for future reference 478/7130 764/3594 478/7130 764/3628 478/7130 764/3659 Important Please read these instructions fully before
FAVORIT VI DISHWASHER USER MANUAL
 FAVORIT 55002 VI DISHWASHER USER MANUAL 2 CONTENTS 4 SAFETY INFORMATION 6 PRODUCT DESCRIPTION 7 CONTROL PANEL 8 PROGRAMMES 9 OPTIONS 10 BEFORE FIRST USE 13 DAILY USE 16 CARE AND CLEANING 17 TROUBLESHOOTING
GETTING STARTED? EASY.
 User Manual GETTING STARTED? EASY. ZDF21001WA ZDF21001XA ZDF21001NA EN User Manual Dishwasher SAFETY INFORMATION Before the installation and use of the appliance, carefully read the supplied instructions.
instruction manual Dishwasher
 instruction manual Dishwasher Model number:dw602xa For detailed operating method read the corresponding content on the instruction manual. Switch on the appliance Press the On/Off button to switch on the
DAILY REFERENCE GUIDE PRODUCT DESCRIPTION APPLIANCE CONTROL PANEL. Before using the appliance carefully read Health and Safety guide.
 DAILY REFERENCE GUIDE EN THANK YOU FOR BUYING A HOTPOINT PRODUCT. In order to receive a more complete assistance, please register your appliance on: www.hotpoint.eu/register You can download the Safety
For detailed operating method read the corresponding content on the instruction manual.
 TRD-WQP-940F For detailed operating method read the corresponding content on the instruction manual. Switch on the appliance Press the On/Off button to switch on the appliance, Open the door. Fill the
Freestanding Dishwasher KDW60S12
 ON OFF Freestanding Dishwasher KDW60S12 installation / instructions manual KDW60S12_IB_120416_Running Change_Annie.indd 1 12 年 4 月 16 日下午 7:01 contents unpacking... 4 installation... 5 location... 5 product
MW001 Integrated Dishwasher. Manual for Installation, Use and Maintenance
 MW001 Integrated Dishwasher Manual for Installation, Use and Maintenance Important The CDA Group Ltd cannot be held responsible for injuries or losses caused by incorrect use or installation of this product.
GETTING STARTED? EASY.
 User Manual GETTING STARTED? EASY. ZDT24001FA EN User Manual Dishwasher SAFETY INFORMATION Before the installation and use of the appliance, carefully read the supplied instructions. The manufacturer is
FAVORIT 66609M0P FAVORIT 66609W0P. EN User Manual
 FAVORIT 66609M0P FAVORIT 66609W0P EN User Manual 2 www.aeg.com CONTENTS 1. SAFETY INFORMATION...3 2. SAFETY INSTRUCTIONS... 4 3. PRODUCT DESCRIPTION... 5 4. CONTROL PANEL...6 5. PROGRAMMES... 7 6. SETTINGS...
Installation and Operating Instructions Model: VERSO-DW-SS
 Installation and Operating Instructions Model: VERSO-DW-SS For your convenience, we recommend to attach the serial number label HERE. 77660605 Dear Valued Customer, Thank you and congratulations on purchasing
User Manual Dishwasher FAVORIT 56302MO FAVORIT 56302WO
 EN User Manual Dishwasher FAVORIT 56302MO FAVORIT 56302WO 2 www.aeg.com CONTENTS 1. SAFETY INFORMATION...3 2. SAFETY INSTRUCTIONS... 4 3. PRODUCT DESCRIPTION... 5 4. CONTROL PANEL...6 5. PROGRAMMES...
User manual. Dishwasher ZDTS102. Downloaded from manuals search engine
 User manual Dishwasher ZDTS102 Contents Safety information _ 2 Control panel 3 Washing programmes _ 4 Use of the appliance 5 Set the water softener _ 6 Use of dishwasher salt _ 7 Use of rinse aid 7 Load
Dear Customer, Please carefully read this manual before using the dishwasher which will help you to use and maintain the dishwasher properly.
 D20D W Dear Customer, Please carefully read this manual before using the dishwasher which will help you to use and maintain the dishwasher properly. Keep it to refer to at a later date. Pass it on to any
FAVORIT 55200VI EN DISHWASHER USER MANUAL
 FAVORIT 55200VI EN DISHWASHER USER MANUAL 2 FOR PERFECT RESULTS Thank you for choosing this AEG product. We have created it to give you impeccable performance for many years, with innovative technologies
DAILY REFERENCE GUIDE PRODUCT DESCRIPTION APPLIANCE CONTROL PANEL. Before using the appliance carefully read Health and Safety guide.
 DAILY REFERENCE GUIDE EN THANK YOU FOR BUYING A ARISTON PRODUCT. In order to receive a more complete assistance, please register your appliance on: www.aristonbrand.com You can download the Safety Instructions
For detailed operating method read the corresponding content on the instruction manual.
 EDPR60SS/EDPR60WH For detailed operating method read the corresponding content on the instruction manual. Switch on the appliance Press the On/Off button to switch on the appliance, Open the door. Fill
De Longhi Dishwasher USER GUIDE. Model DEDW6015S/DEDW6015W. Please read this user guide carefully and retain for future reference
 De Longhi Dishwasher Model DEDW6015S/DEDW6015W USER GUIDE Please read this user guide carefully and retain for future reference Contents Parts and Features.................................. 03 De Longhi
Freestanding Dishwasher KDW60W14 / KDW60B13
 Freestanding Dishwasher KDW60W4 / KDW60B3 installation / instructions manual Delay /2 Prog. Start/Pause On/ Off Contents Safety Warnings... 5 unpacking... 8 installation... 9 location... 9 product overview...
DW814EW / DW914ES. Dishwasher. Made in China INSTRUCTION MANUAL :
 DW814EW / DW914ES Dishwasher Made in China INSTRUCTION MANUAL : WWW.CAMPOMATIC.COM For detailed operating method read the corresponding content on the instruction manual. Switch on the appliance Press
INSTRUCTION MANUAL FULL SIZE DISHWASHER CDW60W13 / CDW60B14 / CDW60S14
 INSTRUCTION MANUAL FULL SIZE DISHWASHER CDW60W3 / CDW60B4 / CDW60S4 Contents Safety Warnings... 5 Unpacking... 8 Installation... 9 Location...9 Product Overview... 3 Front View...3 Rear View...3 Internal
User Manual Dishwasher FAVORIT 66602VI0P
 EN User Manual Dishwasher FAVORIT 66602VI0P 2 www.aeg.com CONTENTS 1. SAFETY INFORMATION...3 2. SAFETY INSTRUCTIONS... 4 3. PRODUCT DESCRIPTION... 5 4. CONTROL PANEL...6 5. PROGRAMMES... 7 6. SETTINGS...
TABLE TOP DISHWASHER USER S MANUAL PDT 671
 TABLE TOP DISHWASHER USER S MANUAL PDT 671 Dear customer, thank you for buying a PHILCO brand product. So that your appliance serves you well, please read all the instructions in this user s manual. CONTENTS
Dear Customer, Control Panel...3 Dishwasher Features...3
 DW24C Dear Customer, This appliance is intended to be used in household and similar applications such as: -staff kitchen areas in shops, offices and other working environments; -farm houses; -by clients
Dear Customer, Please carefully read this manual before using the dishwasher which will help you to use and maintain the dishwasher properly.
 D3305 SS Dear Customer, Please carefully read this manual before using the dishwasher which will help you to use and maintain the dishwasher properly. Keep it to refer to at a later date. Pass it on to
Slimline Dishwasher Instruction Manual
 Slimline Dishwasher Instruction Manual Model Number: RHSLDW1 Please read these instructions carefully and keep them for future reference For Customer Services, Spare Parts & Manufacturer s Warranty Information,
Get usage advice, brochures, trouble shooter, service information: Register your product for better service:
 FAVORIT 66603VI0P EN User Manual 2 www.aeg.com CONTENTS 1. SAFETY INFORMATION...3 2. SAFETY INSTRUCTIONS... 4 3. PRODUCT DESCRIPTION... 5 4. CONTROL PANEL...6 5. PROGRAMMES... 7 6. SETTINGS... 8 7. OPTIONS...
ESL 5201LO EN DISHWASHER USER MANUAL
 ESL 5201LO EN DISHWASHER USER MANUAL 2 www.electrolux.com CONTENTS 1. SAFETY INFORMATION... 2 2. SAFETY INSTRUCTIONS...4 3. PRODUCT DESCRIPTION... 5 4. CONTROL PANEL...6 5. PROGRAMMES...6 6. SETTINGS...
VESTA DWV335BBS Automatic Built-In Compact Dishwasher
 VESTA DWV335BBS Automatic Built-In Compact Dishwasher Unit Parts Identification 1 Important Safety Instructions 2-3 Installation Instructions and Use & Care Guide Installation Instructions Installation
USER MANUAL 6 PLACE DISHWASHER TDW6SS.
 USER MANUAL 6 PLACE DISHWASHER TDW6SS IMPORTANT // Please ensure that you read through this user manual prior to installation and use. This manual contains important information to ensure optimal performance
BFD65W DISHWASHER 60 CM FULL HEIGHT DISHWASHERS
 BFD65W DISHWASHER BAUMATIC BDW0W/SS dishwasher user manual BFD65W DISHWASHER 60 CM FULL HEIGHT DISHWASHERS IMPORTANT! PLEASE READ THIS MANUAL AND KEEP IT FOR FUTURE REFERENCE! THIS MANUAL CONTAINS SECTIONS
60cm Wide Dishwasher Instruction Manual
 60cm Wide Dishwasher Instruction Manual Model number(s): RHDW3 (B) (SS) IMPORTANT: RETAIN FOR FUTURE REFERENCE Contents Safety instruction. 3-4 Water & electrical connection. 5-6 Disposal of old electrical
DWI cm Fully integrated full height dishwasher
 USER MANUAL FOR YOUR DWI605 60 cm Fully integrated full height dishwasher NOTE: This User Instruction Manual contains important information, including safety & installation points, which will enable you
GETTING STARTED? EASY.
 User Manual GETTING STARTED? EASY. ZDT24003FA EN User Manual Dishwasher SAFETY INFORMATION Before the installation and use of the appliance, carefully read the supplied instructions. The manufacturer is
BDF465SL/W 45 cm Freestanding dishwasher
 BDF465SL/W 45 cm Freestanding dishwasher USER MANUAL FOR YOUR BAUMATIC BDF465SL/W 45 cm Freestanding dishwasher NOTE: This User Instruction Manual contains important information, including safety & installation
ESF5202LOW. EN Dishwasher User Manual
 ESF5202LOW EN Dishwasher User Manual 2 www.electrolux.com CONTENTS 1. SAFETY INFORMATION...3 2. SAFETY INSTRUCTIONS...4 3. PRODUCT DESCRIPTION... 6 4. CONTROL PANEL... 7 5. PROGRAMMES... 8 6. SETTINGS...9
User manual 14 place integrated dishwasher
 User manual 14 place integrated dishwasher TDW14I IMPORTANT // Please ensure that you read through this user manual prior to installation and use. This manual contains important information to ensure optimal
DAILY REFERENCE GUIDE PRODUCT DESCRIPTION APPLIANCE CONTROL PANEL. Before using the appliance carefully read Health and Safety guide.
 DAILY REFERENCE GUIDE EN THANK YOU FOR BUYING A HOTPOINT PRODUCT. In order to receive a more complete assistance, please register your appliance on: www.hotpoint.eu/register You can download the Safety
DAILY REFERENCE GUIDE PRODUCT DESCRIPTION APPLIANCE CONTROL PANEL. Before using the appliance carefully read Health and Safety guide.
 DAILY REFERENCE GUIDE EN THANK YOU FOR BUYING A WHIRLPOOL PRODUCT. In order to receive a more complete assistance, please register your appliance on: www.whirlpool.eu/register You can download the Safety
DAILY REFERENCE GUIDE PRODUCT DESCRIPTION APPLIANCE CONTROL PANEL. Before using the appliance carefully read Health and Safety guide.
 DAILY REFERENCE GUIDE EN THANK YOU FOR BUYING A HOTPOINT PRODUCT. In order to receive a more complete assistance, please register your appliance on: www.hotpoint.eu/register You can download the Safety
DAILY REFERENCE GUIDE PRODUCT DESCRIPTION. 11 Service: APPLIANCE CONTROL PANEL
 DAILY REFERENCE GUIDE EN THANK YOU FOR BUYING A WHIRLPOOL PRODUCT. In order to receive a more complete assistance, please register your appliance on: www.whirlpool.eu/register You can download the Safety
For detailed operating method read the corresponding content on the instruction manual.
 HDWSS For detailed operating method read the corresponding content on the instruction manual. Switch on the appliance Press the On/Off button to switch on the appliance, Open the door. Fill the detergent
Control Panel...3 Dishwasher Features...3
 Dear Customer, Please carefully read this manual before using the dishwasher, it will help you to use and maintain the dishwasher properly. Keep it to refer to it at a later date. Pass it on to any subsequent
BYDI cm Fully integrated full height dishwasher
 USER MANUAL FOR YOUR BYDI630 60 cm Fully integrated full height dishwasher NOTE: This User Instruction Manual contains important information, including safety & installation points, which will enable you
instruction manual Dishwasher
 instruction manual Dishwasher Model number:ofi101xa Dear Customer, Please carefully reading it before using the dishwasher will help you to use and maintain the dishwasher properly. Keep it to refer to
BAUMATIC BFD46W DISHWASHER 45CM FULL HEIGHT DISHWASHER
 IMPORTANT! PLEASE READ THIS MANUAL AND KEEP IT FOR FUTURE REFERENCE! THIS MANUAL CONTAINS SECTIONS OF SAFETY INSTRUCTIONS, OPERATING INSTRUCTIONS & TROUBLESHOOTING TIPS, ETC. BAUMATIC BFD46W DISHWASHER
Slimline Dishwasher. Instruction Manual
 Slimline Dishwasher Instruction Manual Model number: RHSLDW1 (B) (S) (G) Opening times: Monday - Friday 8am 6pm & Saturday 9am 1pm or visit us at www.productcareuk.com Contents Safety Instructions 3-4
GETTING STARTED? EASY.
 User Manual GETTING STARTED? EASY. ZDF22017WA EN User Manual Dishwasher SAFETY INFORMATION Before the installation and use of the appliance, carefully read the supplied instructions. The manufacturer is
Control Panel...3 Dishwasher Features...3
 ADP 450 Dear Customer, Please carefully read this manual before using the dishwasher, it will help you to use and maintain the dishwasher properly. Keep it to refer to it at a later date. Pass it on to
IVFSD place settings Alt function
 IVFSD60 14 place settings Alt function Quick operation guide For detailed operating method read the corresponding content on the instruction manual. Switchontheappliance PresstheON/OFFbuttontoswitchontheappliance,Openthedoor.
FAVORIT VI EN DISHWASHER USER MANUAL.
 FAVORIT 88060 VI EN DISHWASHER USER MANUAL 2 FOR PERFECT RESULTS Thank you for choosing this AEG product. We have created it to give you impeccable performance for many years, with innovative technologies
Control Panel...2 Dishwasher Features...2
 FDW18SAC-SS Dear Customer, Please carefully reading it before using the dishwasher will help you to use and maintain the dishwasher properly. Keep it to refer to at a later date. Pass it on to any subsequent
EDS14SX. 14 place settings Alt function Auto program
 EDS14SX 14 place settings Alt function Auto program For detailed operating method read the corresponding content on the instruction manual. Switch on the appliance Press the On/Off button to switch on
SD-9252SS-Stainless Steel
 SD-9252SS-Stainless Steel SD-9252W-White Dishwasher Features...1 Safety Instructions...2-3 Grounding Instructions Electrical Connection Proper Use Electrical Requirements Hydrogen Gas Warning Installation...3