Instructions for use. Gas hobs for installation in worktops GKS GWS GKS GKS
|
|
|
- Silvester Hubbard
- 5 years ago
- Views:
Transcription

1 Instructions for use Gas hobs for installation in worktops GKS GWS GKS GKS For use in: Hong Kong Issue: Version: 1.3_EN Identity no.: _HK
2 Welcome 2
3 Welcome Dear customer, We thank you for your confidence in our product. We are supplying you with a high-quality Küppersbusch product. As part of quality controls conducted prior to its delivery, it was inspected to ensure that it is in its proper condition. For the purpose of safe, appropriate use, please read the instructions for use and other documentation accompanying the product carefully and store them until the product is disposed of. Please inform us should faults become apparent or information be missing (address, see last page). The instructions for use are protected by copyright and intended exclusively for users of the appliance. 3
4 Contents Contents 1 Safety and responsibility Appropriate use User responsibility Qualification of persons Warnings in these instructions for use Overview of the gas hobs Gas hob GKS Gas hob GWS Gas hob GKS Gas hob GKS Installation and operation Installation and operation safety Gas hob installation Making a hole in the worktop Installing several gas hobs Mounting clips for fastening the gas hobs Installing the gas hob Connecting the gas hob Operation Cleaning Troubleshooting Safety when troubleshooting Finding faults Technical data
5 Contents 7 Changing types of gas Injector specification Changing gas used by high-capacity and standard burners Changing the gas used by the WOK burner
6 Safety and responsibility 1 Safety and responsibility For the purpose of safe, appropriate use, please observe the safety instructions before you use the appliance. 1.1 Appropriate use The appliance is intended to be used exclusively for preparing food in the home. According to the EN 30 standards, the gas hobs belong to appliance category 3: Appliances for Installation in Kitchen Units or Worktops. The appliances may only be operated when they have been adapted to the local gas supply - see the marking on the back of the appliance - and when the instructions for use are available in the language of the respective country. The instructions for use are a component of the appliance and must be handed over when it is passed on or sold. Any other possible fields of application or uses, and modifications, attachments or alterations may considerably jeopardise the safety, reliability and functioning of the appliance. Such measures rule out any Küppersbusch guarantee, and responsibility for personal injury and damage to property is passed on to the user. 1.2 User responsibility The user is responsible for the safe, appropriate operation of the appliance. This includes: y A supply of energy and spatial requirements (space needed, ventilation, room air conditions, etc.). y Children must be under permanent supervision when the appliance is operating in order to ensure that they do not play with the appliance. y The appliance must be installed in accordance with local regulations. y Regular inspections are to be carried out by a professional gas fitter. y It is recommended that you conclude a maintenance agreement in order to ensure long-term, failure-free operation. y Legibility and completeness of the instructions for use at the place of use. y Rectification of faults when relevant measures are described in these instructions for use. Make contact with the dealer for other measures. y Legibility and completeness of all the safety signs and nameplates on the appliances. y When an appliance is finally put out of operation: careful separation of electronic and metal components and disposal or recycling in accordance with legal provisions. 6
7 Safety and responsibility 1.3 Qualification of persons Persons performing operations on the appliance during its individual life phases must be appropriately qualified. Operations Person Qualification Erection, installation User Knowledge of these instructions for use Installation of gas connections, initial operation, maintenance, fault rectification, repairs Operation, cleaning, fault rectification (provided permitted by the user, see Section 5.2 Troubleshooting ) Disposal Electrician (electrical connections), fitter (gas connections) User User Knowledge of specifications for electrical connections or gas connections Knowledge of these instructions for use Knowledge of regional specifications, if necessary enquiries at local waste disposal enterprises 1.4 Warnings in these instructions for use The following safety alert symbols and signal words are used to distinguish potential hazards in these instructions for use. Safety alert symbol and signal word Meaning DANGER WARNING CAUTION Injury to persons Indication of a dangerous situation which, if not avoided, will result in serious injury or death. Indication of a dangerous situation which, if not avoided, may possibly result in serious injury or death. Indication of a dangerous situation which, if not avoided, may possibly result in medium or minor injury. IMPORTANT Damage to property Indication of a situation which, if not avoided, may result in damage to the appliance or to property in its environment. 7
8 Overview of the gas hobs 2 Overview of the gas hobs This section contains an overview of the gas hobs and their control elements. 2.1 Gas hob GKS Standard burner 3 High-power burner 2 Standard burner control knob 4 High-power burner control knob 2.2 Gas hob GWS WOK burner 2 WOK burner control knob 8
9 Overview of the gas hobs 2.3 Gas hob GKS Standard burner 3 High-power burner control knob 2 High-power burner 4 Standard burner control knob 2.4 Gas hob GKS Standard burner 4 Standard burner control knob 2 High-power burner 5 WOK burner 3 High-power burner control knob 6 WOK burner control knob 9
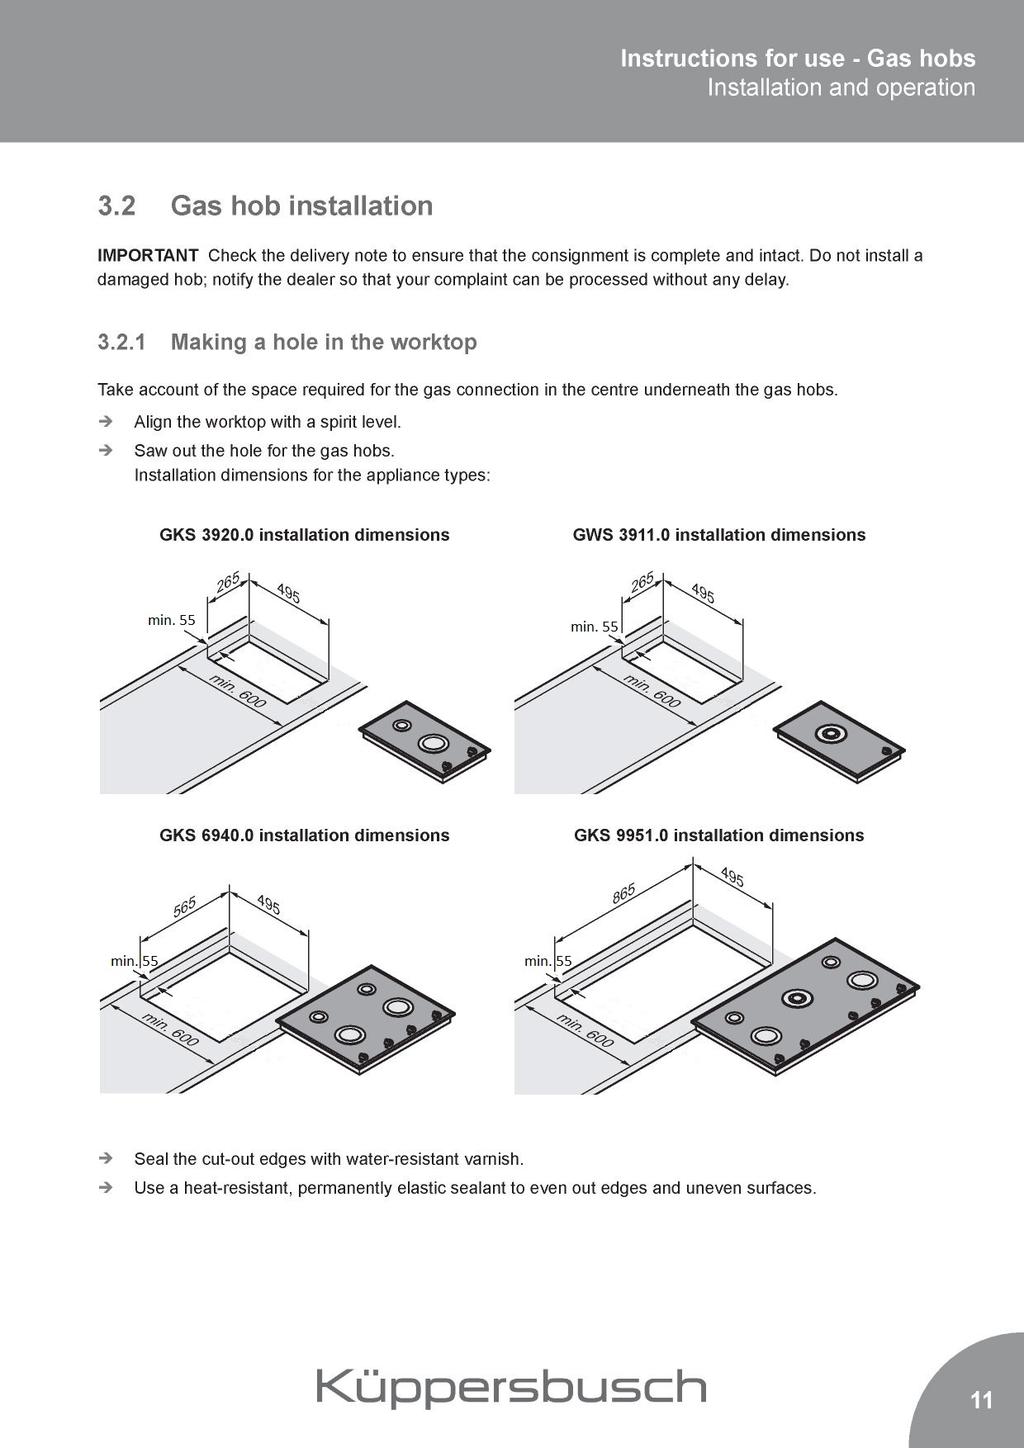
10 Installation and operation 3 Installation and operation 3.1 Installation and operation safety WARNING Fatal injury caused by explosive gas y Gas connections must all be installed by a professional gas fitter. y Only operate gas hobs in a well-ventilated, sufficiently large room (at least 20 m³) or install a mechanical ventilation device, e.g. a cooker hood. Take account of ventilation when making constructional changes to buildings. Fatal injury caused by fire y Never install gas hobs near flammable items, e.g. decorations. y Use heat-resistant wall connection strips which do not rest more than 30 mm on the worktop. y For combustible installation walls: Minimum clearance at the back: 50 mm (wall made of heat-resistant material, no sockets, no wood, no plastic materials, etc.) Minimum clearance on the left and right: 50 mm Minimum clearance to cooker hoods or wall units installed above the hobs: 650 mm Fatal injury caused by electricity y Cables may not come into contact with hot parts. y Do not bend cables or install them direct on sharp edges. y Check electrical connections, see Section 6 Technical data. Serious burns caused by fat explosions y Never extinguish burning fat with water; use an extinguisher blanket or foam extinguisher. Overheated fats and oils may spontaneously ignite. Appliances must never be left unattended when in operation. Serious crushing and knocks y Danger of slipping: remove fat which has splashed onto the floor immediately. 10
11
12 Installation and operation Installing several gas hobs Take account of the space needed to install several gas hobs: The worktop may not be narrower than 35 mm between the holes cut out for the gas hobs. 6 mm 35 mm Mounting clips for fastening the gas hobs Worktop thickness = 30 mm: Screw clips (4 clips) onto the top holders. 30 Worktop thickness = 40 mm: Screw clips (4 clips) onto the bottom holders
13 Installation and operation Installing the gas hob First of all install the gas hob into the hole at the rear 1, pressing the clips in slightly when doing so 2. Install the gas hob into the hole at the front 3, pressing the clips in slightly when doing so 2. Check to ensure that the gas hob is flush with the worktop, that it cannot be moved about freely and that the hob sealant has been properly applied. If the gas hob can be moved about freely in the hole, it will be too big. It can be adjusted slightly with the clips. Push against the gas hob from below and remove it. Bend the clips further outwards. Install the gas hob again. Install the burner caps. Put the saucepan supports in place so that the pins are in the holes Connecting the gas hob y Electrical connection: connect the mains plug of the appliance to a socket with an earthed conductor. y Gas connection: The gas connection must be made by a professional gas fitter. Observe local gas suppliers regulations. Observe regulations concerning permissible types of gas; see marking on the back of the appliance. Check the inlet pressure (flow pressure) and flue gas evacuation. Check the gas connection, supplies lines and connections to make sure there are no leaks. The appliance connection may only be checked at a maximum pressure of 150 mbar. Do not operate any valves while carrying out the check. When pipes and hose assemblies are installed it must be ensured that they cannot make contact with the movable parts of the built-in module, e.g. drawers, nor may they be laid through spaces in cupboards which may be filled. The connecting hose may not be subject to tensile or torsional stress, not may it be crushed or tightly bent. The hose connection may not be pushed onto sharp edges or cutting bodies, it must run freely. 13
14 Installation and operation 3.4 Operation The appliance is only intended to be used for cooking food. WARNING Fatal injury caused by explosive gas A smell of gas means that there is a risk of explosion: y DO NOT ignite gas hobs or electrical switches. y Immediately close gas shut off valves. y Open windows and doors. y Have a gas fitter find out the cause and rectify it. y If a burner goes off during operation, immediately turn the control knob to position 1. y Wait at least one minute before re-igniting. y Never operate the ignition device for longer than 15 seconds. Fatal injury caused by flue gases y The use of a gas cooker causes heat, humidity and combustion products to form in the room where the cooker is installed. The room in which the cooker is installed must be well-ventilated, particularly when the cooker is being used. The natural ventilation openings must be kept open or a mechanical ventilation device, e.g. a cooker hood, must be installed. y Intensive and prolonged use of the appliance may require additional ventilation, e.g. an open window, or effective ventilation, e.g. operation of the mechanical ventilation device at a higher setting. Fatal injury caused by fire y Do not allow food to cook until pots and pans are dry. y Do not switch the burners on if not using them for cooking. y Only switch the burners on to cook food; do not, for example, use them to heat rooms. y Keep combustible materials, e.g. plastics, sheeting, sugar and food containing sugar away from hot hobs. y Make sure connection cables for electrical devices are not jammed on the hot burners. IMPORTANT y Never use a glass ceramic hob as a work or storage surface! If the glass ceramic surface shows any signs of cracks, fissures or breakage, switch off the appliance immediately and inform Customer Service (see the last page for the address). y Do not use any other spacers on the saucepan supports. 14
15 Installation and operation Notes on operation: y Before you cook food for the first time: clean the gas hobs thoroughly. y Clean the appliance every day. y Do not use any pots or pans that jut out over the edge of the hob. Diameter of pots and pans: Standard burner: cm High-power burner: cm WOK burner: use only WOK pans y Set the burners so that no flames spread out next to pots, pans, etc. Operating standard burners and high-power burners: Press the control knob, keep it pressed and turn it anti-clockwise into position 2. Keep the control knob pressed for about 10 seconds after the burner has ignited, until the burner gets a sufficient supply of gas. Adapt the burner power to the food being cooked. Set the burner knob between positions 2 and 3. End operation: turn the control knob to position Operating a WOK burner: Press the control knob, keep it pressed and turn it anti-clockwise into position 2. Keep the control knob pressed for about 10 seconds after the burner has ignited, until it gets a sufficient supply of gas. Adapt the burner power to the food being cooked. Set the control knob between positions 2 and Position 2 = outer burner: high flame inner burner: high flame Position 3 = outer burner: low flame inner burner: high flame Position 4 = outer burner: off inner burner: high flame Position 5 = outer burner: off inner burner: low flame 3 4 End operation: turn the control knob to position 1. 15
16 Cleaning 4 Cleaning Keep the surface clean. Immediately remove dirt, e.g. lime, fat, protein, starch, salt and spices. Always clean the appliance after operation. Switch off the appliance, allow it to cool down and observe the following: y The knobs can be pulled off for cleaning purposes. y Remove the saucepan supports and burner caps for cleaning purposes, rinse them with warm water and a little detergent and then dry. y Clean the area under the saucepan supports. Cover the burners with tin foil and protect them against dirt and water. Use moistened sponges or cloths. y Remove slight stains with warm water to which a little detergent has been added. y Use a cleaning scraper on more stubborn stains (burnt food) on the glass. 16
17 Troubleshooting 5 Troubleshooting 5.1 Safety when troubleshooting WARNING Fatal injury caused by explosive gas y A smell of gas means that there is a risk of explosion: DO NOT ignite gas hobs or electrical switches. Immediately close gas shut off valves. Open windows and doors. Have a gas fitter find out the cause and rectify it. Fatal injury caused by electricity y Have all the work on the electrical system carried out by a qualified electrician. y Pull out the mains plug. y After a short circuit: have a complete check of the appliance carried out by an electrician. Serious injury caused by improper troubleshooting y Only carry out work described in these instructions. Any other work or repairs requires extensive technical knowledge. The dealer's customer service (see the last page for the address) is responsible in this case. y Only use original components. 17
18 Troubleshooting 5.2 Finding faults Malfunction Cause(s) Measure(s) Burner will not ignite Burner goes off after ignition Flame flickers Burner can only be ignited when the burner is pressed for a long time Gas escapes Slits (gas outlets) on the burner head blocked Mains connection interrupted Gas stop valve closed Burner defect Control knob not pressed long enough Slits (gas outlets) on the burner head blocked Burner cap does not sit properly Temperature sensor bent Supply lines and/or connections leaking Remove the saucepan support Take the cap off the burner head Clean the slits on the burner head Check the mains connection Open the gas stop valve Close the gas stop valve Inform the dealer's customer service Keep the control knob pressed for approx. 10 seconds after ignition Remove the saucepan support Take the cap off the burner head Clean the slits on the burner head Put the burner cap on the burner properly Carefully bring the temperature sensor into a vertical position Close the gas stop valve Inform a qualified gas fitter 18
19 Technical data 6 Technical data This section shows the technical data. The values shown serve to support orientation and may deviate slightly. GKS GWS GKS GKS Width x height x depth (300 x 517 x 50) mm (300 x 517 x 50) mm (600 x 517 x 50) mm (900 x 517 x 50) mm Weight: approx. 8.6 kg approx. 8.6 kg approx kg approx kg Standard burner [Qn (H S )]: 1 x 1.7 kw (max.) 2 x 1.7 kw (max.) 2 x 1.7 kw (max.) High-power burner [Qn (H S )]: 1 x 3.8 kw (max.) 2 x 3.8 kw (max.) 2 x 3.8 kw (max.) WOK burner [Qn (H S )]: 1 x 5.0 kw (max.) 1 x 5.0 kw (max.) Power consumption (electrical): Power supply (electrical): 0.8 VA (only when igniting) V, Hz Gas connection: 1/2 Type of gas: Hong Kong Towngas G110, 15 mbar 19
.")
20 Changing types of gas 7 Changing types of gas WARNING Danger caused by improper conversion to other types of gas y Have only qualified gas fitters convert the appliance to another type of gas in accordance with local regulations. y The type of gas and the inlet pressure must comply with the appliance gas setting; see the marking (back of the appliance). y Only use Küppersbusch injector sets (scope of delivery). y Before changing: Close the gas stop valve. Pull out the mains plug. y After changing: Make changes permanently recognisable on the nameplate by sticking the labels for the injector sets (scope of delivery) on the bottom of the appliance. Check to ensure that there are no leaks on the gas connections. Test the appliance for correct functioning. The sealing must be renewed when the appliance has been converted to another type of gas or when the gas pressure has been changed. 7.1 Injector specification WARNING Damage to health resulting from the use of unsuitable injectors The use of injectors larger than those authorised for the gas/inlet pressure will damage the health of the user (emission of CO) and of the appliance. y Only use Küppersbusch injector sets (scope of delivery). The values in the following table are stamped on the injector heads! Injector specification full flame injector / low setting injector Type of gas Liquefied gas butane/propane G30 (28 30/37 mbar) Individual burner WOK burner High-power Standard burner Inside Outside burner 98/25 65/25 50/23 72/45 20


21 Changing types of gas 7.2 Changing gas used by high-capacity and standard burners Replacing the injectors: WARNING Danger of electric shock! Pull out the mains plug. Discontinue the supply of gas. CAUTION Hot surfaces. Remove the saucepan support 1. Take off the burner cap 2. Remove the attachment for the burner cap 3. Screw out the main adjusting injector with a socket spanner. Screw in the new main adjusting injector until it stops. Observe the injector specification. Removing the gas hob: Example: Appliance type GWS Push against the gas hob from below and remove it. Remove all the screw from the burner flange. 21
22 Changing types of gas Screw the glass ceramic top off the hob cavity. Remove the glass ceramic top. Dismantling the gas tap: Remove the rubber cap 1. Remove the holder 2 to the side. Remove component part 3. Loosen the screws on the top part of the gas tap. 22
23 Changing types of gas Remove the top part of the gas tap. Screw the low setting injector 1 out and remove it with pointed pliers 2. Screw in the new low setting injector until it stops. Observe the injector specification. Insert the top part of the gas tap 1, making sure that the peg (underside of the top part of the gas tap) is guided into the groove (injector holder). If the positions no longer correspond: carefully align the groove. Screw the top part of the gas tap tight. 23
24 Changing types of gas Replace component parts 1 to 3. Place the glass ceramic top into the hob cavity and screw it on. Screw the burner flange tight. Seal the appliance. Stick the labels for the injector sets used (scope of delivery) onto the back of the appliance above the previous label. Put the gas hob into the worktop. Insert the attachment for the burner cap. Install the burner caps. Put the saucepan supports into position. Restore the gas supply. Restore the power supply. Ignite the burner. Use a screwdriver to set the low setting injector so that the flame does not flicker even at the lowest setting. Put the control knob on again and turn it quickly between the highest and the lowest setting several times. Readjust if the flame goes off. 24


25 Changing types of gas 7.3 Changing the gas used by the WOK burner Replacing the injectors: WARNING Danger of electric shock! Pull out the mains plug. Discontinue the supply of gas. CAUTION Hot surfaces. Pull the control knob off by pulling it upwards. Remove the saucepan support. Remove the burner cap and the attachment. Screw out the main adjusting injector with a socket spanner. Screw in the new main adjusting injector until it stops. Observe the injector specification. 25

26 Changing types of gas Remove both main adjusting injectors with an open-jawed spanner (size 7). Screw in the new main adjusting injectors until they stop. Observe the injector specification. Removing the gas hob: Example: Appliance type GWS Push against the gas hob from below and remove it. Remove all the screw from the burner flange. Screw the glass ceramic top off the hob cavity. 26

27 Changing types of gas Remove the glass ceramic top. Screw the low setting injector out with a screwdriver and remove it with pointed pliers. Screw in the new low setting injector until it stops. Observe the injector specification. Dismantling the gas tap: Remove the rubber cap 1. Remove the holder 2 to the side. Remove component parts 3 and 4. Loosen the screws on the top part of the gas tap. 27


 is guided into the groove (injector holder).")
28 Changing types of gas Remove the top part of the gas tap. Screw the low setting injector 1 out and remove it with pointed pliers 2. Screw in the new low setting injector until it stops. Observe the injector specification. Insert the top part of the gas tap 1, making sure that the peg (underside of the top part of the gas tap) is guided into the groove (injector holder). If the positions no longer correspond: carefully align the groove. Screw the top part of the gas tap tight. 28
 onto the back of the appliance above the previous label. Put the gas hob into the worktop. Insert the attachment for the burner cap.")
29 Changing types of gas Replace component parts 1 to 4. Place the glass ceramic top into the hob cavity and screw it on. Screw the burner flange tight. Seal the appliance. Stick the labels for the injector sets used (scope of delivery) onto the back of the appliance above the previous label. Put the gas hob into the worktop. Insert the attachment for the burner cap. Install the burner caps. Put the saucepan supports into position. Restore the gas supply. Restore the power supply. Ignite the burner. Use a screwdriver to set the low setting injector so that the flame does not flicker even at the lowest setting. Put the control knob on again and turn it quickly between the highest and the lowest setting several times. Readjust if the flame goes off. 29
30 30
31 31
32 Küppersbusch Hausgeräte GmbH Postfach , D Gelsenkirchen (Germany) Küppersbuschstr. 16, D Gelsenkirchen (Germany) Telephone: , fax: Shun Hing Electric Works & Engineering Co., Ltd. Room 601, East Ocean Centre, 6/F., 98 Granville Road Tsimshatsui East, Kowloon Hong Kong
Hong Kong Town Gas. Gas Hobs. for installation in worktops GD LUX 30 1G GD LUX 30 2G
 Hong Kong Town Gas Gas Hobs for installation in worktops GD LUX 30 1G GD LUX 30 2G Welcome 2 Welcome Dear customer, We thank you for your confidence in our product. We are supplying you with a high-quality
BUILT-IN / TABLE TOP HOB GAS COOKER USER MANUAL
 GB BUILT-IN / TABLE TOP HOB GAS COOKER USER MANUAL Dear Costumer, It is our ultimate desire that you achieve the best performance from our product, which has been passed through meticulous quality control
HG 675 CX 60 HG 675 CN 60 HG 675 CW 60
 HG 675 X 60 HG 675 CX 60 HG 675 CN 60 HG 675 CW 60 1 2 1. : 93/68: 90/396: 2006/95/CE: 2004/108/CE: - 1935/2004:. 2002/95/CE: RoHS 2.,.,,,,...,. (,..)..,,.,. ( ),,, ;,,.,.....,.,,,,,,...,. (..),,.,..,.,,,,
User manual Installation instruction Conversion instruction. BG6xA BG6xB BG6xC BG6xD BG6xE BG6xF
 User manual Installation instruction Conversion instruction BG6xA BG6xB BG6xC BG6xD BG6xE BG6xF Pictograms used: Important information Tip Gas connection Electrical connection Right Wrong Safety regulations
PDG PDG4.1...A PDG5.0...A INSTRUCTION MANUAL IO 00450/2 ( )
") PDG4.0... PDG4.1...A PDG5.0...A INSTRUCTION MANUAL IO 00450/2 (11.2010) DEAR CUSTOMER, Outstanding user-friendliness and excellent efficiency make cooktops a perfect choice. Please read this manual thoroughly
PDG4.0... PDG4.1...A PDG5.0...A INSTRUCTION MANUAL IO 00450/2 (11.2010) DEAR CUSTOMER, Outstanding user-friendliness and excellent efficiency make cooktops a perfect choice. Please read this manual thoroughly
Built-in Gas Hob CZ55554 CZ55571
 Built-in Gas Hob CZ55554 CZ55571 INSTALLATION AND OPERATING INSTRUCTIONS The product may differ from the one illustrated but the installation and operation procedure remains the same The product may differ
Built-in Gas Hob. Important - Please read these instructions fully before using. Operating Instructions -Please keep for future reference
 Built-in Gas Hob Operating Instructions -Please keep for future reference A70GCIS Important - Please read these instructions fully before using These instructions contain important information which will
BUILT-IN GAS HOB. Important - Please read these instructions fully before using AG60GNSS AG60GNW
 BUILT-IN GAS HOB Operating & Installation Instructions -Please keep for future reference AG60GNSS AG60GNW Important - Please read these instructions fully before using These instructions contain important
USER MANUAL. 80 cm 2 burners, glass hob AKC 820C/BLM
 USER MANUAL 80 cm 2 burners, glass hob AKC 820C/BLM For your safety These instructions have been drawn up for your safety and that of others. You are therefore requested to read them carefully before installing
GAS COOKER GAS OVEN SERIES. Owner s Manual Please read this manual carefully before operating your set. Retain it for future reference.
 GAS COOKER GAS OVEN SERIES Owner s Manual Please read this manual carefully before operating your set. Retain it for future reference. Record model number and serial number of the set. See the label attached
USER MANUAL. 60cm, 3 burners, Hob AKC 630
 USER MANUAL 60cm, 3 burners, Hob AKC 630 For your safety These instructions have been drawn up for your safety and that of others. You are therefore requested to read them carefully before installing
Proline GAS HOB Model TCG40IX Instruction Book
 Proline GAS HOB Model TCG40IX Instruction Book GB Operating and Installation Instructions Index Technical data and specifications...... 3 Installation...................... 3-6 Ventilation........................
Belling. Gas Hob GHU573 - GHU573T GHU70GE - GHU70TGE - GHU70GC GHU70TGC - GHU60GC INSTALLATION AND USER INSTRUCTIONS
 Belling Gas Hob GHU573 - GHU573T GHU70GE - GHU70TGE - GHU70GC GHU70TGC - GHU60GC INSTALLATION AND USER INSTRUCTIONS Note: This appliance is supplied for use with Natural Gas and can be converted to LPG
Installation and Operating Instructions
 Installation and Operating Instructions Models: Verso 4G Hob As part of Parmco Appliances commitment to improving and updating product ranges, we reserve the right to alter, change and update technical
GAS STAINLESS COOKTOPS
 GAS STAINLESS COOKTOPS CG604D & CG905D models CG604DCG905D USER GUIDE HK SG Contents 1 EN Safety and warnings 2 Introduction 5 Using your cooktop 6 Cooking guidelines and cookware 8 Care and cleaning
NOTE: THIS APPLIANCE MUST BE INSTALLED SOLELY AND EXCLUSIVELY BY A QUALIFIED TECHNICIAN.
 Table of Contents 1. IMPORTANT SAFETY INSTRUCTIONS... 4 2. DESCRIPTION OF CONTROLS... 6 3. USING THE COOKTOP... 7 3.1 Ignition with safety device... 7 3.2 Practical advices to use the burners... 8 3.3
Built-In Hob User manual
 Built-In Hob User manual HISW 72225 SOB HISW 73225 SOB HISW 92225 SOB HISW 93225 SOB EN 01M-8846793200-0216-01 Please read this manual first! Dear Customers! Thank you for preferring a Beko product. We
3gb53231b.fm5 Page 12 Friday, April 11, :21 PM
 3gb53231b.fm5 Page 12 Friday, April 11, 2003 12:21 PM INSTRUCTIONS FOR USE BEFORE USING THE COOKTOP SUGGESTIONS FOR ENVIRONMENT PROTECTION PRECAUTIONS AND GENERAL ADVICE ENERGY SAVING TIPS CARE AND MAINTENANCE
User Manual. 60 cm Knob control 4 zone ceramic cooktop
 User Manual HHC601 60 cm Knob control 4 zone ceramic cooktop OTE: This User Instruction Manual contains important information, including safety & installation points, which will enable you to get the most
Glass Chimney Hood. Installation & User Instructions Please keep for future reference
 Glass Chimney Hood Installation & User Instructions Please keep for future reference 4897549 4897556 Important Please read these instructions fully before installing or using These instructions contain
UBGHFF60W 60cm Gas on Glass Gas Hob
 UBGHFF60W 60cm Gas on Glass Gas Hob GB [02] x 1 [03] x 2 [04] x 1 [01] x 1 [08] x 4 [05] x 2 [09] x 1 [06] x 1 [07] x 4 [10] x 4 [11] x 1 TEMPLATE TEMPLATE UBGHFF60W GB Built-in 60cm Gas on Glass Gas Hob
HR 601 C A AUS. ENGLISH Instructions for use Page 2
 HR 61 C A AUS ENGLISH Instructions for use Page 2 1 INSTRUCTION FOR USE IMPORTANT SAFETY INSTRUCTIONS BEFORE USING THE GLASS CERAMIC HOB INSTALLATION ELECTRICAL CONNECTIONS ENERGY SAVING TIPS SAFEGUARDING
INSTALLATION AND USER S MANUAL COOKER HOOD RS-600/A-S
 INSTALLATION AND USER S MANUAL COOKER HOOD RS-600/A-S RS-600 (CHS60SS)-GB-05.indd 1 6/8/2010 9:30:59 AM TABLE OF CONTENTS 1. Introduction 2 2. Safety precaution 2 3. Intended use 3 4. Parts supplied 3
EGG9363NOX EN HOB USER MANUAL
 EGG9363NOX...... EN HOB USER MANUAL 2 www.electrolux.com CONTENTS 1. SAFETY INFORMATION................................................... 3 2. SAFETY INSTRUCTIONS..................................................
Dear customer! Instructions for use. Instructions for connection. Rating plate
 Dear customer! This electric integrated gas cooker is manufactured for household use. Our appliances are packed in the environmentally friendly materials which may be recycled, deposited or destroyed without
PROF. RANGE COOKER MODEL: EPRC-9850FE/SS EPRC-9860E/SS. Owner s Manual Please read this manual carefully before operating your set.
 PROF. RANGE COOKER MODEL: EPRC-9850FE/SS EPRC-9860E/SS Owner s Manual Please read this manual carefully before operating your set. Retain it for future reference. Record model number and serial number
Built in Gas Hob. Model number: RHGH1
 Built in Gas Hob Model number: RHGH1 Before using your appliance, please read this manual carefully and keep it for future reference. Contents Important information 3 Safety Instructions 4-8 Before using
Built in Electric Ceramic Hob. Instruction Manual
 Built in Electric Ceramic Hob Instruction Manual Model number: RHEH1 Opening times: Monday - Friday 8am 6pm & Saturday 9am 1pm or visit us at Contents Safety Instructions 3-4 Before using the appliance
FREESTANDING PRODUCTS DOUBLE OVEN. Operating Manual TG50W TG50B TG60W TG60B. Service Helpline:
 EN Operating Manual FREESTANDING PRODUCTS DOUBLE OVEN Operating Manual TG50W TG50B TG60W TG60B Service Helpline: 0333 577 7238 CONTENTS 2 PART-1: SAFETY WARNINGS...4 PART-2: INSTALLATION AND PREPARATIONS
INSTALLATION GUIDE NZ AU
 DISHWASHER DW60U6I & DW60U2I models INSTALLATION GUIDE NZ AU 1 SAFETY AND WARNINGS 100 lb 45 kg! WARNING! Electrical shock hazard Before installing the dishwasher, remove the house fuse or open the circuit
CLGOGUIT
 CLGOGUIT5 3663602842217 V10617 1 2 IMPORTANT - Please read carefully the separate safety guide before use. x1 [02] x1 [03] x1 [06] x2 [07] x1 [08] x1 [09] x4 [01] x1 [04] x2 [05] x1 [10] x1 [11] x5 (G30
INSTRUCTION MANUAL GAS COOKTOPS IL**604, IL**775, IL**905 (** = BV, WV and SS models)
") INSTRUCTION MANUAL GAS COOKTOPS IL**604, IL**775, IL**905 (** = BV, WV and SS models) OPEN 24/7 ILVE ACCESSORIES ONLINE SHOP Dear customer, We thank you and congratulate you on your choice. This new carefully
INSTRUCTION MANUAL GAS COOKTOPS IL**604, IL**775, IL**905 (** = BV, WV and SS models) OPEN 24/7 ILVE ACCESSORIES ONLINE SHOP Dear customer, We thank you and congratulate you on your choice. This new carefully
50cm Single Cavity Gas Cooker CZ55583 INSTALLATION AND OPERATING INSTRUCTIONS
 50cm Single Cavity Gas Cooker CZ55583 INSTALLATION AND OPERATING INSTRUCTIONS The product may differ from the one illustrated but the installation and operation procedure remains the same Contents Introduction
User and maintenance manual
 GB User and maintenance manual IMPORTANT SAFETY INSTRUCTIONS These instructions shall also be available on website: docs.whirlpool.eu. YOUR SAFETY AND THAT OF OTHERS IS HIGHLY IMPORTANT. This manual and
MHG201 Gas Hob Manual for Installation, Use and Maintenance
 MHG201 Gas Hob Manual for Installation, Use and Maintenance 1 Customer Care Department The Group Ltd. Harby Road Langar Nottinghamshire NG13 9HY T : 01949 862 012 F : 01949 862 003 E : customer.care@cda.eu
Instructions for use
 GB EN Instructions for use These instructions are also available at: docs.kitchenaid.eu Product description and symbols 4 Control symbols 4 Using the burners 4 Practical advice on using the hob 5 Positioning
Electrical Double Oven
 0 0 0 Electrical Double Oven Operating & Installation Instructions -Please keep for future reference AE66DCW AE66DCA AE66DCSS Important - Please read these instructions fully before using These instructions
BUILT-IN GLASS HOB MODEL: EGH-G8592G(BK) EGH-G8593G(BK) Owner s Manual Please read this manual carefully before operating your set.
 EGH-G8593G(BK) Owner s Manual Please read this manual carefully before operating your set.") BUILT-IN GLASS HOB MODEL: EGH-G8592G(BK) EGH-G8593G(BK) Owner s Manual Please read this manual carefully before operating your set. Retain it for future reference. Record model number and serial number
BUILT-IN GLASS HOB MODEL: EGH-G8592G(BK) EGH-G8593G(BK) Owner s Manual Please read this manual carefully before operating your set. Retain it for future reference. Record model number and serial number
BUILT-IN GAS HOBS INSTALLATION AND OPERATION INSTRUCTION
 BUILT-IN GAS HOBS INSTALLATION AND OPERATION INSTRUCTION en ER74357HK ER74253HK ER74333HK ER74232HK Preface Dear customer, Congratulations on your choice and thank you for purchasing one of our appliances.
User Manual. Hob ZGX65414BA
 EN User Manual Hob ZGX65414BA GB Contents Safety information 2 Safety Instructions 3 Product description 6 Daily use 6 Hints and tips 7 Care and cleaning 8 Troubleshooting 9 Installation 10 Technical information
PHCZ6511 / KMG13169C / PHCG4.1ZpZtC
 PHCZ6511 / KMG13169C / PHCG4.1ZpZtC INSTRUCTION MANUAL EN DEAR CUSTOMER, Outstanding user-friendliness and excellent efficiency make cooktops a perfect choice. Please read this manual thoroughly before
HVG620 & HVG720 Gas Hob Manual for Installation, Use and Maintenance
 HVG620 & HVG720 Gas Hob Manual for Installation, Use and Maintenance Customer Care Department The Group Ltd. Harby Road Langar Nottinghamshire NG13 9HY T : 01949 862 012 F : 01949 862 003 E : customer
EGG6343NOR EGG6343NOX EGG6343NOW EGG6343NDX...
 EGG6343NOR EGG6343NOX EGG6343NOW EGG6343NDX...... EN HOB USER MANUAL 2 www.electrolux.com CONTENTS 1. SAFETY INFORMATION................................................... 3 2. SAFETY INSTRUCTIONS..................................................
Multi-Function Cooktop
 INSTALLATION GUIDE Multi-Function Cooktop Contents Wolf Multi-Function Cooktop.................... 3 Multi-Function Cooktop Specifications............ 4 Multi-Function Cooktop Installation...............
FR GUIDE D'INSTALLATION ET D UTILISATION EN GUIDE FOR INSTALLATION AND USE TABLE DE CUISSON TABLE DE CUISSON GAZ COOKING GAS HOB
 FR GUIDE D'INSTALLATION ET D UTILISATION EN GUIDE FOR INSTALLATION AND USE TABLE DE CUISSON TABLE DE CUISSON GAZ COOKING GAS HOB 0.1 DPE7610* DPE7610*M 0.1.1 0.1.2 3,5 cm 5 cm 47,5 cm (48 49 cm) 1.1.2
Gas-on-glass cooktop. User guide. CG603D, CG604D, & CG905D models NZ AU
 Gas-on-glass cooktop CG603D, CG604D, & CG905D models User guide NZ AU Contents 1 Introduction 4 Using your cooktop 6 Cooking guidelines and cookware 8 Care and cleaning 9 Troubleshooting 13 Warranty and
INSTALLATION GUIDE Dual Fuel Ranges
 INSTALLATION GUIDE Dual Fuel Ranges Contents Wolf Dual Fuel Ranges......................... 3 Safety Instructions............................ 4 Dual Fuel Range Specifications.................. 5 Dual Fuel
User Manual. Hob CH601FL
 EN User Manual Hob CH601FL Contents Safety information 2 Safety instructions 3 Product description 5 Daily use 5 Hints and tips 5 Care and cleaning 6 Safety information Troubleshooting 7 Installation 7
Wok Cookers Instruction Manual
 Wok Cookers Instruction Manual Part No. DC100-09 Single Burner Wok Cooker Part No. DC200-09 Double Burner Wok Cooker IMPORTANT It is IMPORTANT that you read these instructions carefully and understand
Operating and installation instructions Gas hobs
 Operating and installation instructions Gas hobs To avoid the risk of accidents or damage to the appliance it is essential to read these instructions before it is installed and used for the first time.
Contents. 1. Instructions for safety and use 20
 Contents 1. Instructions for safety and use 20 2. Positioning in the counter top 21 2.1 Fixing to the supporting structure 21 2.2 Positioning the adhesive sponge 22 2.3 Positioning the fastening clips
THE BEAUTY OF SIMPLICITY USER MANUAL
 DESIGNER HOOD MODEL: CK-SPECCHIO THE BEAUTY OF SIMPLICITY USER MANUAL Fig.1 Fig.2 Fig.3 Fig.4 Fig.5 2 Fig.6 A B Fig.7 Fig.8 Fig.9 Fig.10 Fig.11 Fig.12 Fig.13 Fig.14 3 Fig.15 Fig.16 Fig.17 Fig.18 GENERAL
Built-in Conventional Oven
 Built-in Conventional Oven LAM3204 User & Installation Guide using this manual Thank you for choosing LAMONA Built - In Oven. This user Manual contains important information on safety and instructions
USE AND CARE GUIDE WALL MOUNTED HOOD
 USE AND CARE GUIDE WALL MOUNTED HOOD MODELS: HEE92(900MM) HEE22(600MM) HEE96(600MM) HEM52(A-900MM) HEE22(F-1100MM) HEE91(A-600MM) HEE22(900MM) HEE65(900MM) HEM52(A-600MM) HEM52(A-600MM) Fig.1 Fig.2 Fig.3
USER MANUAL AKC cm 4 Burners, Stainless Steel Hob
 USER MANUAL AKC 641 60 cm 4 Burners, Stainless Steel Hob For your safety These instructions have been drawn up for your safety and that of others. You are therefore requested to read them carefully before
USER AND INSTALLATION INSTRUCTIONS
 USER AND INSTALLATION INSTRUCTIONS PCC 1274 Issue 3 USER AND INSTALLATION INSTRUCTIONS FOR USE IN :- GB, IE, FR, NL, BE, LU, ES, IT, NO, DE, DK, SE WARNING Read the instructions before use. Only use this
Stainless Steel Built-in 4 Function Fan Oven and Gas Hob pack CZ55552 CZ55524
 Stainless Steel Built-in 4 Function Fan Oven and Gas Hob pack CZ55552 CZ55524 INSTALLATION AND OPERATING INSTRUCTIONS These products may differ from the ones illustrated but the installation and operation
User Manual. Hob ZGO75524
 EN User Manual Hob ZGO75524 GB Contents Safety information 2 Safety instructions 3 Product description 6 Daily use 6 Hints and tips 7 Care and cleaning 8 Troubleshooting 9 Installation 10 Technical information
FRANKE DESIGNER GAS COOKTOP 90CM
 page 1 of 7 510 880 45 480 Min 50 860 Min 600 SPECIFICATIONS Recommended use Material Colour availability Weight Dimensions Voltage Domestic Stainless Steel Stainless Steel 18.2kg 880 x 510 x 45mm 220-240V
Operating Instructions HOB Contents
 THP 641 W/IX/I English Operating Instructions HOB Contents Operating Instructions,1 Warnings,2 Assistance,2 Description of the appliance,3 Installation,4 Start-up and use,7 Precautions and tips,7 Maintenance
User manual. Hob CHT601FL
 User manual Hob CHT601FL Contents Safety information 2 Safety instructions 3 Product description 5 Daily use _ 6 Helpful hints and tips _ 8 Safety information Care and cleaning 8 Troubleshooting 9 Installation
GAS GRIDDLE INSTRUCTIONS MODEL: PGF GRIDDLES PGF 300, 600, 800, 1200
 Page 1 of 17 GAS GRIDDLE INSTRUCTIONS MODEL: PGF GRIDDLES PGF 300, 600, 800, 1200 VALIDATE WARRANTY SAFETY INSTRUCTIONS INSTALLATION INSTRUCTIONS OPERATION INSTRUCTIONS MAINTENANCE INSTRUCTIONS CONVERSION
Installation Instructions Dual Fuel Ranges
 Installation Instructions Dual Fuel Ranges E30DF74EPS E36DF76EPS E48DF76EPS 5995447082 2 Safety IMPORTANT SAFETY INSTRUCTIONS Safety Precautions Do not attempt to install or operate your unit until you
Built-in Electric Ceramic Hob
 Instruction Manual Built-in Electric Ceramic Hob LCHOBTC14 Image for indication only. GB Contents Safety Warnings... 3 Unpacking... 5 Product Overview... 6 Top View...6 Control Panel...6 Before Using Your
IDE 20 / IDE 30 / IDE 50 IDE 60 / IDE 80
 IDE 20 / IDE 30 / IDE 50 IDE 60 / IDE 80 EN OPERATING MANUAL OIL HEATER TRT-BA-IDE20-30-50-60-80-TC-001-EN Table of contents Information on the use of this manual... 1 Scope of delivery... 1 General safety...
INSTRUCTION MANUAL GAS HOB. Model:GH600
 INSTRUCTION MANUAL GAS HOB Model:GH600 1 Contents Important Information Description of Hob Operation Maintenance and cleaning Troubleshooting Instruction for installer Technical data Important safety requirements
O. Gas boiler. Gaz 6000 W WBN H-E-N/L-S2400. Operating instructions for the end customer (2017/09) en
 en") 8 716 473 216-00.3O Gas boiler WBN 6000-30-H-E-N/L-S2400 Operating instructions for the end customer en 2 Contents Contents 1 Key to symbols and safety instructions................... 2 1.1 Key to symbols..................................
8 716 473 216-00.3O Gas boiler WBN 6000-30-H-E-N/L-S2400 Operating instructions for the end customer en 2 Contents Contents 1 Key to symbols and safety instructions................... 2 1.1 Key to symbols..................................
Menumaster. Commercial Microwave Oven Use and Care Manual CFSP70 GSAND-7D SAND-7D SAND-700
 Menumaster Commercial Microwave Oven Use and Care Manual CFSP70 GSAND-7D SAND-7D SAND-700 Keep these instructions for future reference. If the microwave oven changes ownership, be sure this manual accompanies
INSTALLATION & USER MANUAL
 INSTALLATION & USER MANUAL Scholtès Gas Domino Built-in Hob Index Important Safety Instruction, 1-2 Instructions for Use, 3 Usage Maintenance Instructions for Installer, 4-5 Installation Positioning Gas
User Manual. Hob PH601SS
 EN User Manual Hob PH601SS Contents Safety information 2 Safety instructions 3 Product description 5 Daily use 5 Hints and tips 6 Care and cleaning 6 Safety information Troubleshooting 6 Installation 7
User Manual. Hob ZEV6240FBV
 EN User Manual Hob ZEV6240FBV Contents Safety information 2 Safety instructions 3 Product description 5 Daily use 6 Hints and tips 7 Care and cleaning 7 Troubleshooting 8 Installation 9 Technical information
F900 SERIES GAS CHARGRILL G9440, G9460, G9490, G User, installation and servicing instructions T Read these instructions before use
 F900 SERIES User, installation and servicing instructions GAS CHARGRILL G9440, G9460, G9490, G94120 Read these instructions before use DATE PURCHASED: MODEL NUMBER: SERIAL NUMBER: DEALER: SERVICE PROVIDER:
1. Take the hoses and elbow out of the holders, depending on model. max. 100 cm. min. * cm
 Safety instructions The washing machine is heavy - take care when lifting. Caution: frozen hoses may rip/burst. Do not install the washing machine in areas exposed to frost or outdoors. The washing machine
EN User Manual ZGG67412 GB
 EN User Manual ZGG67412 GB Contents Safety information 2 Safety instructions 3 Product description 5 Daily use 6 Hints and tips 7 Care and cleaning 7 Troubleshooting 8 Installation 9 Technical information
installation and operating instructions OG63XA Cooktop
 installation and operating instructions OG63XA Cooktop Dear customer, We thank you and congratulate you on your choice. This new carefully designed product, manufactured with the highest quality materials,
Operating instructions
 Operating instructions For the operator Operating instructions HOME SYSTEM GB, IE Publisher/manufacturer Vaillant GmbH Berghauser Str. 40 D-42859 Remscheid Tel. +49 21 91 18 0 Fax +49 21 91 18 28 10 info@vaillant.de
GAS GRIDDLE INSTRUCTIONS MODEL: PGF GRIDDLES GGP6.4, 6.6, 6.8, 6.10
 Page 1 of 18 GAS GRIDDLE INSTRUCTIONS MODEL: PGF GRIDDLES GGP6.4, 6.6, 6.8, 6.10 VALIDATE WARRANTY SAFETY INSTRUCTIONS INSTALLATION INSTRUCTIONS OPERATION INSTRUCTIONS MAINTENANCE INSTRUCTIONS CONVERSION
Installation and Operating Instructions
 Installation and Operating Instructions Models: HO-1 HO-2 HO-6 HO-7 As part of Parmco Appliances commitment to improving and updating product ranges, we reserve the right to alter, change and update technical
installation and operating instructions K224 rangehood
 installation and operating instructions K224 rangehood Fig. 1 Fig. 2 Fig. 3 Fig. 4 Fig. 5 Fig. 6 Fig. 7 Fig. 8 Fig. 9 GENERAL Carefully read the following important information regarding installation safety
Fig. 1 - Unit PGD4, PGS4, WPG4
 OWNER S MANUAL 14 SEER Single -Package Air Conditioner and Gas Furnace System with R -410A Refrigerant Single Phase 2 to 5 Nominal Tons Three Phase 3 to 5 Nominal Tons PGD4andPGS4SeriesE,WPG4SeriesB Fig.
User manual MG PC/EN
 User manual MG2015-1-PC/EN Content Chapter Subject Page 1 Installation dimensions 3 2 Connection: gas and electrical 4 3 General instructions 6 4 Control PITT cooking 7 5 Optimal use of the PITT cooking
JDW 5-IN-1 ELECTRIC GRILL (5 Functions in 1: GRILL, BAKE, ROAST, FRY, STEW) Operating Instructions Important Safety Instructions...
 Operating Instructions Important Safety Instructions...") 1 JDW 5-IN-1 ELECTRIC GRILL (5 Functions in 1: GRILL, BAKE, ROAST, FRY, STEW) Operating Instructions Important Safety Instructions....2 Unit Overview...5 Assemble the Knob to the Glass Lid...5 Temperature
1 JDW 5-IN-1 ELECTRIC GRILL (5 Functions in 1: GRILL, BAKE, ROAST, FRY, STEW) Operating Instructions Important Safety Instructions....2 Unit Overview...5 Assemble the Knob to the Glass Lid...5 Temperature
Operating instructions
 Operating instructions Capriz 2 24c 28c GB, IE Contents Contents 1 Safety... 3 1.1 Action-related warnings... 3 1.2 Intended use... 3 1.3 General safety information... 4 2 Notes on the documentation...
Gas Fire Patio Heater Q9
 Gas Fire Patio Heater Q9 Instruction Manual Please read the manual BEFORE you unpack or install the fire TABLE OF CONTENTS Warning 3 Getting Started 4 What s Included 5 Assembly Procedures 6 Product Drawing
Cooker Hood Instruction Manual
 Cooker Hood Instruction Manual Model number(s): RHSCH601SS/B & RHSCH901SS/B IMPORTANT: RETAIN FOR FUTURE REFERENCE Contents Safety Instructions. 3-6 Product Overview. 7 Positioning. 8 Operational modes.
4 BURNER GAS HOB INSTRUCTION / INSTALLATION MANUAL CGHOBB12 CGHOBW12
 4 BURNER GAS HOB INSTRUCTION / INSTALLATION MANUAL CGHOBB12 CGHOBW12 Contents Unpacking... 5 Product Overview... 6 The Main Unit...6 Control Panel...6 Before Using Your New Hob... 7 Lighting the Hob...
Viking Installation Guide
 Viking Installation Guide Viking Range Corporation Front Street Greenwood, Mississippi 38930 USA (66) 455-00 For product information, visit the Viking Web site at vikingrange.com Professional Built-In
HVG680. Four Burner Gas Hob. Installation, use and maintenance.
 HVG680 Four Burner Gas Hob Installation, use and maintenance www.cda.eu Contents: 3 Important 5 Important Notes 6 Using Your Hob 7 Igniting the burners 8 Efficient use of your hob 9 Care And Maintenance
Operating instructions
 The energy you need Operating instructions Betacom 3 24c -A (H-GB) 30c -A (H-GB) GB, IE Contents Contents 1 Safety... 3 1.1 Action-related warnings... 3 1.2 Intended use... 3 1.3 General safety information...
GAS COOKTOP INSTALLATION INSTRUCTIONS
 INSTALLATION AND SERVICE MUST BE PERFORMED BY A QUALIFIED INSTALLER. IMPORTANT: SAVE FOR LOCAL ELECTRICAL INSPECTOR'S USE. READ AND SAVE THESE INSTRUCTIONS FOR FUTURE REFERENCE. WARNING If the information
Installer manual AG-AA10. Air/air heat pump IHB GB AG-AA10-30 AG-AA10-40/50
 -30 Installer manual Air/air heat pump -40/50 IHB GB 1516-1 331554 Table of Contents 1 Important information 2 5 Installation 7 Safety information 2 Model combinations 7 Read before starting the installation
K Operating Instructions. Before first use of the unit read these operating instructions and act in accordance with them.
 K 1.100 Operating Instructions Before first use of the unit read these operating instructions and act in accordance with them. www.kaercher.com/register-and-win 59651430 (10/13) Contents General information..............
Electric Cooker. Important Please read these instructions fully before installing or using
 Electric Cooker Installation & User Instructions - Please keep for future reference Cat no Model 2147349 BUSH BFEDC60W WHITE 2139405 BUSH BFEDC60B BLACK 2145248 BUSH BFEDC50W WHITE 1983559 BUSH BFEDC50B
BUILD-IN COOKING HOB MODELS H200F, H250F, H400F, 756 & 854F FOR USE WITH LIQUIFIED PETROLEUM GAS
 CO UN T RY L E I S U R E BUILD-IN COOKING HOB MODELS H200F, H250F, H400F, 756 & 854F FOR USE WITH LIQUIFIED PETROLEUM GAS USER AND INSTALLATION INSTRUCTIONS WARNING This appliance must be installed by
GETTING STARTED? EASY.
 User Manual GETTING STARTED? EASY. ZGG65411 ZGG65414 ZGG65XS414 EN User Manual Hob GB IE SAFETY INFORMATION Before the installation and use of the appliance, carefully read the supplied instructions. The
Operating and Installation Instructions for CRAMER COE Gas Cooker
 Operating and Installation Instructions for CRAMER COE Gas Cooker Models: COE-C COE-CG COE-CGO COE-FULL COE-C-DUFU COE-CG-DUFU COE-CGO-DUFU COE-FULL-DUFU Cooker (4 gas burners) Cooker + grill (4 gas burners)
Owner s Information Manual
 48ES---A and 48VL---A Comfort and Performance 13 and 14 SEER Single Packaged Air Conditioner and Gas Furnace System With Puron (R---410A) Refrigerant Single and Three Phase 2---5 Nominal Tons (Sizes 24---60)
HCN610 Induction Hob. Manual for Installation, Use and Maintenance
 HCN610 Induction Hob Manual for Installation, Use and Maintenance Customer Care Department The Group Ltd. Harby Road Langar Nottinghamshire NG13 9HY T : 01949 862 012 F : 01949 862 003 E : service@cda.eu
Built-in Oven and Gas hob
 MSP60SS Oven-Gas Guide D4.qxd 4/7/06 13:42 Page 1 user guide Built-in Oven and Gas hob MSP60SS MSP60SS Oven-Gas Guide D4.qxd 4/7/06 13:42 Page 2 70 80 90 60 50 40 30 20 10 contents getting to know your
User Manual. Hob GH701
 GB EN User Manual Hob GH701 Contents Safety information 2 Safety instructions 3 Product description 5 Daily use 6 Hints and tips 7 Care and cleaning 7 Safety information Troubleshooting 8 Installation