OVEN INSTRUCTION MANUAL KO611TCX
|
|
|
- Mabel Hutchinson
- 5 years ago
- Views:
Transcription
2501-963 5732 +49 (0)2501-963 1834")
1 INSTRUCTION MANUAL OVEN KO611TCX Klugmann Hausgeraete GmbH. Gropiusstraße 7, Münster, Deutschland +49 (0) (0)
2 DEAR CUSTOMERS, First of all, thank you for buying our product. Please read all the instructions and warnings in this manual carefully. The manual includes important information about safe installation, use, and maintenance of your product, as well as necessary warnings for optimum use of your appliance. Please keep this manual safe and within your reach for future reference. The manufacturer can not be held responsible for any damage that may occur due to translated or printed versions of this manual, or for any bodily, environmental or other material harm that may arise from incorrect use of the appliance. TABLE OF CONTENTS Important information regarding safety... : 1 Oven Technical Specifications... :2 Device Installation...:3-4 Oven Energy Efficiency... :5 Oven Description... :6 Oven Use,... : Menu Screen Setup... :12 Cooling Fan,... :...13 Device Cleaning and Maintenance,... :14-15 Information about Transportation... :16 What to do before calling the authorized service... :16 Customer Service and Warranty...:17 After Sales Services... :17
3 CHILD SAFETY * NEVER allow small children to tamper with the oven, its controls or play near the oven. *When the oven operates, it has handling parts and its front glass panel is extremely hot. Therefore, children must be ABSOLUTELY kept away from the environment where oven operates. *For safety reasons, packaging material such as nylon and styrofoam must be kept away from children's reach, otherwise they can be dangerous. PRE INSTALLATION AND INSTALLATION WARNINGS *Before using your product, make sure that you remove all of the packaging materials. *This product shouldn't be used for any purpose other than cooking meal. Its use for any other purposes (For instance; to heat the room in which it is installed) is dangerous and unsuitable. Our company shall not be held responsible for and harm done to humans, animals or goods resulting from misuse of unfavorable use. *A smell resulting from insulation materials and heating elements can be experienced for once during the first use of the oven. If this happens, wait for the smell to dissipate before placing food inside the oven. Clean the interior of the oven with a humid cloth. *Do not touch the hearing elements inside to oven as the oven will be extremely hot during use. Oven surface may be extremely hot during grill function, be careful. *Never cook or fry on the base of the oven. *Do not cover the bottom of the oven with aluminum foil. *There are certain rules to obey when using electrical equipment. *While you are handling, cleaning or applying maintenance to product, unplug it from the mains. *Never pull the power cord from the outlet to disconnect it from the mains. *Do not touch the product if your hands or feet are wet or humid. *Do not allow children or non-adults to use the product without any guardian nearby. *If neglected, unhinged oven lid may hurt your hands. *Close and take the plug out and do not tamper with the oven if it breaks or doesn't work properly. *Any repairs and maintenance must be carried out by authorized services and only original spare parts must be used. Your oven may be damaged if you do not heed any of the warnings above. *Make sure all the functions are in "OFF" position when you're not using the oven. *Always use kitchen gloves when taking the tray out. *For the oven's cleanness and your safety, always keep the oven clean. The residual oil inside the oven may damage the surface in time. *Our company cannot be held responsible for the damages to people, animals or properties due to the nonconformance to the rules. *Our company cannot be held responsible for the damages that may result from dangerous or improper use of the oven. 1
4 OVEN TECHNICAL SPECIFICATIONS The oven has been designed to work with monophase V AC electricity. Please read the registry label at the bottom-front section of the oven carefully prior to the installation. Klugmann Model Name KO611TCX-PRO Top Heater 800 W Bottom Heater 1200 W Grill Heater 1200 W Cooling Fan 22 W Oven Lamp 25 W Turbo Fan 25 W Bottom Heater + Top Heater 2000 W Bottom Heater + Top Heater + Fan 2025 W Oven External Dimensions (WxDxH) 595x560x598 mm Installation Cabin Dimensions (WxDxH) 560x575x560 mm Oven Interior Volume 67 Lt Net Weight (Kg) 32 Gross Weight (Kg) 35 Voltage V AC Maximum Power 3000 W ENVIRONMENTAL WARNING: *After you installed your product, please dispose of its packaging materials according to the safety and environment conditions. Please dispose the residual packaging materials to the relevant recycling containers according to their category (folio, cardboard, Styrofoam). When you dispose any electrical appliance, make it unusable by cutting its power cord. The oven has been designed to work with monophase V AC electricity. Please read the registry label at the bottom-front section of the oven carefully prior to the installation. 2
5 DEVICE INSTALLATION Installation must be carried out by an authorized technician according to the guidelines. Our company cannot be held responsible for the damages to people, animals or properties due to improper installation. INSTALLATION WARNINGS Dimensions and materials of the cabin or cupboard in which the built-in oven will be installed in have to be correct and it has to be resistant to temperature increases. Please install as shown in Figure. *The furniture walls in which the oven is installed in must be heat resistant. Wall panels must be resistant to 100 C especially if the side walls are made of wallboard. Plastic or adhesive panels that are not resistant to this heat may deform and sustain damage. *For safety reasons, direct contact with electrical parts of the oven must be avoided. *Isolation and protective parts must be installed in a way to prevent them from being removable by any tool. *Oven must be installed as in Figure in order to provide a more effective air flow. *It is advised to leave a space of at least 40 mm on the back for the kitchen unit in which the oven is installed. *A support must be placed under the oven which can carry the weight when placing the oven. *The back section of the cabin in the kitchen unit must be removed in order to provide better air flow. *First complete the place in which oven will be installed and the electrical installation in order to ready the oven. Afterwards, call the closest Klugmann Authorized Service. *It is not advised to install the device near refrigerators or freezers, otherwise performance of said devices would be affected from the heat radiated. Figure 1 3

6 INSTALLATION OF THE OVEN TO THE CABIN *Place the device centered on the inlaid cabin. *Open the oven lid and mount the body to the countertop with four woodscrews by aligning the holes on the sides. *Oven can be mounted to a cupboard up top or under the counter if desired. *When mounting an electrical built-in stove on the counter over the oven, electricity cables of the oven and the stove must be separated in order to dismount the oven from the stove when necessary. ELECTRICAL CONNECTION *The device must be connected to the main electricity grid only by authorized electricity technicians in accordance with the laws and regulations in force. *Make sure that the power from the main grid is enough to supply the power stated in the information tag placed on the front bottom of the device. *If the current of fuse in your house is less than 16 Ampere, have a qualified electrician connect a 16 Ampere fuse. WARNING: The device must absolutely be grounded. *Your oven includes a grounded plug mounted on the grid cord. This plug must be used with a grounded line. Have a licensed electrician do the grounding installation. Before supplying electricity to the device: 1) Place the oven in a way to make reaching the plug used for electricity connection or double pole switch easier. 2) Do not let the electricity cable touch hot surfaces when placed and do not pin it to the oven lid. 3) Contact the nearest authorized service if the electricity cable is damaged. Make sure authorized service makes the chance with a new cable with plastic insulation at the same size and that can withstand the electricity current the oven needs. *A double pole switch with at least 3 mm between the contact points between the device and the electric wire and suitable for carrying the desired load in accordance with the laws in force must be installed if the device is to be connected directly to the electric wiring. Ground wire must not be cut be double pole switch. *It is not advised to use adapters, multi plugs or extension cords. If absolutely necessary, adapters or extension cords in line with safety laws can be used. However, never go beyond the maximum current capacity and maximum power stated for the adapter. *Test heating elements for 3 minutes after the connections are done. *Electricity safety of the device is guaranteed only if connected to suitable source correctly with grounding in accordance with the rules. Our company cannot be held responsible for the damages to people, animals or properties due to the failure to ground the device properly. Figure 2: Oven Electricity Plug Connection 4
7 WHEN THE DEVICE IS INSTALLED INITIALLY: 1. Set the Temperature Control to maximum level. (250 C MAX) 2. Set the Function button as Top and Bottom Grill (and + Fan if available). 3. Run the oven in this setup for 30 minutes. 4. Open a window for air circulation. A smoke and smell resulting from insulation materials and heating elements can be experienced for once during this period. If this happens, wait for the smoke and smell to dissipate before placing food inside the oven. *After these are done, clean the interior of the oven with a slightly wet soapy soft cloth. IMPORTANT: Always use the middle section of the handle when opening the lid of the oven. WARNING: Carefully wash parts such as tray, grid etc before the first use of the oven. OVEN ENERGY EFFICIENCY - Ovens with high efficiency in electricity use and heat insulation should be preferred. - Frequently opening the oven lid causes cold air outside the oven to enter inside, thereby causing energy loss. Therefore, oven lid shouldn't be opened if not necessary. - You shouldn't try to cook more than one meal in the oven at once. Meals that cook earlier should be taken out first, thereby use less energy without changing oven temperature. - Residual heat after the meal cooked in the oven should be used for another meal. You will save energy this way. - Preheating should be done for a short time (10 minutes the most). - Frozen meals should be deiced before cooking in the oven. - Combustible, inflammable materials that ignite easily must be kept away from the oven. - Ovens must be installed on a location far from inflammable environments. - Ovens will continue cooking in current temperature by using less energy if the lid is closed a few minutes before cooking. 5
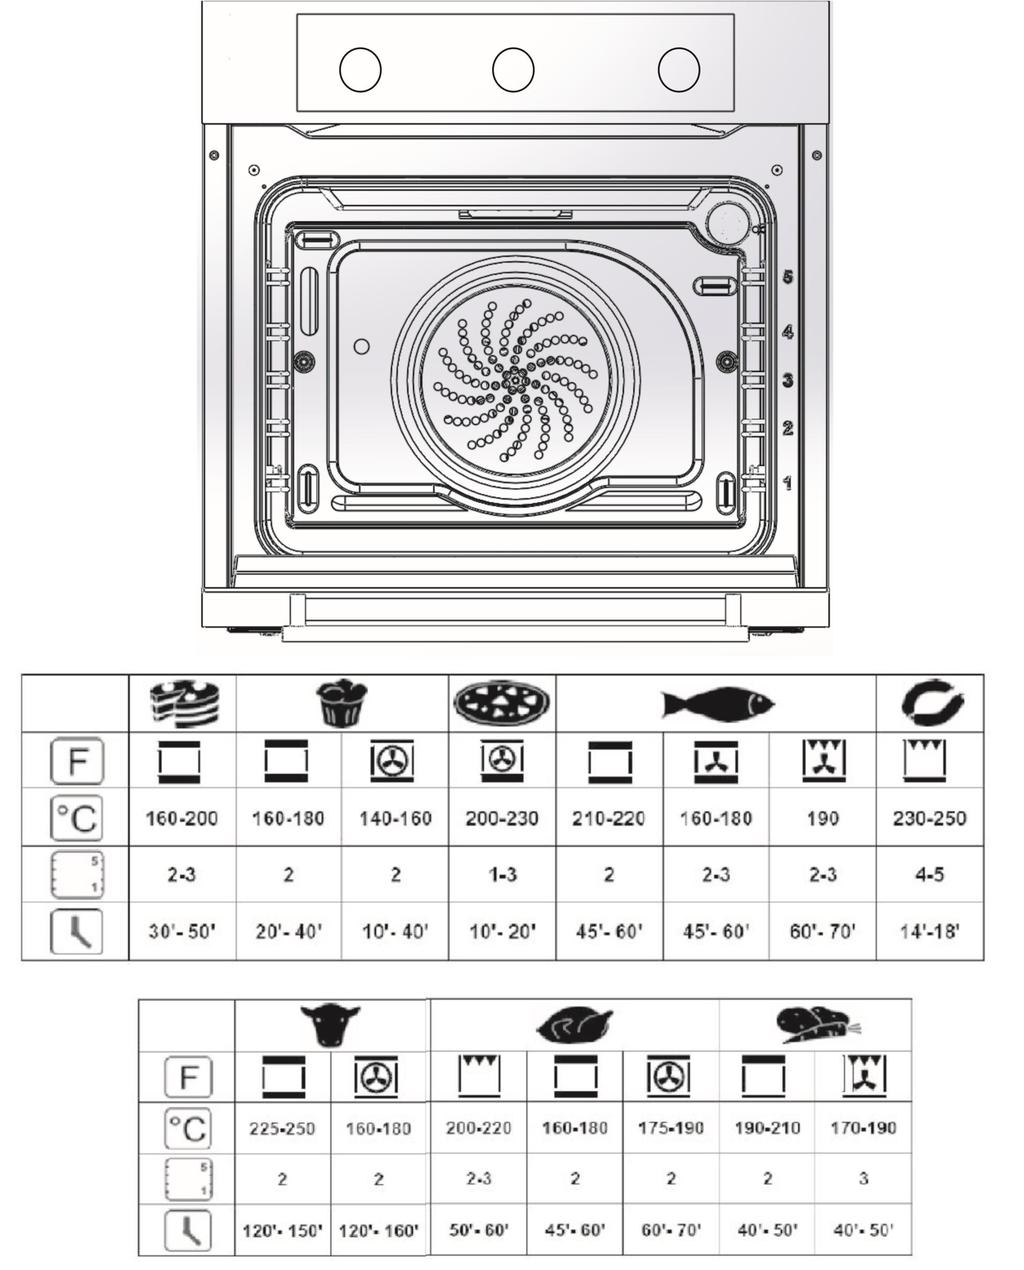
 Wire Grill 6) Product Information Tag 7) Oven Glass 8) Front Lid 9) Handle")
8 OVEN DESCRIPTION 1) Control Panel 2) Oven Top Resistor 3) Lamp 4) Turbo Fan 5) Wire Grill 6) Product Information Tag 7) Oven Glass 8) Front Lid 9) Handle 6

9 Display: Clock Indicator; the area which includes the time and date. Combination Screen; the area which shows chosen cooking function. Temperature Screen; the area which shows the adjusted oven temperature. Timer Display; Shows the status of the timer Screen status; shows the Oven Status symbol. Pause shows that the parameters on the screen were paused by the user. Key Lock Indicator Touchscreen Buttons: On/Off function. Stops the program; - Temperature Adjustment; - Timer Function; - Decrease; - Increase; - Function setting-down; - Function setting-up; - Increasing rapid heat setting; - Activate or deactivate key lock; - Open or close the light; - Start the cooking operation; Overview; Cooking time, stop time, cooking temperature can be adjusted from its menu. Also current, heat, real time appearance, chronometer, key lock functions, fan combinations can be set as user touchscreen buttons. 7
10 Key Lock On / Off; Command key (independent child lock) is turned on or off. The screen is completely blank when OFF. Push for 1 second to activate. Displays the actual time. Note: Time indicator won't be correct in case of any power failure. Flashing 00:00 will be displayed. It is not possible to use features outside its control without setting date and time setting. You can set the correct time by using and buttons It turn from On to OFF if you press for 1 second. Date and Time Setting: Touch and buttons date and time will start flashing. Press and buttons. Set the correct time and wait for 7 seconds, it will stop flashing and the adjustment is complete. Choosing Cooking Function: You can use or function buttons to browse the menu. The current function will flash for 7 seconds and the cooking temperature set for this function will be displayed on the temperature screen. (Note: It's not possible to control the temperature for some functions and their temperature indicator is empty.) the status will flash on the screen, this indicates that it is ready for cooking. Symbol shows that it hasn't started yet. Selecting Oven Temperature Change Function: Temperature Setting button can be changed by touching Temperature Indicator. Temperature indicator will start flashing and you can adjust to desired temperature with 5 degree increments using and symbols. (!) Note: Touch the symbol for 5 seconds until you hear a ring sound if you want to change the default temperature setting. Default temperature setting for this function has been permanently changed. Manual Cooking Function: When function is selected, you can start cooking with temperature indicator (if any) temperature setting by touching the button. Time passed during cooking will be displayed on the screen. Or cooking durations according to the maximum chosen cooking temperatures have been listed below: It stops manually by the user C 10h C 6h C 3h As will be explained later, semi or fully automatic cooking is stopped before starting cooking by the parameters set be the user. (by touch ) Starting or Stopping Cooking:The symbol will appear during cooking stop operation. will start flashing if touched during cooking and the other sections of the screen stay the same. All oven heating elements and the turbo fan will temporarily be disabled. And the cooking operation stops. 8
11 Touch the symbol again to finish the cooking operation, there will be no indicators regarding cooking on the screen. The remaining heat will be shown. Note: A second touch without touching, brings back the previous function and temperature settings to the screen after cooking is finished, cooking can start again. As described in this document, use the proper buttons to set cooking parameters (Function, Temperature etc). restart with set parameters if you touch the symbol. Cooking will Automatic Cooking: Automatic cooking will finish according to control parameters after choosing tools, cooking function and temperature and before touching the symbol. Semi Automatic Cooking: This method is carried out by setting desired cooking duration. 1) Choose desired function and set the temperature (if needed) as described in this document. 2) Touch the button. Timer will flash on the screen. 3)Set desired cooking duration using and the button. The status will be displayed on the screen. (You may hear two alarm sounds if set to 0:00) 4) Touch the symbol, cooking operation will start will disappear. Timer will be displayed on the screen along with cooking end time and the symbol. Fully Automatic Cooking: 1)) Will flash on the screen along with previous cooking ending time touch the button. 2) Set desired ending time using the and buttons. A delayed cooking program and cooking won't start immediately may disappear from the screen while it is present. 3) Touching the GO symbol will start cooking. Symbol disappears. Cooking time will be displayed with symbol, timer will be displayed on the screen. While Cooking: The 5 bars over the temperature indicator provides information about the real oven temperature. Each bar assign 1/5th to the corrected value. The up arrow near the bars will flash when heating elements are active. End of Automatic Cooking: Flashing and buzzer will ring for 7 minutes: cooking will stop automatically and if any (please see Remainder Heat Indicator section), temperature indicator will show remainder heat. Touching the second will cancel. Features: ON / OFF Light: The light inside each oven will be ON when the function is set. It will be OFF after cooking and the remainder heat indicator will appear. However, may be ON or OFF using thawing function without touching. 9
12 Quick Heating: Oven's temperature quickly increases according to the value set. turbo fan will operate for a short while for circular circuit and / or a quick heating. The symbol will be displayed on the screen when the oven reaches the set temperature, will disappear after a while and a ring is heard. Note: Quick heating isn't allowed for some functions (grill) or when it is far from the actual temperature, as its temperature is lower 50C. The degree of quick heating is 100C. Child Lock: Child lock can be activated or deactivated by pressing the for 1 second until the symbol appears on the screen. No button function except will work when child lock is activated. Minute Warning(Alarm): Touch the symbol and then the will start flashing on the screen. And touch to set the time. It will stop for 7 seconds after the set time has passed, the alarm will ring for 7 minutes. you can cancel by and symbols to stop the alarm. Cooling Fan: Fan will be activated if the oven temperature goes above 85 C. Fan will be deactivated if the oven temperature 75 C. Error Inductions: May prevent normal operation the appliance enters error mode if this happens. The error code Display Clock is displayed when the appliance is on standby. This code will stay on the screen unless the button is touched. There are a total of 8 error codes: Error Code Error Description and Possible Causes Err1 Err2 Err3 Communication error between UM and PM protocols DKB2-XX-POC400 data cable connector may have loosened from both ends DKB2-XX-POC400 may be damaged POC 400 PM may be faulty Temperature Sensor On PT-1000-M2-XXX sensor connector OS may be loosened May be PT-1000-M2-XXX sensor error. POC 400 PM may be faulty Temperature Sensor Open Circuit May be PT-1000-M2-XXX error POC 400 PM may be faulty 10
13 Error Code Error Description and Possible Causes Err4 Err5 Front Panel Temperature Limit Exceeded UM exceeded limit (100C) and temperature, cooling fan control POC 400 UM may be faulty. PM Temperature Limit Exceeded PM exceeded Temperature limit (105C). POC 400 PM may be faulty Err6 Heat sensor error may be UM POC 400 UM fault. Err7 Heat sensor error UM PM heat sensor error POC 400 PM may be faulty. Err8 Temperature Regulation Check heating elements and connections may be POC 400 PM fault If a Error Message appears: In case of any error the errors, incoming electricity is shut down by touching may start after 2 min. button. And error correction Programmable Options Buzzer Tone:You can pick from three ring tones. Push the button for 5 seconds, clock display will show "tn1" as the tone (high) or "tn2 (medium)" or "tn3 (low)" as selected. Selected tone can be changed by. Default ring is "tn1". Touch Button Sound: there are three main sounds to choose from. Touch the button for 5 seconds, Clock display will show "bt" (beeping sound) or "c" (click sound) or "nt" (no sound) as selected button sound. The last may be the valid key sound, change by touching the button in 7 seconds. Standard button sound is "bt". in 7 seconds. Daytime Mode 24h/12h Time: Default mode is 24 hours. Touch and buttons for 5 seconds if you want 12 h am / pm mode. You will hear a beep when mode has changed. Repeat the same process for reversing. Automatic Power Saving (APS): APS is not activated in factory settings. Another case is set to display the time of day when it will switch off automatically. If pressed for 5 seconds in standby mode (no work will be available), time for a few seconds with a beep will enable the PS ON. Same applies for deactivating, PS OFF will be displayed on the screen. 11
.")
14 COOLING FAN Overheating of the external surface oven and damaging its perimeter is prevented by ventilation system cooling fan. This fan creates a ventilation that enables discharge of hot air from grids (ventilation openings). The heat emanating over the oven prevents oven from reheating, also prevents overheating of the control panel and the cover and the components by creating an air curtain. Ventilation of the cooling fan prevents condensation that may occur by heat and humidity on electrical and mechanical components and makes them safer and durable. Cooling fan is enabled and disabled by the thermostat on it. In this case, as the cooling fan works based on temperature, it will run for a period even if the oven is turned off and stops automatically. MISCELLANEOUS SUGGESTIONS PROBLEM CAUSE SOLUTION Bottom heat level low Top of the meal is overcooked, bottom is undercooked. Bottom of the meal is overcooked, top is undercooked. Top heat level low Possibly wrong cooking shelf, tray must be put to the shelf 1 lower Possibly wrong cooking shelf, tray must be put to the shelf 1 higher Exterior of the meal is cooked but interior is not Overheating Wrong cooking temperature, lower heat Exterior of the meal dried Low heating Wrong cooking temperature Increase heat 12
15
16 13

17 DEVICE CLEANING AND MAINTENANCE GENERAL CLEANING *Unplug the device or turn the power switch to off position and cut the electricity connection of the oven before any cleaning process. *Wait for the device to cool before starting cleaning. *Clean stainless steel surfaces with commercially available special stainless steel cleaner sprays or liquids. *Make sure that the cleaning materials you will be using on your products do not contain varnish or particles that may scratch painted surfaces. *Do not use liquid cleaners that contain abrasive particles and metal sponges in order to prevent erasing the symbols while cleaning the control panel and buttons. *Do not clean the oven with bleach, hci and similar materials. *Do not try to detach buttons from the control panel as buttons cannot be detached in some models. *Never use abrasive (rubber, cleaning powder, oven sprey, abrasive hard sponge), acid (bleach) or cleaning materials containing chloride in oven cleaning. *Do not leave abrasive and acidic stains (lemon juice, vinegar etc.) on varnished, painted and stainless steel surfaces. OVEN INTERIOR *Take care of cleaning the oven after each use. *It is best to clean the varnished surface inside the oven when it is warm. *Take out trays and grids. Clean the Interior Section by wiping with a cloth soaked in soapy warm water. Afterwards, wipe with a wet cloth once and dry. *Do not use abrasive materials such as sandpaper, steel wool or bleach. Otherwise the varnished section of the oven may be damaged. *Clean the oven thoroughly with a suitable oven cleaning material periodically. *You may use cleaning material used for stainless steel or some amount of vinegar against stubborn stains. *Stains of this sort of liquids will damage the oven's shine but will not affect its performance in any way. REMOVING SIDE WIRE TRAYS OF THE OVEN It is possible to remove and clean the side wire trays in which trays and wire grids are placed easily. Follow the procedure as shown in the picture below to remove the oven interior wire trays from the side walls. 14
18 OVEN GLASS Clean and dry the glass lid with soft sponge and clothes. OVEN SEAL: *Condensation may occur inside the front lid and lid seal after the oven has been used for a long time. Remove the humidity with a dry cloth or sponge. *Control this seal's condition periodically. Clean without using necessary abrasive cleaning materials. *Contact the nearest Klugmann Authorized Service if the seal is damaged. Do not use your oven until it's fixed. REMOVING OVEN LID You can remove and clean the oven lid easily. You must follow the procedures below to remove the lid. *Open the lid completely. *Push the 2 hinges shown in the picture backwards. *Hold the lid and close up to the first stopping place. *Pull the raised lid away from its mounted location. Place the hinges correctly and push downwards in order to mount removed oven lid back properly. CHANGING OVEN BULB *Make sure the device doesn't get electricity before carrying out this procedure. *The oven bulb must have the features below. High heat resistance (up to 300 C). Electricity values: V AC *Electricity power: 25W *E 14 connection *Oven bulb must be changed as shown in the Figure: Press the glass cover and turn counter clockwise, Remove the burnt bulb, Install the new bulb, Place the glass cover, Turn the device's power on. IMPORTANT: Disconnect the oven's electricity connection by pulling the device's plug if you decide not to use the device again. Unused devices pose a safety risk for children. Therefore, keep the oven away from children's reach. 15

19 16

20 17
TABLE OF CONTENTS DEAR CUSTOMERS,
 MODEL : P619.1SS DEAR CUSTOMERS, First of all, thank you for buying our product. Please read all the instructions and warnings in this manual carefully. The manual includes important information about
Owner s Manual GEMINI PETIT CHEF MULTIFUNCTION THERMOFAN
 Owner s Manual GEMINI PETIT CHEF MULTIFUNCTION THERMOFAN EYE LEVEL OVEN CONTENTS 2 Introduction 2 Unpacking 2 Cupboard Design 2 Safety Advice 3 Installation 3 Electrical Installation 4 The Control Panel
Built-in Conventional Oven
 Built-in Conventional Oven LAM3204 User & Installation Guide using this manual Thank you for choosing LAMONA Built - In Oven. This user Manual contains important information on safety and instructions
SK110, SK210 & SK310 Single Ovens Installation, Use and Maintenance
 SK110, SK210 & SK310 Single Ovens Installation, Use and Maintenance Customer Care Department The Group Ltd. Harby Road Langar Nottinghamshire NG13 9HY T : 01949 862 012 F : 01949 862 003 E : customer.care@cda.eu
BUILT-IN OVEN MODEL: EBO-D7080D(SS) Owner s Manual Please read this manual carefully before operating your set. Retain it for future reference.
 Owner s Manual Please read this manual carefully before operating your set. Retain it for future reference.") BUILT-IN OVEN MODEL: EBO-D7080D(SS) Owner s Manual Please read this manual carefully before operating your set. Retain it for future reference. Record model number and serial number of the set. See the
BUILT-IN OVEN MODEL: EBO-D7080D(SS) Owner s Manual Please read this manual carefully before operating your set. Retain it for future reference. Record model number and serial number of the set. See the
BUILT-IN OVEN MODEL: EBO-E7081D(SS) Owner s Manual Please read this manual carefully before operating your set. Retain it for future reference.
 Owner s Manual Please read this manual carefully before operating your set. Retain it for future reference.") BUILT-IN OVEN MODEL: EBO-E7081D(SS) Owner s Manual Please read this manual carefully before operating your set. Retain it for future reference. Record model number and serial number of the set. See the
BUILT-IN OVEN MODEL: EBO-E7081D(SS) Owner s Manual Please read this manual carefully before operating your set. Retain it for future reference. Record model number and serial number of the set. See the
Built-in single oven instruction manual C2233 / C2233BK. Contact Caple on or for spare parts
 Built-in single oven instruction manual C2233 / C2233BK Contact Caple on 0117 938 7420 or for spare parts www.caple.co.uk CONTENTS Safety instructions 3 Environmental protection 6 Preparation for installation
VK902 Compact Combination Microwave Oven Installation, Use and Maintenance
 VK902 Compact Combination Microwave Oven Installation, Use and Maintenance Customer Care Department The Group Ltd. Harby Road Langar Nottinghamshire NG13 9HY T : 01949 862 012 F : 01949 862 003 E : customer.care@cda.eu
T-60cm-OVEN-SS T-60cm-OVEN-CM T-60cm-OVEN-BL
 T-60cm-OVEN-SS T-60cm-OVEN-CM T-60cm-OVEN-BL USER INSTRUCTIONS GENERAL WARNINGS Read carefully all the instructions contained in this booklet. It provides you with important information regarding the safe
BSM60SS / BSM60WH BUILT IN MULTI-FUNCTION ELECTRIC FAN OVEN. Instruction Manual
 BSM60SS / BSM60WH BUILT IN MULTI-FUNCTION ELECTRIC FAN OVEN Instruction Manual Please read these instructions carefully before use and retain for future reference CONTENTS Safety Instructions 2 Specifications
CTEC50WH CTEC60WH CTEC60BK OPERATING AND INSTALLATION INSTRUCTIONS OF ELECTRIC DOUBLE OVEN
 TM CTEC50WH CTEC60WH CTEC60BK EN OPERATING AND INSTALLATION INSTRUCTIONS OF ELECTRIC DOUBLE OVEN Dear Customer, Thank you for purchasing this Cooking Appliance. The safety precautions and recommendations
Instruction Manual for Electric Ovens OO757X OO986X
 Instruction Manual for Electric Ovens OO757X OO986X 1 2 DEAR CUSTOMER, We thank you and congratulate you on your choice. This new carefully designed product, manufactured with the highest quality materials,
Cooking Appliances. Installation and operating instructions. Professional Series Stretch Oven TO851X
 Cooking Appliances Installation and operating instructions Professional Series Stretch Oven TO851X 9111 TO851 Use and Care.indd 1 28/4/08 12:07:30 PM Contents Dear customer 3 The first time you use the
OVENS AUS. Installation - Use - Maintenance. Oven models: 60cm Built in Ovens
 OVENS Installation - Use - Maintenance AUS Oven models: 60cm Built in Ovens 539.07.031 539.07.041 GENERAL INFORMATION Please read this booklet thoroughly before you use this appliance. It is important
Contents. Downloaded from manuals search engine
 Contents 1. INSTRUCTIONS FOR SAFE AND PROPER USE 6. INSTALLATION 8 3. DESCRIPTION OF CONTROLS 30 4. USE OF THE OVEN 35 5. AVAILABLE ACCESSORIES 36 6. COOKING HINTS 37 7. CLEANING AND MAINTENANCE 43 8.
BSF60WH / BSF60SS BUILT IN ELECTRIC FAN OVEN. Instruction Manual. Please read these instructions carefully before use and retain for future reference
 BSF60WH / BSF60SS BUILT IN ELECTRIC FAN OVEN Instruction Manual Please read these instructions carefully before use and retain for future reference SAFETY INSTRUCTIONS Important: This appliance is not
VK702 Compact Steam Oven with Grill Installation, Use and Maintenance
 VK702 Compact Steam Oven with Grill Installation, Use and Maintenance Customer Care Department The Group Ltd. Harby Road Langar Nottinghamshire NG13 9HY T : 01949 862 012 F : 01949 862 003 E : customer.care@cda.eu
Instruction Manual for Ceramic Cooker Hob Model : PCH465T-U
 Instruction Manual for Ceramic Cooker Hob Model : PCH465T-U Dear Customer, Thank you for purchasing this PROline Ceramic Hob. The safety precautions and recommendations in these instructions are for your
DC740 Built-under & DC940 Built-In
 DC740 Built-under & DC940 Built-In Double Oven Installation, use and maintenance www.cda.eu Contents: 3 Important information 4 Important safety notes 6 Before first use 7 Notes on usage 8 Oven controls
Owner s Manual STOVES. MODELS 620 Kitchenaire. 621 Kitchenaire 711S
 Owner s Manual STOVES MODELS 620 Kitchenaire 621 Kitchenaire 711S CONTENTS 2 Introduction 2 Unpacking 2 Installation 2 Electrical Installation 3 Safety Advice 3 Control Panels 4 The Oven 5 Solid Plates
Instructions for Use
 Instructions for Use ENVIRONMENT PROTECTION The packaging of your product is recyclable. Do not dispose of it with the rest of your waste but rather recycle the packaging or bring it to your nearest recycling
operating & installation instructions SA20XMFR
 operating & installation instructions SA20XMFR Contents 1. INSTRUCTIONS FOR SAFE AND PROPER USE 26 2. INSTALLATION 28 3. DESCRIPTION OF CONTROLS 30 4. USE OF THE OVEN 35 5. AVAILABLE ACCESSORIES 36 6.
SAFEGUARDING THE ENVIRONMENT IMPORTANT NOTES BEFORE USING THE OVEN OVEN ACCESSORIES CARE AND MAINTENANCE TROUBLESHOOTING GUIDE AFTER SALES SERVICE
 31002018GB.fm Page 11 Tuesday, December 2, 2008 10:29 PM INSTRUCTIONS FOR USE SAFEGUARDING THE ENVIRONMENT IMPORTANT NOTES BEFORE USING THE OVEN OVEN ACCESSORIES CARE AND MAINTENANCE TROUBLESHOOTING GUIDE
SAFEGUARDING THE ENVIRONMENT IMPORTANT NOTES BEFORE USING THE OVEN OVEN ACCESSORIES CARE AND MAINTENANCE TROUBLESHOOTING GUIDE AFTER SALES SERVICE
 INSTRUCTIONS FOR USE SAFEGUARDING THE ENVIRONMENT IMPORTANT NOTES BEFORE USING THE OVEN OVEN ACCESSORIES CARE AND MAINTENANCE TROUBLESHOOTING GUIDE AFTER SALES SERVICE To make the most of your new oven,
MODEL NO: MC02 BATCH NO: PR3547
 MODEL NO: MC02 BATCH NO: PR3547 INSTRUCTION MANUAL PLEASE READ AND RETAIN FOR FUTURE REFERENCE IMPORTANT TIPS AND SAFEGUARDS - This appliance is intended for domestic use only, not for commercial purposes.
COUNTERTOP OVEN. use and care manual. TOD3300 Series
 COUNTERTOP OVEN use and care manual TOD3300 Series Thank you for your purchase! Should you have any questions or concerns with your new product, please call our Customer Service Line at 1-800-231-9786
45CM BUILT-IN OVEN MODEL: EBO-C3580ST(SS) Owner s Manual Please read this manual carefully before operating your set. Retain it for future reference.
 Owner s Manual Please read this manual carefully before operating your set. Retain it for future reference.") 45CM BUILT-IN OVEN MODEL: EBO-C3580ST(SS) Owner s Manual Please read this manual carefully before operating your set. Retain it for future reference. Record model number and serial number of the set. See
45CM BUILT-IN OVEN MODEL: EBO-C3580ST(SS) Owner s Manual Please read this manual carefully before operating your set. Retain it for future reference. Record model number and serial number of the set. See
Important Safeguards. Topic 2 SAVE THESE INSTRUCTIONS - FOR HOUSEHOLD USE ONLY SAVE THESE INSTRUCTIONS - FOR HOUSEHOLD USE ONLY 3
 User s Manual Index Topic Important safeguards 03 Safety features 05 Parts and accessories 05 Before first use 06 Operating instructions 06 Programme settings 08 Care and cleaning 09 Pressure canning guide
WARM/CANCEL button While the cooker is in standby mode, press WARM/CANCEL button to start the keep warm function.
 Product introductions 1. Detachable steaming valve and inner cover for easy clean 2. Aluminum alloy inner pot with non-stick coating 3. Safety protection for high temperature 4. LED digital display Knowing
INSTRUCTIONS FOR USE. To make the most of your new oven, read the user's instructions carefully and keep them on hand for consultation in the future.
 INSTRUCTIONS FOR USE INSTALLATION...4 SAFEGUARDING THE ENVIRONMENT... 7 IMPORTANT NOTES... 7 BEFORE USING THE OVEN... 8 OVEN ACCESSORIES... 9 CARE AND MAINTENANCE... 10 TROUBLESHOOTING GUIDE... 12 AFTER
Breakfast-To-Go. Instruction Manual. 3-in-1 Toaster Oven, Coffee Maker and Griddle. Model: ABT-203W
 Breakfast-To-Go 3-in-1 Toaster Oven, Coffee Maker and Griddle Instruction Manual Model: ABT-203W Congratulations! Your 3-in-1 Toaster Oven, Coffee Maker and Griddle will surely become one of the most versatile
Operating instructions Page 14. Refrigerator Read the operating instructions before switching on for the first time
 Operating instructions Page 14 Refrigerator Read the operating instructions before switching on for the first time 7085 039-00 LKv 5710 Content Disposal notes... 14 Description of the appliance... 14 Safety
Warming Drawer LAM9000. User & Installation Guide
 Warming Drawer LAM9000 User & Installation Guide 1 CONTENTS Safety information... 2 Safety instructions... 4 Precautions during use... 5 Appliance Description... 6 Use... 7 Load capacity... 8 Cleaning
Valued Customer, It is our goal to offer product which more than meets your expectationsby carefully producing them in modern facilities with proven q
 OPERATING AND INSTALLATION INSTRUCTIONS OF ELECTRICAL FREESTANDING OVEN AFEE30-AFEE31-AFEE32-AFEE56- AFEC50-AFEC51-AFEC52 Valued Customer, It is our goal to offer product which more than meets your expectationsby
HEAVY DUTY RANGE BAIN MARIES & HOTCUPBOARDS (ELECTRIC)
") V HEAVY DUTY RANGE BAIN MARIES & HOTCUPBOARDS (ELECTRIC) MODEL NUMBERS SCEP12 SCEP16 SCEP19 SCEP22 SCDD12 SCDD16 SCDD19 SCDD22 PEER12 PEER16 PEER19 PEER22 PEDD12 PEDD16 PEDD19 PEDD22 PEER12T PEER16T PEER19T
V HEAVY DUTY RANGE BAIN MARIES & HOTCUPBOARDS (ELECTRIC) MODEL NUMBERS SCEP12 SCEP16 SCEP19 SCEP22 SCDD12 SCDD16 SCDD19 SCDD22 PEER12 PEER16 PEER19 PEER22 PEDD12 PEDD16 PEDD19 PEDD22 PEER12T PEER16T PEER19T
Owner s Manual THERMOFAN STOVES MODELS 631T 731T 735TC CONTENTS
 Owner s Manual THERMOFAN STOVES MODELS 631T 731T 735TC CONTENTS 2 Introduction 2 Unpacking 2 Installation 2 Electrical Installation 3 Safety Advice 3 Control Panels 4 Automatic Oven Timer/Clock 6 Introduction
USING THE REFRIGERATOR COMPARTMENT
 USING THE REFRIGERATOR COMPARTMENT Switching the appliance on Starting the appliance Insert the plug. The light, located under the control panel or inside the product (depending on model) comes on when
Operating and installation instructions
 Operating and installation instructions Plate warming drawer EGW 3060-10 To avoid the risk of accidents or en-gb damage to the appliance it is essential to read these instructions before it is installed
Operating instructions Page 12
 Operating instructions Page 12 Refrigerator with explosion-proof interior container Read the operating instructions before switching on for the first time 7082 271-00 LKEXv 910 Disposal notes The appliance
DOUBLE OVEN. Instructions for use - Installation advice. Before operating this oven, please read these instructions carefully P A U
 P A U TO DOUBLE OVEN model CKB 300 Instructions for use - Installation advice Before operating this oven, please read these instructions carefully 2 CONTENTS Page Number Introduction.....................................
USER GUIDE. A commitment to: Belling 100/110 Ei Range Part Number: Date: 11/08/16
 USER GUIDE A commitment to: Belling 100/110 Ei Range Part Number: 083596201 Date: 11/08/16 Countries of destination: GB - Great Britain þ IE - Ireland DE - Germany ES - Spain FR - France IT - Italy PL
Owner s Manual SLIMLINE STAINLESS STEEL CONTENTS BUILT-IN OVEN 600 STE THERMOFAN
 Owner s Manual SLIMLINE STAINLESS STEEL BUILT-IN OVEN 600 STE THERMOFAN CONTENTS 2 Unpacking 2 Cupboard Design 2 Electrical Installation 3 Installation 3 The Control Panel 4 Thermofan Oven 5 Turbo Grilling
BEL FS50ET SIL/ BEL FS50ET BLK/ BEL FS50ET WHI/ OPERATING AND INSTALLATION INSTRUCTIONS OF ELECTRIC TWIN CAVITY
 BEL FS50ET SIL/444443922 BEL FS50ET BLK/444443921 BEL FS50ET WHI/444443920 OPERATING AND INSTALLATION INSTRUCTIONS OF ELECTRIC TWIN CAVITY Dear Customer, Thank you for purchasing this Cooking Appliance.
RV961 Range Cooker Installation, Use and Maintenance
 RV961 Range Cooker Installation, Use and Maintenance Customer Care Department The Group Ltd. Harby Road Langar Nottinghamshire NG13 9HY T : 01949 862 012 F : 01949 862 003 E : customer.care@cda.eu W :
VK901 Compact Combination Microwave Oven Installation, Use and Maintenance
 VK901 Compact Combination Microwave Oven Installation, Use and Maintenance Customer Care Department The Group Ltd. Harby Road Langar Nottinghamshire NG13 9HY T : 01949 862 012 F : 01949 862 003 E : customer.care@cda.eu
Convection TCO650. For your safety and continued enjoyment of this product, always read the instruction book carefully before using.
 Convection Toaster Oven TCO650 For your safety and continued enjoyment of this product, always read the instruction book carefully before using. IMPORTANT SAFEGUARDS SAVE AND READ THESE INSTRUCTIONS When
For Models FF2310APS, FF2310APW, FF2310APB 55cm FREESTANDING FRIDGE FREEZER. Instruction Manual
 For Models FF2310APS, FF2310APW, FF2310APB 55cm FREESTANDING FRIDGE FREEZER Instruction Manual Please read these instructions carefully before use and retain for future reference. Before switching on your
cooking collection Instructions for use and warranty details Built In Oven Model No.: OMF6011
 cooking collection Instructions for use and warranty details Built In Oven Model No.: OMF6011 2 Congratulations on the purchase of your new Kleenmaid appliance. Your new Kleenmaid appliance has been designed
Instruction Manual for Electric Warming Drawer BWD14B
 Instruction Manual for Electric Warming Drawer BWD14B Contents Appliance Description... 6 Main Components... 6 How the warming drawer works... 6 Use... 7 Before using for the first time... 7 Control Panel...
Operating instructions Wine storage cabinet Page 16
 7081 295-00 508 Operating instructions Wine storage cabinet Page 16 Many thanks for your trust. Congratulations on your purchase of this wine storage cabinet. In buying this product, which is distinguished
Built in Electric Ceramic Hob. Instruction Manual
 Built in Electric Ceramic Hob Instruction Manual Model number: RHEH1 Opening times: Monday - Friday 8am 6pm & Saturday 9am 1pm or visit us at Contents Safety Instructions 3-4 Before using the appliance
OWNER S MANUAL HIGH WALL INVERTER. (English) (BSHVD1S SERIES)
 (BSHVD1S SERIES)") OWNER S MANUAL HIGH WALL INVERTER (English) (BSHVD1S SERIES) IMPORTANT As with any product that has moving parts or is subject to wear and tear, it is VERY IMPORTANT that you maintain your air conditioner
OWNER S MANUAL HIGH WALL INVERTER (English) (BSHVD1S SERIES) IMPORTANT As with any product that has moving parts or is subject to wear and tear, it is VERY IMPORTANT that you maintain your air conditioner
Electrical Double Oven
 0 0 0 Electrical Double Oven Operating & Installation Instructions -Please keep for future reference AE66DCW AE66DCA AE66DCSS Important - Please read these instructions fully before using These instructions
Instruction Manual for the Ceramic Hob
 Instruction Manual for the Ceramic Hob Model:CERX60 Dear customer, Thank you for purchasing our ceramic hob. Please read this instruction manual carefully before using and ensure it is installed by a qualified
HOW TO OPERATE THE REFRIGERATOR COMPARTMENT
 HOW TO OPERATE THE REFRIGERATOR COMPARTMENT Switching on the appliance 1. Plug in the appliance 2. When the appliance is plugged in, it is normally factory set to a temperature of 5 C. Adjusting the temperature
Instructions for Use GB IE MT
 Instructions for Use GB IE MT GLASS CERAMIC INDUCTION BUILT-IN COOKING HOB Dear customer! Instructions for use Installation instructions Rating plate Fire hazard protection Built-in glass ceramic induction
OPERATING AND INSTALLATION INSTRUCTIONS OF ELECTRIC DOUBLE OVEN
 BEL FS50EFDO SIL/444443926 BEL FS50EFDO STA/444443924 BEL FS50EFDO BLK/444443925 BEL FS50EFDO WHI/444443923 OPERATING AND INSTALLATION INSTRUCTIONS OF ELECTRIC DOUBLE OVEN Dear Customer, Thank you for
Instructions. 1 Instructions
 Contents 1 Instructions 22 1.1 General safety instructions 22 1.2 Identification plate 23 1.3 Manufacturer liability 23 1.4 Appliance purpose 23 1.5 Disposal 23 1.6 This user manual 24 1.7 How to read
USER MANUAL 60CM BUILT-IN OVEN BMO6S AND BMO9S
 USER MANUAL 60CM BUILT-IN OVEN BMO6S AND BMO9S PREFACE Dear Customer, Congratulations on purchasing your new product from Home Appliances. To register your Parts and Labour Warranty, some conditions apply,
INSTRUCTIONS FOR USE, INSTALLATION, AND CONNECTION
 MT IE GB INSTRUCTIONS FOR USE, INSTALLATION, AND CONNECTION GLASS CERAMIC INDUCTION BUILT-IN COOKING HOB GLASS CERAMIC INDUCTION BUILT-IN COOKING HOB Dear customer! Instructions for use Installation instructions
Double Oven / User Manual
 EN Double Oven / User Manual 444444812 BEL FSI608MFTc Sta Thank you for choosing this product. This User Manual contains important safety information and instructions on the operation and maintenance of
Electric Cooker. Important Please read these instructions fully before installing or using
 Electric Cooker Installation & User Instructions - Please keep for future reference Cat no Model 2287041 BUSH BUEDC60W WHITE 2442374 BUSH BUEDC60B BLACK 2753812 BUSH BUEDC60SS S/STEEL Cooker serial number
Installation and Operating Instructions MODEL: MSE46W
 Installation and Operating Instructions MODEL: MSE46W MSE50W MODEL: Free Standing Electric ElectricOven Oven Free Standing Please read these instructions carefully before attempting to install or use this
Operating Instructions
 Operating Instructions Model : PRT-E / PRT-EN Installer Note: This thermostat is a combination model allowing you to choose between Floor Only or Air & Floor temperature control. Please see page 11 for
INSTRUCTIONS FOR USE
 -1- INSTRUCTIONS FOR USE INDUCTION COOKERS Base-Line Fajita Heater SH/BA 3500 FH -2- CONTENT 1 General remarks...3 1.1 Description of danger signs...3 1.2 Purpose of induction cookers...4 2 Description
J70 BIO ( ) Built-In Electric Oven User Manual
 Built-In Electric Oven User Manual") J70 BIO (538.01.001) Built-In Electric Oven User Manual ACKNOWLEDGMENT Thank you for purchasing our product. We hope you enjoy using the many features and benefits it provides. Before using this product
J70 BIO (538.01.001) Built-In Electric Oven User Manual ACKNOWLEDGMENT Thank you for purchasing our product. We hope you enjoy using the many features and benefits it provides. Before using this product
Operating instructions
 Operating instructions Built-in Plate Warmer EGW 2060 To prevent accidents and machine damage read these instructions before installation or use. UV M.-Nr. 06 405 620 Contents IMPORTANT SAFETY INSTRUCTIONS.................................
CS027 User Instructions
 CS027 User Instructions Battery Powered 7 Day Programmable Room Thermostat Programmable room thermostats are widely recognised as one of the best ways in which to control central heating. The CS027 programmable
GLASS CERAMIC COOKTOP
 PHS 3216C GLASS CERAMIC COOKTOP USER'S MANUAL Dear customer, Thank you for buying a PHILCO brand product. So that your appliance serves you well, please read all the instructions in this user's manual.
BULL INSTRUCTION MANUAL. Model Number: BC-130 REFRIGERATOR BEFORE USE, PLEASE READ AND FOLLOW ALL SAFETY RULES AND OPERATING INSTRUCTIONS.
 BULL INSTRUCTION MANUAL Model Number: BC-130 REFRIGERATOR BEFORE USE, PLEASE READ AND FOLLOW ALL SAFETY RULES AND OPERATING INSTRUCTIONS. 1 REFRIGERATOR SAFETY Your safety and the safety of others are
USER GUIDE. A commitment to: Belling 90 Ei Range Part Number: Date: 20/06/16
 USER GUIDE A commitment to: Belling 90 Ei Range Part Number: 083596100 Date: 20/06/16 Countries of destination: GB - Great Britain þ IE - Ireland DE - Germany ES - Spain FR - France IT - Italy PL - Poland
IMPORTANT SAFETY INSTRUCTIONS DANGER WARNING
 IMPORTANT SAFETY INSTRUCTIONS These instructions shall also be available on website: www.whirlpool.eu YOUR SAFETY AND THAT OF OTHERS IS VERY IMPORTANT This manual and the appliance itself provide important
INSTALLATION GUIDE / USER GUIDE GB IE
 BUILT-IN OVEN OB60 double oven under bench models INSTALLATION GUIDE / USER GUIDE GB IE Contents 1 Safety and warnings 2 Installation instructions 6 Using your oven for the first time 14 Clock and timer
Operating Instructions Model : HC HC-N
 Operating Instructions Model : HC HC-N This product should be installed by a qualified electrician. Improper installation may result in injury, death or property damage. Contents Table Contents 1 What
USER GUIDE. A commitment to: Belling Elec Range Part Number: Date: 09/06/16
 USER GUIDE A commitment to: Belling Elec Range Part Number: 083596000 Date: 09/06/16 Countries of destination: GB - Great Britain þ IE - Ireland DE - Germany ES - Spain FR - France IT - Italy PL - Poland
User Manual. Ceramic Cooktop Model : CRSF745
 User Manual Ceramic Cooktop Model : CRSF745 Please read this instruction manual carefully before using your new ceramic cooktop and keep the manual in a safe place for future reference. Dear customer,
Dual Fuel Double Oven
 Dual Fuel Double Oven Installation & User Instructions - Please keep for future reference Cat no Model 2667018 BUSH BUDFD60B BLACK 2469285 BUSH BUDFD60SS S/STEEL 2666923 BUSH BUDFD60W WHITE Cooker serial
Optimax Refrigerated Retail Merchandisers
 V Optimax Refrigerated Retail Merchandisers MODEL NUMBERS RMR65E RMR100E RMR130E RMR65S RMR100S RMR130S RMR65SW RMR100SW RMR130SW Assisted service 650 wide Assisted service 1000 wide Assisted service 1300
50110_HM-neoStat-2014_Layout 1 31/10/ :33 Page 1 neo
 neo Model: Available in : Sapphire Black and Glacier White 1 Wavin neo Table of Contents Product Image 1 Optional Features 19-22 Table of Contents 2 Re-calibrating the Thermostat 23 What is a Programmable
Instructions for use. Model: X2-30ES
 Instructions for use Model: X2-30ES Important safety instructions, read carefully and keep for future reference. CONTENTS Precautions to Avoid Possible Exposure to Excessive Microwave Energy..1 Specifications...1
Warming Drawer LAM9001. User & Installation Guide
 Warming Drawer LAM9001 User & Installation Guide 1 CONTENTS Safety information... 2 Safety instructions... 4 Precautions during use... 5 Appliance Description... 6 Use... 7 Load capacity... 8 Cleaning
6L PRESSURE COOKER. Instruction Manual. Model: PLA1424
 6L PRESSURE COOKER Instruction Manual Model: PLA1424 Due to ongoing product improvements, specifications and accessories may change without notice. Actual product may differ slightly to that depicted.
QUARTZ HEAT COUNTERTOP OVEN INSTRUCTION MANUAL MODEL: TSCLTRDG1
 QUARTZ HEAT COUNTERTOP OVEN INSTRUCTION MANUAL MODEL: TSCLTRDG1 1 TABLE OF CONTENTS IMPORTANT SAFEGUARDS 3 POLARIZED PLUG 4 PRODUCT DIAGRAM 5 LCD DISPLAY 5 USAGE INSTRUCTIONS PREPARING YOUR COUNTERTOP
Warming Drawer. Instructions and Installation LAM
 Warming Drawer Instructions and Installation www.howdens.com/appliance-registration LAM9002 See back page for product serial number 3 CONTENTS Safety information... 4 Appliance Description... 8 Use...
Table of Contents. Product Image Table of Contents What is a Programmable Room Thermostat? Installation Procedure
 1 Model: 1 Table of Contents Product Image Table of Contents What is a Programmable Room Thermostat? Installation Procedure 1 2 3-4 5-6 Mode Select Pairing the ProTouch iq Hub Pairing the ProTouch iq What
INSTRUCTION MANUAL ELECTRIC OVEN CBCONX14
 INSTRUCTION MANUAL ELECTRIC OVEN CBCONX14 Contents Safety Warnings... 4 Unpacking... 7 Product Overview... 8 Front View...8 Control Panel...8 Connecting to the Mains... 9 First Time Use of the Oven...
User Manual Watt Drop-In Induction Range. Model: DC /2017. Please read and keep these instructions. Indoor use only.
 1800 Watt Drop-In Induction Range Model: DC1800 08/2017 Please read and keep these instructions. Indoor use only. www.avantcoequipment.com 1 Specifications Model No... DC1800 Power Rating... 500-1800W
INDUCTION COOKER MODEL: EIC-G1810(BK) Owner s Manual. Please read this manual carefully before operating your set. Retain it for future reference.
 Owner s Manual. Please read this manual carefully before operating your set. Retain it for future reference.") INDUCTION COOKER MODEL: EIC-G1810(BK) Owner s Manual Please read this manual carefully before operating your set. Retain it for future reference. Record model number and serial number of the set. See the
INDUCTION COOKER MODEL: EIC-G1810(BK) Owner s Manual Please read this manual carefully before operating your set. Retain it for future reference. Record model number and serial number of the set. See the
User Manual. Hob PH601SS
 EN User Manual Hob PH601SS Contents Safety information 2 Safety instructions 3 Product description 5 Daily use 5 Hints and tips 6 Care and cleaning 6 Safety information Troubleshooting 6 Installation 7
IMPORTANT SAFETY INFORMATION
 319252GB.fm Page 11 Wednesday, September 3, 28 4:5 PM IMPORTANT SAFETY INFORMATION This manual contains important information regarding safety, the use and maintenance of your new hob. Read the manual
RBO-AVATA2-70SS. Built-In Oven
 RBO-AVATA2-70SS Built-In Oven ACKNOWLEDGMENT Thank you for purchasing our product. We hope you enjoy using the many features and benefits it provides. Before using this product please study this entire
NW 50ES WHI/ NW 50ES BLK/ OPERATING AND INSTALLATION INSTRUCTIONS OF ELECTRICAL FREESTANDING OVEN
 NW 50ES WHI/444443914 NW 50ES BLK/444443915 OPERATING AND INSTALLATION INSTRUCTIONS OF ELECTRICAL FREESTANDING OVEN Dear Customer, Thank you for purchasing this Cooking Appliance. The safety precautions
SMOKELESS INDOOR GRILL & INDUCTION STATION WITH TRIVET
 SMOKELESS INDOOR GRILL & INDUCTION STATION WITH TRIVET INSTRUCTIONS MODEL CCIGSL3 1 CONGRATULATIONS Congratulations on buying the Cook s Companion Smokeless Indoor Grill and Induction Station with Trivet.
OPERATING AND MAINTENANCE MANUAL
 Enter Serial No. here. In the event of an enquiry please quote this serial number. www.monoequip.com OPERATING AND MAINTENANCE MANUAL COMPACT SERIES 643 3 TRAY OVEN FILE 52 643 compact 3 TRAY RevA17 10-4-17
USER INSTRUCTIONS. Read carefully all the instructions contained in this booklet. It provides you with important information regarding
 BO-AE 5640 SS-TN USER INSTRUCTIONS GENERAL WARNINGS Read carefully all the instructions contained in this booklet. It provides you with important information regarding the safe installation, use and maintenance
Built-in Microwave Oven
 Built-in Microwave Oven Instructions and Installation /appliance-registration HJA7030 See back page for product serial number CONTENTS Environmental note 4 Installation 5 Important safety information 6-10
C-Stat 17-ZW User Instructions
 C-Stat 17-ZW User Instructions 7 Day Wireless Programmable Room Thermostat and ASR-ZW Receiver Programmable room thermostats are widely recognised as one of the best ways in which to control central heating.
Built-in Conventional oven
 Built-in Conventional oven LAM3208 User Manual 2 CONTENTS S afety information 2 S afety instructions 3 Product description 5 B efore first use 6 Daily use 6 Using the accessories 7 Additional functions
DAILY REFERENCE GUIDE
 DAILY REFERENCE GUIDE THANK YOU FOR PURCHASING AN HOTPOINT PRODUCT To receive more comprehensive help and support, please register your product at www. hotpoint. eu / register EN You can download the Safety
Model: Available in: Sapphire Black and Glacier White. 1 Series
 Model: Available in: Sapphire Black and Glacier White 1 Series Table of Contents Product Image Table of Contents What is a Programmable Room Thermostat? Installation Procedure Mode Select Pairing the neohub