THE BOILING WATER DISPENSER INSTALLATION & OPERATING INSTRUCTIONS IMPORTANT: READ AND SAVE THESE INSTRUCTIONS FOR THE BENEFIT OF THE USER
|
|
|
- Arron Clark
- 5 years ago
- Views:
Transcription
1 THE BOILING WATER DISPENSER INSTALLATION & OPERATING INSTRUCTIONS IMPORTANT: READ AND SAVE THESE INSTRUCTIONS FOR THE BENEFIT OF THE USER
2 Thank you for choosing a quality Redring product manufactured by Applied Energy Products Limited, Peterborough, U.K. Contents 2 Page Installation Instructions Important notes... 2 What the installer will need... 3 Where to locate the SB Installing the water supply and steam vent pipes... 3 Installing the mains supply... 4 Removing the front cover... 4 Fixing the unit on the wall... 6 Connecting the water supply and steam vent pipes... 6 Connecting the mains cable... 6 Replacing the front cover... 6 Schematic wiring diagram... 6 Operating Instructions General product description... 7 How to operate the SB How to clean and descale your SB Trouble shooting guidance... 9 After Sales Service Guarantee Installation Instructions Important Notes All installation must be supervised by a qualified electrician and plumbing engineer. Installation and wiring must conform to current IEE Regulations (U.K.) and the Water Regulations Act Local regulations may apply in other countries. The steam vent connection MUST BE MADE, as required in these instructions. The product must be supplied by a 13 Amp fused double pole isolating switch with a minimum contact gap of 3mm in each pole. Check that the mains supply matches the electrical rating on the product. The rating plate is located on the bottom edge of the unit. THIS APPLIANCE, AND ALL METAL PIPE WORK CONNECTED TO IT, MUST BE EARTHED. If you have any queries about installing this product or after it has been installed, please contact Applied Energy Products Customer Services (Ring ). Customers outside the U.K. should contact their local Redring distributor. This product will need to be descaled regularly. The frequency of descaling will depend on the hardness of the water supply.
3 What the installer will need A 13 Amp fused double pole isolating switch with a minimum contact gap of 3mm in each pole. Suitable length of 1.0mm 2 three core multi strand PVC insulated mains cable that complies with BS6500. Suitable lengths of 15mm copper pipe. Where to locate the SB 2 We recommend that the unit is installed on a suitable wall, at shoulder height and over a sink. Adjacent to the 13 Amp (240 V) double pole fused isolating switch. Available mains cold water supply and drainage facility. Do not install the SB 2 within reach of a person using a bath or shower. Do not obstruct the ventilation channel in the backplate. Installing the water supply and steam vent pipes Ventilation Channel Condenser Fig. 1 Ventilation Channel Steam Vent Inlet The unit must be connected to cold, mains fed, drinking water only. Pressure range between 0.7 Bar/69kPa (10psi) and 10.0 Bar/940kPa (140psi). Do not connect to a storage tank Isolate the water supply. Lay in 15mm water supply pipe to the location of the inlet connection (Fig. 1). (Check that the water supply position gives enough space under the unit for it to be used properly). Flush through the water supply before making the final connection, so that any debris is removed. Note: The inlet elbow contains a flow regulator. THIS MUST BE USED IN THE INSTALLATION. Lay in 15mm drainage pipe to the location of the steam vent connection (Fig. 1). (Connection is made using the push fit adaptor provided). The steam vent connection must be taken directly to the sink below, if there is one, or via a tundish to a suitable drain. Note: The steam vent outlet also acts as an overflow. (If a sink is used it must be able to withstand boiling water and have an overfill outlet). 3
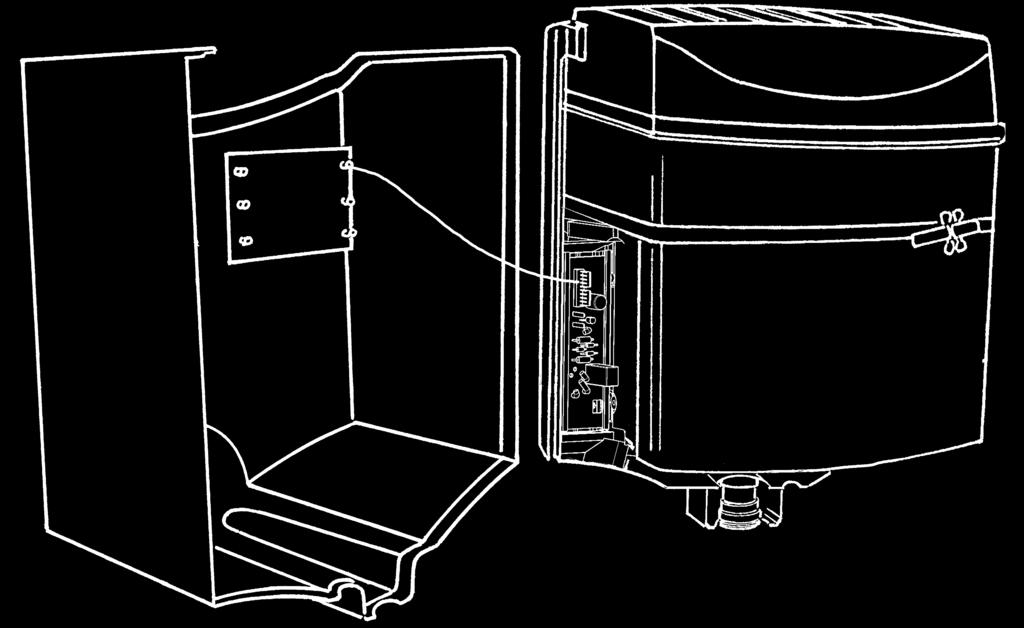
4 Installing the mains supply If a mains supply is not already available. Install a 13 Amp fused double pole isolating switch with a minimum contact gap of 3mm in each pole adjacent to where the unit will be fixed. Removing the front cover Remove the screws from the bottom and top edge of the unit (Fig. 3). Support the front cover and remove the flow knob (Fig. 4). Pull the front cover away from the unit. Please note that there is a flying lead and plug freely attached to the front cover. Fig. 3 4

5 Fig. 4 Fig. 5a Fig. 5b 5
6 Fixing the unit on the wall Use the wall mounting bracket supplied and the two lower fixing holes. An extra top fixing point is available by temporarily removing the condenser assembly. Connecting the water supply and vent pipes When the unit is fixed to the wall, make the final water supply and steam vent connections and secure the pipe work. Switch the water supply back on. Connecting the mains cable Ensure the mains supply is isolated. Connect the mains cable from the SB 2 to the 13 Amp fused isolating switch. Ensure the cable clamps are firmly secured and the cable ends are tightened into the terminal block. Note: The supply cable must be a minimum of 1.0mm 2 three core multi strand PVC insulated mains cable. The terminal block will not accept cable diameters above 1.5mm 2. Check that the mains supply matches the electrical rating on the product. The rating plate is located on the bottom edge of the unit. IMPORTANT: Connect the supply cable, complying with BS6500, to this appliance in accordance with the following code: GREEN AND YELLOW (EARTH) connect to terminal marked " ". BLUE (NEUTRAL) connect to terminal marked "N" BROWN (LIVE) connect to terminal marked "L" WARNING: THIS APPLIANCE, AND ALL METAL PIPE WORK CONNECTED TO IT, MUST BE EARTHED. Replacing the front cover Support the cover and re-attach the flying lead to the unit (See Fig. 5a and Fig. 5b). Replace the front cover and secure using the top and bottom fixing screws. Carefully replace the knob, ensuring correct alignment of the D shaft. Reconnect the mains supply. Schematic Wiring Diagram 6
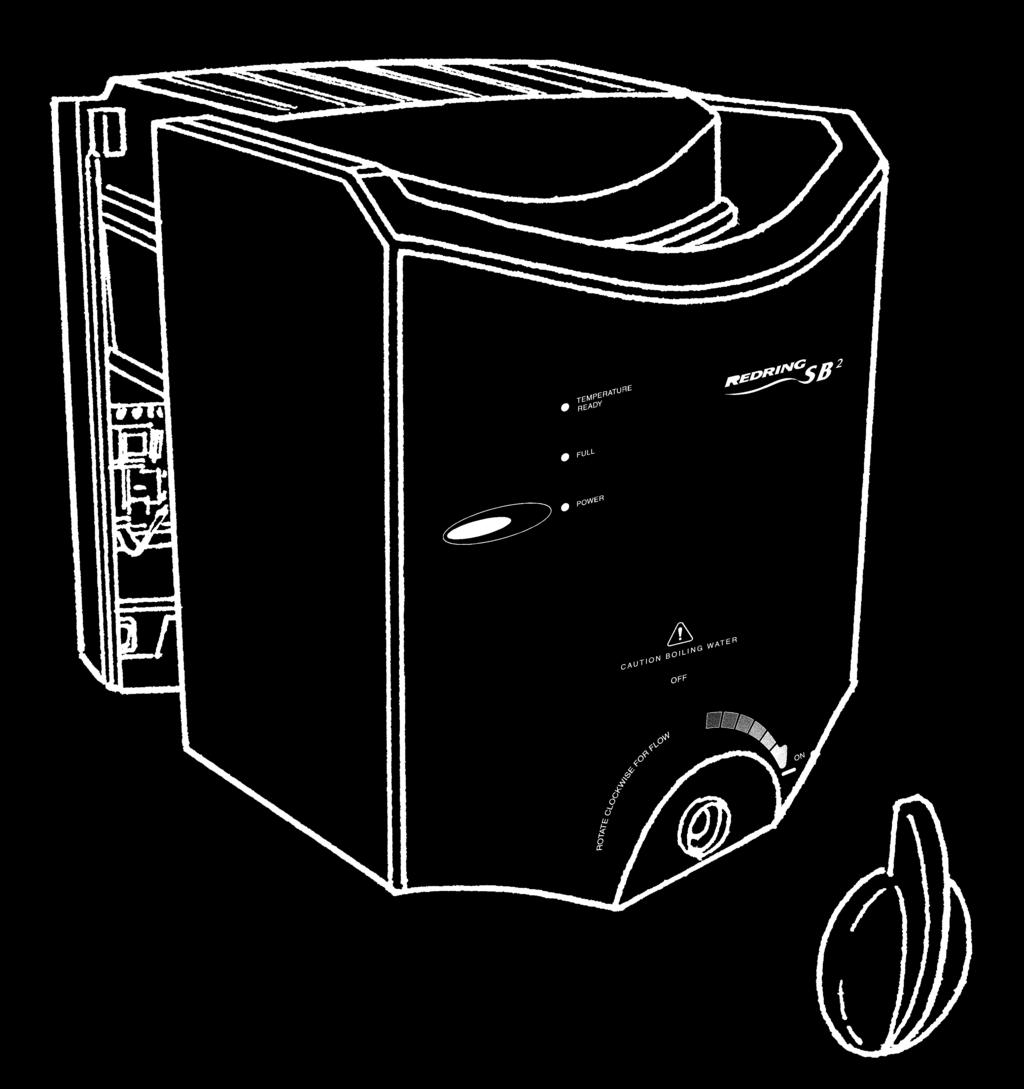
7 Operating Instructions General Product Description The SB 2 is a wall mounted, self calibrating and self filling boiling water heater. It can be used for making cups of tea or coffee and even soups and hot snacks. A special condenser traps steam and returns droplets to the tank, minimising waste and saving energy. The water temperature is set and automatically maintained by the SB 2 and the unit is powered down with the Power button. Water is dispensed by rotating the front cover knob clockwise. How to operate the SB 2 Make sure the electricity and water is turned on. Fig. 6 Refer to Fig. 6 Use the POWER button to switch the SB 2 on and to power down. (The SB 2 should be switched off at the mains if the water is not required e.g. at weekends, holidays, etc). POWER light When the SB 2 is on the POWER light will come on. FULL light The FULL light comes on when the tank is full of water. (The SB 2 fills up automatically and this can take up to 10 minutes if the tank is completely empty). TEMPERATURE READY light The TEMPERATURE READY light comes on when the water is hot enough to use. (This can happen even when the tank is not completely full of water). 7
8 Please Note: The SB 2 can take several minutes to reach the required temperature, depending on usage and tank capacity. To avoid energy wastage, the SB 2 will automatically reduce the temperature by 10ºC if the unit is not used for more than 60 minutes. (The SB 2 will automatically go back to boiling when the water is used). When the SB 2 is switched on at the local isolator and the POWER button is pressed, it will start by self calibrating. This can take up to 20 minutes to complete and includes automatically boiling the water for 30 seconds. When first installed, it is recommended that the initial tank of boiling water is fully drawn off and discarded. Allow the tank to re-fill and the TEMPERATURE READY light to come on, before using the SB 2. Dispensing water from the SB 2 Fig. 7a Fig. 7b Place your cup under the red spout at the bottom of the unit. Turn the knob clockwise to fill your cup (Fig. 7b). Turn the knob anti-clockwise to OFF (Fig. 7a). WARNING SCALDING HOT WATER can be dispensed from the SB 2. Never wash your hands directly from the unit. Some plastic cups can distort if they are filled with boiling water, so causing a danger of scalding. How to clean and descale your SB 2 Before cleaning or descaling, switch off the electricity at the isolating switch. It is recommended that the SB 2 surfaces are cleaned with a soft cloth. Do not use abrasive or solvent cleaning fluids. DESCALING A qualified electrician should carry out the descaling. ENSURE THE MAINS ELECTRICITY SUPPLY IS ISOLATED. If scale comes out with the hot water then the SB 2 may need to be descaled. This is done by removing the front cover and top condenser assembly and using a suitable kettle descaler. Ensure unit is thoroughly flushed through after descaling. 8
9 Trouble shooting SELF HELP (See Table 1) If the SB 2 is unsatisfactory, then make the following checks before calling out the contractor. Any one of these adjustments could restore the performance. Table 1 a) TEMPERATURE READY light is not on b) TEMPERATURE READY light is on but the FULL light is off This is normal: The water has not reached the set temperature. (See Table 3 on page 10 for approximate heat up times). This is normal: Some water has been taken out of the tank so it is no longer full, but the water temperature is still hot enough to use. (The tank will automatically fill up). c) The FULL light is on but the TEMPERATURE READY light is off d) The POWER light is on but the TEMPERATURE READY and FULL lights are both off e) TEMPERATURE READY light ison but the water is not boiling f) All the lights are out and the POWER button does not work g) The water flowing from the outlet is sometimes only a trickle h) The SB 2 takes a long time to reach the selected temperature This is normal: The tank has automatically filled itself and the heater is still getting the water up to the boil. (See Table 3 on page 10 for approximate heat up times). This is normal: The tank is still filling itself with water and the heater is still getting up to the boil. (See table 3 on page 10 for approximate heat up times). To avoid energy wastage, the SB 2 is designed to automatically reduce the temperature by 10ºC if the unit is not used for more than 60 minutes. (The SB 2 will automatically go back to boiling when the water is used). Ensure that the electricity supply is switched on at the isolator, then press the POWER button. The water in the tank has been drained out due to a high demand. Wait for the FULL & TEMPERATURE READY lights to come on again. When the SB 2 is first switched on it can take up to 18 minutes to reach the Boil setting. (See Table 3 on page 10 for approximate heat up times). i) Steam and very hot water sometimes dribbles out of the vent hole at the back of the SB 2 Check that a pipe has been fitted to the steam vent. Contact your installer if this is missing. Use the POWER button to power down the unit and not the main electrical isolator. (This will reduce the amount of steam produced). j) The water tastes different A new SB 2 needs to be flushed out before being first used. We recommend that the initial tank of boiling water is fully drawn off and discarded. Wait for the FULL & TEMPERATURE READY lights to come on, before using the unit. k) Solid particles are visible in the water Scale has built up inside the tank. As with all water heaters scale will build up inside the water tank. How quickly this build up occurs will depend on the hardness of the water and the usage of the SB 2. Descale the SB 2 heater tank. (This should be carried out by a qualified electrician). We recommend the use of in line resin filters to protect the heater. 9
10 Professional Service (see table 2) If the SELF HELP checks do not cover the symptom, you should seek professional help. The following additional checklist is provided for the benefit of the qualified engineer. WARNING: SWITCH OFF THE ELECTRICITY AT THE ISOLATING SWITCH BEFORE REMOVING THE COVER TO MAKE CHECKS. Table 2 a) Unit fails to heat the water Check that the water supply is on and that its pressure is between 0.7 Bar 69kPa (10 psi) and 10.0 Bar 940 kpa (140 psi). Check circuit through solenoid coil. Check circuit through the heating element. Check circuit through float switch. If defective then replace. b) All the lights are out and the POWER button does not work c) Water flows continuously from the steam vent pipe d) The water tank takes more than 20 minutes to fill with water Ensure that the electricity supply is switched on at the isolator. Ensure that the flying lead to the front cover is connected properly (see Fig. 5a and Fig. 5b). Check the supply to the PCB. If supply OK then change PCB. Check that the float switch operates correctly and switches the water solenoid on and off. Check that the water supply is on and that its pressure is between 0.7 Bar 69kPa (10 psi) and 10.0 Bar 940kPa (140 psi). Check operation of the water solenoid and that water flows into the tank at a rate between 0.3 Litres/min and 1 Litre/min. Check circuit through the solenoid coil. SB 2 heat up times Table 3 CONDITION SB 2 is switched on at the local isolator and the unit is empty of water. POWER button is pressed. APPROXIMATE HEAT UP TIME 2.5 Litre SB 2 4 Litre SB 2 12 minutes 18 minutes (4 mins filling (5 mins filling 8 mins heating) 13 mins heating) WHAT ELSE HAPPENS - POWER light comes on - then FULL light comes on - then TEMPERATURE READY light comes on - then steam comes out of the vent for 30 seconds. SB 2 is switched on at the local isolator and the unit is already full of cold water. POWER button is pressed. 8 minutes 13 minutes - POWER and FULL lights both come on. - then TEMPERATURE READY light comes on. - then Steam comes out of the vent for 30 seconds 10
11 APPLIED ENERGY PRODUCTS AFTER SALES SERVICE We offer a technical service on the telephone to contractors and other customers seeking advice. RING Some parts can be supplied using a credit card. RING Remember to quote the model of SB 2 and have a note of the Catalogue number as stated on the rating plate along the bottom edge of the unit. SPARE PARTS Part No Part Description Element assembly Terminal block Logic board assembly Power PCB assembly Solenoid valve Float switch Cable pack Control knob Outlet Spout Scale Trap Outlet valve Inlet elbow assembly (includes flow regulator) 11
12 Guarantee We, Applied Energy Products Ltd., guarantee that should this SB 2 unit prove to be defective by reason of faulty workmanship or material within 24 months (outside of U.K. please contact your local distributor) of the date of purchase or commencement of hire we will replace or repair the defective parts FREE OF CHARGE on the condition that: a) The appliance has been correctly installed and used only on the supply circuit or voltage stamped on the rating plate. b) The appliance has been used in accordance with these instructions and has not been tampered with or otherwise subject to misuse, neglect or accident. c) The appliance has not been taken apart, modified or repaired except by a person authorised by us. d) EVIDENCE of the date of purchase in the form of an invoice, receipt (or hire purchase document) is included with the appliance if returned under guarantee. SCALE PREVENTION Formation of scale occurs with hot water heaters operating at high temperatures in hard water areas. We strongly recommend the use of in line resin filters to protect the heater. The manufacturers guarantee does not extend to cover this natural phenomenon. This Guarantee does not affect your statutory rights Full details of terms and conditions of guarantee are available on request from: Applied Energy Products Ltd. Morley Way, Peterborough, PE2 9JJ. U.K. Telephone: +44 (0) Fax: +44 (0) Website: Technical Advisory Hotline: Rev B
Manual and Thermostatic Power Shower Units
 520M/520TS Manual and Thermostatic Power Shower Units Installation instructions & User guide IMPORTANT: This booklet should be given to the customer after installation and demonstration. WARNING: Under
BOILING UNIT REDITAP. Installation and User Guide. IMPORTANT: This booklet should be left with the user after installation and demonstration
 in tap Boiling water to in tap sink Drain Valve (as high as possible) REDITAP CONNECTION SUMMARY Amp mains supply cold mains water into in tap optional filter cold water in hot water BOILING UNIT Installation
SHOWER HANDBOOK IMPORTANT
 SHOWER HANDBOOK IMPORTANT This booklet should be given to the customer after installation and demonstration. Thank you for choosing a quality Redring product manufactured in Peterborough, England. Contents
MW & EW 10 & 15 Litre Unvented Water Heaters HANDBOOK. IMPORTANT: This booklet should be given to the customer after installation and demonstration.
 MW & EW 10 & 15 Litre Unvented Water Heaters HANDBOOK IMPORTANT: This booklet should be given to the customer after installation and demonstration. Description of water heater 1) Hot water outlet 2) Temperature
airooncentre.co.uk irconcentre.co.uk Xpelair Low Energy Wall/Window Fan Range GX6 EC2 GXC6 EC2 Quick Order Hotline or
 Xpelair Low Energy Wall/Window Fan Range GX6 EC2 GXC6 EC2 Installation and Maintenance Instructions Retain for future reference 3. To remove the impeller, unscrew the central screw with a 7mm nut runner
850DL & 950DL CREDA 850DL & 950DL ELECTRIC SHOWER. Installation and User Guide
 850DL & 950DL CREDA 850DL & 950DL ELECTRIC SHOWER Installation and User Guide IMPORTANT: This booklet should be left with the user after installation and demonstration CONTENTS Section Introduction...........................................................
Installation and User Guide Please leave this guide with the end user (for future reference)
") Contact and Commissioning Details Installer Contact Name and Address : Model N : Serial N : Date Installed : Installation and User Guide Please leave this guide with the end user (for future reference)
Contact and Commissioning Details Installer Contact Name and Address : Model N : Serial N : Date Installed : Installation and User Guide Please leave this guide with the end user (for future reference)
REDRING POWERSTREAM UNVENTED INSTANTANEOUS WATER HEATER. Installation and User Guide
 REDRING POWERSTREAM UNVENTED INSTANTANEOUS WATER HEATER Installation and User Guide IMPORTANT: This booklet should be left with the user after installation and demonstration. It should be kept in a safe
AQUA PREMIER ELECTRONIC ELECTRIC SHOWER. Installation and User Guide
 AQUA PREMIER ELECTRONIC ELECTRIC SHOWER Installation and User Guide IMPORTANT: This booklet should be left with the user after installation and demonstration CONTENTS Section Page Section Page Introduction.......................
SUPREME 140, 155, 170
 FULL HALF FULL TEMPERATURE READY ON SUPREME 140, 155, 170 Fitting Instructions and User Guide 1 Please read and understand these instructions prior to installing your Supreme water heater. Particular attention
REDRING POWERSTREAM UNVENTED INSTANTANEOUS WATER HEATER. Installation and User Guide
 : GUARANTEE AND CONTACT DETAILS REDRING POWERSTREAM UNVENTED INSTANTANEOUS WATER HEATER Installation and User Guide APPLIED ENERGY PRODUCTS LIMITED MORLEY WAY, PETERBOROUGH PE2 JJ TEL: +44 (0) 844 372
CREDA FLORIDA PLUS ELECTRIC SHOWER. Installation and User Guide
 CREDA FLORIDA PLUS ELECTRIC SHOWER Installation and User Guide IMPORTANT: This booklet should be left with the user after installation and demonstration THIS APPLIANCE CAN BE USED BY CHILDREN AGED FROM
irconcentre.co.uk airooncentre.co.uk
 Installation and maintenance instructions DX100 Standard DX100PC Pull Cord DX100T Timer DX100H Humidistat DX100HP Humidistat and Pull Cord DX100PIR Integral Body Movement Sensor DX100VTD Delay Timer Toilet/Bathroom
product safety Please read these instructions before operating the appliance and retain them for future use.
 product safety Please read these instructions before operating the appliance and retain them for future use.! This product is not suitable for use by children, and may not be suitable for persons requiring
Autofill counter top water boiler
 Autofill counter top water boiler Please read and keep these instructions For Burco counter top water boilers 76500 (SKU 444448531) and 76502 (SKU 444448533) Getting the best from your water boiler Remove
HINTS AND TIPS Cleaning and maintenance HELPLINE
 43675 Rev1 24/4/08 09:43 Page 1 DESCALING IMPORTANT: As this appliance is fitted with a concealed element, it must be descaled regularly. The frequency of descaling depends on usage and the hardness of
LV100 Standard LV100PC Pull Cord LV100T Timer LV100H Humidistat LV100HP Humidistat and Pull Cord LV100PIR
 Installation and operating instructions LV100 Standard LV100PC Pull Cord LV100T Timer LV100H Humidistat LV100HP Humidistat and Pull Cord Safety extra low voltage toilet/bathroom 100mm fan range Integral
Autofill wall mounted water. boiler. Getting the best from your water. boiler. Please read and keep these instructions
 Autofill wall mounted water boiler Please read and keep these instructions For Burco wall mounted boilers 76700 (SKU 444448534), 76702 (SKU 444448546), & 76704 (SKU444448548) Getting the best from your
Stainless steel kettle
 Stainless steel kettle Please read and keep these instructions getting the best from your new kettle... Empty the water out of the kettle after the first boiling To clean away any deposits that are left
HINTS AND TIPS Cleaning and maintenance HELPLINE
 43068 rev2 5/6/06 14:51 Page 1 DESCALING IMPORTANT: As this appliance is fitted with a concealed element it must be descaled regularly. The frequency of descaling depends on usage and the hardness of the
Autofill Wall Mount Boilers
 USER INSTRUCTION MANUAL Autofill Wall Mount Boilers HELPLINE 0844 372 7766 Redring Warranty 2 Year Parts 2 Year Labour 083329501-05/12/13 Contents 1.0 About your Product My Product (please complete this
HINTS AND TIPS Cleaning and maintenance HELPLINE
 43840 Rev1 23/10/08 16:17 Page 1 Descaling IMPORTANT: As this appliance is fitted with a concealed element, it must be descaled regularly. The frequency of descaling depends on usage and the hardness of
INSTANTANEOUS ELECTRIC SHOWER
 GUARANTEE / SERVICE POLICY INSTANTANEOUS ELECTRIC SHOWER GUARANTEE Designa guarantee this DS3000 product for a period of two years, from date of purchase, against mechanical and electrical defects arising
HINTS AND TIPS Cleaning and maintenance HELPLINE
 43690 rev1 6/3/07 12:49 Page 1 Descaling IMPORTANT: As this appliance is fitted with a concealed element it must be descaled regularly. The frequency of descaling depends on usage and the hardness of the
Xpelair Simply Silent TM Contour Fan
 Xpelair Simply Silent TM Contour Fan Installation and Maintenance Instructions C4S (92960AW) / C4R (92961AW) C4TS (92962AW) / C4TR (92963AW) C4PS (92964AW) / C4PR (92965AW) C4HTS (92966AW) / C4HTR (92967AW)
One Cup. Please read and keep these instructions for future use
 43922 rev6_layout 1 10/10/2013 14:13 Page 1 KT43922 MUK Rev 6 2GUARANTEE YEAR One Cup Please read and keep these instructions for future use For competitions, product hints and tips and more join us at
Zip Chillmaster Floor Mounted Chiller
 Installation and operating instructions Zip Chillmaster Floor Mounted Chiller CH101 Floor mounted chiller Affix model number label here 81585UK Page 1 of 12 81585UK Zip Chillmaster - Installation & operating
Simply Silent Contour 4 (100mm) Axial Extraction Fan
 Axial Extraction Fan") Simply Silent Contour 4 (100mm) Axial Extraction Fan Suitable for bathrooms, toilets, shower and utility rooms Controls humidity, odours and mould growth Sleek low-profile design, wall or ceiling mounting
Simply Silent Contour 4 (100mm) Axial Extraction Fan Suitable for bathrooms, toilets, shower and utility rooms Controls humidity, odours and mould growth Sleek low-profile design, wall or ceiling mounting
User and Installation Instructions. Electric Auto-Fill Water Boilers EB3F, EB4F, EB6F, EB6TF IS339 ECN3539
 User and Installation Instructions Electric Auto-Fill Water Boilers EB3F, EB4F, EB6F, EB6TF IS339 ECN3539 Dear Customer Thank you for purchasing this Lincat product. With correct use and careful maintenance
BRITA Filter Jug Kettle
 KT10009 MUK Rev 1 BRITA Filter Jug Kettle Please read and keep these instructions for future use For competitions, product hints and tips and more join us at www.morphyrichards.co.uk/blog www.facebook.com/morphyrichardsuk
HW3 Handwash Installation and Operating Instructions
 HW3[16]instructions 10/12/15 14:05 Page 1 HW3 Handwash Installation and Operating Instructions IMPORTANT SAFEGUARDS SPECIFICATION: HW3 RATING: 230-240V, 3000W, ~50Hz; DIMENSIONS: 170w x 190h x 80d mm;
kW kW kW kW
 TEMPESTA 100 ELECTRIC SHOWER DESIGN + ENGINEERING GROHE GERMANY 99.0351.031/ÄM 231959/08.14 www.grohe.com 26 178 8.5kW 26 179 9.5kW 26 221 9.5kW 26 222 9.5kW IMPORTANT: This booklet should be left with
Please read and keep these instructions for future use
 43922 rev7.qxp_layout 1 22/01/2015 10:12 Page 1 KT43922 MUK Rev 7 One Cup Please read and keep these instructions for future use For competitions, product hints and tips and more join us at www.morphyrichards.co.uk/blog
Unvented Calorifier Range. Operating and Maintenance Manual. For Models & 500
 Unvented Calorifier Range. Operating and Maintenance Manual. For Models 125 300 & 500 Telephone 08456 448802 Fax 08456 448803 Emial info@mhgheating.co.uk Web www.mhgheating.co.uk TABLE OF CONTENTS. Section
T550i power shower pump Installation and operating instructions
 power shower pump Installation and operating instructions Installers please note these instructions are to be left with the user 2180149H March 2008 CONTENTS Page Plumbing and electrical notes...1 Introduction...2
Contents. Commissioning 6 Operation 6 Routine Preventative Maintenance 6 Fault Finding 7 Spares Parts 8 Technical Support 9
 Contents Product Description 2 Approvals 2 Warranty 2 Warnings 2 Technical Specification 3 Installation 4 Location 4 Plumbing Connection 4 Electrical connection 5 Commissioning 6 Operation 6 Routine Preventative
4L Instant Water Boiler Instructions for Use
 Power Details: 220-240Va.c. 50Hz-60Hz 2200-2600W Capacity: 4.0L Accessories: 2 Water aid trays Water Filters are not included and can be purchased separately Item Code 10747 IMPORTANT NOTES FOR YOUR INSTANT
Internal/External Wall/Window Fan Range GX6. Installation and maintenance instructions Retain for future use
 Internal/External Wall/Window Fan Range GX6 Installation and maintenance instructions Retain for future use A GLASS WINDOW B C D ( 6 see F ) 13 E1 E2 E3 G1 G2 G3 G4 H I GB Xpelair GX6, GXC6, GXC6T, GX6HT
CROWN WATER HEATERS CPU10 - CPU15 CPOS10 - CPOS15
 CROWN WATER HEATERS CPU10 - CPU15 CPOS10 - CPOS15 COMPACT PLUS 10 and 15 Litre Unvented Under and Over Sink Water Heater INSTALLATION AND USER GUIDE 1 DIMENSIONS 10L - 250mm 15L - 310mm 100mm 80mm 410mm
Xpelair Simply Silent DX150
 English Xpelair Simply Silent DX150 Installation and Maintenance Instructions DX150S (93070AW) DX150R (93071AW) DX150TS (93072AW) DX150TR (93073AW) DX150PS (93074AW) DX150PR (93075AW) DX150HTS (93076AW)
POWER SHOWERS Models 4500M 5002M 4500T 5002T
 II POWER SHOWERS Models 4500M 5002M 4500T 5002T Performance Shower Products CUSTOMER SERVICE HELPLINE: 01883 730339 CONTENTS PLEASE READ THESE INSTRUCTIONS CAREFULLY: This booklet covers all models in
User and Installation Instructions. Wall Mounted Water Boiler WMB3F/B and WMB3F/W IS435 ECN3461
 User and Installation Instructions Wall Mounted Water Boiler WMB3F/B and WMB3F/W IS435 ECN3461 Dear Customer Thank you for purchasing this Lincat product. With correct use and careful maintenance as described
cream collection traditional kettle
 cream collection traditional kettle 1 product safety This appliance can be used by children aged from 8 years and above and persons with reduced physical, sensory or mental capabilities or lack of experience
User Instruction Manual
 User Instruction Manual Export Electric Catering Urn Please read and keep these instructions These instructions cover the Burco 10, 20 and 30 litre electric catering urns for export SKU s 444441912, 444441913
Zip Econoboil. On wall boiling water. Installation instructions & user manual. Model number: ,
 Zip Econoboil On wall boiling water. Model number: 305542, 303542 1 Table of contents Intended Use... 2 Warnings and precautions... 3 Before installation... 5 Technical specification... 6 Installation
WC2 & WC3 Installation & Maintenance Instructions
 WC2 & WC3 Installation & Maintenance Instructions Please leave this instruction booklet with the home owner as it contains important guarantee, maintenance and safety information WC3 shown WC2 WC3 IMPORTANT
Multipoint. Installation and User Instructions Instantaneous Hand Wash Models: EV 2008
 Installation and User Instructions Instantaneous Hand Wash Models: EV 2008 Multipoint Please read and understand these instructions before starting work. Please leave this leaflet with the user following
stainless steel jug kettle
 stainless steel jug kettle product safety READ CAREFULLY AND KEEP FOR FUTURE REFERENCE This appliance can be used by children aged from 8 years and above and persons with reduced physical, sensory or mental
Actual product may differ from the one illustrated
 Actual product may differ from the one illustrated Important Safety Instructions READ CAREFULLY AND KEEP FOR FUTURE REFERENCE This product can be used by children aged 8 years and above, and persons who
BRITA Filter Jug Kettle
 43960 rev1_layout 1 30/08/2012 16:21 Page 1 KT43960 MUK Rev 1 * BRITA Filter Jug Kettle Upon registration with Morphy Richards (UK & ROI only) Please read and keep these instructions for future use For
Health and Safety (cont)
") 43485 0x1rev3_Layout 1 08/1/011 13:57 Page 1 Health and Safety (cont) Do not touch hot surfaces, use handles or knobs. Always close the lid if applicable and always have the filter in place. Avoid contact
43485 0x1rev3_Layout 1 08/1/011 13:57 Page 1 Health and Safety (cont) Do not touch hot surfaces, use handles or knobs. Always close the lid if applicable and always have the filter in place. Avoid contact
ZIP Varipoint III. Installation, Maintenance and User Instructions. Models VP303, VP503 VP803, VP953 direct unvented water heaters. Issued August 2008
 Varipoint cover qxd:varipoint cover qxd 22/8/08 11:14 Page 1 Installation, Maintenance and User Instructions ZIP Varipoint III Models VP303, VP503 VP803, VP953 direct unvented water heaters Issued August
Zip Hydroboil. Installation and Operating Instructions. Filtered instant boiling water
 Installation and Operating Instructions Zip Hydroboil Filtered instant boiling water 01552 Zip Hydroboil 1.5 Litre White 01551 Zip Hydroboil 1.5 Litre Stainless Steel 03552 Zip Hydroboil 3 Litre White
HEATRAE SADIA. Installation and User Instructions for the UTC Undersink Vented Water Heater
 HEATRAE SADIA The quality name in water heating Installation and User Instructions for the UTC Undersink Vented Water Heater UTC 15 Please read and understand these instructions before starting work. Please
product safety Please read these instructions before operating the appliance and retain them for future use.
 product safety Please read these instructions before operating the appliance and retain them for future use.! This product is not suitable for use by children, and may not be suitable for persons requiring
FRANKE MINERVA 3-IN-1 HOT WATER TAP HEATING TANK INSTALLATION GUIDE
 FRANKE MINERVA 3-IN-1 HOT WATER TAP HEATING TANK INSTALLATION GUIDE Introduction Thank you for purchasing this Franke product, which has been designed and manufactured to the highest quality standards.
SPEEDIBOIL Installation and User Instructions. Models: SP2.5, SP5.0, SP7.5
 SPEEDIBOIL Installation and User Instructions Models: SP2.5, SP5.0, SP7.5 Multipoint Please read and understand these instructions before starting work. Please leave this leaflet with the user following
illuminated jug kettle
 illuminated jug kettle product safety READ CAREFULLY AND KEEP FOR FUTURE REFERENCE This appliance can be used by children aged from 8 years and above and persons with reduced physical, sensory or mental
Fitting Instructions and User Guide
 SUPREME 150SS, 165SS, 180SS Fitting Instructions and User Guide 1 Please read and understand these instructions prior to installing your Supreme water heater. They are for use by competent personnel i.e.
SPEEDIBOIL Installation and User Instructions
 SPEEDIBOIL Installation and User Instructions Models: SP2.5, SP5.0, SP7.5 Please read and understand these instructions before starting work. Please leave this leaflet with the user following installation.
Exclusions. Disclaimer
 100002.qxp_Layout 1 15/10/2014 16:18 Page 1 Health and Safety The use of any electrical appliance requires the following common sense safety rules. Please read these instructions carefully before using
Installation and Operating Instructions. Budget priced instant boiling water heater for beverages.
 Installation and Operating Instructions Zip Econoboil Budget priced instant boiling water heater for beverages. Model No. Description Reg.No. Part No. HS503 Zip Econoboil 3.0 litre White EB003 103592 HS505
Operating Instructions
 EN Operating Instructions 5 6 4 3 7 2 1 14 13 12 11 10 9 8 WK 30E UK 220-240V 3000W PARTS AND FEATURES 1. Water gauge 2. Kettle 3. Spout 4. Limescale filter (removable) 5. Lid 6. Lid opening button 7.
STREAMLINE OVERSINK. Fitting Instructions and User Guide _iss_05.indd 1 15/09/ :46:30
 STREAMLINE OVERSINK Fitting Instructions and User Guide 1 36005997_iss_05.indd 1 15/09/2015 08:46:30 CONTENTS SECTION PAGE 1.0 INTRODUCTION 3 2.0 TECHNICAL SPECIFICATIONS 4 3.0 INSTALLATION 6 4.0 COMMISSIONING
stainless steel jug kettle
 stainless steel jug kettle Product safety Please read these instructions before operating the appliance and retain them for future use. This appliance can be used by children aged from 8 years and above
IS09 ECN2087. EB3, EB4 & EB6 Automatic Fill Water Boilers INSTALLATION, USER & SERVICING INSTRUCTIONS
 EB3, EB4 & EB6 Automatic Fill Water Boilers INSTALLATION, USER & SERVICING INSTRUCTIONS 1 Contents Introduction 3 Accessories Warnings and Precautions 4 Installation Preparation 5 Work Surfaces and Areas
Exclusions. Disclaimer
 108101 rev2.qxp_layout 1 23/01/201 09:29 Page 1 Health and Safety The use of any electrical appliance requires the following common sense safety rules. Please read these instructions carefully before using
02/ ver.1.1 WK 30M UK. Indesit Company UK Ltd Morley Way, Peterborough PE2 9JB
 6 5 4 3 7 2 1 8 9 Indesit Company UK Ltd Morley Way, Peterborough PE2 9JB WK 30M UK 02/2013 - ver.1.1 www.indesitcompany.com EN Operating Instructions 220-240V WK 30M AX0 UK 10 3000W PARTS AND FEATURES
Mira Sport Max with Airboost
 Mira Sport Max with Airboost 9.0 & 10.8 kw These instructions must be left with the user Installation Guide 1 INTRODUCTION our instructions and recommendations. inside the shower. The Mira Sport Max with
2.8KW ELECTRIC FAN HEATER
 2.8KW ELECTRIC FAN HEATER MODEL NO: DEVIL 2800 PART NO: 6925800 OPERATION & MAINTENANCE INSTRUCTIONS ORIGINAL INSTRUCTIONS GC0817 INTRODUCTION Thank you for purchasing this CLARKE product. Before attempting
Safety and Instruction Manual
 T10004 Safety and Instruction Manual PLEASE READ CAREFULLY *Subject to registering Your Extended Guarantee online at www.towerhouswares.co.uk. 1.7 Litre Illuminated Glass Kettle 1912 Midland Metal Spinners
Please tape down. NewTeam Ltd. Customer Service Dept. Brunel Road Earlstrees Industrial Estate Corby Northants NN17 4JW
 3rd Fold 1st Fold NewTeam Ltd. Customer Service Dept. Brunel Road Earlstrees Industrial Estate Corby Northants NN17 4JW 2nd Fold Please tape down Please tape down Affix Stamp Installation Instructions
Zip Econoboil. Installation and Operating Instructions. Budget priced instant boiling water for canteens and kitchens.
 Installation and Operating Instructions Zip Econoboil Budget priced instant boiling water for canteens and kitchens. 103592 Zip Econoboil 3.0 litre White HS503 105592 Zip Econoboil 5.0 litre White HS505
Ecoboiler T20 & T30 SERVICE MANUAL. Marco Beverage Systems Ltd. 63d Heather Road, Sandyford Industrial Estate, Dublin 18, Republic of Ireland
 Ecoboiler T20 & T30 SERVICE MANUAL Marco Beverage Systems Ltd. 63d Heather Road, Sandyford Industrial Estate, Dublin 18, Republic of Ireland Ireland Tel: (01) 295 2674 Ireland Fax: (01) 295 3715 UK Tel:
Streamline Undersink. Fitting Instructions and User Guide
 Streamline Undersink Fitting Instructions and User Guide 1 CONTENTS SECTION PAGE 1.0 INTRODUCTION 3 2.0 TECHNICAL SPECIFICATIONS 4 3.0 INSTALLATION 6 4.0 COMMISSIONING 10 5.0 EXPLANATION TO USER 11 6.0
Zip Hydroboil. Instant boiling water. Installation and Operating Instructions
 Installation and Operating Instructions Zip Hydroboil Instant boiling water HS010 Hydroboil 10 Litre White 10552 HS110 Hydroboil 10 Litre Stainless Steel 10551 HS015 Hydroboil 15 Litre White 11552 HS115
WARNING: Do not place the appliance onto a metal tray or metal surface whilst in use. WARNING: The appliance must not be immersed for cleaning.
 108261 REV 2.qxp_Layout 1 01/03/2017 1:1 Page 1 Health and Safety The use of any electrical appliance requires the following common sense safety rules. Please read these instructions carefully before using
NON-SUBMERSIBLE WATER PUMP
 NON-SUBMERSIBLE WATER PUMP MODEL NO: CEB103 PART NO: 7230327 OPERATION & MAINTENANCE INSTRUCTIONS LS0114 INTRODUCTION Thank you for purchasing this CLARKE Water Pump, which is a general purpose pump, suitable
SERVICE MANUAL. Ecoboiler Model range: T20 ( ) T30 ( )
 T30 ( )") SERVICE MANUAL Ecoboiler Model range: T20 (1000662) T30 (1000663) Marco Beverage Systems Ltd. 63d Heather Road, Sandyford Industrial Estate, Dublin 18, Republic of Ireland Ireland Tel: (01) 295 2674 Ireland
SERVICE MANUAL Ecoboiler Model range: T20 (1000662) T30 (1000663) Marco Beverage Systems Ltd. 63d Heather Road, Sandyford Industrial Estate, Dublin 18, Republic of Ireland Ireland Tel: (01) 295 2674 Ireland
Operating Instructions
 EN Operating Instructions 7 6 5 4 3 3 8 2 1 12 9 10 11 WK 30I UK PARTS AND FEATURES 1. Kettle 2. Water gauge 3. Handle 4. Lid opening button 5. Lid 6. Stop button 7. Power Switch 8. Spout 9. Drip tray
Zip Hydroboil. Instant boiling water. Installation and Operating Instructions
 Installation and Operating Instructions Zip Hydroboil Instant boiling water HS001 Zip Hydroboil 1.5 Litre White HS003 Zip Hydroboil 3.0 Litre White HS005 Zip Hydroboil 5.0 Litre White HS105 Zip Hydroboil
AIRE. Thermostatic bath shower mixer. Installation and Operating Instructions INSTALLERS PLEASE NOTE THESE INSTRUCTIONS ARE TO BE LEFT WITH THE USER
 AIRE Thermostatic bath shower mixer Installation and Operating Instructions INSTALLERS PLEASE NOTE THESE INSTRUCTIONS ARE TO BE LEFT WITH THE USER 2180427C October 2005 CONTENTS Page Introduction 1 Safety
Operating and installation instructions
 Operating and installation instructions Plate warming drawer EGW 3060-10 To avoid the risk of accidents or en-gb damage to the appliance it is essential to read these instructions before it is installed
Please tape down. NewTeam Ltd. Customer Service Dept. Brunel Road Earlstrees Industrial Estate Corby Northants NN17 4JW
 3rd Fold 1st Fold NewTeam Ltd. Customer Service Dept. Brunel Road Earlstrees Industrial Estate Corby Northants NN17 4JW 2nd Fold Please tape down Please tape down Affix Stamp Installation Instructions
DOMESTIC STEAM GENERATOR Installation Instructions
 DOMESTIC STEAM GENERATOR Installation Instructions Please read all of the instructions carefully before commencing installation or using the facility. Contents INTRODUCTION Page 2 TECHNICAL SPECIFICATION
Aqua & Instantaneous Electric Shower Installation Instructions SERVICE POLICY
 SERVICE POLICY In the event of you needing to contact the Galaxy Customer Service Department, the following procedure should be followed:- 3 5 Before telephoning the Galaxy Customer Service Department
T-SERIES. Wall & Panel Models. Installation, Set-up and Operating Instructions. 230V/1/50Hz
 T-SERIES Wall & Panel Models Installation, Set-up and Operating Instructions Stock Ref. Nos. WIRED 456166A (9" WL) 456167A (9" PL) 456174A (12" WL) 456175A (12" PL) WIRELESS 456170A (9" WL) 456171A (9"
Xpelair Simply Silent TM DX100 Fan
 Xpelair Simply Silent TM DX100 Fan Installation and Maintenance Instructions DX100R (93005AW) / DX100S (93025AW) DX100TR (93006AW) / DX100TS (93026AW) DX100PR (93007AW) / DX100PS (93027AW) DX100HTR (93008AW)
Calomax Limited Lupton Avenue, Leeds LS9 7DD Tel Fax
 INSTALLATION, OPERATION AND SERVICING INSTRUCTIONS FOR THE ECLIPSE PUSH BUTTON WATER BOILERS Issue 4 03/01/18 DCR: 986 Please read these instructions carefully before operating your boiler for the first
Bath Shower Mixer
 86004490 Bath Shower Mixer Installation and operating instructions The showerhead and hose supplied with this product are a safety critical part of your shower. Failure to use genuine Triton parts may
Installation & Operating Instructions
 PREMIUM Installation & Operating Instructions AQP-20SIL Signature Filtered Water Cooler Premium Selection Congratulations on your purchase of a Aquaport Signature Filtered Water Cooler This unit is easy
Zip Econoboil 1.5 litre White Zip Econoboil 3.0 litre White Zip Econoboil 5.0 litre White Zip Econoboil 7.
 Zip Econoboil Installation and Operating Instructions 301042 Zip Econoboil 1.5 litre White 303042 Zip Econoboil 3.0 litre White 305042 Zip Econoboil 5.0 litre White 307042 Zip Econoboil 7.5 litre White
PURE 7.5/8.5/9.5/10.5kW
 PURE 7.5/8.5/9.5/10.5kW Installation and User Guide IMPORTANT: This booklet should be left with the user after installation and demonstration Contents 1 Pack Contents 3 2 Installation Check List 3 3 Important
Xpelair Simply Silent DX100B
 Xpelair Simply Silent DX100B Installation and Maintenance Instructions English DX100BR (92997AW) DX100BS (93017AW) DX100BTR (92998AW) DX100BTS (93018AW) DX100BHTR (92999AW) DX100BHTS (93019AW) DX100BHPTR
Lo-Carbon SELV Tempra
 Lo-Carbon SELV Tempra THROUGH THE WALL HEAT RECOVERY FAN Installation and Wiring Instructions DRAFT Stock Ref. N 444368 Pullcord. (SVP) 444369 Timer. (SVT) 444370 Humidistat -Timer Pullcord. (SVHTP) 220-240V~50Hz
Supreme 150SS, 165SS, 180SS Fitting Instructions and User Guide
 Supreme 150SS, 165SS, 180SS Fitting Instructions and User Guide INTRODUCTION Thank you for purchasing a Heatrae Sadia Supreme water heater. This boiling water heater is manufactured to the highest standards
ELECTRIC WATER BOILER
 JJ3 ELECTRIC WATER BOILER OWNER S MANUAL Click here for Parts List Manual Part No: 930150-01 Electric Water Boiler - 1 Model No. Product Description Rev. Date Jackson Junior Boiler JJ3 Jackson Junior Boiler
Installation & Operating Instructions
 3WAY TAP Installation & Operating Instructions AQP-TAP-3S Three Way Tap AQP-TAP-3G Three Way Tap SYSTEM Congratulations on your purchase of the Filtered Water Sink Mixer 3 Way Tap AQUAPORT SELECT 3 STEP
Installation and User Instructions Instantaneous Hand Wash Models: EV 2008 No-Touch. EV 2008 No Touch
 Installation and User Instructions Instantaneous Hand Wash Models: EV 2008 No-Touch MULTIPOINT EV 2008 No Touch Please read and understand these instructions before starting work. Please leave this leaflet
PLEASE LEAVE THIS MANUAL WITH THE OSO UNIT AFTER INSTALLATION INSTALLATION MANUAL
 PLEASE LEAVE THIS MANUAL WITH THE OSO UNIT AFTER INSTALLATION SOLARCYL IM/SC INSTALLATION MANUAL This manual gives detailed advice for installation and should be read carefully prior to fitting any unvented