SWAN CYCLONIC UPRIGHT. INSTRUCTION MANUAL Model: SU3017
|
|
|
- Francis Matthews
- 5 years ago
- Views:
Transcription


1 SWAN CYCLONIC UPRIGHT INSTRUCTION MANUAL Model: SU3017
2 GUARANTEE This product is guaranteed for 2 years from the date of original purchase. If any defect arises due to faulty materials or workmanship, the unit will, either be repaired, replaced or refunded at our discretion. The following conditions apply: The product must be returned to the retailer with original proof of purchase. The product must be installed and used in accordance with the instructions contained in this user instruction guide. It must be used only for domestic purposes. It does not cover wear and tear, damage, misuse or consumable parts. The supplier has no responsibility for incidental or consequential loss or damage. Valid in the UK & Eire only. Valid only if purchased from the LWSD Group. Technical Specification: Power supply: Power Consumption: Model number: Protection: 220V-240V AC. 50Hz 1600 Watts Nom, 1800W Max SU3017 Class II LWSD Group L70 1AB Box MPRC8 Swan Vacuum Helpline. Please Call Swan Vacuum Spare Parts. Please Call Calling from outside the UK please call
3 IMPORTANT SAFETY INSTRUCTIONS When using your Cyclonic Upright Vacuum, the following basic safety precautions should be observed: 1. Never vacuum wet surfaces, pick up wet objects or use in wet conditions. 2. Always disconnect the vacuum from the electrical supply before attempting any maintenance. 3. Do not vacuum anything that is burning or smoking, such as cigarettes, matches, or hot ashes. 4. Do not use the vacuum to pick-up large objects that could, damage or cause a blockage. 5. Do not use the vacuum to pick up builders rubble, sand, plaster dust etc. 6. This vacuum cleaner is for domestic use only. Industrial or commercial use invalidates the warranty. 7. Do not let children use the vacuum cleaner unattended. 8. Do not use without a dust bag/bin and filter in place. 9. Use extra care when cleaning on stairs. 10. Always ensure the vacuum height setting is set in the tools position when using on stairs. Take extra care not to allow the vacuum to tilt and the beater bar make contact with the carpet whilst using the tools on the stairs. 11. Keep hair, loose clothing, fingers and all parts of the body away from openings and moving parts. Safety Alerts: To reduce the risk of fire, electric shock, or injury 1. Do not leave the vacuum unattended when plugged in, unplug from the outlet when not in use and before servicing. 2. To reduce the risk of electric shock, do not use outdoors or on wet surfaces. 3. Use only as described in this manual. 4. Do not use with a damaged cord or plug. 5. Do not run the vacuum cleaner over the cord. Keep the cord away from heated surfaces. 6. Do not unplug by pulling on the cord. To unplug, grasp the plug, not the cord. 7. Do not handle the plug or the vacuum cleaner with wet hands. 8. Turn off all controls before unplugging. 2
4 Electrical Safety Before switching on, make sure that the voltage of your electricity supply is the same as that indicated on the rating plate. This product is designed to operate on V AC; 50Hz. Connection to any other power source may damage the unit. This product may be fitted with a non rewireable plug. If it is necessary to change the fuse in the plug, the fuse cover must be refitted. If the fuse cover becomes lost or damaged, the plug must not be used until a suitable replacement obtained. If the plug has to be changed because it is not suitable for your socket, or becomes damaged in any way, it should be cut off and an appropriate plug fitted following the wiring instructions below. This should be carried out by a qualified electrician. The plug removed must be disposed of safely, as insertion into a 13 Amp socket is likely to cause an electrical hazard. IMPORTANT THIS IS A CLASS II APPLIANCE AND DOES NOT REQUIRE AN EARTH CONNECTION. Wiring Instructions The wires in this mains lead are colored in accordance with the following code: Blue = Neutral Brown = Live As the colours of the wires in the mains lead of this appliance may not correspond with the coloured markings identifying the terminals in your plug, proceed as follows (refer to the plug wiring diagram). The wire which is coloured BLUE must be connected to the terminal which is marked with the letter N or coloured Black. The wire which is coloured BROWN must be connected to the terminal which is marked with the letter L or coloured Red. If a 13Amp (BS1363) plug is used, a 13Amp (BS1362) fuse must be fitted, or if any other type of plug is used, a 13Amp fuse must be fitted, either in the plug or adaptor, or on the Distribution Board. 3

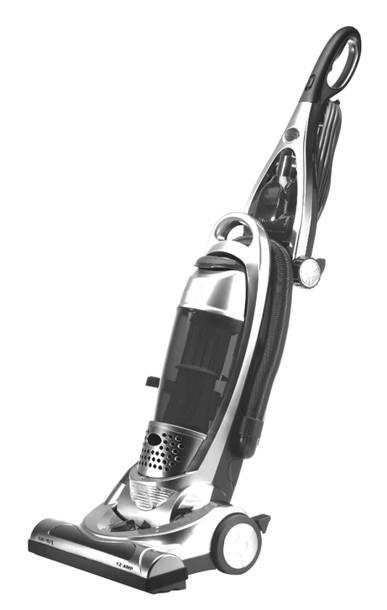
5 Description: 1 Folding Handle 11 Air Driven Turbo Brush 2 Folding Handle Release Latch 12 Carry Handle 3 Flexible Hose 13 Dust-Bin 4 Handle Release Pedal 14 Dust-Bin Handle 5 6 Exhaust Filter Cover Bin Full Indicator Dusting Brush Upholstery Brush 7 Quick Release Power Cord Holder 17 Crevice Tool 8 Hose Handle 18 Carpet Height Adjuster 9 Telescopic Tube 19 Tool Caddy 10 On/off Switch 20 Inspection door 4
 Fig 1 5. Make sure the quick release cord holder is in the upright position. Quick Release 6.")
 On/off switch The On/Off slide switch is sited on the handle of the vacuum How to Start The upright vacuum can be used on multiple types of carpeting, bare floors or upholstery with attachments.")
6 OPERATING INSTRUCTIONS Assembling Your Vacuum Cleaner 1. Carefully unpack all components and set aside the packaging. 2. Lift vacuum body to the upright position. 3. Swing the folding handle into the upright position 4. The handle will click and lock in place. (Fig. 1) Fig 1 5. Make sure the quick release cord holder is in the upright position. Quick Release 6. Wrap the cord into place by wrapping it in a clockwise direction around the quick release cord holder and the lower cord holder. (Fig. 2) On/off switch The On/Off slide switch is sited on the handle of the vacuum How to Start The upright vacuum can be used on multiple types of carpeting, bare floors or upholstery with attachments. When using the attachment tools such as the crevice tool and the upholstery brush, place the handle of the vacuum in the upright position and set the carpet height selector to the tools setting. 1. Turn the quick release cord holder to either side 180 to release the power cord. 2. Plug the power cord into an electrical outlet socket. 3. Depress on the handle release pedal to lower the handle. 4. Slide the On/Off button to the ON position to switch on the vacuum. When using the attachments, the vacuum must be in the upright position. (Fig. 3) Fig 2 7. Turn the quick release cord holder left or right 180 to unwrap the power cord. (Fig. 2) Fig 3 5

 Fig. 4 Fig.")
7 Carpet Height Adjustment This upright vacuum can be used on multiple types of carpet, bare floors and upholstery with attachments. To select a carpet height setting: 1. Turn the vacuum cleaner "Off". 2. Select your carpet height setting by turning the height adjustment knob to the setting you desire. (Fig.4 ) OPERATING INSTRUCTIONS Using and Storing the Accessories The vacuum is designed with a built-on tool caddy for the accessories. 1. On the side of the vacuum is a storage space for the upholstery brush, crevice tool, dusting brush and telescopic tube. (Fig. 7) Fig. 4 Fig. 7 Suggested Pile Height Settings: You may need to raise the height of the vacuum to make some jobs easier, such as scatter rugs and longer pile carpets. Suggested settings are: HIGH: shag carpet, long pile, plus scatter rugs and tools. MED: medium pile. FLOOR: very low pile, bare floors. Attaching the Telescopic Tube to the Hose 1. Attach the flexible hose to the hose handle by pushing on and twisting to lock. Push the hose handle onto the telescopic tube. (Fig. 5) To extend the telescopic tube, simply push forward on the plastic button and pull the inner tube outward to extend for a longer reach. (Fig. 6) Caution: Do not use the upholstery brush on delicate or woven fabrics that may snag on the upholstery brush. Do Not use the upholstery brush on wooden floors as this accessory might cause mild scratching. Using the Attachments Warning: To reduce the risk of electric shock, the power cord must be disconnected before attaching or removing accessories. a) Place the vacuum in its upright position. Make sure the vacuum cleaner is NOT plugged into the electrical outlet when adding or removing accessories. b) Make sure the carpet height selector is set to the Tools position (Fig.8) Fig. 5 Fig. 6 Fig. 8 Tools 6
 d) If additional length is required, attach the hose handle to the telescopic tube and then attach the desired accessory. Using the Air Driven Turbo Brush 1.")


8 OPERATING INSTRUCTIONS c) Remove the hose connector from the side of the unit and attach the hose handle. (Fig. 9) d) If additional length is required, attach the hose handle to the telescopic tube and then attach the desired accessory. Using the Air Driven Turbo Brush 1. Pull out the air driven turbo brush from the storage compartment. (Fig. 10) Fig. 10 Fig.9 Dusting Brush The dusting brush is used for furniture. Crevice Tool For radiators, crevices, corners, baseboards and between cushions. Upholstery Tool The upholstery tool is ideal for use on furniture. The unique surface makes it an excellent tool for removing unwanted pet hair. NOTE: This tool is not a grooming tool and should not be used on animals. Caution: Do not use the upholstery tool on delicate or woven fabrics that may snag on the upholstery brush. Do Not use the upholstery tool on wooden floors as this accessory might cause mild scratching. 1. Connect the air driven turbo brush to the hose handle or telescopic tube. The efficiency of your Air Driven Turbo Brush depends on the bristle brush rotating at high speed. Strong air suction is needed to accomplish this. In order to ensure maximum air suction is maintained, please read the following instructions: a) Empty the Dust-Bin frequently during use. b) Always TapClean the HEPA dust-bin filter each time the dust-bin is emptied. c) Ensure the rotating bristle brush is kept free of hair and string. d) Inspect the turbine regularly to ensure the air passage is free of dirt and debris. Cleaning Air Driven Turbo Brush Do NOT over extend the hose length when reaching. Doing so may cause the vacuum to tip over. Warning: Avoid tilting the vacuum on carpeted stairs whilst using the hose with attachments. The agitator will continue to rotate whilst using the attachments. Avoid leaving the vacuum in one place for an extended period of time, particularly on thick carpet. Fig. 11 Fig. 12 a) Pull the locking latch upwards to open the inspection door of the Turbo brush. (Fig 11). b) The door housing is hinged and will tilt up approximately 45º only. (Fig. 12) 7
 Inspect the rotating brush for built-up hair or string. If present, remove carefully by cutting with scissors. Avoid damaging or cutting bristles. e) Once clean, close the inspection door.")

 Fig. 14 2.")


9 OPERATING INSTRUCTIONS Cleaning Air Driven Turbo Brush cont. c) Inspect the turbine wheel and air passage for debris and blockages. Remove debris if present. d) Inspect the rotating brush for built-up hair or string. If present, remove carefully by cutting with scissors. Avoid damaging or cutting bristles. e) Once clean, close the inspection door. Bin Full Indicator When the bin full indicator lights, either the dust-bin is full, the HEPA filter requires cleaning or there is a blockage in the hose or telescopic tube. You must check and empty the dust-bin, clean the HEPA filter and debris screen also, check the unit for any blockages in the hose and tubes. Check behind inspection door see page 4. Fig. 13 Removing & Emptying the Dust-Bin The Dust-Bin must be emptied when the dirt level is "FULL, or if the bin full indicator has lit. To remove the dust-bin from the vacuum follow steps 1 and 2: 1. To remove the dust-bin, lift the dust-bin release handle then pull the dust-bin out from the vacuum. (Fig. 14) Fig To empty the dust-bin, hold it by the handle and over a garbage can and press the trap door release button to empty. (Fig. 15) Fig. 15 Bin full indicator Cleaning the Dust-Bin The dust-bin can be washed in lukewarm water. Do not use strong detergents. Ensure that the dust-bin is fully dry before replacing in the vacuum cleaner. (Fig. 16) Fig. 16 Do not wash in dishwasher. Cleaning the HEPA Dust-Bin Filter IMPORTANT, Please Note: The rinseable TapClean HEPA Dust-BIN Filter will stop most dust particles and airborne allergens from re-entering the air you breathe. In fact it stops 99.97% of all particles as small as 0.3 microns - many times smaller than a human hair. Because of this the HEPA Filter will quickly accumulate many fine dust particles inside the white filter folds that will eventually block or reduce the vacuum suction power if not cleaned properly. Clean the HEPA Filter after each use as described in this section. To remove the HEPA filter, hold the dust cup container by the handle and turn the cover anti-clockwise to unlock the dust-bin container lid. (Fig. 17) 1. To remove the HEPA filter from the dust cup. Fig. 17 Turn over the dust-bin lid and twist the HEPA filter anti-clockwise to unlock. (Fig. 18) Fig. 18 8
 Fig. 20 3.You can wash / rinse the HEPA filter. (Fig. 21) Fig.")

10 OPERATING INSTRUCTIONS 1. Clean the HEPA filter after every use with the built in pleat cleaner. Fig. 19 Turn the knob on top of the HEPA filter cartridge to clean the HEPA filter. (Fig. 19) 2. Remove the filter and "TapClean on a hard surface to remove any residual dust that might be within the filter. (Fig.20) Fig You can wash / rinse the HEPA filter. (Fig. 21) Fig. 21 Important: NEVER use the pleat cleaner knob on the HEPA filter if the HEPA filter is wet. Doing so will cause damage to the filter. Note: We recommend washing the filter once a month or when suction appears reduced. Always allow 24 hours for drying before refitting to the vacuum. The HEPA dust-bin filter should, however, be replaced every three (3) to six (6) months to ensure peak performance of your vacuum. Please Note: The white material in the HEPA filter will discolour over time - This is NORMAL and will NOT affect the performance of the filter. For Best Performance: Always empty the dust-bin and clean the HEPA dust-bin filter and debris screen before each use and during prolonged usage. Never over fill the dust-bin. Cleaning the Debris Screen 1.To remove the debris screen from the dust-bin: With the trap door open, grasp the frame within the dust bin and turn clock-wise and remove. Either brush gently or rinse the frame in lukewarm water to remove any dust that is adhering to the screen. Fig Make sure the debris screen is completely dry before refitting to the dust-bin. 3.To refit the debris screen, insert the screen into the dust-bin and turn anti-clockwise to lock. Cleaning the Pre-Motor Filter Located beneath the dust-bin on the vacuum is a pre-motor filter that should be cleaned each time the HEPA filter is cleaned. 1.Remove the dust-bin. 2.Lift the pre-motor filter out. 3.Rinse in lukewarm water and let the filter air dry for 24 hours before re-installing. 4.When the filter is dry, refit to the vacuum. Do not use a washing machine to rinse the filter. Do not use a hair dryer to dry it. Air dry only. Never operate the vacuum without ALL filters in place. Note: This is a washable filter, but we recommend replacing it every three (3) months. Note: A severely blocked filter should be thoroughly washed with fresh water. A mild detergent can be used if required. Changing & Cleaning the Charcoal Exhaust Filter The exhaust filter is located at the front of the vacuum. Please note; this filter is not washable and should only be cleaned by lightly brushed. It is recommended that the Charcoal filter be replaced every 3-6 months. 9
 2.")


 5.")
11 OPERATING INSTRUCTIONS Changing & Cleaning the Charcoal Exhaust Filter cont. 1.Insert a thumb into the slot on the exhaust filter cover then press down and pull the cover outwards. (Fig. 23) 2.Pull out the exhaust filter frame. (Fig. 24) 3.Clean the exhaust filter by lightly brushing. Charcoal filters reduce pet odours released from within the vacuum and should be replaced every 3-6 months for optimum performance. Fig. 26 Fig. 27 Fig. 23 Fig. 24 Cleaning & Changing the Belt Warning: To reduce the risk of electric shock, the power cord must be disconnected before performing any maintenance / trouble shooting checks. Occasionally the vacuum drive belt will require changing, the frequency of change will depend upon the amount you use your vacuum. 1.Turn the vacuum "Off" and unplug from power supply. 2.Release the handle by pressing on the handle release pedal and pull back on the handle until it releases from its upright position. Turn the vacuum over and place on the floor. 3. With a screw driver remove the five (5) screws on the bottom plate. (Fig. 25) 4. Remove the bottom cover of the floor head. (Fig. 26) 5. Lift the right side of the agitator brush first and then lift the left hand side and lift out the agitator brush. (Fig. 27) 6.Carefully remove any belt residue that may exist in the drive belt area. 7. If the drive belt has broken, remove any loose pieces before replacing with a new drive belt. 8. Remove the worn or broken drive belt from the motor drive shaft. 9.Turn the new drive belt sideways then loop it over the motor drive shaft and then over the agitator pulley on the agitator. (Fig. 28) Fig. 28 Fig. 25 Note: The drive belt is consumable part. Please call to buy genuine Swan spare parts. 10

12 OPERATING INSTRUCTIONS Cleaning & Changing the Belt Please Note: The agitator end caps show an arrow that indicates the correct direction the agitator must be installed when refitting. 10. Insert both sides of the agitator by placing the end caps of the agitator, down into the slots on each side. Press firmly to make sure that each end is completely inserted. 11. Check to make sure that the belt is centered on the pulley and that the agitator turns. 12. Replace the cover over the floor head base and replace the screws. Storage The vacuum handle has a unique handle which folds for easy storage. 1.To fold the handle; turn the folding handle release latch below the handle. (Fig. 29) Motor Thermostat Important: This unit is equipped with a motor protective thermostat. If for some reason the vacuum cleaner should overheat, the thermostat will automatically turn the vacuum off. Should this occur: 1. Turn the vacuum Off. 2. Disconnect the plug from the power source. 3. Check the source of overheating. (i.e. blocked hose or filter) 4. If there is a blocked hose or filter, unblock and clean / replace the filters if necessary. 5. Wait between minutes before attempting to reuse the vacuum. The thermal protection device should cool down within this time and the vacuum can then be reused. Fig Push the handle down until it is in the storage position. 3. To return the handle to the upright position, pull handle upwards to the upright position until you hear the handle lock into place. 4. NOTE: The folding handle release latch is on a spring and will return to its original position. 11
13 PROBLEM SOLVING This appliance was inspected thoroughly and was in good operating condition when it was shipped from the factory. If a minor problem occurs, it usually can be solved quite easily. Therefore, this checklist is provided for your convenience. PROBLEM POSSIBLE CAUSE POSSIBLE Cleaner Won t Run Cleaner Won't Pick Up 1. Not properly plugged into outlet. 2. No electricity in wall outlet 3. On/Off switch not turned on. 4. Motor thermostat tripped. 5. Blown fuse/tripped breaker. 1. Full or clogged dust cup. 2. Wrong pile height setting. 3. Clogged nozzle or dust inlet port. 4. Blocked hose Check behind inspection door (No 20 page 4). 5. Broken belt. 6. Hose not inserted fully. 7. Dirty filters. 8. HEPA filter needs cleaning or replacing. 9. Debris screen needs cleaning. 1. Plug in firmly. 2. Reset circuit breaker or replace the fuse. 3. Push on/off switch to on. 4. Reset motor thermostat. 5. Check fuse or breaker. 1. Clean dust cup. 2. Adjust setting. 3. Remove obstruction. 4. Remove obstruction. 5. Replace belt. 6. Push hose in securely. 7. Clean / change filters 8. Clean or replace HEPA Filter. 9. Clean debris screen. Cleaner Picks Up Moveable Rugs Or Pushes Too Hard Agitator Does Not Turn Air Driven Turbo Brush Does Not Rotate Or Rotates Slowly Air Flow Restricted With Attachment Use Sound Changes 1. Wrong pile height setting. 1. Adjust setting. 1. Broken drive belt 1. Replace drive belt. 2. Belt(s) installed incorrectly. 2. Check belt and agitator bar. 1. Rotating brush, turbine 1. Clear obstructions. obstructed. 2: Call Belt broken. 3. Clear obstruction. 3. Hose obstructed. 4. Clean HEPA filter or debris 4. HEPA filter or debris screen screen. clogged. 1. Attachment use restricts air flow. 1. Check attachment. 2. New carpet debris clogging air 2. Remove obstruction. path. 12
 Directive has been introduced across the European Union: to recycle waste electrical products using the best available recovery and recycling")
14 WASTE ELECTRICAL RECYCLING This symbol indicates that this product is classed as Electrical or Electronic Equipment and should not be disposed of with other household waste. The Waste Electrical and Electrical Equipment (WEEE) Directive has been introduced across the European Union: to recycle waste electrical products using the best available recovery and recycling techniques in order to minimise the impact on the environment to treat any hazardous substances and to avoid increasing landfill. WEEE product should be disposed of by handing it over at a designated collection point. For more information about where you can drop off your waste product for recycling please contact your local authority. 13
15 SPARES & SERVICE Service If the vacuum cleaner is malfunctioning or the power cord is damaged in any way, don t use the vacuum cleaner. The vacuum cleaner must be repaired by a qualified service agent. If you have any problems with your vacuum cleaner, please call the Swan helpline: Available Spares: SU3016/01 Hose SU3010/02 Belt SU3010/03 Beater Bar SU3016/04 Telescopic Tube SU3016/05 Upholstery Tool SU3016/06 Crevice Tool SU3016/07 Dusting Brush SU3017/08 Turbo Brush SU3017/09 Dustbin & Lid SU3010/10 Debris Screen (not supplied with filter kit) SU3010/11 HEPA Filter SU3015/12 Exhaust Charcoal Filter SU3015/51 Filter Kit SWAN VACUUM HELPLINE: PLEASE CALL SWAN VACUUM SPARE PARTS: PLEASE CALL When calling from outside the UK please use
INSTRUCTION MANUAL Model: SU3022
 INSTRUCTION MANUAL Model: SU3022 GUARANTEE This product is guaranteed for 2 years from the date of original purchase. If any defect arises due to faulty materials or workmanship, the unit will, either
BAGLESS UPRIGHT VACUUM
 BAGLESS UPRIGHT VACUUM OWNER S MANUAL Model UV219CS 120V., 60Hz., 12 Amps FOR HOUSEHOLD OR COMMERCIAL USE USA: EURO-PRO Operating LLC Canada: EURO-PRO Operating LLC 94 Main Mill Street, Door 16 4400 Bois
User Guide. Please read carefully before use. Your Hoover Guarantee. Your Hoover Guarantee. Contents. IMPORTANT Safety Reminders
 Your Hoover Guarantee Contents Your Hoover Guarantee During year 1 HOOVER engineers will replace or repair all defective parts free of charge, except for parts subject to fair wear and tear such as belts,
SAVE THESE INSTRUCTIONS
 OWNER S MANUAL Model EP708 120V~, 60Hz., 12 Amps Bagless Cyclonic Upright For information or assistance: USA: EURO-PRO Corporation Canada: EURO-PRO Corporation 178 West Service Rd. 4400 Bois Franc Champlain,
Bagless upright vacuum
 U89 U90 & U91-P2 Power 2 Series User Guide V2.0:U90-P2 User Guide 13/08/2010 11:44 Page 1 Vax Careline: (UK) 0844 412 8455 (ROI) 1-800 928 308 Bagless upright vacuum Vax model number: U91-P2 Series U90-P2
Compact Cyclonic Bagless Upright Vacuum Cleaner
 Compact Cyclonic Bagless Upright Vacuum Cleaner Model Number: RHUV20MR05 For Customer Services & Spare Parts please call 0345 209 7461 Opening times: Monday - Friday 8am 8pm & Saturday 9am 1pm Or visit
U88-T2-B. User Guide. Bagless Upright. Get Cleaning... vax.co.uk. U88-T2 series. What s your Vax model number? (Located on the flap of the packaging)
") User Guide Bagless Upright U88-T2-B Get Cleaning... What s your Vax model number? (Located on the flap of the packaging) e.g. U9O-MA-B What s your serial number? (Located on the base of the machine) Note
User Guide Bagless Upright U88-T2-B Get Cleaning... What s your Vax model number? (Located on the flap of the packaging) e.g. U9O-MA-B What s your serial number? (Located on the base of the machine) Note
User Manual. Compact Bagged Vacuum Cleaner. Dog & Cat W2000
 User Manual Compact Bagged Vacuum Cleaner 3 Features 1 2 On/off button Flexible hose 4 7 3 4 Telescopic wand Wand length adjustment 2 8 5 Cord rewind button 6 7 Variable speed control Combination floor
BATTERY POWERED BACKPACK VACUUM
 BATTERY POWERED BACKPACK VACUUM Operation Instructions Read all instructions before using this appliance IMPORTANT SAFETY INSTRUCTIONS Per CFR 49, Lithium Ion batteries are considered hazardous goods.
AA Z** V2** W** U1* V** U2** USER MANUAL U* E D L U3* M N S ** T* O Q P P3 P2 P1 R** AD* PRINTED IN P.R.C /01
 AA Z** V2** H F Y* G AB X* I J AC W** U1* C B A K V** U2** USER MANUAL U* E D L U3* M N S ** T* O PRINTED IN P.R.C. 48022156/01 Q P P3 P2 P1 R** AD* *Certain models only **May vary according to the model
Atrix Back Pack Vacuum
 1 Atrix Back Pack Vacuum OWNER S MANUAL Model: VACBP1 120V 12A, 1400W ETL US Canada Model: VACBP2 230V 6A, 1400W EAC Atrix International, Inc. 1350 Larc Industrial Blvd. Burnsville, MN 55337 www.atrix.com
RETRACTOR TOTAL SYSTEM VAC
 RETRACTOR TOTAL SYSTEM VAC OWNER S MANUAL Model EP187H 120V., 60Hz., 7.1 Amps USA: EURO-PRO Operating LLC Canada: EURO-PRO Operating LLC 94 Main Mill Street, Door 16 4400 Bois Franc Plattsburgh, NY 12901
- 1- IMPORTANT SAFETY REMINDERS
 USER MANUAL IMPORTANT SAFETY REMINDERS This appliance should only be used for domestic cleaning, as described in this user guide. Please ensure that this guide is fully understood before operating the
Turbo Stick Vac. OWNER S MANUAL Model EP V., 60Hz., 7.5 Amps.
 OWNER S MANUAL Model EP600 120V., 60Hz., 7.5 Amps. Turbo Stick Vac For information or assistance: EURO-PRO Operating LLC 94 Main Mill Street, Door 16 Plattsburgh, NY 12901 Tel.: 1 866 98SHARK (74275) www.sharkvac.com
Compact Cyclonic Bagless Cylinder Vacuum Cleaner
 Compact Cyclonic Bagless Cylinder Vacuum Cleaner Model Number: RHUV3002 220-240V~, 50/60Hz, 700W For Customer Services & Spare Parts please call 0345 209 7461 Opening times: Monday - Friday 8am 8pm & Saturday
Bagless upright. vax.co.uk. Vax Careline: (UK) (ROI) Mach 1 series Mach 2 series. Vax model number: Version 1.
 (ROI) Mach 1 series Mach 2 series. Vax model number: Version 1.") U91-M1 & M2 Mach Series User Guide v1.2:user Guide 31/08/2010 19:19 Page 1 Vax Careline: (UK) 0844 412 8455 (ROI) 1-800 928 308 Bagless upright MACH Vax model number: Mach 1 series Mach 2 series WARNING:
U91-M1 & M2 Mach Series User Guide v1.2:user Guide 31/08/2010 19:19 Page 1 Vax Careline: (UK) 0844 412 8455 (ROI) 1-800 928 308 Bagless upright MACH Vax model number: Mach 1 series Mach 2 series WARNING:
Multi-Cyclonic Vacuum USER GUIDE
 Multi-Cyclonic Vacuum USER GUIDE MODEL CJTG00499B-120 Thank you for purchasing a BENNETT READ POWER UP PET vacuum. Your POWER UP PET vacuum incorporates the latest technological advances in home cleaning
Single Cyclonic Cylinder Vacuum Cleaner
 Single Cyclonic Cylinder Vacuum Cleaner Model Number: RHCV3001 220-240V~, 50/60Hz, 800W For Customer Services & Spare Parts please call 0345 209 7461 Opening times: Monday - Friday 8am 8pm & Saturday 9am
GV 8 quart Model BP BATTERY POWERED BACKPACK VACUUM
 GV 8 quart Model BP BATTERY POWERED BACKPACK VACUUM Operation Instruction Read all instructions before using this appliance Congratulations on your purchase of the GV 8 Quart Battery Powered Back pack
ERGO BACKPACK VACUUM OWNER S MANUAL
 ERGO BACKPACK VACUUM OWNER S MANUAL Model: VACBP1 120V 12A, 1400W ETL US Canada Atrix 1350 Larc Industrial Blvd. Burnsville, MN 55337 www.atrix.com sales@atrix.com Telephone: 952.894.6154 Toll Free Telephone:
User Manual. Deep Cleaning Bagless Vacuum with Powerhead. Deep Clean W3000
 User Manual Deep Cleaning Bagless Vacuum with Powerhead Deep Clean W3000 Features 1 2 3 4 5 6 7 8 9 10 11 On/off button Flexible hose Telescopic wand Wand length adjustment Cord rewind button Combination
Bagged Vacuum Cleaner with Powerhead. Compact Powerhead for a Powerful Clean Washable HEPA Filtration High Efficiency Soft Start Motor
 Bagged Vacuum Cleaner with Powerhead Compact Powerhead for a Powerful Clean Washable HEPA Filtration High Efficiency Soft Start Motor 3 1 2 5006PH Mode Congratulations on the purchase of your new HOOVER
Compact Cyclonic Pro Bagless Cylinder Vacuum Cleaner
 Compact Cyclonic Pro Bagless Cylinder Vacuum Cleaner Model Number: RHCV15SB05 220-240V AC 50/60Hz 1000W For Customer Services & Spare Parts please call 0345 209 7461 Opening times: Monday - Friday 8am
Owner s Guide. Powerhead Canister Vacuum Cleaner
 Owner s Guide Powerhead Canister Vacuum Cleaner INDEX 1. Important Safety Instructions 2. Components & Accessories 3. Assembly 4. How to Operate a. On/Off Switch b. Check bag indicator c. Variable suction
OptiClean. U S E R S G U I D E 6 0 A 4 S E R I E S v. Product View. Assembly. Operations. Maintenance and Care.
 OptiClean U S E R S G U I D E 6 0 A 4 S E R I E S 2 2 0-2 4 0 v 3 Safety Instructions 4 Product View 5 Assembly 6-8 Operations 9-12 Maintenance and Care 13 Troubleshooting 14 Consumer Services 15 Replacement
Turbo Cyclonic Pro Bagless Cylinder Vacuum Cleaner
 Turbo Cyclonic Pro Bagless Cylinder Vacuum Cleaner Model Number: RHCV20MR04 220-240V~, 50/60Hz, 900W For Customer Services & Spare Parts please call 0345 209 7461 Opening times: Monday - Friday 8am 8pm
DUST MANAGER USER INSTRUCTIONS GENERATION FUTURE indd 1 28/11/ :27:15
 GENERATION FUTURE DUST MANAGER USER INSTRUCTIONS 0565-5287.indd 1 28/11/2007 15:27:15 IMPORTANT SAFETY REMINDERS User s manual - This cleaner should only be used for its intended purpose as described in
O INSTRUCTION MANUAL P V* S N W* J F X* E R L** M** A Y* PRINTED IN P.R.C
 T G H* U O INSTRUCTION MANUAL U T P V* S N Q I W* J C F K B D X* E R L** M** PRINTED IN P.R.C. 48005539 1 A Y* *Certain models only ** 2 3 4 5 14 15 16 17 ** * 6 7 8 9 18 19 20 21 10 11 12 13 22 23 *Certain
Model No.: VUM33AS20G
 Model No.: VUM33AS0G USER MANUAL IMPORTANT SAFETY INSTRUCTIONS Before operating the appliance for the first time, read these instructions carefully. Please store this user manual for future reference..
POWERLITE SERIES USER GUIDE. Cyclonic Vacuum DDU01-E01-P01
 POWERLITE SERIES Cyclonic Vacuum USER GUIDE DDU01-E01-P01 WARNING BASIC SAFETY PRECAUTIONS This vacuum cleaner is intended for household use only and NOT for commercial or industrial use. Only use the
Vacuum Cleaner MC-E3003 MC-E3001. Operating Instructions. Model No.
 Operating Instructions Vacuum Cleaner Model No. MC-E3003 MC-E3001 We would recommend that you carefully study these Operating Instructions before attempting to operate the unit and that you note the Important
POWERGROOM. MultiCyclonic 1654 SERIES
 POWERGROOM MultiCyclonic 1654 SERIES IMPORTANT SAFETY INSTRUCTIONS READ ALL INSTRUCTIONS BEFORE USING YOUR VACUUM. When using an electrical appliance, basic precautions should be observed, including the
Ultima Pet Plus Instruction Manual
 Ultima Pet Plus Instruction Manual U6011 IMPORTANT SAFETY INSTRUCTIONS IMPORTANT SAFETY INSTRUCTIONS READ ALL INSTRUCTIONS BEFORE USING (THIS APPLIANCE) When using an electrical appliance basic precautions
BDASV101 BDASV102 BDASV103. model
 BDASV101 BDASV10 BDASV103 model IMPORTANT SAFETY INSTRUCTION SAFETY GUIDELINES - DEFINITIONS It is important for you to read and understand this manual. The information it contains relates to protecting
AIRSPEED TECHNOLOGY High velocity airflow Powerful cleaning performance ZAS1000A
 AIRSPEED TECHNOLOGY High velocity airflow Powerful cleaning performance ZAS1000A 2 Content Important safeguards 3 Before using your vacuum cleaner 4 Identifying parts of your vacuum cleaner 5 How to use
Essentials Family and Pets+ permanent bagged cylinder vacuum cleaner
 70255 rev1 12/9/07 09:49 Page 1 Essentials Family and Pets+ permanent bagged cylinder vacuum cleaner Please read and keep these instructions Getting the best from your new cleaner... If your cleaner is
- 2 - IMPORTANT SAFETY REMINDERS
 USER MANUAL IMPORTANT SAFETY REMINDERS This appliance should only be used for domestic cleaning, as described in this user guide. Please ensure that this guide is fully understood before operating the
DUST MANAGER USER INSTRUCTIONS GENERATION FUTURE indd 1 28/11/ :43:21
 GENERATION FUTURE DUST MANAGER USER INSTRUCTIONS 0565-5289.indd 1 28/11/2007 15:43:21 IMPORTANT SAFETY REMINDERS User s manual - This cleaner should only be used for its intended purpose as described in
Air Reach Upright VACUUM CLEANER
 Air Reach Upright VACUUM CLEANER LIGHTWEIGHT, FULL SIZE POWER, MULTI CYCLONIC UPRIGHT LET S GET STARTED. VX55 vax.com.au vax.co.nz Let s talk safety Basic safety precautions Do s This machine is intended
Description of the vacuum R30D, R30P & R30PET. Owner s Manual
 Description of the vacuum R30D, R30P & R30PET Owner s Manual Contents Getting Started Important Safety Instructions... 2 Polarization Instructions... 3 State of California Proposition 65 Warnings... 3
R20SC, R20E & R20ENT. Owner s Manual
 R20SC, R20E & R20ENT Owner s Manual Contents Getting Started Important Safety Instructions... 2 Polarization Instructions... 3 State of California Proposition 65 Warnings... 3 Description of the Vacuum...
Bagless upright. Vax Careline (UK) (ROI) vax.co.uk VS-19EC. Vax model number:
 (ROI) vax.co.uk VS-19EC. Vax model number:") Vax Careline (UK) 0844 412 8455 Bagless upright Vax model number: VS-19EC instruction manual vax.co.uk Please read carefully before using this cleaner. Always fully extend the mains cable before use. Retain
Vax Careline (UK) 0844 412 8455 Bagless upright Vax model number: VS-19EC instruction manual vax.co.uk Please read carefully before using this cleaner. Always fully extend the mains cable before use. Retain
CA N* Q1** T* M* HF P* Q2** O* F T* P* E C O* L D USER MANUAL B V* J GP R K A I X* Q** PRINTED IN P.R.C
 M* CA N* N* Q1** T* M* HF S P* Q2** O* U* F T* P* E C O* L D USER MANUAL B V* J G H W* GP R PRINTED IN P.R.C. 48011352 1 K A I X* Q** * Certain models only ** Certain models only, nozzles may vary according
Congratulations on the purchase of your new Hoover Smart.
 USER INSTRUCTIONS IMPORTANT SAFETY REMINDERS User s manual - This cleaner should only be used for its intended purpose as described in these instructions. Ensure that these are fully understood before
Compact Cyclonic Bagless Cylinder Vacuum Cleaner
 Compact Cyclonic Bagless Cylinder Vacuum Cleaner Model Number: RHCV35BM01 220-240V AC 50/60Hz 700W For Customer Services & Spare Parts please call 0345 209 7461 Opening times: Monday - Friday 8am 8pm &
Description of the vacuum. (The chances are you re never going to read me) Owner s Manual. models X9 & G9.
 Owner s Manual. models X9 & G9.") Description of the vacuum (The chances are you re never going to read me) Owner s Manual models X9 & G9 www.simplicityvac.com Contents IMPORTANT SAFETY INSTRUCTIONS 2 Polarization instructions 3 Description
Description of the vacuum (The chances are you re never going to read me) Owner s Manual models X9 & G9 www.simplicityvac.com Contents IMPORTANT SAFETY INSTRUCTIONS 2 Polarization instructions 3 Description
USER MANUAL. Q1a Q1b Q1c Q1* Q1* H. Q2a Q2d. Q2c M Q2b Q2* L P C B N** GP O** I. ** Certain models only, nozzles may vary according to model
 Q1a Q1b Q1c J R Q1* H Q1* Q2a Q2d Q2c M Q2b Q2* L P K USER MANUAL D F C B G N** GP E A O** I CA HF 1 N1** N2** S* T* U* V* PRINTED IN P.R.C. 48011752 ** 2 3 4 5 * * 14 15 16 17 ** ** 6 7 8 9 18 19 20 21
slalom USER INSTRUCTIONS Slalom IM.indd 1 01/06/ :19:31
 slalom USER INSTRUCTIONS Slalom IM.indd 0/06/008 08:9:3 IMPORTANT SAFETY REMINDERS User manual - This cleaner should only be used for its intended purpose as described in these instructions. Ensure that
POWERFORCE COMPACT USER GUIDE 2112 SERIES
 POWERFORCE COMPACT USER GUIDE 2112 SERIES More of a video person? Look for this icon and go online for an instructional how-to video at / videos IMPORTANT SAFETY INSTRUCTIONS READ ALL INSTRUCTIONS BEFORE
Important: The wires in the mains power lead are coloured in accordance with the following code: Blue - Neutral Brown - Live
 User Instructions P1 P2 P3 P4 P5 P6 P7 P8 P9 P10 P11 P12 P13 P14 P15 P16 P17 P18 P19 P20 P21 Freespace_bag_std t7_v3.qxp 13/03/2007 12:23 Page 1 IMPORTANT SAFETY REMINDERS: This cleaner should only be
OWNER S GUIDE LA400.
 OWNER S GUIDE LA400 LA400_40_IB_ENG_120910_3.indd 1 IMPORTANT SAFETY INSTRUCTIONS For Household Use Only WHEN USING AN ELECTRICAL APPLIANCE, BASIC SAFETY PRECAUTIONS SHOULD ALWAYS BE OBSERVED, INCLUDING
SH3020 USER INSTRUCTIONS
 DEHUMIDIFIER SH3020 USER INSTRUCTIONS GUARANTEE This product is guaranteed for 2 years from the date of original purchase. If any defect arises due to faulty materials or workmanship, the unit will, either
OPERATING INSTRUCTIONS
 CLEANMAX OPERATING INSTRUCTIONS FOR CLEANMAX STANDARD SERIES UPRIGHT VACUUMS MODELS : CMS-1T CMS-1N Before operating the vacuum, please read these instructions completely. Index Important Safety Instructions............................................................
USER INSTRUCTIONS Jazz IM UK.indd 1 5/15/2012 9:54:22 AM
 USER INSTRUCTIONS 4800538 Jazz IM UK.indd 5/5/0 9:54: AM IMPORTANT SAFETY REMINDERS User manual - This cleaner should only be used for its intended purpose as described in these instructions. Ensure that
Wand Cleaning Adjusting the Suction Power for Tool Cleaning Cleaning Tools... 11
 OWNER S MANUAL Contents Getting Started Important Safety Instructions... 2 Polarization Instructions... 3 State of California Proposition 65 Warnings... 3 Description of the Vacuum... 4 Assembling the
Hand Vac. Owner s Manual. Review this manual before operating cleaner. English pp. 1-7 Español pág Français p.
 TM Owner s Manual English pp. 1-7 Español pág. 8-11 Français p. 1-16 Hand Vac Thank you for selecting a HOOVER product. This cleaner was inspected and packaged carefully before being shipped from the factory.
NP320 series OWNER S GUIDE. NP320series_40_IB_ENG_120409_2.indd 1
 NP320 series OWNER S GUIDE NP320series_40_IB_ENG_120409_2.indd 1 IMPORTANT SAFETY INSTRUCTIONS For Household Use Only WHEN USING AN ELECTRICAL APPLIANCE, BASIC SAFETY PRECAUTIONS SHOULD ALWAYS BE OBSERVED,
IMPORTANT SAFETY REMINDERS
 USER Manual IMPORTANT SAFETY REMINDERS This appliance should only be used for domestic cleaning, as described in this user guide. Please ensure that this guide is fully understood before operating the
Refresh & Clean Carpet Washer
 Refresh & Clean Carpet Washer Model Number: RHCC5001 220-240 V~, 50/60Hz, 500-600W For Customer Services & Spare Parts please call 0345 209 7461 Opening times: Monday - Friday 8am 8pm & Saturday 9am 1pm
getting the best from your new cleaner...
 VC73360MUK-CyclonicBaglessRev3 3/11/05 4:41 pm Page 1 Cyclonic bagless vacuum cleaner Please read and keep these instructions getting the best from your new cleaner... If your cleaner isn t picking up
- 2 - IMPORTANT SAFETY REMINDERS
 USER MANUAL IMPORTANT SAFETY REMINDERS This appliance should only be used for domestic cleaning, as described in this user guide. Please ensure that this guide is fully understood before operating the
IMPORTANT SAFETY REMINDERS:
 User Instructions P1 P2 P3 P4 P5 P6 P7 P8 P9 P10 P11 P12 P13 P14 P15 P16 P17 P18 P19 P20 P21 STD cyclonic t7_v2.qxp 12/03/2007 17:11 Page 1 IMPORTANT SAFETY REMINDERS: GB This cleaner should only be used
IMPORTANT SAFETY REMINDERS
 USER MANUAL IMPORTANT SAFETY REMINDERS This appliance should only be used for domestic cleaning, as described in this user guide. Please ensure that this guide is fully understood before operating the
True Hepa Shark Plus Canister Vacuum Model EP238 Use and Care Instructions
 True Hepa Shark Plus Canister Vacuum Model EP238 Use and Care Instructions For information or assistance, call 800-798-7398 USA: EURO-PRO Operating LLC Canada: EURO-PRO Operating LLC 21 Lawrence Paquette
DUST MANAGER USER INSTRUCTIONS
 Hoover_Stabiliser_FINAL_Vs2c_01_03_06.qxp 01/03/2006 10:28 Page 1 DUST MANAGER USER INSTRUCTIONS Hoover_Stabiliser_FINAL_Vs2c_01_03_06.qxp 01/03/2006 10:28 Page 2 IMPORTANT SAFETY REMINDERS User s manual-
USER GUIDE LET S GO. Bagless Cylinder. dirtdevil.com.au. Dirt Devil Service Line AU: / NZ:
 USER GUIDE Dirt Devil Service Line AU: 1300 361 505 / NZ: 0800 800 900 Bagless Cylinder LET S GO. What s your Dirt Devil s model number? D D R C What s your serial number? (Located on the base of the machine)
OWNER S GUIDE LA400.
 OWNER S GUIDE LA400 www.sharkclean.com IMPORTANT SAFETY INSTRUCTIONS For Household Use Only WHEN USING AN ELECTRICAL APPLIANCE, BASIC SAFETY PRECAUTIONS SHOULD ALWAYS BE OBSERVED, INCLUDING THE FOLLOWING:
Ireland. Australia. New Zealand
 UK Ireland Australia New Zealand 2 3 4 5 Intended use Your Black & Decker vacuum cleaner has been designed to vacuum dry substances. This product is intended for household use only. Safety instructions
Storm pets cylinder vacuum cleaner
 70313 rev3 3/7/06 13:59 Page 1 Storm pets cylinder vacuum cleaner Please read and keep these instructions Getting the best from your new cleaner... If your cleaner is not picking up as well as it should,
P17 P18 P19 P20 P21 P22 P23
 User Instructions P1 P2 P3 P4 P5 P6 P7 P8 P9 P10 P11 P12 P13 P14 P15 P16 P17 P18 P19 P20 P21 P22 P23 Nanopack cyclonic t7_v2.qxp 12/03/2007 17:32 Page 1 IMPORTANT SAFETY REMINDERS: This cleaner should
With Full Size Nozzle. Owner s Manual
 With Full Size Nozzle Owner s Manual 1 IMPORTANT SAFETY INSTRUCTIONS When using an electrical appliance, basic precautions should always be followed, including the following: READ ALL INSTRUCTIONS BEFORE
IMPORTANT SAFETY REMINDERS
 USEr manual IMPORTANT SAFETY REMINDERS This appliance should only be used for domestic cleaning, as described in this user guide. Please ensure that this guide is fully understood before operating the
MODEL MC-UL592 MC-UL594 POWER SOURCE. 230V - 240V ~ 50 Hz MAX INPUT 1400 W 1500 W NOMINAL INPUT DIMENSIONS (W x L x H)
") Order Number: PMMA091040CE Vacuum Cleaner MC-UL592/MC-UL594 SPECIFICATION MODEL MC-UL592 MC-UL594 POWER SOURCE 230V - 240V ~ 50 Hz MAX INPUT 1400 W 1500 W NOMINAL INPUT DIMENSIONS (W x L x H) 1200-1300
Order Number: PMMA091040CE Vacuum Cleaner MC-UL592/MC-UL594 SPECIFICATION MODEL MC-UL592 MC-UL594 POWER SOURCE 230V - 240V ~ 50 Hz MAX INPUT 1400 W 1500 W NOMINAL INPUT DIMENSIONS (W x L x H) 1200-1300
Easy Vac BAGLESS VACUUM
 Easy Vac BAGLESS VACUUM USER S GUIDE 3130 SERIES 3 Safety Instructions 4 Product View 5 Assembly 6-7 Operations 8-12 Maintenance and Care 13 Troubleshooting 14 Consumer Services 15 Replacement Parts 16
Get Cleaning... What s your Vax s model number? User Guide VA X. Bagless Upright. VAU1200 / VARU1200 / VAUW1200
 Bagless Upright VA X User Guide Vax Service line AU: 1300 361 505 NZ: 0800 800 900 Get Cleaning... What s your Vax s model number? V A U 1 2 0 0 / V A R U 1 2 0 0 / V A U W 1 2 0 0 What s your serial number?
Bagless upright. vax.co.uk. Vax Careline: (UK) (ROI) VS-190 Series. Vax model number: Version 1.1
 (ROI) VS-190 Series. Vax model number: Version 1.1") VS-190 Series User Guide V1.1.qxd:VS-190 User Guide 26/1/11 10:44 Page 1 Vax Careline: (UK) 0844 412 8455 (ROI) 1-800 928 308 Bagless upright Vax model number: VS-190 Series WARNING: This cleaner has a
VS-190 Series User Guide V1.1.qxd:VS-190 User Guide 26/1/11 10:44 Page 1 Vax Careline: (UK) 0844 412 8455 (ROI) 1-800 928 308 Bagless upright Vax model number: VS-190 Series WARNING: This cleaner has a
INSTRUCTION MANUAL. Cylinder Bagless Vacuum Cleaner BVC1805
 INSTRUCTION MANUAL BVC1805 Cylinder Bagless Vacuum Cleaner Warranty Helpline: 1800 509 394 (Australia) 0800 450 259 (New Zealand) The Gold Technical Support Line: 1902 215 259 Personal Product Support
Turbo Lite Corded Handheld Stick Vacuum
 Turbo Lite Corded Handheld Stick Vacuum Model Number: RHCHS1001 For Customer Services & Spare Parts please call 0345 209 7461 Opening times: Monday - Friday 8am 8pm & Saturday 9am 1pm Or visit us at www.productcare.co.uk
User Guide U88-AM-B / U88-AM-P / U88-AM-R / U88-AM-T / U87-AM-C
 Designed in the UK User Guide U88-AM-B / U88-AM-P / U88-AM-R / U88-AM-T / U87-AM-C Performance is everything. Contents Contents Machine Overview General Safety Information 3 Getting Started 4 How To Use
- website: Vax Ltd., Kingswood Road, Hampton Lovett, Droitwich, Worcestershire WR9 0QH, UK
 V-026PT User Guide.qxd 7/9/06 15:13 Page 12 EEC STATEMENT OF COMPLIANCE Manufacturer/EEC importer: Vax Limited, hereby on our own responsibility, declare that the product V-026PT is manufactured in compliance
IMPORTANT SAFETY INSTRUCTIONS. WARNING - To reduce the risk of fire, electric shock, or injury : SAVE THESE INSTRUCTIONS CONTENTS
 IMPORTANT SAFETY INSTRUCTIONS Read All Instructions Carefully Before Using This Appliance When using an electrical appliance, basic precautions should always be followed, including the following : WARNING
AirPet User Guide VCAP1500
 Designed in the UK AirPet User Guide VCAP500 Performance is everything. Contents Contents Machine Overview General Safety Information Getting Started Maintenance Looking After Your Machine Filters Looking
Your Blast Vac Pro. Your Blast Vac Pro
 Your Blast Vac Pro Your Blast Vac Pro Product code: V02364 03/13 JML JML House, Regis Road, London NW5 3EG Tel: 020 7691 3800, Fax: 020 7691 3801 E-mail: info@jmlgroup.co.uk Web: www.jmldirect.com Instructions
M* U INSTRUCTION MANUAL ENGLISH N* O* P* Q** R I PRINTED IN P.R.C * Certain models only ** May vary depending on model
 48004107 - Ultra - UK IM.pdf 1 6/24/2011 10:29:10 AM L M* U INSTRUCTION MANUAL ENGLISH GB J C M Y V* CM MY CY CMY K N* O* P* E D C W* F K S PRINTED IN P.R.C. 48007324 1 Q** R I H G B A T X* * Certain models
Owner s Manual. For Fuller Brush Tidy Maid Vacuum. Model FBTM-PW
 Owner s Manual For Fuller Brush Tidy Maid Vacuum Model FBTM-PW Thank you for purchasing this Fuller Brush Upright Vacuum. To ensure the best results, please read this manual first and keep it for future
Vax Careline: Instruction Manual. Vax Model Number V-029 Vax Model Number V-029Q
 www.vax.co.uk Vax Careline: 0870 6061248 Vax Model Number V-029 Vax Model Number V-029Q Please read carefully before using the washer. Always fully extend the mains cable before use. Instruction Manual
Ireland. Australia. New Zealand
 UK Ireland Australia New Zealand 2 3 4 5 Intended use Your Black & Decker vacuum cleaner has been designed to vacuum dry substances. This product is intended for household use only. Safety instructions
Owner s Guide. Thank you for purchasing your new Eureka vacuum! Important instructions.
 Owner s Guide Thank you for purchasing your new Eureka vacuum! NEU180 series Upright vacuum cleaner; household type Important instructions For easy assembly, please take a few moments to read this owner
THE SUPER-SILENT, ULTRA-POWERFUL SOLUTION FOR PREMIUM HOME CLEANING USER GUIDE
 THE SUPER-SILENT, ULTRA-POWERFUL SOLUTION FOR PREMIUM HOME CLEANING USER GUIDE Thank you for purchasing a BENNETT READ WHISPER vacuum. Your WHISPER vacuum incorporates the latest technological advances
Description of the vacuum R40 & R40P. Owner s Manual
 Description of the vacuum R40 & R40P Owner s Manual 1 Contents Getting Started Important Safety Instructions... 2 Polarization Instructions... 3 State of California Proposition 65 Warnings... 3 Description
Get Cleaning... What s your Vax s model number? User Guide. Carpet Washer Vax Careline: AU: NZ:
 User Guide Vax Careline: AU: 1300 361 505 NZ: 0800 800 900 Carpet Washer Get Cleaning... What s your Vax s model number? W8 W8 W0 W0 W0 W W W W W What s your serial number? (Located on the base of the
OPERATING INSTRUCTIONS
 CLEANMAX OPERATING INSTRUCTIONS FOR CLEANMAX PRO SERIES UPRIGHT VACUUMS MODELS : CMPS-1T CMPS-1N Before operating the vacuum, please read these instructions completely. Index Important Safety Instructions............................................................
PLEASE DO NOT RETURN THIS PRODUCT TO THE STORE.
 Owner s Manual Operating and Servicing Instructions Español - página E1 hoover.com IMPORTANT: READ CAREFULLY BEFORE ASSEMBLY AND USE. Questions or concerns? For assistance, please call Customer Service
OPERATING INSTRUCTIONS
 OPERATING INSTRUCTIONS FOR CARPET PRO UPRIGHT VACUUMS MODELS : CPU-75, CPU-75T, CPU-85, CPU-85T Before operating the vacuum, please read these instructions completely. Index Important Safety Instructions.............................................................2
Canister Cleaner. Owner s Manual. Review this manual before operating cleaner. Thank you for selecting a HOOVER product
 Canister Cleaner Owner s Manual ENGLISH pp. 1-9 ESPAÑOL pág. 10-14 FRANÇAIS p.15-19 Thank you for selecting a HOOVER product This cleaner was inspected and packaged carefully before being shipped from
POWERFORCE HELIX. Vacuum USER GUIDE 2110 & 2111 SERIES. (Model 2110 Shown)
") POWERFORCE HELIX Vacuum USER GUIDE 0 & SERIES (Model 0 Shown) IMPORTANT SAFETY INSTRUCTIONS READ ALL INSTRUCTIONS BEFORE USING YOUR APPLIANCE. Unplug from outlet when not in use and before conducting maintenance.
POWERFORCE HELIX Vacuum USER GUIDE 0 & SERIES (Model 0 Shown) IMPORTANT SAFETY INSTRUCTIONS READ ALL INSTRUCTIONS BEFORE USING YOUR APPLIANCE. Unplug from outlet when not in use and before conducting maintenance.
Pet. Easy Guide. VAX Ltd., Kingswood Road, Hampton Lovett, Droitwich, Worcestershire, WR9 OQH, UK - website:
 V-027P Rapide Pet User Guide 10/7/07 10:05 Page 14 EEC STATEMENT OF COMPLIANCE Manufacturer/EEC importer: VAX Limited, hereby on our own responsibility declare that the products V-027/V-027PT/V-027P/CCW-701
Bagless cylinder vacuum cleaner
 73270 rev2 27/10/08 09:52 Page 1 Bagless cylinder vacuum cleaner Please read and keep these instructions Getting the best from your new cleaner... If your cleaner is not picking up as well as it should,
OPERATING INSTRUCTIONS
 OPERATING INSTRUCTIONS FOR FULLER BRUSH HEAVY DUTY UPRIGHT VACUUMS MODELS : FBMM-1T FBMM-1N FBMM-PW Thank you for purchasing this Fuller Brush Upright Vacuum. To ensure the best results, please read this
Australia. New Zealand
 .... Australia New Zealand 2 5 3 4 JA JB JC JD JE JF JG JH JI JJ JK JL JM JN JO 5 Intended use Your Black & Decker vacuum cleaner has been designed to vacuum dry substances. This product is intended for