GB5MV-10-LD GB6MP-10-LD-U GB8MP-10-LD-U
|
|
|
- Allan Harrison
- 5 years ago
- Views:
Transcription

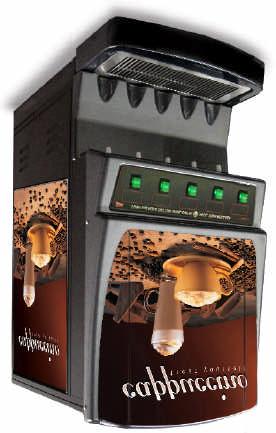
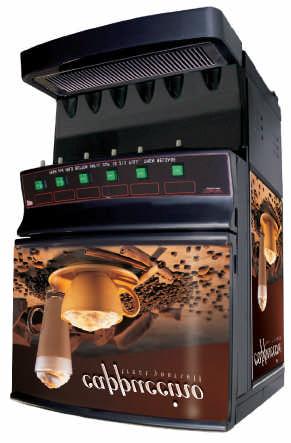
1 GBMV-10-LD GB6MP-10-LD-U GB8MP-10-LD-U Operation Manual NL48P July 200
2 CONTENTS Important Owner Information 1 Introduction 1 Important Safety Instructions 2 Model Description 3 Specifications 3 Plug Configurations 3 Installation 4 Start-up Procedure Troubleshooting Guide 6 Recommended Cleaning and Sanitizing 7 Dual Probe Liquid Level Controller 8 Components Tests 9 Hopper Assembly 10 Whipper Chambers 11 Body Frame 12 Electrical Chassis 21 Upper Door 22 Lower Door 23 Hot Water Tanks 24 Electrical diagram 26
3 IMPORTANT OWNER INFORMATION Record the model number, serial number (identification plate is located behind front door), voltage and purchase date of your Cecilware Cappuccino Dispenser in the spaces below. Please have the information available when calling Cecilware for assistance. Model #: Serial #: Voltage: Date of Purchase: Business Hours: 8:30 a.m. to :00 p.m. Eastern Standard Time Telephone: ; Fax: Additional information can be found by visiting our web site at INTRODUCTION The Cecilware, 6, & 8 head instant Cappuccino Dispenser is designed to meet the exact needs of the Convenience Store atmosphere. Cecilware has led the way in the highly profitable and growing market of Cappuccino with its GB series of Automatic Cappuccino Dispensers. Having set the standard for reliability, Cecilware also leads the way in variety with over 0 different models to choose from. With the introduction of Cecilware GBMV-10-LD, GB6MP-10-LD-U & GB8MP-10-LD-U designed exclusively to fit the increasing demand for Cappuccino sales, the hot beverage area has become to be known as Destination Cappuccino. This manual provides the installation, safety and operating instructions for the Destination Cappuccino Dispensers. We recommend all installation, operating and safety instructions appearing in this manual be read prior to installation or operation of your Cecilware Cappuccino Dispenser. Safety instructions that appear in this manual after a warning symbol and the words WARNING or CAUTION printed in bold face are very important. WARNING means that there is the possibility of serious injury or death to yourself or others. CAUTION means there is the possibility of minor or moderate injury. CAUTION without the symbol signifies the possibility of equipment or property damage only. Cecilware products are made with extensive research and field-testing. Every unit is thoroughly inspected and tested prior to shipment.
4 IMPORTANT SAFETY INSTRUCTIONS IMPORTANT! Read the following important safety instructions to avoid personal injury or death, and to avoid damage to the equipment or property. WARNINGS The GB8MP-10-LD-U (only) is equipped with two (2) power switches and two (2) 120 volt grounded power cords. To avoid any injury, turn both power switches OFF. Or, unplug both power cords and allow unit to cool completely before performing any maintenance or cleaning. The GBMV-10-LD and GB6MP-10-LD-U are equipped with one (1) power switch and one (1) 120 volt grounded power cord. Plug units into properly grounded electrical outlets of the correct voltage, size, and plug configuration. The GB8MP-10-LD-U (only) requires two (2) separate dedicated outlets. If the plug and receptacle do not match, contact a qualified electrician to determine the proper voltage and size and install the proper electrical outlets. These units have no user serviceable parts. To avoid damage to the unit or injury to personnel, use only Authorized Cecilware Service Agents and Genuine Cecilware Parts when service is required. Genuine Cecilware Replacement Parts are specified to operate safely in the environment in which they are used. Some aftermarket or generic replacement parts do not have the characteristics that will allow them to operate safely in Cecilware equipment. It is essential to use Cecilware Replacement Parts when repairing Cecilware equipment. Failure to use Cecilware Replacement Parts may subject operators of the equipment to hazardous electrical voltage, resulting in electrical shock or burn. CAUTIONS Place the unit at the proper counter height in an area that is convenient for use. The location should be level to prevent the unit or its contents from accidentally falling, and strong enough to support the weight of the unit and its contents. To avoid any injury or damage to the unit do not move or relocate the unit for cleaning. Abrasive cleaners could scratch the finish of your unit. Use only mild, non abrasive cleaners.

5 MODEL DESCRIPTION GB8MP-10-LD-U (shown) GB-LD-U & GB6MP-10-LD-U (typical) These High Volume Cappuccino Dispensers will hold double the amount of your most popular flavor along with up to seven other flavors as well. With these Dispensers you will not waste valuable time refilling product Hoppers or lose profits during peak sales periods. With the hot water dispense button, you can increase sales by offering the ability to add packet items to your menu as well. Only Cecilware brings you this type of versatility. With its top hinged and bottom hinged door design, its 27 inch footprint (left to right) allows maximum utilization of counter space. SPECIFICATIONS ELECTRICAL RATING CHART Model * Voltage Watts Amps Circuit Shipping Breaker Weight GBMV-10-LD 1 x 120 V 1 x 1800 W 1 x 1 A 1 x 1 A 130 lbs GB6MP-10-LD-U 1 x 120 V 1 x 1800 W 1 x 1 A 1 x 1 A 160 lbs GB8MP-10-LD-U 2 x 120 V 2 x 1800 W 2 x 1 A 2 x 1 A 180 lbs *HOT WATER IS OPTIONAL, ADD W TO MODEL NUMBER PLUG CONFIGURATIONS The GB8 MODEL is supplied from the factory with two (2) 120 volt electrical cords and plugs installed. Plugs are supplied according to the application as shown in figure # 1. WARNING Plug unit into two (2) properly grounded electrical outlets of the correct voltage, size and plug configuration. If the plugs and receptacles do not match, contact a qualified electrician to determine the proper voltage and size and install the proper electrical outlets. (2) DEDICATED OUTLETS 120 V 1 A FOR GB8 MODELS ONLY NEMA -1R NEMA -1R NEMA -1P NEMA -1P Figure # 1 PLUG CONFIGURATION
6 UNPACKING INSTRUCTIONS Carefully unpack the Cappuccino Dispenser Unit and inspect immediately for shipping damage. Your Cappuccino Dispenser Unit was shipped in a carton designed to give it maximum protection in normal handling. It was thoroughly inspected before leaving the factory. In case of damage, contact the shipper. DESCRIPTION AND LOCATION OF COMPONENTS Note: Refer to Illustrations for description and location of COMPONENTS and CONTROLS. 1. HOPPERS. To remove the hoppers simply swing the top compartment door open and lift out. To reposition the canisters in the compartment, slide the canister base back until the ¼" pin at the bottom of the base falls into the positioning hole of the compartment base. 2. RINSE SWITCHES. See diagrams inside this manual for the location of rinse switches for each individual model. In the RINSE position they disengage the hopper motors and allow only water to be dispensed. They are used for flushing out the Whipper Chambers and to adjust the water dispense valves for proper flow rates. 3. HEATER SWITCHES. See diagrams inside this manual for the location of heater switches for each individual model. Their primary function is to shut off the heating elements during the initial priming, start up operation of the machine, or whenever the tank is being drained for service. 4. POWER SWITCHES. See diagrams inside this manual for the location of power switches for each individual model. They control all power to the unit including the heater elements. Note: The Power and Heater Switches are independent of each other. Both switches must be OFF in order for the unit to be completely shut down. Note: The Power Switches and Heater Switches must be ON in order for the elements to operate. INSTALLATION INSTRUCTIONS WATER INLET CONNECTION: This equipment is to be installed to comply with the applicable Federal, State, or Local plumbing codes having jurisdiction. In addition: WATER CONNECTION: GB8MP-10-LD-U: There are two (2) Water Connections. (2) ¼ inch Flare Water Inlet Fittings are located on the left and right side in the back of unit. GBMV-10-LD, & GB6MP-10-LD-U: There is one (1) Water Connection, (1) ¼ inch Flare Water Inlet Fitting located on the back of unit. An approved back flow prevention device, such as a Double Check Valve should be installed between the unit and the water supply. HIGHLY RECOMMENDED: A WATER SHUT-OFF VALVE and A WATER FILTER, preferably a combination Charcoal/Phosphate Filter, to remove odors and inhibit lime and scale build up in the machine. Note: In areas with extremely hard water, a water softener must be installed in order to prevent malfunctioning of the equipment and in order not to void the warranty.
.")
7 START-UP PROCEDURE Caution: Make sure that the Heater Switches, are in the OFF position. 1. Connect the ¼ inch copper waterlines to the ¼ inch flare water inlet fittings of the valves. 2. Plug the power cords into dedicated receptacles. 3. Activate the Power Switch (Toggle Up). The door display panel, the red power indicator lights and the green dispense buttons will light up and the tanks will start filling. Allow approximately 4- minutes for the tanks to fill. 4. Activate the Heater Switch. Allow approximately minutes for the water to reach the proper dispensing temperature of 190 F. The heat up time will depend on the water inlet temperature, the input voltage and the wattage of the elements in the water tanks.. Place a cup under the dispense nozzle, press and hold the dispense switch for 6 seconds. The unit will dispense water at the rate of 1 oz. per second. Repeat it several times to check for consistent output. Repeat same for the other dispense switches. This procedure checks that the dispense valves are not air-locked. 6. While the water tanks are heating up, the heater light comes on. Remove the hoppers, load them with product and reposition them back in place. When the heater light turns off, the water tanks have reached their proper temperature and are ready to dispense the first cup of Cappuccino. TO DIPENSE A CUP OF CAPPUCCINO: Place a cup under the selected drink dispense nozzle. Push and hold dispense button until cup is 2/3 full, then release button.
8 TROUBLESHOOTING GUIDE WARNING: To reduce the risk of electrical shock, DISCONNECT POWER CORDS before repairing or replacing any internal components of the unit. Before any attempt to replace a component be sure to check all electrical connections for proper connection. PROBLEM PROBABLE CAUSE REMEDY 1 Light display not lit. 2 No water when Rinse Switch is ON. 3 No product when Dispense Button is pressed 4 Water does not shut off. Water keeps dispensing. No water is going into tank at all. 6 Water will not stop flowing into water tank. 7 Water is not heating up in water tank. A Dispensing unit unplugged. B No power from Terminal Block. C Defective Bulb. D Defective Ballast. E Loose Bulb in socket. A Water supply OFF. B Clogged inlet screen (Water Inlet Valve). C Inoperative Water Inlet Valve. D Loose electrical connection. A No product in Canister. B Auger not working. C Damaged, loose, or missing Agitator Gear. D Inoperative Auger Motor or Relay. E Canister outlet clogged. F Faulty Coupling. A Leaking Water Inlet Valve. B Inoperative Dispense Switch. C Inoperative Rinse Switch. D Clogged/stuck Water Dispense Valve. A Water Inlet Valve malfunction. B Dual Probe malfunction. Reconnect dispensing unit. Check the Terminal Block for loose wire. Replace Bulb. Replace Ballast. Make sure bulb is seated properly in socket. Turn water ON. Disconnect water line and clean inlet screen. Check connection, if needed replace Valve. Check all electrical connections. Add product. Engage Hopper/Nut to Motor Gear. Replace Agitator Gear. Check connections of Motor, Relay and/or Switch, if needed replace components. Clean Hopper. Replace damaged Coupling components. Clean/check Water Inlet Valve fittings. Replace Water Inlet Valve if needed. Check Switch connections. Replace Dispense Switch if needed. Check Rinse Switch connections. Replace Rinse Switch if inoperative. Clean or unclog Water Dispense Valve. Replace Dispense Valve if inoperative. Check Solenoid. Replace if necessary. Check Probe. Replace if necessary. C Dual Probe Liquid Level Controller malfunction. Check Controller. Replace if necessary. A Dual Probe malfunction. B Solenoid (Water Inlet Valve) malfunction. Check Probe. Replace if necessary. Check Solenoid. Replace if necessary. C Dual Probe Liquid Level Controller malfunction. Check Controller. Replace if necessary. A Heater Switch is OFF. B Thermostat is OFF. C Loose connection on Thermostat. D Hi-Limit Temperature Switch is defective E Heater is burned out or defective. Turn Heater Switch ON. Turn Thermostat ON. Make sure all wires and terminals on Thermostat are tight. Replace the Hi-limit switch. Replace the Heater.
9 Model L690A (Rev. B) Dual Probe Liquid Level Controller Overview - The L690A is a Dual Probe Liquid Level Controller designed to maintain a specific level of water in the tank. This device utilizes two level probes for increased reliability. Independent maximum fill timers are incorporated in the controller for overflow protection. Operation - When a fill problem occurs, the Dual Probe Liquid Level Controller turns OFF power to the fill valves and remains OFF until the power input is reset (i.e. turn power switch off then back on). Low Level Probe - When the Low Level Probe detects the absence of water for two seconds, the Controller immediately opens the Fill Valve. When the Low Level Probe detects the presence of water the Controller immediately closes the Fill Valve. High Level Probe - When the High Level Probe detects the absence of water the Controller immediately turns ON and the Low Level Probe is allowed to control the Fill Valve. When the High Level Probe detects the presence of water for 1. seconds the Controller turns OFF power, which closes the Fill Valve. Maximum Fill Timers On the first fill, the unit will only allow 1 minutes of continuous filling if neither of the Level Probes has detected the presence of water since power has been applied (i.e. first fill). Once the presence of water has been detected the unit will only allow 10 minutes of continuous filling to prevent flooding. If the duration of continuous filling exceeds the allotted time then a Fatal Error is generated, which closes the inlet valve. Status LED Located on the Controller, this indicator is turned ON for one second after power is applied to indicate a functioning unit. The indicator will blink when the High Level Probe detects water to signify a warning. During a Fatal Error the indicator will be ON continuously.
10 1. ROTATE PRODUCT GUIDES UP, REMOVE HOPPERS AND REFILL WITH PRODUCT. 2. REPLACE HOPPERS, ROTATE PRODUCT GUIDES DOWN. 3. EMPTY DRIP TRAY. 4. SANITIZE* ALL EXTERIOR SURFACES. 1. RINSE WHIPPER CHAMBERS - POSITION PAN UNDER DISPENSE TUBES. - MOVE RINSE SWITCH TO "RINSE". - PUSH AND HOLD EACH DISPENSE BUTTON 3 TO SEC. - MOVE RINSE SWITCH TO "SERVE". 2. EMPTY DRIP TRAY WASH, RINSE, AND SANITIZE* 1. PRODUCT HOPPER CLEANING - ROTATE PRODUCT GUIDES UP, REMOVE HOPPERS FROM MACHINE. - EMPTY POWDER INTO PANS. - PULL OFF PRODUCT GUIDES. - REMOVE AGITATOR WHEELS. - UNSCREW AND REMOVE FRONT AND BACK AUGER LOCKS. - REMOVE AUGER. - WASH, RINSE, SANITIZE*, AND AIR DRY ALL SMALL PARTS. -WASH & SCRUB HOPPERS AND AGITATOR WHEEL RECESSES WITH BRISTLE BRUSH - REASSEMBLE ALL HOPPERS. - POUR POWDER INTO HOPPERS. - INSTALL ALL HOPPERS INTO UNIT. 2. WHIPPER CHAMBER CLEANING - REMOVE DISPENSE CAPS BY TURNING AND LIFTING. - REMOVE MIXING BOWLS BY LIFTING AND PULLING. - REMOVE PRODUCT TUBES BY PULLING DOWN. - TWIST OFF WHIPPING CHAMBERS CLOCKWISE. - PULL OFF WHIPPER BLADES. - TWIST OFF WHIPPER CHAMBER MOUNTS CLOCKWISE. - REMOVE O-RINGS. - REMOVE TRAY BY PULLING LEVERS DOWN. - REMOVE BOTH POWDER TRAYS BY PULLING LEVERS OUT. - WASH, RINSE, AND SANITIZE SMALL PARTS AND INTERIOR MACHINE SURFACES. - REASSEMBLE ALL SMALL PARTS. * SANITIZING: All sanitizing agents in the food zone must comply with 21 CFR All food dispensing units should be sanitized periodically. All parts to be sanitized must be cleaned first. To prepare a sanitizing solution: ADD 2 TSP. OF LIQUID CLOROX BLEACH (.2% CONCENTRATION) TO 1 GALLON OF WATER AT ROOM TEMPERATURE (70-90 F). Note: Always start with a unopened bottle of Clorox Bleach since the solution from an opened bottle has a short life span. -Soak all parts for a minimum of 3 min. in the sanitizing solution. -Let all sanitized parts drain and dry naturally. DO NOT WIPE THEM DRY. -Before using the sanitized unit (or parts) with food stuffs, rinse all parts thoroughly with water.
11
12 GBMV-10-LD (VISTA) Flavor Cappuccino Dispenser Door not shown HOPPER (4) (CD18) 10 HOPPER (1) (CD179) PRODUCT GUIDE HEATER LIGHT HEATER SWITCH POWER SWITCH RINSE SWITCH WHIPPER CHAMBER GRILL DRIP TRAY PAN
13 GB6M-10-LD-U GB6MP-10-LD-U 6 Flavor Cappuccino Dispenser Upper Door open, Lower Door not shown. GB8M-10-LD-U GB8MP-10-LD-U 8 Flavor Cappuccino Dispenser Upper Door open, Lower Door not shown. UPPER DOOR OPEN HOPPER (CD18) 10 GAS SPRING (2) DOOR LIFTS HOPPER (CD180) HOPPER (CD18) 10 PRODUCT GUIDE SLANTED WHIPPER CHAMBER POWER SWITCH PRODUCT GUIDE HEATER LIGHT RINSE SWITCH WHIPPER CHAMBER GRILL DRIP TRAY PAN 21." GRILL DRIP TRAY PAN (2) 27.0" HOT WATER (OPTIONAL) UPPER DOOR OPEN GAS SPRING (2) DOOR LIFTS HOPPER (CD180) HEATER LIGHT POWER SWITCH RINSE SWITCH LEFT SIDE HEATER LIGHT POWER SWITCH RINSE SWITCH RIGHT SIDE
14 L S N A T E D WHIPPER CHAMBER IMPORTANT: SLANTED WHIPPER CHAMBERS (SEE BELOW) ARE NOT INTERCHANGEABLE WITH STANDARD STRAIGHT WHIPPER CHAMBERS. BE SURE TO ORDER USING THE CORRECT PART NUMBERS SLANTED WHIPPER CHAMBER MARKING 10 ITEM IMPELLER (1 FLAT) USE W/ CD7A) 1 IMPELLER (2 FLATS) USE W/ CD7A OR CD30 1
15 HOPPER COVER AGITATOR WHEEL W/SPRINGS AUGER MOTOR #CD17 (90 RPM) AUGER BUSHING FRONT CD306 PRODUCT GUIDE, SHORT CD70A NUT CD278 [2] BEVELLED SOCKET CD271 AUGER BUSHING-BACK CD279 HOPPER BASE CD140
16 HOPPER COVER AGITATOR WHEEL W/SPRINGS AUGER MOTOR #CD17 (90 RPM) AUGER BUSHING FRONT CD306 PRODUCT GUIDE, SHORT CD70A NUT CD278 [2] BEVELLED SOCKET CD271 AUGER BUSHING-BACK CD279 HOPPER BASE CD140
17 BODY ASS'Y GBMV-10-LD (Vista) ITEM DESCRIPTION P/N QTY
18 DOOR ASS'Y GBMV-10-LD (Vista) ITEM DESCRIPTION P/N QTY
19
20 DOOR ASS'Y GB6MP-10-LD-U (Panorama) GB8MP-10-LD-U (Panorama) ITEM GB6MP GB8MP DESCRIPTION OF COMPONENTS FOR MACHINES NO. P/N QTY P/N QTY WITH MOLDED FRONT GB6MP AND GB8MP 1 SK61A 1 SK43A 1 INSIDE DOOR PANEL, UPPER DOOR 2 SK6A 1 SK4A 1 INSIDE DOOR PANEL, LOWER DOOR 3 SK60A 1 SK42A 1 DOOR HOUSING, UPPER 4 SK0A 1 SK44A 1 DOOR HOUSING, LOWER M903A 1 M91A 1 MOLDED UPPER DOOR PANEL 6 M904A 1 M916A 1 MOLDED LOWER DOOR PA NEL NN13A 1 NN2A 1 SWITCH PANEL LABEL F/ MOLDED LOWER DOOR 7 L4A 6 L4A 8 DISPENSE SWITCH [GREEN] 8 MA0A 1 MA26A 1 CLEAR WINDOW PANEL 0.04" THICK 9 M981A 2 M981A 3 TY-WRAP 10 B216A 2 B216A 3 LAMP HOLDER FOR UNIFIED BULB 11 CE82A 2 CE80A 3 BULB UNIFIED 120V [CE80A 240V] 7
21 ITEM DESCRIPTION P/N QTY
22 TANK DIMENSIONS: 12" WIDE, 4.8" DEEP, 16." HIGH. APPROX. 3.7 GAL. ITEM DESCRIPTION P/N QTY
23 TANK DIMENSIONS: 1" WIDE, 6" DEEP, 18" HIGH. APPROX. 6 GAL. ITEM DESCRIPTION P/N QTY
24 BLK BREW SWITCH BREW SWITCH BREW SWITCH YEL BRN VIO BREW SWITCH WHT WHT WHT WHT RED BREW SWITCH ORG WHT DISPLAY LIGHT BLK DOOR UNIT GND MAIN UNIT DISPENSE VALVE DISPENSE VALVE DISPENSE VALVE DISPENSE VALVE GND BLK A1 43NO 31NC 21NC 13NO RINSE SWITCH CONTACTOR A2 44NO 32NC 22NC 14NO AUGER AUGER AUGER AUGER DISPENSE VALVE AUGER WHIPPER WHIPPER WHIPPER WHIPPER WHIPPER BLK BLK BLK BLK BLK RELAY RELAY RELAY RELAY RELAY BLU L1 WATER INLET VALVE LIQUID LEVEL CONTROL FAN L1 WATER LEVEL PROBES TANK HEATER 1.7KW WATER L1 N GB-LD-U HI-LIMIT THERMOSTAT HEATER SWITCH -1R -1P W W G G 1A-1.7KW GND POWER SWITCH L1
25 GB6M-10-LD-U
26 DISPLAY LIGHTS LIQUID LEVEL CONTROL WATER LEVEL PROBES WATER GB8M-10-LD-U & GB8M10WLD ELECTRICAL DIAGRAM - LEFT SIDE - 120V REV A NE19 SHEET 1 OF 2
27 DISPLAY LIGHT LIQUID LEVEL CONTROL WATER LEVEL PROBES WATER GB8M-10-LD-U & GB8M10WLD ELECTRICAL DIAGRAM - RIGHT SIDE - 120V REV A NE19 SHEET 2 OF 2
Operator Manual Compact Powdered Beverage Dispenser
 Operator Manual Compact Powdered Beverage Dispenser GB Models 1CP, 2CP, 3CP Model GB3CP Model GB1HC-CP Model GB2CP Safety Information...2 Installation...3 Operation...6 Cleaning...7 Table of Contents Maintenance...8
FACTORY GRAM THROW SETTINGS
 1 2 GB5-MF-IT FACTORY GRAM THROW SETTINGS FOR 8 OZ. CUP 9/16/2005 FLAVOR COFFEE MILK VANILLA CARAMEL CINNAMON 5 grams 4 grams 5 grams 1.4 grams 20 grams LATTES: ORIGINAL 0 0 0 70 60 Fr. VANILLA 135 0 0
Water Boilers ME10EN, ME15EN. Table of Contents
 Water Boilers ME10EN, ME15EN Operator Manual Model ME15EN Model ME10EN Safety Information...2 Rough-In Drawing...3 Installation...4 Priming...5 Cleaning...5 Table of Contents Adjustments...6 Maintenance...7
Hot Water Dispensers HWD2, HWD3, HWD5. Table of Contents
 Hot Water Dispensers HWD2, HWD3, HWD5 Operator Manual Activate your warranty now at http://gmcw.com/warranty-registration Model HWD2 Safety Information...2 Rough-In Drawing...3 Specifications...4 Installation...4
Operator Manual Powdered Beverage Dispensers PIC3, PIC33A, PIC5, PIC6
 Operator Manual Powdered Beverage Dispensers PIC3, PIC33A, PIC5, PIC6 Model PIC3 Model PIC5 with Island Option Safety Information...2 Installation...3 Operation...4 Cleaning...5 Adjustments...8 Maintenance...9
Hot Water Boilers 810(E), 815(E), 830(E), 850(E) Table of Contents
, 815(E), 830(E), 850(E) Table of Contents") Hot Water Boilers 810(E), 815(E), 830(E), 850(E) Operator Manual Model 810(E) Safety Information...2 Rough-In Drawing...3 General Description...4 Installation...4 Priming...5 Cleaning...5 Table of Contents
Hot Water Boilers 810(E), 815(E), 830(E), 850(E) Operator Manual Model 810(E) Safety Information...2 Rough-In Drawing...3 General Description...4 Installation...4 Priming...5 Cleaning...5 Table of Contents
P200E Shuttle Brewer
 P200E Shuttle Brewer Operator Manual Safety Information...2 Installation...3 Start-up...4 Operation...5 Adjustments...5 Table of Contents Model P200E Cleaning...8 Maintenance...9 Troubleshooting Guide...9
Model HC-2. Crathco Whipped Hot Chocolate Dispenser. Table of Contents. Operation and Instruction Manual. for
 Crathco Whipped Hot Chocolate Dispenser Operation and Instruction Manual Table of Contents Introduction...1 Specifications...2 Installation and Start-Up Procedures...2 How to Dispense Hot Chocolate...3
2 Gallon Water Boiler
 USER S GUIDE 2 Gallon Water Boiler READ AND SAVE THESE INSTRUCTIONS NOTICE TO INSTALLER: Please leave this booklet with the machine. CONTENTS CL39...FS39... IS2...II20...II21...CI16............ES83.........
Primo Cappuccino Instructions
 FIND OUT MORE ON THE WEB. WILBURCURTIS.COM WILBUR CURTIS COMP OMPANY ANY,, I Primo Cappuccino Instructions, INC NC. MODEL PC-3 References in this manual to "Primo Cappuccino" Throughout this service manual,
Operator Manual Autofill System
 Operator Manual Autofill System Bubbler Ratio 4:1 Ratio 5:1 Single 2001-001 2001-000 Double 2001-003 2001-002 Remote Single 2001-005 Remote Double 2001-004 Granita* Ratio 4:1 Ratio 5:1 Single 2002-001
Cecilware sells value... Worldwide th Avenue, Long Island City, NY FAX: Models:
 GOURMET HOT BEVERAGE DISPENSER Models: ICAP1 ICAP1-P ICAP-MINI WHIPPER WHIPPER MINI OPERATIONAL MANUAL Specifications Installation & Operating Instructions Adjustments Care & Maintenance Trouble Shooting
INSTALLATION MANUAL ICE/BEVERAGE DISPENSER MODEL: ENDURO-200/250
 INSTALLATION MANUAL ICE/BEVERAGE DISPENSER MODEL: ENDURO-200/250 Release Date: March 24, 2004 Publication Number: 92181INS Revision Date: April 07, 2014 Revision: G Visit the Cornelius web site at www.cornelius.com
Installation & Operating Guide
 5-036 HOT WATER TANK Installation & Operating Guide Read all instructions thoroughly. Keep this guide for future reference. Proof of purchase is required for Warranty. Staple receipt or proof of purchase
Owner s Manual WARMER DRAWER. (Without Water Tray) Models WD-20, WD21A, & WD-35A. WD-20 Shown MANUFACTURING NUMBERS: P/N Rev.
 Models WD-20, WD21A, & WD-35A. WD-20 Shown MANUFACTURING NUMBERS: P/N Rev.") MANUFACTURING NUMBERS: 9400130 9400132 9400134 9400136 9400140 9400142 9400144 9400146 9400150 9400152 9400154 9400156 C L I S T E D US SA L NIT A T I S T E ION D CM WARMER DRAWER (Without Water Tray)
MANUFACTURING NUMBERS: 9400130 9400132 9400134 9400136 9400140 9400142 9400144 9400146 9400150 9400152 9400154 9400156 C L I S T E D US SA L NIT A T I S T E ION D CM WARMER DRAWER (Without Water Tray)
CAPPUCCINO, COFFEE, and SOUP DISPENSERS. GB POUROVER models: Cecilware sells value... Worldwide GB1P GB2P GB3P GB4P OPERATION MANUAL
 CAPPUCCIO, COFFEE, and SOUP DISPESERS GB POUROVER models: GB1P GB2P GB3P GB4P OPERATIO MAUAL Specifications 2 Installation and Operating Instructions 3 Adjustments 4 Test & Troubleshooting 8 Maintenance
Service Manual PCGT. Important Safeguards/Conventions. WARNINGS To help avoid personal injury. Important Notes/Cautions from the factory
 Wilbur Curtis Company, Inc. Models Included PCGT3 PCGT4 PCGT5 Service Manual PCGT Important Safeguards/Conventions This appliance is designed for commercial use. Any servicing other than cleaning and maintenance
Classic Bubbler Premix Cold Beverage Dispensers Operation Manual
 Classic Bubbler Premix Cold Beverage Dispensers Operation Manual D Series E Series Table of Contents Unpacking & Installation Instructions... 3 Assembly... 4 Product Preparation... 5 Disassembly... 6 Routine
Operator Manual Powdered Beverage Dispenser
 Operator Manual Powdered Beverage Dispenser GB Models 1, 2, 3, 4, 5, & 6 Model GB3M10-LD Model GB1HC Model GB5M10-LD Safety Information...2 Installation...3 Operation...6 Cleaning...8 Table of Contents
SERVICE/INSTALLATION MANUAL ICE ONLY DISPENSERS MODELS-IOD150, IOD200 AND IOD250
 SERVICE/INSTALLATION MANUAL ICE ONLY DISPENSERS MODELS-IOD150, IOD200 AND IOD250 Ice-O-Matic 11100 East 45th Ave Denver, Colorado 80239 Part Number 9081305-01 Date 10/08 Introduction IOD150,IOD200,IOD250
WILBUR CURTIS COMPANY, INC.
 WILBUR CURTIS COMPANY, INC. Primo Cappuccino System Instructions Important Safeguards/Conventions This appliance is designed for commercial use. Any servicing other than cleaning and maintenance should
Important Safeguards. Save these instructions for future reference. (continued on next page)
") User Guide 2. Important Safeguards WARNING To reduce the risk of fire, electric shock or other injury, read and follow the safety precautions and instructions in this User Guide. Save these instructions
User Guide 2. Important Safeguards WARNING To reduce the risk of fire, electric shock or other injury, read and follow the safety precautions and instructions in this User Guide. Save these instructions
Gemini Satellite USER GUIDE. See brewer user guide for brewing instructions READ AND SAVE THESE INSTRUCTIONS. Style varies
 USER GUIDE Gemini Satellite Style varies See brewer user guide for brewing instructions READ AND SAVE THESE INSTRUCTIONS NOTICE TO INSTALLER: Please leave this booklet with the machine. CONTENTS CL82 Important
Wilbur Curtis Company, Inc. Service Manual PCGT4 & PCGT5
 Wilbur Curtis Company, Inc. Service Manual PCGT4 & PCGT5 Important Safeguards/Symbols This appliance is designed for commercial use. Any servicing other than cleaning and routine maintenance should be
Installation Manual CARBONATOR With Plain-Water Booster
 CORNELIUS INC One Cornelius Place Anoka, MN 55303-6234 Telephone (800) 238-3600 Facsimile (763) 422-3246 Installation Manual CARBONATOR With Plain-Water Booster IMPORTANT: It is the responsibility of the
B.I.C.A Built-In Coffee Appliance
 B.I.C.A Built-In Coffee Appliance Automatic Coffee Brewer Parts & Service Models: 1033510, 1033510S & 1033511 3828 S. Main St. Los Angeles, CA 90037-1491 800-421-6860 310-787-5444 Fax 310-787-5412 e-mail:
IMPORTANT INSTRUCTIONS - OPERATING MANUAL
 IMPORTANT INSTRUCTIONS - OPERATING MANUAL Models: AK80LSL, AK100LSL Exhaust Fan READ AND SAVE THESE INSTRUCTIONS READ CAREFULLY BEFORE ATTEMPTING TO ASSEMBLE, INSTALL, OPERATE OR MAINTAIN THE PRODUCT DESCRIBED.
WIRING DIAGRAM. This manual describes the unit features and explains how to set-up, operate and maintain these AirPac Models. COOLIT2600 COOLIT2900
 WIRING DIAGRAM This manual describes the unit features and explains how to set-up, operate and maintain these AirPac Models. COOLIT2600 COOLIT2900 17 THANK YOU! WARRANTY INFORMATION Thank you for choosing
ICE ONLY DISPENSERS MODELS-IOD150, IOD200 AND IOD250 INSTALLATION/SERVICE MANUAL
 ICE ONLY DISPENSERS MODELS-IOD150, IOD200 AND IOD250 INSTALLATION/SERVICE MANUAL Ice-O-Matic 111000 East 45th Ave Denver, Colorado 80239 Part Number 9081305-01 Rev. C Revision Date: September 19, 2011
VISUAL DISPLAY DISPENSER OWNERS MANUAL
 VISUAL DISPLAY DISPENSER OWNERS MANUAL MODEL: JT20, JT20-W25, JT20-W26 Publication Number: 621058565INS Revision Date: June 24, 2014 Revision: A Visit the Cornelius web site at www.cornelius.com for all
Wilbur Curtis Company, Inc. Service Manual PCGT3
 Wilbur Curtis Company, Inc. Service Manual PCGT3 Important Safeguards/Symbols This appliance is designed for commercial use. Any servicing other than cleaning and routine maintenance should be performed
Wilbur Curtis Company, Inc. Service Manual WB-10 Water Boiler
 MODELS INCLUDED WB-10-12 WB-10-60 CAUTION: Please use this setup procedure before attempting to use this appliance. Failure to follow the instructions can result in injury or the voiding of the warranty.
Service Manual PCGT. Important Safeguards/Conventions. WARNINGS To help avoid personal injury. Important Notes/Cautions from the factory
 Wilbur Curtis Company, Inc. Models Included PCGT3 PCGT3 ICED CAPPUCCINO PCGT3 PRESET DISPENSE PCGT4 PCGT5 Service Manual PCGT Important Safeguards/Conventions This appliance is designed for commercial
INSTALLATION MANUAL ICE/BEVERAGE DISPENSER MODEL: ENDURO VALVE
 INSTALLATION MANUAL ICE/BEVERAGE DISPENSER MODEL: ENDURO--175 8 VALVE Release Date: March 24, 2004 Publication Number: 620917902INS Revision Date: April 08, 2014 Revision: E Visit the Cornelius web site
MODELS: TJ45 TJ90 Operator s Manual
 ICE DISPENSER MODELS: TJ45 TJ90 Operator s Manual Part No. 90614 Revision: H Revision Date: May 26, 2014 THIS DOCUMENT CONTAINS IMPORTANT INFORMATION This Manual must be read and understood before installing
WARMING AND MERCHANDISING CABINET
 WARMING AND MERCHANDISING CABINET MODEL 695 MODEL 695-S (Two door unit shown) (Single door unit shown) Snack foods have to be hot and moist to be appealing. Cold won t do... Dry won t do. Wisco s model
WARMING AND MERCHANDISING CABINET
 WARMING AND MERCHANDISING CABINET Above red graphics now replace green graphics shown in photo. MODEL 695 (Single door unit shown) MODEL 695-S (Single door unit shown) Snack foods have to be hot and moist
Operator Manual P300 and P400 Shuttle Brewers
 Operator Manual P300 and P400 Shuttle Brewers Model P300E Model P400E Safety Information...2 Installation...3 Start-up...5 Operation...5 Adjustments...5 Table of Contents Cleaning...8 Maintenance...9 Troubleshooting
OSD10, OSD20 & OSD30 DRINK DISPENSER
 INSTRUCTION MANUAL Eat well, drink well and live well with Omega www.omegajuicers.com OSD10, OSD20 & OSD30 DRINK DISPENSER English PLEASE READ THESE INSTRUCTIONS CAREFULLY BEFORE USE OMGMAN 082009 RevA
DUAL BREWER AUTOMATIC DB2A
 DUAL BREWER AUTOMATIC DB2A DB2A INSTALLATION REV -29-2006 INSTALLATION, OPERATION, AND TROUBLESHOOTING MANUAL FOR DB2A AUTOMATIC BREWER WITH WARMERS & POUR-OVER Model DB2A 8-1/2 W x 18 D x H 700 Total
INSTALLATION & SERVICE MANUAL QUANTUM SERIES
 INSTALLATION & SERVICE MANUAL QUANTUM SERIES IMI CORNELIUS INC. One Cornelius Place Anoka, MN 55303 Tel: 1-888-248-5568 / 630-539-5050 Fax: 1-800-344-3801 / 630-539-6960 Part Number- 7208011206 Revision-
DOUBLE DOOR COMPACT REFRIGERATOR. User Manual MODEL:KSTRC312BW KSTRC312BB
 DOUBLE DOOR COMPACT REFRIGERATOR User Manual MODEL:KSTRC312BW KSTRC312BB SERIAL/MODEL # S - IMPORTANT SAFETY INSTRUCTIONS Read and Save These Instructions This Owner s Guide provides specific operating
MANUFACTURING NUMBERS: CORN CAROUSEL. Model CC-19 Series P/N /99. Owner s Manual
 MANUFACTURING NUMBERS: 9500410 9500412 C US Model CC-19 Series 9500400 P/N 1010730 10/99 Owner s Manual A.J. Antunes & Co. Owner Information...1 General...1 Warranty Information...1 Service/Technical Assistance...2
INDEX. Granita Machine. Operation a nd Instruction Manual
 INDEX Index 2 Unpacking 3 Positioning the machine 3 Familiarizing yourself with the Controls 4 Cleaning and Sanitizing instructions 5 Part ONE. Disassembly and Cleaning of Dispenser 5 Part TWO. Re-assemble
AHPO-6/18 GOLD PROOFER OVEN
 AHPO-6/18 GOLD PROOFER OVEN For information or technical assistance, call: TOLL FREE 1(800) 735-DUKE (3853) or 1(314) 231-1130 PN 156081R 1 of 25 TABLE OF CONTENTS MANUFACTURER S INTRODUCTION...3 INSTALLATION...4
Instruction Manual. Cheese Warmer with Pump
 Instruction Manual Cheese Warmer with Pump 10700 Medallion Drive, Cincinnati, Ohio 45241-4807 USA 2013 Gold Medal Products Co. Part No. 38298 SAFETY PRECAUTIONS Page 2 INSTALLATION INSTRUCTIONS Inspection
QUICK REFERENCE GUIDE FOR OPERATION AND MAINTENANCE
 EQUIPMENT SETUP GUIDE Read and follow the BUNN ULTRA Installation & Operating Guide included with your kit. This Equipment Setup Guide is not intended to replace any manufacturer s process or procedure.
Installation & Operating Guide
 HOT WATER DISPENSER Installation & Operating Guide Read all instructions thoroughly. Keep this guide for future reference. Proof of purchase is required for Warranty. Staple receipt or proof of purchase
User information. Cleaning/descaling and sanitizing
 User information How the dispenser works Follett s 110 series automatic-load ice and water dispensers are equipped with Follett s 425 lb (193 kg)/day ice machine. In the continuous icemaking process, water
PLACE CUP HERE OPERATING & SERVICE MANUAL BUNN-O-MATIC CORPORATION
 BUNN FMD-1 (prior to S/N FMD0013000) PUSH and HOLD BUTTON UNTIL CUP IS 2/3 FULL, THEN RELEASE RELEASE BUTTON WHEN CUP IS 2/3 FULL PLACE CUP HERE OPERATING & SERVICE MANUAL BUNN-O-MATIC CORPORATION POST
READ AND SAVE THESE INSTRUCTIONS READ CAREFULLY BEFORE ATTEMPTING TO ASSEMBLE, INSTALL, OPERATE OR MAINTAIN THE PRODUCT DESCRIBED. PROTECT YOURSELF AN
 READ AND SAVE THESE INSTRUCTIONS READ CAREFULLY BEFORE ATTEMPTING TO ASSEMBLE, INSTALL, OPERATE OR MAINTAIN THE PRODUCT DESCRIBED. PROTECT YOURSELF AND OTHERS BY OBSERVING ALL SAFETY INFORMATION. FAILURE
Owner s Manual. Keep with machine for reference PKC24 INSTALLATION & OPERATION REV Perlick Corporation 8300 W Good Hope Rd Milwaukee, WI 53223
 Owner s Manual Keep with machine for reference PKC24 INSTALLATION & OPERATION REV.11.09 Perlick Corporation 8300 W Good Hope Rd Milwaukee, WI 53223 800-558- 5592 FAX 414-353- 7069 perlick.com TABLE OF
Mobile Hot Food Merchandiser Series. Series: MHB Operation Manual
 Mobile Hot Food Merchandiser Series Series: MHB Operation Manual BKI LIMITED WARRANTY Grandview Drive Simpsonville, SC 0 USA () - Toll Free: (00) - Fax: () - WHAT IS COVERED WHO IS COVERED COVERAGE PERIOD
SERVICE & TROUBLESHOOTING MANUAL FOR DISPLAY HOLD CABINETS DHC SERIES
 SERVICE & TROUBLESHOOTING MANUAL FOR DISPLAY HOLD CABINETS DHC SERIES REV: 1/28/09 ELECTRICAL SPECIFICATIONS Domestic Item # Description Voltage Hz. Watts Amps Cord/Plug Dimensions DHC 24H Domestic DHC
- 1 - Updated on 18 March, 2010
 - 1 - Updated on 18 March, 2010 TABLE OF CONTENTS 1. SPECIFICATION & PARTS IDENTIFICATION...3 2. OPERATION & FUNCTION OF PARTS...4, 5 A. Cooling Operation B. Heating Operation C. Function of Parts 3. LOCATION
Machine MANUAL. Spaceman USA, LLC. Sales and Product Information Sunday Saturday 8 AM 5 PM Mountain. 226 Commerce Street Suite B Broomfield, CO 80020
 Machine MANUAL MODEL SM-6650 FROZEN BEVERAGE - COUNTERTOP - ONE FLAVOR Customer Service Spaceman USA, LLC Sales and Product Information Sunday Saturday 8 AM 5 PM Mountain 226 Commerce Street Suite B Broomfield,
TABLE OF CONTENTS FOR YOUR SAFETY
 TABLE OF CONTENTS 1. SPECIFICATION & PARTS IDENTIFICATION...2 2. OPERATION & FUNCTION OF PARTS...2, 3 A. Cooling Operation B. Heating Operation C. Function of Parts 3. LOCATION REQUIREMENTS...3, 4 4. INSTALLATION
HD150. Introduction. Table of Contents
 Introduction To the owner or user: This product manual is a source of information about the installation, start up, cleaning, maintenance and repair of the product. The is a hotel/motel ice dispenser.
UF424 and UN324. Technical Service
 UF424 and UN324 Technical Service Technical Service 1-800-533-6006 Check out the new mobile ready website www.scotsman-ice.com/service Technical Service Virtual Business Card What you will learn Introduction
INSTALLATION AND SERVICE MANUAL FOR THE SLIMLINE II, JUICE DISPENSER
 Please refer to the Lancer web site (www.lancercorp.com) for information relating to Lancer Installation and Service Manuals, Instruction Sheets, Technical Bulletins, Service Bulletins, etc. INSTALLATION
ICE COOLED DISPENSER ALTA 1522 DROP-IN DISPENSER
 ICE COOLED DISPENSER ALTA 1522 DROP-IN DISPENSER Operators Manual Release Date: June 10, 2013 Publication Number: 741200028OPR Revision Date: May 9, 2014 Revision: B Visit the Cornelius web site at www.cornelius.com
INSTALLATION AND OPERATION INSTRUCTIONS LC-D SERIES COFFEE CONCENTRATE BREWER WITH DIGITAL ELECTRONIC CONTROL CENTER
 107353 1-00 INSTALLATION AND OPERATION INSTRUCTIONS LC-D SERIES COFFEE CONCENTRATE BREWER WITH DIGITAL ELECTRONIC CONTROL CENTER PLUMBER'S INSTALLATION INSTRUCTIONS CAUTION: Power to brewer must be OFF
VIKING RANGE CORPORATION, P.0. DRAWER 956, GREENWOOD, MS. USA
 VIKING RANGE CORPORATION, P.0. DRAWER 956, GREENWOOD, MS. USA TABLE OF CONTENTS Installation------------------------------------------------------------------------------------------- 3 Reversible Door-------------------------------------------------------------------------------------
Instruction Manual. Dogeroo, Super Dogeroo, and Mini Dogeroo
 Instruction Manual Dogeroo, Super Dogeroo, and Mini Dogeroo Model No. 8102, 8103, 8108 10700 Medallion Drive, Cincinnati, Ohio 45241-4807 USA Part No. 87793 SAFETY PRECAUTIONS Page 2 INSTALLATION INSTRUCTIONS
MODEL L-1X & L-1X16 Installation & Operations
 Owner s Manual Keep with machine for reference MODEL L-1X & L-1X16 Installation & Operations Rev 1.15 CMA DISHMACHINES 12700 KNOTT AVENUE GARDEN GROVE, CALIFORNIA 92841 800-854-6417 FAX 714-8 95-2 141
INSTANT HOT WATER DISPENSER
 INSTANT HOT WATER DISPENSER Tank Installation Materials required (not provided) 2 mounting bracket screws (and 2 plastic anchors if attaching to drywall) Shut-Off valve and T fitting Components When you
U155 Series Ice and Beverage Dispensers
 U155 Series Ice and Beverage Dispensers Order parts online www.follettice.com Installation, Operation and Service Manual Manual load unit Automatic load unit with one icemaker Model U155, U155X Model U155B,
Fountain Classic. Installation and Owner s Manual. Page 16
 Fountain Classic Installation and Owner s Manual Page 16 4120 NW 44th St Lincoln, NE 68524 USA Tel: 402.467.9300 Toll Free in the USA: 800.875.5915 Fax: 402.467.9393 www.purewaterinc.com Page 2 Fountain
WA A Aqua Sub Bottom-load Water Cooler
 WA1-02-21A Aqua Sub Bottom-load Water Cooler 4002638 Thank you for choosing a Soleus Air Water Cooler. This owner s manual will provide you with valuable information necessary for the proper care and maintenance
STRUCTURE ILLUSTRATION...3 IMPORTANT SAFETY INSTRUCTIONS 4 INSTALLATION INSTRUCTION..4 OPERATING YOUR REFRIGERATOR...5-6
 TABLE OF CONTENTS STRUCTURE ILLUSTRATION....3 IMPORTANT SAFETY INSTRUCTIONS 4 INSTALLATION INSTRUCTION..4 OPERATING YOUR REFRIGERATOR...5-6 FREEZER COMPARTMENT OPERATION 6 CARE & MAINTENANCE..7 CHANGING
ICE DISPENSER. D45 and D90 Installation Manual. Release Date: August, 1995 Publication Number: Revision Date: March 27, 2014 Revision: D
 ICE DISPENSER D45 and D90 Installation Manual Release Date: August, 1995 Publication Number: 91561 Revision Date: March 27, 2014 Revision: D Visit the Cornelius web site at www.cornelius.com for all your
The Danger signal indicates an immediately hazardous situation which, if not avoided, will result in death or serious injury.
 The Danger signal indicates an immediately hazardous situation which, if not avoided, will result in death or serious injury. The Warning signal alerts you to potential hazards or unsafe practices which,
VFCB. Ice Frost 2 and 3 Bowl Post-Mix and 2 Bowl Pre-Mix. Installation, Service, and Operator s Manual
 VFCB Ice Frost 2 and 3 Bowl Post-Mix and 2 Bowl Pre-Mix Installation, Service, and Operator s Manual Release Date: April 19, 2004 Publication Number: M620919596OPR Revision Date: June 14, 2007 Revision:
8070 Mytee Lite. Instructions for. Please read before use. Register your product at support/register.
 Instructions for 8070 Mytee Lite Please read before use. Register your product at http://www.mytee.com/ support/register Model # Serial # Form # ADP-8070 06-16 1 GENERAL INFORMATION Dear Customer: Congratulations
Wilbur Curtis Company, Inc.
 Find out more on the web. WILBURCURTIS.COM MODEL WB-14-11 Service Manual Water Boiler 14 Gallon Gas Important Safeguards/Conventions This appliance is designed for commercial use. Any servicing other than
Symphony Plus 25 and 50 Series Ice and Water Dispensers 25FB425A/W, 50FB425A/W
 Symphony Plus 25 and 50 Series Ice and Water Dispensers 25FB425A/W, 50FB425A/W Installation Guide Please visit https://www.follettice.com/technicaldocuments for the Operation and Service manual for your
OWNER S MANUAL. 4 GALLON OUTPUT PER DAY COOL MOISTURE HUMIDIFIER Model HCM-2051 Series. * Output dependent on room temperature and humidity.
 OWNER S MANUAL 4 GALLON OUTPUT PER DAY COOL MOISTURE HUMIDIFIER Model HCM-2051 Series * Output dependent on room temperature and humidity. IMPORTANT SAFETY INSTRUCTIONS READ AND SAVE THESE SAFETY INSTRUCTIONS
MODEL GL-X INSTALLATION & OPERATION
 Owner s Manual Keep with machine for reference MODEL GL-X INSTALLATION & OPERATION Rev. 1.01B CMA DISHMACHINES 12700 KNOTT AVENUE GARDEN GROVE, CALIFORNIA 92841 800-854-6417 FAX 714-8 95-2 141 www.cmadishmachines.com
INSTALLATION & OPERATION Rev 1.00A DISTRIBUTED EXCLUSIVELY BY CMA DISHMACHINES KNOTT AVENUE GARDEN GROVE, CALIFORNIA 92841
 MODEL UC 60e INSTALLATION & OPERATION Rev 1.00A DISTRIBUTED EXCLUSIVELY BY CMA DISHMACHINES 12700 KNOTT AVENUE GARDEN GROVE, CALIFORNIA 92841 800-854- 6417 FAX 714-895-2141 www.cmadishmachines.com TABLE
ICE/BEVERAGE DISPENSER
 ICE/BEVERAGE DISPENSER MODEL: ENDURO-175 8 VALVE OPERATOR S MANUAL Release Date: March 1, 2004 Publication Number: 620917901OPR Revision Date: August 3, 2010 Revision: C Visit the IMI Cornelius web site
TURBOWASH TM... Pot and Pan Sink
 TURBOWASH TM... Pot and Pan Sink MODEL TW ML-110644 701 S. RIDGE AVENUE TROY, OHIO 45374-0001 FORM 33800 Rev. A (4-98) Installation, Operation, and Care of TurboWash TM Pot and Pan Sink SAVE THESE INSTRUCTIS
INSTALLATION, OPERATION and MAINTENANCE MANUAL for Cres Cor AQUATEMP TM HUMIDITY CONVECTION and RETHERM OVENS with MICROPROCESSOR CONTROLS
 9 Heisley Road Mentor, OH 0- Rev. (6/0) Page of INSTALLATION, OPERATION and MAINTENANCE MANUAL for Cres Cor AQUATEMP TM HUMIDITY CONVECTION and RETHERM OVENS with MICROPROCESSOR CONTROLS ROFWB-Q COFWUAB-Q
Virtu 40 series. Coffee machine
 Virtu 40 series Coffee machine Users manual Model: Virtu 40 Machine type: 9FEC Revision B, English Reference: 5DUFEK20 Your supplier is: The manufacturer of the machine is: De Jong Duke Postbus 190 3360
VU155K Integral Cold Carbonation Series Ice and Beverage Dispensers
 VU155K Integral Cold Carbonation Series Ice and Beverage Dispensers Order parts online www.follettice.com Installation, Operation and Service Manual Service numbers above B50000 Following installation,
OWNER S MANUAL COOL MOISTURE HUMIDIFIER 1.25 GALLON (4.7 LITERS) OUTPUT PER DAY* RCM-832N. *Output dependent on room temperature and humidity.
 OUTPUT PER DAY* RCM-832N. *Output dependent on room temperature and humidity.") OWNER S MANUAL COOL MOISTURE HUMIDIFIER 1.25 GALLON (4.7 LITERS) OUTPUT PER DAY* RCM-832N *Output dependent on room temperature and humidity. IMPORTANT SAFETY INSTRUCTIONS READ AND SAVE THESE SAFETY INSTRUCTIONS
OWNER S MANUAL COOL MOISTURE HUMIDIFIER 1.25 GALLON (4.7 LITERS) OUTPUT PER DAY* RCM-832N *Output dependent on room temperature and humidity. IMPORTANT SAFETY INSTRUCTIONS READ AND SAVE THESE SAFETY INSTRUCTIONS
IMI Cornelius Automated Beverage System (ABS)
") BE 31 BEVERAGE EQUIPMENT Model ABS Daily maintenance task BE 31 D1 Clean ABS Model ABS Monthly maintenance task BE 31 M1 Clean and sanitize ice hopper and ice chute Quarterly maintenance task BE 31 Q1
BE 31 BEVERAGE EQUIPMENT Model ABS Daily maintenance task BE 31 D1 Clean ABS Model ABS Monthly maintenance task BE 31 M1 Clean and sanitize ice hopper and ice chute Quarterly maintenance task BE 31 Q1
PWC-500/1000/1010/1500
 SERVICE MANUAL for by Vertex Model PWC-500/1000/1010/1500 P/N man-7008 Table of Contents 1. Introduction 2. Cooler Set-up 3. Remove Top Cover 4. Remove/Replace Float 5. Remove/Replace Hot Tank 6. Faucet
Simplicity Bubbler Crathco Cold Beverage Dispensers
 Operator Manual Simplicity Bubbler Crathco Cold Beverage Dispensers Activate your warranty now at http://gmcw.com/warranty-registration Model CS-2E-16 Model CS-2D-16 Model CS-3L-16 (culus certification
Installation Manual UNIVERSAL C-750 PRE-MIX DISPENSER
 IMI CORNELIUS INC One Cornelius Place Anoka, MN 55303-6234 Telephone (800) 238-3600 Facsimile (612) 422-3246 Installation Manual UNIVERSAL C-750 PRE-MIX DISPENSER Part No. 185211000 January 25, 1984 Revised:
CENTURY 2000-IT, COFFEE BREWING EQUIPMENT
 CENTURY 2000-IT, COFFEE BREWING EQUIPMENT MODELS C-2003G-IT C-2003RG-IT C-2003LG-IT MANUAL Specifications Installation Operating Instructions Programming Instructions Care Maintenance Adjustments Parts
Hot Dog Hutch. Models HDH-3, HDH-3DR, & HDH-4 owner s manual. Manufacturing Numbers:
 Hot Dog Hutch Models HDH-3,, & HDH-4 owner s manual Manufacturing Numbers: 9300100, 9300101, 9300102, 9300104, 9300106, 9300108, 9300112, 9300116, 9300118, 9300120, 9300124, 9300125, 9300130, 9300132 www.ajantunes.com
SINGLE SERVING AUTOMATIC POD MACHINE FKP-4 NEWCO ENTERPRISES INC, 3650 NEW TOWN BLVD SAINT CHARLES, MO FAX
 PN782163 REV 20180814 SINGLE SERVING AUTOMATIC POD MACHINE FKP-4 NEWCO ENTERPRISES INC, 3650 NEW TOWN BLVD SAINT CHARLES, MO 63301 1-800-325-7867 FAX 1-636-925-0029 Features/ Specifications AUTOMATIC POD
PS-3E AND PS-6E ELECTRIC CONVECTON STEAMERS PARTS AND SERVICE MANUAL
 PS-3E AND PS-6E ELECTRIC CONVECTON STEAMERS PARTS AND SERVICE MANUAL EFFECTIVE AUGUST 1, 2014 Superseding All Previous Parts Lists. The Company reserves the right to make substitution in the event that
Installation, Operation, and Maintenance Manual RTE14S & RTE14S-2. For the Taco Bell "Rethermalizer" Model Numbers
 Installation, Operation, and Maintenance Manual For the Taco Bell "Rethermalizer" Model Numbers RTE14S & RTE14S-2 NOTICES There are three different types of notices that you should be familiar with, a
ELECTRIC FIREPLACE WITH MANTEL MODEL WS-Q-03 OWNERS MANUAL
 ELECTRIC FIREPLACE WITH MANTEL MODEL WS-Q-03 OWNERS MANUAL Only use this heater as described in this manual. Any other use is not recommended by the manufacturer, and may cause fire, electric shock, or
USER MANUAL. Bottled Water Dispenser SAVE FOR FUTURE USE. Model #
 Model # 900161: Page 1 USER MANUAL Bottled Water Dispenser Model # 900161 TO REDUCE THE RISK OF INJURY AND PROPERTY DAMAGE, USER MUST READ THIS MANUAL BEFORE ASSEMBLING, INSTALLING & OPERATING DISPENSER.
Ice Pro DB650, EDB650 Automatic Ice Bagging and Dispensing System
 Ice Pro DB650, EDB650 Automatic Ice Bagging and Dispensing System Order parts online www.follettice.com Installation, Operation and Service Manual Following installation, please forward this manual to
OWNERS MANUAL For HOT WATER DISPENSER. MODELS: 0401 Hot Water Dispenser. Includes: Installation Operation Use & Care Servicing Instructions
 714 OWNERS MANUAL For HOT WATER DISPENSER MODELS: 0401 Hot Water Dispenser Includes: Installation Operation Use & Care Servicing Instructions Model: 0401 PRINTED IN CHINA p/n 77380 Rev.(-) ECN-12917 M714
Instruction Manual. Bucket Oil Pump
 Instruction Manual Bucket Oil Pump 10700 Medallion Drive, Cincinnati, Ohio 45241-4807 USA 2016 Gold Medal Products Co. Part No. 79064E SAFETY PRECAUTIONS DANGER Machine must be properly grounded to prevent
Product Manual. Scotsman. Models: 10150, and 10250
 Product Manual Scotsman Models: 10150, 10200 and 10250 IN TRO DUC TION This service manual is intended as a reference for the installer, user, and service agent of this Scotsman ice dispenser. It includes