Installation Manual EF5000 AUS & NZ
|
|
|
- Magdalene Flowers
- 5 years ago
- Views:
Transcription


1 Installation Manual EF5000 AUS & NZ This manual is ONLY for fires with a serial No. from to Important: The appliance shall be installed in accordance with; Local gas fitting regulations Municipal building codes AS/NZS :2013, Gas installations Any other relevant statutory regulations. TO BE INSTALLED ONLY BY AN AUTHORIZED PERSON THIS APPLIANCE MUST NOT BE INSTALLED OR USED INDOORS INSTRUCTIONS MUST BE LEFT WITH THE CONSUMER AND THE CONSUMER TO RETEAIN THEM FOR FUTURE REFERENCE. Manufactured by: Escea Ltd, PO Box 5277 Dunedin NZ, Ph: , info@escea.com For contact details of your local Escea distributor or dealer please visit
2 Warning: Children and adults should be alerted to the hazards of high surface temperatures, burns and clothing ignition. Young Children should be carefully supervised when they are in the area of the appliance. Clothing or other flammable materials should not be hung from the appliance, or placed on or near the appliance. Any guard or other protective device removed for servicing the appliance must be replaced prior to operating the appliance. Installation of appliances fitted to fixed gas supply systems and repair of all appliances must be carried out by a qualified service person. A qualified service person should inspect and service this product at least annually. Cleaning may be required in order to keep the control compartment, burners, and circulating air passageways clean. The 240/24volt plug pack MUST be installed inside and out of the weather. It MUST be kept dry and protected from rain and water ingress. This Gas Fire is for outdoor use only.
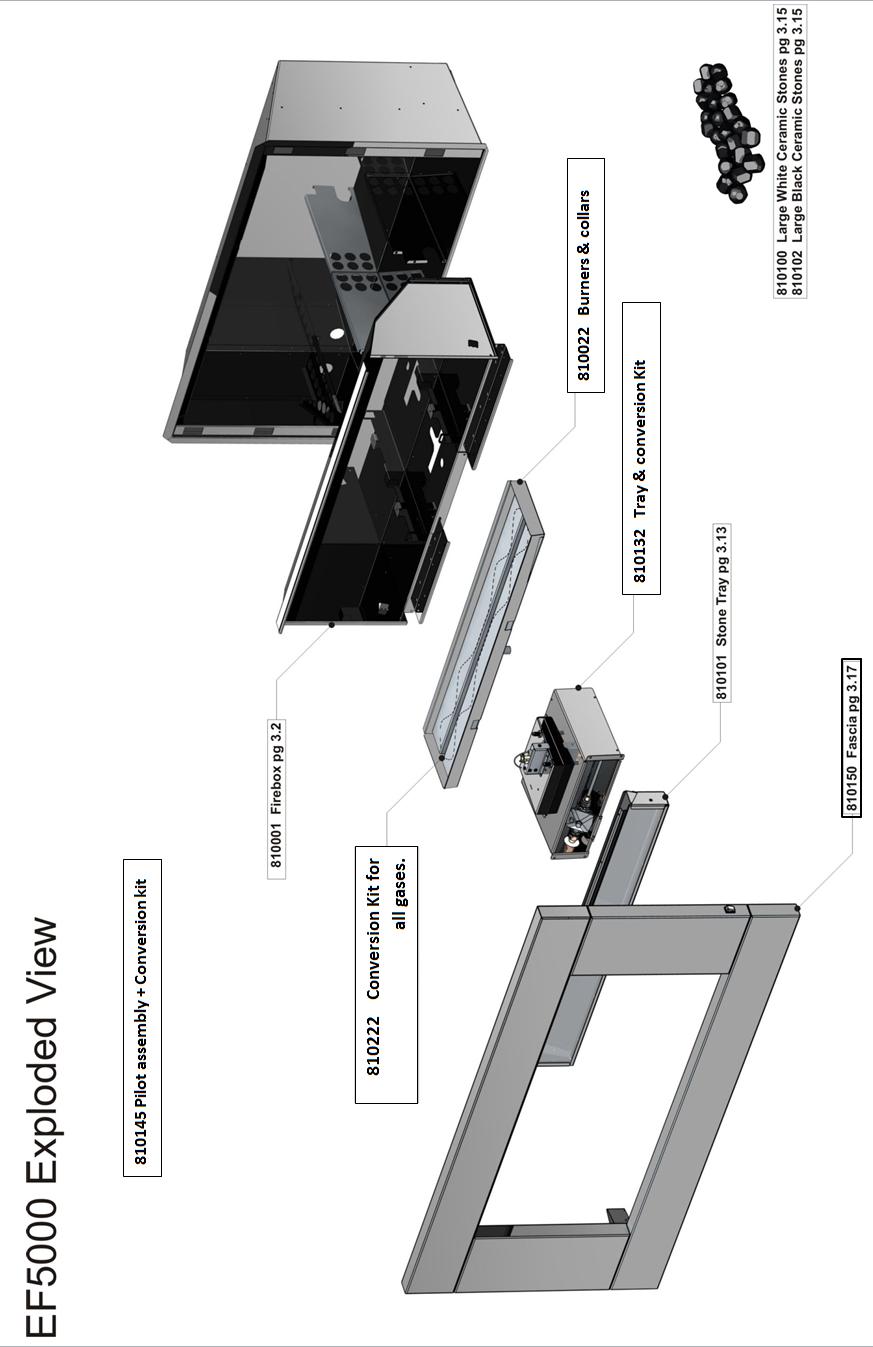
3 Contents: Chapter: Product description 1.0 Power supply 2.0 Creating the cavity 3.0 Wall cladding around the fire 4.0 Minimum install height off the ground 5.0 Types of installation 6.0 Corner Installations 7.0 Laying gas pipe 8.0 Fixing the fire into the cavity 9.0 Connecting gas pipe 10.0 Connecting the power supply and touch panel 11.0 Testing of touch panel and spark ignition 12.0 Checking operating pressure 13.0 Assembly of stone cartridge 14.0 Fitting the fascia 15.0 Placement of ceramic pebbles 16.0 Operating Instructions 17.0 Maintenance and cleaning 18.0 Electrical Schematic 19.0 Gas Conversion 20.0
4 1.0 Product Description: The escea EF5000 flame effect gas fire is designed for outdoor use only. This appliance requires no flue and must be permanently installed into a cavity. It may be installed into a timber cavity. The fire is controlled by the user from a switch that is situated on the lower right hand side of the stainless steel fascia. The Data Label, containing all technical information such as manufacture date, serial number, gas type, jet size, etc, can be found in the lower right hand side of the fire, below the firebox, to access this, the fascia must be removed. 1.1 Product dimensions: (mm)

5 2.0 Power Supply: This appliance requires a constant external 24V AC 1A power supply to mains electricity. A transformer is supplied with the fire. 3.0 Creating the Cavity: The dimensioned drawing below shows the size of opening that must be created to install the unit. 3.1 Cavity Dimensions: Minimum Cavity Dimensions C A B C 1010 mm 585 mm 330 mm B A 3.2 Where possible, it is recommended that the cavity is made slightly larger than the above dimensions to give the installer the maximum amount of space to work in. 3.3 Clearances to combustibles: CEILING Minimum clearance distance between a combustible ceiling and the fascia must be no less than 1400mm. WALL 1400mm Minimum Warning: Under no circumstances should any object such as people, pets, furniture, etc. be closer than 1 metre in front of the escea EF mm Minimum 30mm Minimum SIDE VIEW Warning: Do not install a TV above this fire under any circumstances.

6 4.0 Wall cladding around fire: 4.1 The temperature of the wall directly above the heater does get hot and hence may discolour paint finishes. 4.2 Some dark coloured exhaust stains may also become visible directly above the fire due to exhaust. In most cases this can be cleaned off with water and a brush. 5.0 Minimum install height: The fire has ventilation gaps behind the fascia at the top and bottom. These must not be blocked, so ensure there is a gap of at least 30mm between the bottom of the fascia and anything below. 6.0 Types of Installation: This appliance shall only be used in an above ground open-air situation with natural ventilation, without stagnant areas, where gas leakage and products of combustion are rapidly dispersed by wind and natural convection. Certain materials or items, when placed under or near the appliance, will be subjected to radiant heat and could become damaged. The following installation diagrams are escea recommendations only and may or may not comply with your local council standards. Please check with your local council for actual building standards. Typically an outdoor space is not enclosed but, any enclosure in which the appliance is used should comply with one of the following: - An enclosure with walls on all sides, but at least one permanent opening at ground level and no overhead cover.


7 - Within a partial enclosure that includes an overhead cover and no more than two walls. - Within a partial enclosure that includes an overhead cover and more than two walls, the following should apply: At least 25% of the total wall area is completely open, and At least 30% of the remaining wall area is open and unrestricted Rectangular areas have been used in the above diagrams; the same principles apply to any other shaped area. In the case of balconies, at least 20% of the total wall area should be and remain open and unrestricted.
8 7.0 Corner Installations: If a cavity is to be created in a corner, the following drawings give the minimum sized interior wall dimensions possible Note: Allowances need to be made for cladding the internal of the cavity. Dimensions of the cavity in this diagram represent the internal size only. 270 Minimum 1000 Minimum Minimum clearance distance between adjacent wall and fascia needs to be no less than 270mm.
9 8.0 Laying Gas Pipe: Gas pipe should be sized as per the requirements of AS5601/AG The pipe sizing must be sufficient to deliver the following volume of gas to the heater with all other gas appliances in the home running at the same time; EF5000 Natural Gas = 52 Mj/hr EF5000 Propane = 40 Mj/hr EF5000 ULPG = 40 Mj/hr It is highly recommended to install an easily accessible isolating shut off valve (ball valve) along the gas line to the EF500 unit which should be easily accessible to the user. 8.1 This fire has been supplied with a ½ pipe connected through a short 45 flare nut inlet connection to make the gas supply easy and safe. Solid pipe should be run to the inside lower left hand side of the fire. Insert the supplied rubber plug and cut it as shown below to allow the gas pipe and the electrical cable to pass through, keeping the plug as air-tight as possible. Gas Pipe Entry Point 8.2 Any flexible pipe should be attached to the copper supply pipe and joint tested to ensure gas tightness, an isolating valve is recommended for this purpose. 8.3 Before each use of the appliance the hose assembly connecting the appliance to the gas supply must be inspected. If there is evidence of excessive abrasion or wear, or if the hose is damaged, then the hose assembly must be replaced before the appliance is operated. 8.4 The gas hose should be properly located away from pathways or areas where the hose may be subject to accidental damage.

10 9.0 Fixing the fire into the cavity: To fix the fire to the cavity, first drill 4 to 6 (5mm diameter) holes in the outer flange (as shaded grey in the picture below) in locations which will give you the most support from the cavity framework behind and evenly spaced around the flange. Using the supplied Stainless Steel screws, fasten the fire to the cavity through these drilled holes. Ensure that the fire is securely located and free from movement Connecting the Gas Pipe: When the fire unit has been pushed into position and secured the flexible hose can be connected to the inlet side of the appliance regulator at the front center of the fire. The hose and pipe assembly should have been tested prior to this as per section No matter which connection the installer chooses, the regulator that is supplied in the fire MUST NOT BE REMOVED. Removal of the regulator, or replacing it with one not intended for use with an Escea EF5000, will void the limited appliance warranty The EF5000 must be disconnected from the gas supply piping system during any pressure testing of that system at test pressures in excess of ½ psi (3.5 kpa).
11 11.0 Connecting the power supply and power switch: 11.1 The Power Supply socket is located in the centerline of the fire, below the firebox, facing the right hand side behind the ignition tray. Push the 2 pin plug together until they click The ON/OFF Power Switch socket plugs into the 3 pin plug lead situated at the front RH side of the fire. Push them together until they click Testing of the power switch and spark ignition: IMPORTANT: Before the operating pressure can be checked and the fascia fitted, The power switch and spark ignition must be tested This can be done with the gas supply either turned on or off. With the power supply and power switch connected, Lean the fascia Right end up beside the fire and run through the steps for igniting the pilot (refer to section 17.0 for instructions).
.")
12 13.0 Checking Operating Pressure: NOTE: Check ensure that the correct jets, for the gas being used, are installed see Chapter 20. This check is done at the regulator located at the lower front of the appliance This must be done before fascia has been fitted Pressure test point available for operating pressure (as shown below) The operating pressure has been factory set. Please check that the operating pressure is exactly as listed below and if not, adjust screw in centre of regulator until pressure is correct. If unable to do this, reassess the inlet gas pressure / pipes Replace operating test point screw and leak-test the test point Test for overall soundness using an appropriate method. A B C A B C A = Inlet gas connection B = Pressure adjustment screw C = Operating pressure test point Note that that there are two types of regulator used in the EF5000. Although components are different the method for conversion is the same. EF EF Pressure Pressure table table Propane Natural Gas ULPG Minimum Inlet pressure 2.5 kpa 1.0 kpa 2.5 kpa Maximum Inlet pressure 5.0 kpa 5.0 kpa 5.0 kpa Operating Pressure 2.0 kpa 1.0 kpa 2.2 kpa

13 14.0 Assembly of stone cartridge: The glass which fits inside in the stone Cartridge has been packaged to protect it during transit, and can be found inside the firebox. Insert the glass strip into the stone cartridge as shown to the right, between the two metal flanges and push it all the way to the bottom. A bag of pebbles (River Stones) are also supplied, use these to fill the stone cartridge With the glass in position, fix the stone cartridge to the fire by using the two supplied screws in the location shown below. Do this before the fascia is fitted.


14 15.0 Fitting the Fascia: Before fitting the fascia, the hooks must be attached using the screws supplied. Ensure the wires connecting the fascia to the fire are securely connected, as per section The EF5000 fascia is attached to the combustion box by four hooks on the corners of the fascia. Line up the hooks with the receptacles on the Outdoor Fire pictured below, and push the fascia into position. The first slot in the hook can be used to hang the fascia in the receptacles in order to ease the attachment When you have pushed the fascia in as far as it will go, briefly push down on the fascia to secure the fascia into position.

15 16.0 Placement of ceramic stones: EF5000 fuel beds should be evenly spread out with a maximum one layer of media. Do not heap or mound the fuel bed media and attempt to get an even spread across the top of the burners. Ceramic stones River stones UNDER NO CIRCUMSTANCES SHOULD THE SUPPLIED SMALL STONE PEBBLES (RIVER STONES) BE PLACED ON THE BURNERS. THEY ARE FOR USE INSIDE THE STONE CARTRIDGE ONLY 16.1 If desired, an optional Weather Cover can be purchased from your Escea retailer, which protects the fuelbed and burners. This should be replaced when while the fire is not in use To fit the weather cover ensure fire is off and cooled, and place the front edge on the glass at the front of the fire, the rear flange of the Weather Cover will rest on the burner supports behind the rear burner. To remove, lift the Weather Cover upwards and then towards yourself The fire MUST NOT be operated while the cover is fitted The cover MUST NOT be fitted while the fire is hot. A cooling period of 30 minutes must be observed before fitting Objects such as wood, coal, fire logs or any other solid fuels shall not be burned in the gas fireplace. Under no circumstances should any part of your body enter the gas fireplace during the start-up or whilst the fire is running.


16 17.0 Operating Instructions: The EF5000 is operated by the switch located on the right hand side outer edge of the fascia. The basic operations possible are ON/OFF. Before operating the fire, ensure the power transformer is plugged into the mains wall socket & turned on, and the supply is turned on. ON/OFF power switch 17.1 Igniting the pilot flame To turn the fire on push the ON/OFF rocker switch to the on position. The ignition unit will start sparking and the pilot and burners will ignite almost immediately. In the event of no gas, the ignition unit will attempt to try to light up to 3 times before shutting down Turning off the fire To turn the fire off, simply flick the ON/OFF rocker switch to the off position. This will shut down the gas flow to the pilot flame and both burners. Please ensure the gas supply is also turned off, and as an extra safety please turn off the main power supply at the house.
17 17.3 Pilot Flame and Burner Positioning 18.0 Maintenance and Cleaning The unit must be cold before starting any form of maintenance or cleaning. To remove the glass and stones in the front stone tray simply reverse the steps in section The glass can be cleaned using standard window cleaner and the quartz stones can be washed using soapy water 18.1 If the stainless steel fascia or weather cover requires cleaning the following products are recommended; 3M Stainless steel cleaner or methylated spirits. Periodically the pilot and burners should be checked visually for carbon and soot build-up, consistent flame and clean burning Cleaning of the burners and ceramic stones can be carried out using a brush and a dry cloth and should be done at least annually. This will remove carbon or soot build-up.
18 19.0 Electrical Schematic Part No _2 i
19


20 19.1 Operation Chart Propane ULPG Natural Gas Min. Inlet Pressure 2.5 kpa 2.5 kpa 1.00 kpa Max Inlet Pressure 5.0 kpa 5.0 kpa 5.00 kpa Manifold Pressure 2.0 kpa 2.2 kpa 1.00 kpa Front Burner Jet Size Ø1.4 Ø1.25 Ø3.2 Rear Burner Jet size Ø1.4 Ø1.25 Ø3.2 Front Burner Aeration Hole 11mm x 2 off per burner 11mm x 2 off per burner 5mm x 2 off per burner Collar must be fitted Rear Burner Aeration Hole 11mm x 2 off per burner 11mm x 2 off per burner 5mm x 2 off per burner Collar must be fitted Mj/hour For any inquires, please contact your local Escea distributor or dealer


21 20.0 Gas conversion Warning: Before starting the gas conversion, ensure that the fireplace is cool. Step One: Lift the fascia and hang it in the second slot, now you can unplug the fascia lead and remove the Fascia from the EF5000 firebox by lifting up and outwards. This will give you access to remove the Burners and Stone tray. Step Two: Remove all of the coals and the two screws holding the burner clamps in place, remove the clamps. Step Three: Remove the two screws holding the Stone tray in place and lift it out.


.")


22 Step Four: Lift out both burners, this will give you access to the jets (spuds). Step Five: Change the two jets with the conversion jets supplied in kitset. Cover the existing gas type label with the new gas type label supplied in kitset. Ensure serial number and date of manufacture are still visible. Write your name, company (if appropriate) and date of conversion on new label with permanent marker. Step Six: Replace the pilot jet with the correct one supplied in the kit (See the table below). Note: You will have to remove the cover from behind the pilot assembly, it may be helpful to remove the control tray Burner Jets Data Label Position EF5000 AUS Pilot Jet EF5000 AUS AGA Cert. No Part No _2 Gas NG Propane ULPG Pilot Jet Ø0.45 Ø0.30 Ø0.30 Front Jet Ø3.2 Ø1.4 Ø1.25 Rear Jet Ø3.2 Ø1.4 Ø1.25 Step Seven: Take the regulator spring out of the regulator by unscrewing the pressure adjustment knob completely. Swap regulator spring with the new spring that is supplied in conversion kitset. Replace adjustment screw and reset gas pressure as per the settings below. Escea Ltd, PO Box 5277 Dunedin, NZ Example AGA Cert. No Part No _2 Escea Ltd, PO Box Dunedin, NZ


23 Natural Gas Propane ULPG kpa Step Eight: For Propane/ULPG to Natural gas conversion you will need to fit the natural gas restrictor collars. These slide over the burner tube on the underside of the burners, and must be screwed into place so that the porting holes line up. Holes must line up Fitting the restrictor sleeve Note: For Natural gas to Propane/ULPG conversion remove the restrictor collars from the burners.
 Replace the stone tray and fix it back onto the firebox. c) Replace the coals, ensuring you have only one even layer.")


24 Step Nine: a) Insert the burners and fix them into place with the burner clamps. b) Replace the stone tray and fix it back onto the firebox. c) Replace the coals, ensuring you have only one even layer. Do not heap or mound the coals. Step Ten: Re-attach the fascia power supply lead. Push them together until they click. Line up the hooks with the receptacles on the Firebox, take advantage of the first slot in the hook where you can rest the fascia before you push the fascia into position. Step Eleven: When you have pushed the fascia in as far as it will go, briefly push down on the fascia to secure the fascia into position. Once the fire has been re-assembled, test the fire to ensure it is running correctly.
Installation Manual EF5000 NZ
 Installation Manual EF5000 NZ Important: The appliance shall be installed in accordance with; Local gas fitting regulations Municipal building codes AS/NZS 5601.1.1:2010 Gas Installation Any other relevant
Installation Manual EF US
 Installation Manual EF5000 - US WARNING: If the information in this manual is not followed exactly, a fire or explosion may result causing property damage, personal injury or loss of life. - Do not store
Installation Manual EF US
 Installation Manual EF5000 - US WARNING: If the information in this manual is not followed exactly, a fire or explosion may result causing property damage, personal injury or loss of life. DANGER - WHAT
User Guide - Australia and New Zealand EF Outdoor Gas Fireplace. For the latest documentation, visit _6
 User Guide - Australia and New Zealand EF 5000 Outdoor Gas Fireplace For the latest documentation, visit www.escea.com 630114_6 !WARNING Any service work carried out on this appliance must only be done
ST900 Direct Vent Gas Fireplace Conversion Kit Manual
 ST900 Direct Vent Gas Fireplace Conversion Kit Manual Series 2 Natural Gas for NZ Important: The appliance shall be converted in accordance with; This installation instruction booklet Local gas fitting
GAS FIRE USER GUIDE Australia and New Zealand. EF _ 5 Userguide Aus & NZ
 GAS FIRE USER GUIDE Australia and New Zealand EF5000 www.escea.com 630114_ 5 Userguide Aus & NZ Any service work carried out on this appliance must only be done by a recognised Escea technician or authorised
Patio Heater Model No. GM and GM
 Patio Heater Model No. GM124-003 and GM124-004 FEATURES: The ideal solution for extending the season for outdoor entertaining Maximum output 39.6 MJ/hr Direct ignition Adjustable heat output Safety tip-over
Outdoor Tabletop Heater TTH20 Series
 Outdoor Tabletop Heater TTH20 Series FEATURES: The ideal solution for extending the outdoor entertaining season Creates a stylish and attractive ambience Casts an approximate 1 to 1.5 metre circle of radiant
FOR YOUR SAFETY FOR OUTDOOR USE ONLY PROPANE GAS. Model No. AH2069ODS, AH2063ODS
 Model No. AH2069ODS, AH2063ODS The ideal solution for extending the season of outdoor entertaining Creates a stylish and attractive ambience Direct ignition Includes a safety tip-over switch that halts
Area Heater AH100 Series
 Area Heater AH100 Series FEATURES: The ideal solution for extending the season for outdoor entertaining Creates a stylish and attractive ambience Casts an approximate 3 to 5 metre circle of radiant sun-like
Wok Cookers Instruction Manual
 Wok Cookers Instruction Manual Part No. DC100-09 Single Burner Wok Cooker Part No. DC200-09 Double Burner Wok Cooker IMPORTANT It is IMPORTANT that you read these instructions carefully and understand
IB1100 and IB850 Installation Manual AUSTRALIAN EDITION
 IB1100 and IB850 Installation Manual AUSTRALIAN EDITION Important: The appliance shall be installed in accordance with; This installation instruction booklet Local gas fitting regulations Municipal building
IB850 and IB600 Installation Manual AUSTRALIAN EDITION
 IB850 and IB600 Installation Manual AUSTRALIAN EDITION Important: The appliance shall be installed in accordance with; This installation instruction booklet Local gas fitting regulations Municipal building
Owners Manual OWNERS MANUAL. Australia s original Outdoor brand. Part No. Comp827. SAI Global Cert. SAI AS
 Owners Manual AQUACUBE RV digital water heater Part No. Comp827 WARNING OUTDOOR USE ONLY SAI Global Cert. SAI - 400097 AS 2658-2008 OWNERS MANUAL Australia s original Outdoor brand Important: Read these
Owners Manual OWNERS MANUAL. Australia s original Outdoor brand. Part No. Comp830Li. SAI Global Cert. SAI AS
 Owners Manual AQUACUBE LOGIC Li RECHARGEABLE CAMP SHOWER Part No. Comp830Li SAI Global Cert. SAI - 400135 AS 2658-2008 OWNERS MANUAL Australia s original Outdoor brand INTRODUCTION Important: Read these
PORTABLE PROPANE HEATER
 OWNERS MANUAL PORTABLE PROPANE HEATER Part No. COMP0556 IMPORTANT: Read these instructions for use carefully. Familiarise yourself with the appliance before connecting it to a gas container. Keep these
Pizza Oven with Stand
 Pizza Oven with Stand Cooks up to 3 pizzas at a time Use to cook a variety of food Easy clean vitreous enamel interior Model No. P0104 Powerful 22MJ/h stainless steel burner Viewing window and temperature
CERT 7795 Fully certified to AS2658:2008. Part No. COMP825 OWNERS MANUAL
 CERT 7795 Fully certified to AS2658:2008 Part No. COMP825 OWNERS MANUAL INTRODUCTION IT IS IMPORTANT THAT YOU READ THESE INSTRUCTIONS CAREFULLY AND UNDERSTAND THE OPERATION & SAFETY FEATURES OF THIS APPLIANCE.
2 BURNER LP GAS STOVE OPERATING INSTRUCTIONS
 BURNER LP GAS STOVE OPERATING INSTRUCTIONS Part No. 5090 IMPORTANT Read these instructions for use carefully. Familiarise yourself with the appliance before connecting it to it s gas container. Keep these
POWER COOKER & STOCKPOT SET Instruction Manual Part No. COMP7012
 POWER COOKER & STOCKPOT SET Instruction Manual Part No. COMP7012 IMPORTANT Read these instructions for use carefully. Familiarise yourself with the appliance before connecting it to its gas container.
Rambo CAST IRON RING BURNERS OPERATING INSTRUCTIONS. C40LP 3 Ring Burner C50LP 4 Ring Burner
 Rambo CAST IRON RING BURNERS OPERATING INSTRUCTIONS C20LP 1 Ring Burner C30LP 2 Ring Burner C40LP 3 Ring Burner C50LP 4 Ring Burner IMPORTANT: READ THESE INSTRUCTIONS FOR USE CAREFULLY. KEEP THESE INSTRUCTIONS
Specialist Deluxe Series II Built-In 4 & 6 Burner BBQ BQ8342B & BQ8362B
 Specialist Deluxe Series II Built-In 4 & 6 Burner BBQ BQ8342B & BQ8362B FEATURES Deluxe BBQ featuring vitreous enamel body and #304 stainless steel fascia #304 Stainless steel hood includes glass window
OPERATING INSTRUCTIONS AND OWNER S MANUAL PORTABLE BUDDY RADIANT HEATER
 OPERATING INSTRUCTIONS AND OWNER S MANUAL PORTABLE BUDDY RADIANT HEATER Model # MH9BX READ INSTRUCTIONS CAREFULLY: Read and follow all instructions. Place instructions in a safe place for future reference.
THE INSTRUCTIONS IN THIS MANUAL APPLY TO KENT GAS FIRES. CONTENTS:-
 THE INSTRUCTIONS IN THIS MANUAL APPLY TO KENT GAS FIRES. THE MODELS COVERED ARE:- For use with Natural Gas:- KENT ESTATE NG, KENT ULTIMA NG For use with Liquid Propane Gas (LPG):- KENT ESTATE LP, KENT
by PRIMUS Portable Buddy Compact Propane Heater User Manual and Product Specifications
 by PRIMUS Portable Buddy Compact Propane Heater Part No. MH9BX User Manual and Product Specifications IMPORTANT Read these instructions for use carefully. Familiarise yourself with the appliance before
Installation / Service Instructions DL850 / DL1100. Gas Fireplaces. For the latest documentation, visit _12
 Installation / Service Instructions DL850 / DL1100 Gas Fireplaces For the latest documentation, visit www.escea.com 630241_12 Important: The appliance shall be installed in accordance with; This installation
Installation Manual. ST900 Direct Vent Gas Fireplace. Important: NZ / AUS EDITION
 ST900 Direct Vent Gas Fireplace Installation Manual NZ / AUS EDITION Important: The appliance shall be installed in accordance with; This installation instruction booklet Local gas fitting regulations
IB1100, IB850, IB600 (Log Fire / Coal Fire) Installation Manual NEW ZEALAND EDITION
 Installation Manual NEW ZEALAND EDITION") IB1100, IB850, IB600 (Log Fire / Coal Fire) Installation Manual NEW ZEALAND EDITION Important: The appliance shall be installed in accordance with; This installation instruction booklet Local gas fitting
IB1100, IB850, IB600 (Log Fire / Coal Fire) Installation Manual NEW ZEALAND EDITION Important: The appliance shall be installed in accordance with; This installation instruction booklet Local gas fitting
2 BURNER STOVE WITH GRILL
 9 OWNERS MANUAL OWNERS MANUAL 2 BURNER STOVE WITH GRILL Part No. COMP546 IMPORTANT: Read these instructions for use carefully. Familiarise yourself with the appliance before connecting it to a gas container.
Hanover Outdoor Furniture IMPORTANT. If you have any problems with this product (missing or damaged parts, assembly issues, etc.),
,") Hanover Outdoor Furniture IMPORTANT If you have any problems with this product (missing or damaged parts, assembly issues, etc.), PLEASE DO NOT RETURN TO THE RETAILER/STORE from where you purchased the
Hanover Outdoor Furniture IMPORTANT If you have any problems with this product (missing or damaged parts, assembly issues, etc.), PLEASE DO NOT RETURN TO THE RETAILER/STORE from where you purchased the
Installation Instructions Horizon Natural Draft Electronic Ignition Gas Fireplaces
 Installation Instructions Horizon Natural Draft Electronic Ignition Gas Fireplaces Installation Instructions Horizon Natural Draft Electronic Ignition 3 Sided Gas Fireplaces Natural Draft Electronic Ignition
Installation / Service Guide DX1000 / DX1500. Gas Fireplaces. For the latest documentation, visit _11
 Installation / Service Guide DX1000 / DX1500 Gas Fireplaces For the latest documentation, visit www.escea.com 630228_11 Important: The appliance shall be installed in accordance with; This installation
Installation / Service Guide DX1500. Gas Fireplace. For the latest documentation, visit _2
 Installation / Service Guide DX1500 Gas Fireplace For the latest documentation, visit www.escea.com 630213_2 Important: The appliance shall be installed in accordance with; This installation instruction
Inset - IB850, IB1100 Fascia Installation Manual NEW ZEALAND EDITION
 Inset - IB850, IB1100 Fascia Installation Manual NEW ZEALAND EDITION Important: The appliance shall be installed in accordance with; This installation instruction booklet Must be installed by a qualified
Using it in an enclosed space can kill you.
 38 X 56 GAS FIRE PIT - OWNER S MANUAL Carlisle Chat Fire Table Base Model # 00GBC7 (6877B) Fits 6877A Carlisle Chat Fire Table Top For Propane and *Natural Gas (*See Page 7) Certified to CSA International
HOTTAP OUTING USER GUIDE MODEL: JCA11009 IMPORTANT!
 USER GUIDE HOTTAP OUTING MODEL: JCA11009 INFO. MONITOR IMPORTANT! It is important that you read these instructions carefully and understand the operation and safety features of this appliance. Familiarise
USE AND CARE GUIDE PEDESTAL FIREBOWL
 DANGER If you smell gas: 1. Shut off gas to the appliance. 2. Extinguish any open flame. 3. If odor continues, keep away from the appliance and immediately call your gas supplier or fire department. WARNING
SG Burner Only
 SG 700-780-900-1100 Burner Only SG Gas Burner into a Warmington SI Wood Open Fire Installation Guide Only Warmington SI Open Wood Firebox. Warmington SG Gas Burner. Traditional Grate & Burner Pure Grate
Manual. Seville & Naples. Gas Fires. Owners & Installation PLEASE KEEP THESE INSTRUCTIONS FOR FUTURE REFERENCE
 Owners & Installation Seville & Naples Manual Gas Fires PLEASE KEEP THESE INSTRUCTIONS FOR FUTURE REFERENCE WARNING Improper installation, adjustment, alteration, service or maintenance can cause injury
ASSEMBLY INSTRUCTIONS
 ASSEMBLY INSTRUCTIONS Installer: Leave these instructions with consumer. Consumer: Keep these instructions for future reference. WARNING: If the information in this manual is not followed exactly, a fire
OVATION SERIES FIRE TABLES ASSEMBLY INSTRUCTIONS
 OVATION SERIES FIRE TABLES ASSEMBLY INSTRUCTIONS CSA Model98900 DRS02403 Installer: Leave these instructions with consumer. Consumer: Keep these instructions for future reference. DANGER If you smell gas:
ASSEMBLY INSTRUCTIONS
 ASSEMBLY INSTRUCTIONS CSA Model: 98910L Printed in China Installer: Leave these instructions with consumer. Consumer: Keep these instructions for future reference. WARNING: If the information in this manual
Dashley Outdoor Fire Table
 Dashley Outdoor Fire Table MODEL N0. 085-557-8 L-FT047PST-F ASSEMBLY INSTRUCTIONS Toll-free 888 670-6684 IMPORTANT: Please read this manual carefully before beginning assembly of this product. Keep this
Stoneridge Fire Pit High Dining Table Assembly Instruction
 Stoneridge Fire Pit High Dining Table Assembly Instruction Item# L-DN1773SST-D-T WARNING: For Outdoor Use Only. DANGER If you smell gas: 1. Shut off gas to the appliance. 2. Extinguish any open flame.
USE AND CARE GUIDE WARNING WARNING WARNING WARNING
 USE AND CARE GUIDE Item No.: HF11501AA USE PROPANE GAS ONLY! -Do not store or use gasoline or other flammable vapors in the vicinity of this or any other appliance. - Service must be performed by a qualified
Installation / Service Instructions DS1400. Gas Fireplace. For the latest documentation, visit _3
 Installation / Service Instructions DS1400 Gas Fireplace For the latest documentation, visit www.escea.com 630358_3 Important: The appliance shall be installed in accordance with; This installation instruction
CASUAL FIRESIDE TM A HIGHER STANDARD IN QUALITY AND APPEARANCE - SAFE AND BEAUTIFUL OUTDOOR FIRE PIT FOR PROPANE AND *NATURAL GAS
 OWNER'S MANUAL 51-20 Aero CASUAL FIRESIDE TM Report #521-O-02-5 Tested & Certified to ANSI Z21.97-2014/CSA 2.41-2014 CGA 2.17-M91 (R2009) A HIGHER STANDARD IN QUALITY AND APPEARANCE - SAFE AND BEAUTIFUL
Kalahari DECORATIVE FUEL EFFECT GAS FIRE
 Kalahari DECORATIVE FUEL EFFECT GAS FIRE User Instructions These instructions should be read by the user before operating the appliance and retained for future reference Model No. KRDC00MN & KRDC00SN are
Gas Fire Patio Heater Lhotse-817
 Gas Fire Patio Heater Lhotse-817 Instruction Manual Please read the manual BEFORE you unpack or install the fire TABLE OF CONTENTS Warning 3 Getting Started 4 What s Included 5 Assembly Procedures 6 Product
INSTALLATION, INSTRUCTION AND SERVICE MANUAL
 TUNGSTEN SMART-HEAT PORTABLE HEATER BY BROMIC INSTALLATION, INSTRUCTION AND SERVICE MANUAL SUITABLE FOR GAS RADIANT HEATER MODELS: TUNGSTEN SMART-HEAT! Do not store or use petrol or other flamable vapor
Owners Manual. Australia s original Outdoor brand. Part No. COMP243. SAI Global Cert. GSCS20069 AS 2658:2008
 Owners Manual PORTABLE GAS HEATER Part No. COMP243 WARNING - OUTDOOR USE ONLY SAI Global Cert. GSCS20069 AS 2658:2008 Australia s original Outdoor brand IMPORTANT: Read these instructions for use carefully.
Gas Fire Patio Heater Q9
 Gas Fire Patio Heater Q9 Instruction Manual Please read the manual BEFORE you unpack or install the fire TABLE OF CONTENTS Warning 3 Getting Started 4 What s Included 5 Assembly Procedures 6 Product Drawing
Legend VENTED GAS FIREPLACE HEATERS
 MODEL 937XN FOR USE WITH NATURAL GAS Legend MODEL 937XP FOR USE WITH PROPANE VENTED GAS FIREPLACE HEATERS WARNING: If the information in this manual is not followed exactly, a fire or explosion may result
MODELS LFP4218/LFP6018 TOP VENT GAS FIREPLACE
 MODELS LFP4218/LFP6018 TOP VENT GAS FIREPLACE PFS APPROVED FOR NATURAL GAS OR PROPANE GAS Z21.50-2014 If your plans do not allow for the venting system as outlined previously in the installing chimney/vent
OWNER'S MANUAL WARNING WARNING WARNING WARNING WARNING. Factory No.: HYFP Style No.: WARNING WARNING READ BEFORE USE!
 OWNER'S MANUAL READ BEFORE USE! Factory No.: HYFP30205-19 Style No.: 65209 For Outdoor Use Only! Use Propane Gas Only! - USE PROPANE GAS ONLY! Do not store or use gasoline or other flammable vapors and
MODEL 466 Radiant / Convector Gas Fire Black Beauty
 O W N E R G U I D E MODEL 466 Radiant / Convector Gas Fire Black Beauty This Owner Guide is intended to help you care for your Valor gas fire. Please read carefully before using your gas fire and keep
100% Safety Shutoff Control 40,000 BTUH Input Rating Constant Pilot Propane Gas
 glor sun The Original Outdoor Patio Heater Manufactured by INFRARED DYNAMICS, INC. Yorba Linda, CA 92886 U.S.A. Tel: (714) 572-4050 Fax: (714) 572-6093 Toll-Free: (888) 317-5255 www.infradyne.com SPECIFICATIONS:
PTO50 Outdoor Decorative Fireplace
 Specifications: PTO50 Outdoor Decorative Fireplace Model PTO50-NG PTO50-LP Fuel Type Natural Gas Propane Gas Minimum Supply Pressure Minimum Supply Pressure Manifold Pressure - High 14 W.C. (3.49 kpa)
Renovator Range Firebox XL 1200SS
 1 2 Model Specifications Our offers a selection of Stainless Steel zero clearance fireboxes that can be fitted by your builder, into any combustible or non combustible material. These models offer you
IGE850 ISLAND GOURMET ELITE CUT OUT SPECIFICATIONS
 IGE850 ISLAND GOURMET ELITE CUT OUT SPECIFICATIONS A template is provided with your Island Gourmet packaging. The cut out you need on your bench top to fit the Heatlie Island Gourmet Elite is 1104mm x
Fyn Installation guide
 Fyn 600 4001131-1123 ENG Installation guide ENG 1.1 1.2 A B 1.3 1.4 1 < < < < 2.1 2.2 2.3 2.4 3.1 3.2 2 < < < < 4.1 4.2 4.3 4.4 3 < < < < 1 Introduction The appliance can only be installed by a competent
Gas Fire Patio Heater Kongur-500
 Gas Fire Patio Heater Kongur-500 Instruction Manual Please read the manual BEFORE you unpack or install the fire TABLE OF CONTENTS Warning 3 Getting Started 4 What s Included 5 Assembly Procedures 6 Product
Emberglow COAL EFFECT BALANCED FLUE GAS FIRE
 Emberglow COAL EFFECT BALANCED FLUE GAS FIRE User Instructions These instructions should be read by the user before operating the appliance and retained for future reference Model No. FEBC00MN is only
OWNER S GUIDE ETERNITY. MODEL 540C (GC No ) INSET BALANCED FLUE GAS FIRE
 INSET BALANCED FLUE GAS FIRE") 600B637/02 ETERNITY MODEL 540C (GC No. 32-032-19) INSET BALANCED FLUE GAS FIRE THIS APPLIANCE IS FOR USE WITH NATURAL GAS (G20) THIS APPLIANCE IS FOR USE IN THE UNITED KINGDOM (GB) AND THE REPUBLIC OF
600B637/02 ETERNITY MODEL 540C (GC No. 32-032-19) INSET BALANCED FLUE GAS FIRE THIS APPLIANCE IS FOR USE WITH NATURAL GAS (G20) THIS APPLIANCE IS FOR USE IN THE UNITED KINGDOM (GB) AND THE REPUBLIC OF
CATALINA FIRE TABLE ASSEMBLY INSTRUCTIONS
 CATALINA FIRE TABLE ASSEMBLY INSTRUCTIONS CSA Model 98300 DRF01000 Installer: Leave these instructions with consumer. Consumer: Keep these instructions for future reference. DANGER If you smell gas: 1.
WARNING. SPECIFICATIONS: Completely Self-contained Rain Protected Wind Resistant No Electrical Required WARNING FOR OUTDOOR USE ONLY!
 SPECIFICATIONS: Completely Self-contained Rain Protected Wind Resistant No Electrical Required 100% Safety Shutoff Control 40,000 BTUH Input Rating Constant Pilot Propane Gas DANGER If you smell gas: 1.
Service Manual For model N260 - a 2.4 cu. ft., 2-way refrigerator. For model N a 2.4 cu. ft., 3-way refrigerator.
 Service Manual For model N260 - a 2.4 cu. ft., 2-way refrigerator. For model N260.3 - a 2.4 cu. ft., 3-way refrigerator. NORCOLD, Inc. P.O. Box 4248 Sidney, OH 45365-4248 Part No. 619260A (4-98) Table
Model BR660VA Heat Engine
 5112253/01 Model BR660VA Heat Engine POWER FLUE INSET GAS FIRE (GC No. 32-032-44) THIS APPLIANCE IS FOR USE WITH NATURAL GAS (G20). WHEN CONVERTED USING CONVERSION KIT NO. 0591149 THIS APPLIANCE IS FOR
Gas Flare & Rail Burners Gas Flare & Rail Burners Installation Instructions
 Gas Flare & Rail Burners Gas Flare & Rail Burners Installation Instructions Gas Flare Rail Burner (Ash Pan ) Rail Burner (Grate ) OPTION 1 OPTION 2 and 3 Installation to Comply with NZS 5262 / 5261:2003
THE INSTRUCTIONS IN THIS MANUAL APPLY TO MASPORT BOSTON (Flued) AND CALGARY (Flueless) GAS FIRES.
 AND CALGARY (Flueless) GAS FIRES.") THE INSTRUCTIONS IN THIS MANUAL APPLY TO MASPORT BOSTON (Flued) AND CALGARY (Flueless) GAS FIRES. THE MODELS COVERED ARE:- MG 3000 STD NG, and MG 3000 FLS NG for use with Natural Gas MG 3000 STD LP, and
THE INSTRUCTIONS IN THIS MANUAL APPLY TO MASPORT BOSTON (Flued) AND CALGARY (Flueless) GAS FIRES. THE MODELS COVERED ARE:- MG 3000 STD NG, and MG 3000 FLS NG for use with Natural Gas MG 3000 STD LP, and
Kalahari RC & Camber RC
 Kalahari RC & Camber RC DECORATIVE FUEL EFFECT GAS FIRE User Instructions These instructions should be read by the user before operating the appliance and retained for future reference Model No s KRDC**RN
Renovator Range Firebox 900SS
 1 2 Model Specifications Our offers a selection of Stainless Steel zero clearance fireboxes that can be fitted by your builder, into any combustible or non combustible material. These models offer you
Specialist Deluxe Series II 4 & 6 Burner BBQ BQ8342 & BQ8362
 Specialist Deluxe Series II 4 & 6 Burner BBQ BQ8342 & BQ8362 FEATURES Deluxe BBQ featuring vitreous enamel body and #304 stainless steel fascia #304 Stainless steel hood includes glass window and temperature
INSTALLATION & USER INSTRUCTIONS
 INSTALLATION & USER INSTRUCTIONS WALL MOUNTED ELECTRIC FIRE MODELS COVERED BY THESE INSTRUCTIONS SMEG UK LTD 3a Park Square Milton Park Abingdon OX14 4RN L30 FABEBL L30 FABECR L30 FABERE L30 FABESI L30
Imperial Electric Fires
 Imperial Electric Fires GB IE MODELS: Flamescape II Curvascape II manual & remote. Installation and User Instructions PLEASE READ THESE INSTRUCTIONS CAREFULLY AND RETAIN FOR FUTURE REFERENCE This electric
INSTALLATION AND OPERATIONS GUIDE FOR GRAND CANYON GAS LOG FIRE PIT SERIES ONLY
 INSTALLATION AND OPERATIONS GUIDE FOR GRAND CANYON GAS LOG FIRE PIT SERIES ONLY Installation and service must be provided by a qualified installer, service agency or gas supplier Grand Canyon Gas Logs,
Installation / Service Instructions AF700. Gas Fireplace. For the latest documentation, visit _3
 Installation / Service Instructions AF700 Gas Fireplace For the latest documentation, visit www.escea.com 630301_3 Important: The appliance shall be installed in accordance with; This installation instruction
Fyn Installation guide
 Fyn 450 400100929-1114 ENG Installation guide ENG 1.1 1.2 A B 1.3 1.4 1 < < < < 2.1 2.2 2.3 3.1 3.2 2 < < < < 4.1 4.2 4.3 4.4 3 < < < < Table of contents 1 Introduction... 6 2 Safety instructions... 6
INSTALLATION AND OPERATION INSTRUCTIONS FOR
 INSTALLATION AND OPERATION INSTRUCTIONS FOR BI-40-DEEP-XT BI-50-DEEP-XT BI-60-DEEP-XT BI-72-DEEP-XT BI-88-DEEP-XT SAFETY INFORMATION WARNING If the information in these instructions are not followed exactly,
Duet XL /0929. Installation guide
 Duet XL 40010749/0929 ENG Installation guide ENG 1.1 1.2 1.3 1.4 1.5 A 1.6 1.7 1 < < < < B A 2.1 2.2 2.3 2.4 2 < < < < 2.5 2.6 2.7 2.8 3 < < < < 3.1 F F 3.2 3.3 4 < < < < Table of contents 1 Introduction...
ASSEMBLY INSTRUCTIONS
 ASSEMBLY INSTRUCTIONS CSA Model 99000 ARL00100 Installer: Leave these instructions with consumer. Consumer: Keep these instructions for future reference. DANGER If you smell gas: 1. Shut off gas to the
Riva Nemos. Balanced Flue Convector Fire. Instructions for Use, Installation and Servicing. For use in GB, IE (Great Britain and Eire) IMPORTANT
 IMPORTANT") Riva Nemos Balanced Flue Convector Fire Instructions for Use, Installation and Servicing For use in GB, IE (Great Britain and Eire) IMPORTANT THE OUTER CASING, FRONT AND GLASS PANEL BECOME EXTREMELY HOT
Riva Nemos Balanced Flue Convector Fire Instructions for Use, Installation and Servicing For use in GB, IE (Great Britain and Eire) IMPORTANT THE OUTER CASING, FRONT AND GLASS PANEL BECOME EXTREMELY HOT
Hanover Outdoor Furniture IMPORTANT. If you have any problems with this product (missing or damaged parts, assembly issues, etc.),
,") Hanover Outdoor Furniture IMPORTANT If you have any problems with this product (missing or damaged parts, assembly issues, etc.), PLEASE DO NOT RETURN TO THE RETAILER/STORE from where you purchased the
Hanover Outdoor Furniture IMPORTANT If you have any problems with this product (missing or damaged parts, assembly issues, etc.), PLEASE DO NOT RETURN TO THE RETAILER/STORE from where you purchased the
Owner s Manual. FMI BRANDS INC Avenue Surrey, B.C. Canada V3Z 3V7 Toll Free Fax Model number FMPPC2F
 Owner s Manual Model number FMPPC2F Series number 863 2017 FMI Brands Inc. Patent Pending D.863.000.V3 FMI BRANDS INC. 107 19052 26 Avenue Surrey, B.C. Canada V3Z 3V7 Toll Free 1-888-514-1663 Fax 1-888-797-9931
ASSEMBLY INSTRUCTIONS
 ASSEMBLY INSTRUCTIONS Installer: Leave these instructions with consumer. Consumer: Keep these instructions for future reference. CSA Model99000 BRH01000 DANGER If you smell gas: 1. Shut off gas to the
Before social media, there was just social_
 FIRE BY Before social media, there was just social_ Escea gas fireplaces combine high tech and energy efficiency with sleek design but it s the fire, man s oldest technology, that make them essential.
HD81 GLASS BURNER ASSEMBLY
 INSTALLER: LEAVE THIS MANUAL WITH THE APPLIANCE. CONSUMER: RETAIN THIS MANUAL FOR FUTURE REFERENCE. 1 INSTALLATION AND OPERATING INSTRUCTIONS CERTIFIED UNDER CANADIAN AND AMERICAN NATIONAL STANDARDS: CSA
Rhode Island PIT FIRES
 Rhode Island PIT FIRES HELLO from all of us at Living Flame THE RHODE ISLAND PIT FIRE RANGE So you want a little something special for your yard. We ve created these with you in mind (Besides, being inside
Clear Installation guide
 Clear 40010631-0938 ENG Installation guide ENG 1.1 1.2 1.3 A 1.4 1.5 1 < < < < A B 2.1 2.2 2.3 C 2.4 2.5 2 < < < < 3.1 3.2 3-3 3 < < < < Inhoudsopgave 1 Introduction... 6 2 Safety instructions... 6 3 Installation
PRE-PLANNING GUIDE for the Linear Burner System
 PRE-PLANNING GUIDE for the Linear Burner System GAS PRESSURE SPARK products are engineered, safety tested and certified to function properly within a specific gas supply pressure range. It is CRITICALLY
Owner s Manual. FMI BRANDS INC Avenue Surrey, B.C. Canada V3Z 3V7 Toll Free Fax Model number FMPPC2E-1
 Owner s Manual Model number FMPPC2E-1 Series number 401 FMI BRANDS INC. 107 19052 26 Avenue Surrey, B.C. Canada V3Z 3V7 Toll Free 1-888-514-1663 Fax 1-888-797-9931 Owner & Safety Manual Model number FMPPC2E-1,
Portable Camping BBQ HOT 0ZI SERIES II
 Portable Camping BBQ HOT 0ZI SERIES II Model No. BQ2007 FEATURES Versatile and portable Large 40.5cm (16 ) cooking plate 6 unique stabilising legs High pressure - no regulator required Ideal for camping,
Dovre 250 Cast Iron Gas Stove
 Dovre 50 Cast Iron Gas Stove NATURAL GAS AND LPG INSTALLATION, SERVICING AND USER INSTRUCTIONS THIS PRODUCT IS FOR USE ONLY IN GREAT BRITAIN AND IRELAND These instructions are to be left with the customer,
PAULIN PRODUCTS INDOOR HEATER
 PAULIN PRODUCTS INDOOR HEATER OWNER S MANUAL AND OPERATING INSTRUCTIONS May be used with a disposable 1 lb. propane cylinder: - for emergency indoor home heating - for indoor use in commercial enclosures,
MAJESTIC OUTDOOR GAS FIREPLACE
 MAJESTIC OUTDOOR GAS FIREPLACE To suit Models: ODGSR36ANAU & ODGSR36APAU Gas Types: Natural Gas (NG) or Propane (LPG) CUSTOMER INSTALLATION AND OPERATING INSTRUCTIONS Thank you for purchasing a Majestic
Table Top Patio Heater
 Table Top Patio Heater INSTRUCTION MANUAL MODEL: HPS-B Certified by international recognized standards. The infra-red with heat wave outdoor heater. Variable control gas valve with electric push igniter.
FREESTANDING GAS HEATER
 FREESTANDING GAS HEATER July 2001 OPERATIONS, MAINTENANCE & WARRANTY INFORMATION 25-07-01 Page 1 of 23 Operation Instructions for Eros Free Standing Gas Fire July 2001.doc CONTENTS: PAGE INTRODUCTION 3
Owner s Manual. FMI BRANDS INC th Avenue Surrey, B.C. Canada V3Z 3V7 Toll Free Fax Model number FMPPC2A
 Owner s Manual Model number FMPPC2A Series number 890 FMI BRANDS INC. 309-19133 26th Avenue Surrey, B.C. Canada V3Z 3V7 Toll Free 1-888-514-1663 Fax 1-888-797-9931 Owner & Safety Manual Model number FMPPC2A,
ULTIMATE INSET LIVE FUEL EFFECT GAS FIRE MODEL 417 OWNER GUIDE
 ULTIMATE INSET LIVE FUEL EFFECT GAS FIRE MODEL 417 OWNER GUIDE THE NATURAL GAS MODEL IS FOR G20 AT A SUPPLY PRESSURE OF 20mbar THE PROPANE GAS MODEL IS FOR G31 AT A SUPPLY PRESSURE OF 37mbar THESE APPLIANCES
Before social media, there was just social_
 FIRE BY Before social media, there was just social_ Escea gas fireplaces combine high tech and energy efficiency with sleek design but it s the fire, man s oldest technology, that make them essential.