Instruction manual Bedienungsanleitung Instrukcja obsługi. Lavender 3537W BAP-HA-I3537-U20W
|
|
|
- Lewis Giles Hoover
- 5 years ago
- Views:
Transcription

1 Instruction manual Bedienungsanleitung Instrukcja obsługi BAP-HA-I3537-U20W
2 CONTENT CAUTIONS... 8 ATTENTION PRODUCT PERFORMANCE AND TECHNICAL FEATURES Product performance Technical features COMPONENT INTRODUCTION Diagram of the outlook Diagram of unit Operating parts CAUTIONS BEFORE OPERATING How to touch the control panel? Placement Disassembling front cover Installation of the filters Power supply OPERATING INSTRUCTION Power setting Function setting Timing setting Fan speed setting Intelligent setting Reset setting MAINTENANCE AND CLEANING INSTRUCTION Maintenance and cleaning instruction
3 Methods for replacing UV lamp Disassembly and installation for UV lamp FAQ TECHNICAL PARAMETERS Parameters of the unit Filter parameters UV parameters NOMENCLATURE INHALT VORSICHTSMASSNAHMEN ACHTUNG PRODUKTLEISTUNG UND TECHNISCHE DATEN Produktleistung Technische Daten ÜBERSICHT DES GERÄTS Äußerer Aufbau des Geräts Innerer Aufbau des Geräts Betriebskomponenten VORSICHTSMASSNAHMEN VOR DEM GEBRAUCH Verwendung des Bedienfelds Aufstellung Demontage der vorderen Abdeckung Installation der Filter Stromversorgung GEBRAUCHSANLEITUNGEN
4 Betriebseinstellungen Funktionseinstellungen Zeiteinstellungen Leistungseinstellungen Gebläse Intelligente Einstellungen Rückstellung REINIGUNG UND WARTUNG Reinigungs- und Wartungsanleitungen Ersatz der UV-Lampe Demontage und Installation der UV-Lampe FAQ TECHNISCHE DATEN Daten des Geräts Filterparameter UV-Parameter NOMENKLATUR SPIS TREŚCI OSTRZEŻENIA ISTOTNE UWAGI FUNKCJE PRODUKTU I DANE TECHNICZNE Funkcje urządzenia Dane techniczne OPIS KOMPONENTÓW Rysunek poglądowy Urządzenie
5 Elementy sterujące ZANIM ROZPOCZNIESZ KORZYSTANIE Z URZĄDZENIA Jak obsługiwać dotykowy panel sterowania? Miejsce pracy Demontaż przedniej pokrywy Montaż filtrów Zasilanie INSTRUKCJA OBSŁUGI Włączenie zasilania Konfiguracja funkcji Konfiguracja czasu pracy Konfiguracja wydajności wentylatora Funkcje inteligentne Resetowanie ustawień KONSERWACJA I CZYSZCZENIE Konserwacja i czyszczenie Wymiana lamp UV Demontaż i montaż lamp UV PYTANIA I ODPOWIEDZI PARAMETRY TECHNICZNE Parametry urządzenia Parametry filtra Parametry UV NOMENKLATURA
6 Lavender series Home use Thank you for use this product which protected by intellectual property. Please read this instruction manual carefully before use and keep it for future use. If the parameter, specification and other information may be changed, we will not notice specially, please refer to the actual machine. The optional are optional functions, please kindly check with the retailer if your machine with these functions 6
7 Make an ecological home to avoid viruses Environment self cicatrization Produces air vitamin It can generate 8,000,000 air vitamin every second which can improve the home environment. Anti bacteria Restrain the breeding and activity of viruses UV light can efficiently kill bacteria and inhibit its activation Healthy air Healthy air is the basis of health and life A child needs 400KG of air everyday, equal to 100 times of an adult needs water per day. So it is very important to the health to improve the air environment of live. 7
8 CAUTIONS In order to prevent harm or damage happened to users or others, be sure to comply with the requirement as below: Warning/Attention Warning Attention It reminds that misusing or mishandling may cause death. It reminds that misusing or mishandling may cause hurt. FORBID IMPORTANT Kindly attention: If the power wire is broken, to prevent danger happen, please send it to agent, after-sales service or technical person for repair. 8
9 WARNING Please supervise your children and avoid them from touching or using machine. Do not connect or disconnect the power with wet hand. It may cause electrical shocking. No disassembly, repair and reconstruction. It may cause fire or damage. Please send it to the retailer for repair. Do not use the overrun socket or wiring connector. Do use the rated voltage. It may cause fire AVOID WET Do plug the power into the socket completely. It may cause fire because of heating or electrical shocking. Do not use the damaged plug or loose socket. NO DISASSEMBLE FORBID 9
10 Avoid any water on the surface of the unit. It may cause short circuit or electrical shocking. The appliance must be disconnected from the supply mains before cleaning or other maintenance. Otherwise the unit may start working in a sudden which may cause electrical shocking or hurt. Do not insert any metal objects into the unit. It may cause hurt or electric shocking AVOID WET Do not repair it when the cord or plug is damaged. It may cause short circuit, electric shocking or fire. Please send it to the retailer for repair. DISCONNECT POWER If there is dust on the plug, it may weaken the insulation, even cause fire. Take out the plug and clean it with dry cloth. Please remove the plug from the socket if not using for a long period. FORBID FORBID Clean the plug periodically 10
11 ATTENTION ATTENTION Do not power the unit on when using insecticide in the room. Otherwise the insecticide may be stored in the unit and will blow out during the normal working time. It is harmful to the health. Please ventilate completely after having used the insecticide before turn on the unit. Do not use in the room with fumes such as kitchen. It may cause hurt because the machine is not a ventilator. FORBID Do not blow in any combustible or fired cigarette into the unit. It may cause fire. Do not use in the watery or high temperature room such as the bathroom etc. Otherwise it may cause leakage, electric shocking or fire. 11
12 Keep away from alcohol, organic impregnant or insecticide. It may cause cracking, short circuit, electric shocking, hurt or fire. Please ventilate timely when used with fire in the room. Otherwise it may cause poisoning of Co, as the machine is not a ventilator. Please hold the plug instead of the cord when unplug the power. Otherwise it may cause short circuit, breaking of the cord, electric shocking or fire. Please remove the plug from the socket if any conditions as below: If all switches do not work If the power cord or plug hot singularly If any peculiar smell, exceptional noise or vibration Any other abnormality or failure If the power cord is damaged, please send it to the retailer or service center or technician for repairing. Do not change or repair it by yourself. 12
13 PRODUCT PERFORMANCE AND TECHNICAL FEATURES Product performance Pre-filter: can effectively remove particle PM 10.0 or over larger particles. HEPA: using a new generation of composite materials, can effectively remove of particle PM2.5. Activated carbon: adopting the porous coconut made by modern biological carbonization synthesis technology, adsorption capacity is bigger, and can effectively remove smoke, formaldehyde. Photo catalyst: using titanium dioxide (Ti02) material, its oxidation function can damage bacteria cell membrane captured by the filter, suppress the virus. UV lamp: air is the main path leading to the spread of the virus, using UV air sterilization technology, the environment of natural bacteria killing rate can reach more than 96%. Anion: negative ion is praised as Air Vitamin. People live in the high negative ionic environment, can help boost your metabolism, and improve immunity. Technical features Air quality intelligent detection: built-in Sharp second generation PM2.5 particle sensor and odor sensor. IMD control panel: using a new generation of IMD technology, more convenient control. Digital display: PM2.5, temperature, humidity, timer indicator, more intuitive and easy to understand. Automatic alarm: set filter, UV lamp replacement warning indicator. Standby power 1.5W. PG motor, more quiet and more environmental. 13
14 COMPONENT INTRODUCTION Diagram of the outlook IMD control panel Front cover Handle Air outlet Back cover Air in Label Power cord hole Base Front view Right view Back view Diagram of unit Front cover Pre-filter HEPA filter Activated carbon and photo catalyst filter Main body UV lamp 14
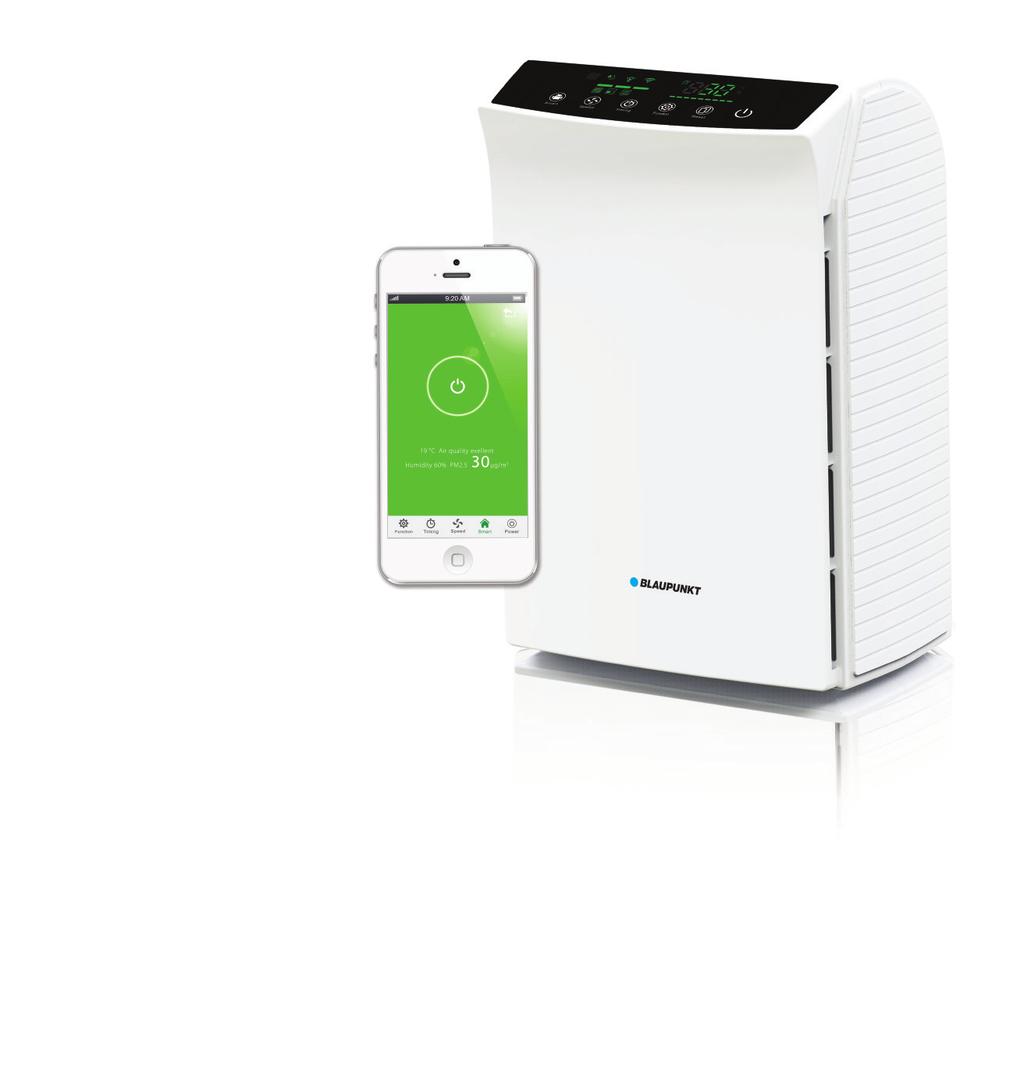
15 Operating parts Digital indicator Temperature Humidity Timing PM2.5 Screen diagram Signal receiver Speed Filter replacement Indicator Function display Air quality indicator Power on/off Anion UV lamp Wi-Fi 15


16 CAUTIONS BEFORE OPERATING How to touch the control panel? Please touch the button with whole finger Placement Wrong Correct Please keep the machine air inlet and outlet 30cm or more away from the wall and home furniture. Do not use the machine in front of heat source outlet. Disassembling front cover Disassembling diagram Please hold on the front cover and take it off. Installation diagram Insert two pins of bottom side into two slot of main body. 16
17 Installation of the filters Take off front cover Take out pre-filter, HEPA, activated carbon+photo catalyst filter, tear off filter transparent bag and put them back into device accordingly. 1. Take off front cover 2. Install activated carbon and photo catalyst filter 3. Install HEPA filter 4. Install pre-filter Power supply Please don t connect this machine with wrong voltage of power supply, inserting the plug firmly into the power socket. 17
18 OPERATING INSTRUCTION Power setting To press the power icon on the product operating panel, machine is entered the initial working status. The diagram as following: Function setting Press the function icon, choose anion or UV function, you can choose both functions working together or close them. The diagram as following: Anion UV lamp 18
19 Timing setting Long press Timing icon, the displayed digit is flashing, then the timing mode is started. Press Timing icon continuously, the time can be chosen from 0 to 12 hours, the device memory function will be started after waiting for 5 seconds. The diagram as following: Remark 1: Press time button on operation panel to preview how long time setting. Remark 2: Hold on time button if you want to cancel time setting. Remark 3: When time setting is finished/power off, machine turn to normal working mode. Fan speed setting If machine is set as intelligent mode, the fan speed icon can t be adjusted. Fan speed high, medium, low can be selected after pressing the "fan speed" icon on the product operating panel.p1 Sleep mode: pressing fan speed icon and hold on for 3 seconds, the sleep mode will be on, if pressing any icons, the sleep mode will be cancelled.p2: Remark: Sleep mode is night mode, fan speed and noise are very low, all indicators are not lighted. P1:Speed adjustment diagram P2:Sleep mode diagram 19
20 Intelligent setting Odor sensor is built-in, PM2.5 function is optional (Attention: for standard configuration, please see your purchased machines) Air quality indicator will be lighted after pressing the "intelligent" icon on the product operating panel, the machine will check the air quality and control its working status automatically. PM2.5 sensor: it's to check the dust or particles and display it by data. The diagram as following: The number of PM2.5 particles, air quality status, and machine intelligently running status as below. P1 P2 P1:Best P2:good P3: Mild-tomoderate polluted P4: worst polluted P3 P4 Remarks 1: the quantity of the air quality indicator means air quality level and its working status. Remarks 2: when you choose "intelligent" mode, the device will take 3 minutes to warm up, "function" icon can not use in this mode. Remarks 3: when air humidity is above 80%, it will affect the sensitivity of sensor, the PM2.5 data is just for your reference. 20
21 PM2.5 abnormal correcting: After used the PM2.5 sensor for a long time, trace amounts of particulate will adhere to the sensor inductive head, it may cause the PM2.5 numerical display abnormal. When you find PM2.5 numerical severely deviated from the normal range, here we advise you to regulate it as follow steps based on the weather forecast's PM2.5 numerical in your city. 1. Open the window ventilated for 5 minutes (PM2.5 sensor will start to collect current environmental data again). 2. Long press function icon, after hearing click, then you are on PM2.5 regulating mode. Each time you press function icon, the machine's PM2.5 numerical will increase 2ug/m 3, each time you press smart icon, PM2.5 numerical will decrease 2ug/m When the PM2.5 numerical adjusts to the PM2.5 numerical of your city's weather forecast, PM2.5 sensor regulating will be finished after 5 seconds. Reset setting If the filter icons are always flashing, it means the filters life time comes to the end, please clean or replace new filters. After cleaning or replacing new filters, please press "Reset" icon, then filter icons will stop flashing, the machine starts to record the filters using time. Remark: Reset icon has refresh function, PM2.5 data can be refreshed after pressing the "Reset" icon on the product operating panel. Pre-filter Filter replacement indicator Activated carbon HEPA 21
22 MAINTENANCE AND CLEANING INSTRUCTION Maintenance and cleaning instruction Maintenance and cleaning instruction Please remove plug from the socket before cleaning and maintenance. Cleaning the body for this device by damp cloth, then wipe it dry. If machine is too dirty, neutral detergent can be used for cleaning, but please dilute the detergent before use. Do not clean the unit with the solvent listed on the right which may cause distortion or discolour. Methods for replacing UV lamp Photo sensor is built-in the device, if the UV light is very weak or not lighted, the UV icon on the product operating panel will be flashing; it means UV lamp should be replaced. The diagram as following: UV lamp replacement indicator 22
23 Disassembly and installation for UV lamp Take off the front cover, and take out all filters, then UV lamp can be replaced. The diagram as following: Hold the UV lamp and rotate it for 90 degrees clockwise or anticlockwise, then take it out. Hold the UV lamp and rotate it for 90 degrees clockwise or anticlockwise, then install it well. 23
24 FAQ If the machine can t work properly, please kindly check as below before you send it out for repair. Abnormal occurrence Checking methods Solution Do not work Odor can not be removed High noise Air quality indicator can not work properly Small changes for humidity or temperature data Please check if the plug is disconnected from the socket. Please check if the front cover is installed completely. Is there a very strong odor in the using environment? (Notes: air should be purified continuously). Does the using life time for activated carbon filter come to the end? Is the PE bag for filter removed? Does the using life time for HEPA come to the end? Is the air humidity very high? Is the machine affected by kitchen oil fume or sprays? Is the machine using area too big? Power plug should be plugged properly. Recover the front cover correctly. Suggesting to ventilate, then start up the machine. Please replace new filters. Please take out filters and tear off PE bag. Please replace new HEPA. Please move the machine to another room to test again. Please use this machine in applicable room. If the problem is still existed after above inspections, please disconnect the power and send it for repair. 24
25 TECHNICAL PARAMETERS Parameters of the unit Model No.: BAP-HA-I3537-U20W Voltage supply: 220V-240V,50Hz Air flow volume(m 3 /h): m 3 /h Noise level db(a): 46dB(A) Length of power cord: 1.4M Product size: 370x265x570(mm) Net weight: 8.5kgs Power rating (W): 72W Applicable area: 50m 2 (538ft 2 ) Filter parameters Description Size Life time HEPA L 415 X W 315 X H 25 (mm) About 12 months Activated carbon and photo catalyst L 415 X W 315 X H15 (mm) About 6 months Pre-filter L X W X H 21 (mm) About 6 months UV parameters Description UV lamp Wave length 254nm Model Power rating Lifetime T5 6W 8000h 25
26 NOMENCLATURE B AP HA I U 20 W Blaupunkt Air Purifier Filters H: True Hepa A: Feature I: Ioniser CADR max. multiplied by 10(CFM) Air delivery multiplied by 10 Feature U: UV Lamp Internal number Additional feature: Wi-Fi Active Carbon 26
27 Attention: This appliance can be used by children aged from 8 years and above and persons with reduced physical, sensory or mental capabilities or lack of experience and knowledge if they have been given supervision or instruction concerning use of the appliance in a safe way and understand the hazards involved. Children shall not play with the appliance. Cleaning and user maintenance shall not be made by children without supervision. If the supply cord is damaged, it must be replaced by the manufacturer, its service agent or similarly qualified persons in order to avoid a hazard. Subject to technical modification. The current version of the manual can be downloaded: 27
28 Lavender-Produktreihe Privater Gebrauch Vielen Dank für den Kauf dieses durch geistige Eigentumsrechte geschützten Produkts. Lesen Sie diese Bedienungsanleitung vor dem Gebrauch sorgfältig durch und bewahren Sie sie für ein zukünftiges Nachschlagen gut auf. Parameter, technische Daten und andere Informationen unterliegen unangekündigten Änderungen. Beziehen Sie sich bitte immer auf das tatsächliche Produkt. Optional bezieht sich auf optionale Funktionen. Lassen Sie sich von Ihrem Einzelhändler entsprechend beraten. 28
29 Erzeugen Sie eine ökologische Umgebung in Ihrem Heim zur Vermeidung von Viren Ausheilung der Umgebung Erzeugt Vitamine für die Luft Das Gerät kann pro Sekunde bis zu Luftvitamine erzeugen und somit die Umgebung in Ihrem Heim verbessern. Antibakteriell Unterbinden Sie die Entstehung und Aktivität von Viren UV-Licht tötet Bakterien effizient ab und unterbindet deren Aktivität Gesunde Luft Gesunde Luft ist die Basis für ein gesundes Leben Kinder benötigen 400 kg Luft pro Tag; dies entspricht der 100-fachen Menge an Wasser, die ein Erwachsener benötigt. Die Verbesserung der Luft ist daher zum Leben und für die Gesundheit unabdinglich. 29
30 VORSICHTSMASSNAHMEN Um Schäden oder Verletzungen zu vermeiden, müssen die nachfolgenden Hinweise beachtet werden: Warnung/Achtung Warnung Achtung Missbrauch oder unsachgemäßer Gebrauch können tödliche Folgen haben. Missbrauch oder unsachgemäßer Gebrauch können Verletzungen verursachen. VERBOTEN WICHTIG Hinweis: Ein beschädigtes Netzkabel muss für die Reparatur an den Händler, den Kundendienst oder eine Fachkraft gesendet werden, um Gefahrensituationen zu vermeiden. 30
31 WARNUNG Kinder müssen beaufsichtigt werden, damit sie das Gerät nicht anfassen oder verwenden. Das Netzkabel nicht mit nassen Händen anschließen oder trennen. Es besteht Stromschlaggefahr. Nicht demontieren, reparieren oder modifizieren. Es besteht die Gefahr von Feuer oder Schäden. Lassen Sie es vom Händler reparieren. Verwenden Sie keine verschlissenen Anschlüsse oder Verbindungen. Nur mit der Nennspannung verbinden. Es besteht Brandgefahr. FEUCHTIGKEIT VERMEIDEN Schließen Sie das Netzkabel vollständig an die Buchse an. Es besteht die Gefahr von Wärme oder Stromschlag. Verwenden Sie keine beschädigten Stecker oder lockeren Anschlüsse. NICHT DEMONTIEREN VERBOTEN 31
32 Schützen Sie die Oberfläche des Geräts vor Wasser. Es besteht die Gefahr von Kurzschlüssen oder Stromschlägen. Das Gerät muss vor der Durchführung von Reinigungs- oder Wartungsarbeiten vom Netzstrom getrennt werden. Anderenfalls könnte das Gerät versehentlich den Betrieb starten, was wiederum Stromschläge oder Verletzungen verursachen könnte. Stecken Sie keine Metallgegenstände in das Gerät. Es besteht die Gefahr von Verletzungen und Stromschlägen. FEUCHTIGKEIT VERMEIDEN Nicht reparieren, wenn das Netzkabel oder der Stecker beschädigt ist. Es besteht die Gefahr von Kurzschlüssen, Stromschlägen oder Feuer. Lassen Sie es vom Händler reparieren. NETZSTECKER TRENNEN Staub auf dem Stecker kann die Isolierung schwächen oder sogar Feuer verursachen. Trennen Sie den Netzstecker und reinigen Sie ihn mit einem trockenen Lappen. Trennen Sie den Netzstecker während längerer Zeiten des Nichtgebrauchs. VERBOTEN VERBOTEN Reinigen Sie den Stecker regelmäßig 32
33 ACHTUNG ACHTUNG Schalten Sie das Gerät nicht ein, wenn Sie Insektenspray im Raum verwenden. Anderenfalls würde das Insektenspray im Gerät gespeichert und während des normalen Betriebs wieder ausgestoßen. Dies ist gesundheitsschädlich. Lüften Sie den Raum nach dem Gebrauch von Insektenspray vollständig, bevor Sie das Gerät erneut einschalten. Verwenden Sie das Gerät nicht in Räumen mit Rauch, wie z.b. in Küchen. Das Gerät könnte beschädigt werden, da es sich nicht um einen Lüfter handelt. VERBOTEN Lassen Sie keine brennbaren Gegenstände oder angebrannte Zigaretten in das Gerät eindringen. Es besteht Brandgefahr. Nicht in feuchten Räumen oder bei hohen Temperaturen verwenden, wie z.b. in Badezimmern, usw. Anderenfalls besteht die Gefahr von Leckagen, Stromschlag oder Feuer. 33
34 Von Alkohol, organischen Imprägnierungsmitteln und Insektenspray fernhalten. Es besteht die Gefahr von Rissen, Kurzschluss, Stromschlag, Verletzungen oder Feuer. Lüften Sie den Raum rechtzeitig nach einem Feuer. Anderenfalls besteht die Gefahr von Kohlendioxidvergiftungen dieses Gerät ist kein Ventilator. Ziehen Sie am Stecker und nicht am Kabel, wenn Sie das Gerät vom Netz trennen. Anderenfalls besteht die Gefahr von Kurzschlüssen, Schäden am Kabel, Stromschlag oder Feuer. Trennen Sie in folgenden Situationen den Netzstecker vom Netzstrom: Keine Taste funktioniert Das Netzkabel oder der Stecker ist heiß Strenge Gerüche, außergewöhnliche Geräusche oder Vibration Andere Anomalitäten oder Fehlfunktionen Lassen Sie ein beschädigtes Netzkabel vom Händler, Kundendienst oder einem Techniker reparieren. Ändern oder reparieren Sie es nicht eigenständig. 34
35 PRODUKTLEISTUNG UND TECHNISCHE DATEN Produktleistung Vorfilter: Entfernt effizient PM 10.0 oder größere Partikel. HEPA: Durch die Verwendung einer neuen Generation von Verbundstoffen können PM2.5 Partikel effizient entfernt werden. Aktivkohle: Dank offenporiger Kokosnuss, die durch moderne biologische Verkohlungssynthese hergestellt wird, ist die Absorptionskapazität größer und somit die Entfernung von Rauch und Formaldehyd effektiver. Photokatalyse: Materialien aus Titandioxid (Ti02) und deren Oxidationsfunktion zerstören die Zellmembranen der im Filter gefangenen Bakterien und unterdrücken die Aktivität von Viren. UV-Lampe: Luft ist der Hauptübertragungsweg für Viren. Durch die UV- Luftsterilisierungstechnologie werden mehr als 96% der natürlichen Bakterien in der Umgebung abgetötet. Anion: Negative Ionen werden als das Luftvitamin angepriesen. Menschen, die in einer Umgebung mit hohem Anteil an negativen Ionen leben, können ihre Immunität dank eines verbesserten Stoffwechsels stärken. Technische Daten Intelligente Erfassung der Luftqualität: Integrierter, präziser PM2.5 Partikelsensor der zweiten Generation sowie Geruchssensor. IMD-Bedienfeld: IMD-Technologie der neuen Generation für eine noch praktischere Bedienung. Digitales Display: PM2.5, Temperatur, Feuchtigkeit, Zeitanzeige intuitiv und einfach im Gebrauch. Automatischer Alarm: Warnanzeige für die Einstellung des Filters und den Ersatz der UV- Lampe. Standby-Verbrauch 1,5W. PG-Motor noch leiser und umweltfreundlicher. 35
36 ÜBERSICHT DES GERÄTS Äußerer Aufbau des Geräts IMD-Bedienfeld Vordere Abdeckung Lufteintritt Griff Luftaustritt Rückseitige Abdeckung Etikett Netzkabelanschluss Sockel Vorderseite Rechte Seite Rückseite Innerer Aufbau des Geräts Vordere Abdeckung Vorfilter HEPA-Filter Aktivkohlefilter und Photokatalyse-Filter Hauptgerät UV-Lampe 36
37 Betriebskomponenten Digitale Anzeige Temperatur Feuchtigkeit Timer PM2.5 Displayanzeige Signalempfänger Geschwindigkeit Anzeige für den Ersatz des Filters Funktion Luftqualität Ein/Aus Anion UV-Lampe Wi-Fi 37
38 VORSICHTSMASSNAHMEN VOR DEM GEBRAUCH Verwendung des Bedienfelds Tippen Sie mit dem gesamten Finger auf die Taste Aufstellung Falsch Richtig Lassen Sie zwischen dem Lufteintritt bzw. Luftaustritt und einer Wand oder angrenzenden Möbeln mindestens 30 cm Platz. Verwenden Sie das Gerät nicht unmittelbar vor der Öffnung einer Wärmequelle. Demontage der vorderen Abdeckung Demontagediagramm Halten Sie die vordere Abdeckung fest und nehmen Sie diese ab. Installationsdiagramm Stecken Sie die beiden Stifte an der Unterseite in die beiden Schlitze am Hauptgerät. 38

39 Installation der Filter Entfernen Sie die vordere Abdeckung. Nehmen Sie den Vorfilter, den HEPA-Filter, den Aktivkohlefilter und den Photokatalyse-Filter heraus, ziehen Sie den Klarsichtbeutel des Filters ab und installieren Sie die Filter wieder ordnungsgemäß. 1. Entfernen Sie die vordere Abdeckung. 2. Installieren Sie den Aktivkohlefilter und den Photokatalyse-Filter. 3. Installieren Sie den HEPA-Filter. 4. Installieren Sie den Vorfilter. Stromversorgung Schließen Sie dieses Gerät nur an die entsprechende Spannungsversorgung an und vergewissern Sie sich, dass der Stecker vollständig in der Steckdose steckt. 39
40 GEBRAUCHSANLEITUNGEN Betriebseinstellungen Drücken Sie das power -Icon am Bedienfeld, um den ursprünglichen Betriebsmodus zu aktivieren. Siehe nachfolgende Abbildung: Funktionseinstellungen Drücken Sie das function -Icon am Bedienfeld, um die Anion- oder die UV-Funktionen für den separaten oder gemeinsamen Gebrauch auszuwählen oder zu beenden. Siehe nachfolgende Abbildung: Anion UV-Lampe 40
41 Zeiteinstellungen Halten Sie das Timing -Icon gedrückt; die angezeigte Ziffer beginnt zu blinken und der Timer-Modus wird gestartet. Drücken Sie das Timing -Icon wiederholt, um einen Wert zwischen 0 und 12 Stunden einzustellen. Nach 5 Sekunden startet die Speicherfunktion des Geräts. Siehe nachfolgende Abbildung: Hinweis 1: Drücken Sie die Time-Taste am Bedienfeld, um die verbleibende Zeit anzuzeigen. Hinweis 2: Halten Sie die Time-Taste gedrückt, um die Zeiteinstellung abzubrechen. Hinweis 3: Nach Ablauf der Zeiteinstellung oder wenn das Gerät ausgeschaltet wurde, kehrt das Gerät zum normalen Betriebsmodus zurück. Leistungseinstellungen Gebläse Falls der intelligente Modus eingestellt ist, ist die Einstellung mit dem fan speed -Icon nicht möglich. Drücken Sie das fan speed -Icon am Bedienfeld, um die Gebläseleistung mit high, medium, low einzustellen.p1 Sleep-Modus: Drücken Sie das fan speed -Icon 3 Sekunden lang, um den Sleep-Modus zu aktivieren. Drücken Sie ein anderes Icon, um den Sleep-Modus zu deaktivieren.p2 Hinweis: Der Sleep-Modus ist ein Nachtmodus; die Lüftergeschwindigkeit ist sehr gering, der Betrieb ist sehr geräuscharm und keine der Anzeigen leuchtet. P1: Diagramm für die Leistungseinstellung P2: Diagramm für den Sleep-Modus 41
42 Intelligente Einstellungen Das Gerät verfügt über einen Geruchssensor; die PM2.5 Funktion ist optional (Achtung: Für die Standardausstattung beziehen Sie sich bitte auf das von Ihnen erworbene Gerät) Drücken Sie das intelligent -Icon am Bedienfeld. Die Anzeige der Luftqualität leuchtet auf und das Gerät überprüft die Luftqualität. Im Anschluss daran stellt es den Betriebsmodus entsprechend ein. PM2.5 Sensor: Überprüft Staubmenge oder Partikel und zeigt die Daten entsprechend an. Siehe nachfolgende Abbildung: Menge der PM2.5 Partikel, Status der Luftqualität und intelligenter Betriebsmodus siehe nachfolgende Erläuterung. P1 P2 P1: Am besten P2: Gut P3: Leichte bis moderate Verschmutzung P4: Am stärksten verschmutzt P3 P4 Hinweis 1: Die Anzeige der Luftqualität gibt Aufschluss über die Stufe der Luftqualität und den Betriebsstatus. Hinweis 2: Wenn Sie den intelligenten Modus auswählen, benötigt das Gerät 3 Minuten, um sich aufzuwärmen. Das function -Icon ist in diesem Modus nicht verfügbar. Hinweis 3: Eine Luftfeuchtigkeit von über 80% hat Auswirkungen auf die Empfindlichkeit des Sensors; die PM2.5 Daten dienen nur als Referenz. 42
43 PM2.5 Störbehebung: Nach längerer Zeit werden sich Partikelspuren am induktiven Kopf des Sensors festsetzen, was zu einer abnormalen Anzeige des PM2.5 Displays führen kann. Wenn Sie deutliche Abweichungen zwischen der numerischen PM2.5 Anzeige und dem normalen Bereich feststellen, empfehlen wir, die Daten basierend auf den PM2.5 Werten Ihres lokalen Wetterberichts zu regulieren. 1. Öffnen Sie das Fenster und lüften Sie 5 Minuten lang (PM2.5 Sensor erfasst die Daten in der Raumumgebung neu). 1. Halten Sie das function -Icon gedrückt. Es ertönt ein Klickgeräusch und im Display erscheint die PM2.5 Anzeige; das Gerät aktiviert den PM2.5 Einstellungsmodus. Mit jedem Drücken des function -Icons erhöht sich der numerische PM2.5 Wert um 2 ug/m 3. Mit jedem Drücken des smart -Icons reduziert sich der PM2.5 Wert um 2 ug/m Wenn Sie den PM2.5 Wert an den numerischen PM2.5 Wert gemäß Ihres lokalen Wetterberichts angepasst haben, warten Sie 5 Sekunden, bis der PM2.5 Sensor die Datenerfassung beendet hat. Rückstellung Falls die Icon-Anzeigen der Filter ständig blinken, ist die Lebensdauer der Filter abgelaufen. Reinigen oder ersetzen Sie die Filter entsprechend. Drücken Sie nach dem Reinigen oder Ersetzen das Reset -Icon; die Filteranzeigen hören auf zu blinken und das Gerät beginnt erneut mit der Aufzeichnung der Filternutzungsdauer. Hinweis: Das Reset -Icon verfügt über eine Aktualisierungsfunktion. Die PM2.5 Daten können durch Drücken des Reset -Icons auf dem Bedienfeld aktualisiert werden. Vorfilter Anzeige für den Ersatz des Filters Aktivkohlefilter HEPA 43
44 REINIGUNG UND WARTUNG Reinigungs- und Wartungsanleitungen Reinigungs- und Wartungsanleitungen Trennen Sie den Netzstecker, bevor Sie Reinigungs- und Wartungsarbeiten durchführen. Reinigen Sie den Gerätekörper mit einem feuchten Lappen; anschließend trocken wischen. Bei hartnäckigen Verschmutzungen verwenden Sie ein neutrales Reinigungsmittel, das Sie vor der Reinigung mit Wasser verdünnen. Reinigen Sie das Gerät nicht mit den rechts aufgelisteten Lösungsmitteln; diese können Verformungen und Verfärbungen verursachen. Ersatz der UV-Lampe Das Gerät verfügt über einen integrierten Fotosensor. Falls die UV-Lampe sehr schwach ist oder nicht leuchtet, blinkt das UV-Icon im Bedienfeld und weist somit darauf hin, dass die UV-Lampe ersetzt werden muss. Siehe nachfolgende Abbildung: Anzeige für den Ersatz der UV-Lampe 44
45 Demontage und Installation der UV-Lampe Entfernen Sie die vordere Abdeckung und nehmen Sie alle Filter heraus. Sie können dann die UV-Lampe ersetzen. Siehe nachfolgende Abbildung: Halten Sie die UV-Lampe fest, drehen Sie diese um 90 Grad im oder entgegen dem Uhrzeigersinn und nehmen Sie sie dann heraus. Halten Sie die UV-Lampe fest und drehen Sie diese um 90 Grad im oder entgegen dem Uhrzeigersinn, um sie zu installieren. 45
46 FAQ Falls das Gerät nicht ordnungsgemäß funktioniert, informieren Sie sich in der nachfolgenden Übersicht, bevor Sie das Gerät zwecks Reparatur einsenden. Problem Mögliche Ursache Lösung Überprüfen Sie, ob der Stecker richtig in der Steckdose steckt. Der Stecker muss richtig angeschlossen sein. Funktioniert nicht Überprüfen Sie, ob die vordere Abdeckung vollständig installiert ist. Befestigen Sie die vordere Abdeckung ordnungsgemäß. Gerüche werden nicht beseitigt. Laute Geräusche Die Anzeige der Luftqualität funktioniert nicht richtig Geringe Änderungen in der Feuchtigkeit oder Temperatur Möglicherweise ist ein sehr starker Geruch in der Umgebung vorhanden (Hinweis: Die Luft muss kontinuierlich gereinigt werden). Überprüfen Sie, ob die Lebensdauer des Aktivkohlefilters abgelaufen ist. Überprüfen Sie, ob der PE-Beutel der Filter entfernt wurde. Überprüfen Sie, ob die Lebensdauer des HEPA-Filters abgelaufen ist. Möglicherweise ist die Luftfeuchtigkeit sehr hoch. Überprüfen Sie, ob das Gerät Öl, Rauch oder Sprays ausgesetzt ist. Möglicherweise ist die Nutzungsfläche zu groß für das Gerät Es wird empfohlen, den Raum zu lüften und dann das Gerät zu starten. Ersetzen Sie den Filter. Nehmen Sie die Filter heraus und entfernen Sie den PE-Beutel. Ersetzen Sie den HEPA- Filter. Bringen Sie das Gerät in einen anderen Raum und testen Sie es erneut. Verwenden Sie das Gerät nur in geeigneten Räumen. Falls Probleme auch nach den oben genannten Überprüfungen weiterhin bestehen, trennen Sie das Gerät vom Netzstrom und senden Sie es für die Reparatur ein. 46
47 TECHNISCHE DATEN Daten des Geräts Modell-Nr.: BAP-HA-I3537-U20W Netzspannung: 220V-240V,50Hz Volumen Luftstrom (m 3 /h): 369,50m 3 /h Geräuschpegel db(a): 46dB(A) Netzkabellänge: 1,4m Produktabmessungen: 370x265x570(mm) Nettogewicht: 8,5 kg Nennleistung (W): 72W Raumgröße: 50m 2 (538ft 2 ) Filterparameter Beschreibung Größe Lebensdauer HEPA L 415 X B 315 X H 25 (mm) Ca. 12 Monate Aktivkohle- und Photokatalyse-Filter L 415 X B 315 X H 15 (mm) Ca. 6 Monate Vorfilter L 5 X B 312,5 X H 21 (mm) Ca. 6 Monate UV-Parameter Beschreibung UV-Lampe Wellenlänge 254nm Modell Nennleistung Lebensdauer T5 6W 8000h 47
48 NOMENKLATUR B AP HA I U 20 W Blaupunkt Luftreiniger Filter H: Original- HEPA A: Feature I: Ionisator CADR max. multipliziert mit 10(CFM) Luftzuführung Feature multipliziert mit 10 U: UV- Lampe Interne Nummer Zusätzliche Funktion: Wi-Fi Aktivkohle 48
49 Achtung: Dieses Gerät ist geeignet für den Gebrauch durch Kinder ab 8 Jahren und Personen mit eingeschränkten körperlichen, sensorischen oder geistigen Fähigkeiten, oder ohne Erfahrung und Wissen, sofern sie beaufsichtigt oder über den sicheren Umgang mit dem Gerät angeleitet werden und die damit einhergehenden Gefahren verstehen. Kinder dürfen nicht mit dem Gerät spielen. Reinigungsarbeiten und Benutzerwartungen dürfen von Kindern nur unter Aufsicht durchgeführt werden. Ein beschädigtes Netzkabel muss vom Hersteller, dessen Kundendienst oder einer ähnlich qualifizierten Fachkraft ersetzt werden, um Gefahrensituationen zu vermeiden. Technische Änderungen vorbehalten. Die aktuelle Version der Bedienungsanleitung finden Sie unter: 49
50 Seria Lavender do użytku domowego Dziękujemy za wybranie naszego produktu chronionego prawem autorskim. Prosimy o uważne przeczytanie niniejszej instrukcji obsługi i zachowanie jej, by można było skorzystać z niej w przyszłości. Parametry, specyfikacja i inne informacje mogą ulec zmianie bez powiadomienia użytkownika niniejszego urządzenia. Funkcje oznaczone jako opcjonalne nie są dostępne we wszystkich modelach. Zapytaj sprzedawcę o dostępność poszczególnych funkcji. 50

51 Stwórz ekologiczny dom bez wirusów Samoleczenie się środowiska Wytwarza witaminy powietrzne Posiada zdolność generowania powietrznych witamin na sekundę, dzięki czemu poprawia się jakość powietrza w domu. Antybakteryjny Ograniczenie rozprzestrzeniania się i działania wirusów Promieniowanie UV skutecznie zabija bakterie i hamuje ich rozwój Zdrowe powietrze Zdrowe życie zaczyna się od zdrowego powietrza Każdego dnia dziecko potrzebuje 400 kg powietrza, czyli ponad 100 razy więcej niż dzienne zapotrzebowanie dorosłej osoby na wodę. Dlatego z powodów zdrowotnych należy starać się poprawić jakość powietrza w środowisku, w którym żyjemy. 51
52 OSTRZEŻENIA Aby zapobiec obrażeniom ciała użytkowników i innych osób, przestrzegaj poniższych wskazówek: Ostrzeżenie/Istotna uwaga Ostrzeżenie Istotna uwaga Przypomina, że niepoprawne użycie lub obsługa mogą spowodować śmierć. Przypomina, że niepoprawne użycie lub obsługa mogą spowodować obrażenia ciała. ZABRONIONE WAŻNE Pamiętaj: Aby uniknąć potencjalnych zagrożeń w razie wystąpienia usterki przewodu zasilającego, należy dostarczyć przewód do dystrybutora, biura obsługi klienta lub serwisu w celu dokonania napraw. 52
53 OSTRZEŻENIE Pilnuj, aby dzieci nie dotykały ani nie używały urządzenia. Nie podłączaj ani nie odłączaj przewodu zasilającego mokrymi dłońmi. Może to spowodować porażenie prądem. Nie demontuj, naprawiaj ani nie modyfikuj urządzenia. Może to spowodować pożar lub uszkodzenie urządzenia. W celu dokonania napraw, przekaż urządzenie sprzedawcy. Nie przeciążaj gniazda ściennego lub linii zasilającej. Podłącz do zasilania zgodnego ze specyfikacją urządzenia. Może to spowodować pożar. UNIKAJ WILGOCI Zadbaj o poprawne podłączenie wtyczki do gniazda zasilającego. Zaniedbanie grozi pożarem spowodowanym przegrzaniem lub porażeniem elektrycznym. Nie używaj urządzenia, gdy wtyczka jest uszkodzona, lub gdy gniazdo jest niepoprawnie zainstalowane. NIE DEMONTUJ ZABRONIONE 53
54 Chroń powierzchnię urządzenia przed wilgocią. W przeciwnym razie istnieje niebezpieczeństwo wystąpienia zwarcia lub porażenia prądem. Przed czyszczeniem lub konserwacją należy odłączyć urządzenie od źródła zasilania. W przeciwnym razie urządzenie może uruchomić się nieoczekiwanie i spowodować porażenie prądem lub obrażenia ciała. Nie umieszczaj w urządzeniu metalowych przedmiotów. Zignorowanie powyższego zalecenia może spowodować obrażenia ciała lub porażenie prądem. UNIKAJ WILGOCI Nie naprawiaj, gdy wtyczka lub przewód zasilający są uszkodzone. Może to spowodować zwarcie, porażenie prądem lub pożar. W celu dokonania napraw, przekaż urządzenie sprzedawcy. ODŁĄCZ ZASILANIE Kurz na wtyczce może obniżyć skuteczność izolacji i być przyczyną pożaru. Odłącz wtyczkę i wyczyść ją suchą szmatką. Jeżeli nie będziesz korzystać z urządzenia przez dłuższy czas, odłącz wtyczkę z gniazdka. ZABRONIONE ZABRONIONE Regularnie czyść wtyczkę 54
55 ISTOTNE UWAGI ISTOTNE UWAGI Nie włączaj urządzenia, jeżeli w pomieszczeniu zastosowany został środek owadobójczy. Może to spowodować nagromadzenie się insektycydu w urządzeniu i jego późniejsze wydzielanie podczas pracy. Stanowi to potencjalne zagrożenie dla zdrowia. Po zastosowaniu środków owadobójczych dokładnie przewietrz pomieszczenie, a następnie włącz urządzenie. Nie stosuj w pomieszczeniach, w których obecne są opary, takich jak kuchnia. Może to być niebezpieczne dla zdrowia. Urządzenie nie jest wentylatorem. ZABRONIONE Nie wdmuchuj do urządzenia środków palnych ani dymu z papierosów. Może to spowodować pożar. Nie używaj w pomieszczeniach wilgotnych lub pomieszczeniach o bardzo wysokiej temperaturze, takich jak łazienka itp. Może to spowodować wyciek, porażenie prądem lub pożar. 55
56 Chroń przed alkoholem, organicznymi impregnatami lub insektycydami. Mogą one powodować pękanie, zwarcie, porażenie prądem, obrażenia ciała lub pożar. Gdy w pomieszczeniu występuje ogień, pamiętaj o wentylacji. W przeciwnym razie może dojść do zatrucia tlenkiem węgla (CO). Urządzenie nie jest wentylatorem. Odłączając zasilanie ciągnij za wtyczkę, nie za przewód. W przeciwnym razie może dojść do zwarcia, przerwania przewodu, porażenia prądem lub pożaru. Jeśli wystąpią poniższe okoliczności, odłącz wtyczkę od gniazda zasilającego: gdy nie działają przełączniki; gdy przewód zasilający lub wtyczka są gorące; w razie pojawienia się niepokojącej woni, hałasu lub wibracji; w razie wystąpienia innych niestandardowych zjawisk lub awarii. W razie uszkodzenia przewodu zasilającego, przekaż przewód do punktu sprzedaży lub serwisu, w celu dokonania napraw. Nie modyfikuj ani nie naprawiaj przewodu samodzielnie. 56
57 FUNKCJE PRODUKTU I DANE TECHNICZNE Funkcje urządzenia Filtr wstępny: skutecznie usuwa cząstki PM10,0 i większe. HEPA: wykorzystuje nową generację materiałów kompozytowych, skutecznie usuwa cząstki PM2,5. Węgiel aktywowany: wykorzystuje porowatość kokosa poddanego nowoczesnej technologii karbonizacji biologicznej, dzięki czemu ma większe zdolności absorpcyjne i może skutecznie usuwać dym, formaldehyd. Fotokatalizator: wykorzystuje dwutlenek tytanu (TiO2), który utleniając się uszkadza błonę komórkową bakterii, hamuje aktywność wirusów. Lampa UV: powietrze jest główną drogą rozprzestrzeniania się wirusów. Dzięki sterylizacji powietrza za pomocą lampy UV możliwe jest usunięcie ponad 96% bakterii. Jonizacja: jony ujemne nazywane są często witaminami w powietrzu. Przebywanie w otoczeniu o silnej ujemnej jonizacji poprawia metabolizm oraz wzmacnia odporność. Dane techniczne Inteligentna detekcja jakości powietrza: wbudowany czujnik nieprzyjemnych zapachów oraz czujnik cząstek PM2,5 Sharp, drugiej generacji. Panel sterowania IMD: dzięki wykorzystaniu nowej technologii IMD sterowanie jest bardziej wygodne. Wyświetlacz cyfrowy: PM2,5; temperatura; wilgotność; wskaźnik czasu pracy; bardziej intuicyjny i łatwiejszy w obsłudze. Automatyczny alarm: umieszczenie filtra, ostrzeżenie o konieczności wymiany lampy UV. Zużycie energii w stanie czuwania 1,5W. Silnik PG, cichszy i bardziej ekologiczny. 57
58 OPIS KOMPONENTÓW Rysunek poglądowy Panel sterowania IMD Przednia pokrywa Rączka Wylot powietrza Tylna pokrywa Wlot powietrza Etykieta Widok z przodu Podstawa Widok z prawej Otwór przewodu zasilającego Widok z tyłu Urządzenie Przednia pokrywa Filtr wstępny Filtr HEPA Filtr z węgla aktywowanego i fotokatalityczny Jednostka główna Lampa UV 58
59 Elementy sterujące Wyświetlacz cyfrowy Temperatura Wilgotność Czas pracy PM2,5 Ekran Odbiornik sygnału Prędkość Wskaźnik wymiany filtra Wyświetlacz funkcji Wskaźnik jakości powietrza Włączanie/ wyłączanie zasilania Aniony Lampa UV Wi-Fi 59
60 ZANIM ROZPOCZNIESZ KORZYSTANIE Z URZĄDZENIA Jak obsługiwać dotykowy panel sterowania? Dotknij przycisku opuszką palca Niepoprawnie Miejsce pracy Poprawnie Wlot i wylot powietrza z urządzenia powinny znajdować się w odległości przynajmniej 30 cm od ścian i mebli. Nie używaj urządzenia w pobliżu źródła ciepła. Demontaż przedniej pokrywy Demontaż Przytrzymaj przednią pokrywę i zdejmij ją. Montaż Włóż oba wypusty znajdujące się w dolnej części w otwory w jednostce głównej. 60

61 Montaż filtrów Zdejmij przednią pokrywę Wyjmij filtr wstępny, HEPA, filtr z aktywowanego węgla + filtr fotokatalityczny, zdejmij przezroczyste opakowanie filtra i umieść filtry w urządzeniu. 1. Zdejmij przednią pokrywę 2. Umieść filtr węgla aktywowanego i filtr fotokatalityczny. 3. Zainstaluj filtr HEPA. 4. Zainstaluj filtr wstępny. Zasilanie Nie podłączaj urządzenia do zasilania o napięciu innym niż podane w specyfikacji. Zwróć uwagę na poprawne podłączenie wtyczki do gniazda. 61
62 INSTRUKCJA OBSŁUGI Włączenie zasilania Naciśnięcie ikony power na panelu operacyjnym spowoduje przejście urządzenia w tryb rozruchowy. Patrz ilustracja poniżej: Konfiguracja funkcji Po naciśnięciu ikony function na panelu operacyjnym urządzenia możliwy jest indywidualny lub łączny wybór jonizatora i UV oraz wyłączenie obu funkcji. Patrz ilustracja poniżej: Aniony Lampa UV 62
63 Konfiguracja czasu pracy Długie przytrzymanie ikony Timing spowoduje miganie wyświetlanej liczby, a następnie uruchamiany jest tryb czasu pracy. Przytrzymaj ikonę Timing, aby wybrać czas pracy urządzenia: od 0 do 12 godzin. Funkcja pamięci urządzenia zostanie uruchomiona po 5 sekundach. Patrz ilustracja poniżej: Wskazówka 1: Naciśnij przycisk czasu na panelu operacyjnym, aby sprawdzić pozostały czas pracy urządzenia. Wskazówka 2: Aby anulować funkcję pracy przez wybrany czas, przytrzymaj przycisk czasu pracy. Wskazówka 3: Po upłynięciu wybranego czasu pracy/wyłączeniu urządzenie zostanie przełączone na standardowy tryb pracy. Konfiguracja wydajności wentylatora Po włączeniu inteligentnego trybu pracy zmiana ustawień dla fan speed (moc wentylatora) jest niemożliwa. Aby wybrać moc wentylatora (duża, średnia, niska), naciśnij ikonę fan speed na panelu operacyjnym urządzenia.rys. 1 Tryb nocny: aby włączyć tryb nocny, przytrzymaj przycisk fan speed przez 3 sekundy. Aby wyłączyć tryb nocny, naciśnij dowolną ikonę.rys. 2: Uwaga: w trybie nocnym moc wentylatora i generowany przez niego hałas są bardzo niskie, wszystkie wskaźniki są wyłączone. Rys. 1: Ekran regulacji mocy wentylatora Rys. 2: Ekran trybu nocnego 63
64 Funkcje inteligentne Czujnik nieprzyjemnych zapachów jest wyposażeniem standardowym, funkcja PM2,5 jest opcjonalna. (Uwaga: sprawdź konfigurację konkretnego urządzenia). Wskazanie jakości powietrza zostanie wyświetlone po naciśnięciu ikony intelligent na panelu operacyjnym produktu. Urządzenie będzie automatycznie sprawdzać jakość powietrza i sterować swoim trybem pracy. Czujnik cząstek PM2,5: sprawdza obecność cząstek pyłu zawieszonego i wyświetla aktualną wartość. Patrz ilustracja poniżej: Poniżej przedstawione zostały: ilość cząstek PM2,5, jakość powietrza i inteligentne ustawienia urządzenia. Rys. 1 Rys. 2 Rys. 1: najlepsza jakość powietrza Rys. 2: dobra Rys. 3: średnie, umiarkowane zanieczyszczenie Rys. 4: wysokie zanieczyszczenie Rys. 3 Rys. 4 Wskazówka 1: wskazanie jakości powietrza informuje o aktualnym zanieczyszczeniu powietrza i trybie pracy urządzenia. Wskazówka 2: po włączeniu trybu intelligent urządzenie będzie się rozgrzewać przez 3 minuty. Ikona function nie jest dostępna w tym trybie. Wskazówka 3: gdy wilgotność powietrza przekroczy 80%, obniży się czułość czujnika. Wskazanie ilości cząstek PM2,5 jest orientacyjne. 64
65 Nieprawidłowe wskazania wyświetlacza PM2,5: Po dłuższym użytkowaniu na głowicy indukcyjnej czujnika PM2,5 gromadzą się śladowe ilości zanieczyszczeń, które mogą powodować niepoprawne działanie wyświetlacza numerycznego PM2,5. Gdy wskazania wyświetlacza numerycznego PM2,5 zaczną znacząco odbiegać od standardowych wskazań, zalecamy jego regulację, po sprawdzeniu ilości cząstek PM2,5 w lokalnej prognozie pogody. 1. Otwórz okno i wietrz pomieszczenie przez 5 minut (czujnik PM2,5 ponownie rozpocznie zbieranie danych). 1. Przytrzymaj ikonę function do usłyszenia kliknięcia i automatycznego przełączenia okna wyświetlacza PM2,5, następnie uruchomiony zostanie tryb regulacji wskazań PM2,5. Każde naciśnięcie ikony function zwiększa wskazanie PM2,5 o 2 g/m 3 ; każde naciśnięcie ikony smart zmniejsza wskazanie PM2,5 o 2 g/m Po ustawieniu wartości wskazania PM2,5 zgodnej z prognozą/poziomem cząstek PM2,5 publikowaną przez służby miejskie odczekaj 5 sekund. Kalibracja czujnika PM2,5 została zakończona. Resetowanie ustawień Jeżeli ikony filtra migają, oznacza to zbliżanie się terminu wymiany filtrów. Oczyść lub wymień filtry. Po oczyszczeniu lub wymianie filtrów na nowe naciśnij ikonę Reset. Ikony filtrów przestaną migać, a urządzenie rozpocznie rejestrację czasu pracy nowych filtrów. Uwaga: Ikona Reset umożliwia odświeżanie wyświetlacza. Naciśnij ikonę Reset na panelu operacyjnym urządzenia, aby odświeżyć wskazanie wyświetlacza PM2,5. Filtr wstępny Wskaźnik wymiany filtra Filtr węgla aktywowanego i filtr fotokatalityczny Filtr HEPA 65
66 KONSERWACJA I CZYSZCZENIE Konserwacja i czyszczenie Konserwacja i czyszczenie Przed czyszczeniem i konserwacją odłącz wtyczkę od gniazda zasilającego. Oczyść obudowę urządzenia za pomocą wilgotnej ściereczki, a następnie wytrzyj je do sucha. Jeżeli urządzenie jest bardzo zabrudzone, do czyszczenia można użyć łagodnego środka myjącego, który należy rozcieńczyć przed zastosowaniem. Nie czyść urządzenia środkami chemicznymi przedstawionymi na ilustracji z prawej strony, gdyż mogą spowodować zniekształcenie lub odbarwienie powierzchni urządzenia. Wymiana lamp UV Urządzenie posiada wbudowany czujnik fotoelektryczny. Gdy światło UV jest bardzo słabe lub nie jest emitowane, na panelu operacyjnym urządzenia miga ikona UV. Oznacza to konieczność wymiany lamp UV. Patrz ilustracja poniżej: Wskaźnik wymiany lamp UV 66
67 Demontaż i montaż lamp UV Zdejmij przednią pokrywę i wyjmij wszystkie filtry, a następnie wymień lampy UV. Patrz ilustracja poniżej: Chwyć lampę UV i obróć ją o 90 stopni w prawo lub w lewo, a następnie wyjmij lampę. Trzymając pionowo lampę UV w ręce obróć ją o 90 stopni w prawo lub w lewo, a następnie włóż ją w gniazdo. 67
68 PYTANIA I ODPOWIEDZI Jeżeli urządzenie nie działa poprawnie, przeprowadź poniższe czynności zanim odeślesz urządzenie do naprawy. Problem Co należy sprawdzić Rozwiązanie Nie działa Sprawdź, czy wtyczka jest podłączona do gniazda zasilającego. Wtyczka musi być poprawnie podłączona do gniazda zasilającego. Sprawdź, czy przednia pokrywa jest poprawnie zainstalowana. Poprawnie załóż przednią pokrywę. Nieprzyjemne zapachy nie są eliminowane. Duży hałas Wskaźnik jakości powietrza nie działa poprawnie Małe zmiany danych temperatury lub wilgotności Czy w miejscu użytkowania występuje bardzo silna woń? (Uwaga: oczyszczanie powietrza powinno przebiegać w trybie ciągłym). Czy żywotność filtra z węgla aktywowanego dobiegła końca? Czy opakowanie z tworzywa sztucznego zostało zdjęte z filtra? Czy żywotność filtra HEPA dobiegła końca? Czy wilgotność powietrza jest bardzo wysoka? Czy urządzenie pracuje w miejscu, w którym występują tłuste opary kuchenne lub rozpylane są substancje lotne? Czy wielkość pomieszczenia, w którym działa urządzenie jest zgodna ze specyfikacją? Przewietrz pomieszczenie, a następnie ponownie uruchom urządzenie. Wymień filtry na nowe. Wyjmij filtry i usuń z nich opakowania z tworzywa sztucznego. Wymień filtr HEPA na nowy. Przenieś urządzenie do innego pomieszczenia i sprawdź ponownie. Korzystaj z urządzenia w pomieszczeniu o powierzchni zgodnej ze specyfikacją. Jeżeli po przeprowadzeniu kontroli według powyższych wskazówek problem występuje nadal, odłącz urządzenie od zasilania i odeślij je do naprawy. 68
69 PARAMETRY TECHNICZNE Parametry urządzenia Model: Napięcie znamionowe: BAP-HA-I3537-U20W 220V-240V,50Hz Przepływ powietrza (m 3 /godz.): 369,50m 3 /h Poziom hałasu db(a): Długość przewodu zasilającego: Wymiary urządzenia: Masa netto: Moc znamionowa (W): 46dB(A) 1,4 m 370x265x570 (mm) 8,5 kg 72 W Powierzchnia działania: 50 m 2 (538 ft 2 ) Parametry filtra Opis Wymiary Żywotność Filtr HEPA Dł. 415 x szer. 315 x wys. 25 (mm) Około 12 miesięcy Z węgla aktywowanego i fotokatalityczny Dł. 415 x szer. 315 x wys. 15 (mm) Około 6 miesięcy Filtr wstępny Dł. 412,5 x szer. 312,5 x wys. 21 (mm) Około 6 miesięcy Parametry UV Opis Lampa UV Długość fali 254 nm Model Moc Żywotność T5 6W 8000 godz. 69
70 NOMENKLATURA B AP HA I U 20 W Blaupunkt Oczyszczac z powietrza Filtry H: True Hepa A: Filtr węgla aktywowanego Funkcja I: Jonizator CADR (wskaźnik dostawy czystego powietrza) maks. mnożony przez 10 (CFM stopy sześcienne/ minuta) Dostawa powietrza pomnożo na przez 10 Funkcja U: Lampa UV Numer wewnętrzny Funkcja dodatkowa: Wi-Fi 70
71 Istotna uwaga: Niniejsze urządzenie może być użytkowane przez dzieci w wieku powyżej 8 lat oraz osoby posiadające obniżone zdolności fizyczne, sensoryczne lub mentalne bądź nieposiadające doświadczenia i wiedzy, pod warunkiem zapewnienia nadzoru i udzielenia wskazówek dotyczących bezpiecznego użytkowania urządzenia oraz objaśnienia powiązanych zagrożeń. Dzieci nie powinny bawić się urządzeniem. Przeprowadzanie konserwacji i czyszczenia przez dzieci, które nie znajdują się pod nadzorem, jest niedopuszczalne. Uszkodzony przewód zasilający powinien zostać wymieniony przez producenta, podległy mu serwis techniczny lub wykwalifikowanego technika. W ten sposób unikniesz potencjalnych zagrożeń. Zastrzegamy sobie prawo do zmian technicznych. Aktualną wersję instrukcji można pobrać: 71

72 KUNDENHOTLINE 72
1224 BAP-HC-I1224-U16X
 Lavender 1224 BAP-HC-I1224-U16X EN Air Purifier Instruction manual Page: 2 10 DE Luftreiniger Bedienungsanleitung Seite: 11-20 PL Oczyszczacz powietrza Instrukcja obsługi Strony 21-30 CONTEST IMPORTANT
Always there to help you
 Always there to help you Register your product and get support at www.philips.com/welcome Question? Contact Philips AC086 User manual 3 Benutzerhandbuch 37 Mode d emploi 75 Қолданушының нұсқасы 111 Руководство
ENGLISH 4 DEUTSCH 20
 MÖJLIG GB DE ENGLISH Please refer to the last page of this manual for the full list of IKEA appointed After Sales Service Provider and relative national phone numbers. DEUTSCH Auf der letzten Seite dieser
ENGLISH 4 DEUTSCH 30
 RENLIG GB DE ENGLISH 4 DEUTSCH 30 ENGLISH 4 Contents Safety information 4 Safety instructions 5 Product description 7 Control panel 8 Before first use 11 Daily Use 11 Hints and tips 14 Programmes 15 Consumption
ENGLISH 4 DEUTSCH 27
 GB MIRAKULÖS DE ENGLISH Please refer to the last page of this manual for the full list of IKEA appointed After Sales Service Provider and relative national phone numbers. DEUTSCH Auf der letzten Seite
MÖJLIG GB DE DE AT
 MÖJLIG GB DE DE AT ENGLISH Please refer to the last page of this manual for the full list of IKEA appointed After Sales Service Provider and relative national phone numbers. DEUTSCH Auf der letzten Seite
Kühlregale für Snacks. Wokingham. Cabinets are located in branch entrance area & fail to maintain correct temperatures.
 Wokingham Kühlregale für Snacks Wokingham Snacking Cabinets Die Kühlregale sind im Eingangsbereich der Geschäftsstelle aufgestellt bringen es nicht fertig, die richtigen Temperaturen zu halten. Cabinets
2041 BAP-HC-I2041-X18X
 Lavender 2041 BAP-HC-I2041-X18X EN Air Purifier Instruction manual Page: 2 16 PL Oczyszczacz powietrza Instrukcja obsługi Strony: 17-32 CONTENTS IMPORTANT SAFETY INFORMATION... 2 PRODUCT STRUCTURE... 4
ENGLISH 4 DEUTSCH 30
 GB HYGIENISK DE ENGLISH Please refer to the last page of this manual for the full list of IKEA appointed After Sales Service Provider and relative national phone numbers. DEUTSCH Auf der letzten Seite
ENGLISH 4 DEUTSCH 28
 GB KÖLDGRADER DE ENGLISH Please refer to the last page of this manual for the full list of IKEA appointed After Sales Service Provider and relative national phone numbers. DEUTSCH Auf der letzten Seite
ENGLISH 4 DEUTSCH 27
 RENLIG GB DE FWM7 ENGLISH 4 DEUTSCH 27 ENGLISH 4 Contents Safety information 4 Safety instructions 5 Product description 7 Control panel 8 Before first use 10 Settings 10 Daily Use 10 Programmes 13 Consumption
PA / PA-PRO PORTABLE AIR PURIFIER Instruction Manual
 PA - 777 / PA-PRO PORTABLE AIR PURIFIER Instruction Manual PA-777 Model Shown PA-PRO Model Shown Residential / Light Commercial Air Purification Unit Thank you for selecting PetAirapy for your pets, your
ENGLISH 4 DEUTSCH 27
 RENLIG GB DE IWM60 ENGLISH 4 DEUTSCH 27 ENGLISH 4 Contents Safety information 4 Safety instructions 5 Product description 7 Control panel 8 First use 10 Daily use 10 Hints and tips 13 Subject to change
ENGLISH 4 DEUTSCH 29
 GB RENODLAD DE ENGLISH Please refer to the last page of this manual for the full list of IKEA appointed After Sales Service Provider and relative national phone numbers. DEUTSCH Auf der letzten Seite dieser
ENGLISH 4 DEUTSCH 23
 SUPERBT GB DE ENGLISH 4 DEUTSCH 23 ENGLISH 4 Contents Safety instructions 4 Product description 7 First use 11 Daily use 11 Helpful hints and tips 14 Care and cleaning 15 Subject to change without notice.
TKF 8439 TKF 8439 A TKF 8439 S. Dryer Trockner
 TKF 8439 TKF 8439 A TKF 8439 S Dryer Trockner Read this manual prior to initial operation of the product! Dear Customer, We hope that your product, which has been manufactured in modern facilities and
auto
 FR DE NL ES IT PT DA NO SV FI EL TR MS ZH KO TH AR FA 1 2 3 1 auto 3.1 4 5 5.1 6 7 8 9 PRÉVTION DES ACCIDTS DOMESTIQUES Pour un enfant, une brûlure même légère peut parfois être grave. Au fur et à mesure
KC-6400E KC-6500E AIR PURIFIER OPERATION MANUAL LUFTREINIGER BEDIENUNGSANLEITUNG. *Plasmacluster is a trademark of Sharp Corporation.
 R KC-6400E KC-6500E AIR PURIFIER OPERATION MANUAL KC-6400E LUFTREINIGER BEDIENUNGSANLEITUNG KC-6500E Free standing type Freistehende Ausführung *Plasmacluster is a trademark of Sharp Corporation. CONTENTS
ENGLISH 4 DEUTSCH 16
 LAGAN GB DE HGC3K ENGLISH Please refer to the last page of this manual for the full list of IKEA appointed After Sales Service Provider and relative national phone numbers. DEUTSCH Auf der letzten Seite
dekopin Magnetic Panels
 Product Data Sheet Version: 03ZT18 Langenthaler Str. 4 69434 Hirschhorn/Neckar Germany Tel. +49 (0) 6272-689-0 Fax +49 (0) 6272-6893-0 dekopin Magnetic Panels Product Description The dekopin product group
HK955070XB EN HOB USER MANUAL 2 DE KOCHFELD BENUTZERINFORMATION 19
 HK955070XB EN HOB USER MANUAL 2 DE KOCHFELD BENUTZERINFORMATION 19 2 FOR PERFECT RESULTS Thank you for choosing this AEG product. We have created it to give you impeccable performance for many years, with
Refrigerator Kühlschrank De Koelkast Le Réfrigérateur Saldytuvas - Saldiklis BU 1200 HCA BU 1201
 Refrigerator Kühlschrank De Koelkast Le Réfrigérateur Saldytuvas - Saldiklis BU 1200 HCA BU 1201 Please read this manual first! Dear Customer, We hope that your product, which has been produced in modern
the Bit More BTA720/BTA730 EN QUICK GUIDE DE KURZANLEITUNG
 the Bit More BTA720/BTA730 EN QUICK GUIDE DE KURZANLEITUNG CONTENTS 2 We recommend safety first 6 Getting to know your new appliance 7 Operating your new appliance 9 Care, Cleaning & Storage At Sage we
ENGLISH 4 DEUTSCH 33
 GB KULINARISK DE ENGLISH Please refer to the last page of this manual for the full list of IKEA appointed After Sales Service Provider and relative national phone numbers. DEUTSCH Auf der letzten Seite
DRY:SOON WALL MOUNTED HEATED AIRER
 INSTRUCTION BOOKLET DRY:SOON WALL MOUNTED HEATED AIRER Model: 24576 J18515 DrysoonMountedAirer Ins 7Aug14.indd 1 07/08/2014 15:12 DRY:SOON WALL MOUNTED HEATED AIRER Thank you for choosing the Dry:Soon
CYC LONE/THUNDER AR1320/AC1320
 CYC LONE/THUNDER AR1320/AC1320 Seller 1. Warranty 1 year warranty is provided counted from the date of purchase 2. Spare parts Provided free during the warranty except consumables and charged at the local
ENGLISH 4 DEUTSCH 29
 GB FROSTKALL DE ENGLISH 4 DEUTSCH 29 ENGLISH 4 Contents Safety information 4 Safety instructions 5 Installation 7 Product description 9 Operation 10 Daily Use 14 Hints and tips 18 Care and cleaning 19
NiteCool TCC-100/RCC-100
 NiteCool TCC-100/RCC-100 Standkühlanlage Parking cooler system Rafraîchisseur d'air Raffrescatore a veicolo fermo Enfriador evaporativo Interieurkoeler Betriebsanweisung Operating Instructions Notice d
the Bakery Boss BEM825 EN QUICK GUIDE DE KURZANLEITUNG
 the Bakery Boss BEM825 EN QUICK GUIDE DE KURZANLEITUNG Contents 2 Important Safeguards 5 Components 7 Assembly 8 Functions 9 Care & Cleaning 9 Troubleshooting SAGE RECOMMENDS SAFETY FIRST At Sage we are
TSM 1551 TSM 1551 A+ TSM 1551 A++
 Kühlschrank Refrigerator Réfrigérateur Køleskab TSM 1551 TSM 1551 A+ TSM 1551 A++ Bedienungsanleitung Operating instructions Please read this manual first! Dear Customer, We hope that your product, which
47056VS EN User manual 2 DE Benutzerinformation 31
 47056VS EN User manual 2 DE Benutzerinformation 31 2 www.aeg.com CONTENTS 1. SAFETY INSTRUCTIONS...................................................... 3 2. PRODUCT DESCRIPTION.....................................................
RCNA406K30XB. Refrigerator - Freezer Kühlschrank - Gefrierschrank Refrigerador - Congelador Frigorífico - Congelador
 Refrigerator - Freezer Kühlschrank - Gefrierschrank Refrigerador - Congelador Frigorífico - Congelador Instruction of use Gebrauchsanweisung Instrucciones para el uso Instruções de utilização RCNA406K30XB
Clean Air Optima HEPA UV ionizer air purifier CA-508
 Clean Air Optima HEPA UV ionizer air purifier CA-508 Manual Read these instructions carefully before you start using the air purifier and keep the manual for later usage. Copyright : Clean Air Optima 1
CBI 7700 HCA CBI 7701 HCA
 CBI 7700 HCA CBI 7701 HCA Please read this manual first! Dear Customer, We hope that your product, which has been produced in modern plants and checked under the most meticulous quality control procedures,
WELCOME TO THE VE SAMPLE BOOK WILLKOMMEN ZUM VE SAMPLE BOOK
 SAMPLES WILLKOMMEN ZUM VE SAMPLE BOOK Wir freuen uns, dass Du Dich für einen unserer High Class Custom In-Ear Hörer entschieden hast und geben unser Bestes, Dir ein hervorragendes Produkt zu liefern, das
Refrigerator Kühlschrank Réfrigérateur Koelkast Hladilnik
 Refrigerator Kühlschrank Réfrigérateur Koelkast Hladilnik Instruction of use Gebrauchsanweisung Notice d'utilisation Gebruiksaanwijzing Navodila za uporabo BLSA210M2S EN DE FR NL SL Please read this user
Owners Manual Model: XXL
 Corporate Office 200, 11246-163 St. Edmonton AB T5M 1Y6 Phone: 780-930-1100 Fax: 780-930-1125 Toll Free: 1-877-528-2010 www.zephyrairsystems.com AIR PURIFIER E356005 Owners Manual Model: XXL Maintenance
INTEGRATED OVEN USER MANUAL GB BEDIENUNGSANLEITUNG DE. 60 cm. H Rev 001
 INTEGRATED OVEN 60 cm H10-20-220-105 Rev 001 USER MANUAL GB BEDIENUNGSANLEITUNG DE GB Dear Customer, Thank you for relying on this product. e aim to allow you to optimally and efficiently use this environment-friendly
INSTRUCTIONS FOR INSTALLATION AND USE
 INSTRUCTIONS FOR INSTALLATION AND USE Ceiling Fan Model Loft (FN511XX) BEFORE YOU START Proper use: - This product is intended exclusively for non-commercial use as ceiling fan. - The product has to be
Cooler / Freezer Kühlschrank / Gefrierschrank Congélateur / Réfrigérateur BLSA210M3S
 Cooler / Freezer Kühlschrank / Gefrierschrank Congélateur / Réfrigérateur BLSA210M3S Please read this user manual first! Dear Customer, We hope that your product, which has been produced in modern plants
EN Instruction on mounting and use DE Montage- und Gebrauchsanweisung
 EN Instruction on mounting and use DE Montage- und Gebrauchsanweisung EN - Instruction on mounting and use Closely follow the instructions set out in this manual. All responsibility, for any eventual
Humidifying Air Purifier
 Humidifying Air Purifier To ensure that you fully understand and use this product, please read the instruction manual, it is recommended that you keep it for inspection when required. AERATE TORNAOO AT3430
Multi Channel Potentiostat for testing the resistance to cathodic disbonding acc. ASTM G-8, ASTM G-42, DIN EN ISO 15711, DIN 30670
 Multi Channel Potentiostat for testing the resistance to cathodic disbonding acc. ASTM G-8, ASTM G-42, DIN EN ISO 15711, DIN 30670 Principle of testing cathodic disbonding The CD Test Unit can be used
Thermo Scientific GLD Pro Gas Leak Detector
 Thermo Scientific GLD Pro Gas Leak Detector Users Guide 66002-001 For best battery performance, keep unit on the charger when not in use. Table of Contents Page 1.0 Introduction... 3 2.0 Battery Charging...
DESCRIPTION OF THE APPLIANCE SAFETEY OPERATION CAUTION MAJOR COMPONENTS. Features
 048-GM-486 SAFETEY OPERATION DESCRIPTION OF THE APPLIANCE Please exercise caution when using this air purifier or any other electrical device! This manual describes the safety precautions which should
Operation Manual Bedienungsanleitung
 Operation Manual Bedienungsanleitung Electrical Chicken Rotisseries Hähnchengrill Elektro CRE2, CRE3, CRE4, CRE5, CRE6 To avoid the risk of accidents or damage to the appliance it is essential to read
LAGAN GB DE FR IT FCF186/44
 LAGAN GB DE FR IT FCF186/44 ENGLISH 4 DEUTSCH 17 FRANÇAIS 32 ITALIANO 48 ENGLISH 4 Contents Safety information 4 Operation 6 First use 7 Daily use 7 Helpful hints and tips 8 Care and cleaning 9 Subject
Refrigerator. User manual. Réfrigérateur. Kühlschrank/Gefrierschrank. Chłodziarka EN DE FR PL. Bedienungsanleitung. Manuel d'utilisation
 Refrigerator User manual Kühlschrank/Gefrierschrank Bedienungsanleitung Réfrigérateur Manuel d'utilisation Chłodziarka Instrukcja użytkowania BCN 130000 BCN 130001 EN DE FR PL Please read this user manual
Please read this user manual first! The user manual will help you use the product in a fast and safe way.
 Hladnjak Please read this user manual first! Dear Customer, We hope that your product, which has been produced in modern plants and checked under the most meticulous quality control procedures, will provide
VK-6008D. User Manual
 VK-6008D User Manual Contents 1. Important safety information 01 2. Product Structure 02 3. Before first use 03 4. Using the appliance 05 5. Cleaning 08 6. Filter Replacement 11 7. Storage 13 8. Environment
Chest Freezer Horizontale Gefrieranlage HSA47530
 Chest Freezer Horizontale Gefrieranlage HSA47530 WARNING! In order to ensure a normal operation of your refrigerating appliance, which uses a completely environmentally friendly refrigerant the R600a
Vacuum cleaner. User manual. SS60K60 Series / SS60M60 Series. Before operating this unit, please read the instructions carefully. For indoor use only.
 Vacuum cleaner User manual SS60K60 Series / SS60M60 Series Before operating this unit, please read the instructions carefully. For indoor use only. Contents PREPARATION Safety information 3 INSTALLATION
atmotec exclusive, atmotec plus Operating instructions VC, VCC, VCW
 Operating instructions atmotec exclusive, atmotec plus VC, VCC, VCW DE Publisher/manufacturer Vaillant GmbH Berghauser Str. 40 D-42859 Remscheid Tel. +49 2 9 8 0 Fax +49 2 9 8 280 info@vaillant.de www.vaillant.de
WHYNTER Eco Pure Air Purifier
 WHYNTER Eco Pure Air Purifier SB/W Instruction Manual MODEL# : AFR-300 Thank you for your purchase of this WHYNTER product. Please read this Instruction Manual carefully before using the product to ensure
the Crystal Clear BKE750 EN QUICK GUIDE DE KURZANLEITUNG
 the Crystal Clear BKE750 EN QUICK GUIDE DE KURZANLEITUNG CONTENTS 2 Important Safeguards 3 Sage recommends safety first 5 Know your Sage product 6 Care & Cleaning At Sage we are very safety conscious.
Instruction Manual FEEL THE ENERGY. FEEL THE FRESHNESS.
 Instruction Manual FEEL THE ERGY. FEEL THE ERGY. Thank you for selecting our Euroair Energie Photocatalytic Air Purifier. Please read the instruction manual carefully and keep it for future reference.
D Gebrauchsanweisung GB Operating instructions F Notice d'emploi NL Gebruiksaanwijzing E Instrucciones uso Instruções de uso I Istruzioni per l'uso
 Pos: 1 /Alle Produkte/Dummy_module/===== Seitenwechsel ===== @ 0\mod_1125648978015_0.doc @ 1630 D Gebrauchsanweisung GB Operating instructions F Notice d'emploi NL Gebruiksaanwijzing E Instrucciones de
HEPA Air Purifier with Ion Flow Technology
 SPECIFICATION Input voltage: AC120V 60Hz Rated power: 57W HEPA type: 99.5% Ideal area: 269 sq. ft. Noise level (dba): High 48 / Med 39 / Low 28 Wind capacity (CFM): Strong 115 / Middle 74 / Silent 50 Unit
Instruction Manual. ERN-1000SD Series
 Instruction Manual ERN-1000SD Series Important Thank you for purchasing "Rain". Before using this product, please be sure to read this manual and the Safety Precautions (P.34 to 38) thoroughly. Furthermore,
Owner s Manual. Airgle Personal Air Purifier ( Model: AG25 )
") Owner s Manual Airgle Personal Air Purifier ( Model: AG25 ) WARNING Important safety instructions READ AND SAVE THESE INSTRUCTIONS Read all instructions before using this air cleaner: Before turning on
Owner s Manual Airgle Personal Air Purifier ( Model: AG25 ) WARNING Important safety instructions READ AND SAVE THESE INSTRUCTIONS Read all instructions before using this air cleaner: Before turning on
Heat Transfer Station
 Operating manual Heat Transfer Station 16.03.2012 Applicable for: HTS PS1 Table of contents V1.0/03.12 1 Foreword... 2 2 Proper operation... 3 3 Basic safety instructions... 3 3.1 Obligations of the user...
Note: Verify that plastic bags are removed from filters, if equipped or installed, before first use (see page 8) CONTENTS
 CONTENTS") DEAR CUSTOMER Thank you for purchasing the Ionmax Breeze ION420 Air Purifier. The Ionmax Breeze can help to improve the indoor air quality in your home or office. Please read this manual carefully before
DEAR CUSTOMER Thank you for purchasing the Ionmax Breeze ION420 Air Purifier. The Ionmax Breeze can help to improve the indoor air quality in your home or office. Please read this manual carefully before
atmomag Operating instructions AT, DE MAG mini...4/1 I
 Operating instructions atmomag MAG mini...4/1 I AT, DE Publisher/manufacturer Vaillant GmbH Berghauser Str. 40 D-42859 Remscheid Tel. +492191 18 0 Fax +492191 18 2810 info@vaillant.de www.vaillant.de Contents
LOCK H M L REPLACE SLEEPING ANTI-POLLEN IONIZER UV-LAMP. User Manual
 LOCK H M L REPLACE SLEEPING ANTI-POLLEN IONIZER UV-LAMP User Manual Congratulations on your purchase of Euroair Detox Air Purifier from Eureka Forbes. We encourage you to read this manual carefully for
LAVINA EN DE
 LAVINA 536.01.601 EN DE EN THIS APPLIANCE IS CONCEIVED FOR DOMESTIC USE ONLY. THE MANUFACTURER SHALL NOT IN ANY WAY BE HELD RESPONSIBLE FOR WHATEVER INJURIES OR DAMAGES ARE CAUSED BY INCORRECT INSTALLATION
BUILT-IN OVEN AND HOB USER'S MANUAL EINBAUOFEN UND KOCHFELD BEDIENUNGSANLEITUNG
 BUILT-IN OVEN AND HOB USER'S MANUAL EINBAUOFEN UND KOCHFELD BEDIENUNGSANLEITUNG GB DE PCV 6 X FCO 607 X FCO 7 XL CANDY HOOVER GROUP S.R.L. Via Privata Eden Fumagalli 007 Brugherio Milano Italy CONTENTS
BestAir. Instruction manual
 BestAir www.bestair.me Instruction manual Congratulations on your new air purifier BestWater thanks you for your purchase. You have made a good choice by having selected our product. We hope that you enjoy
BestAir. Instruction manual
 BestAir www.bestair.me Instruction manual Congratulations on your new air purifier BestWater thanks you for your purchase. You have made a good choice by having selected our product. We hope that you enjoy
Cutting-edge technology for hands-free taps
 What is IZI-flow? Cutting-edge technology for hands-free taps The unique new IZI-flow is an innovative smart valve that enables all types of existing hand-operated faucets to also work hands-free, by foot-pedal.
Moisture detector controllers. Type FF- Installation and Operation Instructions. Original instructions. Analysentechnik BE /2017
 Analysentechnik Moisture detector controllers Type FF- Installation and Operation Instructions Original instructions BE410002 09/2017 Bühler Technologies GmbH, Harkortstr. 29, D-40880 Ratingen Tel. +49
1. Important safety information
 User Manual VK-6010 Contents 1. Important safety information 01 2. Product Structure 02 3. Before first use 03 4. Using the appliance 05 5. Cleaning 07 6. Filter Replacement 10 7. Storage 12 8. Environment
MANUAL GB BEDIENUNGSANLEITUNG DE
 BUILT-IN COOKTOP Electric H10-20-260-144 Rev 002 USER MANUAL GB BEDIENUNGSANLEITUNG DE GB Dear User, Our objective is to make this product provide you with the best output which is manufactured in our
Gebrauchsanleitung Operating instructions. PondoRell
 DE EN Gebrauchsanleitung Operating instructions PondoRell 3000 - - 2 - - 3 - - 4 - - 5 - EN - - EN - Translation of the original Operating Instructions WARNING This unit can be used by children aged 8
OVHM80 Max Air Purifier
 OVHM80 Max Air Purifier Index Important Safeguards.. 2 Air purifier Description..3 Function Description. 4 How to use..5 Maintenance 6 Troubleshooting..8 1 Important Safeguards! READ ALL INSTRUCTIONS BEFORE
Installation Guide. Circulation set for S-F units. Zirkulationsset für S-F Stationen. Code No. 004U8405
 Installation Guide Circulation set for Zirkulationsset für S-F Stationen iv.788 Code No. 004U8400 iv.484 Code No. 004U8403 iv.789 Code No. 004U8401 iv.487 Code No. 004U8405 English - G If the household
MANUAL HONEY DECRYSTALLIZATION COIL WITH TEMPERATURE REGULATOR
 MANUAL HONEY DECRYSTALLIZATION COIL WITH TEMPERATURE REGULATOR Przedsiębiorstwo Pszczelarskie Tomasz Łysoń Spółka z o.o. Spółka Komandytowa 34-125 Sułkowice, ul. Racławicka 162, Polska www.lyson.com.pl,
Coway Air Purifier AP-1008DH
 Coway Air Purifier AP-1008DH This product is for domestic use only.it cannot be used in an overseas country where the power voltage is different. Warranty card is included in this user s manual. Read and
CA3500, BA3500, CH3500 New Comfort
 CA3500, BA3500, CH3500 New Comfort 6 Stage AIR PURIFIER INSTRUCTION MANUAL CAUTION: Read manual carefully for proper installation and operation. CONTENTS 2 Specifications... 2 Features... 3 Introduction...
Air Purification System. Instruction Book CLI-AP20
 Air Purification System Instruction Book CLI-AP20 by Contents 2 Cli-Mate Recommends Safety First 6 Components 7 Functions 10 Care & Cleaning 11 Troubleshooting CLI-MATE RECOMMENDS SAFETY FIRST At Cli-Mate
7. CARE AND MAINTENANCE
 EAP100D Ultra Quiet Air Purifier with room temperature and humidity display three stage filtration technology HEPA / activated carbon / plasma ioniser USER MANUAL Thank you for choosing this innovative
MANUAL LAL-SRW3 WARNING DEVICE WARNANLAGE SYSTÈME D'ALARME ALARMSYSTEM. По вопросам продаж и поддержки обращайтесь:
 PROCESS AUTOMATION MANUAL LAL-SRW3 EN WARNING DEVICE DE WARNANLAGE FR SYSTÈME D'ALARME DA ALARMSYSTEM По вопросам продаж и поддержки обращайтесь: Архангельск (8182)63-90-72 Астана +7(7172)727-132 Белгород
AIR PURIFIER WITH GERMICIDAL UV LIGHT
 Adorable Air Purifiers AIR PURIFIER WITH GERMICIDAL UV LIGHT FOR THE FOLLOWING MODELS : EE-5064 EE-5065 PLEASE READ AND SAVE ALL INSTRUCTIONS TO ENSURE THE SAFE AND EFFECTIVE USE OF THIS AIR PURIFIER.
CONVECTION OVENS PIECE KONWEKCYJNE
 USER MANUAL INSTRUKCJA OBSŁUGI CONVECTION OVENS PIECE KONWEKCYJNE Kod: 223932 223925 223918 You should read this user manual carefully before using the appliance Przed uruchomieniem urządzenia należy koniecznie
15,000 BTU Portable Air Conditioner
 Instruction Manual 15,000 BTU Portable Air Conditioner Model: HYAC15 READ AND SAVE THESE INSTRUCTIONS Please read and follow the instructions in this user manual even if you feel you are familiar with
User s Manual Version 1.4
 SENSAPHONE IMS-1000 User s Manual Version 1.4 Every effort has been made to ensure that the information in this document is complete, accurate and up-to-date. Sensaphone assumes no responsibility for the
CARE 1 x 1 PROTECTION AND CARE FOR HIGH TECH TEXTILES photo: Swix Sport GmbH
 559204 CARE x PROTECTION AND CARE FOR HIGH TECH TEXTILES photo: Swix Sport GmbH WWW.TOKO.CH LONG-LASTING FUNCTIONALITY TOKO CARE OVERVIEW MATERIALS Modern functional textiles are made of synthetic materials
ENGLISH 4 DEUTSCH 14 FRANÇAIS 27 ITALIANO 40
 ISANDE GB DE FR IT ENGLISH 4 DEUTSCH 14 FRANÇAIS 27 ITALIANO 40 ENGLISH 4 Contents Safety information 4 Product description 6 First use 7 Daily use 7 Cleaning and maintenance 9 What to do if... 10 Technical
English. Kundendienst und Anwendungsberatung. General Power Tool Safety Warnings. Entsorgung. Work area safety. Electrical safety WARNING.
 ! " English 7 Wenn die Service-Anzeige in regelmäßigen Abständen blinkt, ist das Elektrowerkzeug defekt. Verwenden Sie in diesem Fall das Elektrowerkzeug nicht weiter und schicken Sie es sofort an den
TPP440. owner s guide. air purifier with uv light. air purifier with uv light TP
 TPP TPP air purifier with uv light air purifier with uv light TP-052511 by owner s guide by table of contents SAFETY INSTRUCTIONS 2 Thank you for purchasing the Therapure air purifier. With UV germicidal
Comefresh CF-8608 Air Purifier
 Comefresh CF-8608 Air Purifier With Pre-filter, HEPA, Activated Carbon, UVC, Ionizer Breathe the difference This product is imported by: Solenco SA Providing Solutions for Environmental Comfort PO Box
WINIX AIR PURIFIER. User Manual. Tower XQ
 User Manual WINIX AIR PURIFIER Model Tower XQ Use & Care Guide Please read and follow all safety rules and instructions in this manual before operating. The product warranty is printed on the back of this
Roborock Robotic Vacuum Cleaner Manual. Please read this manual carefully before using the product and keep it properly
 Roborock Robotic Vacuum Cleaner Manual Please read this manual carefully before using the product and keep it properly Security Information Restrictions This product is designed for indoor floor cleaning
Refrigerator - Freezer Chłodziarko - Zamrażarka Chladnička - Mrazák Külmik - Sügavkülmik CNA365E20P
 Refrigerator - Freezer Chłodziarko - Zamrażarka Chladnička - Mrazák Külmik - Sügavkülmik CNA365E20P Please read this user manual first! Dear Customer, We hope that your product, which has been produced
OPERATING INSTRUCTIONS
 EN AIR PURIFIER OPERATING INSTRUCTIONS Read the instructions carefully before operating or servicing the air purifier. Observe all the safety instructions; failure to observe the instructions may lead
PBS 75 A 75 AE. Originalbetriebsanleitung Original instructions Notice originale Manual original
 OBJ_DOKU-29278-002.fm Page 1 Tuesday, July 10, 2012 12:43 PM WEU WEU Robert Bosch GmbH Power Tools Division 70745 Leinfelden-Echterdingen Germany www.bosch-pt.com 1 619 X07 388 (2012.07) O / 73 WEU PBS
Register your product and get support at AC4002 AC4004. User manual
 Register your product and get support at www.philips.com/welcome AC4002 AC4004 User manual 3 1 2 3 1 H 4 6 8 10 5 7 9 11 12 14 13 A B C I J K L M G F D E 6 English introduction Congratulations on your
Register your product and get support at. AC4006. User manual
 Register your product and get support at www.philips.com/welcome AC4006 User manual 2 EnGLISH 3 1 4 English Introduction Congratulations on your purchase and welcome to Philips! To fully benefit from the
IMPORTANT INSTRUCTIONS OPERATING MANUAL
 IMPORTANT INSTRUCTIONS OPERATING MANUAL ESP AIR PURIFIER with UV GERMICIDAL LAMP and NEGATIVE ION Model No.: 9079E READ AND SAVE THESE IMPORTANT INSTRUCTIONS When using electrical appliances, basic precautions
Washing Machine. User manual WW9*K5*****/WW8*K5*****/WW7*K5***** Untitled :17:40
 Washing Machine User manual WW9*K5*****/WW8*K5*****/WW7*K5***** Untitled-6 1 2017-12-12 3:17:40 Contents Contents 4 What you need to know about the safety instructions 4 Important safety symbols 4 Important
S-Guard. IP x4 D. fire protection system for sauna. Installation and operation instruction. Made in Germany. S-Guard. print no en/ -40.
 S-Guard fire protection system for sauna S-Guard G Installation and operation instruction Made in Germany IP x4 D print no. 29344392en/ -40.13 1 English Contents Delivery scope... 3 Istallation... 4 Connections...