VarioCookingCenter Original operating instructions
|
|
|
- Ross Fitzgerald
- 5 years ago
- Views:
Transcription

1 VarioCookingCenter Original operating instructions
2 Dear Customer, Congratulations on your new VarioCookingCenter. Thanks to the immediately understandable visual operating concept, you will achieve excellent cooking success very quickly with your VarioCookingCenter, with practically no teaching or time-consuming user training courses required. In VarioCooking Control mode you simply select the food to be cooked and your desired cooking result at the push of a button - and that's it! There is no need for conventional settings such as cooking temperature and time or constant monitoring. In manual mode, all the basic functions of the VarioCookingCenter are available. With Programming/Save mode you can create your own cooking programs. As an end customer, we give a 24-month warranty from the date of initial installation, provided that you have correctly completed the warranty registration in full. The General Terms and Conditions of the manufacturer shall apply. The warranty excludes seals, glass damage and damage resulting from incorrect installation, use, maintenance and repair. To be able to make extensive use of the many possibilities and benefits of your VarioCookingCenter, we recommend that you read these operating instructions thoroughly and keep them on hand at all times. You can also view the operating instructions by clicking on the? button on your device. We hope you have fun with your new VarioCookingCenter. FRIMA We reserve the right to make technical changes in the interest of progress! Dealer: Installer: installed on: Unit number:
3 Contents Explanation of the pictograms in the operating instructions 5 Safety instructions 6 General safety instructions 6 Safety information during use 6 Safety instructions for deep frying 6 Care, inspection, maintenance and repair 10 Care 10 Inspection, maintenance and repair 10 Liability 10 Notes on using your unit 12 Working parts (VarioCookingCenter 112T, 112L) 12 Working parts (VarioCookingCenter 112, 211, 311) 12 General notes on use 14 Working with the core temperature probe 15 Working with the hand shower 18 Operating instructions 19 Touchscreen and dial 19 Start level display 20 Explanation of the buttons 21 Filling volumes in the pan 28 Help function 32 Overview of the cooking modes 33 VarioCooking Control mode Buttons and pictograms in VarioCooking Control mode Manual mode Buttons and pictograms in Manual mode Programming/Save mode

4 Contents Buttons in Programming/Save mode 39 MyVCC appliance configuration 41 Cleaning 42 Interim cleaning 42 Basic cleaning 44 Service reports 45 Before you call customer service 49 Domestic appliances 51 Unit accessories 52
5 Explanation of the pictograms in the operating instructions Danger! Warning! Caution! Immediately hazardous situation which may result in severe injury or death. A possibly hazardous situation that may result in severe injury or even death. A possibly hazardous situation that may result in minor injury. Danger of explosion! Danger of fire! Danger of burns! Danger of injury! Please read the manual carefully prior to initial startup. Attention: Damage may be caused if this is ignored. Handy tips for everyday use. 5 / 59
6 Safety instructions General safety instructions Keep these operating instructions in a place that is accessible at all times to everyone who will be using the unit. The safety guidelines can also be displayed by pressing the "?" button in the device display. The unit must not be used by children, people with limited physical, sensory or mental abilities or anyone who lacks experience and/or the necessary knowledge unless such people are supervised by a person who is responsible for safety. Operate using hands only. Damage caused by the use of pointed, sharp or other objects will invalidate the warranty. We recommend regular training of your staff to avoid the risk of accident or damage to the unit. Operators must also receive regular safety instruction. Warning! Check before switching on and using every day - Before using the unit for cooking, ensure that there are no cleaning agent residues in the pan. - Remove all objects which have been placed on the unit Warning! - Do not store any easily flammable substances near the unit Danger of fire! - Food that contains easily flammable substances must not be cooked. Substances with a low flashpoint can ignite spontaneously - Danger of fire! Warning! - The VarioCookingCenter must only be set up and installed in compliance with the local regulations by qualified and authorised personnel who have received product-specific training. - Incorrect installation, servicing, maintenance, cleaning or modifications to the unit may result in damage, injury or death. Read these operating instructions carefully before you start to use the unit. - Only use this unit for cooking food in commercial kitchens. Any other use is not intended and is therefore considered dangerous. - Cleaning agents and the associated accessories may only be used for the purpose described in this manual. Any other use is not intended and is therefore considered dangerous. 6 / 59
7 Safety instructions Safety information during use Warning! - This equipment is designed for commercial catering purpose and will generate significant heat. Hot surfaces will cause burns. A hazaed and risk assessment must be undertaken by owners and all operators made aware of these. - Only take hold of baskets, the lifting arm and other objects in or over the hot pan while wearing heatproof clothing Danger of burns! - The pan contains hot or boiling water Danger of burns! - Open the unit cover carefully - hot vapour may escape - Danger of burns! - Vapours can escape when the lid is closed - Danger of burns - Tilt the pan carefully in order to avoid spillage Danger of slipping and burns! - When pressure cooking (option, not 112T, 112L), observe the minimum fill levels allowed to build up the pressure and the maximum fill levels allowed (see the "Operating instructions - Fill levels" section) - Danger of scalding if the contents foam up or spray out when you open the cover. - VitroCeran (option, not 112T, 112L) can be hot Danger of burns! - Do not use pots or pans with handles on the VitroCeran (option, not 112T, 112L). Danger of tipping when the cover is closed and when the pan is moved Danger of burns! - Do not place any cooking utensils or aluminium containers etc. on the VitroCeran (option, not 112T, 112L) while it is still hot Danger of burns! - Do not use the VitroCeran (option, not 112T, 112L) as a storage area Danger of burns! - Observe the maximum and minimum filling heights allowed in the pan for each of the cooking modes. There is a danger of fire or scalding if the pan is used incorrectly (if the limits are exceeded or undershot). - Do not fill cold water into the preheated empty pan Danger of burns and scalding! - The external temperature of the unit may be higher than 60 C. Only touch the control elements of the unit - Danger of burns! - Mobile units must not be moved until the pan is completely empty to ensure that no liquid spills out - Danger of slipping and burns. - For the mobile use of Variomobil : Cover the container if it contains liquids to ensure that no liquid spills out - Danger of slipping and burns. - Use a sufficiently wide collecting container when draining Danger of slipping and burns. - Never pre-heat the empty pan without supervision. 7 / 59
8 Safety instructions Warning! - There is a danger of injury when moving the cover, locking (for pressure cooking, not 112T, 112L) or tilting the pan. - If there are sudden movements when closing or opening the cover, please open the cover carefully and do not activate the lock. Immediately inform your Service partner. In this case the following warning sign must be attached to the unit order to inform all users. Warning! Cover mechanism defective. Do not move the cover! Danger of injury! - Do not place any objects on the cover or in its swivelling range. - If mobile units are not to be moved, the wheel locking brakes must be applied. Units may roll away on uneven floors Danger of injury! - Do not operate the unit in pressure mode (option) if it is mounted on rollers (option) Danger of injury! - Oil carts, basket carts, VarioMobil and units mounted on rollers may tip over during transport on an inclined plane or threshold Danger of injury! - When installing the VarioCookingCenter 112T, 112L with screwed-on feet a pinch point is created at the basin leading edge - risk of injury - Position the core temperture sensor on the lid. Please ensure that the point is not protruding - danger of injury! - Do not allow the lever of the pan vent (112T, 112L) to snap back, as hot water or oil may splash - danger of burning! Safety instructions for deep frying Danger! - Do not extinguish burning fat and oil with water Danger of explosion! - Do not add water to fat Danger of explosion! - Do not use the hand shower when working with hot oil - Danger of explosion! - Only use the VitroCeran (option, not 112T, 112L) if it is secured by the frame or with the bain-marie (see the "Unit accessories" section). Make sure that no liquid sprays into the pan - Danger of explosion! - Do not use pots or pans with handles on the VitroCeran (option, not 112T, 112L) or place on the user console. Danger of tipping when the cover is closed and when the pan is moved Danger of explosion! - Do not drain any oil through the integrated basin outlet - risk of explosion! - If hot oil is drained through the basin outlet, damage can be made to the structure. No liability is assumed for this. 8 / 59
9 Safety instructions Warning! - Regularly check the quality of the oil. Old oil may ignite - Danger of fire! - When using solid fat this is to be melted in the deep-fry mode at a temperature of 50 C. Close the device lid during the melting process. Warning! - The oil is hot in deep frying mode Danger of burns! - Do not exceed the minimum and maximum fill levels allowed (see pan mark 'min oil' and 'max oil') when deep frying - Danger of burns from spitting oil! - Baskets and lifting bars are hot - Danger of burns! - Use the oil cart (see the "Unit accessories" section) or another sufficiently wide drip container to empty the pan. Position it so as to avoid spills - Danger of burns! - Tilt the pan carefully in order to avoid spillage Danger of slipping and burns! - Hot oil may spit out as you are emptying the pan - Danger of burns! - Observe the recommended load sizes given in the application manual (which can be called up by pressing the "?" button) - Danger of burns! - Oil foams up and spits particularly badly when you lower large quantities of wet food into it - Danger of burns! - The external temperature of the unit may be higher than 60 C. Only touch the control elements of the unit - Danger of burns! 9 / 59
10 Care, inspection, maintenance and repair Care In order to maintain the quality of the stainless steel, for hygienic reasons ant to prevent interruptions to operation, the unit must be cleaned daily. Warning! If the unit is not cleaned, or is not sufficiently cleaned, fat deposits and/or food residues in the pan may ignite Danger of fire! Warning! Cleaning Aggressive chemical agents Danger of chemical burn! Wear the correct protective clothing, gloves, goggles and a mask. - Clean your unit before using it for the first time. - Clean your accessories before using them for the first time. - For longer breaks in operation (e.g. overnight), leave the pan valve open and do not close the cover fully. - Do not use sharp or pointed tools to clean the pan. - Do not use high pressure cleaners for cleaning. - Do not use hydrochloric acid sulphurous or other oxygen-consuming substances to clean the unit and its accessories since this can damage the passive layer of the chrome nickel steel and discolour the unit or accessories. - If necessary, boil a little diluted vinegar in the pan to remove limescale or discolouration ("rainbow colours" after boiling). Then drain off the vinegary water and rinse thoroughly with fresh water. - Regularly unscrew, remove and clean the pan valve (see the "Cleaning" section). - Follow any instructions on the packaging of the cleaning agent. - Refer to the Cleaning section for the cleaning sequence. - Only use abrasive cleaning aids on the inside of the pan. All other surfaces are sensitive to scratches. - Avoid salt deposits on stainless steel surfaces. When adding salt, dissolve it quickly by stirring. Remove residues by thoroughly rinsing with fresh water. 10 / 59
11 Care, inspection, maintenance and repair Inspection, maintenance and repair Danger high voltage - Inspection, maintenance and repair work must only be carried out by trained and qualified personnel. - For cleaning, inspection, maintenance and repair work, the unit must be disconnected from the power supply. - For mobile units, the freedom of movement must be restricted so that there can be no damage to the power cables, water pipes or drain pipes if the unit is moved. If the unit is moved, it must be ensured that the power cables and water and drain pipes are correctly disconnected. If the unit is returned to its original position, the movement locks and the power cables and water and drain pipes must be correctly attached. Attention: The unit must be levelled horizontally again! - Your unit should be serviced at least once a year by an authorised service partner to ensure that it remains in perfect technical condition. Liability Installations and repairs that are not carried out by authorised specialists or using original spare parts, and any technical change that is not approved by the manufacturer will invalidate the manufacturer s warranty and product liability. Furthermore, the General Terms and Conditions of the Manufacturer shall apply. 11 / 59
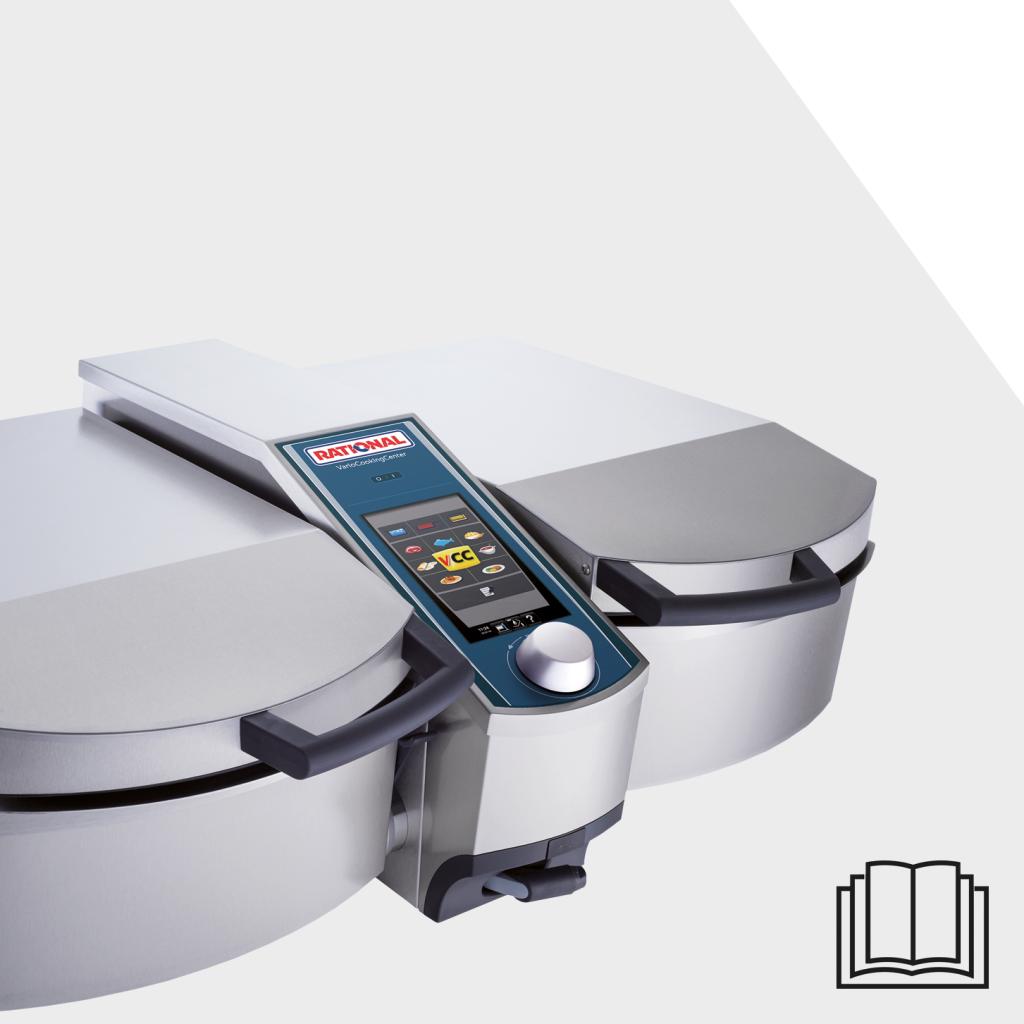
 Control panel Central dial Unit cover Cover handle Hand shower mechanism) (with retraction VarioDose Core temperature probe Lifting arm hook VarioCookingCenter 112T,")
12 Notes on using your unit Working parts (VarioCookingCenter 112T, 112L) Rating plate (with all the important data such as power consumption, voltage, number of phases and frequency along with the unit type, unit number and weight) Control panel Central dial Unit cover Cover handle Hand shower mechanism) (with retraction VarioDose Core temperature probe Lifting arm hook VarioCookingCenter 112T, 112L Pan valve Pan Steam nozzles Pan valve lever 12 / 59
 Control panel Central dial Unit cover Cover handle Cover for the electronic")
 Pan valve Pan Steam nozzles VarioCookingCenter 211 / 311 are")
13 Notes on using your unit Working parts (VarioCookingCenter 112, 211, 311) Rating plate (with all the important data such as power consumption, voltage, number of phases and frequency along with the unit type, unit number and weight) Control panel Central dial Unit cover Cover handle Cover for the electronic components Hand shower mechanism) (with retraction VarioDose VitroCeran (option) VarioCookingCenter 112, 112T without 9, 11 Unit feet (height-adjustable) Socket 1N A C 230V Core temperature probe Lifting arm hook Interlock for pressure cooking (option) Pan valve Pan Steam nozzles VarioCookingCenter 211 / 311 are identical 13 / 59
14 Notes on using your unit General notes on use - Avoid having heat sources (e.g. grill plates, deep-fat fryers etc.) near the unit. - The room temperature must be greater than 5 C when operating the unit. At lower ambient temperatures, you must heat the unit to a temperature above 5 C before starting it. - In normal mode, the noise level of the unit is less than 70 db. - Only use genuine heatproof accessories made by the unit manufacturer. - Always clean accessories before use. - For longer breaks in operation (e.g. free days) switch off the water and power supply to the unit. - The water inlets (hand shower and VarioDose) must be used regularly to prevent water stagnating in the pipes and germs forming. If they are not used for more than three days or after the unit has been transported, we recommend flushing the VarioDose and the hand shower with about 10 litres of water (depending on the length of the pipe. - Check that there are no food residues in the area of the pan valve. - Do not dispose of this unit in the domestic waste or local collection point. We will be happy to help you with the disposal of your unit. Maximum load size for each unit size VarioCookingCenter VarioCookingCenter VarioCookingCenter VarioCookingCenter 112/112T: 15 kg per pan 112L: 25 kg per pan 211: 100 kg 311: 150 kg Exceeding the maximum load sizes can result in damage to the unit. Observe the specified maximum load sizes for food given in the application manual (which can be called up by pressing the "?" button). No deep-frozen products may be thawed or stored in the pan or on the console terminal. NB: We wish to point out that storing and thawing food in a non-heated cooking area is not advisable for reasons of hygiene. 14 / 59
15 Notes on using your unit Working with the core temperature probe Caution! The core temperature probe may be hot. Only pick it up wearing heatproof clothing. Caution! When you set the core temperature probe, protect your arms and hands against the tip of the probe - risk of injury. Insert the core temperature probe into the thickest point of your food to be cooked. The needle must pass through the middle of the food. You will find a detailed description of the optimum positioning of the core temperature probe in the application manual (which can be viewed by pressing the "?" button). When the core temperature probe is not in use, put it back in the place provided on the cover as shown (cable straight, tip of the probe turned to one side and attached to the cover). 15 / 59
16 Notes on using your unit We do not accept any responsibility for any damage resulting from improper use or positioning of the core temperature probe. When the core temperature probe is not in use, put it back in the place provided on the cover as shown - risk of damage. Do not allow the core temperature probe to hang out of the pan risk of damage. Remove the core temperature probe from the food before you remove the food from the pan risk of damage. If, at the beginning of a cooking process, the core temperature probe is hotter than the core temperature set (e.g. because it was in the frying oil during preheating), allow it to cool before putting it into food. Please ensure that it is dry if it comes into contact with oil - risk of burning! 16 / 59
17 Notes on using your unit Maximal socket power Appliance VarioCookingCenter 112 (not 112T, 112L) VarioCookingCenter 211/311 Unit weights Appliance 112T L max. Power Fuse 3.6 kw 16 A without pressure option with pressure option 2.3 kw 99 kg 168 kg 132 kg 195 kg 251 kg 10 A not available 186 kg not available 223 kg 279 kg 17 / 59
18 Notes on using your unit Working with the hand shower - Pull out the hose and press the actuating knob to use the hand shower. - The hand shower retracts automatically. - Always allow the hand shower to slide back slowly and in a controlled manner. Warning! Do not use the hand shower when working with oil (deep frying). Close the plug socket cover before using the hand shower! Pulling the hand shower out sharply beyond the maximum available length will damage the hose. Make sure that the hand shower hose is fully rewound after use. 18 / 59
19 Operating instructions Touchscreen and dial Your unit has a touchscreen. You can make settings on your unit by just touching it lightly with your finger. Press a button to activate it. The active state is identified by the flashing red border. In the active state, you can make settings with the central dial. Alternatively you can make settings by moving/dragging the slider. Your setting is accepted when you press the button or the central dial or after 4 seconds have elapsed. 19 / 59

20 Operating instructions Start level display On/Off switch VarioCooking Control mode Top 10 Meat Fish Vegetables and Side Dishes Egg dishes Soups + sauces Milk / Desserts Finishing and Service Manual Mode Boiling Other function Programming/Save mode Pan fried Deep fried 20 / 59
21 Operating instructions Explanation of the buttons Home button: Returns to the start level (hold key down) Back button: Exits the process or jumps to the higher level. MyVCC unit configuration (model 112/112T/112L) MyVCC unit configuration (model 211/311) My VCC unit configuration (model 112/112T/112L) shows that a new software update is available (Ethernet option). Press the button and then select the "system administration" button to apply an update. My VCC unit configuration (model 211, 311) shows that a new software update is available (Ethernet option only). Press the button and then select the "system administration" button to apply an update. Pan selection button grey: Switches to the display view for the left-hand pan (model 112/112T/112L) Pan selection button red: Display view the right-hand pan is active (model 112/112T/112L) Pan selection button with red border: A cooking process is running in the left-hand pan (display view for right-hand pan is active). If action is required on the left-hand side, the border flashes (model 112/112T/112L). Help function Function button: Shows the buttons for operating the unit components such as cover, pan, VarioDose, pan valve and VitroCeran plate (optional, not 112T/112L) 21 / 59
22 Operating instructions Buttons when function button is pressed The cover is closed by pressing and holding the button. On the model 112/112T/112L, the cover must be closed manually. The cover is opened by pressing the button. Pressing the button again stops the movement. On the model 112/112T/112L, the cover must be opened manually. If the "VarioClose" setting has been activated (model 112L only), one other button will appear. This lowers the cover mechanically in order to be able to reach the handle to close the cover when placed high up. After 3 seconds, the cover will reopen completely if the cover was not closed. 22 / 59
23 Operating instructions Caution! If there are sudden movements when closing or opening the cover, please open the cover carefully and do not activate the lock. Inform your Service partner immediately. In this case the following warning sign must be attached to the unit order to inform all users: Warning! Cover mechanism defective. Do not move the cover! - Risk of injury! Do not place any objects on the cover or in its swivelling range - risk of injury! Caution! Open the appliance cover with care. Vapours can escape - risk of burning! 23 / 59
24 Operating instructions The pan is lowered by pressing and holding the button. The pan must be fully lowered before you can start a cooking mode. After pressing the "Lower pan" button, another "Lower pan auto" button will appear. If this is pressed, the pan will automatically be lowered fully (model 112, 112T, 112L only). The pan in models 211 and 311 will lower automatically to 10. The "Lower pan" button can then be pressed again and the pan lowered completely. This option will only appear (model 211/311 only) if the pan has been automatically lowered to 10. Now press the "Lower pan" button to lower the pan completely. Caution! Do not place any objects under the pan or in its swivelling range. - Risk of injury! The pan is raised by pressing and holding the button. This is not possible until the cover is fully open. Attention! If the lifting arm is in use, it must first be removed manually! 24 / 59
25 Operating instructions Caution! Tilt the pan carefully in order to avoid spillage Danger of slipping and burns! Use a sufficiently wide collecting container when draining Danger of slipping and burns. We recommend our accessories VarioMobil and oil cart for this. VarioDose cold The VarioDose function allows precisely measured water to be added directly to the pan. Press the button and then set the volume of water using the central dial. Filling and counting down of the number of litres starts when you press the button, the dial or after 4 seconds. Pressing the dial again stops the inflow before the set number of litres has been reached. VarioDose warm (optional, not112t/112l) Maximum filling volumes with the VarioDose VarioCookingCenter 112/112T: 14 litres per pan VarioCookingCenter 112L: 25 litres per pan VarioCookingCenter 211: 100 litre VarioCookingCenter 311: 150 litre 25 / 59
26 Operating instructions The pan valve is opened by pressing the button. Holding the button down helps to avoid the pan vent from opening unintentionally. It cannot be opened if the temperature in the pan is too high. It can be opened again after the pan has cooled down. When you select deep frying, the pan valve can only be opened if the pan is fully tilted. On model 112T/112L the pan valve is opened manually using the pan valve lever. The pan valve is closed by pressing the button. The pan valve is automatically closed when you select a process or a manual cooking mode. On model 112T/112L the pan valve is closed manually using the pan valve lever. On the VarioCookingCenter 112T/112L the integrated pan outlet is opened and closed manually by operating the pan valve lever. If the pan valve is opened during or after deep-frying an acoustic warning signal is sounded and the pan valve is to be closed again immediately. Hot oil is to be emptied by tipping it over the pan lip and by following the applicable guidelines accordingly. Do not use the hand shower when working with oil (deep frying)! 26 / 59
27 Operating instructions The VitroCeran (optional, not 112T, 112L) is started by pressing the button. You can then set 6 different heating levels using the central dial. VitroCeran (optional, not 112T, 112L): Stage 1 minimum VitroCeran (optional, not 112T, 112L): Stage 6 maximum Caution! VitroCeran (optional, not 112T, 112L) can get very hot - risk of burning! Do not use steel pots or pans the VitroCeran (optional, not 112T, 112L) or place on the user console. Danger of tipping when the cover is closed and when the pan is moved - risk of buring! Do not place any cooking utensils or aluminium containers etc. on the VitroCeran (optional, not 112T, 112L) while it is still hot - risk of burning! Do not use the VitroCeran (optional, not 112T, 112L) as a storage area - risk of scalding! If the VitroCeran (optional, not 112T, 112L) is cracked or broken, disconnect the unit or the elements from the mains immediately - risk of injury! 27 / 59


28 Operating instructions Filling volumes in the pan For your safety, always observe the filling limits as indicated by the marks in the pan. 112/112T 112L / 59
29 Operating instructions General fill levels Unit type 112/112T 112L Unit type 112/112T 112L Permitted Minimum fill level Maximum fill level Fill level Permitted Minimum fill level of oil Maximum fill level Fill level of oil* 3 litres 6 litres 20 litres 30 litres 4 litres 8 litres 30 litres 45 litres 14 litres 25 litres 100 litres 150 litres 9 litres* 14 litres* 35 litres* 49 litres* * Basically, the maximum permissible filling quantities as per DIN must be observed. With the VarioCookingCenter 311, only fill with cold oil up to the "MIN" mark (45 litres). The oil will automatically reach the "MAX" mark (49 litres) due to the expansion of the oil at the operating temperature. This complies with the safety regulations and this quantity of oil can easily be stored and transported in the oil cart. Fill level for boiling with baskets Unit type 112/112T 112L Permitted fill level for boiling with baskets 10 litres 18 litres 60 litres 90 litres 29 / 59
30 Operating instructions Fill levels for pressure cooking (optional, not 112T, 112L) The pressure is built up through the evaporation of water. Make sure that there is sufficient free water in the pan that is not absorbed by the food during cooking. Unit type Permitted Minimum fill level for pressure cooking 2 litres 20 litres 30 litres Unit type 112/112T 112L Maximum fill level Fill level for pressure cooking 14 litres 80 litres 100 litres Maximum load size 15 kg/pan 25 kg/pan 100 kg 150 kg Maximum load size of the accessory baskets The maximum load size of the accessory baskets depends on the food involved. See application manual. 30 / 59
31 Operating instructions Caution! Observe the maximum and minimum fill levels in the pan for each of the cooking modes. There is a risk of fire or burning if the pan is used incorrectly (if the levels are too high or too low)! Exceeding the maximum load sizes allowed can result in damage to the unit. 31 / 59
32 Operating instructions Help function To make simple and efficient use of the many possibilities of your unit, there are detailed operating instructions and an application manual with practical examples and useful tips stored on the unit. Press the "?" button to select the Help function. Explanation of the buttons 32 / 59 Start the Help function Open the selection menu and select manual Display safety instructions Exit the help function Scroll forward one page Scroll back one page Open the next section Open the previous section


33 Operating instructions Overview of the cooking modes When you switch the unit on or hold down the Home button, you go straight to the Start level. Here you can select the three cooking modes of the VarioCookingCenter. VarioCooking Control mode Manual mode Programming/ Save mode When you press the Meat, Fish, Vegetables and Side Dishes, Egg Dishes, Soups and Sauces, Milk / Desserts or Finishing and Service button, the window for selecting the cooking processes in VarioCooking Control mode opens. When you press the Boil, Pan-Fry or Deep Fry button, you switch to manual mode. If you have a unit with the Non-deep frying option, the Deep Fry button is greyed out. When you press the Programming button, you switch to Programming/ Save mode. 33 / 59
34 VarioCooking Control mode In VarioCooking Control mode you simply select the food to be cooked and your desired cooking result at the push of a button. Cooking time and temperature are constantly adjusted. The remaining time as currently calculated is displayed. You will find examples and useful notes in the application manual, which can be viewed by pressing the "?" button. Buttons and pictograms in VarioCooking Control mode Cooking speed Core temperature/cooking level Delta-T Cooking level for Boil eggs Cooking time Size of food Browning Frying level Temperature Food thickness Core temperature probe Type of meat Basket Viscosity Chocolate variety 34 / 59
35 VarioCooking Control mode Information and prompts during the cooking process Preheat display Insert roasting rack prompt Water inlet display Load prompt Lower cover prompt Request to load chocolate in water bath Lock lid prompt (option, not 112T, 112L) Deglaze prompt Unlock lid prompt (option, not 112T, 112L) Water bath temperature Decompression display (option, not 112T, 112L) Cooking step display End of cooking step display Prompt to insert core temperature probe in food (in this case meat) Request to insert the core temperature probe again. Prompt to insert core temperature probe in cooking liquid Request to insert the core temperature probe again. Prompt to turn food (in this case fish) Power failure Prompt to stir in 35 / 59
36 VarioCooking Control mode Display of maximum fill level for pressure cooking (option, not 112T, 112L) Model 112: 14 litres Model 211: 80 litres Model 311: 100 litre Prompt to stir in and insert core temperature probe Display emergency process if core temperature probe is not inserted or inserted incorrectly Prompt to mix Display of defective core temperature probe. Some processes cannot be selected. Consult a technician. Prompt to chop Kaiserschmarrn Confirm / Yes button Cancel / No button Options following the end of cooking 36 / 59 Continue with time Move core temperature probe Keep hot Reloading
 Cooking with baskets 37 /")
37 Manual mode In Manual mode, all the basic functions of the VarioCookingCenter are available: Buttons and pictograms in Manual mode Cooking temperature Boiling temperature Delta-T cooking PowerBoost TM Cooking time Core temperature Boil Preheat Pan fried Continuous operation Deep fried Pressure cooking (optional, not 112T, 112L) Cooking with baskets 37 / 59
38 Manual mode You can press the Cooking temperature button to call up the current data, such as the actual cooking temperature, actual core temperature and elapsed cooking time. The actual values are displayed continuously if you hold down the Cooking temperature button for 10 seconds. Press the Cooking temperature button again to return to the set values. 38 / 59

39 Programming/Save mode With Programming/Save mode you can create your own cooking programs. You can copy the cooking processes from VarioCooking Control mode to suit your individual needs, modify them and save them under a new name, or create your own manual programs with up to 12 steps. Buttons in Programming/Save mode New program Copy program Change program Image view List view MyDisplay (see MyVCC MyDisplay section) Press the arrow buttons or turn the central dial to select a program. Delete program Program selection window 39 / 59
40 Programming/Save mode Info button: Displays program details in the selection window Selection window when Info button is pressed When you hold down the Info button, other information is called up or discarded in addition to the program name. Image of the food for the program Notes about the program Image of the accessory for the program Additional attributes can be selected Group allocation (e.g. "Breakfast") The pictogram beside the program name shows whether the stored cooking program is a manual program (shown on the left) or a VarioCooking Control cooking workflow. 40 / 59

41 MyVCC appliance configuration All the appliance's default settings (e.g. time, date, language etc.) can be changed under MyVCC. Press the MyVCC button to open the overview display for your appliance's default settings. You can customise your appliance's settings to suit your requirements. Explanation of pictograms: Favourites (active when MyVCC is selected) Settings Acoustics System management MyEnergy Expert setting MyDisplay Service 41 / 59
42 Cleaning Regular cleaning will ensure that your VarioCookingCenter retains its value, is protected from corrosion, and continues to operate smoothly, allowing you to prepare your food hygienically. Warning! Wear the correct protective clothing, gloves, goggles and a mask. The pan base may be hot. The cleaning water can heat up quickly - Danger of scalding! Interim cleaning The following cleaning tasks should be carried out after every time the unit is used. Pan Clean the pan, particularly in the corners and edges, after every cooking process using lukewarm water and a sponge. Remove any scale, grease, starch and protein layers from the unit and accessories. Corrosion can occur under these layers due to lack of air exposure. If necessary, use a fat-dissolving cleaning agent or diluted vinegar (do not use acids ). Do not use sharp or pointed tools to clean the pan. - Only use abrasive cleaning aids on the inside of the pan. All other surfaces are sensitive to scratches. - Do not use steel wool to clean - risk of corrosion! - Do not use high pressure cleaners for cleaning. - Do not use hydrochloric acid, sulphurous or other oxygen-consuming substances to clean the unit and its accessories since this can damage the passive layer of the chrome nickel steel and discolour the unit or accessories. - If necessary, boil a little dilute vinegar in the pan to remove limescale or discolouration ("rainbow colours" after boiling). Then drain off the vinegary water and rinse thoroughly with fresh water. - Avoid salt deposits on stainless steel surfaces. When adding salt, dissolve it quickly by stirring. Remove residues by rinsing thoroughly with fresh water. 42 / 59
43 Cleaning Pan valve Clean the pan valve after using the unit by unscrewing the valve cover with the valve opened and thoroughly clean the opening. Also clean the valve cover and, in particular, the seal. Avoid damaging the valve's threaded rod and seal (do not use sharp-edged tools). Screw in the valve cover once more after cleaning. Warning! If cleaned as described in the instructions, the seal should be replaced after no more than 1000 operating hours. If the seal is constantly exposed to oil or grease, the service life may be greatly reduced. If the seal is damaged, it should be replaced immediately (part no ). Core temperature probe Clean the core temperature probe after every use with a soft sponge (do not use steel wool). If necessary, use a fat-dissolving cleaning agent (do not use acids). Cover seal Clean the cover seal regularly. Check, in particular, the bottom sealing area (channel between the sealing lips) as water can collect in it. Check that the cover seal is clean, particularly before pressure cooking (optional, not 112T). The cover seal can be pulled out without tools so that you can clean the guide rail behind it. Drain channel, 112 model Clean the drain channel on the back of the pan using the hand shower. 43 / 59
44 Cleaning Basic cleaning The following cleaning jobs should be carried out as required after use, but at least once a week. Unit housing Always lower the pan before rinsing the outer surfaces of the VarioCookingCenter. Make sure that you only pour the water into the unit from above. If necessary, use a fat-dissolving cleaning agent (do not use acids). Do not use high pressure cleaners. VitroCeran (option; not 112T, 112L) Clean the VitroCeran using commonly available cleaning agents for Ceran plates. Control panel Clean the control panel with a soft cloth. Do not use any scratchy or rough materials. Do not use abrasive or aggressive cleaning agents. Steam nozzles 112 model The steam nozzles (protective attachment over the opening to divert the steam to the inside of the cover) can be removed without using tools. You can then clean the opening beneath using the hand shower. Clean the steam nozzles using the hand shower or in the dishwasher. Remember to reattach the steam nozzles after cleaning so that you do not lose them. You cannot operate the unit without the steam nozzles. Pressure-cooking system (optional, not 112T, 112L) Carry out a cleaning cycle on the pressure system once a week by filling the minimum quantity of water (112 : 2 litres; 211: 20 litres; 311: 30 litres) into the pre-cleaned pan and operating for 5 minutes in pressure mode. Accessory Remove any scale, grease, starch and protein layers from the unit and accessories. Corrosion can occur under these layers due to lack of air exposure. 44 / 59

45 Service reports If faults occur on your unit, they are indicated on the display: Please make a note of the telephone number so that you can quickly make contact with your customer service department. Faults that allow the unit to continue to be used can be suppressed by pressing the Back button. Service report Error Effects and action Service 100 Core temperature probe error Cooking without a core temperature probe is possible Pressure cooking (optional, not 112T/112L) not possible Model 112/112T/112L: No restrictions in the right-hand pan Call customer service Service 101 Core temperature probe error (R) Cooking without a core temperature probe is possible Pressure cooking (optional, not 112T/112L) not possible No restrictions in the left-hand pan Call customer service 45 / 59
46 Service reports Service report Error Effects and action Service 110 Error in temperature measuring system B1 Roasting applications possible Model 112/112T/112L: No restrictions in the right-hand pan Call customer service Service 111 Error in temperature measuring system B2 Roasting applications possible No restrictions in the left-hand pan Call customer service Service 121, Error in temperature measuring system B4,... B11 Call customer service Service 200 Flow sensor Please check the water inlet. Cooking without automatic water inlet possible Service 201 Hot water flow sensor Please check the hot water inlet. Cooking without automatic hot water inlet possible Service Error in the locking system Model 112: No restrictions in the right-hand pan Call customer service Service Error in the locking system (R) No restrictions in the left-hand pan Call customer service 46 / 59
47 Service reports Service report Error Effects and action Service 230 Error in the pan valve drive Automatic pan valve defect Model 112: No restrictions in the right-hand pan Call customer service Service 231 Error in the pan valve drive (R) Automatic pan valve defect No restrictions in the left-hand pan Call customer service Service Error in AutoLiftsystem Open left-hand cover and select AutoLift again. Do not close the cover manually during AutoLift operation. Service Error in AutoLift system (R) Open right-hand cover and select AutoLift again. Do not close the cover manually during AutoLift operation. 47 / 59
48 Service reports Service report Error Effects and action Service 252 Error in the cover drive system Call customer service Service 260 Error in the pressure measurement system Pressure cooking (optional, not 112T/112L) not possible. Model 112: No restrictions in the right-hand pan. Call customer service Service 261 Error in the pressure measurement system (R) Pressure cooking (optional, not 112T/112L) not possible No restrictions in the left-hand pan Call customer service Service 262 Error in the pressure system Error in pressure cooking Please check: - Bound food product? - Too little water? - Overfilling? - Steam nozzle contaminated? Otherwise: Call customer service Service 263 Error in the pressure system (R) Error in pressure cooking Please check: - Bound food product? - Too little water? - Overfilling? - Steam nozzle contaminated? Otherwise: Call customer service Service 450 Bus error I/O A4 Call customer service Service 460 Unit model not defined Call customer service Service System error No restrictions Call customer service 48 / 59
49 Before you call customer service error possible cause Rectification Water low: "Water tap symbol" Water tap closed Open the water tap Water intake filter on the unit is fouled Check and clean the filter. To do this: - Close the water tap and unscrew the water supply line to the unit. - Remove the filter at the water intake and clean. - Insert the filter once more. Connect the water supply line and check for leaks. Water leaking out of the bottom of the unit The unit is not level Align the unit with a spirit level (see installation instructions). Drain is blocked (blockages can occur if a lot of products containing a high proportion of fat are cooked or if the drain pipe was fitted with an insufficient fall). Remove the drain (HT pipe) on the bottom of the unit and clean. Run the drain pipe as described in the installation instructions. 49 / 59
50 Before you call customer service error possible cause Rectification The unit does not appear to be working after switching on External main switch was switched off. Switch on at the main switch. Fuse has blown on the main distribution board Check the fuses on the main distribution board The ambient temperature remained below 5 C (41 F) for too long after the unit was switched off. Heat the unit to a temperature above 5 C. The room temperature must be greater than 5 C when operating the unit. 50 / 59


51 Domestic appliances The following inspection tasks may be carried out by experienced technical personnel. Only use genuine spare parts from the unit manufacturer. Replacing the cover seal model 112 Replacing the pan valve seal The cover seal is pressed into a guide on the cover edge. - Pull the old seal out of the sealing groove. (no tools are required for this.) - Clean the sealing groove. - Moisten the seal base with soapy water. - Insert the new seal into the sealing groove, starting at each corner of the cover. The seal base must be inserted fully into the seating frame. The annular pan valve seal is attached to the valve cover. - Open the pan valve and unscrew the valve cover. - Clean the sealing groove. - Pull the old sealing ring out of the valve cover. - Attach the new sealing ring. - Screw on the valve cover. 51 / 59


52 Unit accessories Arm for automatic raising/lowering mechanism To boil and deep fry in baskets with AutoLift. Model 112/112T: Part no Model 112L: Part no Model 211: Part no Model 311: Part no Deep-frying basket 112L For deep frying in baskets with AutoLift. Model 112L: Part no / 59 Deep-frying basket 112/112T For deep frying in baskets with AutoLift. Model 112/112T: Part no Deep-frying basket 211/311 For deep frying in baskets with AutoLift. Model 211/311: Part no


53 Unit accessories Basket insert 211/311 Acts as another level when boiling or deep frying in baskets with AutoLift. Model 211/311: Part no Boiling basket 112L For boiling in baskets with AutoLift. Model 112L: Part no Boiling basket 112/112T For boiling in baskets with AutoLift. Model 112/112T: Part no Boiling basket 211/311 For boiling in baskets with AutoLift. Model 211/311: Part no / 59

: Part no. 60.72.")


54 Unit accessories Portion container with handle 6 portion containers, perforated, with frame, model 112/112T: Part no portion containers, perforated, with frame, model 112L: Part no Portion container with handle, perforated (2x): Part no Portion container with handle and cover, non-perforated (2 x): Part no Bain-marie for VitroCeran (optional, not 112T, 112L) Attachment with 4 portion containers with handle and cover as well as one 2/3 GN container: Part no Sieve Holds back loose boiled products when you drain off the water. Model 112/112T: Part no Model 112L: Part no Model 211: Part no Model 311: Part no Pan base grid To avoid contact between roasts and the pan base. Model 112/112T: Part no Model 112L: Part no Model 211: per 2x Part no Model 311: per 3x Part no / 59


55 Unit accessories Spatula Part no Stirring spatula 211/311 For mixing and stirring food in the VarioCookingCenter. Model 211/311: Part no Scoop / perforated scoop To simplify emptying of the pan for large quantities of food. Scoop: Part no Perforated scoop: Part no / 59


56 Unit accessories Oil cart For filling the cooking pan and for storing and filtering the oil. With preheating to melt block fat or cooled oil. Extraction of hot oil possible. Part no VarioMobil For the effortless and safe removal of food and for transporting in GN containers (GN containers are not supplied as standard). Model 112/112T/112L: Part no Model 211/311: Part no Basket cart 211/311 For storing, transporting and drip-drying cooking baskets Model 211/311: Part no UltraVent condensation hood Model 112: Part no Model 211: Part no Model 311: Part no / 59
57 57 / 59
58 VarioCookingCenter is a trademark of RATIONAL AG. This product incorporates the following software: 1. the software developed independently by RATIONAL AG 2. the software licensed under the GNU Gerneral Public License, Version 2 (GPL v2) 3. the software licensed under the GNU LESSER General Public License, Version 2.1 (LGPL v2.1) and/or, 4. open sourced software other than the software licensed under the GPL v2 and/or LGPL v2.1 For the software categorized as (3), (4) and (5), please refer to the terms and conditions of GPL v2 and LGPL v2.1, as the case may be at and At least three (3) years from delivery of products, RATIONAL AG will give to any third party who contact us at the contact information provided below, for a charge no more than our cost of physically performing source code distribution, a complete machinereadable copy of the corresponding source code covered under GPL v2/lgpl v2.1. Contact Information: sourcecode@rational-online.com 58 / 59

59 ...

60 _RATIONAL V-16 PM/Naha 02/19
INSTRUCTION MANUAL KETTLE
 INSTRUCTION MANUAL KETTLE PT EL EL SV PT ES NL DE FR EN EN IT Dear Customer, Thank you for purchasing a Smeg 50 s Style kettle. By choosing one of our products, you have selected an appliance which combines
Range with baking oven
 Read the operating instructions prior to commissioning Operating instructions Range with baking oven Translation from the original document 2023114-00ABDE-A 18/05/2016 Unit Type of energy Unit type Model
Contents Safety instructions...3
 Contents Safety instructions...3 Machines Overview...7 Start-up...8 Preparing beverages...9 Programming cup capacity...10 Cleaning the machine every day (after the last time you use it)...11 Optional:
Operating Instructions. ELRO EasyCook. Flexi-Pan Type PKGN Kettle Type JK. Date Replaces Responsible. Revised on 2.
 Operating Instructions ELRO EasyCook Flexi-Pan Type PKGN Kettle Type JK Date 24.03.2015 Replaces 13.01.2014 Author PM Responsible Doc. No. VAE VAE VAE X101842E Revised on 2 Pages 10 1 Safety Please observe
PROF. RANGE COOKER MODEL: EPRC-A6456GE(SS) Owner s Manual Please read this manual carefully before operating your set. Retain it for future reference.
 Owner s Manual Please read this manual carefully before operating your set. Retain it for future reference.") PROF. RANGE COOKER MODEL: EPRC-A6456GE(SS) Owner s Manual Please read this manual carefully before operating your set. Retain it for future reference. Record model number and serial number of the set.
PROF. RANGE COOKER MODEL: EPRC-A6456GE(SS) Owner s Manual Please read this manual carefully before operating your set. Retain it for future reference. Record model number and serial number of the set.
VK902 Compact Combination Microwave Oven Installation, Use and Maintenance
 VK902 Compact Combination Microwave Oven Installation, Use and Maintenance Customer Care Department The Group Ltd. Harby Road Langar Nottinghamshire NG13 9HY T : 01949 862 012 F : 01949 862 003 E : customer.care@cda.eu
IMPORTANT WARNINGS Therefore, to avoid breaking it, do not turn it manually in order to seek the correct position.
 IMPORTANT WARNINGS Before use check that the voltage power supply corresponds to the one shown on the appliance data plate. Only connect the appliance to electrical sockets which have a minimum load of
OVENS AUS. Installation - Use - Maintenance. Oven models: 60cm Built in Ovens
 OVENS Installation - Use - Maintenance AUS Oven models: 60cm Built in Ovens 539.07.031 539.07.041 GENERAL INFORMATION Please read this booklet thoroughly before you use this appliance. It is important
Combi oven Metos SelfCookingCenter 61 Sous Vide
 1 ( 9) Combi oven Metos SelfCookingCenter 61 Sous Vide This model is with Sous-Vide core temperature probe, attached externally. Capacity 6x GN1/1-65mm or 6x GN1/1-40mm, guide rail distance 68 mm Metos
GAS COOKER GAS OVEN SERIES. Owner s Manual Please read this manual carefully before operating your set. Retain it for future reference.
 GAS COOKER GAS OVEN SERIES Owner s Manual Please read this manual carefully before operating your set. Retain it for future reference. Record model number and serial number of the set. See the label attached
IMPORTANT SAFETY INSTRUCTIONS DANGER WARNING
 IMPORTANT SAFETY INSTRUCTIONS These instructions shall also be available on website: www.whirlpool.eu YOUR SAFETY AND THAT OF OTHERS IS VERY IMPORTANT This manual and the appliance itself provide important
IMPORTANT SAFETY INSTRUCTIONS DANGER WARNING
 IMPORTANT SAFETY INSTRUCTIONS These instructions shall also be available on website: www.whirlpool.eu YOUR SAFETY AND THAT OF OTHERS IS VERY IMPORTANT This manual and the appliance itself provide important
Cooker with baking oven
 Read the operating instructions prior to commissioning Operating instructions Cooker with baking oven Translation from the original document 2023203-20ABDE-A 19/05/2016 Unit Multi-plate cooker with baking
User Manual. Dishwasher ZDM17301SA ZDM17301WA
 EN User Manual Dishwasher ZDM17301SA ZDM17301WA Contents Safety information 2 Safety instructions 3 Product description 4 Control panel 5 Programmes 6 Daily Use 7 Hints and tips 10 Care and cleaning 11
Important Safeguards. Topic 2 SAVE THESE INSTRUCTIONS - FOR HOUSEHOLD USE ONLY SAVE THESE INSTRUCTIONS - FOR HOUSEHOLD USE ONLY 3
 User s Manual Index Topic Important safeguards 03 Safety features 05 Parts and accessories 05 Before first use 06 Operating instructions 06 Programme settings 08 Care and cleaning 09 Pressure canning guide
Read this manual carefully before installing and using the appliance. This will ensure optimum results and maximum safety.
 GB Read this manual carefully before installing and using the appliance. This will ensure optimum results and maximum safety. DESCRIPTION (see drawing on cover) A. Lid B. Viewing window (not all models)
User manual. Hob CHT601FL
 User manual Hob CHT601FL Contents Safety information 2 Safety instructions 3 Product description 5 Daily use _ 6 Helpful hints and tips _ 8 Safety information Care and cleaning 8 Troubleshooting 9 Installation
OPERATOR S MODEL FGE-615 FGE-621 FGE-115 FGE-121 FGE-215 FGE-221. FlexFusion TM ELECTRIC GOLD COMBI. Read instructions before operating the appliance
 OPERATOR S M A N U A L FlexFusion TM ELECTRIC GOLD COMBI MODEL FGE-615 FGE-621 FGE-115 FGE-121 FGE-215 FGE-221 REGISTER WARRANTY ONLINE AT WWW.HENNYPENNY.COM Read instructions before operating the appliance
6L PRESSURE COOKER. Instruction Manual. Model: PLA1424
 6L PRESSURE COOKER Instruction Manual Model: PLA1424 Due to ongoing product improvements, specifications and accessories may change without notice. Actual product may differ slightly to that depicted.
Food Steamer EFS-6882
 Food Steamer EFS-6882 Instructions for Use Read the following instructions carefully and save these instruction Important safety instructions The use of any electrical appliance requires following common
User Manual. Hob ZEV6240FBV
 EN User Manual Hob ZEV6240FBV Contents Safety information 2 Safety instructions 3 Product description 5 Daily use 6 Hints and tips 7 Care and cleaning 7 Troubleshooting 8 Installation 9 Technical information
Contents. 03 Welcome. 04 General Information and Safety Instructions. 05 Description of parts. 06 Instructions. 09 Cooking tips and recipes
 2 in 1 Air Fryer Contents 03 Welcome 04 General Information and Safety Instructions 05 Description of parts 06 Instructions 09 Cooking tips and recipes 10 Cleaning and Maintenance Warranty Card 68447 Date
Installation and Operating Instructions
 Installation and Operating Instructions Model: HOB2S-2E-1 For your convenience, we recommend to attach the serial number label HERE. As part of Parmco Appliances commitment to improving and updating product
User Manual. Hob CH601FL
 EN User Manual Hob CH601FL Contents Safety information 2 Safety instructions 3 Product description 5 Daily use 5 Hints and tips 5 Care and cleaning 6 Safety information Troubleshooting 7 Installation 7
SelfCookingCenter Original operating instructions
 SelfCookingCenter Original operating instructions RATIONAL ServicePlus The all-inclusive package for an all-round service. We want to maximise your return on investment from the very start. Over the entire
FAVORIT34502VIO. EN User Manual
 FAVORIT34502VIO EN User Manual 2 www.aeg.com CONTENTS 1. SAFETY INFORMATION...3 2. SAFETY INSTRUCTIONS... 4 3. PRODUCT DESCRIPTION... 6 4. CONTROL PANEL...6 5. PROGRAMMES... 7 6. SETTINGS... 8 7. BEFORE
AVM 340 AVM 440. Instructions for use. Cover 1. Whirlpool Sweden AB
 Instructions for use AVM 0 AVM 0 0 00 0 0 ARM 00 0 0 0 0 0 000 hirlpool Sweden AB Cover Content Page Electrical connection Before you operate the oven Control panel and symbol description Oven overview
Read these instructions before using and keep them available at all times!
 200065 V2/0614 GB/UK ENGLISH Translation of the original instruction manual Read these instructions before using and keep them available at all times! 1. General information... 16 1.1 Information about
OPERATOR S MODEL FPE-615 FPE-621 FPE-115 FPE-121 FPE-215 FPE-221. FlexFusion TM ELECTRIC PLATINUM COMBI
 OPERATOR S M A N U A L FlexFusion TM ELECTRIC PLATINUM COMBI MODEL FPE-615 FPE-621 FPE-115 FPE-121 FPE-215 FPE-221 REGISTER WARRANTY ONLINE AT WWW.HENNYPENNY.COM Read instructions before operating the
BUILT-IN OVEN MODEL: EBO-E7081D(SS) Owner s Manual Please read this manual carefully before operating your set. Retain it for future reference.
 Owner s Manual Please read this manual carefully before operating your set. Retain it for future reference.") BUILT-IN OVEN MODEL: EBO-E7081D(SS) Owner s Manual Please read this manual carefully before operating your set. Retain it for future reference. Record model number and serial number of the set. See the
BUILT-IN OVEN MODEL: EBO-E7081D(SS) Owner s Manual Please read this manual carefully before operating your set. Retain it for future reference. Record model number and serial number of the set. See the
Instructions. 1 Instructions
 Contents 1 Instructions 22 1.1 General safety instructions 22 1.2 Identification plate 23 1.3 Manufacturer liability 23 1.4 Appliance purpose 23 1.5 Disposal 23 1.6 This user manual 24 1.7 How to read
Contents. Downloaded from manuals search engine
 Contents 1. INSTRUCTIONS FOR SAFE AND PROPER USE 6. INSTALLATION 8 3. DESCRIPTION OF CONTROLS 30 4. USE OF THE OVEN 35 5. AVAILABLE ACCESSORIES 36 6. COOKING HINTS 37 7. CLEANING AND MAINTENANCE 43 8.
English Instructions for use HOB Contents Important safety instructions,5 Safeguarding the environment,6 Eco design declaration,6 Before use,6
 EN English Instructions for use HOB Contents Important safety instructions,5 Safeguarding the environment,6 Eco design declaration,6 Before use,6 Existing pots and pans,6 Recommended pot bottom widths,6
FAVORIT VI DISHWASHER USER MANUAL
 FAVORIT 55002 VI DISHWASHER USER MANUAL 2 CONTENTS 4 SAFETY INFORMATION 6 PRODUCT DESCRIPTION 7 CONTROL PANEL 8 PROGRAMMES 9 OPTIONS 10 BEFORE FIRST USE 13 DAILY USE 16 CARE AND CLEANING 17 TROUBLESHOOTING
SFR 5320WH. EN Vita Fryer. Copyright 2016, Fast ČR, a.s
 SFR 5320WH EN Vita Fryer - 1 - EN Vita Fryer Important safety instructions READ CAREFULLY AND STORE FOR FUTURE USE. This appliance may be used by children 8 years of age and older and by persons with physical
User Manual. Hob PH601SS
 EN User Manual Hob PH601SS Contents Safety information 2 Safety instructions 3 Product description 5 Daily use 5 Hints and tips 6 Care and cleaning 6 Safety information Troubleshooting 6 Installation 7
BUILT-IN OVEN MODEL: EBO-D7080D(SS) Owner s Manual Please read this manual carefully before operating your set. Retain it for future reference.
 Owner s Manual Please read this manual carefully before operating your set. Retain it for future reference.") BUILT-IN OVEN MODEL: EBO-D7080D(SS) Owner s Manual Please read this manual carefully before operating your set. Retain it for future reference. Record model number and serial number of the set. See the
BUILT-IN OVEN MODEL: EBO-D7080D(SS) Owner s Manual Please read this manual carefully before operating your set. Retain it for future reference. Record model number and serial number of the set. See the
User manual. Dishwasher ZDI12001
 EN User manual Dishwasher ZDI12001 Contents Safety information 2 Product description _ 3 Control panel 3 Programmes 4 Before first use _ 4 Daily use 7 Care and cleaning 9 Troubleshooting 9 Technical information
FAVORIT DISHWASHER USER MANUAL
 FAVORIT 77000 DISHWASHER USER MANUAL 2 CONTENTS 4 SAFETY INFORMATION 6 PRODUCT DESCRIPTION 7 CONTROL PANEL 8 PROGRAMMES 10 OPTIONS 11 BEFORE FIRST USE 14 DAILY USE 17 CARE AND CLEANING 18 TROUBLESHOOTING
MW001 Integrated Dishwasher. Manual for Installation, Use and Maintenance
 MW001 Integrated Dishwasher Manual for Installation, Use and Maintenance Important The CDA Group Ltd cannot be held responsible for injuries or losses caused by incorrect use or installation of this product.
DFPS08. Deep Fryer. User Manual
 DFPS08 Deep Fryer User Manual IMPORTANT SAFETY INFORMATION Please follow all the precautions listed below for safety and to reduce the risk of fire, injury or electrical shock. Read all the instructions
Contents. Safety instructions...4. Machines Overview...8. Start-up...9. Preparing beverages Programming cup capacity...11
 2 Safety instructions...4 Contents Machines Overview...8 Start-up...9 Preparing beverages...10 Programming cup capacity...11 Cleaning the machine (daily/monthly)...12 Descaling the machine - monthly...14
Deep Fryer Model FDF300
 Deep Fryer Model FDF300 OPERATING INSTRUCTIONS FDF300: 240V, 50Hz, 2000W Thank you for choosing this GOLDAIR deep fryer. This GOLDAIR appliance has been designed and manufactured to high standards of engineering
operating & installation instructions SA20XMFR
 operating & installation instructions SA20XMFR Contents 1. INSTRUCTIONS FOR SAFE AND PROPER USE 26 2. INSTALLATION 28 3. DESCRIPTION OF CONTROLS 30 4. USE OF THE OVEN 35 5. AVAILABLE ACCESSORIES 36 6.
FAVORIT W0P. EN User manual
 FAVORIT 77000 W0P EN User manual 2 www.aeg.com CONTENTS 1. SAFETY INSTRUCTIONS...................................................... 3 2. PRODUCT DESCRIPTION.....................................................
Hot Chocolate Dispenser
 Hot Chocolate Dispenser Instruction manual Model: CN219-A AU Telephone Helpline: 1300225960 Safety Tips Position on a flat, stable surface. A service agent/qualified technician should carry out installation
Thank you for choosing AMI FRY. We hope you enjoy the convenience, quality and affordability of your new unit.
 Thank you for choosing AMI FRY. We hope you enjoy the convenience, quality and affordability of your new unit. You will find AMI Fry of extreme benefit to your frying needs with its fast recovery and temperature
Operating Instructions
 Operating Instructions Fryer KM 403 To prevent accidents and reduce machine damage, read these lnstructions before installation or use. UV M.-Nr. 05 825 170 2 Contents IMPORTANT SAFETY INSTRUCTIONS.................................
5L STAINLESS STEEL SLOW COOKER
 5L STAINLESS STEEL SLOW COOKER PL390 Instruction Manual IMPORTANT SAFETY INSTRUCTIONS READ CAREFULLY AND KEEP FOR FUTURE REFERENCE Carefully read this manual before using this appliance. Ensure that you
Instruction Manual for Electric Ovens OO757X OO986X
 Instruction Manual for Electric Ovens OO757X OO986X 1 2 DEAR CUSTOMER, We thank you and congratulate you on your choice. This new carefully designed product, manufactured with the highest quality materials,
Contents Introduction...4 Unpacking...4 Product Overview...5 Positioning the Fryer...6 Preparation...6 Cooking with the Fryer...
 DEEP FAT FRYER INSTRUC TION MANUAL C20FFW10 Contents Introduction... 4 Unpacking... 4 Product Overview... 5 Positioning the Fryer... 6 Preparation... 6 Removing the frying basket...6 Removing the lid...6
User manual. Dishwasher ZDT15002
 EN User manual Dishwasher ZDT15002 Contents Safety information 2 Product description _ 3 Control panel 4 Programmes 4 Options _ 5 Before first use _ 5 Daily use 7 Care and cleaning 9 Troubleshooting 10
VK702 Compact Steam Oven with Grill Installation, Use and Maintenance
 VK702 Compact Steam Oven with Grill Installation, Use and Maintenance Customer Care Department The Group Ltd. Harby Road Langar Nottinghamshire NG13 9HY T : 01949 862 012 F : 01949 862 003 E : customer.care@cda.eu
BUILT-IN CERAMIC HOB MODEL: ECH-G6604ST(BK)
") BUILT-IN CERAMIC HOB MODEL: ECH-G6604ST(BK) Owner s Manual Please read this manual carefully before operating your set. Retain it for future reference. Record model number and serial number of the set.
BUILT-IN CERAMIC HOB MODEL: ECH-G6604ST(BK) Owner s Manual Please read this manual carefully before operating your set. Retain it for future reference. Record model number and serial number of the set.
User Manual. 60 cm Knob control 4 zone ceramic cooktop
 User Manual HHC601 60 cm Knob control 4 zone ceramic cooktop OTE: This User Instruction Manual contains important information, including safety & installation points, which will enable you to get the most
Built-in Conventional oven
 Built-in Conventional oven LAM3208 User Manual 2 CONTENTS S afety information 2 S afety instructions 3 Product description 5 B efore first use 6 Daily use 6 Using the accessories 7 Additional functions
OPERATOR S MODEL FGG-615 FGG-621 FGG-115 FGG-121 FGG-215 FGG-221. FlexFusion TM GAS GOLD COMBI. Read instructions before operating the appliance
 OPERATOR S M A N U A L FlexFusion TM GAS GOLD COMBI MODEL FGG-615 FGG-621 FGG-115 FGG-121 FGG-215 FGG-221 REGISTER WARRANTY ONLINE AT WWW.HENNYPENNY.COM Read instructions before operating the appliance
L&C Deep Fryer INSTRUCTION MANUAL MODEL:
 L&C Deep Fryer INSTRUCTION MANUAL MODEL: IMPORTANT SAFEGUARDS.... 1 Part Name... 3 To Use... 4 General Frying Advice... 7 Cleaning and Maintenance... 9 The Reset Feature... 10 Troubleshooting... 11 Technical
SAFEGUARDING THE ENVIRONMENT IMPORTANT NOTES BEFORE USING THE OVEN OVEN ACCESSORIES CARE AND MAINTENANCE TROUBLESHOOTING GUIDE AFTER SALES SERVICE
 INSTRUCTIONS FOR USE SAFEGUARDING THE ENVIRONMENT IMPORTANT NOTES BEFORE USING THE OVEN OVEN ACCESSORIES CARE AND MAINTENANCE TROUBLESHOOTING GUIDE AFTER SALES SERVICE To make the most of your new oven,
INSTRUCTIONS AND ADVICE FOR THE USE, INSTALLATION AND MAINTENANCE OF BUILT-IN ELECTRIC HOBS
 INSTRUCTIONS AND ADVICE FOR THE USE, INSTALLATION AND MAINTENANCE OF BUILT-IN ELECTRIC HOBS Dear Customer, Thank you for having purchased one of our products. We are certain that this new, modern, functional
Heating Indicator Thermostat Control Inner Pan Heating Element Food Basket Removable handle
 IMPORTANT SAFEGUARDS When using electrical appliances, basic safety precautions should always be followed. These instructions should be saved for future reference: Read and familiarise yourself with all
1.5 LITRE COMPACT FRYER
 INSTRUCTION BOOKLET 1.5 LITRE COMPACT FRYER Model: 18912 LAKELAND 1.5 LITRE COMPACT FRYER Thank you for choosing the Lakeland 1.5 Litre Compact Fryer. Please take a little time to read this booklet before
Operating Instructions. Electric Frypan. Item: FEP210
 Operating Instructions Electric Frypan Item: FEP210 General care and safety guide Thank you for choosing a Goldair Electric Fry Pan. This Goldair appliance has been designed and manufactured to high standards
Operating and installation instructions
 Operating and installation instructions Plate warming drawer EGW 3060-10 To avoid the risk of accidents or en-gb damage to the appliance it is essential to read these instructions before it is installed
User manual. Induction Hob ZEI6640XBA
 EN User manual Induction Hob ZEI6640XBA Contents Safety information 2 Installation instructions _ 3 Product description _ 5 Operating instructions 7 Helpful hints and tips 9 Care and cleaning _ 10 What
FAVORIT W0P. EN User manual
 FAVORIT 88419 W0P EN User manual 2 www.aeg.com CONTENTS 1. SAFETY INSTRUCTIONS...................................................... 3 2. PRODUCT DESCRIPTION.....................................................
1. Pan 2. Basket 3. Basket release button 4. Basket handle 5. Safety lock 6. Timer (0-60min)/Power on knob 7. Temperature control knob (80-200C )
/Power on knob 7. Temperature control knob (80-200C )") Introduction Your new Kogan air-fryer allows you to prepare your favourite ingredients and snacks in a healthier way. The air-fryer uses hot air in combination with high-speed air circulation (Rapid Air)
Introduction Your new Kogan air-fryer allows you to prepare your favourite ingredients and snacks in a healthier way. The air-fryer uses hot air in combination with high-speed air circulation (Rapid Air)
User Guide. * Depending on model. EN 1. TE_FRYERS_FILTRA-ONE_UK_NC _Mise en page 1 06/12/13 15:36 PageC1.
 TE_FRYERS_FILTRA-ONE_UK_NC00122287_Mise en page 1 06/12/13 15:36 PageC1 EN 1 2 3 4 5 6 7 8 9 Réf. NC00122287 12/2013 ESPACE GRAPHIQUE User Guide www.tefal.com 12 13 * Depending on model. 10 11 TE_FRYERS_FILTRA-ONE_UK_NC00122287_Mise
FAVORIT 34502VI0. EN User manual
 FAVORIT 34502VI0 EN User manual 2 www.aeg.com CONTENTS 1. SAFETY INSTRUCTIONS...................................................... 3 2. PRODUCT DESCRIPTION.....................................................
PARAGON FRYERS INSTALLATION INSTRUCTIONS SAFETY INSTRUCTIONS USER INSTRUCTIONS MODEL: PF9 MODEL: PSF3 MODEL: PSPF9 MODEL: PDPF6 MODEL: PDPF9
 INSTRUCTION REF: IN123 ISSUE No. 1 DATE 23.02.06 Page 1 of 10 TELEPHONE: SERVICE (44) 01332 875665 FAX: SERVICE (44) 01332 875536 INSTALLATION INSTRUCTIONS SAFETY INSTRUCTIONS USER INSTRUCTIONS PARAGON
User Manual Dishwasher FAVORIT 56302MO FAVORIT 56302WO
 EN User Manual Dishwasher FAVORIT 56302MO FAVORIT 56302WO 2 www.aeg.com CONTENTS 1. SAFETY INFORMATION...3 2. SAFETY INSTRUCTIONS... 4 3. PRODUCT DESCRIPTION... 5 4. CONTROL PANEL...6 5. PROGRAMMES...
User Manual. 3.5L Deep Fryer Stainless Steel Model Number: MDF35S READ AND SAVE THESE INSTRUCTIONS
 User Manual 3.5L Deep Fryer Stainless Steel Model Number: MDF35S READ AND SAVE THESE INSTRUCTIONS IMPORTANT Read and follow the instructions in this user manual even if you feel you are familiar with the
User manual. Dishwasher ZDF14001WA ZDF14001KA ZDF14001SA
 EN User manual Dishwasher ZDF14001WA ZDF14001KA ZDF14001SA Contents Safety instructions 2 Control panel 4 Programmes _ 4 Options _ 5 Before first use _ 6 Daily use _ 7 Hints and tips 9 Care and cleaning
HK614010BB EN HOB USER MANUAL
 HK614010BB EN HOB USER MANUAL 2 FOR PERFECT RESULTS Thank you for choosing this AEG product. We have created it to give you impeccable performance for many years, with innovative technologies that help
Operating Instructions. Accessory Units Melitta Cafina XT Series. Melitta Professional Coffee Solutions
 Operating Instructions Accessory Units Melitta Cafina XT Series Melitta Professional Coffee Solutions Contents General... 4. Manufacturer information... 4.2 About these instructions... 4.3 Explanation
GETTING STARTED? EASY.
 User Manual GETTING STARTED? EASY. ZIT6460CB EN User Manual Hob SAFETY INFORMATION Before the installation and use of the appliance, carefully read the supplied instructions. The manufacturer is not responsible
WC141 Integrated Dishwasher Installation, Use and Maintenance
 WC141 Integrated Dishwasher Installation, Use and Maintenance Customer Care Department The Group Ltd. Harby Road Langar Nottinghamshire NG13 9HY T : 01949 862 012 F : 01949 862 003 E : customer.care@cda.eu
 www.indesit.com/register GB Contents Safety instructions, 3 Safeguarding the environment, 5 Setting up your oven, 6 Operation instruction, 7 Troubleshooting, 11 Installation instruction, 12 2 SAFETY INSTRUCTIONS
Operating Instructions Design Multicook plus
 Operating Instructions Design Multicook plus Art.-No. 42526 Design Multicook Plus Read all provided instructions before first usage! Model and attachments are subject to change! For household use only!
User manual. Dishwasher ZDT15010FA
 EN User manual Dishwasher ZDT15010FA Contents Safety instructions 2 Control panel 3 Programmes _ 4 Options _ 5 Before first use _ 6 Daily use _ 7 Hints and tips 9 Care and cleaning _ 10 Troubleshooting
GETTING STARTED? EASY.
 User Manual GETTING STARTED? EASY. ZDT24003FA EN User Manual Dishwasher SAFETY INFORMATION Before the installation and use of the appliance, carefully read the supplied instructions. The manufacturer is
User Manual. Hob ZEI6740BBA
 EN User Manual Hob ZEI6740BBA Contents Safety information 2 Safety instructions 3 Product description 5 Daily use 6 Hints and tips 8 Care and cleaning 10 Troubleshooting 10 Installation 12 Technical information
User manual. Dishwasher ZDT12041FA
 EN User manual Dishwasher ZDT12041FA Contents Safety instructions 2 Control panel 3 Programmes _ 4 Options _ 4 Before first use _ 5 Daily use _ 7 Hints and tips 9 Care and cleaning 9 Troubleshooting 10
user manual Dishwasher ESL 46510
 user manual Dishwasher ESL 46510 2 electrolux CONTENTS Electrolux. Thinking of you. Share more of our thinking at www.electrolux.com Safety information 2 Product description 5 Control panel 5 Use of the
GUH90 90 cm Canopy Hood
 User Manual for your GUH90 90 cm Canopy Hood NOTE: This User Instruction Manual contains important information, including safety & installation points, which will enable you to get the most out of your
User Manual. Dishwasher IDSH604W
 EN User Manual Dishwasher IDSH604W Contents Safety information 2 Safety instructions 3 Product description 4 Control panel 5 Programmes 5 Settings 6 Before first use 8 Safety information Daily use 9 Hints
DIGITAL DOUBLE DEEP FRYER
 DIGITAL DOUBLE DEEP FRYER Customer Service: 1-800-423-4248 Printed in China Digital Double Deep Fryer ITEM NO.8387SI. The Sharper Image name and logo are registered trademarks. Manufactured and Marketed
ESL 5201LO EN DISHWASHER USER MANUAL
 ESL 5201LO EN DISHWASHER USER MANUAL 2 www.electrolux.com CONTENTS 1. SAFETY INFORMATION... 2 2. SAFETY INSTRUCTIONS...4 3. PRODUCT DESCRIPTION... 5 4. CONTROL PANEL...6 5. PROGRAMMES...6 6. SETTINGS...
User manual. 600 // Ceramic Hob - TOUCH TCT60
 User manual 600 // Ceramic Hob - TOUCH TCT60 IMPORTANT // Please ensure that you read through this user manual prior to installation and use. This manual contains important information to ensure optimal
Contents. 7 Notices 21 Electromagnetic fields (EMF) 21 Recycling Important 4
 21 Recycling Important 4") HD2178 User manual Contents 1 Important 4 2 Your All-in-One cooker 8 What s in the box 8 Product overview 9 Controls overview 10 3 Getting started 11 Before first use 11 7 Notices 21 Electromagnetic fields
HD2178 User manual Contents 1 Important 4 2 Your All-in-One cooker 8 What s in the box 8 Product overview 9 Controls overview 10 3 Getting started 11 Before first use 11 7 Notices 21 Electromagnetic fields
AIR FRYER INSTRUCTION MANUAL
 AIR FRYER INSTRUCTION MANUAL HOUSEHOLD USE ONLY Shenzhen TidylifeTrading Co., Ltd. Xingduhaoting,Buji Street,Longgang District,Shenzhen Facebook Page:www.facebook.com/Tidylifeservice Website:www.tidylife.cc
Cooker Hood Instruction Manual
 Cooker Hood Instruction Manual Model number(s): RHSCH601SS/B & RHSCH901SS/B IMPORTANT: RETAIN FOR FUTURE REFERENCE Contents Safety Instructions. 3-6 Product Overview. 7 Positioning. 8 Operational modes.
User manual. Dishwasher ZDI12010XA
 EN User manual Dishwasher ZDI12010XA Contents Safety instructions 2 Control panel 4 Programmes _ 4 Before first use _ 5 Daily use _ 7 Hints and tips 9 Care and cleaning 9 Troubleshooting 10 Technical information
User manual. Dishwasher ZDTS102. Downloaded from manuals search engine
 User manual Dishwasher ZDTS102 Contents Safety information _ 2 Control panel 3 Washing programmes _ 4 Use of the appliance 5 Set the water softener _ 6 Use of dishwasher salt _ 7 Use of rinse aid 7 Load
Induction Fryer. Instruction manual. Model Modèle Modell Modello Modelo Malli: CP793
 Induction Fryer Instruction manual Model Modèle Modell Modello Modelo Malli: CP793 UK Safety Tips Position on a flat, stable surface. A service agent/qualified technician should carry out installation
The Professional s Choice
 SureFlow compact range: 1000-C & 1000-M Auto-Fill Catering Water Boiler Installation And User Instructions The Professional s Choice CONTENTS CONTENTS & INTRODUCTION 2 SAFETY & ENVIRONMENTAL INFORMATION
Installation & Operators Manual
 Installation & Operators Manual Eco, Hydro and Duo under counter range Part number 902.0011 Revision A Installation and Operation instructions For Classeq under counter range of glass and dishwashers.
Installation and Operating Instructions
 Installation and Operating Instructions Model: HOB6S-4E-4 HOB6W-4E-4 For your convenience, we recommend to attach the serial number label HERE. As part of Parmco Appliances commitment to improving and
Built-in Microwave Oven
 Built-in Microwave Oven Instructions and Installation /appliance-registration HJA7030 See back page for product serial number CONTENTS Environmental note 4 Installation 5 Important safety information 6-10
GETTING STARTED? EASY.
 User Manual GETTING STARTED? EASY. ZDF26001WA ZDF26001XA EN User Manual Dishwasher SAFETY INFORMATION Before the installation and use of the appliance, carefully read the supplied instructions. The manufacturer