Laveuse automatique b chargement frontal
|
|
|
- Moses Howard
- 5 years ago
- Views:
Transcription
1 Front-Loading Automatic Washer Use & "+"%Gude " Lavadora autombtica de carga frontal Laveuse automatique b chargement frontal,_...g,+_. '..., _ Models/Modelos/Modeles , $ = color number, n0mero de color, numero de couleur Designed to use only HE High Efficiency detergent Disefiado para utilizar solamente detergente de alto rendimiento Congu pour I'utilisation d'un detergent haute efficacite seulement Sears Roebuck and Co., Hoffman Estates, IL 60179, U.S.A. / Sears Canada Inc., Toronto, Ontario, Canada M5B 2B8

2 TABLE OF CONTENTS PROTECTION AGREEMENTS... 2 In the U.S.A... 2 In Canada... 2 WARRANTY... 3 WASHER SAFETY... 4 INSTALLATION REQUIREMENTS... 5 Tools and Parts... 5 Options... 5 Location Requirements... 6 Drain System... 7 Electrical Requirements... 8 INSTALLATION INSTRUCTIONS... g Remove Transport System... 9 Connect the Inlet Hoses... 9 Route the Drain Hose Secure the Drain Hose Level the Washer Complete Installation FEATURES AND BENEFITS WASHER USE Starting Your Washer Using the Proper Detergent Using the Dispenser Pausing or Restarting Changing Cycles, Options and Modifiers Status Lights Cycles Normal Washer Sounds Options Modifiers Laundry Guide LAUNDRY TIPS Loading WASHER CARE Cleaning Your Washer Water Inlet Hoses Vacation, Storage, and Moving Care TROUBLESHOOTING SERVICE NUMBERS... BACK COVER PROTECTION AGREEMENTS The Master Protection Agreement also helps extend the life of your new product. Here's what's included in the Agreement: v' Expert service by our 12,000 professional repair specialists v' Unlimited service and no charge for parts and labor on all covered repairs v' "No-lemon" guarantee - replacement of your covered product if four or more product failures occur within twelve months v' Product replacement if your covered product can't be fixed v' Annual Preventive Maintenance Check at your request - no extra charge v' Fast help by phone - phone support from a Sears technician on products requiring in-home repair, plus convenient repair scheduling v' Power surge protection against electrical damage due to power fluctuations v' Rental reimbursement if repair of your covered product takes longer than promised Once you purchase the Agreement, a simple phone call is all that it takes for you to schedule service. You can call anytime day or night, or schedule a service appointment online. Sears has over 12,000 professional repair specialists, who have access to over 4.5 million quality parts and accessories. That's the kind of professionalism you can count on to help prolong the life of your new purchase for years to come. Purchase your Master Protection Agreement today! Some limitations and exclusions apply. For prices and additional information, call Sears Installation Service For Sears professional installation of home appliances, garage door openers, water heaters, and other major home items, in the U.S.A. call MY-HOME. Maintenance Agreements Your purchase has added value because you can depend on Sears HomeCentraP for service. With over 2,400 Service Technicians and more than a million parts and accessories, we have the tools, parts, knowledge and skills to back our pledge: We Service What We Sell. Your Kenmore product is designed, manufactured and tested to provide years of dependable operation. But like all products, it may require service from time to time. The Sears Maintenance Agreement offers you an outstanding service program, affordably priced. The Sears Maintenance Agreement Is your way to buy tomorrow's service at today's price Master Protection Agreements Congratulations on making a smart purchase. Your new Kenmore product is designed and manufactured for years of dependable operation. But like all products, it may require preventive maintenance or repair from time to time. That's when having a Master Protection Agreement can save you money and aggravation. Purchase a Master Protection Agreement now and protect yourself from unexpected hassle and expense. Eliminates repair bills resulting from normal wear and tear Provides phone support from a Sears technician on products requiring in-home repair Even if you don't need repairs, provides an annual Preventive Maintenance Check, at your request, to ensure that your product is in proper running condition. Some limitations apply. For more information about Sears Canada Maintenance Agreements, call
3 KENMORE ELITE APPLIANCE WARRANTY ONE YEAR LIMITED WARRANTY When installed, operated and maintained according to all instructions supplied with the product, if this appliance fails due to a defect in material or workmanship within one year from the date of purchase, call MY-HOME to arrange for free repair. LIMITED LIFETIME WARRANTY ON STAINLESS STEEL DRUM For the lifetime of the washer from the date of purchase, when this washer is installed, operated and maintained according to all instructions supplied with the product, Sears will replace the stainless steel wash drum due to defective materials or workmanship. After the first year, customer assumes any labor costs associated with replacement of this part. TEN YEAR LIMITED WARRANTY ON PLASTIC TUB For ten years from the date of purchase, when this washer is installed, operated and maintained according to all instructions supplied with the product, Sears will replace the plastic tub due to defective materials or workmanship. After the first year, customer assumes any labor costs associated with replacement of this part. FIVE YEAR LIMITED WARRANTY ON DRIVE SYSTEM PARTS For five years from the date of purchase, when this washer is installed, operated and maintained according to all instructions supplied with the product, Sears will replace the following drive system parts if defective in materials or workmanship: drive pulley and drive belt. After the first year, customer assumes any labor costs associated with replacement of these parts. TWO YEAR LIMITED WARRANTY ON SENSOR SMART TM ELECTRONIC BOARD For two years from the date of purchase, when this washer is installed, operated and maintained according to all instructions supplied with the product, Sears will replace the electronic control board if defective in materials or workmanship. After the first year, customer assumes any labor costs associated with replacement of these parts. If this appliance is used for other than private family purposes, this warranty applies for only 90 days from the date of purchase. THIS WARRANTY COVERS ONLY DEFECTS IN MATERIAL AND WORKMANSHIP. SEARS WILL NOT PAY FOR: 1. Expendable items that can wear out from normal use, including but not limited to filters, belts, light bulbs, and bags. 2. A service technician to instruct the user in correct product installation, operation or maintenance. 3. A service technician to clean or maintain this product. 4. Damage to or failure of this product if it is not installed, operated or maintained according to all instructions supplied with the product. 5. Damage to or failure of this product resulting from accident, abuse, misuse or use for other than its intended purpose. 6. Damage to or failure of this product caused by the use of detergents, cleaners, chemicals or utensils other than those recommended in all instructions supplied with the product. 7. Damage to or failure of parts or systems resulting from unauthorized modifications made to this product. DISCLAIMER OF IMPLIED WARRANTIES; LIMITATION OF REMEDIES Customer's sole and exclusive remedy under this limited warranty shall be product repair as provided herein. Implied warranties, including warranties of merchantability or fitness for a particular purpose, are limited to one year or the shortest period allowed by law. Sears shall not be liable for incidental or consequential damages. Some states and provinces do not allow the exclusion or limitation of incidental or consequential damages, or limitations on the duration of implied warranties of merchantability or fitness, so these exclusions or limitations may not apply to you. This warranty applies only while this appliance is used in the United States and Canada. This warranty gives you specific legal rights, and you may also have other rights which vary from state to state. Sears, Roebuck and Co. Dept. 817WA, Hoffman Estates, IL Sears Canada Inc. Toronto, Ontario, Canada M5B 2B8 PRODUCT RECORD In the space below, record your complete model number, serial number, and purchase date. You can find this information on the model and serial number label located on the product. Have this information available to help you obtain assistance or service more quickly whenever you contact Sears concerning your appliance. Model number Serial number Purchase date Save these instructions reference. and your sales receipt for future
4 WASHER SAFETY Your safety and the safety of others are very important. We have provided many important safety messages in this manual and on your appliance. Always read and obey all safety messages. This is the safety alert symbol. This symbol alerts you to potential hazards that can kill or hurt you and others. All safety messages will follow the safety alert symbol and either the word "DANGER" or "WARNING." These words mean: You can be killed or seriously follow instructions. injured if you don't immediately You can be killed or seriously injured if you don't follow instructions. All safety messages will tell you what the potential hazard is, tell you how to reduce the chance of injury, and tell you what can happen if the instructions are not followed. IMPORTANT SAFETY INSTRUCTIONS WARNING: To reduce the risk of fire, electric shock, or injury to persons when using the washer, follow basic precautions, including the following: [] Read all instructions before using the washer. [] Do not wash articles that have been previously cleaned in, washed in, soaked in, or spotted with gasoline, dry-cleaning solvents, other flammable, or explosive substances as they give off vapors that could ignite or explode. [] Do not add gasoline, dry-cleaning solvents, or other flammable, or explosive substances to the wash water. These substances explode. give off vapors that could ignite or [] Under certain conditions, hydrogen gas may be produced in a hot water system that has not been used for 2 weeks or more. HYDROGEN GAS IS EXPLOSIVE. If the hot water system has not been used for such a period, before using the washing machine, turn on all hot water faucets and let the water flow from each for several minutes. This will release any accumulated hydrogen gas. As the gas is flammable, this time. do not smoke or use an open flame during [] Do not allow children to play on or in the washer. Close supervision of children is necessary when the washer is used near children. [] Before the washer is removed from service or discarded, remove the door or lid. [] Do not reach into the washer if the drum, tub or agitator is moving. [] Do not install or store the washer where it will be exposed to the weather. [] Do not tamper with controls. [] Do not repair or replace any part of the washer or attempt any servicing unless specifically recommended in this manual or in published user-repair instructions that you understand and have the skills to carry out. SAVE THESE INSTRUCTIONS [] See "Electrical Requirements" for grounding instructions.
5 INSTALLATION REQUIREMENTS Gather the required tools and parts before starting installation. The parts supplied are in the washer drum. Tools needed for connecting the water inlet hoses Pliers (that open to 19/16"[39.5 mm]) Flashlight (optional) Tools needed for installation Open end wrenches 17 mm and 13 mm Level Wood block Pedestal You have the option of purchasing pedestals of different heights separately for this washer. You may select a 10" (25.4 cm) or a 15.5" (39.4 cm) pedestal. Remember that the pedestal will add to the total height of the washer. Ruler or measuring tape Parts supplied A B A. 10" (25.4 crn) pedestal B. 15.5" (39.4 crn) pedestal This pedestal (with storage drawer) is available in several colors. To order, call your local Sears store. For further information, please call MY-HOME ( ). Alternate Parts A. Drain hose form B. Inlet hose (2) C. Inlet hose washer (4) D. Transport bolt hole plug (4) E. Beaded strap Parts listed are available from your local Sears store or Sears Service Center. For further information, please call MY-HOME ( ). I1 You Have You Will Need to Buy Laundry tub or Sump pump system (if not already standpipe taller available) than 96" (2.4 m) Pedestal Approximate Color Part Height Height with Number Washer 10" (25.4 cm) 48" (122 cm) White " (39.4 cm} 53" (135 cm) White Stack Kit Are you planning to stack your Kenmore washer and dryer? To do so, find the stack kit ( ) in the drum of the matching Kenmore dryer. Follow instructions included with the kit. See "Location Requirements." Overhead sewer Standard 20 gal. (76 L), 30" (76.2 cm) tall drain tub or utility sink and sump pump (available from local plumbing suppliers) Floor drain Siphon break, Part Number ; additional drain hose, Part Number ; and connector kit, Part Number Drain hose too 4 ft (1.2 m) drain hose extension kit, short Part Number Water faucets 2 longer water fill hoses: beyond reach of fill 6 ft (1.8 m) Part Number 76314, hoses 10 ft (3.0 m) Part Number
6 Selecting theproper locationforyourwasher improves performance andminimizes noiseandpossiblewasher "walk." Yourwashercanbeinstalledunderacustomcounter, orina basement, laundryroom,closet,orrecessedarea.see"drain System." Companion appliance locationrequirements shouldalsobe considered. Proper installation isyourresponsibility. You will need A water heater set to deliver 120 F (49 C) water to the washer. A grounded electrical outlet located within 6 ft (1.8 m) of where the power cord is attached to the back of the washer. See "Electrical Requirements." Hot and cold water faucets located within 4 ft (1.2 m) of the hot and cold water fill valves, and water pressure of psi ( kpa). A level floor with a maximum slope of 1" (2.5 cm) under entire washer. Installing the washer on soft floor surfaces, such as carpets or surfaces with foam backing, is not recommended. A sturdy and solid floor to support the washer with a total weight (water and load) of 400 Ibs (180 kg). Do not operate your washer in temperatures below 32 F (0 C). Some water can remain in the washer and can cause damage in low temperatures. Installation clearances The location must be large enough to allow the washer door to be fully opened. Additional spacing should be considered for ease of installation and servicing. Additional clearances might be required for wall, door, and floor moldings. Additional spacing of 1" (2.5 cm) on all sides of the washer is recommended to reduce noise transfer. Recommended installation spacing for custom undercounter installation The dimensions shown are for the recommended spacing. Custom undercounter installation - Washer only 39"rain. (99.0cm) + 1"--*F%,. 27"--_ 1" (2.5 crn) (68.6 crn) (2.5 cm) Recommended installation spacing for recessed or closet installation, with or without a pedestal The dimensions shown are for the recommended spacing. Recessed area or closet installation F- L _..., 34"' (86.4 cm) _ I1"_ 31_/2 " -_14"I_- (2.5cm) (86cm) (10.2cm) A 48 in'2*-} (310 crn 2} 24in,2* -, (155cm2) ' A. Side view - closet or confined area B. Closet door with vents *Min. top and bottom air openings for closet door. # '_t 3" (7.6crn) f 3" (7.6cm) Recessed or closet installation - Washer on pedestal Companion appliance spacing should also be considered. Washer Dimensions 5/" (129.5crn) 27 _ 38 _ 196.5cm) (2.8 cm) A. Recessed area B. Side view - closet or confined area 311/2" (80.0crn)
7 Recommended installation spacing for recessed or closet installation, with stacked washer and dryer The dimensions shown are for the recommended spacing. 48 in?* (316 cm 2) + O 3" (7.6cm) The washer can be installed using the standpipe drain system (floor or wall), the laundry tub drain system, or the floor drain system. Select the drain hose installation method you need. See "Tools and Parts." Standpipe drain system - wall or floor (views A & 13} The standpipe drain requires a minimum diameter standpipe of 2" (5 cm). The minimum carry-away capacity can be no less than 17 gal. (64 L) per minute. The top of the standpipe must be at least 30" (76.2 cm) high and no higher than 96" (2.4 m) from the bottom of the washer. 24in? * (155cm2) 3" (7.6 cm) + _- 1" (2.5crn) 30" rnin. (76,2cm) 6" (1_2 cm) t A B i \\ 76" (193crn) Laundry tub drain system (view C) The laundry tub needs a minimum 20 gal. (76 L) capacity. The top of the laundry tub must be at least 30" (76.2 cm) above the floor. 5½"** (14cm) (2.5 cm) _--27"- - 1"*** 68.6 crn 2.6 cm *Min. top and bottom air openings for closet door. **External exhaust elbow requires additional space. ***Wall, door and floor molding additional spacing. may require Floor drain system (view D) The floor drain system requires a siphon break that may be purchased separately. See "Tools and Parts." The siphon break must be a minimum of 28" (71 cm) from the bottom of the washer. Additional hoses might be needed. Recommended installation spacing for cabinet installation The dimensions shown are for the recommended spacing. For cabinet installation, with a door, the minimum ventilation openings in the top are required. C 7" (17.8cm) 7" (17.8cm) k, (22.9 cm) 4" 31W' 1" 1" 27" 1" (16.2 cm) (60,6 cm) (2.5 cm) (2.5 cm) (68.6 cm) (2.5 cm)
8 Do not ground to a gas pipe. Check with a qualified electrician if you are not sure the washer is properly grounded. Do not have a fuse in the neutral or ground circuit. GROUNDING INSTRUCTIONS Electrical Shock Hazard Plug into a grounded 3 prong outlet. Do not remove ground prong. Do not use an adapter. Do not use an extension cord. Failure to follow these instructions can result in death, fire, or electrical shock. A 120 volt, 60 Hz., AC only, 15- or 20-amp, fused electrical supply is required. A time-delay fuse or circuit breaker is recommended. It is recommended that a separate circuit serving only this appliance be provided. This washer is equipped with a power supply cord having a 3 prong grounding plug. To minimize possible shock hazard, the cord must be plugged into a mating, 3 prong, grounding-type outlet, grounded in accordance with local codes and ordinances. If a mating outlet is not available, it is the personal responsibility and obligation of the customer to have the properly grounded outlet installed by a qualified electrician. If codes permit and a separate ground wire is used, it is recommended that a qualified electrician determine that the ground path is adequate. For a grounded, cord-connected washer: This washer must be grounded. In the event of a malfunction or breakdown, grounding will reduce the risk of electrical shock by providing a path of least resistance for electric current. This washer is equipped with a cord having an equipment-grounding conductor and a grounding plug. The plug must be plugged into an appropriate outlet that is properly installed and grounded in accordance with all local codes and ordinances. WARNING: Improper connection of the equipmentgrounding conductor can result in a risk of electric shock. Check with a qualified electrician or serviceman if you are in doubt as to whether the appliance is properly grounded. Do not modify the plug provided with the appliance - if it will not fit the outlet, have a proper outlet installed by a qualified electrician. For a permanently connected washer: This washer must be connected to a grounded metal, permanent wiring system, or an equipment grounding conductor must be run with the circuit conductors and connected to the equipment-grounding terminal or lead on the appliance.
9 emove INSTALLATION 'ans s od: Ss,s ;}em...,,!j... Excessive Weight Hazard Use two or more people to move and install washer. Failure to do so can result in back or other injury. INSTRUCTIONS Make sure the washer drum is empty. 1. Attach the hose with the red color indicator to the Hot (left) inlet valve. Attaching the red coupling first makes it easier to tighten connection with pliers. Screw on coupling by hand until it is seated on the washer. 2. Attach the hose with the blue color indicator to the Cold (right) water inlet valve. Screw on coupling seated on the washe by hand until it is IMPORTANT: Position the washer so that the rear of the washer is within approximately 3 ft (90 cm) of its final location. There are 4 bolts in the rear panel of the washer that support the suspension system during transportation. These bolts also retain the power cord inside the washer until the bolts are removed. H. Hot C, Cold 1, 2. Using a 13 mm wrench, loosen each of the bolts. Once the bolt is loose, move it to the center of the hole and completely pull out the bolt, including the plastic spacer covering the bolt. 3, 4, Using pliers, check the tightness already attached to the washer. of the hose couplings NOTE: Do not overtighten. Damage to the coupling can result. Attach the hose with the red color indicator faucet. Screw on coupling washer. to the hot water by hand until it is seated on the 5, Attach the hose with the blue color indicator to the cold water faucet. Screw on coupling by hand until it is seated on the washer. 6, Using pliers, tighten the couplings two-thirds turn. with an additional 3. Once all 4 bolts are removed, discard the bolts and spacers. Then pull the power cord through the opening of the rear panel and close the hole with the attached cap. 4. Close the bolt holes with the 4 transport bolt hole plugs. NOTE: If the washer is to be transported at a later date, call your local service center. To avoid suspension and structural damage to your washer, it must be properly set up for relocation by a certified technician. NOTE: Do not overtighten. Damage to the coupling can result. Turn on the water faucets and check for leaks. NOTE: Replace inlet hoses after 5 years of use to reduce the risk of hose failure. Record hose installation or replacement dates on the hoses for future reference. Periodically inspect and replace hoses if bulges, kinks, cuts, wear, or leaks are found.
10 Proper routingofthedrainhoseprotectsyourfloorsfrom damageduetowaterleakage. Readandfollowthese instructions. Removedrainhosefromwashercabinet Gentlypullthecorrugated drainhosefromtheshippingclips Drape the power cord over the washer top. Secure the drain hose to the laundry tub leg or standpipe the beaded strap provided. (See illustrations A and B.) with C / If the washer faucets and the drain standpipe are recessed (see illustration C), put the hooked end of the drain hose in the standpipe. Tightly wrap the beaded strap around the water inlet hoses and the drain hose. Laundry tub drain or standpipe drain Connect the drain hose form to the corrugated drain hose. Do not force excess drain hose into the standpipe. Properly leveling your washer avoids excessive noise and vibration. 1. Check the levelness of the washer by placing a level on the top edge of the washer, first side to side, then front to back. A B A. Snap either end of the drain hose form to the drain hose at the point where the corrugation begins. B. Bend drain hose over drain hose form and snap into place. To keep drain water from going back into the washer: Do not straighten the drain hose, and do not force excess drain hose into standpipe. Hose should be secure, but loose enough to provide a gap for air. Do not lay excess hose on the bottom of the laundry tub. Floor drain You may need additional Parts." parts. See Floor drain under "Tools and If the washer is against a wall, move the washer out slightly before tipping back. If the washer is not level, first prop the front with a wood block and adjust the feet as necessary; then prop the back and adjust feet as necessary. Repeat this step until washer is level. Make sure that all four feet are stable and resting on the floor. Then check that the appliance is perfectly level (use a level). After the washer is level, use a 17 mm open-end wrench to turn the nuts on the feet tightly against the washer cabinet. IMPORTANT: All four feet must be tightened. If the nuts are not tight against the washer cabinet, the washer may vibrate. When you are pushing on the edges of the washing machine top plate, the machine should not move front to back, side to side, or diagonally. Slide the washer Confirm to its final location. the levelness of the washer. 10

11 f. Check the electrical requirements. Be sure that you have the correct electrical supply and the recommended grounding method. See "Electrical Requirements." 2. Be sure all parts are now installed. If there is an extra part, go back through the steps to see which step was skipped. 3. Be sure you have all of your tools. 4. Dispose of/recycle all packaging materials. 5. Be sure the water faucets are on. 6. Check for leaks around faucets and inlet hoses. Plug into a grounded Electrical Shock Hazard 3 prong outlet. Do not remove ground prong. Do not use an adapter. Do not use an extension cord, Auto Water Level Adjusting to the size of the load, this feature allows the washer to use the minimal amount of water needed to clean and rinse the clothes. With a low water level, you can obtain the same results with smaller amounts of laundry products. Because only the required amount of water is used, the washer saves energy, too. Larger Load Size Since there is no agitator, you can wash larger, bulkier items such as an average size sleeping bag, pillow or a king size comforter. You are also able to wash more clothes at one time, which means fewer loads. Suspension System To reduce washer "walk" and "off-balance" conditions, your new washer combines: 2 Springs to isolate vibration 4 Shock absorbers at the washer base to minimize movement Stainless Steel Drum The stainless steel drum eliminates corrosion and enables higher spin speeds for more water extraction, helping to reduce drying time. High-Efficiency Wash System Your new front-loading, high-efficiency washer saves time with fewer, larger loads. It also conserves resources and lowers your water and energy bills g. Failure to follow these instructions can result in death, fire, or electrical Plug into a grounded Read "Washer Use." shock. 3 prong outlet. To test and to clean your washer, measure 1/2the manufacturer's recommended amount of powdered or liquid High Efficiency (HE) detergent for a medium size load. Pour the detergent into the detergent dispenser. Select NORMAL/ CASUAL, and then select START. Allow the washer to complete one whole cycle. Spin Speeds This washer automatically selects a spin speed based on the cycle selected. This factory setting can be changed, however, with up to six different spin speed choices. Thermal Optimizer with Smart Wash Technology The heating system ensures that the wash water is heated to the preset temperature for Heavy Duty, Whitest Whites, and the Sanitary cycles. It also provides Smart Wash Technology with "Stepped Cleaning" when you are using the Sanitary cycle. "Stepped Cleaning" starts the wash cycle with warm water to remove stains (such as blood or grass). Use only HE High Efficiency detergent. FEATURES AND BENEFITS Audio Visual Electronic Controls Flexible electronic controls are easy to use whether you are a beginner or an expert. Detergent Advantage System Dispenser The four compartments in the dispenser allow loading of all laundry products before the washer is started. The products will be dispensed into the wash at the optimal time for high-performance cleaning. TIMED BLEACH TM release is included in the detergent advantage system. The detergent is added at the beginning of the cycle, and the bleach is added after the enzymes have had a chance to do their cleaning. The fabric softener is dispensed in the rinse cycle. The Detergent Advantage System Dispenser tray can easily be removed for cleaning. Add Clothes This option is available in all wash cycles except Rinse/Spin, Drain/Spin and Clean Washer. When this option is available at the beginning of the cycle, the Add Clothes status light will illuminate for the first 8 minutes. This washer allows a 8-minute period in which other garments may be added to a load. Catalyst _ Cleaning Action A concentrated detergent solution is sprayed onto the clothes at the beginning of the cycle to ensure that the detergent comes into contact with the clothes as quickly as possible, helping to remove stains from your clothes without pretreating. Dynamic Balance A precision balancing system that allows the washer to reach spin speeds of up to 1,050 rpm. The washer spins faster so that clothes coming out of the washer will dry faster. In addition, if the Dynamic Balance system detects off-balance loads during spinning, it redistributes the clothes so that they are evenly balanced. 11
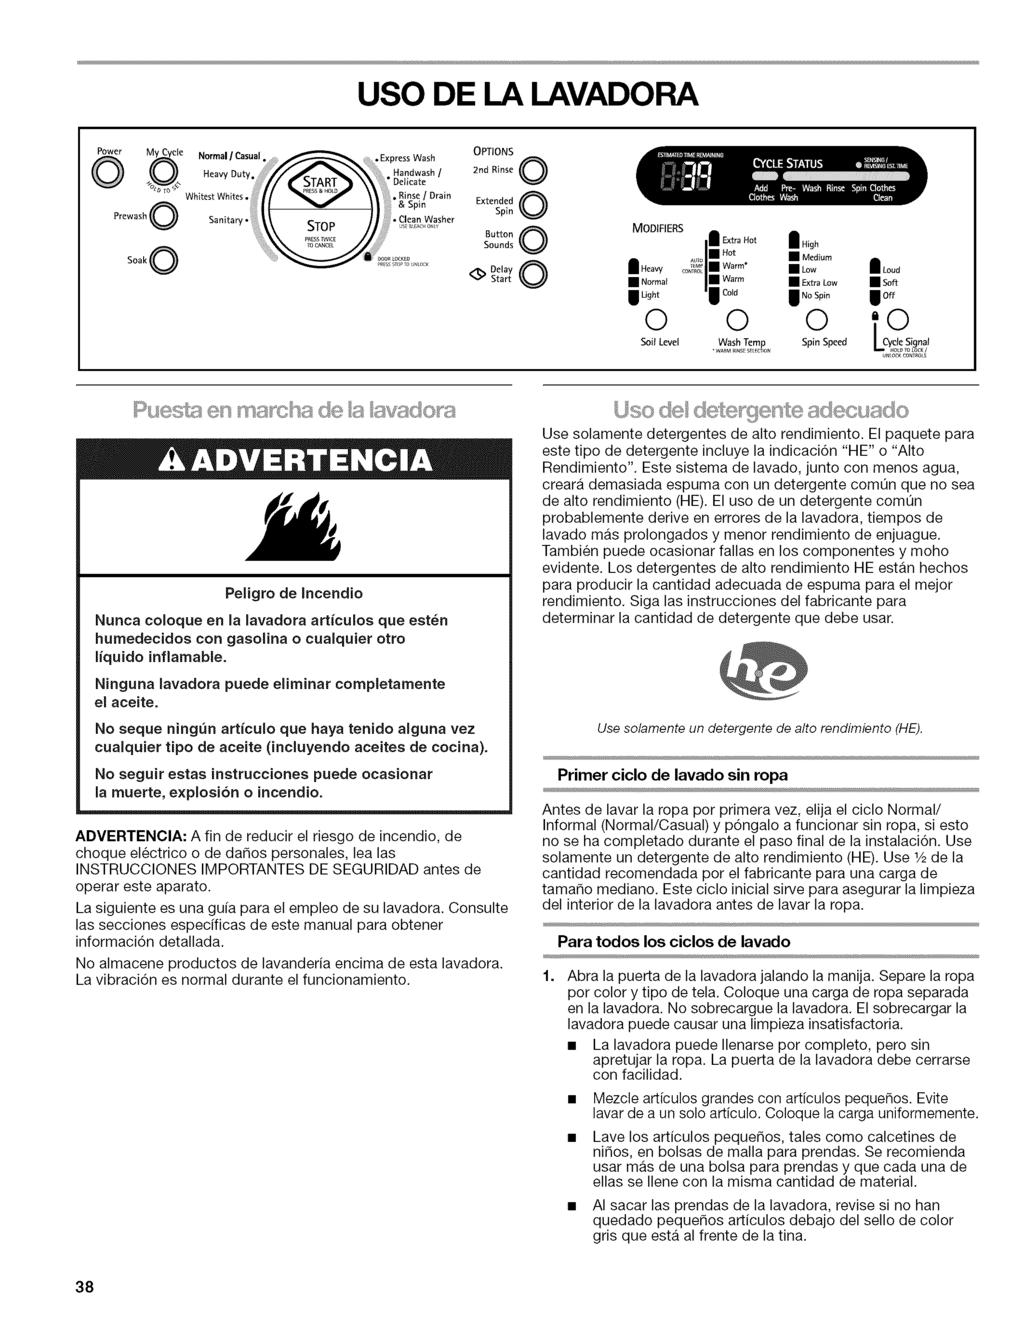
![WASHER USE Power My C de Normal / Canal Express Wash OPTIONS @ F._] Heavy Duty_ " DelicateHandwash / ore Whitest Whites.](/docs-images/96/128728079/images/12-0.jpg ". Rinse / Drain Prewash O Sanitary : & Clean Sp nwasher Soa k oo_lo_ke_ 2rid Rinse 0 Extended Spin 0 sbo';to 0 Delay _) Start 0 MODIFIERS 1 Extra H t IHigh BB Hot Medium ihe_w...in ilo_ ilo_d.")
12 WASHER USE Power My C de Normal / Canal Express Wash F._] Heavy Duty_ " DelicateHandwash / ore Whitest Whites.. Rinse / Drain Prewash O Sanitary : & Clean Sp nwasher Soa k oo_lo_ke_ 2rid Rinse 0 Extended Spin 0 sbo';to 0 Delay _) Start 0 MODIFIERS 1 Extra H t IHigh BB Hot Medium ihe_w...in ilo_ ilo_d.o,mo, Imwo=.t.oLow so_ I Light I Co(d 1 No Spin loft '0,, First Wash Cycle Without Laundry Before washing clothes for the first time, if not completed during the final installation step, choose the Normal/Casual cycle and run it without clothes. Use only HE High Efficiency detergent. Use Y_the manufacturer's recommended amount for a medium-sized load. This initial cycle serves to ensure the interior is clean before washing clothes. For All Wash Cycles Fire Hazard Never place items in the washer that are dampened with gasoline or other flammable fluids. No washer can completely remove oil. Do not dry anything that has ever had any type of oil on it (including cooking oils). Doing so can result in death, explosion, or fire. WARNING: To reduce the risk of fire, electric shock, or injury to persons, read the IMPORTANT SAFETY INSTRUCTIONS before operating this appliance. The following is a guide to using your washer. Please refer to specific sections of this manual for more detailed information. Do not store laundry products on the top surface of this washer. Vibration is normal during operation. Use only High Efficiency detergents. The package for this type of detergent will be marked "HE" or "High Efficiency." This wash system, along with less water, will create too much sudsing with a regular non-he detergent. Using regular detergent will likely result in washer errors, longer cycle times and, reduced rinsing performance. It may also result in component failures and noticeable mold or mildew. HE detergents are made to produce the right amount of suds for the best performance. Follow the manufacturer's instructions to determine the amount of detergent to use. Use only "HE" High Efficiency detergent. Open the washer door by pulling on the handle. Sort laundry according to color and type of fabric. Place a load of sorted clothes in the washer. Do not overload washer. Overloading can cause poor cleaning. The washer can be fully loaded, but not tightly packed. Washer door should close easily. Mix large and small items. Avoid washing a single item. Load evenly. Wash small items such as infant socks in mesh garment bags. It is recommended that more than one garment bag be used and that each garment bag be filled with equal amounts of material. When unloading garments, check under the gray colored seal at the front of the tub for small items. 2. Close the washer door by pushing it firmly until the lock clicks. The washer door will remain locked during the wash cycle. 3, 4, NOTES: After any wash cycle is completed, the door must be opened and then closed before a new cycle can begin. The door can be opened only if STOP is selected while the ADD CLOTHES light is glowing or if the cycle has been canceled. See "To cancel a cycle" in "Changing Cycles, Options and Modifiers section. Open the dispenser drawer and add laundry products to the detergent, bleach, or fabric softener compartments. Close drawer slowly to avoid spills. See "Using the Dispenser." Turn on the washer by selecting POWER. Select one of the cycles by turning the cycle selector. The indicator light for the selected cycle will glow green. When you are selecting a wash cycle, the preset modifiers (Soil Level, Wash Temp and Spin Speed) for the cycle, will glow green. Selectable options will glow amber. If an option or modifier is unavailable with the selected cycle, the light will not illuminate. The preset settings provide the recommended fabric care for the selected cycle. The display shows the estimated time remaining. See "Cycles." 12
13 5. Select the desired OPTIONS. Not all Options are available with all cycles. See "Options." 6. Select the desired MODIFIERS. Not all Modifiers are available with all Cycles and Options. See "Modifiers." 7. If desired, select the CYCLE SIGNAL. The signal is helpful when you are washing items that should be removed from the washer as soon as it stops. Select LOUD, SOFT or OFF. 8. To begin the wash cycle immediately Select and hold START (for approximately 1 second). If you do not select START within 5 minutes of choosing a cycle, the washer automatically shuts off. When the wash cycle is complete, the CLOTHES CLEAN status light glows, the door unlocks, and the wash load can be removed from the washer. The washer powers down automatically 60 minutes after the cycle is complete and the CLOTHES CLEAN light goes off. 9. To begin the wash cycle later Select DELAY until the desired delay time (in hours) shows in the Estimated Time Remaining display. Select START. The countdown to the wash cycle will show in the display window, and the button indicator will blink until the cycle begins. IMPORTANT: When delaying a cycle, use only powdered detergents in the main wash compartment since liquid detergents may seep out of the compartment during Delay, before the wash cycle begins. Your new washer has a dispenser drawer with three separate compartments for your laundry products--one is for detergent, one is for liquid chlorine bleach, and one is for liquid fabric softener. Laundry products are diluted and dispensed automatically at the proper time during the wash cycle, making it unnecessary for you to return to the washer during the cycle to add them. It is normal for small amounts of water to remain in the dispensers when the wash cycle is complete. Do not put laundry products directly into the wash tub. Always use the proper dispensers when adding laundry products. To fill dispenser compartments 1. Pull out the dispenser drawer. 2. Add the desired laundry product to the proper compartment. 3. Push in the dispenser drawer slowly and completely (to avoid a spill). Choosing the Right Detergent Use only High Efficiency detergents. The package for this type of detergent will be marked "HE" or "High Efficiency." This wash system, along with less water, will create too much sudsing with a regular non-he detergent. Using regular detergent will likely result in washer errors, longer cycle times and, reduced rinsing performance. It may also result in component failures and noticeable mold or mildew. HE detergents are made to produce the right amount of suds for the best performance. Follow the manufacturer's instructions to determine the amount of detergent to use. B...Y Use only "HE" High Efficiency detergent. Dispenser A. Detergent type selector B. Main Wash detergent compartment C. Dispenser release lever D. Chlorine bleach compartment E. Fabric softener compartment Main Wash detergent compartment (Letters A & B in Dispenser Illustration) Add liquid or powdered HE detergent to this compartment for your main wash cycle. The detergent type selector (A) must always be in the correct position for the detergent type used. Slide the detergent type selector to the correct position. IMPORTANT: If you are using the Delay option, powdered detergent must be used in the main wash compartment since liquid detergents may seep out of the main wash compartment, before the main wash begins. Use detergent manufacturer's recommended amount for load size. Liquid or powdered color-safe bleach may be added to the Main Wash compartment along with the same type of detergent, liquid or powdered. 13
14

15
16
17
18
19
20
21
22
23
24
25
26
27
28
29
30
31
32
33
34
35
36
37
38

39

40

41
42
43
44
45
46
47

48
49

50

51
52
53
54
55

56
57
58
59

60
61

62
63

64

65
66

67

68

69

70
71
72
73
74

75
76
77
78
79

80
INSTALLATION INSTRUCTIONS
 INSTALLATION INSTRUCTIONS INSTALLATION REQUIREMENTS Tools and Parts Gather required tools and parts before starting installation. Tools needed: Optional tools: Flashlight Options: Bucket Pedestal: You
202 West 2 nd St Whirlpool Laundry Manual WASHER SAFETY. Your safety and the safety of others are very important.
 WASHER SAFETY Your safety and the safety of others are very important. We have provided many important safety messages in this manual and on your appliance. Always read and obey all safety messages. This
WASHER USER INSTRUCTIONS
 WASHER USER INSTRUCTIONS Before calling for assistance or service, please check Troubleshooting. It may save you the cost of a service call. If you still need help, contact the dealer from whom you purchased
FRONT-LOADING AUTOMATIC WASHER
 CONSUMER SERVICES TECHNICAL EDUCATION GROUP PRESENTS L-78 FRONT-LOADING AUTOMATIC WASHER MODELS: WFW8300SW, WFW8500SW, WFW8500SR JOB AID Part No. 8178558 FORWARD This Whirlpool Job Aid, Duet Sport Front-Loading
Pro Line FRONT-LOADING AUTOMATIC WASHER
 KAL-6 TECHNICAL EDUCATION Pro Line FRONT-LOADING AUTOMATIC WASHER MODEL KHWV01RSS JOB AID 4317375 FORWARD This KitchenAid Job Aid Pro Line Front-Loading Automatic Washer (Part No. 4317375), provides the
WASHER INSTALLATION INSTRUCTIONS INSTRUCTIONS POUR L INSTALLATION DE LA LAVEUSE
 WASHER INSTALLATION INSTRUCTIONS INSTRUCTIONS POUR L INSTALLATION DE LA LAVEUSE Table of Contents WASHER SAFETY...1 INSTALLATION REQUIREMENTS...2 Tools and Parts... 2 Location Requirements... 2 Drain System...
Washer. 120~volt 60-Hz. IhilPORTANT: Read and save these instructions. Parts supplied:
 Bi Installation Instructions 120~volt 60-Hz Washer Your safety and the safety of others is very important. We have provided many important safety messages in this manual and on your appliance. Always read
EPIC z FRONT-LOADING WASHER
 ML-8 TECHNICAL EDUCATION EPIC z FRONT-LOADING WASHER MODELS: MHWZ400TW00 MHWZ600TW00 JOB AID 8178686 FORWARD This Maytag Job Aid, Epic z Front-Loading Automatic Washer (Part No. 8178686), provides the
WASHER USER INSTRUCTIONS
 If you need assistance or service, first see the Troubleshooting section. Additional help is available by calling our Customer experience Center at 1-800-253-1301 from anywhere in the U.S.A., or write:
THE READY RACK 2 GEAR PPE DRYING CABINET. Operator s Manual & Installation Guide. Installation/Operation/Maintenance/Part Number I
 THE READY RACK 2 GEAR PPE DRYING CABINET Operator s Manual & Installation Guide Installation/Operation/Maintenance/Part Number 820220I Copy right 2016 Forward We are pleased that you have selected a Ready
CONSUMER CARE TECHNICAL EDUCATION GROUP PRESENTS
 CONSUMER CARE TECHNICAL EDUCATION GROUP PRESENTS L-83 2008 24 FRONT-LOADING AUTOMATIC WASHER Model WFC7500VW0 JOB AID Part No. 8178738 FORWARD This Whirlpool Job Aid, 2008 24" Front-Loading Automatic Washer
ML-1 TECHNICAL EDUCATION. Epic FRONT-LOADING AUTOMATIC WASHER MODEL MFW 9700S MFW 9600S JOB AID
 ML-1 TECHNICAL EDUCATION Epic FRONT-LOADING AUTOMATIC WASHER MODEL MFW 9700S MFW 9600S JOB AID 8178604 FORWARD This Maytag Job Aid Epic Front-Loading Automatic Washer (Part No. 8178604), provides the In
WASHER USER INSTRUCTIONS
 WASHER USER INSTRUCTIONS Table of Contents ASSISTANCE OR SERVICE... 1 WASHER SAFETY... 2 WASHER USE... 3 WASHER CARE... 5 TROUBLESHOOTING... 6 WARRANTY... 8 If you need assistance or service, first see
WASHER USER INSTRUCTIONS
 If you need assistance or service, first see the Troubleshooting section. Additional help is available by calling our Customer Interaction Center at 1-800-253-1301 from anywhere in the U.S.A., or write:
Operator s Manual READY RACK EXTRACTOR. Installation/Operation/Maintenance/Parts DIMENSIONS OF THE WASHER: HEIGHT (AT BACK): 42
: 42") READY RACK EXTRACTOR DIMENSIONS OF THE WASHER: HEIGHT (AT BACK): 42 HEIGHT (W/ LID RAISED): 56 WIDTH: 27 DEPTH: 26 DEPTH (W/ REAR HOSE): 30 WEIGHT: 190 lbs. SHIP WEIGHT: 255 lbs. Operator s Manual Installation/Operation/Maintenance/Parts
READY RACK EXTRACTOR DIMENSIONS OF THE WASHER: HEIGHT (AT BACK): 42 HEIGHT (W/ LID RAISED): 56 WIDTH: 27 DEPTH: 26 DEPTH (W/ REAR HOSE): 30 WEIGHT: 190 lbs. SHIP WEIGHT: 255 lbs. Operator s Manual Installation/Operation/Maintenance/Parts
DRYER USER INSTRUCTIONS
 If you need assistance or service, first see the Troubleshooting section. Additional help is available by calling our Customer experience Center at 1-800-253-1301 from anywhere in the U.S.A., or write:
Kenmore Elite Top-Loading
 Use & Care Guide high efficiency English Model: 796.3155* Kenmore Elite Top-Loading Automatic Washer * = color number P/N MFL68267013 Sears Brands Management Corporation TABLE OF CONTENTS IMPORTANT SAFETY
WASHER USER INSTRUCTIONS
 WASHER USER INSTRUCTIONS If you need assistance or service, first see the Troubleshooting section. Additional help is available by calling: Whirlpool Customer Interaction Centre 1-300-363-344 (Australia)
WASHER USER INSTRUCTIONS WASHER SAFETY
 WASHER USER INSTRUCTIONS If you need assistance or service, first see the Troubleshooting section. Additional help is available by calling our Costco Support Line for KIRKLAND SIGNATURE appliances by Whirlpool
Unpacking and removing shipping bolts. Connecting the drain line Leveling the washer Connecting to the power supply
 11 INSTALLATION Installation Overview Choosing the proper location Unpacking and removing shipping bolts Connecting the water line Connecting the drain line Leveling the washer Connecting to the power
INSTALLATION INSTRUCTIONS INSTRUCTIONS D INSTALLATION. Commercial Washer. Laveuse commerciale TABLE OF CONTENTS
 INSTALLATION INSTRUCTIONS Commercial Washer INSTRUCTIONS D INSTALLATION Laveuse commerciale TABLE OF CONTENTS. Page Washer Safety... 2 Tools & Parts... 3 Dimensions... 4 Location Requirements... 5 Drain
Installation Instructions
 Installation Instructions for Frontload Washers Original Instructions Keep These Instructions for Future Reference. (If this machine changes ownership, this manual must accompany machine.) www.speedqueen.com
Kenmore Elite Front-Loading
 Use & Care Guide For best results, a low-sudsing, HE High Efficiency Detergent made for high efficiency washers must be used. Model: 796.4198* Kenmore Elite Front-Loading Automatic Washer * = color number
24 IN. (61 CM) ELECTRIC WASHER/DRYER INSTALLATION INSTRUCTIONS WASHER/DRYER SAFETY DANGER WARNING
 ELECTRIC WASHER/DRYER INSTALLATION INSTRUCTIONS WASHER/DRYER SAFETY DANGER WARNING") 4 IN. (6 CM) ELECTRIC WASHER/DRYER INSTALLATION INSTRUCTIONS WASHER/DRYER SAFETY... INSTALLATION INSTRUCTIONS... Tools and Parts... Alternate Parts... Location Requirements... Drain System... Electrical
4 IN. (6 CM) ELECTRIC WASHER/DRYER INSTALLATION INSTRUCTIONS WASHER/DRYER SAFETY... INSTALLATION INSTRUCTIONS... Tools and Parts... Alternate Parts... Location Requirements... Drain System... Electrical
INSTALLATION INSTRUCTIONS INSTRUCTIONS D INSTALLATION. Commercial Washer. Laveuse commerciale TABLE OF CONTENTS
 INSTALLATION INSTRUCTIONS Commercial Washer INSTRUCTIONS D INSTALLATION Laveuse commerciale TABLE OF CONTENTS. Page Washer Safety... 2 Tools & Parts... 3 Dimensions... 4 Location Requirements... 5 Drain
Upright Freezer Congélateur vertical Congelador vertical
 Installation and User Manual Manuel d installation et d utilisation Manual de instalación y del usuario HFU0100ACW Upright Freezer Congélateur vertical Congelador vertical Part # 0570000002 TABLE OF CONTENTS
/ W A. Table of Contents/Table des matières... 2
 FRONT-LOADING AUTOMATIC WASHER Use & Care Guide For questions about features, operation/performance, parts, accessories or service call: 1-800-253-1301 In Canada, call: 1-800-807-6777 or visit our website
BEFORE USE, PLEASE READ AND FOLLOW ALL SAFETY RULES AND OPERATING INSTRUCTIONS.
 INSTRUCTION MANUAL Model Number: BLZ-SSRF130 BEFORE USE, PLEASE READ AND FOLLOW ALL SAFETY RULES AND OPERATING INSTRUCTIONS. 1 TABLE OF CONTENTS REFRIGERATOR SAFETY 3 IMPORTANT SAFEGUIDES 4 PARTS AND FEATURES
Indicates a hazardous situation which, if not avoided, will result in death or serious injury.
 Installation Instructions If you have any questions, call 800.GE.CARES (800.432.2737) or visit our Website at: GEAppliances.com In Canada, call 1.800.561.3344 or visit www.geappliances.ca This is the safety
Installation Instructions
 Instructions for Frontload Washers Original Instructions Keep These Instructions for Future Reference. (If this machine changes ownership, this manual must accompany machine.) www.alliancelaundry.com Part
Sears, Roebuck and Co., Hoffman Estates, IL U.S.A.
 Pre-lnstallation Requirements... 2 Electrical Requirements... 2 Grounding Requirements... 2 Water Supply Requirements... 2 Drain Requirements... 2 Rough-In Dimensions... 3 Location Of Your Washer... 4
Installation Instructions
 Installation Instructions IMPORTANT: Read and save these instructions. IMPORTANT: Installer: Leave Installation Instructions with the homeowner. Homeowner: Keep Installation Instructions for future reference.
WASHING MACHINE OWNER S MANUAL
 ENGLISH FRANÇAIS OWNER S MANUAL WASHING MACHINE Read this owner s manual thoroughly before operating the appliance and keep it handy for reference at all times WD100C* WD200C* MFL68267007 www.lg.com Copyright
Coin-Operated Commercial Automatic Washer
 Coin-Operated Commercial Automatic Washer 3948598A Sears Roebuck and Co., Hoffman Estates, IL 60179 U.S.A. www.sears.com TABLE OF CONTENTS PRODUCT RECORD... 2 WASHER SAFETY... 2 INSTALLATION REQUIREMENTS...
Installation Instructions
 Installation Instructions Before you begin... 2 Location... 2 Recommended grounding instructions... 2 Electrical requirements... 2 Exhaust requirements... 3 Water supply and drain requirements... 3 Please
Kenmore Elite Top-Loading
 9 Use & Care Guide Manual de Uso y Cuidado English / Español high efficiency Para obtener los mejores resultados, deberá utilizarse un detergente HE para lavadoras de alta eficacia y baja espuma. Model/Modelo:
CONSUMER SERVICES TECHNICAL EDUCATION GROUP PRESENTS
 CONSUMER SERVICES TECHNICAL EDUCATION GROUP PRESENTS L-68 Front-Loading Automatic Washer Model Numbers: GHW9100L GHW9200L JOB AID Part No. 8178076 i FORWARD This Whirlpool Job Aid, Front-Loading Automatic
Installation Instructions
 Instructions for Topload Washers Original Instructions Keep These Instructions for Future Reference. CAUTION: Read the instructions before using the machine. (If this machine changes ownership, this manual
Use & Care Guide COMPACTWO SPEED AUTOMATIC WASHER LPR6244A LPR4231A. Model and serial -number plate (under lid) instructions
 instructions") Use & Care Guide Model and serial -number plate (under lid) -Lid instructions Load size selector (model LPR6244A) Basket Agitator Tub COMPACTWO SPEED AUTOMATIC ER LPR6244A LPR4231A Contents Page Important
Use & Care Guide Model and serial -number plate (under lid) -Lid instructions Load size selector (model LPR6244A) Basket Agitator Tub COMPACTWO SPEED AUTOMATIC ER LPR6244A LPR4231A Contents Page Important
Installation Instructions
 Installation Instructions for Topload Washers Original Instructions Keep These Instructions for Future Reference. (If this machine changes ownership, this manual must accompany machine.) www.speedqueen.com
Installation Instructions
 Instructions for Topload Washers Original Instructions Keep These Instructions for Future Reference. (If this machine changes ownership, this manual must accompany machine.) www.speedqueen.com Part No.
Installation Instructions
 Installation Instructions Full Size Tumble Action Washers Before beginning installation, carefully read these instructions. This will simplify the installation and ensure the washer is installed correctly
Compact Two Speed Automatic Washers
 Compact Two Speed Automatic Washers A Note to You...2 Washer Safety...3 Parts and Features...4 Washer Installation...5 Using Your Washer...7 Starting your washer...7 Loading...8 Selecting a cycle and time...9
TWO SPEED AUTOMATIC WASHERS Use & Care Guide
 TWO SPEED AUTOMATIC WASHERS Use & Care Guide Table of Contents... 2 W10096744 WASHER SAFETY...3 PARTS AND FEATURES...4 WASHER USE...5 Understanding Washer Cycles...5 Loading...5 Normal Sounds...5 Starting
Presented By. Jerry Frear MSA National Trainer. Duet. Whirlpool. Front ---Loading Automatic Washer
 Presented By Jerry Frear MSA National Trainer Duet BY Whirlpool Front ---Loading Automatic Washer 1 GENERAL IMPORTANT SAFETY INFORMATION Your safety and the safety of others are very important. We have
Kenmore Elite Front-Loading
 Use & Care Guide Manual de Uso y Cuidado English / Español high ency Para obtener los mejores resultados, deberá utilizarse un detergente HE para lavadoras de alta baja espuma. Model/Modelo: 796.4157#
TWO SPEED AUTOMATIC WASHERS Use & Care Guide
 TWO SPEED AUTOMATIC WASHERS Use & Care Guide Table of Contents...2 3950327 www.whirlpool.com TABLE OF CONTENTS WASHER SAFETY... 3 PARTS AND FEATURES... 4 USING YOUR WASHER... 5 Understanding Washer Cycles...
Kenmore Elite Top-Loading
 Use & Care Guide English Para obtener los mejores resultados, deberá utilizarse un detergente HE para lavadoras de Model: 796.3140* Kenmore Elite Top-Loading Automatic Washer * = color number MFL68019765
MEDICAL FREEZER. Model FS24L INSTRUCTION MANUAL. Write Serial Number (on back of unit) here:
 here:") MEDICAL FREEZER Model FS24L INSTRUCTION MANUAL - Write Serial Number (on back of unit) here: FELIX STORCH, INC. 770 Garrison Avenue Bronx, New York 10474 www.medicalrefrigerators.com TABLE OF CONTENTS
MEDICAL FREEZER Model FS24L INSTRUCTION MANUAL - Write Serial Number (on back of unit) here: FELIX STORCH, INC. 770 Garrison Avenue Bronx, New York 10474 www.medicalrefrigerators.com TABLE OF CONTENTS
EASY-TO-USE AUTOMATIC WASHER Use & Care Guide
 EASY-TO-USE AUTOMATIC WASHER Use & Care Guide Table of Contents... 2 Model 3RLSQ8000 8316482 WASHER SAFETY...2 WASHER DISPOSAL...3 PARTS AND FEATURES...4 WASHER USE...5 Understanding Washer Cycles...5
ELECTRIC DRYER INSTALLATION INSTRUCTIONS
 ELECTRIC DRYER INSTALLATION INSTRUCTIONS Table of Contents DRYER SAFETY... 2 installation REQUIREMENTS... 3 Tools and Parts... 3 LOCATION REQUIREMENTS... 4 ELECTRICAL REQUIREMENTS... 6 install LEVELING
INSTALLATION MANUAL CT-200
 INSTALLATION MANUAL CT-200 1 CHILLER SAFETY Your safety and the safety of others are very important. We have provided many important safety messages in this manual and on your appliance. Always read and
DRYERUSERINSTRUCTIONS. TableofContents ASSISTANCE OR SERVICE... 1 DRYER SAFETY... 1 DRYER USE... 3 DRYER CARE... 5 TROUBLESHOOTING... 5 WARRANTY...
 by Whirlpool Corporation DRYERUSERINSTRUCTIONS If you need assistance or service, first see the "Troubleshooting" section. Additional help is available by calling our Customer Interaction Center at 1-800-253-1301
Full Size Tumble Action Washers
 Full Size Tumble Action Washers Before beginning installation, carefully read these instructions. This will simpfify the installation and ensure the washer is installed correctly and safely. Leave these
READ AND UNDERSTAND THESE INSTRUCTIONS BEFORE OPERATING THE MACHINE
 XAACT Xtract 200 INFORMATION & OPERATING INSTRUCTIONS READ AND UNDERSTAND THESE INSTRUCTIONS BEFORE OPERATING THE MACHINE 78-00018 Rev B 032912 1 CONTENTS: Machine Specifications............ 2 Record Important
TWO SPEED AUTOMATIC WASHERS
 TWO SPEED AUTOMATIC WASHERS Use & Care Guide For questions about features, operation/performance, parts, accessories or service call: 1-800-253-1301 or visit our website at www.whirlpool.com Table of Contents...2
OWNER S MANUAL WASHING MACHINE
 ENGLISH FRANÇAIS OWNER S MANUAL WASHING MACHINE Please read this owner's manual thoroughly before operating and keep it handy for reference at all times. WM5000H*A MFL69306208 www.lg.com INSTALLATION INSTRUCTIONS
INSTRUCTION MANUAL (UNIT APPEARANCE MAY VARY FROM IMAGE) BEFORE USE, PLEASE READ AND FOLLOW ALL SAFETY RULES AND OPERATING INSTRUCTIONS.
 BEFORE USE, PLEASE READ AND FOLLOW ALL SAFETY RULES AND OPERATING INSTRUCTIONS.") INSTRUCTION MANUAL Model Number: FR551 REFRIGERATOR-FREEZER (UNIT APPEARANCE MAY VARY FROM IMAGE) BEFORE USE, PLEASE READ AND FOLLOW ALL SAFETY RULES AND OPERATING INSTRUCTIONS. Igloo has a policy of continuous
INSTRUCTION MANUAL Model Number: FR551 REFRIGERATOR-FREEZER (UNIT APPEARANCE MAY VARY FROM IMAGE) BEFORE USE, PLEASE READ AND FOLLOW ALL SAFETY RULES AND OPERATING INSTRUCTIONS. Igloo has a policy of continuous
USE AND CARE GUIDE COMBINATION KITCHENS. C301 Series C301 AUTO Series C39 Series C39 AUTO Series C48 Series C60 Series
 Page SUMMIT SPECIALTY APPLIANCES DIV. USE AND CARE GUIDE COMBINATION KITCHENS C301 Series C301 AUTO Series C39 Series C39 AUTO Series C48 Series C60 Series If you need service or call with a question,
MHWE201YW MSRP$ Key Features. 3.5 cu. ft. Capacity. Cold Wash Cycle RPM Spin Speed
 Front Load MHWE201YW Maytag Performance Series High-efficiency front load washer from Whirlpool... https://secure5.whirlpool.com/catalog/product_popup.jsp?productid=8619&popup=y&initialsku=mhwe201... Page
Automatic Washer A
 Automatic Washer A Note to You...2 Washer Safety...3 Parts and Features...4 Using Your Washer...5 Starting Your Washer...5 Loading...6 Selecting a Cycle, Time and Temperature...7 Adding Liquid Chlorine
COMPACT ELECTRIC DRYER
 COMPACT ELECTRIC DRYER Model SPD1205 Use & Care Guide Before using this machine, please read and follow all safety rules and operating instructions. Felix Storch, Inc. Summit Appliance Division 770 Garrison
29 IN. (73.7 CM) ELECTRIC DRYER INSTALLATION INSTRUCTIONS DRYER SAFETY
 ELECTRIC DRYER INSTALLATION INSTRUCTIONS DRYER SAFETY") 9 IN. (7.7 CM) ELECTRIC DRYER INSTALLATION INSTRUCTIONS DRYER SAFETY... INSTALLATION INSTRUCTIONS... Tools and Parts... Location Requirements... Electrical Requirements... Electrical Connection...4 Venting
9 IN. (7.7 CM) ELECTRIC DRYER INSTALLATION INSTRUCTIONS DRYER SAFETY... INSTALLATION INSTRUCTIONS... Tools and Parts... Location Requirements... Electrical Requirements... Electrical Connection...4 Venting
WASHER USER INSTRUCTIONS
 If you need assistance or service, first see the Troubleshooting section. Additional help is available by calling our National Call Center at 0800-128-940, or at: Johannesburg: Tel: (011) 621-0500 Fax:
REFRIGERATOR SAFETY. Your safety and the safety of others are very important.
 REFRIGERATOR SAFETY Your safety and the safety of others are very important. We have provided many important safety messages in this manual for your appliance. Always read and obey all safety messages.
OWNER S MANUAL WASHING MACHINE
 ENGLISH ESPAÑOL OWNER S MANUAL WASHING MACHINE Before beginning installation, read these instructions carefully. This will simplify installation and ensure that the washer is installed correctly and safely.
About the control and indicator settings.
 About the control and indicator settings. WARNING To reduce the risk of fire, electric shock, or injury to persons, read the IMPORTANT SAFETY INSTRUCTIONS before operating this appliance. 11 F 5 4 3 7
INSTALLATION INSTRUCTIONS ELECTRIC DRYER
 INSTALLATION INSTRUCTIONS ELECTRIC DRYER Table of Contents... 2 IMPORTANT: Save for local electrical inspector s use. 3397627C DRYER SAFETY... 2 INSTALLATION INSTRUCTIONS... 4 Tools and Parts... 4 Location
ELECTRIC & GAS DRYER Use & Care Guide. SECADORA A GAS Y ELÉCTRICA Manual de Uso y Cuidado
 ELECTRIC & GAS DRYER Use & Care Guide SECADORA A GAS Y ELÉCTRICA Manual de Uso y Cuidado Models/Modelos ELECTRIC/ELÉCTRICA: 88042, 88052, 88056, 88076 GAS: 98042, 98052, 98056, 98076 P/N 134914900C (0807)
Portable Dehumidifier with Internal Pump
 Portable Dehumidifier with Internal Pump OPERATING INSTRUCTIONS 115 Pint Portable Dehumidifier With Internal Pump Model Number: DMC-115IP-210 3092402 V161220 PURCHASE INFORMATION Thank you for choosing
Outdoor/Commercial Refrigerator USER S MANUAL
 Outdoor/Commercial Refrigerator USER S MANUAL MODEL Number:BLZ-SSRF40D IMPORTANT:READ THIS USER S MANUAL PRIOR TO CONNECTING POWER AND USE Before the refrigerator is used, it must be PROPERLY POSITIONED,
B. Table of Contents (New Zealand)
") SUDS-MISER AUTOMATIC WASHER Use & Care Guide For questions about features, operation/performance, parts, accessories or service, call: 1-300-363-344 (Australia) 0-800-442-584 (New Zealand) Table of Contents...
SUDS-MISER AUTOMATIC WASHER Use & Care Guide For questions about features, operation/performance, parts, accessories or service, call: 1-300-363-344 (Australia) 0-800-442-584 (New Zealand) Table of Contents...
BEFORE USE, PLEASE READ AND FOLLOW ALL SAFETY RULES AND OPERATING INSTRUCTIONS.
 WINE CELLAR Model SWC1545 Model No.: SWC1545 Instruction Manual BEFORE USE, PLEASE READ AND FOLLOW ALL SAFETY RULES AND OPERATING INSTRUCTIONS. Write Serial No. (on back of unit) here: Felix Storch, Inc.
ML-5 TECHNICAL EDUCATION AUTOMATIC WASHER MODEL MTW6300TQ JOB AID
 ML-5 TECHNICAL EDUCATION AUTOMATIC WASHER MODEL MTW6300TQ JOB AID 8178642 FORWARD This Maytag Job Aid, Bravos Automatic Washer (Part No. 8178642), provides the In-Home Service Professional with information
Coin- Operated Commercial Tumble Action Washer Installation Instructions and Use and Care Guide
 Coin- Operated Commercial Tumble Action Washer Installation Instructions and Use and Care Guide Model: 27182 For best results a lowsudsing, HE High Efficiency Detergent made for front loading washers must
BEVERAGE MERCHANDISERS Instruction Manual
 BEVERAGE MERCHANDISERS Instruction Manual Model SCR700 (sliding doors) Model SCR7012D (swing-out doors) BEFORE USE, PLEASE READ AND FOLLOW ALL SAFETY RULES AND OPERATING INSTRUCTIONS. Write Model and Serial
B. Table of Contents...2
 THREE SPEED ELECTRONIC WASHER Use & Care Guide For questions about features, operation/performance, parts, accessories or service call: 1-800-253-1301 In Canada, for assistance call: 1-800-461-5681, for
INSTRUCTION MANUAL. Model Number: DX K Wine Cooler BEFORE USE, PLEASE READ AND FOLLOW ALL SAFETY RULES AND OPERATING INSTRUCTIONS.
 INSTRUCTION MANUAL Model Number: DX-48.130K Wine Cooler CAUTION: BEFORE USE, PLEASE READ AND FOLLOW ALL SAFETY RULES AND OPERATING INSTRUCTIONS. TABLE OF CONTENTS 1. WINE COOLER SAFETY...114 2. IMPORTANT
Important Safety Information. Operating Instructions The Controls on Your Washer Other Washer Features Preparing to Wash Care of Product
 Model: YIXR1060T Washer Owner s Manual Important Safety Information 2 Operating Instructions The Controls on Your Washer Other Washer Features Preparing to Wash Care of Product Helpful Information Specialized
OWNER S MANUAL WASHING MACHINE
 ENGLISH OWNER S MANUAL WASHING MACHINE Please read this owner's manual thoroughly before operating and keep it handy for reference at all times. WD100C* WD200C* MFL68267005 www.lg.com 2 TABLE OF CONTENTS
TOP-LOADING HIGH EFFICIENCY LOW-WATER WASHER USE AND CARE GUIDE
 TOP-LOADING HIGH EFFICIENCY LOW-WATER WASHER USE AND CARE GUIDE Table of Contents WASHER SAFETY... 2 WASHER DISPOSAL... 3 WHAT S NEW UNDER THE LID?... 4 CONTROL PANEL AND FEATURES... 5 CYCLE GUIDE... 6
Ui REFRIGERATOR SPEC SHEET
 Ui REFRIGERATOR SPEC SHEET ISOMETRIC VIEW 19 7/8 20 1/2 32 3/4 FRONT VIEW NOTES: 1. CUTOUT DIMENSIONS: 20 1/2"W X 33"L X 20 3/4"D 2. CUTOUT DIMENSIONS ARE FOR REFRIGERATOR ONLY. REFER TO STAINLESS STEEL
User s Manual and Operating Instructions
 User s Manual and Operating Instructions Model Numbers: CL-30P-DDF, CL-20F-DDF, CL-24O-DDF, CL-30-DDF READ AND SAVE THESE INSTRUCTIONS IMPORTANT: Read and understand all of the directions in this manual
Congélateur bahut à dégivrage manuel Congelador horizontal de descongelación manual
 Manual Defrost Chest Freezer Installation and User Manual Manuel d installation et d utilisation Manual de instalación y del usuario HFC9204ACW HFC1104ACW HFC1504ACW Congélateur bahut à dégivrage manuel
OWNER S MANUAL WASHING MACHINE. Please read this owner s manual thoroughly before operating and keep it handy for reference at all times.
 ENGLISH FRANÇAIS OWNER S MANUAL WASHING MACHINE Please read this owner s manual thoroughly before operating and keep it handy for reference at all times. WM3997H*A P/No.: MFL67737672 www.lg.com 2 TABLE
WA A Aqua Sub Bottom-load Water Cooler
 WA1-02-21A Aqua Sub Bottom-load Water Cooler 4002638 Thank you for choosing a Soleus Air Water Cooler. This owner s manual will provide you with valuable information necessary for the proper care and maintenance
GDDEM10 DEHUMIDIFIER
 GDDEM10 DEHUMIDIFIER SOCIABLE REMARK When using this dehumidifier in the European countries, the following information must be followed: DISPOSAL: Do not dispose this product as unsorted municipal waste.
DRYER USER instructions
 DRYER USER instructions Table of Contents ASSISTANCE OR SERVICE...1 DRYERSAFETY...1 CHECKING YOUR VENT...3 DRYER USE...3 DRYERCARE...5 TROUBLESHOOTING...6 WARRANTY...8 Assistance If you need assistance
Table of Contents/Table des matières... 2
 FRONT-LOADING AUTOMATIC WASHER Use & Care Guide For questions about features, operation/performance, parts, accessories, or service call: 1-800-253-1301 In Canada, call: 1-800-807-6777 or visit our website
USER S GUIDE LAW2400. Automatic Washer W-19
 LAW2400 Automatic Washer W-19 USER S GUIDE Congratulations on your purchase of a Maytag Performa clothes washer! Your satisfaction is very important to us. Read this manual for best results. It contains
CONSUMER SERVICES TECHNICAL EDUCATION GROUP PRESENTS
 CONSUMER SERVICES TECHNICAL EDUCATION GROUP PRESENTS L-71 SinkSpa JETTED SINK Model LJD1306L JOB AID Part No. 8178201 FORWARD This Whirlpool Job Aid, SinkSpa Jetted Sink, (Part No. 8178201), provides the
BULL INSTRUCTION MANUAL. Model Number: BC-130 REFRIGERATOR BEFORE USE, PLEASE READ AND FOLLOW ALL SAFETY RULES AND OPERATING INSTRUCTIONS.
 BULL INSTRUCTION MANUAL Model Number: BC-130 REFRIGERATOR BEFORE USE, PLEASE READ AND FOLLOW ALL SAFETY RULES AND OPERATING INSTRUCTIONS. 1 REFRIGERATOR SAFETY Your safety and the safety of others are
HMT-D30-A HMT-D45E-A HMT-D70E-A. Model Numbers: HMT-D30-A HMT-D45E-A HMT-D70E-A. Portable Dehumidifier Operating Instructions V.
 HMT-D30-A HMT-D45E-A HMT-D70E-A Model Numbers: HMT-D30-A HMT-D45E-A HMT-D70E-A Portable Dehumidifier Operating Instructions 3119233 V.141217 General Dehumidifier Information RECOMMENDED HUMIDITY LEVELS
Owner s Guide. 24-inch Gas Wall Oven with Time-Of-Day Clock and Timer Canada w A/01/08
 Owner s Guide 24-inch Gas Wall Oven with Time-Of-Day Clock and Timer TABLE OF CONTENTS IMPORTANT SAFETY INSTRUCTIONS... 2-4 MAINTENANCE... 11... Oven or broiler door... 11 CLOCK AND TIMER... 5 Oven bottom...
WASHING MACHINE OWNER S MANUAL. Please read this owner's manual thoroughly before operating and keep it handy for reference at all times.
 ENGLISH OWNER S MANUAL WASHING MACHINE Please read this owner's manual thoroughly before operating and keep it handy for reference at all times. WM3770H*A MFL68639737 www.lg.com 2 PRODUCT FEATURES PRODUCT
Operating Instructions & Parts Manual Models 99533, 99532
 Operating Instructions & Parts Manual Models 99533, 99532 2 Please read and save these instructions. Read carefully before attempting to assemble, install, operate or maintain the product described. Protect
BUILT-IN MICROWAVE OVEN INSTALLATION INSTRUCTIONS 24" (61.0 cm), 27" (68.6 cm), 30" (76.2 cm)
, 27 (68.6 cm), 30 (76.2 cm)") BUILT-IN MICROWVE OVEN INSTLLTION INSTRUCTIONS 24" (61.0 cm), 27" (68.6 cm), 30" (76.2 cm) This product is suitable for use above electric or gas built-in ovens, and below non-vented electric or gas cooktops.
BUILT-IN MICROWVE OVEN INSTLLTION INSTRUCTIONS 24" (61.0 cm), 27" (68.6 cm), 30" (76.2 cm) This product is suitable for use above electric or gas built-in ovens, and below non-vented electric or gas cooktops.
_EMA_TopLoadLaundryCat 5/8/07 2:33 PM Page 1 Top Load Laundry
 Top Load Laundry Uniquely designed for value. For years, Frigidaire top load washers have set the standard in the industry. So you expect conveniences like our In-Post Dispenser that automatically dispenses
Portable Dehumidifier
 Portable Dehumidifier OPERATING INSTRUCTIONS HMT-D30-A Model Numbers: HMT-D30-A HMT-D45E-A HMT-D70E-A HMT-D45E-A HMT-D70E-A 3058080 V.161115 PURCHASE INFORMATION Thank you for choosing a Soleus Air Portable
Compactor. Compactador. Compacteur. Use & Care Guide. Manual de uso y cuidado. Guide d utilisation et d entretien
 Compactor Use & Care Guide Compactador Manual de uso y cuidado Compacteur Guide d utilisation et d entretien Models/Modelos/Modèles 665.1363* * = color number, número de color, numéro de couleur Sears