INSTALLATION AND OWNER S MANUAL
|
|
|
- Alexina Cummings
- 6 years ago
- Views:
Transcription


1 INSTALLATION AND OWNER S MANUAL For VECTAPURE 360 Drinking Water Systems THIS MANUAL IS TO BE LEFT WITH THE OWNER OF THE EQUIPMENT FOR REFERENCE PURPOSES AND TECHNICAL GUIDANCE. IT IS STRONGLY RECOMMENDED THAT QUALIFIED DEALER SERVICE PERSONNEL BE CONTACTED IN THE EVENT OF AN UNKNOWN INTERRUPTION OF SERVICE OR APPARENT PRODUCT MALFUNCTION. AN ANNUAL PREVENTATIVE MAINTENANCE INSPECTION BY A WATER PROFESSIONAL IS RECOMMENDED TO ENSURE TROUBLE-FREE AND CONTINUOUS OPERATION.
2 Congratulations! You have purchased the finest residential drinking water system available for your home. It will provide you years of reliable service if properly installed, operated and maintained. Please read this entire manual before attempting installation and operation. Section 1. Frequently Asked Questions Before getting started, take the time to familiarize yourself with your new Waterite VECTAPURE 360 system by reading some FAQs listed below. Call us or ask your dealer if you have any other questions about your system s operation. Q: How does your Vectapure 360 Drinking Water System differ from an ordinary water filter? Ordinary water filters use a cartridge or membrane contained in a sump or housing to filter your drinking water. Cartridge or membrane changes require housing wrenches and manual insertion of the cartridges into the housings. Vectapure 360 systems use a convenient quarter-turn bayonet style cartridge that may be easily changed without any system disassembly. Your system will deliver pure, bottled water quality water to a faucet conveniently located at your kitchen sink or any other designated area. Q: What is a membrane and how does it work? An ultrafiltration (UF) membrane element consists of hollow capillaries or filaments, bundled together and packed in a plastic tube. Each capillary has tiny pores that will allow water to pass to its interior. As the raw water passes across the surface of the filaments, only clean water is allowed to pass through and collect in the filaments and continue on in the system, while sediment and other contaminants are rejected and retained by the cartridge. A reverse osmosis (RO) membrane is a semi-permanent synthetic film that is spiral wound and separates raw water from product water (permeate). Water containing dissolved contaminants and salts is forced though the membrane by water pressure, with pure water being collected in the storage tank and rejected contaminants flushed to waste. Q: What processes does the Vectapure 360 systems use? Vectapure 360 systems use combinations of 5 types of treatment to produce your drinking water. 5-micron polypropylene (PP) particle filters remove dirt, rust and other sediment. Activated carbon cartridges (granular carbon in GAC and moulded briquettes in CBC) remove chlorine, colour, taste, odours and other contaminants. UF membranes are used to reduce very fine suspended particles, bacteria, cysts and viruses, in combination with PP and CBC cartridges. RO membranes will reduce concentrations of dissolved ions in the water by up to 99.9%. Q: Will membranes remove minerals and salts from the water? Reverse Osmosis (RO) membranes will remove up to 99.9% of common salts in solution. UF does not remove minerals from the product water, leaving calcium and other naturally occurring minerals normally found in spring water to remain in your drinking water. 2
3 Q: Does membrane filtration remove bacteria? Cryptosporidium? Viruses? Yes. RO and UF membranes will eliminate most bacteria, viruses and parasites such as Cryptosporidium from the water. However, where these conditions exist, pre-filters and other system components located before the membrane will become contaminated from exposure to them. Cross contamination of the entire system may occur when the membrane or filters are changed or disturbed.! VECTAPURE 360 DRINKING WATER SYSTEMS ARE DESIGNED ONLY TO IMPROVE AESTHETIC PROPERTIES AND IS NOT DESIGNED TO ACT AS A PRIMARY BARRIER TO WATERBORNE MICROBIOLOGICAL OR TOXIC CHEMICAL CONTAMINATION. WHERE THESE CONDITIONS MAY EXIST CONSULT A WATER PROFESSIONAL TO ENSURE SUFFICIENT RAW WATER PRE-TREATMENT AND DISINFECTION. Q: Where is the system installed? Typically, the system is installed under the kitchen sink. This will be handy for most homeowners, for Vectapure 360 systems are compact and take up very little space. Some homeowners or installers prefer the basement or crawlspace, as this conserves storage in the kitchen and may allow for easier access to the system for maintenance purposes. If you install the system more that 20 from your faucet, you may need a booster pump to ensure adequate pressure at the faucet. Your dealer can provide you with this optional equipment. Q: Can the Vectapure 360 system be connected to an extra faucet? Yes. Many installations may include an optional ¼ tee and line to connect refrigerator icemakers or additional sink faucets. See your dealer for advice and parts. Q: How much water does the Vectapure 360 system produce? A Vectapure 360 RO system will nominally produce 75 US gallons (285 litres) of product water per day. This output will be affected by system pressure, concentration of dissolved salts in the raw water, raw water temperature and other localized factors. Normally, you can expect the system to produce 7 or 8 litres of water per hour. Vectapure 360 UF systems and inline filtration systems operate continuously and will produce about 3 to 5 litres of drinking water per minute. No storage tank is required. Q: What is the standard warranty with Vectapure 360 systems? Every Vectapure 360 system comes with a standard one-year limited warranty on all parts and repair labour. A detailed warranty card is included with the unit. You may purchase an extended consumer warranty if you wish - see the enclosed Extended Warranty Program information sheet and enrolment form included in your package. Call your dealer or go to to apply. Normal filter cartridge replacement is excluded from your warranty. Q: What is the cartridge replacement schedule for a Vectapure 360 system? A good rule of thumb is to replace filter cartridges (red, green and blue cartridges) every three to six months. Dependent upon local water conditions, your UF membrane (violet cartridge) should have a life expectancy of 6 months to a year. More severe water conditions (iron, hardness or the presence of polyphosphate additives to municipal water) may shorten this life significantly. RO membranes (yellow cartridge) have a life usually ranging from one year to as much as five to seven years, dependent upon local water conditions. Falling UF system flow rates or slow storage tank refill rates on RO systems are indicators that the membrane requires replacement. 3
4 Section 2. Unpacking and Installation Your system includes: The V360 filtration unit assembly with colour-coded cartridge(s). Depending on the model, you will have a single, dual or triple UF filtration unit or a four-stage RO unit. The cartridge(s) have been pre-inserted into the filter body. Also included with Dual Filter and Triple Filter UF systems and 4 -Stage RO systems: One self-piercing cold water saddle valve with 1 meter of PE tube attached; One low-lead (stainless is optional), long reach faucet and related mounting hardware including threaded push-on tube adapter and tube stiffener insert; Three (3) #10 X1 wall mounting screws; One only 1-meter length (clear) of tube for connecting the filtration system to the faucet; One Owner s package including owner s manual, warranty certificate, Extended Warranty Plan enrolment form, Waterite Parts Program enrolment form. Also included with 4-Stage RO System: An RO water storage tank; One storage tank valve (included in RO hardware kit); One only 1-meter length (clear) of tube for connecting RO system to the storage tank; One drain pipe saddle (included in RO hardware kit); The waste water drain tube has been factory attached to the RO membrane with the DLFC installed. Step 1. Selecting the System Location 1. Your V360 filtration system is designed for installation under a sink. It can however, be mounted anywhere within 20 feet of the faucet, such as the basement or adjoining utility room. Keep in mind that filter cartridges will need periodic replacement and that easy access must be maintained. Do not install in a location with high humidity, heat or direct sun. Figure 1A. Mounting bracket Push-on cold water inlet Storage tank valve (RO only) Storage tank (RO system only) Push-on outlet to faucet PP Sediment cartridge (blue) Carbon block cartridge (green) Saddle valve Figure 1B. V360 four-stage RO shown above RO membrane (yellow) UF membrane (violet) Faucet Granular carbon cartridge (red) PE tube Drain pipe saddle (RO only) Push-on storage 4 tank connection (RO system only)

5 Keep in mind that you may install a tube tee on the line to the faucet to connect icemakers or other faucets to the system. If you locate your system farther than 20 feet from the faucet, you will need to add a pressure booster pump to your system. See your dealer for parts and details. Step 2. Getting Ready 1. Clear working area. Unpack all components and check for visual damage. Ensure all listed components are included. 2. Inspect the cold water supply line and the condition of the pipe. The SV-8 saddle included is intended for standard ½ or ¾ copper or PVC plumbing pipe. If you have a polybutylene, polypropylene, iron or a PEX supply line, you will need to consult your plumber or plumbing supply store to purchase an appropriate cold water connection. 3. You will need the following tools: An electric drill, a 5/8 drill bit, a 1/8 drill bit, a pencil, a small adjustable (crescent) wrench, a sharp knife (X-Acto type knife is best), adjustable pliers, a Phillips-head screwdriver, a rat-tail file, a center punch. V360 RO installers will also need a ¼ drill bit. Always wear eye protection when using an electric drill. Step 3. Install the Cold Water Supply Pipe Saddle 1. Turn the water supply line valve to your home OFF. 2. Place the saddle on the COLD water supply line in a place that will not interfere with normal access to the installation area but within easy reach of the RO unit. Thread the brass bolt screw through the threaded hole opposite the valve and insert the reversible pipe back plate, matching the contour with your supply pipe size. See Figure 2. Snug firmly but DO NOT OVERTIGHTEN. Turn the T valve handle on the saddle valve clockwise until the supply pipe is pierced and the valve is fully closed. Your pipe saddle valve will already have the poly tube factory pre-attached. Keep the saddle valve closed for now. Figure You may now turn the water supply to your home ON. Check for leaks around the saddle. Tighten, reseat or reinstall if necessary. 5
6 Step 4. Install the Sink Faucet Tools required for this step: An electric drill, a 5/8 carbide bit, a small adjustable wrench, a center punch, a pencil, a rat-tail file. Your dealer will be able to supply a variety of designer faucets and finishes to suit your particular installation, if you wish. Included in your system is a premier quality chrome faucet that is compatible to most kitchen installations. 1. Examine the sink. If it has an existing hole for mounting a faucet, skip to Step 4. (6). 2. Locate and mark the spot you wish to install the faucet. Make sure it does not interfere with operation of the main faucet and that there is clearance for plumbing and mounting hardware directly below it under the sink or countertop. If you have a stainless sink, go to Step 4. (5) 3. If you have a concrete sink with a thickness of less than 1, the faucet can be mounted directly to sink. If the thickness exceeds 1, the faucet must be mounted directly on the countertop or a faucet with an extended shank must be used. Tool substitution: Use a 5/8 masonry bit to drill the concrete sink. 4. If you have a porcelain enamel or ceramic sink, it is strongly recommended that a professional install the faucet to avoid chipping and damaging the sink finish. 5. Mark the spot chosen for the faucet hole with the pencil. Use the center punch to slightly indent the spot (the center punch is unnecessary for concrete sinks). Use the 5/8 bit and drill the hole. Use the rat-tail file to smooth any burrs or rough edges on the hole. 6. The sink faucet may now be assembled to the sink or countertop using the assembly procedure shown in Figure Thread the faucet tube adapter on the faucet shank until snug, but DO NOT OVERTIGHTEN. Do not attach the tube at this time. Figure 3. If you have a V360 RO system, proceed to step 5. For all other V360 systems, proceed to step 7. 6

7 Step 5. Install the Drain Saddle Assembly (V360 RO System only) 1. Select the location to install the drain saddle assembly. This is usually on the sink drainpipe and needs to always be located above the S trap. 2. Position the drain saddle assembly in the selected location and mark the spot through the outlet with a pencil or marker. 3. Drill a ¼ hole at the marked spot. Strip the backing paper from the adhesive side of the foam gasket and position on the inside of the drain clamp back plate, aligning the gasket hole with the outlet. Attach the drain clamp back plates to the drainpipe, aligning the pushon fitting with the drilled hole. Using the screws provided, tighten the clamp snugly. DO NOT OVERTIGHTEN. See Figure 4 below. 4. You will find the drain tube attached to the bottom of your RO membrane cartridge (yellow) with the factory-installed Drain Line Flow Control (DLFC). The drain tube may be inserted directly into the push-on drain clamp fitting, using instructions in Step 8 below. Do not attach drain tube at this time. Figure 4. Step 6. Install the Tank Valve, Preparing the Storage Tank (V360 RO System only) Wrap the threaded storage tank nipple with two wraps of Teflon tape. Thread on tank shut-off valve until snug. Using the wrench, turn an additional ¼ turn. DO NOT OVERTIGHTEN. Place tank in its intended position and open the tank valve to the fully open position. Connect one length of the clear PE tube to the tank valve by inserting the tube into the push-on fitting all the way. Gently tug to assure a secure connection. Step 7. Mounting the Filtration Unit 1. While holding the V360 system in its intended mounting position, mark the holes for the wall screws with the pencil. Using a 1/8 bit, drill the pilot holes for the screws. 7
 Screw in the mounting screws leaving ¼ protruding. Hang the system mounting bracket on the screws and tighten until snug.")
8 2. (For V360 Single Filter systems) Position the bracket and screw in the mounting screws until snug. 3. (For V360 Dual Filter or Triple Filter UF systems only) Screw in the mounting screws leaving ¼ protruding. Hang the system mounting bracket on the screws and tighten until snug. If the unit is to be mounted on wallboard, use the plastic screw anchors supplied. 4. (For V360 RO systems only) Screw in the mounting screws leaving ¼ protruding. Cut the ¼ tube from the storage tank to the desired length by following the directions in Step 6. Connect the tank tube to the to storage tank fitting at the rear of the RO system. See Figure 1B if you are unsure of its location. Make sure that the tube is inserted all the way into the fitting and the connection is secure. Hang the system mounting bracket on the screws and tighten until snug. If the unit is to be mounted on wallboard, use the plastic screw anchors supplied. Step 6. Connect the System Tubing! When making connections to the inlet and outlet fittings on the V360 system DO NOT use stem elbows or any stem adapters or leaks may occur at the joint. ONLY use PE tube to connect to system fittings. 1. Connect the red tube from the water supply valve with the system push-on water inlet fitting, after cutting the ¼ red supply tube to the length required. Make sure tube cuts are clean and square and the tube is fully inserted into the inlet fitting. 2. Connect the clear ¼ tube to the faucet tube adapter. Connect the other end to the to faucet system outlet fitting after cutting the faucet tubing to the desired length. Make sure tube cuts are clean and square and the tube is fully inserted into the fitting. 8
9 You may find that your unit does not have labels attached to indicate the water inlet and faucet connections. Refer to Figure 1A to verify their location. 3. (For V360 RO systems only) Connect the drain tube from the bottom of the RO membrane to the drain saddle, by first cutting to the desired length and then inserting the tube into the push-on drain fitting. Make sure tube cuts are clean and square and the tube is fully inserted into the fitting.! DO NOT USE ANY WATER FROM THE SYSTEM UNTIL THE NEXT STEP IS COMPLETE. Step 7. Starting Up the Vectapure 360 Filtration System 1. (For V360 Single, Dual or Triple Filter systems only) Turn on the water supply saddle valve and check all connections for leaks. Do not proceed further until any leaks are fixed. Open the system faucet and let the system run for two minutes. Carbon cartridges may release carbon dust momentarily at initial start-up, but this is harmless and will clear immediately. Close the faucet and check all connections for leaks and fix if necessary. Your system is now ready for use. 2. (For V360 RO systems only) Open water supply saddle valve and let RO system fill with water. Check for leaks and tighten any joints if necessary. 3. Let the system operate for about 10 minutes. Close the storage tank valve and open the faucet until product water drips out. Check for leaks again and fix if necessary. 4. Open the storage tank valve and close the faucet. The system is now operating and filling the storage tank. Allow the tank to fill completely and the system to automatically shut itself off. This step may take 1-3 hours or more. Open the faucet and let the entire tank drain completely. You may see dark carbon dust briefly flush from the carbon cartridge this is harmless and normal for the first flow of water through the cartridge. Allow the system to re-fill the tank. Once completed, your system is ready for use. Section 3: Operation and Maintenance Operation of your V360 Filtration System is simple and easy. This appliance is fully automatic and can be enjoyed without complicated operating procedures. Be sure to follow the cartridge replacement schedule to ensure peak performance and long membrane element life. Changing Filter Cartridges The red, green and blue cartridges should be changed, as a rule of thumb, every three to six months, depending on local raw water conditions. The UF membrane (violet) should be changed dependent upon the raw water conditions, but normally between every three and six months to one year. The RO membrane (yellow) will normally last from a little as one and to as long as seven years. Falling UF system flow rates at the faucet or slow storage tank refill rates on RO systems are indicators that the membrane requires replacement. Membrane elements require changing much less frequently than the filter cartridges and only when failure is indicated. This should be done when water production begins to noticeably fall or, for RO membranes, TDS readings in the product water begin to rise. Total Dissolved Solids may 9


10 be measured by a water professional or by use of a simple hand-held TDS meter. These are available from your dealer or from Waterite s Online Store at Soft water free from iron is ideal for long membrane life. Hardness, iron, chlorine and infrequently changed filter cartridges are the membrane s greatest enemies. UF membrane life is significantly reduced if local water authorities inject a polyphosphate additive to municipal water to inhibit water main corrosion. Filter cartridges may be changed with the saddle valve ON. However, a small amount of water may seep from the cartridge socket momentarily upon removal. To avoid this leakage, simply turn the saddle valve OFF when changing cartridges. 1. Close the cold water supply saddle valve. On RO systems, close the tank valve. Open the faucet until the flow of water stops, and then close. Grasp the cartridge to be removed, swing it outwards and twist ¼ turn to the LEFT. The cartridge will disengage and can be easily removed by pulling it out of the socket. Repeat for each cartridge to be changed. 2. Wash hands thoroughly. Remove the replacement cartridge from its box and its sanisealed protective sleeve. Remove the protective cap. Make sure the correct cartridge is installed in its socket according to its colour. Locate the alignment tab on the top of the cartridge (there are two at 180 degrees from each other) and align with the center front of the cartridge socket. Push cartridge straight up into the socket, while turning ¼ turn to the RIGHT. The cartridge tabs will engage the tab slots and lock into place. See figure 5. Cartridge alignment tab slot Figure 5. Cartridge socket 3. Turn the raw water saddle valve ON. Open the faucet and allow the system to run for two minutes to flush. For RO systems, drain the storage tank and allow to refill. You may now resume normal use of the system. Your Warranty Keep your bill of sale and your warranty certificate, included in this kit. This is needed to claim any parts or repair service during the warranty period. Read the document completely for warranty claim instructions. 10
11 Section 4: Troubleshooting Guide Trouble Shooting Guide Possible Cause Solution Low Water or No Water Water supply valve closed or RO tank valve closed. Open valves Low home water pressure Must exceed 40 PSI. If lower, install booster pump see dealer Crimped poly tube Repair or replace tube Filters or membrane plugged Replace membrane or cartridges Tubes installed to wrong fitting Install tubes per S.6 (1), (2) and (3). (RO) Low air charge in tank Charge to 7-10 psi or replace tank (RO)Tank full but no water flow Replace tank bladder ruptured (RO) Flow restrictor (DLFK) Check DLFK and replace if necessary (RO) Raw water TDS high Consult dealer may need pretreatment (UF) UF Membrane plugged Polyphosphate added to water? Check with water authority and replace UF membrane System Runs Continuously (RO) Auto shutoff valve defective Replace valve Leaking Joints Fittings not seated Disconnect fitting and reseat tube. See S.6. 11
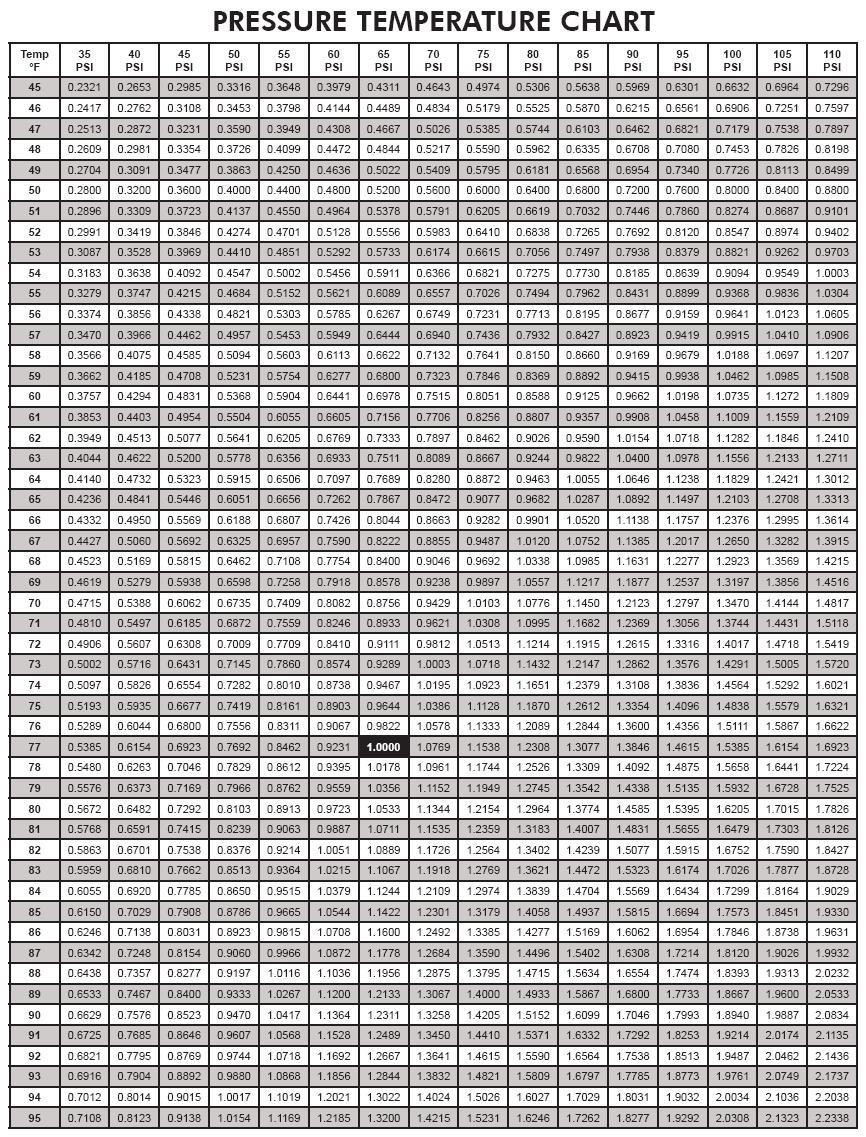
12 VECTAPURE 360 DRINKING WATER SYSTEM COMMON PARTS LIST DESCRIPTION PART NUMBER Auto shut-off valve (RO) ROS002 Pre-filter PP Sediment Cartridge (Blue) V360112PP-05 Pre-filter CBC Carbon Cartridge (Green) V360212CC-05 UF Membrane Cartridge (Violet) V360312UF-00 Post-filter GAC Carbon Cartridge (Red) V360412GC GPD RO Membrane (Yellow) V360312RO-00 Tube-attached Saddle Valve SV-8 Faucet F9-C ¼ push-on tee (used for refrigerator hook-up) A4TU4 Calculating your RO System s Daily Output The Pressure and temperature chart below will help you determine what daily output you can expect from your V360 RO System. Your RO system is rated to produce 75 US gallons per day, or approximately 285 litres per day. Membranes are nominally rated at about 77 F (23 C) and 65 PSI (4.5 bar). By measuring your household pressure and inlet water temperature, you may calculate the expected production of your RO system in your home. Keep in mind that RO membrane output normally decreases with age, up to about 10% after 3 years. Example: 58 F (13 C) and 50 PSI (3.4 bar) measured in your home at the RO inlet. (From the chart below).5094 X 75 gallons = 38.2 gallons (145 litres) per day gallons/24 hours = 1.6 gallons (6.0 litres) per hour production rate VISIT THE WATERITE TECHNOLOGIES WEBSITE FOR INFORMATION, CONSUMER ONLINE REPLACEMENT PARTS AND PRODUCT UPDATES AT: 12
13 13
14 PAGE LEFT INTENTIONALLY BLANK 14
15 PAGE LEFT INTENTIONALLY BLANK 15
 786-1604 (204)")
16 PAGE LEFT INTENTIONALLY BLANK Waterite Technologies, Inc Meridian Drive Winnipeg, Manitoba Canada R2R 2V9 (204) (204) fax 16
VECTAPURE NX Residential Reverse Osmosis Water System
 VECTAPURE NX Residential Reverse Osmosis Water System INSTALLATION AND OWNER S MANUAL VERSION B THIS MANUAL IS TO BE LEFT WITH THE OWNER OF THE EQUIPMENT FOR REFERENCE PURPOSES AND TECHNICAL GUIDANCE.
VECTAPURE NX Residential Reverse Osmosis Water System
 R2 VECTAPURE NX Residential Reverse Osmosis Water System INSTALLATION AND OWNER S MANUAL FOR MODELS RO4053HNX, RO405400TNX AND RO405400NX THIS MANUAL IS TO BE LEFT WITH THE OWNER OF THE EQUIPMENT FOR REFERENCE
475 PRO SERIES Reverse Osmosis System Installation & Operation Manual
 PLEASE READ ALL INSTRUCTIONS BEFORE INSTALLING AND USING THIS SYSTEM 475 PRO SERIES Reverse Osmosis System Installation & Operation Manual Model STAGE 1 STAGE 2 STAGE 3 STAGE 4 OUTPUT 475 SEDIMENT CARBON
OWNER S MANUAL AND INSTALLATION GUIDE PLEASE READ THIS MANUAL CAREFULLY BEFORE ATTEMPTING INSTALLATION
 ClearChoice Economy Under Sink Drinking Water System OWNER S MANUAL AND INSTALLATION GUIDE PLEASE READ THIS MANUAL CAREFULLY BEFORE ATTEMPTING INSTALLATION Congratulations on the purchase of your ClearChoice
Installation and Operation Manual
 How To Install, Operate and Maintain Your Reverse Osmosis System FILTER CARTRIDGE CONFIGURATION MAY BE SUBJECT TO CHANGE. 475 PRO SERIES 475BP PRO SERIES INSTALLERS: PLEASE READ ALL INSTRUCTIONS BEFORE
ULTIMATE REVERSE OSMOSIS SYSTEM
 ULTIMATE REVERSE OSMOSIS SYSTEM INSTALLATION INSTRUCTION & OWNER S MANUAL Ver 3.1 All Rights Reserved APEC Water Systems Please keep this Owner s Manual for future reference. It contains useful information
Parasitic Cysts - Cryptosporidium and Giardia, Chemicals, Heavy Metals, Dissolved Salts, Offensive Tastes and Odours, Sediment, Dirt,
 Aqua-Pure is a market leader in water filtration. In addition to our comprehensive range of Domestic Water Purifiers, we design and manufacture an extensive commercial and industrial range of purification
APEX Water Filters MODEL RO 5. Treat your body to pure goodness with Apex filtered water INSTRUCTION MANUAL. pure water in every drop
 APEX Water Filters pure water in every drop MODEL RO 5 INSTRUCTION MANUAL Treat your body to pure goodness with Apex filtered water A Water supply adapter valve B Cold water shut-off valve C Hot water
Installation & Service Guide
 Reverse Osmosis Ontario Soft Water.ca Kitchener, Canada 519-579-0500 Installation & Service Guide Pentair 75 gpd Encapsulated Membrane System Standard System 75gpd Membrane Your New Reverse Osmosis System
WATER FILTRATION SYSTEM (USF3) OWNER S MANUAL
 OWNER S MANUAL") WATER FILTRATION SYSTEM (USF3) OWNER S MANUAL 1 INTRODUCTION Congratulations on choosing Permatech to improve the quality of your water. You will immediately begin to notice the numerous benefits of having
WATER FILTRATION SYSTEM (USF3) OWNER S MANUAL 1 INTRODUCTION Congratulations on choosing Permatech to improve the quality of your water. You will immediately begin to notice the numerous benefits of having
Owner s Manual AQ-RO-BASE. Aquasana OptimH2O Drinking Water System Reverse Osmosis Filtration Technology
 Owner s Manual AQ-RO-BASE Aquasana Drinking Water System Reverse Osmosis Filtration Technology Welcome to the Aquasana experience. You are about to enjoy clean, clear water and the peace of mind that comes
Tap Master Artesian Hydro Gardener Series Installation & Service Manual
 Perfect Water Technologies 7 Tips for an Easy and Successful Installation 1. Keep it simple - there are 3 connections to make, and the tubing is color coded. 2. Have plenty of time, light, space, and towels
IMPORTANT! ank You! Model: Twist-In 100 GPD, 3-Stage RO Unit. Installation, Operation & Maintenance Guide
 Twist-In 00 GPD, 3-Stage RO Unit WARNING: Please read carefully before proceeding with installation. Your failure to follow any attached instructions and operating parameters may lead to the product s
Alkaline RO System INSTALLATION MANUAL
 Alkaline RO System INSTALLATION MANUAL 1-800-992-8876 Customer Support Disclaimer All rights reserved. All material published on this site by Express Water Inc., including all portions of the website,
WATERSHIELIJrM REVERSE OSMOSIS INSTALLA TION MANUAL ~ ~ ~ ~ ~ l ~ TO INSURE THIS PRODUCT AND THE INSTALLATION THEREOF. ~ ~ ~ ~ ~
 WATERSHIELIJrM REVERSE OSMOSIS SYSTEM INSTALLA TION MANUAL p 1 ~ -~ I IMPORTANT I ITHIS REVERSE OSMOSIS SYSTEM WAS SOLD IN KIT FORM. IT HAS ~ INOT BEEN PRESSURE TESTED IN ANY WAY. UPON INSTALLATION IT
Installation and Operation Manual
 How To Install, Operate and Maintain Your Reverse Osmosis System INSTALLERS: PLEASE READ ALL INSTRUCTIONS BEFORE IN- STALLING AND USING THIS SYSTEM. IT IS RECOMMENDED TO WAIT UNTIL THE ENTIRE SYSTEM IS
by Water Purification Supplies
 REVERSE OSMOSIS PURIFIER With Booster Pump by Water Purification Supplies Member, Water Quality Association Read these instructions carefully before using the purifier. Retain these instructions in safe
REVERSE OSMOSIS WATER FILTRATION SYSTEM MODEL PB-TLRO4H50T INSTRUCTION MANUAL
 REVERSE OSMOSIS WATER FILTRATION SYSTEM MODEL PB-TLRO4H50T INSTRUCTION MANUAL Pure Blue H20, LLC 13813 Monroes Business Park Tampa, FL 33635 USA www.pureblueh2o.com (844) 787-3148 (844) PURE-1-4-U 2015.02.25
INSTALLATION MANUAL CRS-3
 INSTALLATION MANUAL CRS-3 12630 US 33 N. Churubusco, IN 46723 Ph. (260)693-1972 Fax (260)693-0602 www.sterlingwatertreatment.com 1 TABLE OF CONTENTS: SECTION I. SECTION II. INTRODUCTION...3 SPECIFICATIONS...3
Installation and Operation Manual
 Installation and Operation Manual Canature North America Inc. How To Install, Operate and Maintain Your Reverse Osmosis System FILTER CARTRIDGE CONFIGURATION MAY BE SUBJECT TO CHANGE. 475 PRO SERIES 475BP
IMPORTANT! ank You! Model: Twist-In 100 GPD 4-Stage RO/DI Unit. Installation, Operation & Maintenance Guide
 Model: 54037 Twist-In 00 GPD 4-Stage RO/DI Unit WARNING: Please read carefully before proceeding with installation. Your failure to follow any attached instructions and operating parameters may lead to
WATER FILTRATION SYSTEM (RO5) OWNER S MANUAL
 OWNER S MANUAL") WATER FILTRATION SYSTEM (RO5) OWNER S MANUAL 1 INTRODUCTION Congratulations on choosing Permatech to improve the quality of your water. You will immediately notice the numerous benefits of having quality
WATER FILTRATION SYSTEM (RO5) OWNER S MANUAL 1 INTRODUCTION Congratulations on choosing Permatech to improve the quality of your water. You will immediately notice the numerous benefits of having quality
TANKLESS REVERSE OSMOSIS SYSTEMS USER S MANUAL
 Water Systems, LLC www.123filter.com Email: sales@123filter.com TANKLESS REVERSE OSMOSIS SYSTEMS USER S MANUAL Model #RCB4T ABOUT THE SYSTEM Reverse Osmosis process is a separation process. Tap water enters
Owner s Manual AQ-RO-3. Aquasana OptimH2O Drinking Water System. Reverse Osmosis plus Claryum Filtration Technology
 Owner s Manual AQ-RO-3 Aquasana OptimHO Drinking Water System Reverse Osmosis plus Claryum Filtration Technology Welcome to the Aquasana experience. You are about to enjoy clean, clear water and the peace
MKTF CRO-Series 5-Stage Reverse Osmosis System Installation and Maintenance Manual
 MKTF - 215 CRO-Series 5-Stage Reverse Osmosis System Installation and Maintenance Manual Please fill out the following information at the time of installation. Save for future reference. Model: Date Code:
Table of Contents. List of Figures
 1 P a g e Table of Contents Introduction. 3 Receiving....4 Description Model G3 & G4...5/6 Water Production Flow Chart...7 Positioning the Cooler...8 Water Cooler Connections..9 Feed Water Connection....10
1 P a g e. G4 Counter Top OPERATION MANUAL
 1 P a g e G4 Counter Top OPERATION MANUAL Table of Contents Introduction. 3 Receiving....4 Description Model G3 & G4...5/6 Water Production Flow Chart...7 Positioning the Cooler...8 Water Cooler Connections..9
PRF-RO Pentair Reverse Osmosis System Installation and Maintenance Manual SAFETY GUIDES THE BASIC REVERSE OSMOSIS SYSTEM. Tools and Materials Required
 PRF-RO Pentair Reverse Osmosis System Installation and Maintenance Manual SAFETY GUIDES Read and follow all steps and guides carefully before installing and using your reverse osmosis system. Do not use
GROWMAX WATER Perfect Water for Plants and Gardens
 GROWMAX WATER Perfect Water for Plants and Gardens WATER SYSTEMS FOR HYDROPONICS AND GARDENING GROWMAX 3000 Ultra-Pure Reverse Osmosis Water System Up to 3000 L/D of Pure Water Don't forget to register
WATER FILTRATION SYSTEM (RO6) OWNER S MANUAL
 OWNER S MANUAL") WATER FILTRATION SYSTEM (RO6) OWNER S MANUAL 1 INTRODUCTION Congratulations on choosing Permatech to improve the quality of your water. You will immediately notice the numerous benefits of having quality
WATER FILTRATION SYSTEM (RO6) OWNER S MANUAL 1 INTRODUCTION Congratulations on choosing Permatech to improve the quality of your water. You will immediately notice the numerous benefits of having quality
Gallon rating: 2,000 gallons annually before replacing WXC 20 cartridge
 Cartridge: WXC 20 Ceramic, Carbon, and Resin Cartridge Height: 16 ¾ Width: 3 Depth: 3 Weight: 8 lbs Quick-connect fittings attach to 3/8 tubing provided or 3/8 copper tubing. Commercial quality, doubletube,
R.O. DRINKING WATER SYSTEM
 R.O. DRINKING WATER SYSTEM INSTALLATION, OPERATION & SERVICE MANUAL IMPORTANT NOTICES: This reverse osmosis system contains replaceable treatment components critical for effective performance. It is the
Reverse Osmosis System OWNERS MANUAL
 APS Water Services Corporation Quick Change, Twist & Loc Reverse Osmosis System OWNERS MANUAL Installation, Operation & Maintenance Sold By : APS Water Services Corp 818-786-0600 NOTE: Please read through
Tap Master Series Reverse Osmosis System Installation & Service Manual
 Perfect Water Technologies 10 Tips for an Easy and Successful Installation 1. Keep it simple - there are 4 connections to make, and the tubing is color coded. VIDEO INSTRUCTIONS ARE AVAILABLE ONLINE (6
INSTALLATION INSTRUCTION Ver
 ispring Reverse Osmosis Water Filter Systems INSTALLATION INSTRUCTION Ver 2005-6 Copyright 2005-2015 ISPRING WATER SYSTEMS, LLC. All rights reserved. Please keep this owner s manual for future reference.
DWSB-TFC-50 DWSB-50-PUMP
 INSTALLATION MANUAL DWSB-TFC-50 DWSB-50-PUMP 12630 US 33 N. Churubusco, IN 46723 Ph. (260)693-1972 Fax (260)693-0602 www.sterlingwatertreatment.com 1 TABLE OF CONTENTS: SECTION I. SECTION II. INTRODUCTION...3
ERO-175. Undersink REVERSE OSMOSIS DRINKING WATER SYSTEM. u Safety Guides u Installation u Operation u Maintenance u Repair Parts
 Undersink REVERSE OSMOSIS DRINKING WATER SYSTEM ERO-175 u Safety Guides u Installation u Operation u Maintenance u Repair Parts EcoWater Systems LLC P.O. Box 64420 St. Paul, MN 55164 TEL (651) 739-5330
Installation Instructions Residential Reverse Osmosis Drinking Water System
 Your Reverse Osmosis System has been tested to ensure it will operate correctly. The following periodic maintenance is recommended so your system will provide years of trouble-free service: Replacement
Drinking Water Purification Systems
 supersedes 200695Cx-2i&o SEAGULL IV X-2KB and X-2KF Drinking Water Purification Systems SEAGULL IV X-2KB SEAGULL IV X-2KF INSTALLATION AND PRODUCT USE GUIDE INSTALLATION INSTRUCTIONS NOTE: Read instructions
REVERSE OSMOSIS DRINKING WATER SYSTEM
 REVERSE OSMOSIS DRINKING WATER SYSTEM INSTALLATION, OPERATION & SERVICE MANUAL Drink With Confidence! TABLE OF CONTENTS SECTION I. Page INTRODUCTION...3 SECTION II. SPECIFICATIONS...4 SECTION III. SECTION
2-Stage Under Counter Filtration System Model: WP-2 LCV
 INSTALLATION, OPERATION AND MAINTENANCE MANUAL Save manual for future reference 2-Stage Under Counter Filtration System Model: WP-2 LCV IMPORTANT If you are unsure about installing your WATTS water filter,
Model #: PT3000T36-GOLD
 Good Water Warehouse Inc. 1700 E Walnut Ave Fullerton CA 92831 (714) 441-2893 (714) 441-0525 FAX Reverse Osmosis System Installation & Service Guide Model #: PT3000T36-GOLD Do not use with water that is
Installation Instructions for:
 Installation Instructions for: Home II Reverse Osmosis System Home II Reverse Osmosis System COMBO Installation Instructions Pre-amble. This Aquasafe Reverse Osmosis System has been specifically designed
AQUA ONE. Reverse Osmosis System Model ARO5000. Installation and Service Guide PLEASE READ THIS MANUAL CAREFULLY BEFORE ATTEMPTING INSTALLATION
 AQUA ONE Reverse Osmosis System Model ARO5000 Congratulations on your purchase of the most sophisticated water purifier system available! Installation and Service Guide PLEASE READ THIS MANUAL CAREFULLY
Installation Instructions AS-WH Whole House Water Filter
 Installation Instructions AS-WH Whole House Water Filter Contents The AS-WH Whole House System is tested to NSF standards to reduce 97% of chlorine. It can also reduce sediment, synthetic chemicals and
Paragon PW750F two stage Drinking Water Filtration System Installation & Operation Manual
 Paragon PW750F two stage Drinking Water Filtration System Installation & Operation Manual Marketed & Distributed in Singapore by: Quantum Impact Pte Ltd (UEN 201014570H) Add:16 Raffles Quay, #41-07, Hong
INSTALLATION INSTRUCTIONS
 Please read carefully and retain for future reference. CONTENTS 1. Important Information 2. Included Parts 3. Filter Head Assembly Instructions 4. Installation Instructions 4.1. Auxiliary Tap Connection
INSTALLATION & SERVICE MANUAL
 INSTALLATION & SERVICE MANUAL Countertop Reverse Osmosis Systems Series CT System Tested and Certified by WQA against NSF/ANSI Standard 58 for the reduction of Arsenic, Barium, Cadmium, Copper, Cyst, Hexavalent
Installation Instructions for:
 Installation Instructions for: Maximus II Reverse Osmosis System with Remineralization Maximus II Reverse Osmosis System COMBO with Remineralization Installation Instructions Pre-amble. This Aquasafe Reverse
3-STAGE WATER FILTRATION SYSTEM. INSTALLATION INSTRUCTION & OWNER S MANUAL Ver 1.5
 3-STAGE WATER FILTRATION SYSTEM INSTALLATION INSTRUCTION & OWNER S MANUAL Ver 1.5 www.freedrinkingwater.com All Rights Reserved APEC Water Systems Please keep this Owner s Manual for future reference.
PRO-RO 6-Stage Reverse Osmosis System
 PRO-RO 6-Stage Reverse Osmosis System Rev: 1016 Introduction to the PRO-RO Congratulations on your purchase of the PRO-RO six stage reverse osmosis system. The PRO-RO features a four-stage prefilter,
Installation Instructions. For the 18 Built-In Dishwasher and Front Color Panels
 Installation Instructions For the 18 Built-In Dishwasher and Front Color Panels Printed in USA 154232102 Before You Begin DO NOT INSTALL DISHWASHER UNTIL YOU HAVE READ ALL INSTRUCTIONS. FOR YOUR SAFETY,
Home Master Reverse Osmosis System Installation & Service Manual
 Perfect Water Technologies 10 Tips for an Easy and Successful Installation 1. Keep it simple - there are 4 connections to make, and the tubing is color coded. VIDEO INSTRUCTIONS ARE AVAILABLE ONLINE (6
US Water American Revolution 5-Stage RO System The ONLY RO system on the market that is totally American made!
 US Water American Revolution 5-Stage RO System The ONLY RO system on the market that is totally American made! MEMBRANE POST CARBON PRE SEDIMENT TUBING FAUCET AND MOUNTING KIT FILTER WRENCH DRAIN SADDLE
Advanced Two-Stage Drinking Water Filter
 OWNER'S MANUAL E L I T E Advanced Two-Stage Drinking Water Filter MODEL NO. 625.385010 Caution: Read and follow all safety rules and operating instructions before first use of this product. Questions?
3-STAGE WATER FILTRATION SYSTEM INSTALLATION INSTRUCTION & OWNER S MANUAL
 3-STAGE WATER FILTRATION SYSTEM INSTALLATION INSTRUCTION & OWNER S MANUAL Ver 1.2 All Rights Reserved APEC Water Systems Please keep this Owner s Manual for future reference. It contains useful information
The Coffee Professor Reverse Osmosis System Model Genesis Cafe
 The Coffee Professor Reverse Osmosis System Model Genesis Cafe Congratulations on your purchase of the most advanced water purifier system available! Installation and Service Guide PLEASE READ THIS MANUAL
QCRO-50 QCRO-50-PUMP SRO-100 INSTALLATION MANUAL
 INSTALLATION MANUAL QCRO-50 QCRO-50-PUMP SRO-100 1260 US N. Churubusco, IN 4672 Ph. (260)69-1972 Fax (260)69-0602 www.sterlingwatertreatment.com 1 QCRO Manual 180212.docx TABLE OF CONTENTS: SECTION I.
Home Master Reverse Osmosis System Installation & Service Manual
 Perfect Water Technologies Home Master Reverse Osmosis System Installation & Service Manual Home Master Standard RO Home Master Artesian Full Contact Home Master IRON Home Master UV Home Master ULTRA Home
Bonnie USER'S MANUAL. Cold & Hot Water Dispenser. Memo PURE-PRO REVERSE OSMOSIS SYSTEM. Type of product. Bonnie. Date of purchase.
 Type of product Bonnie Memo Date of purchase Name Address Tel REVERSE OSMOSIS SYSTEM 11 Cold & Hot Water Dispenser Bonnie USER'S MANUAL 01 Preface / Parts 02 RO flow chart 03 Piping installation 04 Replacement
TABLE OF CONTENT WARNING: READ ENTIRE MANUAL. FAILURE TO FOLLOW ALL GUIDES AND RULES COULD CAUSE PERSONAL INJURY OR PROPERTY DAMAGE.
 TABLE OF CONTENT I. COMPONENTS AND TOOLS IDENTIFICATION... 3 II. PRE-INSTALLATION... 3 System Location... 4 Site Preparation... 4 Unit Preparation... 4 III. INSTALLATION INSTRUCTIONS... 4 Faucet Installation...
REVERSE OSMOSIS DRINKING WATER SYSTEM
 REVERSE OSMOSIS DRINKING WATER SYSTEM 10/10 1 2 Introduction To The Sierra Congratulations on your purchase of the Nimbus Sierra reverse osmosis system. When properly maintained, this system will provide
BUILT-IN DISHWASHER INSTALLATION INSTRUCTIONS
 BUILT-IN DISHWASHER INSTALLATION INSTRUCTIONS PLEASE READ COMPLETE INSTRUCTIONS BEFORE YOU BEGIN LEAVE INSTALLATION INSTRUCTIONS AND USER'S GUIDE WITH OWNER ALL ELECTRIC WIRING AND PLUMBING MUST BE DONE
MODEL FW-2000 OPERATION MANUAL
 MODEL FW-2000 OPERATION MANUAL 1 P a g e Table of Contents Introduction...pg.3 Receiving..pg.4 Description Model H2O- 2000....pg.5 Operation. pg.6,7 Drain Container Operation. p.g.8 Cup Dispenser Operation.p.g.9
Reverse Osmosis Filter Change Guide
 Reverse Osmosis Filter Change Guide Written by 602abcWATER Start Here Con irm Your ilter order. Open your packages and confirm that you have received all the correct filters. If you are missing or sent
Installation & Service Manual. Reverse Osmosis Drinking Water Systems 75 GPD with Fully Automatic Noiseless Booster Pump
 Installation & Service Manual Reverse Osmosis Drinking Water Systems 75 GPD with Fully Automatic Noiseless Booster Pump Distributed by: Serial # Please read this entire service guide prior to beginning
INSTALLATION AND OPERATIONS MANUAL
 MODEL 6001 REVERSE OSMOSIS High Purity Water Production System THREE STAGE Filtration for the reduction of: Organic Matter Total Dissolved Solids (TDS) Suspended Solids Chemical Contaminants Bad Taste
Please read the following installation instructions first after purchasing this product or transporting it to another location.
 9 Installation Overview Please read the following installation instructions first after purchasing this product or transporting it to another location. 1 Unpacking your refrigerator 2 Choosing the proper
WM-450-PT WM-900-PT Commercial Wall Mounted Reverse Osmosis
 WM-450-PT WM-900-PT Commercial Wall Mounted Reverse Osmosis Installation And Service Manual Watts Pure Water 1725 W. Williams Dr. C-20., Phoenix, Arizona 85027 Phone: 888-774-7405 Fax: 602-588-0356 www.wattspurewater.com
5-Stage Reverse Osmosis System
 5-Stage Reverse Osmosis System 41840 McAlby Court, Suite A Murrieta, CA 92562 800-451-9343, FAX 951-894-2801 www.nimbuswater.com 02/09 1 Introduction to the WaterMaker Five Congratulations on your purchase
INSTALLATION & SERVICE MANUAL
 INSTALLATION & SERVICE MANUAL Countertop Reverse Osmosis Systems Series CT CT-315 CT-315TFC CT-445 CT-445P CT-D425 CT-D425P CT-550UP 3 STAGE CTA RO SYSTEM 3 STAGE TFC RO SYSTEM 4 STAGE TFC RO SYSTEM 4
ispring Whole House Water Filter Systems USER S MANUAL
 ispring Whole House Water Filter Systems USER S MANUAL Version 2014-5 Introduction Congratulations on your purchase of the ispring Whole House Water Filter system. Featuring a three-stage filtration process,
Starting Your Installation Component Checklist: 1 Storage Tank 1 RO System 1 Faucet (with faucet install kit) 1 Installation Kit
 1 Installation Kit") Operating Parameters: Water supply: Potable water Feed water temperature: 33º F - 113º F Safe operating pressure: 40-80 PSI Recommended Turbidity:
Operating Parameters: Water supply: Potable water Feed water temperature: 33º F - 113º F Safe operating pressure: 40-80 PSI Recommended Turbidity:
INSTALLATION, OPERATION AND SERVICE MANUAL GUARDIAN R.O. DRINKING WATER SYSTEM WITH WATER QUALITY MONITOR MODEL LRO-35
 INSTALLATION, OPERATION AND SERVICE MANUAL GUARDIAN R.O. DRINKING WATER SYSTEM WITH WATER QUALITY MONITOR MODEL LRO-35 Tested and Certified by NSF International against NSF/ANSI Standard 58 for the reduction
AquaLiv Water System - Usage & Installation Instructions
 AquaLiv Water System - Usage & Installation Instructions Congratulations on your purchase of an AquaLiv Water System the most complete and comprehensive water purification and enhancement system available
Owners Manual FOR REVERSE OSMOSIS SYSTEMS MODEL ET6500 (P/N )
") Owners Manual FOR REVERSE OSMOSIS SYSTEMS MODEL ET6500 (P/N 10-02-1330) Includes: Installation and Service Procedures, Specifications and Operation Guidelines 07\15 RO Manual A TABLE OF CONTENTS Introduction
Owners Manual FOR REVERSE OSMOSIS SYSTEMS MODEL ET6500 (P/N 10-02-1330) Includes: Installation and Service Procedures, Specifications and Operation Guidelines 07\15 RO Manual A TABLE OF CONTENTS Introduction
Installation and Operation Manual
 Model EP-RO25 How to install, operate and maintain your Reverse Osmosis Drinking Water System Do not return unit to store If you have any questions or concerns when installing, operating or maintaining
IMPACT HEALTH SOLUTIONS. Installation & Service Guide
 IMPACT HEALTH SOLUTIONS Reverse Osmosis Drinking Water System With Energy Resonance Technology Installation & Service Guide DEALER INFORMATION IMPACT@KINGSLEY.CO.ZA 083 691 4045 021 853 3696 CONGRATULATIONS
INSTALLATION. Glass Panel Doors (select models) CAUTION
 CAUTION") Location Do not install refrigerator near oven, radiator or other heat source. If not possible, shield refrigerator with cabinet material. Do not install where temperature falls below 55 F (13 C) or rises
Location Do not install refrigerator near oven, radiator or other heat source. If not possible, shield refrigerator with cabinet material. Do not install where temperature falls below 55 F (13 C) or rises
REVERSE OSMOSIS DRINKING WATER SYSTEM
 REVERSE OSMOSIS DRINKING WATER SYSTEM 12/12 1 Please fill out the following information at the time of installation. Save for future reference. Model: Sierra NS-1N30-00 Date Code: Install Date: Sold by:
Installation, Operation and Maintenance Manual AQPC-35. TFC Reverse Osmosis Drinking Water System
 Installation, Operation and Maintenance Manual AQPC-35 TFC Reverse Osmosis Drinking Water System Tested and Certified by NSF International against NSF/ANSI Standard 58 for the reduction of the claims specified
RO.. DRINKING WATER SYSTEM
 MICROLINE RO.. DRINKING WATER SYSTEM MODEL C. T. A. - 3 INSTALLATION, OPERATION & SERVICE MANUAL IMPORTANT NOTICES: This reverse osmosis system contains replaceable treatment components critical for effective
USER S MANUAL. For use with the following systems: Flow Diagram for 5, 6 or 7-Stage Reverse Osmosis Water Systems (no pump)
") USER S MANUAL Version 2013-1 For use with the following systems: Residential Units (no pump) Residential Units with Booster Pump Commercial Units (with Booster Pump) RCC7, RCC7D, RCC7U, RCC7AK, RCC7AKUV
USER S MANUAL Version 2013-1 For use with the following systems: Residential Units (no pump) Residential Units with Booster Pump Commercial Units (with Booster Pump) RCC7, RCC7D, RCC7U, RCC7AK, RCC7AKUV
Model MRO-35 INSTALLATION, OPERATION & SERVICE MANUAL
 Millennium Reverse Osmosis Drinking Water System Model MRO-35 INSTALLATION, OPERATION & SERVICE MANUAL Tested and Certified by NSF International against NSF/ANSI Standard 58 for the reduction of the claims
User s Manual. Purity In Each Drop. Latest RO+UV technology Now at your home
 User s Manual Purity In Each Drop Latest RO+UV technology Now at your home Table of Contents 1 Safety Information...1 2 Water Purification Process...2 3 Reverse Osmosis Process...3 4 UV Process...3 5 Specifications:
PRO 48 INSTALLATION INSTRUCTIONS
 PRO 48 INSTALLATION INSTRUCTIONS CONTENTS PRO 48 Installation Recommendations 3 PRO 48 Overall Dimensions 4 PRO 48 Installation Specifications 5 PRO 48 Installation Instructions 6 PRO 48 Installation Checklist
How your hot water dispenser works
 The Installation, Care and Use of Your New Steamin' Hot Models H-770 and H-778 Hot Water Dispenser Safety Instructions Warnings alert you to hazards or unsafe practices which could result in severe personal
Dishwasher Installation Instructions DW 24XT/DW 24XV
 Dishwasher Installation Instructions DW 24XT/DW 24XV Installation Instructions Dishwasher BEFORE YOU BEGIN Read these instructions completely and carefully. IMPORTANT Observe all governing codes and ordinances.
INSTALLATION MANUAL ARS-1
 INSTALLATION MANUAL ARS-1 First Sales, LLC 12630 US 33 N. Churubusco, IN 46723 Ph. (260) 693-1972 Fax (260) 693-0602 1 ARS-1 Manual 141021 TABLE OF CONTENTS: SECTION I. SECTION II. INTRODUCTION AND LIABILITY...3
INSTALLATION MANUAL DWSB-TFC-50
 INSTALLATION MANUAL DWSB-TFC-50 12630 US 33 N. Churubusco, IN 46723 Ph. (260)693-1972 Fax (260)693-0602 www.sterlingwatertreatment.com DWSB Manual 180822.docx TABLE OF CONTENTS: SECTION I. SECTION II.
Undercounter Refrigeration
 INSTALLATION GUIDE Undercounter Refrigeration Contents Undercounter Refrigeration..................... 3 Undercounter Specifications.................... 4 Site Preparation..............................
1 P a g e MODEL G5CT COUNTER TOP OPERATION MANUAL
 1 P a g e MODEL G5CT COUNTER TOP OPERATION MANUAL Table of Contents Introduction...pg.3 Receiving..pg.4 Description Model G5CT Counter Top.......pg.5 Operation. pg.6,7 Positioning the Cooler....pg.8 Water
Tier1 Water Home Filtration System
 Tier1 Water Home Filtration System Carbon+KDF Series OWNERS MANUAL BEFORE YOU BEGIN INSTALLATION, READ THIS ENTIRE MANUAL. FOLLOW THE INSTALLATION INSTRUCTIONS CAREFULLY. 1. Avoid pinched o-rings during
Whole House Descaler Installation Instructions
 Whole House Descaler Installation Instructions MODEL HF-SOFT Safe, effective scale prevention without the use of chemicals or salt. HF-SOFT DIRECTION OF FLOW 26" Shut-Off Valve 48" 5-Micron Pre-Filter
Installation Instructions
 Installation Instructions SELECTRONIC Hard-Wired AC Powered ICU Lavatory Proximity Faucet PRODUCT NUMBER 0. Certified to comply with ASME A..M 0 American Standard M 0. ICU Faucet shown Installed on American
R.O. DRINKING WATER SYSTEM MODEL T.F.C
 M I C R O L I N E R.O. DRINKING WATER SYSTEM MODEL T.F.C. - 335 INSTALLATION, OPERATION & SERVICE MANUAL Tested and Certified by NSF International against NSF/ANSI Standard 58 for the reduction of the
USER MANUAL NON-ELECTRIC MINERAL WATER PURIFIER. The Industry Leader in Alkaline Water Ionizer Technology NON-ELECTRIC MINERAL WATER PURIFIER
 The Industry Leader in Alkaline Water Ionizer Technology NON-ELECTRIC MINERAL WATER PURIFIER NON-ELECTRIC MINERAL WATER PURIFIER USER MANUAL Direct Tap water Filtering system Built-in Water Flow Control
Tier1 Water Home Filtration System
 Tier1 Water Home Filtration System Salt-Free Softener OWNERS MANUAL BEFORE YOU BEGIN INSTALLATION, READ THIS ENTIRE MANUAL. FOLLOW THE INSTALLATION INSTRUCTIONS CAREFULLY. 1. Avoid pinched o-rings during
Top Control Dishwasher
 INSTALLATION GUIDE Top Control Dishwasher NS-DWH2BS8/NS-DWH2SS8/NS-DWR2BS8/NS-DWR2WH8/NS-DWR2SS8 Before using your new product, please read these instructions to prevent any damage. Contents Introduction......................................................................................................
INSTALLATION INSTRUCTIONS
 INSTALLATION INSTRUCTIONS BUILT-IN BOTTOM MOUNT REFRIGERATOR/FREEZER DBRTGK72SS-GRILLE KIT (FOR designer SERIES ONLY) VIKING RANGE CORPORATION 111 Front Street Greenwood, Mississippi (MS) 38930 USA (662)