Electric Kettle. I. Introduction
|
|
|
- Britton Tucker
- 6 years ago
- Views:
Transcription
1 Electric Kettle

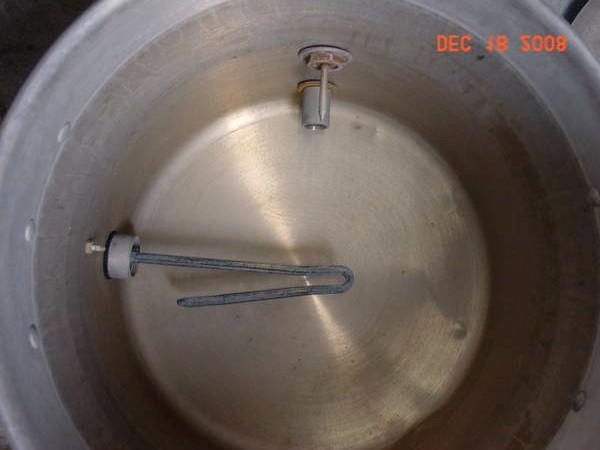
2 Electric Kettle I. Introduction When I first became interested in Homebrewing several years ago I struggled with the idea of how I was going to boil my wort. As with most homebrewers I promised myself that when I finally did jump into homebrewing that I was going to make the best beer possible. After reading as much as possible I concluded from the experts that a full five-gallon boil would yield the best results. The problem was there was no way my wife was going to let me do this on our kitchen stove. Searching out alternatives and just plain dumb luck I found a used Bruheat Mashing Boiler Pail at a garage sale. I asked the owner what it was and he told me that it was used to boil wort for making beer. He said that his brother had been in England in the Air Force and had bought it and when he returned to the United States had given it to him. He stated that he had never used it because it required a 220 outlet and didn t want the hassle of messing with electricity. I offered him twenty dollars and bought it. (See Picture Below) Doing research on how the Bruheat worked I realized that: It was powered by 220 volts with maximum amperage of 15 amps watt heating element. The electricity cycles through a Simmerstat switch that controls the power to the heater element. Further research on just what was a Simmerstat revealed that a Simmerstat switch is another name for an infinite switch. It a type of switch that allows for variable power output. It utilizes a bi-metallic strip conductive connection across a terminal that disconnects with increased temperature. As electricity passes through the bimetal connection, it will heat and deform, breaking the connection and turning off the power. After a short time, the bimetal will cool and reconnect. Therefore, infinite switches vary the average power delivered to a device by oscillating quickly between on and off states. This makes them ideal for situations that are not sensitive to such changes, such as the resistive heating elements. After researching I realized that this might be the answer to my to quest for a five gallon boil. I knew that I would be brewing in a corner of my basement and knew that I would need to make changes to my house electrical system for this to work properly.

3 II. Setup Obviously I was going to need a power source. My corner of the basement was already set up with a 220-volt outlet. Talking to the electrician that wired my house and explaining to him my needs he recommended a Ground Fault GFCI Plug-in Circuit Breaker, 15 amp to replace the 30 amp breaker that was currently installed. He said that this type of breaker was the best of both worlds for my purposes serving as a breaker with the 15 Amps that I needed and with a built in GFCI for protection. This Circuit Breaker below, (Square D SQD HOM215GFI Circuit Breaker) was used, and had been reconditioned. Square D SQD HOM215GFI Circuit Breaker A web site that I found for this circuit breaker that I have in my panel is: In doing further research I have found a vendor who sells rebuilt 220 GFI Circuit breakers. They have a web site on ebay and a Siemens ITE QF215 GFI circuit breaker 2pole 15amp NEW is selling for $ The next step was the outlet. The electrician then installed the receptacle (shown below) and attached the plug (shown below) to the wire from the electric kettle. Leviton Commercial Grade Single Receptacle Ace Hardware #: Manf#: ISP UPC#: Manf: LEVITON MFG. Price: $6.20 Cooper Wiring Industrial 3 Wire Grounding Plug Ace Hardware #: Manf#: 5666N-BAG UPC#: Manf: COOPER WIRING Checkout Price: $11.33 The electrician s total bill to include parts and labor came to $ dollars. I saved a little by purchasing the receptacle and plug myself.
4 III. Test Run I completely tore the bucket apart and put it back together again. I bought new seals for the element and the tap. After filling it with water and convinced that there were no leaks I decided to plug it in. Not trusting the electrician handy work or mine I turned the breaker off and plugged the Bruheat Mashing Boiler Pail in with the power setting to 3 on a 1 6 scale. I then flipped the breaker on and the water began to heat up. I had five gallons of tap water in the bucket with a starting temperature of 60 degrees. After watching it for 15 minutes I took the waters temperature and it had risen to 115 degrees. I could see bubbles around the element and could also hear the Simmerstat cycling on and off so I was convinced that it was working. I then turned the setting to # 5 and within 45 minutes of initially plugging it in I had water greater than 200 degrees. To make a long story short I used my Bruheat Mashing Boiler Pail over the next two years and never had any problems with it. I routinely performed cleaning of the element and occasionally changed the O- Rings. Overall I was very satisfied and made what I thought was excellent extract based beer. I would recommend the Bruheat Mashing Boiler Pail to anyone whom routinely brewed extract beer. IV. A Better Mouse Trap Two years ago in the never ending quest to make better beer I started investigating brewing beer using the Mini-Mash technique. I thought that this was something that I would like to try with eventually moving into All-Grain. I realized that my current system would be adequate but just barely. The drawback was that I only had one pot to heat both the water and the wort. It would be doable but would be time consuming and cumbersome. I then decided to try and buy another Bruheat Mashing Boiler Pail. I found a Home Brew Supply shop in England who said that they would sell me one for $ dollars but I would have to pay shipping. I then started to do research on making my own electric kettle. I scoured HomeBrew Forum web sites and quickly realized that it could be done. The biggest question I had was how to control the heating elements? The different methods were intriguing but appeared to be way to complex for my skill level. I then turned my attention to the controlling unit (Simmerstat) that I had in my in my original setup. The problem was that there was plenty of information out their but this type of controlling device is used almost exclusively overseas. I was fortunate enough to find Ogden Manufacturing Company (see address below) who made the Simmerstat that I eventually used. Ogden Manufacturing Company 103 Gamma Drive, Pittsburgh, PA Web Site: Simmerstat Regulator or Cycling Timer TYPE TYJ Product Description "Simmerstat" regulators provide a range of control from zero to full heat by opening and closing a snap-action switch in the circuit at short, definite time intervals, convenient for cookers and hot plates, grills, glue pots, drying ovens and similar applications. The control knob has a scale marking in five divisions from "off" to "full". Ratings: 15 amps-200/250vac or 15 amps-100/125vac. I decided to jump in with both feet. I was going to try to make my own Electric Kettle for brewing my beer. What follows is what I hope to be step by step instructions on how to build your own Electric Kettle. I have been using mine, with some modifications, for the last two years and I am extremely pleased with it. I know that there are better mouse traps out there that you could use for boiling water and wort but I like my set up because of the simplicity of it. It is consistent, controllable, bring 6 gallons of water to boiling in 30 minutes and brews good beer. Because I am so pleased with the results from my Electric Kettle and have begged borrowed and stolen from my peers in the homebrewing world I would like to show you how I made the kettle that I use today.
5 V. Equipment List **A more detailed list is attached with quantities and prices are on attached page** Description Masterbuilt Aluminum Kettle 30 qt. Water Heater Element, Voltage Rating 240 Volts, Power Rating 3000 Watts, Style Screw In, Insert Length 9 Inches, Low Watt Density Model Vendor / Web Site Sports Authority Grainger O-Ring, Silicone, AS568A Dash #322, Red Color, ID 1 1/4, Width 3/16 In, Quantity #10 Stainless Steel - Special Half -Coupling - 1" Simmerstat Regulator or Cycling Timer Ratings: 15 amps-200/250vac or 15 amps-100/125vac. Indicator, Panel Mount, Green Neon, Oil Tight, 250 VAC, 0.38" MH, 22 AWG, 4.4" Leads Indicator, Panel Mount, Red Neon, Oil Tight, 250 VAC, 0.38" MH, 22 AWG, 4.4" Leads Aluminum Project Enclosure Dimensions: 5.25 x 3.0 x 2.125" Grainger Grainger Carlin Automation Phone (309) , ask for Jolene PO Box th Street Rock Island, IL Allied Electronics &MPN=6013M5&R= &SEARCH= &DESC=6013M5 Allied Electronics &MPN=6011M1&R= &SEARCH= &DESC=6011M1 Radio Shack Brewmometer - Weldless Thermometer Northern Brewer Receptacle 3 Pole/3 Wire, 15 AMP 250v Ace Hardware Plug, 3 Pole/ 3 Wire, 15 Amp Volt Ace Hardware 6 ft - 14 / 3 Electrical Cord Ace Hardware Teflon Tape Size: 10/24, 1 inch Bronze Screw & Nuts Ace Hardware Ace Hardware #10 Bronze Lock Washer & Washers Ace Hardware #61 O-Ring 5/32 OD x 1/16 ID Ace Hardware Ring Terminals (8-10 Gauge) (8 per Pk) Ace Hardware 3/8" Electrical Clamp Connector Ace Hardware VI. Tools Needed 1. Drill 2. Tape Measure 3. Screwdriver (Phillips and Straight) 4. Metal Hole Saw (1 ¾ inch and 1 ¼ inch) 5. 3 drill bits, Size (3/16), (3/8), (1/2) 6. Needle Nose Pliers or Vice Grips (Clamping Type) 7. Wire stripper. Not necessary but handy.
 c. 2 ½ inches from bottom of pot using a 1-¼ inch hole saw drill a 1 ¼ inch diameter hole.")

6 VII. Construction 1. Kettle Holes for Element (See Page 1 of Diagram) Element Mounting Hole a. Mounting hole for Water Heater Element is (1 ¼ inch diameter) b. Placement of element mounting hole is optional. I placed mine ¼ diameter of pot from Turkey tap. (See above) c. 2 ½ inches from bottom of pot using a 1-¼ inch hole saw drill a 1 ¼ inch diameter hole. I drilled a small pilot hole to keep the hole saw from jumping. 2. Aluminum Project Enclosure Box Preparation (See Page 2 & 3 of Diagrams) Open End Piece or Back Panel a. Disassemble the project box. You will note two pieces. The open end will be the piece that will eventually mount to the Kettle. b. Measure 1 ¾ inches from bottom of this piece and mark. Measure 1-½ inches from the side and mark. c. You should now have the spot where you will now drill the hole for the element housing d. Using the 1 ¾ inch hole saw, drill a 1 ¾ inch diameter hole in the back panel. The hole will allow the element housing to sit inside the enclosure box. e. Measure ½ inch down from the top of the back panel. Mark. Measure ½ inch up from the bottom of back panel. Mark. Measure 1 ½ inch to center of panel and mark both measurements from above. f. Using a 3/16-inch drill bit drill the two holes. You now have the mounting holes that will mount the back panel to the kettle. g. Take this piece and center it over the hole that you drilled in the kettle. Centering it as much as possible both horizontally and vertically mark on the kettle the holes that you just drilled in the back panel. h. Using the 3/16-inch drill bit drill the holes into the kettle. i. On the holes drilled take a file and file off metal shards that may be left from drilling these holes.
7 3. Mounting Element and Back Panel to Kettle (See Page 3 & 4 of Diagrams) a. Take the Water Heater Element and wrap teflon tape around threads. b. Apply the Silicone 1 1/4 O-Ring across the threads of the element resting the O-ring on housing of the element. c. Put element through the drilled hole of kettle and then put other O-Ring across threads on inside of kettle. d. Screw on the Stainless Steel - Special Half -Coupling - 1" to the element threads on inside of kettle. Screw on till snug. e. Take two - 10/24, 1 inch Bronze Screws and wrap teflon tape around the threads. f. Place a washer on both screws and insert through holes drilled in mounting panel. Place lock washer, washer and nut on screw protruding from backside and tighten. g. Once tightened, in this order, place nut, lock washer, washer and Silicon O-Ring 5/32 OD x 1/16 from protruding screws on the back panel. h. Mount panel on kettle. On screw protruding inside of kettle in this order put on screw Silicon O-Ring, washer, lock washer and nut to both screws protruding into the kettle. i. On the bottom part of the back panel, tighten the two nuts till snug against the kettle. Do not over tighten or the seal will become deformed. j. On the top tighten bolts until finger tight. You will have to loosen this screw later for the ground wire attachment. k. You should now have the back panel mounted to the kettle with the element housing protruding into the back panel. 4. Mounting Simmerstat on Front Panel (See Page 5 of Diagrams) a. Take the front panel and measure ¾ inch down from top of panel. Mark b. Measure 1-½ inches to middle of panel. Mark. c. Drill mounting hole using 3/8-inch drill bit. d. Secure Simmerstat to panel with lock nut. 5. Mounting Indicator Lights (See Page 5 & 6 of Diagrams) a. On back panel measure from front to back 1 ½ inch. Mark. Then ½ inch from side. Mark. Do this on the other side. b. Drill the two holes that are marked using 3/8-inch drill bit. c. Take indicator lights and feed through hole and tighten using nuts that came with lights. 6. Mounting of the Electrical Cord Clamp (See Page 5 & 6 of Diagrams) a. When drilling this hole you can go on either side of the front panel. I chose the side were the cord would run to the back and into the outlet. So looking at your kettle with the tap facing you and depending on which side you mount the box on you would want the cord running towards the back. b. On side of front panel measure from bottom up 3 ½ inches. Mark. From side measure 1 inch. Mark c. Using a ½ inch drill bit drill your hole. d. Attach your 3/8" Electrical Clamp Connector and tighten. e. Strip back your 14-3 electrical cord so that you have three inches of white, green and black. Cut these pieces and set aside. Then strip back the cord again so that you have three inches of white, black and green showing f. Feed this through the connector and tighten where casing enters the clamp. g. You should now have three inches of three wires securely mounted in the front panel.

8 7. Electrical Hook Up to Simmerstat, Indicator Lights & Kettle (See Page 7 of Diagrams) a. The best way I can describe the wiring of the unit is to follow the wiring for detailed instructions on page 7 of the diagrams. In short I have tried to type this is step by step b. All wires are assumed to have been stripped back ½ inch. c. Following the diagram take your white wire from the cord coming into the panel and a wire from the red indicator light and clamp it into a ring terminal and attach it to the bronze connector that came with the Simmerstat. Attach this connector to L1 on the Simmerstat. d. Following the diagram take your black wire from the cord coming into the panel and the other wire from the red indicator light and clamp it into a ring terminal and attach it to the bronze connector that came with the Simmerstat. Attach this connector to L2 on the Simmerstat. e. Following the diagram take the white wire that you had set aside when attaching the cord to the Front Panel and one wire from the green indicator light and clamp it into a ring terminal and attach it to the bronze connector that came with the Simmerstat. Attach this connector to H1 on the Simmerstat. f. Following the diagram take the black wire that you had set aside when attaching the cord to the Front Panel and other wire from the green indicator light and clamp it into a ring terminal and attach it to the bronze connector that came with the Simmerstat. Attach this connector to H2 on the Simmerstat. g. You should now have a bare white, black and green wire. Attach a ring connector to all three and attach the black and white wires to screws on the water heater element. I don t think it makes any difference what color goes to what screw. h. You should now only have a green wire left. This is your ground. You will attach this to one of the bronze screws that is mounting the back panel to the kettle. I attach mine to the top one. i. On the other end of the electrical cord that comes out of the front panel strip back 1-½ inches and expose the white, black and green wires. j. You are now ready to attach 3 Wire Grounding Plug Slide the housing over these wires. k. The white wire attaches to the silver screw, the black to the gold screw and the green to the ground screw or green screw(?). l. I was unsure of what went where so I took the panel off the 220 outlet and looked at receptacle. This was to make sure that when I plugged it in each prong aligned with the proper color. 8. Brewmometer - Weldless Thermometer Placement a. I placed my thermometer two inches above the tap. b. Follow instructions that came with the thermometer for installation. 9. Test Run a. Ensuring that all connections are secure and is everything that is screwed on is tight. Slide the Front panel onto the back panel and secure with the screws provided. Place dial onto front of Simmerstat with setting on ) b. Place a newspaper under the Kettle. c. Fill with water to above the thermometer. Make sure the tap is closed tightly. d. Let sit for 1 hour and check for leaks. e. If leaks are found tighten the appropriate screws till leak stops. f. If unable to get leak to stop consider a High Heat Food Grade Silicon.
9 10. Fire It Up a. Never run your kettle without water covering your element. Ever!!!! b. Once convinced there are no leaks you can plug your kettle in. c. If your wiring is correct you will notice that the Red Indicator light will come on. This means there is power to your unit. This will stay on all the time. This is good. d. Now turn your dial to 3. You will notice that both the Red and Green Indicator light is on. This means that there is power to the element. e. Stand back and watch. The Simmerstat will now start to cycle. When there is no power to the element the Green light will be off. When the cycle powers the green light will come on. f. The higher or lower the setting will determine the cycle. g. On setting 6 the Simmerstat will not cycle and you will have constant power to the element. h. You can control your boil by your cycle setting. i. One final thought. Are you inpatient? If you are then you are now wondering if this is really working? So how can you tell? Easy, stick your hand in the water and grab the element to see if it is hot. Now that you are saying to yourself that that was really stupid try this. Just look into the kettle and see if you can see any tiny bubbles around the element. Or you can wait 5 15 minutes to see if the temperature goes up on the thermometer. 11. Usage and Maintenance 1. Make sure you season the pot before first usage by boiling water for minutes. 2. I can boil 6.5 gallons of water in minutes. 3. Adjust your settings accordingly to control your boil. 4. And yes you can have boil over using the Electric Kettle. It usually happens to me when I turn the dial to 6 and get side tracked, so keep an eye on your boil. 5. After each usage clean the pot and wipe down the element. 6. Dry the inside of the pot after cleaning and store. 7. I have two years experience with this design and have had no problems. 8. I have not replaced any of my O-Rings because nothing has leaked. 9. Make sure your element stays clean and that the element remains free of touching the other parts on the element. 12. Food For Thought a. Electricity of this magnitude can kill. b. If you are uncomfortable with this design do not try it. c. I make no guarantees that this will work so construct at your own risk. d. I am not responsible if this causes you great bodily harm. e. I will not support the family you leave behind if you kill yourself. f. Do I have your attention? I hope so Here is what I recommend. g. When constructed my electric kettle I dry ran it using 110 outlet. I ran everything the way I have described but with a 110 light fixture plugged into a 110 outlet. h. Wire it the same way but instead of hooking the wires into the element wire it into a light fixture. Same wiring diagram. i. Your Red Indicator light will light up meaning power to the unit and once you turn the dial your green light will come on and hopefully so will the light bulb. j. I recommend this if you are unsure of yourself because it will give you an idea of how the Simmerstat works and will test to ensure that your wiring is correct. k. I know there will be questions and I will try and answer them as best that I can. l. I know I have forgotten something but if your are somewhat handy this project can be done. It took me about four hours to complete once I had all the equipment. m. I am currently on my third generation of this kettle and wouldn t think of brewing beer with anything else. n. Enjoy

10 VIII. Final Product
11 Electric Kettle Equipment Vendor List Item# Description Qty Price Each Total Price Vendor / Web Site Masterbuilt Aluminum Kettle 30 qt. 1 $ Sports Authority 2E301 Water Heater Element, Voltage Rating 240 Volts, Power Rating 3000 Watts, Style Screw In, Insert Length 9 Inches, Low Watt Density Model 1RFG4 O-Ring, Silicone, AS568A Dash #322, Red Color, ID 1 1/4, Width 3/16 In, Quantity #10 1 $ Grainger 1 $ Grainger 6JK49 Stainless Steel - Special Half -Coupling - 1" 1 $ Grainger CH-252 Simmerstat Regulator or Cycling Timer 1 $ Carlin Automation Phone (309) , ask for Jolene Ratings: 15 amps-200/250vac or 15 amps-100/125vac. PO Box th Street Rock Island, IL Indicator, Panel Mount, Green Neon, Oil Tight, 250 VAC, 0.38" MH, 22 AWG, 4.4" Leads Indicator, Panel Mount, Red Neon, Oil Tight, 250 VAC, 0.38" MH, 22 AWG, 4.4" Leads 1 $ Allied Electronics M5&R= &SEARCH= &DESC=6013M5 1 $ Allied Electronics M1&R= &SEARCH= &DESC=6011M1 1 $ Radio Shack Aluminum Project Enclosure Dimensions: 5.25 x 3.0 x 2.125" 7417 Brewmometer - Weldless Thermometer $ Northern Brewer Plug, 3 Pole/ 3 Wire, 15 Amp Volt 1 $ Ace Hardware Ring Terminals (8-10 Gauge) (8 per Pk) 1 $ Ace Hardware 6 ft - 14 / 3 Electrical Cord 1 $ Ace Hardware Teflon Tape 1 $ Ace Hardware Size: 10/24, 1 inch Bronze Screw & Nuts 6 each $ Ace Hardware #10 Bronze Lock Washer & Washers 6 each $ Ace Hardware #61 O-Ring 5/32 OD x 1/16 ID 2 $ Ace Hardware 3/8" Electrical Clamp Connector 1 $ Ace Hardware Receptacle 3 Pole/3 Wire, 15 AMP 250v 1 $ Ace Hardware
12 Frontal View of Aluminum Pot Page 1 Kettle Mounting Holes for Size: 10/24, 1 inch Bronze Screw & Nuts 1 1/4 in 1 1/4 in Diameter Hole in: Aluminum Kettle for element 2 1/2 in 1 1/4 in 3 in
13 Frontal View of Back Panel (Attaches To Brew Kettle) Frontal - Aluminum Project Enclosure Box Dimensions: 5 1/4 in x 3 in Page 2 3 in 1 3/4 in 5 1/4 in 1 3/4 diameter hole on back side of box for element. 1/2 in 1 in 1/2 in Water Heater Element, Voltage Rating 240 Volts, Power Rating 3000 Watts, Style Screw In, Low Watt Density Model Kettle Mounting Holes for Size: 10/24, 1 inch Bronze Screw & Nuts 1 3/4 in
14 Side View of Back Panel (Attaches To Brew Kettle) Back Panel Aluminum Project Enclosure Box - Dimensions: 5 1/4 in x 2 1/8 in Page 3 2 1/8 in 3/4 in Indicator Lights, 3/8" Mounting Hole Bronze Washer & Bronze Lock Washer & Bronze Nut Kettle Mounting Holes For: 10/24, 1 inch Bronze Screw & Nuts 1 3/4 diameter hole on back side of box for element O-Ring, Silicone, AS568A Dash #322, Red Color, ID 1 1/4, Width 3/16 In 1/2 in 1 3/4 in 1 3/4 in 5 1/4 in 1/2 in Water Heater Element, Voltage Rating 240 Volts, Power Rating 3000 Watts, Style Screw In, Low Watt Density Model Bronze Washer & Bronze Lock Washer & Bronze Nut
15 Side View of Back Panel (Attaches To Brew Kettle) Back Panel Aluminum Project Enclosure Box - Dimensions: 5 1/4 in x 2 1/8 in Page 4 Indicator Lights, 3/8" Mounting Hole 2 1/8 in 3/4 in Bronze Washer & Bronze Lock Washer & Bronze Nut O-Ring Aluminum Kettle Kettle Mounting Holes For: 10/24, 1 inch Bronze Screw & Nuts 1 3/4 in diameter hole on back side of box for element Water Heater Element, 240 Volts, Power Rating 3000 Watts, Style Screw In, Low Watt Density Model 1/2 in 1 3/4 in 2 1/2 in 1 3/4 in 1 1/4 in 5 1/4 in 1/2 in 1 1/4 in diameter hole in: Aluminum Kettle for element 3.00 in. Bronze Washer & Bronze Lock Washer & Bronze Nut 1.25 in. O-Ring, Silicone, AS568A Dash #322, Red Color, ID 1 1/4, Width 3/16 In O-Ring
16 Frontal View of Front Panel (Attaches to Back Panel) Aluminum Project Enclosure Box - Dimensions: 5 1/4 in x 3 in Page 5 Indicator Lights, 3/8" Mounting Hole 1/2 in 1/2 in 3/8" Mounting Hole For Simmerstat Regulator or Cycling Timer TYPE TYJ15 amps-200/250vac or 15 amps-100/125vac 3/8"Clamp Electrical Connector 6 ft of 14 / 3 Electrical Cord 3 1/2 in 4 1/2 in 5 1/4 in 1 1/2 in 3 in
17 Top View of Back Panel (Front Panel Attaches) Aluminum Project Enclosure Box, Dimensions 3 in x 2 1/8 in Page 6 Bronze Washer & Bronze Lock Washer & Bronze Nut 1/2 in 1/2 in Indicator Lights, 3/8" Mounting Hole 1 1/2 in 2 1/8 in 3 in
18 Simmerstat, Indicator Lights, Kettle Wiring Diagram Page 7 Ground Hot Neutral 220 Outlet Kettle Indicator Lights Simmerstat P L1 L2 H1 H2 Water Heater Element
Fast and Easy Cooler Mash Tun Build
 Fast and Easy Cooler Mash Tun Build This is my version of a very simple mash tun build. There are many ways of building a mash tun but to me this way provides a robust and simple method for making a mash
Fixing my Fisher and Paykel Fridge Active Smart Fridge/Freezer Model E440T
 Fixing my Fisher and Paykel Fridge Active Smart Fridge/Freezer Model E440T ** DISCLAIMER ** I am not a fridge technician, an electrician or a representative of Fisher and Paykel. I am an average Australian
Materials: Wiring materials, one way switches, stripping tools [a potato for each student or group, pennies, copper wires, zinc-plated nails
 Haley Hensley Course: Survey of Ag / Electricity I Unit Title: Introduction to electricity Materials: Wiring materials, one way switches, stripping tools [a potato for each student or group, pennies, copper
72 ONYX XL FLAT PANEL ELECTRIC FIREPLACE
 72 ONYX XL FLAT PANEL ELECTRIC FIREPLACE Model Numbers: 80005 OWNER S MANUAL WARNING Read and understand this entire owner s manual, including all safety information, before plugging in or using this product.
Redneck Air Conditioner
 Redneck Air Conditioner I have been somewhat successful in gleaning information from multiple sources and have put together a portable 12 volt and ice powered air conditioner. In an effort to give back,
Basic Hydroponics System
 Basic Hydroponics System by 'Buds' Parts List: 1 bucket with lid - 3 Gallon or larger 1 aquarium air pump - Elite 802 2 feet airline 1 air stone (4" or smaller) 1 3" or 4" plant pot 2 cups gro rock or
ELECTRIC FLAT PANEL FIREPLACE HEATER
 ELECTRIC FLAT PANEL FIREPLACE HEATER Model Numbers: WM50; WM-50-W; WS-G-01;WS-G-02 OWNER S MANUAL WARNING Read and understand this entire owner s manual, including all safety information, before plugging
Science 10-Electricity & Magnetism Activity 14 Chapter 5 Review
 Science 10-Electricity & Magnetism Activity 14 Name Due Date Show Me Hand In 10 Correct and Hand In Again By 1. Write the equation for electrical power. (In terms of voltage and current.) 2. Write the
HERMS (Heat Exchanger Recirculating Mash System) Controller
 Controller") HERMS (Heat Exchanger Recirculating Mash System) Controller Your new HERMS controller Thanks for buying your controller from us!!! Your controller is based on two MYPIN TA4 series PID controllers. Unlike
HERMS (Heat Exchanger Recirculating Mash System) Controller Your new HERMS controller Thanks for buying your controller from us!!! Your controller is based on two MYPIN TA4 series PID controllers. Unlike
INSTALLATION INSTRUCTIONS UNDERCOUNTER DISHWASHERS
 INSTALLATION INSTRUCTIONS UNDERCOUNTER DISHWASHERS VIKING 111 Front Street Greenwood, Mississippi 38930 USA (662) 455-1200 IMPORTANT - PLEASE READ AND FOLLOW Before beginning - please read these instructions
Installation Instructions
 Installation Instructions Before you begin... 2 Location... 2 Recommended grounding instructions... 2 Electrical requirements... 2 Exhaust requirements... 3 Water supply and drain requirements... 3 Please
ELECTRIC FLAT PANEL FIREPLACE HEATER
 ELECTRIC FLAT PANEL FIREPLACE HEATER Model Numbers: 80-2000A-42 OWNER S MANUAL AC 120V 60Hz 1500W WARNING Read and understand this entire owner s manual, including all safety information, before plugging
Installation Instructions
 www.aquanta.io Aquanta by Sunnovations Inc. www.sunnovations.com Installation Instructions For online instructions go to: https://portal.aquanta.io/setup 1 Tools Needed: Phillips screw driver Flathead
Heat Exchanger Tube Change Procedure
 Heat Exchanger Tube Change Procedure Application: DATS II, DATS III, CorrDATS, CFM-500 and high temp, 120 or 240 VAC manufactured after 1 May 01 Last Update: 17 Dec 02 The DATS II and III systems use identical
Adding a Cooling Fan to The Big Red Pig (BRP)
") Adding a Cooling Fan to The Big Red Pig (BRP) As many XR650R owners are aware, the bike comes from the factory very restricted in terms of jetting and airflow. This needs to be corrected both for proper
Adding a Cooling Fan to The Big Red Pig (BRP) As many XR650R owners are aware, the bike comes from the factory very restricted in terms of jetting and airflow. This needs to be corrected both for proper
Table of Contents. What to Expect with. Mounting Options. Tools Needed. Preparation. Wiring. Downrod.
 Table of Contents www.casablancafanco.com What to Expect with Your Installation Congratulations on purchasing your new Casablanca ceiling fan! It will provide comfort and performance in your home or office
The Association of Electrical and Medical Imaging Equipment Manufacturers Arc Fault Circuit Interrupter
 Arc Fault Circuit Interrupter SUCCESS STORIES AFCIs avert potential disaster in South Carolina I would like to take the time and thank you for the Arc Fault breaker, your product saved our lives and our
Here is my experience and a few things I learned about my metallic epoxy floor install purchased from
 Here is my experience and a few things I learned about my metallic epoxy floor install purchased from http://www.garageflooringllc.com This was my first dealings with metallic epoxy. Overall I am happy
Aquapeutics GENERAL INSTALLATION GUIDE. Toll Free Customer Service line 1 (800)
") Aquapeutics GENERAL INSTALLATION GUIDE Toll Free Customer Service line 1 (800) 290-6812 Thank you for choosing an Aquapeutics product. Please read the following guide in its entirety before assembling
Aquapeutics GENERAL INSTALLATION GUIDE Toll Free Customer Service line 1 (800) 290-6812 Thank you for choosing an Aquapeutics product. Please read the following guide in its entirety before assembling
Experiencing BIG Growth in a Small Town. Somerset is a great place to live and pressure washing back around 1999
 Wash Kleen: Experiencing BIG Growth in a Small Town by Allison Hester Troy Whitaker is the owner of Wash Kleen, a small exterior cleaning company in the small community of Somerset, Kentucky. He has three
INSTALLATION GUIDE
 INSTALLATION GUIDE 22 WWW.POWERBOXINC.COM Every grower s worst nightmare has to be an electrical fire. The sad part is, grow room fires happen far more often than they should, usually caused by overloaded
HydroCycle Vertical Aeroponic Systems
 HydroCycle Vertical Aeroponic Systems 2018 Growers Supply All Rights Reserved. Reproduction is prohibited without permission. 113700 4' Vertical System (24 Grow Sites) Revision date: 01.10.18 1 Important
HydroCycle Vertical Aeroponic Systems
 HydroCycle Vertical Aeroponic Systems 2018 Growers Supply All Rights Reserved. Reproduction is prohibited without permission. *Actual system may differ from system shown. 113593 8' Vertical System (44
OWNER S MANUAL. Wall Hanging Mode. Pedestal Mode ELECTRIC FLAT PANEL FIREPLACE HEATER. Model Number: EFW-XB60B WARNING CAUTION
 ELECTRIC FLAT PANEL FIREPLACE HEATER Model Number: EFW-XB60B OWNER S MANUAL Wall Hanging Mode Pedestal Mode WARNING CAUTION Read and understand this entire owner s manual, including all safety information,
CONSUMER SERVICES TECHNICAL EDUCATION GROUP PRESENTS
 CONSUMER SERVICES TECHNICAL EDUCATION GROUP PRESENTS L-71 SinkSpa JETTED SINK Model LJD1306L JOB AID Part No. 8178201 FORWARD This Whirlpool Job Aid, SinkSpa Jetted Sink, (Part No. 8178201), provides the
Table of Contents What to Expect with Your Installation. Top Housing. Ceiling Plate. Tools Needed.
 Table of Contents Congratulations on purchasing your new Hunter ceiling fan! It will provide comfort and performance in your home or office for many years. This installation and operation manual contains
Flat Wall Mounted / Free stand Electric Fireplace. Model Numbers: S OWNER S MANUAL. Wall Hanging Mode. Freestanding Mode AC 120V / 60HZ 1500W
 Flat Wall Mounted / Free stand Electric Fireplace Model Numbers: 80-421S OWNER S MANUAL Wall Hanging Mode Freestanding Mode AC 120V / 60HZ 1500W WARNING Read and understand this entire owner s manual,
Click here for a labelled version of above
 Click here for a labelled version of above Download Of This Page: Click Here to download this whole page. (773 Kb Adobe Acrobat File) Biodiesel Processor Diagram: Click Here to download a detailed diagram
Permanent Marker you need a felt tip permanent marker to write on the Mylar bags and the buckets.
 The issue of How do I store food in buckets? seems to have a regular appearance here so I decided to document my process this last weekend. I ll start with what you need to have on hand and various sources
Revision B Printed Fall Elston Manufacturing HC Heater Owners Manual
 Revision B Printed Fall 2007 Elston Manufacturing HC Heater Owners Manual Table of Contents Important Safety Information... ii 1) Description of Heater... 1 General information about your heater including
INSTALLATION INSTRUCTIONS FOR. 230/240 VAC, 1ø, 50Hz SERIES RV ROOF TOP AIR CONDITIONER/HEAT PUMP
 RV Products Division INSTALLATION INSTRUCTIONS FOR 230/240 VAC, 1ø, 50Hz 47000 SERIES RV ROOF TOP AIR CONDITIONER/HEAT PUMP Airxcel, Inc. RV Products Division P.O. Box 4020 Wichita, KS 67204 Coleman is
Natural Concept Landscape Co., Inc C SR9 SE Snohomish, WA Office-(360)
") Natural Concept Landscape Co., Inc. 20318-C SR9 SE Snohomish, WA 98296 Office-(360)668-8530 E-mail-cory@nclandscape.com Below we have explained in a step by step manner how to properly winterize irrigation
Natural Concept Landscape Co., Inc. 20318-C SR9 SE Snohomish, WA 98296 Office-(360)668-8530 E-mail-cory@nclandscape.com Below we have explained in a step by step manner how to properly winterize irrigation
Winter Projects
 2016-2017 Winter Projects During the winter of 2016 2017 while we were in Sitka Alaska we caught up on a number of projects on the boat and I thought it would be interesting to summarize them in a single
RECON Strobe Install. Here I Will Explain How To Install RECON s 90 Watt Strobe Kit. You Should Have:
 RECON Strobe Install Here I Will Explain How To Install RECON s 90 Watt Strobe Kit *Now, There Are Many Ways of Installing Them, Including Wiring Methods, Wiring Connectors, And Other Variables - In This
Electric Floor Warming Systems Installation and Operation Instructions. Mat Heating Systems and Cable Heating Systems. UL Listed for USA and Canada
 Electric Floor Warming Systems Installation and Operation Instructions Mat Heating Systems and Cable Heating Systems UL Listed for USA and Canada Thank you for your purchase of a Warming Systems electric
IMPORTANT SAFETY INSTRUCTIONS:
 PRODUCT NAME: Hadley 4 Light Pendant ITEM NUMBER: LC813 DIMENSIONS OF ITEM ASSEMBLED: Small: 18 1/2 H x 11 Square Large: 25 H x 16 Square IMPORTANT SAFETY INSTRUCTIONS: -A licensed professional electrician
Installation Instructions
 Installation Instructions Over the Range Microwave Oven BEFORE YOU BEGIN (Read these instructions completely and carefully.) IMPORTANT IMPORTANT Save these instructions for local inspector s use. Observe
installing a programmable thermostat
 section 23 installing a programmable thermostat Now that we ve taught you how to program a thermostat, we should teach you how to install one, just in case you don t have one yet. Warning: Do NOT install
Robobrew 35L All In One Brewery with Pump Model: 8695
 Instruction Sheet Robobrew 35L All In One Brewery with Pump Model: 8695 WARNING IMPORTANT INFORMATION! 1. Please read this ENTIRE instruction sheet before using the Robobrew unit. If you are unsure about
INSTALLATION AND OPERATING INSTRUCTIONS. For Reliance Controls Emergency Power Transfer Switch Kit Model Number 30216BRK
 INSTALLATION AND OPERATING INSTRUCTIONS For Reliance Controls Emergency Power Transfer Switch Kit Model Number 30216BRK Congratulations on your purchase of the Reliance Controls Generator Power Transfer
Summer Breeze Heater Service Manual
 Summer Breeze Heater Service Manual RSBH RSBH-SB RSBHP Revision: 1.0 Issued: 12-18-2012 Table of Contents I. Basic Assembly and Operation A. Safety Instructions... 2 B. Grounding Instructions... 3 C.
Retro-DWS Other Methods Internal Heating Cable System for Sewer Pipe and Waste Drain Applications
 Retro-DWS Other Methods Internal Heating Cable System for Sewer Pipe and Waste Drain Applications Installation Instructions Standard Cleanout Requiring Extension 4" example pg 3 3" example pg 5 Installing
Standard Downrod for ceilings 8-10 feet high. Longer Downrod for ceilings 10 feet or higher
 Table of Contents www.casablancafanco.com To register your fan, please visit: www.casablancafanco.com/register What to Expect with Your Installation Save your receipt for proof of purchase. Ceiling Bracket??
Wall Mount Electric Fireplace
 Wall Mount Electric Fireplace User Guide Thank you for purchasing the Ivation Wall Mount Electric Fireplace. This User Guide is intended to provide you with guidelines to ensure that operation of this
Vigilant Wine Cellar Display Lighting
 Vigilant Wine Cellar Display Lighting Introducing Vigilant display lighting kits. Display lighting gives your wine cellar a classic look and really adds to the aesthetic value of your fine wine collection.
Installation Instructions 30 French Door Built-in Wall Ovens
 Installation Instructions 30 French Door Built-in Wall Ovens Questions? Call 1.800.GE.CARES (1.800.432.2737) or visit www.geappliances.com In Canada, call 1.800.561.3344 or visit www.geappliances.ca DESIGN
PolyMax H2-24 Dutch Bucket System
 11234 PolyMax H2-24 Dutch Bucket System *Actual system may differ. PolyMax Dutch Buckets Versatile PolyMax Dutch Buckets are ideal for both small- and large-scale hydroponic growing. 2017 FarmTek All Rights
Manual update 2016 MC37/MFC3600
 Manual update 2016 MC37/MFC3600 SETUP INSTRUCTIONS Evaporative cooling works on the principle of heat absorption by moisture evaporation. Simply put, heat is removed from the air as water evaporates. You
FIVE EASY HOMEBREW PROJECTS
 FIVE EASY HOMEBREW PROJECTS Looking for a Saturday-morning project? From a wort pump to a carboy cart, here are five brewing gadgets you can make yourself. By Tom Cannell AQUARIUM PUMP The fishy way to
Installation Instructions. For the 18 Built-In Dishwasher and Front Color Panels
 Installation Instructions For the 18 Built-In Dishwasher and Front Color Panels Printed in USA 154232102 Before You Begin DO NOT INSTALL DISHWASHER UNTIL YOU HAVE READ ALL INSTRUCTIONS. FOR YOUR SAFETY,
Milkweed Seed Separator
 Milkweed Seed Separator Chip Taylor s design is for a 30 gallon metal trashcan (plans and video http://monarchwatch.org/bringback-the-monarchs/milkweed/seed-separator). Bryan Bockbrader of the Wood County
22 Water Fall Instructions
 1 of 12 22 Water Fall Instructions 2 of 12 Parts Hood - 1 Tray - 1 Water Distribution Unit with Baffling Pad - 1 Pebble Shelf - 1 Pebbles in bag - 1 Pump - 1 1 Grabber Screw - 15 2.5 Grabber Screw - 5
J-PRO-24 Soda Ash Injection Installation & Start-Up Guide
 J-PRO-24 Soda Ash Injection Installation & Start-Up Guide Thank you for purchasing a Clean Water System! With proper installation and a little routine maintenance, your system will be ph neutral water
Installation Instructions
 Installation Instructions Electric Drop-In Range JDS28, JDP39 Questions? Call 800.GE.CARES (800.432.2737) or Visit our Website at: ge.com BEFORE YOU BEGIN Read these instructions carefully and completely.
Installation Instructions
 GE Consumer & Industrial Appliances Installation Instructions Junction Box Cover Within this user bag, you will find a junction box cover and a #10 hex head screw used to attach the junction box cover
ImPress IRONING STATION
 CONSUMER SERVICES TECHNICAL EDUCATION GROUP PRESENTS L-73 ImPress IRONING STATION Model LFB2611L JOB AID Part No. 8178203 FORWARD This Whirlpool Job Aid, ImPress Ironing Station, (Part No. 8178203), provides
IMPORTANT SAFETY INSTRUCTIONS:
 PRODUCT NAME: Beau Chandelier Small ITEM NUMBER: LC945 DIMENSIONS OF ITEM ASSEMBLED: 25 1/2 H x 23 DIA IMPORTANT SAFETY INSTRUCTIONS: -We strongly recommend that a professional electrician install all
Smart Water Heater Controller
 Smart Water Heater Controller Installation Instructions Version 1.0 2016 1 Introduction Congratulations on the purchase of your Aquanta Smart Water Heater Controller! The Aquanta retrofittable water heater
Evaluation Summary. Years Gardening 20% 19.3% 5.0% 10.0% 15.0% 20.0% 25.0% 30.0% 35.0% 40.0% 45.0% 50.0% 2016 (n=55) (n=254)
 (n=254)") 2016 Grow Well Missouri Gardening Program Evaluation Summary MFH Project: Collaborating with Missouri Food Pantries for Better Health University of Missouri Interdisciplinary Center for Food Security December
2016 Grow Well Missouri Gardening Program Evaluation Summary MFH Project: Collaborating with Missouri Food Pantries for Better Health University of Missouri Interdisciplinary Center for Food Security December
installation and operation manual for Hunter Ceiling Fans
 For Your Records and Warranty Assistance Model Name: Catalog/Model No.: Serial No.: Date Purchased: Where Purchased: For reference also attach your receipt or a copy of your receipt to the manual. installation
Smart Grid Tables. Exploring the Electrical Infrastructure Grades 9-12
 Smart Grid Tables Exploring the Electrical Infrastructure Grades 9-12 Exploration 1 1. There are three power plants represented on the end of the grid table. List them here. Estimate how much (%) of the
SAVE THESE INSTRUCTIONS
 Built-In Dishwasher Dishwashers Write the model and serial numbers here: Model # Serial # You can find them on the tub wall just inside the door or. the lower part of back. Installation Instructions DDW1802W
DAVIS PACKAGING. TD-362 Dual Roll Console Reference Guide.
 DAVIS PACKAGING www.davispackaging.net E-mail: contact@davispackaging.net TD-362 Dual Roll Console Reference Guide SPECIFICATIONS Overall Dimensions: Working Height: Power Requirement: Wattage: Unit Weight:
HFG 12 and 24 Hydrogen Generators Installation Instructions
 HFG 12 and 24 Hydrogen Generators Installation Instructions Model 12 Model 24 PLEASE READ THESE INSTRUCTIONS FROM BEGINNING TO END BEFORE STARTING YOUR INSTALLATION. If you are still having problems after
Manual for MC91 SETUP INSTRUCTIONS
 Manual for MC91 SETUP INSTRUCTIONS Evaporative cooling works on the principle of heat absorption by moisture evaporation. Simply put, heat is removed from the air as water evaporates. You feel this principle
Wall Hanging Mode. Pedestal Mode
 ELECTRIC FLAT PANEL FIREPLACE HEATER Model Number: EFW-XB60D OWNER S MANUAL Wall Hanging Mode Pedestal Mode WARNING CAUTION Read and understand this entire owner s manual, including all safety information,
Table of Contents. What to Expect with. Mounting Options. Tools Needed
 Table of Contents www.hunterfan.com What to Expect with Your Installation Congratulations on purchasing your new Hunter ceiling fan! It will provide comfort and performance in your home or office for many
5700-E Sediment Filter Installation & Start-Up Guide
 Clean Water Made Easy www.cleanwaterstore.com 5700-E Sediment Filter Installation & Start-Up Guide Thank you for purchasing a Clean Water System! With proper installation and a little routine maintenance
Manual for MC37/MFC3600
 Manual for MC37/MFC3600 SETUP INSTRUCTIONS Evaporative cooling works on the principle of heat absorption by moisture evaporation. Simply put, heat is removed from the air as water evaporates. You feel
Installation and Operation Manual For Hunter Ceiling Fans
 Installation and Operation Manual For Hunter Ceiling Fans 1 2 CONGRATULATIONS! Your new Hunter ceiling fan is an addition to your home or office that will provide comfort and performance for many years.
OWNER S MANUAL AVN SERIES RETRACTABLE NOZZLE VACUUM SEALER WITH GAS PURGE
 OWNER S MANUAL AVN SERIES RETRACTABLE NOZZLE VACUUM SEALER WITH GAS PURGE WHAT S IN THE PACKAGE? This Operation Manual. (1) Vacuum Sealer. (1) E-(unit size) Heating Element, inside the manual sheet protector.
IMPORTANT INFORMATION. Revised Dishwasher Installation Instructions
 IMPORTANT INFORMATION Revised Dishwasher Installation Instructions To obtain a revised copy of the entire Dishwasher User s Manual, go to www.eurotechappliances.com. SPECIAL EDITION 11-20-02 SAVE THESE
Your electrician must furnish sufficient voltage levels, and current for proper operation of your machine. We recommend this machine be on a
 Table of Contents I. Safety Precautions..3 II. Installation Instructions...4 III. Operating Instructions..5 IV. Maintenance and Cleaning Instructions..... 6-7 V. System Parts Location Guide..8-11 VI. Ordering
1. Physical Installation 2. In-app Setup 3. Features 4. Troubleshooting 5. Advanced Installation Options
 Spotlight Cam Mount Smart Security at Every Corner of Your Home Your new Spotlight Cam lets you extend the Ring of Security around your entire property. Now, you ll always be the first to know when someone
Menumaster. Commercial Microwave Oven Owner's Manual GCSAND7RR
 Menumaster Commercial Microwave Oven Owner's Manual GCSAND7RR Keep these instructions for future reference. If the oven changes ownership, be sure this manual accompanies oven. Contents Model Identification
Q.: I liked our single stream recycling. It was easier and more convenient. This is a step backwards. Why?
 FREQUENTLY ASKED QUESTIONS REGARDING THIS CHANGE: Q.: I liked our single stream recycling. It was easier and more convenient. This is a step backwards. Why? A.: This is not a change we wanted to make;
ANYWHERE. U.S. Patent(s) Pending INSTRUCTION MANUAL WARRANTY CERTIFICATE
 Pending INSTRUCTION MANUAL WARRANTY CERTIFICATE") TM ANYWHERE BY U.S. Patent(s) Pending INSTRUCTION MANUAL WARRANTY CERTIFICATE 2017 Minka Lighting Inc. Manual design and all elements of manual design are protected by United States Federal and/or State
TM ANYWHERE BY U.S. Patent(s) Pending INSTRUCTION MANUAL WARRANTY CERTIFICATE 2017 Minka Lighting Inc. Manual design and all elements of manual design are protected by United States Federal and/or State
Operating Instructions & Parts Manual Models 99533, 99532
 Operating Instructions & Parts Manual Models 99533, 99532 2 Please read and save these instructions. Read carefully before attempting to assemble, install, operate or maintain the product described. Protect
FLECK 5600 WATER SOFTENER INSTALLATION
 FLECK 5600 WATER SOFTENER INSTALLATION Discount Water Softeners recommends using a licensed plumber to install your water softener. The following installation instructions are for use with the water softener
PolyMax H1-10 Dutch Bucket System
 112529 PolyMax H1-10 Dutch Bucket System *Actual system may differ. PolyMax Dutch Buckets Versatile PolyMax Dutch Buckets are ideal for both small- and large-scale hydroponic growing. STK# DIMENSIONS 112529
Dimensions: 39 1/2" w x 22" D x 35.5 H. kk25 installation. Things you might need for the installation: vessel sink,
 Things you might need for the installation: vessel sink, plumber's putty(home depot), liquid nails(home depot), Bucket silicone caulk(home depot), Putty knife Plumber's putty Pipe wrench Channel-lock pliers
Table of Contents. What to Expect with. Tools Needed. Mounting Options. Blades
 Table of Contents 1.888.830.1326 Ceiling Bracket 30 inches Ladder Downrod 3 Wiring 10 Operation, Maintenance & Cleaning Light Kit 11 Troubleshooting??? 17 15 1 13 5 Blades 9 Switch Housing 12 Canopy 6
THE BLACK BOX MONITORING AND CONTROL OF SOLAR WATER HEATERS
 THE BLACK BOX MONITORING AND CONTROL OF SOLAR WATER HEATERS This article gives details of the "black box" mentioned in a previous article "Customizing a commercial solar water heater". The device is basically
Wrangler JK Engine Cooling
 Wrangler JK Engine Cooling Preface In the old days the temperature gauge was a simple and direct monitor of engine cooling. Contemporary cars with their recovery tanks, electric fans, and electronic controls
Fume Free Casting Box
 Fume Free Casting Box Contributed by: Mark James A.K.A mark james This tutorial was downloaded from http://www.penturners.org The International Association of Penturners - 2014 FUME FREE CASTING BOX by
Installation Instructions
 Installation Instructions Above the Cooktop Microwave Oven JVM60 and JVM65 Questions? Call -800-56- or Visit our Website at: GEAppliances.ca BEFORE YOU BEGIN Read these instructions completely and carefully.
READ AND SAVE THESE INSTRUCTIONS READ CAREFULLY BEFORE ATTEMPTING TO ASSEMBLE, INSTALL, OPERATE OR MAINTAIN THE PRODUCT DESCRIBED. PROTECT YOURSELF AN
 READ AND SAVE THESE INSTRUCTIONS READ CAREFULLY BEFORE ATTEMPTING TO ASSEMBLE, INSTALL, OPERATE OR MAINTAIN THE PRODUCT DESCRIBED. PROTECT YOURSELF AND OTHERS BY OBSERVING ALL SAFETY INFORMATION. FAILURE
OPERATION AND MAINTENANCE INSTRUCTIONS FOR ROOF TOP HEAT PUMPS AND CEILING PLENUMS
 OPERATION AND MAINTENANCE INSTRUCTIONS FOR ROOF TOP HEAT PUMPS AND CEILING PLENUMS RV Products A Division of Airxcel, Inc. P.O. Box 4020 Wichita, KS 67204 1976H207 (10-06) PP TABLE OF CONTENTS I. General
PARTS & ACCESSORIES INSTALLATION AND SAFETY INSTRCUTIONS ITEM NO.:60006PC SAFETY PRECAUTION. Canopy. Downrod. Housing. Blade. Transmitter CR2032/3V
 L I G H T I N G INSTALLATION AND SAFETY INSTRCUTIONS ITEM NO.:000PC SAFETY PRECAUTION PARTS & ACCESSORIES Canopy Downrod Housing IMPORTANT : PLEASE READ BEFORE INSTALLATION.. Do not connect this remote
Home Improvement Ebooks Gratuit
 Home Improvement 1-2-3 Ebooks Gratuit Home Improvement 1-2-3 is a workbench classic. The new editionâ more than 600 projects, thousands of color photos, detailedâ illustrations, charts, and graphs, and
Installation Instructions
 Installation Instructions Self-Cleaning Radiant Electric Drop-In Range JDP47, JD968, JD900 If you have questions, call 1.800.GE.CARES or visit our website at: ge.com Before You Begin Read these instructions
Installing and operating your Enclosed Cabinet Cooling System and digital thermostat
 NOTE: These instructions are for a standard system, since it is not possible to make separate instructions for every custom system. If you have requested a custom system, please be aware of the differences
e Bath Fan with Light User s Guide
 e Bath Fan with Light User s Guide abfl50uq, BFL60UQ, BFL70, BFL85 Item Stock Number(s): BFL50UQ, BFL60UQ, BFL70, BFL85 IMPORTANT INSTRUCTIONS - OPERATING MANUAL READ AND SAVE THESE INSTRUCTIONS READ CAREFULLY
PO Box 827 Hawley, MN (218) Fax (218)
 Fax (218)") Introduction Before proceeding with the installation or operation of the Oil Alert System, read all instructions thoroughly, as well as complying with all Federal, State and Local codes, Regulations and
Introduction Before proceeding with the installation or operation of the Oil Alert System, read all instructions thoroughly, as well as complying with all Federal, State and Local codes, Regulations and
INSTALLATION INSTRUCTIONS & HOME OWNERS MANUAL AUTOBOOSTER IMPORTANT SAFETY INFORMATION
 INSTALLATION INSTRUCTIONS & HOME OWNERS MANUAL AUTOBOOSTER IMPORTANT SAFETY INFORMATION When installing or using any high voltage electrical appliance, basic safety precautions should always be followed.
WAILEA OWNER S MANUAL
 WAILEA OWNER S MANUAL The blades in each pack are matched for equal weight to assure smooth fan operation. If more than one fan is being installed, be careful not to mix blades from different cartons.
Hickory Rotisseries. Machine Type N / 5. 5 E 200ºF - 550ºF. Final Inspection:
 Installation Manual USA Hickory Rotisseries Models: N/5.5 E Machine Type N / 5. 5 E Total Power Rating Elements / Spits Electrical Rating Temperature Range Timer Delivery Date: 6000 or 8400 Watts 4 Elements
Installation Instructions
 Installation Instructions Ordering Code: RF16UQT1XXC RF32UQT1XXC RF32UHT1XX RF45UQT1XXC RF45UHT1XX PLEASE READ THESE INSTRUCTIONS BEFORE INSTALLATION OF THE FOLLOWING: 4 STRIP FIXTURES 8 STRIP FIXTURES
Shay - Painting & Assembling The Boiler
 The goal here is to: Shay - Painting & Assembling The Boiler Nelson Riedel Nelson@NelsonsLocomotive.com Initial: 3/07/04 Last Revised: 06/06/2004 Paint the boiler, jacket, bands and walkways Apply lagging
Sundance Spas SPA EQUIPMENT SYSTEM. Installation Instructions. P/N Rev. A
 Sundance Spas SPA EQUIPMENT SYSTEM Installation Instructions P/N 6530-456 Rev. A Contents Important Notices 1 Important Safety Instructions 2 Where to Place the Equipment System 3 Connecting Pipes Between