IMPORTANT SAFETY INSTRUCTIONS
|
|
|
- Neal Thomas
- 6 years ago
- Views:
Transcription


1 PLERMO INSERT

2 PLERMO INSERT
3 Table of ontents Important Safety Notice... 3 Tools and parts... 4 Location Requirements... 4 Product imensions... 4 Venting Requirements... 5 Venting Methods... 6 alculating Vent System Length... 6 Electrical Requirements... 6 Installation Instructions... 7 Prepare Location... 7 Install range hood... 9 onnect the Vent System omplete Installation Range Hood Use Range Hood are vailable ccessories Warranty PPROVE FOR RESIENTIL PPLINES FOR RESIENTIL USE ONLY RE N SVE THESE INSTRUTIONS PLESE RE ENTIRE INSTRUTIONS EFORE PROEEING. INSTLLTION MUST OMPLY WITH LL LOL OES. IMPORTNT: Save these Instructions for the Local Electrical Inspector s use. INSTLLER: Please leave these Instructions with this unit for the owner. OWNER: Please retain these instructions for future reference. Safety Warning:Turn off power circuit at service panel and lock out panel before wiring this appliance. Requirement 120 V, 60 Hz. 15 or 20 ranch ircuit IMPORTNT SFETY INSTRUTIONS WRNING: TO REUE THE RISK OF FIRE, ELETRI SHOK, OR INJURY TO PERSONS, OSERVE THE FOLLOWING: Use this unit only in the manner intended by the manufacturer. If you have questions, contact the manufacturer. efore servicing or cleaning the unit, switch power off at service panel and lock the service disconnecting means to prevent power from being switched on accidentally. When the service disconnecting means cannot be locked, securely fasten a prominent warning device, such as a tag to the service panel. Installation work and electrical wiring must be done by qualified person(s) in accordance with all applicable codes and standards, including fire-rated construction. Sufficient air is needed for proper combustion and exhausting of gases through the flue (chimney) of fuel burning equipment to prevent backdrafting. Follow the heating equipment manufacturer s guideline and safety standards such as those published by the National Fire Protection ssociation (NFP), the merican Society for Heating, Refrigeration and ir onditioning Engineers (SHRE), and the local code authorities. When cutting or drilling into wall or ceiling; do not damage electrical wiring and other utilities. ucted fans must always be vented outdoors. UTION: For general ventilating use only. o not use to exhaust hazardous or explosive materials and vapors. UTION: To reduce risk of fire and to properly exhaust air, be sure to duct air outside - do not vent exhaust air into spaces within walls or ceilings, attics or into crawl spaces, or garages. WRNING: TO REUE THE RISK OF RNGE TOP GRESE FIRE: Never leave surface units unattended at high settings. oilovers cause smoking and greasy spillovers that may ignite. Heat oils slowly on low or medium settings. lways turn hood ON when cooking at high heat or when flambeing food (i.e. repes Suzette, herries Jubilee, Peppercorn eef Flambé). lean ventilating fans frequently. Grease should not be allowed to accumulate on fan or filter. Use proper pan size. lways use cookware appropriate for the size of the surface element. WRNING: TO REUE THE RISK OF INJURY TO PERSONS IN THE EVENT OF RNGE TOP GRESE FIRE, OSERVE THE FOLLOWING: a SMOTHER FLMES with a close fitting lid, cookie sheet, or metal tray, then turn off the burner. E REFUL TO PREVENT URNS. If the flames do not go out immediately, EVUTE N LL THE FIRE EPRTMENT. NEVER PIK UP FLMING PN - you may get burned. O NOT USE WTER, including wet dishcloths or towels - a violent steam explosion will result. Use an extinguisher ONLY if: -You know you have a class extinguisher, and you already know how to operate it. The fire is small and contained in the area where it started. The fire department is being called. You can fight the fire with your back to an exit. a ased on Kitchen Fire Safety Tips published by NFP. WRNING: To reduce the risk of fire or electrical shock, do not use this fan with any solid-state speed control device. WRNING: TO REUE THE RISK OF FIRE, USE ONLY METL UTWORK RE N SVE THESE INSTRUTIONS 3
4 Tools and Parts Gather the required tools and parts before starting installation. Read and follow the instructions provided with any tools listed here. Tools needed (all models) Level rill ¹ 8 (3.0 mm) drill bit Pencil Pliers Tape measure or ruler aulking gun and weatherproof caulking compound Flat-blade screwdriver Phillips screwdriver Saber or keyhole saw Metal snips Vent clamps Parts Supplied Remove parts from packages. heck that all parts are included x 12 (76.2 x 30.5 cm) face panel amper 2-40W incandescent lamps (only model ES428SS) 2-50W halogen lamps (only model EPR628SS) 2 - Metal grease filters 2 - Mounting brackets 2 - Metal spacers (for use when cabinet depth is greater than 12 ) Hardware package. Includes: Installation Instructions and Use and are Guide 8 - metal washers 8 - plastic washers x 13 mm wood screws x 15 mm machine screws x 9.5 mm flat-head sheet metal screws x 19 mm sheet metal screws x 9.5 mm sheet metal screws T10 TORX adapter Location Requirements IMPORTNT: Observe all governing codes and ordinances. Have a qualified technician install the range hood. It is the installer s responsibility to comply with installation clearances specified on the model/serial rating plate. The model/serial rating plate is located inside the liner behind the filter on the left wall of the range hood. Range hood location should be away from strong draft areas, such as windows, doors, and strong heating vents.abinet opening dimensions that are shown must be used. Given dimensions provide minimum clearance. onsult your cooktop/ range manufacturer installation instructions before making any cutouts. Grounded electrical outlet is required. See Electrical Requirements section. The range hood is factory set for vented installations through the roof or wall. For non-vented (recirculating) installations see Non- Vented (recirculating) Installation Through the Soffit/abinet in the Prepare Location section. Recirculation Kit Part is available from your dealer or an authorized parts distributor. ll openings in ceiling and wall where range hood will be installed must be sealed. For Mobile Home Installations The installation of this range hood must conform to the Manufactured Home onstruction Safety Standards, Title 24 FR, Part 328 (formerly the Federal Standard for Mobile Home onstruction and Safety, title 24, HU, Part 280) or when such standard is not applicable, the standard for Manufactured Home Installation 1982 (Manufactured Home Sites, ommunities and Setups) NSI 225.1/NFP 501, or latest edition, or with local codes. Product imensions Parts needed 6 (15.2 cm) round metal vent system TORX is a registered trademark of Saturn Fasteners, Inc. I* - Metallic spacers Spacers has to be installed and used when cabinet depth is greater than 12. ES428SS / EPR628SS range hood models imension IM (71.8 cm) IM 26 (66 cm) IM 1 ⅛ (2.9 cm) IM 10 ¾ (27.3 cm) IM E 9 ½ (24.2 cm) IM F IM G IM H IM I I* 5 16 (.85 cm) (37 cm) 6 (14.8 cm) ½ (1.27 cm) I* 4
5 Installation learances VENTING REQUIREMENTS Vent system must terminate to the outdoors, except for no vented (recirculating) installations. o not terminate the vent system in an attic or other enclosed area. o not use a 4 (10.2 cm) laundry-type wall cap. Use metal vent only. rigid metal vent is recommended. Plastic or metal foil vent is not recommended. The length of the vent system and number of elbows should be kept to a minimum to provide efficient performance. For the most efficient and quiet operation: Use no more than three 90 elbows. Make sure there is a minimum of 24 (61.0 cm) of straight vent between the elbows if more than 1 elbow is used. o not install 2 elbows together. The vent system must have a damper. Use clamps to seal all joints in the vent system. Use caulking to seal exterior wall or roof opening around the cap. The size of the vent should be uniform.. 12 (30.5 cm) min. upper cabinet height. 30 (76.2 cm) cabinet opening width*. 24 (61 cm) min. 36 (91.4 cm) suggested max. bottom of cabinet to cooking surface. 12 (30.48 cm) cabinet opening depth* E. 15 (38.1 cm) min. clearance upper cabinet to countertop F. 36 (91.4 cm) base cabinet height For gas range installation: Mount this hood so that the bottom edge is at minimum 27 (68,5 cm) above the cooking surface. For electric range installation: mount this hood so that the bottom is not less than 24 (61 cm). old weather installations n additional back draft damper should be installed to minimize backward cold air flow and a thermal break should be installed to minimize conduction of outside temperatures as part of the vent system. The damper should be on the cold air side of the thermal break. The break should be as close as possible to where the vent system enters the heated portion of the house. Makeup air Local building codes may require the use of makeup air systems when using ventilation systems with greater than specified FM of air movement. The specified FM varies from locale to locale. onsult your HV professional for specific requirements in your area. *NOTE: This range hood is set to 30 (76.2 cm) cabinet width x 12 (30.5 cm) deep cabinets. 5
6 Venting Methods This range hood is factory set for venting through the roof or through the wall. The vent system needed for installation is not included. 6 (15.2 cm) round vent system is recommended. Roof Venting Wall Venting Recirculating Vent Piece 6 (15.2 cm) 45 elbow 2.5 ft (0.8 m) 90 elbow 5.0 ft (1.5 m) Example Vent System 90 elbow 6 ft (1.8 m) Wall cap 2 ft (0.6 m). 6 (15.2 cm) vent through the roof. Roof cap. 6 (15.2 cm) vent through the wall. Wall cap alculating Vent System Length. 6 (15.2 cm) vent through the cabinet. Round recirculating grid The recommended vent system is 6 (15.2 cm) round vent with a maximum length of 35 ft (10.7 m). For the best performance, use no more than three 90 elbows. To calculate the length of the system, add the equivalent feet (meters) for each of the vent pieces used in the system. Maximum Recommended Length = 35 ft (10.7 m) 1-90 elbow = 5.0 ft (1.5 m) 1 - wall cap = 0.0 ft (0.0 m) 9 ft (2.8 m) straight = 9.0 ft (2.8 m) Length of 6 (15.2 cm) system Electrical Requirements = 14.0 ft (4.3m) WRNING Plug into a grounded 3 prong outlet. o not remove ground prong. o not use an adapter. o not use an extension cord. Failure to follow these instructions can result in IMPORTNT: The range hood must be electrically grounded in accordance with local codes and ordinances, or in the absence of local codes, with the National Electrical ode, NSI/NFP 70 (latest edition) or anadian Electrical ode, S 22.1 No. 0-M91 (latest edition). If codes permit and a separate ground wire is used, it is recommended that a electrical installer determine that the ground path is adequate. copy of the above code standards can be obtained from: National Fire Protection ssociation 1 atterymarch Park Quincy, M S International 8501 East Pleasant Valley Road leveland, Ohio volt, 60 Hz, only, 15- or 20-amp, fused electrical circuit is required. time-delay fuse or circuit breaker is also recommended. It is recommended that a separate circuit serving only this range hood be provided. This range hood is equipped with a power supply cord having a 3 prong grounding plug. To minimize possible shock hazard, the cord must be plugged into a mating, 3 prong, grounding-type outlet, grounded in accordance with local codes and ordinances. If a mating outlet is not available, it is the personal responsibility and obligation of the customer to have the properly grounded outlet installed by a electrician. 6
7 The grounded 3 prong outlet is to be located inside the cabinet above the range hood at a maximum distance of (85.0 cm) from where the power cord exits the hood. The grounded 3 prong outlet must be accessible after installation of the range hood. See illustration (85 cm) GROUNING INSTRUTIONS For a grounded, cord-connected range hood: This range hood must be grounded. In the event of an electrical short circuit, grounding reduces the risk of electric shock by providing an escape wire for the electric current. This range hood is equipped with a cord having a grounding wire with a grounding plug. The plug must be plugged into an outlet that is properly installed and grounded. WRNING: Improper grounding can result in a risk of electric shock. onsult a qualified electrician if the grounding instructions are not completely understood, or if doubt exists as to whether the range hood is properly grounded. o not use an extension cord. If the power supply cord is too short, have a qualified electrician install an outlet near the range hood. SVE THESE INSTRUTIONS Installation Instructions Prepare Location It is recommended that the vent system be installed before the range hood is installed. efore making cutouts, make sure there is proper clearance within the ceiling or wall for vent fittings. Making the cutout to the bottom of the cabinet may be easier to do prior to mounting the cabinet to the wall. 1. isconnect power. 2. etermine which venting method to use: roof, wall, or non vented. 3. Select a flat surface for assembling the range hood. Place covering over that surface. WRNING Excessive Weight Hazard Use two or more people to move and install range hood. Failure to do so can result in back or other injury. 4. Using 2 or more people, lift range hood onto covered surface Range Hood abinet utout 1. Use a saber saw or keyhole saw to cut out the cabinet bottom inside the cabinet frame. NOTE: Frameless type cabinets require ¾ (1.9 cm) front lip in the cabinet bottom. ¾ (1.9 cm) thick filler strip (not supplied) may be required for some types of cabinets. (See Step 3 in the Install Range Hood section). ut out dimensions (without spacers) 1 2. ottom of cabinet cutout (72 cm) (27.62cm) 2. omplete cabinet preparation following the instructions for your type of venting. etermine venting cutout locations and cut out vent openings in the cabinets, walls and/or soffit. 7
8 Venting Outside Through the Roof 1. Measure and mark the lines as shown. Use a saber saw or keyhole saw to cut an opening through the top of the cabinet and the roof for the vent. *. Measurement. enterline. 6¼ (15.9 cm) round cutout Non-Vented (recirculating) Installation Through the Soffit/abinet G G. utout. 6¼ (15.9 cm)*. 7¾ (19.7 cm) centerline to cabinet front. enterline F *NOTE: For 12 (30.5 cm) high cabinets a 6¼ deep x 8 wide (14.6 cm x 20.3 cm) rectangular opening in the cabinet top is required for damper transition clearance. F E H I E Venting Outside Through the Wall 1. Install the 6 (15.2 cm) vent transition to the top of the range hood liner using two 3.5 x 9.5 mm screws. ssemble the vent duct that you will use over the 6 (15.2 cm) vent transition. 2. Measure from the bottom of the range hood liner to the horizontal centerline of the vent opening (). eiling. Vent cover. Soffit. 6 (15.2 cm) vent E. Range hood F. abinet G.Wall H. 12 (30.5 cm) min. cabinet height I. 17 (43.2 cm) min. vent cover height 1. Measure and mark the centerline of the cabinet to the soffit above. 2. Measure from the bottom of the cabinet to the centerline of the where the vent will come through the soffit. Mark the location and use a saber saw or keyhole saw to cut a 5¾ (14.6 cm) hole for the vent cover.. Vent cover. enterline. Measurement. Horizontal centerline of vent opening. Range hood liner 3. Remove the vent duct from the range hood liner. Transfer measurement to the cabinet back wall. Measure from the underside of the cabinet. 4. Mark the cutout as shown. Use a saber saw or keyhole saw to cut a round opening through the back of the cabinet and the exterior wall for the vent. Go to Step 3. *NOTE: For 12 (30.5 cm) high cabinets a 6¼ deep x 8 wide (14.6 cm x 20.3 cm) rectangular opening in the cabinet top is required for damper transition clearance. Measure and mark the centerline location for the cutout in the cabinet top. Use a saber saw or keyhole saw to cut an opening for the vent. 8
9 Install Range Hood. utout. See chart below. 7¾ (19.7 cm) centerline to cabinet front. enterline WRNING Excessive Weight Hazard Use two or more people to move and install range hood. Failure to do so can result in back or other injury. abinet Height Hole Shape and Size 12 (30.5 cm) 6¼ deep x 8 wide (15.9 cm x 20.3 cm) rectangular opening in the cabinet top is required for damper transition clearance. omplete Preparation 1. If not yet attached, install the 6 (15.2 cm) vent transition the top of the range hood liner using two 3.5 x 9.5 mm screws. 2. Locate side mounting bracket flush 1 cm to the bottom of the cabinet side and against the inside of the front cabinet face. Orient the bracket depending on the width of your cabinet as depicted in the diagrams below. rill ⅛ (3 mm) pilot holes in 6 places, attach a bracket using three 4.5 x 13 mm screws to each side of the cabinet, and tighten. dditional washers in hardware package are supplied as spacers for cabinet walls thinner than ½ (13 mm). 1. Using 2 or more people, lift the hood liner into its mounted location. ttach with four 4.2 x 19 mm screws into the slotted openings. o not tighten screws. racket Orientation for 30 (76.2 cm) abinet. 30 (76.2 cm) cabinet. Screws x 13 mm (8).Washers (optional). Mounting bracket (2) (position for 30 [76.2 cm] cabinet).abinet.hood liner canopy assembly. Screws x 19 mm (8) 2. enter the canopy in the cabinet. lign the bottom of the canopy with the bottom of the cabinet. Install four 4.2 x 19 mm screws into the round mounting plate openings and tighten all (8) mounting screws. 3. Remove the metal grease filters from the face panel. See the Range Hood are section. ttach the face plate to the hood insert. NOTE: If cabinet depth is greater than 12, it is recommended that the two 1/2 metal spacers are installed. Install to front and rear sides of the face plate with 3.5 x 9.5 mm screws as shown in drawing. Move the bracket 6 16 (1 cm) from the bottom side of the cabinet 3. Install the vent system according to the method needed. Use caulking to seal the exterior wall or roof opening..face Panel.Front and rear spacer. Screws x 9.5 mm (4) 9
10 omplete Installation WRNING. Screws x 9.5 mm flat-head (4). Face plate (30 x 12 [76.2 cm x 30.5 cm] shown). abinet (30 x 12 [76.2 cm x 30.5 cm] shown). Screws x 15 mm truss-head (2) For cabinet size - 30 x 12 (76.2 cm x 30.5 cm) ttach the x 10 ¾ (71.8 cm x 27.3 cm) face panel (supplied with range hood) to the hood liner using four 3.5 x 9.5 mm screws and two 4.2 x 15 mm truss head screws. Tighten to secure. onnect the lamp electrical connector. onnect the Vent System Vented Installations 1. onnect the vent system to the range hood vent opening. Seal the connection with clamps. Electrical Shock Hazard Plug into a grounded 3 prong outlet. o not remove ground prong. o not use an adapter. o not use an extension cord. Failure to follow these instructions can result in 1. Replace grease See the Range Hood are section. 2. Plug 3-prong power cord into a grounded 3-prong outlet located inside the cabinet above the range hood. 3. heck the operation of the range hood fan and light. See Range Hood Use section. If range hood does not operate, check to see whether a circuit breaker has tripped or a household fuse has blown. isconnect power and check wiring connections. NOTE: To get the most use from your new range hood, read the Range Hood Use section. 10
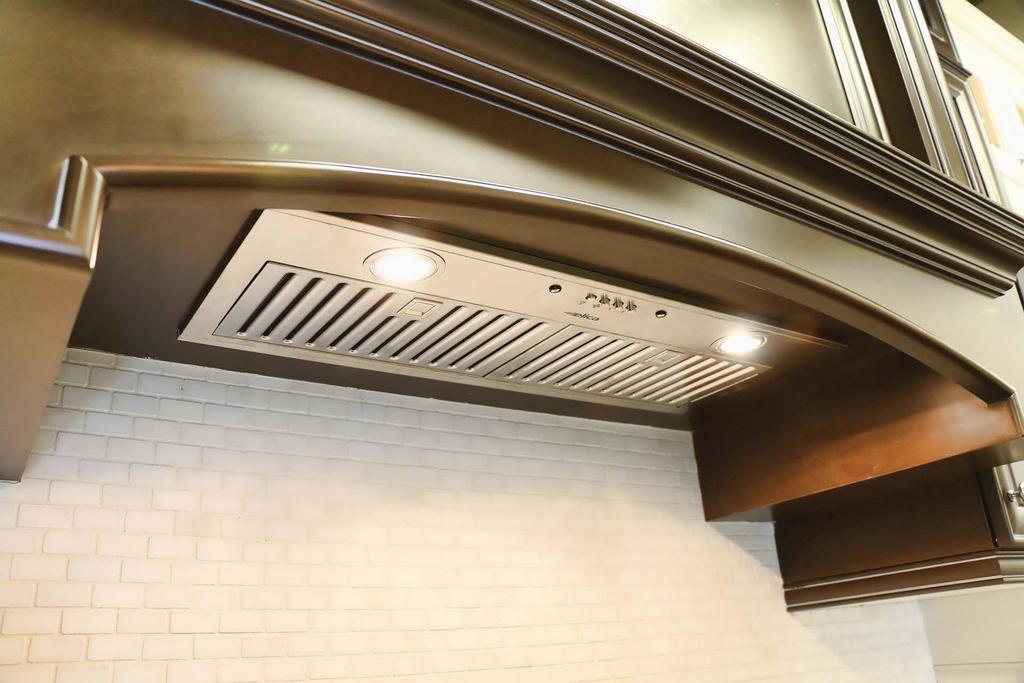
11 Range Hood Use Range Hood are The range hood is designed to remove smoke, cooking vapors and odors from the cooktop area. For best results, start the hood before cooking and allow it to operate several minutes after the cooking is complete to clear all smoke and odors from the kitchen. The hood controls are located on the center of the front of the range hood liner. Range Hood ontrols IMPORTNT: lean the hood and grease filters frequently according to the following instructions. Replace grease filters before operating hood. Exterior Surfaces: To avoid damage to the exterior surface, do not use steel wool or soap-filled scouring pads. lways wipe dry to avoid water marks. leaning Method: Liquid detergent soap and water, or all-purpose cleanser Wipe with damp soft cloth or nonabrasive sponge, then rinse with clean water and wipe dry. Metal Grease Filter The filters should be washed frequently. Place metal filters in dishwasher or hot detergent solution to clean. Let filter dry thoroughly before replacing it. Turn off fan and lights. llow lamps to cool. 1. Remove each filter by pulling the spring release handle and then pulling down the filter.. lower and light controls. Grease filter. Grease filter handle. Halogen or Incandescent lamps (depending of hood model) Range Hood ontrols. EPR628SS model spring release handle. On/Off light button. lower off and speed minimum button. lower speed medium button. lower speed maximum button Operating the Light The On/Off light button controls all lights. Press once for On and again for Off. Operating the lower The LOWER SPEE buttons turn the blower on and control the blower speed and sound level for quiet operation. The speed can be changed anytime during fan operation by pressing the desired blower speed button. Press the LOWER OFF button a second time to turn off the blower.. ES428SS model Spring release handle 2. Wash metal filters as needed in dishwasher or hot detergent solution. 3. Reinstall the filter by making sure the spring release handles are toward the front. Insert metal grease filter into upper track. 4. Pull the spring release handle down. 5. Push up on metal filter and release handle to latch into place. 6. Repeat steps 1-5 for the other filter. 11
12 Replacing the halogen lamp (EPR628SS models) UTION: efore replacing the lamps, disconnect power off to prevent from being switched on accidentally. Turn off the range hood and allow the halogen / incandescent lamp to cool. To avoid damage or decreasing the life of the new bulb, do not touch bulb with bare Replace bulb, using tissue or wearing cotton gloves to handle bulb. If new lamps do not operate, make sure the lamps are inserted correctly before calling service. 1. isconnect power. 2. Use a screwdriver and gently pry the light cover loose. 3. Remove the lamp and replace with a 120-volt, 40-watt maximum, halogen lamp made for a G-9 base. 4. Replace the light cover. 5. Reconnect power. Replacing the incandescent lamps (ES428SS models) 1. isconnect power. 2. Use a Phillips # 2 screw driver to remove the lamp cover. Remove it carefully from its housing. 3. Remove the damaged lamp bulb (turn counter clockwise) and replace it with a new bulb. E12 Philips Lamp 120V, 40W. Reconnect power. 12
13 WRRNTY ELI North merica TWO-YER LIMITE WRRNTY TO OTIN SERVIE UNER WRRNTY Owner must present proof of original purchase date. Please keep a copy of your dated proof of purchase (sales slip) in order to obtain service under warranty. PRTS N SERVIE WRRNTY For the period of two (2) year from the date of the original purchase, Elica will provide free of charge, non consumable parts or components that failed due to manufacturing defects. uring these two (2) year limited warranty, Elica will also provide free of charge, all labor and in-home service to replace any defective parts. WHT IS NOT OVERE amage or failure to the product caused by accident or act of God, such as, flood, fire or earthquake. amage or failure caused by modification of the product or use of non-genuine parts. amage or failure to the product caused during delivery, handling or installation. amage or failure to the product caused by operator abuse. amage or failure to the product caused by dwelling fuse replacement or resetting of circuit breakers. amage or failure caused by use of product in a commercial application. Service trips to dwelling to provide use or installation guidance. Light bulbs, metal or carbon filters and any other consumable part. Normal wear of finish. Wear to finish due to operator abuse, improper maintenance, use of corrosive or abrasive cleaning products/pads and oven cleaner products. WHO IS OVERE This warranty is extended to the original purchaser for products purchased for ordinary residential use in North merica (Including the United States, Guam, Puerto Rico, US Virgin Islands & anada). This warranty is non-transferable and applies only to the original purchaser and does not extend to subsequent owners of the product. This warranty is made expressly in lieu of all other warranties, expressed or implied, including, but not limited to any implied warranty of merchantability or fitness for a particular purpose and all other obligations on the part of Elica North merica, provided, however, that if the disclaimer of implied warranties is ineffective under applicable law, the duration of any implied warranty arising by operation of law shall be limited to two (2) year from the date of original purchase at retail or such longer period as may be required by applicable law. This warranty does not cover any special, incidental and/or consequential damages, nor loss of profits, suffered by the original purchaser, its customers and/or the users of the Products. WHO TO ONTT To obtain Service under Warranty or for any Service Related Question Please all: Elica North merica uthorized Service at (888) Or by Writing To: Elica North merica, ttention ustomer Service, th venue SE, ellevue, W US infoamericas@elica.com 13
USA Canada LI30MB / Feb/13
 US 1-800-944-9044 www.frigidaire.com anada 1-800-265-8352 www.frigidaire.ca LI30M / 316902497 Feb/13 PRODUT REORD ND REGISTRTION ONTENTS Important Safety Instructions... 3 List of materials... 5 Electrical
APPUZO RANGE HOOD INSTALLATION
 IMPORTANT SAFETY INFORMATION TO REDUCE THE RISK OF FIRE, ELECTRIC SHOCK, OR PERSONAL INJURY, PLEASE READ THE FOLLOWING: Use the range hood only in the manner intended by the manufacturer. If you have questions,
Use, Care, and Installation Guide
 Use, Care, and Installation Guide Model PSU-E30AS XP022421(1) 182766 Safety Notice... 2-3 List of Materials... 4 D ucting Calculation Sheet... 5 Mounting Height & Clearance... 6 Ducting Options... 7 Hood
Installation Instructions
 Installation Instructions RH2000 SERIES IMPORTANT: Read and save these instructions. IMPORTANT: Installer: Leave Installation Instructions with homeowner. Homeowner: Keep Installation Instructions for
Installation Guide. Tuscany Hoods
 Installation Guide Tuscany Hoods Table of Contents Important Information 2 Warnings _ 3 Dimensions & Specifications _ 4 Clearance Dimensions _ 5 Interior Ventilator Dimensions 6 Exterior Ventilator Dimensions
Installation Instructions Use and Care Guide Instructions d installation Mode d emploi et d entretien
 Installation Instructions Use and Care Guide Instructions d installation Mode d emploi et d entretien AMCHD36SS/ AMCHD44SS/ INDEX WARNINGS AND REQUIREMENTS... 3 RECOMMENDATIONS AND SUGGESTIONS... 6 DIMENSIONS
Use and Care & Installation Guide
 Use and Care & Installation Guide 30 Vented Hood Safety Instructions...Front Cover, 2 Operating Instructions...2, 3 Automatic Heat Sensor...3 Controls...2 Cleaning...3 Filter...3 Light Bulb Replacement...3
Installation Instructions and Use and Care
 Installation Instructions and Use and Care RH4900 SERIES (shown) RH4700 SERIES IMPORTANT: Read and save these instructions. IMPORTANT: Installer: Leave Installation Instructions with homeowner. Homeowner:
Imperial. Read Before Starting Installation!
 Imperial Read Before Starting Installation! Inspect your range hood prior to installing! Any cosmetic defects must be reported to us prior to installation. Once this hood is installed, ICP will NOT accept
Model: GVA-I 668IS2 GVA-IS2 688I IMPORTANT: READ AND SAVE THESE INSTRUCTIONS. FOR RESIDENTIAL USE ONLY.
 30" AND 36" ISLAND-MOUNT RANGE HOOD Universal Installation Instructions and Use & Care Guide For questions about features, operation/performance parts, accessories or service, call: 1-626-453-0550 or visit
COPPER INSERT INSTALLATION INSTRUCTIONS, USE AND CARE GUIDE
 COPPER INSERT INSTALLATION INSTRUCTIONS, USE AND CARE GUIDE DESIGNER SERIES MODELS Model Width CFM Type of Motor & Blower VSL430 BF 28-3/8" * Remote VSL436 BF 34-3/8" * Remote VSL442 BF 40-3/8" * Remote
INSTALLATION INSTRUCTIONS & USE & CARE GUIDE 06E Series Model 06E Series Model RANGE HOOD LOCATION 1. The range hood must be installed just above the
 INSTALLATION INSTRUCTIONS & USE & CARE GUIDE 06E Series Model 06E Series Model RANGE HOOD LOCATION 1. The range hood must be installed just above the cooktop. 2. The minimum distance from the cooking surface
INSTALLATION INSTRUCTIONS & USE & CARE GUIDE Air-O Ultra Series Range Hoods
 INSTALLATION INSTRUCTIONS & USE & CARE GUIDE Air-O Ultra Series Range Hoods Ultra Series Models: UL2824 UL2830 UL2836 CONTENTS: Part 1 - Planning The Installation Part 2 - Electrical Connection Part 3
UNDER CABINET RANGE HOOD
 UNDER CABINET RANGE HOOD MANUAL IMPORTANT SAFETY INSTRUCTIONS READ AND SAVE THESE INSTRUCTIONS FOR DOMESTIC COOKING ONLY 1. Read all instructions before using the appliance 2. Install or locate this appliance
Imperial. Cal. Products, Inc. Installation Instructions & Warranty Information. 425 Apollo Street Brea, CA
 Imperial Cal. Products, Inc. Installation Instructions & Warranty Information 425 Apollo Street Brea, CA 92821 www.imperialhoods.com (800) 851-4192 DO NOT THROW AWAY, PROPERTY OF THE HOME OWNER! Read Before
 INSTALLATION INSTRUCTIONS & USE & CARE GUIDE 01A/02A Series Models 01A/02A Series Models RANGE HOOD LOCATION 1. The range hood must be installed just above the cooktop. 2. The minimum distance from the
XOE30 XOE36 READ AND SAVE THE INSTRUCTIONS FOR RESIDENTIAL COOKING ONLY
 XOE30 XOE36 READ AND SAVE THE INSTRUCTIONS FOR RESIDENTIAL COOKING ONLY Register your product online at: www.xoventilation.com NEED HELP? Call our ventilation experts at 800-966-8300 1 Dear Customer, If
UNDER CABINET RANGE HOOD. This manual is made with 100 % recycled paper.
 UNDER CABINET RANGE HOOD This manual is made with 100 % recycled paper. IMPORTANT SAFETY INSTRUCTIONS READ AND SAVE THESE INSTRUCTIONS FOR DOMESTIC COOKING ONLY 1. Read all instructions before using the
READ AND SAVE THESE INSTRUCTIONS
 READ AND SAVE THESE INSTRUCTIONS WARNING TO REDUCE THE RISK OF FIRE, ELECTRIC SHOCK, OR INJURY TO PERSONS, OBSERVE THE FOLLOWING: 1. Use this unit only in the manner intended by the manufacturer. If you
User s Manual WS-69TB30 / WS-69TB36 (22 ) WS-69TB42 / WS-69TB48 (22 ) WS-69TS30 / WS-69TS36 (18 ) WS-69TS42 / WS-69TS48 (18 )
 WS-69TB42 / WS-69TB48 (22 ) WS-69TS30 / WS-69TS36 (18 ) WS-69TS42 / WS-69TS48 (18 )") www.windsterhood.com User s Manual LINER SERIES WS-69TB30 / WS-69TB36 (22 ) WS-69TB42 / WS-69TB48 (22 ) WS-69TS30 / WS-69TS36 (18 ) WS-69TS42 / WS-69TS48 (18 ) NOTE: PLEASE INSPECT HOOD IMMEDIATELY UPON
www.windsterhood.com User s Manual LINER SERIES WS-69TB30 / WS-69TB36 (22 ) WS-69TB42 / WS-69TB48 (22 ) WS-69TS30 / WS-69TS36 (18 ) WS-69TS42 / WS-69TS48 (18 ) NOTE: PLEASE INSPECT HOOD IMMEDIATELY UPON
Imperial Cal Products, Inc.
 Imperial Cal Products, Inc. Read Before Starting Installation! Inspect your range hood prior to installing! Any cosmetic defects must be reported to us prior to installation. Once this hood is installed,
Table of Contents/Table des matières COOKTOP SAFETY
 30" (76.2 M) ELETRI INDUTION OOKTOP INSTLLTION INSTRUTIONS INSTRUTIONS D'INSTLLTION DE LTLEDEUISSON ÉLETRIQUE À INDUTION DE 30" (76,2 M) Table of ontents/table des matières OOKTOP SFETY... 1 INSTLLTION
Owner and Maintenance Guide Models Equipped with K250 Blower
 Owner and Maintenance Guide Models Equipped with K250 Blower Thank You For Choosing Vent-A-Hood We know you will be pleased with your purchase decision. Since 1933, our company has earned an outstanding
READ AND SAVE THESE INSTRUCTIONS WARNING! TO REDUCE THE RISK OF FIRE, ELECTRICAL SHOCK, OR INJURY TO PERSONS OBSERVE THE FOLLOWING:
 DANVER INSTALLATION INSTRUCTIONS & USE & CARE GUIDE DANVER DOHC Series Range Hood 1300 CFM DOHC Séries Models: 36 48 60 CONTENTS: Part 1 - Planning The Installation Part 2 - Electrical Connection Part
Owner and Maintenance Guide for M Line Range Hoods with M600/M1200 Blowers
 Owner and Maintenance Guide for M Line Range Hoods with M600/M1200 Blowers Thank You For Choosing Vent-A-Hood We know you will be pleased with your purchase decision. Since 1933, our company has earned
WARNINGS: Must be followed carefully to avoid personal injury. IMPORTANT: Must be followed carefully to avoid damage or incorrect installation.
 INSTALLATION INSTRUCTIONS & USE & CARE GUIDE Designer Series Models Model Width CFM Type of Motor & Blower VSL430 BF 28 3/8 * Remote VSL436 BF 34-3/8 * Remote VSL442 BF 40-3/8 * Remote VSL448 BF 46-3/8
INSTALLATION INSTRUCTIONS & USE & CARE GUIDE Euro-style Range Hood ESH5200
 INSTALLATION INSTRUCTIONS & USE & CARE GUIDE Euro-style Range Hood ESH5200 Installer: Owner: READ AND SAVE THESE INSTRUCTIONS Please leave Installation Instructions with the range hood. Please keep Installation
PRO VENTILATION HOOD USE AND CARE GUIDE CLEANING, MAINTENANCE, AND MORE
 PRO VENTILATION HOOD USE AND CARE GUIDE CLEANING, MAINTENANCE, AND MORE PRO VENTILATION HOOD Contents 4 Safety Precautions 6 Hood Features 7 Hood Operation 9 Care Recommendations 10 Troubleshooting 11
WALL MOUNT RANGE HOOD. This manual is made with 100 % recycled paper. Electronic version of this manual is available at:
 WALL MOUNT RANGE HOOD This manual is made with 100 % recycled paper. Electronic version of this manual is available at: www.cosmoappliances.com Thank You Thank you for your purchase. We know that you have
IVI WARNINGS: Must be followed carefully to avoid personal injury. [VL
 INSTALLATION INSTRUCTIONS & USE & CARE GUIDE Bull Outdoor Products BBQ Hood 1250 CFM Item# 66009 CONTENTS: Part 1 - Planning The Installation Part 2 - Electrical Connection Part 3 - Direction of Vent and
RL Series Commercial/Residential Ventilation Fan Installation Instructions Please Read And Save These Instructions.
 Page 1 of 8 RL Series Commercial/Residential Ventilation Fan Installation Instructions Please Read And Save These Instructions. DO NOT CONNECT POWER SUPPLY UNTIL FAN IS COMPLETELY INSTALLED. MAKE SURE
Barcelona Collection. Use and handling instructions Mode d emploi et d entretien Instrucciones de uso y mantenimiento
 Barcelona Collection Use and handling instructions Mode d emploi et d entretien Instrucciones de uso y mantenimiento GBENGLISH INSTALLATION INSTRUCTIONS. READ & SAVE THESE INSTRUCTIONS! INSTALLATION INSTRUCTIONS:
User s Manual WS-3230SS WS-3236SS WS-3242SS WS-3248SS
 www.windsterhood.com User s Manual UNDER CABINET SERIES WALL MOUNT SERIES WS-3230SS WS-3236SS WS-3242SS WS-3248SS NOTE: PLEASE INSPECT HOOD IMMEDIATELY UPON RECEIVING. CLAIM OF DAMAGE AFTER 7 DAYS OF DELIVERY
Bosch ventilation use and care manual DPH36652UC - DPH30652UC
 Bosch ventilation use and care manual DPH36652UC - DPH30652UC IMPORTANT SAFETY INSTRUCTIONS Read All Instructions Before Using the Appliance. READ AND SAVE THESE INSTRUCTIONS WARNING TO REDUCE THE RISK
Use, Care, and Installation Guide
 Use, Care, and Installation Guide PR-2011S PR-2011W PR-2011-36 PR-2011-36 PR-1230S PR-1230W PR-1236S PR-1236W Model number: Serial Number: Date of Purchase: Sales Dealer: XP022309(1) SAFETY NOTICE... 1-2
Table of Contents/ Table des matières
 30" (76.2 M) ND 36" (91.4 M) ELETRI INDUTION OOKTOP INSTLLTION INSTRUTIONS INSTRUTIONS D INSTLLTION DE L TLE DE UISSON ÉLETRIQUE À INDUTION DE 30" (76,2 M) ET DE 36" (91,4 M) OOKTOP SFETY... 2 INSTLLTION
Installation. Professional Built-in Hoods
 Installation Professional Built-in Hoods Table of Contents Warnings & Important Information _ 3 VWH 0 H. Wall Hoods w/standard Ventilator 30, & 36 Dimensions & Specifications _ 5 Clearance Dimensions _
User s Manual WS-4830SS WS-4836SS NOTE: PLEASE INSPECT HOOD IMMEDIATELY UPON RECEIVING. CLAIM OF DAMAGE AFTER 7 DAYS OF DELIVERY WILL BE DENIED.
 www.windsterhood.com User s Manual UNDER CABINET SERIES WS-4830SS WS-4836SS NOTE: PLEASE INSPECT HOOD IMMEDIATELY UPON RECEIVING. CLAIM OF DAMAGE AFTER 7 DAYS OF DELIVERY WILL BE DENIED. This unit is designed
AerFlow at ::rangehoods.com is a division of kitchen::accessories U N L I M I T E D
 USA COOKER HOOD USER INSTRUCTIONS IMPORTANT SAFETY INSTRUCTIONS READ AND SAVE THESE INSTRUCTIONS PLEASE READ ENTIRE INSTRUCTIONS EFORE PROCEEDING. IMPORTANT: Save these Instructions for the Local Electrical
CLEANING & MAINTENANCE For performance, appearance, and health reasons, clean filter, fan and grease-laden surfaces. Use only a clean cloth and mild d
 PROFESSIONAL STYLE RANGE HOOD Page 1 READ AND SAVE THESE INSTRUCTIONS FOR DOMESTIC COOKING ONLY TO REDUCE THE RISK OF FIRE, ELECTRIC SHOCK, OR IN- JURY TO PERSONS, OBSERVE THE FOLLOWING: 1. Use this unit
READ AND SAVE THESE INSTRUCTIONS
 UXT3030AA UXT3036AA SERIES To register this product visit www.broan.com ECONOMY RANGE HOOD INSTALLATION INSTRUCTIONS READ AND SAVE THESE INSTRUCTIONS TO REDUCE THE RISK OF FIRE, ELECTRIC SHOCK, OR INJURY
MH70230AS MH70236AS MH70248AS
 MODEL #. MH70230AS MH70236AS MH70248AS Installation, Use and Care Guide READ AND SAVE THESE INSTRUCTIONS 2014.NOV SAFETY NOTICE... 2-3 LIST OF MATERIALS... 4 INSTALLATION Ducting Calculation Sheet...
WS-5530SS WS-5536SS WS-5542SS NOTE: PLEASE INSPECT HOOD IMMEDIATELY UPON RECEIVING. CLAIM OF DAMAGE AFTER 7 DAYS OF DELIVERY WILL BE DENIED.
 www.windsterhoocom UNDER CABINET SERIES User s Manual WS-5530SS WS-5536SS WS-5542SS NOTE: PLEASE INSPECT HOOD IMMEDIATELY UPON RECEIVING. CLAIM OF DAMAGE AFTER 7 DAYS OF DELIVERY WILL BE DENIED. This unit
High Power Range Hood
 High Power Range Hood Pictured Model: CW500 Installation and Operating Instructions Please read all instructions before installing and operating. All wiring and installation must be in accordance with
User s Manual RA-3030SS RA-3036SS. NOTE: This unit was designed for indoor residential use and DUCTED operation only.
 www.windsterhood.com User s Manual UNDER CABINET SERIES RA-3030SS RA-3036SS NOTE: This unit was designed for indoor residential use and DUCTED operation only. DO NOT USE OVER A WOOD GRILL OR MOUNT OUTDOOR
User s Manual WS-63TB36SS WS-63TB42SS NOTE: PLEASE INSPECT HOOD IMMEDIATELY UPON RECEIVING. CLAIM OF DAMAGE AFTER 7 DAYS OF DELIVERY WILL BE DENIED.
 www.windsterhood.com User s Manual WS-63TB36SS WS-63TB42SS ISLAND SERIES NOTE: PLEASE INSPECT HOOD IMMEDIATELY UPON RECEIVING. CLAIM OF DAMAGE AFTER 7 DAYS OF DELIVERY WILL BE DENIED. This unit is designed
INSTALLATION INSTRUCTIONS 30" (76.2 CM) ELECTRIC SINGLE AND DOUBLE BUILT-IN OVEN
 ELECTRIC SINGLE AND DOUBLE BUILT-IN OVEN") INSTLLTION INSTRUTIONS 30" (76.2 M) LTRI SINGL N OUL UILT-IN OVN Table of ontents UILT-IN OVN SFTY...2 INSTLLTION RQUIRMNTS...3 Tools and Parts...3 uilt-in Oven Location Requirements...3 Water Filtration
INSTLLTION INSTRUTIONS 30" (76.2 M) LTRI SINGL N OUL UILT-IN OVN Table of ontents UILT-IN OVN SFTY...2 INSTLLTION RQUIRMNTS...3 Tools and Parts...3 uilt-in Oven Location Requirements...3 Water Filtration
READ AND SAVE THESE INSTRUCTIONS COOKING ONLY.! WARNING
 READ AND SAVE THESE INSTRUCTIONS! INTENDED FOR DOMESTIC COOKING ONLY.! TO REDUCE THE RISK OF FIRE, ELECTRIC SHOCK, OR INJURY TO PERSONS, OBSERVE THE FOLLOW- ING: 1. Use this unit only in the manner intended
UseandCare & Installation Guide
 UseandCare & Installation Guide Downdraft Vent System Safety Instructions...2 Operating Instructions, Tips Canning...3 Controls...3 Cooking Tips...3 Care and Cleaning Blower...4 Grease Filter...4 Problem
User s Manual. NOTE: This unit does not support ducted operation. For ducted operation, please refer to model WS208L30SS or WS208L36SS
 www.windsterhood.com User s Manual UNDER CABINET SERIES WS-208LF30SS WS-208LF36SS NOTE: This unit does not support ducted operation. For ducted operation, please refer to model WS208L30SS or WS208L36SS
Use, Care, and Installation Guide
 Use, Care, and Installation Guide RH00529S RH00538S DEC10.0101 READ AND SAVE THESE INSTRUCTIONS SAFETY NOTICE... 2-3 LIST OF MATERIALS... 4 INSTALLATION Ducting Calculation Sheet... 5 Mounting Height
User s Manual WALL MOUNT SERIES TABLE OF CONTENTS RA7730SS/RA77B30SS RA7736SS/RA77B36SS RA7742SS/RA77B42SS RA7748SS/RA77B48SS.
 TABLE OF CONTENTS 1 Table of Contents www.windsterhood.com Safety Information... 2 3 WALL MOUNT SERIES User s Manual RA7730SS/RA77B30SS RA7736SS/RA77B36SS RA7742SS/RA77B42SS RA7748SS/RA77B48SS NOTE: PLEASE
ISLAND MOUNT RANGE HOOD. This manual is made with 100 % recycled paper. Electronic version of this manual is available at:
 ISLAND MOUNT RANGE HOOD This manual is made with 100 % recycled paper. Electronic version of this manual is available at: www.cosmoappliances.com Thank You Thank you for your purchase. We know that you
User s Manual WS-5830SS WS-5836SS WS-5842SS
 www.windsterhoocom UNDER CABINET SERIES User s Manual WS-5830SS WS-5836SS WS-5842SS NOTE: PLEASE INSPECT HOOD IMMEDIATELY UPON RECEIVING. CLAIM OF DAMAGE AFTER 7 DAYS OF DELIVERY WILL BE DENIED. This unit
Use, Care, and Installation Guide
 www.zephyronline.com Use, Care, and Installation Guide Twister AK8000AS Tornado I AK8100AS Model number: Serial Number: Date of Purchase: Sales Dealer: JAN08.0201 2008 Zephyr Corporation READ AND SAVE
e Bath Fan with Light User s Guide
 e Bath Fan with Light User s Guide abfl100rnl, BFL125RNL Item Stock Number(s): BFL100RNL, BFL125RNL IMPORTANT INSTRUCTIONS - OPERATING MANUAL READ AND SAVE THESE INSTRUCTIONS READ CAREFULLY BEFORE ATTEMPTING
Use, Care, and Installation Guide READ AND SAVE THESE INSTRUCTIONS
 Use, Care, and Installation Guide READ AND SAVE THESE INSTRUCTIONS EN Contents page 1 English Contents Important safety Notice...3 Electrical & Installation requirements...4 Electrical requirements...4
User s Manual ISLAND SERIES TABLE OF CONTENTS RA-7630SS RA-7636SS RA-7642SS RA-7648SS. Table of Contents. Safety Information...
 - TABLE OF CONTENTS Table of Contents 1 www.windsterhood.com Safety Information... 2 3 ISLAND SERIES User s Manual RA-7630SS RA-7636SS RA-7642SS RA-7648SS NOTE: PLEASE INSPECT HOOD IMMEDIATELY UPON RECEIVING.
User s Manual WS-62N30SS WS-62N36SS NOTE: PLEASE INSPECT HOOD IMMEDIATELY UPON RECEIVING. CLAIM OF DAMAGE AFTER 7 DAYS OF DELIVERY WILL BE DENIED.
 WALL MOUNT SERIES www.windsterhood.com User s Manual WS-62N30SS WS-62N36SS NOTE: PLEASE INSPECT HOOD IMMEDIATELY UPON RECEIVING. CLAIM OF DAMAGE AFTER 7 DAYS OF DELIVERY WILL BE DENIED. This unit is designed
Section 1 - Safety Information Section 2 - Installation: Wall Mount Hoods Section 3 - Installation: Island Mount Hoods
 Range Hoods Owner s Manual Section 1 - Safety Information Section 2 - Installation: Wall Mount Hoods Section 3 - Installation: Island Mount Hoods Section 4 - Use & Care Instructions Section 5 - Control
Table of Contents. Safety Information Content Checklist Measurements Preparation Installation
 TABLE OF CONTENTS 1 Table of Contents Safety Information... 2 3 Content Checklist... 4 Measurements... 5 Preparation... 6 Installation... 7 8 Installation Diagram... 9 Operation & Features... 10 Cleaning
user manual Model #: BLZ-HOOD
 user manual Model #: BLZ-HOOD ii Table of Contents Table of Contents 1 Saftey Notice III-V 2 Diagrams 1-3 Hood Dimensions............ 1 Control Panel.............. 2 Clearance............... 3 3 Installation
e Heater/Exhaust Fan/Light User s Guide
 e Heater/Exhaust Fan/Light User s Guide abflh70l, BFLH85L Item Stock Number(s): BFLH70L, BFLH85L IMPORTANT INSTRUCTIONS - OPERATING MANUAL READ AND SAVE THESE INSTRUCTIONS READ CAREFULLY BEFORE ATTEMPTING
Wall Mounted Hoods. Use & Care Page 6. Installation Instructions Page 4. Warranty & Registration Page 9
 Wall Mounted Hoods Owners Manual Installation Instructions Page 4 Use & Care Page 6 Warranty & Registration Page 9 IMPORTANT SAFETY INFORMATION **Read the complete manual carefully before installation**
15" (38.1 CM) ELECTRIC COOKTOP INSTALLATION INSTRUCTIONS INSTRUCTIONS D INSTALLATION DE TABLE DE CUISSON ÉLECTRIQUE DE 15" (38,1 CM)
 ELECTRIC COOKTOP INSTALLATION INSTRUCTIONS INSTRUCTIONS D INSTALLATION DE TABLE DE CUISSON ÉLECTRIQUE DE 15 (38,1 CM)") 15" (38.1 M) LTRI OOKTOP INSTLLTION INSTRUTIONS INSTRUTIONS INSTLLTION TL UISSON ÉLTRIQU 15" (38,1 M) Table of ontents/table des matières OOKTOP STY...2 INSTLLTION RQUIRMNTS...3 Tools and Parts...3 Location
15" (38.1 M) LTRI OOKTOP INSTLLTION INSTRUTIONS INSTRUTIONS INSTLLTION TL UISSON ÉLTRIQU 15" (38,1 M) Table of ontents/table des matières OOKTOP STY...2 INSTLLTION RQUIRMNTS...3 Tools and Parts...3 Location
e Bath Fan with Light User s Guide
 e Bath Fan with Light User s Guide abfl125rok Item Stock Number(s): BFL125ROK IMPORTANT INSTRUCTIONS - OPERATING MANUAL READ AND SAVE THESE INSTRUCTIONS READ CAREFULLY BEFORE ATTEMPTING TO ASSEMBLE, INSTALL,
Installation Instructions
 Installation Instructions 30" ELECTRIC Downdraft Cooktop Modules selected at time of purchase IMPORTANT: Read and save these instructions. Part No. 208040 A 438589 Quick Reference Table of Contents: Pages
user manual Model #: BLZ-WVH-42
 user manual Model #: BLZ-WVH-42 ii Table of Contents Table of Contents 1 Safety Notice III-V 2 Diagrams 1-3 Hood Dimensions............ 1 Control Panel.............. 2 Clearance............... 3 3 Installation
Model U102I ENGLISH...2 FRANÇAIS...15 ESPAÑOL A. BEST BY BROAN, P. O. Box 140, Hartford, WI 53027
 Model U102I ENGLISH...2 FRANÇAIS...15 ESPAÑOL...28 BEST BY BROAN, P. O. Box 140, Hartford, WI 53027 99043479A READ AND SAVE THESE INSTRUCTIONS INTENDED FOR DOMESTIC COOKING ONLY!! WARNING TO REDUCE THE
INSTALLATION INSTRUCTIONS & USE & CARE GUIDE Trade-Wind Professional Series Liners
 INSTALLATION INSTRUCTIONS & USE & CARE GUIDE Trade-Wind Professional Series Liners Professional Series Models Model Width CFM Type of Motor & Blower PSL736 34-3/8 * Remote PSL742 40-3/8 * Remote PSL748
IMPORTANT: Read and save these instructions. 24 and 30 Convertible Range Hood. Part No Rev. E
 MPORTANT: Read and save these instructions. MPORTANT: nstaller: Leave nstallation nstructions with homeowner. Homeowner: Keep nstallation nstructions for future reference. Save nstallation nstructions
2 Finding Information
 2 Finding Information PLEASE READ AND SAVE THIS GUIDE Attach your sales receipt to this page for future reference. Thank you for choosing Electrolux, the new premium brand in home appliances. This Use
Model KER222. BEST BY BROAN P.O. Box 140 Hartford, WI ENGLISH...3 FRANÇAIS...12 ESPAÑOL
 Model KER222 ENGLISH...3 FRANÇAIS...12 ESPAÑOL...21 BEST BY BROAN P.O. Box 140 Hartford, WI 53027-1 - READ AND SAVE THESE INSTRUCTIONS! INTENDED FOR DOMESTIC COOKING ONLY! WARNING TO REDUCE THE RISK OF
INSTALLATION INSTRUCTIONS &USE & CARE GUIDE AL-T7200 Versa BBQ Hood Series
 INSTALLATION INSTRUCTIONS &USE & CARE GUIDE AL-T7200 Versa BBQ Hood Series AL-T7200 Versa Series Models: No Blower AL-T7236 AL-T7242 AL-T7248 CONTENTS: Part 1 - Planning The Installation Part 2 - Electrical
READ AND SAVE THESE INSTRUCTIONS
 11000 SERIES SOLID STATE CONVERTIBLE CANOPY RANGE HOOD INSTALLATION INSTRUCTIONS WARNING READ AND SAVE THESE INSTRUCTIONS TO REDUCE THE RISK OF FIRE, ELECTRIC SHOCK, OR INJURY TO PERSONS, OBSERVE THE FOLLOWING:
Installation Instructions. Millennia Island (Ceiling Mount) Range Hoods. Models: DHI361, DHI421, DHI482 and DHI542
 Range Hoods. Models: DHI361, DHI421, DHI482 and DHI542") Millennia Island (Ceiling Mount) Range Hoods Models: DHI361, DHI421, DHI482 and DHI542 Installation Instructions Approved for use with all dacor ranges and cooktops. IMPORTANT: INSTALLATION OF THIS HOOD
Millennia Island (Ceiling Mount) Range Hoods Models: DHI361, DHI421, DHI482 and DHI542 Installation Instructions Approved for use with all dacor ranges and cooktops. IMPORTANT: INSTALLATION OF THIS HOOD
Cooktop Low-Profile Ventilation Hoods
 USE & CARE GUIDE Cooktop Low-Profile Ventilation Hoods Contents Wolf Cooktop Low-Profile Ventilation Hoods 3 Safety Instructions 4 Cooktop Low-Profile Hood Features 6 Cooktop Low-Profile Hood Operation
READ AND SAVE THESE INSTRUCTIONS Installer: Leave this manual with homeowner.
 Models covered by these instructions: UIB, UIBTF, CMUIB, UIM Ventilation Inserts & Liners Intended for Domestic Cooking Only READ AND SAVE THESE INSTRUCTIONS Installer: Leave this manual with homeowner.
User s Manual WS-68N30SS WS-68N36SS WS-68N42SS
 ISLAND SERIES www.windsterhood.com User s Manual WS-68N30SS WS-68N36SS WS-68N42SS NOTE: PLEASE INSPECT HOOD IMMEDIATELY UPON RECEIVING. CLAIM OF DAMAGE AFTER 7 DAYS OF DELIVERY WILL BE DENIED. This unit
READ AND SAVE THESE INSTRUCTIONS READ CAREFULLY BEFORE ATTEMPTING TO ASSEMBLE, INSTALL, OPERATE OR MAINTAIN THE PRODUCT DESCRIBED. PROTECT YOURSELF AN
 READ AND SAVE THESE INSTRUCTIONS READ CAREFULLY BEFORE ATTEMPTING TO ASSEMBLE, INSTALL, OPERATE OR MAINTAIN THE PRODUCT DESCRIBED. PROTECT YOURSELF AND OTHERS BY OBSERVING ALL SAFETY INFORMATION. FAILURE
395 CFM Code Compliant
 Professional Liners Inserts Model Width CFM Type of Motor & Blower INSTALLATION INSTRUCTIONS & USE & CARE GUIDE CopperSmith Professional Liners Inserts 395 CFM Code Compliant *These models connect to an
INSTALLATION INSTRUCTIONS & USE & CARE GUIDE Trade-Wind 7200 Series BBQ Hood
 INSTALLATION INSTRUCTIONS & USE & CARE GUIDE Trade-Wind 7200 Series BBQ Hood 7200 Series Models: No Blower 1200 CFM 2300 CFM 7236 7236-12 N/A 7242 7242-12 N/A 7248 7248-12 N/A 7254 N/A 7254-23 7260 N/A
Installation Instructions
 Installation Instructions Above the Cooktop Microwave Oven PVM1899 & PVM2155 Questions? Call 1-800-561-3344 or Visit our Website at: GEAppliances.ca BEFORE YOU BEGIN Read these instructions completely
Table of Contents/Table des matières BUILT-IN OVEN SAFETY. Your safety and the safety of others are very important.
 INSTLLTION INSTRUTIONS 27 " (68.6 M)N 30" (76.2 M) LTRI SINGL N OUL UILT-IN OVN INSTRUTIONS INSTLLTION FOUR ÉLTRIQU NSTRÉ 27" (68,6 M) T 30" (76,2 M) SIMPL T OUL UILT-IN OVN SFTY... 1 INSTLLTION RQUIRMNTS...
Installation Instructions Preference Wall Mount Range Hood
 Installation Instructions Preference Wall Mount Range Hood For use with models PHW30 and PHW36 Part No. 101745 Rev. D Table of Contents Important Safety Instructions... 1 Important Information About Safety
e Bath Fan with Light User s Guide
 e Bath Fan with Light User s Guide abfl50uq, BFL60UQ, BFL70, BFL85 Item Stock Number(s): BFL50UQ, BFL60UQ, BFL70, BFL85 IMPORTANT INSTRUCTIONS - OPERATING MANUAL READ AND SAVE THESE INSTRUCTIONS READ CAREFULLY
WARNINGS: Must be followed carefully to avoid personal injury. IMPORTANT: Must be followed carefully to avoid damage or incorrect installation.
 INSTALLATION INSTRUCTIONS & USE & CARE GUIDE Trade-Wind VSL 400 Series Liners For Remote/In-Line Blowers VSL 400 Series Liner Models Model Width CFM Type of Motor & Blower VSL430BF 28 3 / 8 * Remote VSL436BF
READ AND SAVE THESE INSTRUCTIONS
 To register this product visit www.broan.com MODELS 2830 & 2836 ECLIPSE DOWNDRAFT BLOWER SYSTEM READ AND SAVE THESE INSTRUCTIONS WARNING TO REDUCE THE RISK OF FIRE, ELECTRIC SHOCK, OR INJURY TO PERSONS,
Range Hood WPP430 and WPP436
 Range Hood WPP430 and WPP436 User Manual & Installation Instructions IMPORTANT SAFETY INSTRUCTIONS Carefully read the important information regarding installation, safety and maintenance. Keep these instructions
INSTALLATION INSTRUCTIONS & USE & CARE GUIDE Trade-Wind P7200 Series BBQ Hood
 INSTALLATION INSTRUCTIONS & USE & CARE GUIDE Trade-Wind P7200 Series BBQ Hood P7200 Series Models: No Blower 1200 CFM P7236 P7236-12 P7242 P7242-12 P7248 P7248-12 P7260 P7260-23 P7272 P7272-23 CONTENTS:
MODEL: AN-1129 Pryamid 30
 MODEL: AN-1129 Pryamid 30 2015-11-19 MAAN1129-06 IMPORTANT SAFETY INSTRUCTIONS Carefully read the following important information regarding installation safety and maintenance. Keep these instructions
Self-Cleaning Range Hoods
 Self-Cleaning Range Hoods Wall Mount and Island Range Hoods Installation and Operation Instructions Please read all instructions before installing and operating. All wiring and installation must be in
BUILT-IN MICROWAVE OVEN INSTALLATION INSTRUCTIONS 24" (61.0 cm), 27" (68.6 cm), 30" (76.2 cm)
, 27 (68.6 cm), 30 (76.2 cm)") BUILT-IN MICROWVE OVEN INSTLLTION INSTRUCTIONS 24" (61.0 cm), 27" (68.6 cm), 30" (76.2 cm) This product is suitable for use above electric or gas built-in ovens, and below non-vented electric or gas cooktops.
BUILT-IN MICROWVE OVEN INSTLLTION INSTRUCTIONS 24" (61.0 cm), 27" (68.6 cm), 30" (76.2 cm) This product is suitable for use above electric or gas built-in ovens, and below non-vented electric or gas cooktops.
ELECTRIC COOKTOP INSTALLATION INSTRUCTIONS INSTRUCTIONS D'INSTALLATION DE LA TABLE DE CUISSON ÉLECTRIQUE
 LTRI OOKTOP INSTLLTION INSTRUTIONS INSTRUTIONS 'INSTLLTION L TL UISSON ÉLTRIQU Table of ontents / Table des matières OOKTOP STY... 1 INSTLLTION RQUIRMNTS... 2 Tools and Parts... 2 Location Requirements...
Pro Ventilation Hood Liners
 INSTALLATION GUIDE Pro Ventilation Hood Liners Contents Wolf Pro Hood Liners........................... 3 Installation Considerations...................... 4 Pro Hood Liner Specifications...................
Built-In Electric Wall Oven
 uilt-in lectric Wall Oven Installation uide NW9000K Install_NW9000K_68-00000_00_N.indd 1 2016-06-30 6:21:36 ontents Safety informations Safety informations 2 Related equipment safety ontents Related equipment
Installation & Operation Manual
 Installation & Operation Manual For All CS Series IMPORTANT: Read and save these instructions NOTICE: Installer: Leave this guide with the homeowner Homeowner: Keep this guide for future reference 1 Table
Use, Care, and Installation Guide
 Use, Care, and Installation Guide Breeze I AK1124x, AK1100x, AK1136x Breeze II AK1200x, AK1236x Model number: Serial Number: Date of Purchase: Sales Dealer: JUN10.0301 Zephyr Corporation READ AND SAVE
Use, Care, and Installation Guide
 Use, Care, and Installation Guide SUMMIT VSU-E30CS VSU-E36CS PLATEAU VPL-E30AS VPL-E36AS Model number: Serial Number: NOV14.0601 SAFETY NOTICE... 2-3 LIST OF MATERIALS... 4 INSTALLATION Ducting Calculation
LI3YMC/W D. Table of Contents/Table des matières...2
 30" (76.2 M) ND 36" (91.4 M) WLL-MOUNT NOPY RNGE HOOD Installation Instructions and Use & are Guide For questions about features, operation/performance parts, accessories or service, call: 1-800-253-1301