ULTIMA series USER MANUAL
|
|
|
- Lindsey West
- 6 years ago
- Views:
Transcription

1 USER MANUAL
2 In order to ensure that our products are continually improved, GETINGE LANCER reserves the right to make any changes to their features relating to technical developments Drawings and photos are non-contractual ORIGINAL INSTRUCTIONS
3 SUMMARY CHAPTER 1 PRESENTATION OF THE ULTIMA SERIES... 5 CHAPTER 2 GENERAL INFORMATION GENERAL CONSIDERATIONS COPYRIGHT LIABILITY DECLARATION OF CONFORMITY MANUFACTURER 7 2. SAFETY WARNINGS CORRECT USAGE OPERATOR TRAINING 8 3. PRODUCT & ADDITIVE LIABILITY 8 4. SYMBOL 8 CHAPTER 3 ULTIMA SERIES WASHERS OPERATOR INTERFACES TOUCH SCREEN ICON LIST ALPHANUMERIC KEYPAD EMERGENCY STOP BUTTON FUNCTIONS ACCESS BY LEVEL CODE SAFETY ADVICES PRECAUTIONS FOR USE SAFETY LABELLS USE MAXIMUM CHARGE OPENING OF THE DOOR WASHING PRODUCTS PRODUCT TANK AREA WASHING PRODUCTS CATEGORIES INSTRUCTIONS TO RESPECT IN CASE OF HANDLING THE WASHING PRODUCTS CHANGE OF THE TANKS HOW TO CHANGE CHEMICAL CONTAINER 18 NU_ULTIMA_02_EN_1612 1
4 7. BUILT-IN PRINTER (OPTION) CHECKING THE PRINTER CHOICE OF THE SUITABLE PAPER ROLLS REMOVING PAPER AND CLEARING PAPER JAMS LOADING PAPER OPERATING MODES PRINTER MAINTENANCE EXTERNAL PRINTER (OPTION) CHECKING THE PRINTER CHOICE OF THE SUITABLE PAPER ROLLS REMOVING PAPER AND CLEARING PAPER JAMS LOADING PAPER OPERATING MODES PRINTER MAINTENANCE NOTE PRINTING USING OF THE ACCESSORIES SOME EXAMPLES FITTING THE BASKETS LOADING GLASSWARE 26 CHAPTER 4 LAUNCHING A CYCLE CYCLES PRESENTATION CONNECTING TO THE MAINS SECURITY LEVEL BASIC SECURITY (LEVEL 1) HIGH SECURITY (LEVEL 2) LAUNCHING A CYCLE INFORMATIONS DURING THE CYCLE END OF CYCLE 31 CHAPTER 5 ACCESS TO THE USER S MENU SAMPLING WASHER DOCUMENTATION PUMP PRIMING TICKET PARAMETERS (ONLY FOR WASHER WITH PRINTER OPTION) TICKET HEADER TICKET FOOTER 39 NU_ULTIMA_02_EN_1612 2
5 4.3 REPRINTING TICKETS USER SETUP EDIT PROGRAMS 41 CHAPTER 6 TRACEABILITY MACHINE TRACEABILITY DOCUMENT PRINTER (OPTION) THE PRO KIT (OPTION) (OPTION ONLY FOR LX MODELS) VALIDATION MONITOR, PRINTER (OPTION) (OPTION ONLY FOR LXP/1800LXA MODELS) 47 CHAPTER 7 ALARMS INCIDENTS ALARMS HISTORY WARNINGS ALARMS TABLE WASHER ALARMS LIST VALIDATION MONITOR /PRO KIT ALARMS (OPTION) CONDUCTIVITYMETER ALARMS (OPTION) 55 CHAPTER 8 MAINTENANCE OF THE WASHER CHAMBER FILTERS REGENERATING OF SOFTENER (OPTION) STRAINER FILTERS DRYING AIR FILTERS (NOT APPLICABLE TO 810LX AND 815LX) EXTERNAL MAINTENANCE OF THE WASHER CLEANING METHOD CLEANING PRODUCTS FOR EXTERIOR PANELS SHUT DOWN AT END OF DAY PREVENTIVE MAINTENANCE PREVENTATIVE MAINTENANCE SCHEDULE RECOMMENDED SPARE PARTS RECOMMENDED SPARE PARTS 810 LX 815 LX RECOMMENDED SPARE PARTS 820 LX RECOMMENDED SPARE PARTS 910 LX 63 NU_ULTIMA_02_EN_1612 3
6 9.4 RECOMMENDED SPARE PARTS 1300 LX RECOMMENDED SPARE PARTS 1400 LX / 1400 LXP RECOMMENDED SPARE PARTS 1600 LXP RECOMMENDED SPARE PARTS 1800 LXA DISPOSAL OF WASHER 65 CHAPTER 9 WASHING PROGRAMS FACTORY PROGRAMMED CYCLE FLOW-RATE OF ACID AND DETERGENT PUMPS CONSUMPTION OF WATER PER OPERATION AND MODEL LABELLING OF WATERS ACCORDING TO STANDARD AND OPTIONS WATERS USED ON FACTORY PROGRAMMED CYCLES ACCORDING TO STANDARD AND SOFTENER OPTION LX / 815 LX - FACTORY PROGRAMMED CYCLE LX - FACTORY PROGRAMMED CYCLE LX - FACTORY PROGRAMMED CYCLE LX - FACTORY PROGRAMMED CYCLE LX - FACTORY PROGRAMMED CYCLE LXP - FACTORY PROGRAMMED CYCLE LXP - FACTORY PROGRAMMED CYCLE LXA - FACTORY PROGRAMMED CYCLE USER CYCLE PROGRAMMING TABLE 77 NU_ULTIMA_02_EN_1612 4

, using hot HEPA filtered air, or")

7 PRESENTATION OF THE ULTIMA CHAPTER 1 PRESENTATION OF THE ULTIMA series You have in your possession a GETINGE LANCER ULTIMA series washer. The ULTIMA series washer and ULTIMA series washer/dryer has been designed to meet and exceed the growing requirements of the Laboratory industry for cleaning of glassware in the chemistry, microbiology, quality control and analytical laboratories A wide range of washers and washer-dryers for laboratory glassware : Undercounter 810LX 815 LX 820 LX Free-standing 910 LX 1300 LX 1400 LX 1400 LXP 1600 LXP 1800 LXA Fully programmable, easy to use, ULTIMA series features technological innovations as the injector drying system (except 810LX and 815 LX), using hot HEPA filtered air, or the automatic electric door locking for the users comfort and safety. Some of the main features of ULTIMA series washers: - User friendly touch screen that provide comprehensible help in resolving problems and allow operators to see machine status from a distance : - 3,5 color touch screen for 810 LX / 815 LX / 820 LX / 910 LX / 1300 LX / 1400 LX - 7 color touch screen for 1400 LXP / 1600 LXP / 1800 LXA - 40 microprocessor-controlled programs, of which 4 are factory preset and 36 can be user-customized (PIN code protected) to suit particular applications or loads. - PLC microprocessor designed for simplicity, one-touch start and real-time status indicators - Multiple loading configurations thanks to independent washing levels, the upper levels can be positioned in different positions. Its good working and your entire satisfaction depend on the attention you pay when reading this guide. NU_ULTIMA_02_EN_1612 5
8

9 GENERAL INFORMATION CHAPTER 2 GENERAL INFORMATION 1. GENERAL CONSIDERATIONS 1.1 COPYRIGHT LIABILITY All rights reserved. GETINGE LANCER pays close attention to all technical developments and continuously seeks to improve its products and services in order to provide an adequate response to the needs of its clients. GETINGE LANCER therefore reserves the right to modify the related documentation without prior notice. 1.2 DECLARATION OF CONFORMITY This ULTIMA series washer has been developed and manufactured following the standards (CE or UL). For the washers in conformity with the CE standards, a CE conformity declaration is delivered with the machines. 1.3 MANUFACTURER This ULTIMA series washer is manufactured in our Center of Excellence for glassware washers : GETINGE LANCER 30, Bd de l Industrie Zone industrielle Pahin Concerto Tournefeuille - France 2. SAFETY WARNINGS 2.1 CORRECT USAGE The installation of the ULTIMA series washer must be achieved in accordance with the procedures described in the installation manual delivered with the machine. This section contains important information on how to operate your washer. Follow the instructions in this manual carefully for best outcome. ULTIMA series washers are equipped with a number of safety devices. To avoid injury, do not by-pass or disable these devices. Do not tamper with or attempt to modify these devices, as this could prove dangerous. NU_ULTIMA_02_EN_1612 7
10 GENERAL INFORMATION 2.2 OPERATOR TRAINING Read these instructions carefully before use. The ULTIMA series washer must only be used by experienced and trained staff. This training is left to the discretion of the facility based on need and staff experience. Users and technicians must be trained before operating the ULTIMA series washer. All staff using the ULTIMA series washer should have received full user training. This training must include selecting and understanding the washing cycle, loading and unloading of the glassware and knowledge of the chemical products used. Installation and maintenance must be carried out by staffs who have received training for this equipment. 3. PRODUCT & ADDITIVE LIABILITY ULTIMA series washers must be used under normal operating conditions as indicated in this GETINGE LANCER user manual. Failure to follow these recommendations including training could result in material damage or personal injury and will render null and void any warranty or liability on GETINGE LANCER part. Liability will not be accepted in the event of incorrect use or modification of the washer without the prior agreement of the manufacturer. 4. SYMBOL This manual contains extremely important warnings, instructions and notices, hence symbols have been used to draw your attention to them. Safety warning for persons and equipment NU_ULTIMA_02_EN_1612 8
11 ULTIMA series WASHERS CHAPTER 3 ULTIMA series WASHERS 1. OPERATOR INTERFACES 1.1 TOUCH SCREEN (example of the main screen) 1.2 ICON LIST Login Logout Page Up Page Down Information System Door Open Door Close Light Back Confirm Close Documentation Program Edit Program Sampling Start Abort/Stop Clear Alarm Cycle Details Alarm History Export USB Print Reprint Copy Date/Time Language User Setup Settings Diagnostics Calibration Manual Calibration Automatic Calibration Pump Priming Ticket Header Ticket Footer NU_ULTIMA_02_EN_1612 9


12 ULTIMA series WASHERS Edit Users Counters Rename Alarm Timers Flow Meters Temperature Settings Pressure Transmitters Security Settings Conductivity Edit System File Management System Reset Equipment ID Sequence Names Water Supplies Door Management Chemical Supplies Drying Regulation Download File Upload File Reboot System 1.3 ALPHANUMERIC KEYPAD When you press on a modificable parameter, an alphanumeric keypad opens. On the upper left corner is indicated the minimum and maximal value of the modifiable parameter. Press, and to navigate between the 3 alphanumeric keypads. NU_ULTIMA_02_EN_

13 ULTIMA series WASHERS 2. EMERGENCY STOP BUTTON AN OPTION FROM THE 1300 LX / LXP / STANDARD ON 1800 LXA The button should be used in case of an emergency, press the emergency stop button to immediately stop the operation of the washer. After actuating and before unlocking the emergency stop button, the washer must be inspected to determine the reason for the shutdown. The machine must be inspected to determine the reason for the stop command and before resetting the emergency stop button. In order to reset the machine, turn the stop button red head clockwise or insert and turn the key (only for emergency stop button with key). For emergency stop button with key, the key must be in the control device to disconnect the control device (to prevent hand injuries) 3. FUNCTIONS ACCESS BY LEVEL CODE FUNCTIONS OPERATOR TECHNICIAN SUPERVISOR Launching a cycle Sampling during cycle Washer documentation Dosing pumps priming Edit programs Ticket parameters User setup Date & time update Calibration Diagnostics (inputs/ outputs) Display language Settings NU_ULTIMA_02_EN_
14 ULTIMA series WASHERS 4. SAFETY ADVICES This apparatus, dedicated to an industrial use, has been developed to wash and dry glassware, labware in the chemistry, microbiology, quality control and analytical laboratories This washer must be used under the normal conditions of operation in conformity with the instructions manual of the manufacturer We decline any responsibility and guarantee in the event of non-respect of these recommendations which can involve body or material damages Use only cleaning products designed for use in laboratory glassware washers. If you pretreat items to be cleaned with solvents or other cleaning agents, ensure that they have been purged from the items to be cleaned and allow potentially harmful or flammable fumes to dissipate before placing them in the apparatus. In the same way, it is strongly recommended not to use solvents or aerosols near the apparatus. If incidents occur and you cannot solve those using solutions that we recommend you, do not hesitate to contact GETINGE LANCER technical assistance service. 4.1 PRECAUTIONS FOR USE BURN RISK IF THE DOOR IS OPENED OVER 60 C. AT THE END OF THE CYCLE, LET THE SUPPORTS, BASKETS, ACCESORIES AND WASHED OBJECTS COOL BEFORE HANDLING THEM. BURN RISK if the door is opened over 60 C. At the end of the cycle, if the temperature is over 60 C a preventive message appears on the screen. A cold ventilation at the end of the cycle can be programmed to avoid the risk. NU_ULTIMA_02_EN_
15 ULTIMA series WASHERS 4.2 SAFETY LABELLS SAFETY GLASSES MANDATORY SAFETY GLOVES MANDATORY RISK FOR OPERATOR DEPENDS ON THE PRODUCTS (DETERGENTS AND ACIDS) USED INSIDE THE MACHINE AND ON THE NATURE OF DEPOSITS ON THE ITEMS TO BE CLEANED. WEARING SAFETY GLASSES AND GLOVES May NOT BE SUFFICIENT IN SOME CASES. OPERATOR HAS TO READ SAFETY DATA SHEETS OF USED PRODUCTS (DELIVERED WITH THE WASHER) SO AS TO PREVENT RISK BEFORE OPENING THE DOOR. 4.3 USE IT IS STRICTLY FORBIDDEN TO USE THE WASHER IN AN EXPLOSIVE ENVIRONMENT OR TO USE SOLVENTS, HYDROCARBONS, NITRIC ACID, ALCOHOL, ALCOHOL DERIVATIVES, OR OTHER FLAMMABLE PRODUCTS IN THE MACHINE. DO NOT FORCE DOOR LOCKING DEVICE DURING A WASHING CYCLE This machine uses detergent (caustic) and acid additives with elevated temperatures in the chamber during the different phases of the wash cycle. Opening the door during the wash cycle can cause EXPOSURE TO HIGH TEMPERATURES AND HAZARDOUS CHEMICALS AND VAPORS. WASH CYCLE INTERRUPTED BY ALARM CONDITION If the machine goes into an alarm condition, the wash cycle is stopped and is considered unsuccessful. The machine will return to its initial state. Resolve the problem then restart the cycle. An automatically drain will be done at the start of the cycle. NU_ULTIMA_02_EN_
16 ULTIMA series WASHERS 4.4 MAXIMUM CHARGE Respect the maximum charge allowed for the loading at the door and upper level. Do not climb or sit on the door. When several racks are used simultaneously on the different levels, only one rack should be pulled out of chamber on the door and the runners at a time. Maximum charge permissible allowed (basket + items to be washed) on the different levels is : Door area to avoid tilting LX 910 LX 44 kg (97 lb) 44 kg (97 lb) 52 kg (114 lb) (if plinth) 52 kg (114 lb) (if plinth) 1300 LX 51 kg (112 lb) 1400 LX 1400 LXP 65 kg (143 lb) 1600 LXP 90 kg (198 lbs) 1800 LXA First level in the chamber 26 kg (57 lb) 26 kg (57 lb) 26 kg (57 lb) 30 kg (66 lb) 30 kg (66 lb) 30 kg (66 lb) Upper level in the chamber 23 kg (50 lb) 23 kg (50 lb) 23 kg (50 lb) 26 kg (57 lb) 26 kg (57 lb) 26 kg (57 lb) Check that your basket may support the weight of your parts to be washed. You should only use baskets that are suitable for the parts to be washed. When your washer is put into service, our technicians will give you useful advice on the best way to load the racks relative to the items to be washed. It is possible to strengthen the baskets to your request, please feel free to contact GETINGE LANCER for advice or assistance. 5. OPENING OF THE DOOR ALL ULTIMA MODELS EXCEPT 1800 LXA DO NOT CLIMB OR SIT ON THE DOOR. MAXIMUM WEIGHT ALLOWED ON THE DOOR IS INDICATED PAGE 14. Washer ON, press to unlock the door. Use the door handle to open the door. When washer is loaded and door closed, the washing cycle can begin. DO NOT TRY TO FORCE TO OPEN THE DOOR DURING A WASHING CYCLE, DOOR SAFETY LOCKING DEVICE CAN BE DAMAGED. NU_ULTIMA_02_EN_
17 ULTIMA series WASHERS 1800 LXA MODELS The washer is equipped with a door locking device which prevents its opening during the washing cycle. At switching ON, door is automatically opened. When washer is loaded, washing cycle can begin. Select the cycle and press the icon to start the program, the door closes automatically. At the end of the cycle the door opens automatically. On standby, the door may be closed with and opened with DO NOT OPERATE THE DOOR IF THE PRODUCTS TANKS COMPARTMENT DOOR IS OPEN. DO NOT TRY TO FORCE TO OPEN THE DOOR DURING A WASHING CYCLE, DOOR SAFETY LOCKING DEVICE CAN BE DAMAGED. NU_ULTIMA_02_EN_

18 ULTIMA series WASHERS 6. WASHING PRODUCTS PROGRAMS PREESTABLISHED WITH THIS WASHER HAVE BEEN VALIDATED WITH THE GETINGE LANCER BRAND WASHING PRODUCTS. THE INFORMATION CONCERNING THE SAFETY DATA OF THE GETINGE LANCER WASHING PRODUCTS HAS BEEN DELIVERED WITH THE MACHINE. 6.1 PRODUCT TANK AREA (ONLY FOR WASHER EQUIPPED WITH A PRODUCT COMPARTMENT) The washer is equipped with a product compartment (capacity 2 x 10L [2.5 gal] tanks) located on front of washer LXA MODELS ELECTRICAL DANGER / TAKE CARE OF YOUR HANDS Do not insert your hand in between the product tank compartment and the hinged door which allows access to the product tank compartment. Do not operate the door if the products tanks compartment door is open NU_ULTIMA_02_EN_
19 ULTIMA series WASHERS 6.2 WASHING PRODUCTS CATEGORIES NON-FOAMING DETERGENT Using the correct non-foaming detergent is required for proper cleaning in this machine. The non-foaming detergent must be matched to remove the contamination source in order to ensure satisfactory washing. IT IS STRICTLY FORBIDDEN TO USE SOLVENTS AS DETERGENT. PLEASE REFER TO SUPPLIERS MATERIAL SAFETY DATA SHEET FOR SPECIFIC SAFETY AND FORMULATION INFORMATION REGARDING THE DETERGENT USED IN THIS EQUIPMENT. INCOMPATIBLE CHEMICAL LIQUIDS CAN HARM THE EQUIPMENT. THE PROGRAMMED CYCLES ON THIS WASHER HAVE BEEN VALIDATED WITH GETINGE LANCER CHEMICALS. NEUTRALIZING ACID Using the correct non-foaming neutralizing acid is required for proper cleaning in this machine. The non-foaming neutralizing acid must be matched to remove the detergent source in order to ensure satisfactory washing. THE USE OF NITRIC ACID IS PROHIBITED. ONLY DILUTE PHOSPHORIC, ACETIC AND CITRIC ACIDS CAN BE USED. PLEASE REFER TO SUPPLIER S MATERIAL SAFETY DATA SHEET FOR SPECIFIC SAFETY AND FORMULATION INFORMATION REGARDING THE ACID USED IN THIS EQUIPMENT. INCOMPATIBLE CHEMICAL LIQUIDS CAN HARM THE EQUIPMENT. THE PROGRAMMED CYCLES ON THIS WASHER HAVE BEEN VALIDATED WITH GETINGE LANCER CHEMICALS. 6.3 INSTRUCTIONS TO RESPECT IN CASE OF HANDLING THE WASHING PRODUCTS ANYBODY CALLED TO HANDLE THE WASHING PRODUCTS MUST BE INFORMED OF THE RISKS ASSOCIATED WITH THESE PRODUCTS. Before changing to a different type or brand of cleaning chemical (acid or detergent) it is necessary to purge the chemical line with water and rinse the plumbing circuitry of the machine. Install the new chemical(s) per the installation instructions and then prime the detergent and acid pumps. Then a wash cycle can be programmed and run which uses several rinses with water only. This will prevent any cross contamination of chemicals. After the new cleaning chemical have been installed, it will be necessary to adjust the chemical dosing times in all applicable steps of the wash cycle in order to match the formulation of the new cleaning chemicals. Please contact GETINGE LANCER for advice or assistance. NU_ULTIMA_02_EN_
20 ULTIMA series WASHERS 6.4 CHANGE OF THE TANKS Before launching the cycle, check product tank levels and change those with low levels so as to avoid bad washing because of a lack of additive. 6.5 HOW TO CHANGE CHEMICAL CONTAINER Switch the washer OFF. Use the necessary protection for the chemical to be changed (gloves, mask, safety glasses ). Locate the container(s) that need to be changed. Unscrew the cap(s) from the empty chemical bottle(s) and take out the chemical suction tube(s). Unscrew the cap(s) from the full chemical bottle(s) and insert the chemical suction tube(s). Tighten the cap(s) to secure the chemical suction tube in place. Switch the washer ON. Dispose of used chemical bottles or caps according to local and company regulations. Please consult the Material Safety Data Sheet for specific information regarding the chemicals used in the washer. NU_ULTIMA_02_EN_
21 ULTIMA series WASHERS 7. BUILT-IN PRINTER (OPTION) 7.1 CHECKING THE PRINTER Before launching any cycle or reprinting the printout, check the quantity of paper of the printer roller. 7.2 CHOICE OF THE SUITABLE PAPER ROLLS It is recommended that a high quality thermal paper be used with a minimum of seven years life expectancy. The use of non-approved products can cause dust and increased wear. This can affect the warranty. The paper roll is delivered separately in order to prevent it from unrolling or becoming damaged during transport. Consult your GETINGE LANCER representative about suitable paper rolls. 7.3 REMOVING PAPER AND CLEARING PAPER JAMS If there is some paper in the printer when a new roll is necessary or a paper jam has occurred, simply open the cover and press the paper advance button. 7.4 LOADING PAPER 1- open the printer cover and press down the swinging support of the print mechanism at the point marked PUSH 2- insert the end of the paper roll in the slit of the print mechanism and position the paper roll so that it rotates in the right direction, as shown in the figure 3- the paper is automatically pulled by the roller for 3 or 4 centimeters 4- tear off the paper and re-close the cover 7.5 OPERATING MODES Powering up is automatic or carried out by a command received from the washer. 7.6 PRINTER MAINTENANCE After a certain time of use, it may prove necessary to remove paper dust from inside and around the mechanism. Use a small vacuum for cleaning. For more information refer directly to the printer website. NU_ULTIMA_02_EN_


22 ULTIMA series WASHERS 8. EXTERNAL PRINTER (OPTION) 8.1 CHECKING THE PRINTER Before launching any cycle or reprinting the printout, check the quantity of paper of the printer roller. 8.2 CHOICE OF THE SUITABLE PAPER ROLLS Please use quality paper. The use of non-approved products can cause dust and increased wear. This can affect the guarantee. The paper roll is normally delivered separately in order to prevent it from unrolling or becoming damaged during transport. Consult GETINGE LANCER about suitable paper rolls. 8.3 REMOVING PAPER AND CLEARING PAPER JAMS If there is some paper in the printer when a new roll is necessary or a paper jam has occurred, simply open the cover and press the paper advance button. 8.4 LOADING PAPER 1. Slide the cover opening button forward until it opens. 2. Unroll a small amount of paper and insert the paper roll in the printer. 3. Close the cover, the paper has been loaded. Pressing on the paper advance button while the printer is on standby mode makes the paper advance. However, the advance button has several other functions: Pressing the button once and releasing it: In standby mode, makes the paper advance. In sleep mode, makes the printer go into the standby mode. In standby mode, a double click on the button, prints out a sample message. 8.5 OPERATING MODES Stand-by mode : ready to receive data but there is no data waiting to be printed out in the buffer and the printer engine is not turning. Sleep mode : actually disabled. If the paper advance button is pressed, the external charger connected or external data is received, the printer leaves sleep mode and enters stand-by mode. The LED is off in sleep mode. There is no switch. Powering up is automatic or carried out by a command received from the washer. To save energy, the printer enters sleep mode after a period of inactivity. The printer can be also programmed to always remain active or to enter sleep mode on command. 8.6 PRINTER MAINTENANCE After a certain time of use, it may prove necessary to remove paper dust from inside and around the mechanism. Use a small vacuum for cleaning. NU_ULTIMA_02_EN_
23 ULTIMA series WASHERS 8.7 NOTE PRINTING If the printer is connected to a battery pack and not an AC battery charger, it is imperative to control the operating mode (sleep mode / idle mode) of your printer prior to launch the printing. In the user menu, you can access to the reprinting cycles tickets and in the supervisor menu for printing: program parameters configuration settings. If the printer is in sleep mode, the data launched from these menus will be lost. It is imperative to enable the printer by pressing the paper feed button to launch printing. If printing has been requested without idle mode setting of the printer, it may be necessary to power off and on again your washer and printer to reset them. NU_ULTIMA_02_EN_
 or \"PSBT\" (basic rack with spray arm) after removing one")


24 ULTIMA series WASHERS 9. USING OF THE ACCESSORIES 9.1 SOME EXAMPLES In order to wash items in "LTC" or "STC" type baskets, place the baskets on the "PS" (basic rack) or "PSBT" (basic rack with spray arm) after removing one or more "GS" (support grilles). Check that the basket is correctly fitted on the rods of the rack designed for that purpose. Reinstall the grids for any washing operation that does not require the use of "LTC" or "STC" type baskets. Note : The "PST" should only be positioned at the bottom level of the washer chamber where washing action is provided by the lower spray arm. The "PSBT" can be positioned on any level. It is extremely important that the items to be washed are prevented from moving in order to obtain correct cleaning and to avoid breakage of fragile items. Items that can be easily moved or knocked over when loaded on the "PST" or "PSBT" rack should be secured in place. The "GC" hold down screen should be used for "PST" or "PSBT" racks. The "GCI" hold down screen should be used for injector racks. In the case of washing items with small diameter openings such as volumetric flasks, it is very important that the flow rate of the injectors used must be lower than the flow capacity of the flasks to be washed in order to avoid a gradual filling of the flasks during the washing cycle. If the diameter of the opening is too small to allow the water to escape from around the injector the mechanical action of the injector can be absorbed by the water contained in the glassware giving poor cleaning results. It is imperative to use baskets with injectors of proper diameter and, above all, to secure lightweight items with a "GC" or "GCI" hold down screen. NU_ULTIMA_02_EN_

25 ULTIMA series WASHERS DETAIL ON BASKET INJECTOR : An adaptable stainless steel wire to maintain the glassware in position It shall be used with narrow width mouth glassware and shall not under any circumstances exceed their flexibility by forcing glassware that is not intended to be placed in these. Just below the injector tip is a flat surface which allows a wrench to be used to remove the injector for maintenance An integrated spring clip allows the star base to be moved up or down to accommodate different heights of glassware You should only use baskets that are suitable for the parts to be washed. When your washer is put into service, our technicians will give you useful advice on the best way to load the racks relative to the items to be washed. Please feel free to contact GETINGE LANCER for advice or assistance. When several racks are used simultaneously on the different levels, only one rack should be pulled out of chamber on the door and the runners at a time. IF THE LOADED RACKS EXCEED 25 KG (55 LB) AN OPTIONAL TROLLEY CAN BE USED TO LOAD AND UNLOAD THE WASHER. NU_ULTIMA_02_EN_


26 ULTIMA series WASHERS 9.2 FITTING THE BASKETS Pull the slide rails out of the chamber. Open the locking device by rotating it up. Insert back wheels of basket into rail slide and begin pushing basket into chamber. Once the middle wheels of basket have gone past the locking device, rotate it down to lock the basket in place. Push basket and rail slides all the way into the chamber. THE CHOICE OF THE BASKETS AND RACKS IS VERY IMPORTANT TO EFFICIENT CLEANING. PLEASE FEEL FREE TO CONTACT GETINGE LANCER FOR ADVICE OR ASSISTANCE. NU_ULTIMA_02_EN_

27 ULTIMA series WASHERS 1800 LXA MODELS The rails, not positioned in the central rack, are locked inside the chamber using a spring lock. Before fitting basket you must : Press the spring to release the rail. Relax the pressure once the rail is completely clear. RISK OF FINGER PINCH. And after use the procedure describe above to fitting basket CHECK THAT ALL RAILS ARE IN THE RETRACTED POSITION BEFORE ANY DOOR MOVEMENT. NU_ULTIMA_02_EN_

 IS REQUIRED")


28 ULTIMA series WASHERS 9.1 LOADING GLASSWARE A MINIMUM CLEARANCE OF 25 MM (1 IN) IS REQUIRED BETWEEN THE END OF THE INJECTOR AND THE BASE OF THE GLASSWARE. PLEASE FEEL FREE TO CONTACT GETINGE LANCER FOR ADVICE OR ASSISTANCE. Some examples of loading glassware: NU_ULTIMA_02_EN_
29 LAUNCHING A CYCLE CHAPTER 4 LAUNCHING A CYCLE 1. CYCLES PRESENTATION PROGRAMME 01: VOLUMETRIC FLASKS Prewash with the detergent Wash with the detergent. Acid rinse with the neutralizant acid Rinse with purified water Final rinse at 50 with the purified water Drying (depending washer model) Cooling (depending washer model) PROGRAMME 02: BACTERIOLOGY, VIROLOGY Prewash with the detergent Wash with the detergent. Acid rinse with the neutralizant acid Final rinse at 80 with the purified water Drying (depending washer model) Cooling (depending washer model) PROGRAMME 03: CHEMISTRY, BIOLOGY Prewash with the detergent Wash with the detergent. Acid rinse with the neutralizant acid Rinse with purified water Final rinse at 80 with the purified water Drying (depending washer model) Cooling (depending washer model) PROGRAMME 04: GELOSE Prewash with the detergent Wash with the detergent. Acid rinse with the neutralizant acid Rinse with purified water Final rinse at 80 with the purified water Drying (depending washer model) Cooling (depending washer model) NOTE: other programs can be setup has needed. NU_ULTIMA_02_EN_

 Press icon to login to system.")
30 LAUNCHING A CYCLE 2. CONNECTING TO THE MAINS Press the ON button. After a few seconds, the Initialization screen is displayed. After the software is loaded, the main screen is shown. 3. SECURITY LEVEL Depending upon the configured security level, you may be prompted to login for access to certain menus and to launch a cycle. There are two types of security levels: 3.1 BASIC SECURITY (LEVEL 1) Press icon to login to system. If the system is configured for Level 1 Basic Security, a numeric keypad will be shown for entering an access code. After entering the code, the the entry and log into the system. icon is pressed to confirm NU_ULTIMA_02_EN_

31 LAUNCHING A CYCLE 3.2 HIGH SECURITY (LEVEL 2) Press icon to login to system. The login menu is shown. Pressing on the user name field will allow the alphanumeric keypad to open. The user name is entered and the icon is pressed to accept the entry and return to the login menu. The password is entered in the same manner as the user name. Once both pieces of information have been entered, the icon is pressed to complete the login process. 4. LAUNCHING A CYCLE From the main menu, the operator may scroll through the program list. The last program used is highlighted with dark shading. (P01 in this example.) Once a program as been selected, the program function menu opens in which functions related to wash programs can be selected (see different possibilities p33). To start the program the icon is pressed. NU_ULTIMA_02_EN_


32 LAUNCHING A CYCLE 5. INFORMATIONS DURING THE CYCLE During normal wash cycle operation, the Circle graph is shown. Additional information (Program #, Sequence, Phase, Total Cycle Time, and Phase Time) is shown in the display header. The wash cycle can be stopped / aborted by pressing the icon. During the cycle, detailed information can be displayed. Press the icon to display the detailed information. Press the icons to page up/down. NU_ULTIMA_02_EN_

33 LAUNCHING A CYCLE 6. END OF CYCLE If the wash cycle is completed without incident, the cycle complete display is shown. Press the the cycle. icon to acknowledge If washer is fitted with a door locking device, the door can be unlocked by pressing on the icon. NU_ULTIMA_02_EN_
34

.")
35 ACCESS TO THE USER S MENU CHAPTER 5 ACCESS TO THE USER S MENU 1. SAMPLING A sampling valve can be fitted on the sump of the washer to perform sampling of the washer water. A sampling selection in the program stops the washer. Sampling allows to control the efficiency of the cycle and validate it. Once a program as been selected, the program function menu opens in which functions related to wash programs can be selected When the icon is pressed, the sampling menu opens The operator can select to be taken during the cycle : : one sample before the final rinse draining phase ( final rinse sampling). : multiple samples before each draining phase ( multi-phase sampling) After making the appropriate selection, the display returns to the program function menu. After the program is started, a sample confirmation message will appear during the cycle when it is time to take the sample. Remove the sampling valve plug Place a glassware under the sampling valve neck Open the valve to take a sample. Close the valve. Put the plug back in place. Once the sample has been taken, press on the cycle to continue. icon to allow NU_ULTIMA_02_EN_

36 ACCESS TO THE USER S MENU 2. WASHER DOCUMENTATION Selecting a program from main menu (P01 in this example) will open a menu in which you can perform different functions related to program cycles. Pressing the icon will allow you to view the program setup for the current cycle. Use the page up/down icons to scroll through the information (Note, there are 14 menu pages of information related to Program cycles. Press the icons to page up/down. NU_ULTIMA_02_EN_

37 ACCESS TO THE USER S MENU NU_ULTIMA_02_EN_


38 ACCESS TO THE USER S MENU At any point you can press cycle data to USB or printer icon to send the program (If the printer option is not fitted on washer, the printer icon will be shown in grey to indicate that it is not active.) NU_ULTIMA_02_EN_


39 ACCESS TO THE USER S MENU 3. PUMP PRIMING Selecting a program from main menu will open a menu in which you can perform different functions related to program cycles. Pressing the chemical pump. icon will allow you to select and then prime a Select the desired chemical pump. Once you press the icon, the pump will run for 60 seconds or you can press The icon can be pressed at any time during the 60 seconds to stop the pump. After the pump stops, the chamber will be filled with cold water for 30 seconds to help flush away residual chemical and then the drain circuit will be energized for 30 seconds to send the solution to drain. NU_ULTIMA_02_EN_
 Selecting a program from main menu will open a menu in which you can perform different functions related to program")

40 ACCESS TO THE USER S MENU 4. TICKET PARAMETERS (only for washer with printer option) Selecting a program from main menu will open a menu in which you can perform different functions related to program cycles. Pressing the icon will open a menu in which you can to select and edit ticket header and footer information and also reprint previous cycle tickets. 4.1 TICKET HEADER Press the icon to display the header menu. Press the applicable Header 1, 2 or 3 icon to open the alphanumeric keypad and enter desired header text. Press icon to confirm text entry and to close the alphanumeric keypad. At the header menu, press header information icon to save the updated NU_ULTIMA_02_EN_

 Pressing on the Ticket Number icon will open a numeric keypad so that you can select the ticket number to reprint Press keypad.")
41 ACCESS TO THE USER S MENU 4.2 TICKET FOOTER Press the icon to display the footer menu. Press the applicable Footer 1, 2, or 3 icon to open the alphanumeric keypad. Press icon to confirm text entry and to close the alphanumeric keypad. At the footer menu, press footer information icon to save the updated 4.3 REPRINTING TICKETS Press the previous tickets. icon to open the reprint menu and reprint (Note, if the printer option is not fitted on washer, the printer icon will be shown in grey to indicate that it is not active.) Pressing on the Ticket Number icon will open a numeric keypad so that you can select the ticket number to reprint Press keypad. icon to confirm the selection and to close the At the reprint menu, press ticket to the printer. icon to resend the selected Please refer to the traceability chapter page 45 to see an example of ticket. NU_ULTIMA_02_EN_


42 ACCESS TO THE USER S MENU 5. USER SETUP Pressing the icon will open the system menu and allow you to edit system functions. (Note, this is a restricted menu and if the operator is not already logged in they will be required to enter an access code or user name/password depending upon the defined security level.) Pressing on the icon will allow an operator to change their user name and password. Each user can change his own user name and password. Press icon. Enter with the alphanumeric keypad your OLD password, then enter the NEW password and confirm it. Press on the to the System menu. icon to confirm any changes and return Press. icon. Enter with the alphanumeric keypad your OLD ID, then enter the NEW ID. Press on the to the System menu. icon to confirm any changes and return NU_ULTIMA_02_EN_
 will")


.")
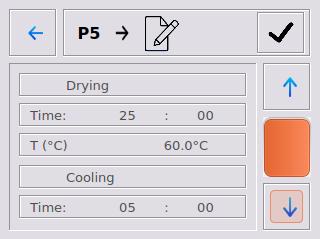
43 ACCESS TO THE USER S MENU 6. EDIT PROGRAMS Selecting a program from main menu (P5 in this example) will open a menu in which you can perform different functions related to program cycles. Pressing the parameters. icon will allow you to edit the program The sequence selection menu is shown. Press the icons to page up/down. Pressing on sequence name (PREWASH 1 in this example) will open a menu in which the parameters for the selected sequence can be changed). Pressing on one of the parameters will open a numeric keypad for Time, Temp or Chemical Volume and a selection list for Water Source. NU_ULTIMA_02_EN_


44 ACCESS TO THE USER S MENU Numeric keypad for time entry is preformatted and shows the allowable range. The same principle will apply for Temperature set points and chemical dosing volume. If an entry is outside of the allowable range, the value will revert back to its original state. Please see adjacent table range : Time 0-30 min Temperature 0-95 C Additive volume ml Number 0-9 Drying time 0-90min Drying temperature 0-90 C It is not recommend to set wash programs at maximum values for time and temperature as this will result in reduced equipment life and increased maintenance frequency of equipment. Do not set back to back high temperature 85 c to 95 c heating phases. Doing so can increase the temperature inside the machine and may activate some overheating devices. To prevent this from occurring, we recommend to program a minimum 30 second cold phase between two heating phases. If you wish to create a custom wash program, please refer to the factory default programs for examples of typical times and temperatures. You may also contact your GETINGE LANCER representative for advice on creating wash programs. It is not recommended to install the machine in a place exceeding 30 C. It will help to increase during the cycle the temperature inside the machine. It will result in reduced equipment life and increased maintenance frequency of equipment For water selection, select on the drop down menu the water source that you want. NU_ULTIMA_02_EN_


45 ACCESS TO THE USER S MENU On each page you must press modification. icon to save Follow this same process for other sequences you desire to setup. (Example screens of the different sequences are shown below.) If you do not wish to save the changes, press on the icon NU_ULTIMA_02_EN_

46 ACCESS TO THE USER S MENU NU_ULTIMA_02_EN_
47 TRACEABILITY CHAPTER 6 TRACEABILITY 1. MACHINE TRACEABILITY DOCUMENT When starting the ULTIMA series washer, a machine traceability document should be created to index the various operations carried out on the washer (in parallel to the traceability already in use at facility). This document, in conjunction with the facility's traceability procedure, should consist of archiving of printouts issued by the washer and recording of maintenance operations (corrective and preventive). REGARDLESS OF THE RESULTS OF THE PROCESSED CYCLE,, YOU MUST REVIEW THE WASHER PRINTOUTS BEFORE ARCHIVING THEM 2. PRINTER (OPTION) GETINGE LANCER recommends to photocopy or scan the processing cycle printouts. To ensure cycle documentation, information can be printed on a printer. The printout gives documented evidence of the cleaning process including cycle parameters, operator number, time of program start, phase duration, probe temperature during each phase, detergent and acid intake. EXAMPLE OF TICKET NU_ULTIMA_02_EN_
48 TRACEABILITY 3. THE PRO KIT (OPTION) (OPTION ONLY FOR LX MODELS) The PRO KIT tracks a number of parameters and prints out their status OK/NOK or values at the end of the cycle for the customer s records and attention. It is an easy and efficient method of quick analysis of the report. PRO KIT 1 LX includes: Printer, printout gives documented evidence of the cleaning process. Water temperature, the water temperature is measured, both the preset and measured values are printed out. Recirculation pump pressure, a pressure sensor will measure and print out the value. If the value is higher than the set value an alarm will be raised and the machine will stop the process. Detergent / Acid flow rate, both lines are individually fitted with a flow meter. The device will print out the flow of each line. PRO KIT 2 LX includes: All PRO KIT 1 features and checks the quality of the wash process by measuring the conductivity of the final rinse water. The obtained value is printed out. If the value is higher than the set value an alarm will be raised and the machine will stop the process. EXAMPLES OF TICKET NU_ULTIMA_02_EN_
49 TRACEABILITY 4. VALIDATION MONITOR, PRINTER (OPTION) (OPTION ONLY FOR LXP/1800LXA MODELS) The validation monitor has its own probes to check and validate every parameter of the cycle of the washing cycle. The validation monitor option includes: One built-in panel printer One pressure transmitter for verification of proper functioning of the recirculating pump Two flow-meters measure the exact quantity of chemical taken by the machine during the cycle One water level pressure stat for verification of proper filling of the sump Two dual temperature probes for verification of proper temperature values One electrical link to the heating system for verification of proper temperature inside the chamber One electrical link to the draining system for verification of proper water exhaust between two wash cycle phases EXAMPLE OF TICKET NU_ULTIMA_02_EN_
50

 is available.")
51 ALARMS CHAPTER 7 ALARMS 1. INCIDENTS INCIDENTS SOLUTION / VERIFICATION The detergent or neutralizing agent does not enter in the washer The washer does not function Abnormal noise The tube is blocked. The tank is empty. The pump hose is pinched. It is not connected to the power supply. There is mains power. The circuit breaker protecting the electrical control circuit has been tripped. CONSULT THE MAINTENANCE DEPARTMENT. One of the washing arms is touching one or more of the items to be washed. Check the loading of the washer 2. ALARMS HISTORY In standby and during operation, Information about the washer (Alarm History and Washer Documentation) is available. Pressing icon opens a menu where you can pick from Alarm History or Washer Documentation. Pressing the icon will allow you to view the last ten alarms stored in memory. Use the page up/down icons to scroll through the alarms. NU_ULTIMA_02_EN_


52 ALARMS The icon is only active in Standby mode. Pressing the icon will allow you to export the alarm history data to USB or the printer by pressing on the appropriate icon. (If the printer option is not fitted on washer, the printer icon will be shown in grey to indicate that it is not active.) NU_ULTIMA_02_EN_

53 ALARMS 3. WARNINGS After the Start icon is pressed, the system checks for any problems and will notify the operator via warning messages. Pressing the icon will clear the warning. HOT CHAMBER The following message is displayed if the temperature inside the washing chamber is above the safety temperature set point for door opening. At the end of the cycle, let the washer chamber and contents cool before opening the chamber door. ACTIVE ALARME At least one alarm is active RECIPE ERROR The selected recipe is not configured ENTER A BATCH ID Required batch ID is missing. DOOR OPEN Door is opened or unlocked. ADDITIVE 1 LOW LEVEL * optional for 810LX and 815 LX ADDITIVE 2 LOW LEVEL * optional for 810LX and 815 LX ADDITIVE 3 LOW LEVEL ** optional extra alkaline dosing pump The following message is displayed at the start of the cycle. It is indispensable to replace the tank. Consider checking the level of other product tanks in order to avoid another alarm. ADDITIVE 4 LOW LEVEL ** optional extra alkaline dosing pump The warning for low level prohibits the equipment to start if not the corrective action has been made to change chemical canister. ADDITIVE 5 LOW LEVEL ** optional extra alkaline dosing pump END OF CYCLE : OPEN THE DOOR Successful cycle completed. System waiting. NU_ULTIMA_02_EN_
54 ALARMS SERVICE TIME REGENERATION RENEWAL * only for washers with regeneration After turning on the machine, the reminder of the upcoming preventative maintenance is shown on the display. Acknowledge the reminder. Schedule a preventative maintenance service call. The following message is displayed at the start of the cycle. Fill the salt pot located inside the washer. NU_ULTIMA_02_EN_

55 ALARMS 4. ALARMS TABLE If an alarm occurs, the wash cycle is aborted and the appropriate alarm message is shown in red. Pressing the icon will clear the alarm. 4.1 WASHER ALARMS LIST 1 DRAINING FAULT 9 LOW LEVEL ALARM During the draining phase, the washer as not - Check that drain pipe or drain valve/pump is not obstructed. been drained within the configured drain - Verify operation of drain pump/valve. time. - Check drain time. During the filling phase, the machine has not achieved proper water level for pump priming. - Check the water supply, hoses, filter screens, and valves. 10 FILLING FAULT : PURIFIED WATER During the filling phase, the water high level switch was not reached within the configured filling time. - Check opening of valves. - Check pressure of water supply. - Check filling time 30 ADDITIVE 1 INTAKE: OUT OF RANGE LOW * optional ProKIT or validation monitor 31 ADDITIVE 2 INTAKE: OUT OF RANGE LOW * optional ProKIT or validation monitor ADDITIVE 3 INTAKE: OUT OF RANGE LOW * optional ProKIT or validation monitor ADDITIVE 4 INTAKE: OUT OF RANGE LOW * optional ProKIT or validation monitor ** optional extra alkaline dosing pump ADDITIVE 5 INTAKE: OUT OF RANGE LOW * optional ProKIT or validation monitor ** optional extra alkaline dosing pump During the cycle, the necessary amount of product is not dosed. - Check the tank level, - Check the dosing pump, the flowmeter. NU_ULTIMA_02_EN_
56 ALARMS 34 ADDITIVE 1 INTAKE: UNEXPECTED * optional ProKIT or validation monitor 35 ADDITIVE 2 INTAKE: UNEXPECTED * optional ProKIT or validation monitor 36 ADDITIVE 3 INTAKE: UNEXPECTED * optional ProKIT or validation monitor A flow of product is detected outside a product intake phase. - Check the flowmeter ADDITIVE 4 INTAKE: UNEXPECTED * optional ProKIT or validation monitor ** optional extra alkaline dosing pump ADDITIVE 5 INTAKE: UNEXPECTED * optional ProKIT or validation monitor ** optional extra alkaline dosing pump 50 TEMPERATURE EXCEEDS SET POINT 51 HEATING FAULT 52 COLUMN DRYING FAULT The temperature is higher than set point + tolerance. During the heating phase if the water temperature has not increased by the set minimum slope. During the heating phase the temperature has not reached the set point within 4 minutes - Check the "MAXIMUM OVERHEATING" parameter for water heating. - Check the water inlet temperature. - Verify the probe reads correctly. - Verify that the steam valve is closed. - Verify if the heating contactor is open. - Check electrical connection, state of heating elements and safety thermal cut-out. - Verify that steam valve is opening (steam heating option) - Check the "TEMPERATURE INCREASE TOLERANCE" parameter for water heating. - Check the heaters - Check the probe 54 CHAMBER HEATING MAXIMUM TEMPERATURE The temperature is over the maximum allowed - Check the probe max value parameter. - Check that the steam valve is operating properly - Check the probe 55 COLUMN DRYING MAXIMUM TEMPERATURE The temperature is over the maximum allowed - Check the probe max value parameter. - Check the probe 70 HEATING : PROBE DEFECT Open wire, overrange or underrange - Verify the probe. - Check the wire connections. 71 COLUMN DRYING : PROBE DEFECT Open wire, overrange or underrange - Verify the probe. - Check the wire connections. 82 USER STOP Cycle aborted by user. 90 LOADING DOOR FAULT The door was detected opened during cycle or failed to close/lock on request. - Check door closing and door switches. 97 SAMPLING TIME ELAPSED (only for washer with sampling option) Sampling break was not acknowledged within the sampling alarm delay. - Allow enough time to do the sampling. - Acknowledge sampling when done. 98 AIR PRESSURE (if final rinse kit (final rinse kit, includes 2 pneumatic stop valves for detergent and acid)) Air pressure not detected - Check the compressed air supply. - Check PLC I/O and wiring. NU_ULTIMA_02_EN_
57 ALARMS 4.2 VALIDATION MONITOR /PRO KIT ALARMS (OPTION) 20 COLUMN PRESSURE : OUT OF RANGE LOW 21 COLUMN PRESSURE : UNEXPECTED 22 COLUMN PRESSURE : OUT OF RANGE HIGH Pressure is lower than the minimum set point programmed Pump pressure is above minimum set point value when pump not running. Pump pressure is above Max set point value - Check that the baskets are in the machine or that the rack ports are capped accordingly. - Check that the pump operates - Check the door switches - Check the transmitter calibration. - Check the foaming issues within the chamber - Check the transmitter (look at the pressure and calibrate it if necessary). - Check the low limit value for the pressure alarm. (This value is used for this alarm). - Pressure transmitter must give 4mA when the pump is stopped - Check column piping - Check the transmitter - Verify that there is no blockage in the column. - Check blocking issues 4.3 CONDUCTIVITYMETER ALARMS (OPTION) 74 FINAL RINSE CONDUCTIVITY : PROBE DEFECT Open wire, overrange or underrange - Verify the probe. - Check the wire connections. 78 FINAL RINSE CONDUCTIVITY The final rinse conductivity is higher than the limit configured in the program settings. - Check set point. - Check conductivity probe calibration. NU_ULTIMA_02_EN_
58


 WHICH COULD BE PLACED INSIDE THE FILTERS OF THE BOTTOM OF THE CHAMBER. 1.")

59 MAINTENANCE OF THE WASHER CHAPTER 8 MAINTENANCE OF THE WASHER NEVER USE OR PLACE IN THE WASHER REMMANTS OF PRODUCTS SUCHS AS ACETONE, SOLVANTS, OIL, SULFO-CROMIC, PETROL DERIVATIVES, ACIDS (SULFURIC, NITRIC, CLORHIDRIC, EVEN AT LOW CONCENTRATIONS), ETC. DURING THE CLEANING OPERATIONS INSIDE THE CHAMBER, IT IS CONVENIENT TO WEAR SAFETY GLOVES WITH GLOVES AND TO PAY ATTENTION TO THE EVENTUAL EDGE TOOLS (NEEDLES, INSTRUMENTS ) WHICH COULD BE PLACED INSIDE THE FILTERS OF THE BOTTOM OF THE CHAMBER. 1. CHAMBER FILTERS 810LX 815 LX 820 LX 910 LX 1300 LX 1400 LX 1400 LXP 1600 LXP- Clean the filters after each cycle. Place them correctly. Order of fitting: A -> B 1800 LXA NU_ULTIMA_02_EN_


60 MAINTENANCE OF THE WASHER 2. REGENERATING OF SOFTENER (OPTION) Only for washers with regeneration (option). This function is automatic (masked time). When the display unit indicates "SALT RECHARGE", it is essential to fill the salt pot located at the bottom of the chamber, inside the washer. Use special softening, regenerating salt. 1 Salt pot 2 Filling funnel 3 Salt pot cap DO NOT FORGET TO REINSTALL SALT POT CAP AFTER FILLING WITH SALT 3. STRAINER FILTERS Check the cleanness of the strainer filters and clean them if needed. Debris in the filters will increase the filling times and could activate the alarm FILLING FAULT. The filters should be replaced each year. 4. DRYING AIR FILTERS (Not applicable to 810LX and 815LX) The life duration of the drying air filters depends on the rate of use of the washer and the room air quality. We recommend the preventive change of the drying air filters at least one time every year. Check visually the state of the drying air filters every 6 months as stated in the preventive maintenance scheme NU_ULTIMA_02_EN_
61 MAINTENANCE OF THE WASHER 5. EXTERNAL MAINTENANCE OF THE WASHER GETINGE LANCER washers are entirely covered with panels (bodywork) in stainless steel AISI 304L. 5.1 CLEANING METHOD Regular maintenance cleaning is done using a soft cleaning product. In the event that regular cleaning tasks have been neglected for too long, we recommend using a special cleaner. The product must be wiped on using a cloth or a soft sponge, being careful to rub the stainless steel in the direction of the grain on the panel to avoid any scratches. For drying, good practice is to use a rubber scraper, as you would on glass surfaces; this avoids any shimmering effect that can be produced when cleaning with a cloth. AVOID WATER RINSING DIRECTLY ON THE WASHER 5.2 CLEANING PRODUCTS FOR EXTERIOR PANELS DETERGENTS, WASHING LIQUIDS: All types of detergents, washing liquids and commercial soaps are generally usable, as long as they do not contain chlorinated products. ABRASIVE POWDERS: These products can scratch stainless steel surfaces and therefore change the appearance, at least in small areas. However, they can be useful to remove stubborn stains through rubbing. ACID PRODUCTS: The use of acid-based cleaning products should only be used in special cases. Acetic acid can be used to remove stains caused by the buildup of limescale. There are phosphoric acid or nitric acid based products that are specially designed for cleaning stainless steel. Strictly follow the manufacturer instructions when using them. Chlorinated disinfectants should only be used sparingly: solution diluted in cold water, reduced contact time, rinse well. AFTER CLEANING IT IS NECESSARY TO ABONDANTLY RINSE WITH A SOFT CLOTH TO REMOVE TRACES OF THE CLEANING PRODUCTS THAT WERE USED NU_ULTIMA_02_EN_
62 MAINTENANCE OF THE WASHER 6. SHUT DOWN AT END OF DAY a) SHUT OFF THE WATER INLET VALVES so that the lines are not left pressurised. Do not forget to open them again before using the washer. b) SHUT DOWN THE APPLIANCE. 7. PREVENTIVE MAINTENANCE GETINGE LANCER S TECHNICAL ASSISTANCE SERVICE recommends to carry out a preventive maintenance action every year in order to guarantee the validity of the washing cycles and to ensure the operation of the washer. The preventive maintenance reduced the risks of stoppings of the washer due to breakdowns and makes it possible to lengthen the lifespan of the equipment. The washer stores the operational hours in memory. At the end of 900 operating hours, a message on the screen is shown to indicate that preventive maintenance is required. The 900 hours are a guide line and it is advisable in the case of less frequent use of the washer to perform the preventive maintenance on an annual basis Depending on the countries where the washer is used and the local norms, a higher frequency of preventive maintenance visits can be necessary. NU_ULTIMA_02_EN_
63 MAINTENANCE OF THE WASHER 8. PREVENTATIVE MAINTENANCE SCHEDULE FUNCTION Daily (1) Biannual (2) 1 Year (2) 2 Years (2) 5 Years (2) Clean filter system in chamber. X X X X X Check chemical containers for any leakage. X X X X X Ensure chemical hoses are not pinched. X X X X X Clean exterior panels. X X X X X Inspect water supply hoses for cracks, bulges, and leaks. X X X X Ensure the water hose seals and filters are clean and have no cracks. X X X X Check chemical supply hoses for cracks, bulges and leaks. X X X X Inspect internal tubing on chemical pumps for wear. X X X X Check chemical level sensors for correct operation. X X X X Ensure all panels are properly secured. X X X X Check all internal hoses for cracks, bulges and leaks. X X X X Ensure all hose clamps are properly tightened. X X X X Check all column seals for leaks and cracks. X X X X Check spray arm support seals for leaks and cracks. X X X X Check spray arms and bushings for wear. X X X X Check door seal and gasket for leakage. X X X X Inspect the door springs, door wheels, door cable, hooks, gas spring, mounting hardware, and door switch for proper operation. X X X X Change the Hepa filter of the dryer (if applicable) X X X X Check recycling and emptying pump seals for leakage and quiet operation. X X X Check for lose electrical connections at components and electronic cards. X X X Verify the correct operation of all relays and their associated components. X X X Verify the correct operation of the fan of the dryer (if applicable) X X X Verify the correct operation of the non-return valve of the drying network (if applicable) X X X (1) Daily maintenance must be handled by users staff. (2) Others maintenances (bi-annual, 1 year, 2 years & 5 years) must be carry out by the GETINGE LANCER s technical assistance service. NU_ULTIMA_02_EN_
64 MAINTENANCE OF THE WASHER 9. RECOMMENDED SPARE PARTS 9.1 RECOMMENDED SPARE PARTS 810 LX 815 LX Description Part # Quantity/ Machine Door Spring Door wheels Door cable Emptying Pump 50/60 hz Pressurestat Autoclude Internal tubing Main Pump50/60hz capacitor Door Seal Bottom Door Seal Column Seal Threaded Connection Water Inlet Filter/Seal Spray Arm Washer Heating Relay RECOMMENDED SPARE PARTS 820 LX Description Part # Quantity/Machine Door Spring Door wheels Door cable Emptying Pump 50/60hz Pressurestat Autoclude Internal tubing Main Pump 50/60hz capacitor Door Seal Bottom Door Seal Column Seal Threaded Connection Water Inlet Filter/Seal Spray Arm Washer Heating Relay HEPA filter of the dryer Fan of the dryer NU_ULTIMA_02_EN_
65 MAINTENANCE OF THE WASHER 9.3 RECOMMENDED SPARE PARTS 910 LX Description Part # Quantity / Machine Door Spring Door wheel Door cable Emptying Pump 50/60hz Pressurestat Autoclude Internal tubing Main Pump 50/60hz Capacitor Door Seal Bottom Door Seal Column Seal Threaded Connection Water Inlet Filter/Seal Spray Arm Washer Heating Relay Drying Hepa filter Fan of the dryer RECOMMENDED SPARE PARTS 1300 LX Description Part # Quantity / Machine Door Spring Door wheel Door cable Emptying Pump 50/60hz Pressurestat Autoclude Internal tubing Main Pump 50hz Main Pump 60hz Capacitor 50hz Capacitor 60hz Door Seal Bottom Door Seal Column Seal Threaded Connection Water Inlet Filter/Seal Spray Arm Washer Heating Relay Drying Hepa filter Fan of the dryer NU_ULTIMA_02_EN_
66 MAINTENANCE OF THE WASHER 9.5 RECOMMENDED SPARE PARTS 1400 LX / 1400 LXP Description Part # Quantity / Machine Emptying Pump 50hz Emptying Pump 60hz Pressurestat Autoclude Internal tubing Main Pump 50hz 400v tri/50hz v tri without neutral/50hz v tri/50hz v tri/50hz Main Pump 60hz 200v tri/60hz v 60hz v tri/60hz v tri/60hz v tri/60hz v tri without neutral /60hz Door Seal Bottom Door Seal Column Seal Threaded Connection Water Inlet Filter/Seal Heating Relay Drying Hepa filter Fan of the dryer RECOMMENDED SPARE PARTS 1600 LXP Description Part # Quantity/Machine Emptying Pump 50hz Emptying Pump 60hz Pressurestat Autoclude Internal tubing Main Pump 50hz 400v tri/50hz v tri without neutral/50hz v tri/50hz v tri/50hz Main Pump 60hz 200v tri/60hz v 60hz v tri/60hz v tri/60hz v tri/60hz v tri sans neutre/60hz Door Seal Bottom Door Seal Column Seal NU_ULTIMA_02_EN_

67 MAINTENANCE OF THE WASHER Threaded Connection Water Inlet Filter/Seal Heating Relay HEPA filter of the dryer Fan of the dryer RECOMMENDED SPARE PARTS 1800 LXA Description Part # Quantity / Machine Emptying Pump 50hz Emptying Pump 60hz Pressurestat Autoclude Internal tubing Main Pump 50hz 400v tri/50hz v tri without neutral/50hz v tri/50hz v tri/50hz Main Pump 60hz 200v tri/60hz v 60hz v tri/60hz v tri/60hz v tri/60hz v tri without neutral /60hz Door Seal Column Seal Threaded Connection Water Inlet Filter/Seal Heating Relay Drying Hepa filter Fan of the dryer DISPOSAL OF WASHER At the end of life of the washer, the users' attention is drawn to the requirement not to dispose of waste electrical and electronic equipment (WEEE) as unsorted municipal waste and to collect such WEEE separately. NU_ULTIMA_02_EN_
810 LX / 815LX USER MANUAL
 810 LX / 815LX USER MANUAL ORIGINAL INSTRUCTIONS PRECAUTIONS TO BE TAKEN BEFORE USE Users must be trained before using the washer. The staff that use or repair this washer must have followed a complete
820 LX / 910 LX / 1300 LX USER MANUAL
 820 LX / 910 LX / 1300 LX USER MANUAL ORIGINAL INSTRUCTIONS ORIGINAL INSTRUCTIONS PRECAUTIONS TO BE TAKEN BEFORE USE Users must be trained before using the washer-dryer. The staff that use or repair this
1400 LX USER MANUAL ORIGINAL INSTRUCTIONS
 1400 LX USER MANUAL ORIGINAL INSTRUCTIONS ORIGINAL INSTRUCTIONS PRECAUTIONS TO BE TAKEN BEFORE USE Users must be trained before using the washer-dryer. The staff that use or repair this washer-dryer must
USER S MANUAL LABORATORY RANGE 910 / 1300 / 1400 / 1600 UP UPDP - UPSS - UPDPSS
 USER S MANUAL LABORATORY RANGE 910 / 1300 / 1400 / 1600 UP UPDP - UPSS - UPDPSS MODELS 910 UP / UPDP / UPSS / UPDPSS 1300 UP / UPDP / UPSS / UPDPSS 1400 UP / UPDP / UPSS / UPDPSS 1600 UP / UPDP / UPSS
ULTIMA series undercounter labware washing systems
 ULTIMA series undercounter labware washing systems Effective. Sustainable. Space efficient. 2 image Clean one time, every time. Offering the best labware cleaning solutions in the industry. ULTIMA series
ULTIMA series undercounter labware washing systems
 ULTIMA series undercounter labware washing systems Effective. Sustainable. Space efficient. 1 Clean one time, every time. Offering the best labware cleaning solutions in the industry. Washer Function and
ULTIMA series model 1300 LX laboratory washer/dryer
 ULTIMA series model 1300 LX laboratory washer/dryer SPECIFICATIONS 609 mm 24" 535 mm 752 mm 21.1" 29.6" 1420 mm 55.9" 1643 mm 64.7" 644 mm 25.4" 520 mm 20.5" 730 mm 28.7" 862 mm 33.8" Base Model ULTIMA
SECTION LABORATORY GLASSWARE WASHER Model 1800 LXA PART 1 GENERAL 1.01 SYSTEM DESCRIPTION 1.02 SUBMITTALS 1.03 QUALITY ASSURANCE 1.
 SECTION 11600 - LABORATORY GLASSWARE WASHER Model 1800 LXA PART 1 GENERAL 1.01 SYSTEM DESCRIPTION A. Laboratory Glassware Washer/Dryer 1.02 SUBMITTALS A. Bill of Materials B. Product Literature C. Installation
ULTIMA series model 815 LX undercounter laboratory washer/dryer
 ULTIMA series model 815 LX undercounter laboratory washer/dryer SPECIFICATIONS 609 mm609 mm 1267 mm 1267 mm 24" 24" 739 mm739 mm 49.9" 49.9" 29.1" 29.1" 535 mm535 mm 668 mm668 mm 21.1" 21.1" 26.3" 26.3"
ULTIMA series freestanding labware washing systems
 ULTIMA series freestanding labware washing systems Maximum capacity. One-touch simplicity. Professional cleaning performance. Integrated systems, repeatable results. Washer Function and Flexibility From
Version 7 1/ LXP
 SECTION 11600 LABORATORY GLASSWARE WASHER Model 1600 LXP PART 1 GENERAL 1.01 SYSTEM DESCRIPTION A. Laboratory Glassware Washer/Dryer 1.02 SUBMITTALS A. Bill of Materials B. Product Literature C. Installation
Version 7 1/ LX
 SECTION 11600 LABORATORY GLASSWARE WASHER Model 1300 LX PART 1 GENERAL 1.01 SYSTEM DESCRIPTION A. Laboratory Glassware Washer/Dryer 1.02 SUBMITTALS A. Bill of Materials B. Product Literature C. Installation
Labexia 820 LX. Undercounter Laboratory Glassware Washer Dryer. A big washer for small spaces! Accessories
 T E C H N I C A L D A T A & U T I L I T I E S OVERALL DIMENSIONS CHAMBER DIMENSIONS (h x w x d) (mm) (h x w x d) (inch.) (h x w x d) (mm) (h x w x d) (inch.) 845 x 900 x 700 33,26" x 35,43" x 27,55" DRAINAGE
LABEXIA 810 LX Glassware Washer
 LABEXIA 80 LX Glassware Washer Construction and Design The 80 LX Undercounter Washer fits in the same space as a standard, domestic dishwasher but has professional features and stainless steel construction
LABEXIA 1300 LX Glassware Washer-Dryer
 LABEXIA LX Glassware Washer-Dryer Construction and Design The LX Washer-Dryer stands upright and has professional features and stainless steel construction for durability. Complete cleaning is obtained
Dryer Controller M720
 User Manual Dryer Controller M720 Hardware version 2.00 Software version 2.00 Manual M720 Dryer controller Page 1 of 60 Document history Preliminary version: - Created in April, 2009 Hardware Version 2.00,
Spa Touch Control Panel with BP2100, BP6013 spa controllers. (Spa Owner s Manual insert)
") Spa Touch Control Panel with BP2100, BP6013 spa controllers. (Spa Owner s Manual insert) P.N. 7876C (export) February 12, 2015 For Spas equipped with BP2100, BP6013 controllers and Spa Touch panel. Spa
Spa Touch Control Panel with BP2100, BP6013 spa controllers. (Spa Owner s Manual insert) P.N. 7876C (export) February 12, 2015 For Spas equipped with BP2100, BP6013 controllers and Spa Touch panel. Spa
User Manual. Dryer Controller M720
 User Manual Dryer Controller M720 Hardware version 1.00 Software version 1.00 Preliminary version Manual M720 Dryer controller Page 1 of 42 Document history Preliminary version: - Created in April, 2009
Spa Touch Control Panel with 2000, 2100 controllers. (Spa Owner s Manual insert)
") Spa Touch Control Panel with 2000, 2100 controllers (Spa Owner s Manual insert) P.N. 7876B February 11, 2015 For Spas equipped with BP2000, BP2100 controllers and Spa Touch panel. Spa Touch Control Panel
Spa Touch Control Panel with 2000, 2100 controllers (Spa Owner s Manual insert) P.N. 7876B February 11, 2015 For Spas equipped with BP2000, BP2100 controllers and Spa Touch panel. Spa Touch Control Panel
LABEXIA 1400 LXP Glassware Washer-Dryer
 LABEXIA LXP Glassware Washer-Dryer Construction and Design The LXP Washer-Dryer provides professional features and is constructed of stainless steel for maximum durability. Complete cleaning is obtained
LABEXIA 1800 LXA Glassware Washer-Dryer
 LABEXIA 800 LXA Glassware Washer-Dryer Construction and Design Easy selection of 0 standard washing programs for numerous applications including: Chemistry glassware Bacteriology/virology (high temperature)
i.c³ User Guide For Helmer i.series Ultra-Low Freezers A/A
 i.c³ User Guide For Helmer i.series Ultra-Low Freezers 360175-A/A Document History Revision Date CO Supersession Revision Description A 18 APR 2014* 9275 n/a Initial release. * Date submitted or change
D-TECT 3 IP. GJD260 IP Motion Detector
 D-TECT 3 IP GJD260 IP Motion Detector PACKAGE CONTENTS 1 x D-TECT 3 IP 1 x Drilling template for fixing holes 3 x 31.75mm wall plugs 3 x 31.75mm screws 2 x Spare sliding curtains 2 x Tamper feet 1 x Tamper
TECHNICAL SPECIFICATIONS FOR PLUSHER WDC 8 SERIES INSTRUMENT WASHER DISINFECTORS
 TECHNICAL SPECIFICATIONS FOR PLUSHER WDC 8 SERIES INSTRUMENT WASHER DISINFECTORS PRODUCT PLUSHER WDC 8 series instrument washer disinfectors are offered in single door formation with manual horizontal
VS LD series vertical steam sterilizers
 VS LD series vertical steam sterilizers Steelco vertical Steam Sterilizers VS LD series are designed to answer the typical sterilization needs of a laboratory: glassware, stainless steel instruments, culture
PROBLEM CAUSE CORRECTIVE ACTION. Product Service Replace cup. Malfunction of cup. Detergent cup fails to open. Malfunction of relay
 CHAPTER 7 TROUBLESHOOTING Refer to the following table if your Glassware Washer fails to operate properly. If the suggested corrective actions do not solve your problem, contact Labconco for additional
DC200 Digital Dispenser Operating Manual
 DC200 Digital Dispenser Operating Manual 2015 Fisnar Phone: (973) 646-5044 E-mail: info@fisnar.com Table of Contents Product Safety Statements 4 Specifications 6 Accessories 6 External Controls 7 Machine
Glass and Dishwashers. BarAid 500/800. Installation and. Starting from Serial No.:
 Glass and Dishwashers BarAid 500/800 Installation and operation Instructions Starting from Serial No.: 8652 0001 REV. 19.01.2009 1617-A-01-09 Content Page 1 Important Notes... 4 2 Installation... 5 2.1
D-TECT 2 IP. GJD230 IP Motion Detector
 D-TECT 2 IP GJD230 IP Motion Detector PACKAGE CONTENTS 1 x D-TECT 2 IP 1 x Drilling template for fixing holes 3 x 31.75mm wall plugs 3 x 31.75mm screws 2 x Spare sliding curtains 2 x Tamper feet 1 x Tamper
Glass and Dishwashers AMX / AUX Series
 Glass and Dishwashers AMX / AUX Series INSTALLATION OPERATION VERSION 24.02.04 Important Notes Use in Accordance with Regulations This machine is exclusively to be used to wash ware such as plates, cups,
Glass and Dishwashers AMX / AUX Series
 Glass and Dishwashers AMX / AUX Series INSTALLATION OPERATION REV. 8.xx 04.07.2005 Installation and Operation Instructions for Models of AMX / AUX Series Content Page 1 Installation... 3 2 Connections...
AS950 ALL-WEATHER REFRIGERATED SAMPLERS
 AS950 ALL-WEATHER REFRIGERATED SAMPLERS Applications Wastewater Collections Industrial Pretreatment Environmental Monitoring Stormwater Sampling has never been this easy. The AS950 All-Weather Refrigerated
Manual v1 Page 1 of 19. Manual. Laboratory autoclave
 Manual 20.2.2015 v1 Page 1 of 19 Manual Laboratory autoclave Autoclave using steam for the treatment of material and laboratory processes e.g. sterilization, as an aid in research and development CertoClav
LTE Scientific Ltd. Touchclave-R. The dynamic new range of cylindrical-section autoclaves from LTE Scientific
 Touchclave R (Rob) 8/5/06 12:31 pm Page 1 LTE Scientific Ltd. Touchclave-R The dynamic new range of cylindrical-section autoclaves from LTE Scientific Touchclave R (Rob) 8/5/06 12:31 pm Page 2 2 An Introduction
Rules for Safe Operation
 Rules for Safe Operation Important: Do not attempt to operate the CleanStation until you have read thoroughly and understand all instructions and safety rules contained in this manual. Failure to comply
Covidien Articulating Absorba Tack Foil Pouch Leak Tester Owner s Manual IPE SN Rev 1
 Covidien Articulating Absorba Tack Foil Pouch Leak Tester Owner s Manual IPE SN 12497 Rev 1 MANUFACTURER: INNOVATIVE PRODUCTS & EQUIPMENT, INC. 5 PROGRESS AVE TYNGSBORO, MASSACHUSETTS 01879 U.S.A Revision
FlaskScrubber & SteamScrubber Laboratory Glassware Washers
 FlaskScrubber & SteamScrubber Laboratory Glassware Washers FlaskScrubbers & SteamScrubbers Table of Contents / Overview Overview............................................3 FlaskScrubber Vantage Series
OWNER S MANUAL DLFCAB / DLFCHB / DLFDAB / DLFDHB High Wall Ductless System Sizes 09 36
 OWNER S MANUAL DLFCAB / DLFCHB / DLFDAB / DLFDHB High Wall Ductless System Sizes 09 36 TABLE OF CONTENTS PAGE SAFETY PRECAUTIONS... 2 GENERAL... 2 INDOOR UNIT PART NAMES... 3 REMOTE CONTROL PART NAMES...
ULTRA LOW TEMPERATURE FREEZER. User Manual
 ULTRA LOW TEMPERATURE FREEZER User Manual Note:Kaltis reserves the right to modify any parts of this manual without prior notice. 1. No part of this manual may be reproduced in any form, or translated
Syringe Pump. User Manual
 Syringe Pump User Manual Specifications Length Height Width Weight Waterproof Rating Battery 30 cm 13 cm 12.5 cm 1.8 kg IPX3 Rechargeable Li Polymer 7.4 V 1900 mah 6 Hour Battery Life Running 3 Hours When
User instructions DHP-AT
 User instructions DHP-AT VUGFC202 If these instructions are not followed during installation and service, Danfoss A/S liability according to the applicable warranty is not binding. Danfoss A/S retains
Operation Manual Fighter ProVision Software. Version: 0.0 Revision: 1
 Operation Manual Fighter ProVision Software Version: 0.0 Revision: 1 TABLE OF CONTENTS 1. Introduction 5 2. Software Installation 5 3. PC Users 6 3.1 Introduction 6 3.2 Default Code 6 3.3 Edit PC User
BarAid 400. Installation and. Starting from Serial No.:
 Glasswasher BarAid 400 Installation and operation Instructions Starting from Serial No.: 8649 1065 REV. 19.01.2009 DE 1618-A-01-09 Content Page 1 Important Notes... 4 2 Installation... 5 2.1 Location...
AS950 REFRIGERATED SAMPLERS
 AS950 REFRIGERATED SAMPLERS Applications Wastewater Collections Industrial Pretreatment Environmental Monitoring Stormwater Sampling has never been this easy. The AS950 Refrigerated Sampler makes programming,
Follett Performance Plus
 Follett Performance Plus touchscreen user guide The next level of control in undercounter refrigeration Controller Operation - Performance Plus touchscreen Use and care of the LCD Performance Plus touchscreen
PORTABLE AIR-CONDITIONER MODEL: EPAC-A4010D(WH) Owner s Manual Please read this manual carefully before operating your set.
 Owner s Manual Please read this manual carefully before operating your set.") PORTABLE AIR-CONDITIONER MODEL: EPAC-A4010D(WH) Owner s Manual Please read this manual carefully before operating your set. Retain it for future reference. Record model number and serial number of the
PORTABLE AIR-CONDITIONER MODEL: EPAC-A4010D(WH) Owner s Manual Please read this manual carefully before operating your set. Retain it for future reference. Record model number and serial number of the
spatouch Menued Control Panels
 spatouch Menued Control Panels Balboa Water Group BP Series Systems User Interface and Programming Reference The spatouch menued panel is compatible with all BP systems that already support the TP800 and/or
MW001 Integrated Dishwasher. Manual for Installation, Use and Maintenance
 MW001 Integrated Dishwasher Manual for Installation, Use and Maintenance Important The CDA Group Ltd cannot be held responsible for injuries or losses caused by incorrect use or installation of this product.
Policy # MI_WASH Department of Microbiology. Page Quality Manual TABLE OF CONTENTS APPENDIX I STERILIZATION AND GLASS WASHING TECHNICAL MANUAL...
 Quality Manual Version: 1.1 CURRENT 1 of 13 Prepared by QA Committee Issued by: Laboratory Manager Revision Date: 4/14/2018 Approved by Laboratory Director: Annual Review Date: 5/1/2019 Microbiologist-in-Chief
LOGIC CONTROLLED DEKO 25 EASE OF USE
 DEKO 25 Washer-disinfector WASHROOM SYSTEMS DEKO 25 The DEKO 25 has been designed to bring reliability, outstanding cleaning and disinfection performance and quality into one compact and economic washerdisinfector.
IQ/OQ Protocol Installation Qualification/ Operation Qualification
 IQ/OQ Protocol Installation Qualification/ Operation Qualification FlaskScrubber Vantage TM Series Glassware Washer Labconco o: 1058701 Rev. B Available at www.labconco.com or by e-mail in Word 2000 document
Climapro 2. User manual. wireless room thermostat without receiver. To be left with the user.
 Climapro 2 User manual To be left with the user wireless room thermostat without receiver www.glow-worm.co.uk table of contents READ CAREFULLY BEFORE USING 1 Introducing your Climapro 2... 3 1.1 Description...
Model GW1020 Laboratory Glassware Washer General Specifications
 Model GW1020 Laboratory Glassware Washer General Specifications 1.0 General Description The Model GW1020 Laboratory Glassware Washer is a high capacity spray cabinet washer specifically designed to clean
wc431 Slimline Integrated Dishwasher Manual for Installation, Use and Maintenance
 wc431 Slimline Integrated Dishwasher Manual for Installation, Use and Maintenance Contents Contents... 2 Important... 3 Important Notes... 4 Recommendations... 5 Before First Use... 5 Control Panel...
Owner s Manual. Model AC375C Refrigerant Recovery, Recycle, and Recharge Unit
 Owner s Manual Model AC375C Refrigerant Recovery, Recycle, and Recharge Unit Model AC375C Recover, Recycle, and Recharge Unit for R-12 or R-134a Refrigerant Voltage: 220 230; 50 60 Hz SAFETY DEFINITIONS:
FlaskScrubber & SteamScrubber. Laboratory Glassware Washers NEW! FlaskScrubber & SteamScrubber racks now interchangeable
 FlaskScrubber & SteamScrubber Laboratory Glassware Washers! FlaskScrubber & SteamScrubber racks now interchangeable FlaskScrubber Laboratory Glassware Washers General Features Patent-pending design Lower
MPT Electric Fire Pump Controller
 Setup and Operating Instructions MPT Electric Fire Pump Controller This manual provides general information, installation, operation, maintenance, and system setup information for Metron MPT Electric Fire
ClearFire. Startup Guide. Model CFH. Horizontal Steam Boiler
 ClearFire Model CFH Horizontal Steam Boiler Startup Guide 750-293 www.cleaverbrooks.com Improper installation, adjustment, service, or maintenance can cause equipment damage, personal injury, or death.
DEKO Washer-disinfector WASHROOM SYSTEMS
 DEKO 2000 Washer-disinfector WASHROOM SYSTEMS RELIABLE PERFORMANCE The DEKO 2000 is designed and constructed to meet the performance and design requirements stated in EN ISO 15883-1 Washer-disinfectors
DEKO 25 washer-disinfector
 DEKO 25 washer-disinfector DEKO 25 The DEKO 25 has been designed to bring reliability, outstanding cleaning and disinfection performance and quality into one compact and economic washer-disinfector. It
AS950 PORTABLE SAMPLERS
 AS950 PORTABLE SAMPLERS Applications Wastewater Collections Industrial Pretreatment Environmental Monitoring Stormwater Sampling has never been this easy. The AS950 Portable Sampler makes programming,
TECHNICAL SPECIFICATIONS FOR PLUSHER WDS 12 SERIES INSTRUMENT WASHER DISINFECTORS
 TECHNICAL SPECIFICATIONS FOR PLUSHER WDS 12 SERIES INSTRUMENT WASHER DISINFECTORS PRODUCT PLUSHER WDS 12 series instrument washer disinfectors are offered with single or double door formation with manual
OWNER S MANUAL. High-Wall Fan Coil Unit CONTENTS
 OWNER S MANUAL High-Wall Fan Coil Unit Page GENERAL 2,3 OPERATING MODES 2 REMOTE CONTROL 2 OPERATION 3-9 REMOTE CONTROL OPERATION 3 INDOOR UNIT DISPLAY 5 EMERGENCY OPERATION 5 PRESSING THE ON/OFF BUTTON
Diagnostics and Monitoring System WEB Tool 2. User Manual
 Diagnostics and Monitoring System 2 (Translation of the original documentation) User Manual S/N: Valid from: 01.05.2012 Rev.: 2.0 2 Rev. 1.... 1 1.1 General information... 1 1.1.1 Equipment... 1 1.1.2
Engineers manual. Under counter machines
 Table of Contents 1. INTRODUCTION... 3 1.1 1.2 1.3 INSTALLATION AND COMMISSIONING... 3 SERVICE AND REPAIRS... 3 MODIFICATION... 3 2. EXPLANATION OF SYMBOLS USED... 3 3. WARNING AND SAFETY INFORMATION...
Focus 4010\ Focus 4010 HT porcelain firing furnace
 INSTRUCTION MANUAL Focus 4010\ Focus 4010 HT porcelain firing furnace Warning You have available one of the most precise dental furnaces equipped with a heating muffle made by the original manufacturer
Instruction Manual for Electric Ovens OO757X OO986X
 Instruction Manual for Electric Ovens OO757X OO986X 1 2 DEAR CUSTOMER, We thank you and congratulate you on your choice. This new carefully designed product, manufactured with the highest quality materials,
STEAM STERILIZER SERIE S1000 (RBE)
") STEAM STERILIZER SERIE S1000 (RBE) INTRODUCTION: Of Turkish manufacturing, our sterilizers Series S1000 (RBE) are designed for the purpose of inactivating and sterilizing infectious waste generated in
STEAM STERILIZER SERIE S1000 (RBE) INTRODUCTION: Of Turkish manufacturing, our sterilizers Series S1000 (RBE) are designed for the purpose of inactivating and sterilizing infectious waste generated in
Portable Air Conditioner with Heat Pump Technology Operating Instructions. Model No.: HCB-P13HP-D. Reference No.: BPD13HP V140217
 Portable Air Conditioner with Heat Pump Technology Operating Instructions 3092402 Model No.: HCB-P13HP-D Reference No.: BPD13HP V140217 Thank you for choosing a Soleus Air Portable Air Conditioner with
N-Wissen GmbH. Top Loading Autoclaves (95, 120, 135 L) Available top loading models: The Top Loading Autoclave range features:
 Available top loading models: The Top Loading Autoclave range features:") Top Loading Autoclaves (95, 120, 135 L) The Top Loading Autoclave range features: A choice of 63, 95, 120 and 135 litres models A fully programmable 5,7 Touch Screen Colour Controller Timed/Pulsed Free
Top Loading Autoclaves (95, 120, 135 L) The Top Loading Autoclave range features: A choice of 63, 95, 120 and 135 litres models A fully programmable 5,7 Touch Screen Colour Controller Timed/Pulsed Free
PG 8535 Perfect Reprocessing
 PG 8535 Perfect Reprocessing 3 8 labwasher.com The World s Most Intelligent Dishwasher Uncompromising perfection... the new PG 8535 Uncompromising Perfection the new PG 8535 In general, the more critical
OPERATING INSTRUCTIONS
 OPERATING INSTRUCTIONS Automatic Carousel Stainer MSM INS5000GB 2011_08_07 Instructions MSM 1 Instructions MSM 2 CONTENTS 1. INTENDED USE... 4 2. SYMBOLS... 4 3. SAFETY NOTES... 4 4. COMPONENTS... 5 5.
IntelliDoX Operator Manual
 IntelliDoX Operator Manual OPERATOR MANUAL TABLE OF CONTENTS Table of Contents Table of Contents...1 About this Publication...3 Important Safety Information: Read First...4 Getting Started...5 About the
ModSync Sequencing System Installation & Operation Manual. For use with Fulton Steam Boilers.
 ModSync Sequencing System Installation & Operation Manual For use with Fulton Steam Boilers. Revision 3.0 8/21/2008 - 2 - Table of Contents Introduction Page 4 Features Page 4 Sequence of Operation Page
Touchpad Exit Controller Administration Guide
 Touchpad Exit Controller Administration Guide 2018 RF Technologies, Inc. All specifications subject to change without notice. All Rights Reserved. No Part of this work may be reproduced or copied in any
Owner's Manual TABLE OF CONTENTS
 40MAQ High Wall Ductless System Sizes 09 to 36 Owner's Manual TABLE OF CONTENTS PAGE A NOTE ABOUT SAFETY... 2 GENERAL... 2 PART NAMES... 3 FUNCTION BUTTONS... 4 DISPLAY PANELS... 5 REMOTE CONTROL... 6
Model No.: PS08-01 PS10-01 Ref: KY80 KY100
 8,000/10,000/12,000 BTU Portable Air Conditioner Operating Instructions Model No.: PS08-01 PS10-01 Ref: KY80 KY100 Model No.: PS12-03 Ref: KY120 3119233 V160310 Thank you for choosing a Soleus Air Portable
The Reliance 400/500 Glassware Washers
 LABORATORY RESEARCH Flexibility That Boosts Productivity STERIS: Technological Innovations with Proven Worldwide Applications Making the Most of Time and Space More Flexibility Features STERIS LIfe Sciences
Original Instructions Instucciones originales Consignes originales. Model: AC R-1234yf A/C Recover, Recycle, Recharge Machine
 Original Instructions Instucciones originales Consignes originales Model: AC1234-6 R-1234yf A/C Recover, Recycle, Recharge Machine Description: Recover, recycle, and recharge machine for use with R-1234yf
TECHNICAL SPECIFICATIONS FOR PLUSHER WDS 18 SERIES INSTRUMENT WASHER DISINFECTORS
 TECHNICAL SPECIFICATIONS FOR PLUSHER WDS 18 SERIES INSTRUMENT WASHER DISINFECTORS PRODUCT PLUSHER WDS 18 series instrument washer disinfectors are offered with single or double door formation with vertical
OWNER S MANUAL HIGH WALL INVERTER. (English) (BSHVD1S SERIES)
 (BSHVD1S SERIES)") OWNER S MANUAL HIGH WALL INVERTER (English) (BSHVD1S SERIES) IMPORTANT As with any product that has moving parts or is subject to wear and tear, it is VERY IMPORTANT that you maintain your air conditioner
OWNER S MANUAL HIGH WALL INVERTER (English) (BSHVD1S SERIES) IMPORTANT As with any product that has moving parts or is subject to wear and tear, it is VERY IMPORTANT that you maintain your air conditioner
GIRTON CABINET WASHER MODEL 794A
 DESCRIPTION GIRTON CABINET WASHER MODEL 794A The washer shall be a Girton Model 794A Cabinet Type Pressure Washer constructed of type-304 stainless steel, utilizing a reciprocating header spray system.
Glass and Dishwashers 402/452/502. (original instructions) (incl. Australian /502) Starting from Serial No.:
 (incl. Australian /502) Starting from Serial No.:") Glass and Dishwashers ECOMAX 402/452/502 (incl. Australian 452-90/502) INSTALLATION AND OPERATION INSTRUCTIONS (original instructions) Starting from Serial No.: 8663 4000 REV. 05.10.2015 EN IMPORTANT NOTES
Glass and Dishwashers ECOMAX 402/452/502 (incl. Australian 452-90/502) INSTALLATION AND OPERATION INSTRUCTIONS (original instructions) Starting from Serial No.: 8663 4000 REV. 05.10.2015 EN IMPORTANT NOTES
INSTALLATION INSTRUCTIONS
 TT-1343 5/06b INSTALLATION INSTRUCTIONS Original Issue Date: 8/03 Model: Automatic Transfer Switches Equipped with Series 1000 Programmable Controller Market: ATS Subject: Remote Annunciator Kits GM28938-KP1,
Syncro AS. Analogue Addressable Fire Control Panel. User Manual
 Syncro AS Analogue Addressable Fire Control Panel User Manual Man-1100 Issue 02 Nov. 2008 Index Section Page 1. Introduction...3 2. Safety...3 3. Panel Controls...4 3.1 Access Level 1...4 3.2 Access Level
DEKO 260 Washer - Disinfector - Dryer
 DEKO 260 Washer - Disinfector - Dryer HIGH QUALITY, EFFICIENT WASHING PERFORMANCE WITH SHORT CYCLE TIMES DEKO 260 The Deko 260 washerdisinfector-dryer is designed and manufactured to be fully compliant
General The Dryer Programmer for Windows Computers
 Published Manual Number: MQYDSB01 Specified Date: 20131120 As-of Date: 20131120 Access Date: 20131120 Depth: Detail Custom: n/a Applicability: YDS Language Code: ENG01, Purpose: publication, Format: 1colA
WC141 Integrated Dishwasher Installation, Use and Maintenance
 WC141 Integrated Dishwasher Installation, Use and Maintenance Customer Care Department The Group Ltd. Harby Road Langar Nottinghamshire NG13 9HY T : 01949 862 012 F : 01949 862 003 E : customer.care@cda.eu
OWNER S MANUAL HIGH WALL INVERTER. (English) (MSHVD1S SERIES)
 (MSHVD1S SERIES)") OWNER S MANUAL HIGH WALL INVERTER (English) (MSHVD1S SERIES) IMPORTANT As with any product that has moving parts or is subject to wear and tear, it is VERY IMPORTANT that you maintain your air conditioner
OWNER S MANUAL HIGH WALL INVERTER (English) (MSHVD1S SERIES) IMPORTANT As with any product that has moving parts or is subject to wear and tear, it is VERY IMPORTANT that you maintain your air conditioner
Operating manual. Wascator FOM71 CLS
 Operating manual Wascator FOM71 CLS Operating manual in original language 438 9200-91/EN 2010.05.03 Register now And be able to join the Wascator FOM 71 CLS web site where you can find: General information
User s Manual. CONCEPT Processor 305 DW / 405 DW / 505 DW 505 DW XP
 User s Manual CONCEPT Processor 305 DW / 405 DW / 505 DW 505 DW XP User's Manual CONCEPT Processor 305 DW / 405 DW / 505 DW / 505 DW XP T11336 Edition AA, April 2013 This book has part No. 10070285 0-2
Installation and user manual
 Installation and user manual Please read carefully and retain for future reference Models EcoHeat: C3, C5, C6, C8, C9, C11, C12 Rev.1_09-07-15 Page 1 Table of Contents 1 IMPORTANT: WARNINGS 1.1 GENERAL
DEKO 190 Ward washer-disinfector
 DEKO 190 Ward washer-disinfector SUPERIOR PERFORMANCE, LARGE CAPACITY AND ADVANCED STATE-OF-THE-ART CONTROL DEKO 190 The DEKO 190 is designed and constructed to exceed the standard performance and design
14,000 BTU Portable Air Conditioner 14,200 BTU Heat Pump Model Number: LX-140 Operating Instructions. Model No. LX Soleus Air International
 14,000 BTU Portable Air Conditioner 14,200 BTU Heat Pump Model Number: LX-140 Operating Instructions 3092402 Model No. LX-140 2012 Soleus Air International Thank you for choosing a Soleus Air LX-140 Portable
OWNER'S MANUAL R-410A Duct Free Split System Air Conditioner and Heat Pump
 R-10A Duct Free Split System Air Conditioner and Heat Pump Product Family: DFF(A/H)H, DFC(A/H) Please read the operating instructions and safety precautions carefully and thoroughly before installing and
Autoclave Operations Manual
 UNIVERSITY OF ILLINOIS AT URBANA/CHAMPAIGN - COMPOSITES MANUFACTURING LAB Autoclave Operations Manual Version 1 Written by KRH 2/21/2011 Contents ACCS... 4 Alarms... 7 Main Display Tabs... 7 Process Control
USER MANUAL TOUCHCLAVE-LAB AUTOCLAVES
 USER MANUAL Part 1 all users TOUCHCLAVE-LAB AUTOCLAVES ADVANCED STERILIZING TECHNOLOGY LTE Scientific Ltd Greenbridge Lane, Greenfield, Oldham OL3 7EN, England Tel: +44(0)1457 876221 Fax: +44(0)1457 870131
Ion Gateway Cellular Gateway and Wireless Sensors
 Page 1 of 9 Account & Network Setup If this is your first time using the Ion Gateway online system site you will need to create a new account. If you have already created an account you can skip to the
Standard Operating Manual
 Standard Operating Manual CEE 100CB Spin Coater /Hotplate Version 1.1 Page 1 of 18 Contents 1. Picture and Location 2. Process Capabilities 2.1 Cleanliness Standard 2.2 Substrate Size 2.3 Hotplate Temperature
HIGH EFFICIENCY FIRETUBE CONDENSING GAS BOILER
 This manual must be left with owner and should be hung on or adjacent to the boiler for reference. US HIGH EFFICIENCY FIRETUBE CONDENSING GAS BOILER MODELS CHS-85 through CHS-399 APPENDIX A CONTROLLER