PHONE: (888) FAX: (661) / 2000 Series Owners Guide. Home of the Perfect Impression
|
|
|
- Wilfred Poole
- 6 years ago
- Views:
Transcription
1 AAmstamp Machine Company Hot Stamping Machines and Accessories PHONE: (888) FAX: (661) / sales@aamstamp.com 2000 Series Owners Guide Home of the Perfect Impression Revised 2014
2 2000 Series Imprinting Machines Table of Contents Introduction and Safety Precautions Unpacking Instructions M-2000 Diagram Air-2000 Diagram Titan-2000 Diagram, Front Titan-2000 Diagram, Rear Getting Started Air-2000 Setup Loading Foil Foil Advance Adjustment Heat, Pressure, Dwell Type & Die Holder Setup Adapter Sleeve Setup Cushion Boards and Attachments Printing Napkins Printing Pencils and Business Cards x 12 Ribbon and Stationary Plate Fixture Setup Guide Warranty and Returns Aamstamp Machine Company LLC Trade Center Drive, Suite B Palmdale, California, USA Ph Fx info@aamstamp.com Copyright
3 PLEASE READ THIS MANUAL COMPLETELY BEFORE OPERATINGEQUIPMENT INTRODUCTION For years nothing has equaled the appearance and quality of foil imprinting. Printing with ink does not offer the vibrant color of foil. In addition, foil imprinting imparts a 3-dimensional effect that is not obtainable with conventional ink printing. Foils are uniformly opaque, odorless, non-liquid and are smear free. The foil imprinting process transfers the color of the foil to an item by the application of heat and pressure. The three basic elements needed to create a quality foil imprint are the proper amount of heat, pressure and dwell (the length of time the type and dies are in contact with the product.) AAmstamp's personalizing machines are designed to give you the power of a big press in a table top machine. The 2000 Series Machine and it s accessories, type, dies, emblems and foils are the highest quality and easiest to use products available today. After reviewing this manual, please call our customer service department toll free (888) with any questions you may have. SAFETY PRECAUTIONS - PLEASE READ CAREFULLY AAmstamp's printing machine is an electric tool and as such, basic safety precautions should be followed. Taking these precautions will reduce the risk of fire, electric shock, or personal injury. 1 Keep your area clean and clutter free. 2 Dress properly. Do not wear loose clothing or jewelry which could become entangled in the machine. 3 Do not use the machine in a damp or wet place, or expose it to rain. Do not use the machine in the presence of flammable liquids or gases. 4 Do not touch the Typehead/Ram Bar assembly. These parts of the machine have operating temperatures that can seriously burn on contact. 5 Guard against electrical shock by inspecting all the electrical cords regularly and replace any worn or damaged cords. 6 Always use the safety guard when using an air operated machine. Before using the machine, ensure that the guard is in place and functioning properly. 7 Note the voltage on the power source. AAmstamp equipment runs on standard 115V A/C. The M-2000 Machine draws 5.5 amperes while the Air-2000 draws 7.0 amperes. 8 AAmstamp equipment should not be used while under the influence of alcohol and/or drugs. 9 WARNING!! The Air and Titan Machines are air operated and caution should be exercised when working around the imprinting area to avoid serious injury. 2
4 Read this Owners Guide first. UNPACKING YOUR NEW AAMSTAMP IMPRINTER (Please read this entire manual completely before proceeding with this section.) Reference Page numbers have been included in this section to make finding appropriate information easier. Unpack and inspect all equipment, accessories and supplies. Place the 2000 Series Machine on a table capable of supporting 100 or more pounds. Customer MUST retain the shipping box and custom packing materials as they are Required for all machine returns. This includes Warranty, repair and upgrades. Aamstamp Machine will not accept machines shipped in any container not supplied with the machine. If you need to return your machine and have not retained its packaging, a new box and packaging Must be purchased, including Shipping. Install Foil Guide Arms. See diagram on page 4. Large washer goes behind rear arm. Install Machine Handle. You must retract safety slider on Air/Titan machines. See Figure XX. Plug the 2000 Series Machine into a standard 115Vac/220Vac electrical outlet, Depending on your machines factory configuration. Turn on power switch located on power cord Choose the appropriate alignment tools for your job. See pg. 22. Select the appropriate cushion board, if necessary. See pg. 18. Do Not allow type to contact table plate as damage to type will occure. Load foil see instructions on page 11. Insert the typeholder into the typehead. See page. Set the digital temperature controller to 220 degrees. Most products print in the range between 220 and 280. Allow the machine to warm up for a period of 3-5 minutes. Large type holders may take up to 5 minutes to reach the proper temperature. See pg XX for instructions on setting the desired temperature. On the Air/ Titan, the regulator must be turned down to 0 psi for set-ups and manual printing. See page XX for directions to adjusting the regulator. Begin printing by pulling down the machine handle. Control quality of print by varying pressure and dwell (duration of print). See page XX for examples of the printing triangle. AIR2000 & TITAN2000: Machine Handle MUST be removed before use. Begin printing by pressing the foot or two-hand activation switch(s). Safety shield must be in the lowered position. Be sure your hands are clear and that the product is appropriately lined up under the typehead. Be sure that the typehead and type/die holders have adequate clearance and will not collide with any of the setup alignment tools such as the 10x12 base plate. Control the quality of print by varying the pressure and dwell (duration of print). 3

5 M-2000 Machine Handle Foil Tension Roller Release Lever Ram Bar Foil Advance Adjustment Foil Spool Foil Advance Housing Type Head Type Holder Handle Foil Guide Bars Foil Guide Knob Table Plate Digital Temperature Controller 4

6 AIR-2000 AIR-2000 Half Ton Air Cylinder Pressure Gauge Pressure Regulator Knob Dwell Timer Foil Tension Roller Release Lever Foil Advance Adjustment Foil Spool Foil Advance Housing Type Head Type Holder Handle Safety Shield Foil Guide Bars Table Plate Digital Temperature Controller 5
7 TITAN-2000 Titan-2000 One Ton Air Cylinder Pressure Gauge Pressure Regulator Knob Dwell Timer Foil Tension Roller Release Lever Foil Advance Adjustment Foil Advance Housing Foil Spool Type Head Type Holder Handle Safety Shield Foil Guide Bars Table Plate Digital Temperature Controller 6
8 Picture taken from rear of Air-Titan with foil loaded. Foil Advance Knob Foil Tension Roller Release Lever Foil Tension Roller Metal Drive Roller 7
9 Getting Started (Please read this entire manual completely before proceeding with this section.) Reference Page numbers have been included in this section to make finding appropriate information easier. 1. Read this Owners Guide from cover to cover. 2. Unpack and inspect all equipment, accessories and supplies 3. Place the 2000 Series Machine on a table capable of supporting 100 or more pounds. 4. If you ordered a type style, please be aware that certain styles may take extra time to arrive. Use extra caution when opening type, as the type is fragile and the characters can easily fall out of the package. When first opening the package use special care to keep the type in order and place into a type box in the appropriate location to keep letters separate. It can take an extensive amount of time to resort type if it should get mixed up. Also be aware that the amount of type you will receive per character will vary depending on the frequency of it s use in language (For example you will receive more e s then z s). 5. Plug The 2000 Series Machine into a standard 115V electrical outlet. 6. Setup Type / Die Holder: Type is set right-side up and backwards with the typeholder handle to your right. Use character spacers between letters and block or line spacers to fill up blank lines. AAmstamp has special heavy duty spacers available to expedite this. Always make sure the type and dies are sitting flush to the bottom of the typeholder. This ensures a level printing surface. You can use tweezers to make it easier to handle the type when hot. 7. Load Foil. [Pg. #17 ] 8. Insert the typeholder directly into the typehead unless you are using a single line or two line holder. If you are using one of these holders you will need to use the appropriate adapter sleeve. To do this, you first insert the adapter sleeve into the typehead and lock it in place using the retaining lever on the adapter sleeve. Then you can insert the typeholder into the adapter sleeve. [Pg. 9-11] 9. Set the digital temperature controller to (189 ). This should be a good starting point, after which you should gradually increase the temperature to find the ideal setting for your application. Most products print in the range between 220 and 260. [Pg. #20 ] 10 Allow The 2000 Series Machine to warm up for a period of 3 minutes. Large typeholders may take up to 5 minutes to reach temperature. Continued 8
10 Getting Started (continued) 11. Choose the appropriate alignment tools for your job (Gauge Bar Guide, Ribbon Plate, Napkin Guide, Business Card Guide, Match Guide, or Pencil Guide, etc.) and set up the alignment tools on the table plate of the machine. [Pg. #12-15 ] 12. Choose the proper cushion board if necessary. [Pg. #12] 13. M2000: Begin printing by pulling down the machine handle. Control quality of print by varying pressure and dwell (duration of print). [Pg. #20] 14 AIR2000 & TITAN2000: Begin printing by pressing the foot activation switch. Be sure your hands are clear and that the product is appropriately lined up under the typehead. Be sure that the typehead and type/die holders have adequate clearance and will not collide with any of the setup alignment tools such as the 10x12 base plate. Control the quality of print by varying the pressure and dwell (duration of print). [Pg. #20] ADDITIONAL TIPS: In the case of deep leather embossing you can also use a thick piece of foam to gain a deep impression into your leather products. In this case you will be embossing and can not use foil i n this process. Additional Helpful Items Scissors : To Cut excess Foil. Ruler: To measure product and for aligning fixtures. 9

11 AIR-2000 and TITAN-2000 MODELS The AAmstamp Air-2000 and Titan-2000 are the pneumatic air-operated versions of the AAmstamp M-2000 machines. Instead of hand operating the foil press the operator depresses a foot pedal to actuate a pneumatic air-cylinder, which creates pressure to press the typehead into your product.. Using the Air-2000 and Titan-2000 Manually: The Air-2000 and Titan-2000 can also be used manually when the machine handle is inserted into the righthand side of the machine This can be useful especially when aligning the first article to be printed. Please note that the AIR-regulator must be turned to 0 psi in order to operate the machine manually. Be aware that for safety reasons the air-mechanism is disengaged while the handle is inserted. Saftey Features: When using the Air-2000 and Titan-2000 be sure to keep the safety shield on the machine at all times. Keep hands clear from underneath the typehead, typeholders, and typeholder handle while printing. As mentioned above, when the manual operation handle is inserted into the AIR-2000 or TITAN-2000 the air-pneumatics operation of the machine is disabled. Using the AIR-2000 and Titan-2000 Air Drive System: To use the air drive system on the AAmstamp AIR-2000 and TITAN-2000 equipment you must first connect the AAmstamp machine to an air-compressor capable of supplying at least 125 PSI and 1.6 CFM for an AIR-2000 and 2.6 CFM for a TITAN We recommend getting a unit with at least a 3 gallon tank. By having a larger tank you reduce the amount of time the compressor will need to run in order to keep up with the AAmstamp Machine therefore increasing the life of your compressor and reducing the frequency of the run time of the compressor. 1. Connect the air-compressor hose directly to the air-inlet connector as shown in the diagram below. 2. Attach the foot pedal connector cable to foot pedal connector as shown in the diagram below. M-2000 Upgrade The M-2000 can be upgraded to an AIR-2000 or a TITAN-2000 at any time. For more information on upgrades call your AAmstamp Sales Representative. Air Cylinder Air Pressure Regulator Air-Dryer Foot Pedal Air Inlet Connector 10 Foot Pedal Connectors
12 LOADING FOIL It is recommended that you load your foil with the machine turned off and given adequate time to cool down. Loading the foil with the machine hot can result in being accidentally burned. 1. Place foil roll onto foil spool. 2. Place foil spool onto the front foil bracket. 3. Feed the foil underneath both of the foil guide bars. NOTE: Ensure that when loading the foil the adhesive (dull) side is facing down towards the product and the color side is facing up. When looking at the foil from the front of the machine you should see the adhesive side facing you. 4. Continue to feed the foil underneath the rear foil control arm and through the back of the machines. Place the foil over your right index finger, and place your right hand with your index finger extended towards the back of the machine until your index finger touches the location between the two rollers. Then turn the manual foil advance knob on the right hand side of the machine. This should feed the foil through the rollers. If you have trouble getting the foil to start, you may also need to simultaneously push the foil tension roller release lever forward with your left hand while starting the foil with your right hand. This will open the spaces between the rollers and allow you to pinch the foil to get it started. Once the foil is loaded you can also pull the foil tension roller release lever forward to adjust the centering of the foil on the rollers. 5. Feed the excess foil from the back of the machine directly into a box or trash-can for disposal. When it is time to cut the excess foil from the back of the machine make sure to use a pair of scissors. 6. Lock foil spool roller in place using the brass tension spring clips located on the front foil bracket. NOTE:If foil wraps around Tension Roller, use release lever to open gate and unroll foil from rubber roller. Never use a knife or box cutter directly on the rubber tension roller as this will damage the foil advance mechanism. Foil Tension Roller Release Lever Foil Advance Knob Rubber Tension Roller Metal Drive Roller Picture taken from rear of Air-Titan with foil loaded. 11

13 FOIL ADVANCE ADJUSTMENT The 2000 Series Hot Stamping Machines come equipped with a precision foil advance mechanism allowing you to easily adjust the pull of the foil between 0 and 6 inches. To set the foil advance mechanism: 1. Attach the machine handle onto the right side of the machine. If you have an Air-2000 or TITAN-2000, turn the pressure regulator on the back of the AAmstamp Foil Stamper to 0 PSI. 2. Locate the foil advance adjustment slider bar and adjustment knob located on the left side of the machine (See the diagrams at the front of this manual for illustration). 3. Pull the machine handle until the foil advance slider bar is oriented vertically. This will allow the slider bar to move more freely. 4. Loosen the foil advance knob. DO NOT remove this knob entirely. 5. Push the slider bar down to increase the amount of foil pull and up to reduce it. You will need to experiment with your product and prints to find the ideal setting for this adjustment. You can determine this by watching the amount of space between the prints on the used foil as it comes out of the machine. 6. Tighten the adjustment knob firmly to lock setting into place. 7. If you have an AIR-2000 or TITAN-2000, remove the machine handle. Foil Advance Slider Bar Adjustment Knob 12
14 HEAT, PRESSURE AND DWELL Heat Temperature is controlled by using the digital temperature controller located on the bottom front of the machine. TEMPERATURE SETTING The AAmstamp 2000 Series is equipped with a high quality digital heat controller and 550 watt Heater which is designed to precisely hold any desired temperature up to 400 degrees. Temperatures Above 350 are seldom used for foil printing and may melt some brands of type. To set the temperature of the machine, simply hold down the Yellow up or down arrow buttons to reach the desired temperature. Note that it takes the machine approximately 5 minutes to warm up when cold and can take up to 5 minutes to heat a new typeholder when it is placed into the machine. NOTE: *** THE MOST COMMON OPERATING TEMPERATURE RANGE IS BETWEEN 190 AND 300 DEGREES Pressure On the hand operated M-2000 the pressure is controlled by the operator as he or she pulls down the machine handle. Additionally the operator can adjust the leverage of the handle by loosening the black handle lock knob and then sliding the handle up and down. Retighten the knob onto any one of the four notches in the handle to lock the handle in place. On the AIR-2000 and TITAN-2000 the pressure is controlled pneumatically and can be adjusted with the pressure regulator knob on the rear of the air box. To adjust, pull out slightly on the knob, and turn until gauge on front indicates desired pressure. Push in to lock knob. On air operated models, inserting the handle disables the automatic operation, the handle must be removed to allow automatic operation. Remember that you need to apply enough pressure to fully imprint your type and die setup into your product. Larger print areas or hard materials require more pressure. Dwell Dwell is the amount of time the hot type is in contact with the foil and the product to be printed. On the Hand Operated M-2000, the user controls the dwell time by the length of time the handle is pulled. On the air operated AIR-2000 and Titan-2000 machines, the dwell time is controlled by adjusting the dwell timer knob located on the front, upper right hand corner of the machine. The three aspects that control the quality of the foil imprint are heat, pressure and dwell. These three aspects form the heat, pressure and dwell triangle (see diagram). For example, you can increase the dwell and use less pressure. You will need to experiment with your first printed article to determine the best combination of heat, pressure and dwell. 13
15 MORE HELPFUL HINTS 1. Always line up your print area before you feed your foil. This makes it easy to line up your product with the typehead. 2. Always do a test print on scrap paper to check the spelling and set up. 3. After you have put your typeholder into the typehead to get hot, but before you start printing remove the typeholder and retighten the screws. This will help keep your text from falling out of the holder. 4. When you have finished a print job, remove the typeholder from the typehead and loosen the screws so the type can cool under no pressure. This will help your type last longer and help stop elongating of the type. 5. Always fill the typeholder completely with spacers. Do not leave empty space in the typeholder. Heat will not get to all areas of the typeholder if there are air spaces. 6. When using an open chase typeholder. use 72 pt spacers to fill in the big areas. This will make set up very fast. AAmstamp offers special aluminum bar and block spacers for this purpose. TECHNICAL SUPPORT If you cannot get a print to come out and you have already tried changing the temperature, pressure, dwell, and/or cushion boards, call customer service at (888) Our staff will be happy to help you in any way we can! 14
16 Typeholders and Die Holders What is Type? Type are individual letters, numbers and symbols that get loaded into a typeholder which gets placed in the head of the machine for printing. Type sets are available in a wide variety of styles called fonts and can come in upper case, lower case, numbers, punctuation, Spanish accents or as a complete set. What are dies and emblems? Stock Dies AAmstamp Machine Company has a large selection of stock dies available which can be seen in our literature packet or via our website at Custom Dies AAmstamp Machine Company can manufacture custom dies. Simply provide AAmstamp with clean clear black and white line artwork via (sales@aamstamp.com) or U.S. Mail. (Note: Fax transmissions are for quotes only, as faxes are not high enough quality for final copies of artwork). Typeholders are used for single and/or multiple lines of text and emblems. Open Chase Holders will print text, emblems and dies mounted onto type high blocks at the same time. Die Plate Holders print dies mounted onto quick change plates. Die Plate Holders allow for the fastest setup time but can not accept loose type, therefore you can not personalize individual items with different names or dates per print. This holder is ideal for logo printing and other medium to high volume print jobs. In addition to artwork, these logos can be designed to print nonchangeable text such as business cards. l8pt Single Line Typeholders (Requires single line adapter) Available in 5 inch printing lengths and used to print a single line of l8pt body type. 18pt Two, Three and Four Line Typeholders (two line version requires a multi-line adapter.) Available in 5 inch printing lengths and used to print lines of l8pt body type. 15

17 36pt Single Line Typeholders (Requires multi-line adapter) Available in 3. 4 & 5 inch printing lengths and used for printing a single line of 36pt body type. Open Chase Typeholders Available in 4 & 5 inch printing lengths and used to print multiple lines of type in all sizes. You can also print text and large type high dies at the same time. Die Plate Holders Die Plate Holders are ideal for company logos and for medium to long run printing jobs. Text and artwork are permanently etched or machined onto a flat piece of magnesium or copper and then mounted onto a quick change plate which can be inserted into a die plate holder for super fast setups. Because the text is part of this artwork you can create whatever type styles you want onto this artwork using your favorite desktop publishing or word processing software, however the text can not be changed without manufacturing a new die. Die Plate Holders are available in the following configurations 1.5 x 4 1 x x 5 3 x 5 4 x x 5 (1 x 5 Die Plate Holder Shown here.) 16

18 Adapter Sleeves Adapter sleeves are used only on our AAmstamp machines when using single line or small typeholders. There is a single line and a multiple line adapter sleeve. The adapter sleeve slides into the typehead and is held in place by the retaining lever below. The typeholder is then inserted into the adapter sleeve. This allows for easy removal of the typeholder while retaining the adapter sleeve inside the typehead. Retaining Lever Retaining Lever Single-Line Adapter Use with single line l8pt type holder Multi-Line Adapter Use with a two-line 18pt, 24pt single-line or 36pt single-line type holder Typehead Adapter Sleeve 17
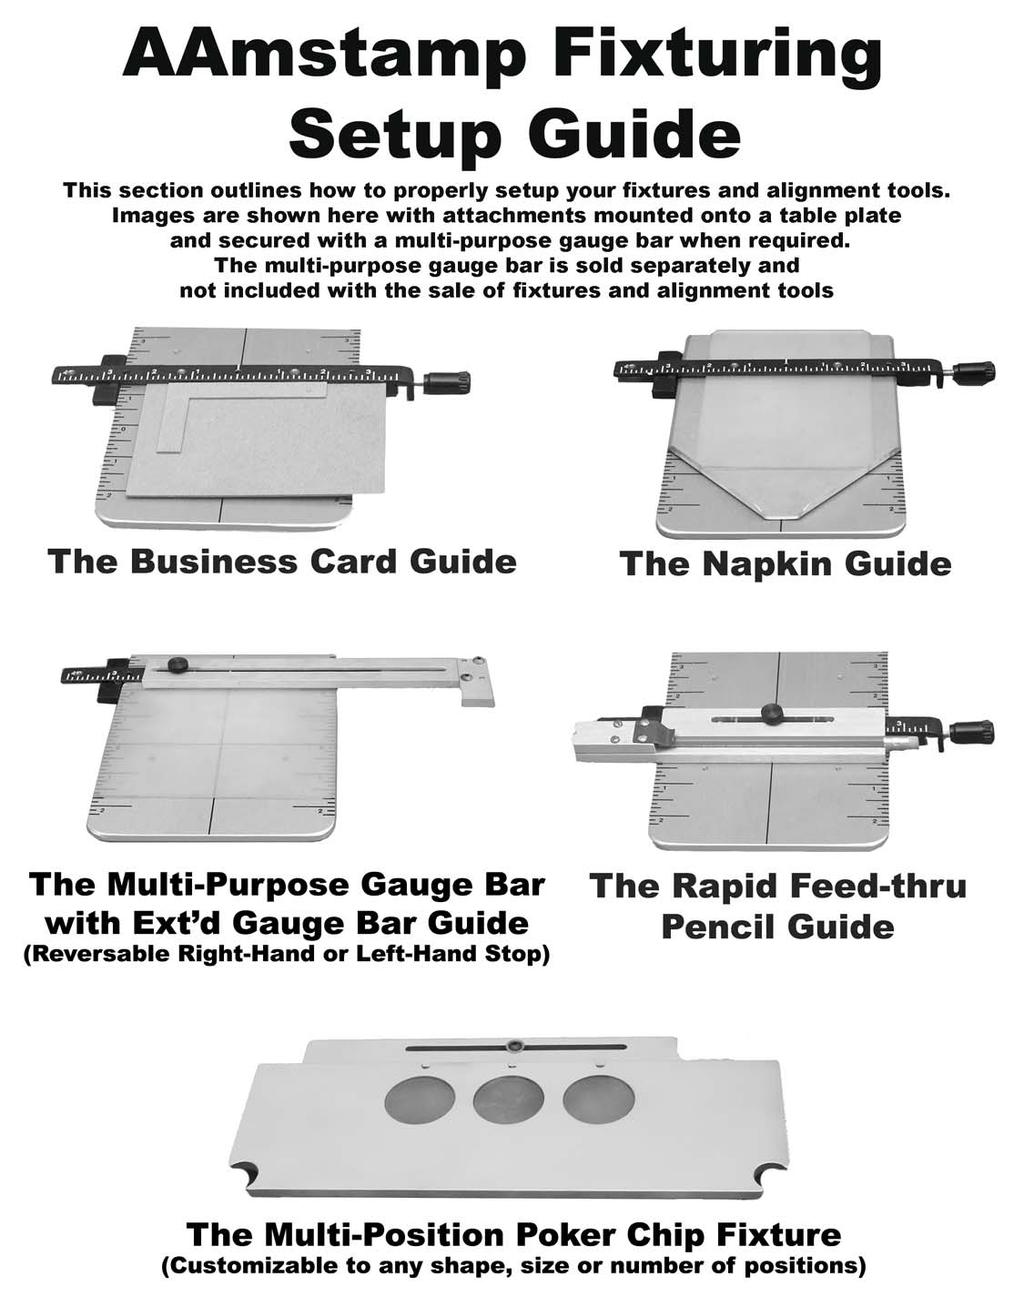
19 CHOOSING THE PROPER CUSHION BOARD Cushion Boards are made of polyurethane material and are designed to give cushion to your products while they are being printed. Cushion boards serve two main purposes. They keep the type and dies from penetrating your product while at the same time allowing the type and dies to gain enough impression to give a crisp clear imprint. HARD CUSHION BOARDS: For printing one or two small lines of type and will keep the type for penetrating your product. MEDIUM CUSHION BOARDS: Used most often, these cushion boards are used for one to four line printing of 18 point or smaller type styles that have medium to bold lettering. SOFT CUSHION BOARDS: Used when doing more then four lines of print or large print areas that contain big bold lettering. AAMSTAMP ATTACHMENTS AAmstamp attachments are designed to make printing particular products easier. AAmstamp attachments are sold separately and are also included in certain machine packages. AAmstamp Currently has the following attachments available: AAmstamp Gauge Bar Business Card Guide Pencil Attachment Guide The 10 x 12 Ribbon and Stationary Plate Napkin Guide Poker Chip Fixture Wire Marking Fixture Shrink Tubing Fixture Multi-Purpose Gauge Bar The multi-purpose gauge bar is used as a hold down clamp for other attachments such as cushion boards. match guides, etc.. The gauge bar will hold the attachments firmly in place and has measuring marks to center the attachment being used. 18
20 PRINTING NAPKINS 1. First place your napkin guide on the table plate and then the proper cushion board using the gauge bar to hold them in position. 2. Before you load your foil, bring the typehead down slowly and adjust the napkin guide by moving it backward or forward to achieve the perfect desired print location on the napkin. 3. Always check to see that the gauge bar is clear from being hit by the typeholder and then tighten the napkin guide by turning the gauge bar hold down knob. AAmstamp also offers a special napkin guide cushion board that makes it far easier to print large areas on napkins. 19
21 PRINTING PENCILS Attach the pencil attachment to your gauge bar using the black thumb screw provided with the pencil attachment. Attach the gauge bar to the table plate. Insert the line up slug into a single line typeholder and bring the machine handle down slowly so that the line up slug fits in the center of the pencil attachment. Tighten the gauge bar to secure the pencil attachment. Remove the typeholder with the line up slug and insert the typeholder with text. Pencil Alignment Slug Pencil Guide PRINTING MATCHES AND BUSINESS CARDS You can print matches in two ways. either straight or angled across the cover. Choose the desired match guide for your print job. You will not need a cushion board when printing matches. Attach the match guide to the table plate using your gauge bar. Before loading the foil, pull the handle slowly down to line up the guide with your typeholder and then tighten the gauge bar to secure the guide. You can also use your straight match guide for printing business cards Gauge Bar Match Guide Match Book Table Plate 20

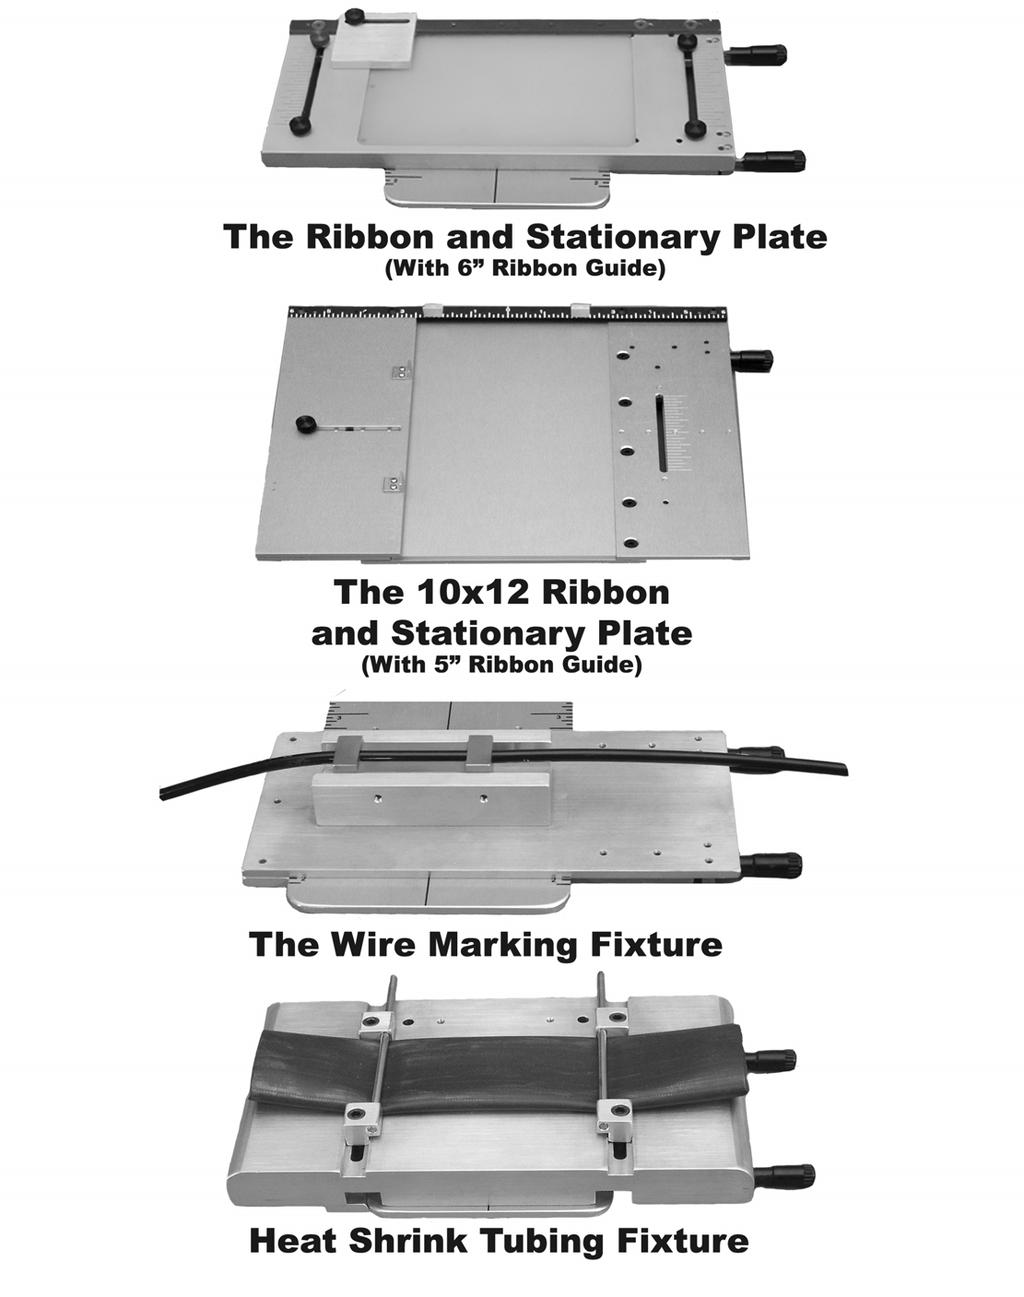
22 THE 10 X 12 RIBBON AND STATIONARY BASE PLATE The AAmstamp 10x12 Ribbon and Stationary Plate offers you the most flexibility in printing ribbon and stationary. This plate is commonly used for printing ribbon or stationary such as business cards, postcards, greeting cards and objects such as photo albums, folders and portfolios. Setup Instructions for printing ribbon: 1. Align the top edge of the 10x12 plate to the 5 1/4 line on the table plate of the machine. Then lock the plate in place using the clamp knob on the top-right side of the 10x12 plate. 2. When printing ribbon you should remove the side adjustment plate from the 10x12 base plate. 3. Load the ribbon onto the AAmstamp Ribbon Spindle. Place the ribbon spindle to the right side of the 10x12 base plate so that the ribbon can be easily fed through the plate. 4. Loosen all four of the ribbon guide slider adjustment knobs located on the bottom side of the 10x12 plate. 5. Feed the ribbon through the 10x12 plate. Feed the ribbon from underneath the main base plate and bring it up through the open slot on the right hand side, then continue across the cushion board and then down through the slot on the left hand side. 6. Now bring the top and bottom sliders on both sides of the 10x12 plate down to meet your ribbon. Check the location of the ribbon to be sure that the your print will be centered on the ribbon by pulling the machine operating handle down while lining up the ribbon (If you are using an AIR machine be sure to adjust the pressure regulator to 0 PSI so that you can pull the handle). Make sure that both sides of the ribbon are even, by lining it up against the incremental marks engraved on the main plate. 7. Tighten the ribbon guide slider adjustment knobs. SETUP COMPLETE. Setup Instructions for printing stationary, books and albums: 1. Slide the 10x12 plate over the table plate of the machine. You can either align the vertical position by eye or use the formula: PAGE MARGIN + 1/2 (STOP RULER) + (PRINT HEIGHT / 2). Lock the 10x12 plate in place using the clamp knob on the top-right side of the plate. 2. Attach the side adjustment plate to the right or left side of the 10x12 plate. This plate acts as a right hand or left hand stop when printing stationary products. If you would like to center your print, divide the width of your product in half and align the side adjustment plate to that location using the stop ruler on the top of the 10x12 plate. For example if you are trying to center an 8.5 wide sheet of paper you would set the side adjustment plate to SETUP COMPLETE. THE 10X12 RIBBON AND STATIONARY PLATE Stationary Stop Guides Stop Ruler Side Adjustment Plate Side Plate Adjustment Knob Clamp Knob Ribbon Slot Main Plate 22 Cushion Board
23 23
24 24
25 **** EQUIPMENT WARRANTY **** AAmstamp Machine Company warrants its 2000 Series Machine Series Equipment for a period of 3 Years (36 Months) from the date of purchase. We warrant our accessories and fixtures for a period of 90 Days from the date of purchase. These warranties are extended solely to the original purchaser. Our sole obligation under this warranty is to repair or replace the defective merchandise, at our option, after our verification that stated defects are not resulting from one of the below listed excluded items. No other warranty, expressed or implied, is given. Any warranty implied by law including warranties for any particular purpose or merchantability is limited to a duration of one year from the date of purchase. Excluded from this warranty are defects resulting from improper application or installation, abuse, misuse, disassembly, alteration, unauthorized attempts at repair, accidental or negligent use, or removal, defacement or alteration of equipment, original identification, accessories or other circumstances beyond our direct control. This warranty specifically excludes consequential or indirect damages, damage to product or loss of prospective profits. Defects discovered after three years will be deemed ordinary wear and tear. AAmstamp Machine Company requires for the length of this warranty that all repairs or upgrades of our equipment be performed by AAmstamp authorized personnel only. We further strongly recommend that all future repairs or upgrades of our equipment should be performed by AAmstamp authorized personnel only. The Above warranties are subject to extension. For information on extended warranties please contact your Representative or AAmstamp Customer Service at ****Return Policy**** All returns must be made within 3 days of the receipt of the product as verified by United Parcel Services Online Tracking System. All returns must be properly packaged in the original packaging and have a return authorization number marked on the outside of the box. Authorization numbers can be obtained by either contacting your local representative or Customer Service. Any return or box not having a return authorization number on it will be refused. All returns other than defective merchandise will be charged a 25% restocking fee. ****Exclusion **** AAmstamp does not warranty or guarantee type, foils or any other consumables. 25
60In. Ceiling Fan. Owner s Manual
 60In. Ceiling Fan Owner s Manual WARNING: Read carefully and understand all ASSEMBLY AND OPERATION INSTRUCTIONS before operating. Failure to follow the safety rules and other basic safety precautions may
INSTALLATION MANUAL. Touchless Paper Towel Dispenser Questions/Accessories/Parts (USA/Canada)
") Touchless Paper Towel Dispenser INSTALLATION MANUAL Questions/Accessories/Parts (USA/Canada) REGISTER ONLINE AT 1-866-599-7066 www.cleancutdispenser.com 1 IMPORTANT SAFEGUARDS SAVE THESE INSTRUCTIONS When
Touchless Paper Towel Dispenser INSTALLATION MANUAL Questions/Accessories/Parts (USA/Canada) REGISTER ONLINE AT 1-866-599-7066 www.cleancutdispenser.com 1 IMPORTANT SAFEGUARDS SAVE THESE INSTRUCTIONS When
High-Velocity Floor Fan
 High-Velocity Floor Fan Owner s Manual WARNING: Read carefully and understand all ASSEMBLY AND OPERATION INSTRUCTIONS before operating. Failure to follow the safety rules and other basic safety precautions
ASG EZ-9000GR Tape Dispenser User Manual ASG #66136
 ASG EZ-9000GR Tape Dispenser ASG #66136 Revision Date: 03/27/18 1 Read Before Use Warnings and Cautions The safety guidelines in this instruction manual must be observed in order to prevent injury to the
OPERATING MANUAL Gfp 255C Please read this manual carefully before operating!
 OPERATING MANUAL Gfp 255C Please read this manual carefully before operating! Unpacking, assembly, and operating videos are available at www.gfpsmoothstart.com 1 Table of Contents Gfp 255C March 2015 Contents
1 supply. Belt Sander INSTRUCTION MANUAL. y::;:,' mm (3") MODEL 9900B. Specifications. DOUBLE INS ULATlO N. Continuous. Belt speed 1.
 MODEL 9900B. Specifications. DOUBLE INS ULATlO N. Continuous. Belt speed 1.") Belt Sander 76 mm (3") MODEL 9900B INSTRUCTION MANUAL DOUBLE INS ULATlO N Specifications Belt size Belt speed rating I Continuous (Input) y::;:,' supply Power cord 76 mm x 533 mm (3") x (2") 360m /min.
Belt Sander 76 mm (3") MODEL 9900B INSTRUCTION MANUAL DOUBLE INS ULATlO N Specifications Belt size Belt speed rating I Continuous (Input) y::;:,' supply Power cord 76 mm x 533 mm (3") x (2") 360m /min.
D O U B L E A U G E R M O R TA R M I X E R OWNER S MANUAL
 D O U B L E A U G E R M O R TA R M I X E R OWNER S MANUAL WARNING: Read carefully and understand all INSTRUCTIONS before operating. Failure to follow the safety rules and other basic safety precautions
45 Wide Format Hot and Cold Laminator
 45 Wide Format Hot and Cold Laminator 1 IMPORTANT SAFEGUARDS OPERATING INSTRUCTIONS TCC1200 When using electrical machines, basic precautions should always be followed to reduce the risk of electric shock
OWNER S MANUAL CAVN SERIES SELF CONTAINED RETRACTABLE NOZZLE VACUUM SEALER WITH GAS PURGE
 OWNER S MANUAL CAVN SERIES SELF CONTAINED RETRACTABLE NOZZLE VACUUM SEALER WITH GAS PURGE WHAT S IN THE PACKAGE? This Operation Manual. (1) Vacuum Sealer. (1) E-(unit size) Heating Element, inside the
OWNER S MANUAL CAVS SERIES SELF CONTAINED RETRACTABLE NOZZLE VACUUM SEALER
 OWNER S MANUAL CAVS SERIES SELF CONTAINED RETRACTABLE NOZZLE VACUUM SEALER WHAT S IN THE PACKAGE? This Operation Manual. (1) Vacuum Sealer. (1) E-(unit size) Heating Element, inside the manual sheet protector.
OPERATING INSTRUCTIONS MIGHTYLAM 2700 ROLL LAMINATOR
 OPERATING INSTRUCTIONS MIGHTYLAM 2700 ROLL LAMINATOR TABLE OF CONTENTS Safety Messages and Electrical Safeguards...3-4 Introduction... Laminator Features...5 Specifications...5 Intial Set-up...6 Operating
OWNER S MANUAL AVN SERIES RETRACTABLE NOZZLE VACUUM SEALER WITH GAS PURGE
 OWNER S MANUAL AVN SERIES RETRACTABLE NOZZLE VACUUM SEALER WITH GAS PURGE WHAT S IN THE PACKAGE? This Operation Manual. (1) Vacuum Sealer. (1) E-(unit size) Heating Element, inside the manual sheet protector.
100In. High Volume Ceiling Fan. Owner s Manual
 100In. High Volume Ceiling Fan Owner s Manual WARNING: Read carefully and understand all ASSEMBLY AND OPERATION INSTRUCTIONS before operating. Failure to follow the safety rules and other basic safety
HEDMAN DI-50. Endorser Instructions. Hedman DI-50 Operators Guide
 HEDMAN DI-50 Endorser Instructions Hedman DI-50 Operators Guide 25-0132-20 TABLE OF CONTENTS 1. INTRODUCTION...1 1.1 DI-50 Description...1 1.2 Items Included...1 1.3 Safety Terms...2 1.4 Safety Precautions...3
22In. Oscillating Pedestal Fan. Owner s Manual
 22In. Oscillating Pedestal Fan Owner s Manual WARNING: Read carefully and understand all ASSEMBLY AND OPERATION INSTRUCTIONS before operating. Failure to follow the safety rules and other basic safety
PORTABLE HAND POWER THREADER 1/2-2
 PORTABLE HAND POWER THREADER 1/2-2 Read this Operator s Manual carefully before using this tool. Failure to understand and follow the contents of this manual may result in electrical shock, fire and/or
Bob-White Systems: AUTOMATED BOTTLE FILLER
 Bob-White Systems: AUTOMATED BOTTLE FILLER PRODUCT CAPPER MANUAL General Safety Rules WARNING: READ ALL INSTRUCTIONS. Failure to follow the safety rules listed below and other basic safety precautions
Gfp 400 Series August Gfp 463 TH. Please read this manual carefully before operating!
 OPERATING MANUAL Gfp 455 TH Gfp 463 TH Please read this manual carefully before operating! 1 Table of Contents Gfp 400 Series August 2015 Contents Page 1. Introduction 3 2. Important Safety Instructions..
Mini-Rooter Operating Instructions
 Mini-Rooter Operating Instructions For 1-1/4 through 4 lines (30mm 100mm) Your Mini-Rooter is designed to give you years of trouble-free, profitable service. However, no machine is better than its operator.
PORTABLE HAND POWER THREADER 1/2-2
 PORTABLE HAND POWER THREADER 1/2-2 Read this Operator s Manual carefully before using this tool. Failure to understand and follow the contents of this manual may result in electrical shock, fire and/or
USER S OPERATING AND INSTRUCTION MANUAL
 Grand Rapids, Michigan, U.S.A. 49504-5298 USER S OPERATING AND INSTRUCTION MANUAL MODEL 1508-NLG SELF-ACTUATING TRAY LIDDER 1508S20000CV2 INDEX SAFETY INSTRUCTIONS... 1508S20002 SET UP... 1508S20003 OPERATING
Product instruction manual Easymount Wide Format Laminators
 Product instruction manual Easymount Wide Format Laminators The Easymount has been designed to be user friendly, however we strongly recommend you take a few minutes to read through this manual to ensure
PS-2/ES Automated pack & tag machine with IndES fastening system
 English Manual PS-2/ES Automated pack & tag machine with IndES fastening system Contents 1. Introduction 2. Important Safety Instructions 3. PS-2/ES 4. Unpacking the machine 5. Setting up the machine 6
20In. Oscillating Wall-Mount Fan. Owner s Manual
 20In. Oscillating Wall-Mount Fan Owner s Manual WARNING: Read carefully and understand all ASSEMBLY AND OPERATION INSTRUCTIONS before operating. Failure to follow the safety rules and other basic safety
Cable Drum Machine. Operation Manual 40 SERIES. Cleans 2" to 4" lines up to 75' N O T F O R R O O T S
 Cable Drum Machine Operation Manual 40 SERIES Cleans 2" to 4" lines up to 75' Used For: Sinks, Showers & Floor Drains N O T F O R R O O T S WARNING - Read All Instructions, When Using Electric Tools, Basic
INSTALLATION INSTRUCTIONS. WOOD BLINDS 1-3/8, 2 and 2-3/8 SLAT SIZES. COMPOSITE FAUX WOOD BLINDS 2 and 2-1/2 SLAT SIZES
 INSTALLATION INSTRUCTIONS WOOD BLINDS 1-3/8, 2 and 2-3/8 SLAT SIZES COMPOSITE FAUX WOOD BLINDS 2 and 2-1/2 SLAT SIZES POLYMER FAUX WOOD BLINDS 2 and 2-1/2 SLAT SIZES STANDARD CORDLESS LIFT Thank you for
Instruction Manual Hydraulic Crimping Tool
 Instruction Manual Hydraulic Crimping Tool 902-480 Due to continuing improvements, actual product may differ slightly from the product described herein. Read this material before using this product. Failure
Easy-Lam School Budget Roll Laminator
 DO NOT DISCARD BOX! (If for any reason you need to ship your machine back and you discard your box you will be responsible for purchasing another one plus any freight charges to ship the box to you) Easy-Lam
INSTALLATION INSTRUCTIONS. WOOD BLINDS 1-3/8, 2 and 2-3/8 SLAT SIZES. FAUX WOOD BLINDS 2 and 2-1/2 SLAT SIZES
 INSTALLATION INSTRUCTIONS WOOD BLINDS 1-3/8, 2 and 2-3/8 SLAT SIZES FAUX WOOD BLINDS 2 and 2-1/2 SLAT SIZES STANDARD CORDLESS LIFT Thank you for your purchase. This blind has been custom built for you
KENSOL 25 Manual ATTENTION! KENSOL PRESS OPERATORS IMPORTANT SAFETY PRECAUTIONS
 Manual ATTENTION! KENSOL PRESS OPERATORS IMPORTANT SAFETY PRECAUTIONS The head of your KENSOL PRESS is driven by either a hand lever or an air cylinder. In order to perform a roll leaf stamping operation,
Bead Roller Operating, Servicing, and Safety Instruction Manual
 Bead Roller Operating, Servicing, and Safety Instruction Manual CAUTION: Read and Understand These Operating, Servicing, and Safety Instructions, Before Using This Machine. 1-800-67-26 10 Cooperative Way
Camarillo 52 Ceiling Fan
 Owner s Manual Camarillo 52 Ceiling Fan Part # 269263, 269259, 269287 Model # 32091, 32092, 32087 Exclusively Distributed by: HD Supply Facilities Maintenance, Ltd. Atlanta, GA 30339 2017 Made in China
SOLO OWNERS MANUAL, OPERATING INSTRUCTIONS & INSTALLATION INSTRUCTIONS
 SOLO OWNERS MANUAL, OPERATING INSTRUCTIONS & INSTALLATION INSTRUCTIONS READ MANUAL BEFORE OPERATING SYSTEM Read the owner s manual thoroughly before operating to ensure the most efficient use of the system.
WHEATGRASS JUICER C O M M E R C I A L. INSTRUCTION MANUAL Model No
 COMMERCIAL PRODUCTS ATTENTION If any components of this unit are broken, do not operate properly, or for product returns, please contact Pragotrade at 1-800-814-4895 Outside the U.S. call 440-638-3131.
HW-17 Record Cleaning Machine Setup and Instruction Manual
 HW-17 Record Cleaning Machine Setup and Instruction Manual VPI Industries, Inc., 77 Cliffwood Ave. #3B, Cliffwood, NJ 07721 Phone: 732-583-6895, Email: Sales@vpiindustries.com http://www.vpiindustries.com
Please read this manual before using the machine. Please keep this manual within easy reach for quick reference.
 DA-927A DA-928A INSTRUCTION MANUAL Please read this manual before using the machine. Please keep this manual within easy reach for quick reference. TWIN NEEDLE / THREE NEEDLE FEED OFF THE ARM DOUBLE CHAIN
20 High velocity Air
 20 High velocity Air Circulator 66878 Set up and Operating Instructions Distributed exclusively by Harbor Freight Tools. 3491 Mission Oaks Blvd., Camarillo, CA 93011 Visit our website at: http://www.harborfreight.com
ASTRO ENVELOPE FEEDER AMC FOR HEIDELBERG PRINTMASTER INSTALLATION AND OPERATING INSTRUCTIONS
 ASTRO ENVELOPE FEEDER AMC-2000-17 FOR HEIDELBERG PRINTMASTER INSTALLATION AND OPERATING INSTRUCTIONS INTRODUCTION Thank you for purchasing the Astro Envelope Feeder. It is fast, efficient, reliable, and
1 HP Air Mover. Owner s Manual
 1 HP Air Mover Owner s Manual WARNING: Read carefully and understand all ASSEMBLY AND OPERATION INSTRUCTIONS before operating. Failure to follow the safety rules and other basic safety precautions may
3-1/2 Gallon Parts Washer
 3-1/2 Gallon Parts Washer Model 38347 Assembly and Operating Instructions 3491 Mission Oaks Blvd., Camarillo, CA 93011 Copyright 1998 by Harbor Freight Tools. All rights reserved. No portion of this manual
Instant Hot Water Dispenser Owner s Manual
 Model Hot1 Instant Hot Water Dispenser Owner s Manual Installation, Care & Use Instalacion, cuidado & uso Installation, soin et utilisation WHAT YOU SHOULD KNOW BEFORE YOU BEGIN For your satisfaction and
Bentley II 13 in Ceiling Fan Owner s Manual. Bentley II Ventilador de Techo de 33 cm Manual del Propietario
 Bentley II 13 in Ceiling Fan Owner s Manual Bentley II Ventilador de Techo de 33 cm Manual del Propietario 326 960 Bentley II by Hampton Bay 13 Bentley II Ceiling Fan by Hampton Bay Thank you for purchasing
SUTTON 52 CEILING FAN
 SUTTON 52 CEILING FAN MODELS #50188, 50189, 50190 Español p. 19 Questions, problems, missing parts? Before returning to your retailer, call our customer service department at 1-877-361-3883, Monday - Thursday,
ATD /8 Electric Drill
 ATD-10538 3/8 Electric Drill Tool specifications: Rated Voltage: (V) 120 Rated Frequency: (Hz) 60 Rated current: (A) 3.3 No-load Speed: (RPM) 0-2700 Speed Selection: Yes Right/Left Rotation: Yes Chuck
Cable Drum Machine. Operation Manual 110ES SERIES. Cleans 1 1/4" to 3" lines up to 25'
 Cable Drum Machine Operation Manual 110ES SERIES Cleans 1 1/4" to 3" lines up to 25' Used For: Sinks, Showers &Tub Drains WARNING - Read All Instructions, When Using Electric Tools, Basic Safety Precautions
150 WATT PORTABLE CLAMP LIGHT 35149
 150 WATT PORTABLE CLAMP LIGHT 35149 ASSEMBLY & OPERATING INSTRUCTIONS 3491 Mission Oaks Blvd., Camarillo, CA 93011 Visit our Web Site at www.harborfreight.com Copyright 2006 by Harbor Freight Tools. All
USER MANUAL. PEDESTAL FAN (16 Inch)
") USER MANUAL PEDESTAL FAN (16 Inch) ACFP1016 Hydrofarm.com TABLE OF CONTENTS OVERVIEW 2 PARTS LIST - (WHAT S IN THE BOX) 3 IMPORTANT SAFEGUARDS 4 ASSEMBLY INSTRUCTIONS 4 ASSEMBLY 4 ELECTRIC SCHEMATIC DIAGRAM
USER MANUAL PEDESTAL FAN (16 Inch) ACFP1016 Hydrofarm.com TABLE OF CONTENTS OVERVIEW 2 PARTS LIST - (WHAT S IN THE BOX) 3 IMPORTANT SAFEGUARDS 4 ASSEMBLY INSTRUCTIONS 4 ASSEMBLY 4 ELECTRIC SCHEMATIC DIAGRAM
OPERATING MANUAL Gfp 800 Series
 OPERATING MANUAL Gfp 800 Series Please read this manual carefully before operating! 1 Contents Table of Contents Page 1. Introduction 3 2. Important Safety Instructions.. 3 3. Installation Safeguards..
Torrena 42 Ceiling Fan
 Torrena 42 Ceiling Fan Owner s Manual Part # 269268, 269269 Model # 32096, 32097 Exclusively Distributed by: HD Supply Facilities Maintenance, Ltd. Atlanta, GA 30339 2017 Made in China If you are experiencing
SOVEREIGN W Grass Trimmer (Model: GT2317) Instruction Manual. Important - Please read these instructions fully before starting assembly
 Instruction Manual. Important - Please read these instructions fully before starting assembly") SOVEREIGN 2937573 250W Grass Trimmer (Model: GT2317) Instruction Manual After Sales Support UK/Ireland 0345 640 0800 Web www.argosspares.co.uk Important - Please read these instructions fully before starting
SOVEREIGN 2937573 250W Grass Trimmer (Model: GT2317) Instruction Manual After Sales Support UK/Ireland 0345 640 0800 Web www.argosspares.co.uk Important - Please read these instructions fully before starting
ELECTRIC FIREPLACE HEATER WITH SINGLE GLASS DOOR
 ELECTRIC FIREPLACE HEATER WITH SINGLE GLASS DOOR Model 91797 ASSEMBLY and Operating Instructions Visit our website at: http://www.harborfreight.com Read this material before using this product. Failure
Lifetime Limited Warranty
 Hampton Bay Lifetime Limited Warranty The retailer warrants the fan motor to be free from defects in workmanship and material present at time of shipment from the factory for a lifetime after the date
75 Sheet Micro-Cut Shredder With CD/DVD Slot
 75 Sheet Micro-Cut Shredder With CD/DVD Slot Model #:PS8500MXW User s Manual PID 011496-109338 Rev. 130712 2 All brand name and trademarks are the property of their respective own companies USER S RECORD:
INSTALLATION INSTRUCTIONS. Aluminum Blinds - Standard - - Lift & Lock -
 1 INSTALLATION INSTRUCTIONS Aluminum Blinds - Standard - - Lift & Lock - 1 Deluxe 1 Traditional 1 Value & 1 Basic 2 Macro Thank you for your purchase. This blind has been custom built for you from the
ELSTON 52 CEILING FAN
 ELSTON 52 CEILING FAN MODEL #10290 Español p. 21 Questions, problems, missing parts? Before returning to your retailer, call our customer service department at 1-877-361-3883, Monday - Thursday, 8 am -
1217A Operating Instructions
 1217A Operating Instructions Reversible Motor Friction Fed Conveyor Stacker Easy Disassembly Adjustable Folds Counter Available MADE IN USA SPECIFICATIONS Paper Weight.28 Lbs. Bond, 90Lbs. Cover, 135Lbs.
INSTRUCTION MANUAL. 05/13/03 Part # TITAN Rollbag TM MODEL 1055
 INSTRUCTION MANUAL 05/13/03 Part #701042 TITAN Rollbag TM MODEL 1055 TABLE OF CONTENTS How to use this manual... Read manual first... Safety information... Requirements... Location... Power... Unpacking
OPERATING AND SETTING MANUAL
 COMPLETE SOLUTIONS FOR ON-DEMAND CD AND DVD PRODUCTION Speed Wrap Case Wrapper for CD or DVD Cases OPERATING AND SETTING MANUAL TP 000 156-1 - Thank you for purchasing a JMV Robotique Speed Wrap OPERATING
Product instruction manual Easymount Wide Format Laminators
 Product instruction manual Easymount Wide Format Laminators The Easymount has been designed to be user friendly, however we strongly recommend you take a few minutes to read through this manual to ensure
Here is what comes in your box:
 Here is what comes in your box: We recommend that you pull everything out of the box and lay it out. We have grouped the drawn components below with the hardware you ll need for those parts. The screws
Xaact Spot. Xaact Hot Spot
 Xaact Spot & Xaact Hot Spot INFORMATION & OPERATING INSTRUCTIONS READ AND UNDERSTAND THESE INSTRUCTIONS BEFORE OPERATING THE MACHINE 78-00012 Rev. 101211 1 CONTENTS: Machine Specifications............
FAUX WOOD BLINDS 2 & 2-1/2 SLAT SIZES
 INSTALLATION INSTRUCTIONS FAUX WOOD BLINDS 2 & 2-1/2 SLAT SIZES STANDARD RECTANGULAR Thank you for your purchase. This blind has been custom built for you from the highest quality materials. To avoid errors
KENSOL FRANKLIN 500, 1000 & 2000 PARTS AND INSTRUCTION MANUAL
 KF 500 KF 1000 KF 2500 Reprinted by Page 1 Phone: 714.547.0194 Description Table of Contents Page Warranty 3 Warning 4 Standard Test of Safety Items 5 Advantages of Hot Stamping 6 Vertical Stamping 7 Press
18 INCHES, OSCILLATING STAND FAN
 To Buy: Contact Sylvane at 800-934-9194 or visit www.sylvane.com For Product Support: Contact Soleus Air at (888) 876-5387 18 INCHES, OSCILLATING STAND FAN OWNER S MANUAL Model # FSM-45 PLEASE READ AND
Instruction Manual Item No.: V~, 60Hz
 Energy- Saving Mode Portable AC 8,000 BTU Model: MW-O-08C Montgomery Ward Customer Service 1112 7th Avenue, Monroe, WI 53566 8:00 am to Midnight, Monday through Friday Wards.com 1 888 557 3848 Instruction
Instruction Manual. Dogeroo, Super Dogeroo, and Mini Dogeroo
 Instruction Manual Dogeroo, Super Dogeroo, and Mini Dogeroo Model No. 8102, 8103, 8108 10700 Medallion Drive, Cincinnati, Ohio 45241-4807 USA Part No. 87793 SAFETY PRECAUTIONS Page 2 INSTALLATION INSTRUCTIONS
Instruction Manual. Nacho Cheese Dispenser and Warmer
 Instruction Manual Nacho Cheese Dispenser and Warmer 10700 Medallion Drive, Cincinnati, Ohio 45241-4807 USA 2013 Gold Medal Products Co. Part No. 36060 SAFETY PRECAUTIONS Page 2 INSTALLATION INSTRUCTIONS
20-GALLON MOBILE PARTS WASHER OWNER S MANUAL
 20-GALLON MOBILE PARTS WASHER OWNER S MANUAL WARNING: Read carefully and understand all INSTRUCTIONS before operating. Failure to follow the safety rules and other basic safety precautions may result in
Power Pack Service Manual
 Power Pack Service Manual MMPP4301-EP MMPP4301 MMPP4301-WC MMPP4301-PKG MMPP4301-PKG-WC MMPP4302 MMPP4302-WC MMPP4302-PKG MMPP4302-PKG-WC MMPP4303-PKG MMPP4303-PKG-WC MMPP4303-PKG-3 MMPP4305-PKG MMPP4305-PKG-WC
OPERATOR S MANUAL. For BURLY ATTACHMENTS
 OPERATOR S MANUAL For BURLY ATTACHMENTS April 4, 2018 Clod-Buster Topsoil Screener LIMITED WARRANTY Burly Attachments, LLC warrants to the original Purchaser, all products, manufactured by it, to be free
Easy Rooter. Operating Instructions
 Easy Rooter Operating Instructions For 3" through 10" lines (75mm 250mm) Your Easy Rooter is designed to give you years of trouble-free, profitable service. However, no machine is better than its operator.
Owner's Manual Paramount 65X GRAPHIC LAMINATION PRODUCTS
 Owner's Manual Paramount 65X GRAPHIC LAMINATION PRODUCTS Royal Sovereign International Inc. Please read and retain these instructions. To register your product, please go to www.royalsovereign.com www.royalsovereign.com
Food Slicer. USK AS V~ 60Hz 130W. Fax Front cover page (first page) Assembly page 1/12
 Assembly page 1/12") Food Slicer www.kalorik.com USK AS 35432 120V~ 60Hz 130W Front cover page (first page) Assembly page 1/12 IMPORTANT SAFEGUARDS When using electrical appliances, basic safety precautions should always be
Food Slicer www.kalorik.com USK AS 35432 120V~ 60Hz 130W Front cover page (first page) Assembly page 1/12 IMPORTANT SAFEGUARDS When using electrical appliances, basic safety precautions should always be
3 Scotch Mini-Weld Adhesive System User s Manual
 3 Scotch Mini-Weld Adhesive System User s Manual The Scotch Mini-Weld Adhesive System Includes The items shown below: Contents of User s Manual Ordering Replacement Parts... 1 Important Safety Information...
D105M COMPONENT IDENTIFICATION
 D105M COMPONENT IDENTIFICATION 1 35 TON HYDRAULIC CYLINDER REMOVABLE PUSHER OIL FILL AND VENT PLUG PNEUMATIC START/STOP SWITCH 110 VOLT HYDRAULIC PUMP ADJUSTABLE RAM RETRACTION STOP MICRO-CRIMP ADJUSTER
Hydraulic Crimping Systems
 ORIGINAL INSTRUCTIONS Hydraulic Crimping Systems Customer Manual 409-35004 04 OCT 17 Rev A SAFETY PRES READ THIS FIRST!... 2 SAFETY PRES AVOID INJURY READ THIS FIRST!... 3 1. INTRODUCTION... 4 2. INSPECTION
6 Sheet Strip-Cut Shredder for Home/Office
 6 Sheet Strip-Cut Shredder for Home/Office Model #:PS580SC User s Manual PID 011395-109315 Rev. 130928 2 All brand name and trademarks are the property of their respective companies USER S RECORD: To provide
OWNER'S MANUAL RSL MyBinding.com 5500 NE Moore Court Hillsboro, OR Toll Free: Local:
 OWNER'S MANUAL RSL-2701 Read all instructions carefully before use. For any Customer Support needs please choose the Customer Support tab on www.royalsovereign.com topic TABLE OF CONTENTS page 1. Introduction...
Product instruction manual Easymount Wide Format Laminators
 Product instruction manual Easymount Wide Format Laminators The Easymount has been designed to be user friendly, however we strongly recommend you take a few minutes to read through this manual to ensure
Installation Instructions. For the 18 Built-In Dishwasher and Front Color Panels
 Installation Instructions For the 18 Built-In Dishwasher and Front Color Panels Printed in USA 154232102 Before You Begin DO NOT INSTALL DISHWASHER UNTIL YOU HAVE READ ALL INSTRUCTIONS. FOR YOUR SAFETY,
5HP CYCLONE DUST COLLECTOR MANUAL
 5HP CYCLONE DUST COLLECTOR MANUAL LAGUNA TOOLS 2072 Alton Parkway Irvine, California 92606 Ph: 800.234.1976 www.lagunatools.com 2018, Laguna Tools, Inc. LAGUNA and the LAGUNA Logo are the registered trademarks
DUVAL 52 CEILING FAN MODELS #50201, Español p. 19 LISTED FOR DAMP LOCATION
 DUVAL 52 CEILING FAN MODELS #50201, 50206 Español p. 19 LISTED FOR DAMP LOCATION Questions, problems, missing parts? Before returning to your retailer, call our customer service department at 1-877-361-3883,
CYCLONETM ROTARY TUMBLER INSTRUCTION GUIDE
 Lyman CYCLONETM ROTARY TUMBLER INSTRUCTION GUIDE Visit our complete Lyman website at www.lymanproducts.com WARNING: This appliance is not intended for use by persons (including children) with reduced physical,
RECHARGEABLE CYCLONIC VACUUM CLEANER WITH POWER BRUSH
 RECHARGEABLE CYCLONIC VACUUM CLEANER WITH POWER BRUSH VC 44287 22.2 DC Li-Ion Batteries www.kalorik.com VC 42475-170120 1 PARTS DESCRIPTION 1. 3 in 1 accessory 2. Charging Station 3. Tube set 4. Motorized
40 GALLON PARTS WASHER
 40 GALLON PARTS WASHER 94994 ASSEMBLY & OPERATING INSTRUCTIONS Due to continuing improvement, actual product may differ slightly from the product described herein. 3491 Mission Oaks Blvd., Camarillo, CA
PS /2 Inch Angle Grinder Assembly & Operating Instructions READ ALL INSTRUCTIONS AND WARNINGS BEFORE USING THIS PRODUCT.
 PS07214 4 1/2 Inch Angle Grinder Assembly & Operating Instructions READ ALL INSTRUCTIONS AND WARNINGS BEFORE USING THIS PRODUCT. This manual provides important information on proper operation & maintenance.
Product instruction manual Easymount Wide Format Laminators
 Product instruction manual Easymount Wide Format Laminators The Easymount has been designed to be user friendly, however we strongly recommend you take a few minutes to read through this manual to ensure
7165 Dust Collector Owner s Manual
 7165 Dust Collector Owner s Manual Oliver Machinery M-7165 12/2016 Seattle, WA Copyright 2003-2017 info@olivermachinery.net www.olivermachinery.net CONTENTS IMPORTANT SAFETY RULES----------------------------------------------------------------
H-16.5 Record Cleaning Machine Setup and Instruction Manual
 H-16.5 Record Cleaning Machine Setup and Instruction Manual VPI INDUSTRIES, INC., 77 CLIFFWOOD AVE., #3B, CLIFFWOOD, NJ 07721 PHONE: 1-732-583-6895, FAX: 1-732-946-8578 http://www.vpiindustries.com 1 Table
UNIQUE USER FRIENDLY MICROMETER STYLE ADJUSTMENT
 The series hose crimper with Micrometer Style Adjustment and 62 tons of crimping force has the capability to crimp hoses up -¼" -2 wire, -¼" 4 wire, and " 6 wire. UNIQUE USER FRIENDLY MICROMETER STYLE
Owner s Manual & Safety Instructions
 Owner s Manual & Safety Instructions Save This Manual Keep this manual for the safety warnings and precautions, assembly, operating, inspection, maintenance and cleaning procedures. Write the product s
Waimea ShowerSpa MODEL #1034
 Start your day in a whole new way! GENERAL DESCRIPTION The Waimea ShowerSpa is sure to make waves with any décor. Wash away your worries with a unique cascading waterfall shower head, a 6" rain style shower
Glendale 52 in Ceiling Fan Owner's Manual. Glendale Ventilador de Techo de 1.32 m Manual del Propietario
 Glendale 52 in Ceiling Fan Owner's Manual Glendale Ventilador de Techo de 1.32 m Manual del Propietario Hampton Bay Lifetime Motor Warranty The retailer warrants the fan motor to be free from defects in
20 GALLON PARTS WASHER
 20 GALLON PARTS WASHER 94702 ASSEMBLY & OPERATING INSTRUCTIONS Due to continuing improvement, actual product may differ slightly from the product described herein. 3491 Mission Oaks Blvd., Camarillo, CA
Floss Machine Instruction Manual Model #3024
 Part No. 42543 Revised: May 2004 Floss Machine Instruction Manual Model #3024 Cincinnati, OH 45241-4807 USA Safety Precautions Floss Machines 2 INTRODUCTION Your Floss Machine warranty is described on
DA-9270 TWIN NEEDLE (THREE NEEDLE) FEED OFF THE ARM DOUBLE CHAIN STITCHER. English
 FEED OFF THE ARM DOUBLE CHAIN STITCHER. English") TWIN NEEDLE (THREE NEEDLE) FEED OFF THE ARM DOUBLE CHAIN STITCHER English Thank you very much for buying a BROTHER sewing machine. Before using your new machine, please read the safety instructions below
TWIN NEEDLE (THREE NEEDLE) FEED OFF THE ARM DOUBLE CHAIN STITCHER English Thank you very much for buying a BROTHER sewing machine. Before using your new machine, please read the safety instructions below
Power-Vee Operating Instructions
 Power-Vee Operating Instructions For 1-1/4 through 3 lines (30mm 100mm) Your Power-Vee is designed to give you years of trouble-free, profitable service. However, no machine is better than its operator.
Power-Spin. Drain Cleaner Operator s Manual
 Drain Cleaner Operator s Manual Power-Spin! Read this Operator s Man ual carefully before using this tool. Failure to understand and follow the contents of this manual may result in electrical shock, fire
CT-930CH, CT-930LPCH and CT-940CH TABLE OF CONTENTS
 CT-930CH, CT-930LPCH and CT-940CH PA22141A01 Rev. 03 5-2012 REMOTE HYDRAULIC COMPRESSION TOOLS Panduit Corp. 2012 TABLE OF CONTENTS SYSTEM SPECIFICATIONS... 1 OPTIONAL ACCESSORIES... 2 PRECAUTIONS AND
e Bath Fan with Light User s Guide
 e Bath Fan with Light User s Guide abfl100rnl, BFL125RNL Item Stock Number(s): BFL100RNL, BFL125RNL IMPORTANT INSTRUCTIONS - OPERATING MANUAL READ AND SAVE THESE INSTRUCTIONS READ CAREFULLY BEFORE ATTEMPTING