SAFETY, INSTALLATION AND MAINTENANCE INSTRUCTIONS
|
|
|
- Cori Davis
- 6 years ago
- Views:
Transcription


1 AQUARIUM LED SAFETY, INSTALLATION AND MAINTENANCE INSTRUCTIONS FULL ONLINE INSTRUCTIONS:
2 READ AND FOLLOW ALL SAFETY INSTRUCTIONS KEEP THESE INSTRUCTIONS FOR FUTURE REFERENCE DANGER- To avoid possible electric shock, special care should be taken since water is employed in the use of aquarium equipment. For each of the following situations, do not attempt repairs yourself; return the appliance to an authorised service facility or discard the appliance. This product is designed for indoor use and the illumination of aquariums only and will provide a good and safe service life, provided that these instructions are followed. Failure to do so may result in serious personal injury or property damage. If you are in any doubt about the installation or operation of this product, please consult a qualified and experienced electrician. Check that the voltage and frequency rating on the product label is the same as your electrical supply before proceeding further. WARNING- To guard against injury, basic safety precautions should be observed, including the following:. Disconnect all appliances in the aquarium from the mains supply socket before putting your hands in the water or maintaining the Luminaire. Never pull on the cord to remove the plug from the socket, instead grasp the plug and pull to disconnect.. Always support the Luminaire when fitting to the tank frame, or adjusting the suspension height to physically prevent it from falling into the water.. Do not operate the Luminaire less than 0cm above the aquarium water level.. Regularly check the security of all your Luminaire legs or suspension mechanism parts.. Do not look directly into the light source.. Do not touch the light source while it is on. Allow the light source to cool before touching it. 7. The Luminaire can get HOT. Never touch the Luminaire while it is operating, allow adequate time for it to cool before attempting any maintenance. 8. If the appliance falls into water DO NOT reach for it. Disconnect from the power supply before attempting to retrieve it. If electrical components of the appliance get wet unplug the appliance immediately. If the appliance shows any sign of water leakage disconnect from the power supply immediately. 9. To avoid the possibility of the appliance plug or socket getting wet, position it to one side of the wall socket. A drip loop should be arranged for each cord connecting to a power socket. The drip loop is that part of the cord below the level of the socket, or connector, which prevents water travelling along the cord to the socket. Illustration. 0. Do not use the appliance other than for its intended use. The use of non-arcadia attachment or accessories is not recommended and may cause an unsafe condition.. Do not install or store the appliance where it will be exposed to extremes of weather or temperatures below freezing. Illustration. DRIP LOOP TECHNICAL SPECIFICATIONS Code Model LED nominal wattages Dimensions Suits aquarium sizes AH0M / AH0F S-0 w x, W x x 0 x mm 0 0cm AHM / AHF S- W x, W x 0 x 0 x mm 0cm AH0M / AH0F S-0 W x, W x 0 x 0 x mm 0-90cm AH90M / AH90F S-90 W x 8, W x 80 x 0 x mm 90 0cm AH0M / AH0F S-0 W x, W x 0 x 0 x mm 0 x 0cm M = Marine / F = Freshwwater ELECTRICAL SPECIFICATION CONSTRUCTION Input voltage 00~0VAC Body Aluminum Input current A IP rating IP Operating frequency 0/0Hz Operating temperature 0 0oC Output voltage VDC Storage temperature -0 0oC Output current.a
3 LED SPECIFICATIONS - MARINE AH0M AHM AH0M AH90M AH0M MARINE AH0M AHM AH0M AH90M AH0M Channel LED Specification Qty Qty Qty Qty Qty CREE WHITE XTE K W CREE ROYAL BLUE XTE 0-0nm W CREE BLUE XPE -8nm W 0 UV 00-0nm W VIOLET 0-0nm W CREE RED XPE 0-0nm W CREE GREEN XPE 0-nm W
4 LED SPECIFICATIONS - FRESHWATER AH0F AHF AH0F AH90F AH0F FRESHWATER AH0F AHF AH0F AH90F AH0F Channel LED Specification Qty Qty Qty Qty Qty CREE WHITE XTE K W CREE WHITE 00-00K W CREE BLUE XTE -8NM W 0 CREE RED XPE 0-0NM W 9 CREE ROYAL BLUE XTE 0-0NM W CREE GREEN XPE 0-NM W

5 PHYSICAL INSTALLATION.. a. b. c. d..... e. f.. Series LED. Screw set. Suspension wire Support rods. Support brackets. Power adapter Select a suitable site close to your electricity supply. Do not connect appliance to the mains supply socket during installation. This appliance is for indoor use only. Ensure the appliance is kept in a ventilated area and away from other heat sources. Make sure that the light from the appliance is aimed within the aquarium. MOUNT USING SUPPORT RODS MOUNT USING SUSPENSION WIRE. d. NOT PROVIDED 7.. f a. e.. a.. c.. b.. e. CONSTRUCT IN SEQUENCE Insert legs into mounting brackets and tighten screws. Slide legs into unit and mount on tank. Tighten screws to lock legs in position Minimum height above water 0cm CONSTRUCT IN SEQUENCE Ensure unit is supported while making connections. Ensure all connections are secure before removing support Minimum height above water 0cm ELECTRICAL INSTALLATION This appliance must be earthed and the circuit must be protected by a suitable fuse! Before installing, ensure that the rated voltage and frequency of the Luminaire match that of your power supply, and that the mains lead plug is fully compatible with your mains supply socket. If in doubt, please return the unit to the point of purchase for verification. This appliance should be earthed to minimise the possibility of electric shock. This appliance is equipped with an electric cord having an equipment earth wire conductor and a grounding type plug. The plug must be plugged into a mains supply socket that is installed and earthed in accordance with all appropriate codes and ordinances. Ensure the mains cable has a drip loop as shown in illustration. Connect unit to power supply and mains as illustration. Illustration
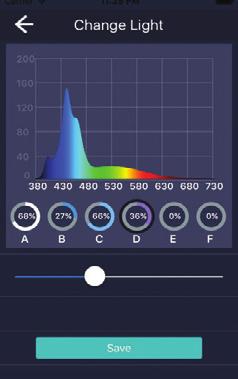
6 UNIT INTERFACE Brightness Power On/Off Dimmer Displays current light level for each channel. Turns unit on/off. Allows user to set light level for each channel to compare colour combinations and light levels. Unit returns to programmed setting on exit. Timer System Sunrise Sunset Sunlight Moonlight Preview System Time Wi-Fi Configuration Load default Temperature Pilot Light Language Version Sets time for sunrise. Sets time for sunset. Sets light levels for sunlight. Sets light levels for moonlight. Runs through new settings. Allows current date and time to be changed. Allows change between one to one Wi-Fi connection and connection to Local Wi-Fi for connecting multiple units. Allows loading of default timer settings. SPS and LPS coral settings available. Displays chassis temperature and fan usage as a percentage. Turns On/Off pilot light. Allows language selection. English or Chinese. Displays latest version level of unit. TROUBLE SHOOTING Indicator Light The light is on but goes out after about seconds. Flicker for two times and go out for one time. Flicker for three times and go out for one time. Irregular flickering. Goes out. Meaning The lamp WIFI works at Hotspot Mode. The lamp WIFI works at Access Network Mode, in the status waiting for configuration. The lamp WIFI works at Access Network Mode, and an error has occurred while connecting to a home router, the reason may be that the password is wrong or the router is turned off. WIFI is transmitting data. WIFI has no data transmitted. FAULT DIAGNOSIS Fault Phenomenon Cause Analysis Solution The screen doesn t display Buttons failure The WIFI signal cannot be found APP cannot control the lamp The light doesn t operate according to the timed set brightness The power plug is not properly inserted or the switch is not turned on. Bad connection between unit and power supply. There is foreign material on the buttons panel. The lamp WIFI is configured to Access Network Mode. The device is too far away from the lamp or WLAN is not enabled. The device is not connected to the lamp WIFI. The network signal is bad or the lamp connection is disconnected. The timing data set is not successfully saved. The time on the lamp is not correctly set. Check the plug and turn on the switch. Check connector. Remove the foreign material and keep the panel clean. Reconfigure it to Hotspot Mode. Check the device WLAN and enable. Reconnect to the lamp WIFI. Reconnect the lamp in the APP. Reset the data and save. Reset the time.
7 DOWNLOAD APPLICATION Connect Go to connect screen Press Change Wi-Fi to find device Click on device (number as label on end of unit) Enter password 78 Return to Connect screen Tick check box for device Click Connect at bottom of screen Manual Allows user to set light level for each channel to compare colour combinations and light levels. Unit returns to programmed setting on exit Tap channel to be changed and use slider to set level Lighting Allows use to set lightning effects Tap start and end times to set duration Use slider to set intensity Tick Run Now check box to preview Click Save to retain settings Manual Allows user to set cloud effects Tap start and end times to set duration Use slider to set intensity Tick Run Now check box to preview Click Save to retain settings TIMER Allows user to program on/off times and % light output for each channel. Up to dimming points can be set. Unit will dim up or down between settings at a rate of % per 0 seconds. It is advisable to write down times and percentages required before setting up program. Preprogrammed settings are available for SPS and LPS corals. Programs are displayed graphically and can be previewed. Click Timer + to add number of dimming points Press and hold time on each dimming point to set time. Press and hold channels to alter percentage light out puts Press eye symbol or use slider to preview program Press Save to confirm program. Program will not be initiated until saved. Press Schem to select a preset program SYSTEM Update app Update light software Restore default - Returns unit to factory defaults Novice guide - Provides some basic advice FAQ Lamp lights- Turns pilot light on/off


8 LED REPLACEMENT Ensure unit is disconnected from the mains before starting. Risk of electric shock or damage to LEDs if the unit is worked on while connected to the mains. Remove the cover plate and end plates. Remove lens. Remove LED to be changed. Plug in new LED. Ensure it is same wattage as previous LED. Damage may occur if wrong wattage LED is fitted. Ensure LED is properly seated before replacing lens and covers as above

9 REPLACEMENT PLUG-IN LED S Code Description Barcode AHPGBL Blue -8nm W AHPGGR Green 0-nm W AHPGRB Royal Blue 0-nm W AHPGRB Royal Blue K W 8007 AHPGRE Red 0-0nm W 8009 AHPGUV UV 0-0nm W AHPGVT Violet 0-0nm W AHPGWH White K W AHPGCW Cool White 00-00K W 800 LED LENSES Code Description Barcode AHL90 S 90 degree lens 8000 AHL0 S 0 degree lens 800 For a list of spare items available, please refer to the Arcadia Products website for the most up to date information. MAINTENANCE Caution! Disconnect all appliances in the aquarium from the mains supply before putting your hands in the water or maintaining the Luminaire. Always support the Luminaire when adjusting its height or mountings and physically prevent it from falling into the water. Regularly check the security of all parts of your hanging mechanism or mountings. Cleaning: Disconnect from the power supply and wait till the Luminaire is cool before cleaning, this not only avoids smears but also reduces the likelihood of any damage from moisture entering the Luminaire. Both the appearance and performance of your Luminaire can benefit from regular cleaning. A damp cloth is normally adequate to clean the body. Excessive deposits of salt on the underside can reduce light output and are a sign that the Luminaire is too close to the aquarium. These can be removed with the careful use of a damp cloth ensuring that water does not enter the Luminaire body. END OF USE RECYCLING INFORMATION This product is covered by European Directive 00/9/EC. Please do not dispose of this product or replacement lamps with your normal household waste. To safely and responsibly dispose of the product please ensure all the components are deposited in the appropriate areas of your local civic recycling centre. Proper disposal of this product helps to prevent potential negative consequences for the environment and human health. All electronic components (this includes the power supply and the lamp holder) should be placed in the electronic waste recycling area. If a fluorescent lamp is provided with this product it contains mercury, and cannot be disposed of with normal household waste; it should be deposited in the fluorescent lamp recycling area at your local civic recycling centre or taken to any approved recycling point for fluorescent lamps. JB00
Halo Programmable LED Aquarium Light. Quick Start Guide
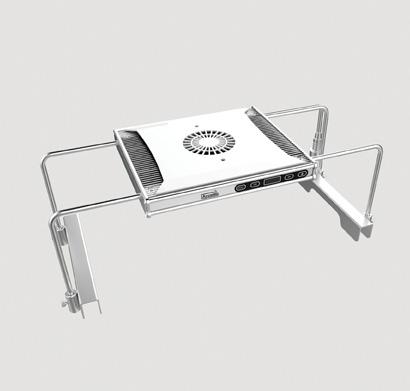
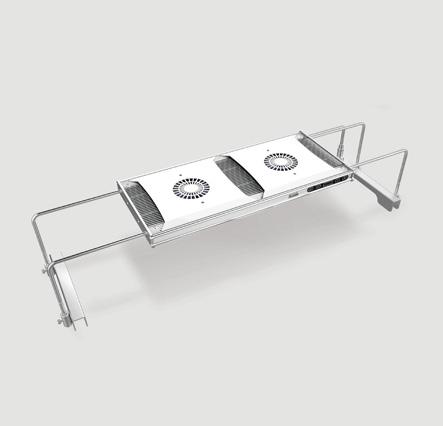
 Halo Programmable LED Aquarium Light www.tiaojiou.com Quick Start Guide 1. FEATURES - 25 LED array delivering rich color spectrum - Two groups (channels) of LEDs to optimize the light - Embedded Timers
AquaReef Cube. Inspiring Excellence in Fish Keeping!
 AquaReef 275 Cube Inspiring Excellence in Fish Keeping! www.aquaone.com.au Instruction version: 25/03/2011 Important Safeguards To guard against injury, basic safety precautions should be observed, including
Clamp 4W Clamp 8W. Owner s Manual
 Clamp 4W Clamp 8W Owner s Manual 1 CONTENTS TABLE OF CONTENTS Important Safety Instructions 3-4 Parts Exploded View & Identification Clamp 4 5 Clamp 8 6 Introduction Clamp 4 7-8 Clamp 8 9-10 Getting Started
MariGlo LED. Inspiring Excellence in Fish Keeping! 45 / 60 / 90 / 120.
 MariGlo LED 45 / 60 / 90 / 120 Inspiring Excellence in Fish Keeping! Instruction version: 01/10/2013 Important Safeguards To guard against injury, basic safety precautions should be observed, including
Owner s Manual. High Output T5 Lunar Aqualight. Aquarium Light Fixture. Featuring: Directional Lunar Blue LEDs
 Owner s Manual High Output T5 Lunar Aqualight Aquarium Light Fixture Featuring: Directional Lunar Blue LEDs OwnMan_T5HO_LUNAR.indd 1 6/15/10 10:06 AM IMPORTANT SAFETY INSTRUCTIONS WARNING: To guard against
Owner s Manual Compact Fluorescent Lunar Aqualight
 Owner s Manual Compact Fluorescent Lunar Aqualight Aquarium Light Fixture Featuring: Directional Lunar Blue LEDs IMPORTANT SAFETY INSTRUCTIONS WARNING: To guard against injury, basic safety precautions
100 Series Maxi Internal Filters
 100 Series Maxi Internal Filters Important Safeguards To guard against injury, basic safety precautions should be observed, including the following: 1. Read and follow all safety instructions and important
Aquience 1200/1500 R
 Aquience 1200/1500 R Congratulations, you have purchased one of the fi nest quality aquariums available. This product will give you many years of excellent service when installed and maintained correctly.
Manuel Guide Lighting Fixtures
 Manuel Guide Lighting Fixtures Models: DL-T2424, DL-T3639, DL-T4854 Please read these manuals in their entirety before using these products. Safety Instructions Important Safety Note: To guard against
GENERAL PRECAUTIONS. Do NOT dismantle.
 HPLD Do NOT dismantle. GENERAL PRECAUTIONS Do NOT place near fl ammable or combustible items. Do NOT alter power cord. Unplug from electrical outlet during lightning storms or when unused for long periods
Lighting Placement. Adjusting Mounting Legs
 CONGRATULATIONS Lighting Placement Installation and Usage Adjusting Mounting Legs ALWAYS center light shell over aquarium ALWAYS mount legs on the outside of the aquarium frame. If needed you can remove
Installation & Maintenance Guide
 Installation & Maintenance Guide Internal Mini Skimmer 115 For Model 510114 Skimmer 30 Gallon www.aquaticlife.com Thank you for purchasing an AquaticLife Internal Mini Skimmer for use with your marine
Important Safety Instructions 3-4
 Owner s Manual 1 CONTENTS TABLE OF CONTENTS Important Safety Instructions 3-4 Parts Exploded View & Identification SingleStrip 12 5 SingleStrip 18 6 SingleStrip 24 7 SingleStrip 36 8 SingleStrip 48 9 Introduction
650/1000 Antihalo 650/1000 Fresnel 650/1000 PC 300/500 Antihalo 300/500 Fresnel. User manual. theatre spotlight
 650/1000 Antihalo 650/1000 Fresnel 650/1000 PC 300/500 Antihalo 300/500 Fresnel User manual Musikhaus Thomann Thomann GmbH Hans-Thomann-Straße 1 96138 Burgebrach Germany Telephone: +49 (0) 9546 9223-0
LED Colour Flood 10W / 30W RGB LED floodlight. user manual
 LED Colour Flood 10W / 30W RGB LED floodlight user manual Musikhaus Thomann Thomann GmbH Hans-Thomann-Straße 1 96138 Burgebrach Germany Telephone: +49 (0) 9546 9223-0 E-mail: info@thomann.de Internet:
E-Flow Pumps. Operating instructions
 E-Flow Pumps Operating instructions IMPORTNT SAFETY INSTRUCTIONS WARNING To guard against injury, basic safety precautions should be observed, including the following. 1) READ AND FOLLOW ALL SAFETY INSTRUCTIONS.
aquamanta the experts in aquatic technology
 HFX 70/100/150/200 TM aquamanta the experts in aquatic technology Coldwater Tropical Marine 2+1 year guarantee Instruction Manual Instruction version: 05/06/2012 Technical Information MODEL: HFX 70 HFX
MiniSkim. Inspiring Excellence in Fish Keeping! Instruction version: 17/08/2012.
 MiniSkim 80 Inspiring Excellence in Fish Keeping! www.aquaone.com.au Instruction version: 17/08/2012 Important Safeguards To guard against injury, basic safety precautions should be observed, including
expandable led Installation & Maintenance Guide Product Description Light 48 IN 21.6W 10K/460nm Expandable Light 36 IN 15W 10K/460nm Expandable
 Installation & Maintenance Guide expandable led Light Fixtures Item # Product Description 420243 Light 24 IN 9.6W 460nm Expandable 420245 Light 36 IN 15W 460nm Expandable 420247 Light 48 IN 21.6W 460nm
aquamanta the experts in aquatic technology CH 025/050/100/ 150/200/300 NEW PHOTO Instruction Manual
 aquamanta TM the experts in aquatic technology CH 025/050/100/ 150/200/300 NEW PHOTO Instruction Manual Technical Information Model Wattage Aquarium Volume CH 025 CH 050 CH 100 CH 150 CH 200 CH 300 25W
Monsoon RS400. Operating Instructions Mode d emploi Bedienungsanleitung Manual de Instrucciones Istruzioni per il funzionamento Gebruiksaanwijzing
 Monsoon RS400 Operating Instructions Mode d emploi Bedienungsanleitung Manual de Instrucciones Istruzioni per il funzionamento Gebruiksaanwijzing PT2495 DEUTSCH FRANÇAIS ENGLISH Exo Terra Monsoon RS400
EXPANDABLE 0.5W LED FRESHWATER LIGHT FIXTURES
 INSTALLATION & MAINTENANCE GUIDE EXPANDABLE 0.5W LED FRESHWATER LIGHT FIXTURES Item # Product Description 420269 Light 20 IN 0.5W X 8W Freshwater 420270 Light 24 IN 0.5W X 9.6W Freshwater 420271 Light
CHAETOMAX. 2 in 1 Refugium LED. Owner s Manual 1
 CHAETOMAX 2 in 1 Refugium LED Owner s Manual 1 CONTENTS TABLE OF CONTENTS Important Safety Instructions 3-4 Parts Exploded View & Identification ChaetoMax Refugium LED 5 Introduction Specifications 6 Unpacking
Curv-infrared.com. The Smarter Way. To Heat Your Home. Installation & Operating Instructions For Cürv, Flat, Towel Rail and Mirror Infrared Heaters
 Curv-infrared.com The Smarter Way To Heat Your Home Installation & Operating Instructions For Cürv, Flat, Towel Rail and Mirror Infrared Heaters Safety Precautions Important Notice To Purchaser Before
INDOOR UNIT/OUTDOOR UNIT
 SPLIT TYPE AIR CONDITIONER ENGLISH INDOOR UNIT/OUTDOOR UNIT MODEL RAS-51CHA3/RAC-51CHA3 RAS-63CHA3/RAC-63CHA3 OUTDOOR UNIT INDOOR UNIT RAS-51CHA3 RAS-63CHA3 RAC-51CHA3 RAC-63CHA3 Instruction manual Page
16" and 20" Economy Incandescent Full Hoods Owner s Manual
 16" and 20" Economy Incandescent Full Hoods Owner s Manual Central Aquatics 5401 West Oakwood Park Drive Franklin, WI 53132 May 2015 Aquarium Reflector Model 16" New Economy Incandescent fits 5-1/2 Aquariums.
SP16. 08/50740/1 (UK) - Issue 1
 - Issue 1") SP16 08/50740/1 (UK) - Issue 1 The product complies with the European Safety Standards EN60335-2-30 and the European Standard Electromagnetic Compatibility (EMC) EN55014, EN60555-2 and EN60555-3 These
SP16 08/50740/1 (UK) - Issue 1 The product complies with the European Safety Standards EN60335-2-30 and the European Standard Electromagnetic Compatibility (EMC) EN55014, EN60555-2 and EN60555-3 These
INSTALLATION & USER INSTRUCTIONS
 INSTALLATION & USER INSTRUCTIONS Skålvik LED Electric Stove Skålvik LED Electric Stove All instructions must be handed to the user for safekeeping. Revision A - 12/15 1 I N S TA L L AT I O N & U S E R
Installation manual Anna. In combination with the Smile T230. Manual PW version 2.0
 Installation manual Anna. In combination with the Smile T230. Manual PW version 2.0 Hello Anna. Before there were thermostats. Now there is Anna. Anna works for you and does what she is supposed to do:
IMPORTANT- RETAIN FOR FUTURE REFERENCE CALL:
 GENOA WALL FIREPLACE Assembly instructions Actual product size H56 x W96 x D4cm Need Help? With: Assembly instructions Missing or damaged parts IMPORTANT- RETAIN FOR FUTURE REFERENCE CALL: 0333 777 8999
READ AND FOLLOW ALL SAFETY INSTRUCTIONS
 WELCOME Safety Instructions IMPORTANT SAFEGUARDS WARNING: To guard against injury, basic safety precautions should be observed, including the following: READ AND FOLLOW ALL SAFETY INSTRUCTIONS DANGER:
PARTS & ACCESSORIES INSTALLATION AND SAFETY INSTRCUTIONS ITEM NO.:60010BZGTGLD SAFETY PRECAUTION. Canopy. Downrod. Housing. Transmitter CR2032/3V
 L I G H T I N G INSTALLATION AND SAFETY INSTRCUTIONS ITEM NO.:000BZGTGLD SAFETY PRECAUTION PARTS & ACCESSORIES Canopy Downrod Housing WARNING To make sure power is off before attempting installation. WARNING
Congratulations on the purchase of your new Hoover Smart.
 USER INSTRUCTIONS IMPORTANT SAFETY REMINDERS User s manual - This cleaner should only be used for its intended purpose as described in these instructions. Ensure that these are fully understood before
1.5 GALLON ULTRASONIC HUMIDIFIER MODEL # EE-5303W
 smartdrop Humidifier 1.5 GALLON ULTRASONIC HUMIDIFIER MODEL # EE-5303W If you have any questions about the operation of your ultrasonic humidifier, please contact Crane Customer Care. Toll Free: 888-599-0992
The Ionzyme DFII System
 The Ionzyme DFII System 2 Introduction The Environ IONZYME machine is a patent pending machine which introduces the use of active low frequency Sonophoresis and intensified Iontophoresis treatments. The
FIELD-INSTALLED MOTION ACTIVATED LED DIMMER CONTROL
 FIELD-INSTALLED MOTION ACTIVATED LED DIMMER CONTROL FOR REACH-IN GLASS DOORS AND MULTI-DECK MERCHANDISERS INSTALLATION AND OPERATION MANUAL P/N 05035_A December 008 LED Dimmer Control Installation and
SPLIT TYPE. Instruction manual
 SPLIT TYPE Instruction manual ENGLISH Instruction manual Page 1~24 To obtain the best performance and ensure years of trouble free use, please read this instruction manual completely. 1 SAFETY PRECAUTION
Safety and Instruction Manual
 T10004 Safety and Instruction Manual PLEASE READ CAREFULLY *Subject to registering Your Extended Guarantee online at www.towerhouswares.co.uk. 1.7 Litre Illuminated Glass Kettle 1912 Midland Metal Spinners
Installation Instructions & Operating Manual IMPORTANT
 Installation Instructions & Operating Manual IMPORTANT These instructions should be read carefully and retained for future reference TABLE OF CONTENTS SECTION 1: WARNINGS & ELECTRIC SPECIFICATIONS 1.1
1500W Black Glass Portable Electric Panel Heater KAHTP20BLKA
 1500W Black Glass Portable Electric Panel Heater KAHTP20BLKA Attention Please handle this product with care and inspect it regularly to ensure it is in good working order. If the product, power supply
CELSI ELECTRIFLAME XD
 CELSI ELECTRIFLAME XD Model No.: XD 850 (B-183840) IMPORTANT This appliance can be used by children aged from 8 years and above and persons with reduced physical, sensory or mental capabilities or lack
Clock Radio AJ100. User manual
 Clock Radio AJ100 User manual 1 1 2 5 6 3 4 7 8 9! @ # $ % 0 ^ 2 3 4 English SUPPLIED ACCESSORIES 1 X AC 7.5V adapter (Input: 220-230V ~ 50Hz 30mA, Output: 7.5V 250mA) TOP AND FRONT PANEL (See 1) 1 REPEAT
9 LITRE DESICCANT DEHUMIDIFIER INSTRUCTION MANUAL
 9 LITRE DESICCANT DEHUMIDIFIER INSTRUCTION MANUAL GDDEKD9 Read and retain these instructions for future reference 1 CONTENTS Specifications 2 Where to position 3 Before use 3 Parts 6 Programming Feature
Installation manual Anna. In combination with the Smile T. Manual PW version 2.0
 Installation manual Anna. In combination with the Smile T. Manual PW version 2.0 Hello Anna. Before there were thermostats. Now there is Anna. Anna works for you and does what she is supposed to do: create
Model 1174 Electric Heater User instructions for LED effect 2kw Inset Heater
 200688_6 Page 1 Model 1174 Electric Heater User instructions for LED effect 2kw Inset Heater These instructions should be read carefully and retained for future reference Important Notes This heater must
2kW Wall Mounted Electric Fire Complete with flat glass front panel. Installation Instructions & Operating Manual
 2kW Wall Mounted Electric Fire Complete with flat glass front panel Installation Instructions & Operating Manual GEORGIA Please read the instructions carefully before the installation or use of this electric
Contact Details. Please note that some of the contact details on this PDF document may not be current.
 Contact Details Please note that some of the contact details on this PDF document may not be current. Please use the following details if you need to contact us: Telephone: 0844 879 3588 Email: customer.services@gdcgroup.co.uk
ProStar Ceiling Fan PS52. Installation Instructions Instrucciones de instalación Instructions d installation
 ProStar Ceiling Fan PS52 Installation Instructions Instrucciones de instalación Instructions d installation Read and Save These Safety Precautions. Turn off electricity at main switch before wiring or
INDOOR UNIT/OUTDOOR UNIT
 SPLIT TYPE AIR CONDITIONER INDOOR UNIT/OUTDOOR UNIT MODEL RAS-260GA/RAC-260GA RAS-350GA/RAC-350GA OUTDOOR UNIT INDOOR UNIT RAC-260GA RAS-260GA RAS-350GA RAC-350GA Instruction manual Page 1~24 To obtain
/04.14_00. De Longhi Appliances via Seitz, Treviso Italia
 De Longhi Appliances via Seitz, 47 31100 Treviso Italia www.delonghi.com 5711010841/04.14_00 TRDS4 0820E - TRDS4 1025E DRAGON 4 OIL FILLED RADIATOR DESCRIPTION A L M B C D I F G H E N O 2 INSTRUCTIONS
 Compact, high-power, outdoor-rated, cable-free, battery-powered LED uplight with onboard wireless DMX, infrared remote, and manual control via OLED function menu + Six-unit road-worthy custom charging
PERSONAL COOL MIST ULTRASONIC HUMIDIFIER
 PERSONAL COOL MIST ULTRASONIC HUMIDIFIER MODEL # EE-5949 PLEASE READ AND SAVE ALL INSTRUCTIONS TO ENSURE THE SAFE AND EFFCTIVE USE OF THIS APPLIANCE. TABLE OF CONTENTS Table of Contents P. 1 Safety Instructions
INDOOR UNIT/OUTDOOR UNIT
 SPLIT TYPE INDOOR UNIT/OUTDOOR UNIT ENGLISH MODEL RAS-70YHA / RAC-70YHA OUTDOOR UNIT INDOOR UNIT RAC-70YHA RAS-70YHA Instruction manual Page 1~23 To obtain the best performance and ensure years of trouble
JLBIHD624 60cm Cooker Hood
 JLBIHD624 60cm Cooker Hood User guide 2 Cooker hood user guide Contents Contents 3 Introduction 4 Safety is important 4 In the box 4 Safety information 5 Important safety information 5 Warnings 5 Cautions
Imperial Electric Fires
 Imperial Electric Fires GB IE MODELS: Flamescape II Curvascape II manual & remote. Installation and User Instructions PLEASE READ THESE INSTRUCTIONS CAREFULLY AND RETAIN FOR FUTURE REFERENCE This electric
Read the instructions and keep them safe. Pass them on if you pass the kettle on. Remove all packaging, but keep it till you know the kettle works.
 instructions 2 Read the instructions and keep them safe. Pass them on if you pass the kettle on. Remove all packaging, but keep it till you know the kettle works. important safeguards Follow basic safety
INFRARED IP55 HEATER INSTRUCTIONS FOR: MODEL:- QZWP45N 1. SAFETY INSTRUCTIONS
 INSTRUCTIONS FOR: INFRARED IP55 HEATER MODEL:- QZWP45N Thank you for purchasing a Consort Claudgen product. Manufactured to a high standard this product will, if used according to these instructions and
Series: Convection WiFi
 Series: Convection WiFi Assembly and instruction manual This product is only suitable for well insulated spaces or occasional use. Please read the instructions carefully before use. Take good care of this
Honeywell Durafit LED Retrofit Kit
 Honeywell Durafit LED Retrofit Kit INSTALLATION INSTRUCTIONS LED RETROFIT LUMINAIRE CONVERSION FOR USE ONLY WITH PRODUCTS DESCRIBED AND INSTALLED IN ACCORDANCE WITH THE INSTRUCTIONS PROVIDED WITH THIS
INSTALLATION & USER INSTRUCTIONS
 INSTALLATION & USER INSTRUCTIONS LED ELECTRIC STOVE Christchurch, Dorset BH23 2BT Tel: 01202 588 638 Fax: 01202 499 639 www.ekofires.co.uk e-mail: sales@ekofires.co.uk MODELS COVERED BY THESE INSTRUCTIONS
INDOOR UNIT/OUTDOOR UNIT
 SPLIT TYPE INDOOR UNIT/OUTDOOR UNIT MODEL RAS-72CHA3/RAC-72CHA3 INDOOR UNIT OUTDOOR UNIT RAS-72CHA3 RAC-72CHA3 Instruction manual Page 1~22 To obtain the best performance and ensure years of trouble free
SH3020 USER INSTRUCTIONS
 DEHUMIDIFIER SH3020 USER INSTRUCTIONS GUARANTEE This product is guaranteed for 2 years from the date of original purchase. If any defect arises due to faulty materials or workmanship, the unit will, either
2-ZONE EASYFIT INTRUDER ALARM
 EXTERNAL SIREN MM05 PIR SENSOR DOOR CONTACTS -ZONE EASYFIT INTRUDER ALARM INSTALLATION & OPERATING INSTRUCTIONS IMPORTANT: PLEASE READ THESE INSTRUCTIONS CAREFULLY BEFORE ATTEMPTING TO INSTALL THIS ALARM
Monsoon RS400. Operating Instructions Mode d emploi Bedienungsanleitung Manual de Instrucciones Istruzioni per il funzionamento Gebruiksaanwijzing
 Monsoon RS400 Operating Instructions Mode d emploi Bedienungsanleitung Manual de Instrucciones Istruzioni per il funzionamento Gebruiksaanwijzing PT2495 INDEX Exo Terra Monsoon RS400 High-pressure Misting
Washing Machine. User manual WW9*K5*****/WW8*K5*****/WW7*K5***** Untitled :17:40
 Washing Machine User manual WW9*K5*****/WW8*K5*****/WW7*K5***** Untitled-6 1 2017-12-12 3:17:40 Contents Contents 4 What you need to know about the safety instructions 4 Important safety symbols 4 Important
Instructions for Use. Record Player in Suitcase PARTS:
 PARTS: 1. Lock catch 2. Dust cover 3. Adapter - Use this when playing 45rpm records with cut out centres. 4. Tone arm lift 5. Auto stop control 6. Speed selection - Three speeds for choice: 33.3, 45, 78
PinSpot LED 3W 6,5K PinSpot. user manual
 PinSpot LED 3W 6,5K PinSpot user manual Musikhaus Thomann Thomann GmbH Hans-Thomann-Straße 1 96138 Burgebrach Germany Telephone: +49 (0) 9546 9223-0 E-mail: info@thomann.de Internet: www.thomann.de 24.05.2018,
Girona. Operating Instructions. Glass Panel Heaters. Models: GFP050 W/B GFP075 W/B GFP100 W/B GFP150 W/B GFP200 W/B. A world of expertise
 A world of expertise Operating Instructions These instructions should be read carefully and retained for future use. Note also the information presented on the appliance. Girona Glass Panel Heaters Models:
AIR COOLER WITH LED DISPLAY Model Number: IG9703
 AIR COOLER WITH LED DISPLAY Model Number: IG9703 INSTRUCTIONS FOR USE Thank you for purchasing this product. Please read these instructions carefully before use Trouble with your Air Cooler? Try our troubleshooting
USER'S MANUAL PU SENS 01 (A11) PU SENS 01 (A19) Sensor Control Panel
 PU SENS 01 (A19) Sensor Control Panel") USER'S MANUAL PU SENS 01 (A11) PU SENS 01 (A19) Sensor Control Panel PU SENS 01 CONTENTS Safety requirements... 3 Purpose... 4 Technical data... 4 Overall dimensions [mm]... 4 Mounting and set-up... 5
USER'S MANUAL PU SENS 01 (A11) PU SENS 01 (A19) Sensor Control Panel PU SENS 01 CONTENTS Safety requirements... 3 Purpose... 4 Technical data... 4 Overall dimensions [mm]... 4 Mounting and set-up... 5
2kW UPRIGHT FAN HEATER INSTRUCTIONS FOR USE
 2kW UPRIGHT FAN HEATER Model Number: IG9020 INSTRUCTIONS FOR USE Thank you for purchasing this product Please read these instructions 1 SAFETY INSTRUCTIONS Read and follow all of the instructions even
IMPORTANT- RETAIN FOR FUTURE REFERENCE CALL:
 CORSICA VESSEL FIREPLACE 65573 Assembly instructions Actual product size H00 x W20 x D30cm Need Help? With: Assembly instructions Missing or damaged parts IMPORTANT- RETAIN FOR FUTURE REFERENCE CALL: 0333
O p e r a t i n g I n s t r u c t i o n s
 O p e r a t i n g I n s t r u c t i o n s www.masterblasterfoam.co.uk Page 1 of 10 Contents Page 2 Page 3 Page 4 Page 5 Page 6 Page 7 Page 8 Page 9 Introduction & Features Safety Instructions Warnings,
FIGARO. 08/52543/0 (UK) Issue 1
 Issue 1") FIGARO UK 08/52543/0 (UK) Issue 1 The product complies with the European Safety Standards EN60335-2-30 and the European Standard Electromagnetic Compatibility (EMC) EN55014, EN60555-2 and EN60555-3. These
FIGARO UK 08/52543/0 (UK) Issue 1 The product complies with the European Safety Standards EN60335-2-30 and the European Standard Electromagnetic Compatibility (EMC) EN55014, EN60555-2 and EN60555-3. These
User Instructions for Remote Controlled 2kW Rotisserie Effect Fan Heater Model 1276
 200662_2 Page 1 User Instructions for Remote Controlled 2kW Rotisserie Effect Fan Heater Model 1276 These instructions should be read carefully and retained for future reference. Important Notes These
GigaCore 12. Gigabit Ethernet Switch for the entertainment industry. Quick Start Guide. V2.1.0 Rev5. English
 GigaCore 12 Gigabit Ethernet Switch for the entertainment industry Quick Start Guide V2.1.0 Rev5 English Table of Content Safety Instructions 3 Compliance information 4 Warranty information 5 Registration
Heater Upgrade Instructions
 Heater Upgrade Instructions Important Safety Precautions It is recommended that you plug the chiller into a GFCI outlet at all times. Do not operate SeaChill chillers or any accessory to SeaChill chillers
Ultraviolet Systems UV-C 50 INSTALLATION INSTRUCTIONS & PRODUCT MANUAL
 Ultraviolet Systems Inc. UV-C 50 INSTALLATION INSTRUCTIONS & PRODUCT MANUAL TABLE OF CONTENTS SECTION 1 General Information 1A. Description...1 1B. Specifications...1 SECTION 2 Installation 2A. Pool Preparation...
INDOOR UNIT/OUTDOOR UNIT
 SPLIT TYPE AIR CONDITIONER INDOOR UNIT/OUTDOOR UNIT ENGLISH MODEL RAS-50YHA/RAC-50YHA OUTDOOR UNIT INDOOR UNIT RAC-50YHA RAS-50YHA Instruction manual Page 1~26 To obtain the best performance and ensure
40cm DC Pedestal Fan with WiFi
 Operating Instructions 40cm DC Pedestal Fan with WiFi Item: GCPF315 General Care and Safety Guide Thank you for choosing this Goldair product. This Goldair appliance has been designed and manufactured
INSTALLATION & USER INSTRUCTIONS
 INSTALLATION & USER INSTRUCTIONS LED ELECTRIC STOVE Christchurch, Dorset BH23 2BT Tel: 01202 588 638 Fax: 01202 499 639 www.ekofires.co.uk e-mail: sales@ekofires.co.uk MODELS COVERED BY THESE INSTRUCTIONS
DISHWASHER. Models DW2432 and DW2432SS. Installation Manual. Write Serial Number (on inner door of unit) here:
 here:") DISHWASHER Models DW2432 and DW2432SS Installation Manual Write Serial Number (on inner door of unit) here: Felix Storch, Inc. Summit Appliance Division 770 Garrison Avenue Bronx, New York 10474 www.summitappliance.com
DISHWASHER Models DW2432 and DW2432SS Installation Manual Write Serial Number (on inner door of unit) here: Felix Storch, Inc. Summit Appliance Division 770 Garrison Avenue Bronx, New York 10474 www.summitappliance.com
Installation and operation manual
 Installation and operation manual - + BRC1HHDAW BRC1HHDAS BRC1HHDAK English Table of contents Table of contents 1 General safety precautions 2 1.1 For the user... 2 1.2 For the installer... 2 2 About this
Built in Electric Ceramic Hob. Instruction Manual
 Built in Electric Ceramic Hob Instruction Manual Model number: RHEH1 Opening times: Monday - Friday 8am 6pm & Saturday 9am 1pm or visit us at Contents Safety Instructions 3-4 Before using the appliance
LC1 & 2. Fire Alarm Panel 6\VWHPLQVWDOODWLRQRSHUDWLQJ PDLQWHQDQFH LQVWUXFWLRQV
 LC1 & 2 Fire Alarm Panel 6\VWHPLQVWDOODWLRQRSHUDWLQJ PDLQWHQDQFH LQVWUXFWLRQV ZIRCONLC1 One Zone Conventional Fire Panel ZIRCONLC2 Two Zone Conventional Fire Panel Compliant with EN54-2:1998 & EN54-4:1998
1. Physical Installation 2. In-app Setup 3. Features 4. Troubleshooting 5. Advanced Installation Options
 Spotlight Cam Mount Smart Security at Every Corner of Your Home Your new Spotlight Cam lets you extend the Ring of Security around your entire property. Now, you ll always be the first to know when someone
nova extreme retrofit High Output T5 Lighting Kit
 nova extreme retrofit High Output T5 Lighting Kit Instructions for Model Nova Extreme Retrofit Model#1130-1135 Important Safety Instructions... Page 2 Installation Instructions... Page 4 Warranty... Page
Gallery Electric Fireplaces
 Gallery Electric Fireplaces Homeowner s Installation Instructions & Operating Manual Model: GBI-34, GBI-41 Only use this heater as described in this manual. Any other use is not recommended by the manufacturer,
INDOOR UNIT/OUTDOOR UNIT
 SPLIT TYPE INDOOR UNIT/OUTDOOR UNIT MODEL RAS-80YHA/RAC-80YHA INDOOR UNIT OUTDOOR UNIT RAS-80YHA RAC-80YHA Instruction manual Page 1~22 To obtain the best performance and ensure years of trouble free use,
INSTALLATION GUIDE NZ AU
 DISHWASHER DW60U6I & DW60U2I models INSTALLATION GUIDE NZ AU 1 SAFETY AND WARNINGS 100 lb 45 kg! WARNING! Electrical shock hazard Before installing the dishwasher, remove the house fuse or open the circuit
INSTRUCTIONS NACHO WARMER MODELS: 1995 / 1995S
 Page 1 of 13 INSTRUCTIONS NACHO WARMER MODELS: 1995 / 1995S SAFETY INSTRUCTIONS TECHNICAL DATA INSTALLATION INSTRUCTIONS OPERATION INSTRUCTIONS MAINTENANCE INSTRUCTIONS EXPLODED VIEW / PARTS LIST FAULT
instructions FAN HEATER HVF3533 Please retain these instructions for future reference
 instructions FAN HEATER HVF3533 Please retain these instructions for future reference Description of Appliance The following terms are used throughout the instruction manual Thermostat Function selector
SP1 Wallfire. SP2 Wallfire. SP3 Wallfire. SP8 Wallfire AUS/NZ. 08/19282/2 (AUS & NZ) Issue 2
 Issue 2") SP1 Wallfire SP2 Wallfire SP3 Wallfire SP8 Wallfire AUS/NZ 08/19282/2 (AUS & NZ) Issue 2 The product complies with the Australian/New Zealand Safety Standards AS/NZ S 335.2.30:1997 and 2002 Part 1 also
SP1 Wallfire SP2 Wallfire SP3 Wallfire SP8 Wallfire AUS/NZ 08/19282/2 (AUS & NZ) Issue 2 The product complies with the Australian/New Zealand Safety Standards AS/NZ S 335.2.30:1997 and 2002 Part 1 also
INDOOR UNIT/OUTDOOR UNIT
 SPLIT TYPE INDOOR UNIT/OUTDOOR UNIT MODEL RAS-0EX9K/RAC-0EX9 RAS-3EX9K/RAC-3EX9 OUTDOOR UNIT INDOOR UNIT RAC-0EX9 RAS-0EX9K RAS-3EX9K RAC-3EX9 Instruction manual Page ~36 To obtain the best performance
Installation Instructions
 Installation Instructions Ordering Code: RF32UQT1XX PLEASE READ THESE INSTRUCTIONS BEFORE INSTALLATION OF THE FOLLOWING: 4 STRIP FIXTURES 8 STRIP FIXTURES HARDWIRE 4 STRIP FIXTURES WRAP FIXTURES TROFFER
HINTS AND TIPS Cleaning and maintenance HELPLINE
 43690 rev1 6/3/07 12:49 Page 1 Descaling IMPORTANT: As this appliance is fitted with a concealed element it must be descaled regularly. The frequency of descaling depends on usage and the hardness of the
Multi-Temp Jug Kettle CPK17U
 Multi-Temp Jug Kettle CPK17U Important Safeguards When using electrical appliances, basic safety precautions should always be followed, including the following: 1. The appliance is not intended to be operated
Chilller Arctic Instruction Manual
 Chilller Arctic 1200 Instruction Manual Important Safeguards This appliance is not intended for use by children or infirm persons without supervision. Young children should be supervised to ensure that
Mira Platinum Wireless Controller
 Mira Platinum Wireless Controller These instructions must be left with the user User Guide 1 1105041-W2-H CONTENTS Introduction...3 General...3 Safety Information...3 Control Layout...4 Display Symbols...5