P&HPG5 APRIL Plumbing & Heating Systems. EFFECTIVE: 25th APRIL Product Guide
|
|
|
- Aubrey Walker
- 6 years ago
- Views:
Transcription


1 Plumbing & Heating Systems P&HPG5 APRIL 2011 EFFECTIVE: 25th APRIL 2011 Product Guide April 2011


2 POLYPIPE PLUMBING & HEATING SYSTEMS: Polypipe is the UK s leading and fastest growing manufacturer of plastic plumbing products for hot and cold plumbing and heating systems. Our products serve the domestic market, providing installers and end users with easy to install, reliable products. At Polypipe we have a commitment to delivering products that meet every conceivable need within our chosen market sectors, with each range designed to provide outstanding innovation, performance and value. CONTENTS Versatility, Flexibility and Choice...03 Plastics in plumbing and heating systems...04 Outstanding performance and value...05 Polybutylene pipe...06 Polyplumb system...08 Installing Polyplumb system...10 Polyfit system...12 Installing Polyfit system...14 Polysure system...16 Installing Polysure system...18 Design, Application and Installation Information...21 Extensive support services...31 In this Product Guide any references to generic terms such as the products, our plumbing systems, or similar terms, are intended to refer to Polyplumb, Polyfit and Polysure systems. 02


3 Versatility, flexibility & choice The manufacturer of choice Polypipe is a key player in the UK plumbing market with an unrivalled reputation for innovation, service and value. In recent years, Polypipe has consistently outstripped the overall market growth of plastic plumbing & heating systems as a growing number of merchants, developers, installers and consumers recognise the benefits of the company s product offering. At the heart of the Polypipe range is a firm belief in creating products suited to specific applications. Long since recognised for our Polyplumb and Polyfit ranges, we have now added Polysure as the first radial press fit plumbing system available in UK sizes. All three ranges are fully described in this product guide. Backing up our versatile collection of fitting types is our commitment to polybutylene pipe, which combines to create the most flexible and efficient plumbing and heating solutions available. Polypipe is also recognised for its innovative channel support initiatives, which provide merchants, developers and installers with access to a wide range of market support, including literature, point of sale materials and technical information. With great products, great service and great value, backed by outstanding channel support and a track record for product and market innovation, Polypipe is increasingly becoming the plumbing sector s manufacturer of choice. About Polypipe With an enviable reputation for a broad product range, reliability and value, Polypipe is one of Europe s largest and most innovative manufacturers of plastic piping systems for residential, commercial and infrastructure sectors. People trust Polypipe to deliver tried and tested, cost effective system solutions across the spectrum of construction projects and market sectors. Operating 17 manufacturing and operations sites, Polypipe manufactures over 16,000 SKUs across multiple product sectors for the residential, commercial and infrastructure markets - the widest range available in its market sector. Polypipe meets, and strives to exceed, the changing regulations governing our operations and products. We are proud of our record in introducing new product systems to meet changing environmental and regulatory issues. Polypipe at a glance 1800 employees across UK, Europe and the Middle East 17 manufacturing and operational sites 28 principal brands 16,000 products 100 worldwide patents and designs 550 trademarks registered or pending 40 UK and European product approvals 20 sustainable product systems 03

4 PLASTICS IN PLUMBING & HEATING SYSTEMS: The development of plastic plumbing solutions has been a significant feature of the building products market for more than 20 years. Copper is, by its very nature, a fixed and inflexible material that requires time consuming joint processes during installation. As a traded metal, copper prices are also subject to the fluctuations of commodity markets with resulting instability in manufacturing costs and product prices. A further consequence of price volatility is the tendency for copper, and other metals, to be the target of theft. By contrast, modern manufacturing technology and ongoing material development allow innovative solutions in plastic that are faster to install, highly durable and secure in use. Plastic systems offer greater flexibility and choice, both in pipe and fittings, and provide high standards of performance alongside great value. 04


5 OUTSTANDING PERFORMANCE & VALUE Application driven product solutions Plumbers know that no two jobs are the same. You choose your product solution to fit the application. This is why Polypipe has developed a Total Plumbing Solution. You assess your job, select the most appropriate Polypipe system, match it with the correct Polypipe pipe, and install the system with confidence. Every job is covered. Use the overview below as a quick guide to our product systems and consult the individual product sections within this product guide for more detailed product information. Or visit our dedicated plumbing systems website at The FAST and PERMANENT system The FAST and DEMOUNTABLE system The SLIM and PERMANENT system PUSH FIT PUSH FIT PRESS FIT Choose Polyplumb for a fast, reliable and permanent fitting Our original plumbing system, using technology tried and tested for over 30 years, Polyplumb provides a superb combination of fast fitting with a permanent, reliable fix Polyplumb offers a one-step joint process, with joint integrity assured by a high performance, stainless steel grab ring within the fitting Only demounted by dis-assembly, reducing the risk of tampering Polyplumb fittings are also used extensively in our underfloor heating systems Choose Polyfit when you need speed and demountability The push-click, that s it feature of our Polyfit system makes it the market leader in speed to fit With its unique one-step operation, with no need for a quarter locking turn, Polyfit will lock tight for a secure fit and to prevent accidental release Polyfit systems can be easily demounted and re-used if required Choose Polysure when you want a slim and secure fitting Polysure is the first plumbing fitting to bring you the best in emerging radial press fit technology in UK sizes Polysure fittings are slim profile and are applied using a specialist pressing tool to ensure the most secure and permanent fix, making it the ideal system for applications where a tamper proof solution is important Polysure provides an enhanced joint to pipes via a visual pipe socket depth indicator and double O ring seal 05


6 POLYBUTYLENE PIPE: FLEXIBLE & SUSTAINABLE Within the manufacturing cycle polybutylene doesn t require chemical or radiation cross linking, which reduces the number of production processes, leading to faster and more efficient manufacturing. Another key advantage of polybutylene pipe is that it is extremely lightweight, particularly when compared with copper piping systems. For example, 15mm copper tube will weigh approximately 0.28kg/m, whereas 15mm polybutylene pipe weighs only 0.074kg/m, a significant difference of 75% on consignment weight when transporting materials to site. Weight comparison of 100m of 15mm tube Polybutylene Copper At the heart of our systems is our commitment to polybutylene pipe. Unlike a number of other plumbing manufacturers, we choose polybutylene to create the most flexible and efficient pipes and plumbing systems available. Polybutylene pipe is ideal for both domestic hot and cold water plumbing and heating systems, offering exceptional durability and long-term performance, which has seen it become the preferred material choice for today s building projects. The most important characteristic of polybutylene is its natural flexibility, allowing you to bend, curve and manipulate the pipe into even the tightest of spaces. Polybutylene is the most malleable plastic used in the manufacture of piping systems. The table below shows the modulus of elasticity or rigidity of polybutylene compared with a range of piping systems: Flexural Elasticity Modulus (MPa) Method ISO 178 PB-1* PEX Polybutylene pipe has good resistance to freezing temperatures, maintaining long-term durability in heating and water applications. This, combined with the pipe s elasticity, means that if water is subjected to freezing temperatures, the result will be a reduced possibility of burst pipes (for special precautions to be taken in surface / underfloor heating systems see page 30). Polybutylene pipe has low thermal conductivity. Its co-efficient of thermal expansion is 1.3 x 10⁻⁴m/m C. It accommodates expansion by its natural flexibility. Our plumbing systems give better performance than rigid pipe systems in terms of low noise transmission and low water hammer effect. PB-1 SAFE SAFE MANUAL MANUAL HANDLING HANDLING 28kg 7.4kg 4 8 The table below highlights the sound velocity of polybutylene pipe compared with other materials: 620 Sound Velocity (Meters per Second) PE-RT PEX 800 PP-R 800 CPVC 2,350 PVC-C 3,500 Copper 3,900 Flexible Rigid Quiet Noisy *PB-1 is the chemical name for Polybutylene Polypipe Building Products is a member of the Polybutylene Piping Systems Association (P.B.P.S.A), which is a recognised association of companies whose aim is to promote the features, benefits and best practice installation techniques of polybutylene pipe systems, as well as providing a wide range of technical information and support 06


 specified in DIN 4726.")

7 Polypipe Pipe options Polypipe offers a range of pipe options and sizes to complement each of our fitting systems and to suit every project: Grey Polyplumb polybutylene pipe, available in standard monolayer and barrier versions. White Polyfit polybutylene pipe, available in barrier versions only. Polysure can be used with either white or grey polybutylene pipe. Polyplumb pipe in pipe systems consist of a polybutylene barrier pipe encased within a black conduit pipe. The conduit provides protection for the polybutylene pipe during the installation process, as well as allowing easy withdrawal for future alteration or maintenance. The conduit pipe coils allow 15mm and 22mm Polyplumb pipe to be laid in a floor screed, conforming to water regulations. When conduit pipe is used in conjunction with conduit boxes, it provides a cost effective and practical solution, as an alternative to other ducting systems. Red and blue conduit pipes are also available should an identifiable conduit be preferred. Pipe selection Cut length or Plumb straight Although Plumb Straight coiled pipe is designed to effectively straighten when un-coiled, where the visual appearance of pipe is important, i.e. short visible sections of 22mm pipe in cylinder cupboards, pipe cut from straight lengths may be preferred. NOTE: Polybutylene pipe must not be used for long permanently exposed runs of pipe where appearance is important. Both straight and coiled pipes are flexible. Standard or Barrier As barrier pipes contain an EVOH barrier layer to reduce oxygen ingress into the system through the pipe wall it is our opinion that these pipes must be used on central heating systems. When tested to DIN 4726 and DIN 4727 barrier pipes give an oxygen permeability less than the value of 0 1g (m3d) specified in DIN British Gas now accept central heating systems containing standard polybutylene pipes onto their maintenance and service contracts but this may result in additional checks and maintenance being carried out. The use of corrosion inhibitor in central heating systems is acceptable provided that the inhibitor is specifically designed for plastic piping systems and guidance on their suitability should be sought from the inhibitor manufacturer prior to adding to the system. Both barrier and standard pipes can be used in hot and cold water supplies. PIPE SIZE 10mm 15mm 22mm 28mm PIPE LENGTH white grey white grey white grey white grey 2m 3m 6m 25m 50m 100m 120m 150m Pipe in pipe is available in grey only in the following variants: 10mm x 50m 15mm x 25 and 50m 22mm x 25m Plain conduit pipe is available for 15mm and 22mm pipes in 25m and 50m lengths in black, red and blue. 07

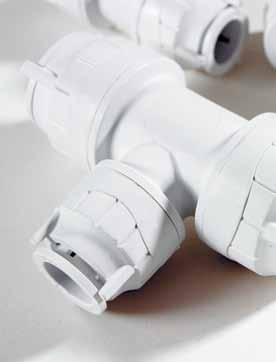
8 POLYPLUMB SYSTEM Polyplumb is an integrated flexible plumbing system, incorporating polybutylene pipes and a complementary range of push-fit fittings. It can be used in hot and cold water supply, and radiator and floor heating installations. The system offers a high degree of reliability, achieved through a product design that has been tried and tested over the past 30 years. The system offers a number of benefits, including: Time efficient, no nonsense one step joint process High performance stainless steel grab ring ensures superb joint integrity Demountable only by dis-assembling, reducing potential for tampering The original Polypipe pushfit plumbing system used and relied on by customers throughout the world 08
 FM00318 Installation Standard - to follow the requirements of BS5955 -")


9 Approvals and applications WRAS Listed in the WRAS Water Fittings and Materials Directory Standards Manufacturing Quality Assurance - in accordance with BS EN ISO 9002 (BSI registered firm Certificate FM00318) FM00318 Installation Standard - to follow the requirements of BS PART Plastic pipework (Thermoplastic Materials) British Standard - Class S rated to BS7291 Part 1 and Kitemark Licence Number to BS7291 Part 1 & 2 British Gas - has accepted the Polyplumb Class S Polybutylene pipe system as being acceptable for open vented and sealed central heating systems and are eligible for acceptance onto Home Care Central Heating System Cover BBA - Polyplumb Polybutylene barrier pipe, fittings and accessories are covered by BBA Certificate No 00/3699 AENOR - The Spanish Association for Standardisation and Certification Suitable for use in hot and cold water and heating systems in domestic properties Polyplumb fittings should be used with grey Polyplumb pipes and other Polypipe specialist pipe systems such as conduit pipe All installation practices must be observed. See this guide and our website at for more information 09


10 Jointing There are five vital stages to successfully jointing the Polyplumb system. Step 1a: Cutting Polyplumb pipes Firstly check that the pipe is not scored or scratched in any way and if it is so cut back to a point where there is no damage present. Always use one of the approved pipe cutters (code PB781 or PB778). Ensure pipes are always cut squarely and cleanly and that no dirt, dust or material fragments are present around the pipe end. A slight rotation of the pipe when cutting will help make cutting easier. Never use a hacksaw and always cut on a depth insertion mark. These K shaped marks are equally spaced along the pipe and indicate the depth required for full insertion in to a Polyplumb socket fitting. Step 3: Visual check of fitting and fitting components Although every single socket is visually checked during the manufacturing process to ensure that all components are present and in the correct order, a further visual check must be carried out as tampering by others can take place on site or during distribution. CAUTION - Do not insert fingers into the Polyplumb fittings, as the grab ring is sharp and designed to grip. NOTE: Components shown in dismantling section. Lubricants All Polypipe fittings are supplied with pre-lubricated EPDM o rings. If for any reason further lubrication is required only Polypipe silicone lubricant should be used. Substances such as solder flux must not be used. Step 4: Insert pipe fully into fitting Check to ensure that the pipe and socket are clean and free from any contamination. The pipe should be inserted into the fitting to full socket depth such that the insertion depth mark aligns with the outer end of the cap nut on the fitting. Insertion depth markers on fittings Each fitting now has an insertion depth marker on the fitting body to aid with installation. The only way of being certain that a joint has been completed successfully is by using the insertion depth marks on the pipe for cutting and insertion purposes. Step 1b: Cutting copper pipe for insertion in a Polyplumb fitting Wherever possible, use a rotational pipe cutter when cutting copper pipe. Ensure that all cut ends have a rounded lead in, with burrs removed. Never use a hacksaw. You will need to mark the insertion depth on the pipe as below. Insertion Depth Pipe diameter (mm) Insertion depth (mm) Step 2: Use of pipe stiffener Pipe stiffeners are an integral part of the joint when using Polyplumb pipe with either Polyplumb fittings or compression fittings and need to be fully inserted in to the pipe end. They are not required when using copper pipe. Step 5: Grab ring check A quick tug on the pipe will confirm that the pipe is inserted past the grab ring and that a grab ring was present in the fitting. It does not however ensure that the pipe is fully inserted as this can only be confirmed by using the depth insertion mark. IMPORTANT NOTE: Avoidance of re-jointing On no account should a pipe be removed from a jointed Polyplumb fitting by removing the cap-nut and withdrawing the pipe end complete with all the socket components from the fitting to be rejointed without removing and replacing the grab-ring into the fitting and re-making the joint in accordance with the normal Polyplumb jointing procedure. If the pipe end complete with all the socket components is subsequently re-jointed into the body of a fitting, there is a risk that the outer edge of the grab-ring could catch on the outer end or the inside surface of the socket of the fitting which forces the grab-ring into an angled position on the pipe. Forcing the grab-ring into an angled position on the pipe in this way, seriously damages the grab-ring teeth and will reduce the pull-out performance of the joint when subjected to pressure, such that premature failure will almost certainly occur with the potential for serious injury. WARNING All jointing instructions must be followed at all times with particular attention being paid to correct insertion depths. If a pipe is not inserted fully into a fitting through both the O ring seal and the grab ring then the incorrect assembly will come apart. The pipe will then have an open end which will result in water discharging un-intentionally. As our products can be used on hot water and heating systems there is the potential for serious injury should this situation occur with hot water. 10
11 Dismantling a Polyplumb joint Polyplumb fittings must not be dismantled for any reason prior to jointing. Step 1: Procedure for using the component pack of spares Dismantling the joint If it is necessary to remove a jointed pipe from a fitting, the cap-nut should be unscrewed and the pipe with all the socket components present on the pipe end should be pulled out of the socket of the fitting. The pipe end complete with all the socket components should be cut off and discarded. A complete component pack of socket spares should be fitted to the socket as described below and pipe jointing should be carried out as described left. Pipe Stiffener Retaining Cap Spacer (28mm only) Grab ring O ring Spacer Spacer Washer Polyplumb fittings general arrangement Step 2: Replacement components The component pack (Code: PB95XX) is supplied as a cap-nut with all the socket components present in the correct order and retained by a retaining cap. Step 3: Preparing components Completely remove the retaining cap, ensuring that the socket components remain within the cap-nut. Step 4: Replacing the components Without removing any of the socket components from the cap-nut, introduce the cap-nut and socket components to the socket of the fitting and tighten up the cap-nut by hand ensuring that the components enter the socket without snagging. Step 6: Fitting the joint Carry out pipe jointing as described on page 10 from step 3 onwards. Reduced component fittings Changes have been made to 15mm Polyplumb couplers, elbows and tees and 22mm Polyplumb elbows and tees, which need to be considered when using Polyplumb spares kits with these fittings, as follows: Original Polyplumb fittings If the bottom white washer is present in the fitting below the grab-ring, then the spares kit can be used as supplied without making any changes. New Polyplumb fittings If there is no bottom white washer present below the grab-ring with one of the five listed fittings then this is one of the fittings which has been modified. Before the spares kit is used, the carrier moulding should be carefully removed from the cap-nut and the bottom white washer should be removed and discarded without changing the order of any of the other components. After this has been done, the spares kit should be offered up to the socket of the fitting, inserting the components into the socket in the order they are within the kit and then screwing down the cap-nut onto the outside of the socket. Retaining Cap Grab ring Spacer Pipe Stiffener O ring 15mm couplers, elbows and tees and 22mm elbows and tees System testing Prior to completing installation it is necessary to fully test the installed system. Please refer to the section on page 30 of this Product Guide for system testing guidance. Step 5: Checking the fitting Carry out a visual check to ensure that all socket components are present in the correct order as shown in the diagram and that the rubber O ring is lubricated. If in doubt, the O ring should be re-lubricated using Polyplumb silicone lubricant. 11


12 POLYFIT SYSTEM Polyfit is the one step, fully demountable and reusable pushfit plumbing product, which combines with white polybutylene pipe to create a truly flexible, yet highly secure, plumbing system that is demountable and reusable when required. The Polyfit system brings extensive benefits: One step operation, for quick and easy installation Flexible polybutylene pipe, for even the most difficult locations Fittings lock tight, preventing accidental release Fully demountable and re-usable when required Push click, that s it The polybutylene pipe is simply inserted into the Polyfit fitting to engage. There s no need to make a quarter locking turn, just push click, that s it. Locked tight Polyfit fittings lock tight in one click and can only be released when required, providing both installers and consumers with total piece of mind. Once engaged into the fitting it is completely secure against accidental release. Fully demountable Polyfit fittings have been designed to be completely secure once installed. However, there will always be times when they need to be removed or adjusted, so they are also fully demountable when required. 12
 FM00318 Installation Standard - to")


13 Approvals and applications WRAS Listed in the WRAS Water Fittings and Materials Directory Standards Manufacturing Quality Assurance - in accordance with BS EN ISO 9002 (BSI registered firm Certificate FM00318) FM00318 Installation Standard - to follow the requirements of BS PART Plastic pipework (Thermoplastic Materials) British Standard - Class S rated to BS7291 Part 1 and Kitemark Licence Number to BS7291 Part 1 & 2 British Gas - has accepted the Polyfit Class S Polybutylene pipe system as being acceptable for open vented and sealed central heating systems and are eligible for acceptance onto Home Care Central Heating System Cover Suitable for use in hot and cold water and heating systems in domestic properties Polyfit fittings should be used with white Polyfit pipes and other Polypipe specialist pipe systems such as conduit pipe All installation practices must be observed. See this guide and our website at for more information 13


.")

14 Jointing There are four stages to successfully jointing the Polyfit system. Step 1: Cutting Polyfit pipes Firstly check that the pipe is not scored or scratched in any way and if it is so cut back to a point where there is no damage present. Ensure pipes are always cut squarely and cleanly and that no dirt, dust or material fragments are present around the pipe end. Using an approved pipe cutter cut the pipe squarely using the K marks on the pipe as a guide. Visual check on Polyfit Prior to fitting pipes into Polyfit fittings a visual check should be carried out on all fittings to ensure all components are present within the fitting socket. Polyfit fittings contain; a blue bottom washer; an EPDM o ring; a blue top washer and a collet all held in place by a cap nut. All cap nuts are torqued to ensure that the cap nuts cannot unscrew easily. There is no need to undo cap nuts and remove any components prior to jointing Polyfit fittings. Step 4: Checking the joint security Tug back on pipe to check it is inserted fully. Step 2: Use of pipe stiffener Insert a pipe stiffener into the pipe (not required on copper pipes). Step 5: Connecting Polyfit to copper pipes Cut the copper pipe using a rotational pipe cutter. Mark the copper pipe insertion depth as shown in the table below. Follow steps 3 and 4 using the mark as a socket depth guide. Insertion Depth Pipe diameter (mm) Insertion depth (mm) Step 3: Inserting pipe into fitting Check to ensure that the pipe and socket are clean and free from any contamination. Push pipe into the fitting, ensuring it is inserted to the full socket depth denoted by the next K mark on the pipe. Lubricants All Polypipe fittings are supplied with pre-lubricated EPDM o rings. If for any reason further lubrication is required only Polypipe silicone lubricant should be used. Substances such as solder flux must not be used. Insertion depth markers on fittings Each fitting now has an insertion depth marker on the fitting body to aid with installation. The only way of being certain that a joint has been completed successfully is by using the insertion depth marks on the pipe for cutting and insertion purposes. Demounting a Polyfit joint Polyfit fittings are fully demountable and re-usable. To demount a Polyfit fitting simply depress the collet squarely towards the fitting and pull the pipe out of the fitting. Care should be taken that the collet is pushed all the way back to the fitting squarely to avoid scratching or scoring the pipe when it is pulled from the fitting. When systems have been pressurised the collet is designed to grip into the pipe therefore using a fitting release aid (product code FITAID) will assist in demounting fittings. System testing Prior to completing installation it is necessary to fully test the installed system. Please refer to the section on page 30 of this Product Guide for system testing guidance. 14


15 Polyfit Flexible Connectors Flexible hose connectors are the latest great addition to the Polyfit product range. This versatile collection comes in a wide range of length and connection end combinations to suit every need. Many of our flexible connectors include the Polyfit one step joint feature, which are quick and easy to install and are ideal for use in tricky to reach or tight locations. All Polyfit hoses which have a tap connector nut now contain captive rubber seals ensuring that seals are not lost or damaged on site. All Polyfit flexible connectors are listed under the Water Regulations Advisory Scheme. Look out for the black thread that is wound into each hose, which denotes a WRAS quality product. Each EPDM hose is suitable for use in domestic hot and cold water applications and must not be used for heating applications. Polyfit flexible hoses come in a packaging design which aids quick and easy product selection and all hoses come in pairs. Selecting your Polyfit Flexible Connector Polyfit Fitting 15mm and 22mm Polyfit push fit connections. Just push, click, Polyfit ends are secure in use but also fully demountable and reusable. Polyfit Chrome Plated Valve 15mm and 22mm Connectors incorporating service valves to reduce the number of joints within a system. Incorporates the Polyfit push fit feature. Tap Connection Nut 1/2 and 3/4 These wing nut style tap connector nuts will only require hand tightening. Compression Fitting 15mm and 22mm Our compression end connectors use the same high quality components as the rest of the Polyfit push fit range. 15


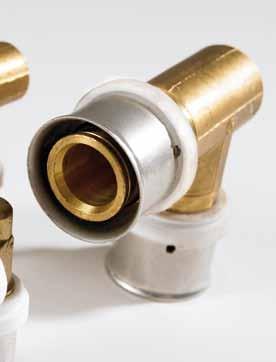
16 POLYSURE SYSTEM Polysure is a range of radial press fit fittings, the first in UK sizes, for use with Polyplumb or Polyfit pipes in domestic applications. Choosing Polysure combines the benefits of flexible polybutylene pipe systems with emerging press fit fitting technology. Polysure offers a number of benefits, including: Flexible plastic piping eases the installation process and speeds up time to install Reduced risk of theft because of low re-sale value of plastics Reduced wastage as all pipes used are also compatible with Polyplumb and Polyfit push fit fittings Press fit fittings reduce the risk of tampering, an important factor in some projects such as social housing The slim profile brass fittings are easily accommodated into existing buildings including boxing designed for copper systems Polysure provides an enhanced joint to pipes via a visual pipe socket depth indicator and double O ring seal Polysure fittings are designed specifically for Polypipe s UK sized pipes A location washer for pressing ensures jaws are correctly positioned for pressing onto grey Polyplumb and white Polyfit pipes Safe, heat-free jointing with no more jointing consumables to buy such as flux and solder saving cost 16

 BS 7291 Class S Kitemark Suitable for use in hot and cold")


17 Approvals and applications WRAS Listed in the WRAS Water Fittings and Materials Directory Installation Standard - to follow the requirements of BS PART Plastic pipework (Thermoplastic Materials) BS 7291 Class S Kitemark Suitable for use in hot and cold water and heating systems in domestic properties Polysure fittings can be used with Polyfit and Polyplumb pipes and systems can contain a mix of fittings All installation practices must be observed. See this guide and our website at for more information 17


18 Jointing There are six stages to completing a joint using Polysure fittings. Unlike the other Polypipe systems, Polyplumb and Polyfit, the Polysure system requires some specialist pressing tools which can be purchased directly from Polypipe or via the manufacturers stockists. Polypipe recommends using REMS pressing equipment who have a reputation for manufacturing durable products that can stand up to today s site conditions. For full details of products, instructions, servicing requirements and warranties please visit Step 1: Cutting pipes Firstly check that the pipe is not scored or scratched in any way and if it is so cut back to a point where there is no damage present. Pipes should be cut squarely using an approved Polypipe cutter. Ensure pipes are always cut squarely and cleanly and that no dirt, dust or material fragments are present around the pipe end. There is a visual indicator on each fitting which is used to check that the pipe has been inserted into the fitting correctly, therefore, it is not essential that pipes are cut on the K marks. It is however essential that pipes are cut squarely as this may affect chamfering. Step 3: Insert pipe into fitting Check to ensure that the pipe and socket are clean and free from any contamination. Polysure pipes have a visual indicator to assist in jointing pipes and fittings together. The chamfered Polyplumb or Polyfit pipe should be inserted into the Polysure fitting and pushed in until the pipe can be seen through the hole in the stainless steel pressing sleeve. When this has been achieved the joint is ready for pressing. Lubricants All Polypipe fittings are supplied with pre-lubricated EPDM o rings. If for any reason further lubrication is required only Polypipe silicone lubricant should be used. Substances such as solder flux must not be used. Step 2: Chamfering the pipes Polysure fittings use press fit technology which seals on the pipe bore so it is necessary to provide an internal lead in on the pipe end so the square edge of the pipe does not damage the O ring seals. On push fit fittings this lead in is provided by the pipe stiffener. Polypipe offer specific pipe chamfering tools for our Polyplumb and Polyfit pipes and these must always be used. The chamfering tools are available in either individual tools or as a block of four dependent on the installers preference however all work in the same way. The chamfer tool spigot should be inserted into the bore of the pipe until contact is made with the blades then the chamfer tool should be twisted gently to provide a lead in as shown. Any debris should be removed from the pipe end and the chamfer tool. Check that the pipe has been cleanly chamfered around the full diameter of the pipe. If not repeat the chamfering process again. Step 4: Preparing the pressing tools There are three types of pressing tool recommended for jointing Polysure fittings. The REMS Eco Press is a manual pressing tool which can be used on 10mm, 15mm and 22mm joints only but provides the installer with a light weight, low cost entry pressing tool which can be used in most situations. Alternatively the battery operated tools (mini or standard version) can be used where a high volume of joints needs to be done in a short space of time. The battery operated tools must be used for 28mm fittings. The 10mm,15mm and 22mm Polypipe TH pressing jaws have been designed to fit both the manual and standard battery 18


19 operated pressing tools. The mini pressing jaws are only compatible with the mini pressing gun and can not be used with the manual or standard battery operated guns. All jaws are specifically designed to press Polysure press fit fittings and should only be used for these fittings. Likewise no other pressing jaw should be used for Polysure fittings. Step 4a: Manual pressing tool Secure the jaw in the tool by firstly removing the locking pins from the Eco Press, lining up the holes in the Eco Press with those in the jaw and re-inserting the locking pins. Step 5: Securing the joint Whether using the manual or battery operated press gun the jaws are located on to the fitting in exactly the same manner. Do a final check to ensure that the pipe is still inserted fully into the fitting then using the white washer as a location point fix the jaws over the fitting in the un-pressed condition. Step 4b: Battery operated pressing tool To insert a Polypipe TH jaw into the battery operated gun, press the release catch on the locking pin on the gun. Slide the jaw into the gun aligning the centre hole in the jaw with the locking pin and push the locking pin back into position until locked. Once the jaws are locked in the respective machine the pressing tools are now ready to complete the joint process. Step 5a: Manual pressing tool The levers can now closed completely ensuring that the two stops on the press tool are touching. Extension pieces are included with the Eco Press if extra leverage is required to completely close the tool. Only when the tool has been completely closed with the two stops touching is the joint fully secured. The levers can then be opened and the fitting will be released from the jaws. 19


20 Step 5b: Battery operated pressing tool The trigger can now be pressed on the tool to start the pressing process. Keep the trigger depressed until the jaws have closed completely and the pressing machine clicks to denote the end of the process. NOTE: once the process is underway it must be completed before the safety catch can be pressed to allow the jaws to be released. Step 6: Checking the joint Finally check that the fitting has been pressed successfully by ensuring that the TH pressing profile has been indented consistently around the full circumference of the fitting. Check that the pipe end is still visible through the hole in the sleeve. The white washer should not be damaged or have moved in any way, if so discard the fitting and re-press a replacement fitting. Spare pressing sleeves and washers are available to purchase if required. Once Polysure fittings have been pressed they are not demountable. System testing Prior to completing installation it is necessary to fully test the installed system. Please refer to the section on page 30 of this Product Guide for system testing guidance. 20

21 DESIGN APPLICATION & INSTALLATION INFORMATION The following information is designed to provide basic guidance for installers and specifiers when designing, planning and installing hot and cold water and heating systems using Polypipe products. The information is not exhaustive and guidance may change dependent on site conditions and applications. This document should be read in conjunction with all other installation and application instructions available. If in doubt please contact our technical services department on Service Conditions Polyplumb, Polyfit and Polysure are suitable for the following Class S service conditions in a normal domestic operation (subject to the exceptions referred to in note 2 below): (Continuously operated re-circulating systems are excluded from these applications) Application Indirect cold water systems Direct mains-fed cold water systems Subsurface heating systems (including Underfloor) Vented hot water supply systems Unvented hot water supply systems including instantaneous heaters and/or incorporating storage Vented central heating systems Sealed central heating systems Nominal system flow temperature Tf ºC Maximum system service temperature Ts ºC System malfunction temperature Tm ºC (see explanatory note 1 below) (see explanatory note 1 below) (see explanatory note 1 below) ½ ½ ½ ½ ½ System maximum working pressure bar Connection to Irish copper pipe Irish copper pipe to IS238:1980 can be connected to Polyplumb fittings which incorporate the ¾ or 1 adaptor set. Using a standard 22mm or 28mm Polyplumb fitting, remove the nut and socket components and discard. Replace these parts with the relevant adaptor set, ¾ - PB7034 or 1 - PB701. The adaptor sets are distinguishable by the black cap nut. Connections to chrome plated and stainless steel pipework Polyplumb and Polyfit fittings should not be connected directly to chrome plated copper pipes or stainless steel pipes. To connect to these pipes we recommend the use of a compression coupler. A pipe stiffener should be used when connecting Polyplumb and Polyfit pipe to a compression fitting. Connecting Polysure press fit fittings to copper Polysure press fit fittings have been designed specifically to fit to Polyplumb and Polyfit polybutylene pipes. To connect to copper pipes we advise the use of a Polysure press fit x BSP male or female adaptor, with the corresponding adaptor being used on the copper side from the Polyplumb or Polyfit range. PTFE tape should be used to seal the mating brass components. Note 1 : nominal system flow temperature Tf is the intended maximum flow temperature of a system for a particular application as recommended in codes of practice and other guidance documents maximum system service temperature Ts is the maximum service temperature that can occur intermittently during normal operation system malfunction temperature Tm is the maximum temperature likely to be applied to pipes and fittings in the event of control thermostat failure or malfunction Note 2 : Certain fittings in the Polyplumb and Polyfit ranges are not suitable for all the Class S service conditions. The limitations are indicated against every applicable fitting in the Trade Price List eg Cold Water Only. Barrier pipe must be used for Subsurface heating systems (including Underfloor) Connections to other materials Connection to Imperial Copper using Polyplumb Imperial ¾ copper pipe is of significantly different size to its metric 22mm counterpart and therefore requires a different O ring to that supplied in the 22mm fitting. The 22mm O ring should be replaced with a ¾ O ring (PB9034). Standard 15mm fittings can be connected to Imperial ½ copper pipe, and 28mm fittings can be connected to 1 copper pipe. Connections close to capillary fittings Capillary fittings should preferably be completed prior to the use of Polypipe fittings. Where this is not possible, care should be taken to ensure that flux or solder does not come into contact with plastic pipes or fittings. A damp cloth should be wrapped around the copper pipe close to the nearest plastic pipe or fitting to ensure against damage by conductive heat. Pipework should be flushed to clear flux before active use. Connections to incoming cold water supply There are two options for connecting incoming MDPE mains water service pipe to Polyplumb and Polyfit pipe systems. Firstly the push fit x compression adaptors provide a one piece transition fitting covering connections from 20mm, 25mm and 32mm MDPE service pipes to 15mm, 22mm and 28mm polybutylene pipes and most sizes are available in both Polyplumb and Polyfit versions. Secondly, as there is a requirement for a stopcock on the incoming main there is also a combined stopcock and adaptor which reduces the number of fittings required in a position where there is often limited space e.g. under a kitchen sink. These products allow connections from 20mm or 25mm MDPE pipe via a compression end to 15mm or 22mm polybutylene using a push fit connection. 21
22 through with anything other than water from the normal UK mains water supply or a cleaning product at the correct concentration that is specifically recommended for plastic piping systems. Pushfit x compression adaptor Combined stopcock and pushfit x compression adaptor Gas, oil, and compressed air Polypipe systems are suitable for domestic plumbing and heating systems. Pipes and fittings must not be used for gas and oil supply pipework or compressed air pipework. In all the above instances metal pipework should be installed. Continuously operated re-circulating systems (Secondary Hot Water Circulation / Ring main installations) A continuously operated re-circulating system is a water-replenished circulating system which is maintained at a constant high temperature to provide a constant source of hot water. Continuously operated re-circulating systems are used to distribute constant hot water to wards or rooms that may be distant from the heat source or hot water storage vessel. Locations where continuously operated re-circulating systems are used include, but are not limited to, residential care homes, hospitals and hotels. Continuously operated re-circulating systems are very different from conventional hot water supply and central heating systems found in domestic properties, for which our products have been tested to, under either BS 7291 Class S or WRAS approval standards, and for this reason Polyplumb, Polyfit or Polysure must not be used on any continuously operated re-circulating systems. Some secondary hot water circulation systems are used intermittently, controlled by time and/ or temperature thermostats. This application is also unsuitable for products manufactured to BS Re-cycled rainwater systems Polypipe products can be used in systems conveying re-cycled or harvested rainwater within domestic properties. All pipe work used in this type of system should be clearly identifiable and this should be carried out in accordance with WRAS Information and Guidance Note No ; Marking and Identification of Pipework for Reclaimed (Greywater) Systems. If self adhesive labels are to be used, these should not be applied directly to the pipe. Chlorine and other additives The polybutylene material used in Polyplumb, Polyfit and Polysure pipes and fittings is WRAS approved. It is resistant to the buildup of scale. Normal levels of chlorine in UK domestic water supplies will not have an adverse effect on Polyplumb, Polyfit and Polysure. However Polyplumb, Polyfit and Polysure are not suitable for systems in which any further additives are ever added, periodically added, or regularly dosed in to or additional to the normal UK mains water supply, for example chlorine for swimming pools or those used for bacteria control or legionella prevention. Systems must not be flushed The use of corrosion inhibitor in central heating systems is acceptable provided that the inhibitor is specifically designed for plastic piping systems and guidance on their suitability should be sought from the inhibitor manufacturer prior to adding to the system. Light Polyplumb & Polyfit pipe and fittings should be protected from UV light. Standard decorating paints form adequate protection. Pipe insulation forms adequate protection for external use. Polypipe products are delivered in light protective packaging. Compatibility with other substances For details of compatibility with building and cleaning substances, and treatments (eg filler foam and wood worm treatments) please consult the relevant manufacturers to confirm suitability with Polybutylene. Polyplumb, Polyfit and Polysure pipes and fittings can be painted using emulsion or undercoat and gloss. Cellulose based paints, strippers or thinners must not be used. Vermin There is no evidence to suggest that Polyplumb, Polyfit or Polysure attract vermin. Where vermin are present they can cause damage to other services, building fabric and pipes and fittings, and therefore a qualified pest controller should be employed to remove vermin from the affected area. Connections to other equipment Boilers and appliances: All boilers and appliances must have safety devices such as thermostatic controls, cut-outs and pump over-run protection to make sure that they cannot operate above the Class S working temperature and pressure limits set out in the table of Class S service conditions on page 21. Exposure to conditions in excess of those specified could result in failure of the pipes or fittings with the potential for serious injury. Gas Boilers: Pipe should only be connected to gas boilers where the pipe connection is outside the boiler casing and where the boiler incorporates a high limit thermostat and pump over-run facility. The pipe connections should be 350mm from the heat source. In all other situations, a section of metal pipe should be at least 1m in length. In addition for back boilers metal pipe work should be used within the fire opening extending out of the chimney brickwork. Combination Boilers: Where system connections are made to an incoming water supply pipe from a water meter or any other device which contains a check valve a suitable expansion vessel must be fitted to prevent the expansion of heated water back down the supply pipe. This is especially important where a water meter is fitted retrospectively. Solid Fuel Boilers & Cooking Ranges: Pipes and fittings must not be used for primary or gravity circuits from solid fuel boilers, cooking ranges or other uncontrolled heat sources. Solar Panels / Systems Pipes and fittings must not be used for connection of solar panels or any part of solar distribution that operates above the Class S working temperature and pressure limits set out in the table of Class S service conditions on page


 where plastic pipe and fittings should not be used.")
23 Oil Fired Boilers Open Vented Central Heating Systems: The use of plastic pipe and fittings is acceptable when used in oil fired installations where the boiler is connected to an open vented system, however the first metre of primary pipework from the boiler connections must be installed using metal pipe. The boiler must be suitable for this type of application and all relevant safety features as supplied and fitted to the boiler must be checked for correct operation. The system must also be commissioned in accordance with the boiler manufacturers instructions. Polyplumb and Polysure swivel tap connector with brass nut Plastic pipe and fittings can also be used in the hot and cold water and underfloor central heating systems with the exception of continuously operated re-circulating systems (see page 22) where plastic pipe and fittings should not be used. For further information regarding the suitable applications for our plastic pipe and fittings please refer to the Class S Service Conditions table as shown on page 21 of this publication. Polyfit hand tighten tap connector Sealed Central Heating Systems: Where a sealed system oil fired boiler is to be used all primary boiler pipework to and from the hot water cylinder (if fitted) and any radiator or towel rail circuits must be installed using metal pipe nd fittings. Plastic pipes can be used on underfloor central heating systems where the plastic pipes are fitted after the UFCH control unit and manifold arrangement which must contain a correctly operating thermostatic mixing valve. Polyplumb bent valved tap connector Plastic pipe and fittings can also be used in the hot and cold water system with the exception of continuously operated re-circulating systems (see page 22) where plastic pipe and fittings should not be used. All relevant safety features as supplied and fitted to the boiler such as the boiler temperature control thermostat, high limit thermostat, pump overrun facility and the pressure and temperature relief valve must be checked for correct operation at both installation stage and at any subsequent boiler service intervals. The system must also be commissioned in accordance with the boiler manufacturers instructions. For further information regarding the suitable applications for our plastic pipe and fittings please refer to the Class S Service Conditions table as shown on page 21 of this publication. Cylinders: All pipework in the cylinder cupboard should be from cut lengths rather than coils and should be clipped to a pipe board rather than the wall using screw clips at 300mm centres. Pipe clip spacers should be used to achieve crossovers where necessary. Connections to sanitary appliances: The connection to sanitary appliances such as baths, basins, sinks and WC s is easy with the Polypipe product ranges. With a wide range of fitting types to choose from every eventuality is covered. Swivel tap connectors with brass connecting nuts are available in Polyplumb, Polyfit and Polysure versions. There are hand tighten tap connectors available in Polyplumb and Polyfit for those difficult to access places. A number of specialist products are also available which incorporate valves into appliance connectors. Both straight and bent valved connectors are available as well as versions in both plastic and chrome plated brass. Polypipe supply both a conical seal (attached to the connector) and a flat seal (supplied loose with each individually packed tap connector) with each swivel style brass nut tap connector. As we do not know what type of tap is being installed it is the installers responsibility to ensure that the seal supplied is compatible with the tap to ensure a water tight seal is made. Polyfit straight valved tap connector Finally the Polyfit range contains one of the widest ranges of flexible connectors on the market with products of varying lengths and connection type. Connections to ½ and ¾ taps are covered as well as products which include built in service valves. There are also specialist products which are available for connection to monobloc mixer taps and a space saving elbow pattern connector. Polyplumb terminal fitting: Where wall mounted taps are being utilised the use of a conduit terminal box is recommended. The fitting consists of a 15mm x ½ female elbow which is housed in a plastic terminal box allowing the hot and cold water supply pipes to be hidden in a wall cavity. The terminal elbow can also be mounted onto a backing plate which assists installation and centring the taps. Once installed, taps can be screwed into the female threaded elbow and the wall finish applied to give a neat cleanly designed environment. Connecting to radiators: As with connections to sanitary appliances there are a number of options for connecting pipes to radiators. Available within the ranges are spigot elbows for 10mm and 15mm connections as well as a 10mm x 15mm version which allows 10mm pipes to be connected 23


24 directly into a 15mm radiator valve with out the need for additional reducers. The Radiator Connector Bend RCB provides installers with an attractive method of connecting 10mm or 15mm Polypipe pipe from walls or floors to radiators. The rigid white 100mm x 150mm bend can be cut to length and connects directly to Polypipe fittings and radiator valves and requires pipe stiffeners in each end. Installation instructions Installing flow and return pipework Step 1 : Install 10mm flow and return pipework down sub-wall with continuous loop long enough for radiator feeds through wall. Pressure testing of the heating system must be carried out at this stage. Use of aluminium tape To comply with the NHBC guidelines regarding detection of pipes in wall cavities Polypipe recommends the use of aluminium tape. This tape should be applied directly to the wall sub-structure and pipes should be clipped on top of the tape. The tape must not be applied directly to the pipes. Dot and dab walling Dry lined or dot and dab walls are commonly used to speed up the build process and Polypipe systems are compatible with these types of constructions. Board adhesive or plaster should not be applied to Polypipe pipe and fittings especially around the area where the pipes pass through the wall to feed radiators and appliances. Pipes and fittings must remain accessible should future maintenance be required. Radiator terminal plate The new Polypipe Radiator Terminal Plate is a multi functional product for use in Polyplumb and Polyfit piping systems. It provides an air tight seal around pipework entering rooms from wall cavities to feed radiators helping developers to achieve air tightness levels required by Building Regulations Gives a neat and secure entry point for pipes serving radiators. Ensures pipes are not damaged by rough edges of wall boards or plaster boards Can be fitted with or without a single gang electrical back box (supplied by others) Product features Holes sized to provide interference fit with pipes giving air tight seal Three bosses allow use with single gang electrical back box if required or just act as a cutting guide for other trades Preparing the wall boarding Step 2: Cut a hole the size of a standard electrical back box in the wall boarding. For guidance use the three bosses on the reverse side of the Polypipe Radiator Terminal Plate. 70mm 70mm Cutting the pipes Step 3: Cut pipes at appropriate point to allow for wall board to be installed ensuring enough pipe is left to reach valves at each end of the radiator. Pipe threading Step 4: Thread pipes through hole cut in wall board taking care not to scratch or damage pipes. Fit Radiator Terminal Plate on to pipes Three screw holes included for additional security Can be fixed to wall boarding using panel adhesive Step 5: Pass the pipes through the radiator terminal plate from back to front using the pipe guides to aid routing. They should be a tight interference fit through the holes which provides the seal. Cutting the ends of the pipes at an angle may help to thread pipes through the hole but remember to cut pipes square again before connecting into a fitting. 24


25 Securing the Radiator Terminal Plate Step 6: Use panel adhesive to seal the Polypipe Radiator Terminal Plate to the wall board and if necessary use tape or three countersunk screws to hold the plate in position whilst the adhesive sets x Span to 0.25 x Span 0.25 x Span to 0.4 x Span Fitting the Radiator Step 7: Fit radiator and valves and connect the pipes as per normal installation instructions. Pipework installation Position of notches and holes SPAN Alterations to existing systems Less disruption to property as floors and carpets may not have to be removed in some rooms. Kinder to building structure, as existing joists may not allow further notching. Pipes can be cabled around existing obstructions. Safety is enhanced as no naked flames are required. Polybutylene pipe provides installers with the flexibility of installing pipes through both holes and notches in joists, choosing the most appropriate method. Building Regulations provide instructions on the drilling and notching of floor joists however an example is shown below. Minimum bending radius The minimum bending radius of unsupported Polybutylene pipe is 12 times the pipe diameter. Bends can either be supported at each end of the bends using pipe clips where possible. Alternatively, bends can be supported by a bend former (PB6315 or PB6322) where only one screw hole is required, and the minimum bend radius is 8 times the diameter. Notch depth x joist depth e.g.21.8mm Depth e.g.175mm Holes 3 diameters apart and maximum diameter 0.25 x joist depth e.g.43mm Size of notches and holes Bend former Pipe supports All pipes should be correctly supported using either nail-in, snap-fit or bulldog clips. Where required spacer pieces are available for the snap-fit clips. All pumps and valves must be correctly supported to prevent unnecessary strain on the pipework. Minimum bending radius Pipe diameter (mm) Unsupported (mm) Supported (mm) Pipe cabling The main benefit of using Polypipe polybutylene pipes is that the pipe flexibility allows pipe to be cabled through the fabric of the building offering the following advantages. New build applications Allows 1st floors to be laid before plumbing is installed. Plumbing can be installed through holes drilled in joists. Site safety is enhanced as pipework can therefore be installed from below. Post installation repair work is reduced, as expansion noise due to trapped pipes does not occur, and leaks due to nailed pipes are avoided. Nail-in clip and snap-fit with spacer Minimum support centres Horizontal pipes Vertical pipes 10mm & 15mm 0.3m 0.5m 22mm 0.5m 0.8m 28mm 0.8m 1.0m 25
26 System design Although flexible systems can be used in exactly the same way as rigid systems, the flexibility of the pipe allows more design options which may benefit the installer, the building, or during future maintenance. The general theory of designing water systems in Polypipe products is to use the flexibility of the pipe to its best advantage and therefore using fewer fittings. This not only ensures the most cost-effective use, but also allows fewer joints and hence improved flow around changes of direction. The flexibility of the pipe allows jointing to be made in fewer locations and joint locations can more easily be made accessible. 15mm hot & cold bath 15mm hot basin 22mm hot Example water system design Use of 10mm pipe for heating applications Use of 10mm pipe for heating applications. As 10mm pipe is so flexible and can easily be positioned behind dry lining, its use offers many installation advantages. As it is the smallest of the pipe diameters offered in the Polypipe ranges, restrictions on the use of 10mm pipe should be considered. The table below gives a guide on the restrictions of using 10mm pipes with Polyfit and Polyplumb fittings. When using 10mm Polysure fittings we recommend that the length of 10mm branch pipe runs are as short as possible and preferably no longer than 3 metres (6 metres for flow and return) and radiator outputs are restricted to a maximum of 1kW. EXAMPLE: 10m of pipe prior to 10mm connection (5m flow, 5m return) used with 1.25kW Radiator. Maximum length of 10mm = 13m (6 5m flow, 6 5m return). Max length of pipe prior to 10mm connection e.g. 10m = 5m flow and 5m return 15mm hot basin 22mm cold 15mm WC Maximum length of 10mm pipe total e.g. 13m = 6.5m flow and 6.5m return 1 kw Rad 1.25 kw Rad 1.5 kw Rad Polyplumb manifold system For use in most domestic hot and cold water supply and radiator heating projects, Polypipe manifold systems provides a central connection point for water distribution. Manifold plumbing which is ideally suited for use with Polyplumb pipe-in-pipe technology (where screed embedded pipework is used with minimal joints) is employed in a similar way to simple electrical circuits in that all services are supplied from an easily accessible central distribution unit that can be either wall mounted, placed in an unobtrusive void or housed within an inspection box and subsequent supply pipework cabled through wall, floor or ceiling voids. Although manifolds are available in various port configurations they can be close coupled together to create manifolds with any number of outlets. Application of manifolds in central heating Polypipe manifolds are dimensionally compact and can be used in joisted floors or ceiling voids for in-line distribution. They are normally used unvalved, as each radiator has valves on for isolation purposes. There are both single and double sided versions with 10mm ports and in-line side versions with 15mm ports. Being lightweight they can be simply used inline without bracketed support as long as the pipework is adequately supported. 22mm supply pipe 10mm pipe to radiators 1 x 4 port manifold Polyplumb 4-port manifold for radiator supply When heating supply is to be used with a screeded floor, (where no joints are allowed below the floor surface) a 22mm pipe-in-pipe main supply is used. This supply would exit the floor, pass through the manifold system above the floor surface, and re-enter the floor to the next manifold supply point elsewhere in the building. 22mm spigot elbow 10mm pipe to radiator 4 port manifold Screed Floor Manifold used above a screeded floor 22mm supply pipe 26
.")


 or brass integrally valved manifolds can be used. Manifold brackets are also available for brass products.")

27 The supply to each radiator would then be taken off the manifold, these single sided unvalved manifolds are available in both brass with 15mm ports or plastic with 10mm or 15mm ports (10mm pipe for small radiators or short runs and 15mm for longer runs or larger radiators). Using manifolds to create extra ports One clever design feature of the Polyplumb Manifold Range is that both polybutylene and brass manifolds can be joined together to create extra ports where required. Application of manifolds for hot and cold water supply There are two ways that the manifold system can be employed in hot and cold water supply, the benefits of which are that all pipework is concealed but fittings are above floor level and can be hidden away in cupboards and voids. Services can be isolated where needed using the valved manifolds. Localised supply is where the manifold is placed unobtrusively within a void or cupboard or under the bath in the area supplied, i.e. bathroom, en-suite or kitchen area. The 22mm supply pipe is fed through the house to the manifold and then secondary supply pipes are taken out of the ports to feed each appliance, e.g. basin, bath or shower. Shower Shower Basin Basin Bath Bath Joining together of manifolds increases number of ports Manifolds options There are three distinct variations of manifolds that can be employed. Both brass and plastic non-valved (with separate push-fit ball valves if required) or brass integrally valved manifolds can be used. Manifold brackets are also available for brass products. BATHROOM EN-SUITE FLOOR LEVEL 22mm supply pipe KITCHEN/ UTILITY Washing Machine Dish Washer Sink FLOOR LEVEL Polybutylene double sided manifold - 4 port and Polybutylene single sided manifold - 3 port Localised supply design layout Centralised manifold supply is where the manifold distributes water to each appliance directly from a central cylinder cupboard, where a series of valved manifolds are dedicated to each area, i.e. bathroom, en-suite, kitchen or utility room. CYLINDER CUPBOARD Shower Basin BATHROOM Bath Shower EN-SUITE Basin Bath Brass single sided manifold unvalved - 2 port and Ball valve brass FLOOR LEVEL 22mm supply pipe Washing Machine Dish Washer Sink KITCHEN/ UTILITY FLOOR LEVEL Centralised supply design layout Brass single sided manifold valved - 3 port and manifold bracket 27


28 Conduit Pipe and Pipe-in-Pipe The conduit pipe coils (CPC15XX and CPC22XX) provide a conduit pipe which allows 15mm and 22mm pipes to be laid in a floor screed whilst conforming to Water Regulations. The installation and application of the system is described in the following section. The conduit pipe used in conjunction with the conduit boxes (JIB1 and JIB3) which house fittings, provides a cost effective and practical pipework solution. Polyplumb Pipe-in-Pipe consists of a polybutylene barrier pipe encased within a black conduit pipe. The conduit provides protection for the polybutylene pipe in the installation process as well as allowing easy withdrawal for future alteration or maintenance. Cutting conduit pipe Step 6: Cut conduit to length required before threading conduit over pipe and through hole in box to 2 or 3 corrugations. Securely fitting conduit pipe Step 7: Push away pipe from end yet to be connected to allow grip onto the pipe and push the pipe into the fitting before allowing conduit to cover pipe. Push conduit through hole in box to 2 or 3 corrugations. Installing conduit systems Positioning the conduit box Step 1: Loosely position conduit boxes where required. Assembling fittings Step 2: Assemble fittings in boxes HANDY TIP: Where boxes abut a wall, i.e. elbows beneath radiators or sanitary appliances, boxes can be cut in two with the open end abutting the wall, this reduces the number of boxes required. Joints in screeded floors due to accidental damage Where it is necessary to have joints in screeded floors, these joints must be accessible. For example, where accidental damage to a pipe has occurred, the damaged section of pipe must be removed and replaced. The section containing the joints must be installed within a Junction Inspection Box. Junction Inspection Boxes are manufactured to suit two screed depths; 65mm (Product Code JIB3) - black in colour and 75mm (Product Code JIB1) - grey in colour. Both accept the 12mm plywood lid (Product Code JIB2) to provide future access should it be required. Positioning drill holes Step 3: Drill conduit box using fitting assembly to determine hole position. Fixing the conduit box Step 4: Fix conduit box to floor. HANDY TIP: Use round drilled out sections of conduit box as washers. Preparing the pipe Step 5: Make joint at one end of pipe to be installed and cut pipe to length required. 28

 or Polyfit socket blank end (FIT19XX) is ideal.")


29 Pipe and Fitting Blanking Pipes and fittings may need to be temporarily or permanently blanked for testing, avoidance of construction debris or for future connections. There are a number of options for blanking pipes in the Polyplumb and Polyfit ranges. For example for permanent capping off of pipes we would recommend the use of a Polyplumb socket blank (product code PB19XX) or where blanking off is only a temporary measure then either a Polyplumb demountable cap end (PB69XX) or Polyfit socket blank end (FIT19XX) is ideal. Fittings can be blanked off using either a Polyplumb blank end (PB9XX) for permanence or a Polyfit version (FIT9XX) which features handy finger slots for gripping when demounting when used in temporary situations. Polyplumb Socket Blank End Polyfit Spigot Blank End Painting Pipes and fittings can be painted using emulsion or undercoat and gloss. Cellulose based paints, strippers or thinners must not be used. Electrical safety Where Polypipe pipes break the continuity of existing metal pipe, which may be used for earthing, or bonding this continuity must be re-instated by affixing permanent earth clips and a section of earth cable between the copper ends on either side of the plastic sections. Equipotential bonding Both the IEE and the Chartered Institute of Plumbing and Heating Engineers now give guidance on the Earth Bonding requirements of Plastic Pipe systems. As plastic pipes do not conduct electricity, installations generally require less equipotential bonding than metal systems although if in doubt exact guidance should be sought. Handling and storage of products Polyplumb Demountable Socket Blank End The packaging of both pipes and fittings is designed to protect from ultraviolet light and environmental contamination. Pipes and fittings should therefore be retained in their packaging as long as possible, and should be stored in a cool dry area. When on site, fittings should be stored to prevent dust and debris from entering the fitting and sticking to the pre-lubricated O ring. Care should be taken to avoid scratching the pipe surface during the handling, storage and installation processes. Polyplumb Spigot Blank End Polyfit Socket Blank End 29
30 System testing Pressure testing of the pipe system is essential however a successful pressure test using the following steps is not a guarantee of complete and correct installation and only ensures that pipes have been inserted into fittings passed both the o ring and the grab ring. If pipes have been scored or scratched during the installation process a high pressure test as below may not highlight these issues. 1st fix Installations Step 1: Pipe and fittings only should be tested. The system should be filled completely using water not more than 20 o c at a test pressure of 18 bar which should be applied for not less than 15 minutes and no longer than 1 hours. Joint security can be checked visually and by tugging at joints. 2nd fix Installations Step 2: Complete installations including appliances should be tested with water to the maximum pressure allowed by the manufacturers of the appliances and fittings. Please note, due to health and safety reasons pipework installations must not be air tested. Pressure testing in sub zero temperatures Special precautions are necessary if the pressure testing is to take place in sub-zero temperatures. This applies particularly in under floor central heating systems using the screeded floor system where most of the pipe is encased in concrete. Due to the contact between pipe and floor panel on screeded installations, where the screed does not completely surround the pipe, there may be points where strain is created on the pipe in freezing conditions which is not normally present. Therefore it is advisable to drain the under floor central heating system once testing and screeding has been completed. Precautions should also be taken where installations contain large quantities of fittings which due to the rigidity of their construction may put undue pressure on the pipe. 30

31 EXTENSIVE SUPPORT SERVICES An underlying ethos of the Polypipe Group is a recognition of the importance of our distribution channels and a commitment to customer support. Standards Polypipe meets, and constantly strives to exceed, the changing laws and regulations governing our operations and products. We have invested in extensive testing and development facilities to ensure the products we supply are of the highest quality. Our plumbing systems conform to a number of 3rd party accredited standards which are listed below. British Standard Class S rated to BS7291 Part 1 and Kitemark Licence Number to BS7291 Part 1 & 2. Polyplumb polybutylene barrier pipe, fittings and accessories are covered by BBA Certificate No 00/3699. Listed in the WRAS Water Fittings and Materials Directory. Standards Manufacturing Quality Assurance - in accordance with BS EN ISO 9002 (BSI registered FM00318 firm Certificate FM00318). At Polypipe we pride ourselves on offering the highest quality products, and wherever possible our products and processes are covered by independent third-party accreditation, so you can rest easy knowing that you are buying from the UK s market leading manufacturer. We have invested significantly in our quality control procedures, have our own fully-equipped modern laboratory for development and analysis, and also have our own tooling and extrusion processes. Customer service Our friendly customer service team are dedicated to offering a quality service and can help you through every stage of the job. Our technical support team can provide installation assistance support, both before, during and after projects. This support also includes design and estimating services, to ensure you get the right product for your job. Site support engineers are also available to help with any queries or problems on site. This extensive range of products is backed up by the dedicated service and support provided by our customer service team and throughout the supply chain: from initial order through to post installation site support. This service and support ensures that all our customers projects are completed successfully, and is the reason why we are seen as the manufacturer of choice and why many of our customers come back time and time again. Distribution Polypipe s distribution network is a crucial aspect of our business. In order to maintain a quality delivery service, we have a dedicated fleet of 150 commercial vehicles and 300 trailers, which between them travel over 13.5 million miles per year. We hold an extensive stock of products, enabling us to provide merchants with a fast and efficient delivery service. We ensure Polypipe stocking merchants always have a wide range of products available. Our sales team are always on hand for product advice and technical support is available for our head office technical team. Installation Standard must follow the requirements of BS PART Plastic Pipework (Thermoplastic Materials). Guarantee Polypipe guarantees for 25 years against defects in materials or manufacture of the Polyplumb and Polyfit hot and cold water supply and heating systems from the date purchased. This guarantee only applies if the products are installed in accordance with the manufacturers recommendations and are used in a normal domestic operation. Merchant support Events Point of sale material Literature Promotions Stock profiling Installer support Dedicated trade websites Technical support Literature Training Builder and developer support Technical support Design and scheduling service Literature On site training 31

32 Product Guide Plumbing & Heating Systems Polypipe Building Products Broomhouse Lane Edlington Doncaster DN12 1ES Tel: Fax: London Road Mount Vernon Glasgow G32 8XZ Tel: Fax: Dromore Road Lurgan, Craigavon Co. Armagh BT66 7HL Tel: Fax:
Polypipe Plumbing & Heating
 P&HIG JUNE 07 Polypipe Plumbing & Heating Installation Guide Contents Plumbing & Heating Installation Guide 0 Introduction Underfloor Heating Underfloor Heating Plumbing & Heating Pipes & Fittings 05 Fittings
Polypipe Plastic Plumbing
 P&HDLTPL6 FEBRUARY 2017 EFFECTIVE: 6th FEBRUARY 2017 Polypipe Plastic Plumbing NEW PRODUCTS Trade List 2017 Plumbing & Heating Trade List 2017 Welcome to the new Polypipe Plumbing and Heating Systems Trade
Polypipe Plastic Plumbing
 P&HDLTPL7 FEBRUARY 2018 EFFECTIVE: 5th FEBRUARY 2018 Polypipe Plastic Plumbing NEW PRODUCTS Trade List 2018 Plumbing & Heating Trade List 2018 Welcome to the new Polypipe Plumbing and Heating Systems Trade
Technical Checklist - Plumbing and Heating Fittings - UK Sizes
 Technical Checklist - Plumbing and Heating Fittings - UK Sizes July 2008 NOTE: This checklist refers exclusively to fittings and accessories from our range of push-fit products for Plumbing and Heating
Polypipe Plumbing & Heating
 P&HDLTPL1 JUNE 2013 EFFECTIVE: 1ST JUNE 2013 Polypipe Plumbing & Heating Trade List 2013 Contents 4 Plumbing & Heating Applications Plumbing & Heating Pipes 8 Grey Pipe 9 White Pipe 10 Underfloor Heating
Polypipe Plumbing & Heating
 P&HDPD1 JUNE 2013 EFFECTIVE: 1ST JUNE 2013 Polypipe Plumbing & Heating Product Guide for International Markets Contents 4 Plumbing & Heating Applications Plumbing & Heating Pipes 8 Grey Pipe 9 White Pipe
FLEXIBLE METAL - BENDING THE RULES OF PLUMBING CONNECT WITH CONFIDENCE SEE OUR NEW EXTENDED RANGE OF VALVES -
 FLEXIBLE METAL - BENDING THE RULES OF PLUMBING CONNECT WITH CONFIDENCE SEE OUR NEW EXTENDED RANGE OF VALVES - AVAILABLE FROM JULY 2014 THE TECTITE FLEXIBLE METAL SYSTEM Every customer relies on you to
DOMESTIC HOT AND COLD WATER SUPPLY AND CENTRAL HEATING SYSTEMS. Guidance Notes
 DOMESTIC HOT AND COLD WATER SUPPLY AND CENTRAL HEATING SYSTEMS Guidance Notes 02 DOMESTIC HOT AND COLD WATER SUPPLY AND CENTRAL HEATING SYSTEMS Introduction Plastic pipes are widely used in domestic hot
Polypipe Underfloor Heating
 P&HDLTPL7 FEBRUARY 2018 EFFECTIVE: 5th FEBRUARY 2018 Polypipe Underfloor Heating NEW PRODUCTS Trade List 2018 Underfloor Heating Trade List 2018 Welcome to the new Polypipe Underfloor Heating Trade List.
Polypipe Underfloor Heating
 P&HDLTPL6 FEBRUARY 2017 EFFECTIVE: 6th FEBRUARY 2017 Polypipe Underfloor Heating NEW PRODUCTS Trade List 2017 Underfloor Heating Trade List 2017 Welcome to the new Polypipe Underfloor Heating Trade List.
Polypipe Underfloor Heating
 P&HDLTPL7 FEBRUARY 2018 EFFECTIVE: 5th FEBRUARY 2018 Polypipe Underfloor Heating NEW PRODUCTS Trade List 2018 Underfloor Heating Trade List 2018 Welcome to the new Polypipe Underfloor Heating Trade List.
Introduction. Overview DOMESTIC HOT AND COLD WATER SUPPLY AND CENTRAL HEATING SYSTEMS
 02 DOMESTIC HOT AND COLD WATER SUPPLY AND CENTRAL HEATING SYSTEMS Introduction Plastic pipes are widely used in domestic hot and cold water supply and central heating systems. Their flexibility offers
For more information on Pegler Yorkshire visit Heating Controls. Radiator valves with new integral push-fit inlet
 Heating Controls Radiator valves with new integral push-fit inlet Heating Controls Radiator valves with new integral push-fit inlet Terrier is a name which should need no introduction to the professional
Ensure nut and olive are in place before inserting pipe insert.
 SYSTEM CONNECTIONS Connection to compression fitting When using compression fittings with Speedfit pipe, a Standard Pipe Insert (prefix TSM) must be used to withstand the compressive pressure of the olive.
Thermostatic bar mixer valve with adjustable head Installation guide
 Bar valve Thermostatic bar mixer valve with adjustable head Installation guide Index Introduction p.3 - Safety information p.3 - Product specification p.3 Connection to supplies p.3 - Flushing p.4 - Filters
NEW NEW. Qual-PEX Crimp System. Plumbing and Heating Installation Manual SAFE. Over 45 ye ars serving the Irish Plumbing Industry.
 Qual-PEX Crimp System 50 YEAR WARRANTY Plumbing and Heating Installation Manual NEW NEW Over 45 ye ars serving the Irish Plumbing Industry Sleek, Affordable, Fast, Efficient SAFE www.pipelife.com Contents
S T O R E R A N G E C Y L I N D E R & G R A N T FEATURES: GRANT MONOWAVE UNVENTED DIRECT AND INDIRECT SINGLE-COIL CYLINDERS
 G R A N T C Y L I N D E R & S T O R E R A N G E High Efficiency Direct and Indirect Hot Water Storage Solutions FEATURES: GRANT MONOWAVE UNVENTED DIRECT AND INDIRECT SINGLE-COIL CYLINDERS GRANT DUOWAVE
UPONOR Ltd. Specification for UPONOR Q&E PEX Shrinkfit Plumbing Systems
 UPONOR Ltd Specification for UPONOR Q&E PEX Shrinkfit Plumbing Systems Reference Page(s) UPONOR Q&E PEX 2 Operating Conditions 2 Pipe Properties 2 Fittings Range 3 Radiator Heating Systems 3 H&C Water
MIDAS. Installation instructions 110/220
 MIDAS Installation instructions 110/220 INDEX INTRODUCTION Page 3 Safety information Page 3 Product specification Page 3 Important information CONNECTION TO SUPPLIES Page 4 Flushing Page 4 Filters Page
Bar valve with fixed and adjustable shower heads. Installation guide. Midas Plus installation instructions Page 1
 Midas Plus Bar valve with fixed and adjustable shower heads Installation guide Midas Plus installation instructions Page 1 Midas Plus Midas Plus installation instructions Page 2 Components Literature not
TREVI BLEND SINGLE LEVER SHOWER VALVES. INSTALLER After installation pass to user for future reference
 11 A4000, A4100 & A4110 TREVI BLEND PARTS LIST Ref. Description 1 Lever handle complete 1a/1b Nut and washer 2 Handle cover cap 3 Shield 4 Cover plate fixing screw 5.1 Cover plate for built in version
AQ150:Midas 10/9/15 14:50 Page 1 AQ150. Thermostatic bar mixer valve with adjustable head. Installation guide
 AQ150:Midas 10/9/15 14:50 Page 1 AQ150 Thermostatic bar mixer valve with adjustable head Installation guide AQ150:Midas 10/9/15 14:50 Page 2 Important information Introduction The product is an exposed
Aquamixa. Thermo. Thermostatic shower valve with manual bath fill
 Aquamixa Thermo Thermostatic shower valve with manual bath fill Aquamixa Thermo thermostatic shower valve with manual bath fill installation instuctions page 1 Shower systems Aquamixa Thermo (300.01) with
Bath Shower Mixer
 86004490 Bath Shower Mixer Installation and operating instructions The showerhead and hose supplied with this product are a safety critical part of your shower. Failure to use genuine Triton parts may
1 What is the name of the tool shown in the diagram? Basin wrench Footprint wrench Stilson wrench Torque wrench.
 36 Exam Success Plumbing and Heating 6189-11 and 6189-21 Sample test The sample test below is for paper 6189-005, Understand and carry out site preparation, and pipework fabrication techniques for domestic
Quartz. Thermo. Concealed shower valve with adjustable head. Quartz Thermo installation guide page 1
 Quartz Thermo Concealed shower valve with adjustable head Quartz Thermo installation guide page 1 Shower systems Components Quartz Thermo built-in shower valve with adjustable head QZ3111 Quartz Thermo
Cistern-fed water heating
 Cistern-fed water heating 95 900 883 Issue 1 Introduction 03 Heatrae Sadia has built an unrivalled reputation for developing, manufacturing and marketing the highest quality products. By offering the widest
MANUAL MIXER SHOWER. Installation and operating instructions. Installers please note these instructions are to be left with the user CAUTION!
 MANUAL MIXER SHOWER CAUTION! THIS PRODUCT IS NOT THERMOSTATICALLY CONTROLLED Installation and operating instructions Installers please note these instructions are to be left with the user 2180586B July
Varsity Concealed Shower System
 VARSITY CONCEALED SHOWER SYSTEM Installation & aftercare instructions Please retain for future reference Varsity Dual Function Concealed Shower System Product code SVA1615 Varsity Single Function Concealed
Flexible Gas Tubing. Semi-Rigid Corrugated Stainless Steel Tube System PRODUCT GUIDE.
 Flexible Gas Tubing Semi-Rigid Corrugated Stainless Steel Tube System PRODUCT GUIDE www.teslauk.com NOVEMBER 2016 A Flexible Solution Tesla ex is a lightweight semi-rigid corrugated stainless steel tube
Union coupling. copper x copper. Cone joint to BS 1010.
 Union coupling. copper x copper. Cone joint to BS 00. YP Size Pattern No. Pack Qty Pack 2 Qty Code Barcode Price ( ) ex VAT 8mm YP 5 00 08250 502205008250 2.78 5mm YP 0 00 0825 502205008250 8.4 22mm YP
Dene Bath Shower Mixer
 Dene Bath Shower Mixer Installation and operating instructions The showerhead and hose supplied with this product are an integral part of the safety of your shower. Failure to use genuine Triton parts
Dream DCV. Thermostatic Dual control mixer valve range. Installation guide
 Dream TM DCV Thermostatic Dual control mixer valve range Installation guide Index Introduction p.3 - Safety information p.3 - Product specification p.3 Connection to supplies p.4 - Pipe sizing p.4 - Flushing
Technical Specifications: Your product has a high quality finish and should be treated with care to preserve the visible surfaces.
 3 Remove concealing plate KIRI Concealed Mixer Valve ABS Undo nuts (9) on both hot and cold inlets and remove filter washer KIRI VA (6) Installation Instructions & Maintenance Guide 5 Rinse filter washers
Quartz. Digital. Bath with bath waste filler. Quartz Digital Bath with bath waste filler installation instuctions page 1
 Quartz Digital Bath with bath waste filler The Waste Electrical and Electronic Equipment (Producer Responsibility) Regulation 2004 This product is outside the scope of the European Waste Electrical and
Male elbow, copper x BSP taper male thread
 Male elbow, copper x BSP taper male thread YP13 Elbow Size Pattern No. Pack 1 Qty Pack 2 Qty Code Barcode Price ( ) ex VAT test 15mm x 1/2" YP13 10 240 08333 5022050083333 16.22 22mm x 3/4" YP13 5 100
WARM WATER UNDERFLOOR HEATING SYSTEMS. Guidance Notes
 WARM WATER UNDERFLOOR HEATING SYSTEMS Guidance Notes 02 WARM WATER UNDERFLOOR HEATING SYSTEMS Introduction Underfloor heating systems consist of a series of pipes which are integrated into the floor structure
Prism Thermostatic Recessed Shower with Integral 2 Outlet Diverter
 Prism Thermostatic Recessed Shower with Integral 2 Outlet Diverter Installation Instructions & User Guide Please keep these instructions for future reference and request of replacement parts Thank you
M07. Wunda Premium Manifold. Before you start: Check the contents THE BRAND YOU CAN TRUST
 Before you start: Check the manifold box contents against the list below. Check the contents 1. 2 x Manifold end blanks 2. 2 x Manual air vent & drain cocks 3. 2x Adjustable mounting brackets 4. Manifold
DUOPEX WATER MANUAL mm WM WMKA021044
 DUOPEX WATER MANUAL 32-63mm WM-022149 WMKA021044 The DUOPEX WATER Pipe and Fitting System is designed for 32mm- 63mm potable hot and cold water applications. This revolutionary alternative for the professional
Enzo Concealed Shower Mixing Valve
 Enzo Concealed Shower Mixing Valve EZ40010CP, EZ40013CP & EZ40014CP Installation and Maintenance Instructions In this procedure document we have endeavoured to make the information as accurate as possible.
Installation Instructions Flute Tap Range
 Installation Instructions Flute Tap Range Models covered: FLT BAS C, FLT 1HBF C, FLT 2HBSM C, FLT TBAS C Please keep this booklet for future reference. Installer, when you have read these instructions
METRO BASIN MONO MIXER CHR
 METRO BASIN MONO MIXER CHR 20004010020 This product should only be fitted by a qualified plumber to NVQ (National Vocational Qualification) or SNVQ (Scottish National Vocational Qualification) Level 3.
Aquatique. Shower heads. Fixed and adjustable height heads. Aquatique shower kits installation guide page 1
 Aquatique Shower heads Fixed and adjustable height heads Aquatique shower kits installation guide page 1 Components Aquatique adjustable height shower kit concealed Chrome 560.01 / Gold 560.04 Aquatique
INTRODUCTION STORAGE PRIOR TO INSTALLATION. Expansion Vessel Hose. Part No High Flow Rate Inlet Control Set. Part No.
 INTRODUCTION The Worcester Greenskies cylinder is a Stainless Steel Unvented Twin Coil Storage vessel specifically designed to be installed in conjunction with the Worcester Greenskies solar package. Should
Thermostatic exposed shower valve and bath/shower mixer systems Installation guide
 Midas Thermostatic exposed shower valve and bath/shower mixer systems Installation guide 2 Index Introduction p.4 - Safety information p.4 - Product specification p.4 Connection to supplies p.4 - Flushing
General System Layout Sketch
 General System Layout Sketch EZ-37 Solar Panels PV panel Glycol Fill Valve Expansion Tank ` 1 Introduction This document describes how to install a Heliatos GH type solar water heating system. These systems
Parenzo Range. Basin Mixer, Bath Filler & Bath Shower Mixer. Assembly instructions
 Parenzo Range Basin Mixer, Bath Filler & Bath Shower Mixer Assembly instructions We have designed these products with your enjoyment in mind. To ensure that they work to their full potential, they need
Puro Mini Dual Control Shower Mixer PU90010CP
 Puro Mini Dual Control Shower Mixer PU90010CP Installation and Maintenance Instructions In this procedure document we have endeavoured to make the information as accurate as possible. We cannot accept
Ambassador. Installation guide & user instructions. Please ensure that this document is handed to the user after installation is completed
 Ambassador Installation guide & user instructions Please ensure that this document is handed to the user after installation is completed 2 Contents Introduction p.4 - Safety information p.4 - Product specification
General System Layout Sketch
 General System Layout Sketch EZ-37 Solar Panels PV panel Can use Standard Copper, CPVC or PEX Pipes Pump Existing Water Heater Bottom Feed Connector 1 Introduction This document describes how to install
Quartz. Digital. Concealed with adjustable height and fixed head. Quartz Digital concelaed adjustable/fixed installation instuctions page 1
 Quartz Digital Concealed with adjustable height and fixed head The Waste Electrical and Electronic Equipment (Producer Responsibility) Regulation 2004 This product is outside the scope of the European
Telo Shower Mixing Valve TL10016CP
 Telo Shower Mixing Valve TL10016CP Installation and Maintenance Instructions In this procedure document we have endeavoured to make the information as accurate as possible. We cannot accept any responsibility
TYNE. Installation and Operating Instructions. Thermostatic bath shower mixer. Installers please note these instructions are to be left with the user
 TYNE Thermostatic bath shower mixer Installation and Operating Instructions Installers please note these instructions are to be left with the user 2180426F - February 2013 CONTENTS Page Introduction...
PLEASE LEAVE THIS MANUAL WITH THE OSO UNIT AFTER INSTALLATION INSTALLATION MANUAL
 PLEASE LEAVE THIS MANUAL WITH THE OSO UNIT AFTER INSTALLATION SOLARCYL IM/SC INSTALLATION MANUAL This manual gives detailed advice for installation and should be read carefully prior to fitting any unvented
Enzo and Enzo Deluxe Safe Touch Thermostatic Shower EN10031CP & EN10035CP
 Enzo and Enzo Deluxe Safe Touch Thermostatic Shower EN10031CP & EN10035CP Installation and Maintenance Instructions In this procedure document we have endeavoured to make the information as accurate as
KAHO manual mixer shower
 KAHO manual mixer shower CAUTION! THIS PRODUCT IS NOT THERMOSTATICALLY CONTROLLED Installation and operating instructions Covering: Exposed and Built in fitting Installers please note these instructions
Rise. Digital. Bath with overflow filler. Rise Digital Bath installation instuctions page 1
 Rise Digital Bath with overflow filler The Waste Electrical and Electronic Equipment (Producer Responsibility) Regulation 2004 This product is outside the scope of the European Waste Electrical and Electronic
Installation Instructions & Maintenance Guide 6 Refit Nuts (19) and tighten.
 and tighten.") 3 Remove concealing plate KIRI Concealed Mixer Valve With Undo nuts (9) on both hot and cold inlets and remove filter washer Diverter (2 olts & Bath Fill) ABS (6) KIRI 3VDIVA 5 Rinse filter washers (6)
3 Remove concealing plate KIRI Concealed Mixer Valve With Undo nuts (9) on both hot and cold inlets and remove filter washer Diverter (2 olts & Bath Fill) ABS (6) KIRI 3VDIVA 5 Rinse filter washers (6)
Blueberry Kitchen Sink Tap
 Blueberry Kitchen Sink Tap Installation Instructions & User Guide Please keep these instructions for future reference and request of replacement parts Contents Thank you for choosing Bristan, the UK s
Cinnamon Kitchen Sink Tap
 Cinnamon Kitchen Sink Tap Installation Instructions & User Guide Please keep these instructions for future reference and request of replacement parts Contents Thank you for choosing Bristan, the UK s leading
PLEASE LEAVE THIS MANUAL WITH THE OSO UNIT AFTER INSTALLATION INSTALLATION MANUAL
 PLEASE LEAVE THIS MANUAL WITH THE OSO UNIT AFTER INSTALLATION 0 RD 0 RI 0000-06 IM/ IM/a INSTALLATION MANUAL This manual gives detailed advice for installation and should be read carefully prior to fitting
DUOPEX WATER MANUAL mm
 DUOPEX WATER MANUAL 32-63mm The DUOPEX WATER Pipe and Fitting System is designed for 32mm- 63mm potable hot and cold water applications. This revolutionary alternative for the professional plumber, makes
Where the tap has a removable aerator on the spout exit it can be removed and cleaned periodically to maintain optimum flow performance.
 TAP6000 3 in Hot Tap Guarantee (UK only): 04-7 Your tap has the benefit of a comprehensive manufacturer s guarantee, details of which are shown on your Proof of Purchase Document. Any claim during the
Alcor dual control mixer shower
 Alcor dual control mixer shower Installation and operating instructions INSTALLERS PLEASE NOTE THESE INSTRUCTIONS ARE TO BE LEFT WITH THE USER 2180442A March 2005 CONTENTS Page Introduction 1 Safety warnings
Monza Easyfit Kitchen Sink Mixer
 Monza Easyfit Kitchen Sink Mixer Installation Instructions & User Guide Please keep these instructions for future reference Contents Thank you for choosing Bristan, the UK s leading taps and showers expert.
FRESH FLOW WASTEWATER SYSTEM
 FRESH FLOW WASTEWATER SYSTEM Welcome to LEAP, a new name dedicated to providing the most advanced water systems in Australasia. LEAP aims to improve customers lives with innovative, sustainable, environmentally
Installation Instructions and User Guide. Thermostatic Recessed Dual Control Shower Valve. Models covered: CAS SHCVO C, COB SHCVO C, ORB SHCVO C,
 Installation Instructions and User Guide Thermostatic Recessed Dual Control Shower Valve Models covered: CAS SHCVO C, COB SHCVO C, ORB SHCVO C, EXD SHCVO C, SAI SHCVO C, GLR SHCVO C, BRG SHCVO C, HOU SHCVO
Parasitic Cysts - Cryptosporidium and Giardia, Chemicals, Heavy Metals, Dissolved Salts, Offensive Tastes and Odours, Sediment, Dirt,
 Aqua-Pure is a market leader in water filtration. In addition to our comprehensive range of Domestic Water Purifiers, we design and manufacture an extensive commercial and industrial range of purification
LP30 High Integrity Low Level Alarm Probe Installation and Maintenance Instructions
 4024750/9 IM-P402-44 AB Issue 9 LP30 High Integrity Low Level Alarm Probe Installation and Maintenance Instructions 1 General safety information 2 General product information 3 Installation 4 Wiring 5
Assessment Schedule - TS.6
 The Assessor shall determine the business s commitment and support to good and safe working practices; also that it has a positive culture in all aspects of its work. In particular, the assessor shall
Thermostatic mixing valves with interchangeable cartridges
 www.caleffi.com R37. Thermostatic mixing valves with interchangeable cartridges Installation, commissioning and servicing instructions 3 Series Function The thermostatic mixing valve is used in systems
Pear Kitchen Sink Tap
 Pear Kitchen Sink Tap Installation Instructions & User Guide Please keep these instructions for future reference and request of replacement parts Contents Thank you for choosing Bristan, the UK s leading
HW3 Handwash Installation and Operating Instructions
 HW3[16]instructions 10/12/15 14:05 Page 1 HW3 Handwash Installation and Operating Instructions IMPORTANT SAFEGUARDS SPECIFICATION: HW3 RATING: 230-240V, 3000W, ~50Hz; DIMENSIONS: 170w x 190h x 80d mm;
BASIN MIXERS INSTALLATION & AFTERCARE INSTRUCTIONS
 BASIN MIXERS INSTALLATION & AFTERCARE INSTRUCTIONS This guide covers the installation of all Tavistock basin mixer varients. Please select the installation diagram suited to the basin mixer you have purchased.
Enzo Safe Touch Thermostatic Shower EZ10010CP & EZ10014CP
 Enzo Safe Touch Thermostatic Shower EZ10010CP & EZ10014CP Installation and Maintenance Instructions In this procedure document we have endeavoured to make the information as accurate as possible. We cannot
RAMOR Shower Tower Thermostatic mixer Installation and Operating Instructions
 RAMOR Shower Tower Thermostatic mixer Installation and Operating Instructions Installers please note these instructions are to be left with the user 2180513B March 2006 CONTENTS Page Introduction 1 Safety
Model ESFR-17 Dry Type Pendent Sprinklers Early Suppression Fast Response 16.8 K-factor General Description
 Technical Services 800-381-9312 +1-401-781-8220 www.tyco-fire.com Model ESFR-17 Dry Type Pendent Sprinklers Early Suppression Fast Response 16.8 K-factor General Description The TYCO Model ESFR-17 Dry
Delphi dual control thermostatic mixer shower Installation and operating instructions
 Delphi dual control thermostatic mixer shower Installation and operating instructions Installers please note these instructions are to be left with the user 2180607B January 2009 Contents Page Introduction...1
UB110DNC/L/U/B BASIN MONOBLOC WITH NO POP-UP WASTE BASIN MONOBLOC TALL WITH NO POP-UP WASTE UB112DNC/L/U/B INSTALLATION INSTRUCTIONS
 BASIN MONOBLOC WITH NO POP-UP WASTE BASIN MONOBLOC TALL WITH NO POP-UP WASTE UB110DNC/L/U/B UB112DNC/L/U/B INSTRUCTIONS INTRODUCTION DIMENSIONS Please read these instructions carefully and keep in a safe
Water Heating UK 14 th May 2016
 Water Heating UK 14 th May 2016 Hot Water Storage Systems for Heating by Solid Fuel Appliances - General Requirements and Test Methods 1.0 Introduction All hot water storage systems installed in the UK
GENERAL FITTING GUIDE THERMOSTATIC BAR SHOWER MIXER with RIGID RISER KIT
 GENERAL FITTING GUIDE THERMOSTATIC BAR SHOWER MIXER with RIGID RISER KIT GUARANTEE & AFTERCARE When installing or using tools, extra care must be taken to avoid damaging the finish or fitting. To maintain
Unvented Calorifier Range. Operating and Maintenance Manual. For Models & 500
 Unvented Calorifier Range. Operating and Maintenance Manual. For Models 125 300 & 500 Telephone 08456 448802 Fax 08456 448803 Emial info@mhgheating.co.uk Web www.mhgheating.co.uk TABLE OF CONTENTS. Section
Dart Eco concentric thermostatic mixer shower
 Dart Eco concentric thermostatic mixer shower Eco Statement This product has been fitted with a flow regulator to deliver a maximum flow rate of 9 litres per minute. Installation and operating instructions
TRV & Lockshield Pack Angle Pattern Thermostatic Radiator Valve Vertical or horizontal mounting with (367 CPLS) matching lockshield
 matching lockshield") TRV & Lockshield Pack Angle Pattern Thermostatic Radiator Valve Vertical or horizontal mounting with (367 CPLS) matching lockshield GENERAL INFORMATION Size Pattern No. Pack 1 Qty Code Barcode Angle Pattern
TRV & Lockshield Pack Angle Pattern Thermostatic Radiator Valve Vertical or horizontal mounting with (367 CPLS) matching lockshield GENERAL INFORMATION Size Pattern No. Pack 1 Qty Code Barcode Angle Pattern
Target Monobloc Kitchen Mixer Chrome
 Target Monobloc Kitchen Mixer Chrome Installation Instructions & User Guide Please keep these instructions for future reference and request of replacement parts Contents Thank you for choosing Bristan,
H o t Wa te r Syste m s. Ultrasteel. Unvented Hot Water Cylinders. Exceeding the Standard
 H o t Wa te r Syste m s Unvented Hot Water Cylinders Ultrasteel Exceeding the Standard STEP UP TO... Ultrasteel... is the new Albion unvented hot water storage system. Based on the company s experience
SINGLE LEVER CERAMIC DISC MANUAL SHOWER VALVE
 SINGLE LEVER CERAMIC DISC MANUAL SHOWER VALVE (exposed/concealed) Shower control handles concealing plate & elbow may differ depending on Model OWNER S GUIDE Issue two INTRODUCTION This owner s guide shows
Installation and User Instructions Aquaheat Unvented Water Heaters Models: AH30H
 Installation and User Instructions Aquaheat Unvented Water Heaters Models: AH30H Please read and understand these instructions before starting work. Please leave this leaflet with the user following installation
Case Study - Yardley Park Road Gerpex MLCP and Press Fit System, Underfloor Heating and Manifold Based Sanitary Systems
 Engineered Water Solutions Case Study - Yardley Park Road Gerpex MLCP and Press Fit System, Underfloor Heating and Manifold Based Sanitary Systems www.emmeti.co.uk Site Summary The project, located in
INSTALLATION MANUAL. Ecoline Geo RI HP PLEASE LEAVE THIS MANUAL WITH THE OSO UNIT AFTER INSTALLATION
 PLEASE LEAVE THIS MANUAL WITH THE OSO UNIT AFTER INSTALLATION Ecoline Geo RI HP INSTALLATION MANUAL The Ecoline GEO is an indirect unvented cylinder designed and approved for use with a heat pump. The
SEALED THERMAL STORE
 ISSUE 3 0717 INSTALLATION AND USER GUIDE ENERGYMANAGER SEALED THERMAL STORE ADVANCE APPLIANCES LTD PLEASE RETAIN AND ENSURE SERVICE RECORDS ARE KEPT UP TO DATE. SCHEMATIC DIAGRAM OF ENERYMANAGER THERMAL
Product and installation manual. Underfloor Heating
 Product and installation manual Contents Introduction 2-3 Why Choose? 2 Why Hep 2 O UFH? 2 Choosing a System The Three Essential Elements 3 Floor Products 4-5 Staples System 4 System Plates 4 Dry Construction
Smile Tap Range. Installation Instructions & User Guide. Please keep these instructions for future reference and request of replacement parts
 Smile Tap Range Installation Instructions & User Guide Please keep these instructions for future reference and request of replacement parts Contents Thank you for choosing Bristan, the UK s leading taps
Straight pattern thermostatic radiator valve vertical or horizontal mounting with (368T CPDLS) matching drain off lockshield
 matching drain off lockshield") Straight pattern thermostatic radiator valve vertical or horizontal mounting with (368T CPDLS) matching drain off lockshield Straight pattern TRV & drain off lockshield pack Size Pattern No. Pack 1 Qty
Straight pattern thermostatic radiator valve vertical or horizontal mounting with (368T CPDLS) matching drain off lockshield Straight pattern TRV & drain off lockshield pack Size Pattern No. Pack 1 Qty
FIXATE mini exposed sequential thermostatic mixer shower
 FIXATE mini exposed sequential thermostatic mixer shower Installation and operating instructions Installers please note these instructions are to be left with the user The showerhead and hose supplied
Beeline Monobloc Kitchen Mixer Tap
 Beeline Monobloc Kitchen Mixer Tap Installation Instructions & User Guide Please keep these instructions for future reference and request of replacement parts Contents Thank you for choosing Bristan, the
Oltis thermostatic bar mixer
 Oltis thermostatic bar mixer Installation and operating instructions Installers please note these instructions are to be left with the user 2180564E February 2009 CONTENTS Page Introduction... 1 Safety
CEILING FED RISER RAIL KIT. Installation Guide. tritonshowers.co.uk/digital
 CEILING FED RISER RAIL KIT Installation Guide tritonshowers.co.uk/digital 2181533B - December 2017 CONTENTS General installation & safety notes (please read)... Installation options... Main components...
Inta City Concealed Shower Mixing Valve CT80010CP
 Inta City Concealed Shower Mixing Valve CT80010CP Installation and Maintenance Instructions In this procedure document we have endeavoured to make the information as accurate as possible. We cannot accept