Technical data. Bathroom/shower room installations. Water services (WRAS approved)
|
|
|
- Felicia Robertson
- 6 years ago
- Views:
Transcription
1
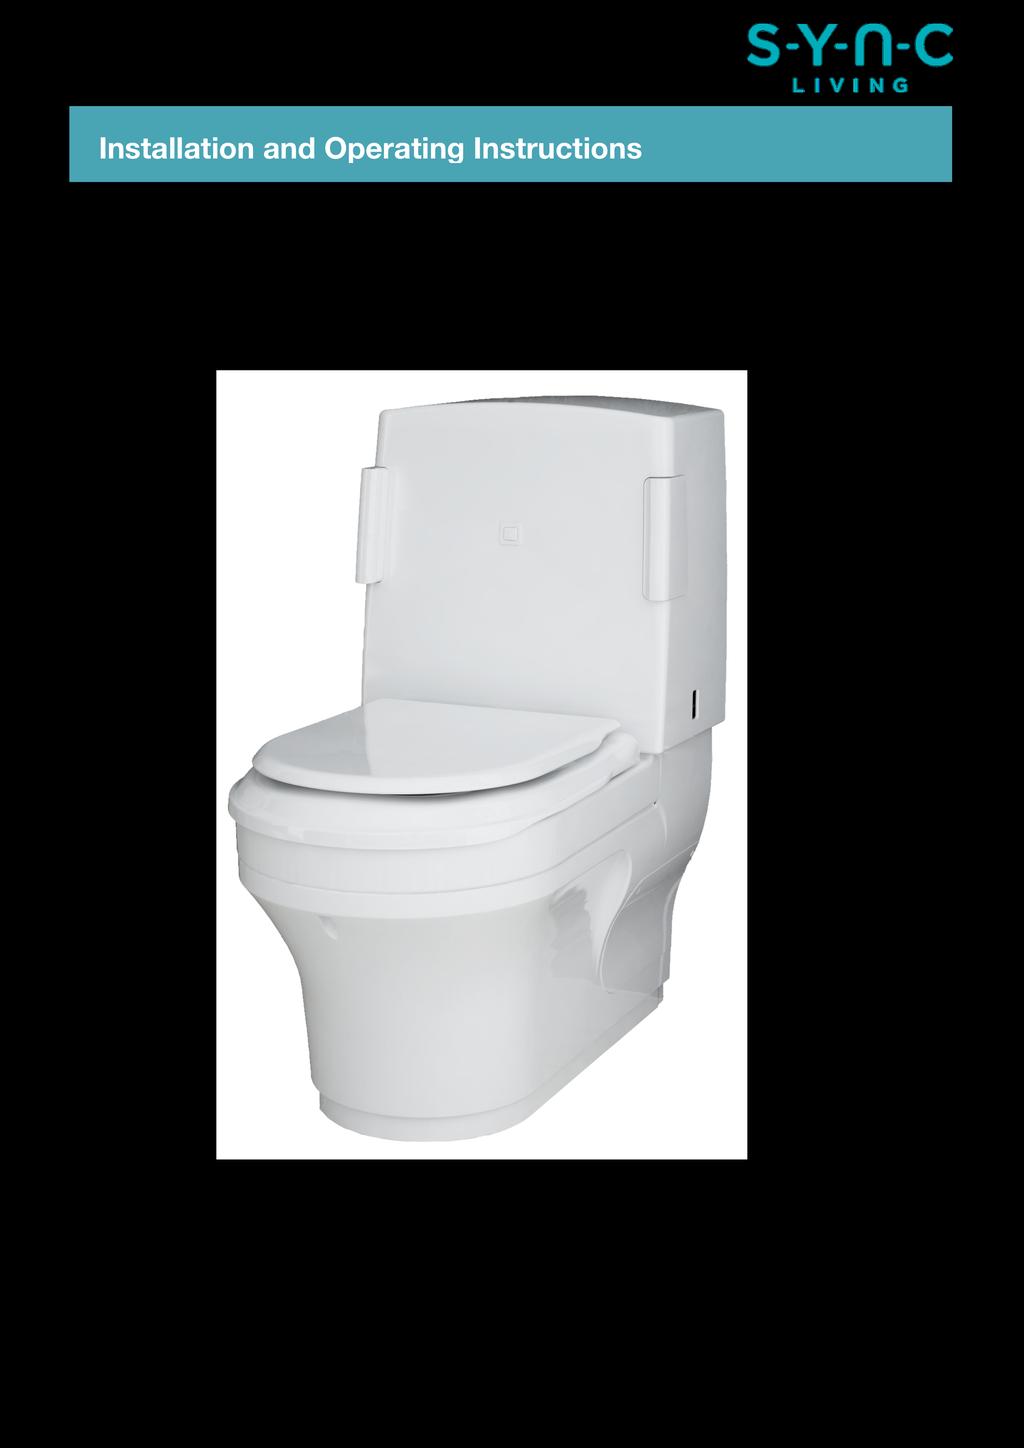
2 Technical data The Closomat toilet MUST be installed by a competent or qualified person. Explanation of symbols Safety instructions in this manual are identified by symbols. The safety instructions are introduced by signal words, which express the extent of the hazard/ risk. IEC TYPE B APPLIED PART IEC Safety 01 b Follow operating instructions In order to prevent accidents, personal injury, property damage and guarantee maximum user safety, follow the safety instructions without fail and exercise caution. Description of equipment The Closomat toilet is an electrically operated wash and dry toilet designed to provide the operator/user with a hygienic solution to toileting. Start-up procedure To enable a warm washing cycle operation the Closomat toilet must be switched on. Each Closomat toilet has its own isolation switch. To switch the unit on, the location for each switch is as follows; Palma Vita Right hand side of unit, at the base of the cistern cover, through a Perspex screen. Lima Vita Right hand side of unit, at the base of the cistern cover, through a Perspex screen. Once switched on, the water will reach core temperature within 5 minutes. It is advised that to maintain the core temperature in readiness for use, the unit be left switched on at all times. Electrical services To avoid the risk of electric shock, this equipment MUST only be connected to a supply mains with protective earthing by a competent or qualified person. Mains isolation All electrical appliances must be installed in accordance to the relevant regulations associated with the country it is within. To conduct any form of repairs or servicing it is recommended that a mains isolation device be located in the vicinity of the unit. 220/240v single phase AC supply is required, (loading 10A, maximum power 1300 watts). The Closomat Palma toilet is supplied with a 3 core cable attached and MUST NOT be removed or replaced. A fused spur is required for isolation. Spur outlet to be located in accordance with current I.E.E. Regulations (Current Edition). No modification of this unit is allowed other than by the manufacturer. Closomat has IPX4 rating. Shutdown procedure For normal isolation, the Closomat toilet can be turned off using the integrated switch. To carry out any servicing, the unit MUST be isolated at the mains feed. Bathroom/shower room installations The Closomat toilet must not be in direct line with the shower spray. Some form of partition between shower and the Closomat toilet is advisable to prevent any water spraying directly onto the equipment. A shower should not be used in conjunction with the Closomat toilet i.e. under no circumstances must a user shower whilst seated on the Closomat toilet. Water services (WRAS approved) It is essential that the entering water is cold. We would recommend water supply isolated via isolation valve. Water supply can be from storage vessel or mains ( Grey Water MUST NOT BE USED). Boiler Capacity: 1.7 litres. Water rate: min. 8 l/min. max. 0.8 PMa (8 bar) Cistern capacity: 6 litres. Overflow The Closomat toilet has an internal overflow which discharges into the W.C. pan through the flush valve. Soil connection Relevant soil connector to be sourced by installer. Soil connections suitable for Closomat toilet; S-Trap (vertical fall) wall to centre of pipe from 70mm-230mm max. P-Trap (horizontal) floor to centre of pipe 200mm max. The Closomat toilet is suitable for all turned trap outlets, through purpose made removable side covers on lower level. 2
3 Further notes No permanent hand rails or other obstructions should be fitted across the front or top of the unit. The outer casing has to be pulled upwards and forward to remove for servicing purposes. Unit not rated for altitude. 2000m is the maximum. This application requires an earth connection. Environmental conditions operating ambient room temperature maximum = 60 C. Environmental conditions The Closomat toilet is rated to IPX4 and can be installed and operated within a typical shower/toilet room. Infill panel The infill panel specifications are printed on page 11. Classification Medical Device Class 1 certified EN : 2007/AC: Cleaning information The use of bleach products is not advised due to the exposed stainless metal parts associated with the washing device. (tarnishing may occur). The Closomat toilet washing device is designed to self cleanse during and after every use. Normal cleansing of the bowl and outer covers is required. Maintenance and frequency of serviceable parts The Closomat toilet is self-sufficient but it is recommended that a competent experienced Service Engineer carry out a safety check and an annual service of the internal workings, to extend the Closomat s life. Risk associated with the waste of equipment after service life At the stage the unit is not repairable it can be discarded to any appropriate recyclable plant. There are no immediate risks to the environment. User guide Flushing Press either elbow pad whilst standing for conventional flush. Washing Press elbow pad whilst seated and hold down for approximately seconds, flushing and warm water washing will then take place. Drying Warm air drying automatically follows when elbow pad is released. 3
4 Palma Vita planning data and service requirements D Key / Installation guide: J 1. Determine unit height as standard or with optional points (P) 2. Locate floor & wall template jig to plan positions (J) 3. Locate waste pipe / soil position (S) 4. Locate cold water supply (W) 5. Locate electrical supply (E) 6. Use floor template jig for fixing frame (J) W S E R Floor & Wall Templates Located in Document Box S J F W Water services Supplied with 15mm Stainless steel braided outer, EDM inner WRAS approved flexible hose. (Please refer to page 2, water services prior to installation) E Electrical services Supplied with 1000mm long, three core (live/neutral/earth) insulated 3183Y-1-white control flex-cable, rated to 220V/240V, 10 amps. (Please refer to page 2, electrical services prior to installation) S Waste details Pan has a horizontal spigot standard 100mm diameter outlet, suitable for standard pan connection fittings. D Rear wall fixing Position 25mm to RH of the centreline. 810mm from the floor. R Rear floor fixing (2No) (Standards Installations) Position on the floor 102mm from the rear wall mm to each side of the centreline. F Front floor fixing (2No) (When using Support Arms) Position on the floor 327mm from the rear wall mm to each side of the centreline. PALMA VITA V, 50hz 10A IPX4 Tel: Maximum weight limit: 190Kg 30St Overall dimensions: 869mm high x 451mm wide x 730mm deep 4


.")
5 Installation IMPORTANT: Please retain all packaging until the installation is complete. Protect all floor surfaces when handling the Closomat. DO NOT slide the Closomat across the flooring. 1 To lift the Closomat use the porcelain flushing edge at the front and the steel frame at rear, and lift it out of the bottom of the packing. 2 Remove the seat Open the lid. Press and hold the seat hinges together with both thumbs whilst firmly gripping the outer edges of the seat. Now pull upwards sharply. 3 Carefully loosen and pull out the covering cap on the cistern housing. 4 Loosen the screw of the cistern housing completely, but do not remove it. 5 Gently lift the cistern housing upwards (small arrow) and then pull it forward and off (large arrow). 6 Loosen and remove the front screw. 7 Unhook the fixing adjuster brackets from the frame. 8 Repeat unhooking on opposite side ensuring cover is free. 9 Pull away cover once adjuster brackets are loose. 5
 10 Using the template provided proceed to set 11 Drill")


6 Installation (cont.) 10 Using the template provided proceed to set 11 Drill suitable holes in the floor to suit the the Closomat s position in the bathroom. floor fixings (depending on floor finish). PLEASE NOTE Two templates are provided: One for floor installations and One for wall installations 12 Locate your services, with the electrical isolation positioned outside the confines of the toilet covers. Spur outlet to be located in accordance with current I.E.E. Regulations (Current Edition). 13 Cold water connection is via a 15mm connection pipe at the rear of the unit. We recommend the supply pipe enter the unit through the floor or through the wall. If side entry is necessary then a suitable infill panel will be required. The provision of an isolation valve is always recommended. 14 Position the Closomat and place the anchor blocks in place. 15 Fix the Closomat to the floor. Note technical information as to how many fixings should be used for different circumstances. 16 Anchor the Closomat to the rear wall for stability. 17 Remove the skirt from inside the bowl cover and insert skirt locators supplied loose. 18 Place the lower skirt around the base of the frame. 19 Ensure the skirt locator is engaged to the frame. 6
 until it reaches its mechanical stop and hold it with your free hand.")
.")


.")

7 Test procedure 1 Insert the special tool into the douche arm from below (arrow). 2 Pull out the douche arm using the special tool with force against the spring pressure (arrow) until it reaches its mechanical stop and hold it with your free hand. Once fully extended use the opposite end of the tool and locate in the slot in the douche arm to anchor it as shown. 3 Locate on/off switch and click to position 1 the switch will glow blue. 4 Check the circuit board to see that the boiler light is illuminated red. If this light is not glowing, press the red reset button (see inset). Once the boiler is up to temperature, the red light will go out. 5 IMPORTANT Place perspex guard over pan to avoid accidental spraying. 6 Whilst depressing the right hand seat hinge, hold in the flush lever to activate warm water washing. 7 Rotate the adjusting screw on the pump lever on the right side of the toilet in clockwise motion. The rinsing stream is intensified. Rotate the adjusting screw on the pump lever in anti-clockwise motion. The rinsing stream is diminished. 8 Fill Closomat with water and switch on electricity supply; allow approximately 5 minutes for water in heating compartment to reach operating temperature. Check for any leaks on the unit or connections. 9 Check manual flushing of the unit by pressing either of the two elbow pads. 10 Lift the seat lid and press downwards at back (this closes switch in hinge normally operated by user sitting down). With this depressed, press either elbow pad and keep pressed. Douche arm will now emerge from housing and spray with warm water. As the arm emerges cover spray with other hand and allow water to run cool (approx seconds). Release elbow pad, but maintain pressure on seat lid; the douche will now retract and warm air dryer will operate until cycle is completed i.e. until the seat switch is released. note The Closomat will not function automatically if the seat switch is not depressed. T h e u n i t s h o u l d b e s w i t c h e d o n e l e c t r i c a l l y a t a l l times when in service. check procedure 1 Ensure electrical supply is connected to unit, and switched on: check that correct fuse is fitted. 2 Ensure water supply is turned on and that the ball valve is allowing water to enter the cistern and shutting off at correct level. Ensure flow of water is adequate to keep douche supplied. 3 Ensure rear of seat is depressed. 4 Keep elbow pad depressed until water runs cold. Keep seat depressed while hot air is operating. note Foot switch, hand switch or remote switch, if fitted, will operate exactly as elbow pads. Douche temperature and pressure are preset at factory, and adjustments should only be carried out by Closomat engineers familiar with the equipment. 7


8 Finishing the installation 1 On completion of installation and test procedure, replace bowl cover. 2 Hook brackets into position. Where necessary adjust to provide a water tight seal, adjust the rising block until the seals are tight against the porcelain. 3 Replace and tighten the front screw. 4 Now locate the cistern cover in place, making sure the window in the right hand displays the on/off switch. 5 Tighten the screw of the flush tank housing completely. 6 Carefully tighten and push in the seat buffer on the cistern housing. 7 Replace the seat by locating the hinge pins in the corresponding holes in the pan press the seat firmly to secure its position. 8 Complete the installation by testing the Closomat works by again depressing the seat and holding in one of the elbow levers ensuring the perspex guard is in place. Please advise us of installation address in order that we can arrange the commission and activate the 12-month guarantee. 8


9 Side entry pipes 1 With a sharp implement, remove the side panel screw covers. 2 Remove the screw and set aside. 3 Remove the side panel. 4 Install the side entry pipe scribing the side panel to suit each location, refit the side panel and screw covers on completion. Installation on a plinth 1 Using the template locate the four fixing positions for the plinth, drill suitable holes in the floor to suit the floor fixings (depending on floor finish). 2 Locate the plinth and secure to the floor using all four fixing points. 3 Locate the Closomat over the plinth. 4 Using ALL four blocks anchor the Closomat to the plinth. 9
10 Palma integrated fold-down support arms installation Armrest Left Hand Stainless Pivot Bearing HoLE CuTTINg PoSITIoN for outer CovEr IS measured To CENTrE of arm BraCkET on frame m20 Bolt Important Bolt must not rotate when the armrest is moved. Pivot Block End Cap Nylon Washer Pivot Block 50mm Dia. Belville Washer Important Ensure Belville Washer is assembled correctly with the dome towards the bolt head Pivot Block Washer Inserted on to Pivot Block Nylon Trim Washer Hole diameter 54mm minimum 60mm maximum How to drill holes in the cover if armrests are fitted Measure from upper side of porcelain pan to centre of arm fixing point approx. 207mm 210mm Measure 367mm from rear of unit to centre of arm fixing point 10


11 Palma integrated fold-down support arms technical data 373 Fixing positions Infill panel The infill panel has been designed to aid installation where pipe-work inhibits the Closomat toilet from being located against the wall. It is also to be used in conjunction with an extended douche arm, where channelling the rear wall is not an option. Infill panel available in thickness sizes 25mm, 50mm & 75mm. Infill panel is 100mm taller than Closomat toilet. It must be cut from bottom to suit finished toilet height. 11
Closomat Lima Vita installation & user guide
 Closomat Lima Vita installation & user guide design manufacture supply install service recycle Technical data The Closomat toilet MUST be installed by a competent or qualified person. Explanation of symbols
Quartz. Thermo. Concealed shower valve with adjustable head. Quartz Thermo installation guide page 1
 Quartz Thermo Concealed shower valve with adjustable head Quartz Thermo installation guide page 1 Shower systems Components Quartz Thermo built-in shower valve with adjustable head QZ3111 Quartz Thermo
OWNERS INSTRUCTION MANUAL
 OWNERS INSTRUCTION MANUAL 132CM/52 Classic INSTALLATION OPERATION MAINTENANCE CAUTION READ INSTRUCTIONS CAREFULLY FOR SAFE INSTALLATION AND FAN OPERATION. IF UNSURE CONSULT A QUALIFIED ELECTRICIAN SUITABLE
HW3 Handwash Installation and Operating Instructions
 HW3[16]instructions 10/12/15 14:05 Page 1 HW3 Handwash Installation and Operating Instructions IMPORTANT SAFEGUARDS SPECIFICATION: HW3 RATING: 230-240V, 3000W, ~50Hz; DIMENSIONS: 170w x 190h x 80d mm;
PARTS & ACCESSORIES INSTALLATION AND SAFETY INSTRCUTIONS ITEM NO.:60006PC SAFETY PRECAUTION. Canopy. Downrod. Housing. Blade. Transmitter CR2032/3V
 L I G H T I N G INSTALLATION AND SAFETY INSTRCUTIONS ITEM NO.:000PC SAFETY PRECAUTION PARTS & ACCESSORIES Canopy Downrod Housing IMPORTANT : PLEASE READ BEFORE INSTALLATION.. Do not connect this remote
(3 plastic wire connectors,blade balancing kit, 2 extra mounting screws #10-32 for outlet box.)
") Excel Lighting & Manufacturing Ltd. Lifetime Limited Warranty Excel Lighting & Manufacturing Ltd. Warrants the fan motor to be free from defects in workmanship and material present at time of shipment
Excel Lighting & Manufacturing Ltd. Lifetime Limited Warranty Excel Lighting & Manufacturing Ltd. Warrants the fan motor to be free from defects in workmanship and material present at time of shipment
ER MANUAL FOR YOUR BAUMATIC
 BW18BL 50 litre thermoelectric beverage centre BW28BL 70 litre thermoelectric beverage centre ER MANUAL FOR YOUR BAUMATIC BW18BL 50 litre thermoelectric beverage centre BW28BL 70 litre thermoelectric beverage
PARTS & ACCESSORIES INSTALLATION AND SAFETY INSTRCUTIONS ITEM NO.:60010BZGTGLD SAFETY PRECAUTION. Canopy. Downrod. Housing. Transmitter CR2032/3V
 L I G H T I N G INSTALLATION AND SAFETY INSTRCUTIONS ITEM NO.:000BZGTGLD SAFETY PRECAUTION PARTS & ACCESSORIES Canopy Downrod Housing WARNING To make sure power is off before attempting installation. WARNING
Lo-Carbon T-series Window & Roof Models
 Lo-Carbon T-series Window & Roof Models Installation & User Instructions WIRED 456165A (9 WW) 456168A (9 RF) 456173A (12 WW) 456176A (12 RF) WIRELESS 456169A (9 WW) 456172A (9 RF) 456177A (12 WW) 456180A
52 SAN LUCAS CEILING FAN
 52 SAN LUCAS CEILING FAN Owner s Manual Models #20551 If a problem cannot be remedied or you are experiencing difficulty in installation, please contact the Service Department: 1-877-459-3267, 9 a.m.-
Quartz. Digital. Concealed with adjustable height and fixed head. Quartz Digital concelaed adjustable/fixed installation instuctions page 1
 Quartz Digital Concealed with adjustable height and fixed head The Waste Electrical and Electronic Equipment (Producer Responsibility) Regulation 2004 This product is outside the scope of the European
POWER SHOWERS Models 4500M 5002M 4500T 5002T
 II POWER SHOWERS Models 4500M 5002M 4500T 5002T Performance Shower Products CUSTOMER SERVICE HELPLINE: 01883 730339 CONTENTS PLEASE READ THESE INSTRUCTIONS CAREFULLY: This booklet covers all models in
Autofill wall mounted water. boiler. Getting the best from your water. boiler. Please read and keep these instructions
 Autofill wall mounted water boiler Please read and keep these instructions For Burco wall mounted boilers 76700 (SKU 444448534), 76702 (SKU 444448546), & 76704 (SKU444448548) Getting the best from your
T-SERIES. Window & Roof Models. Installation, Set-up and Operating Instructions. 230V/1/50Hz
 T-SERIES Window & Roof Models Installation, Set-up and Operating Instructions Stock Ref. Nos. WIRED 456165A (9" WW) 456168A (9" RF) 456173A (12" WW) 456176A (12" RF) WIRELESS 456169A (9" WW) 456172A (9"
CREDA STORAGE RADIATORS
 5411160 Issue 1 July 99 CREDA STORAGE RADIATORS Models Covered:- AUTOMATIC 79331S 79341S 79351S 79361S (0.85kW) (1.7kW) (2.55kW) (3.4 kw) MANUAL 79334S 79344S 79354S 79364S (0.85kW) (1.7kW) (2.55kW) (3.4kW)
HEATRAE SADIA. Installation and User Instructions for the UTC Undersink Vented Water Heater
 HEATRAE SADIA The quality name in water heating Installation and User Instructions for the UTC Undersink Vented Water Heater UTC 15 Please read and understand these instructions before starting work. Please
T-SERIES. Wall & Panel Models. Installation, Set-up and Operating Instructions. 230V/1/50Hz
 T-SERIES Wall & Panel Models Installation, Set-up and Operating Instructions Stock Ref. Nos. WIRED 456166A (9" WL) 456167A (9" PL) 456174A (12" WL) 456175A (12" PL) WIRELESS 456170A (9" WL) 456171A (9"
COOKER HOOD USER MANUAL
 COOKER HOOD USER MANUAL TROUBLE SHOOTINGS CAUTION: Disconnect the power supply before servicing. STATUS The power supply is damaged CAUSE AND METHOD OF REPAIRING If the power supply is damaged,please call
INSTANTANEOUS ELECTRIC SHOWER
 GUARANTEE / SERVICE POLICY INSTANTANEOUS ELECTRIC SHOWER GUARANTEE Designa guarantee this DS3000 product for a period of two years, from date of purchase, against mechanical and electrical defects arising
Thermostatic bar mixer valve with adjustable head Installation guide
 Bar valve Thermostatic bar mixer valve with adjustable head Installation guide Index Introduction p.3 - Safety information p.3 - Product specification p.3 Connection to supplies p.3 - Flushing p.4 - Filters
In Intimate Cleanliness
 The Ultimate In Intimate Cleanliness THE ORIGINAL SHOWER TOILET I am confident that I am really clean. I have my independence, to go whenever I need WE CARE ABOUT YOUR INTIMATE CARE On a business trip
Please read and save these instructions. Should you have any questions or difficulty installing your fan, call us first!
 IC/Air2 and IC/Air3 Installation Instructions and Owners Manual Please read and save these instructions. Should you have any questions or difficulty installing your fan, call us first! Customer Service
doc.m rimless super pack
 433 APRIL 2013 * * LESS ABLE 12:1:434 doc.m rimless super pack modern rimless design 4 litre flush Doc.M rimless super pack with white grab rails & seat. Right hand installation shown. Doc.M rimless super
Imperial Electric Fires
 Imperial Electric Fires GB IE MODELS: Flamescape II Curvascape II manual & remote. Installation and User Instructions PLEASE READ THESE INSTRUCTIONS CAREFULLY AND RETAIN FOR FUTURE REFERENCE This electric
Unvented Electric Water Heater 10/15 litre Undersink
 Unvented Electric Water Heater 10/15 litre Undersink Fitting Instructions and User Guide 1 CONTENTS SECTION PAGE 1.0 INTRODUCTION 2 2.0 TECHNICAL SPECIFICATION 3 3.0 INSTALLATION 4 4.0 COMMISSIONING 9
52 BARSTOW CEILING FAN
 52 BARSTOW CEILING FAN Owner s Manual Models #20519 If a problem cannot be remedied or you are experiencing difficulty with installation, please contact the Service Department: 1-877-459-3267, 9 a.m.-
Owner s Manual FS-10/FreshSpa
 Owner s Manual FS-10/FreshSpa Table of Contents Product Features................ Page 2 Parts List....................... Page 3 Configuration................... Page 4 Installation.....................
INSTALLATION INSTRUCTION for ceiling fan
 INSTALLATION INSTRUCTION for ceiling fan F8203 Installation & Operating Instructions for the Parrotuncle Owner s Installation,Manual Motor is core parts of the fan and the most expensive in all the components.
PRESSURE WASHER MODEL NO: JETSTAR 1750 OPERATION & MAINTENANCE INSTRUCTIONS. WARNING Read the instructions before using the machine PART NO:
 WARNING Read the instructions before using the machine PRESSURE WASHER MODEL NO: JETSTAR 1750 PART NO: 7333230 OPERATION & MAINTENANCE INSTRUCTIONS LS0711 INTRODUCTION Thank you for purchasing this CLARKE
Installation Instructions
 Installation Instructions KFN 9855 ide en - CA Installation, repair and maintenance work should be performed by a Miele authorized service technician in accordance with national and local safety regulations
MIX Boiler & Font Range Service Manual
 MIX Boiler & Font Range Service Manual 1000870# 1000871# 1000875# 1000880# 1000887# 1000878 1000879 2300268 www.marcobeveragesystems.com Ireland Tel: +353 (1) 295 2674 UK Tel: +44 (0207) 2744577 Service
Operator s Manual. Stripping Solution Applicator
 Operator s Manual Stripping Solution Applicator Record this Important Information Date of Purchase Purchased From Address City State Zip Phone Contact Serial Number Emergency Contacts Medical Emergency
PLEASE READ INSTRUCTIONS IN CONJUNCTION WITH ILLUSTRATIONS.
 Silhouette Lo-Carbon RANGE 100/150mm AXIAL EXTRACT FAN Installation and Wiring Instructions Stock Ref. N 44 16 24-100B 44 16 25-100T 44 16 26-100HT 44 16 28-150B 44 16 29-150T 44 16 30-150HT 220-240V~50Hz
Hand Dryer Installation & User Manual
 Hand Dryer Installation & User Manual Please read instructions in conjunction with the illustrations Please save these instructions. Safety & Guidance notes Important:- Read all these instructions before
Here is what comes in your box:
 Here is what comes in your box: We recommend that you pull everything out of the box and lay it out. We have grouped the drawn components below with the hardware you ll need for those parts. The screws
Autofill counter top water boiler
 Autofill counter top water boiler Please read and keep these instructions For Burco counter top water boilers 76500 (SKU 444448531) and 76502 (SKU 444448533) Getting the best from your water boiler Remove
SERVICE MANUAL DISHWASHERS DIVA ACCESSIBILITY DISHWASHERS
 SERVICE MANUAL DISHWASHERS DIVA ELECTROLUX HOME PRODUCTS S.p.A. Publication no. Spares Operations Italy Corso Lino Zanussi,30 I - 33080 PORCIA /PN (ITALY) 599 38 70-09 Fax +39 0434 394096 EN DISHWASHERS
Ceiling Fan Installation Instructions
 Owner s Manual Ceiling Fan Installation Instructions Total fan weigh with light For 5AYR54 Series Fans READ AND SAVE THESE INSTRUCTIONS Quality Ceiling fans 1. 2. 3. 4. 5. 6. 7. 8. 9. 10. 11. 12. 13. 14.
CARVER CASCADE 2 & CASCADE 2 GE CARAVAN WATER HEATER INSTALLATION INSTRUCTIONS LEAVE THESE INSTRUCTIONS WITH THE USER
 CARVER - CASCADE 2 & CASCADE 2 GE CARAVAN WATER HEATER INSTALLATION INSTRUCTIONS LEAVE THESE INSTRUCTIONS WITH THE USER 1:0 SPECIFICATIONS Water capacity Water connections Water supply 9 litres (2 gallons)
INFRARED IP55 HEATER INSTRUCTIONS FOR: MODEL:- QZWP45N 1. SAFETY INSTRUCTIONS
 INSTRUCTIONS FOR: INFRARED IP55 HEATER MODEL:- QZWP45N Thank you for purchasing a Consort Claudgen product. Manufactured to a high standard this product will, if used according to these instructions and
PARTS WASHER Model: CW1D Part No:
 PARTS WASHER Model: CW1D Part No: 7630900 OPERATING & MAINTENANCE INSTRUCTIONS GC01/12 INTRODUCTION Thank you for purchasing this CLARKE Parts Washer. Before using the product, be sure to read these instructions
Model 1174 Electric Heater User instructions for LED effect 2kw Inset Heater
 200688_6 Page 1 Model 1174 Electric Heater User instructions for LED effect 2kw Inset Heater These instructions should be read carefully and retained for future reference Important Notes This heater must
Manual and Thermostatic Power Shower Units
 520M/520TS Manual and Thermostatic Power Shower Units Installation instructions & User guide IMPORTANT: This booklet should be given to the customer after installation and demonstration. WARNING: Under
Hanson LED C e i l i n g F a n
 Hanson LED C e i l i n g F a n model no. 052-8398-2 Toll-free 1-866-827-4985 IMPORTANT: For your safety please read and understand this manual before installing or operating this product. OWNER S MANUAL
Installation Instructions
 Installation Instructions Over the Range Microwave Oven PVM88 Questions? Call -800-56-44 or Visit our Website at: GEAppliances.ca BEFORE YOU BEGIN Read these instructions completely and carefully. IMPORTANT
SERVICE MANUAL. Ecoboiler Model range: T20 ( ) T30 ( )
 T30 ( )") SERVICE MANUAL Ecoboiler Model range: T20 (1000662) T30 (1000663) Marco Beverage Systems Ltd. 63d Heather Road, Sandyford Industrial Estate, Dublin 18, Republic of Ireland Ireland Tel: (01) 295 2674 Ireland
SERVICE MANUAL Ecoboiler Model range: T20 (1000662) T30 (1000663) Marco Beverage Systems Ltd. 63d Heather Road, Sandyford Industrial Estate, Dublin 18, Republic of Ireland Ireland Tel: (01) 295 2674 Ireland
TECHNICAL INFORMATION Touchtronic Clothes Dryers
 TECHNICAL INFORMATION Touchtronic Clothes Dryers Includes: T1302, T1303, T1322, T1329ci T1403 & T1405 2004 Miele This page intentionally left blank. Table of Contents GENERAL INFORMATION A. Warning and
BWTC6510GL Cooker Hood 60 cm Glass cooker hood in stainless steel. BWTC9510GL Cooker Hood 90 cm Glass cooker hood in stainless steel
 User Manual for your BWTC6510GL Cooker Hood 60 cm Glass cooker hood in stainless steel BWTC9510GL Cooker Hood 90 cm Glass cooker hood in stainless steel NOTE: This User Instruction Manual contains important
Aqua & Instantaneous Electric Shower Installation Instructions SERVICE POLICY
 SERVICE POLICY In the event of you needing to contact the Galaxy Customer Service Department, the following procedure should be followed:- 3 5 Before telephoning the Galaxy Customer Service Department
Aquamixa. Thermo. Thermostatic shower valve with manual bath fill
 Aquamixa Thermo Thermostatic shower valve with manual bath fill Aquamixa Thermo thermostatic shower valve with manual bath fill installation instuctions page 1 Shower systems Aquamixa Thermo (300.01) with
OPERATING & MAINTENANCE INSTRUCTIONS
 PARTS WASHER MODEL NO: CW1D PART NO: 7630900 OPERATING & MAINTENANCE INSTRUCTIONS ORIGINAL INSTRUCTIONS GC0318 REV 4 INTRODUCTION Thank you for selecting this CLARKE Parts Washer. Before using the product,
Quartz. Digital. Bath with bath waste filler. Quartz Digital Bath with bath waste filler installation instuctions page 1
 Quartz Digital Bath with bath waste filler The Waste Electrical and Electronic Equipment (Producer Responsibility) Regulation 2004 This product is outside the scope of the European Waste Electrical and
Glass Chimney Hood. Installation & User Instructions Please keep for future reference
 Glass Chimney Hood Installation & User Instructions Please keep for future reference 4897549 4897556 Important Please read these instructions fully before installing or using These instructions contain
Table of Contents. What to Expect with. Mounting Options. Tools Needed
 www.hunterfan.com Table of Contents What to Expect with Your Installation Congratulations on purchasing your new Hunter ceiling fan! It will provide comfort and performance in your home or office for many
AQUA PREMIER ELECTRONIC ELECTRIC SHOWER. Installation and User Guide
 AQUA PREMIER ELECTRONIC ELECTRIC SHOWER Installation and User Guide IMPORTANT: This booklet should be left with the user after installation and demonstration CONTENTS Section Page Section Page Introduction.......................
PERFECT FIT IN-DASH HEAT/ COOL/ DEFROST 1968 CHEVROLET IMPALA
 specializing in AIR CONDITIONING, PARTS AND SYSTEMS for your classic vehicle PERFECT FIT IN-DASH HEAT/ COOL/ DEFROST 1968 CHEVROLET IMPALA CONTROL & OPERATING INSTRUCTIONS The controls on your new Perfect
Mix Boiler & Font Range ( #, #, #, , )
") Mix Boiler & Font Range (1000870#, 1000871#, 1000880#, 1000878, 1000879) Service Manual Marco Beverage Systems Ltd. 63d Heather Road, Sandyford Industrial Estate, Dublin 18, Republic of Ireland Ireland
Mix Boiler & Font Range (1000870#, 1000871#, 1000880#, 1000878, 1000879) Service Manual Marco Beverage Systems Ltd. 63d Heather Road, Sandyford Industrial Estate, Dublin 18, Republic of Ireland Ireland
SHORT WAVE INFRARED PANEL DRYER
 INSTRUCTIONS FOR: SHORT WAVE INFRARED PANEL DRYER MODEL: IR3000 Thank you for purchasing a Sealey product. Manufactured to a high standard this product will, if used according to these instructions and
52 STRATHMERE CEILING FAN
 52 STRATHMERE CEILING FAN Owner s Manual Models #20341 If a problem cannot be remedied or you are experiencing difficulty with installation, please contact the Service Department: 1-877-459-3267, 9 a.m.-
Table of Contents What to Expect with Your Installation. Top Housing. Ceiling Plate. Tools Needed.
 Table of Contents Congratulations on purchasing your new Hunter ceiling fan! It will provide comfort and performance in your home or office for many years. This installation and operation manual contains
The Professional s Choice
 CPF Series Models: CPF2100, CPF210, CPF310, CPF4100-3, CPF4100-6 & CPF6100 Auto-Fill Catering Water Boiler With Integrated Multi-Filter Installation And User Instructions The Professional s Choice INSTANTA
52 BAYTOWNE CEILING FAN
 52 BAYTOWNE CEILING FAN Owner s Manual Models #20501 If a problem cannot be remedied or you are experiencing difficulty in installation, please contact the Service Department: 1-877-459-3267, 9 a.m.- 5
Issue 4 Oct Panamatic Top loading Maxi & Optima 3 Installation
 Issue 4 Oct 2005 Panamatic Top loading Maxi & Optima 3 Installation Please Do handle the unit with care, to avoid scuffs and scratches during installation. Do not over-tighten plumbing or any other mechanical
Minimalist Bottom Outlet Thermostatic Bar Shower. Telephone Product Specification
 Product Specification ~ Minimum Working Pressure 0.5 bar ~ Maximum Working Pressure 4.0 bar ~ Cold Water Supply Temp 4-20 c ~ Hot Water Supply Temp 55-85 c ~ Fixing Centres 150mm +/- 20mm ~ Outlet size
Ceiling Fan Installation Instructions
 Owner s Manual Ceiling Fan Installation Instructions For 5AHR60XXD-L Series Fans READ AND SAVE THESE INSTRUCTIONS Total fan weight with light kit included 1. 2. 3. 4. 5. 6. 7. 8. 9. 10. 11. 12. 13. 14.
installation and operation manual for Hunter Ceiling Fans
 For Your Records and Warranty Assistance Model Name: Catalog/Model No.: Serial No.: Date Purchased: Where Purchased: For reference also attach your receipt or a copy of your receipt to the manual. installation
VERTICAL COOKING PRECISIO/PRECIJET COMBI OVEN PRECISIO/ PRECIJET OVENS S.A.V. MAINTENANCE AND REPAIR
 VERTICAL COOKING S.A.V. PRECISIO/ PRECIJET OVENS MAINTENANCE AND REPAIR 27/03/2012 PPS-3BEFM10PC GENERAL Tools Every time this symbol appears, it is imperative to have the appropriate tool in order to
Installation Instructions
 Installation Instructions The energy you need Accessories/PFGHRD 60/100 Passive Flue Gas Heat Recovery Device Explanation of Symbols a DANGER: Risk of injuries. The PFGHRD is an integral part of the flue
Puro Mini Dual Control Shower Mixer PU90010CP
 Puro Mini Dual Control Shower Mixer PU90010CP Installation and Maintenance Instructions In this procedure document we have endeavoured to make the information as accurate as possible. We cannot accept
AQUARIUS 45 MARINE SERVICE MANUAL
 AQUARIUS 45 MARINE SERVICE MANUAL CONTENTS: PAGE 1. INTRODUCTION 3 2. SAFETY INSTRUCTIONS 4 3. BASIC INSTRUCTIONS 5 3.1. Installation Details 5 3.2. Operating the Boiler for the First Time 6 3.3. Troubleshooting
CEILING SPEAKER SYSTEM
 INSTRUCTION MANUAL CEILING SPEAKER SYSTEM F-2852C TABLE OF CONTENTS 1. SAFETY PRECAUTIONS... 2 2. GENERAL DESCRIPTION... 3 3. FEATURES... 3 4. NOMENCLATURE AND DIMENSIONS... 4 5. INSTALLATION... 5 7. REPAINTING
Rif Cod i220-0
 15 52 50 6 13 53 51 2 9 8 3 20 19 18 5 1 7 14 10 4 17 Rif Cod 1 0010060 2 0060287 3 0060310 4 0080003 5 0080004 6 0080051 7 0080053 8 0080410 9 0080413 10 0080430 11 0080432 12 0080434 13 0080435 14 0080436
BWT6.3GL Cooker Hood 60 cm Glass chimney hood
 User Manual for your BWT6.3GL Cooker Hood 60 cm Glass chimney hood NOTE: This User Instruction Manual contains important information, including safety & installation points, which will enable you to get
Multi Function Food Processor
 G2SMFP3001 Multi Function Food Processor User Guide Important: retain for future reference ASDA G2SMFP3001 Food processor.indd 1 22/06/2012 15:26 WArnings: IMPORTANT SAFETY INSTRUCTIONS PLEASE READ ALL
Installation Instructions
 Installation Instructions Above the Cooktop Microwave Oven JVM60 and JVM65 Questions? Call -800-56- or Visit our Website at: GEAppliances.ca BEFORE YOU BEGIN Read these instructions completely and carefully.
BUILT-IN DISHWASHER INSTALLATION INSTRUCTIONS
 BUILT-IN DISHWASHER INSTALLATION INSTRUCTIONS PLEASE READ COMPLETE INSTRUCTIONS BEFORE YOU BEGIN LEAVE INSTALLATION INSTRUCTIONS AND USER'S GUIDE WITH OWNER ALL ELECTRIC WIRING AND PLUMBING MUST BE DONE
USE & CARE MANUAL WALL HANGING FIRE. CO9126 V2_110512
 WALL HANGING FIRE CO9126 V2_110512 USE & CARE MANUAL www.adamfires.co.uk SECTION 01 These notes must be read before installation These instructions are for your safety. Please read through them thoroughly
MIDAS. Installation instructions 110/220
 MIDAS Installation instructions 110/220 INDEX INTRODUCTION Page 3 Safety information Page 3 Product specification Page 3 Important information CONNECTION TO SUPPLIES Page 4 Flushing Page 4 Filters Page
52 CEILING FAN READ AND SAVE THESE INSTRUCTIONS FAN RATING AC 120V.
 Irene 52 CEILING FAN READ AND SAVE THESE INSTRUCTIONS FAN RATING AC 120V. 60Hz TABLE OF CONTENTS Tools and Materials Required... 1 Package Contents... 1 Safety Rules... 2 Mounting Options... 3 Hanging
60" Lyndon Patio. Instruction Manual Customer Service :30 AM to 5:00 PM EST, Monday - Friday A Kichler Decor ceiling fan
 60" Lyndon Patio TM 310140 A Kichler Decor ceiling fan Includes wall mount control system Kichler Lighting 7711 East Pleasant Valley Road P.O. Box 318010 Cleveland, Ohio 44131-8010 Instruction Manual Customer
Use & Care Manual Contemporary Electric Fires
 Use & Care Manual Contemporary Electric Fires These instructions are for your safety. Please read through them thoroughly before use and retain for future reference. Failure to follow them could cause
Owner s Guide and Installation Manual
 For Your Records and Warranty Assistance For reference, also attach your receipt or a copy of your receipt to the manual. Model Name Type 2 Models Owner s Guide and Installation Manual Model No. Date Purchased
Look for Service Centres, Point of Sale addresses and other information on: Version: Date: Mai 2011 Tools required:
 Description: C250 S/CS Electric Valve Part number: 23709 information on: www.thetford.eu Version: V2 Date: Mai 2011 Tools required: Remove Waste holding tank Remove bowl retainer bracket closest to the
POWERFLOW Series. Unvented Electric Storage Water Heaters. Installation & Operating Instructions Manual
 POWERFLOW Series Unvented Electric Storage Water Heaters Installation & Operating Instructions Manual These Instructions must be left with the user after installation. Version 3.0 June 2009 Hyco POWERFLOW
CEILING SPEAKER SYSTEMS F-2352C
 INSTRUCTION MANUAL CEILING SPEAKER SYSTEMS F-2322C F-2352C F-2322C F-2352C TABLE OF CONTENTS 1. SAFETY PRECAUTIONS... 2 2. GENERAL DESCRIPTION... 3 3. FEATURES... 3 4. NOMENCLATURE AND DIMENSIONS... 4
Owner s Guide and Installation Manual
 For Your Records and Warranty Assistance For reference, also attach your receipt or a copy of your receipt to the manual. Model Name Type 8 Models Owner s Guide and Installation Manual Model No. Catalog
Ecoboiler T20 & T30 SERVICE MANUAL. Marco Beverage Systems Ltd. 63d Heather Road, Sandyford Industrial Estate, Dublin 18, Republic of Ireland
 Ecoboiler T20 & T30 SERVICE MANUAL Marco Beverage Systems Ltd. 63d Heather Road, Sandyford Industrial Estate, Dublin 18, Republic of Ireland Ireland Tel: (01) 295 2674 Ireland Fax: (01) 295 3715 UK Tel:
Grant Spira 6-26kW and 9-36kW Wood Pellet Boilers
 ADDENDUM to INSTALLATION INSTRUCTIONS for Grant Spira 6-26kW and 9-36kW Wood Pellet Boilers DOC42-01/02 Rev03 - December 2014 ATTENTION INSTALLERS - UPDATED INFORMATION! The Grant Spira condensing wood
EH0533 Indoor Climate Control
 EH0533 Indoor Climate Control 2.8 kw of cooling, 2.9 kw of heating Air Conditioning Efficient heating (air-source heat-pump) Cooling Remote control Suitable for low-wall installation No external unit required
Ingenious bathroom solutions now and in the future
 Ingenious bathroom solutions now and in the future For more than 30 years Pressalit Care has worked to diminish limitations with knowledge, products and advice. The objective is a better life for people
Innes. Instruction Manual A Kichler Decor ceiling fan. Includes our new TM
 Innes 300130 A Kichler Decor ceiling fan Includes our new CoolTouch Control System Looks permanent, but goes wherever you go! U.S. Patent Pending Kichler Lighting 7711 East Pleasant Valley Road P.O. Box
THE ORIGINAL SHOWER TOILET
 THE ORIGINAL SHOWER TOILET CLOSOMAT Asana OPERATING INSTRUCTIONS SWISS MADE 2 DEAR CUSTOMER Thank you for deciding on the CLOSOMAT, the original shower toilet since 1957. The Asana model is the latest
Ceiling Fan Installation Instructions
 Owner s Manual Ceiling Fan Installation Instructions For 5SCR60BR3-L Fan READ AND SAVE THESE INSTRUCTIONS Total fan weigh with light 1. 2. 3. 4. 5. 6. 7. 8. 9. 10. 11. 12. 13. 14. 15. Installation SAFETY
Geberit AquaClean 8000plus UP Service instructions
 Geberit AquaClean 8000plus UP Service instructions 01-2010 998.601.00.1 (00) Contents Contents ESD protection... 4 Service spare parts... 5 Fault clearance by fault pattern... 8 Fault clearance by error
Internal/External Wall/Window Fan Range GX6. Installation and maintenance instructions Retain for future use
 Internal/External Wall/Window Fan Range GX6 Installation and maintenance instructions Retain for future use A GLASS WINDOW B C D ( 6 see F ) 13 E1 E2 E3 G1 G2 G3 G4 H I GB Xpelair GX6, GXC6, GXC6T, GX6HT
Installation Instructions / Operating & Maintenance Manual Ablution Plant Model BTHW-1
 Arrow Valves Ltd Operating & Maintenance Manual ABLUTION PLANT Arrow Valves Tel 01442 823 123 Fax 01442 823 234 www.arrowvalves.co.uk Installation Instructions / Operating & Maintenance Manual Ablution
Bar valve with fixed and adjustable shower heads. Installation guide. Midas Plus installation instructions Page 1
 Midas Plus Bar valve with fixed and adjustable shower heads Installation guide Midas Plus installation instructions Page 1 Midas Plus Midas Plus installation instructions Page 2 Components Literature not
Built-in Gas Hob CZ55554 CZ55571
 Built-in Gas Hob CZ55554 CZ55571 INSTALLATION AND OPERATING INSTRUCTIONS The product may differ from the one illustrated but the installation and operation procedure remains the same The product may differ
ECOLEC PANEL HEATERS GENERAL NOTES.
 GENERAL NOTES. ECOLEC heating products are specifically designed to give you comfortable, controllable warmth when and where you need it. PLEASE READ THESE NOTES BEFORE INSTALLATION AND RETAIN FOR FUTURE
Dream DCV. Thermostatic Dual control mixer valve range. Installation guide
 Dream TM DCV Thermostatic Dual control mixer valve range Installation guide Index Introduction p.3 - Safety information p.3 - Product specification p.3 Connection to supplies p.4 - Pipe sizing p.4 - Flushing