Installation Manual. Electric Underfloor Heating. heatingthroughinnovation.
|
|
|
- Sherilyn Hubbard
- 6 years ago
- Views:
Transcription

1 Installation Manual Electric Underfloor Heating heatingthroughinnovation.
2 02 Electric Underfloor Heating Contents 1.0 General Information Preparation Installation Measuring Values with the Multimeter Connecting the Thermostat Technical Data Operating Instructions 11
3 Electric Underfloor Heating General information The MYSON mat is manufactured from high quality, durable materials. To guarantee that your product functions optimally there are a few points of attention which are described in the installation manual. We can only offer you the full guarantee if the mat is correctly installed in accordance with the installation manual. Carefully read the instructions prior to installation and ensure that you have the correct tools and materials. PLEASE NOTE: The electrical installation MUST BE carried out by a qualified electrician. Check before hand if the heating mat is the right size for the floor area to be heated and that there is sufficient electrical capacity (Amps) available. The mat should not be positioned over expansion joints. If multiple mats are installed in an area then a shared power point can be installed so that only 1 power cable runs to the thermostat. Maximum capacity of the thermostat is 16 Amps. The thermostat should be installed by a qualified electrician. The power supply must be turned off during installation. The MYSON mat consists of a heating cable of 8-9 Watts per metre that is equally distributed and connected to a glass fibre net with an inter-loop distance of approximately 7 cm. Each mat is tested at the factory and has a unique inspection card. Every mat is tested at 4000 volt. You must check the mat after each installation phase, in order to know at which phase any defect occurs (section 4). The heating cable, attached to the grey glass fibre net, must NOT be broken. The mats must NOT be laid over each other and the heating cables must NEVER cross each other. The cable junction (where the power supply cable joins the heating cable) is just within the heating mat and is marked. The mat has 1 connecting cable, which is 5 metres in length. The connector cable MUST NOT be shortened by more than 3 metres, there must therefore always be at least 2 metres of connecting wire left. The power supply must be turned off during installation. The heating mat is 3-4 mm thick and must be incorporated in an adhesive or screed suitable for floor heating. Check the manufacturer s data. A distance from the wall of 10 cm should generally be adhered to. The mat may never be installed under fixed objects like wall units, kitchen units, baths or showers and must be able to give off its warmth unimpeded. The MYSON mat may only be incorporated into the free floor/wall areas. As many bathrooms consist mainly of a small free floor area the mat may only be installed as supplementary heating. Please contact your heating engineer who will advise the heating requirement of the room. The sensor must be installed in the middle of a cable loop for optimal temperature registration. Ensure that the sensor is installed well clear (min. 50 cm) of hidden radiator and water pipes, drains and electrical wiring. The sensor MUST always remain in the sensor pipe. Cap the end of the pipe to avoid the sensor getting stuck during installation. If the sensor ever needs to be replaced it can then easily be removed. A sufficiently strong and thick compression resistant floor, with or without reinforcing, must be applied on wood and insulation. If this is not the case please contact Customer Servies and enquire about our other products. The electric heating mat is guaranteed for 10 years. The thermostat is guaranteed for 2 years. The guarantee does not apply to damage caused by external factors and/or incorrect installation

. Plastic glue comb with approx. 6mm teeth. Electrical junction box (min 40mm deep). Power outlet with RCD 30mA.")

. Feed the sensor through the flexible pipe (fig 3). The sensor must always remain in the flexible pipe.")

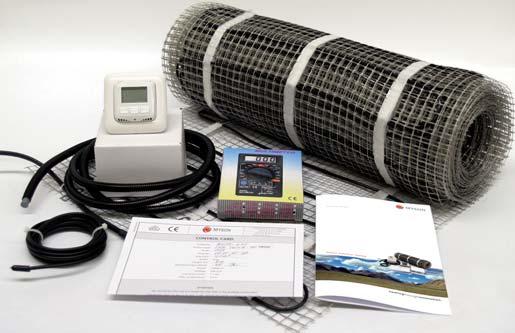
4 04 Electric Underfloor Heating 2.0 Preparation Check the contents of the box before starting. A complete set will consist of: Heating mat with connecting wire. Control card. Digital clock thermostat incl. floor sensor. Flexible sensor pipe. Multimeter. Installation manual. 2.1 Preparation: Necessary Materials A MYSON mat System. Flexible tile adhesive or levelling / screed and grout suitable for floor heating. Flexible cement and cement gun for expansion joints along the walls. Approx. 2 m flexible electrical piping (16mm). Plastic glue comb with approx. 6mm teeth. Electrical junction box (min 40mm deep). Power outlet with RCD 30mA. Adhesive or double sided tape (for screeded floors). 2.2 Preparation: Placing the Thermostat Determine where the thermostat is to be placed. Place a standard electrical junction box with a minimum depth of 50mm, preferably at a height of 1.40 m for ease of operation. Grind/cut the necessary grooves (fig 1) and mount the junction box and suitable sheathing/conduit to allow plastering after installation. Cut a groove in the floor for the floor sensor pipe 2 cm deep (fig 2). Feed the sensor through the flexible pipe (fig 3). The sensor must always remain in the flexible pipe. Cap the end of the pipe (fig 4) to avoid the sensor getting stuck during installation. If the sensor ever needs to be replaced it can then easily be removed. Fig. 1 Fig. 2 Ensure that the surface where the mat is worked on is flat, clean, and free of dust and grease. In larger spaces place the edge strips/expansion joints along the wall. Fig. 3 Fig. 4 PLEASE NOTE: Never place the sensor in the vicinity of a hidden radiator pipe and never install it passing under a heating cable. The sensor MUST always remain in the flexible pipe.


5 Electric Underfloor Heating Installation Using the System for the First Time Allow the floor sufficient drying time before you turn on the floor heating. The floor s drying time depends on many factors like room temperature, ventilation and moisture. Generally the drying time for floor cement is 3 to 4 weeks. Please verify this with the floor cement / screed manufacturer. Tile Cement Unroll the MYSON mat with the heating cable facing down so that only the glass fibre netting is visible (fig 5). Screed Unroll the MYSON mat with the heating cable facing up. This prevents the glass fibre netting floating on the levelling screed. If necessary, the mat can also be attached using double sided adhesive tape. Determine how the matting must be laid. The glass fibre netting can be cut between the cable loops and folded over. Avoid damaging the cable. There are many possible variations when installing, please check section 3.4. Fig. 5 Fig. 6 Fig. 7 Fig Installation: Measuring out the Mat Test mat before commencing installation to ensure there are no faults. Allow a distance from the wall of 10 cm when rolling out the matting. This does not apply to conservatories where extra heating is required. The loose cables must be looped at least 4 cm from each other. They should not touch or cross each other. Retest the mat when it has been laid section 4.0. If the mat is too long it can be folded 180 o, (fig 6) for example, by cutting through the fibre netting without damaging the heating cable (fig 7). This can be repeated a number of times (fig 8). If the mat is still too long the cable can be cut loose from the fibre netting and installed in loose strips, please see section 3.4.


6 06 Electric Underfloor Heating 3.2 Installation: Tile Cement Apply a first layer of cement of 0.5 to 1 cm thick and approximately 55 cm wide (fig 9). Pull the end of the connecting cable through the electrical piping to the thermostat (fig 10). Roll the mat out over the tile cement with the cable facing downwards (fig 11). Softly push the mat down with a wooden spatula or gloves and spread the tile cement that oozes through the mat (fig 12). Smooth it over and allow it to dry. Test the mat again (section 4). Then apply a second layer of tile cement taking care to avoid air bubbles using a plastic tile cement comb to avoid damaging the heating mat (fig 13). Press down the tile with a light sliding motion (fig 14). Fig. 9 Fig. 10 Fig. 11 Fig. 12 Fig. 13 Fig. 14

 and write down the readings on the")

.")
7 Electric Underfloor Heating Installation: Screed Position the mat as described in section 3.0. Attach the mat to the floor with adhesive or double sided tape (fig 15-17). Test the mat again with a multimeter (section 4) and write down the readings on the control card. Read the instructions of the levelling screed, check that the product is suitable for floor heating and follow the laying instructions of the manufacturer. Observe the manufacturer s drying time and then apply the floor covering (fig 18). PLEASE NOTE: Applying 2 separate levelling layers, one on top of the other, is NOT RECOMMENDED because it can cause unnecessary tension in the floor. Fig. 15 Fig. 16 Fig. 17 Fig. 18


8 08 Electric Underfloor Heating 3.4 Installation: Laying Variations The mat can be laid in several ways, as illustarated in diagram below: Never cut the heating cable. PLEASE NOTE: Heating will only occur where the mat has been installed. Never cross the heating cables. 3.5 Installation: Laying Example Please note that where there is no matting installed the floor will not be heated. If the mat is too long the cable can be cut loose from the fibre netting and installed in loose strips. The loose cables must be looped at least 4 cm from each other. They must not touch or cross each other. See section 3.4. The sensor must be installed in the middle of a cable loop for optimal temperature registration. Ensure that the sensor is installed well clear (min. 50 cm) of hidden radiator and water pipes, drains and electrical wiring. The mat must never be installed under fixed objects like wall units, kitchen units, baths, or showers and must be able to give off its warmth without being unimpeded.

.")
 have a clear insulation sheath. Do not touch the wires when measuring. Check readings according the control card which was attached to the heating mat.")
. Earth wire has no sheath.")
9 Electric Underfloor Heating Installation: Other possibilities You can also use any section that you have left over within the wall or a step to the bath. You can include it in the plaster layer or apply it with tile cement. This maximises the effective heating area from your mat. TIP: A MYSON Towel Warmer will give you the comfort and convenience of warm dry towels, to add to the luxury of your warm floor. This may also give the benefit of additional heat. Please contact Customer Services for a Design Product brochure. 4.0 Measuring Values with the Multimeter Connect the wires to the multimeter (fig 19). Turn the knob of the multimeter to the Ohm 2000 position. (fig 20). Connect the red and black probe to the connection wires (fig 21). The connection wires (Phase and Neutral) have a clear insulation sheath. Do not touch the wires when measuring. Check readings according the control card which was attached to the heating mat. If readings are not within a 5% margin please check again to make sure. Please call and cease installation if readings are not within 5% margin. Connect the RED probe to one of the connection wires and the BLACK probe to the Earth wire (fig 22). Earth wire has no sheath. Repeat this step with the RED probe to the other connection and BLACK probe to the Earth wire. Reading on the multimeter now should be 1. If you read any resisance there is a possible break in the wires. Please check again. Please call and cease installation if reading still shows resistance. Fig. 19 Fig. 20 Fig. 21 Fig. 22

: 1, 4 and 6 (Earth) are used for the connection wires from the heating cable.")
10 10 Electric Underfloor Heating 5.0 Connecting the Thermostat During installation/de-installation of the thermostat the electricity should always be turned off at the mains. Installation must be carried out by a qualified electrician in accordance with the IEC regulations. Cover: Check that the electricity is turned off. Remove the display housing by inserting a blunt, suitable instrument into the square hole at the top of the thermostat and exerting pressure. Both the display housing and the cover plate can then be removed. Wiring (see wiring diagram below): 1, 4 and 6 (Earth) are used for the connection wires from the heating cable. The connection wires (Phase and Neutral) have a clear insulation sheath clear insulation sheath, and it does not matter which one goes into terminal 1 and which into terminal 4. Pictured coloured insulation sheath for Earth wire is not included (fig 23). 2 (Neutral), 3 (Phase) and 5 (Earth) are for the power supply. 7 and 8 are for connecting the sensor. Thermostat Installation: Place the thermostat in the right position and fasten this with two screws. Replace the cover and protection cap by pressing them on gently. As soon as the power is turned back on will appear flashing and the thermostat can be used. In case of a newly installed floor, allow at least three weeks drying out period. Wiring Diagram HEATING N L HEATING EARTH EARTH SENSOR SENSOR 230V/16A HEATING MAX. 3200W EXTERNAL SENSOR Fig Technical Data Heating Performance Data Heat Outputs Type Wattage Amps Ohm m W W W W W W W W W W W W W W Power supply 230V / 16 Amp Max. capacity 3200W Temp. range 0 C to 40 C Class IP20 Colour RAL9010 Polar/White Warranty 2 years Examination CE
11 Electric Underfloor Heating Operating Instructions General information This thermostat is designed specially for electrical floor heating. The floor sensor is supplied standard with the system. Please study these guidelines carefully before installation and use. Save these instructions for possible later use. Direction for use Turn on the power after having checked the installation instructions carefully. In the screen the present room temperature and 12.00h will appear flashing. The thermostat is operated with the use of three buttons: Left: Note the signs, higher or lower Middle: SET: menu choice and confirmation Right: Note the signs, higher or lower Menu At the bottom appears SET above the middle button and by pressing this, the menu will appear. The menu is made up from: Day/Time Setting right day and time Program Change standard week program Temperature Adjustment standard setting On/Off On/Off Automatic or manual Start Setting day and time: 1. Press the middle button twice 2. First confirm Day/Time with the middle button 3. Set the day on the top and confirm 4. Wait until hour flashes. Set the correct hour and confirm 5. Wait until minute flashes. Set the right minutes and confirm. Almost immediately automatic will appear in the main screen. After the setting of the correct day and time: The thermostat is now operative following the standard program. You can recognise this from the blinking of the two dots between the hour and the minutes in the main screen. Please do not change this program during the first week so the thermostat can store historical data. When power is consumed the word HEATING will appear on the screen. If not the thermostat is functioning on stand-by. In the menu the settings you will find underneath are pre-programmed. These settings can be adjusted by going into the menu by pressing SET, select the relevant topic, confirming this and then adjusting this with the left or right button. Do not forget to confirm all steps with the middle button. After the last confirmation the main screen will appear again. Incorrect settings can be reset in the same way. Reset (return to standard settings): Choose Auto/Man and press the right button for approx. 5 seconds. Program Confirm and adjust standard settings of: Mon to Fri from 5.00h to 9.00h and 17.00h to 23.00h. Sat / Sun from 9.00h to 23.00h. Temperature Adjust comfort temperature and confirm. This is the temperature that your floor will reach when your heating is set to be on. Night set back will now show. This is the floor temperature at which your floor will be maintained, when your heating is set to be off. Maintaining this temperature means that when you heat your floor up to the required temperature the next time it is on, you are not heating it up from cold, therefore not using as much energy and giving a quicker warm up. The difference can be approx 3 C for main heating and 5 C for background heating. For example if you are using your system for background heating, and have it set at 21 C, the set back temperature should not be lower than 16 C. Adjust night set back temperature and confirm. MYSON recommend setting your thermostat at 29 C for living areas and 33 C for wet rooms. On/Off Confirm and adjust standard setting On to Off or vice versa. Auto/Man Confirm and adjust standard setting Auto to Manual or vice versa. Childproof lock When desirable a childproof lock can be installed by pressing the middle and right button for approx. 8 seconds. A small lock will appear in the top right of the screen. This lock can be turned off by pressing the middle and left button for 8 seconds. Error messages when failure occurs When the following codes appear on the screen, first contact your supplier. F1 = Sensor failure F2 = Memory failure F3 = Display connection failure The adjustments below should be carried out after consultation with your supplier. Choose Auto/Man in the menu and press the left button for approx. 5 seconds. You now enter the service menu which is only intended for the installer. 1. With the flashing number you can adjust the screen contrast. 2. Press SET - with the flashing number you can now adjust the calibration. 3. Press SET - with the flashing number you can now adjust the differential. 4. Press SET and the software number appears on the screen. To return to the main screen press SET.
12 MYSON Eastern Avenue, Team Valley, Gateshead, Tyne & Wear NE11 0PG, UK T: , F: ,
English. Dear Client,
 Installation manual Dear Client, This heating product is manufactured from high quality, durable materials. To guarantee that your product functions optimally there are a few points of attention which
emat Pro 100/150/200 Installation Manual
 emat Pro 100/150/200 Installation Manual www.electricunderfloorheating.co.uk Before you begin installing read through these instructions carefully and check that you have all the components required. Introduction
LIFETIME. INSTALLATION MANUAL emat Pro 100w/150w/200w WARRANTY
 INSTALLATION MANUAL emat Pro 100w/150w/200w LIFETIME WARRANTY Before you begin installing, read through these instructions carefully and check that you have all the components required. 01473 276677 www.elementsunderfloorheating.co.uk
SLIM-LINE RC FAN CONVECTOR.
 SLIM-LINE RC FAN CONVECTOR. INSTALLATION, OPERATING, MAINTENANCE & AFTER SALES MANUAL Product Serial Number: Please leave this manual with the end user. Part Number: 1370064 heatingthroughinnovation. Contents
Introduction. Please read the following instructions carefully before commencing installation.
 Introduction Please read the following instructions carefully before commencing installation. Installation involves simple processes. These are explained step by step in the following pages. Should you
Underlaminate Foil Heater
 Installation Manual: Underlaminate Foil Heater TECHNICAL HELPLINE 0845 345 2288 n online at warmup.co.uk IMPORTANT Read this manual before attempting to install your foil heater. Incorrect installation
Installation And User Instructions GB/IRE. Devimat Warm Floor System Installation Instructions User Guide Trouble Shooter
 GB/IRE Installation And User Instructions Devimat Warm Floor System Installation Instructions User Guide Trouble Shooter Please retain this booklet for homeowners future reference. For Devireg 55 setup
Installation Manual Loose cable underfloor heating. A large print version can be downloaded from our website. www. underfloorheatinghq.co.
 English Installation Manual Loose cable underfloor heating A large print version can be downloaded from our website www. underfloorheatinghq.co.uk Phone: 0800 328 4980 E-mail: enquiries@underfloorheatinghq.co.uk
Model: Touch-RS. 1 Touch-RS
 Model: Touch-RS Model: Touch-RS 1 Touch-RS Table of Contents Product Image 1 Temperature Hold 15 Table of Contents 2 Holiday Programming 16 What is a Programmable Room Thermostat? Installation Procedure
Model Dimensions Coverage 230v 230Vac. Pack Contents. Measuring Up
 Installation and Operating Instructions Electric tile-warming system Model Dimensions Coverage Wattage @ 230v Amps@ 230Vac RTS1M 2.0m x 0.5m 1.0m 2 160W 0.70A RTS1.5M 3.0m x 0.5m 1.5m 2 240W 1.04A RTS2M
Underfloor Heating Cable Installation Manual
 Affordable Underfloor Heating Underfloor Heating Cable Installation Manual Technical Helpline 0845 034 8272 www.sunstone.co.uk SunStone Wire Manual V3.1.indd 1 09/01/2015 14:00:49 BEFORE YOU BEGIN INSTALLATION...
HI-LINE SUPER RC FAN CONVECTOR MODELS: 25-18,
 HI-LINE SUPER RC FAN CONVECTOR MODELS: 25-18, 29-20. INSTALLATION, OPERATING, MAINTENANCE & AFTER SALES MANUAL Product Serial Number: Please leave this manual with the end user. Part Number: 1370065 heatingthroughinnovation.
IMPORTANT NOTES. Electric Underfloor Heating Mats For use with Touchsceen underfloor heating Thermostat
 For any assistance or further information, go online at bathstore.com Electric Underfloor Heating Mats For use with Touchsceen underfloor heating Thermostat - 61000012339 Model Dimensions Area Covered
amuheat Cable Mat floor heating systems Installation Manual CM02-12
 amuheat floor heating systems Cable Mat Installation Manual CM02-12 Table of Contents Introduction 1 2 Cable Mat Important Installation Guidelines Tools & Materials Needed for Installation Kit Contents
INSTRUCTION. Danfoss heating cable mats type 100/150 Danfoss heating cable mats for thin floors. Danfoss heating cable mat type 100/150
 INSTRUCTION GB Danfoss heating cable mats type 100/150 Danfoss heating cable mats for thin floors NB! Read page 2 before installing the product if you intend to connect 2 mats to the same thermostat Danfoss
Classic Mats Installation Manual
 Classic Mats Installation Manual 1 Classic Mats WarmTouch Classic Mats are the ideal Electric floor warming systems, designed by DomoTecK, for installation under tile, stone or marble. WarmTouch Classic
Foil Heaters. Installation Manual: TECHNICAL HELPLINE
 Installation Manual: Foil Heaters TECHNICAL HELPLINE 0345-345-2288 Complete and submit the warranty form online at www.warmup.co.uk IMPORTANT Read this manual before attempting to install your foil heater.
Electric Warm-Stretch under floor heating
 Electric Warm-Stretch under floor heating bath store Installation Manual Please read these instructions before you start your installation. Any damage to the system due to incorrect installation will invalidate
Installation Guide. Heating cables. Thin concrete (< 3 cm) Intelligent solutions with lasting effect. Visit DEVI.com
 Intelligent solutions with lasting effect. Visit DEVI.com") Installation Guide Heating cables Thin concrete (< 3 cm) Intelligent solutions with lasting effect Visit DEVI.com Table of contents 1 Introduction.................... 2 1.1 Safety Instructions...............2
Installation Guide Heating cables Thin concrete (< 3 cm) Intelligent solutions with lasting effect Visit DEVI.com Table of contents 1 Introduction.................... 2 1.1 Safety Instructions...............2
Underwood Heater Installation Manual
 Underwood Heater Installation Manual Contents Important Safeguards and Warnings... 3 1 General Information... 3 1.1 Use of the Manual... 3 1.2 Safety Guidelines... 3 1.3 Remember to measure resistance...
Carbon Film Installation Instructions
 Contents Page 2 Page 3 Page 4 Page 5 Page 8 Product Overview Pre-Installation & Electrical Provision Depron Underlay Installation Carbon Film Installation - Under Wood/Laminate Flooring Notes & Trouble
Installation And User Instructions
 GB Installation And User Instructions Devimat Warm Floor System Installation Instructions User Guide Trouble Shooter 1 Existing Floor Maximum load per m 2 Wooden Floors 100 W/m 2 Concrete Floors 150 W/m
Undertile Heating Mat. Instructions. CORGI Underfloor Heating - Quality, Flexibility, Safety 1
 Undertile Heating Mat Instructions CORGI Underfloor Heating - Quality, Flexibility, Safety 1 It is vital that you read through these instructions fully before installing your CORGI undertile heating mat.
Underfloor Heating Mat Installation Manual
 Affordable Underfloor Heating Underfloor Heating Mat Installation Manual Technical Helpline 0845 034 8272 www.sunstone.co.uk 1 SunStone Mat Manual V3.1.indd 1 09/01/2015 13:58:26 DO S & DON TS ENSURE CORRECT
Warm Feet For Uncoupling Membrane Pour membrane de désolidarisation. Installation Guide Floor Heating Cable
 Warm Feet For Uncoupling Membrane Pour membrane de désolidarisation Installation Guide Floor Heating Cable 119A Sir Wilfrid Laurier Saint-Basile-le-Grand, (Québec), J3N 1M2 Tel: 1-450-482-1919 Toll Free:
EN-SUITE & KITCHEN HEATING
 EN-SUITE & KITCHEN HEATING 64 ELECTRIC UNDER FLOOR HEATING 70 HEATED TOWEL RADIATORS 74 MIRROR DEMISTERS ELECTRIC UNDERFLOOR HEATING Electric Under Floor Heating It s like walking on Sunshine Comfort electric
CoziMat. 1. Introduction and Brief Description COZIMAT INSTALLATION INSTRUCTIONS & SAFETY REQUIREMENTS
 CoziMat 1. Introduction and Brief Description The CoziMat underfloor heating mat is designed for underfloor heating of rooms where the floor thickness needs to be kept to a minimum. CoziMat underfloor
HI-LINE LV FAN CONVECTOR MODEL: 7-4.
 HI-LINE LV FAN CONVECTOR MODEL: 7-4. INSTALLATION, OPERATING, MAINTENANCE & AFTER SALES MANUAL Product Serial Number: Please leave this manual with the end user. Part Number: 1370058 heatingthroughinnovation.
Installation Guide For your AHT Underfloor Heating System
 Installation Guide For your AHT Underfloor Heating System Dear AHT Customer, Thank you for choosing the AHT underfloor heating system. It is designed to be simple to install and cost efficient to operate.
HEAT CABLE underfloor heating
 HEAT CABLE underfloor heating Installation Manual Thermosoft Heat Cable Installation Manual Page 1 INSTALLATION INSTRUCTIONS TM u n d e r f l o o r h e a t i n g c a b l e Please read these notes carefully
HEATING USER GUIDE. Philex Support Line: Monday to Friday 9.00am to 5.00pm (Local rate - UK only)
") HEATING Underfloor Heating Kit USER GUIDE WARNING: Before installation make sure you have selected the right sized mat - you cannot cut the cable to make it shorter - slightly too small is better than
HEATING Underfloor Heating Kit USER GUIDE WARNING: Before installation make sure you have selected the right sized mat - you cannot cut the cable to make it shorter - slightly too small is better than
Installation Guide. Heating cables. Pipe tracing. Intelligent solutions with lasting effect. Visit DEVI.com
 Installation Guide Heating cables Pipe tracing Intelligent solutions with lasting effect Visit DEVI.com Table of Contents 1 Introduction.................... 3 1.1 Safety Instructions...............3 1.2
Installation Instruction
 GB/DAS Installation Instruction Devimat DTIF 100/150 Heating cable mats for thin floors NB! Read page 3 before installing the product if you intend to connect 2 mats to the same thermostat 1 Devimat 100/150
Underfloor Heating Inscreed Cable System
 The world s best-selling floor heating brand Installation Manual: Underfloor Heating Inscreed Cable System TECHNICAL HELPLINE 085 5 2288 IMPORTANT Read this manual before attempting to install your inscreed
ELECTRIC UNDERFLOOR HEATING SYSTEMS. Operating Guide & Guarantee. The Underfloor Heating Specialists Tel:
 ELECTRIC UNDERFLOOR HEATING SYSTEMS The Underfloor Heating Specialists Tel: 0800 954 8862 Operating Guide & Guarantee www.myheat.co.uk Operating Guide Operation of your heating system is similar to other
Electric Under Floor Heating
 Electric Under Floor Heating It s like walking on Sunshine Comfort electric underfloor heating provides a very comfortable, efficient and economical addition or alternative to standard heating systems.
UNDERWOOD HEATING SYSTEM
 INSTALLATION MANUAL Suitable for most wooden/laminate fl oors (always check with fl oor manufacturer) Ideal for most wood/laminate fl oors Easy to install Fully compliant to latest regulations CE approved
Installation And User Instructions. Devimat Warm Floor System Installation Instructions User Guide Trouble Shooter
 GB Installation And User Instructions Devimat Warm Floor System Installation Instructions User Guide Trouble Shooter 1 Existing Floor Wooden Floors Concrete Floors Maximum load per m 2 100 W/m 2 150 W/m
floor heating system
 floor heating system Installation manual Instrukcja montażu Инструкция по установке EN PL RU EN The package contains: Thin self-adhesive heating mat Thermostat and temperature sensor (option) Installation
Contact Details. Please note that some of the contact details on this PDF document may not be current.
 Contact Details Please note that some of the contact details on this PDF document may not be current. Please use the following details if you need to contact us: Telephone: 0844 879 3588 Email: customer.services@gdcgroup.co.uk
WATCH OUT! UNDERNEATH THE WOODEN FLOORING IS A 230 VOLT HEATING FOIL SYSTEM! NEVER DRILL OR SCREW INTO THE FLOOR!
 WATCH OUT! UNDERNEATH THE WOODEN FLOORING IS A 230 VOLT HEATING FOIL SYSTEM! NEVER DRILL OR SCREW INTO THE FLOOR! SEE SCHEDULE/PICTURE FOR THE POSITION OF THE KLIMA FOIL. Control measurements: Type foil
ELECTRIC HEATING THERMOSYSTEM
 ELECTRIC RADIANT MAT 8200E INSTALLATION AND USE MANUAL heating passion ELECTRIC HEATING THERMOSYSTEM WARNING: For the guarantee to be valid, the product must be installed and handled as indicated in this
AVANT DGS. Thermal Electric Radiator. Operating and Installation Instructions. (Read these instructions carefully and retain for future reference)
") (v8 20180104) AVANT DGS Thermal Electric Radiator Operating and Installation Instructions (Read these instructions carefully and retain for future reference) Models: AVANT-DGS 350 AVANT-DGS 500 AVANT-DGS
(v8 20180104) AVANT DGS Thermal Electric Radiator Operating and Installation Instructions (Read these instructions carefully and retain for future reference) Models: AVANT-DGS 350 AVANT-DGS 500 AVANT-DGS
stock code 5265 FIXING GUIDE Thermonet underfloor heating programmable thermostat kit
 stock code 5265 FIXING GUIDE 09 Thermonet underfloor heating programmable thermostat kit 2.9 TEMPORARY TEMPERATURE BYPASS The temperature setting can be temporarily adjusted when in Automatic mode. Use
Intro. Intro. Table of Contents
 EN Intro Intro Dear AHT Customer, Thank you for choosing the AHT underfloor heating system. It is designed to be simple to install and cost efficient to operate. This guide provides the information you
LIFETIME. INSTALLATION MANUAL efoil WARRANTY
 INSTALLATION MANUAL efoil LIFETIME WARRANTY Before you begin installing, read through these instructions carefully and check that you have all the components required. 01473 276677 www.elementsunderfloorheating.co.uk
CERTIFIED UNDERFLOOR HEATING WITH 15 YEARS GUARANTEE
 Electric underfloor heating Simple to install Cheap to install Simple to regulate Safe to use Maintenance free CERTIFIED UNDERFLOOR HEATING WITH 15 YEARS GUARANTEE WHY CHOOSE HEATCOM? Heatcom is a leading
CASE STUDY UNDER FLOOR HEATING. Electric Underfloor Heating Display Stand
 CASE STUDY UNDER FLOOR HEATING Electric Underfloor Heating Display Stand 58 & MIRROR DEMISTERS 60 BENEFITS & FEATURES OF UFH 64 THERMOSTATS 62 THERMAL INSULATION BOARD 66 MIRROR DEMISTERS 63 HEATING MATS
Uponor Comfort E AL-Foil Mat
 Uponor Comfort E AL-Foil Mat Contents Important notes on the intended use, safety and warranty...3 Intended use...3 Uponor Declaration of Warranty...3 System description...4 Floor construction...4 Technical
Always make sure to check the heating film before, during, and after installation of the floor covering.
 Installation of floor heating film for ceramic tiles, granite and other stone or composite flooring Read through this entire manual before starting installation. All electrical connections must be made
Colorado SCR. Electric Towel Radiator Operating and Installation Instructions. (Read these instructions carefully and retain for future reference)
") Colorado SCR Electric Towel Radiator Operating and Installation Instructions (Read these instructions carefully and retain for future reference) Models SCR 300 300W SCR 450 450W SCR 750 750W NOTE A qualified
Colorado SCR Electric Towel Radiator Operating and Installation Instructions (Read these instructions carefully and retain for future reference) Models SCR 300 300W SCR 450 450W SCR 750 750W NOTE A qualified
DOMOTHERM CLASSIC TWIN/S MAT
 Floor warming products 2013 V 10.12.2012 DOMOTHERM CLASSIC TWIN/S MAT An ideal solution for the whole house Ultra thin cable (2mm) Energy efficient Easy to install Domotherm Twin/s can be installed under:
WARRANTY INSTALLATION MANUAL. Ideal for most wood/ laminate fl oors Easy to install. Fully compliant to latest regulations CE approved
 INSTALLATION MANUAL LIFETIME WARRANTY Ideal for most wood/ laminate fl oors Easy to install Fully compliant to latest regulations CE approved Suitable for most wooden/laminate fl oors (always check with
ATC Electric Under Floor Heating
 ATC Electric Under Floor Heating Comfort ATC electric underfloor heating provides a very comfortable, efficient and economical addition or alternative to standard heating systems. Because it is installed
Mounting and Operating Instructions EB 5610 EN. TROVIS 5600 Automation System TROVIS 5610 Heating and District Heating Controller
 TROVIS 5600 Automation System TROVIS 5610 Heating and District Heating Controller Mounting and Operating Instructions Electronics from SAMSON EB 5610 EN Firmware version 1.40 Edition December 2014 Controller
Royden. Look how easy it is to roll out the heat
 Royden Look how easy it is to roll out the heat 6 good reasons to select Royden infloor heating foil 1. Easily installed Royden heating foil comes on the roll, ready to fit. Whatever the room size or shape
Floor Heating & Heated Towel Rails Product Catalogue
 Floor Heating & Heated Towel Rails Product Catalogue Affordable Heating Luxuries HEATING 1300 HOTWIRE hotwireheating.com.au Hotwire Floor Heating Hotwire Floor Heating may well be the very ultimate in
KICKSPACE 500, 600, V & 800
 MYSON Eastern Avenue, Team Valley, Gateshead, Tyne & Wear NE11 0PG, UK T: 0845 402 3434, F: 0191 491 7568, sales@myson.co.uk, www.myson.co.uk Installation, Operating, Maintenance and After Sales Manual.
QuickNet System Installation Manual Manuel d installation du système QuickNet Manual de instalación del sistema QuickNet
 QuickNet System Manual Manuel d installation du système QuickNet Manual de instalación del sistema QuickNet Floor heating system Système de chauffage par le plancher Sistema de calefacción de pisos Table
AVANT DGi. Thermal Electric Radiator. Operating and Installation Instructions. (Read these instructions carefully and retain for future reference)
") (v13. 20180906) MODE CONFIG. PROG. AVANT DGi Thermal Electric Radiator Operating and Installation Instructions (Read these instructions carefully and retain for future reference) Models: AVANT-DGi 350
(v13. 20180906) MODE CONFIG. PROG. AVANT DGi Thermal Electric Radiator Operating and Installation Instructions (Read these instructions carefully and retain for future reference) Models: AVANT-DGi 350
AUS. Devireg TM 535 Installation and user manual
 AUS Devireg TM 535 Installation and user manual 1 Congratulations with... your DEVI floor heating system Your property has been installed with a DEVI heating system. DEVI is Europe s leading floor heating
Installation And User Instructions. devimat Warm Floor System Installation Instructions User Guide Trouble Shooter
 GB Installation And User Instructions devimat Warm Floor System Installation Instructions User Guide Trouble Shooter Existing Floor Wooden Floors Concrete Floors Maximum load per m 2 100 W/m 2 150 W/m
UNDERFLOOR HEATING EXPRESS. UK s Water & Electric Underfloor Heating Supplier
 UK s Water & Electric Underfloor Heating Supplier CATALOGUE 2017 Electric Underfloor Heating Water Underfloor Heating Manifolds & Pumps Insulation Boards Thermostats & Controls Accessories Underfloor Heating
POWER SHOWERS Models 4500M 5002M 4500T 5002T
 II POWER SHOWERS Models 4500M 5002M 4500T 5002T Performance Shower Products CUSTOMER SERVICE HELPLINE: 01883 730339 CONTENTS PLEASE READ THESE INSTRUCTIONS CAREFULLY: This booklet covers all models in
TF1800 Thermofan Installation Guide YOUR STEP-BY-STEP GUIDE TO THE PERFECT INSTALLATION
 ! PLEASE ENSURE YOU HAVE READ AND FULLY UNDERSTOOD THIS GUIDE BEFORE INSTALLATION! TF1800 Thermofan Installation Guide YOUR STEP-BY-STEP GUIDE TO THE PERFECT INSTALLATION BATHROOM FAN HEATERS Introduction
INSTALLATION INSTRUCTIONS
 INSTALLATION INSTRUCTIONS Unit 1 79 Friar Street Worcester WR1 2NT Tel: 01905 616 928 Fax:01905 611 240 E-mail: info@underfloorheatingsystems.co.uk Website: www.underfloorheatingsystems.co.uk ngsystems.co.uk
Underlaminate Foil Heater
 - Installation Manual: Underlaminate Foil Heater TECHNICAL HELPLINE 0845 345 2288 IMPORTANT! Do not place items such as bean bag furniture, thick rugs or floor-flush furniture on your heated floor covering.
WARRANTY INSTALLATION MANUAL. Ideal for most wood/ laminate fl oors Easy to install. Fully compliant to latest regulations CE approved
 INSTALLATION MANUAL LIFETIME WARRANTY Ideal for most wood/ laminate fl oors Easy to install Fully compliant to latest regulations CE approved Suitable for most wooden/laminate fl oors (always check with
Danfoss Self-limiting Heating Cables SLPG-10/26/33, SLPG-18, SLHW-55/70, SLPH-10
 MAKING MODERN LIVING POSSIBLE Installation Guide SLPG-10/26/33, SLPG-18, SLHW-55/70, SLPH-10 www.eh.danfoss.com Table of Contents 1 Introduction............................................. 3 1.1 Self-limiting
EFET 535. Installation Manual INT INT
 MAKING MODERN LIVING POSSIBLE EFET 535 Installation Manual Warning! This manual is only to be used by a professional installer to install and set up the thermostat properly. It is not intended for the
Toll Free:
 1 ProLine s electric radiant floor heating system is one of the most popular and durable floor heating solutions on the market. Available pre-spaced in mats with an adhesive backing or on the spool, the
ebrochure the information contained within this pdf document has been downloaded from the official Dimplex website
 24/05/2011 CI/SFB [56] www.dimplex.co.uk ebrochure the information contained within this pdf document has been downloaded from the official Dimplex website The information is correct at time of downloading,
Service Instructions
 BASIC EXCELLENT PERFECT U Universal ovens I Incubators S Sterilisers Service Instructions Mo Tu We Th Fr Sa Su t3 on off h t2 t1 t4 loop 4 3 2 1 STERI DEFRO C MIN MAX C IN 1 IN 2 OUT IN 1 IN 2 OUT % rh
MOUNTING GUIDE. MOUNTING INSTRUCTIONS FOR MODULAR UNDERFLOOR HEATING MESH FOR INDOOR code PVMR
 MOUNTING INSTRUCTIONS FOR MODULAR UNDERFLOOR HEATING MESH FOR INDOOR code PVMR MOUNTING GUIDE WARNING: only qualified personnel must perform installation. A B A. Before starting the montage it is indispensable
Electric Floor Warming Systems Installation and Operation Instructions. Mat Heating Systems and Cable Heating Systems. UL Listed for USA and Canada
 Electric Floor Warming Systems Installation and Operation Instructions Mat Heating Systems and Cable Heating Systems UL Listed for USA and Canada Thank you for your purchase of a Warming Systems electric
Katherm NE - Natural convection with electric heating element 2.45
 1.26 1.45 Katherm NE - Natural convection with electric heating element 2.45 Please retain this manual carefully for future use! Read carefully prior to commissioning! I 60/0/09/01 GB 2.45 Katherm NE -
ELEKTRA HEATING MATS. Designed to be installed under laminate flooring and/or engineered wood UK PL RU. Installation manual
 www.elektra.eu ELEKTRA HEATING MATS Designed to be installed under laminate flooring and/or engineered wood Installation manual Instrukcja montażu Èíñòðóêöèÿ ïî ìîíòàæó UK PL RU Purpose The ELEKTRA WoodTec
INSTALLATION. For more information on this product or to order samples call or visit our website at builddirect.com.
 Page 1 Page 2 Section 1. Introduction The Perfectly Warm Floating Floor Heat Heating System (PWF) is a unique heating system that is installed below floating flooring materials to create warm, comfortable
6ELECTRIC ELECTRIC HEATING ELECTRIC HEATING
 INTRODUCTION 189 Electric heating has grown in popularity rapidly in recent years, offering benefi ts that cannot be provided by conventional heating. MYSON have a full range of electric products, including
IdealFILM. Do-It-Yourself Installation Manual
 IdealFILM Do-It-Yourself Installation Manual Comfortable Warm Floors Benefits of using RSG Idealfilm Heats from the floor up for better heat distribution throughout the room No dust or allergens blown
ES-LCD User Control SD Card Location
 SD Card Location Addendum to Leaflet Number 671415 The EMC Directive 2014/30/EU The Low Voltage directive 2014/35/EU Checking SD Card for secure location Due to the possibility of movement during transit,
ETO 2 - Controller for ice and snow melting
 ETO 2 - Controller for ice and snow melting Advantages Simple adjustment knob with two functions Illuminated display where you can easily see the temperature status and other values Controls both pumps
AUTOMATIC VENT CONTROLLER EL-VC-AVC002 EL-VC-AVC002C EL-VC-AVC002R. Operation Manual.
 AUTOMATIC VENT CONTROLLER EL-VC-AVC002 EL-VC-AVC002C EL-VC-AVC002R Operation Manual www.vent-controller.com www.electrostoreonline.com Index Page O Introduction 3 User Guide 4 \ \. Controller Installation
Installation Manual. Frost Protection Cable. Warmup Ireland Web: Telephone:
 Installation Manual Frost Protection Cable Warmup Ireland Web: www.warmup.ie Email: ie@warmup.com Telephone: 1 800 937 429 TECHNICAL HELPLINE 0845 345 2288 IMPORTANT Read this manual before attempting
Dimplex ebrochure PDF
 19/09/2016 CI/SFB [56] Dimplex ebrochure PDF The information contained within this PDF document has been downloaded from the official Dimplex website. The information is correct at time of downloading,
INSTALLATION INSTRUCTIONS ONE LARGE ZONE
 INSTALLATION INSTRUCTIONS ONE LARGE ZONE Unit 1 79 Friar Street Worcester WR1 2NT Tel: 01905 354 791 Fax: 01905 352 100 E-mail: info@underfloorheatingsystems.co.uk Website: www.underfloorheatingsystems.co.uk
FloorHeat Installation Manual
 FloorHeat Installation Manual Transforming frosty floor surfaces into radiant warmth Transforming frosty floor surfaces into radiant warmth Contents Important Instructions!... 3 Safety Instructions:...
HG-2000E HEAT GUN WATTS
 HG-2000E HEAT GUN 2.000 WATTS EN - INSTRUCTIONS Carefully read the instructions for use before you start using the machine. drivenbycare www.orfit.com 1 2 6 8 7 2 8 450 C 300 C 6 A E FE 550 C PVC (hard)
MODEL FPT-130 SINGLE POINT FREEZE PROTECTION HEAT TRACE CONTROL
 TRACON MODEL FPT-130 SINGLE POINT FREEZE PROTECTION HEAT TRACE CONTROL TABLE OF CONTENTS FPT 130 Overview... 2 Installation... 3 Power Source and Load Connections... 4 Temperature Sensor... 5 External
What is solarcache touch? How does it work? What can I see on the screen?
 Congratulations on your purchase of a solarcache touch, the intelligent proportional controller that heats your water and is a comprehensive monitor of your energy use. This guide will to help you to understand
Simple. Smart. Solutions. ROOM PACK Z2105/239/0812. Step by Step Installation Guide
 Simple. Smart. Solutions. ROOM PACK Z2105/239/0812 Step by Step Installation Guide 1. Room Pack Overview 2. Temperature Settings 3. Operation 4. Wiring 5. Installing Your Room Pack Before you get started
Table of Contents. Product Image Table of Contents What is a Programmable Room Thermostat? Installation Procedure
 1 Model: 1 Table of Contents Product Image Table of Contents What is a Programmable Room Thermostat? Installation Procedure 1 2 3-4 5-6 Mode Select Pairing the ProTouch iq Hub Pairing the ProTouch iq What
Installation and User Guides
 Installation and User Guides Mats and Cable Trademat Plus+ Softmat Loose Cable Control Units Gloss Touch-Screen Stat Touch-Screen Stat Wireless Timerstat Manual Thermostat Contents Contents 3 Mats and
Carbon Heating Film. Failure to follow these instructions may result in fire, electrical shock, property damage, personal injury, or death.
 Carbon Heating Film Easy to install. Does not circulate pollutants, dust, dirt, allergens or dry air. May be installed on wall, ceiling, under laminate, engineered wood floors or tile. Brings soothing
Installer Manual KNX Touchscreen Thermostat
 Installer Manual 02952 KNX Touchscreen Thermostat Index GENERAL FEATURES AND FUNCTIONALITY from page 5 ETS PARAMETERS AND COMMUNICATION OBJECTS from page 7 COMMUNICATION OBJECTS GENERAL FEATURES AND FUNCTIONALITY
Installation Instruction Devidry - for installation with Devidry Pro Kit
 Installation Instruction Devidry - for installation with Devidry Pro Kit UK Devidry TM Congratulations with your new DEVI floor heating system. DEVI is Europe s leading floor heating manufacturer with
Radiant Thermostat 519
 106103_dl_02 Radiant Thermostat 519 Installation & Operation Manual Introduction The Radiant Thermostat 519 accurately controls the room and/or floor temperature for a hydronic heating zone using Pulse
HANDBOOK FOR COMFORTABLE WARM FLOORS
 HANDBOOK FOR COMFORTABLE WARM FLOORS WWW.PENTAIRTHERMAL.COM ABOUT THIS HANDBOOK We all know, that when our feet are cold, our whole body feels cold Smart underfloor heating is the answer. Put those woollen
Installing Underfloor Heating Film. 1. Layout of electric underfloor heating systems
 Read through this entire manual before starting installation. May be installed under laminate, engineered wood or approved hardwood floors. See flooring manufacturer s specifications and instructions.
4 1 Heating. wooden floors or renovated floors.
 4 1 Heating 1.1 General information DEVI s floor heating systems consist of deviflex heating cables or devimat heating mats, devireg temperature regulation thermostats, and installation accessories. The