CONTENTS SAFETY SYMBOLS... 1 GENERAL WARNINGS... 1 MAIN FEATURES... 2 MAIN FUNCTIONS... 2 USER UNIT... 3
|
|
|
- Liliana Oliver
- 6 years ago
- Views:
Transcription
1 CONTENTS SAFETY SYMBOLS... 1 GENERAL WARNINGS... 1 MAIN FEATURES... 2 MAIN FUNCTIONS... 2 USER UNIT... 3 KEYBOARD...3 ACTIVE KEY COMBINATIONS...4 TURNING THE UNIT ON/OFF...4 CHANGING TEMPERATURE AND FAN SPEED SETS...4 CHANGING OPERATING MODE...5 TURNING THE ECONOMY FUNCTION ON/OFF...5 ENABLING/DISABLING ELECTRIC HEATER OPERATION...5 ENABLING/DISABLING MINIMUM ROOM TEMPERATURE CONTROL...5 ENABLING/DISABLING ROOM HUMIDITY CONTROL...5 CHANGING THE HUMIDITY SET...5 TURNING THE TIME SLOTS ON/OFF...5 VIEWING THE WATER TEMPERATURE...6 LOCKING/UNLOCKING THE KEYBOARD...6 VIEWING TIME AND DATE...6 CHANGING CLOCK DATA...6 CONFIGURING TIME SLOTS...6 PARAMETERS MENU AND LISTS... 7 CONFIGURATION MENU...7 ADJUSTMENT MENU...9 SETUP MENU...9 ADJUSTMENT LOGIC SWITCHING BETWEEN COOLING/HEATING...10 VENTILATION...10 VALVE...13 ELECTRIC HEATER...14 ECONOMY...14 MINIMUM TEMPERATURE CONTROL...14 DEHUMIDIFICATION...15
2 NETWORKS AND CONNECTIVITY CONNECTION TO SUPERVISION SYSTEM (ERGO SOLUTION)...16 ERGO GALLETTI MANAGEMENT SOFTWARE...18 SMALL NETWORK SOLUTION...18 MIXED NETWORK...19 MEANINGS OF LEDS TECHNICAL DATA INSTALLATION AND MAINTENANCE PROBE INSTALLATION...20 REMOTE AIR PROBE INSTALLATION...20 HUMIDITY PROBE INSTALLATION...21 WATER PROBE INSTALLATION...21 USER UNIT INSTALLATION...23 ON-BOARD I/O BOARD INSTALLATION...23 ELECTRIC CONNECTIONS...24 MAINTENANCE...24 I/O TABLE FOR THE BOARD...24 ELECTRICAL DIAGRAM...25
3 Controller for units EVO WARNING KEEP THE DATA CABLES SEPARATE FROM THE POWER CABLES GENERAL WARNINGS Keep this manual intact and in good condition for the entire service life of the machine. Read all of the information contained herein carefully, with particular attention to the parts marked with "Important" and "Attention"; failure to observe the instructions could cause damage to people or the machine. SAFETY SYMBOLS READ CAREFULLY WARNING DANGER VOLTAGE In case of malfunction consult this manual and, if necessary, contact your nearest Galletti S.p.A. assistance centre. Installation and maintenance operations must be performed by qualified staff, unless stated otherwise in this manual. Before performing any procedure on the unit, disconnect the voltage to the machine. Failure to observe the regulations reported in the manual will cause the warranty to lapse immediately. Galletti S.p.A. will not be held liable for any damage deriving from improper use of the machine or failure to observe the regulations reported in this manual and on-board the unit. DO NOT PULL DO NOT FORCE This appliance is not intended to be used by children or persons with physical, sensorial or mental problems, inexpert or unprepared, without supervision. Be careful that children do not approach the appliance. Upon reception of the appliance check its conditions, verifying that it has there is no damage due to transport. For the installation and news of any accessories please refer to the related technical data sheets. 1 OPERATION MANUAL
4 Controller for units GENERAL FEATURES The EVO controller is designed to control all of the system units in the Galletti range with multi-speed, single-phase motor or coupled to an inverter for speed modulation. The EVO controller system is composed of: I/O board containing the power supply circuit, the microprocessor system and the connectors (unscrewable) to connect the input and output devices; User unit composed of graphic display and keyboard (six keys) equipped with clock and probe to read the room temperature. The connection between the I/O board and the user unit is set up using the relative connectors and a data transmission cable fitted with a pair of twisted conductors and shielding. The controller makes serial communication possible on two types of networks: ERGO solution: connection to an external supervision system with MODBUS RTU protocol on serial RS485 (the Galletti ERGO system, for example); SMALL solution: connection of multiple EVO controllers in two possible configurations: - MASTER/SLAVE on serial RS485 - MASTER/SLAVE on CW (Conveyed Waves), which can also be set up with ERGO solutions. MAIN FUNCTIONS Automatic or manual fan speed variation (selected from the keyboard); Management of ON/OFF or modulating valves for two or four-piped systems. SUPPORTING electric heater control, used during heating; SUMMER/WINTER mode switch (= cooling/heating) in four possible ways: - manually, from the keyboard; - manually, remotely (from digital input); - automatically, depending on water temperature; - automatically, depending on air temperature. dehumidification function control; operation with TIME SLOTS. It is also supplied with: External pre-consensus digital input (for example: window contact, remote ON/OFF, presence sensor, etc.) that can enable or disable unit operation (contact logic: see board configuration parameters); Digital switching input Remote centralised Cooling/ Heating (contact logic: see board configuration parameters); Digital input to enable ECONOMY function from remote control (contact logic: see board configuration parameters); Water temperature probe (accessory), one or two (optional with 4-pipe systems); STANDARD room air temperature probe (installed inside the user unit); Remote room air probe (accessory) that can be used, if connected, in place of the standard one installed in the user interface; Remote relative room air humidity probe (accessory); A completely configurable digital output (dry contact). USER MANUAL 2
5 Controller for units EVO USER UNIT alarm signal: symbol and identification of the type of alarm overwrite the area normally dedicated to status symbols. The following information is contained in the rt side (from top to bottom) identification of the operating mode COOLING mode The main screen is divided into two parts (which are referred to below as lt side and rt side) by a vertical line that separates them. the following information is contained on the lt side (from top to bottom and lt to rt): room temperature (read by the remote probe on-board the user unit, or by the probe connected to the I/O board terminal board, according to the configuration) ambient humidity (if there is a humidity probe installed and configured) status symbols: time slots on HEATING mode identification of the ventilation status identification of the room air temperature SET value If the unit is OFF the side will be completely covered by the word OFF written vertically across it. KEYBOARD There are 6 keys on the display screen; below are the basic functions associated with each key. ON/OFF KEY switch the unit on/off go back to main screen economy function on dehumidification running minimum room temperature function enabled valve/s open electric heater enabled/on SMALL network on RS485 on serial communication with supervision system locked keyboard Prg Mode Set PRG KEY access to the MENU MODE KEY change operating mode (HEATING/ COOLING) UP ARROW KEY change ventilation values/speed scroll through screens SET KEY change SET/VENTILATION mode confirm value/return in screen scroll mode DOWN ARROW KEY change ventilation values/speed scroll through screens 3 OPERATION MANUAL
6 KEY COMBINATIONS Controller for units CHANGE VENTILATION SPEED Set enable/disable TIME SLOTS With the unit in operation, press the SET key twice to enter ventilation speed change mode (auto, extra-low speed, low, medium, high) WATER temperature display (if the probe is installed) press the UP/DOWN keys to change the ventilation speed; Prg Mode clock DATA display (date and time) MANUAL ventilation AUTOMATIC ventilation Set LOCK/UNLOCK keyboard FORCED ventilation (not editable) TURN UNIT ON/OFF To turn the unit on and off, it is necessary to go to the main screen and press the ON/OFF key from there. To go back to the main screen quickly from any point press the ON/OFF key and then press it again to turn the unit on/off. The key has no effect if time slot operation is on (the clock symbol appears on the main screen). To turn the time slots on/off, see the relative paragraph. CHANGE THE TEMPERATURE SET To change the temperature SET it is necessary to view the main screen with the unit on, then proceed as follows; press the SET key once to highlight the (on the bottom rt of the screen) value of the entered room air temperature set; press the UP/DOWN arrow to change the value of the entered room air temperature set; press the SET key again to confirm the displayed value and exit temperature set edit mode. with step ventilation, follow the editing sequence below: 3-speed hydronic unit Low Medium High Automatic 4-speed hydronic unit Extra-low Low Medium High Automatic with modulating ventilation, the ventilation speed will appear as a percentage instead of steps. Pressing the arrows will change this value from the minimum set limit to the maximum limit (see ADJUSTMENT MENU); automatic ventilation mode is automatically applied outside of the limits; if the difference between the detected room air temperature and the entered set is within 0.5 C, ventilation will switch off and the word STDBY will appear; press the key SET is used to confirm/exit editing mode and go back to the main screen; if the controller is equipped with a water probe and the detected temperature is not high enough to enable ventilation, the controller will switch off and the symbol for the operating mode will flash: COOLING mode HEATING mode USER MANUAL 4
7 Controller for units EVO CHANGING OPERATING MODE To change the operating mode (Cooling/Heating) press the MODE key from the main screen. TURNING THE ECONOMY FUNCTION ON/OFF To turn the ECONOMY function on it is necessary to view the main screen. From here: press the UP/DOWN keys to scroll through the screens until you get to the Turning the economy function On mask; press the SET key to enter edit mode; press the UP/DOWN keys to turn the function on/off and press the SET key again to confirm; press the ON/OFF key to go back to the main screen. If the function is on, the economy symbol will appear in the main screen. ENABLING/DISABLING ELECTRIC HEATER OPERATION To enable/disable electric heater operation (if installed and configured) you must go to the main screen. From here: press the UP/DOWN keys to scroll through the screens until you reach the 'turning the heater on' mask; press the SET key to enter edit mode; press the UP/DOWN keys to enable/disable the function and press the SET key again to confirm; press ON/OFF to go back to the main screen. If the electric heaters are enabled (and configured correctly in the CONFIGURATION MENU) the heater symbol will appear on the main screen; it will flash if the heaters are not running, or it will appear steady if the heaters are running. ENABLING/DISABLING MINIMUM ROOM TEMPERATURE CONTROL To enable/disable the minimum room temperature control function it is necessary to go to the main screen. From here: press the UP/DOWN keys to scroll through the screens until you reach the turning the minimum temperature control on mask; press the SET key to enter edit mode; press the UP/DOWN keys to enable/disable the function and press the SET key again to confirm; use ON/OFF to go back to the main screen. If the function is on, the minimum temperature symbol will appear in the main screen. TURNING AMBIENT HUMIDITY CONTROL ON/ OFF To turn the ambient humidity control on/off you must go the the main screen and there must be a humidity probe. From here: press the UP/DOWN keys to scroll through the screens until you get to the Turning the humidity control on mask; press the SET key to enter edit mode; press the UP/DOWN keys to enable/disable the function and press the SET key again to confirm; use ON/OFF to go back to the main screen. CHANGE THE HUMIDITY SET To change the value of the ambient humidity set you must go back to the main screen and have turned the ambient humidity controller on. From here: press the UP/DOWN keys to scroll through the screens until you get to the Humidity setpoint mask; press the SET key to enter edit mode; press the UP/DOWN keys to enable/disable the function and press the SET key again to confirm; press ON/OFF to go back to the main screen. TURNING THE TIME SLOTS ON/OFF To turn the time slots on/off quickly, it is necessary to go to the main screen (with the unit either on or off). Press the SET and DOWN ARROW keys at the same time. The clock symbol on the main screen means that the time slots are on. 5 OPERATION MANUAL
8 Controller for units VIEWING WATER TEMPERATURE To view the water temperature value you must have previously configured the presence of the probe in the CONFIGURATION MENU. To view the temperature value read by the probe you must go to the main screen and press the UP ARROW and DOWN ARROW keys at the same time. With a 4-pipe unit with 2 temperature probes, it is possible to scroll through the two screens that display the two temperature values using the UP/DOWN ARROW keys (cold water temperature and hot water temperature). LOCKING/UNLOCKING THE KEYBOARD To lock/unlock normal operation of the keys on the user unit, press the UP + SET + DOWN keys at the same time. The key symbol will appear on the display when the keyboard is locked. When stand-by mode starts up it is possible to view the main screen by pressing the ON/OFF key. VIEWING DATE AND TIME (INTERNAL CLOCK) To view clock data you must view the main screen, with the unit on. Press PRG and MODE at the same time: time and date will be displayed for 5 seconds, and then the screen will automatically go back to the main page. The above procedure will not have any effect if Clock has been set as well as Stand-by mode (inside the CONFIGURATION MENU); in this case, in fact, time and date will constantly be displayed on the screen after the stand-by time has lapsed, i.e. 30 seconds since the last operation has been carried on the display. CHANGING DATE AND TIME From the main screen press PRG to enter the MENU and from here scroll through the screens until you get to Clock Setup and press SET to enter. Change the data as required and press SET every time to confirm and move on to the next piece of data. Lastly, press ON/OFF to go back to the main screen. CONFIGURING TIME SLOTS From the main screen, press PRG to enter the MENU and from here scroll through the screens until you get to Time Slots and press SET to enter. The first six screens are used to set the values for the temperature SETS that can be used in time slot configurations, i.e. T1, T2 and T3 values in SUMMER and WINTER mode. At any time it is possible to press the MODE key to access the actual time slot settings. The time slot system is hourly, daily and weekly: every hour of every day of the week (from MONDAY to SUNDAY) is a slot that the user can decide whether: the fan coil is OFF the fan coil operates with setpoint T1 the fan coil operates with setpoint T2 the fan coil operates with setpoint T3 1 DAY (PRG to edit) 2 TIME SLOT (UP/DOWN to scroll) 3 Day to copy to (UP+MODE) 4 SET POINT 5 View profile The UP/DOWN arrows are used to scroll through the 24 time slots of every day of the week; scrolling is displayed graphically by the scroll cursor at the bottom of the screen, or in text, when the when the time slot is updated, at the top. If you wish to edit the attribute (OFF, T1, T2, T3) of a slot press SET to enter edit mode, change the attribute using the UP/DOWN ARROW and press SET again to confirm. Press PRG to move on to the next day of the week. To duplicate a profile press the UP ARROW and MODE keys at the same time; the day you wish to copy the profile to will be copied will be highlighted: to change it use the UP/DOWN ARROW keys and confirm with the SET key. USER MANUAL 6
9 Controller for units EVO PARAMETERS MENU AND LISTS To access the MENU press the PRG key. Use the UP/DOWN ARROW keys to scroll through the various MENU items, which are in the following order: CONFIGURATION MENU (access using password 10): see dedicated paragraph ADJUSTMENT MENU (access using password 77): see dedicated paragraph CLOCK SETUP MENU (no password required): to set date, time and day of week TIME SLOTS MENU (no password required) NETWORK AND CONNECTION MENU (access using password 20) OUTPUT DISPLAY MENU: to view the status of the physical outputs (digital and 0-10V) on the board OUTPUT TEST MENU (access using password 30): forcing the physical outputs (digital and 0-10V) on the board INFO MENU: to view information on the installed software. CONFIGURATION MENU LIST OF PARAMETERS DESCRIPTION DEFAULT POSSIBLE VALUES Unit type 3 speeds 3 speeds 4 speeds Number of pipes 2 Pipes 2 Pipes - 4 Pipes Air probe Display Display - Board Temperature display Celsius Celsius - Fahrenheit Type of ventilation Step Step - Modulating Valve configuration Switching Summer/Winter Not included From keyboard/ serial Not included - On/Off - Modulating From keyboard/serial From Digital input Auto on water temp. Auto on air temp. DOUT Configuration No use (see dedicated paragraph) Digital output logic N.A. N.A. N.C. Heater included No No/Yes Water probe installed No No/Yes Number of water probes 4-pipe unit 1 1/2 Humidity probe installed No No/Yes Turning Economy on from digital input No No/Yes Turning ON/OFF on from digital input No No/Yes Dehumidify from DIN No No/Yes Ventilation in STANDBY Ventilation speed in standby Standard Low Standard Always ON Always OFF Extra-low Low Medium High Natural convection No No/Yes ON/OFF and SUM/WIN with disconnected serial From keyboard From keyboard From supervisor Language Italian Italian/English Stand-by Mode Off Off - Clock - Temperature 7 OPERATION MANUAL
10 Controller for units CONFIGURATION LIMITS CONFIGURABLE DIGITAL OUTPUT Unit configuration must take the following requirements into account: if there is a heater you will also need a water probe to be installed: if there is a heater and a valve, then the valve must be a 3-WAY (NO 2-WAY VALVES); if Summer/Winter switching is set on "Auto on water temp." then there must also be a water probe; no heater must be installed on 4-pipe units; with 4-pipe units with a single water probe, summer/ winter switching cannot be set on "Auto on water temp."; it is only possible to set summer/winter switching on "Auto on air temp." if there is an electric heater or if the unit has 4-pipes; If SUMMER/WINTER switching is set on "Auto on water temp." it is not possible to use a 2-way valve. The water probe must be installed on a point in the hydraulic circuit with minimum circulation. The board has a digital output (identified by O7 on the electrical diagram) and its status is linked to one of the operating statuses of the unit reported in the list below: Operating mode Cooling or heating request Cooling request Heating request ON/OFF status of the unit Alarm installed Dehumidify call Humidify call High room temperature Low room temperature No water consent to heating No water consent to cooling From supervisor and selectable from the "DOUT Configuration" configuration parameter. It is also possible to choose, using the next "Digital output logic" parameter setting, whether the status of the relay needs to follow the logic NO (Normally Open) or NC (Normally Closed). STAND-BY MODE If no operation is performed on the user unit keyboard for 30 seconds the main screen goes into stand-by mode, which can differ based on the settings of the "Stand-by Mode" parameter, accordingly: Stand-by mode = Off: the display goes completely black; Stand-by mode = Clock: the display goes partly black and the current time and date are shown; Stand-by Mode = Temperature: the display goes partly black and the room temperature and any humidity are shown, if the probe is installed. SERIAL CONNECTION FAILURE If the serial connection fails with the controller set as SLAVE, EVO will either maintain the supervisor on/off settings and summer/winter mode, or it will reset the last settings entered from the keyboard, based on the relative configuration parameter. USER MANUAL 8
11 Controller for units EVO ADJUSTMENT MENU DESCRIPTION DEFAULT Minimum cooling SET limit 10.0 C Maximum cooling SET limit 35.0 C Minimum heating SET limit 5.0 C Maximum heating SET limit 30.0 C Minimum humidity SET limit 35% Maximum humidity SET limit 75% Humidity hysteresis 5% Offset on humidity reading 0% Minimum value of modulating ventilation 20% Maximum value of modulating ventilation 100% Air probe offset 0.0 C Water probe offset 0.0 C Heating water probe offset 0.0 C Economy Hysteresis 2.5 C Cooling water consent SET 22.0 C Cooling water consent hysteresis 5.0 C Heating water consent SET 30.0 C Heating water consent hysteresis 7.0 C Dehumidification water consent SET 10.0 C Dehumidification water consent hysteresis 2.0 C Valve water consent SET 30 C Valve water consent hysteresis 5.0 C Heater water consent SET 39.0 C Heater water consent hysteresis 2.0 C Temperature minimum control SET 9.0 C Temperature minimum control hysteresis 1.0 C Neutral zone 5.0 C Modulating ventilation % in standby 20% 20% Default values RESET No SETUP MENU From the main display, press the UP/DOWN keys to view the following pages in this order: Turning Economy function on Enabling electrical heater use Turning temperature minimum control on Turning humidity control on Humidity setpoint If it is not possible to access editing of one or more entries, you will need to preventively set the relative configuration parameters. For example, to enable electric heater operation you will need to preventively set it up in the configuration parameters menu. Some parameters (or possible values) in the configuration, regulation and setup menus may not be accessible based on which parameter setting is selected. 9 OPERATION MANUAL
12 ADJUSTMENT LOGIC COOLING/HEATING SWITCHING Controller for units VENTILATION GENERAL ASPECTS FAN SPEED WINTER SUMMER AIR TEMPERATURE WATER TEMPERATURE OPENING VALVE YES NO There are 4 different and alternative logics to select the thermostat operating modes, according to the controller configuration setting: Local: chosen by the user pressing the MODE key Distance: based on the status of digital input DI1 depending on the water temperature In case of a water probe alarm, the mode control returns temporarily to Local mode. The control can manage two types of ventilation: step ventilation with a set number of selectable speeds (3 or 4); modulating ventilation with variable speed between 0% and 100% The use of one or the other type of control depends on the type of ventilator (step or modulating) installed on-board the machine. Step adjustment itself can follow two different logics based on the type of valve/s (ON/OFF or modulating). In brief, the automatic adjustment logics managed by the controller (and described in detail here below) are as follows: step ventilation with 0N/OFF valve (or not installed) and 3 speeds, in cooling and heating mode; step ventilation with 0N/OFF valve (or not installed) and 4 speeds, in summer and winter mode; step ventilation with modulating valve and 3 speeds, in summer and winter mode; step ventilation with modulating valve and 4 speeds, in summer and winter mode; modulating ventilation adjustment with ON/OFF valve, in summer and winter mode; modulating ventilation adjustment with modulating valve. NATURAL CONVECTION depending on the air temperature For units with valve, by enabling the parameter from the configuration menu, ventilation for heating is delayed by 0.5 C to allow for an initial natural convection phase. STEP VENTILATION Where: Set is the temperature set with the arrows NZ is the neutral zone The operating mode of the thermostat is indicated on the display by the symbols COOLING and HEATING. Use the UP/DOWN keys to choose from the following speeds: Automatic SPD.:depending on set temperature and room air temperature; Extra-low spd: can only be selected if the unit is 2X1 (4 speeds) Low SPEED Medium SPD. High SPD. USER MANUAL 10
13 Controller for units EVO AUTOMATIC OPERATION FOR 3-SPEED UNITS AND ON/OFF VALVE/S (OR IF NOT INSTALLED): 1 Low SPEED 2 Medium SPEED 3 High SPEED COOLING For configurations with 4 speeds and valve, ventilation for heating is delayed by 0.5 C to allow for an initial natural convection phase. AUTOMATIC OPERATION FOR 3-SPEED UNITS AND MODULATING VALVE/S 1 Low SPEED 2 Medium SPEED 3 High SPEED COOLING HEATING HEATING AUTOMATIC OPERATION FOR 4-SPEED UNITS AND ON/OFF VALVE (OR NOT INSTALLED): 1 Low SPEED 2 Medium SPEED 3 High SPEED el EXTRA LOW SPEED COOLING AUTOMATIC OPERATION FOR 4-SPEED UNITS AND MODULATING VALVE/S: 1 Low SPEED 2 Medium SPEED 3 High SPEED el EXTRA LOW SPEED COOLING HEATING 11 OPERATION MANUAL
14 Controller for units HEATING HEATING WITH 4-SPEED CONFIGURATIONS MODULATING VENTILATION As with step ventilation, the management logic for modulating ventilation offers two possible operating modes: AUTOMATIC operation fixed-speed OPERATION The operating percentage is selected by pressing the UP/ DOWN keys, while automatic ventilation comes on when ventilation is set below the minimum (20%) or above the maximum (100%) values. MANUAL ventilation WATER CONSENT For configurations with 4 speeds, ventilation for heating is delayed by 0.5 C to allow for an initial natural convection phase. Regardless of what type of fan is installed (step or modulating), ventilation depends on the system's water temperature control. Depending on the work mode, we will have different consent thresholds for heating and cooling. COOLING AUTOMATIC ventilation FORCED ventilation AUTOMATIC OPERATION FOR 3- OR 4-SPEED UNITS AND ON/OFF VALVE/S OR NOT INSTALLED: COOLING HEATING HEATING WITH 3-SPEED CONFIGURATIONS Failure to have this consent, when the thermostat sends a signal, will be displayed by the flashing symbol of the mode that is currently in operation Cooling or Heating. This enabling signal will be ignored if: the water probe is not required or it is in alarm conditions because it is disconnected Cooling with 4-pipe configurations USER MANUAL 12
15 Controller for units EVO FORCED OPERATIONS Normal ventilation logic (modulating and non-modulating) will be ignored in particular forcing situations which could be necessary for the correct temperature control or functioning of the terminal. Possible situations: in COOLING MODE: - with on-board controller and configurations with valve: the minimum available speed is maintained even when the temperature is reached - with on-board controller and configurations without valve: every 10 minutes a 2-minute washing at medium speed with the fan stopped allows the air probe to perform a more precise room temperature reading. - if ventilation is set on standby always ON, the selected speed is maintained once the temperature setpoint is reached. in HEATING MODE: - with the heater on: ventilation is forced at medium speed - once the heater is switched off: post-ventilation is maintained at medium speed for 2 minutes. (NB: this ventilation will be completed even should the thermostat be turned off or pass to the cooling mode.) - if ventilation is set on standby always ON, the selected speed is maintained once the temperature setpoint is reached. VALVE The control can manage 2- or 3-way ON/OFF (i.e. fully open or fully closed) or modulating valves (valve opening can range between 0% and 100%). ON/OFF VALVE Valve (2- or 3-way) opening is controlled depending on the operating setpoint and air temperature setpoint. COOLING HEATING MODULATING VALVE Valve ( 2- or 3-way) opening is controlled depending on the operating setpoint and air temperature setpoint. The opening adjustment logic follows the diagrams provided below. COOLING HEATING WITH 3-SPEED CONFIGURATIONS 13 OPERATION MANUAL
16 Controller for units HEATING WITH 4-SPEED CONFIGURATIONS WATER CONSENT Consent to switch on the heater depends on water temperature control. The following is the relative consent logic: HEATING WATER CONSENT Water temperature control for opening consent only concerns configurations with 3-way valves and electrical heater. In such configurations the water temperature will be checked in the following cases: Heating with heater: heater operation requires forced ventilation; it is therefore necessary to avoid water that is too cold from passing through the unit. Post ventilation due to the heater switching off: maintained until the end of the set time, even if the operation mode is changed. During post-ventilation water consent coincides with consent required for ventilation. ELECTRICAL HEATER SWITCHING IT ON If it has been preventively included by the configuration parameter and use is enabled by the setup parameter, the electrical heater is used when the thermostats requires it, based on the room temperature: This enabling signal will not be given if the water probe is not included or is disconnected. ECONOMY If it has been preventively included by the configuration parameter and use is enabled by the setup parameter, the Economy function will correct the setpoint by 2.5 C and force operation at the minimum available seed to reduce unit operation. Cooling: set C Heating: set 2.5 C MINIMUM TEMPERATURE CONTROL If it has been preventively included by the configuration parameter and use is enabled by the setup parameter, when the thermostat is off, this logic avoids the room temperature from dropping below a settable threshold ("Minimum temperature control SET"), forcing the unit to heating mode for the required amount of time. If the electrical heater is present, it will be used only if it was previously selected as a resource in the Heating mode. SWITCHING IT ON If this control is selected, the terminal will turn on if the room temperature falls below 9 C: Switching it on entails forced ventilation. USER MANUAL 14
17 Controller for units EVO Once the temperature returns above 10 C, the thermostat will go back Off. Pressing OFF on the digital input will deactivate this logic. DEHUMIDIFICATION The dehumidification function, which can only be used in Cooling mode, if a humidity probe has been included in the configuration menu, makes the unit operate with the aim of reducing any humidity in the room, until it reaches the setpoint level entered in the setup menu parameter. LOGIC Ventilation speed will be forced to low, or, if the temperature is much higher than the entered set, to medium speed. If there is no consent the dehumidification function will be momentarily disabled. This will also happen if the probe is disconnected. ALARMS Once the reference humidity level is reached or the controller is placed on Off, dehumidification will switch off. The alarms managed by the controller refer to missing probes required by the unit's configuration. Accordingly, the following are possible alarms: Air probe alarm Water probe alarm Humidity probe alarm They must bring humidity back to the set value (and the valve, if installed), ventilation will switch on even if the room temperature has already reached the relative set (shown on the display). If it drops too far below this threshold, the logic will be temporarily disabled. WATER CONSENT Consent to switch on dehumidification depends on water temperature control. The following is the relative consent logic: 15 OPERATION MANUAL
18 Controller for units NETWORKS AND CONNECTIVITY CONNECTION TO SUPERVISION SYSTEM (ERGO SOLUTION) Connection is possible for version ERGO 3.10 or higher. Using serial port RS485 it is possible to connect EVO controllers (up to 247) to a management software that uses standard MODBUS RTU as a communication protocol, with the following characteristics: settable baudrate (defualt: 9600); no parity 8 bits of data 1 bit of stops Inside a supervision network, each EVO controller acts as a SLAVE towards the centralised management system which constitutes the network MASTER (figure 01). Once the network has been wired, it is necessary to configure each EVO controller. Press PRG to access the MENU and then enter sub-menu Networks and connections (password = 20). Set the SETUP RS485 parameters as follows: MST/SLV = Slave from SPV Protocol = Modbus Serial address = set a value between 1 and 255 Speed = set based on the requirements of the Master leave the SETUP OC PARAMETERS UNCHANGED (MST/SLV = none). For details on how to wire the network, read RS485 NETWORK GUIDE LINES available in the download area of the Galletti website. The following functions are recognised and managed by the controller as SLAVE: CODE DESCRIPTION 01 coil status reading 02 input status reading 03 holding register reading 04 input register reading 15 multiple coil status writing 16 multiple holding register writing The following are the available variables: COIL STATUS (DIGITAL READING/WRITING) DESCRIPTION 1 ON/OFF controller 2 SUMMER/WINTER controller 3 ECONOMY controller 4 ENABLE ANTI-FREEZE controller 5 ENABLE ELECTRICAL HEATER controller 6 modulating ventilation MAN/AUTO controller 7 enable ON/OFF from MASTER 8 enable ECONOMY from MASTER 9 enable SUMMER/WINTER from MASTER 10 enable ANTI-FREEZE from MASTER 11 enable ELECTRIC HEATERS from MASTER 12 enable SETPOINT from MASTER 13 enable SETPOINT LIMITS from MASTER 14 enable VENTILATION SPEED from MASTER 15 KEYBOARD LOCK controller 16 enable HUMIDITY CONTROL consent from MASTER 17 enable HUMIDITY CONTROL 18 control for CONFIGURABLE DIGITAL OUTPUT NO.7 INPUT STATUS (READ-ONLY DIGITAL) DESCRIPTION 1 unit ON/OFF 2 SUMMER/WINTER 3 ECONOMY on 4 ANTI-FREEZE on 5 ALARM installed 6 Room temperature probe alarm 7 Water temperature probe alarm 8 Hot water temperature probe alarm (only with 4-pipe units) 9 Room humidity probe alarm 10 Speed number (3/4) 11 Pipe number (2/4) 12 Type of ventilation (STEP/MODULATING) USER MANUAL 16
19 Controller for units EVO 13 Adjustment probe (DISPLAY/BOARD) 14 Installed electrical heaters 15 Installed humidity probe 16 Digital output 1 status (01) 17 Digital output 2 status (02) 18 Digital output 3 status (03) 19 Digital output 4 status (04) 20 Digital output 5 status (05) 21 Digital output 6 status (06) 22 Digital output 7 status (07) 23 Water probe presence 24 Hot water probe presence (hydronic unit with 4 pipes) 25 Dehumidification active 26 Valve open 27 Hydronic unit switched off from remote contact 28 Ventilation control (manual/automatic) 29 Heater active 30 Valve presence 31 Enable ECONOMY from contact HOLDING REGISTER (READING/WRITING WHOLES/ANALOGUES) DESCRIPTION 1 Summer temperature SET (cooling) 2 Summer temperature SET minimum limit 3 Summer temperature SET maximum limit 4 Winter temperature SET (heating) 5 Winter temperature SET minimum limit 6 Winter temperature SET maximum limit Single temperature SET 7 (if SUM/WIN on water/air temp.) 8 Humidity SET 9 Minimum humidity SET limit 10 Maximum humidity SET limit Step ventilation speeds: 0 = extra-low speed 1 = low speed 11 2 = medium speed 3 = maximum speed 4 = AUTO speed 12 Modulating ventilation speed INPUT REGISTER (READ-ONLY WHOLES/ANALOGUES) DESCRIPTION 1 Room temperature 2 Room humidity 3 Water temperature 4 Hot water temperature (only with 4-pipe units) Step ventilation status: 0 = no ventilation 1 = extra-low speed 5 2 = low speed 3 = medium speed 4 = maximum speed 6 Modulating ventilation % value 7 % value of analogue output 1 8 % value of analogue output 2 9 % value of analogue output 3 10 Temperature SET on 11 Summer temperature SET 12 Winter temperature SET 13 Single temperature SET (if SUM/WIN on water/air temp.) 14 Humidity SET on 15 Type of valve (NOT INCLUDED/ON-OFF/MODULATING) 17 OPERATION MANUAL
20 Controller for units ERGO GALLETTI MANAGEMENT SOFTWARE If you are using ERGO Galletti management software it is also possible to connect a Chiller/Heat pump to the supervision system. In this way, the management software analyses the system's data and adapts operation to the real needs. ERGO management software can assign 4 different degrees of freedom to the LCD controller, based on the type of remote control that has been assigned through the software. LOCAL: all of the functions are accessible on the controller: speed choice, temperature, cooling or heating mode, ON/OFF. All of the operation parameters are read by the system. REMOTE CONTROL A - cooling or heating mode is set from the ERGO software; all of the other functions are accessible on the controller: speed choice, temperature, ON/OFF. All of the operation parameters are read by the system. REMOTE CONTROL B - The user can choose the based on the value set through ERGO. The operating mode is set by the software. REMOTE CONTROL C - No function can be set on the control panel, it is fully managed by the software. SMALL NETWORK SOLUTIONS SMALL network solutions constitute a MASTER/SLAVE network system where one of the EVO controllers performs the function of MASTER while all of the other EVO controllers on the network perform the SLAVE function. It can be set up in two different ways, each with different functions and type of connection: SMALL network on RS485 SMALL network on CONVEYED WAVES SMALL NETWORK ON RS485 In this case the connection is set up using bus RS485, comprised of a twisted 2-conductor, shielded data cable (figure 02). For details on how to wire the network, read RS485 NETWORK GUIDE LINES available in the download area of the Galletti website. The MASTER controller sends the following settings to the SLAVE controller: Operating mode: (COOLING or HEATING); ON/OFF status of the controller: all of the SLAVE controllers switch to the ON/OFF status of the MASTER controller; Enabling minimum room temperature control; Room temperature SET; or (based on the "Temperature control from MASTER" parameter in the "Networks and Connections" menu): Limits that apply to changes in the room temperature SET (both SUMMER and WINTER): on each SLAVE controller, the SET variation is allowed with a delta of ± 2 C around the value of the SET entered on the MASTER controller. In terms of the ON/OFF status, the following is allowed on each SLAVE controller: Automatic local ON when requested by the minimum room air temperature control function. Automatic local ON/OFF depending on the time slots, if enabled; OFF on SLAVE controller from digital input if it is enabled. Each SLAVE controller maintains its autonomy in managing ventilation speed, in switching the ECONOMY function on and in setting the SET value (with the limits described above). This type of network does not allow a supervision network to be included (ERGO solution) as the RS485 serial ports on all of the controllers (both MASTER and SLAVE) are already occupied by the SMALL network arrangement. Once the network has been wired, it is necessary to configure each EVO controller. Press PRG to access the MENU and then enter sub-menu Networks and connections (password = 20). Set the SETUP RS485 parameters as follows: MST/SLV = set Master on the EVO controller acting as the MASTER on the network, and set Local Slave on all of the EVO controllers acting as the SLAVEs in the network. Protocol = Modbus Serial address = set a value between 1 and 255, only in the SLAVE controllers. USER MANUAL 18
21 Controller for units EVO Speed = do not change (9600) Leave the SETUP OC PARAMETERS UNCHANGED (MST/ SLV = none). SMALL NETWORK ON CONVEYED WAVES This type of configuration controls up to a maximum of 32 hydronic units through a single user unit. The connection is set up using an OC bus, comprised of a twisted 2-conductor, shielded data cable (figure 03). In this case, the MASTER controller makes all of the SLAVE controllers connected to the network operate (instant by instant) in an identical fashion to the MASTER controller itself. Accordingly, no SLAVE controller can make autonomous decisions, nor are they equipped with their own user unit. The maximum number of SLAVE controllers that can be connected to this type of network is 32. Before connecting the I/O boards to the network, each board needs to be configured. Connect the user unit to each I/O board. Press PRG to access the MENU and then enter sub-menu Networks and connections (password = 20). Set the OC SETUP parameters as follows: MST/SLV = set Master on the I/O board acting as the MASTER of the network and Slave on all of the SLAVEs in the network. Serial address = set a value between 2 and 34 on the SLAVE controllers. It is now possible to connect all of the I/O boards to the network. Once the board has been set as SLAVE, it can no longer communicate with any random user unit. Accordingly, if the settings are changed, it will be necessary to RESET it in the following manner: disconnect the board from the network and, keeping it powered, place digital input 10 in short circuit for 15 seconds (clamps I10 and IC). MIXED NETWORK The SMALL network on CONVEYED WAVES can also be connected to a supervision network (ERGO or SMALL solution) on RS485 through RS485 serial port of the MASTER controller, thus obtaining what is known as a MIXED NETWORK. Figure 04 illustrates the diagram of a mixed network comprised of a SMALL network on CONVEYED WAVES combined with a supervision network. PARAMETER OUTLINING TABLE RS485 MST/SLV ERGO BMS Slave from SPV SMALL RS485 EVO Master: Master EVO Slave: Slave from SPV SMALL OC - Mixed Network EVO Master: Master EVO Slave: Slave from SPV Protocol Modbus Modbus - Modbus Serial Address Speed OC Based on the Master EVO Master: 0 EVO Slave: MST/SLV - - Serial Address - - MEANINGS OF THE LEDS STATUS LED NETWORK LED - EVO Master: 0 EVO Slave: EVO Master: Master EVO Slave: Slave EVO Master: 0 EVO Slave: BLUE GREEN RED Unit OFF OC Master Unit ON Communication OK Alarm in progress No communication Looking at the I/O board from the front, the STATUS LED is on the left, while the NETWORK LED is on the right. All of the hydronic units (i.e. both MASTER and SLAVE) connected to the network must be configured in the same way. 19 OPERATION MANUAL
22 TECHNICAL DATA Controller for units INSTALLATION AND MAINTENANCE Power supply 230Vac 50/60Hz Power 2.5 W Operating Range 0-50 C Temperature Storage Temperature Range C IP protection rating IP30 (user unit) Type of board Type 1.C Output relay Inputs Temperature Probes Humidity probe Max cable section for clamps Pollution rating Heat/fire resistance Over-voltage category EMC conformity standards Normal Open 240V (Resistive) Max room temperature: 105 C Micro-interruption NTC Temperature Probes 0-5V probes on Dry contacts (digital inputs) NTC probes 10K C Range C Resistive type of probe Range 20-90%RH 1.5 mm 2 Degree II Category D Category II EN (2007) EN (2007) + A1(2011) The procedures for installing the user interface, the power board and probes, with specific instructions for individual hydronic units of the Galletti range, will be described at a later stage. PROBE INSTALLATION The EVO controller manages the following probes: Air temperature reading probe installed inside the user unit; it does not require any special installation operations. Probe (optional and alternative to the previous one) connected to the I/O board for temperature readings of the air taken in by the machine, or in any other point of the room subject to temperature adjustment (REMOTE AIR PROBE) Probes (optional) for water temperature readings: it is possible to connect one or two probes, depending on whether the unit is connected to a 2- or 4-pipe system. Probe (optional) to read the relative ambient humidity, connected to the I/O board To avoid interference, and subsequent faulty operation, the probe cables must NOT be set up near power cables 8230V). REMOTE AIR PROBE INSTALLATION Use of the remote air probe to adjust the room temperature is optional. When it is used, it becomes the main adjustment probe, in place of the probe installed inside the user unit. It is always possible to choose the main room temperature adjustment probe from the "air probe" parameter contained in the CONFIGURATION MENU. The remote air probe must always be connected to clamps I1-C1 on the I/O board. USER MANUAL 20
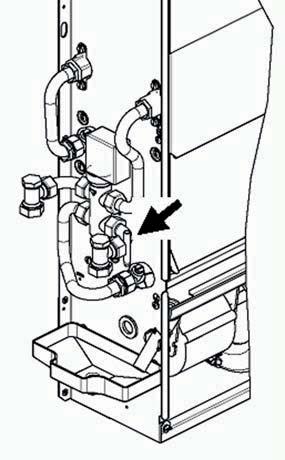
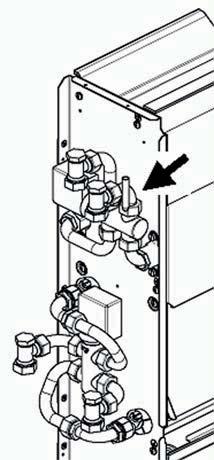
23 Controller for units EVO FLAT - 2X1 Use the adhesive plastic probe-holder located on the side wall of the screw feed. Pass the probe cable (black) through the opening in the plastic probe-holder and fasten the probe in place by inserting it by its leg (the part covered by the rubber sheath). The cable supplied with the humidity sensor is equipped with a shield. There is no need to connect this shield to the I/O board. If interference from near-by power cables or other is affecting the relative humidity reading, connect the aforementioned shield to the GND clamp on the RS485 serial port. WATER PROBE INSTALLATION ESTRO Use the supplied adhesive plastic probe-holder: Fan coil without base (figure 05) Fan coil with base (figure 06) Fan coil with front suction (figure 07) HUMIDITY PROBE INSTALLATION Probe-holder The humidity probe is an optional accessory. If one is installed, it must be connected to the SU-SU clamps on the I/O board. The probe sensor can be positioned where it will be in contact with the air flow of the unit's suction circuit (if there is also a remote temperature probe, strap them together as illustrated in the figure below) or in any other point in the room subject to temperature and humidity adjustment. IT IS also possible to position the probe sensor inside the user unit using the relative hook on the base of the unit (figure 08). The water temperature detection probe (white cable) is an optional accessory. With 2-pipe units (single coil) the water probe must be connected to clamps I2 - C1 of the I/O board. With 4-pipe units it is possible to choose (through the "Number of water probes" parameter in the CONFIGURATION MENU) how many probes (one or two) to use. If you choose to use a water probe, it must be installed so that it reads the temperature of the heating water (and is therefore installed on the hot water coil) and must be connected to clamps I2 - C1 of the I/O board. If, on the other hand, you choose to use two water probes, the cold water detection probe must be connected to clamps I2 - C1 of the I/O board, whereas the hot water detection probe must be connected to clamps I3 - C1 of the I/O board. FLAT - ESTRO Use the copper probe-holder for the water probe and, depending on the case, set it up as described below. Fan coils for: 2-PIPE system - NO VALVE or 2-WAY VALVE: the water probe must be set up on the exchanger (figure 09); 2-PIPE system - NO VALVE or 2-WAY VALVE: the water probe (if single) must be set up on the exchanger in the heating circuit (figure 10); any second probe must be installed on the exchanger in the cooling circuit; 2-PIPE system - WITH 3-WAY VALVE: the water probe must be positioned on the valve entrance, on the branch leading out from the system (figure 11); 4-PIPE system - WITH 3-WAY VALVES: the water probe (if single) must be positioned on the entrance of the heating valve, on the branch leading out from the circuit (figure 12); any second probe must be installed on the entrance of the cooling valve on the branch leading out from the circuit. 21 OPERATION MANUAL
24 Controller for units 2X1 Use the copper probe-holder for the water probe (white cable) and, depending on the case, set it up as described below. UTN For two-pipe units without valve, the water probe must be installed on the exchanger using the supplied strap (figure 13); For four-pipe units without valves, the water probe must be installed on the exchanger in the heating circuit (figure 14); For two-pipe units with valve the water probe must be positioned on the valve entrance, on the branch coming from the system (figure 15); For four-pipe units with valves, the water probe must be installed on the heating valve entrance, on the branch coming from the circuit (figure 16). Example, valves installed on the left side: Water probe for 4-pipe system PWN Example, valves installed on the left side: System pipe supplied by the customer For PWN units without valves, for 2-pipe systems, the water probe must be positioned on the pipe at the entrance of the exchanger. For PWN units without valves, for 4-pipe systems, the water probe must be positioned on the pipe at the entrance of the exchanger in the heating circuit. AIR AIR Water probe for 2-pipe system For UTN units without valves, for 2-pipe systems, the water probe must be positioned on the pipe at the entrance of the exchanger. For UTN units without valves, for 4-pipe systems, the water probe must be positioned on the pipe at the entrance of the exchanger in the heating circuit. USER MANUAL 22
25 Controller for units EVO USER UNIT INSTALLATION Choose an area to install the controller panel which is easily accessible to set functions and efficient for room temperature detection (at least 1.5 m from the floor). Therefore, avoid: direct sunlight exposure; direct exposure to hot or cold air currents; placing obstacles which impair correct temperature detection (curtains or furniture); the constant presence of water vapour (kitchens, etc.): covering or recessing the panel into the wall. For wall installation of the controller, it is advisable to use a recessed 503 electrical contact box behind the controller to house the wires. For installation, follow the instructions below: Remove the controller's closing screw (figure 17). If a 503 enclosed gang box is used, pass the cables through the slot at the bottom of the controller and use the relative holes for fastening (figure 17). Otherwise drill a hole in the wall, for the fastening holes on the base of the controller, where you wish to install the controller. Use the base of the controller as a template to mark the position of the holes. Pass the cables through the slots on the base and fasten it with plugs onto the previously drilled wall (figure 18). Connect the clamp to the display board. Close the controller back up using the closing screw. The connection between the panel and the controller and the I/O board must be set up using the 2-clamp connectors for conveyed waves installed on both devices (see electrical diagram). With the I/O board, there are 2 connectors to set up the connection: it makes no difference which connector is used. It is necessary to use a data cable for networks with a pair of twisted conductors and shielding. It is also necessary to connect the shielding conductor to the clamp (-) on the user side and on the I/O board (figure 23). ON-BOARD I/O BOARD INSTALLATION 2X1 - ESTRO - UTN PWN Install the I/O board on 2X1, ESTRO and UTN units using the relative clamping bracket and the supplied 9.5 mm screws (figure ); Screw the 3-way terminal board onto the bracket using the supplied 25 mm screws; Install the bracket onto the side of the unit that is opposite the water infeed/outfeed manifolds; Set up the electrical connections as illustrated in the electrical diagram (figure 23); use the cable with a 1.5 mm 2 section to connect the unit terminal board (CN) to the board. On the PWN unit, install the I/O board directly onto the electrical connections box using the supplied 9.5 mm screws (figure 22). Set up the electrical connections as illustrated in the electrical diagram (figure 23); use the cable with a 1.5 mm 2 section to connect the unit terminal board (CN) to the board. 23 OPERATION MANUAL
26 Controller for units ELECTRICAL CONNECTIONS All of the operations must be carried out by qualified staff, in accordance with regulations in force. For any electricalrelated procedure, refer to the electrical diagrams supplied with the unit. We also suggest making sure that the characteristics of the electrical network are suitable for the absorption levels reported in the electrical data table. MAINTENANCE Before carrying out any operation on electrical parts, make sure the power supply is disconnected. Check that the mains voltage is compatible with the specifications of the unit (voltage, number of phases, frequency) shown on the unit rating plate. The supply voltage must not fluctuate by more than ±5% in relation to the rated value. The electrical connections must be set up according to the electrical diagram attached to the specific unit and with the regulations in force. Maintenance operations must be carried out exclusively by a manufacturer-authorised assistance centre or by qualified staff. For safety reasons, before carrying out any maintenance or cleaning, turn the equipment off. I/O TABLE FOR THE BOARD (figure 23) POWER SUPPLY L N INPUTS I1 I2 I3 I4 I5 IC Phase Neutral Room air NTC probe Water NTC probe Hot water NTC probe (with 4-pipe units) Not used Not used +5 Not used I6 I7 I8 I9 I10 IC SU - SU OUTPUTS A1 A2 A3 CA O1 O2 O3 O4 O5 O6 C1 O7 C7 Common for NTC probes Input for remote ON/OFF Input for remote SUM/WIN Input for remote ECONOMY Not used Not used Common for I6-I7-I8 Humidity probe Brushless fan modulation Water valve modulation (cold with 4-pipe units) Hot water valve modulation (only with 4-pipe units) Common for 0-10V outputs Extra-low speed Low Speed Medium Speed High Speed Water valve (cold with 4-pipe units) Hot water valve (only with 4-pipe units) or heater Common for O1-O6 relay outputs Configurable signal output PORTS (FRONT OF BOARD) A/B/GND Common for O7 relay output RS485 serial MODBUS protocol + / - Display connection or second board + / - Display connection or second board USER MANUAL 24
27 Controller for units EVO ELECTRICAL DIAGRAM (figure 23) KEY SA SW SWH SU ON/OFF MS SUM/WIN ECONOMY Room temperature probe Water temperature probe (cold with 4-pipe units) Hot water temperature probe (only with 4-pipe units) Ambient humidity probe Dry contact for remote ON/OFF Micro switch FLAT - 2X1 Dry contact for remote SUMMER/WINTER Dry contact for remote ECONOMY FAN 0/10V Modulating fan 0/10V VH 0/10V VH 0/10V MV INV MV INV V1 V2 V3 V4 COM VC VH/RE CN IL F L N Modulating 0/10V water valve (cold with 4-pipe units) Modulating hot water valve (only with 4-pipe units) Fan Fan inverter Inverter fan motor Extra-low speed Low speed Medium speed Maximum speed Common for ON/OFF outputs Water valve (cold with 4-pipe units) Cold water valve (only with 4-pipe units) or electric heater Unit terminal board Line switch (not included) Fuse (not included) Phase Neutral 25 OPERATION MANUAL
28

29

30
31 FLAT ESTRO 21 22
32 23
33 23
34 NOTE
35 NOTE


 Via Romagnoli 12/a")

36 Stampato su carta riciclata Printed on recycled paper Bentivoglio (BO) Via Romagnoli 12/a Tel. 051/ Fax. 051/ Azienda certificata UNI EN ISO 9001 e OHSAS
REMOTE CONTROL FOR CHILLER MYCHILLER
 REMOTE CONTROL FOR CHILLER MYCHILLER GENERAL FEATURES... 3 MAIN FUNCTIONS AND EQUIPMENT:... 3 LCD DISPLAY... 4 KEYBOARD... 5 BOARD CONFIGURATION... 7 LIST OF MAIN PARAMETERS... 7 CONFIGURATION OF MAIN
Modular Standard HP Chiller 1/4 screw compressor with Carel driver
 Program for pco¹ pco 2 and pcoc Modular Standard HP Chiller 1/4 screw compressor with Carel driver Manual version 1.0 25 September 2003 Program code: FLSTDmMSDE Do we want you to save you time and money?
Installer Manual KNX Touchscreen Thermostat
 Installer Manual 02952 KNX Touchscreen Thermostat Index GENERAL FEATURES AND FUNCTIONALITY from page 5 ETS PARAMETERS AND COMMUNICATION OBJECTS from page 7 COMMUNICATION OBJECTS GENERAL FEATURES AND FUNCTIONALITY
INSTALLATION & USER MANUAL
 INSTALLATION & USER MANUAL HC Digital Automatic Humidistat (Y3760) CONTROLS 506808-01 3/2016 Supersedes 6/2011 picture goes here THIS MANUAL MUST BE LEFT WITH THE HOMEOWNER FOR FUTURE REFERENCE NOTICE
EXPERT TRI-STAR. Temperature controller. User s Manual
 Temperature controller r s Manual WARNINGS The warranty can be void if this product is used in a manner not specified by the manufacturer. Every effort has been made to ensure that this manual is complete,
Refrigerated air dryers
 Refrigerated air dryers OPERATING AND MAINTENANCE MANUAL Original instructions 38178800319 OPERATING AND MAINTENANCE MANUAL - Contents 1 CONTENTS CONTENTS... 1 Chapter 1 IDRY ELECTRONIC CONTROLLER...
ENERGY LIGHT USER S GUIDE ENERGY LIGHT USER S GUIDE
 ENERGY LIGHT USER S GUIDE Release January 2001 CONTENTS 1.0 GENERAL CHARACTERISTICS... 4 1.1 MAIN CHARACTERIS TICS... 4 2.0 USER INTERFACE (CODE C5121230)... 5 2.1 DISPLAY... 5 2.2 MEANING OF THE LEDS...
MO n : 12JMC rév A
 CTT8 MO n : rév A Page 2 / 18 MODIFICATIONS Rev. Description Date Checked by Approuved by Z Creation 2012/02/12 JMC LA A First issue 2012/02/14 JMC LA INDEX Page 3 / 18 GENERALITY 4 INTRODUCTION 4 ACCESSORIES
Operation manual. Rooftop Packaged Unit
 Operation manual Rooftop Packaged Unit odels: UATYQ20ABAY1 UATYQ25ABAY1 UATYQ30ABAY1 UATYQ45ABAY1 UATYQ50ABAY1 UATYQ55ABAY1 UATYQ65ABAY1 UATYQ75ABAY1 UATYQ90ABAY1 UATYQ110ABAY1 UATYQ115ABAY1 UATYQ20AFC2Y1
CTT8 TEMPERATURE MONITOR DEVICE
 INSTRUCTION MANUAL IM302-U v2.3 CTT8 TEMPERATURE MONITOR DEVICE GENERALITY The device of control temperatures CTT8 is used in the control of electric machine, transformer, motor, etc. where it s possible
RCS Residential Control Systems Inc.
 RCS Residential Control Systems Inc. Model TZ16 Z-Wave Communicating Thermostat with Rev P HVAC Control Unit INSTALLATION AND OPERATION MANUAL DCN: 141-00882 Rev 02 5/18/06 This manual applies to the following
EasyTronic III MANUAL SERVICE
 rev.6 EasyTronic III MANUAL SERVICE General characteristics: Power supply 24 Vac ±15% Max consumption at 24Vac 300mA Relay outputs 6 Maximum relay current 8 A res. Serial standard RS232 2 Serial standard
User manual CLIMATIC 200/400 - Controller. Providing indoor climate comfort
 User manual CLIMATIC 2/4 - Controller Providing indoor climate comfort MUL35E-56 9-26 INDEX CONTENTS PAGE INDEX 1 GENERAL DESCRIPTION 2 THE KEYPAD, Climatic 2 3 THE KEYPAD, Climatic 4 4 THE KEYPAD REMOTE
Table of Contents. Model: Series. Available in : Sapphire Black and Glacier White. Product Image. 20 Table of Contents.
 1 Model: Available in : Sapphire Black and Glacier White Table of Contents Product Image 1 Frost Protection 20 Table of Contents 2 Power ON/OFF 21 What is a Programmable Room Thermostat? Installation Procedure
DC 60 & DM 60 displays
 USER MANUAL DC 60 & DM 60 displays BALTIC FLEXAIR ENERGY AIRCOOLAIR COMPACTAIR FLATAIR (& Inverter) AQUALEAN DC60-DM60-IOM-1310-E www.lennoxemea.com Summaries 1 Display DC60 1.1 Introduction... 2 1.2
LCF Touch Modbus Datasheet Application Security Advice Caution
 LCF Touch Modbus Electronic Fan Coil Thermostat with Touch Display (Flush mounting) Datasheet Subject to technical alteration Issue date: 3.11.214 Application Modern design flush mounting fan coil room
DPC-1 Programmable digital thermostat with communication Versión 2.0. Technical Information. Ref: N
 DPC-1 Programmable digital thermostat with communication Versión 2.0 Ref: N-27360 1108 Technical Information I S O 9 0 0 1 ER-0028/1991 Johnson Controls Manufacturing España, S.L. is participating in the
HIGH EFFICIENCY FIRETUBE CONDENSING GAS BOILER
 This manual must be left with owner and should be hung on or adjacent to the boiler for reference. US HIGH EFFICIENCY FIRETUBE CONDENSING GAS BOILER MODELS CHS-85 through CHS-399 APPENDIX A CONTROLLER
Temperature Controller CC24-7 UNIBOX USER S MANUAL Legion Dr. Mason, MI USA October 2010 Ph. (517) Fax (517)
 Fax (517)") 3 4 Temperature Controller USER S MANUAL Aerotech, Inc. FORM: QM1386 4215 Legion Dr. Mason, MI 48854-1036 USA October 2010 Ph. (517) 676-7070 Fax (517) 676-7078 FOR CUSTOMER USE Enter the serial number
3 4 Temperature Controller USER S MANUAL Aerotech, Inc. FORM: QM1386 4215 Legion Dr. Mason, MI 48854-1036 USA October 2010 Ph. (517) 676-7070 Fax (517) 676-7078 FOR CUSTOMER USE Enter the serial number
RADIANT HEATING AND COOLING SYSTEMS CLIMATE CŎNTROL ZONING SYSTEM INSTALLATION GUIDE. Climate Cŏntrol Zoning System Installation Guide
 RADIANT HEATING AND COOLING SYSTEMS CLIMATE CŎNTROL ZONING SYSTEM INSTALLATION GUIDE Climate Cŏntrol Zoning System Installation Guide Uponor Climate Cŏntrol Zoning System Installation Guide Published by
Products no longer available
 Technical data sheet MONICO-.. Turnkey automation station MONICO-.. Forms an efficient fire protection system together with the motorisation sets BF(G)24MP Completely wired controller in matching control
User Manual. Dryer Controller M720
 User Manual Dryer Controller M720 Hardware version 1.00 Software version 1.00 Preliminary version Manual M720 Dryer controller Page 1 of 42 Document history Preliminary version: - Created in April, 2009
OPERATION AND MAINTENANCE MANUAL
 OPERATION AND MAINTENANCE MANUAL Prg Sel line alarm on on/off alarm enter Clear EMIpro MICROPROCESSOR CONTENTS 1 GENERAL CHARACTERISTICS Page 2 1.1 General description Page 2 2 EMIPRO USER INTERFACE Page
WATER HEATER ELECTRONIC CONTROLLER USER MANUAL
 WATER HEATER ELECTRONIC CONTROLLER USER MANUAL UPPER LED READOUT LED ICONS LOWER LED READOUT PVI INDUSTRIES, LLC - Fort Worth, Texas 76111 - Web www.pvi.com - Phone 1-800-433-5654 Page 1 / 7 PV500-40 03/17
OWNER S MANUAL Venstar Inc. 08/07
 Digital Thermostat residential THERMOSTAT T1 800 7-DAY PROGRAMMABLE up to 3-heat & 2-cool HEAT COOL HEAT PUMP Control up to 3 Heat & 2 Cool Stages 3 Configurable Outputs Adjustable 2nd & 3rd Stage Timers
Chiltrix 5.1 Thin DC - Inverter Water Fan Coil Unit Floor, Wall or Ceiling Universal Mount Manual
 Chiltrix 5.1 Thin DC - Inverter Water Fan Coil Unit Floor, Wall or Ceiling Universal Mount Manual Version 1.5 1 CONTENTS CHAPTER 1 GENERAL INTRODUCTION...3 1. Preface... 3 2. Product Introduction... 3
HEAT HEAT HEAT COOL COOL
 OWNER S MANUAL AUTO 74 COOL 7 2 HEAT T O T A L I N E HEAT COOL COMMERCIAL THERMOSTAT P/N P374-2700 HEAT PUMP NON-PROGRAMMABLE DIGITAL THERMOSTAT 3 Configurable Outputs Control up to 2 Heat & 2 Cool Stages
Fan Coil Thermostat Controller Specification and Installation Instructions. Model TFHB24F3XYZ1 with External Humidity Sensor and BACnet Communication
 Model TFHB24F3XYZ1 with External Humidity Sensor and BACnet Communication Description The TFHB24F3XYZ1 is a fully configurable controller designed specifically for 2 pipe and 4 pipe fan coil applications.
READ AND SAVE THESE INSTRUCTIONS
 XXXXXXX-0 EN 1904 READ AND SAVE THESE INSTRUCTIONS BASIC-PLC CONTROLLER MANUAL For all Condair desiccant dryer with equipped with Basic- PLC valid from version: PLC-35/PLC-45 18.04.03 Dehumidification
NA G µair CONNECT 2
 NA 9.41 G 7-216 µair CONNECT 2 Control manual EN CONTENTS PAGE 1. GENERAL INFORMATION 2 2. COMPONENTS 3 2.1 On the front: 3 2.2 On the rear: 4 3. MENU TREE 7 4. ACCESS LEVEL (menu 8) 1 5. CONFIGURING
INSTRUCTION MANUAL REMOTE CONTROL DEVICE EASYREMOTE
 INSTRUCTION MANUAL REMOTE CONTROL DEVICE EASYREMOTE Technical features Guide to LCD symbols Guide to keys Technical features Supply by communication bus Number of temperature levels 2 (DAY / NIGHT) Temperature
Table of Contents. Product Image Table of Contents What is a Programmable Room Thermostat? Installation Procedure
 1 Model: 1 Table of Contents Product Image Table of Contents What is a Programmable Room Thermostat? Installation Procedure 1 2 3-4 5-6 Mode Select Pairing the ProTouch iq Hub Pairing the ProTouch iq What
Dryer Controller M720
 User Manual Dryer Controller M720 Hardware version 2.00 Software version 2.00 Manual M720 Dryer controller Page 1 of 60 Document history Preliminary version: - Created in April, 2009 Hardware Version 2.00,
N M AirControl AHU. Control manual
 N 10.63 M 03-2016 AirControl AHU Control manual EN CONTENTS PAGE 1 - MONITORING AND CONTROL 2 1.1 The program 2 1.2 The HMI terminal 2 1.3 The controller 4 1.4 Description of the air handling units 4
Psychrologix Controller W/ DHC
 Psychrologix Controller W/ DHC User Manual For Psychrologix version 1.3 Please read this entire document before connecting the Psychrologix controller. 1 *IMPORTANT PLEASE NOTE The Following: First, a
TECHNICAL MANUAL CVM 20 C 5005 CV/04-99 GB
 Summary 1 CONNECTIONS... 3 1.1 TEMPERATURE PROBES...3 1.2 LOW VOLTAGE DIGITAL INPUTS...3 1.3 LIVE DIGITAL INPUTS...4 1.4 RELAY OUTPUTS...5 2 POWER SUPPLY... 6 3 SERIAL CONNECTIONS... 6 4 SOFTWARE... 7
Model: Available in : Sapphire Black and Glacier White. 1 Series
 Model: Available in : Sapphire Black and Glacier White 1 Series Table of Contents Product Image 1 Frost Protection 20 Table of Contents 2 Power ON/OFF 21 What is a Programmable Room Thermostat? Installation
INSTALLATION MANUAL AND OPERATING INSTRUCTIONS
 AMB4/AMB8 MULTIPLE BOILER SEQUENCERS INSTALLATION MANUAL AND OPERATING INSTRUCTIONS ARGO (Technical Support) 2201 Dwyer Avenue Utica, NY 13501 (Corporate Sales) 85 Middle Road An ISO 9001-2000 Certified
50110_HM-neoStat-2014_Layout 1 31/10/ :33 Page 1 neo
 neo Model: Available in : Sapphire Black and Glacier White 1 Wavin neo Table of Contents Product Image 1 Optional Features 19-22 Table of Contents 2 Re-calibrating the Thermostat 23 What is a Programmable
P20. ECL Comfort. User's Guide. Installer's Guide. ECL Comfort P20. User's Guide. Installer's Guide *VI7BD502* *087R8014* *087R8014* *VI7BD502*
 User's Guide VI.7B.D5.02 2005.10 P20 *VI7BD502* *087R8014* www.danfoss.com ECL Comfort User's Guide ECL Comfort Installer's Guide www.danfoss.com *087R8014* *VI7BD502* Boiler controller P20 VI.7B.D5.02
HEAT HEAT HEAT COOL COOL PUMP OWNER S MANUAL 7-DAY TOTALINE
 OWNER S MANUAL COMMERCIAL THERMOSTAT P/N P374-2800 I 2 : 0 0 Su AUTO Pm 74 COOL 7 2 HEAT T O T A L I N E HEAT COOL 7-DAY HEAT PUMP PROGRAMMABLE DIGITAL THERMOSTAT 3 Configurable Outputs Control up to 2
DAP III Zone Master User s Guide
 DAP III Zone Master User s Guide Data Aire, Inc. 230 West BlueRidge Avenue Orange, California 92865 Document Number 600-000-788 March 2010 Revision 1.0 Document # 600-000-788 1 Overview The Data Aire DAP
Model: Edge-HC. 1 edge-hc
 Model: Model: Edge-HC 1 edge-hc Table Of Contents Product Image Table of Contents Installation Procedure System Type LCD Display Power On/OFF Setting the Time & Date Mode Select Fan Speed Temperature Display
ModSync Sequencing System Installation & Operation Manual. For use with Fulton Steam Boilers.
 ModSync Sequencing System Installation & Operation Manual For use with Fulton Steam Boilers. Revision 3.0 8/21/2008 - 2 - Table of Contents Introduction Page 4 Features Page 4 Sequence of Operation Page
TEC2620 Series Non-Programmable Fan Coil Network Thermostat Controller and Remote I/O Relay Packs
 TEC2620 Series Non-Programmable Fan Coil Network Thermostat ler and Remote I/O Relay Packs TEC2620H-0, TEC2620C-0, TEC2620H-0+PIR, TEC2620C-0+PIR, TEC2621H-0, TEC2621C-0, TEC2621H-0+PIR, TEC2621C-0+PIR
Installation and user manual
 Installation and user manual Please read carefully and retain for future reference Models EcoHeat: C3, C5, C6, C8, C9, C11, C12 Rev.1_09-07-15 Page 1 Table of Contents 1 IMPORTANT: WARNINGS 1.1 GENERAL
Halton SAFE / 7.14 user guide and installation instructions
 Halton SAFE / 7.14 user guide and installation instructions VERIFIED SOLUTIONS BY H A LTO N Enabling Wellbeing Table of contents 1 System description 3 2 User Accounts 4 3 Main menu 7 3.1 Main menu - Change
Table of Contents SECTION PAGE
 Table of Contents SECTION PAGE SECTION 1 INTRODUCTION................... 1.1 Description.............................. 1.2 Features................................ 1.3 Models.................................
ELECTRONIC COMMUNICATING THERMOSTAT
 O M N I S T A T ELECTRONIC COMMUNICATING THERMOSTAT Installation Manual RC-81 Single Stage Heat/Cool Real Time Pricing System Document Number 13I00-2 January, 1997 Copyright 1997 Home Automation, Inc.
HEAT COOL. Meets Commercial California Title 24
 Digital Thermostat commercial THERMOSTAT T2900 7-DAY MABLE up to 3-heat & 2-cool HEAT COOL HEAT PUMP Control up to 3 Heat & 2 Cool Stages 3 Configurable Outputs Adjustable 2nd & 3rd Stage Timers & Deadbands
ARGO (Technical Support) 2201 Dwyer Avenue Utica, NY (Corporate Sales) 85 Middle Road
 2201 Dwyer Avenue Utica, NY (Corporate Sales) 85 Middle Road") ARGO (Technical Support) 2201 Dwyer Avenue Utica, NY 13501 (Corporate Sales) 85 Middle Road An ISO 9001-2000 Certified Company Dunkirk, NY 14048 www.argoindustries.com P/N 240005498A, Rev. 1.5 [02/07]
ARGO (Technical Support) 2201 Dwyer Avenue Utica, NY 13501 (Corporate Sales) 85 Middle Road An ISO 9001-2000 Certified Company Dunkirk, NY 14048 www.argoindustries.com P/N 240005498A, Rev. 1.5 [02/07]
CRIMSON & CRIMSON MAX
 High efficiency water/water and geothermal heat pumps 5 114 General High efficiency water/water and geothermal heat pumps. Ideal for heating, cooling and production of domestic hotwater with total or partial
Networkable Fan Coil Controller Specification and Installation Instructions
 Controller Models EFCB10T-OE1 (24Vac / 0 relays) EFCB12T-OE1 (240Vac / 0 relays) EFCB10TU4-OE1 (24Vac / 4 relays) EFCB12TU2-OE1 (240Vac / 2 relays) EFCB12TU4-OE1 (240Vac / 4 relays) TFL Series Thermostat
Model: Available in: Sapphire Black and Glacier White. 1 Series
 Model: Available in: Sapphire Black and Glacier White 1 Series Table of Contents Product Image Table of Contents What is a Programmable Room Thermostat? Installation Procedure Mode Select Pairing the neohub
ELECTRONIC AIR CONDITIONING CONTROL
 1 ELECTRONIC AIR CONDITIONING CONTROL TH-T500 Simplified Driver s panel TH-T505 Complete Driver s panel TH-T510 Control box THERMOBUS INSTRUCTION MANUAL FOR OPERATOR PHONE: +39 035 4997266 FAX: +39 035
Spa Touch Control Panel with BP2100, BP6013 spa controllers. (Spa Owner s Manual insert)
") Spa Touch Control Panel with BP2100, BP6013 spa controllers. (Spa Owner s Manual insert) P.N. 7876C (export) February 12, 2015 For Spas equipped with BP2100, BP6013 controllers and Spa Touch panel. Spa
Spa Touch Control Panel with BP2100, BP6013 spa controllers. (Spa Owner s Manual insert) P.N. 7876C (export) February 12, 2015 For Spas equipped with BP2100, BP6013 controllers and Spa Touch panel. Spa
Table of Contents. Product Image 1 Locking/Unlocking the neoair 24 Table of Contents 2 Frost Protection 25 What is a Programmable Room Thermostat?
 Table of Contents Product Image 1 Locking/Unlocking the neoair 24 Table of Contents 2 Frost Protection 25 What is a Programmable Room Thermostat? 3-4 Power ON/OFF 26 Holiday Programming 27 Installation
Watts Under Floor Multi-zone Controller User Manual
 Watts Under Floor Multi-zone Controller User Manual Master unit RF Timer The digital wall thermostat can also use a floor temperature sensor to control minimum and maximum floor temperature, as well as
Installation Guide. ECL Comfort 210, application A Table of Contents
 1.0 Table of Contents 1.0 Table of Contents... 1 1.1 Important safety and product information..................... 2 2.0 Installation... 4 2.1 Before you start.....................................................
Gas Detection System TOX ALARM DG2000-Garage
 Gas Detection System TOX ALARM DG2000-Garage Gas Detection System 32 independent programmable channels 2 programmable alarm levels for each gas = up to 6 for each channel LCD alphanumeric display of gas
<IMG INFO> 339,95 195, ,35 14,15-1. ENERGY 400 Four Steps Chiller Heat Pump Controller
 339,95 195,85 0 2 89,35 14,15-1 Four Steps Chiller Heat Pump Controller 1 CONTENTS 1 Contents...2 2 How to use this manual...4 3 Introduction...5 3.1 Components...5 3.1.1 Basic Module...5 3.1.2
User s Manual
 997-060180-4e User s Manual 8403-060 Menu Driven Display 1120-445 I. CONTROLLER OPERATION ADJUSTING TEMPERATURE (Temporary Override when in Programmable mode) 1. Before you can adjust the temperature,
CLEVER CONTROL Version: V3
 CLEVER CONTROL Version: V3 INSTALLATION AND FUNCTIONING MANUAL USER AND BASIC VERSION Please, read these instructions carefully before attempting installation SECURITY ADVISE SIMBOLS Attention, Danger,
RS 0021 DIGITAL GAS DETECTION CONTROL UNIT FOR SENSORS WITH S-BUS PROTOCOL. USER MANUAL Read carefully before use
 RS 0021 DIGITAL GAS DETECTION CONTROL UNIT FOR SENSORS WITH S-BUS PROTOCOL USER MANUAL Read carefully before use GENERAL INFORMATION This device is a gas control unit with RS485 serial communication, based
DIMENS. MIN TYPICAL MAX A 71.0 (2.795) 71.0 (2.795) 71.8 (2.826) B 29.0 (1.141) 29.0 (1.141) 29.8 (1.173)
 71.0 (2.795) 71.8 (2.826) B 29.0 (1.141) 29.0 (1.141) 29.8 (1.173)") Evco S.p.A. Code 104K204E05 page 1/5 EVK204 Digital controller for ventilated refrigerating units, with HACCP and Energy Saving functions version 1.05 GB ENGLISH 1 PREPARATIONS 1.1 Important Please read
Evco S.p.A. Code 104K204E05 page 1/5 EVK204 Digital controller for ventilated refrigerating units, with HACCP and Energy Saving functions version 1.05 GB ENGLISH 1 PREPARATIONS 1.1 Important Please read
icomfort Residential Communicating Control System icomfort Touch Communicating Thermostat
 C O N T R O L S icomfort Residential Communicating Control System icomfort Touch Communicating Thermostat P R O D U C T S P E C I F I C AT I O N S Bulletin No. 210538 March 2012 Supersedes October 2011
Index. 1. General description of the application Types of units controlled Types of regulation Condensation...
 LCS pco ADVANCED MICROPROCESSOR USER MANUAL GB Index 1. General description of the application... 4 1.1. Types of units controlled...4 1.2. Types of regulation...4 1.3. Condensation...4 1.4. Safety devices
OWNER S MANUAL Venstar Inc. 08/07
 Digital Thermostat commercial SCHOOL THERMOSTAT T2900SCH MABLE up to 3-heat & 2-cool HEAT COOL HEAT PUMP Energy Saving Operation Morning Warm-up Period Programmable Override Unoccupied until button press
SOLO User Guide. Description. Installation. Programmable Dual Voltage Thermostat 240 V (120 V)
") SOLO User Guide Programmable Dual Voltage Thermostat Description The SOLO thermostat is designed to control the temperature of a floor heating system for both 120-volt and 240-volt applications. The thermostat
SOLO User Guide Programmable Dual Voltage Thermostat Description The SOLO thermostat is designed to control the temperature of a floor heating system for both 120-volt and 240-volt applications. The thermostat
M3092 Programmer. User s Manual. M3096B-33 E Copyright 2017 SELCO
 User s Manual Copyright 2017 SELCO SELCO Betonvej 11 - DK-4000 Roskilde Denmark Phone: 45 7026 1122 - Fax: 45 7026 2522 e-mail: selco@selco.com www.selco.com Table of contents 1 INTRODUCTION...4 2 SOFTWARE
RC-2000 Thermostat Installation Instructions
 RC-2000 Thermostat Installation Instructions DESCRIPTION The RC-2000 is a precision digital thermostat designed for 24 VAC heating and cooling systems. The RC-2000 will support the following systems: Single
Quickheat 30 weather compensated boiler control
 Quickheat 0 weather compensated boiler control A compact and sophisticated heating controller The compact KM controller is designed for the control of fan assisted boilers with modulating burners. The
Rooftop Thermostat Controller Specification and Installation Instructions. Model TRT2422
 ºF / º C Rooftop Thermostat Controller Model TRT2422 Description The TRT2422 is a combination controller and thermostat with a built-in scheduler, which is designed for simple and accurate control of single
MAKING MODERN LIVING POSSIBLE. TP7001 Range Electronic 7 Day Programmable Room Thermostat. User Guide. Danfoss Heating
 MAKING MODERN LIVING POSSIBLE TP7001 Range Electronic 7 Day Programmable Room Thermostat Danfoss Heating User Guide TP7001 Electronic 7 Day Programmable Room Thermostat For a large print version of these
DOL 31 Speed Controller Technical User Guide
 Technical User Guide For other language variants of this document we refer to your local dealer or http://docs.skov.com/1158. Available from April 2016. 612061 2016.09.20 Technical User Guide Program
Electronic Pellet Burner Controller NPBC-V3M
 Electronic Pellet Burner Controller NPBC-V3M SOFTWARE VERSION 3.3a/3.2 page of 27 CHANGES IN THE USER MANUAL OR IN THE CONTROLLER'S SOFTWARE Version of the user manual Changes Page 2.2. The software version
12V. Model: Available in : Sapphire Black and Glacier White. 2 Series
 Model: Available in : Sapphire Black and Glacier White 2 Series Table of Contents Product Image 1 Locking/Unlocking the neostat 19 Table of Contents 2 Frost Protection 20 What is a Programmable Room Thermostat?
INSTALLATION, OPERATION & QUICK START GUIDE
 INSTALLATION, OPERATION & QUICK START GUIDE Controller CS9B-THOA CS9B-THOCA Models: CS9BE-THOA CS9BE-THOCA Bard Manufacturing Company, Inc. Bryan, Ohio 4506 www.bardhvac.com Manual: 00-684 Supersedes:
Dual Point General Purpose Heat Trace Control TRACON MODEL GPT 230 Installation and Operation Manual
 We manage heat MANUAL Dual Point General Purpose Heat Trace Control TRACON MODEL GPT 230 Installation and Operation Manual 1850 N Sheridan Street South Bend, Indiana 46628 (574) 233-1202 or (800) 234-4239
CLEANROOM MONITOR CR3A Network - Installation Instructions
 CLEANROOM MONITOR CR3A Network - Installation Instructions INTRODUCTION The CR3 Series Cleanroom Monitor, was developed specifically to allow for monitoring of confined spaces with accuracy and reliability.
Q-SMART MODBUS KIT. Modbus Protocol & Parameters. Cod EN rev.a ed.08/2018. Q-SMART Software Version AE17
 Q-SMART MODBUS KIT Modbus Protocol & Parameters Cod.001085120EN rev.a ed.08/2018 Q-SMART Software Version AE17 Index 1 Modbus Protocol on Q-SMART... 4 1.1 Broadcasting... 4 1.2 Data Protection... 4 1.3
Model: 1 Series 12V. Available in: Sapphire Black and Glacier White
 Model: Available in: Sapphire Black and Glacier White 1 Series Table of Contents Product Image Table of Contents What is a Programmable Room Thermostat? Installation Procedure Mode Select Pairing the neohub
ER65-DRW Controller. Heating Applications. Product Bulletin. Heating Controller
 PB_ER65-DRW_ 202 ER65-DRW Controller Heating Applications Product Bulletin The controller is a digital device for domestic or residential heating units. It covers water and air heating applications. All-in-one
TEMON 4-C. Doc. N MO-0368-ING TEMPERATURE MONITOR DEVICE TYPE TEMON 4-C OPERATION MANUAL. Microener- Copyright 2010 FW 2.1 Date Rev.
 TEMPERATURE MONITOR DEVICE TYPE TEMON 4-C OPERATION MANUAL Microener- Copyright 2010 FW 2.1 Date 01.12.2008 Rev. 0 1. Generality 3 2. Introduction 3 3. Accessories and Options 3 4. Installation 3 5. Connection
Product Manual SZ1009
 Product Manual SZ1009 Conventional Heating & Cooling Thermostats with Heat Pump Mode Communicating Thermostats Description The SZ1009 is a microprocessor-based mable thermostats designed for conventional
Operating instructions Page 12
 Operating instructions Page 12 Refrigerator with explosion-proof interior container Read the operating instructions before switching on for the first time 7082 271-00 LKEXv 910 Disposal notes The appliance
Corrigo E. Second generation which contains all applications and languages
 revision 05 2009 Corrigo E Second generation which contains all applications and languages The controllers in the Corrigo E series are intended for applications within heating, boiler and ventilation control
Spa Touch Control Panel with 2000, 2100 controllers. (Spa Owner s Manual insert)
") Spa Touch Control Panel with 2000, 2100 controllers (Spa Owner s Manual insert) P.N. 7876B February 11, 2015 For Spas equipped with BP2000, BP2100 controllers and Spa Touch panel. Spa Touch Control Panel
Spa Touch Control Panel with 2000, 2100 controllers (Spa Owner s Manual insert) P.N. 7876B February 11, 2015 For Spas equipped with BP2000, BP2100 controllers and Spa Touch panel. Spa Touch Control Panel
The Vitro-i. Radiant / Convector Combination Heater. Instructions for Operation and Installation
 E1400250 The Vitro-i Radiant / Convector Combination Heater Instructions for Operation and Installation (Read these instructions carefully and retain for further reference.) Models: Vitro-i 750 Black Vitro-i
AQUATROL Zone Synchronizing Universal Injection/Mixing Boiler Reset Controls AQ252
 AQUATROL Zone Synchronizing Universal Injection/Mixing Boiler Reset Controls AQ252 USER OPERATION AND MAINTENANCE WARNING Risk of electrical shock. Can cause severe injury, property damage or death. Only
MC 31 Speed Controller Technical User Guide Code no GB
 Technical User Guide Code no. 99-97-0968 GB Ausgabe: 0 /201 Technical User Guide Program Version The product described in this manual holds software. This manual corresponds to: Software version 1.3 It
SACE PR021/K SIGNALLING UNIT
 SACE PR021/K SIGNALLING UNIT 1SDH000559R0002 L3016 1/52 EN CONTENTS 1. GENERAL INFORMATION...4 1.1. FOREWORD...4 1.2. APPLICABLE SCENARIOS...5 2. TECHNICAL SPECIFICATIONS...6 2.1. ELECTRICAL CHARACTERISTICS...6
Manual for the integration in BMS/GTC
 Manual for the integration in BMS/GTC Communication parameters MODBUS RTU and BACNET COMMUNICATION UTBS PRO-REG Software Version 3.6 EN ÍNDEX 1. GENERALITIES...2 1.1. Introduction...2 1.2. signals types...2
Electronic Pellet Burner Controller NPBC-V3-1
 Electronic Pellet Burner Controller NPBC-V3- SOFTWARE VERSION 3.2/3. page of 3 CHANGES IN THE TECHNICAL AND USER GUIDE OR IN THE SOFTWARE VERSION Technical and User Guide's version Changes Page 2.8. The
Table of Contents SECTION PAGE SECTION 1 INTRODUCTION Description Features Models... SECTION 2 RS-232 COMMUNICATIONS...
 SECTION Table of Contents SECTION 1 INTRODUCTION...................... 1.1 Description............................... 1.2 Features................................. 1.3 Models..................................
RC-90 / RC-90B Single Stage Heat/Cool Thermostat for Zone Control Systems Installation Instructions
 RC-90 / RC-90B Single Stage Heat/Cool Thermostat for Zone Control Systems Installation Instructions DESCRIPTION The RC-90 is a precision digital thermostat designed for 24 VAC single stage heating and
I/O logger box. User manual NO POWER & SIGNAL CABLES TOGETHER READ CAREFULLY IN THE TEXT!
 I/O logger box User manual NO POWER & SIGNAL CABLES TOGETHER READ CAREFULLY IN THE TEXT! H i g h E f f i c i e n c y S o l u t i o n s WARNING DISPOSAL CAREL bases the development of its products on decades
Instruction Guide: Thermostat Operation
 Instruction Guide: Elite Communicating Thermostats TPCM32U03*/TPCM32U04* (*GSR, GSM, TRN, AST) INSTRUCTION GUIDE: ELITE COMMUNICATING THERMOSTAT Thermostat Operation NOTE: These communicating thermostats
TIREE FAN COIL CONTROLLER - T6580
 TIREE FAN COIL CONTROLLER - T6580 PRODUCT SPECIFICATION SHEET 20 DESCRIPTION A pleasing and modern appearance makes the TIREE ideal for living quarter applications, in particular offices and hotels. In
MicroTech Series 200 Centrifugal Chiller
 Protocol Data Information Packet Version 2.2 Group: Controls Date: March 1999 MicroTech Series 200 Centrifugal Chiller Data Communications Packet for Protocol 2002 McQuay International Revision History