KitchenAid Food Stream Solutions Classic and Integrated Series
|
|
|
- Emmeline Payne
- 6 years ago
- Views:
Transcription

1 KitchenAid Food Stream Solutions Classic and Integrated Series

2 KitchenAid

3 Chapter list Installation Range overview Installation General Information Function Compressor Power Control Board Defrosting Heating Element / Fan Anti-ice Heating Element NTC / Temperature Limiter Ice Maker Water Filter Cartridge Magnet Valve / Anti-ice HE / LED Door / Drawer Switch Description of Circuit Repair Guide Line and Accessibility Troubleshooting Base of Appliance Fridge / Wine Cooler Compartment User Interface Power Control Board TriMode / Fridge Compartment Temperature Limiter / NTC Freezer Ice Maker Magnet Valve Ice Maker Door / Drawer Switch Service Test Program Fridge Service Test Program Wine Cellar Troubleshooting Alarms and Malfunctions Error Codes

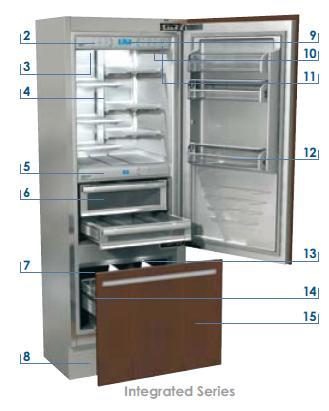
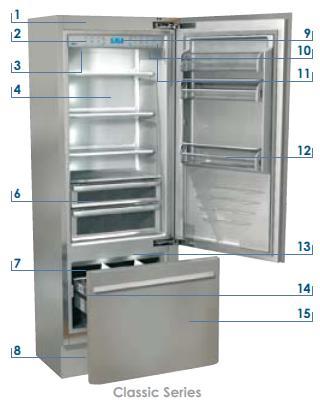
4 Installation Range overview FULL RANGE CLASSIC FREESTANDING Wine Cellar with Riserva Fridge with Fresh Box Fridge No Fresh Box TriMode Bottom-Drawer TriMode Bottom- Drawer TriMode Bottom-Drawer Wine Cellar with Riserva TriMode Bottom- Drawer STRAIGHT HANDLE: Left Hinge: KRVFL 6035 Right Hinge: KRVFR 6035 STRAIGHT HANDLE: Left Hinge: KRXFL 9035 Right Hinge: KRXFR 9035 STRAIGHT HANDLE: Left Hinge: KRXFL 9015 Right Hinge: KRXFR 9015 STRAIGHT HANDLE: Left Hinge: KRVFL 9035 ROUND HANDLE: Left Hinge: KRVFL 6030 Right Hinge: KRVFR 6030 ROUND HANDLE: Left Hinge: KRXFL 9030 Right Hinge: KRXFR 9030 ROUND HANDLE: Left Hinge: KRXFL 9010 Right Hinge: KRXFR 9010 ROUND HANDLE: Left Hinge: KRVFL 9030


5 Installation Range overview FULL RANGE CLASSIC INTEGRATED Wine Cellar with Riserva TriMode Bottom-Drawer Fridge with Fresh Box Fridge No Fresh Box TriMode Bottom-Drawer TriMode Bottom-Drawer Wine Cellar with Riserva TriMode Bottom- Drawer Left Hinge: Left Hinge: Left Hinge: Left Hinge: KRVBL 6031 KRXBL 9031 KRXBL 9011 KRVBL 9031 Right Hinge: Right Hinge: Right Hinge: KRVBR 6031 KRXBR 9031 KRXBR 9011
6 Installation Range overview data Wine 60cm Wine 90cm CB 90cm Fresh Box CB 90cm Depth of the product Height of the product (no handle) Width of the product Net Weight (kg) Gross Weight (kg) Refrig net volume (l) Drawer net volume (l) Bottles capacity 45 bott 81 bott - - Energy (class) A+ A+ A+ A+ Type of shelves WOOD WOOD GLASS GLASS No. of shelves Defrost AUTOMATIC AUTOMATIC AUTOMATIC AUTOMATIC Ice Maker NO NO YES YES Quick Freeze YES YES YES YES
7 Installation Range overview data

8 Installation Range overview data
9 Installation User interface layout BOTTOM MOUNT with 0 COMPARTMENT WINE CELLAR with RISERVA

10 Installation Installation The appliance is very heavy and should only be moved with the utmost care to prevent any damage to people or things. The appliance must always be transported upright. If this is not possible it should be laid flat, resting on its back. Based on the heavy weight (210 to 295 kg) at least 2 people are required to move and install the appliance in customers house.


11 Installation Installation There are 4 wheels on the bottom: 2 at the front and 2 at the back. The front wheels only touch the ground when the adjustable feet at the front have been screwed in fully. The appliance can be levelled by adjusting the two feet at the front using a 17mm open-end spanner. To adjust the height of the 2 wheels at the back use an 17mm ratchet to turn the two devices on the base. To adjust the front foot


12 Installation Installation To avoid that the appliance can overturn by opening the door when all shelves are full, two mounting brackets must be fitted to attach the top of the appliance to the wall. These brackets must be attached as illustrated here below. The mounting holes are already present on the top of the appliance.
13 Installation Main user interface General information Allows complete switching on and off of the appliance (press for three seconds). 2. Allows switching on and off of only the refrigerator compartment (press for three seconds). 3. Allows access to the appliance function menu. 4. Using the Up and Down buttons, it is possible to change the set temperature of the refrigerator and scroll through the interactive menu. 5. lt shows the temperature of the refrigerator and freezer compartments, the date and time, Access functions and visual messages. 6. By selecting Up/Down the preset temperature can be changed accord ing to the selected function mode (freezer, refrigerator, Fresco). 7. Confirms activation or deactivation of the selections made in the Access Menu. 8. Allows activating or deactivating the automatic ice production. 9. Blinks to signal possible malfunctioning, also in combination with a sound signal which can be deactivated by pressing the button.
14 Installation General information Main user interface Shows the temperature of the Fresco compartment Using the Up and Down buttons, it is possible to change the temperature set for the Fresco compartment. 13. Allows switching on and off of only the Fresco compartment (press for three seconds).


15 Installation General information Lighting Compartments illuminated by LED Temperature areas in the appliance
16 Installation General information First start up When the appliance is connected to the electrical power supply but has not yet been switched on, the display shows the message Stand by (safety message to warn that the appliance is connected to the mains, and all the panel buttons are off). To switch on all the appliance compartments, press the ON/OFF button for three seconds. Switching off the Refrigerator and Fresco compartments When the appliance is first switched on the TriMode compartment is set to the "freezer" mode. After switching on it remains always on and can be switched off only by switching off the complete appliance. Press ON/OFF button for three seconds. Restarting Use the same buttons to restart. The freezer compartment always stays on and cannot be switched off except by completely switching off the appliance by pressing the ON/OFF button for three seconds.
17 Installation General information Switching off for long periods During periods of long absence it is recommended to switch off the refrigerator by pressing the ON/OFF button for three seconds and disconnecting the electrical plug. Completely empty the refrigerator, clean and dry it and leave the doors and drawers partially open to prevent unpleasant odor. Refrigeration Compartment From +2 C to +8 C (from 35.6 F to 46.4 F), the recommended preset temperature is +5 C (41 F). To adjust the temperature use the Up/Down buttons. During touching these buttons the newly set temperature will appear in the display. To modify this temperature, use the buttons until reaching the desired temperature. Fresco Compartment From -2 C to +2 C (from 28.4 F to 35.6 F), the recommended preset temperature is 0 C (32 F). To adjust the temperature use the Up/Down buttons. During touching these buttons the newly set temperature will appear in the display. To modify this temperature, use the buttons until reaching the desired temperature.
18 Installation General information Freezer Compartment (TriMode) From -15 C to -22 C (from 5 F to -7.6 F), the recommended temperature is preset at -18 (0 F). To adjust the temperature use the Up/Down buttons. During touching these buttons the newly set temperature will appear in the display. To modify this temperature, use the buttons until reaching the desired temperature. In case the compartment is used as refrigerator or Fresco compartment (TriMode function) the recommended and preset temperatures will correspond to those indicated for the respective compartments. Malfunction message An integrated control system provides information through lighted signals or text messages visualized on the display. The information signal is always visualized with a fixed text message, while a malfunction signal is visualized with blinking text. The sound signal that accompanies some malfunction signals can be deactivated by pressing the Alarm button on the main control panel. To see the list of malfunction signals please refer to the chapter: troubleshooting.
19 Installation General information Start Up When the unit is switched on a 3 min. self test phase is performed prior to actual start up. User Interface unlocking After 3 min. from the door closure all touch keys are locked. To unlock press at the same time key 3 and 4 (Down). Default factory settings Fridge +5 C (+41 F); Crisper compartment +0 C (+30 F); TriMode -18 C (-01 F). To return to the original settings: enter set-up menu (3) > select Settings > select Default Settings > enter (7) to confirm. The TriMode compartment is factory set in the freezer mode but can be set up by the customer as fridge or Fresco compartment. Clearing Sound Alarms To clear a sound Alarm: press Alarm. The alarm light will continue to light up intermittently, though. A Soft Reset Is needed to clear the error message. Soft Reset Can be done by returning to the Default Factory Settings: clear the alarm message from memory. After a soft reset readjust again the settings according to the customer requirements (if needed) and reactivate the ice maker by pressing the specific button on the main user interface.
20 Installation General information Hard Reset Can be done by switching off the appliance at the mains. To be used when the communication between user interface and main electronic board has, for some reasons, failed and controls do not respond. Any existing alarm is not cleared in this way: if this is needed a Soft Reset (Default Factory Settings) should be performed. Temperatures on the display Temperatures on the display may not correspond exactly to actual temperatures inside the cabinet. The temperature on the display gradually adapts to the actual temperature changes (software controlled). Light switches test Use top switch (inside upper hinge) to test upper light and the switch inside TriMode section to test lower light on TriMode section. To extend the period of use of the water filter (to clear a replace filter message) Enter Menu > Functions > Water filter > Status filter > Bypass > Bypass ON The water filter can then be used for a longer time and no further reminders are given. The message Bypass On will however flash continuously on the display.
21 Installation General information To use the appliance without a water filter Press Enter and Alarm touch button exactly at the same time for 5 sec Enter Customize > Water filter > Status > OFF To replace the filter Can be done while appliance operates. No need to close off water mains. Open top glass panel and unscrew (1/4 turn) the filter cartridge. Replace cartridge. Reset filter from Menu > Functions > Water Filter > Status Filter > Reset Filter
 type. A foam filter is placed behind the grille to protect from dust the ventilation system.")

22 Installation General information Condenser cleaning A ventilation grille is located either at the top of the appliance or at the bottom according to the mode) type. A foam filter is placed behind the grille to protect from dust the ventilation system. To clean it use a vacuum cleaner with a soft brush attachment at maxi mum power, sweeping it along the vent slits. In case of a significant dust build up, the ventilation grille can be removed to allow a more accurate cleaning of the filter. Take care also to check the condition of the finned condenser and clean it from dust if needed.

23 Installation General information Condenser cleaning Switch off the appliance by pressing the ON/OFF button on the main control panel for approx. 3 seconds. On models with ventilation at the base remove the screws securing the grille at the bottom and it off. On models with ventilation at the top remove the grille, which is mounted with pressure hooks, by pulling it outward. Clean the grille and the foam filter, by using a vacuum cleaner and the soft brush attachment. Wait approx 30 minutes, until the finned condenser cools down to room temperature, then clean it from any dust build up as shown in the picture, taking care not to damage it. Start up the appliance again, by pressing the ON/OFF button on the main control panel for approx. 3 seconds.

24 Installation Energy label
25 Function Compressor Compressor (4 different types) Equipped with Embraco compressors high efficiency series, PTC controlled. Looking at the appliance from the front: -Fridge compressor: always on the right -TriMode compressor: always on the left
 and controls the operation of compressors, fans and other functional components of the")
26 Function Power Control Board Power Control Board PCB Powered at 220/240 VAC 50 Hz Reads signals from the different NTC probes and other detectors in the appliance, compares them with the default setting values (set up at the factory, can be changed via the Main and Secondary User Interfaces by the user) and controls the operation of compressors, fans and other functional components of the appliance.
 and from other electromechanical, capacitive, illumination, capacity and presence sensors.")

27 Function Power Control Board Power Control Board PCB V AC input power supply, 5 V DC internal power supply, 8 bit re-programmable processor. Reads data received from temperature sensors (NTC) and from other electromechanical, capacitive, illumination, capacity and presence sensors. External utilities piloted via relays for high loads or Triac for other loads. The base has a self-diagnosis system which generates messages on the display to help users find potential solutions for little problems and error codes to help the customer service. Furthermore, it is also possible via the menu to activate a procedure reserved for the customer service to control every single component individually. Please refer to chapter Service Test Program!
28 Function Fan / Defrost Heating Element Fan fixed speed 12V brushless fan, distribution of cold air in TriMode compartment. Fan variable speed Variable speed direct current axial fan. The motor is controlled by an electronic circuit fully contained inside the fan. Power supply 24V DC, operating range 18 to 28V DC. Current drawn 54mA, power consumption 1,4W. Used to circulate air inside the fridge compartment (or wine cooler). Powered by electronic controller and starts up in the following ways: High speed: during chilling (voltage of 24V DC) Low speed: during defrosting (voltage of 18V DC) Defrost heating element 230V heating element, power levels 115, 170, or 230W depending on the appliance. Used to defrost the TriMode evaporator. Inserted between the evaporator fins.
29 Function Anti-ice Heating Element Anti-ice heating element Flexible heating cable clad in silicone rubber and wrapped around the aluminium tube. Supply voltage 230V, power 5W. Used to prevent ice from formation on the water inlet pipe for the IceMaker. Is powered on at all times when the ice maker is in operation.
.")
30 Function NTC / Temperature Limiter NTC Negative coefficient temperature probe. Only one type is used to measure the temperature at different points of the appliance (except in the ice maker which has a specific probe). Temperature limiter Bimetallic, self-restoring, sealed temperature limiter. Normally closed, disconnect temperature 40 C +/-3 C. Two limiters are attached to the freezer evaporator return pipe. They are installed electrically to be in series with the defrost heating element (one before and one after the heating element), and activate when the temperature rises too high during defrosting.


31 Function Ice Maker Ice Maker Ice cubes are dropped into the bucket when the tray is twisted. 12V DC motor. 5V DC supply to internal control circuit. The ice maker is supplied with water from the domestic mains supply which is first filtered then passes via two solenoid valves connected hydraulically in series and supplied electrically in parallel to ensure a high standard of safety in operation. On reaching a temperature of -10 C, a probe at the bottom of the tray sends a signal to the Ice Maker motor which rotates and twists the tray and the ice cubes fall into the bucket below. This cycle is repeated until the bucket is full of ice which pushes up the lever of a sensor which cuts off electricity to the ice maker. When the container is emptied, the cycle starts again. To make medium-size cubes the magnet valve must be powered for 5 seconds, which fills approximately 80cc of water. To make largesize cubes the magnet valve must be powered for 7 seconds, which fills approximately 110cc of water. An average quantity of 1kg = 100 large cubes is produced within 24 hours. If no ice has been made, check if the TriMode compartment has been set to freezer and that the Ice Maker button has been pressed. Check also that the appliance is connected correctly to the mains water supply and that the valve is open, check the magnet valve is working properly, do a manual wash (via menu) to take sure water is getting to the ice maker.
32 Function Water Filter Cartridge Water Filter Cartridge Active carbon filter able to supply high quality water on the outlet side. Used to supply the ice maker. The filter cartridge should be replaced after filtering 3000 litres of water, or after it has been in use for 6 months. The amount of filtered water and the time of use are monitored by an electronic control. When only 10% of the filter capacity remains, the message Check filter appears on the display. When 0% of the filter capacity remains, the message Replace filter appears on the display.
33 Function Magnet Valve / Anti-ice HE / LEDs Magnet Valve for IceMaker 230V AC magnet valve Two solenoid valve (one is a safety one) supply the Ice Maker with drinking water. The main solenoid valve that the water pipe is connected to has a filter (removable to check and clean) which stops any mechanical impurities which may be present in the water circuit. Anti-ice Heating Element 5W 230V AC heating cable with internal resistance of 10kOhm, wound around the aluminium of the ice maker inlet pipe. To prevent ice formation on the water feed pipe going into the ice maker. It is controlled by the power board and is always on when the ice maker is on. Check the resistance with an ohmmeter. Internal LED lighting (bar) 5 LED bar. Each LED has a nominal operating voltage of 3.3 VDC. The LEDs are connected in series. They are powered by a specific constant current power unit. Use to illuminate the ceiling of the fridge compartment and the sides of the wine cooler. Internal LED lighting (compartment) Nominal operating voltage of 3.3 VDC, power consumption 1,1 W. They are powered by a specific constant current power unit. The LED lights are connected in series. The terminals of each device are connected to a diode that allows current through even when one of the LEDs connected in series in not working.
34 Function LEDs LED bar fridge ceiling and sides of wine cooler Nominal incoming voltage V, frequency Hz, secondary current 350 ma (constant), power 15W. Constant direct current power unit to supply Led lights inside appliance. LED fridge compartment Nominal incoming voltage V, frequency Hz, secondary current 350 ma (constant), power 10W. Constant direct current power unit to supply compartment LED lights inside appliance. LED freezer compartment Nominal incoming voltage V, frequency Hz, secondary current 350 ma (constant), power 3W. Constant direct current power unit to supply LED in freezer.
35 Function Door / Drawer Switch Door switch Electromechanical switch. Contacts normally closed, open when door is closed. It is activated by the top hinge. The open/closed condition is used by the electronic controller to activate or disable the lights (LED power unit) running on 230V. Drawer switch Electromechanical switch contacts normally closed, open when door is closed. It is activated by the freezer basket. The open/closed condition is used by the electronic controller to activate or disable the lights (LED power unit) running on 230V.
36 Function Description of circuit Defrosting Refrigeration and Cool compartment Defrosting takes place naturally every time the compressors stops (the fan to circulate air inside stays on at low speed). The compressor is restarted when the evaporator probe temperature reaches +3 C. In addition, every 24 hours a safety defrost is run and the compressors is only restarted when the evaporator probe reaches +7 C. The defrost water is carried to two evaporation trays placed at the head of the compressors (bottom compressors appliances). Freezer part TriMode The TriMode compartment comes out of the factory as a freezer but users can easily configure it as a fridge or low temperature compartment or when wines are stored, as a wine cooler. The TriMode circuit is completely separate from the refrigeration / wine cooler circuit and is managed by a specific compressors.
37 Function Description of circuit Freezer part TriMode The evaporator is controlled by 2 temperature probes, one in the air beside the evaporator to check the temperature in the compartment, and one in contact with the evaporator to control the defrost temperature. Cool air is distributed in the TriMode compartment by an brushless 12V DC fan as follows: Chilling stage: fan switched on 1 minute after the compressor starts and switched off when the compressor stops. Defrosting stage: fan always off. Fast freezing stage: fan always switched on (compressors always on for up to 54 hours). A temperature probe in contact with ice condenser constantly monitors the temperature in order to manage the fan. The condenser fan starts when a temperature of 36 C is read, and stops when a temperature of 33 C is reached, or 300 seconds after the last compressor, whichever one, never has priority over other with regards to switching off the fan. Defrosting TriMode compartment Defrosting is forced by a heating element placed in contact with the evaporator. The fan stays off during this stage. The defrost water is carried to two evaporation trays placed at the head of the compressors (bottom compressors appliances).
38 Function Description of circuit Minimum and maximum compressor OFF / ON times Minimum OFF time: 5 minutes for the fridge and 10 minutes for the freezer. To avoid the compressor switch ON before the pressure has balanced. Maximum OFF time: 360 minutes for both, fridge and the freezer. To prevent expended pauses at low ambient temperatures. Minimum ON time: 10 minutes for both the fridge and for the freezer. Maximum ON time: 720 minutes. To prevent extended running times at very high ambient temperatures (except during the Shopping function - for freezing).


39 Repair Guide Line and Accessibility Base of appliance Base of appliance Components accessible: Compressors, condenser, condenser fan, filters, water magnet valves and gas solenoid valves. All components can be accessed by removing the ventilation grille (secured with magnets), removing the metal plate protecting the installation 2. engineer from coming into contact 6. with electrical parts, and pulling out the base that these are assembled on. Remove the two screws and after disconnecting the electrical connectors, extract the frame by engaging it from the holes in the middle of the base. Lift up the feet at the front first to allow the base to roll out without sticking. 4. Pipes coiled in spiral-shape
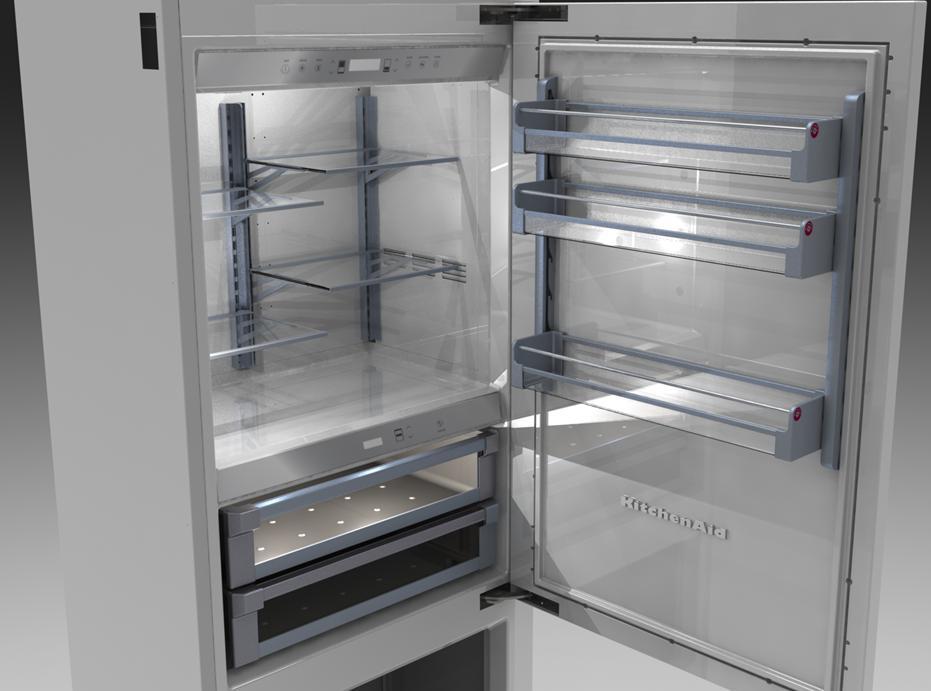
40 Repair Guide Line and Accessibility Fridge / Wine Cooler compartment Fridge / Wine Cooler compartment ceiling Components accessible: Water filter, Electronic Controller, Electrical connectors for various components LED-illuminated component, power unit, Air circulation fan. Open the glass panel and remove it. 2. The electronic controller is protected 6. by a plastic box. The fan is secured using noise-absorbing rubber pads. Be careful not to damage them when pulling them out. 4. Fa n Plastic box to protect the power unit Water filter LED light strips

 or all wine shelves (wine cooler).")

. Remove the fan support.")
41 Repair Guide Line and Accessibility Fridge / Wine Cooler compartment Fridge / Wine Cooler compartment area, hinge side Components accessible: Evaporator, NTC probes (air and evaporator) To remove the side safety panel, follow these steps: Remove the glass panel (fridge) or all wine shelves (wine cooler). Take off the trim covering 2. the rack on the hinge side and 6. the rack. Remove the glass panel on the ceiling of the fridge (or steel panel in wine cooler models). Remove the fan support. Lift the panel up from the frame side, just enough to free it from is seat and pull it out towards you. Be extremely careful not to damage the panel or scratch the frame. 4.


42 Repair Guide Line and Accessibility User Interface User Interface Located in the top part of the evaporator frame, secured by three milled nut that are accessible from inside the refrigerator compartment on opening the glass ceiling Glass ceiling Milled nut


43 Repair Guide Line and Accessibility User Interface User Interface Loosen the 8 screws and lift the user interface from the frame. Unplug the connector. Connector


44 Repair Guide Line and Accessibility Power control board Power Control Board Remove the screws from the plastic box and lift it up. The Power Control Board is fixed with 4 screws to the top of the compartment. The wirings and the connectors are market, e. G. J10 Accessible also the power units for LED: Fridge ceiling and sides of wine cooler, compartment fridge, compartment freezer. The LED devices can be pulled out individually and replaced using a flat screwdriver. Power units LED 1. Fridge compartment 10W 2. LED bar from top 15W 3. Freezer compartment 3W
, anti-ice heating element, TriMode evaporator, NTC probes (air and evaporator). Take out the main drawer and the 2. small basket.")

45 Repair Guide Line and Accessibility TriMode / Fridge compartment TriMode compartment area, ceiling Components accessible: IceMaker (if this has been installed), anti-ice heating element, TriMode evaporator, NTC probes (air and evaporator). Take out the main drawer and the 2. small basket. Unplug the electrical connector 6. powering the ice maker. To remove the IceMaker, remove the screw to fix it to the top of the compartment and disengage it from its supporting frame. To access the evaporator and other associated components, remove the screws securing the safety panel. 4.
 Positioned on the ceiling of respective compartments. The fridge fan can be reached after removing the glass panel or stainless steel ceiling.")
46 Repair Guide Line and Accessibility TriMode / Fridge compartment TriMode compartment area, Fixed speed fan (12V) Component accessible: Located behind the TriMode evaporator compartment Fridge compartment area, Variable speed fan (18-28V) Positioned on the ceiling of respective compartments. The fridge fan can be reached after removing the glass panel or stainless steel ceiling.


47 Repair Guide Line and Accessibility Temperature Limiter / NTC freezer Temperature limiter They are accessible by removing the freezer evaporator safety panel, and are snapped into place on the return pipe NTC Components accessible: Evaporator, NTC probes (air and evaporator)

48 Repair Guide Line and Accessibility Ice Maker Ice Maker Components accessible: Ice Maker, anti-ice heating element, NTC probes. 5W 230V AC heating cable with internal resistance of 10kOhm, wound around an aluminium tube that is used to clad the ice maker inlet pipe. Remove the 2 screws and take the Ice Maker out Water inlet with anti-ice heating


49 Repair Guide Line and Accessibility Magnet Valve for Ice Maker Magnet Valve for Ice Maker Components accessible: The magnet valves are in the base of the appliance and can be reached by removing the lower ventilation grille and extracting the compressor base for bottom compressors appliances Main magnet valve Safety magnet valve


50 Repair Guide Line and Accessibility Door / Drawer Switch Door and Drawer switch Door switch: The door switch is located inside the top hinge box. It can be reached from the top of the appliance by first removing the hinge protecting plate. Drawer switch: The drawer switch is located on the bottom wall of the freezer compartment and can be reached by removing the drawer Door switch 4. Drawer switch
51 Troubleshooting Service Test Program Fridge Start Service Test Program 1. Press Enter and Alarm at exactly the same time for 5 seconds: the menu symbol will light up and Customize or Personalize will appear on the display. 2. Press Enter to confirm: a function will appear in the Menu (e.g. Ice Maker). Use the up and down arrows to browse until you reached Service Test. 3. Press Enter to start the Service Test and to switch from one part of the test to another. You can t skip a phase or go back to a previous phase (you need to start again with step 1). 4. At the end of the Service Test, press the Menu key to exit the customize Menu. The Service Test can also be run when the appliance is in Demo Mode.
52 Troubleshooting Service Test Program Fridge Start Service Test Program

53 Troubleshooting Service Test Program Fridge Start Service Test Program
54 Troubleshooting Service Test Program Fridge Start Service Test Program

55 Troubleshooting Service Test Program Fridge Start Service Test Program
56 Troubleshooting Service Test Program Wine Cellar Start Service Test Program 1. Press Enter and Alarm at exactly the same time for 5 seconds: the menu symbol will light up and Customize or Personalize will appear on the display. 2. Press Enter to confirm: a function will appear in the Menu (e.g. Ice Maker). Use the up and down arrows to browse until you reached Service Test. 3. Press Enter to start the Service Test and to switch from one part of the test to another. You can t skip a phase or go back to a previous phase (you need to start again with step 1). 4. At the end of the Service Test, press the Menu key to exit the customize Menu. The Service Test can also be run when the appliance is in Demo Mode.
57 Troubleshooting Service Test Program Wine Cellar Start Service Test Program

58 Troubleshooting Service Test Program Wine Cellar Start Service Test Program

59 Troubleshooting Service Test Program Wine Cellar Start Service Test Program
60 Troubleshooting Troubleshooting Troubleshooting
61 Troubleshooting Troubleshooting Troubleshooting
62 Troubleshooting Troubleshooting Troubleshooting
63 Troubleshooting Troubleshooting Troubleshooting
64 Troubleshooting Troubleshooting Troubleshooting
65 Troubleshooting Troubleshooting Troubleshooting
66 Operation Alarms and Malfunctions
67 Operation Alarms and Malfunctions

68 Operation Error Codes
69 Operation Error Codes
70 Operation Error Codes
Service Information. WNes 2956 appliance documentation. Service Information no. 27/2004 LHG/TKD-Fe/June SI
 After Sales Service International Service Information Service Information no. 27/2004 LHG/TKD-Fe/June 2004 WNes 2956 appliance documentation Page 1/26 Contents 2.0. Extract from Operating Instructions
Essentia Project Artica Platform No Frost 60 cm Appliances 2011
 Essentia Project Artica Platform No Frost 60 cm Appliances 2011 Event Ca Maiano, May 2011 Presenter Piotr Kelm Francesco Nieli 0 Legend and User Interface Legend THR3 Interface (SQG_CL_32) MID Indesit
SERVICE MANUAL REFRIGERATION
 SERVICE MANUAL REFRIGERATION ELECTROLUX ZANUSSI S.p.A. Publication No. Spares Operations Italy 599 35 40-29 Corso Lino Zanussi, 30 020806 I - 33080 PORCIA / PN (ITALY) ITZ/SERVICE/AA EUROFLEC With exposed
Side-by-side combined refrigerator-freezer
 REPAIR INSTTRUCTTI I IONS Side-by-side combined refrigerator-freezer 1 SAFETY... 2 4.1 Electronic controller... 8 1.1 Safety instructions... 2 1.2 Repair instructions... 2 2 INSTALLATION... 3 3 OPERATION...
SERVICE MANUAL REFRIGERATION
 SERVICE MANUAL REFRIGERATION Electrolux Home Products S.p.A. Spares Operations Italy Corso lino Zanussi, 30 I - 33080 Porcia (PN) Fax +39 0434 394096 S.O.I. Edition: 10.2006 Publication no. 599 38 38-50
Refrigerator KE T
 Refrigerator KE 680-1-3T Service Manual: H8-74-07 Responsible: U. Laarmann KÜPPERSBUSCH HAUSGERÄTE AG E-mail: uwe.laarmann@kueppersbusch.de Tel.: (0209) 401-732 Customer Service Fax: (0209) 401-743 Postfach
SERVICE INSTRUCTION. DYNAMIC COOLING with 0 zone REFRIGERATION. Fridge/freezer with. Publication number
 SERVICE INSTRUCTION REFRIGERATION DISTRIPARTS AB BOX 501 S-562 80 NORRAHAMMAR Phone 036-31 80 00 Telefax 036-31 81 10 Telefax 036-31 80 88 Publication number 599 51 96-71 Rev. 04-04-20 SV/SERVICE DT/MA/AN
EGE Manisa 70 cm BIR Carinaro 55 cm. Fabriano June Presenter Francesco Nieli
 EGE Manisa 70 cm BIR Carinaro 55 cm Fabriano June 2012 Presenter Francesco Nieli Keys and Interfaces Manisa EGE key Carnaro BIR key Tiny Full interface (SQG_CL_??) Tiny SD interface (SQG_CL_??) New LED
Service Quick Guide SQG_CL_15/01_EN
 Service Quick Guide SQG_CL_15/01_EN Indesit Company, Service Department Table - New Platform 2005 Electronic Refrigerators, combination and double-door 1 LED1 LED2 LED3 2 Table 1 In the case of the Led
Turbo Freeze function
 Turbo Freeze function Siena Chest Freezer Range 2011 Whirlpool EMEA Service Competence Center Office +49-(0)711-81071-3551 Mobile +49-(0)172-7505946 Stefan Bässler Service Engineer FSS & Food Preparation
3. OPERATING INSTRUCTIONS & INSTALLATION
 3-1) Digital Panel 20 3-2) Temperature Control Function 20 3-3) Power Freeze and Power Cool Functions 21 3-4) Child Lock Function 21 3-5) Ice & Water Dispenser Function 22 3-6) C-Fan Motor Delay Function
Model Number Nomemclature... 1 Specifications... 3 Refrigeration System... 4 Freezer and Refrigerator Air Circulation... 5 Display Designs...
 Samsung AD Refrigerator Familiarization Maytag Technical Training Services 2004 ABS-L2004-012 Model Number Nomemclature... 1 Specifications... 3 Refrigeration System... 4 Freezer and Refrigerator Air
Fast Track Troubleshooting
 Fast Track Troubleshooting Models Covered: RF197ACPN French Door Refrigeration IMPORTANT SAFETY NOTICE For Technicians Only This service data sheet is intended for use by persons having electrical, electronic,
Service Information. HOTPOINT SIDE-BY-SIDE FRIDGE FREEZERS (7 ~ Segment Version) Indesit Company UK Ltd
 Indesit Company UK Ltd") 5407399 Issue 2 March 2011 HOTPOINT SIDE-BY-SIDE FRIDGE FREEZERS (7 ~ Segment Version) Models Covered Comm. Code Energy Band 'A' Models MSZ801DF 48862 MSZ802DF 46196 MSZ803DF 48863 MSZ806DF 57217 Service
5407399 Issue 2 March 2011 HOTPOINT SIDE-BY-SIDE FRIDGE FREEZERS (7 ~ Segment Version) Models Covered Comm. Code Energy Band 'A' Models MSZ801DF 48862 MSZ802DF 46196 MSZ803DF 48863 MSZ806DF 57217 Service
SERVICE MANUAL REFRIGERATION
 SERVICE MANUAL REFRIGERATION ELECTROLUX HOME PRODUCTS S.p.A. Publication no. Spares Operations Italy 599 37 75-07 Corso Lino Zanussi, 30 060824 I - 33080 PORCIA / PN (ITALY) ITZ/SERVICE/AA Fax +39 0434
Hoffman Controls 759-ECM. Installation & Operating Instructions. Introduction. Installation. Pre-Installation Information/ Instruction
 Hoffman Controls Installation & Operating Instructions Introduction CAUTION Failure to read and understand the accompanying instructions and diagrams prior to energizing the Controller may result in permanent
USER MANUAL: Brilliance Series MODE D EMPLOI: Série Brilliance
 USER MANUAL: Brilliance Series MODE D EMPLOI: Série Brilliance EN FR Index Page 3 4 5 10 12 17 19 21 22 26 27 28 30 31 1 1.1 1.2 1.3 2 2.1 2.2 2.3 3 3.1 3.2 3.3 3.4 3.5 4 4.1 4.2 4.3 4.4 5 5.1 5.2 5.3
Before Putting Into Use. Important. Tips for Energy Savings
 Before Putting Into Use Before connecting the appliance to the power supply, let it stand for about 2 hours, which will reduce a possibility of malfunctions in the cooling system due to transport handling.
User Manual. Dryer Controller M720
 User Manual Dryer Controller M720 Hardware version 1.00 Software version 1.00 Preliminary version Manual M720 Dryer controller Page 1 of 42 Document history Preliminary version: - Created in April, 2009
GCG-10. Instruction Manual. G-Series Cooler. Manual is for the following models: GCG-10-N33EB G-10-N33EB UPRIGHT COOLER
 G-Series Cooler GCG-10 UPRIGHT COOLER Manual is for the following models: GCG-10-N33EB G-10-N33EB Instruction Manual Manual is for the following models: GCG-10-N33EB G-10-N33EB Instruction Manual GCG-10
2 INSTALLATION OPERATION FUNCTIONS SAFETY Compressor Compartment... 10
 REPAIR INSTTRUCTTI I ION REFFRI IGERATTOR 1 SAFETY... 3 4.1 Compressor Compartment... 10 2 INSTALLATION... 4 4.2 Fridge Evaporator Compartment... 11 4.3 Freezer Evaporator Compartment... 12 3 OPERATION...
Dryer Controller M720
 User Manual Dryer Controller M720 Hardware version 2.00 Software version 2.00 Manual M720 Dryer controller Page 1 of 60 Document history Preliminary version: - Created in April, 2009 Hardware Version 2.00,
Korean Side-by-Side Refrigerator Use and Care Manual
 Korean Side-by-Side Refrigerator Use and Care Manual Part No. 10488010 Printed in U.S.A 1996 Raytheon Appliances Amana, Iowa 52203 Contents Electrical Requirements... 2 Model Identification... 2 Model
USER MANUAL Wines Cellars
 USER MANUAL Wines Cellars Index Page 2 3 4 8 10 15 16 17 18 21 1 1.1 1.2 2 2.1 2.2 3 3.1 3.2 3.3 3.4 3.5 4 4.1 4.2 4.3 5 5.1 5.2 5.3 6 6.1 7 7.1 8 8.1 8.2 9 9.1 9.2 9.3 9.4 9.5 10 10.1 10.2 Important
INSTRUCTION MANUAL Portable Refrigerator Units MODEL 15-LITER Including the Standard Battery Backup System (BBS)
") 1 INSTRUCTION MANUAL Portable Refrigerator Units MODEL 15-LITER Including the Standard Battery Backup System (BBS) SECTION TITLE PAGES 1 Introduction and Basic Operation 2-3 2 Cleaning & Storing 4 3 Basic
1 INSTRUCTION MANUAL Portable Refrigerator Units MODEL 15-LITER Including the Standard Battery Backup System (BBS) SECTION TITLE PAGES 1 Introduction and Basic Operation 2-3 2 Cleaning & Storing 4 3 Basic
Liebherr's engineering excellence in Germany provides the largest selection of freezers, refrigerators and wine refrigerators worldwide.
 Design Guide Freestanding / Semi Built In 24", 30", 36", 48", 60", 72" Release 09 / 2018 Welcome Liebherr's engineering excellence in Germany provides the largest selection of freezers, refrigerators and
URS-1 SERVICE AND PARTS MANUAL SERIAL NUMBERS: UP TO
 URS-1 SERVICE AND PARTS MANUAL SERIAL NUMBERS: UP TO 06-10616. File name: URS-1 Service Manual up to 06-10616 Last revised: Jan. 30th 2009 TROUBLESHOOTING AND SERVICE GUIDE: The following is intended as
Double Door Over 70. Service Manual. Models: F NMTZH 821 F T F NMTZH 822 F T
 Double Door Over 70 Service Manual Models: F083975 NMTZH 821 F T F083973 NMTZH 822 F T Contents Parts Description...2 Circuit diagram...3 Cooling diagram...4 The guide for Disassembly Common parts of Refrigerator...5
TABLE OF CONTENTS REFRIGERATOR-FREEZER. Model No. NR-BN34FX1 Model No. NR-BN34FW1
 Order Number GORR1405001CE REFRIGERATOR-FREEZER Model No. NR-BN34FX1 Model No. NR-BN34FW1 Product-Color X:Stainless W:White Destination E(Europe Continental) B(U.K.) TABLE OF CONTENTS PAGE 1 Safety Precautions-----------------------------------------------
SKSFD3604P 36-INCH BUILT-IN FRENCH DOOR REFRIGERATOR
 Style Door Style Interior Cabinet Finish Panel Ready Metal Innovation WiFi-Enabled for SmartThinQ Control with iphone / Android App Inverter Linear Compressor CONVERTIBLE DRAWER The only built-in refrigerator
PRODUCT DESCRIPTION CONTROLS
 PRODUCT DESCRIPTION A. Refrigerator Compartment 1. Crisper drawer 2. Shelves / Shelf area 3. Thermostat control knob/light 4. Door trays 5. Bottle rack 6. Removable bottle restraint 7. Rating plate (at
AQUAMAC MODELS
 AQUAMAC MODELS 300-500-800-1000 OUR SYSTEMS CONFORM TO EC STANDARD 73/23 CEE - 89/336 INSTRUCTION MANUAL Cod. 71503095/0-5/97 WARNING! THE FOLLOWING OPERATIONS AND THOSE EVIDENCED WITH THE SYMBOL ON THE
SERVICE MANUAL New Electronic Cold Platform 2005.
 SERVICE MANUAL New Electronic Cold Platform 2005. All the parts included in this document are the property of Indesit Company S.p.A. All rights reserved. This document and the information it contains are
HOW TO OPERATE THE FREEZER COMPARTMENT PAGE 17 HOW TO DEFROST THE FREEZER COMPARTMENT PAGE 19
 33056-GB.fm5 Page 13 Saturday, January 16, 1999 8:47 AM TABLE OF CONTENTS GB BEFORE USING THE APPLIANCE PAGE 14 SAFEGUARDING THE ENVIRONMENT PAGE 14 PRECAUTIONS AND GENERAL HINTS PAGE 15 HOW TO OPERATE
MIX Boiler & Font Range Service Manual
 MIX Boiler & Font Range Service Manual 1000870# 1000871# 1000875# 1000880# 1000887# 1000878 1000879 2300268 www.marcobeveragesystems.com Ireland Tel: +353 (1) 295 2674 UK Tel: +44 (0207) 2744577 Service
13:00 h REAL FRESHNESS
 13:00 h REAL FRESHNESS Now it is my turn to make my lunch! Refrigerators Cold also plays an important role in a home s warmth. Our refrigerators keep food fresh because they preserve its nutrients and
Compact Refrigerator. User's Manual PLEASE READ THIS MANUAL CAREFULLY BEFORE USING YOUR REFRIGERATOR AND KEEP IT FOR FUTURE REFERENCE.
 Compact Refrigerator User's Manual Model MCBR445B2 / MCBR445S2 PLEASE READ THIS MANUAL CAREFULLY BEFORE USING YOUR REFRIGERATOR AND KEEP IT FOR FUTURE REFERENCE. Product Registration Thank you for purchasing
Freestanding Wine Cooler Instruction Manual
 ARC 2100 Freestanding Wine Cooler Instruction Manual A. IMPORTANT SAFETY INFORMATION The appliance which you have purchased is a wine cooler a professional appliance intended exclusively for keeping wines.
Fast Track Troubleshooting
 Fast Track Troubleshooting Models Covered: RS263BBBB/XAA RS263BBSH/XAA RS263BBWP/XAA RS265LBBP/XAA RS265LBWP/XAA SxS Refrigeration Notice: Bulletin on parts change Thermal Fuse to Bi-Metal Publication
Operating instructions Page 12
 Operating instructions Page 12 Refrigerator with explosion-proof interior container Read the operating instructions before switching on for the first time 7082 271-00 LKEXv 910 Disposal notes The appliance
FDM Series. User Manual. SKOPE Food Display Cabinet Integral models: FDM900i/1200i/1500i. Model FDM1200i
 FDM Series SKOPE Food Display Cabinet Integral models: FDM900i/1200i/1500i Model FDM1200i MAN2056O Rev 2.0 Aug. 2010 Integral models: FDM900i/1200i/1500i SKOPE Food Display Cabinet MAN2056O Rev 2.0 Aug
Telephone Helpline: (Australia) Blast Chiller / Freezer. Instruction Manual. Model DN492-A DN494-A
 Blast Chiller / Freezer. Instruction Manual. Model DN492-A DN494-A") Blast Chiller / Freezer Instruction Manual Model DN492-A DN494-A Safety Tips Position on a flat, stable surface. A service agent/qualified technician should carry out installation and any repairs if required.
Blast Chiller / Freezer Instruction Manual Model DN492-A DN494-A Safety Tips Position on a flat, stable surface. A service agent/qualified technician should carry out installation and any repairs if required.
Outdoor Beverage Center
 ON/OFF SET TEMPERATURE Outdoor Beverage Center Use and Care Guide Be sure unit is standing upright 24 hours prior to plug-in. Model: BBQ10715 IMPORTANT SAFEGUARDS Read all instructions before using this
Liebherr's engineering excellence in Germany provides the largest selection of freezers, refrigerators and wine refrigerators worldwide.
 Design Guide Fully Integrated 30" and 36" Release 08 2015 2 Welcome Liebherr's engineering excellence in Germany provides the largest selection of freezers, refrigerators and wine refrigerators worldwide.
HOW TO OPERATE THE FREEZER COMPARTMENT PAGE 15 HOW TO DEFROST THE FREEZER COMPARTMENT PAGE 17
 GB CONTENTS BEFORE USING THE REFRIGERATOR PAGE 13 SAFEGUARDING THE ENVIRONMENT PAGE 13 PRECAUTIONS AND GENERAL RECOMMENDATIONS PAGE 14 HOW TO OPERATE THE REFRIGERATOR COMPARTMENT PAGE 15 HOW TO OPERATE
TCW 2000 Ice liner refrigerator and freezer PIJ
 TCW 2000 Ice liner refrigerator and freezer OVER VIEW The unique rotomoulded Chest Freezer and inclined Refrigerator with two separate compartments and compressors worldwide Hold over time @ 32 C Hold
CABINET PARTS For Model: KBLC36FMS02 (Stainless Steel)
") CABINET PARTS 36" BOTTOM MOUNT BUILT IN REFRIGERATOR 11 05 Litho In U.S.A. (mek) 1 Part No. CABINET PARTS 1 Literature Parts 2317085 Use & Care Guide 2307361 Energy Label 2306322 Service & Wiring Sheet
CABINET PARTS 36" BOTTOM MOUNT BUILT IN REFRIGERATOR 11 05 Litho In U.S.A. (mek) 1 Part No. CABINET PARTS 1 Literature Parts 2317085 Use & Care Guide 2307361 Energy Label 2306322 Service & Wiring Sheet
rlrm MOflel S DE-BY-SIDE REFRIGERATOR Always consult the Use & Care Guide for more operating information.
 rlrm MOflel 401.40483800 S DE-BY-SIDE REFRIGERATOR Always consult the Use & Care Guide for more operating information. 86002-2008 085 JR O ice BiN For storage of ice cubes made by the icemaker. Do not
SCN60 Residential Nugget Ice Machine
 SCN60 Residential Nugget Ice Machine SCN60 Nugget Ice Nugget Ice What it isn t: Ice frozen in a mold What it is: A chewable ice, formed continuously by forcing soft ice thru tapered holes. Components Compared
Refrigeration. Bosch pioneers in design and energy conservation to produce a range of innovative refrigeration products to suit every need.
 Bosch pioneers in design and conservation to produce a range of innovative refrigeration products to suit every need. As well as being pioneers in product design, our commitment to the environment led
Air Comfort. Installation instructions (English) A
 A") Air Comfort Installation instructions (English) WWW.BRINKAIRFORLIFE.NL 614788-A This appliance may be used by children as of 8 years of age, persons of reduced mental or physical capacities and those of
Air Comfort Installation instructions (English) WWW.BRINKAIRFORLIFE.NL 614788-A This appliance may be used by children as of 8 years of age, persons of reduced mental or physical capacities and those of
REFRIGERATOR SERVICE MANUAL
 http://biz.lgservice.com REFRIGERATOR SERVICE MANUAL CAUTION PLEASE READ CAREFULLY THE SAFETY PRECAUTIONS OF THIS BOOK BEFORE CHECKING OR OPERATING THE REFRIGERATOR. Ref. No. GR-L207NGUA GR-L207NSUA MODEL:
COMMERCIAL REFRIGERATORS, STAINLESS STEEL PRODUCTS REFRIGERATORS OPERATING INSTRUCTIONS
 COMMERCIAL REFRIGERATORS, STAINLESS STEEL PRODUCTS REFRIGERATORS OPERATING INSTRUCTIONS CONTENTS 1. Transportation Positioning Installation 3 2. Starting up 3 3. Safety instructions 4 4. Temperature regulation
1 SAFETY INSTALLATION OPERATION REPAIR COMPONENTS FUNCTIONS... 12
 1 SAFETY... 3 1.1 Safety instructions... 3 1.2 Repair instructions... 3 2 INSTALLATION... 4 3 OPERATION... 5 3.1 Freezer Set button... 5 3.2 Refrigerator Set button... 5 3.3 Super Cool button... 5 3.4
1. SAFETY WARNINGS INSTALLTION Location Reversing the Door Swing Levelling the Unit... 3
 Contents 1. SAFETY WARNINGS... 1 2. INSTALLTION... 2 2.1 Location... 2 2.2 Reversing the Door Swing... 2 2.3 Levelling the Unit... 3 2.4 Cleaning Before Use... 3 2.5 Before Using Your Unit... CE BC108
Refrigerated air dryers
 Refrigerated air dryers OPERATING AND MAINTENANCE MANUAL Original instructions 38178800319 OPERATING AND MAINTENANCE MANUAL - Contents 1 CONTENTS CONTENTS... 1 Chapter 1 IDRY ELECTRONIC CONTROLLER...
Warning: 230V / 1ph / 50Hz V / 3ph / 50Hz. Remarks: Make sure that you have enough power. (See page 15 Cable table)
") 1 2 Warning: - Do not place your hand or any other objects into the air outlet and fan. It could damage the heat pump and cause injuries; - In case of any abnormality with the heat pump, cut off the power
1 2 Warning: - Do not place your hand or any other objects into the air outlet and fan. It could damage the heat pump and cause injuries; - In case of any abnormality with the heat pump, cut off the power
COMMERCIAL GRADE UNDER COUNTER REFRIGERATION RANGE
 COMMERCIAL GRADE UNDER COUNTER REFRIGERATION RANGE The Grand Deluxe Range designed with the bar and restaurant industry in mind. The Grand Deluxe line of kegerators are built to stand up to heavy use in
OPERATING MANUAL Enertronic Control System 2
 OPERATING MANUAL Enertronic Control System 2 The integrated control system for Lennox chillers in the Ecologic range Manufacturer: Lennox Benelux B.V. Postbus 1028, 3860 BA NIJKERK Watergoorweg 87, 3861
Instructions for use
 Instructions for use ENGLISH Instructions for use Page 3 2 INDEX Chapter 1: INSTALLATION...4 1.1. INSTALLING SINGLE APPLIANCE...4 1.2. INSTALLING TWO APPLIANCES...4 1.3. ADJUST DOORS (If available)...4
Fast Track Troubleshooting
 Fast Track Troubleshooting Models Covered: RF266AD**/XAA French Door Refrigeration IMPORTANT SAFETY NOTICE For Technicians Only This service data sheet is intended for use by persons having electrical,
Service Manual. ETL Blast Chiller Series
 Service Manual ETL Blast Chiller Series September, 2012 2 Customer Service: (800) 333-5653, www.thermalrite.com Safety Precautions THIS MANUAL HAS BEEN PREPARED FOR PERSONNEL QUALIFIED TO INSTALL, MAINTAIN
STRUCTURE ILLUSTRATION...3 IMPORTANT SAFETY INSTRUCTIONS 4 INSTALLATION INSTRUCTION..4 OPERATING YOUR REFRIGERATOR...5-6
 TABLE OF CONTENTS STRUCTURE ILLUSTRATION....3 IMPORTANT SAFETY INSTRUCTIONS 4 INSTALLATION INSTRUCTION..4 OPERATING YOUR REFRIGERATOR...5-6 FREEZER COMPARTMENT OPERATION 6 CARE & MAINTENANCE..7 CHANGING
Image Key Part Number Description Substitution Qty.
 Model Number: BOM/Serial #: Graphic Title: XRSR465BW PXRSR465BW0 SUPPLEMENTAL INFORMATION Image Key Part Number Description Substitution Qty. 1 1 67002385 HARNESS-CONTROL 1 1 1 67002384 HARNESS, ICE MAKER
1 SAFETY REPAIR COMPONENTS FUNCTIONS FAULT DIAGNOSIS X-Cool Side by Side Refrigerator
 1 SAFETY... 3 1.1 Safety instructions... 3 1.2 Repair instructions... 3 2 COMPONENTS... 4 2.1 Overall view... 4 2.2 Compressor room... 4 2.3 Power Control Boards (PCB)... 5 2.4 Temperature sensor... 6
ER MANUAL FOR YOUR BAUMATIC
 BW18BL 50 litre thermoelectric beverage centre BW28BL 70 litre thermoelectric beverage centre ER MANUAL FOR YOUR BAUMATIC BW18BL 50 litre thermoelectric beverage centre BW28BL 70 litre thermoelectric beverage
26 CUBIC FOOT FRENCH DOOR BOTTOM MOUNT REFRIGERATOR MODELS: MFI2670XEM7 (Monochromatic Stainless Steel)
") 26 CUBIC FOOT FRENCH DOOR BOTTOM MOUNT REFRIGERATOR MODELS: MFI2670XEM7 (Monochromatic Stainless Steel) 02/26/2015 2015 Maytag Part W10469427 Rev. B CABINET PARTS 02/26/2015 2 Part W10469427 Rev. B CABINET
26 CUBIC FOOT FRENCH DOOR BOTTOM MOUNT REFRIGERATOR MODELS: MFI2670XEM7 (Monochromatic Stainless Steel) 02/26/2015 2015 Maytag Part W10469427 Rev. B CABINET PARTS 02/26/2015 2 Part W10469427 Rev. B CABINET
A few simple steps to ensure perfect water, every time.
 A few simple steps to ensure perfect water, every time. Use and Care Guide MODELS: A9CTELECTRICSS A9ELECTRICBLK A9ELECTRICWHT Registration Please visit the website below to register your new water cooler
PC71 American Style Fridge Freezer
 PC71 American Style Fridge Freezer Installation, Use and Maintenance Customer Care Department The Group Ltd. Harby Road Langar Nottinghamshire NG13 9HY T : 01949 862 012 F : 01949 862 003 E : customer.care@cda.eu
CABINET PARTS. For Models: KBLC36FMS00 (Stainless Steel) 9 05 Litho In U.S.A. (kdj) Part No " BOTTOM MOUNT BUILT IN REFRIGERATOR
 9 05 Litho In U.S.A. (kdj) Part No BOTTOM MOUNT BUILT IN REFRIGERATOR") CABINET PARTS 36" BOTTOM MOUNT BUILT IN REFRIGERATOR 9 05 Litho In U.S.A. (kdj) 1 Part No. 1 Literature Parts LIT2266810 Use & Care Guide LIT2266819 Energy Label LIT2266830 Service & Wiring Sheet LIT628370
CABINET PARTS 36" BOTTOM MOUNT BUILT IN REFRIGERATOR 9 05 Litho In U.S.A. (kdj) 1 Part No. 1 Literature Parts LIT2266810 Use & Care Guide LIT2266819 Energy Label LIT2266830 Service & Wiring Sheet LIT628370
Fast Track Troubleshooting
 Fast Track Troubleshooting Models Covered: RF195AC**/XAA RF197AC**/XAA RF217AC**/XAA IMPORTANT SAFETY NOTICE For Technicians Only This service data sheet is intended for use by persons having electrical,
IKS..10,..20 / IK..00 / EK..10 from Index 20. IKS..14,..24 / IK..04 / EK..14 from Index 20, with 4-star freezer compartment
 After Sales Service International Service Information No. 03/2006 Service Information LHG/TKD-Ne/06.04.06 Appliance Documentation IKS..10,..20 / IK..00 / EK..10 from Index 20 IKS..14,..24 / IK..04 / EK..14
OPERATING INSTRUCTIONS
 COMFORT CONTROL CENTER 2 THERMOSTAT OPERATING INSTRUCTIONS PROGRAMMABLE THERMOSTAT MODEL 3314080.000 BLACK 3314080.015 WHITE USA SERVICE OFFICE Dometic Corporation 1120 North Main Street Elkhart, IN 46514
VFCB. Ice Frost 2 and 3 Bowl Post-Mix and 2 Bowl Pre-Mix. Installation, Service, and Operator s Manual
 VFCB Ice Frost 2 and 3 Bowl Post-Mix and 2 Bowl Pre-Mix Installation, Service, and Operator s Manual Release Date: April 19, 2004 Publication Number: M620919596OPR Revision Date: June 14, 2007 Revision:
quick start guide Product features RF195/197** RF215/217** Moving Tray Surround Multi Flow Twin Cooling System Digital Display & Temperature Control
 quick start guide RF195/197** RF215/217** Product features Surround Multi Flow A center-positioned fan and ducts with multiple flow effluences provide uniform cooling for each shelf and fresh food compartment
SEA FROST BAITFREEZER 110-VOLT AIR-WATER Twin Valve
 372 ROUTE 4 BARRINGTON, NH 03825 USA TEL (603) 868-5720 FAX (603) 868-1040 1-800-435-6708 E-Mail:sales@seafrost.com www.seafrost.com SEA FROST BAITFREEZER 110-VOLT AIR-WATER Twin Valve Operation and Installation
BFFF HUY. Partial Frost-free Bottom Combi Nyíregyháza Factory
 BFFF HUY Partial Frost-free Bottom Combi Nyíregyháza Factory Nyíregyháza Factory Electrolux Code HUY Nyíregyháza HUY Satu Mare ROA Jászberény HUC Product Range HUY HUY production: bottom combis Convenience
USING THE REFRIGERATOR COMPARTMENT
 USING THE REFRIGERATOR COMPARTMENT Switching the appliance on Starting the appliance Insert the plug. The light, located under the control panel or inside the product (depending on model) comes on when
Operating instructions Page 12. NoFrost combined refrigerator-freezer CN 5123
 Operating instructions Page 12 NoFrost combined refrigerator-freezer 7083 275-00 CN 5123 Disposal notes The appliance contains reusable materials and should be disposed of properly - not simply with unsorted
REFRIGERAT A OR USE DF1-15 F ridge
 REFRIGERATOR USE DF1-15 Fridge BEFORE USING THE APPLIANCE. Your new appliance is designed exclusively for domestic use. To ensure best use of your appliance, carefully read the operating instructions which
CABINET PARTS For Model: KSSO36FMX01 (Etched Aluminum)
") CABINET PARTS 36" BUILT IN REFRIGERATOR 9 05 Litho In U.S.A. (kdj) 1 Part No. 1 Literature Parts 2266808 Use & Care Guide 2307362 Energy Label 2306324 Service & Wiring Sheet 2306337 Icemaker and Ingredient
CABINET PARTS 36" BUILT IN REFRIGERATOR 9 05 Litho In U.S.A. (kdj) 1 Part No. 1 Literature Parts 2266808 Use & Care Guide 2307362 Energy Label 2306324 Service & Wiring Sheet 2306337 Icemaker and Ingredient
WINE CELLAR USER MANUAL
 WINE CELLAR USER MANUAL Index Page 2 3 4 7 9 14 15 16 17 20 1 1.1 1.2 2 2.1 2.2 3 3.1 3.2 3.3 3.4 3.5 4 4.1 4.2 4.3 5 5.1 5.2 5.3 6 6.1 7 7.1 8 8.1 9 9.1 9.2 9.3 9.4 9.5 10 10.1 10.2 Important instructions
OWNER S MANUAL STAINLESS STEEL REACH-IN SERIES. Model: ATF1 ATF2 ATF3 ATR1 ATR2 ATR3 ATF2 ATR2
 OWNER S MANUAL STAINLESS STEEL REACH-IN SERIES Model: ATF1 ATF2 ATF3 ATR1 ATR2 ATR3 ABF1 ABF2 ABF3 ABR1 ABR2 ABR3 ABF1 ABR1 ATF2 ATR2 ABF3 ABR3 Please read the manual carefully and follow all instructions.
GCG-9. Instruction Manual. G-Series Cooler. Manual is for the following models: GCG-9-N13EB G-9-N13EB GCG-9-B13EB UPRIGHT COOLER
 G-Series Cooler UPRIGHT COOLER Manual is for the following models: -N13EB G-9-N13EB -B13EB Instruction Manual FOR YOUR FUTURE REFERENCE This easy-to-use manual will guide you in getting the best use of
GKv 5710 / 5760 GKv 6410 / 6460
 After Sales Service International Service Manual No. 21/2007 (version 01) Service Information LWL/KDT/baj/14.05.07 Appliance Documentation GKv 5710 / 5760 GKv 6410 / 6460 Refrigerator for the catering
Mix Boiler & Font Range ( #, #, #, , )
") Mix Boiler & Font Range (1000870#, 1000871#, 1000880#, 1000878, 1000879) Service Manual Marco Beverage Systems Ltd. 63d Heather Road, Sandyford Industrial Estate, Dublin 18, Republic of Ireland Ireland
Mix Boiler & Font Range (1000870#, 1000871#, 1000880#, 1000878, 1000879) Service Manual Marco Beverage Systems Ltd. 63d Heather Road, Sandyford Industrial Estate, Dublin 18, Republic of Ireland Ireland
CRP-40 CRF-50 CR-50 / CR-50 CHROME CR-65 / CR-65 CHROME CR-80 / CR-80 CHROME CR-110 / CR-110 CHROME CR-140 / CR-140 CHROME
 Unbeatable performance Perfect in every detail Home-like cooling comfort Equipped with Danfoss high-tech compressors, the well-proven refrigerators in the WAECO series provide outstandingly intensive,
Operating instructions Page 14. Refrigerator Read the operating instructions before switching on for the first time
 Operating instructions Page 14 Refrigerator Read the operating instructions before switching on for the first time 7084 309-00 LKUv Disposal notes The appliance contains reusable materials and should be
LevControl LC PLUS OPERATING INSTRUCTIONS ALL OUR SYSTEMS COMPLY WITH DIRECTIVE 73/23 EEC - 89/336. Cod /0-12/97
 LevControl LC PLUS ALL OUR SYSTEMS COMPLY WITH DIRECTIVE 73/23 EEC - 89/336 OPERATING INSTRUCTIONS Cod. 71503277/0-12/97 WARNING!!! THE OPERATIONS LISTED BELOW AND THOSE MARKED BY THIS SYMBOL ARE STRICTLY
Quick Guide. Carefully read the user handbook provided before using the appliance. Refrigerator Compartment 1. Control panel
 Product sheet Quick Guide Carefully read the user handbook provided before using the appliance. Refrigerator Compartment 1. Control panel 14 1 2 3 6 5 4 7 8 9 10 11 12 13 15 17 16 2. Main LED s lighting
A p p l i e d L u x u r y
 Applied Luxury Fhiaba Concept Fhiaba s wide choice of elements for food preservation and wine storage aims at providing an answer to the highest expectations in terms of aesthetics and refrigeration technology.
2 THERMOSTAT DETAILS 3 REMOVING OLD THERMOSTAT
 CONTENTS Installation Instructions for Heating & Air Conditioning 1F79 n-programmable Heat Pump Thermostat Preparations... 1 Thermostat Details... 1 Removing Old Thermostat... 1-2 Mounting and Wiring...
Service Documentation
 After Sales Service International Service Manual No. 16/2010 Service Documentation LWL/KDT-baj/30.06.10 Appliance Documentation GKv 4310 / 4360 from Index 20 Commercial refrigerator, ventilated GKv 5730
Scotsman Technical Training. CU50 Cube Ice Machine
 Scotsman Technical Training CU50 Cube Ice Machine Major Topics Overview Installation Start Up Sequence of Operation Maintenance Diagnostics Service Procedures Models Two Base Models Gravity Drain Pump
TFFR01 MANUAL PORTABAL 12/24 VOLTS DC REFRIGERATOR / FREEZER.
 TFFR01 MANUAL PORTABAL 12/24 VOLTS DC REFRIGERATOR / FREEZER www.terrafirma4x4.com 1 Safety Awareness Read this manual carefully and understand the contents before you install the refrigerator / freezer.
User Manual. SKOPE Backbar, Counterline & Slimline BB, CL & CC Series. 1, 2 & 3 Door Horizontal Chillers. MAN11015 Rev. 2.0 Feb.
 BB, CL & CC Series 1, 2 & 3 Door Horizontal Chillers CL400 BB580 MAN11015 Rev. 2.0 Feb. 2015 CL800 SKOPE Warranty Protection Register now for peace of mind It s quick and simple. Take a few minutes to
REFRIGERATORS AND FREEZERS Installation, Operation and Maintenance Instructions
 REFRIGERATORS AND FREEZERS Installation, Operation and Maintenance Instructions INSPECTION When the equipment is received, all items should be carefully checked against the bill of lading to insure all
! WARNING To avoid risk of electrical shock, personal injury or death; disconnect power to range before servicing, unless testing requires power.
 Technical Information Electric Slide-In Range JES9750BA* JES9860BA* Due to possibility of personal injury or property damage, always contact an authorized technician for servicing or repair of this unit.
G-10f/GCG-10f UPRIGHT COOLER
 G-Series Cooler G-10f/GCG-10f UPRIGHT COOLER Manual is for the following models: G-10F, G-10-F33EB GCG-10F, GCG-10-F33EB GCG-10F2, GCG-10-F233EB G-10-F33EB-HC, GCG-10-F33EB-HC GCG-10-F233EB-HC Instruction
REFRIGERATOR SERVICE MANUAL
 REFRIGERATOR SERVICE MANUAL CAUTION BEFORE SERVICING THE PRODUCT, READ THE SAFETY PRECAUTIONS IN THIS MANUAL. MODELS: GR-F218 GR-F258 COLORS: WESTERN BLACK(SB) TITANIUM(TT) SUPER WHITE(SW) STAINLESS(ST)