AIR PURIFIER MODEL NO: APA240 OPERATION & MAINTENANCE INSTRUCTIONS PART NO: GC1114
|
|
|
- Gloria Small
- 6 years ago
- Views:
Transcription


1 AIR PURIFIER MODEL NO: APA240 PART NO: OPERATION & MAINTENANCE INSTRUCTIONS GC1114
2 INTRODUCTION Thank you for purchasing this CLARKE Air Purifier. The APA240 Air Purifier reduces the amount of animal dander (skin cell particles), pollen, and industrial pollutants in the air, and therefore improves the air quality. It also filters out ultra-fine particles larger than 20 nanometers, including bacteria and some viruses. For the best results, you should place the air purifier in a room where you spend most of your time, e.g. the living room or bedroom. Before attempting to use this product, please read this manual thoroughly and follow the instructions carefully. In doing so you will ensure the safety of yourself and that of others around you, and you can look forward to your purchase giving you long and satisfactory service. GUARANTEE This product is guaranteed against faulty manufacture for a period of 12 months from the date of purchase. Please keep your receipt which will be required as proof of purchase. This guarantee is invalid if the product is found to have been abused or tampered with in any way, or not used for the purpose for which it was intended. Faulty goods should be returned to their place of purchase, no product can be returned to us without prior permission. This guarantee does not effect your statutory rights. 2
 Rating; Smoke Dust Pollen 170 cfm 175 cfm 175 cfm Air Flow Rate 240 m 3 /h Filtration Rate 99.")
3 TECHNICAL SPECIFICATION Power source 230 Volts AC 50Hz IP Rating IPX0 Electrical Insulation Class II Operation temperature 5-40ºC Dimensions (L x W x H) 240 mm x 380 mm x 675 mm Weight 8.7 kg Filter Types Pre-filter, Multi-function, HEPA, Activated Carbon Clean Air Delivery Rate (CADR) Rating; Smoke Dust Pollen 170 cfm 175 cfm 175 cfm Air Flow Rate 240 m 3 /h Filtration Rate 99.9% Maximum room size 24 m 2 Sound Pressure Level Sound Power Level Under 70 db Under 70 db ENVIRONMENTAL RECYCLING POLICY Through purchase of this product, the customer is taking on the obligation to deal with the WEEE in accordance with the WEEE regulations in relation to the treatment, recycling & recovery and environmentally sound disposal of the WEEE. In effect, this means that this product must not be disposed of with general household waste. It must be disposed of according to the laws governing Waste Electrical and Electronic Equipment (WEEE) at a recognised disposal facility. 3

4 SAFETY WARNINGS CAUTION: FAILURE TO FOLLOW THESE PRECAUTIONS COULD RESULT IN PERSONAL INJURY, AND/OR DAMAGE TO PROPERTY. 1. Please read this user manual carefully before using the appliance and save it for future reference. 2. Do not clean the appliance with water or any other liquid or (flammable) detergent to avoid electric shock and/or fire hazard. 3. Check if the voltage indicated on the rating label corresponds to the local mains voltage before you connect the appliance. 4. Do not use the appliance if the plug, the power cable or the appliance itself is damaged. contact your Clarke dealer or similarly qualified persons to replace it in order to avoid a hazard. 5. Children should be supervised to ensure that they do not play with the appliance. 6. Do not block the air inlet and outlet, e.g. by placing items on the air outlet or in front of the air inlet. 7. This appliance is not a substitute for the proper ventilation, regular vacuum cleaning or use of an extractor hood or fan while cooking. 8. If the wall socket used to power the appliance has poor connections, the plug of the appliance could become hot. Make sure you plug the appliance into a properly connected wall socket. 9. Always place and use the appliance on a dry, stable, and level surface. 10. Leave at least 20 cm free space behind and on both sides of the appliance and leave at least 30 cm free space above. 11. Do not place anything on top of the appliance and do not sit on it. 12. Do not place the appliance where condensation could drip onto it. 13. Ensure all filters are properly installed before switching on the appliance Always lift or move the appliance by the handle at the rear. 15. Do not insert foreign objects into the air outlet. 16. Do not use this appliance when you have used indoor smoke-type insect repellents or in places with oily residues, burning incense or chemical fumes. 4
5 17. Do not use near gas appliances, heaters or fireplaces. 18. Always unplug the appliance after use and before you clean it. 19. Do not use in a room with major temperature changes as this may cause condensation inside the appliance. 20. To prevent interference, place the appliance at least 2 m away from electrical appliances that use airborne radio waves such as TVs, radios and radio-controlled clocks. 21. The appliance is only intended for household use under normal operating conditions. 22. Do not use the appliance in wet surroundings or in surroundings with high ambient temperatures, such as the bathroom, toilet or kitchen. 23. The appliance does not remove carbon monoxide (CO) or radon (Rn). It cannot be used as a safety device in case of accidents with combustion processes and hazardous chemicals. 5

6 ELECTRICAL CONNECTIONS WARNING! Read these electrical safety instructions thoroughly before connecting the product to the mains supply. Before switching the product on, make sure that the voltage of your electricity supply is the same as that indicated on the rating plate. This product is designed to operate on 230VAC 50Hz. Connecting it to any other power source may cause damage. This product may be fitted with a non-rewireable plug. If it is necessary to change the fuse in the plug, the fuse cover must be refitted. If the fuse cover becomes lost or damaged, the plug must not be used until a suitable replacement is obtained. If the plug has to be changed because it is not suitable for your socket, or due to damage, it should be cut off and a replacement fitted, following the wiring instructions shown below. The old plug must be disposed of safely, as insertion into a mains socket could cause an electrical hazard. WARNING! The wires in the power cable of this product are coloured in accordance with the following code: Blue = Neutral Brown = Live If the colours of the wires in the power cable of this product do not correspond with the markings on the terminals of your plug, proceed as follows. The wire which is coloured Blue must be connected to the terminal which is marked N. The wire which is coloured Brown must be connected to the terminal which is marked L. Plug must be BS1363/A approved. Always fit a 13 Amp fuse. Neutral (Blue) Live (Brown) Ensure that the outer sheath of the cable is firmly held by the clamp We strongly recommend that this machine is connected to the mains supply via a Residual Current Device (RCD) If in any doubt, consult a qualified electrician. DO NOT attempt any repairs yourself. This symbol indicates that this is a Class II product, and does not require an earth connection. 6
7 OVERVIEW THE FILTRATION SYSTEM The air purifier uses a multi-stage filtration system to achieve high air quality: STAGE 1: PRE-FILTER The pre-filter has been treated with antibacterial substances and captures large particles such as human and pet hair etc. STAGE 2: MULTI-FUNCTION (ANTIBACTERIAL/ANTI-FUNGAL) FILTER The second stage filter captures small particles such as pollen. Also using antibacterial and anti-fungal properties, it can remove bacterial and fungal spores. STAGE 3: HIGH PERFORMANCE HEPA FILTER The high-performance composite HEPA filter with anti-bacterial coating effectively removes fine dust and cigarette smoke, while the antibacterial and anti-mould functions of the organic antibacterial materials eliminate germs and mould. STAGE 4: ACTIVATED CARBON FILTER The activated carbon filter can effectively absorb volatile organic compounds (VOCs), reducing odors and harmful gases. STAGE 5: PLASMA FILTER This is an ionization filter which generates electrically charged air or gas ions. These ions attach to airborne particles which are then electrostatically attracted to a charged collector plate, removing them from the air in the room. THE CONTROL SYSTEM The control system automatically adjusts the operation in response to pollutant changes detected in the air. The visual display on the front of the appliance changes colour to indicate the air quality detected: blue being the cleanest level, ranging through green to red, indicating poor air quality. The light sensitive Auto mode operation re-sets the appliance to run quietly at night and adjusts airflow while people are sleeping. It then adjusts to Day mode when light is detected. 7
8 DESIGN FEATURES 8
9 DESIGN FEATURES NO DESCRIPTION 1 Control Panel 2 Air Quality sensor outlet 3 Air Quality sensor panel 4 Air Quality sensor inlet 5 Light Sensor 6 Remote control receiver 7 Air Quality display 8 Air inlet (around four sides) 9 Remote controller 10 Handle 11 Plasma filter 12 Air outlet 13 Power cable storage facility 14 Mains power cable 15 Panel on/off interlock switch 16 Activated carbon filter 17 HEPA filter 18 Multi-functional filter 19 Pre-filter 20 Removable front panel 9


10 INSTALLING THE FILTERS The appliance comes with all filters fitted inside, but you must remove the packaging from each one before using the appliance. Remove the filters, discard the packaging and re-fit to the appliance as follows: NOTE: Make sure you insert each filter in the correct position. 1. Gently pull the top of the front panel towards you before lifting the hooks at the bottom of the panel away from the bottom of the appliance. 2. Remove the pre-filter by gripping the two flanges and pulling the filter towards you. 3. Remove all packing material from the new filters. 10


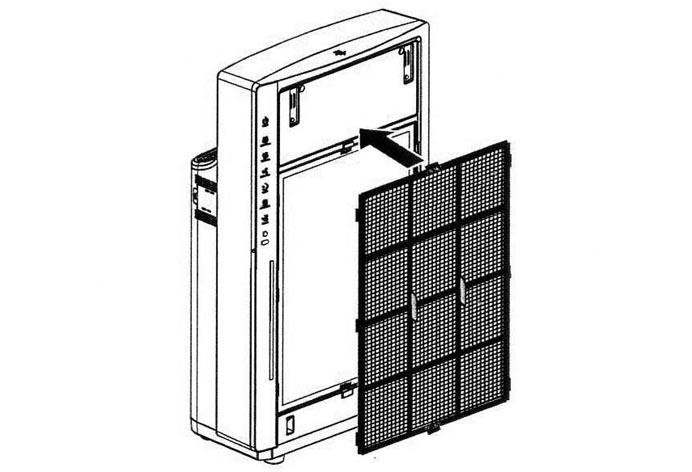
11 4. Refit the activated carbon filter into the appliance. NOTE: Ensure that the side with the tab is pointing towards you. 5. Refit the HEPA filter into the appliance. NOTE: Ensure that the side with the tab is pointing towards you. 6. Refit the multi-functional filter back into the appliance. NOTE: Ensure that the side with the tab is pointing towards you. 7. Refit the pre-filter back into the appliance. NOTE: Ensure that the side with the two projections are pointing towards you. 11
12 8. To re-attach the front panel, insert the bottom hooks into the bottom of the appliance, then press the panel against the body of the appliance. The appliance will not operate without the front panel in its correct position. ACCESSORY STORAGE POWER CABLE STORAGE 1. Push down the arrowhead on the flap to open the compartment and remove the power cable. 2. Extend the cable and close the flap with the cable passing through the gap provided in the flap. 3. Always store the cable in the compartment when not in use. REMOTE CONTROL STORAGE 1. Remove the remote control from its magnetic storage compartment if required. It should be stored here when not in use. The remote controller uses a single CR2032 battery which can be replaced as shown by the diagram printed on the back of the unit. 12
. The fan will run at high speed. MID-SPEED (C).")
13 CONTROL PANEL OPERATION When the appliance is plugged into the power socket, the POWER button (A) lights up in red. Press the POWER button to start the appliance and the light will change to blue. Press again to return to the standby mode. When the appliance is running, press the appropriate indicator to select the following: HIGH SPEED (B). The fan will run at high speed. MID-SPEED (C).The fan will run at mid speed. LOW-SPEED (D). The fan will run at low speed. SILENT-MODE (E). The unit will run at its slowest speed as for night-time running. AIR QUALITY (F). The appliance will run at a speed determined by the Air Quality Sensor. The Plasma generator will be on by default. If the Air Quality indicator flashes, the filters are becoming blocked and will need replacing. PLASMA generator (G) will be operating by default when the unit is running at one of the 3 selected speeds. Item H is the light sensor. Select AUTO MODE using the remote control and the appliance will detect the level of background light to select DAY or NIGHT mode automatically. 13
.")
14 REMOTE CONTROL OPERATION All the controls on the machine control panel are replicated on the remote control unit with the addition of the Auto-Mode (J). Press this button to select AUTO-MODE. When the Air Quality indicator flashes, the filters are becoming blocked and need replacement. (See Maintenance on pages 17-19). After replacing all the filters, press the RESET button (K) on the remote control for 2- seconds and the filter service interval time will be re-set. OPERATING MODES When the appliance is first plugged in, you will hear a beep, indicating that the appliance is operating normally. If required, set the appliance running at high speed for fast initial cleaning of the air before adjusting the control to a slower speed. NORMAL OPERATING MODE When the appliance is on, it will enter the NORMAL operating mode by default. Press the fan speed button (H, M, L, SILENT) as required. The operating status will be as follows: Press the fan speed button to adjust the fan speed as required, the related fan speed light will be on. The Plasma filter will be operating by default. Press the PLASMA button to set the plasma filter on or off. The Air Quality indicator will be on by default. Press the AIR QUALITY button to set the Air Quality indicator on or off. AUTO MODE Set the appliance in Auto mode by using the AUTO button in the remote control. The high, mid, or low fan speed indicator will all flash in turn, showing that the appliance is running in AUTO mode. 14
15 When set in AUTO mode, the appliance will switch to NIGHT or DAY Mode automatically, (DAY Mode by default) according to the light level in the room. When the light in the room is beginning to fade for more than 3 minutes, the appliance will switch to Night Mode. Likewise, when the light has become brighter for more than 5 minutes, the appliance will switch back to the Day Mode. In DAY Mode, the operating status will be as follows: The Plasma filter will be ON by default. Press the PLASMA button to set the Plasma filter on or off. The Air Quality indicator will be on by default. Press the AIR QUALITY button to switch the air quality indicator on or off. According to the air quality detected, the fan speed will be adjusted automatically. When the air quality is poor, the fan will run at high speed; if fair quality mid speed and if good, will run at low speed. In NIGHT Mode, the operating status will be as follows: The Plasma filter will be ON by default. Press the PLASMA button to set the plasma generator on or off. The air quality indicator will be OFF by default. Press AIR QUALITY button to press this button to make the air quality indicator on or off. The appliance will switch to silent mode automatically. AIR QUALITY INDICATION AIR QUALITY INDICATION Colour Blue Green Red Air Quality Very Good Fair Poor In order to display the air quality in a precise way, the air quality is divided into 32 grades and each is displayed by corresponding colours. With changing air quality, the air quality indicator will change colour accordingly. 15
16 ADJUSTING THE AIR QUALITY SENSOR SENSITIVITY The appliance allows you to adjust the sensitivity of the air quality sensor for the benefit of people with allergies or asthma. When it is set to a higher sensitivity level, the appliance starts cleaning the air at lower pollution levels to make the air cleaner. There are four sensitivity levels: Common Standard Sensitive Extra Sensitive The pollution sensor is set to standard sensitivity but you can adjust the sensitivity of the air quality sensor in the following way: 1. If the appliance is already plugged in, unplug and wait for a few minutes. before plugging back in. 2. In STANDBY mode, press AIR-QUALITY + HIGH-SPEED buttons. After the buzzer sounds twice, the air quality sensor sensitivity has been set to extra sensitive. This should be indicated by the corresponding indicator flashing five times and confirmed immediately after pressing the power button to turn on the appliance. 3. In STANDBY mode, press AIR-QUALITY+MID-SPEED buttons. After the buzzer sounds twice, the air quality sensor sensitivity has been set to sensitive level. 4. In STANDBY mode, press AIR-QUALITY+LOW-SPEED buttons. After the buzzer sounds twice, the air quality sensor sensitivity has been set to standard level. 5. In STANDBY mode, press AIR-QUALITY+SILENCE buttons. After the buzzer sounds twice, the air quality sensor sensitivity has been set to common level. The sensitivity level can be confirmed by the corresponding indicator flashing five times immediately after pressing the power button to turn on the appliance. NOTE: The appliance automatically starts operating at the pre-set sensitivity level when switched on again. SENSITIVITY SETTING INQUIRY In STANDBY mode, press the air quality indicator button to check the sensor sensitivity setting. Exit after the corresponding sensitivity indicate light flashes five times or exit by pressing other buttons (except for the reset button). 16

17 MAINTENANCE WARNING: ALWAYS UNPLUG THE APPLIANCE BEFORE PERFORMING ANY CLEANING OR MAINTENANCE OPERATIONS. CLEANING Regularly clean the body of the appliance to prevent dust from collecting. 1. Wipe away dust with a soft dry cloth from the body and air inlet area of the appliance. IMPORTANT: Never immerse the appliance in water or any other liquid. Never use aggressive or flammable cleaning agents such as bleach or alcohol to clean any part of the appliance. IMPORTANT: Only the pre-filter is washable. The other filters should be replaced if heavily contaminated or indicated by the machine. PRE-FILTER 1. If the pre-filter is very dirty, use a soft brush to brush away the dust while it is dry. You can alternatively remove the dust with a vacuum cleaner. 2. Remove the pre-filter as shown on page 10 & wash under a running tap. 3. Air-dry the pre-filter and make sure it is completely dry Re-fit the pre-filter into the appliance. AIR QUALITY SENSOR Clean the air quality sensor every 2 months for optimum functioning of the appliance. Clean it more frequently if you use the appliance in a dusty environment. NOTE: When the humidity level in the room is very high, it is possible that condensation can develop on the air quality sensor. As a result, the AIR QUALITY light on the control panel may indicate that the air quality is poor even though the air quality is good. In this case, it is necessary to clean the air quality sensor. 1. Remove the air quality sensor cover. 2. Clean the air quality sensor, the air inlet and air outlet with a lightly moistened cotton swab. 3. Dry them with a dry cotton swab. 4. Reattach the air quality sensor cover. 17

18 FILTER REPLACEMENT This appliance is equipped with a feature to ensure that the filters are in good condition when the appliance is operating. When one of the filters is almost full and has to be cleaned or replaced, the Air Quality light starts to flash. If you do not replace the Multi-function, HEPA and Activated Carbon filters, the appliance stops operating and is locked off. FIRST ALERT TO CHANGE THE FILTERS The filter function will be relatively poor near the end of its working life. The air quality light will flash to remind the user to change the filters. SECOND ALERT TO CHANGE THE FILTERS If you do not replace the filters in time after the first alert, approximately 3 weeks later the Air Quality light will flash and the buzzer sound every 30 minutes to remind you to replace the filters. FILTER REPLACEMENT LOCK If you do not replace the filters in time during the first and second alerts, the appliance will be locked off. After operating for approx 3 weeks, the appliance will stop working and the Power light and Air Quality light will flash with a continuous beep. How long it takes before the appliance is locked out depends on the room air quality after the filter replacement alert. When the appliance is locked out, you will hear a beep when you press any button. You can shut down the appliance by pressing and holding the on/off button. If the appliance is locked out: 1. Switch off the appliance and unplug it. 2. Replace the appropriate filters as follows:. 18
19 REPLACING THE FILTERS AND RESETTING THE APPLIANCE REPLACING THE FILTERS Remove and re-fit the filters as shown on page 10. RESETTING THE APPLIANCE 1. After filter replacement, plug in and turn back on. The Power On sound will be heard when the appliance reaches STANDBY status. 2. Press the RESET button on the hand controller for 2 seconds. When the buzzer sounds once, the service scheduling of the filters has been cleared and re-set. The Air Quality light will be ON, indicating that the re-set has been successful. NOTE: The RESET button at the Air Quality Sensor inlet can clear the filter service schedule and restart it at any time. Do not press the Reset button when the filter replacement light is not flashing. NOTE: Only replace the filters when the Air Quality light flashes. If you replace the filters before the Air Quality light starts flashing, the service schedule will not be reset but will continue counting the lifetime of the previous filters. As a result, the Air Quality will start flashing and the appliance be locked off far too soon. REPLACEMENT FILTERS Replacement filters are available from your local Clarke dealer as: YEAP Front Pre-filter YEAP Multi-Function filter YEAP HEPA filter YEAP Activated Carbon filter 19
20 TROUBLESHOOTING Problem No operation. No air coming from the outlet. The fan speed does not change when the AUTO mode is activated. Weak airflow coming from the air outlet. Air quality does not improve although the appliance has been running for some time. The colour of the Air Quality display remains the same. The appliance is noisy. The appliance still indicates that the filter needs replacing but this has already been done. Solution One or more of the filters have not been replaced, such that the appliance is now locked and must be reset following the installation of the new filter(s). Appliance is not switched on or plugged in. If the room becomes dark, the night mode is automatically activated when the appliance is in AUTO mode. In this case, the fan speed is set to a low level. To re-set the fan speed, select it manually using the Low, Medium and High buttons. The pre-filter may be dirty and require cleaning. See page 17. Packing material attached to the filters which should have been removed. Check all the filters have been installed in the appliance and are correctly installed in the following order: 1) Activated Carbon, 2) HEPA filter, 3) Multi-function filter, 4) Pre-filter. The Air Quality Sensor is damp. The humidity level in the room is very high and is causing condensation. Confirm that the sensor is clean and dry. See maintenance on p 17. The room in which you are using the appliance is too large (over 24m 2 ), which is the maximum recommended room size. The air quality sensor is dirty and requires cleaning. See Maintenance on p17. Insufficient ventilation in the room. Open a window to improve ventilation. Packing material still attached to the filters. Check that it is all removed. The filter re-set button was not pressed after changing the filters. With the appliance running, press the reset button on the controller, or the reset button at the air inlet of the air quality sensor for 2 seconds. 20
21 Problem Solution If the system has been re-set, the buzzer will sound and the light on the air quality sensor will indicate that the reset has been successful. COMPONENT PART LIST NO DESCRIPTION NO DESCRIPTION 1 Front Panel 23 Air Quality Sensor Cover 2 Front Panel Frame 24 Air Quality Sensor Sponge 3 Magnetic Tablet 1 25 Magnet 4 Pre-Filter 26 Side Handle 5 Multi-Function Filter 27 Remote Controller 6 HEPA Filter 28 Rear Panel Assembly 7 Control Board Cover 29 Power Cable Cover 8 Magnetic Tablet 2 30 Clamp 9 Magnet Holder 31 Clamp Spring 10 Magnet 32 Clamp Cover 11 Micro-switch 33 Power Cable Box 12 Keys Contact 34 Fan 13 Keys Cover 35 Motor Bracket 14 Control Keys 36 Fan Motor 15 Control Keyboard 37 Air Channel 16 Control Key panel 38 Plasma Generator 17 Front Panel Assembly 39 Base 18 Dust Sensor 40 Rubber Foot 19 Air Quality Sensor Plate 41 Main Control Board 20 Air Quality Sensor Box 42 Air Quality Indicating Lights 21 Motor Wires Clamp 43 Activated Carbon Filter 22 Front Panel Securing Clamp 44 Switch Clamp Filters shown in bold text are available as replacements shown on page19. 21
22 COMPONENT PARTS 22
23 DECLARATION OF CONFORMITY 23

24
Register your product and get support at. AC4076. User manual
 Register your product and get support at www.philips.com/welcome AC4076 User manual 2 1 3 4 English Introduction Congratulations on your purchase and welcome to Philips! To fully benefit from the support
Register your product and get support at AC4002 AC4004. User manual
 Register your product and get support at www.philips.com/welcome AC4002 AC4004 User manual 3 1 2 3 1 H 4 6 8 10 5 7 9 11 12 14 13 A B C I J K L M G F D E 6 English introduction Congratulations on your
Register your product and get support at. AC4006. User manual
 Register your product and get support at www.philips.com/welcome AC4006 User manual 2 EnGLISH 3 1 4 English Introduction Congratulations on your purchase and welcome to Philips! To fully benefit from the
NANO HIPPO 50WH Air Purifier
 NANO HIPPO 50WH Air Purifier FIMACO SDN. BHD. Contents Contents 1 Important Safeguards 2 Introduction 4 First installation 9 Using method 11 Maintenance and cleaning 17 Replacing air filter 19 Trouble
VK-6008D. User Manual
 VK-6008D User Manual Contents 1. Important safety information 01 2. Product Structure 02 3. Before first use 03 4. Using the appliance 05 5. Cleaning 08 6. Filter Replacement 11 7. Storage 13 8. Environment
User manual. Always there to help you. Question? Contact Philips AC3252 AC3254 AC3256
 Always there to help you Register your product and get support from www.philips.com/welcome Question? Contact Philips AC3252 AC3254 AC3256 User manual Contents English 1 Important 4 Safety 4 2 Your air
1. Important safety information
 User Manual VK-6010 Contents 1. Important safety information 01 2. Product Structure 02 3. Before first use 03 4. Using the appliance 05 5. Cleaning 07 6. Filter Replacement 10 7. Storage 12 8. Environment
24 & 30 INCH DRUM FANS
 24 & 30 INCH DRUM FANS MODEL NO: CAM24 & CAM30 PART NO: 3231560 / 3231565 OPERATION & MAINTENANCE INSTRUCTIONS GC0414 INTRODUCTION Thank you for purchasing this CLARKE Drum Fan. Before attempting to use
ELECTRIC ASHCAN MODEL NO: ASHVAC1200 OPERATING & MAINTENANCE INSTRUCTIONS PART NO: ORIGINAL INSTRUCTIONS
 ELECTRIC ASHCAN MODEL NO: ASHVAC1200 PART NO: 6471133 OPERATING & MAINTENANCE INSTRUCTIONS ORIGINAL INSTRUCTIONS GC1216 INTRODUCTION Thank you for purchasing this CLARKE product which is designed for fast,
ELECTRIC ASH CAN Model: CVACASH500 Part No:
 ELECTRIC ASH CAN Model: CVACASH500 Part No: 6471132 OPERATING & MAINTENANCE INSTRUCTIONS GC0614 INTRODUCTION Thank you for purchasing this electrically powered Ash Can which is designed for fast, easy
User manual 2017 Koninklijke Philips N.V. All rights reserved.
 1 2 AC2887, AC2882 A C B H I J K L M N O P Q AC2887 G D E F H I J K L M N O AC2882 User manual 2017 Koninklijke Philips N.V. All rights reserved. 4241 210 93661 3 4 5 6 23 24 25 26 29 30 3s 7 8 9 10 27
VACUUM EXTRACTOR MODEL NO: CWVE1 OPERATING & MAINTENANCE INSTRUCTIONS PART NO: GC0916
 VACUUM EXTRACTOR MODEL NO: CWVE1 PART NO: 6471168 OPERATING & MAINTENANCE INSTRUCTIONS GC0916 INTRODUCTION Thank you for purchasing this CLARKE Workshop Vacuum Extractor. Before attempting to use this
Comefresh CF-8608 Air Purifier
 Comefresh CF-8608 Air Purifier With Pre-filter, HEPA, Activated Carbon, UVC, Ionizer Breathe the difference This product is imported by: Solenco SA Providing Solutions for Environmental Comfort PO Box
Note: Verify that plastic bags are removed from filters, if equipped or installed, before first use (see page 8) CONTENTS
 CONTENTS") DEAR CUSTOMER Thank you for purchasing the Ionmax Breeze ION420 Air Purifier. The Ionmax Breeze can help to improve the indoor air quality in your home or office. Please read this manual carefully before
DEAR CUSTOMER Thank you for purchasing the Ionmax Breeze ION420 Air Purifier. The Ionmax Breeze can help to improve the indoor air quality in your home or office. Please read this manual carefully before
Register your product and get support at AC4091. User manual
 Register your product and get support at www.philips.com/welcome AC4091 User manual Contents 1 Important 4 Safety 4 11 Notices 0 0 Compliance with EMF 0 Recycling 0 English 5 What s in the box 5 3 Get
WET & DRY VACUUM CLEANERS
 WET & DRY VACUUM CLEANERS MODEL NO: CCVAC20SS, CVAC25SS & CVAC30SSR PART NO: 6471105, 6471110 & 6471120 OPERATING & MAINTENANCE INSTRUCTIONS GC0114 INTRODUCTION Thank you for selecting this VAC KING Vacuum
18 INCH HIGH VELOCITY FLOOR FAN
 18 INCH HIGH VELOCITY FLOOR FAN MODEL NO: CFF18B100 PART NO: 3231530 OPERATION & MAINTENANCE INSTRUCTIONS ORIGINAL INSTRUCTIONS LS0917 - ISS 1 INTRODUCTION Thank you for purchasing this CLARKE 18 inch
2 KW OIL FILLED RADIATOR
 2 KW OIL FILLED RADIATOR MODEL NO: OFR9/200 PART NO: 6933995 OPERATION & MAINTENANCE INSTRUCTIONS LS0514 INTRODUCTION Thank you for purchasing this CLARKE 2 kw oil filled radiator. Before attempting to
CERAMIC HEATER MODEL NO: DEVIL 350B 230V/110V OPERATING & MAINTENANCE INSTRUCTIONS PART NO: & ORIGINAL INSTRUCTIONS GC ISS 1
 CERAMIC HEATER MODEL NO: DEVIL 350B 230V/110V PART NO: 6920330 & 6920332 OPERATING & MAINTENANCE INSTRUCTIONS ORIGINAL INSTRUCTIONS GC1218 - ISS 1 INTRODUCTION Thank you for purchasing this CLARKE Ceramic
OPERATING & MAINTENANCE INSTRUCTIONS
 CERAMIC HEATER Model: Devil 350 Part No: 6920262 OPERATING & MAINTENANCE INSTRUCTIONS GC11/11rev1 INTRODUCTION Thank you for purchasing this CLARKE Ceramic Heater. Please read this manual thoroughly and
2.8KW ELECTRIC FAN HEATER
 2.8KW ELECTRIC FAN HEATER MODEL NO: DEVIL 2800 PART NO: 6925800 OPERATION & MAINTENANCE INSTRUCTIONS ORIGINAL INSTRUCTIONS GC0817 INTRODUCTION Thank you for purchasing this CLARKE product. Before attempting
20 LITRE DEHUMIDIFIER
 20 LITRE DEHUMIDIFIER MODEL NO: DH20 PART NO: 6470652 OPERATION & MAINTENANCE INSTRUCTIONS LS0510 INTRODUCTION Thank you for purchasing this CLARKE product. Before attempting to use this product, please
Always there to help you Register your product and get support at AC4030/00 AC4030/10 Question? Contact Philips User manual
 Always there to help you Register your product and get support at www.philips.com/welcome Question? Contact Philips AC4030/00 AC4030/10 User manual Contents 1 Important 4 Safety 4 2 Your air purifier
150MM ELECTRIC EARTH BORER
 150MM ELECTRIC EARTH BORER MODEL NO: CEA150 PART NO: 3400997 OPERATING & MAINTENANCE INSTRUCTIONS GC0915 INTRODUCTION Thank you for purchasing this CLARKE Electric Earth Borer designed for boring holes
PARAFFIN/DIESEL HEATER
 PARAFFIN/DIESEL HEATER MODEL NO: XR60 PART NO: 6931002 OPERATION & MAINTENANCE INSTRUCTIONS LS0813 INTRODUCTION Thank you for purchasing this CLARKE product. Before attempting to use this product, please
DIESEL/PARAFFIN HEATERS
 DIESEL/PARAFFIN HEATERS MODEL NO: XR80, XR110, XR160, XR210 PART NO: 6931004, 6931006, 6931008, 6931012 OPERATION & MAINTENANCE INSTRUCTIONS LS0814 INTRODUCTION Thank you for purchasing this CLARKE product.
PORTABLE AIR CONDITIONER MODEL NO: AC9000
 PORTABLE AIR CONDITIONER MODEL NO: AC9000 PART NO: 3230570 OPERATION & MAINTENANCE INSTRUCTIONS GC0113 INTRODUCTION Thank you for purchasing this CLARKE Portable Air Conditioner. Before attempting to operate
2 KW OIL FILLED RADIATOR
 This product is only suitable for well insulated spaces or occasional use. 2 KW OIL FILLED RADIATOR MODEL NO: OFR9/200 PART NO: 6934005 OPERATION & MAINTENANCE INSTRUCTIONS ORIGINAL INSTRUCTIONS LS0618
Instruction Manual FEEL THE ENERGY. FEEL THE FRESHNESS.
 Instruction Manual FEEL THE ERGY. FEEL THE ERGY. Thank you for selecting our Euroair Energie Photocatalytic Air Purifier. Please read the instruction manual carefully and keep it for future reference.
WHYNTER Eco Pure Air Purifier
 WHYNTER Eco Pure Air Purifier SB/W Instruction Manual MODEL# : AFR-300 Thank you for your purchase of this WHYNTER product. Please read this Instruction Manual carefully before using the product to ensure
900W OIL FILLED RADIATOR
 900W OIL FILLED RADIATOR MODEL NO: OFR 9/90 PART NO: 6934003 OPERATION & MAINTENANCE INSTRUCTIONS LS0710 INTRODUCTION Thank you for purchasing this CLARKE 900W oil filled radiator. Before attempting to
DUST EXTRACTOR MODEL No: CDE1000
 DUST EXTRACTOR MODEL No: CDE000 Part No:64765 OPERATING & MAINTENANCE INSTRUCTIONS GC054 INTRODUCTION Thank you for purchasing this CLARKE Dust Extractor which is intended to keep work areas free from
MODEL NO: CW2D PART NO: OPERATING & MAINTENANCE INSTRUCTIONS
 PARTS WASHER MODEL NO: CW2D PART NO: 7630910 OPERATING & MAINTENANCE INSTRUCTIONS ORIGINAL INSTRUCTIONS GC0318 REV INTRODUCTION Thank you for selecting this CLARKE Parts Washer. Before using the product,
HOT AIR GUN MODEL NO: CHG1500D USER INSTRUCTIONS PART NO: GC0414
 HOT AIR GUN MODEL NO: CHG1500D PART NO: 3400757 USER INSTRUCTIONS GC0414 INTRODUCTION Thank you for purchasing this CLARKE Hot Air Gun. Before attempting to use this product, please read this manual thoroughly
Always there to help you. Register your product and get support at AC4373 AC4375. Question? Contact Philips.
 Always there to help you Register your product and get support at www.philips.com/welcome Question? Contact Philips AC4373 AC4375 User manual Contents 1 Important 4 Safety 4 10 Notices 22 Electromagnetic
OPERATING & MAINTENANCE INSTRUCTIONS
 PARTS WASHER MODEL NO: CW1D PART NO: 7630900 OPERATING & MAINTENANCE INSTRUCTIONS ORIGINAL INSTRUCTIONS GC0318 REV 4 INTRODUCTION Thank you for selecting this CLARKE Parts Washer. Before using the product,
Model No: Little Devil II (inc ss)
") GAS HEATER Model No: Little Devil II (inc ss) PART NO: 6926020, 6926025 (SS) OPERATION & MAINTENANCE INSTRUCTIONS LS1213 INTRODUCTION Thank you for purchasing this CLARKE Gas Heater. Before attempting
GAS HEATER Model No: Little Devil II (inc ss) PART NO: 6926020, 6926025 (SS) OPERATION & MAINTENANCE INSTRUCTIONS LS1213 INTRODUCTION Thank you for purchasing this CLARKE Gas Heater. Before attempting
HEPA Air Purifier with Ion Flow Technology
 SPECIFICATION Input voltage: AC120V 60Hz Rated power: 57W HEPA type: 99.5% Ideal area: 269 sq. ft. Noise level (dba): High 48 / Med 39 / Low 28 Wind capacity (CFM): Strong 115 / Middle 74 / Silent 50 Unit
Please read this manual carefully before use to ensure proper usage and save
 DEAR CUSTOMER Please read this manual carefully before use to ensure proper usage and save The package includes: User Manual Note: CONTENTS SAFETY INSTRUCTIONS 1 PRODUCT DIAGRAM 2 SPECIFICATIONS 2 PURIFICATION
OPERATION & MAINTENANCE INSTRUCTIONS
 SUBMERSIBLE PUMPS MODEL NO: PSV3A, PSV4A, PSSV2A & PVP11A PART NO: 7236042, 7236044, 7236050 & 7236060 OPERATION & MAINTENANCE INSTRUCTIONS ORIGINAL INSTRUCTIONS GC07/17 iss 4 INTRODUCTION Thank you for
Owners Manual Model: XXL
 Corporate Office 200, 11246-163 St. Edmonton AB T5M 1Y6 Phone: 780-930-1100 Fax: 780-930-1125 Toll Free: 1-877-528-2010 www.zephyrairsystems.com AIR PURIFIER E356005 Owners Manual Model: XXL Maintenance
BestAir. Instruction manual
 BestAir www.bestair.me Instruction manual Congratulations on your new air purifier BestWater thanks you for your purchase. You have made a good choice by having selected our product. We hope that you enjoy
BestAir. Instruction manual
 BestAir www.bestair.me Instruction manual Congratulations on your new air purifier BestWater thanks you for your purchase. You have made a good choice by having selected our product. We hope that you enjoy
with plasma ioniser and Remote Control USER MANUAL
 EAP145H True HEPA / Activated Carbon Air Purifier with plasma ioniser and Remote Control USER MANUAL Thank you for choosing this innovative ElectrIQ Air Purifier Please read this user manual before using
SUBMERSIBLE DIRTY WATER PUMP
 SUBMERSIBLE DIRTY WATER PUMP MODEL NO: DWP100A, DWP150A, DWP200A PART NO: 7230098, 7230099, 7230100 OPERATION & MAINTENANCE INSTRUCTIONS ORIGINAL INSTRUCTIONS LS1117 - ISS 2 INTRODUCTION Thank you for
3 In 1 AIR CONDITIONER with REMOTE CONTROL MODEL NO: CA9000 PART No: OPERATION & MAINTENANCE INSTRUCTIONS
 3 In 1 AIR CONDITIONER with REMOTE CONTROL MODEL NO: CA9000 PART No: 32305600 OPERATION & MAINTENANCE INSTRUCTIONS 0304 Parts List Item Part No Description Qty 1 FT900001 Top Cover 1 2 FT900002 Filter
3KW ELECTRIC FAN HEATER
 3KW ELECTRIC FAN HEATER MODEL NO: DEVIL 7003 PART NO: 6935452 OPERATION & MAINTENANCE INSTRUCTIONS LS0615 INTRODUCTION Thank you for purchasing this CLARKE product. Before attempting to use this product,
7. CARE AND MAINTENANCE
 EAP100D Ultra Quiet Air Purifier with room temperature and humidity display three stage filtration technology HEPA / activated carbon / plasma ioniser USER MANUAL Thank you for choosing this innovative
OWNER S MANUAL. Air Purifiers ROOM AIR PURIFIER. Operating and Servicing Instructions IMPORTANT: READ CAREFULLY BEFORE ASSEMBLY AND USE
 OWNER S MANUAL Operating and Servicing Instructions ROOM AIR PURIFIER Air Purifiers Questions or concerns? For assistance, please call Customer Service ClimateRight USA 808 Rhoads Ave Columbus, OH 43205
Air Purification System. Instruction Book CLI-AP20
 Air Purification System Instruction Book CLI-AP20 by Contents 2 Cli-Mate Recommends Safety First 6 Components 7 Functions 10 Care & Cleaning 11 Troubleshooting CLI-MATE RECOMMENDS SAFETY FIRST At Cli-Mate
ORIGINAL INSTRUCTIONS
 WARNING: Read the instructions before using the machine. POWER WASHER MODEL NO: JETSTAR 1950 PART NO: 7336010 OPERATION & MAINTENANCE INSTRUCTIONS ORIGINAL INSTRUCTIONS LS0617 - ISS 3 INTRODUCTION Thank
DEVIL CERAMIC SPACE HEATERS
 DEVIL CERAMIC SPACE HEATERS Devil 330 Part Nos: 6920264 (110V) & 6920265 (230V) OPERATING & MAINTENANCE INSTRUCTIONS GC0310 INTRODUCTION Thank you for purchasing this CLARKE Ceramic Space Heater. Please
OVHM80 Max Air Purifier
 OVHM80 Max Air Purifier Index Important Safeguards.. 2 Air purifier Description..3 Function Description. 4 How to use..5 Maintenance 6 Troubleshooting..8 1 Important Safeguards! READ ALL INSTRUCTIONS BEFORE
OPERATING INSTRUCTIONS
 EN AIR PURIFIER OPERATING INSTRUCTIONS Read the instructions carefully before operating or servicing the air purifier. Observe all the safety instructions; failure to observe the instructions may lead
AIR PURIFIER WITH GERMICIDAL UV LIGHT
 Adorable Air Purifiers AIR PURIFIER WITH GERMICIDAL UV LIGHT FOR THE FOLLOWING MODELS : EE-5064 EE-5065 PLEASE READ AND SAVE ALL INSTRUCTIONS TO ENSURE THE SAFE AND EFFECTIVE USE OF THIS AIR PURIFIER.
INFRARED DIESEL HEATER
 INFRARED DIESEL HEATER MODEL NO: DEVIL IRD20B PART NO: 6925500 OPERATION & MAINTENANCE INSTRUCTIONS ORIGINAL INSTRUCTIONS GC0717 iss.1 INTRODUCTION Thank you for choosing this Clarke Infrared Heater which
PARTS WASHER Model: CW2D Part No:
 PARTS WASHER Model: CW2D Part No: 7630910 OPERATING & MAINTENANCE INSTRUCTIONS GC01/12 INTRODUCTION Thank you for purchasing this CLARKE Parts Washer. Before using the product, be sure to read these instructions
LOCK H M L REPLACE SLEEPING ANTI-POLLEN IONIZER UV-LAMP. User Manual
 LOCK H M L REPLACE SLEEPING ANTI-POLLEN IONIZER UV-LAMP User Manual Congratulations on your purchase of Euroair Detox Air Purifier from Eureka Forbes. We encourage you to read this manual carefully for
Coway Air Purifier AP-1008DH
 Coway Air Purifier AP-1008DH This product is for domestic use only.it cannot be used in an overseas country where the power voltage is different. Warranty card is included in this user s manual. Read and
PRESSURE WASHER MODEL NO: JETSTAR 1750 OPERATION & MAINTENANCE INSTRUCTIONS. WARNING Read the instructions before using the machine PART NO:
 WARNING Read the instructions before using the machine PRESSURE WASHER MODEL NO: JETSTAR 1750 PART NO: 7333230 OPERATION & MAINTENANCE INSTRUCTIONS LS0711 INTRODUCTION Thank you for purchasing this CLARKE
PARTS WASHER Model: CW1D Part No:
 PARTS WASHER Model: CW1D Part No: 7630900 OPERATING & MAINTENANCE INSTRUCTIONS GC01/12 INTRODUCTION Thank you for purchasing this CLARKE Parts Washer. Before using the product, be sure to read these instructions
MeacoClean CA-HEPA 119x5 Air Purifier
 MeacoClean CA-HEPA 119x5 Air Purifier Thank you for choosing Meaco, we really do appreciate it INSTRUCTION MANUAL [EN] CA-HEPA 119x5 SAFETY INFORMATION ATTENTION This air purifier must not be used in rooms
INSTRUCTION MANUAL. Remember to register your air purifier at: Multi-Tech 8500 Air Purifier
 Remember to register your air purifier at: www.surroundair.com/register/ INSTRUCTION MANUAL Multi-Tech 8500 Air Purifier HEPA Activated Carbon Germ-Killing UV Lamp Photocatalytic Oxidation Ionizer Toll
TPP440. owner s guide. air purifier with uv light. air purifier with uv light TP
 TPP TPP air purifier with uv light air purifier with uv light TP-052511 by owner s guide by table of contents SAFETY INSTRUCTIONS 2 Thank you for purchasing the Therapure air purifier. With UV germicidal
PUDDLE PUMP PUDDLE PUMP. MODEL No: PSP125 OPERATION & MAINTENANCE INSTRUCTIONS. Part No:
 PUDDLE PUMP PUDDLE PUMP MODEL No: PSP125 Part No: 7230692 OPERATION & MAINTENANCE INSTRUCTIONS 1007 SPECIFICATIONS Model number... PSP125 Rated voltage... 230VAC 50Hz Input power... 293 Watts Maximum delivery
BEFORE OPERATING, READ ALL INSTRUCTIONS IN THIS MANUAL CAREFULLY.
 WARNING:To reduce the risk of electric shock, this equipment has a grounding type plug that has a third (grounding) pin. This plug will only fit into a grounded power outlet. If the plug does not fit into
User Manual Manual del usuario Guide d utilisation. Blueair 400 Series
 User Manual Manual del usuario Guide d utilisation Blueair 400 Series Contents 3 Welcome 4 Getting started 7 Getting the most from your Blueair system 8 Changing the filter 9 Filters 2 Blueair 400 Series
DESCRIPTION OF THE APPLIANCE SAFETEY OPERATION CAUTION MAJOR COMPONENTS. Features
 048-GM-486 SAFETEY OPERATION DESCRIPTION OF THE APPLIANCE Please exercise caution when using this air purifier or any other electrical device! This manual describes the safety precautions which should
Mobile Air Conditioner Instruction Manual Model TC-N9KM
 Mobile Air Conditioner Instruction Manual Model TC-N9KM Please read and retain these instructions for future reference SPECIFICATION Model no. Cooling capacity Power/Ampere consumption for cooling* Air
Welcome to a Healthy Home
 Welcome to a Healthy Home ALLERGY9550 READ AND SAVE THESE INSTRUCTIONS 1 2 Trusted solutions for a healthy home. Delivering healthier indoor air has been our business since 1954. For over 60 years, HVAC
Model: AW600. Triple Action Humidifier. Winix Inc. 120 Prairie Lake Road U nit E East Dundee, IL USA
 To Buy: Visit www.sylvane.com or call (800) 934-9194 For Product Support: Contact Winix America at 847-551-9900 Triple Action Humidifier Model: AW600 This marking shown on the product or its literature,
FUNCTIONS AND FEATURES CONTROL PANEL AND OPERATION CLEANING AND MAINTENANCE SAFETY INSTRUCTIONS... 7 PRODUCT SPECIFICATION...
 Thank you for purchasing the Ionmax ION310 Air Purifier. The ION310 can help to improve the indoor air quality in your home or office. Please read this manual carefully before use to ensure proper usage
THANK YOU FOR PURCHASING THE LV-PUR131 TRUE HEPA AIR PURIFIER BY LEVOIT. GET STYLE #LevoitLove #LevoitLifestyle
 Model: LV-PUR131 True HEPA Air Purifier Questions or Concerns? Questions or Concerns? Please contact us Monday - Friday 9:00 am - 5:00 pm PST PST Please contact us Mon-Fri 9:00AM-5:00PM at at (888) 726-8520.
ELECTRIC FAN HEATERS Devil 6002, 6003, 6005, 6009 & 6015
 ELECTRIC FN HETERS Devil 600, 6003, 6005, 6009 & 605 Part Nos: 6958, 6950, 6955, 69530 & 69535 OPERTING & MINTENNCE INSTRUCTIONS GC077 - ISS 7 INTRODUCTION Thank you for purchasing this CLRKE Electric
Coway Air Purifier AP-1008BH/CH
 Coway Air Purifier AP-1008BH/CH This product is for domestic use only.it cannot be used in an overseas country where the power voltage is different. Warranty card is included in this user s manual. Read
DXAPV3N. Air Purifier. With. Enviro-neutralising Technology DXAPV3N
 DXAPV3N Air Purifier With Enviro-neutralising Technology DXAPV3N WARNING: Please read before use these instructions and keep them for future reference. SAFETY WARNINGS ATTENTION! This unit is regarded
Blueair Pro User Manual
 Blueair Pro User Manual Innovated with Love in Sweden Pro XL Contents Welcome 4 The Blueair Pro Series Air Purifiers 5 Getting the Most from Your Blueair System 6 Pro L Getting Started 7 Settings 8 Care
USERS MANUAL. Desiccant Dehumidifier. Model: ECO DD322FW CLASSIC
 keeping your home safe and clean USERS MANUAL Desiccant Dehumidifier Model: ECO DD322FW CLASSIC Read This Manual Inside you will find many helpful hints on how to use and maintain your dehumidifier properly
USER MANUAL EAP120HC. Unit 2, The Nursery Berristow Lane South Normanton Derbyshire, DE55 2FX
 ElectrIQ UK SUPPORT www.electriq.co.uk/support Please, for your own convenience, check the troubleshooting guide before calling the service line. If the unit still fails to operate call: 0871 620 1057
SECURITY LIGHT MODEL NO: CL6PIR OPERATION INSTRUCTIONS PART NO: GC0215
 SECURITY LIGHT MODEL NO: CL6PIR PART NO: 4003535 OPERATION INSTRUCTIONS GC0215 INTRODUCTION Thank you for purchasing this CLARKE Security Light with motion sensor. The motion sensor is a small electronic
CEMENT MIXER MODEL NO: CCM134L OPERATION & MAINTENANCE INSTRUCTIONS PART NO: GC0514
 CEMENT MIXER MODEL NO: CCM134L PART NO: 3400862 OPERATION & MAINTENANCE INSTRUCTIONS GC0514 INTRODUCTION Thank you for purchasing this CLARKE Cement Mixer. Before attempting to use this product, please
Blueair Sense+ User Manual
 Blueair Sense+ User Manual The intelligent, Wi-Fi enabled Blueair Sense+ cleans your indoor air completely five times in an hour, turning any room up to 18 square meters (194 square feet) into a healthy
USE & CARE INSTRUCTIONS
 USE & CARE INSTRUCTIONS InvisiClean Aura Air Purifier (Model IC-5018) with Pre-filter, Activated Charcoal, True HEPA, UV-C Light, and Ionizer READ AND SAVE THESE INSTRUCTIONS WARNINGS Failure to comply
FR EN NL DE ES PT IT TR RU UK
 FR EN NL DE ES PT IT TR RU UK PU2120 INTENSE PURE AIR NC00113345/03-24/13 1 9 7 8 2 3 4 5 6 EN Read the instructions for use and safety instructions carefully before use and keep them. OPERATING PRINCIPLE
Surgically Clean Air Inc.
 ELECTRONIC AIR PURIFIER OPERATIONAL MANUAL Model No. SCA4000R WARNING: This unit cannot be used in an atmosphere containing Explosive dust, gas or oxygen, or in an area where flammable dust is present.
PORTABLE AIR CONDITIONER MODEL NO: AC7000
 PORTABLE AIR CONDITIONER MODEL NO: AC7000 PART NO: 3230565 OPERATION & MAINTENANCE INSTRUCTIONS GC1214 INTRODUCTION Thank you for purchasing this CLARKE Portable Air Conditioner. Before attempting to operate
Academy The Straightener IM.indd 1 24/06/ :10. Instruction Manual LSHS16
 Academy The Straightener IM.indd 1 24/06/2016 11:10 Instruction Manual LSHS16 Using advanced technology, The Straightener is ready to use in just 10 seconds. With an ultra-fast even heat up thanks to the
PA / PA-PRO PORTABLE AIR PURIFIER Instruction Manual
 PA - 777 / PA-PRO PORTABLE AIR PURIFIER Instruction Manual PA-777 Model Shown PA-PRO Model Shown Residential / Light Commercial Air Purification Unit Thank you for selecting PetAirapy for your pets, your
instructions for use Air Purifier with ionizer _00/
 Instructions for use Air Purifier with Ionizer 5713710041_00/07.12 H T S R Q L P N O M I H A B C D E U F G Fig. 2 Fig. 3 Fig. 4 2 introduction Thank you for choosing a De Longhi product. Please take a
AirPurifier LET S GET STARTED ACAMV101
 AirPurifier LET S GET STARTED ACAMV101 LET'S TALK SAFETY Basic Safety Precautions This appliance is intended for household use only and NOT for commercial or industrial use. Only use the appliance indoors
GAS HEATERS MODEL NOS: DEVIL 700, 900/910SS,1600/ 1610SS & 2100 PART NOS: , , , , , &
 GAS HEATERS MODEL NOS: DEVIL 700, 900/910SS,1600/ 1610SS & 2100 PART NOS: 6920182, 6920186, 6920188, 6920190, 6920192, &6920194 USER INSTRUCTIONS ORIGINAL INSTRUCTIONS GC0318 iss2 INTRODUCTION Thank you
THANK YOU FOR PURCHASING THE LV-H133 TOWER HEPA AIR PURIFIER BY LEVOIT! GET STYLE #LevoitLove #LevoitLifestyle
 Model No.: LV-H133 Tower HEPA Air Purifier Questions or Concerns? Please contact us Monday - Friday 9:00 am - 5:00 pm PT at support@levoit.com or (888) 726-8520. THANK YOU FOR PURCHASING THE LV-H133 TOWER
5KW ELECTRIC FAN HEATER
 5KW ELECTRIC FAN HEATER MODEL NO: DEVIL 7005 PART NO: 6935452 OPERATION & MAINTENANCE INSTRUCTIONS LS0615 INTRODUCTION Thank you for purchasing this CLARKE product. Before attempting to use this product,
ELECTRIC FAN HEATERS Devil 6002, 6003, 6005, 6009 & 6015
 ELECTRIC FN HETERS Devil 600, 6003, 6005, 6009 & 605 Part Nos: 6958, 6950, 6955, 69530 & 69535 OPERTING & MINTENNCE INSTRUCTIONS GC0 INTRODUCTION Thank you for purchasing this CLRKE Electric Fan Heater.
Warranty. Hello! Owner s manual. Return this card now for: Models: Registration Card. Ultra Quiet Air Purifier
 Ultra Quiet Air Purifier Hello! w w w.rabbitair.com Rabbit Air* 201 West Garvey Ave., Suite 102-168 Monterey Park, CA, 91754-7418 fold here Please fold and seal with tape before mailing. Do not staple.
Clean Air Optima HEPA UV ionizer air purifier CA-508
 Clean Air Optima HEPA UV ionizer air purifier CA-508 Manual Read these instructions carefully before you start using the air purifier and keep the manual for later usage. Copyright : Clean Air Optima 1
TOWER AIR PURIFIER FOR THE FOLLOWING MODEL : EE-5067
 TOWER AIR PURIFIER FOR THE FOLLOWING MODEL : EE-5067 If you have any questions about the operation of your purifier, please contact Crane Customer Care. Toll Free: 888-599-0992 Email: customer-service@crane-usa.com
MOBILE PARTS WASHER MODEL No: CWM20
 MOBILE PARTS WASHER MODEL No: CWM20 Part No: 7630925 OPERATING & MAINTENANCE INSTRUCTIONS GC0514 INTRODUCTION Thank you for purchasing this CLARKE mobile parts washer. Before use, please read this instruction
USER S MANUAL AQV09V A Series AQV12V A Series AQV18V A Series AQV24V A Series
 USER S MANUAL AQV09V A Series AQV12V A Series AQV18V A Series AQV24V A Series ENGLISH FRANÇAIS ESPAÑOL Split - type Air Conditioner (Cooling and Heating) E S F DB98-27559A(1) Contents PREPARATION Safety
Triple Action Humidifier Model: AW600
 Triple Action Humidifier Model: AW600 Thank you for purchasing this WINIX product Read and follow all safety rules and instructions before operating this equipment. Please keep this manual for future reference.