INSTALLATION AND OPERATION MANUAL
|
|
|
- Corey Hodge
- 6 years ago
- Views:
Transcription


1 5000 INSTALLATIONANDOPERATIONMANUAL SafetytestedaccordingtoULCS627, UL1482andASTME1509byIntertek TestingServicesandaccordingtoOregon AdministrativeRulesforMobileHomes through CONTACT LOCAL BUILDING OR FIRE OFFICIALS ABOUT RESTRICTIONS AND INSTALLATION INSPECTIONREQUIREMENTSINYOURAREA. PLEASE READ THIS ENTIRE MANUAL BEFORE INSTALLATION AND USE OF THIS PELLET FUEL BURNING ROOM HEATER. FAILURE TO FOLLOW THESE INSTRUCTIONS COULD RESULT IN PROPERTYDAMAGE,BODILYINJURYOREVENDEATH. StoveBuilderInternationalInc. 250,ruedeCopenhague,StAugustindeDesmaures(Quebec)CanadaG3A2H3 Tel:(418) Fax:(418) Thismanualisavailableforfreedownloadonthemanufacturer swebsite.itisacopyrighted document.resaleisstrictlyprohibited.themanufacturermayupdatethismanualfromtimeto time and cannot be responsible for problems, injuries, or damages arising out of the use of informationcontainedinanymanualobtainedfromunauthorizedsources. READANDKEEPTHISMANUALFORREFERENCE PrintedinCanada 45548A
2 5000PelletStoveInstallationandOperationManual THANKYOUFORCHOOSINGTHISOSBURNPELLETSTOVE As one of North America s largest and most respected pellet stove, wood stove and fireplace manufacturers, Stove Builder International takes pride in the quality and performance of all its products.wewanttohelpyougetmaximumsatisfactionasyouusethisproduct. Inthepagesthatfollowyouwillfindgeneraladviceonpelletheating,detailedinstructionsforsafe andeffectiveinstallation,andguidanceonhowtogetthebestperformancefromthisstoveasyou buildandmaintainyourpelletheatingsystem. We highly recommend that our pellet burning hearth products be installed and serviced by professionals who are certified in the United States by NFI (National Fireplace Institute ) or in Canada by WETT (Wood Energy Technology Transfer) or in Quebec by APC (Association des ProfessionnelsduChauffage). Congratulationsonmakingawisepurchase. REGISTERYOURWARRANTYONLINE Toreceivefullwarrantycoverage,youwillneedtoshowevidenceof thedateyoupurchasedyourstove.keepyoursalesinvoice.wealso recommendthatyouregisteryourwarrantyonlineat: Registeringyourwarrantyonlinewillhelpustoquicklytrackthe informationweneedaboutyourstove. 2
3 5000PelletStoveInstallationandOperationManual Tableofcontents 1 INTRODUCTION About Pellet Heating Top 10 Reasons for Buying a Pellet Stove Specifications Overall Exterior Dimensions... 7 PART A INSTALLATION Installation Safety Information Installation Warnings, Cautions and Recommendations Regulations Covering Pellet Stove Installation Before Operating Your Stove Clearances to Combustible Material Location of the Certification Label Minimum Clearances to Combustibles Back Wall Installation Corner Installation Ceiling Clearances Floor Protection Venting system General Recommendations Equivalent Vent Length (EVL) Termination Location Permitted Termination Location Installation Configurations Installation Warnings, Cautions and Recommendations Reminder Through Wall Installation (Main Floor or Basement) Through Roof Installation Through a Prefabricated Chimney Through an Existing Masonery Fireplace Through an Existing Masonery Chimney PART B - OPERATION General information Operation Warnings, Cautions and Recommendations Zone Heating and How to Make It Work for You Combustible Proper Fuel Where to Store Bags of Pellets Stove controls General Information LCD Touch Screen Controls, Operation and Configuration Configuration and Operation Diagram Selecting the Language Viewing Statistics Changing Temperature Unit (F or C) Adjusting the Combustion Level (Heat Output) Convection Fan Speed Reduction (Optional) Selecting Manual or Thermostat Mode Selecting the Pilot Cycle Filling or Purging Auger Housing
4 5000PelletStoveInstallationandOperationManual 7 Stove operation First Startup Everyday Startup Running Out of Pellets Refilling Shutting Down Procedure Signs of an Overheating Stove MAINTENANCE Stove Maintenance Recommended Maintenance Schedule Cleaning the Baffle, the Heat Exchangers and the Combustion Chamber Cleaning the Burn Pot Ash Removal Cleaning the Air Wash System Glass Care Replacement of Broken Door Glass Door Gasket Maintenance Door Adjustment Exhaust Channel and Exhaust Blower Maintenance Venting System Maintenance Dealing With a Chimney Fire Soot and Fly Ash Troubleshooting Validating Status Testing Components Main Error Codes, Possible Causes and Solutions Wiring diagram Fuses access Component location Exploded View And Replacement Parts APPENDIX A: HORIZONTAL AND VERTICAL VENT CHART APPENDIX B: LCD SLIDING BRACKET MOUNTING APPENDIX C: FLAME CARACTERISTICS APPENDIX D: INSTALLING A THERMOSTAT APPENDIX E: MOBILE HOME INSTALLATION APPENDIX F: COMBUSTION AIR SUPPLY Appendix G: Installing the Door Overlay OSBURN LIMITED LIFETIME WARRANTY
5 5000PelletStoveInstallationandOperationManual 1 INTRODUCTION 1.1 ABOUTPELLETHEATING Pelletstovesofferadramaticimprovementintheconvenienceofheatingwithsolidfuel.Wood pelletsarehandledinbagsandarethereforeeasilyandcleanlystored.asingleloadingofapellet stovecanprovidelonghoursofwarmth.pelletstovesalsoprovideaspecialcomfortassociated withwoodburning.thecombinationoffansdeliveringwarmaircurrentsandthedirectcomfort ofradiantheatprovidesspecialsatisfactiononacoldwinterday.theheatprovidedisevenand constant,duetotheautofuelfeedrespondingtoownersettings.pelletstovesalsoofferstrong environmentalbenefits;pelletsnotonlyreducedependenceonfinitesuppliesoffossilfuelslikeoil and gas, but they also put to good use materials that would otherwise unnecessarily and expensivelyaddtoourwastedisposalproblems. Inaddition,pelletstovesburnverycleanlyandofferthelowestemissionsofunwantedpollutants ofallsolidfuelburningappliances TOP10REASONSFORBUYINGAPELLETSTOVE Fuelisrelativelycheap,easytohandleandstore Installationisrelativelyinexpensiveandflexible Canbethermostaticallycontrolled Canrunforlonghourswithouttheneedtorefuel Heatoutputissteadybecausefuelfeedisregulated Providespowerfulconvectionheat Hasthelowestemissionsofallsolidfuels Reducesourdependenceonfossilfuels Pelletsarearenewablefuel Woodpelletsaremadeof100%residualmatter(sawdust).Thiscreatesaddedvaluefrom wastethatwouldotherwiseendupinalandfill. 5
6 5000PelletStoveInstallationandOperationManual SPECIFICATIONS FuelType Woodpellets,WoodandHaypellets,Barkpelletsand SwitchGrasspellets. TestStandards(safety) ULCS627,ASTME1509andUL1482 Heatingcapacityrange* 500to2400sqft(46to223m 2 ) InputBTUrange** From8500BTUto50000BTU Hoppercapacity** 70lb(32Kg) EPAStatus <2.5g/h ApproximateBurnTime* 13to40hours ShippingWeight 390lb(177kg) OverallExteriorDimensions 235/8 Wx317/8 Dx3513/16 H (600mmx799mmx909mm) Ventsystemsize 3 or4 dependingonevl(seesection4.3equivalentvent Length(EVL)) Bafflematerial StainlessSteel Burnrate 1.5lbto5.5lbperhour Energyconsumption 3Aforignitioncycle 1.8Aformaximumcontinuousoperation Electricalrequirements 120VAC15A Controlboardfuses Main:7.5A250Vfastblowfuse Convectionblower:5A250Vfastblowfuse Combustionblower:3A250Vfastblowfuse Exhaustblower:3A250Vfastblowfuse Augermotor#1:3A250Vfastblowfuse Augermotor#2:3A250Vfastblowfuse Igniter:5A250Vfastblowfuse *Burntimeandheatingcapacitymayvarysubjecttolocationinhome,chimneydraft,chimney diameter,locality,heatlossfactors,climate,fuelsandothervariables. **Thiscanvarydependingonpelletsize,length,anddiameter.
7 5000PelletStoveInstallationandOperationManual 1.3 OVERALLEXTERIORDIMENSIONS B B A:FRESHAIRINTAKEB:EXHAUST 7
8 5000PelletStoveInstallationandOperationManual PARTA INSTALLATION 2 INSTALLATIONSAFETYINFORMATION 2.1 INSTALLATIONWARNINGS,CAUTIONSANDRECOMMENDATIONS PROFESSIONNALINSTALLATIONISHIGHLYRECOMMENDED. YOUMAYNEEDTOOBTAINABUILDINGPERMITFORTHEINSTALLATIONOFTHISSTOVEAND ITS VENTING SYSTEM. CONSULT YOUR MUNICIPAL BUILDING DEPARTMENT OR FIRE DEPARTMENT BEFORE INSTALLATION TO DETERMINE THE NEED TO OBTAIN ONE. WE RECOMMENDTHATYOUALSOINFORMYOURHOMEINSURANCECOMPANYTOFINDOUTIF THEINSTALLATIONWILLAFFECTYOURPOLICY. THIS STOVE MUST BE CONNECTED TO A STANDARD 120V. 60 HZ GROUNDED ELECTRICAL OUTLET.DONOTUSEANADAPTERPLUGORSEVERTHEGROUNDINGPLUG.DONOTROUTE THEELECTRICALCORDUNDERNEATH,INFRONTOROVERTHESTOVE. IF THIS STOVE IS NOT PROPERLY INSTALLED,A HOUSE FIRE MAY RESULT. TO REDUCE THE RISKOFFIRE,FOLLOWTHEINSTALLATIONINSTRUCTIONSEXACTLY. BURNINGANYSOLIDFUELSGENERATESCARBONMONOXIDEINLOWCONCENTRATION.THIS GAS IS EVACUATED BY THE VENTING SYSTEM. IN HIGHER CONCENTRATIONS, CARBON MONOXIDE IS TOXIC AND MAY CAUSE DEATH. TO PREVENT THIS, ENSURE THAT YOUR VENTINGSYSTEMISAIRTIGHT. THISSTOVEISMOBILEHOMEAPPROVEDANDREQUIRESINSTALLATIONOFAFRESHAIRKIT, SOLD SEPARATELY. THE STOVE MUST BE ATTACHED TO THE STRUCTURE OF THE MOBILE HOME AND THE STRUCTURAL INTEGRITY OF THE MOBILE HOME FLOOR, WALL, AND CEILING/ROOFMUSTBEMAINTAINED.DONOTINSTALLINASLEEPINGROOM. THISSTOVEISNOTRECOMMENDEDTOBEINSTALLEDINASLEEPINGROOM. THIS STOVE HAS BEEN DEVELOPED AND BUILT FOR RESIDENTIAL SUPPLEMENTARY HEAT SOURCE. COMMERCIAL AND INDUSTRIAL USE IS PROHIBITED AND WILL VOID THE WARRANTY. THE INFORMATION GIVEN ON THE CERTIFICATION LABEL AFFIXED TO THE STOVE ALWAYS OVERRIDES THE INFORMATION PUBLISHED IN ANY OTHER MEDIA (OWNER S MANUAL, CATALOGUES,FLYERS,MAGAZINESAND/ORWEBSITES). CONNECTTHISSTOVEONLYTOALISTEDPELLETVENTFORUSEWITHSOLIDFUELORTOA LINEDCHIMNEYCONFORMINGTONATIONALANDLOCALBUILDINGCODES. 8
9 5000PelletStoveInstallationandOperationManual DO NOT CONNECT THIS STOVE TO ANY OTHER EXISTING VENTING SYSTEM SERVING ANOTHERAPPLIANCE. DONOTCONNECTTOORUSEINCONJUNCTIONWITHANYAIRDISTRIBUTIONDUCTWORK. THE VENTING SYSTEM MUST BE COMPLETELY AIRTIGHT AND PROPERLY INSTALLED. ALL VENT CONNECTOR JOINTS MUST BE SEALED AND FASTENED IN ACCORDANCE WITH THE PELLET VENT MANUFACTURER'S INSTRUCTIONS TO ENSURE CONSISTENT PERFORMANCE ANDAVOIDSMOKEANDASHSPILLAGE. THEVENTINGSYSTEMSHOULDBECHECKED,ATLEASTTWICEAYEARFORANYBUILDUPOF SOOTORCREOSOTE. NEVERBLOCKANYLOUVERSOFTHESTOVE. IF REQUIRED, A FRESH AIT KIT CAN BE INSTALLED TO SUPPLY COMBUSTION AIR TO THE ROOMORSPACE(seeAppendixF:CombustionAirSupply). MIXING OF APPLIANCE COMPONENTS FROM DIFFERENT SOURCES OR MODIFYING COMPONENTSISPROHIBITEDANDWILLVOIDTHEWARRANTY. ANY MODIFICATION OF THE STOVE THAT HAS NOT BEEN APPROVED IN WRITING BY THE TESTING AUTHORITY IS PROHIBITED AND VIOLATES CSA B365 (CANADA), AND ANSI NFPA 211(USA). STOVE BUILDER INTERNATIONAL INC. (SBI) GRANTS NO WARRANTY, IMPLIED OR STATED, FORTHEPOORINSTALLATIONORLACKOFMAINTENANCEOFYOURSTOVEANDASSUMES NORESPONSIBILITYOFANYCONSEQUENTIALDAMAGES. 9
10 5000PelletStoveInstallationandOperationManual 2.2 REGULATIONSCOVERINGPELLETSTOVEINSTALLATION Wheninstalledandoperatedasdescribedintheseinstructions,thispelletstoveissuitableforuse asafreestandingheaterinresidentialinstallations. InCanada,theCSAB365InstallationCodeforSolidFuelBurningAppliancesandEquipmentand thecsac22.1canadiannationalelectricalcodearetobefollowedintheabsenceoflocalcode requirements.intheusa,theansinfpa211standardforchimneys,fireplaces,ventsandsolid FuelBurningAppliancesandtheANSINFPA70NationalElectricalCodearetobefollowedinthe absenceoflocalcoderequirements. ThisstovemustbeconnectedtoapelletventsystemcomplyingwiththerequirementsforPellet VentinthestandardsUL103,ULCS629M,ULCS609andUL641ortoacodeapprovedmasonry chimneywithastainlesssteelflueliner. 2.3 BEFOREOPERATINGYOURSTOVE Someminorinstallationandadjustmentarerequiredpriortouse: If desired, LCD sliding support can be installed on the left at the back of the stove; (see AppendixB:LCDSlidingBracketMounting). Thehandleanddoormustbeadjusted;(seesection8.1.9DoorAdjustment) Thestovemustbeleveledusingthreadedlegs; Thedecorativepanelsmustbeinstalled;(Refertodecorativepanelsinstructionsheet) Thedooroverlaymustbeinstalledonthedoorframeasshown(seeAppendixG:Installingthe DoorOverlay). Makesurethefreshairintakebackdraftshutterworksfreely. 10
11 5000PelletStoveInstallationandOperationManual 3 CLEARANCESTOCOMBUSTIBLEMATERIAL Theclearancesshowninthissectionhavebeendeterminedbytestaccordingtoproceduresset outinsafetystandardsulcs627(canada),astme1509(u.s.a).whenthepelletstoveisinstalled sothatitssurfacesareat,orbeyond,theminimumclearancesspecified,combustiblesurfaceswill notoverheatundernormalandevenabnormaloperatingconditions. WARNING: NO PART OF THE STOVE MAY BE LOCATED CLOSER TO COMBUSTIBLES THAN THE MINIMUMCLEARANCESSPECIFIEDONTHECERTIFICATIONLABEL. CAUTION:NOPARTOFTHEPELLETVENTSYSTEMMAYBELOCATEDCLOSERTOCOMBUSTIBLES THANTHEMINIMUMCLEARANCESSPECIFIEDBYTHEVENTMANUFACTURER. CAUTION: DO NOT USE MAKESHIFT MATERIALS OR MAKE ANY COMPROMISES WHEN INSTALLINGTHISSTOVE. 3.1 LOCATIONOFTHECERTIFICATIONLABEL Since the information given on the certification label affixed to the stove always overrides the informationpublishedinanyothermedia(owner smanual,catalogues,flyers,magazinesand/or web sites), it is important to refer to it in order to have a safe and compliant installation. In addition,youwillfindimportantinformationaboutyourstove(model,serialnumber,etc.).you canfindthecertificationlabelontheinnersideofthehopperlidofthestove. 3.2 MINIMUMCLEARANCESTOCOMBUSTIBLES LETTER CLEARANCESTOCOMBUSTIBLES CANADA USA A* 3(76mm) 3(76mm) B 4(102mm) 4(102mm) C 3(76mm) 3(76mm) D Refertovent manufacturer s clearances Refertovent manufacturer s clearances I 60(1525mm) 60(1525mm) Note:Werecommendleaving24oneachsideofthestoveand12atthebackofthestovein ordertofacilitateaccessformaintenance. *Fromthefreshairintake 11
12 5000PelletStoveInstallationandOperationManual 3.3 BACKWALLINSTALLATION Forabackwallinstallation,inordertoallow the LCD sliding support to move freely and fullyextend,youshouldallowaminimumof 4(105mm)clearancefromthesidewall(B) and3(80mm)clearanceatthebackofthe stove, from the fresh air intake (A). However,ifyouwishtoinstallthestovewith minimum clearances (see table in Section 3.2 Minimum Clearances to Combustibles), itispossibletolocatethelcdtouchscreen elsewhere but within the maximum length of the Telco wire provided. You could also wanttoinstallthelcdslidingsupportonthe left side ofthe stove (see Appendix B: LCD SlidingBracketMounting). 3.4 CORNERINSTALLATION For a corner installation, in order to allow the LCD sliding supporttomovefreelyandfullyextend,youshouldallowa minimumof6¼''(160mm)clearancetotheadjacentwalls (C).However,ifyouwishtoinstallthestovewithminimum clearances(seetableinsection3.2minimumclearancesto Combustibles),itispossibletolocatetheLCDtouchscreen elsewherebutwithinthemaximumlengthofthetelcowire provided. You could also want to install the LCD sliding supportontheleftsideofthestove(seeappendixb:lcd SlidingBracketMounting). 12
13 5000PelletStoveInstallationandOperationManual 3.5 CEILINGCLEARANCES For ceiling clearances refer to the table in Section 3.2 MinimumClearancestoCombustibles. 3.6 FLOORPROTECTION Forfloorprotectionclearancesrefertothefollowingtable. FLOORPROTECTION LETTER CANADA USA E 18(460mm) 6(155mm) F N/A(USAonly) 6(155mm) G 8(205mm) N/A(Canadaonly) H 8(205mm) N/A(Canadaonly) CAUTION: THE STOVE MUST BE PLACED ON A CONTINUOUS (GROUTED JOINTS) NONCOMBUSTIBLEMATERIALSUCHASCERAMICTILE*,CEMENTBOARD,BRICK,MILLBOARDOR EQUIVALENT,ORANYOTHERAPPROVEDORLISTEDMATERIALSUITEDFORFLOORPROTECTION. *Anytypeoftilewillrequireacontinuousnoncombustiblesheetbeneathtopreventthepossibility of embers falling through to the combustible floor if cracks or separation should occur in the finishedsurface,thiswouldincludefloorprotectionforbuiltinraisedhearths.checklocalcodesfor approvedalternatives. 13
14 5000PelletStoveInstallationandOperationManual 4 VENTINGSYSTEM 4.1 GENERAL Eventhoughthechimneydraftismechanical,asuitableventingsystemwillensureanaturaldraft whichwillpreventsmokespillageinyourhomeifapoweroutageoccurs.moreover,asuitable ventingsystemconfigurationwillhelpgettingthebestefficiencyoutofyourstovewheninstalled inaccordancewiththerequiredevl(seesection4.3equivalentventlength(evl)). Eventhebeststovewillnotfunctionsafelyandefficientlyasintendedifitisnotconnectedtoa suitableventingsystem. 4.2 RECOMMENDATIONS InCanada,werecommendthatyouusealistedpelletventthatmeetstheULCS609M89/ORD C441M90 Standard. A pellet vent listed to ULC S629M is also suitable for installation with this stove. For the United States, we recommend that you use a listed pellet vent that meets the UL641 Standard.ApelletventlistedtoULC103isalsosuitableforinstallationwiththisstove. Thisstovecanbeventedinanexistingfactorybuiltormasonrychimneywiththeadditionofa stainlesssteelliner,providedthechimneyismorethan4 indiameter.thelinershouldbelisted and should meet the ULC S635/640 standard in Canada and the UL1777 standard in the USA. Refertotheinstructionsprovidedbytheventmanufacturer,especiallywhenpassingthrougha wall,ceilingorroof. 4.3 EQUIVALENTVENTLENGTH(EVL) Recommendedventingsysteminnerpipediameteris3.Usea4 pipeifyouhavemorethan15 feetofequivalentventlength(evl) TocalculatetheEVLofyourinstallation,usethefollowingconversions: Qty Typeofpipe EVLequivalent(ft) 1 90 elbowor T elbow 3 1ft Horizontalpiperun 1 1ft Verticalpiperun 0.5 NOTE:Horizontalrunsshallnotexceed9feet. NOTE:Neverexceed30feetofEVL. NOTE:Ifthestoveislocatedatanaltitudeof3,000feetormore,itisrecommendedtousea4'' ventingsysteminnerdiameteriftheelvis7feetormore. 14
15 5000PelletStoveInstallationandOperationManual HereisanexampletohelpyoucalculateEquivalentVentLength.OnthefollowingfiguretheEVL canbecalculatedlikethis: 2horizontalrunof1 =(2X1 )X1 =2 ofevl 1elbow90 or"tee"=5 ofevl 3verticallengthof4 =(3X4 )X0.5 =6 ofevl TotalEVL=( )=13. EVLislessthan15 thereforeitiscorrecttousea3 pipe. NOTE: Do not include the exterior wall termination in the EVL calculation. (45 elbow and termination) 4.4 TERMINATIONLOCATION Termination should not be located so that hotexhaustgasescanbeahazard.theycan reach temperatures of 500 ºF and cause seriousburns. CAUTION: TERMINATION COLLAR (SPARK ARRESTER)ISMANDATORY. 15
16 5000PelletStoveInstallationandOperationManual PERMITTEDTERMINATIONLOCATION Refer to NFPA 211 (USA) or CSA B365 (Canada) for rules for the distance of exit terminal from windowsandopenings.theexitterminalofamechanicaldraftsystem,otherthanadirectvent applianceshallbelocatedinaccordancewiththefollowing. Canada: Letter Min.clearances Description A 12 (30cm) Clearancesaboveadjacentgradelevel. B 39 (100cm) Clearancetowindowordoorthatmaybeopened F 0 (0cm) Clearancetooutsidecorner H I 39 (100cm) 72 (183cm) Nottobeinstalledaboveameter/regulatorassemblywithin39"(100cm) horizontallyfromtheverticalcenterlineoftheregulatorandfor15 vertically Clearancetogasserviceregulatorventoutletorwithin39 (100cm)ofanoil tankventoranoiltankfillinlet J 39 (100cm) Clearancetothecombustionairinlettoanyotherappliance K 72 (183cm) Clearancetoamechanicalairsupplyinlet L 84 (213cm) Clearanceabovepavedsidewalkorapaveddrivewaylocatedonpublic property 39 (100cm) Clearancetopropertyboundary Aventshallnotterminateunderneathaveranda,porch,ordeck 16
17 5000PelletStoveInstallationandOperationManual UnitedStates: NotLessthan36 (91cm)aboveanyforcedairinletlocatedwithin10feet(305cm); NotLessthan48 (122cm)belowethorizontallyfrom,oronefoot(30cm)above,anydoor, windoworgravityairinletintoanybuilding; NotLessthan24 (61cm)fromanadjacentbuildingandnotlessthan84 (213cm)above gradewhenlocatedadjacenttoapublicwalkway. Cannotbelocatedlessthan12inches(300mm)abovegrade. Cannot be located above a gas meter/regulator within 3 feet (900mm) horizontally of the verticalcenterlineoftheregulator. Notwithin6feet(1.8meters)ofagasserviceregulatorventoutlet. Otherrestrictionsmayapply.SeeNFPA211forfurtherinformation. 4.5 INSTALLATIONCONFIGURATIONS INSTALLATIONWARNINGS,CAUTIONSANDRECOMMENDATIONSREMINDER PROFESSIONNALINSTALLATIONISHIGHLYRECOMMENDED THISSTOVEUSESAPRESSURIZEDVENTINGSYSTEM.ALLVENTCONNECTORJOINTSMUSTBE SEALED AND FASTENED. CONSULT THE PELLET VENT MANUFACTURER S INSTRUCTION TO ENSUREPROPERINSTALLATION,CONSISTENTPERFORMANCE,ANDTOAVOIDSMOKEAND ASHSPILLAGE. USERTV,METALLICTAPE,ANDAMINIMUMOFTHREESELFTAPINGSCREWSATALLJOINT CONNECTIONSTOENSUREATIGHTSEAL. THECHIMNEYCONNECTORSHALLNOTPASSTHROUGHANATTICORROOFSPACE,CLOSET ORSIMILARCONCEALEDSPACEORFLOORSORCEILING. DONOTINSTALLAFLUEDAMPERINTHEVENTINGSYSTEMOFTHISSTOVE. INSTALLVENTINGSYSTEMATCLEARANCESSPECIFIEDBYTHEVENTMANUFACTURER. THEUSEOFASPARKARRESTERATTHEENDOFTHETERMINATIONISMANDATORY. 17
18 5000PelletStoveInstallationandOperationManual THROUGHWALLINSTALLATION(MAINFLOORORBASEMENT) 1. PositionstovefollowingclearancesgiveninSection3,ClearancestoCombustibleMaterialand followingventmanufacturer sinstructions.thenlocatethepositionoftheexhaustpipeinthe wall. 2. Installwallthimbleasperventmanufacturer sinstructions. 3. Attach enough piping length to go through the wall thimble and extend at least 6 inches beyondtheexteriorwall. 4. Attachcapandsealoutsidewallthimbleswithhightemperaturewaterproofsiliconesealant. CAUTION:TOREDUCETHERISKOFSMOKESPILLAGETHERESHOULDALWAYSBEATLEASTONE FOOTOFVERTICALRISEFOREACHFOOTOFHORIZONTALRUN.INALLCASES,ATLEAST3FEET OFVERTICALRISEISNEEDED. WARNING:TERMINATIONSHOULDNOTBELOCATEDSOTHATHOTEXHAUSTGASESCANBEA HAZARD.EXHAUSTGASESCANREACHTEMPERATURESOF500ºFANDCAUSESERIOUSBURNS. SEESECTION4.4.1PERMITTEDTERMINATIONLOCATION. 18
19 5000PelletStoveInstallationandOperationManual THROUGHROOFINSTALLATION 1. Position stove following clearances given in Section 3.2 Minimum Clearances to Combustibles and following vent manufacturer sinstructions. 2. Installacleanoutteetothestoveexhaust. If necessary, use a horizontal additional lengthbetweentheexhaustandthetee.if youwishtocentertheverticalpartofthe ventwiththestove,a45 elbowandatee can be used to route the pipe from the exhaust towards the back center of the stove. 3. Droptheplumbboboverthecenterofthe teeoutletandmarklocationontheceiling. Install the ceiling support and the vent pipebyfollowingtheventmanufacturer s instructions. 4. Always follow vent manufacturer s clearances instructions from combustible materials. When passing through additionalfloorsorceilings,alwaysinstalla firestopspacer. 5. Afterliningupforholeinroof,cuteithera roundorsquareholeinroof.installupper edge and sides of flashing under roofing materials. Nail it to the roof along upper edge. Do not nail lower edge. Seal nail headswithflexiblewaterproofsealant. 6. Apply high temperature waterproof silicone sealant where the storm collar meets the vent. Slide storm collar down untilitsitsontheflashing. 7. Sealandinstallverticalroofvent.Ifrequired, sealandinstallastormcollar. 19
20 5000PelletStoveInstallationandOperationManual THROUGHAPREFABRICATEDCHIMNEY The best method to make an installation throughaprefabricatedchimneyistoruna3" stainless steel liner inside the prefabricated chimney(ora4"stainlesssteellinerdepending on the Equivalent Vent Length calculated in Section4.3EquivalentVentLength(EVL)). 1. Positionstovefollowingclearancesgivenin Section 3.2 Minimum Clearances to Combustibles and following vent manufacturer sinstructions. 2. Installacleanoutteetothestoveexhaust. If necessary, use a horizontal additional lengthbetweentheexhaustandthetee.if you wish to center the vertical part of the ventwiththestove,a45 elbowandatee can be used to route the pipe from the exhaust towards the back center of the stove. 3. Connect the pellet vent to the stainless steel liner according to the vent manufacturer sinstructions. 4. Seal and install vertical roof vent. If required,sealandinstallastormcollar. WARNING:INTHEU.S.,THEUSEOFASTAINLESSSTEELLINERISMANDATORY.INCANADA,ITIS NOTMANDATORYBUTISSTRONGLYRECOMMENDED. NOTE:VENTINGDIRECTLYINANOVERSIZEDCHIMNEYANDOMITTHEUSEOFASTAINLESSSTEEL LINERCANAFFECTCHIMNEYDRAFTANDDECREASESTOVEPERFORMANCES. 20
21 5000PelletStoveInstallationandOperationManual THROUGHANEXISTINGMASONERYFIREPLACE 1. Position stove, following clearances shown in Section 3.2 Minimum Clearances to Combustibles and following vent manufacturer sinstructions. 2. BuildandInstallablockingplateinsidethe chimney to seal the fireplace damper. Stainless steel plate and screws are recommended. Cut a hole for the exhaust pipe.ifneeded,cutasecondholefortheair intake pipe (see Appendix F: Combustion AirSupply). 3. Attach a section of pipe and clean out tee to the exhaust, making sure the clean out teeiscenteredinthechimneyfluearea. 4. Build and install flashing above the fireplace. Stainless steel plate and screws arerecommended.cutaholeforthevent pipe.ifneeded,cutasecondholefortheair intake pipe. Seal all joints with high temperaturewaterproofsiliconesealantto preventwaterleakage. 5. Seal and install vertical roof vent. If required,sealandinstallastormcollar. NOTE:THESTRUCTURALCONDITIONOFTHEMASONRYCHIMNEYMUSTFIRSTBEINSPECTEDBY AQUALIFIEDCHIMNEYSWEEPORINSTALLER. NOTE:YOUWILLNEEDAPIPELENGTHEQUALTOTHECHIMNEYHEIGHTFROMTHEHEARTH.IF OUTSIDE COMBUSTION AIR IS TO BE USED, YOU WILL NEED A PIPE LENGTH EQUAL TO THE CHIMNEYHEIGHTPLUS18INCHES. 21
22 5000PelletStoveInstallationandOperationManual THROUGHANEXISTINGMASONERYCHIMNEY 1. Position stove following clearances shown in Section 3.2 Minimum Clearances to Combustibles and following vent manufacturer sinstructions. 2. Markthecenteroftheholewherethevent pipewillgothroughthemasonrychimney. 3. It is necessary to make a hole in the masonrywithadiameterof4"aroundthe markfora3''pipe.fora4''pipe,aholeof 5''indiameter. 4. Build and install flashing above the chimney. Stainless steel plate and screws arerecommended.cutaholeforthevent pipe.ifneeded,cutasecondholefortheair intake pipe. Seal all joints with high temperaturewaterproofsiliconesealantto preventwaterleakage. 5. Installthecleanoutteeatthebottomofthe verticalventsystemandloweritdownthe chimneyuntilthecenterbranchofthetee isalignedwiththeholeinthemasonry. 6. Install and seal flashing with high temperaturewaterproofsiliconesealant. 7. Seal and install vertical roof vent. If required,sealandinstallastormcollar. 8. Connect the horizontal vent pipe to the cleanoutteebypushingitthroughthehole inthemasonry. 9. If desired, once the horizontal pipe is in place, the space between the pipe and masonry may be filled with high temperaturegrout. 10. If desired, install a trim collar and use an additional horizontal vent pipe length, if required, to connect the stove to the chimney. 22
23 5000PelletStoveInstallationandOperationManual PARTBOPERATION 5 GENERALINFORMATION 5.1 OPERATIONWARNINGS,CAUTIONSANDRECOMMENDATIONS KEEPTHISMANUALFORREFERENCE. DURINGTHEFIRSTFEWFIRES,YOURSTOVEWILLEMITANODORANDASMALLAMOUNTOF FUMESASTHEHIGHTEMPERATUREPAINTCURESORBECOMESSEASONEDTOTHEMETAL. MAINTAININGSMALLERFIRESWILLMINIMIZETHIS.AVOIDPLACING ITEMSONSTOVETOP DURINGTHISPERIODTOAVOIDDAMAGINGTHEPAINTSURFACE.MAKESURETHEROOMIS WELLVENTILATED.OPENWINDOWS.ODORSANDFUMESRELEASEDDURINGTHISPROCESS AREUNPLEASANTBUTTHEYARENOTTOXIC.ONCEYOUHAVEBURNEDTHEFIRST40LBSOF PELLETS,ITISRECOMMENDEDTOINSPECTTHESTOVEANDTHEVENTINGSYSTEMTOMAKE SURETHATTHEREISNOLEAKS. HOT WHILE IN OPERATION, KEEP CHILDREN, CLOTHING AND FURNITURE AWAY. CONTACT MAYCAUSESKINBURNS.GLOVESMAYBENEEDEDFORSTOVEOPERATION. ITISHIGHLYRECOMMENDEDTHATTHEUSERBUYSTHISPRODUCTFROMARETAILERWHO CANPROVIDEINSTALLATIONANDMAINTENANCEADVICES. THIS STOVE MUST SERVE AS A SUPPLEMENTARY HEAT SOURCE. AN ALTERNATIVE HEAT SOURCESHOULDBEAVAILABLEINTHEHOMEIFNEEDED.THEMANUFACTURERCANNOTBE HELD RESPONSIBLE FOR ADDITIONAL HEATING COSTS ASSOCIATED WITH THE USE OF AN ALTERNATIVEHEATSOURCE. USINGASTOVEWITHCRACKEDORBROKENCOMPONENTS,SUCHASGLASSORBAFFLEMAY PRODUCEANUNSAFECONDITIONANDMAYDAMAGETHESTOVE. NEVER USE GASOLINE, GASOLINETYPE LANTERN FUEL (NAPHTHA), FUEL OIL, MOTOR OIL, KEROSENE,CHARCOALLIGHTERFLUID,ORSIMILARLIQUIDSORAEROSOLS.KEEPALLSUCH LIQUIDSORAEROSOLSWELLAWAYFROMTHESTOVEWHILEITISINUSE. DONOTSTOREFUELWITHINSTOVEMINIMUMCLEARANCESTOCOMBUSTIBLE. THISSTOVESHOULDBEMAINTAINEDANDOPERATEDATALLTIMESINACCORDANCEWITH THESEINSTRUCTIONS.NOTFOLLOWINGTHEINSTRUCTIONSOFTHISMANUALMAYCAUSE SMOKE SPILLAGE AND OTHER POTENTIAL HAZARDS. IT IS ALWAYS RECOMMENDED TO INSTALLSMOKEDETECTORSANDFIREEXTINGUISHERINACONVENIENTLOCATION. THE VIEWING DOOR MUST BE CLOSED AND LATCHED DURING OPERATION. ASH DRAWER ACCESSPANELMUSTALSOBECLOSEDDURINGOPERATION. 23
24 5000PelletStoveInstallationandOperationManual NEVER TRY TO REPAIR OR REPLACE ANY PART OF THE STOVE UNLESS INSTRUCTIONS ARE GIVEN BY THE MANUFACTURER. ALL OTHER WORK SHOULD BE DONE BY A TRAINED TECHNICIAN. DONOTOPERATETHESTOVEIFTHEFLAMEBECOMESDARKANDSOOTYORIFTHEBURN POTOVERFILLSWITHPELLETS.TURNTHESTOVEOFF,INSPECTIT,ANDCALLYOURDEALER. TURNING THE STOVE OFF DOES NOT DISCONNECT ALL POWER FROM THE STOVE. DISCONNECTTHEPOWERCORDBEFOREPERFORMINGANYMAINTENANCEORREPAIRSON THESTOVE. ALLOW THE STOVE TO COOL BEFORE CARRYING OUT ANY MAINTENANCE OR CLEANING. ASHESSHOULDBEPLACEDINAMETALCONTAINERWITHATIGHTFITTINGLID.THECLOSED METAL CONTAINER SHOULD BE PLACED ON A NONCOMBUSTIBLE FLOOR OR ON THE GROUND,WELLAWAYFROMALLCOMBUSTIBLEMATERIALS,PENDINGFINALDISPOSAL.IF THEASHESAREDISPOSEDOFBYBURIALINSOILOROTHERWISELOCALLYDISPERSED,THEY SHOULD BE RETAINED IN THE CLOSED CONTAINER UNTIL ALL ASHES HAVE BEEN THOROUGHLYCOOLED. DONOTOPERATETHESTOVEIFYOUSMELLORSEESMOKE.TURNITOFF,MONITORITAND CALLYOURDEALERIFNECESSARY.DONOTUNPLUGIT.NEVEROPENTHEDOOR. IT IS RECOMMENDED TO UNPLUG THE STOVE WHEN IT S NOT IN USE FOR PROLONGED AMOUNT OF TIME (I.E. DURING SUMMER). SENSORS ON THE STOVE ARE ACTIVATED BY HEATANDCOULDACTIVATETHEFANSEVENIFTHESTOVEISNOTINFUNCTION. THISSTOVEREQUIRESREGULARMAINTENANCEANDCLEANING.FAILURETOFOLLOWTHE MAINTENANCE SCHEDULE (SEE SECTION RECOMMENDED MAINTENANCE SCHEDULE) WILL REDUCE THE STOVE PERFORMANCE AND COULD EVENTUALLY DAMAGE IT. IT ALSO MAYLEADTOSMOKESPILLAGEINYOURHOME. THISSTOVEISDESIGNEDANDTESTEDSPECIFICALLYFORUSEONLYWITHFOURDIFFERENT TYPESOFPELLETS:STANDARDWOODPELLETS,100%BARKPELLETS,SAWDUST/HAYMIX PELLETSANDSWITCHGRASSPELLETS.ANYOTHERTYPEOFFUELBURNEDINTHISHEATER WILLVOIDTHEWARRANTYANDSAFETYLISTING. HOPPERSHOULDONLYCONTAINPELLETS.HOPPERSHOULDBEKEPTFREEOFANYFOREIGN OBJECTSATALLTIMETOPREVENTANYDAMAGETHESTOVE. THE STOVE WILL NOT OPERATE DURING A POWER OUTAGE. IF AN OUTAGE DOES OCCUR, CHECK THE STOVE FOR SMOKE SPILLAGE. OPENING A WINDOW WILL PREVENT NEGATIVE PRESSUREANDSMOKESPILLAGEINTHEROOM. DO NOT UNPLUG THE STOVE IF YOU SUSPECT IT IS MALFUNCTIONING. TURN IT OFF, MONITORITANDCALLYOURDEALERIFNECESSARY. 24
25 5000PelletStoveInstallationandOperationManual THISSTOVEISDESIGNEDTOPROVIDETHEOPTIMUMPROPORTIONSOFFUELANDAIRTO THE FIRE IN ORDER TO BURN FREE OF SMOKE AND SOOT. ANY BLOCKAGE OF THE AIR SUPPLYTOORFROMTHESTOVEWILLSERIOUSLYDECREASEITSPERFORMANCEANDWILL BEEVIDENTBYASMOKINGEXHAUST,ASOOTBUILDUPONTHEWINDOWANDONOUTSIDE WALLS. FOR BEST OPERATION, THE ASH CONTENT OF THE PELLET FUEL SHOULD BE LESS THAN1%ANDTHECALORIFICVALUEAPPROXIMATELY8,200BTU/LB.OTHERSFUELSWITHA HIGHASHCONTENTWILLREQUIREAHIGHERLEVELOFMAINTENANCEANDCLEANING. THESTOVEWILLNOTOPERATEUSINGNATURALDRAFTORWITHOUTAPOWERSOURCETO ACTIVATETHEBLOWERSYSTEMSANDFUELFEEDSYSTEM. STOVE BUILDER INTERNATIONAL INC. GRANTS NO WARRANTY, IMPLIED OR STATED, FOR BAD INSTALLATION OR LACK OF MAINTENANCE OF YOUR STOVE, AND ASSUMES NO RESPONSIBILITYOFANYCONSEQUENTIALDAMAGES. IFYOUNOTICEASMOLDERINGFIRE(BURNPOTFULLBUTNOVISIBLEFLAME)ANDAHEAVY SMOKEBUILDUPINFIREBOX,IMMEDIATELYTURNOFFTHESTOVE,BUTDONOTUNPLUGIT. DO NOT OPEN THE DOOR. MAKE SURE THAT THE FRESH AIR INTAKE SHUTTER WORKS FREELY.WAITUNTILSMOKEINSIDETHEFIREBOXCLEARSANDBLOWERSSHUTDOWN.DO AS INSTRUCTED IN EVERYDAY STARTUP THEN ATTEMPT TO RESTART THE STOVE. IF THE PROBLEM PERSISTS, CONTACT YOUR DEALER. NOTE THAT SMOKE BUILDUP DURING IGNITION MAY OCCUR. SMOKE CAN ACCUMULATE IN THE FIREBOX FOR A FEW SECONDS JUSTBEFORETHEIGNITORISHOTENOUGHTOFIREUPTHEPELLETSINTHEBURNPOT.THIS ISNORMAL.ASSOONASTHEREISFIREINTHEBURNPOT,SMOKEWILLDISAPPEAR. MAINTAIN PROPER VENTILATION. IT IS IMPORTANT THAT ADEQUATE OXYGEN IS BEING SUPPLIED TO THE FIRE FOR PROPER COMBUSTION. DURING THE WINTER SEASON, MAKE SURETHATTHEFRESHAIRINTAKEISFREEOFANYICEASTHISWILLSTARVETHEFIREOFAIR ANDPREVENTTHEPROPEROPERATIONOFTHESTOVE.MAKESURETHEFRESHAIRINTAKE BACKDRAFTSHUTTERWORKSFREELY. OPERATING YOUR STOVE AT THE MAXIMUM SETTING DURING A LONG PERIOD OF TIME MAYREDUCETHESTOVEANDITSCOMPONENTSLIFEEXPECTANCY ZONEHEATINGANDHOWTOMAKEITWORKFORYOU Yournewpelletstoveisaspaceheater,whichmeansitisintendedtoheattheareaitisinstalled in,aswellasspacesthatconnecttothatarea,althoughtoalowertemperature.thisiscalledzone heatinganditisanincreasinglypopularwaytoheathomesorspaceswithinhomes. Zone heating can be used to supplement another heating system by heating a particular space withinahome,suchasabasementfamilyroomoranadditionthatlacksanotherheatsource. Although the stove may be able to heat the main living areas of your house to an adequate temperature,thisstovemustserveasasupplementaryheatsource.westronglyrecommendthat youalsohaveaconventionaloil,gasorelectricadditionalheatingsystemtoprovideheatinginthe 25
26 5000PelletStoveInstallationandOperationManual homeifneeded.themanufacturercannotberesponsibleforadditionalheatingcostsassociated withtheuseofanalternativeheatsourceincaseofstovefailureorpoweroutage. Yoursuccesswithzoneheatingwilldependonseveralfactors:Properstovesize,stovelocation, heatingarea,houselayoutandinsulationandyourclimatezone. 5.2 COMBUSTIBLE PROPERFUEL Eachtypeofpellethasitspropertiesandwillburndifferently.Theamountofashesproducedcan alsovarygreatly.factoryapprovedpelletsarethose¼ or5/16 indiameterandnotover1 long. Longerorthickerpelletswillpreventproperpelletfeed. Thebottomfeedsystemofthisstoveisdesignedandtestedspecificallyforusewithfourdifferent types of pellets: standard wood pellets, 100% bark pellets, sawdust/hay mix pellets and switch grasspellets. Pellettype Composition Ashquantity Ignition Woodpellets Madeofhardor softwood Smallquantity Easy Wood and 1/3hayand2/3 More ashes than straight wood haypellets wood. It is pellets. important to respectthatmix (+/10%). Barkpellets 100% bark Produce a hard crust that will be pellets pushed into the ash drawer. Their ashcontentisveryhigh. woodpellets. Switch grass 100% switch pellets grass Vary from medium to high content depending on when switch grass is harvested. A light and friable crust willforminfrontoftheburnpot.it should break easily and fall into the ashdrawer. Ignition may be more difficult than straight woodpellets. Ignition may be more difficult than straight Ignition may be more difficult than straight woodpellets. WARNING: BURNING OTHER TYPES OF PELLETS IS PROHIBITED. IT VIOLATES THE BUILDING CODESFORWHICHTHESTOVEHASBEENAPPROVEDANDWILLVOIDTHEWARRANTY WHERETOSTOREBAGSOFPELLETS Werecommendthatyoustoreyourbagsofpelletsinadryandwellventilatedareaifpossible. Usingdrypelletswillincreasetheperformanceofyourstove.Youmaywanttohaveabagortwo inthesameroomasyourstoveforrefuelingbutmakesuretorespecttheminimumclearancesto combustiblematerialsandthespacerequiredforrefillingandashremoval. 26
27 5000PelletStoveInstallationandOperationManual 6 STOVECONTROLS 6.1 GENERALINFORMATION ThestoveusesaLCDtouchscreen,thelatesttechnologyincontroldevices.Theblowersandfeed systemarecontrolledfromthisscreen. TheLCDtouchscreenisfactoryinstalledontherighthandsideofthestovewhenfacingit.See AppendixB:LCDSlidingBracketMountingforlefthandsideinstallation LCDTOUCHSCREENCONTROLS,OPERATIONANDCONFIGURATION TheLCDcontrolisanelectronicvisualdisplayaswellasatouchscreenthatwilllightupasyou touch any location on the display area. The Main Status Page will then display different icons layoutdependingifmanualorthermostatmodeisselected. COOL COOL 45 MIN ManualModeMainStatusPage ThermostatModeMainStatusPage 27
28 5000PelletStoveInstallationandOperationManual Descriptionofeachmainstatuspageicon: Indicates that the stove is in the manual mode. It will therefore run continuouslyontheselectedsettinguntilitismanuallymodified,turned OFForifthestoverunsoutofpellets(seeSection6.1.8SelectingManual orthermostatmode). Indicatesthatthestoveisinthethermostatmode.Theredwavesindicate thatthethermostatiscallingforheat.thewaveswilldisappearoncethe thermostat has reached room temperature setting (see Section SelectingManualorThermostatMode). COOL 135 COOL F Indicates the exhaust temperature. If temperature is below 115F, the numericvaluewilldisappearand COOL willbedisplayed. Selecting the flame icon will bring you to the heat control scroll bar. Moving the cursor to the left will reduce the feed of pellets therefore producelessheatandmovingittotherightwillincreasethefeedofpellets whichwillproducemoreheat(seesection6.1.6adjustingthecombustion Level(HeatOutput)). Indicates that the stove is Off. Indicates that the stove is either On in manual mode or calling forheatinthermostatmode. Indicatesthatthestoveisin thermostat mode, in pilot cycle waiting for heat calling. Indicates that the stove is in thermostat mode but not calling for heat and pilot cycle is completed. Selectingthelettericonwilldisplayamenuscreenwhereyoucanaccess the following pages: Setup, Trouble shoot, Statistics and Program (see Section6.1.2ConfigurationandOperationDiagram). Selecting the grey auger icon will display the auger option menu. Once auger option is selected auger icon will show a red arrow and will blink until the end of the chosen option (see Section Filling or Purging AugerHousing). The grey fan icon indicates that the convection fan is on default setting. Thegreyfaniconwithredarrowsindicatesthatfanspeeddefaultsetting hasbeenreducedwiththeoptionalfanspeedscrollbar(seesection6.1.7 ConvectionFanSpeedReduction(Optional)). Indicates the selected pilot cycle. Once selected, one of the following cycles,(30min,45min,60min,alwaysonoralwaysoff)willdisplayunder the hourglass icon (see Section Selecting The Pilot Cycle). Default settingis AlwaysOff. Indicates that unusual cycle has been detected. When this occurs, the envelopeiconwillbedisplayedinreplacementoftheconvectionfanicon. Pressontheenvelopetoreadthewarningmessage. 28
 Select the pilot mode (30,45,60 minutes, always on or always off) Select the scale of temperature")
29 5000PelletStoveInstallationandOperationManual CONFIGURATIONANDOPERATIONDIAGRAM Select the language displayed on the LCD screen (french, english) Select the pilot mode (30,45,60 minutes, always on or always off) Select the scale of temperature displayed on the LCD screen (Celsius or Farenheit) 45 MIN COOL This page will help the user troubleshoot the unit if needed (For more details see the troubleshooting section) LANGUAGE º F / º C HEAT LEVEL PILOT MODE MODE MENU SETUP STATISTICS STATUS PAGE TROUBLE SHOOT PROGRAM Access is limited to SBI technical service or certified technicien Return to menu page Select the mode at which the stove operates (thermostatic or manual) PAGE 1 LCD VERSION :_. I/O VERSION : _. RUN TIME : 0:00:00 IGNITOR RUN TIME : 0:00:00 THERMISTOR PEAK : ºF MENU Return to status page Select the stove heat level SELECTINGTHELANGUAGE Fromthemainstatuspage,choosethelettericon.Select SETUP andthen LANGUAGE. Youcanchoosebetweentwolanguages,EnglishorFrench VIEWINGSTATISTICS Fromthemainstatuspage,choosethelettericon.Select SETUP andthen STATISTICS. This page will display statistics that can be very useful to a service technician or SBI technical support. 29
30 5000PelletStoveInstallationandOperationManual CHANGINGTEMPERATUREUNIT(FORC) From the main status page, choose the letter icon. Select SETUP and then F / C. Selecticon o For o Cinordertodisplaytemperaturesinthedesiredunit ADJUSTINGTHECOMBUSTIONLEVEL(HEATOUTPUT) COMBUSTIONLEVEL FUELQUALITYADJUSTMENT POSITIONTHECURSORTOSETTHE COMBUSTIONLEVEL AUGERMOTOR1 COMBUSTIONFAN + + 0% 0% MIN MAX EXHAUSTFAN + 0% SAVE&EXIT PILOT ADJUST. FUELQ. ADJUST. BACK DEFAULT SAVE&EXIT PILOTSETTINGSADJUSTMENT AUGERMOTOR1 COMBUSTIONFAN EXHAUSTFAN % 2% 5% BACK DEFAULT SAVE&EXIT Thestove sinputrangegoesfrom8,500btuto50,000btu.tochangecombustionlevel,select theflameicon onthemainstatuspagetodisplaythecombustionlevelscrollbar.thescroll barislinearlyscaledbetweentheminimumandmaximum. Note:Inputrangemayvaryaccordingtothetypeofpelletsbeingused. Eventhoughyourstovecanburnalargevarietyofpellets,westronglyrecommendtheuseofhigh qualitypelletstoobtainmaximumperformanceoutofyourstove(seesection5.2.1properfuel). When using lower quality combustible, a restrictive venting system or using the stove in high altitude, you may need to adjust the PILOT SETTING ADJUSTMENT and the FUEL QUALITY ADJUSTMENT.Thesetwo(2)settingsareavailablefromthe COMBUSTIONLEVEL page. Note: To obtain optimal results make sure the venting system, heat exchanger and exhaust channelsarecleanedbeforeperforminganysettingchanges. 30
31 5000PelletStoveInstallationandOperationManual PILOTADJUST.(PilotSettingsAdjustment) The PILOTSETTINGSADJUSTEMENT willallowyoutomodifydefaultsettingsby+/5%forauger motor1and+/10%forexhaustfan,butwillonlyapplyduringpilotcycle: Torestoredefaultsetting,select DEFAULT. Refertofollowingsectionforsettingsadjustmentsexplanation FUELQ.ADJUST(FuelQualityAdjustment) The FUELQUALITYADJUSTMENT willallowyoutomodifydefaultsettingsby+/5%forauger motor1and+/10%forcombustionandexhaustfan. Torestoredefaultsetting,select DEFAULT. Herearesomesituationswhereyoumaywanttoadjustthesecomponents: Averagespeedofaugermotor#1: Youmaywanttoincreasetheaugermotor#1speediffiregoesoutwhencombustionlevelisatits minimumsetting.whenburningpoorqualitypelletsyoumayalsoneedtoreducetheaugermotor speedtoavoidunburnedpelletstofallintotheashdraweratanycombustionlevel. Speedofcombustionfan: You may want to reduce combustion fan speed if fire goes out when combustion level is at minimumsetting.youmayalsowanttoincreasecombustionfanspeedtoavoidunburnedpellets tofallintotheashdraweratanycombustionlevel. Speedofexhaustfan: Youmaywanttoreduceexhaustfanspeedifnaturaldraftisexcessiveand/oriftheflameislow andalmostatthesameheightatanycombustionlevel.youmayalsowanttoincreasetheexhaust fan speed if vent configuration is too restrictive or flame height tends to be high at any combustionlevel(seeappendixc:flamecharacteristics) CONVECTIONFANSPEEDREDUCTION(OPTIONAL) Whenthegreyfanicon isdisplayed,theconvectionfanisondefaultsetting.ondefault settingthespeedissynchronizedwiththeaugerfeedrate.selectingthegreyfaniconwilldisplay the FANSPEEDCONTROL screen.thiswillallowyoutobypassthedefaultsettings.slidingtothe leftwillreducefanspeedandslidingittotherightwillincreasefanspeed.notethatyouwillbe abletodecreasethefanspeedtothelowestpossiblebutnotabletoincreasethefanspeedhigher thanthedefaultfanspeedforthecurrentcombustionlevelsetting. 31
32 5000PelletStoveInstallationandOperationManual FANSPEEDCONTROL SLIDETHECURSORTOSELECTTHEFANSPEED BACK OFF SAVE&EXIT Fanwithredarrowsiconwilldisplay onthemainstatuspageasyou SAVE&EXIT.Fan speedreductionwillbemorenoticeableonhighercombustionlevelsettings.todeactivatethefan speedreduction,select OFF fromthispage. Ifoverheatingoccurs,fanspeedreductionwillbeautomaticallydeactivatedandanenvelopeicon willreplacethefanicononthemainstatuspage.pressontheenvelopeicontoviewthe warningmessage.meanwhile,theconvectionfanwillworkatitshighestsettinguntilthestove reaches a safe temperature. Once the stove reaches that temperature, it will go back to the previouslyselectedfanspeed SELECTINGMANUALORTHERMOSTATMODE To change operating mode press the thermometer icon, or, from the Main Status Page, choosethelettericon thenselect SETUP and MODE. Indicatesthatthestoveisinmanualmode.Itwillthereforeruncontinuouslyonthe selectedsettinguntilitismanuallymodified,turnedofforifthestoverunsoutof pellets. Indicates that the stove is in thermostat mode. The red waves indicate that the thermostatiscallingforheat.itwillheatattheselectedcombustionleveluntilthe thermostathasreachedroomtemperaturesetting. Thewaveswilldisappearoncethethermostathasreachedroomtemperaturesetting. At this time the combustion level will switch into the selected pilot mode until its cycleiscompleted.whenthermostatcallsforheat,theiconwillchangefortheone withwavesandcombustionlevelwillusethelastsetting. 32
33 5000PelletStoveInstallationandOperationManual SELECTINGTHEPILOTCYCLE Note:ThisiconwillbevisibleontheMainStatusPageonlyonthermostatmode. Tochangethepilotcyclepressthehourglassicon,or,fromtheMainStatusPage,choose thelettericon thenselect SETUP and PILOTMODE. You can choose from one of the five different pilot cycles: "ALWAYS OFF", "30 MINUTES", 45 MINUTES, 60 MINUTES or "ALWAYS ON". The selected cycle will be displayed under the hourglassicononthemainstatuspage.defaultsettingis"alwaysoff"sincethisisthemostfuel efficientconfiguration. ALWAYSOFF 30MINUTES 45MINUTES 60MINUTES ALWAYSON Note:Pilotfeedrateislowerthantheminimumcombustionlevelfeedrate AlwaysOFF Thepilotcyclebeginswhentemperaturesetonthethermostatisreached.Whenthe ALWAYS OFF pilotcycleisselected,thestovewillshutdownwhenthetemperaturesetonthethermostat is reached. Every time the thermostat will call for heat, the stove will need to go through the completeignitioncycle Minutes,45Minutesor60Minutes Thepilotcyclebeginswhentemperaturesetonthethermostatisreached.Itwilllast30,45or60 minutesdependingoftheselectedpilotcycle.ifthethermostatdoesnotcallforheatbeforethe endoftheselectedpilotcycledelay,thestovewillshutdownandwillneedtogothroughthe completeignitioncyclewhenthethermostatcallsforheatagain AlwaysON Thepilotcyclebeginswhentemperaturesetonthethermostatisreached.Whenthe ALWAYS ON pilotcycleisselected,thestovestayonpilotmodeuntilthethermostatcallsforheat. 33
34 5000PelletStoveInstallationandOperationManual FILLINGORPURGINGAUGERHOUSING Note:Thisfunctionisdisabledwhenthestoveisrunning. To fill or purge the auger housing press the auger icon and select either FEED AND START, PURGESCREW or ADDPELLETS inthedisplayedpage FeedandStart Usethisoptionwhenyoustartthestoveforthefirsttimeoftheseasonorafterthehopperran outofpellets.theaugerwillturnforoneminutethenthestovewillautomaticallystartanignition cycle PurgeScrew Usethisoptiontoemptytheaugerattheendoftheseason.Whenselected,theaugerwillturnfor twominutes AddPellets Usethisoptiontomanuallyfeedmorepelletintheburnpot.Whenselected,theaugerwillturn for20seconds. 34
35 5000PelletStoveInstallationandOperationManual 7 STOVEOPERATION 7.1 FIRSTSTARTUP Beforestartingyourstove,makesurethattheburnpot,thebafflesandthemaintenanceaccess panelsareproperlyinstalled.alsomakesurethatventingsystemisproperlysealedandalldoors are closed. Make sure the hopper is full; the hopper lid is closed and select the desired mode (manualorthermostat). Presstheaugericon displayedpage. onthemainstatuspagefollowedby FEEDANDSTART buttoninthe If fire doesn t start within 20 minutes, a warning code Refertotroubleshootingsectionformoredetails. will appear. WARNING:NEVERUSEAGRATEOROTHERMEANSOFSUPPORTINGTHEFUEL.ONLYUSETHE STOVEAPPROVEDBURNPOT. 7.2 EVERYDAYSTARTUP Before starting the stove, make sure there is enough pellets in the hopper and that the recommended maintenance schedule has been followed (see Section Recommended maintenanceschedule)thenpressthe ON/OFF icononthemainstatuspage. 7.3 RUNNINGOUTOFPELLETS Ifyourstoverunsoutofpellets,thefirewillslowlygoout;theconvectionfanwillrununtilthe heatsensorontheexhaustfanreads115 F.Thecoolingcyclewilltakeafewminutesbeforeall other motors stops. When this temperature is reached, a warning message NO FUEL will be displayedonthelcdscreen. Torestartthestove,waituntilallcomponentstopsrunning(usually10minutesafterthewarning messagehasbeendisplayed).pressthe RESET button,refillthehopper,andpresstheaugericon onthemainstatuspagefollowedby FEEDANDSTART buttoninthedisplayedpage. 7.4 REFILLING While the stove is running, you have up to 3 minutes to refill pellets in the hopper. Note that openingthehopperlidwillstoptheaugerfromfeedingpelletstothestove.ifthehopperlidisleft open more than 3 minutes, the stove will stop and a warning code HOPPER LID OPEN will appearonthelcdscreen.torestartthestove,closethelid,pressthe RESET button,andthen pressthe ON/OFF icon onthemainstatuspage. 35
36 5000PelletStoveInstallationandOperationManual NOTE:Keephopperlidclosedatalltimesexceptwhenrefilling.Donotoverfillthehopper. 7.5 SHUTTINGDOWNPROCEDURE Toturnyourstoveoff,pressthe ON/OFF icon onthemainstatuspage.theflameatthe centeroftheiconwilldisappear whenthestoveisturnedoff.thecoolingcyclewilltakea fewminutesandtheblowerswillcontinuetoworkwhilethestoveiscoolingdown. 7.6 SIGNSOFANOVERHEATINGSTOVE Under normal conditions, the flame should have a bright yellow color and be very active, but stable (seeappendix C: FlameCharacteristics). If you seethe flame getting lazy,very high and orange,itmaybeasignthatthereissomethingwrong.usually,overheatingissuesarecausedby toomuchrestrictionintheventingsystem,ablockedheatexchanger,alackofcombustionairora lackofmaintenance. Ifthishappens,youstovewillbecomeveryhot.Ifthestovebecomestoohot, UNITOVERHEAT codewillappearonthelcdscreen.beforestartingthestoveagainmakesuretherecommended maintenancehasbeendoneproperly.pressthe RESET buttonandthenpressthe ON/OFF icon onthemainstatuspage.ifa UNITOVERHEAT codeoccurstwice,callyoudealer.hewill beabletogiveyousomeadvicessothiscodewillnotappearagain.ifthecodeappearsmorethan three times, the LCD screen will lock itself up and you will need to call a service technician to unlockit. WARNING:IFYOUCHOOSEASTOVETHATISTOOSMALLFORYOURHOUSEANDYOUNEEDTO OPERATE IT AT THE MAXIMUM SETTING FOR A LONG PERIOD OF TIME, YOU MAY END UP OVERHEATING THE STOVE. ALSO, STOVE AND COMPONENTS S LIFE EXPECTANCY WILL BE REDUCED. WARNING:IFANYEXTERNALPARTOFTHESTOVEBEGINSTOGLOW,YOUAREOVERHEATING. IMMEDIATELY TURN YOUR STOVE OFF. DO NOT UNPLUG IT AND DO NOT OPEN THE DOOR. UNPLUGINGTHESTOVEWILLDISABLEALLTHESAFETYFEATURESONTHESTOVE. 36
37 5000PelletStoveInstallationandOperationManual 8 MAINTENANCE 8.1 STOVEMAINTENANCE RECOMMENDEDMAINTENANCESCHEDULE Usethisasaguideunderaverageuseconditions. Components Weekly orafter +/250pounds Twiceayear orafter +/1tons Annually or per2tonsofpellets Baffle Vacuum Bottomairwashinlet Vacuum BurnPot Brush/Vacuum Glass Clean AshDrawer Empty/Vacuum CombustionChamber Vacuum Vacuum/Brush* HeatExchangerTubes Brush ScrapeandVacuum* ExhaustChannels(through accesstraps) Vacuum* ExhaustBlower Vacuum* CombustionBlower Inspect* ConvectionBlower Vacuum* VentingSystem Inspect/Sweep* SweepandClean Gaskets Inspect Hopper Empty/Vacuum *Cleaningfrequencymayvarydependingonthetypeoffuelused.Fuelwithhigherashcontent willincreasecleaningfrequency.seesection5.2.1properfuelforrecommendedcombustibles. WARNING:FAILURETOCLEANANDMAINTAINTHISSTOVEASINDICATEDCANRESULTINPOOR PERFORMANCEANDSAFETYHAZARDS. WARNING:NEVERCLEANWHENHOT. WARNING: THE USE OF A DOMESTIC, CENTRAL OR COMMERCIAL VACUUM CLEANER TO PERFORMTHEMAINTENANCEOFYOURPELLETSTOVEISNOTRECOMMENDED.ASHPARTICLES MAYDAMAGETHEMOTORSOFTHESESAPPLIANCES.FURTHERMORE,EMBERSTHATARESTILL HOT MAY SET YOUR VACCUM CLEANER S CONTENT ON FIRE. THE USE OF AN ASH VACCUM CLEANERISHIGHLYRECOMMENDED. WARNING:ASHESSHOULDBEPLACEDINAMETALCONTAINERWITHATIGHTFITTINGLID.THE CLOSEDMETALCONTAINERSHOULDBEPLACEDONANONCOMBUSTIBLESURFACE,WELLAWAY FROMALLCOMBUSTIBLEMATERIALS,PENDINGFINALDISPOSAL.IFTHEASHESAREDISPOSED OFBYBURIALINSOILOROTHERWISELOCALLYDISPERSED,THEYSHOULDBERETAINEDINTHE CLOSEDCONTAINERUNTILALLCINDERSHAVEBEENTHOROUGHLYCOOLED. 37
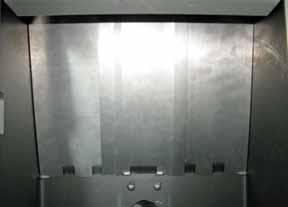
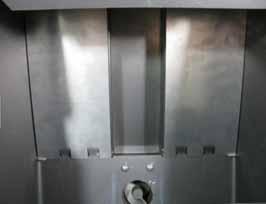
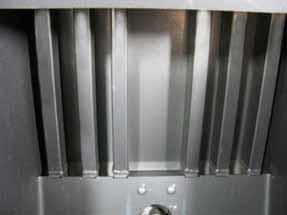
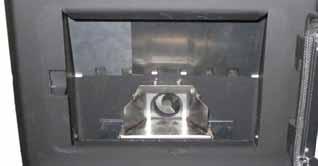

38 5000PelletStoveInstallationandOperationManual CLEANINGTHEBAFFLE,THEHEATEXCHANGERSANDTHECOMBUSTIONCHAMBER Removeandcleanthethreepartsofthebafflethatarelocatedinsidethecombustionchamber. Use the small metal tabs to remove the panels in the order shown on the following pictures. Vacuumheatexchangertubes CLEANINGTHEBURNPOT Burn pot must stay clean and holes should not be obstructed by combustion residues (ashes, clinkers). 38


39 5000PelletStoveInstallationandOperationManual 1. Cleantheburnpotusingthescraperprovidedwiththestoveorabrush. 2. Releasetheclipsonbothsidesoftheburnpotthen,removetheburnpotbyliftingandpulling itout.oncetheburnpotisremovedmakesureallholesareclean.cleanthoroughlyunderthe burnpotwithanashvacuumtoremoveashesthatmayhaveaccumulated. 3. Ifnecessary,cleantheairintakechannel.Toreachtheairintakechannelcleanouttrap,open theashdraweraccessdoorandremovetheashdrawer.unscrewthewingnuttoopenthe cleanouttrap.vacuumthecombustionresidues. 39


40 5000PelletStoveInstallationandOperationManual 4. Verifythatthecleanouttrapgasketisstillingoodcondition,replaceitifneeded ASHREMOVAL 1. Toemptytheashdrawerofitscontents,opentheashpanaccessdoorbyliftingthelatchon therighthandside. 2. Vacuumaroundtheashdrawerandatthebottomofthecombustionchamber. WARNING: ASH PAN MUST BE IN PLACE AND THE ASH PAN ACCESS DOOR MUST BE KEPT CLOSEDWHENTHESTOVEISINUSE. 40

41 5000PelletStoveInstallationandOperationManual CLEANINGTHEAIRWASHSYSTEM Vacuumtheashesthatmayhaveaccumulatedintheairwashsysteminletbetweenthebottom glassretainerandtheglass.thiswillallowanoptimumairflowalongtheinsideportionofthe glassandpreventstheglassfromsootingup GLASSCARE Clean door glass as necessary. The use of a stove glass cleaner is recommended. Regular householdglasscleanerswillnotcleancreosote. WARNING:NEVERUSEABRASIVECLEANERSONTHEGLASSORONANYPLATEDPART. WARNING:DONOTCLEANTHEGLASSWHILEIT SHOT. WARNING:DONOTFORCE,STRIKEORADOPANYBEHAVIOURTHATCOULDWEAKENTHEGLASS DOOR. WARNING:DONOTOPERATETHESTOVEWITHTHEGLASSREMOVED,CRACKEDORBROKEN REPLACEMENTOFBROKENDOORGLASS Carefullyremoveanyloosepiecesofglassfromthedoorframe.Disposeallbrokenglassproperly. A broken glass must be replaced with an identical ROBAX (ceramic glass) 5 mm thick with the dimensions:9"11/64x14"43/64.refertoreplacementpartssection. WARNING:ALWAYSWEARSUITABLEGLOVESWHILEHANDLINGBROKENGLASS. 41
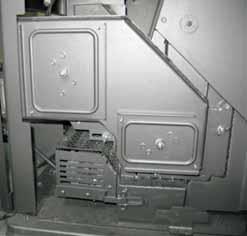
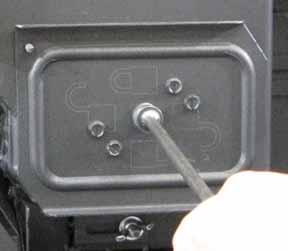
42 5000PelletStoveInstallationandOperationManual WARNING: REPLACEMENT GLASS SHOULD ONLY BE PURCHASED FROM AN AUTHORIZED DEALER (SEE REPLACEMENT PARTS SECTION). TEMPERED GLASS OR ORDINARY GLASS WILL NOTWITHSTANDTHEHIGHTEMPERATURESOFTHESTOVE. WARNING: IF YOU HAVE TO CHANGE THE DOOR GLASS, MAKE SURE YOU INSTALL THE NEW GASKETS AT THE SAME PLACE AS THE ORIGINAL IN ORDER TO KEEP THE AIRWASH WORKING PROPERLY DOORGASKETMAINTENANCE Itisimportanttomaintainthedoorgasketingoodcondition.Afterawhile,thegasketwillwear andcompress;adjustingthedoormaythenberequired.ifthedooradjustmentisnotsufficient, replace the door gasket with a genuine one. If the stove door is not properly sealed, it will be difficulttokeepthedoorglasscleanandcombustiongasesmayleakintotheroom DOORADJUSTMENT Inorderforyourstovetoburnatitsbestefficiency,thedoormustprovideaperfectsealwiththe firebox.therefore,thegasketshouldbeinspectedperiodicallymakingsuretoobtainanairtight fit.airtightnesscanbeimprovedwithasimplelatchmechanismadjustment.toadjust: Remove the lock pin by pulling and turning withpliersandturnthehandlecounterclock wiseoneturntoincreasepressure. Reinstall the lock pin (spring pin) with a smallhammer EXHAUSTCHANNELANDEXHAUSTBLOWERMAINTENANCE. Exhaust channels and the exhaust blower are located on the left hand side of the stove. The followingproceduredemonstrateshowtoperforminspectionandcleaning: In order to access the exhaust channels, open the left side decorative panels. Remove them if necessary(refertodecorativepanelinstructionsheet).removethetwocleanouttrap.toremove thecleanouttraps,youwillneedtounlockthemfirst.usingaphilipsorrobertsonscrewdriver, pushandturnthescrewcounterclockwiseandpullonthetrap. 42
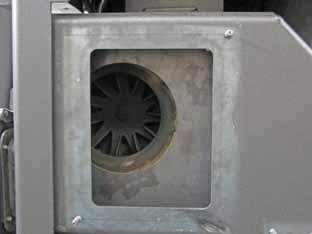
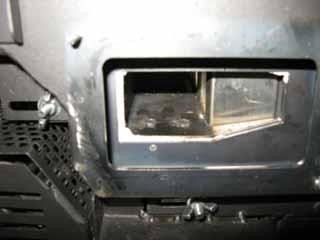
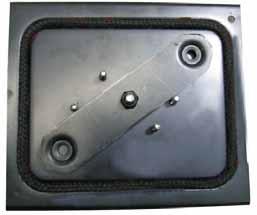
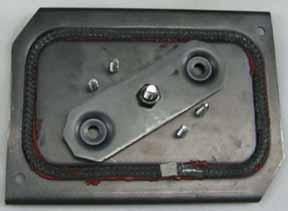
43 5000PelletStoveInstallationandOperationManual Cleanandvacuumanydirtorashbuildupintheexhaustchannelsandexhaustblowerhousing beingcarefulnottodamagetheblower sblades.usethescraperprovidedwiththestovetoclean heatexchangeroutlet. Makesurethegasketsarestillingoodcondition,replacethemifneeded. 43
44 5000PelletStoveInstallationandOperationManual 8.2 VENTINGSYSTEMMAINTENANCE CAUTION:REGULARLYEXAMINETHEVENTINGSYSTEM,THEJOINTS,ANDTHESEALINGTRIMS TO ENSURE THAT THE SMOKE AND THE COMBUSTION GASES ARE NOT DRAWN BY THE CONVECTIONBLOWER. The most efficient method to sweep the venting system is by using a 3 or 4 pellet brush dependingonyourinstallation.brushdownwardssoash,sootandcreosoteresidueswillcomeoff theinnersurfaceandfallatthebottomofthecleanoutteewheretheycanbeeasilyremoved. Theventingsystemmustbeingoodconditionandkeptclean. WARNING:IFASIGNIFICANTLAYEROFCREOSOTEHASACCUMULATED(3MM/1/8 ORMORE), ITMUSTBEREMOVEDIMMEDIATELYTOELIMINATETHERISKOFACHIMNEYFIRE DEALINGWITHACHIMNEYFIRE Regularchimneymaintenanceandinspectioncanpreventchimneyfires.Ifyouhaveachimney fire,followthesesteps: 1. Alertyourfamilyofapossibledanger. 2. Ifyouneedassistance,callthefiredepartment; 3. Ifpossible,useadrychemicalfireextinguisher,bakingsodaorsandtocontrolthefire.Donot usewater,asitmaycausedangerousvapourexplosions. 4. Check outside to ensure that sparks and hot embers coming out of the chimney are not ignitinganycombustiblematerialcloseby; 5. Donotusethestoveagainuntilyourchimneyandstovehavebeeninspectedbyaqualified chimneysweeporafiredepartmentinspector; CAUTION:CLEANOUTOFTHESTOVEANDTHEVENTINGSYSTEMISESPECIALLYIMPORTANTAT THEENDOFTHEHEATINGSEASONTOMINIMIZECORROSIONDURINGTHESUMMERMONTHS, CAUSEDBYACCUMULATEDASH SOOTANDFLYASH Thecombustionproductscontainsmallparticlesofflyash.Flyashcanaccumulateespeciallyin horizontal sections of exhaust pipe and restrict the flow of combustion gases. Incomplete combustion, produced when igniting, shut down or misuse of the stove will cause some soot formationwhichcanaccumulateinventingsystem.theventingsystemmustbeinspectedatleast twiceayeartodetermineifcleaningisnecessary. 44
45 5000PelletStoveInstallationandOperationManual 9 TROUBLESHOOTING Whenyouhaveissueswithyourstove,yourfirstreactionmaybetocalltechnicalsupport.This sectionwillhelpyousavetimeandmoneybyenablingyoutosolvesimpleproblemsbyyourself. Mostcommonproblemsaregenerallycausedbythefollowingfivefactors: 1. Wrongoperationorlackofmaintenance; 2. Badinstallation; 3. Poorqualitycombustible; 4. Componentfailure; 5. Factorydefect. Thestoveisequippedwithapcboardthatallowsthestovetodiagnoseitself.Itisthusimportant nottounplugthestoveifthereisanissuewithit.first,becauseunpluggingthestovewilldisable allthesecurityfeaturesofthestove,andsecond,becauseyouwillnotbeabletoseetheerror codegivenbythestovetounderstandwhatistheproblem.itisthusimportanttoreadcarefully thissectionbeforecallingtechnicalsupport. Thefollowingsectionswillhelpyoutesteachcomponentindividuallyandwillalsogiveyoumany tipsinhowtosolveanyproblemsrelatedtoaspecificerrorcode. NOTE:IFYOUNEEDTOCONTACTYOURDEALERORTECHNICALSUPPORT,MAKESURETOHAVE THEMODELOFYOURSTOVEANDTHESERIALNUMBERONHAND.(THEYCANBEFOUNDONTHE CERTIFICATIONLABELINSIDETHEHOPPERLID). 9.1 VALIDATINGSTATUS When using your stove, you can validate at any time, the status of any of the following components: Electroniccomponents(lowpowerrated) o F160(securityheatsensor) o L250A(securityheatsensor) o Pressureswitch(securitysensor) o Hopperswitch(mechanicalsecuritysensor) o Thermostat(temperatureregulatordevice) Electricalcomponents(highpowerrated) o Igniter(heater) o Combustionblower(willfeedfirewithfreshair) o Convectionblower(willsendhotairintotheroom) o Exhaustblower(willextractcombustiongasoutofthestove) o Augermotor1(locatedunderthehopper) o Augermotor2(willfeedthefirewithpellets) 45

46 5000PelletStoveInstallationandOperationManual WARNING: RISK OF ELECTRICAL SHOCK. IF YOU NEED TO MANUALLY TEST, MANIPULATE OR REPLACE ANY COMPONENTS, THE STOVE NEEDS TO BE DISCONNECTED FROM THE WALL OUTLET. Tovalidatethestatusofacomponent,youneedtogotothe TROUBLESHOOT page.fromthe Main Status Page, Press the LETTER icon and choose TROUBLESHOOT in the menu. Oncethereyouwillbeabletonavigatethrough5pages. Onpage1youwillseealistofeveryelectroniccomponentstatus.Ifthesquarehasagreencolor, itmeansthestatusofthecomponentisnormal,regardlessifitisontheleftorrightcolumn.ifthe squarehasaredcolor,itmeansthatitsstatusisabnormal.thisscreenwillgiveyoustatusinreal time,meaningthatwhenthestoveisrunning,ifacomponentstatuschange,youwillseeitright away.page2and3willgiveyoustatisticsonhowmanytimesyouhadaspecificerrorcode. WITHGREENICONS WITHREDICONS Pressureswitchisatclosedstate. Thisisnormalstate. Pressureswitchisatopenedstate. Thisisnormalstate. Pressureswitchisatclosedstate. Thisisabnormalstate. Pressureswitchisatopenedstate. Thisisabnormalstate. 46
47 5000PelletStoveInstallationandOperationManual 9.2 TESTINGCOMPONENTS Ifyoususpectanelectricalcomponenttobedefective,youcantestitfromthe TROUBLESHOOT page.fromthemainstatuspage,pressthe LETTER icon andchoose TROUBLESHOOT in themenu.page4and5willallowyoutotesteveryelectricalcomponent.notethatyouwillbe abletotestonlycomponentswhenthestoveiscold(showingthisicon COOL ). Forexample,ifyoupressonthewhitesquarenextto GEARMOTOR1,theauger1willturnfor 30seconds.Thiswillgiveyouthepossibilitytoseetheaugerrunningandhearthemotorrunning aswell. PAGE 4 GEAR MOTOR 1 GEAR MOTOR 2 IGNITOR ON OFF EXIT 9.3 MAINERRORCODES,POSSIBLECAUSESANDSOLUTIONS WARNING: RISK OF ELECTRICAL SHOCK. IF YOU NEED TO MANUALLY TEST, MANIPULATE OR REPLACE ANY COMPONENTS, THE STOVE NEEDS TO BE DISCONNECTED FROM THE WALL OUTLET. This section contains main error codes, possible causes and many suggestions to guide you in resolving them. After giving an error code, your stove will shut down by itself and start a cool downcycle.ifyouwanttostartyourstoveagain,youwillneedtopressonthe RESET buttonandthenonthe ON/OFF button cycleiscompleted..yourstovewillonlyrestartwhenthecooldown If after performing all the possible solutions mentioned on the following section, you are still experiencingproblemswithyourstove,callyourlocaldealeroraservicetechnicianat(418) orwritean totech@sbiinternational.com. NOTE:IF,AFTERPERFORMINGALLTHEPOSSIBLESOLUTIONSMENTIONEDINTHEFOLLOWING SECTION, YOU ARE STILL EXPERIENCING PROBLEMS WITH YOUR STOVE, CALL YOUR LOCAL DEALER OR A SERVICE TECHNICIAN AT (418) YOU CAN ALSO WRITE AN TO TECH@SBIINTERNATIONAL.COM.ALL SAREANSWEREDWITHINA24HDELAY. 47
48 5000PelletStoveInstallationandOperationManual NOTE:IFYOUNEEDTOCONTACTYOURDEALERORTECHNICALSUPPORT,MAKESURETOHAVE THEMODELOFYOURSTOVEANDTHESERIALNUMBERONHAND.(THEYCANBEFOUNDONTHE CERTIFICATIONLABELINSIDETHEHOPPERLID). BLOCKED FLUE A BLOCKAGE WAS DETECTED BY THE PRESSURE SWITCH THE FOLLOWING MAY HAVE CAUSED YOUR PROBLEM (BLOCKED FLUE): THE PRESSURE TAP IS BLOCKED THE FLUE IS BLOCKED OR NEEDS CLEANING THE FLUE IS NOT PROPERLY INSTALLED A BACK DRAFT OCCURED INSIDE THE FLUE THE FOLLOWING MAY HAVE CAUSED YOUR PROBLEM (BLOCKED FLUE): THE PRESSURE SWITCH WIRE CONNECTIONS ARE FAULTY THE PRESSURE SWITCH HOSE IS DISCONNECTED THE EXHAUST BLOWER FAILED CONSULT OWNER S MANUAL FOR MORE DETAILS RESET DETAILS BACK BACK Pressuretap(locatedontheexhaustblower)isblocked.Pullofftheairhosefromtheexhaust blowerpressuretapandthewhite()pressureswitchtap.useathinwiretoclearthepressure tapblockageandblowthroughthehose.ifairflowsfreely,thehoseisfine.ifairdoesnotflow throughthehose,useathinwiretocleartheblockage. The flue is blocked or needs cleaning. One of the following components is obstructed or blockedbyashesofbyaforeignobject;airintakeshutter,combustionblower,burnpot,heat exchangers and exhaust channels, exhaust blower and or venting system. Refer to the maintenancesection. The flue is not properly installed. Make sure the venting system meets the criteria in the installationsectionofthismanualaswellastheventingsystemmanufacturer sinstructions. Abackdraftoccurredinsidetheflue.Thiscanoccuronaverywindydayorifyourventing systemdoesnothaveapropertermination. Thepressureswitchwireconnectionsarefaulty.Makesurethatthepressureswitchwires andconnectionsarenotgroundedorloose.replaceorreplugwiresifnecessary. Thepressureswitchhoseisdisconnected.Makesurethepressureswitchhoseiswellinstalled ontheexhaustblowerpressuretapandonthewhite()pressureswitchtap.ifnot,reinstallit. Theexhaustorcombustionblowerfailed.GotothetroubleshootingpageontheLCDscreen and test the combustion and the exhaust blowers independently (see Section 9.2 Testing Components).Ifoneofthemdoesnotwork,makesurethereispowerandthatblowersare wellconnected.iftheystilldon twork,checkf4andf5fuseonthecontrolboard.ifthefuses aregood,thecombustionorexhaustblowerisprobablydefective;replacepart. Pressureswitchisdefective.Evenifthisisveryrare,thepressureswitchcouldbedefective. Totestit,gotothetroubleshootingpageontheLCD(seeSection9.2TestingComponents). andstarttheexhaustblower.ifthepressureswitchsquareswitchfromtherightcolumntothe leftcolumn,itmeansthepressureswitchworks.ifnot,thepressureswitchisdefectiveand needstobereplaced. 48
49 5000PelletStoveInstallationandOperationManual NO FUEL THE EXHAUST TEMPERATURE INDICATES THAT THERE IS NO FIRE IN THE BURN POT THE FOLLOWING MAY HAVE CAUSED YOUR PROBLEM (NO FUEL): THE STOVE RAN OUT OF PELLETS THE BURN POT HOLES ARE BLOCKED THE AUGER JAMMED THE AUGER MOTOR FAILED THE FLUE TEMPERATURE SENSOR FAILED CONSULT OWNER S MANUAL FOR MORE DETAILS RESET DETAILS BACK Thestoveranoutofpellets.Refillthehopper.Press Reset then FeedandStart. Theburnpotholesareblocked.Removetheburnpotandcleanitthoroughly. The auger is jammed or auger motor failed. Go to the troubleshooting page on the LCD (see Section 9.2 Testing Components) screen and test auger motors. If one of the motors is not runningcheckifmotorisdefectiveoriftheaugerisjammed. NOTE:IFTHEHOPPERAUGERMOTORFAILEDORTHEHOPPERAUGERISJAMMED,TOAVOIDPELLET SPILLAGE,EMPTYTHEHOPPEROFITSCONTENTSBEFOREEXECUTINGTHEFOLLOWINGTESTS. o o Iftheaugermotorisdefective,checktomakesurethatelectricalconnectionsarenotloose andcheckthefusesf2andf6onthecontrolboard.ifthefusesaregood,removethefaulty auger motor from its auger housing and retest the motor separately still using the troubleshootingtestmode.makesurethehopperlidisclosed.ifthemotorworks,theauger maybejammedbyaforeignobject.ifnosignsofobstructionarefound,callyourdealerora servicetechniciantoperformacompletetesting. Ifthehopperaugerisjammed,startbyemptyingthehopper.Ifitistheburnpotaugeryou don t need to empty the hopper. To remove both augers from their housing you need to disconnectaugermotorandthenremovethefourscrewsonthesteelplatethatholdsthe augershafttotheaugerhousing.youmayneedtoremovetherearpanelforaneasieraccess. Pullouttheaugerfromthehousing.Oncetheaugerhasbeenremoved,makesuretheauger isstraight,hissurfaceisnotdamagedandtherearenoburrs,orbrokenwelds.removeany foreignmaterialthatmayhavecausedthejam.inspecttheaugerhousingforsignsofdamage suchasburrs,roughspots,orgroovescutintothemetalthatcouldhavecausedajam.clean theaugerhousingthoroughlytoremoveallpelletdust. The flue temperature sensor failed. The Thermistor is a heat sensor located on the exhaust motor housing. Its function is to tell the control board that the stove has ignited properly by measuring the heat at the exhaust. When your stove is cold, check if the exhaust blower COOL temperatureiconisshowingcool.ifyes,startthestoveandmonitortemperature.ifafter 10 minutes, the icon is still showing cool, the sensor is disconnected or defective. If the icon changesandthetemperaturerise,youmayhaveaproblemonminimumfeedrateorpilotmode. Dependingonmanyfactors(ambienttemperature,pelletquality,etc)theheatproducedbythe stove may not be sufficient to keep the exhaust temperature high enough. To resolve the situationincreasefeedrate(seesection6.1.6adjustingthecombustionlevel(heatoutput)). 49
50 5000PelletStoveInstallationandOperationManual FAILED IGNITION THE EXHAUST TEMPERATURE HAS NOT REACHED ITS START-UP VALUE AFTER TWO IGNITION ATTEMPS RESET DETAILS THE FOLLOWING MAY HAVE CAUSED YOUR PROBLEM (FAILED IGNITION): INADEQUATE FUEL IS USED THE IGNITER IS DEFECTIVE THE FLUE TEMPERATURE SENSOR FAILED CONSULT OWNER S MANUAL FOR MORE DETAILS BACK Inadequatefuelisused. Removetheburnpot,makesurethatallopeningsareclearandcheck thatnoashhasfilledthetubearoundtheigniter.refertothemaintenancesection.also,make surethatrecommendedfuelisused(seesection5.2.1properfuel). Theigniterisdefective.Gotothetroubleshootingpage(seeSection9.2TestingComponents) andfollowinstructionsforcomponentcheck.testtheignitortoseeifitglows.itshouldtakeno longerthantwominutes.ifitdoesnotglow,checkthewiringandthef3fuse.ifthewiringis properlyconnectedandthefuseisgood,testthecontinuityoftheigniterwithamultimeter. The flue temperature sensor failed. The Thermistor is a heat sensor located on the exhaust motor housing. Its function is to tell the control board that the stove has ignited properly by measuring the heat at the exhaust. When your stove is cold, check if the exhaust blower COOL temperatureiconisshowingcool.ifyes,startthestoveandmonitortemperature.ifafter 10 minutes, the icon is still showing cool, the sensor is disconnected or defective. If the icon changesandthetemperaturerise,youmayhaveaproblemonminimumfeedrateorpilotmode. Dependingonmanyfactors(ambienttemperature,pelletquality,etc)theheatproducedbythe stove may not be sufficient to keep the exhaust temperature high enough. To resolve the situationincreasefeedrate,(seesection6.1.6adjustingthecombustionlevel(heatoutput)). IGNITER FUSE THE FOLLOWING MAY HAVE CAUSED YOUR PROBLEM (IGNITER FUSE): THE IGNITER FUSE BLEW UP THE IGNITER IS DEFECTIVE THE WIRING HARNESS SHORTED RESET DETAILS CONSULT OWNER S MANUAL FOR MORE DETAILS BACK The igniter is defective: Test the continuity of the igniter with a multimeter. If it is good, the ignitorisgood.ifitisdefective,replaceitandthef3fuse. Thewiringharnessshorted.Inspectthewiringandreplaceanydefectivewireandorconnector. Makesurethewiresarenotshortedtothestoveframe.LocatethefuseF3onthecontrolboard andreplaceit.gotothetroubleshootingpage(seesection9.2testingcomponents)andfollow instructionsforcomponentcheck.testtheignitortoseeifitglows.itshouldtakenolongerthan twominutes. 50
51 5000PelletStoveInstallationandOperationManual AUGER FUSE THE FOLLOWING MAY HAVE CAUSED YOUR PROBLEM (AUGER FUSE): THE AUGER FUSE BLEW UP THE AUGER IS JAMMED THE AUGER MOTOR IS DEFECTIVE THE WIRING HARNESS SHORTED CONSULT OWNER S MANUAL FOR MORE DETAILS RESET DETAILS BACK The auger is jammed or auger motor failed. Go to the troubleshooting page (see Section 9.2 Testingcomponents)ontheLCDscreenandtestaugermotors.Ifoneofthemotorsisnotrunning checkifmotorisdefectiveorjammed. NOTE:IFTHEHOPPERAUGERMOTORFAILEDORTHEHOPPERAUGERISJAMMED,TOAVOIDPELLET SPILLAGE,EMPTYTHEHOPPEROFITSCONTENTSBEFOREEXECUTINGTHEFOLLOWINGTESTS. o o Iftheaugermotorisdefective,checktomakesurethatelectricalconnectionsarenotloose andcheckthefusesf2andf6onthecontrolboard.ifthefusesaregood,removethefaulty auger motor from its auger housing and retest the motor separately still using the troubleshootingtestmode.makesurethehopperlidisclosed.ifthemotorworks,theauger maybejammedbyaforeignobject.ifnosignsofobstructionarefound,callyourdealerora servicetechniciantoperformacompletetesting. Ifthehopperaugerisjammed,startbyemptyingthehopper.Ifitistheburnpotaugeryou don t need to empty the hopper. To remove both augers from their housing you need to disconnectaugermotorandthenremovethefourscrewsonthesteelplatethatholdsthe augershafttotheaugerhousing.youmayneedtoremovetherearpanelforaneasieraccess. Pullouttheaugerfromthehousing.Oncetheaugerhasbeenremoved,makesurethereare nobentflights,burrs,orbrokenwelds.removeanyforeignmaterialthatmayhavecaused thejam.inspecttheaugerhousingforsignsofdamagesuchasburrs,roughspots,orgrooves cut into the metal that could have caused a jam. Clean the auger housing thoroughly to removeallpelletdust. The wiring harness shorted. Make sure the auger motor wiring is properly connected and not shorted. UNIT OVERHEAT AN OVERHEAT ZONE WAS DETECTED ON THE AUGER HOUSING THE FOLLOWING MAY HAVE CAUSED YOUR PROBLEM (OVERHEAT): INADEQUATE FUEL IS USED THE FLUE IS NOT PROPERLY INSTALLED THE FLUE IS BLOCKED OR NEEDS CLEANING THE STOVE NEEDS MAINTENANCE THE FOLLOWING MAY HAVE CAUSED YOUR PROBLEM (OVERHEAT): THE COMBUSTION CHAMBER IS NOT AIR TIGHT THE CONVECTION BLOWER FAILED CONSULT OWNER S MANUAL FOR MORE DETAILS RESET DETAILS BACK BACK Inadequatefuelisused.Removetheburnpot,makesurethatallopeningsareclearandcheck thatnoashhasfilledthetubearoundtheigniter.refertothemaintenancesection.also,make surethatrecommendedfuelisused(seesection5.2.1properfuel). 51
52 5000PelletStoveInstallationandOperationManual The flue is not properly installed. Make sure the venting system meets the criteria in the installationsectionofthismanualaswellastheventingsystemmanufacturer sinstructions. Theflueisblockedorneedscleaning.Oneofthefollowingcomponentsisobstructedorblocked; airintakeshutter,combustionblower,burnpot,heatexchangersandchannels,exhaustblower andorventingsystem.refertothemaintenancesection. Thestoveneedsmaintenance.Refertomaintenancesection. The burn pot is not installed properly. Make sure the burn pot is well installed and locked in place. Thebaffleisnotinstalledproperly.Makesureallthreepanelsarewellinstalled. The convection blower is defective. Go to the troubleshooting page (see Section 9.2 Testing Components)ontheLCDscreenandtesttheconvectionblower. The convection blower needs maintenance. Carefully clean blower housing and make sure blowerlouversarenotblocked. NOTE: IF THE CODE APPEARS MORE THAN THREE TIMES, THE LCD SCREEN WILL LOCK ITSELF UP ANDYOUWILLNEEDTOCALLASERVICETECHNICIANTOUNLOCKIT. HOPPER LID OPEN THE HOPPER LID HAS REMAINED OPEN FOR MORE THAN 3 MINUTES THE FOLLOWING MAY HAVE CAUSED YOUR PROBLEM (HOPPER LID): THE HOPPER LID REMAINED OPEN FOR MORE THAN 3 MINUTES THE HOPPER LID SWITCH IS DEFECTIVE OR MISCONNECTED CONSULT OWNER S MANUAL FOR MORE DETAILS RESET DETAILS BACK Thehopperlidremainedopenformorethan3minutes.Asasecuritymeasure,theaugerstops turningandfeedingpelletsassoonasthehopperlidopens.itwillresumenormaloperationas soonasthehopperlidisclosed.ifthehopperlidstaysopenformorethan3minutes,thestove willstop. Thehopperlidswitchisdefectiveormisconnected.Makesuretheswitchisproperlyconnected. If it is, the hopper switch may be defective. Go to the troubleshooting page (see Section 9.2 TestingComponents)andcheckthefunctionalityoftheswitch.Replaceifnecessary. POWER LOSS POWER WAS INTERRUPTED WHILE BURNING RESET 52
53 5000PelletStoveInstallationandOperationManual Powerwasinterruptedwhileburning.Afterthecooldowncycle,thestovewillrestartusingthe lastsettings.press RESET togobacktothemainstatuspage. Note: For a short power failure (less than 5 seconds), the stove will continue to function at the selectedspeed. SMOKESMELL Ventingsystemleaks.Inspectallventconnections.Thisisapressurizedventingsystem.Allvent connectorjointsmustbesealedandfastenedinaccordancewiththepelletventmanufacturer's instructionstoensureconsistentperformanceandavoidsmokeandashspillage. Worngasket.Gasketsmaybeleaking(Doors,cleanouttraps,etc).Makesurethatallgasketsare ingoodconditionandreplacethemwithoriginalpartsifnecessary.makesurethedooriswell adjusted(seesection8.1.9dooradjustment). Negativepressure.Afaintwoodburningodorduringignitionorshutdownisnormal.Although,if thisincreasesbeyondnormalorifyounoticeanunusualsootbuilduponwallsorfurniture,check your venting system carefully for leaks and make sure all gaskets are in good condition. Also, makesurerecommendedmaintenanceschedulehasbeenperformed.notethatyoumayneedto addafreshairkittoyourstovetosolvethisproblem.(seeappendixf:combustionairsupply) COMBUSTIONAIRSTARVATION Ventingsystemisdirty.Refertothemaintenancesectionofthismanual. The flue is not properly installed. Make sure the venting system meets the criteria in the installationsectionofthismanualaswellastheventingsystemmanufacturer sinstructions. Inadequatefuelisused.Removetheburnpot,makesurethatallopeningsareclearandcheck thatnoashhasfilledthetubearoundtheigniter.refertothemaintenancesection.also,make surethatrecommendedfuelisused(seesection5.2.1properfuel)andsettingsareadjustedto thetypeofpelletsthatarebeingused(seesection6.1.6adjustingthecombustionlevel(heat Output)). Airintakechannelisrestricted.Visuallyinspecttheairintakechannelthatleadstotheburnpot for foreign material. Make sure that the airintake shutter is functional and free of any obstruction. Thecombustion/exhaustblowerfailed.GotothetroubleshootingpageontheLCDscreenand test the combustion and the exhaust blowers independently (see Section 9.2 Testing Components).Ifoneofthemdoesnotwork,makesurethereispowerandthatblowersarewell connected.iftheystilldon twork,checkf4andf5fuseonthecontrolboard.ifthefusesare good,thecombustionorexhaustblowerisprobablydefective;replacepart. THELCDTOUCHSCREENDOESNOTLIGHT. Thereisnocurrentgoingtothestove.Checkifthestoveisconnectedandifthereiscurrentin thewalloutlet.checkifthef7fuseisblown.replaceitifnecessary. TELCO wire is defective of not connected properly. Convection blower, combustion blower, exhaustblowerandburnpotaugerwillstartbutthestovewillbeepcontinuouslyandthelcd touchscreenwillremainblack.checkconnectionandchangewire,ifnecessary. 53
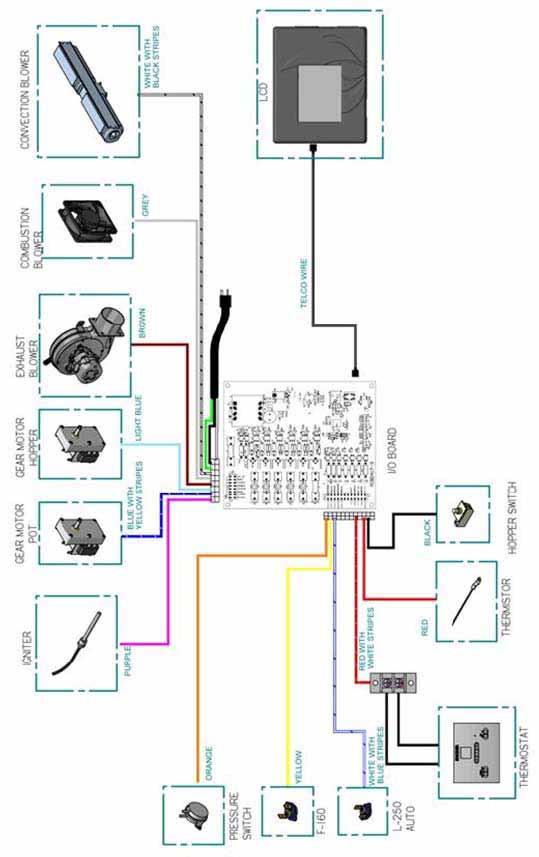
54 5000PelletStoveInstallationandOperationManual 10 WIRINGDIAGRAM 54

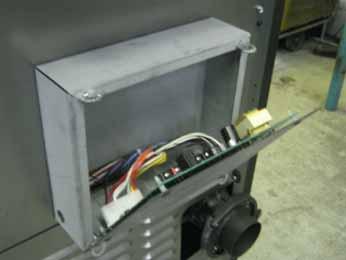
55 5000PelletStoveInstallationandOperationManual 11 FUSESACCESS WARNING:UNPLUGTHESTOVEBEFORECHANGINGTHEFUSES. Allfusesarelocatedinsidethehousingoftheelectronicboard;thehousingisonthebackofyour stove.unplugyourstoveandturnthefourspringcliptoopenthehousing. 55
56 5000PelletStoveInstallationandOperationManual 12 COMPONENTLOCATION 56
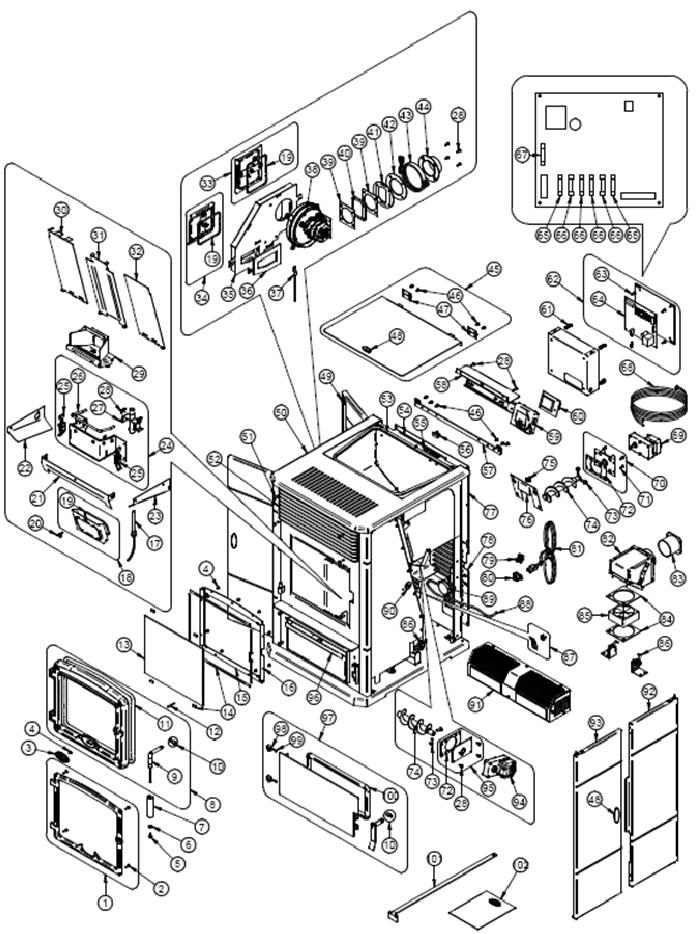
57 5000PelletStoveInstallationandOperationManual 13 EXPLODEDVIEWANDREPLACEMENTPARTS 57
58 5000PelletStoveInstallationandOperationManual IMPORTANT: THIS IS DATED INFORMATION. When requesting service or replacement parts for your stove, please provide the model number and the serial number. We reserve the right to changepartsduetotechnologyupgradeoravailability.contactanauthorizeddealertoobtainany of these parts. Never use substitute materials. Use of nonapproved parts can result in poor performanceandsafetyhazards. # ITEM DESCRIPTION QTY 1 OA10705 BLACKDOOROVERLAY OA10706 BRUSHEDNICKELDOOROVERLAY OA10707 GOLDPLATEDDOOROVERLAY SCREW#832X5/8''PANQUADREXZINC OSBURNDOORLOGO SCREW#832X5/16''TRUSSQUADREXZINC /420X1/2"PANQUADBLACKSCREW /64""AA"TYPEWASHER DRILLEDBLACKWOODENDOORHANDLE 1 8 SE24227 CASTIRONDOORWITHHANDLEANDGASKET 1 9 PL65273 DOORHANDLEROD 1 10 AC09185 DOORLATCHKIT 2 11 AC06900 BLACK1/2''ROUNDX9'GASKETKITWITHADHESIVE SPRINGTENSIONPIN5/32"DIAX11/2"LONG 1 13 PL64470 REPLACEMENTGLASS 1 14 AC06810 SELFADHESIVEBLACKGASKETKIT1/8"X3/8" 1 15 PL64414 HINGESIDEGLASSRETAINER 1 16 PL64413 HANDLESIDEGLASSRETAINER 1 17 SE44132 PELLETIGNITERASSEMBLY120V 1 18 SE64289 BURNPOTRECEPTACLEMAINTENANCEACCESSDOOR 1 19 AC06815 GASKETKITSELFROUNDBLACK3/16" WINGNUT1/420X1/2''ZINC 1 21 PL64290 FRONTASHDEFLECTOR 1 22 PL64276 LEFTASHDEFLECTOR 1 23 PL64277 RIGHTASHDEFLECTOR 1 24 SE64309 BURNPOTRECEPTACLE FIREPOTLATCH 2 26 AC06300 ROUNDGASKETANDSILICONEKIT5/16"X6.6' IGNITERTUBE THREADCUTTINGSCREW1024F5/8"HEXWASHERHEAD SE64313 BURNPOT 1 30 PL64264 LEFTBAFFLE 1 31 PL64458 MIDDLEBAFFLE 1 32 PL64252 RIGHTBAFFLE 1 33 SE64378 EXHAUSTCHANNELMAINTENANCEACCESSDOOR 1 58
59 5000PelletStoveInstallationandOperationManual # ITEM DESCRIPTION QTY 34 SE64379 EXHAUSTBLOWERMAINTENANCEACCESSDOOR 1 35 SE64375 EXHAUSTCHANELASSEMBLY EXHAUSTGASKET THERMISTORASSEMBLY 1 38 SE44144 EXHAUSTFANASSEMBLY OUTLETEXHAUSTBLOWERGASKET 2 41 PL64462 BLOWEROUTLETSPACER 1 42 PL64463 ROUNDEXHAUSTPLATE VENTADAPTERSECURECLAMP 1 44 SE64345 VENTADAPTER 1 45 SE64267 HOPPERLID CUTTINGTHREADSCREW1024TYPE"F"X3/8"HEXWASHER HINGE2''X11/2'' HOPPERHANDLE RUBBERBUMPER 4 50 SE64437 TOPASSEMBLY SCREWPANTORXTYPEF1/420X1"BLACK 4 52 SE64410 GRILLASSEMBLY 1 53 AC06820 EPDMGASKETKIT4.5FT BUILDTOORDER BUILDTOORDER HOPPERLIDSAFETYSWITCH 1 57 PL64466 HOPPERHINGESUPPORT CUTTINGTHREADSCREW1024TYPE"F"X3/8"HEXWASHER SE64356 LCDWITHHOUSING 1 60 PL64356 BUILDTOORDER SPRINGCLIP 1 62 SE64459 PCBOARDWITHHOUSING ELECTRONICBOARDCLIP 1 64 PL64357 MOTHERBOARD6OUPUT FUSE5A/250V/1/4"DIA.X11/4''LONG FUSE3A/250V/1/4"DIA.X11/4''LONG FUSE7.5A/250V/1/4"DIA.X11/4''LONG MAINBOARDWIREHARNESS GEARMOTORFORPELLETSTOVE1.7RPM 1 70 SE24233 GEARMORTORSUPPORTASSEMBLY THREADCUTTINGSCREW1024F5/8"HEXWASHERHEAD AUGERSUPPORTGASKET BOLT5/16''18X3/4"HEXGRADE CASTIRONAUGER 2 59
60 5000PelletStoveInstallationandOperationManual # ITEM DESCRIPTION QTY THERMODISC36T11L25025AUTOMATIC BUILDTOORDER 1 77 PL64337 TOPREARPANEL 1 78 PL64259 BOTTOMREARPANEL THERMOSTATTERMINAL POWERCORDRECEPTACLE POWERCORD6' 1 82 SE64363 COMBUSTIONAIRINLETBOX PLASTICBACKDRAFTDAMPER COMBUSTIONBLOWERGASKET 2 85 SE44147 AXIALBLOWERASSEMBLY TENSIONCLAMP THERMODISC36T12F /8''X24"SILICONEHOSE PRESSURESWITCH MAGNETINSTEELRECEPTACLE 2 91 SE64373 DOUBLECAGEBLOWERWITHHOUSING 1 92 SE64434 LEFTORRIGHTREARSIDEDECORATIVEPANEL 2 93 SE64432 LEFTORRIGHTFRONTSIDEDECORATIVEPANEL AUGERGEARMOTOR1RPM 1 95 SE64319 HOPPERAUGERSUPPORTWITHBUSHINGANDGASKET BUILDTOORDER 1 97 SE64440 ASHDRAWERACCESSDOOR DOORHINGE MECHANICALSCREW1032X1/2''FLATHEAD AC06725 GLUE&3/4"WHITEGASKETKIT PL64498 SCRAPER SE45548 OSBURN5000INSTRUCTIONMANUALKIT 1 60
61 5000PelletStoveInstallationandOperationManual APPENDIXA:HORIZONTALANDVERTICALVENTCHART PossibleVerticalventlength(feet) PossibleHorizontalventlength(feet) For example, let s imagine an installation consisting of a horizontal ventcomingoutatthebackofthestoveonatotaldistanceof8feet. Thishorizontalrunisfollowedbyateeanda6footverticalrise.This type of installation is not acceptable. As you can see, the vent termination is clearly outside the allowed configuration zone on the chart because the venting system proposed does not have at least onefootofverticalriseforeachfootofhorizontalrun. 61
62 5000PelletStoveInstallationandOperationManual Instead,iftheinstallationconsistedofahorizontalventcomingout atthebackofthestoveonatotaldistanceof4feet,followedbya teeanda6footverticalrise,itwouldbeacceptable.theinstallation endshouldbewithintheallowableconfigurationzoneonthechart sinceitwouldhaveatleastonefootofverticalriseforeachfootof horizontalrun.furthermore,thetotalverticalrisewouldbeatleast 3foothigh. WARNING:Toreducetheriskofsmokespillagethereshouldalways beatleastonefootofverticalriseforeachfootofhorizontalrun.in allcases,atleast3feetofverticalriseisneeded. 62
63 5000PelletStoveInstallationandOperationManual APPENDIXB:LCDSLIDINGBRACKETMOUNTING Step1 TheLCDslidingbracketispreassembledontherighthandsidewhenfacingthestove.Toreverse theassemblytoaleftsideconfiguration,extendtherailwiththelcdsupport(e)inordertoaccess the two screws (A) which secures the rail mechanism to the mounting bracket. Remove the screws, rotate the rail 180 and reassemble the rail to the mounting bracket using the screws previouslyremoved. Step2 Remove the screws (C) located on the top edge of the back of the stove. Secure the mounting bracket(b)inplacewiththesamescrews. 63
64 5000PelletStoveInstallationandOperationManual Step3 TaketheTelcoblackwire(D)whichislocatedontherearbottompanelandplugitintothebackof thelcdtouchscreeninterfacereceptacle. Step4 Finally,securetheLCDtouchscreenhousing(F)ontherail(E). 64


65 5000PelletStoveInstallationandOperationManual APPENDIXC:FLAMECARACTERISTICS Efficientflame An efficient flame should be bright but not too vigorous.theflameshouldalsohave ayellowto bright look. There should also be some small embers or spark exiting the flame and burn pot. Thefollowingpictureistheflamepatternthatwill produceoptimumefficiency. Firewithtoomuchair Asmallblowtorchflameasintheimagebelowis aresultoftoomuchoxygenbeingsuppliedtothe fire.thiscausestheflametobeveryshortwitha bright yellow to almost white, flame look. This patterndoesnotallowoptimumheattransferto the exchanger therefore reduces convection efficiency.dependingonthequalityofthepellets, there are usually more embers or sparks exiting theflameandburnpot.torectifythiscondition, reduce combustion air flow to obtain a flame patternasintheimageabove. Firewithnotenoughair If the flame pattern is tall, lazy and orange with black smoky tips it is generally a result of insufficient air flow through the system. The possiblecausesareeitheralackofoxygentothe fire, high moisture content pellet, obstructed channel or vent. This situation will lead to excessive black soot accumulation on the baffle andtheglass.torectifythiscondition,makesure thestoveandtheventsystemisclean,thepellet beingusedisdryandincreasecombustionairflow ifnecessary. 65
66 5000PelletStoveInstallationandOperationManual APPENDIXD:INSTALLINGATHERMOSTAT Usingathermostatwillhelpyoumaintainaconstanttemperaturethroughoutthehouse.Alow voltagethermostatisrequired.afixedwallmountorhandheldmodelcanbeused. Note:Thermostatmanufacturer sinstructionalwaysoverridestheinformationpublishedinthe followingsection. Thermostatlocation Location of the thermostat is very important to obtain comfort and efficiency from your stove. Locatethethermostat4to5feetabovetheoorinaccordancewithapplicablebuildingcodes. Install the thermostat in a location that provides good airow characteristics and avoid areas behinddoors,nearcorners,airvents,directsunlightorheatgeneratingdevices.itshouldalsobe locatedatleast15to20feetfromthestove.topreventcycling,youshouldavoidinstallingthe thermostatonapoorlyinsulatedoutsidewallordirectlyinfrontofthestove. Wiredthermostat Beforeinstallingthethermostat,unplugthestovefromthepoweroutlet. First,connectthetwothermostatwirestotheterminalblocklocatedattherearontherighthand side of the stove while facing it. Loosen the two middle screws and insert the wires in the terminals. Tighten the two screws. Then, open the thermostat and connect the wires as per manufacturer sinstructions. 66


67 5000PelletStoveInstallationandOperationManual Hereisanexampleofwhatyourthermostatcouldlooklike: Connectonewireon RH andtheotherwireon W.Redwirejumpercanbeleftinstalled.For furtherinformationrefertothemanufacturer sinstructions. Wirelessthermostat Ifyouareusingawirelessthermostatorahandheldthermostaticremotecontrol,connectthe twothermostatwirestotheterminalblocklocatedattherearontherighthandsideofthestove whilefacingit.ifthereceiverwiresareequippedwithquickconnectterminalsyoucanconnect themdirectlytothestove swiringharness. QUICKCONNECT TERMINALS To do so, open the right hand side decorative panels and disconnect the two (2) harnesswires attachedtotherearoftheterminalblockandconnectthemtothereceiverwires. 67
INSTALLATION AND OPERATION MANUAL
 5000 INSTALLATION AND OPERATION MANUAL Safety tested according to ULC S627, UL1482 and ASTM E1509 by Intertek Testing Services and according to Oregon Administrative Rules for Mobile Homes 814 23 900 through
CONTACT LOCAL BUILDING OR FIRE OFFICIALS ABOUT RESTRICTIONS AND INSTALLATION INSPECTION REQUIREMENTS IN YOUR AREA
 INSTALLATION AND OPERATION MANUAL EUROSTAR Safety tested according to ULC S627, UL1482 and ASTM E1509 by Intertek Testing Services and according to Oregon Administrative Rules for Mobile Homes 814-23-900
INSTALLATION AND OPERATION MANUAL
 INSTALLATION AND OPERATION MANUAL 5000 (OP00050 model) Safety tested according to ULC S627, UL1482 and ASTM E1509, and also according to Oregon Administrative Rules for Mobile Homes 814-23-900 through
EUROSTAR (EP00055 model)
") INSTALLATION AND OPERATION MANUAL EUROSTAR (EP00055 model) Safety tested according to ULC S627, UL1482 and ASTM E1509 by an accredited laboratory and according to Oregon Administrative Rules for Mobile
INSTALLATION AND OPERATION MANUAL EUROSTAR (EP00055 model) Safety tested according to ULC S627, UL1482 and ASTM E1509 by an accredited laboratory and according to Oregon Administrative Rules for Mobile
Installation and Operation Manual Eco-65
 Installation and Operation Manual Eco-65 Safety tested according to ULC S627, UL1482 and ASTM E1509 by Intertek Testing Services. INSTALLATION BY A PROFESSIONAL IS STRONGLY RECOMMENDED Fabricant de poêles
SAFETY PRECAUTIONS 1 OWNER S MANUAL
 SAFETY PRECAUTIONS 1 MODEL EUROMAX OWNER S MANUAL Warning: If your appliance is not properly installed a house fire may result. For your safety, follow the installation directions. Contact local building
INSTALLATION AND OPERATION MANUAL.
 INSTALLATION AND OPERATION MANUAL Volta (OP00055) Safety tested according to ULC S627, UL1482 and ASTM E1509 by an accredited laboratory. CONTACT LOCAL BUILDING OR FIRE OFFICIALS ABOUT RESTRICTIONS AND
SAFETY PRECAUTIONS 1 ECO - 65 OWNER S MANUAL
 SAFETY PRECAUTIONS 1 ECO - 65 OWNER S MANUAL Warning: If your appliance is not properly installed a house fire may result. For your safety, follow the installation directions. Contact local building or
OWNER S MANUAL PROFESSIONAL INSTALLATION IS HIGHLY RECOMMENDED
 ECO - 65 OWNER S MANUAL Warning: If your appliance is not properly installed a house fire may result. For your safety, follow the installation directions. Contact local building or fire officials about
FP-45 FREESTANDING (FL066 model) OWNER S MANUAL
 OWNER S MANUAL") FP-45 FREESTANDING (FL066 model) OWNER S MANUAL Warning: If your appliance is not properly installed, a house fire may result. For your safety, follow the installation directions. Contact local building
FP-45 FREESTANDING (FL066 model) OWNER S MANUAL Warning: If your appliance is not properly installed, a house fire may result. For your safety, follow the installation directions. Contact local building
ECO-45 (DP00045 model) OWNER S MANUAL
 OWNER S MANUAL") ECO-45 (DP00045 model) OWNER S MANUAL Warning: If your appliance is not properly installed a house fire may result. For your safety, follow the installation directions. Contact local building or fire officials
ECO-45 (DP00045 model) OWNER S MANUAL Warning: If your appliance is not properly installed a house fire may result. For your safety, follow the installation directions. Contact local building or fire officials
MODEL HYBRID-35 FREESTANDING & FIREPLACE INSERT OWNER S MANUAL
 MODEL HYBRID-35 FREESTANDING & FIREPLACE INSERT OWNER S MANUAL Warning: If your appliance is not properly installed, a house fire may result. For your safety, follow the installation directions. Contact
OWNER S MANUAL PROFESSIONAL INSTALLATION IS HIGHLY RECOMMENDED. Manufactured by:
 BIO-45 MF (EP00045 model) OWNER S MANUAL Warning: If your appliance is not properly installed a house fire may result. For your safety, follow the installation directions. Contact local building or fire
PELLET STOVE OPERATING & INSTALLATION INSTRUCTIONS
 PELLET STOVE OPERATING & INSTALLATION INSTRUCTIONS 14142 Tasman 40,000 Insert Model Tasman 40,000 Free Standing Model Please read this entire manual before installation and use of this pellet fuel burning
Installation and operating instructions For the CADDY ALTERNA pellet furnace
 PSG 250, de Copenhague Saint-Augustin-de-Desmaures (Quebec) G3A 2H3 Installation and operating instructions For the CADDY ALTERNA pellet furnace READ THIS MANUAL THOROUGHLY BEFORE OPERATING THE FURNACE
MODEL ECO-45 OWNER S MANUAL
 MODEL ECO-45 OWNER S MANUAL Warning: If your appliance is not properly installed a house fire may result. For your safety, follow the installation directions. Contact local building or fire officials about
Classic Cast P4000 OWNER S MANUAL
 Classic Cast P4000 OWNER S MANUAL WARNING: If your appliance is not properly installed a house fire may result. For your safety, follow the installation directions. Contact local building or fire officials
ECONOMY SERIES P22 OWNER S MANUAL
 ECONOMY SERIES P22 P22FSL P22I P22FSA OWNER S MANUAL WARNING: If your appliance is not properly installed a house fire may result. For your safety, follow the installation directions. Contact local building
PLEASE KEEP THESE INSTRUCTIONS FOR FUTURE REFERENCE PELLET STOVE HP-0020S
 PLEASE KEEP THESE INSTRUCTIONS FOR FUTURE REFERENCE PELLET STOVE HP-0020S Freestanding OWNER S MANUAL Contact your building or fire officials about restrictions and installation inspection requirements
LUXURY SERIES P2700 OWNER S MANUAL
 LUXURY SERIES P2700 OWNER S MANUAL WARNING: If your appliance is not properly installed a house fire may result. For your safety, follow the installation directions. Contact local building or fire officials
MODEL BIO-35 FREESTANDING & FIREPLACE INSERT OWNER S MANUAL
 MODEL BIO-35 FREESTANDING & FIREPLACE INSERT OWNER S MANUAL Warning: If your appliance is not properly installed, a house fire may result. For your safety, follow the installation directions. Contact local
TRADITION SERIES P24 OWNER S MANUAL
 TRADITION SERIES P24 P24FS OWNER S MANUAL Warning: If your appliance is not properly installed a house fire may result. For your safety, follow the installation directions. Contact local building or fire
SOUL 700 Pellet Stove and Insert
 Owner s Manual SOUL 700 Pellet Stove and Insert Installation and Operating Instructions Save These Instructions Please read this entire manual before you install and use your BOSCA SOUL 700 Pellet Stove.
The Sonora. P23 Series PROFESSIONAL INSTALLATION IS HIGHLY RECOMENDED
 The Sonora P23 Series INSTALLATION & OPERATIONAL INSTRUCTIONS OWNER S MANUAL MANUFACTURED BY: Breckwell Hearth Products Arlington, TX PROFESSIONAL INSTALLATION IS HIGHLY RECOMENDED WARNING: If your appliance
Corn Flame Energy Corn Stove Model 3000
 Corn Flame Energy Corn Stove Model 3000 Installation and Operation Guide Read thoroughly before starting installation Save this manual for future reference SAFETY NOTICE If this stove is not properly installed,
Pellet Vent INSTALLATION INSTRUCTIONS
 Pellet Vent INSTALLATION INSTRUCTIONS A MAJOR CAUSE OF CHIMNEY RELATED FIRES IS FAILURE TO MAINTAIN REQUIRED CLEARANCES (AIR SPACES) TO COMBUSTIBLE MATERIALS. IT IS OF THE UTMOST IMPORTANCE THAT THIS PELLET
Cookshack, Inc. Model FEC100 Fast Eddy Oven. Version /1/10
 Cookshack, Inc. Model FEC100 Fast Eddy Oven Operator s Manual Please read this entire manual installation and use of this pellet fired smoker oven. Failure to follow these instructions could result in
OWNER S MANUAL MX2 TM CONTROL EQUIPPED WOOD PELLET BURNING HEATER * INSTALLATION * OPERATION * SERVICE * PARTS *
 OWNER S MANUAL MX2 TM CONTROL EQUIPPED WOOD PELLET BURNING HEATER * INSTALLATION * OPERATION * SERVICE * PARTS * KOZI PREVIA CAST IRON PELLET STOVE CAUTION: Read all instructions carefully before starting
Maintenance 50 Serie CAUTION. Before resetting your electronic card that displays an error code. OVERHEAT MESSAGE
 29-10-2013 CAUTION Before resetting your electronic card that displays an error code. OVERHEAT MESSAGE Service the stove COMPLETELY as described in this manual. Check the chimney pipe. BLOCKED FLUE MESSAGE
Pellet stoves. contemporary design. for a new destination.
 Pellet stoves contemporary design for a new destination www.enerzone-intl.com SUmmary Cambridge.... 3 Eurostar.... 4 Euromax.... 5 General and specific features.... 6 ACCESSORiES... 7 About Pellet Heating
EVOLUTION PELLET STOVE
 EVOLUTION PELLET STOVE INSTALLATION & OPERATION MANUAL Freestanding 25-EP 55-SHPEP 55-TRPEP Fireplace Insert 25-EPI 55-SHPEPI 55-TRPEPI CAUTION Please read this entire manual before installation and use
8 INSTALLATION. C. VERTICALLY WITH NEW CHIMNEY SYSTEM (Refer to Figure 10) NOTE: Follow L-Vent chimney manufacturer s instructions.
 NOTE: Follow L-Vent chimney manufacturer s instructions.") 8 INSTALLATION C. VERTICALLY WITH NEW CHIMNEY SYSTEM (Refer to Figure 10) 12 MINIMUM CLEARANCE TO ROOF NOTE: Follow L-Vent chimney manufacturer s instructions. OPTION: To achieve a center vertical installation
8 INSTALLATION C. VERTICALLY WITH NEW CHIMNEY SYSTEM (Refer to Figure 10) 12 MINIMUM CLEARANCE TO ROOF NOTE: Follow L-Vent chimney manufacturer s instructions. OPTION: To achieve a center vertical installation
Before selecting your stove, it is very important that you clearly identify what your needs are:
 How to choose the best stove? Before selecting your stove, it is very important that you clearly identify what your needs are: What are the dimensions of your house (W x D x H)? How many floors does the
SHERWOOD INDUSTRIES IS AN ENVIRONMENTALLY RESPONSIBLE COMPANY. THIS MANUAL IS PRINTED ON RECYCLED PAPER.
 SHERWOOD INDUSTRIES IS AN ENVIRONMENTALLY RESPONSIBLE COMPANY. THIS MANUAL IS PRINTED ON RECYCLED PAPER. PLEASE KEEP THESE INSTRUCTIONS FOR FUTURE REFERENCE PELLET STOVE Milan Fireplace Insert OWNER S
SHERWOOD INDUSTRIES IS AN ENVIRONMENTALLY RESPONSIBLE COMPANY. THIS MANUAL IS PRINTED ON RECYCLED PAPER. Freestanding & Fireplace Insert
 SHERWOOD INDUSTRIES IS AN ENVIRONMENTALLY RESPONSIBLE COMPANY. THIS MANUAL IS PRINTED ON RECYCLED PAPER. PLEASE KEEP THESE INSTRUCTIONS FOR FUTURE REFERENCE PELLET STOVE VF100 Freestanding & Fireplace
SHERWOOD INDUSTRIES IS AN ENVIRONMENTALLY RESPONSIBLE COMPANY. THIS MANUAL IS PRINTED ON RECYCLED PAPER. TECHNICAL MANUAL
 SHERWOOD INDUSTRIES IS AN ENVIRONMENTALLY RESPONSIBLE COMPANY. THIS MANUAL IS PRINTED ON RECYCLED PAPER. PLEASE KEEP THESE INSTRUCTIONS FOR FUTURE REFERENCE PELLET STOVE EF THERMO 28 TECHNICAL MANUAL 2008
Internet Version for Reference Only INDUCED DRAFT COMMERCIAL WATER HEATERS SUPPLEMENT INSTRUCTIONS TO PART #
 INDUCED DRAFT COMMERCIAL WATER HEATERS SUPPLEMENT INSTRUCTIONS TO PART #238-39387-00 THIS INSTRUCTION SUPPLEMENT IS ONLY INTENDED TO GIVE INSTALLATION INSTRUCTIONS AND INFORMATION RELATED TO THE INDUCED
Before selecting your stove, it is very important that you clearly identify what your needs are:
 How to choose the best stove? Before selecting your stove, it is very important that you clearly identify what your needs are: What are the dimensions of your house (W x D x H)? How many floors does the
SHERWOOD INDUSTRIES IS AN ENVIRONMENTALLY RESPONSIBLE COMPANY. THIS MANUAL IS PRINTED ON RECYCLED PAPER.
 SHERWOOD INDUSTRIES IS AN ENVIRONMENTALLY RESPONSIBLE COMPANY. THIS MANUAL IS PRINTED ON RECYCLED PAPER. PLEASE KEEP THESE INSTRUCTIONS FOR FUTURE REFERENCE PELLET STOVE WINDSOR OWNER S MANUAL Contact
Can I install my stove using an existing masonry chimney?
 FAQ: Wood Stoves Can I install a wood stove in my mobile home? Yes, you can install a wood stove in a mobile home. However, the stove you install must have been specifically approved for mobile home applications.
Malm Fireplaces, Inc. 368 Yolanda Avenue, Santa Rosa, CA (707) Fax: (707)
 Fax: (707)") Malm Fireplaces, Inc. 368 Yolanda Avenue, Santa Rosa, CA 95404 (707) 523-7747 - Fax: (707) 571-8036 info@malmfireplaces.com Fire Drum 2 Tested to U/L Standards 1482 and 737 Assembly And Installation Instructions
Malm Fireplaces, Inc. 368 Yolanda Avenue, Santa Rosa, CA 95404 (707) 523-7747 - Fax: (707) 571-8036 info@malmfireplaces.com Fire Drum 2 Tested to U/L Standards 1482 and 737 Assembly And Installation Instructions
SHERWOOD INDUSTRIES IS AN ENVIRONMENTALLY RESPONSIBLE COMPANY. THIS MANUAL IS PRINTED ON RECYCLED PAPER. OWNER S MANUAL
 SHERWOOD INDUSTRIES IS AN ENVIRONMENTALLY RESPONSIBLE COMPANY. THIS MANUAL IS PRINTED ON RECYCLED PAPER. PLEASE KEEP THESE INSTRUCTIONS FOR FUTURE REFERENCE PELLET STOVE Evolution NZ OWNER S MANUAL PLEASE
INSTALLATION & OPERATION MANUAL
 INSTALLATION & OPERATION MANUAL Biomass Furnace/Stove Rev J, Patents Pending SAFETY PRECAUTIONS SAFETY NOTICE: A qualified installer must perform installation in order to prevent the possibility of a house
PLEASE KEEP THESE INSTRUCTIONS FOR FUTURE REFERENCE OWNER S MANUAL
 SHERWOOD INDUSTRIES IS AN ENVIRONMENTALLY RESPONSIBLE COMPANY. THIS MANUAL IS PRINTED ON RECYCLED PAPER. PLEASE KEEP THESE INSTRUCTIONS FOR FUTURE REFERENCE PELLET STOVE M-55C-FS OWNER S MANUAL PLEASE
ASX7-5-IOM-3 J
 INSTALLATION INSTRUCTIONS 5" CONCENTRIC VENT TERMINAL KIT TUBULAR GAS FIRED DIRECT SPARK PROPELLER UNIT HEATERS UNIT CONVERSION & CATEGORY III VENTING FOR SEPARATED COMBUSTION For 90,000 to 120,000 BTU/HR
SHERWOOD INDUSTRIES IS AN ENVIRONMENTALLY RESPONSIBLE COMPANY. THIS MANUAL IS PRINTED ON RECYCLED PAPER. OWNER S MANUAL
 SHERWOOD INDUSTRIES IS AN ENVIRONMENTALLY RESPONSIBLE COMPANY. THIS MANUAL IS PRINTED ON RECYCLED PAPER. PLEASE KEEP THESE INSTRUCTIONS FOR FUTURE REFERENCE PELLET STOVE Bern OWNER S MANUAL PLEASE READ
MODEL HYBRID-45 MF OWNER S MANUAL
 MODEL HYBRID-45 MF OWNER S MANUAL WARNING: If your appliance is not properly installed a house fire may result. For your safety, follow the installation directions. Contact local building or fire officials
ASX7-4-IOM-6 J
 INSTALLATION INSTRUCTIONS 4" COMBUSTION AIR INLET KIT TUBULAR GAS FIRED DIRECT SPARK PROPELLER UNIT HEATERS UNIT CONVERSION & CATEGORY III VENTING FOR SEPARATED COMBUSTION For 30,000 to 75,000 BTU/HR SUPPLEMENT
INSTALLATION AND SERVICE MANUAL
 INSTALLATION AND SERVICE MANUAL HORIZONTAL COMBUSTION AIR INLET KITS CATEGORY III VENTING FOR SEPARATED COMBUSTION TUBULAR GAS FIRED UNIT HEATERS USE 5 INCH KIT FOR UNITS WITH CAPACITIES 100,000 TO 250,000
EF3 Freestanding, Fireplace Insert, and Built-In Heater
 SHERWOOD INDUSTRIES IS AN ENVIRONMENTALLY RESPONSIBLE COMPANY. THIS MANUAL IS PRINTED ON RECYCLED PAPER. PLEASE KEEP THESE INSTRUCTIONS FOR FUTURE REFERENCE PELLET STOVE EF3 Freestanding, Fireplace Insert,
Owner s Manual MODEL: AP5710
 Owner s Manual MODEL: AP5710 Report No. 0215PS052S Certified for installations in the USA and Canada. U.S. Environmental Protection Agency Certified to comply with 2015 particulate emissions standards.
SHERWOOD INDUSTRIES IS AN ENVIRONMENTALLY RESPONSIBLE COMPANY. THIS MANUAL IS PRINTED ON RECYCLED PAPER. Alliance (EF3) OWNER S MANUAL
 OWNER S MANUAL") SHERWOOD INDUSTRIES IS AN ENVIRONMENTALLY RESPONSIBLE COMPANY. THIS MANUAL IS PRINTED ON RECYCLED PAPER. PLEASE KEEP THESE INSTRUCTIONS FOR FUTURE REFERENCE PELLET STOVE Alliance (EF3) OWNER S MANUAL 6
SHERWOOD INDUSTRIES IS AN ENVIRONMENTALLY RESPONSIBLE COMPANY. THIS MANUAL IS PRINTED ON RECYCLED PAPER. PLEASE KEEP THESE INSTRUCTIONS FOR FUTURE REFERENCE PELLET STOVE Alliance (EF3) OWNER S MANUAL 6
AGP. (All Grade Pellet) Troubleshooting Guide Document Copyright 2017 Travis Industries Certified Factory Training Program
 Troubleshooting Guide Document Copyright 2017 Travis Industries Certified Factory Training Program") AGP (All Grade Pellet) Troubleshooting Guide Document 176-01795 Copyright 2017 Travis Industries Certified Factory Training Program The unit has been programmed to evacuate smoke in case of a power failure.
AGP (All Grade Pellet) Troubleshooting Guide Document 176-01795 Copyright 2017 Travis Industries Certified Factory Training Program The unit has been programmed to evacuate smoke in case of a power failure.
EF3 Freestanding, Fireplace Insert, and Built-In Heater
 SHERWOOD INDUSTRIES IS AN ENVIRONMENTALLY RESPONSIBLE COMPANY. THIS MANUAL IS PRINTED ON RECYCLED PAPER. PLEASE KEEP THESE INSTRUCTIONS FOR FUTURE REFERENCE PELLET STOVE EF3 Freestanding, Fireplace Insert,
OPERATING & MAINTENANCE MANUAL
 DO NOT DISCARD OPERATING & MAINTENANCE MANUAL Quality Fireplaces for Life INSTALLER: LEAVE THIS MANUAL WITH THE APPLIANCE Contact local building or fire officials about restrictions and installation inspection
St. Croix Greenfield Installation Manual
 St. Croix Greenfield Installation Manual Table of Contents General Information... 1 Installation Check List... 2 Approved Installations... 3 Exhaust Venting... 4 Venting - Approved Materials... 4 Venting-Typical
MERIDIAN Freestanding and Fireplace Insert
 SHERWOOD INDUSTRIES IS AN ENVIRONMENTALLY RESPONSIBLE COMPANY. THIS MANUAL IS PRINTED ON RECYCLED PAPER. PLEASE KEEP THESE INSTRUCTIONS FOR FUTURE REFERENCE PELLET STOVE MERIDIAN Freestanding and Fireplace
OWNER S MANUAL MINI FREE-STANDING PELLET STOVE
 MINI FREE-STANDING PELLET STOVE WARRANTY REGISTRATION enviro.com/warranty OWNER S MANUAL PLEASE READ THIS ENTIRE MANUAL BEFORE INSTALLATION AND USE OF THIS PELLET-BURNING ROOM HEATER. FAILURE TO FOLLOW
MERIDIAN Freestanding and Fireplace Insert
 SHERWOOD INDUSTRIES IS AN ENVIRONMENTALLY RESPONSIBLE COMPANY. THIS MANUAL IS PRINTED ON RECYCLED PAPER. PLEASE KEEP THESE INSTRUCTIONS FOR FUTURE REFERENCE PELLET STOVE MERIDIAN Freestanding and Fireplace
SHERWOOD INDUSTRIES IS AN ENVIRONMENTALLY RESPONSIBLE COMPANY. THIS MANUAL IS PRINTED ON RECYCLED PAPER. TECHNICAL MANUAL
 SHERWOOD INDUSTRIES IS AN ENVIRONMENTALLY RESPONSIBLE COMPANY. THIS MANUAL IS PRINTED ON RECYCLED PAPER. PLEASE KEEP THESE INSTRUCTIONS FOR FUTURE REFERENCE PELLET STOVE Windsor TECHNICAL MANUAL PLEASE
The Accentra Pellet Stove
 Installation & Operating Manual The Accentra Pellet Stove Ce manuel est disponible en Français sur demande R15 SAFETY NOTICE Please read this entire manual before installation and use of this pellet fuel-burning
MAXX OWNER S MANUAL F R E E S T A N D I N G P E L L E T S T O V E WARRANTY REGISTRATION enviro.com/warranty
 WARRANTY REGISTRATION enviro.com/warranty MAXX F R E E S T A N D I N G P E L L E T S T O V E OWNER S MANUAL PLEASE READ THIS ENTIRE MANUAL BEFORE INSTALLATION AND USE OF THIS PELLET BURNING ROOM HEATER.
INSTALLATION AND SERVICE MANUAL
 INSTALLATION AND SERVICE MANUAL VERTICAL COMBUSTION AIR INLET KITS CATEGORY III VENTING FOR SEPARATED COMBUSTION TUBULAR GAS FIRED UNIT HEATERS USE 5 INCH KIT FOR UNITS WITH CAPACITIES 100,000 TO 250,000
MERIDIAN-1 PELLET STOVE
 WARRANTY REGISTRATION enviro.com/warranty MERIDIAN-1 PELLET STOVE PLEASE READ THIS ENTIRE MANUAL BEFORE INSTALLATION AND USE OF THIS PELLET BURNING ROOM HEATER. FAILURE TO FOLLOW THESE INSTRUCTIONS COULD
INTRODUCTION TO HITZER STOVES INSTALLATION AND OPERATION
 INTRODUCTION TO HITZER STOVES INSTALLATION AND OPERATION Welcome to our proud team of HITZER heater owners. Your HITZER heater has the finest in Swiss craftsmanship and quality material to assure you that
PELLET STOVE SERVICE MANUAL
 FOR INSTALLERS AND SERVICE TECHNICIANS ONLY. PELLET STOVE SERVICE MANUAL Sherwood Industries Ltd. Duplication of this document is prohibited. All rights reserved. POP-093 Table of Contents Introduction...4
AGP Pellet Stove. -- Contact local building or fire officials about restrictions and installation inspection requirements in your area.
 AGP Pellet Stove Horizontal or Vertical Vent Freestanding Stove Mobile Home Approved Class A Chimney Retrofit Hearth Stove into Existing Masonry Chimney, Masonry Fireplace, or Z.C. Fireplace -- Please
OWNER S MANUAL FOR ALL
 OWNER S MANUAL FOR ALL PELLET HEATERS Contact your local authority about installation requirements and approvals in your area. PLEASE READ THIS ENTIRE MANUAL BEFORE INSTALLATION AND USE OF THIS PELLET
INSTALLATION & OPERATION MANUAL. Biomass Furnace/Stove Rev L, Patents Pending
 INSTALLATION & OPERATION MANUAL Biomass Furnace/Stove Rev L, Patents Pending SAFETY PRECAUTIONS SAFETY NOTICE: A qualified installer must perform installation in order to prevent the possibility of a house
SHERWOOD INDUSTRIES IS AN ENVIRONMENTALLY RESPONSIBLE COMPANY. THIS MANUAL IS PRINTED ON RECYCLED PAPER.
 SHERWOOD INDUSTRIES IS AN ENVIRONMENTALLY RESPONSIBLE COMPANY. THIS MANUAL IS PRINTED ON RECYCLED PAPER. PLEASE KEEP THESE INSTRUCTIONS FOR FUTURE REFERENCE PELLET STOVE EF2 Classic Freestanding, Fireplace
SUPER HIGH EFFICIENCY WATER HEATERS SUPPLEMENT TO INSTRUCTION MANUAL P/N (Replaces pg. 2 in instruction manual.) CONGRATULATIONS!
 CONGRATULATIONS!") SUPER HIGH EFFICIENCY WATER HEATERS SUPPLEMENT TO INSTRUCTION MANUAL P/N 238-44219-00 (Replaces pg. 2 in instruction manual.) CONGRATULATIONS! You have just purchased one of the finest water heaters on
SUPER HIGH EFFICIENCY WATER HEATERS SUPPLEMENT TO INSTRUCTION MANUAL P/N 238-44219-00 (Replaces pg. 2 in instruction manual.) CONGRATULATIONS! You have just purchased one of the finest water heaters on
SHERWOOD INDUSTRIES IS AN ENVIRONMENTALLY RESPONSIBLE COMPANY. THIS MANUAL IS PRINTED ON RECYCLED PAPER. OWNER S MANUAL
 SHERWOOD INDUSTRIES IS AN ENVIRONMENTALLY RESPONSIBLE COMPANY. THIS MANUAL IS PRINTED ON RECYCLED PAPER. PLEASE KEEP THESE INSTRUCTIONS FOR FUTURE REFERENCE PELLET STOVE Windsor OWNER S MANUAL PLEASE READ
MERIDIAN-A Freestanding and Fireplace Insert TECHNICAL MANUAL
 SHERWOOD INDUSTRIES IS AN ENVIRONMENTALLY RESPONSIBLE COMPANY. THIS MANUAL IS PRINTED ON RECYCLED PAPER. PLEASE KEEP THESE INSTRUCTIONS FOR FUTURE REFERENCE PELLET STOVE MERIDIAN-A Freestanding and Fireplace
OWNER S MANUAL FREE-STANDING PELLET STOVE. WARRANTY REGISTRATION enviro.com/warranty
 P4 FREE-STANDING PELLET STOVE WARRANTY REGISTRATION enviro.com/warranty OWNER S MANUAL PLEASE READ THIS ENTIRE MANUAL BEFORE INSTALLATION AND USE OF THIS PELLET BURNING ROOM HEATER. FAILURE TO FOLLOW THESE
EF3 Freestanding, Fireplace Insert, and Built-In Heater
 SHERWOOD INDUSTRIES IS AN ENVIRONMENTALLY RESPONSIBLE COMPANY. THIS MANUAL IS PRINTED ON RECYCLED PAPER. PLEASE KEEP THESE INSTRUCTIONS FOR FUTURE REFERENCE PELLET STOVE EF3 Freestanding, Fireplace Insert,
Corn / Pellet Stove Model: #OLV-PC
 Corn / Pellet Stove Model: #OLV-PC OPERATING & MAINTENANCE MANUAL Contact local building or fire officials about restrictions and installation inspection requirements in your area. SAVE THESE INSTRUCTIONS
INSTALLATION & OPERATION MANUAL. Pellet Stove MODELS 25-PDV / 55-SHP22 / 55-TRP22 SAVE THESE INSTRUCTIONS
 INSTALLATION & OPERATION MANUAL Pellet Stove MODELS 25-PDV / 55-SHP22 / 55-TRP22 SAVE THESE INSTRUCTIONS Manufactured By: England s Stove Works, Inc. PO Box 206 Monroe, VA 24574 10/7/2013 TABLE OF CONTENTS
CHIMNEY INSTALLATION. Technical Bulletin #1
 Technical Bulletin #1 CHIMNEY INSTALLATION A chimney performs two functions: it removes smoke and flue gases from the stove/furnace, and it provides draft for the fire. Draft is the term used to describe
EF2 Freestanding, Fireplace Insert & Built-In Heater
 SHERWOOD INDUSTRIES IS AN ENVIRONMENTALLY RESPONSIBLE COMPANY. THIS MANUAL IS PRINTED ON RECYCLED PAPER. PLEASE KEEP THESE INSTRUCTIONS FOR FUTURE REFERENCE PELLET STOVE EF2 Freestanding, Fireplace Insert
AMERICAN ENERGY SYSTEMS, INC.
 AMERICAN ENERGY SYSTEMS, INC. OWNER S INSTALLATION AND OPERATION MANUAL FOR PELLET FUEL BURNING HEATER Save these instructions MODEL T-40 INSERT DC SAFETY NOTICE Please read this entire manual before you
EF2 Freestanding, Fireplace Insert & Built-In Heater
 SHERWOOD INDUSTRIES IS AN ENVIRONMENTALLY RESPONSIBLE COMPANY. THIS MANUAL IS PRINTED ON RECYCLED PAPER. PLEASE KEEP THESE INSTRUCTIONS FOR FUTURE REFERENCE PELLET STOVE EF2 Freestanding, Fireplace Insert
OWNER S & INSTALLATION MANUAL
 PLEASE KEEP THESE INSTRUCTIONS FOR FUTURE REFERENCE PELLET STOVE EF2 Classic Freestanding, Fireplace Insert & Built-In Heater OWNER S & INSTALLATION MANUAL PLEASE READ THIS ENTIRE MANUAL BEFORE INSTALLATION
VENTING CLEARANCES. BBT NORTH AMERICA Bosch Group. Bosch Water Heating 340 Mad River Park, Waitsfield, VT TWH-V-26 page 1 of 6 rev 01/06
 page 1 of 6 VENTING CLEARANCES The vents should not be obstructed and all joints properly fitted. Floors, ceilings and walls must be cut or framed to provide necessary clearance to vents. Metal strippings
Installation Manual Installation and Appliance Setup
 Installation Manual Installation and Appliance Setup INSTALLER: Leave this manual with party responsible for use and operation. OWNER: Retain this manual for future reference. NOTICE: SAVE THESE INSTRUCTIONS
MAXX-M OWNER S MANUAL F R E E S T A N D I N G P E L L E T S T O V E WARRANTY REGISTRATION enviro.com/warranty
 WARRANTY REGISTRATION enviro.com/warranty MAXX-M F R E E S T A N D I N G P E L L E T S T O V E OWNER S MANUAL PLEASE READ THIS ENTIRE MANUAL BEFORE INSTALLATION AND USE OF THIS PELLET BURNING ROOM HEATER.
SHERWOOD INDUSTRIES IS AN ENVIRONMENTALLY RESPONSIBLE COMPANY. THIS MANUAL IS PRINTED ON RECYCLED PAPER.
 SHERWOOD INDUSTRIES IS AN ENVIRONMENTALLY RESPONSIBLE COMPANY. THIS MANUAL IS PRINTED ON RECYCLED PAPER. PLEASE KEEP THESE INSTRUCTIONS FOR FUTURE REFERENCE PELLET STOVE EF3 Freestanding, Fireplace Insert,
TRADITION SERIES SP24 OWNER S MANUAL
 TRADITION SERIES SP24 OWNER S MANUAL WARNING: IF YOUR APPLIANCE IS NOT PROPERLY INSTALLED A HOUSE FIRE MAY RE- SULT. FOR YOUR SAFETY, FOLLOW THE INSTALLATION DIRECTIONS. CONTACT LOCAL BUILDING OR FIRE
SHERWOOD INDUSTRIES IS AN ENVIRONMENTALLY RESPONSIBLE COMPANY. THIS MANUAL IS PRINTED ON RECYCLED PAPER. TECHNICAL MANUAL
 SHERWOOD INDUSTRIES IS AN ENVIRONMENTALLY RESPONSIBLE COMPANY. THIS MANUAL IS PRINTED ON RECYCLED PAPER. PLEASE KEEP THESE INSTRUCTIONS FOR FUTURE REFERENCE PELLET STOVE Windsor TECHNICAL MANUAL PLEASE
INSTALLATION AND OPERATION INSTRUCTIONS FOR ZERO CLEARANCE AND INSERT UNITS
 INSTALLATION AND OPERATION INSTRUCTIONS FOR ZERO CLEARANCE AND INSERT UNITS ZECL-26-2923-BG ZECL-30-3226-BG ZECL-33-3624-BG ZECL-39-4134-BG ZECL-2939-BG INSERT-26-3825-BG INSERT-30-4026-BG INSERT-33-4230-BG
SHERWOOD INDUSTRIES IS AN ENVIRONMENTALLY RESPONSIBLE COMPANY. THIS MANUAL IS PRINTED ON RECYCLED PAPER. OWNER S MANUAL
 SHERWOOD INDUSTRIES IS AN ENVIRONMENTALLY RESPONSIBLE COMPANY. THIS MANUAL IS PRINTED ON RECYCLED PAPER. PLEASE KEEP THESE INSTRUCTIONS FOR FUTURE REFERENCE PELLET STOVE Windsor OWNER S MANUAL PLEASE READ
TYPE L VENT / VENT SYSTEM FOR PELLET BURNING APPLIANCES
 INSTALLATION INSTRUCTIONS & MAINTENANCE GUIDE TYPE L VENT / VENT SYSTEM FOR PELLET BURNING APPLIANCES LISTED TO ULC-S609 & UL641 A MAJOR CAUSE OF VENT RELATED FIRES IS FAILURE TO MAINTAIN REQUIRED CLEARANCES
W / E / W / E / $10.00
 1 $10.00 30 9.0 General maintenance 9.1 Daily (whenever using the heater) 9.1.1 open main viewing door The front of the heater becomes very hot during operation. Let the heater cool completely before A.
AGP Pellet Stove. -- Contact local building or fire officials about restrictions and installation inspection requirements in your area.
 AGP Pellet Stove Horizontal or Vertical Vent Freestanding Stove Mobile Home Approved Class A Chimney Retrofit Hearth Stove into Existing Masonry Chimney, Masonry Fireplace, or Z.C. Fireplace -- Please
EF3 Freestanding, Fireplace Insert, and Built-In Heater
 SHERWOOD INDUSTRIES IS AN ENVIRONMENTALLY RESPONSIBLE COMPANY. THIS MANUAL IS PRINTED ON RECYCLED PAPER. PLEASE KEEP THESE INSTRUCTIONS FOR FUTURE REFERENCE PELLET STOVE EF3 Freestanding, Fireplace Insert,
EF3 F R E E - S T A N D I N G P E L L E T S T O V E OWNER S MANUAL
 WARRANTY REGISTRATION enviro.com/warranty EF3 F R E E - S T A N D I N G P E L L E T S T O V E OWNER S MANUAL PLEASE READ THIS ENTIRE MANUAL BEFORE INSTALLATION AND USE OF THIS PELLET-BURNING ROOM HEATER.
Leisure Line Power Vent Operations & Maintenance Manual And Safety Instructions
 Leisure Line Power Vent Operations & Maintenance Manual And Safety Instructions Black Rock Manufacturing DBA Leisure Line Stove Company Rear 620 Broad Street Berwick, PA 18603 http://www.leisurelinestoves.com/ind
INSTALLATION & OPERATION MANUAL
 INSTALLATION & OPERATION MANUAL MODEL NUMBERS: 25-PUF 55-SHP240 55-TRP240 Thank you for purchasing this product from a fine line of heating equipment. We wish you many years of safe heating pleasure with
Before selecting your wood heater, it is very important that you clearly identify what your needs are:
 How to choose the best wood wood heater? Before selecting your wood heater, it is very important that you clearly identify what your needs are: What are the dimensions of your house (W x D x H)? How many
Ventis Direct Vent. Installation Instructions
 entis Direct ent Installation Instructions A MAJOR CAUSE OF CHIMNEY RELATED FIRES IS FAILURE TO MAINTAIN REQUIRED CLEARANCES (AIR SPACES), TO COMBUSTIBLE MATERIALS. IT IS OF THE UTMOST IMPRORTANCE THAT
Leisure Line Power Vent Operations & Maintenance Manual And Safety Instructions
 Leisure Line Power Vent Operations & Maintenance Manual And Safety Instructions Black Rock Manufacturing DBA Leisure Line Stove Company Rear 620 Broad Street Berwick, PA 18603 http://www.leisurelinestoves.com/ind