DUST REMOVAL SYSTEM SUBMITTALS
|
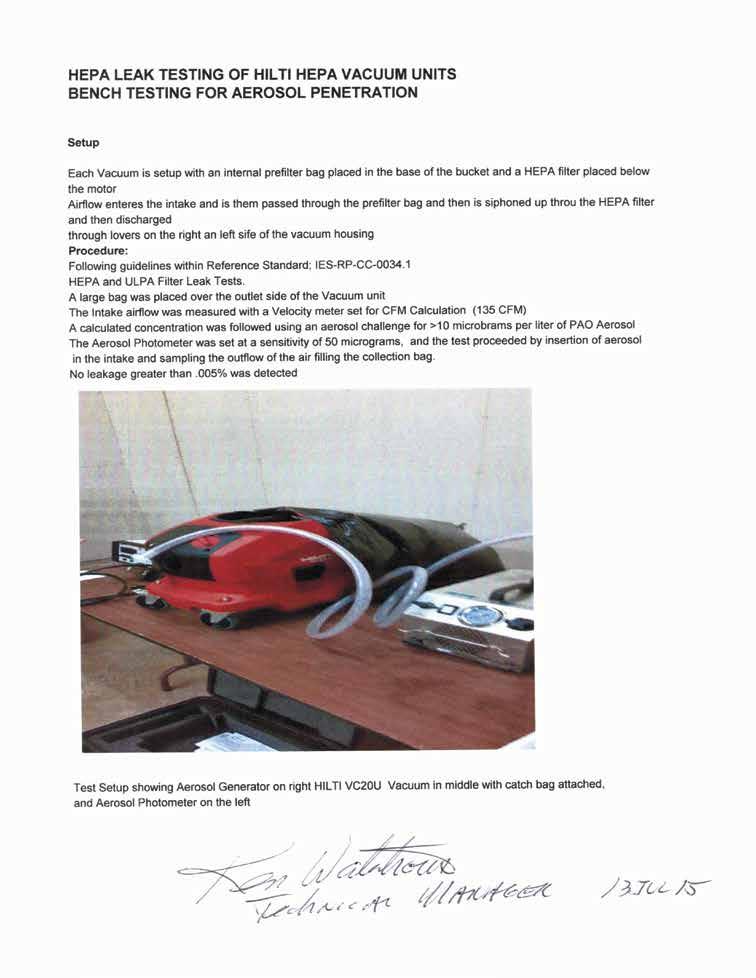
|
|
- Irene Payne
- 6 years ago
- Views:
Transcription
 Rotary hammers with DRS-S Combihammers with DRS-Y Hollow drill bits Core drilling Breakers with DRS-B and DRS-3000")
1 DUST REMOVAL SYSTEM SUBMITTALS Mechanical, plumbing, electrician, telecom, and healthcare Self-contained drilling systems (TE 4A/6A DRS + DRS-M) Rotary hammers with DRS-S Combihammers with DRS-Y Hollow drill bits Core drilling Breakers with DRS-B and DRS-3000 Vacuums
 Current Hilti self-contained dust collection systems: DRS 4-A DRS")
2 HILTI SUBMITTAL PACKAGE OSHA TABLE 1, SECTION vii: Handheld and stand-mounted drills (including impact and rotary hammer drills) Current Hilti self-contained dust collection systems: DRS 4-A DRS 6-A DRS-M For instructions on how to assemble these systems, please refer to the Hilti North America Youtube page DBS 08/17 Onboard systems
3 TABLE 1 REQUIREMENTS These systems fall under table 1, section vii: handheld and stand-mounted drills (including impact and rotary hammer drills). In order to be table 1 compliant, the below requirements must be met: Use drill equipped with commercially available shroud or cowling with dust collection system Operate and maintain tool in accordance with manufacturer s instructions to minimize dust emissions Dust collector must provide the air flow recommended by the tool manufacturer, or greater Have a filter with 99% or greater efficiency and a filter-cleaning mechanism Note: Vacuum must be equipped with a HEPA-filter when cleaning holes Table 1 states that no respirator is required if the above controls are fully and properly implemented. Equipment / Task Engineering and work practice control methods Required respiratory protections and minimum Assigned Protection Factor (APF) 4 hours / shift > 4 hours / shift Handheld and stand-mounted drills (including impact and rotary hammer drills) Use drill equipped with commercially available shroud or cowling with dust collection system. Operate and maintain tool in accordance with manufacturer s instructions to minimize dust emissions. Dust collector must provide the air flow recommended by the tool manufacturer, or greater, and have a filter with 99% or greater efficiency and a filter-cleaning mechanism. Use a HEPA-filtered vacuum when cleaning holes. When used outdoors None None When used indoors or in an enclosed area None None Check below to see how your system can be compliant with To verify the generation of your tool, check the rating plate, or call Hilti at with your serial number. DRS module name Tool name and generation DRS system item number Method of compliance TE 4-A gen 1 n/a Exposure assessment DRS 4-A TE 4-A gen ** Objective data* Objective data* / Table 1 TE 6-A gen 1 n/a Exposure assessment TE 6-A gen 2 n/a Exposure assessment DRS 6-A TE 6-A gen Objective data TE 6-A gen Objective data* / Table ** Objective data* DRS-M TE 6 / 6-S / 7 / 7-C / TE 7-A Objective data* *See Hilti s published Objective Data if not applicable to a specific application, exposure assessment is required. **Can be upgraded to table 1 compliance through purchase of the compliant filter box 3


4 Self-contained drilling systems submittal SYSTEM OVERVIEW Self-contained dust-collection systems are systems that fit on the tool and do not require a separate stand-alone vacuum to collect dust. Hilti currently offers the below systems with this configuration: Tool Accessory Vacuum Rotary hammer TE 4-A 18 or TE 4-A 22 Dust removal system TE DRS 4-A Rotary hammer TE 6-A 36 Dust removal system TE DRS 6-A Rotary hammer TE 7 or TE 7-C Dust removal system TE DRS-M Note: previous generations of tools may have different item numbers or nomenclature. Check with your local Hilti representative or product instruction manual to verify 4
 Hilti has performed testing of the above system to determine the operator s respirable silica dust")
5 OSHA 29 CFR RESPIRABLE SILICA DUST EXPOSURE Hilti TE 4-A/6-A with on-board dust removal system (DRS) Hilti has performed testing of the above system to determine the operator s respirable silica dust exposure in accordance with EN and EN Testing was performed under the following conditions: Room size: 7.8m x 7.8m x 3.3m Closed no air exchange Drilled hole dimensions: ø5/8 x 2 Test duration: 1 hour Total holes drilled: 75 Drilling orientation: overhead Base material: concrete Sampler: 10 l/min GSP pump, FSP sampler, ISO 7708-compliant, 5 μm filter Air sample volume collected during test: 600 liters Dust collection receptacle on tool emptied every 8 holes drilled DRS module items (TE 4A gen 2) and (TE 6A gen 4) only Results: Time-Weighted Average Respirable Silica Dust Exposure 2,3 45 μg/m 3 1 Exception: EN specifies drilling one hundred twenty ø16mm x 50mm holes at a 15 downward-fromhorizontal position. 2 The silica content of base materials varies. As a result, the silica content in respirable dust samples also varies. The above-published exposure value is based on a 20% silica content applied to the total respirable dust measurement. Measured average silica content during testing was 13.8%. 3 Exposure value represents the time-weighted average (TWA) over the 1-hour test period. Due to the test being conducted in a closed, non-ventilated room, this TWA exposure value would increase if the test duration was extended under the same conditions. 4 These test results can be applied for modules used with previous generations of tools. 5
6 Self-contained drilling systems submittal HOW TO UTILIZE HILTI OBJECTIVE DATA 29 CFR (d)(2)(ii) Performance option Hilti has conducted testing to establish the respirable silica dust exposure (exposure level), associated with the use of various Hilti tool systems. These tests were performed in accordance with EN 50632, except the specific work configuration may vary to provide more versatile data and better address U.S. practices. The purpose of the testing was to generate Objective Data to be used as part of the exposure assessment requirements of 29 CFR (d)(2)(ii). Per the EN standard, testing was performed for 1 hour in a 200m 3 closed, non-ventilated room. Under these conditions, exposure levels increase over time. The exposure values published in Hilti s Objective Data represent the average over the 1-hour test period (1-hour TWA) 1. Meaning the TWA started at zero, rose to the published 1-hour value, and would continue to rise if the test were continued. There are several underlying concepts important to applying the Objective Data to any case-specific assessment: 1. More/less work performed in a given time period will increase/decrease the exposure level. 2. Larger/smaller room size will decrease/increase the exposure level. 3. Air exchange decreases exposure levels. Specifically, a 100% air-exchange every hour (either by the work moving to a discrete area, or via sufficient air movement), means Hilti s published 1-hour TWA exposure level is expected to conservatively represent a steady-state TWA. The conceptual basis is two-fold: air exchange would inherently reduce the published closed room exposure value. And sufficient air exchange to reset the environment every hour would keep the exposure values at that level. For reference, a typical 20, 2500 CFM box fan would introduce 100% new air volume in Hilti s test chamber (7,200 ft 3 ), every 3 minutes The OSHA 50 μg/m 3 Permissible Exposure Limit (PEL), is based on an 8-hour TWA. This means the exposure level as an 8-hour TWA is 50 μg/m 3 ; a 4-hour TWA is 100 μg/m 3 (assuming no exposure for the remainder of the shift); a 2-hour TWA is 200 μg/ m3 (assuming no exposure for the remainder of the shift) etc. (time [hours] x exposure level [μg/m 3 ] 400). Hilti s published Objective Data states the amount of work performed during the 1-hour test ( 1-hour work ). Therefore, the respirable silica dust exposure level in any case-specific situation is expected to be below the 8-hour TWA PEL in the following conditions 3 : An employee performing 1-hour work during a shift. An employee performing 1-hour work in an hour, then moving to another discrete area and performing 1-hour work in an hour, etc., throughout an entire shift. An employee performing 1-hour work each hour, in an environment with sufficient airexchange to prevent accumulation of airborne dust. 1 Hilti s published Objective Data incorporates a silica content of 20% of the total respirable dust measurement. Site-specific silica content varies. OSHA Docket No. OSHA , reviewed 588 respirable dust samples from construction tasks, finding the silica content varied from <1%-50%, with an average of 9.1%. 2 Note introduction/exhaust of 100% air volume does not necessarily correlate to a 100% air exchange. 3 As long as: (1) Hilti s published Objective Data exposure level is 50 μg/m3; (2) work is performed in a room with volume 200m3, and/or having adequate ventilation; and (3) site-specific respirable silica content is 20% of total respirable dust. 6
7 HOW TO USE THE TABLE 1 SOLUTION Cordless rotary hammer TE DRS OSHA Hilti developed TE DRS dust collection system with a filter cleaning mechanism and 99% filter efficiency, compliant with OSHA , Table 1. The TE DRS-4-A dust box is compatible with the TE DRS-4-A and TE DRS-4-A (T1) only. The TE DRS-6-A dust box is compatible with the TE DRS-6-A and TE DRS-6-A (T1) only. Set-up 1. Empty the TE DRS dust box, and clean and inspect the filter. 2. Attach the TE DRS module to the rotary hammer. 3. Start TE DRS vacuum by pressing tool s control switch. 4. Verify proper operation of the TE DRS vacuum, including suction at the extraction head. Check for damage or leaks in the dust box, hose, and extraction head. Make sure the hose extends/retracts freely. Drilling 1. Start drilling, and allow the TE DRS to reach full speed before beginning to drill. Hold the rotary hammer perpendicular to the work surface and keep the extraction head in contact with the work surface. 2. To maximize dust collection, after the hole is drilled, slowly withdraw bit from the hole, and keep the rotary hammer running until the bit is fully withdrawn. Cleaning and maintenance Empty the dust box after every 5 in 3 of hole drilling (e.g. after 8-10 holes 5/8 in x 2 in (16 mm x 50 mm)). After every 3 in 3 of hole drilling (e.g. after 5 holes ½ in depth 3 in ( 12 mm x 76 mm)) or if suction performance decreases push the button of the cleaning mechanism 5 times in each direction. To minimize dust emission, either use a vacuum to clean the dust box or place the dust box in a plastic bag keeping it closed as much as possible. Replace the filter if the dust debris cannot be removed, or if there are any tears or leaks in the filter. If more-than-usual dust is emitted during drilling, inspect the TE DRS system, and clean/inspect the dust box and filter. 7
 Current Hilti rotary hammers that use a DRS-S shroud: TE 2 (and 2-S) TE 3-C TE 7")
8 HILTI SUBMITTAL PACKAGE OSHA TABLE 1, SECTION vii Section vii: Handheld and stand-mounted drills (including impact and rotary hammer drills) Current Hilti rotary hammers that use a DRS-S shroud: TE 2 (and 2-S) TE 3-C TE 7 TE 4-A 22 TE 6-A 36 TE 7-C TE 30 (and 30-C) TE 40-AVR TE 50-AVR TE 60-AVR TE 60-ATC/AVR TE 70-AVR TE 70-ATC/AVR TE 80-ATC/AVR For instructions on how to assemble these systems, please refer to the Hilti North America Youtube page DBS 08/17 DRS-S
9 TABLE 1 REQUIREMENTS These systems fall under table 1, section vii: handheld and stand-mounted drills (including impact and rotary hammer drills). In order to be table 1 compliant, the below requirements must be met: Use drill equipped with commercially available shroud or cowling with dust collection system Operate and maintain tool in accordance with manufacturer s instructions to minimize dust emissions Dust collector must provide the air flow recommended by the tool manufacturer, or greater Have a filter with 99% or greater efficiency and a filter-cleaning mechanism Note: Vacuum must be equipped with a HEPA-filter when cleaning holes Table 1 states that no respirator is required if the above controls are fully and properly implemented. Equipment / Task Engineering and work practice control methods Required respiratory protections and minimum Assigned Protection Factor (APF) 4 hours / shift > 4 hours / shift Handheld and stand-mounted drills (including impact and rotary hammer drills) Use drill equipped with commercially available shroud or cowling with dust collection system. Operate and maintain tool in accordance with manufacturer s instructions to minimize dust emissions. Dust collector must provide the air flow recommended by the tool manufacturer, or greater, and have a filter with 99% or greater efficiency and a filter-cleaning mechanism. Use a HEPA-filtered vacuum when cleaning holes. When used outdoors None None When used indoors or in an enclosed area None None Check below to see how your system can be compliant with Table 1. To verify the generation of your tool, check the rating plate, or call Hilti at with your serial number. DRS module name Tool name and generation Vacuums (can use any) Method of compliance TE 2 series TE 3-C series TE 7 series TE 4-A 22 TE 6-A 36 TE 30 series TE 30-A 36 TE 40-AVR TE 50-AVR TE 60 series TE 70 series TE 80-ATC/AVR DRS-S (Item number ) Depth gauge* and DRS-S required VC VC VC 20-U VC 40-U VC 40-UE VC X VC X VC XE VC XE VC X All table 1 compliant *The correct depth gauge will depend on your model of tool. For questions, check your instruction manual or call Hilti at
10 DRS-S Submittal SYSTEM OVERVIEW Hilti rotary hammers with a DRS-S are table 1 compliant through use of a dust collection shroud hooked up to a vacuum that meets table 1 requirements. This shroud attaches to the depth gauge on the tool, and must be purchased separately for tools with an SDS-max connection. Any Hilti rotary hammer with a depth gauge will be table 1 compliant with the DRS-S if a Hilti vacuum is used. Hilti currently offers the below systems with this configuration: Tool Accessory Vacuum (use any) TE 2 and TE 2-S VC VC TE 3-C VC 20-U VC X TE 7 and TE 7-C TE 4-A 22 DRS-S VC XE VC 40-U TE 6-A 36 TE 7-A VC X VC 40-UE TE 30 and TE 30-C TE 30-A 36 TE 40-AVR VC XE VC X Note: previous generations of tools may have different item numbers or nomenclature. Check with your local Hilti representative or product instruction manual to verify 10
11 Tool Accessory Vacuum (use any) TE 50-AVR VC VC TE 60-AVR VC 20-U VC X TE 60-ATC/AVR Depth gauge (sold separately) VC XE VC 40-U TE 70-AVR DRS-S VC X VC 40-UE TE 70-ATC/AVR TE 80-ATC/AVR VC XE VC X Note: previous generations of tools may have different item numbers or nomenclature. Check with your local Hilti representative or product instruction manual to verify 11
12 DRILLING ROTARY HAMMER DRILLS AND COMBI-HAMMERS DRS-S Submittal TE Dust Control OSHA Hilti developed drilling dust collection systems with a shroud, to be attached to a Hilti vacuum with a filter cleaning mechanism and 99% filter efficiency, compliant with OSHA , Table 1. Set-up 1. Attach the appropriate dust collection shroud to the drill. 2. Insert the bit. Rotate the bit in the chuck until you hear a clicking noise to verify that the bit is firmly inserted into the chuck. 3. Choose the correct collector based on the system and insert being used. 4. Set the proper depth using the depth gauge mechanism on the shroud. This will either be a depth gauge rod (DRS-Y, hollow drill bits) or a set of tabbed stops (DRS 4-A/6-A/M, DRS-S) 5. Verify that the bit is flush or below the surface of the dust collection device. Note that for the DRS-Y, with 24 bits, the bit will extend approximately 1 beyond the shroud. 6. Make sure that drilling shroud extends and retracts freely. 7. Start vacuum. 8. Verify proper operation of the dust collection system, including suction at the extraction head. Check for damage or leaks in the vacuum, hose, and extraction head. See instructions for vacuum. Drilling 1. Start the vacuum before beginning to drill. Hold the drill perpendicular to the work surface and keep the extraction head in contact with the work surface. 2. To maximize dust collection, after the hole is drilled, slowly withdraw bit from the hole, and keep the drill running until the bit is fully withdrawn. Cleaning and maintenance See instructions for vacuum. 12
 Current")
13 HILTI SUBMITTAL PACKAGE OSHA TABLE 1, SECTION x AND SECTION vii Section x: Jackhammers and handheld powered chipping tools Section vii: Handheld and stand-mounted drills (including impact and rotary hammer drills) Current Hilti SDS-max rotary hammers that use a DRS-Y shroud: TE 50-AVR TE 60-AVR TE 60-ATC/AVR TE 70-AVR TE 70-ATC/AVR TE 80-ATC/AVR For instructions on how to assemble these systems, please refer to the Hilti North America Youtube page DBS 08/17 DRS-Y
14 TABLE 1 REQUIREMENTS These systems fall under table 1, section x: jackhammers and handheld powered chipping tools and section vii: handheld and stand-mounted drills (including impact and rotary hammer drills). In order to be table 1 compliant, the below requirements must be met: Options for chiseling applications Options for drilling or chiseling applications Use tool with water delivery system that supplies a continuous stream or spray of water at the point of impact OR Use tool equipped with commercially available shroud or cowling with dust collection system Operate and maintain tool in accordance with manufacturer s instructions to minimize dust emissions Dust collector must provide the air flow recommended by the tool manufacturer, or greater Have a filter with 99% or greater efficiency and a filter-cleaning mechanism Note: Vacuum must be equipped with a HEPA-filter when cleaning holes Table 1 requires a respirator to be worn in certain environments based on the time of the application. Check below to see when an APF 10 respirator must be worn. Equipment / Task Engineering and work practice control methods Required respiratory protections and minimum Assigned Protection Factor (APF) 4 hours / shift > 4 hours / shift Handheld and stand-mounted drills (including impact and rotary hammer drills) Use drill equipped with commercially available shroud or cowling with dust collection system. Operate and maintain tool in accordance with manufacturer s instructions to minimize dust emissions. Dust collector must provide the air flow recommended by the tool manufacturer, or greater, and have a filter with 99% or greater efficiency and a filter-cleaning mechanism. Use a HEPA-filtered vacuum when cleaning holes. When used outdoors None None When used indoors or in an enclosed area None None Jackhammers and handheld powered chipping tools Use tool with water deliery system that supplies a continuous stream or spray of water at the point of impact. When used outdoors None APF 10 When used indoors or in an enclosed area APF 10 APF 10 Use tool equipped with commercially available shroud and dust collection system. Operate and maintain tool in accordance with manufacturer s instructions to minimize dust emissions. Dust collector must provide the air flow recommended by the tool manufacturer, or greater, and have a filter with 99% or greater efficiency and a filter-cleaning mechanism. OR When used outdoors None APF 10 When used indoors or in an enclosed area APF 10 APF 10 14
15 DRS-Y Submittal Check below to see how your system can be compliant with Table 1. To verify the generation of your tool, check the rating plate, or call Hilti at with your serial number. To check fit of the DRS-Y with older tool generations, check the sticker on the inside of the case on the DRS-Y, or refer to the instruction manual. Tool models* Accessory Vacuums (can use any) Method of compliance TE 50 TE 50-AVR TE 60 TE 60-AVR TE 60-ATC/AVR TE 70-AVR TE 70-ATC/AVR TE 80-ATC/AVR DRS-Y (Item number ) VC VC VC 20-U VC 40-U VC 40-UE VC X VC X VC XE VC XE VC X All table 1 compliant SYSTEM OVERVIEW Hilti SDS-max rotary hammers are table 1 compliant for both drilling and chiseling applications through use of a dust collection shroud hooked up to a vacuum that meets table 1 requirements. Hilti currently offers the below systems with this configuration: Tool Accessory Vacuum (use any) TE 50-AVR VC VC TE 60-AVR VC 20-U VC X TE 60-ATC/AVR VC XE VC 40-U TE DRS-Y TE 70-AVR VC X VC 40-UE TE 70-ATC/AVR TE 80-ATC/AVR VC XE VC X Note: previous generations of tools may have different item numbers or nomenclature. Check with your local Hilti representative or product instruction manual to verify 15
16 DRILLING ROTARY HAMMER DRILLS AND COMBI-HAMMERS TE Dust Control OSHA Hilti developed drilling dust collection systems with a shroud, to be attached to a Hilti vacuum with a filter cleaning mechanism and 99% filter efficiency, compliant with OSHA , Table 1. Set-up 1. Attach the appropriate dust collection shroud to the drill. 2. Insert the bit. Rotate the bit in the chuck until you hear a clicking noise to verify that the bit is firmly inserted into the chuck. 3. Choose the correct collector based on the system and insert being used. 4. Set the proper depth using the depth gauge mechanism on the shroud. This will either be a depth gauge rod (DRS-Y, hollow drill bits) or a set of tabbed stops (DRS 4-A/6-A/M, DRS-S). A depth gauge is not needed on the DRS-Y when using the attachments for chiseling. 5. Verify that the bit is flush or below the surface of the dust collection device. Note that for the DRS-Y, with 24 bits, the bit will extend approximately 1 beyond the shroud. When chiseling with the DRS-Y, the chisel will extend beyond the head of the chiseling shroud to allow the insert to chisel. 6. When drilling, make sure that drilling shroud extends and retracts freely. 7. Start vacuum. 8. Verify proper operation of the dust collection system, including suction at the extraction head Check for damage or leaks in the vacuum, hose, and extraction head. See instructions for vacuum. Drilling 1. Start the vacuum before beginning to drill. Hold the drill perpendicular to the work surface and keep the extraction head in contact with the work surface. 2. To maximize dust collection, after the hole is drilled, slowly withdraw bit from the hole, and keep the drill running until the bit is fully withdrawn. Cleaning and maintenance See instructions for vacuum. 16
 All Hilti hollow drill bits: TE-CD (SDS+)")
17 HILTI SUBMITTAL PACKAGE OSHA TABLE 1, SECTION vii Section vii: Handheld and stand-mounted drills (including impact and rotary hammer drills) All Hilti hollow drill bits: TE-CD (SDS+) TE-YD (SDS-max) For instructions on how to assemble these systems, please refer to the Hilti North America Youtube page DBS 08/17
18 TABLE 1 REQUIREMENTS These systems fall under table 1, section vii: handheld and stand-mounted drills (including impact and rotary hammer drills). In order to be table 1 compliant, the below requirements must be met: Use drill equipped with commercially available shroud or cowling with dust collection system Operate and maintain tool in accordance with manufacturer s instructions to minimize dust emissions Dust collector must provide the air flow recommended by the tool manufacturer, or greater Have a filter with 99% or greater efficiency and a filter-cleaning mechanism Note: Vacuum must be equipped with a HEPA-filter when cleaning holes. No HEPA filter needed when utilizing Hilti hollow drill bits within a Hilti SafeSet system Table 1 states that no respirator is required if the above controls are fully and properly implemented. Equipment / Task Engineering and work practice control methods Required respiratory protections and minimum Assigned Protection Factor (APF) 4 hours / shift > 4 hours / shift Handheld and stand-mounted drills (including impact and rotary hammer drills) Use drill equipped with commercially available shroud or cowling with dust collection system. Operate and maintain tool in accordance with manufacturer s instructions to minimize dust emissions. Dust collector must provide the air flow recommended by the tool manufacturer, or greater, and have a filter with 99% or greater efficiency and a filter-cleaning mechanism. Use a HEPA-filtered vacuum when cleaning holes. When used outdoors None None When used indoors or in an enclosed area None None Check below to see how your system can be compliant with Table 1. Tool models Accessory Vacuums (can use any) Method of compliance TE 2 series TE 3-C series TE 7 series TE 4-A 22 TE 6-A 36 TE 30 series TE 40-AVR TE 50-AVR TE 60 series TE 70 series TE 80-ATC/AVR Any TE-CD drill bit Any TE-YD drill bit VC VC VC 20-U VC 40-U VC 40-UE VC X VC X VC XE VC XE VC X All table 1 compliant 18
19 Hollow Drill Bit Submittal SYSTEM OVERVIEW Hilti rotary hammers with a hollow drill bit are table 1 compliant through use of a hollowed out drill bit hooked up to a vacuum that meets table 1 requirements. Hilti currently offers the below systems with this configuration: Tool Accessory Vacuum (use any) TE 2-A 18 VC VC TE 2 and TE 2-S VC 20-U VC X TE 3-C TE 7 and TE 7-C TE 4-A 22 TE-CD hollow drill bits VC XE VC 40-U TE 6-A 36 TE 7-A VC X VC 40-UE TE 30 and TE 30-C TE 30-A 36 VC XE VC X TE 40-AVR Note: previous generations of tools may have different item numbers or nomenclature. Check with your local Hilti representative or product instruction manual to verify 19
20 Tool Accessory Vacuum (use any) TE 50-AVR VC VC TE 60-AVR VC 20-U VC X TE 60-ATC/AVR TE-YD hollow drill bits VC XE VC 40-U TE 70-AVR VC X VC 40-UE TE 70-ATC/AVR TE 80-ATC/AVR VC XE VC X Note: previous generations of tools may have different item numbers or nomenclature. Check with your local Hilti representative or product instruction manual to verify 20
 Current Hilti handheld and")
21 HILTI SUBMITTAL PACKAGE OSHA TABLE 1, SECTIONS vi AND vii Section vi: rig-mounted core saws or drills Section vii: handheld and stand-mounted drills (including impact and rotary hammer drills) Current Hilti handheld and rig-mounted core drills DD EC-1 DD 110 DD 120 DD 150-U DD 160 DD 200 DD 250 DD 350 DD 500 For instructions on how to assemble these systems, please refer to the Hilti North America Youtube page DBS 08/17
22 TABLE 1 REQUIREMENTS These systems fall under either table 1, section vi: handheld and stand-mounted drills (including impact and rotary hammer drills) or section vii: handheld and stand-mounted drills (including impact and rotary hammer drills). In order to be table 1 compliant, the below requirements must be met: Section vi Use tool equipped with integrated water delivery system that supplies water to cutting surface Operate and maintain tool in accordance with manufacturer s instructions to minimize dust emissions OR Section vii Use drill equipped with commercially available shroud or cowling with dust collection system Operate and maintain tool in accordance with manufacturer s instructions to minimize dust emissions Dust collector must provide the air flow recommended by the tool manufacturer, or greater Have a filter with 99% or greater efficiency and a filter-cleaning mechanism Table 1 states that no respirator is required if the above controls are fully and properly implemented. Equipment / Task Engineering and work practice control methods Required respiratory protections and minimum Assigned Protection Factor (APF) 4 hours / shift > 4 hours / shift (vi) Rig-mounted core saws or drills Use tool equipped with integrated water delivery system that supplies water to cutting surface. None None Operate and maintain tool in accordance with manufacturer s instructions to minimize dust emissions. (vii) Handheld and stand-mounted drills (including impact and rotary hammer drills) Use drill equipped with commercially available shroud or cowling with dust collection system. Operate and maintain tool in accordance with manufacturer s instructions to minimize dust emissions. Dust collector must provide the air flow recommended by the tool manufacturer, or greater, and have a filter with 99% or greater efficiency and a filter-cleaning mechanism. Use a HEPA-filtered vacuum when cleaning holes. When used outdoors None None When used indoors or in an enclosed area None None 22
23 Core Drill Submittal Check below to see how your system can be compliant with Table 1. To verify the generation of your tool, check the rating plate, or call Hilti at with your serial number. Tool name Accessory (any one) Method of compliance DD EC-1 (rig mounted) DD 120 DD 150-U (rig mounted) DD 160 DD 200 DD 250 DD 350 DD 500 DWP 10 (365595) Gardena connector with supplied water (4297) DD 110 DD 120 DD 150-U DD 160 Any DD-X LM corebit* Vacuums (can use any) VC VC VC 20-U VC 40-U VC 40-UE VC X VC X VC XE VC XE VC X all table 1 DD EC-1 handheld DD 110 DD 150-U DWP 10 (365595) Gardena connector with supplied water (4297) Exposure assessment *Hilti s interpretation is that dust control core bits with a vacuum are categorized under table 1 section vii: handheld and stand-mounted drills (including impact and rotary hammer drills). 23
24 SYSTEM OVERVIEW Core drills from Hilti comply either through use of a water delivery system or a shrouded core bit hooked up to a Hilti vacuum. Hilti currently offers the below systems with this configuration: Tool Accessory DD EC-1 (rig mounted) DD 120 DD 150-U (rig mounted) DD 160 DWP 10 handheld water pump DD 200 Any gardena connector with a supplied water attached to Hilti tool DD 250 DD 350 DD 500 Note: previous generations of tools may have different item numbers or nomenclature. Check with your local Hilti representative or product instruction manual to verify. Table 1 does not address handheld core drills being used wet. For this reason, the only way to comply with handheld wet core drilling is to utilize objective data or exposure assessment procedures. 24
25 Core Drill Submittal Tool Accessory Vacuum (use any) VC VC DD 110-D DD 120 VC 20-U VC X DD 150-U (handheld) Any DD-X LM core drill bit ** VC XE VC 40-U DD 150-U (rig mounted) VC X VC 40-UE DD 160 VC XE VC X DD 110-D* DWP 10 handheld water pump DD 150-U (handheld)* Any gardena connector with a supplied water attached to Hilti tool * Table 1 does not address handheld core drills being used wet. For this reason, the only way to comply with handheld wet core drilling is to utilize objective data or exposure assessment procedures. ** Hilti interprets dust control coring systems as being in table 1, section vii handheld and stand mounted drills (including impact and rotary hammers) 25
26 CORING WET DIA Dust Control OSHA Hilti developed diamond coring systems are equipped with a water connection which is to be attached to a pressurized water source. When rig mounted, these systems are compliant with OSHA , Table 1. Set-up 1. If required, attach the drill stand to the drilling surface using the appropriate anchoring accessories. 2. Attach the water source to the tool. 3. Insert the bit and ensure its tightened by turning the chuck to the closed position. 4. Turn on the water. 5. Verify you have the appropriate amount of water for the application. Verify the water delivery system operates properly with no leaks, delivering water freely inside the bit. See instructions for core machines. Drilling 1. Start the water before beginning to drill. 2. Begin drilling, applying the required amount of pressure. 3. Adjust water flow rate to minimize visible dust. Cleaning and maintenance See instructions for core rigs. Clean up of slurry before it dries can help minimize secondary exposure. Ensure that cleanup and disposal of concrete slurry is done in accordance with relevant state/local regulations. 26
27 Core Drill Submittal CORING DRY CORING DIA Dust Control OSHA Hilti developed dry diamond core drills and bits to be attached to a Hilti vacuum with a filter cleaning mechanism and 99% filter efficiency. Hilti considers these coring applications to fit in, and be in compliance with, OSHA , Table 1, (vii) handheld and stand mounted drills (including impact and rotary hammer drills). Set-up 1. If using as rig mounted, attach the drill stand to the drilling surface using the appropriate anchoring accessories. 2. Attach the vacuum hose to the drill s vacuum hose connector. 3. Insert the bit and ensure its tightened by turning the chuck to the closed position. 4. Start vacuum. 5. Verify proper operation of the dust collection system, including suction at the end of the bit. Check for damage or leaks in the vacuum, hose, and hose connector. See instructions for vacuum. Drilling 1. Start the vacuum before beginning to drill. 2. Begin drilling, applying the required amount of pressure. 3. To maximize dust collection, after the hole is drilled, slowly withdraw bit from the hole, and keep the drill and vacuum running until the bit is fully withdrawn. Cleaning and maintenance See instructions for vacuum. 27
 TE 700-AVR (DRS-B) TE 800-AVR (DRS-B) TE 1000-AVR")
28 HILTI SUBMITTAL PACKAGE OSHA TABLE 1, SECTION x Jackhammers and handheld powered chipping tools Current Hilti breakers with dust control solutions: TE 500-AVR (DRS-B) TE 700-AVR (DRS-B) TE 800-AVR (DRS-B) TE 1000-AVR (DRS-B) TE 1500-AVR (DRS-B) TE 3000-AVR (DRS 3000) For instructions on how to assemble these systems, please refer to the Hilti North America Youtube page DBS 08/17 DRS-B
29 TABLE 1 REQUIREMENTS These systems fall under table 1, section x: jackhammers and handheld powered chipping tools. In order to be table 1 compliant, the below requirements must be met: Use tool with water delivery system that supplies a continuous stream or spray of water at the point of impact or Use tool equipped with commercially available shroud or cowling with dust collection system Operate and maintain tool in accordance with manufacturer s instructions to minimize dust emissions Dust collector must provide the air flow recommended by the tool manufacturer, or greater Have a filter with 99% or greater efficiency and a filter-cleaning mechanism Table 1 requires a respirator to be worn in certain environments based on the time of the application. Check below to see when an APF 10 respirator must be worn. Equipment / Task Engineering and work practice control methods Required respiratory protections and minimum Assigned Protection Factor (APF) 4 hours / shift > 4 hours / shift (x) Jackhamers and handheld powered chipping tools Use tool with water deliery system that supplies a continuour stream or spray of water at the point of impact. When used outdoors None APF 10 When used indoors or in an enclosed area APF 10 APF 10 Use tool equipped with comercially available shroud and dust collection system. Operate and maintain tool in accordance with manufacturer s istructions to minimize dust emissions. Dust collector must provide the air flow recommended by the tool manufacturer, or greater, and have a filter with 99% or greater efficiency and a filter-cleaning mechanism. OR When used outdoors None APF 10 When used indoors or in an enclosed area APF 10 APF 10 Check below to see how your system can be compliant with Table 1. To verify the generation of your tool, check the rating plate, or call Hilti at with your serial number. To check fit of the DRS-B with older tool generations, check the sticker on the inside of the case on the DRS-B, or refer to the instruction manual. Tool models Accessory Vacuums (can use any) Method of compliance TE 50 / 56 / 60 / 70 / 76 / 80 TE 505 / 500-AVR TE 706 / 700-AVR TE 805 / TE 800-AVR TE 905 TE 1000-AVR TE 1500-AVR TE 3000-AVR Separate system DRS-B Item number DRS 3000 Item number VC VC VC 20-U VC 40-U VC 40-UE VC X VC X VC XE VC XE VC X All table 1 compliant 29
30 Hilti submittal package OSHA Table 1, Section x SYSTEM OVERVIEW Hilti combihammers, hammers and breakers are table 1 compliant through use of a dust collection shroud hooked up to a vacuum that meets table 1 requirements. Hilti currently offers the below systems with this configuration: Tool Accessory Vacuum (use any) TE 500-AVR VC VC TE 700-AVR VC 20-U VC X TE 800-AVR TE DRS-B VC XE VC 40-U TE 1000-AVR VC X VC 40-UE TE 1500-AVR TE 3000-AVR TE DRS 3000 VC XE VC X Note: previous generations of tools may have different item numbers or nomenclature. Check with your local Hilti representative or product instruction manual to verify 30

31 HILTI VACUUM PORTFOLIO Supporting information For instructions on how to assemble these systems, please refer to the Hilti North America Youtube page VC 125 VC 150 VC 300 DBS 08/17 CONTENTS Statements of compliance HEPA certification for VC 125, 150, and 300 series vacuums HEPA certification for VC 20, 40 series vacuums Supplemental instructions 47-51
32 32
33 Vacuum Submittal 33
34 34
35 Vacuum Submittal 35
36 36
37 Vacuum Submittal 37
38 38
39 Vacuum Submittal 39
40 40
41 Vacuum Submittal 41
42 42
43 Vacuum Submittal 43
44 44
45 Vacuum Submittal 45
46 46
47 Vacuum Submittal VACUUM CLEANER VC 125 / 150 / 300 OSHA Hilti developed a vacuum cleaner system with a filter cleaning mechanism and a >99% filter efficiency, compliant with many of the OSHA , Table 1 specified controls. Set-up 1. Put a filter into the filter compartment. Decide which filter depending on your applications. See filter section for further information. 2. Put filter bag into the tank. Decide which filter bag depending on your applications. See filter bag section for further information. 3. Put hose into head and attach it to the adaptor of the tool. See tool manual for further information on correct adaptor. 4. Plug vacuum cleaner in socket. 5. Start vacuum cleaner by turning control switch on. Verify proper operation of vacuum cleaner. head on correct and sealed no kinks/breaks/plugs in hose check for normal suction at hose end nothing blocking exhaust port For VC 20/40/150/300, verify the automatic filter cleaning mechanism is turned on, and operating (audible thumping every ~15 seconds). 6. Start running the tool only when vacuum cleaner is on. 7. Turn vacuum cleaner off after tool is turned off. Cleaning and maintenance 1. For VC 125, push manual filter cleaning button every 3 to 5 minutes depending on application, and whenever there is a noticeable change in suction or dust collection.. 2. Filter and filter bag needs to be cleaned and exchanged regularly. See filter and filter bag section for further information. 47
48 UNIVERSAL FILTER-BAGS / PLASTIC BAGS Plastic Bag Universal Bag Applications For dry and wet applications Will not increase lifetime of filter, no pre-filtering For dry applications Virtually dustless recycling / emptying Pre-filter, will increase lifetime of filter How to put bag in vacuum 1. Remove head from tank 2. Put bag into the tank 3. Check that holes are within the vacuum cleaner when installed and that the plastic bag doesn t overlap clamp area 4. Put head back on tank and close clamps properly 1. Remove head from tank 2. Put bag into the tank 3. Connect flange of filter bag to the adapter 4. Put head back on tank and close clamps Disposal guidelines Recycle bag when it is full Tie off or seal paper/fleece bags. Twist plastic bags. Roll bucket to nearest sealed receptacle and transfer bag to garbage. To be recycled normally (dispose of bag according to local regulations) Close cap when bag is full or needs to be recycled Dispose of bag according to local regulations. 48


49 Vacuum Submittal DO S AND DON TS WITH UNIVERSAL FILTER-BAGS / PLASTIC BAGS Plastic Bag Universal Bag Dispose of bag when it is full Use filter bags for all dry applications - Increases lifetime of your tool - Increase lifetime of your filter Do s Dispose of bag when it is full Mandatory for all wood applications Connect flange of filter bag properly into adapter Don ts Fill plastic bag to completely full, it can rip apart Overlap the clamp area with the plastic bag Shake full filter-bag - Dust can exit - Bag can rip apart Use bag for wet applications 49
50 DO S AND DON TS WITH FILTERS Clean filter with automatic filter cleaning (close hose for a 3-5 cycles) Power cleaning: Remove hose, close inlet for 3-5 automatic filter cleaning cycles Do s Use performance filters (PTFE) in order to have a longer lifetime of your tool, longer lifetime of the filter and less blockage of the filter Filter sealing needs to be properly installed During filter change, clean up filter frame and sealing area Check filter condition before starting an application Mix dry and wet applications. Filter used for wet applications needs to be exchanged or dried before using it for dry applications Don ts Manually cleaning the filter, it will be damaged -> a damaged or missing filter can lead to a broken turbine since dust can enter (reduces lifetime of vacuum cleaner) Banging against the wall Cleaning with high-pressured air Use water jet / air pressure jet to clean the filter Use sharp things e.g. wrench etc. to clean the filter Use vacuum cleaner without a filter 50
51 Vacuum Submittal FILTER CLEANING AND EXCHANGE Filter needs to be cleaned when: Feeling of less suction power Clean filter with automatic filter cleaning Dust is coming out of the vacuum cleaner. Indication that filter is broken or blocked Visual check shows that filter needs to be cleaned Filter needs to be exchanged when: Dust is coming out of the vacuum cleaner. Indication that filter is broken or blocked Even after cleaning the filter, suction power is insufficient Visual check shows that filter needs to be exchanged due to a high volume of dust near or inside the filter 51
52 Hilti, Inc. (U.S.) en español Hilti (Canada) Corporation DBS 08/17
DUST REMOVAL SYSTEM SUBMITTALS
 DUST REMOVAL SYSTEM SUBMITTALS Drilling Self-contained drilling systems (TE 4A/6A DRS + DRS-M) Rotary hammers with DRS-S Combihammers with DRS-Y Hollow drill bits Core drilling Chiseling Breakers with
DUST REMOVAL SYSTEM SUBMITTALS
 DUST REMOVAL SYSTEM SUBMITTALS Interior Finisher Self-contained drilling systems (TE 4A/6A DRS + DRS-M) Rotary and Combihammers with DRS-D Rotary hammers with DRS-S Combihammers with DRS-Y Hollow drill
HILTI SUBMITTAL PACKAGE OSHA TABLE 1, SECTIONS vi AND vii
 HILTI SUBMITTAL PACKAGE OSHA 1926.1153 TABLE 1, SECTIONS vi AND vii Section vi: r ig-mounted core saws or drills Section vii: h andheld and stand-mounted drills (including impact and rotary hammer drills)
HILTI VACUUM PORTFOLIO
 HILTI VACUUM PORTFOLIO Supporting information For instructions on how to assemble these systems, please refer to the Hilti North America Youtube page VC 125 VC 150 VC 300 DBS 06/18 CONTENTS Statements
Use saw equipped with integrated water delivery system that continuously feeds water to the blade.
 1926.1153 Respirable crystalline silica. (c) Specified exposure control methods. (1) For each employee engaged in a task identified on Table 1, the employer shall fully and properly implement the engineering
or with a higher exposure potential than the processes, types of material, control methods, work
 specific process, task, or activity. The data must reflect workplace conditions closely resembling or with a higher exposure potential than the processes, types of material, control methods, work practices,
RESPIRABLE CRYSTALLINE SILICA PARAGRAPHS (C) THROUGH (J)
 THROUGH (J)") 1926.1153 RESPIRABLE CRYSTALLINE SILICA PARAGRAPHS (C) THROUGH (J) 1926.1153(c) SPECIFIED EXPOSURE CONTROL METHODS 1926.1153(c)(1) For each employee engaged in a task identified on, the employer shall
1926.1153 RESPIRABLE CRYSTALLINE SILICA PARAGRAPHS (C) THROUGH (J) 1926.1153(c) SPECIFIED EXPOSURE CONTROL METHODS 1926.1153(c)(1) For each employee engaged in a task identified on, the employer shall
Table 1. Exposure Control Methods for Selected Construction Operations
 Using Stationary Masonry Saws Use saw equipped with integrated water delivery system. Change water frequently to avoid silt build-up in water. Prevent wet slurry from accumulating and drying. When working
Crystalline Silica Control Methods
 Crystalline Silica Control Methods Crystalline Silica Guidance Document 1.0 INTRODUCTION 1.1 This guidance document consistits of a table of different construction activities that create crystalline silica
Silica Exposure Control Plan
 Jobsite: Project Executive: Superintendent: Competent Person: Date: Project Manager: Safety Director: Emergency Num. Sawing Cutting Coring Drilling Grinding Control Joints Tuckpointing Cement Board Drywall
OSHA Table 1
 OSHA 1926.1153 Table 1 Specified Exposure Control Methods When Working With Materials Containing Crystalline Silica >4 (i) Stationary masonry saws Use saw equipped with integrated water delivery system
Specified Exposure Control Methods When Working With Materials Containing Crystalline Silica
 TABLE 1 Specified Exposure Control Methods When Working With Materials Containing Crystalline Silica Equipment/Task Engineering + Work Practice Control Methods Required Respiratory Protection up to 4 hours/shift
Engineering and Work Practice Control Methods
 Table 1: Specified Exposure Control Methods When Working with Materials Containing Crystalline Silica 0206500_CP_11_25_en_A2.1 Equipment/Task Engineering and Work Practice Control Methods Required Respiratory
TABLE 1: SPECIFIED EXPOSURE CONTROL METHODS. Required Respiratory Protection and Minimum Assigned Protection Factor (APF)
") Stationary masonry saws Handheld power saws (any blade diameter) Outdoors: Outdoors: APF 10 Handheld power saws (for cutting fibercement board, with a blade diameter of 8 inches or less) Use saw equipped
Stationary masonry saws Handheld power saws (any blade diameter) Outdoors: Outdoors: APF 10 Handheld power saws (for cutting fibercement board, with a blade diameter of 8 inches or less) Use saw equipped
Respirable Crystalline Silica Exposure Control Plan
 1.0 Purpose The purpose of this document is to establish and implement a written exposure control plan that identifies tasks involving silica exposure and methods used to protect employees. University
ENGINEERING CONTROLS FOR SILICA DUST (DUST COLLECTION SYSTEM)
") ENGINEERING CONTROLS FOR SILICA DUST (DUST COLLECTION SYSTEM) Brieser will ensure that each employee with respect to training can demonstrate knowledge and understanding of all aspects of our Silica Exposure
ENGINEERING CONTROLS FOR SILICA DUST (DUST COLLECTION SYSTEM) Brieser will ensure that each employee with respect to training can demonstrate knowledge and understanding of all aspects of our Silica Exposure
Silica Dust Specified Exposure Control Methods
 Silica Dust Specified Exposure When possible and applicable, activities with potential Silica exposure to be consistent with OSHA s Construction Standard Table 1. Supervisors will ensure each employee
Silica Exposure Control Matrix
 Partner Saw Use saw equipped with integrated water delivery system that continuously feeds water to the blade. Operate and maintain tool in accordance with manufacturer s instructions to When used outdoors.
Dust. Solutions that increase working comfort, safety and productivity. Less dust. More productivity. Hilti. Outperform. Outlast.
 Dust Solutions that increase working comfort, safety and productivity Less dust. More productivity. Hilti dust removal Hilti dust removal Dust can influence comfort, safety and productivity. Keep dust
Milwaukee Introducing NEW Dust Extraction System for the Professionals.
 EMBARGO UNTIL - AUGUST 2017 Milwaukee Introducing NEW Dust Extraction System for the Professionals. Since first introducing the universal self-powered dust extractor in 2013, the M12 Universal Hammer Vac,
CONCRETE AND MASONRY SYSTEMS MADE IN GERMANY MOST ADVANCED INTEGRATED DUSTLESS SYSTEMS OSHA COMPLIANT
 CONCRETE AND MASONRY SYSTEMS MADE IN GERMANY MOST ADVANCED INTEGRATED DUSTLESS SYSTEMS OSHA COMPLIANT 1 METABO COMPLIANT SYSTEMS THE HEART OF THE DUSTLESS SYSTEM 157 CFM, NO SUCTION LOSS WHEN IN SELF CLEANING
CONCRETE AND MASONRY SYSTEMS
 CONCRETE AND MASONRY SYSTEMS MADE IN GERMANY MOST ADVANCED INTEGRATED DUSTLESS SYSTEM CONCRETE AND MASONRY DUSTLESS TOOL SYSTEMS ARE YOU OSHA READY? Effective Sept. 23, 2017 OSHA requires all and any indoor
TE 60-AVR TE 60-ATC/AVR
 TE 60-AVR TE 60-ATC/AVR English 1 Information about the documentation 1.1 About this documentation Read this documentation before initial operation or use. This is a prerequisite for safe, trouble-free
TE DRS-M. Bedienungsanleitung Operating instructions Mode d emploi Manual de instrucciones Istruzioni d uso Gebruiksaanwijzing Bruksanvisning
 TE DRS-M Bedienungsanleitung Operating instructions Mode d emploi Manual de instrucciones Istruzioni d uso Gebruiksaanwijzing Brugsanvisning Bruksanvisning Bruksanvisning Käyttöohje Manual de instruções
TE 60-AVR TE 60-ATC/AVR
 TE 60-AVR TE 60-ATC/AVR English 1 Information about the documentation 1.1 About this documentation Read this documentation before initial operation or use. This is a prerequisite for safe, trouble-free
User Guide. Please read carefully before use. Your Hoover Guarantee. Your Hoover Guarantee. Contents. IMPORTANT Safety Reminders
 Your Hoover Guarantee Contents Your Hoover Guarantee During year 1 HOOVER engineers will replace or repair all defective parts free of charge, except for parts subject to fair wear and tear such as belts,
TE 1000-AVR. English. Printed: Doc-Nr: PUB / / 000 / 04
 TE 1000-AVR English 1 Information about the documentation 1.1 About this documentation Read this documentation before initial operation or use. This is a prerequisite for safe, trouble-free handling and
TE 60-ATC/AVR English
 TE 60-ATC/AVR English 1 Information about the documentation 1.1 About this documentation Read this documentation before initial operation or use. This is a prerequisite for safe, trouble-free handling
TE 40 TE 40-AVR English
 TE 40 TE 40-AVR English 1 Information about the documentation 1.1 About this documentation Read this documentation before initial operation or use. This is a prerequisite for safe, trouble-free handling
GARAGE VAC OWNERS MANUAL READ BEFORE OPERATING YOUR SYSTEM
 GARAGE VAC OWNERS MANUAL READ BEFORE OPERATING YOUR SYSTEM IMPORTANT SAFETY INSTRUCTIONS When using an electrical appliance, basic precautions should always be followed, including the following: * Read
- 1- IMPORTANT SAFETY REMINDERS
 USER MANUAL IMPORTANT SAFETY REMINDERS This appliance should only be used for domestic cleaning, as described in this user guide. Please ensure that this guide is fully understood before operating the
WARNING USER S MANUAL. Model iq 2000 Series Dust Collector with manual shaker
 USER S MANUAL Model iq 2000 Series Dust Collector with manual shaker WARNING Read all the following safety and operating instructions prior to using this unit. Not observing this information can result
slalom USER INSTRUCTIONS Slalom IM.indd 1 01/06/ :19:31
 slalom USER INSTRUCTIONS Slalom IM.indd 0/06/008 08:9:3 IMPORTANT SAFETY REMINDERS User manual - This cleaner should only be used for its intended purpose as described in these instructions. Ensure that
TE 300-AVR. English Français Español Português
 TE 300-AVR English Français Español Português en fr es pt 1 2 3 4 5 6 7 8 9 TE 300-AVR en Original operating instructions....................................... 1 fr Mode d'emploi original............................................
Owner's Manual. Please read this document carefully before installing and/or using your vacuum cleaning system.
 Owner's Manual for household use only Please read this document carefully before installing and/or using your vacuum cleaning system. Model : Serial No : Important Safety Instructions When using an electrical
TE DRS-S. Printed: Doc-Nr: PUB / / 000 / 00
 TE DRS-S Bedienungsanleitung Operating instructions Mode d emploi Istruzioni d uso Manual de instrucciones Manual de instruções Gebruiksaanwijzing Brugsanvisning Bruksanvisning Bruksanvisning Käyttöohje
TE 2 TE 2-M TE 2-S English
 TE 2 TE 2-M TE 2-S English 1 Information about the documentation 1.1 About this documentation Read this documentation before initial operation or use. This is a prerequisite for safe, trouble-free handling
TE 2 TE 2-M TE 2-S. English Français Español Português
 TE 2 TE 2-M TE 2-S English Français Español Português en fr es pt 1 Printed: 15.12.2015 Doc-Nr: PUB / 5261122 / 000 / 00 2 3 4 5 Printed: 15.12.2015 Doc-Nr: PUB / 5261122 / 000 / 00 6 7 8 TE 2 TE 2-M TE
π H-2268 SANITAIRE UPRIGHT VACUUM SAFETY uline.com
 π H-2268 SANITAIRE UPRIGHT VACUUM 1-800-295-5510 uline.com SAFETY PAGE 1 OF 7 NOTE: When using an electrical appliance, basic precautions should always be followed, including the following: READ ALL INSTRUCTIONS
Hilti HIT-HY 200 System. One giant leap. Hilti. Outperform. Outlast.
 Hilti HIT-HY 200 One giant leap. Hilti. Outperform. Outlast. Hilti HIT-HY 200 A small step for contractors. And a giant leap forward for your next job. Now you can install anchor rod and post-installed
- website: Vax Ltd., Kingswood Road, Hampton Lovett, Droitwich, Worcestershire WR9 0QH, UK
 V-026PT User Guide.qxd 7/9/06 15:13 Page 12 EEC STATEMENT OF COMPLIANCE Manufacturer/EEC importer: Vax Limited, hereby on our own responsibility, declare that the product V-026PT is manufactured in compliance
Get Cleaning... What s your Vax s model number? User Guide. Carpet Washer Vax Careline: AU: NZ:
 User Guide Vax Careline: AU: 1300 361 505 NZ: 0800 800 900 Carpet Washer Get Cleaning... What s your Vax s model number? W8 W8 W0 W0 W0 W W W W W What s your serial number? (Located on the base of the
Full Size Canister Service Manual Riccar Models 1700 / 1800 Power Nozzles RPB-100 / RPB-220 / RPB-224 / RPB-250
 Full Size Canister Service Manual Riccar Models 1700 / 1800 Power Nozzles RPB-100 / RPB-220 / RPB-224 / RPB-250 Table of Contents I. General Full Size Canister Issues...2 A. Full Bag Indicator...2 1. General
TE 70-AVR TE 70-ATC/AVR TE 80-ATC/AVR
 TE 70-AVR TE 70-ATC/AVR TE 80-ATC/AVR English 1 Information about the documentation 1.1 About this documentation Read this documentation before initial operation or use. This is a prerequisite for safe,
TSS 15/55 Hi-Lift Vacuum
 TSS 15/55 Hi-Lift Vacuum OPERATOR S MANUAL 2007 ICS, Blount Inc. F/N 71335 Oct 07 TABLE OF TITLE CONTENTS SYMBOLS & LABELS 4 SAFETY 5 TECHNICAL SPECIFICATIONS 6 SET-UP 7 OPERATION 8 MAINTENANCE 9 TROUBLESHOOTING
Pet. Easy Guide. VAX Ltd., Kingswood Road, Hampton Lovett, Droitwich, Worcestershire, WR9 OQH, UK - website:
 V-027P Rapide Pet User Guide 10/7/07 10:05 Page 14 EEC STATEMENT OF COMPLIANCE Manufacturer/EEC importer: VAX Limited, hereby on our own responsibility declare that the products V-027/V-027PT/V-027P/CCW-701
Models , Equinox, and Sirens Clutch Replacement Service Manual
 Models 2001-130, Equinox, and 508-128 Sirens Clutch Replacement Service Manual 25500297 Rev. A0 1115 Printed in U.S.A. Copyright 2015 Federal Signal Corporation Contents Safety Messages... 3 General Description...
PUREPOWER SERIES CENTRAL VACUUM POWER UNITS PP500, PP600 & PP650
 USER GUIDE PUREPOWER SERIES CENTRAL VACUUM POWER UNITS PP500, PP600 & PP650 AB0039 FOR RESIDENTIAL USE ONLY!! MODELS SFDB-DQ, SFDB-DR AND SFDB-DS 30042509E IMPORTANT SAFETY INSTRUCTIONS SAVE THESE INSTRUCTIONS
SPECIFICATIONS FEATURES
 FEATURES Excellent for collecting the large chips which will drop into the garbage can before reaching the impeller. The filter bag filters out the remaining sawdust down to 5 microns. With the cyclone
CONTRACTOR GUIDE What You Need to Know About the New OSHA Silica Dust Standard
 CONTRACTOR GUIDE What You Need to Know About the New OSHA Silica Dust Standard OSHA Silica Dust Standard Overview Recently, OSHA changed a standard decreasing the permissible exposure limit (PEL) of silica
TILE SAW RODIA 207RS OPERATING MANUAL
 TILE SAW RODIA 207RS OPERATING MANUAL CAUTION Carefully read and understand all Safety and Operating Procedures prior to using the Rodia 207RS. Keep this Manual in a safe place for future reference. Contact
Nilfisk Model VHS255 Drum Top Vacuum
 Instructions/Spare Parts Manual Nilfisk Model VHS255 Drum Top Vacuum CAUTION: This Nilfisk vacuum cleaner is not to be used in classified (hazardous) environments, as serious injury could result. Under
OPERATOR'S MANUAL. IMPORTANT: READ OPERATOR'S MANUAL CAREFULLY Please fill out & return your warranty card! DP80405
 CARBON SPOT 30 EXTRACTOR OPERATOR'S MANUAL IMPORTANT: READ OPERATOR'S MANUAL CAREFULLY Please fill out & return your warranty card! DP80405 Diamond Products www.diamondproductsus.com Printed in the U.S.A.
User Manual AIR HOG. Vacuum Booster REV. 3/20/ Stowe Dr. Poway, CA P: (858) F: (858)
 F: (858)") User Manual AIR HOG Model: 7303L Vacuum Booster REV. 3/20/18 13655 Stowe Dr. Poway, CA 92064 P: (858) 679-1191 F: (858) 726-6005 INTRODUCTION Dear Customer: Congratulations on the purchase of your new
User Manual AIR HOG Model: 7303L Vacuum Booster REV. 3/20/18 13655 Stowe Dr. Poway, CA 92064 P: (858) 679-1191 F: (858) 726-6005 INTRODUCTION Dear Customer: Congratulations on the purchase of your new
ANGULAR TILE DRILL BEAST FB750W OPERATING MANUAL
 ANGULAR TILE DRILL BEAST FB750W OPERATING MANUAL CAUTION Carefully read and understand all Safety and Operating Procedures prior to using the BEAST Angular Tile Drill FB750W. Keep this Manual in a safe
ACT Cartridge Dust Collector
 IOM-101-1 ACT Cartridge Dust Collector Installation and Operation Manual ACT Dust Collectors CAUTION! Accidents happen, be careful and always follow all local and federal regulations! Fires and explosions
DD 200. Printed: Doc-Nr: PUB / / 000 / 02
 DD 00 Bedienungsanleitung Operating instructions Mode d emploi Istruzioni d uso Gebruiksaanwijzing Manual de instruções Manual de instrucciones Οδηγιες χρησεως de en fr it nl pt es el ar 9 4 8 4 8 7 9
OWNER S MANUAL. Models SCU-H11, SCU-H9, SCU-H7, SCU-H5, SCU-H3
 Warranty Information Maintenance Troubleshooting Operating Instructions Installation OWNER S MANUAL Models SCU-H11, SCU-H9, SCU-H7, SCU-H5, SCU-H3 DOMESTIC USE ONLY Please read this document carefully
MODEL MC-UL592 MC-UL594 POWER SOURCE. 230V - 240V ~ 50 Hz MAX INPUT 1400 W 1500 W NOMINAL INPUT DIMENSIONS (W x L x H)
") Order Number: PMMA091040CE Vacuum Cleaner MC-UL592/MC-UL594 SPECIFICATION MODEL MC-UL592 MC-UL594 POWER SOURCE 230V - 240V ~ 50 Hz MAX INPUT 1400 W 1500 W NOMINAL INPUT DIMENSIONS (W x L x H) 1200-1300
Order Number: PMMA091040CE Vacuum Cleaner MC-UL592/MC-UL594 SPECIFICATION MODEL MC-UL592 MC-UL594 POWER SOURCE 230V - 240V ~ 50 Hz MAX INPUT 1400 W 1500 W NOMINAL INPUT DIMENSIONS (W x L x H) 1200-1300
INSTALLATION MANUAL. Split-type Air Conditioner (Cooling and Heating) Outdoor Unit UQB09JJWC UQB12JJWC. Indoor Unit AQB09JJWC AQB12JJWC
 Outdoor Unit UQB09JJWC UQB12JJWC. Indoor Unit AQB09JJWC AQB12JJWC") AQB09JJ6WC_IM_E_2585 2006.4.17 4:26 PM Page 17 INSTALLATION MANUAL Indoor Unit AQB09JJWC AQB12JJWC Outdoor Unit UQB09JJWC UQB12JJWC ENGLISH FRANÇAIS ESPAÑOL Split-type Air Conditioner (Cooling and Heating)
AQB09JJ6WC_IM_E_2585 2006.4.17 4:26 PM Page 17 INSTALLATION MANUAL Indoor Unit AQB09JJWC AQB12JJWC Outdoor Unit UQB09JJWC UQB12JJWC ENGLISH FRANÇAIS ESPAÑOL Split-type Air Conditioner (Cooling and Heating)
Portable Dust Collection Systems
 Portable Dust Collection Systems MK-SDG-7 MK-IXL SHROUDs CUP WHEELS Dust extractors air scrubbers SAWTEC -ZEK 1315 Storm Parkway, Torrance, CA 90501, USA Tel: 1.800.421.5830, 310.539.5221 Fax: 310.539.5158
73. MEDICAL SURVEILLANCE - Triggers 74. 1)Exposure AL > 30 days/year 75. 2)Exposure > PEL 76. Wearing a Negative Pressure Respirator - 30 days/year
Exposure AL > 30 days/year 75. 2)Exposure > PEL 76. Wearing a Negative Pressure Respirator - 30 days/year") Environmental Monitoring Systems, Inc. 3864 Leeds Avenue Charleston, South Carolina 29405 TEL 800-293-3003 or 843-724-5708 FAX 866-724-5700 Email: info@emssales.net Website http://www.emssales.net 1. CRYSTALLINE
Environmental Monitoring Systems, Inc. 3864 Leeds Avenue Charleston, South Carolina 29405 TEL 800-293-3003 or 843-724-5708 FAX 866-724-5700 Email: info@emssales.net Website http://www.emssales.net 1. CRYSTALLINE
TE 3-M TE 3-C. English Français Español. Printed: Doc-Nr: PUB / / 000 / 01
 TE 3-M TE 3-C English Français Español en fr es Printed: 25.11.2015 Doc-Nr: PUB / 5245522 / 000 / 01 1 This Product is Certified Ce produit est homologué Producto homologado por Este produto está registrado
User Guide Vax Careline: AU: NZ:
 User Guide Vax Careline: AU: 1300 361 505 Bagless Cylinder Get Cleaning... What s your Vax s model number? V C - 1 0 0 2 What s your serial number? (Located on the base of the machine) Note these down
Turbo Vac Pro 18V 2 in 1 Cordless Cleaner
 Turbo Vac Pro 18V 2 in 1 Cordless Cleaner Model Number: RHSV1801 For Customer Services & Spare Parts please call 0345 209 7461 Opening times: Monday - Friday 8am 8pm & Saturday 9am 1pm Or visit us at www.productcare.co.uk
DD 500-CA Operating instructions Mode d emploi Manual de instrucciones Manual de instruções
 DD 500-CA Operating instructions Mode d emploi Manual de instrucciones Manual de instruções en fr es pt Printed: 12.11.2015 Doc-Nr: PUB / 5236316 / 000 / 01 1 This Product is Certified Ce produit est homologué
VC VC English
 VC 125-6 VC 125-9 English 1 Information about the documentation 1.1 About this documentation Read this documentation before initial operation or use. This is a prerequisite for safe, trouble-free handling
INSTRUCTION MANUAL Model: SU3022
 INSTRUCTION MANUAL Model: SU3022 GUARANTEE This product is guaranteed for 2 years from the date of original purchase. If any defect arises due to faulty materials or workmanship, the unit will, either
GREASE INTERCEPTORS. Z1192 GREASE RECOVERY APPLIANCE (GRA) INSTALLATION and OPERATION INSTRUCTIONS
 INSTALLATION and OPERATION INSTRUCTIONS") Z1192 GREASE RECOVERY APPLIANCE (GRA) INSTALLATION and OPERATION INSTRUCTIONS Note: Zurn Grease Interceptors with grease recognizing sensors are efficient appliances designed to separate grease from water.
Z1192 GREASE RECOVERY APPLIANCE (GRA) INSTALLATION and OPERATION INSTRUCTIONS Note: Zurn Grease Interceptors with grease recognizing sensors are efficient appliances designed to separate grease from water.
Application Concrete Drilling & Anchoring
 Application Concrete Drilling & Anchoring BIT TYPE HDC100 11255VSR -plus Dust-Collection HDC200 11264EVS -max Dust Collection HDC250 -max Core Bit Dust Collection GDE18V-16 GBH 18V-26K D25263K D25323K
RVAC-100 VACUUM CLEANER MANUAL. For Household Use Only
 VACUUM CLEANER MANUAL RVAC-100 For Household Use Only 790 Rowntree Dairy Road, Woodbridge, ON Canada L4L 5V3 t: 905.851.6701 f: 905-851.8376 e: info@reversomatic.com Toll Free: 1.800.810.3473 (Canada)
CEREC MC XL Premium Package / MC XL / MC X / MC and inlab MC XL. Cleaning and Maintenance
 CEREC MC XL Premium Package / MC XL / MC X / MC and inlab MC XL Cleaning and Maintenance Contents 03 04 04 05 06 07 07 07 08 08 09 09 09 09 10 12 15 Maintenance Schedule Water System Changing the Filter
Model K 520 M Part No
 Model K 520 M Part No. 1.069-680.0 High Pressure Washer Operator Manual Overview... 2 Precautions... 2-4 Assembly Instructions... 4 Operating Instructions... 5 Using the Accessories... 6 Working with Detergents...
Built-In Dishwasher. Installation Instructions. BEFORE YOU BEGIN Read these instructions completely and carefully. IMPORTANT The dishwasher MUST be
 Installation Instructions Built-In Dishwasher If you have questions, call 800.GE.CARES (800.432.2737) or visit our website at: www.ge.com BEFORE YOU BEGIN Read these instructions completely and carefully.
PUREPOWER SERIES CENTRAL VACUUM POWER UNITS PP500, PP600 & PP650
 USER GUIDE PUREPOWER SERIES CENTRAL VACUUM POWER UNITS PP500, PP600 & PP650 AB0039 FOR RESIDENTIAL USE ONLY!! BROAN-NUTONE LLC; HARTFORD, WISCONSIN WWW.NUTONE.COM 1-888-336-3948 REGISTER YOUR PRODUCT ONLINE
Version 1.1. S88 W1M-B User Guide _User guide 25/02/ :03 Page 12
 S88 W1M-B User Guide - 19.02.13_User guide 25/02/2013 10:03 Page 12 -- --- Vax Ltd., Kingswood Road, Hampton Lovett, Droitwich, Worcestershire, WR9 OQH, UK email: info@vax.co.uk - website: vax.co.uk Version
RONDA 200. RONDA 200 when life is too short for hobby vacuum cleaners OTHER MACHINES FOR SIMILAR PURPOSES RONDA 20 RONDA 400
 vacuum cleaners for the construction industry RONDA 200 RONDA 200 when life is too short for hobby vacuum cleaners Green Tech An CAP motor with improved suction performance and lower power consumption
Owner s Guide and Installation Manual
 For Your Records and Warranty Assistance For reference, also attach your receipt or a copy of your receipt to the manual. Model Name Type 2A Models Owner s Guide and Installation Manual Model No. Date
K 2.90 M. Specifications Operating pressure, max PSI Water volume GPM Voltage V Amp draw AMPS
 K 2.90 M High Pressure Washer Operator Manual Overview... 2 Important Precautions... 3-4 Assembly Instructions... 4 Operating Instructions... 5 GFCI Instructions... 6 Using the Accessories... 6 Working
K 2.97 M. Specifications Operating pressure, max PSI Water volume GPM Voltage V Amp draw AMPS
 K 2.97 M High Pressure Washer Operator Manual Overview... 2 Important Precautions... 3-4 Assembly Instructions... 4 Operating Instructions... 5 GFCI Instructions... 6 Using the Accessories... 6 Working
IMPORTANT SAFETY REMINDERS
 USER Manual IMPORTANT SAFETY REMINDERS This appliance should only be used for domestic cleaning, as described in this user guide. Please ensure that this guide is fully understood before operating the
SERIES CATALOGUE C & G. Shavings Collection System
 SERIES CATALOGUE C & G Shavings Collection System Safety Precautions WARNINGS Wear working clothes suitable for the operation. In particular, eye protection equipment must be worn to prevent shavings from
8 lb Lightweight Vacuum Model CK LW 13/1
 TORNADO INDUSTRIES 7401 W. LAWRENCE AVENUE CHICAGO, IL 60706 (708) 867-5100 FAX (708) 867-6968 www.tornadovac.com Operations & Maintenance Manual For Commercial Use Only 8 lb Lightweight Vacuum Model CK
Vacmobile 20/2. Instruction manual OPERATION & SERVICE
 This instruction manual provides general instructions for the Vacmobile 20/2 vacuum system. This machine may use either the Becker U4.20 or the PVR EM 20/B vacuum pump. Service information specific to
BEAST RAIL SAWS RS34 RS48 RS59 OPERATING MANUAL
 BEAST RAIL SAWS RS34 RS48 RS59 OPERATING MANUAL CAUTION: Carefully read and understand all Safety and Operating Procedures prior to using the Beast machine. Keep this Manual in a safe place for future
DD 30-W. English. Printed: Doc-Nr: PUB / / 000 / 04
 DD 30-W English 1 Information about the documentation 1.1 About this documentation Read this documentation before initial operation or use. This is a prerequisite for safe, trouble-free handling and use
VC 20 U VC 40 U VC 40-UE
 VC 20 U VC 40 U VC 40-UE English Français Español Português en fr es pt 1 2 3 4 5 1 Information about the documentation 1.1 Conventions 1.1.1 Warning signs The following warning signs are used: General
IMPORTANT SAFETY REMINDERS
 USER MANUAL IMPORTANT SAFETY REMINDERS This appliance should only be used for domestic cleaning, as described in this user guide. Please ensure that this guide is fully understood before operating the
AUSTRALIA PAD1200-XE NEW ZEALAND
 PAD1200-XE AUSTRALIA NEW ZEALAND 11 9 10 10 11 A B 12 13 C D 15 14 16 17 F 2 ENGLISH ENGLISH Intended use Your Black & Decker Dustbuster auto car vacuum cleaner has been designed for light dry vacuum cleaning
The Original & Patented Self-Cleaning Vacuum Product Catalog Ridgeview Tulsa,OK
 The Original & Patented Self-Cleaning Vacuum 2017 Product Catalog 500 SERIES 550 and 550H Powerful and compact, the 500 Series offers great performance and portability. Designed to capture dust generated
K 3.97 M. Specifications or visit our website: In USA call: Part No
 K 3.97 M High Pressure Washer Operator Manual Overview... 2 Precautions... 2-4 Assembly Instructions... 4-5 Operating Instructions... 5-6 GFCI Instructions... 6 Using the Accessories... 6 Working with
Owner s Manual. Installation. Instructions. Operating. Maintenance. Troubleshooting
 Warranty Information Maintenance Troubleshooting Operating Instructions Installation Owner s Manual Domestic use only Please read this document carefully before installing and/or using your vacuum cleaning
Installation Instructions
 GE Consumer & Industrial Appliances Installation Instructions Junction Box Cover Within this user bag, you will find a junction box cover and a #10 hex head screw used to attach the junction box cover
Vacuum cleaner Instruction manual
 CSR Tools & Consumables Triniti 3, Level 5 39 Delhi Road North Ryde NSW 23 Australia http://www.csr.com.au Vacuum cleaner Instruction manual IMPORTANT: Read and understand all instructions before using.
SAFETY AND OPERATING MANUAL
 SAFETY AND OPERATING MANUAL Original instructions GENERAL POWER TOOL SAFETY WARNINGS WARNING: Read all safety warnings and all instructions. Failure to follow the warnings and instructions may result in
INSTALLATION MANUAL. Split-type Air Conditioner (Cooling and Heating) Indoor Unit AQB18J6WC AQB24J2WC. Outdoor Unit UQB18J6WC UQB24J2WC
 Indoor Unit AQB18J6WC AQB24J2WC. Outdoor Unit UQB18J6WC UQB24J2WC") AQB8J6WC_IM_E_25864 2006.4.4 3:29 PM Page 7 INSTALLATION MANUAL Indoor Unit AQB8J6WC AQB24J2WC Outdoor Unit UQB8J6WC UQB24J2WC ENGLISH FRANÇAIS ESPAÑOL Split-type Air Conditioner (Cooling and Heating)
AQB8J6WC_IM_E_25864 2006.4.4 3:29 PM Page 7 INSTALLATION MANUAL Indoor Unit AQB8J6WC AQB24J2WC Outdoor Unit UQB8J6WC UQB24J2WC ENGLISH FRANÇAIS ESPAÑOL Split-type Air Conditioner (Cooling and Heating)
USER MANUAL KGNVCTBVAA
 USER MANUAL KGNVCTBVAA IMPORTANT SAFETY INSTRUCTIONS When using an electrical appliance, basic precautions should always be followed, including the following: READ ALL INSTRUCTIONS BEFORE USING THIS APPLIANCE
DESIGNED FOR HEAVY DUTY, OUTDOOR CLEANING
 DESIGNED FOR HEAVY DUTY, OUTDOOR CLEANING LET S GET STARTED. VPW2BC Let s talk safety PLEASE KEEP THESE ORIGINAL INSTRUCTIONS. Basic safety precautions This pressure washer is intended for household use
READ AND FOLLOW ALL INSTRUCTIONS SAVE THESE INSTRUCTIONS
 READ AND FOLLOW ALL INSTRUCTIONS SAVE THESE INSTRUCTIONS 1 IMPORTANT SAFETY INSTRUCTIONS Read the instructions The appliance is not to be used by persons (including children) with reduced physical, sensory
Hand Vac. Owner s Manual. Review this manual before operating cleaner. English pp. 1-7 Español pág Français p.
 TM Owner s Manual English pp. 1-7 Español pág. 8-11 Français p. 1-16 Hand Vac Thank you for selecting a HOOVER product. This cleaner was inspected and packaged carefully before being shipped from the factory.