Spas with 2 or 3 Pumps
|
|
|
- Camilla Griffin
- 6 years ago
- Views:
Transcription


1 Topside Control Instructions for Spas with 2 or 3 Pumps 15bp501tp

2 Programming Menu Sequence 2
3 Powering on Your Spa After filling the spa through the filter assembly to the correct level remove the water hose, replace the filter, the filter basket assembly and the filter cover. Turn the GFCI on. Every time the GFCI is powered on, your spa controls run diagnostic tests. During diagnostic testing, a series of messages are displayed on the topside controls. When diagnostic testing is complete, the spa begins priming mode. Priming Mode Each time you fill your spa some air may be trapped in the plumbing lines. Priming mode safely removes the air. To prevent failure, the heater is disabled during priming mode. Pumps should be observed one at a time. Your spa will automatically begin normal heating and filtering when priming is complete. Priming mode lasts approximately 5 minutes. Run Pumps to Purge the Air When this message is displayed on your topside controls, push the Pump 1 button once to start the pump on low speed. Press the Pump 1 button a second time to switch to high speed. After confirming water is coming from all jets and the pump is not surging, press the Pump 1 button to turn the pump off. Pump 2 is a single speed pump. Press the Pump 2 button once to start Pump 2. After confirming water is coming from all jets and the pump is not surging, press the Pump 2 button to turn the pump off. If the spa you purchased has 3 pumps, Pump 3 is a single speed pump. Press the Pump 3 button to start Pump 3. After confirming water is coming from all jets and the pump is not surging, press the Pump 3 button to turn the pump off. Within 2 minutes of pressing each pump button, water should be flowing from the jets in every seat without surging. If none of the jets in a seat work or if water surges, turn the pump off. After the water is completely still, repeat the process a second time. If the pumps do not prime within 2 minutes on your second attempt, turn the GFCI off. Make sure the slice valves are locked in the OPEN position, that the diverter valves are centered for even distribution of the water, that jets without flow are rotated to the open position and remove any debris in the filter basket and on suction drain covers. Power the GFCI on and repeat the process to run each pump on HIGH SPEED. If the pumps don t prime on the third attempt, call for assistance. Do not turn on any pump that will not prime. A pump that fails to prime should not be left on for more than 2 minutes under any circumstance. The heater will engage when priming mode is complete. If a pump is not properly primed when the heater engages, the spa may overheat causing serious damage. 3

4 Initial Temperature Display Pre-Programmed Factory Settings Your spa will start in Ready Mode The temperature is pre-programmed to 100º F The Duel Temperatures are pre-programmed to a minimum of 80º F and a maximum of 104º F The filtration cycle is pre-programmed to run once each day for 2 hours After briefly displaying the pre-programmed temperature setting, this message will be displayed on your topside controls. The water must circulate through the heater chamber for approximately one minute before the current water temperature can be displayed on the topside controls. When the water temperature reaches the pre-programmed temperature setting, the pump will turn off automatically. To display the current pre-programmed temperature setting, press the Temp button once. The current water temperature will flash on the display. When the display is flashing, the spa controls are in programming mode. To prevent accidently changing pre-programmed settings, after you press a button, you should wait 5 seconds before pressing a different button. Turning the Jets On and Off Pump 1 is a two speed pump. Press the Pump 1 button to operate pump 1 on LOW SPEED. Press the Pump 1 button a second time to operate on HIGH SPEED. Press the Pump 1 button a third time to turn it off. If the Pump 1 button is not pressed to turn it off manually, it will shut sown automatically after 20 minutes. To turn it back on, press the Pump 1 button and repeat the process. The Ozonator engages when pump 1 is operating on LOW SPEED. Pump 2 is a single pump. Press the Pump 2 button to turn it on. Press the Pump 2 button a second time to turn it off. If the Pump 2 button is not pressed to turn it off manually, it will shut down automatically after 20 minutes. Press the Pump 2 button to turn the pump back on. In spas equipped with 3 pumps, pump 3 is a single speed pump. Press the Pump 3 button to turn it on. Press the Pump 3 button a second time to turn it off. If the Pump 3 button is not pressed to turn it off manually, it will shut down automatically after 20 minutes. Press the Pump 3 button to turn it back on. 4


5 To ensure your safety and for optimal performance, your spa controls will automatically perform maintenance functions and run diagnostic testing. The pump will start automatically on low speed to circulate the water for a few minutes every hour to run a system check. During heating, filtration and diagnostic testing the pump runs on low speed. When the pump starts automatically and operates on low speed to perform these maintenance functions, pressing the pump button will not turn the pump off. When a button is pressed to turn a pump on, a clean up cycle will begin 30 minutes after the pump shuts down. The pump will operate on LOW SPEED and the ozonator will engage. Both the pump and ozonator will operate for approximately 30 minutes to help eliminate dirt, bacteria and other particulates as soon as they are introduced to the water Turning the Lights On and Off Press the Light button once to turn the lights on. The colored light will rotate. Press the Light button to turn the light off. To display only one color, press the Light button repeatedly turning the lights on and off. When the color your desire turns on do not turn the light off. Press the button only when ready to turn the light off. If the Light button is not pressed to turn the lights off manually, the lights will turn off automatically after 2 hours. Press the Light button to turn the lights back on. If your spa is equipped with optional perimeter lighting, the perimeter lighting feature work in tandem with the main light. Operating the Audio Components Press the Stereo button to turn the built in audio components on. Press the Stereo button a second time to turn them off. If the button is not pressed to manually power off the audio components, they will power off automatically after 2 hours. Press the Stereo button to turn it back on. Music from your Mp3 player will play through the built in audio Mp3 Audio Jack components when your the device is plugged into the audio jack. The Mp3 Cargo Bay is built into the spa cabinet on the same side as the topside controls. Use your Mp3 player to select music and to control the volume. If the model you purchased is equipped with Bluetooth capability, open the Bluetooth settings on your Mp3 player and connect it to the spa to stream your music wirelessly. Enter 0000 if a pairing code is required. For your safety and to protect your device, your Mp3 player should always be stored in the Mp3 Cargo Bay. When you remove your Mp3 player from the Cargo Bay, always press the Stereo button to turn the speakers off. Leaving the audio components on causes overheating that will permanently damage the audio components. Damage to the audio components that occurs because the components were not turned off is not covered under the warranty. 5


6 Changing the Programmed Settings and Operating Modes Press the Temp button once to enter programming mode. When the display on the topside control is flashing, the spa is in programming mode. In most cases, pressing the light button saves the change. To prevent accidentally changing programmed settings, after pressing one button wait 5 seconds before pressing a different button. Adjusting the Programmed Water Temperature Setting To change to programmed temperature settings, press and release the Temp button. The display on the topside controls will flash, indicating you have entered programming mode. While the display is still flashing, press and hold the Temp button it until the desired temperature is reached. To move the temperature in the opposite direction, continue holding the button. The temperature will automatically begin moving in the opposite direction when the maximum temperature is reached. Release the Temp button when the desired temperature is displayed on the topside controls. Press the light button to save the change and exit programming mode. If the programmed temperature is increased, pump 1 will turn on automatically to begin heating the water. Dual Temperature Ranges When you are setting Duel Temperature Ranges, pay attention to the direction of the arrow displayed on the topside controls. The spa controls allow you program two temperature range settings with independent temperature settings that are most commonly used to program a Ready to Use setting and a Vacation setting. When a range is chosen, the spa will heat to the temperature settings associated with that range. For example, the high range might the set with a low temperature of 80º F and a high temperature of 104º F and the low range might be set between 60º F and 99º F. Freeze protection is active in either range. To program the first temperature range, press the Temp button. While the display is flashing, press the Light button. TEMP will be displayed on the controls. If the arrow beside the word RANGE is pointing up, program the HIGH temperature setting. If the arrow is pointing down, program the LOW temperature. Press and hold the Temp button until the desired temperature is reached. Press the Light button to save the change. Repeat the process to program the opposite temperature range. If necessary, press the Temp button to change the direction of the arrow. Press and hold the Temp button until the desired temperature is reached. Press the Light button to save the changes. 6

7 Setting Dual Temperature Ranges 7


8 Freeze Protection If the water temperature falls to 42º F, the spa will automatically turn on and will run for 4 minutes after the water temperature reaches 46º F to prevent freezing. If your spa is in Sleep Mode when the ambient temperature is 40º F or lower, the water temperature will likely operate in Freeze Protection Mode for extended periods if not continuously. Show and Set the Time-of-Day Setting the time of day is important for determining when filtration cycles and other functions will performed. If no time of day is set, SET TIME will flash on the display if no time-of-day is stored in the memory. When the power supply to the spa is interrupted, the time will not be saved. If filtration cycles must be run at a particular time resetting the time-of-day will be required. When the GFCI is powered on, the default time-of-day is 12:00 Noon. Though SET TIME will still flash on the display, if the GFCI is powered on at Noon, the filtration cycle will run at Noon. Flip the Display To set the time of day, press the Temp button. While the display is flashing, repeatedly press the Light button until TIME appears on the topside display. To set the HOUR, press and hold the Temp button until the correct hour is displayed. Press the Light button to save the hour and begin setting the MINUTES. Press and hold the Temp button until the correct time is displayed. Press the Light button to save your selection. The message on the topside display can be inverted for easy reading both inside and outside the spa. To invert the display, press the Temp button once. When the display is flashing, press the light button repeatedly until the word FLIP flashes on the topside controls. Press the Temp button to invert the display. FLIP will begin flashing in the inverted direction. Press the Light button to save the change. 8


9 Setting the Time of Day Flipping the Display 9

10 Programming Filtration Cycle Settings Your spa is pre-programmed to filter once each day for 2 hours. When the filtration cycle begins, all pumps will turn on and operate on HIGH SPEED to purge the lines and shut down automatically. When purging is complete, Pump 1 will start on LOW SPEED and will automatically shut down when filtration cycle is complete. During filtration cycles, the water circulates to remove debris and small particulates. Increasing filtration will not eliminate or reduce the need for chemical sanitization. How long your water needs to filter varies on a number of factors including how often the spa is used, for how long, and by how many people. In addition to the filtration cycle, the water circulates every 30 minutes for diagnostic testing and during clean up cycles that begin automatically 30 minutes after a pump button is pressed. Under normal use, adequate filtration should be achieved in two hours. If the spa is used for longer periods by more bathers it may be necessary to increase the duration of your filtration cycle which should not exceed 4 hours. Excessive filtration in may cause overheating. Your spa is pre-programmed to run one filtration cycle every day for two hours. You can program when the filtration cycle will begin and the duration. Settings can be adjusted in 15 minute intervals. To program filtration cycles, press the Temp button, Wile the display is flashing, repeatedly press the Light button until FLTR is displayed on the topside controls. Press the Temp button. While BEGN is flashing on the display, press and hold the Temp button until the correct hour is displayed. Press the Light button to save the hour and move to minutes. Press and hold the Temp button until the desired 1/4 hour is displayed. Press the Light button. While RUN HRS is flashing press and hold the Temp button until the desired number of hours is displayed. Press the Light button to save the selection and move to minutes. Press and hold the Temp button until the correct 1/4 hour is displayed. Press the Light button to save the selection and display the time of day the filtration cycle will end. Press the Temp button to save the selection. When selecting the start time pay close attention to A or P in the bottom right corner of the display. The filtration cycle will run during the AM if A is displayed or PM if P is displayed. The system calculates the end time, so A or P are not included in that display. 10

11 Programming the Filtration Cycle 11


12 UNDERSTANDING OPERATING MODES Your spa controls are equipped with three operating modes to help you regulate energy consumption and reduce operating costs. How often the spa is used and the ambient temperature will help you determine which mode is best for you. Ready Mode The water is always heater to the programmed temperature setting. Ready is displayed on the topside controls. When the spa is in Ready Mode, it s always ready to use when you re ready to use it because the programmed temperature setting is automatically maintained. The current water temperature will be displayed on the topside controls. Pump 1 will automatically circulate on low speed for a few minutes every half hour to check the water temperature keeping it consistent throughout the spa and to sanitize the water with Ozone. Rest Mode The water only heats during filtration cycles and may be too cool for immediate use Rest is displayed on the topside controls. DO NOT PUT THE SPA IN REST MODE WHEN THE AMBIENT TEMPERATURE IS 40º F OR LOWER! Rest Mode reduces energy consumption by heating the water only during filtration cycles only. In Ready Mode, the water automatically begins heating when the temperature falls a couple of degrees. In Rest Mode, the water temperature is allowed to fluctuate. When the spa is in Rest Mode, setting the filtration cycle to end right before use can be an effective way to reduce energy consumption. The topside controls will not display the current water temperature until pump 1 is turned on to circulate the water for approximately 1 minute. Ready-In-Rest Mode In Rest Mode, the water heats for 1 hour when the Pump 1 button is pressed Unless the Pump 1 button is pressed, the water only heats during filtration cycles. In Ready-In-Rest Mode the spa will operate in Rest Mode, heating only during filtration cycles, unless the Pump 1 button is pressed. When the Pump 1 button is pressed, the system assumes it is in use and the water begins heating as it circulates for one hour. If the programmed temperature setting isn t reached within the hour, the pump automatically shuts off. To change operating modes, press the Temp button. While the display is flashing, repeatedly press the Light button until MODE appears on the topside display. Press the Temp button to toggle between operating modes. When the desired mode is displayed, press the Light button to save your selection. 12


13 When your spa is in Rest Mode, the actual water temperature cannot be displayed until Pump 1 is turned on to circulate the water. 13
14 Restricting Access To prevent unwanted use or accidental changes to programmed settings, lock the control panel to block use of the topside controls without interrupting the automatic functions. Limited Access Locking the Temperature allows the Jets and other features to be used, but blocks access to other menu items including the programmed temperature setting, FLIP, LOCK, INFO and FAULT LOG. Unlocking To lock the Temperature, press the Temp button once. While the display on the topside control is flashing, press the Light button repeatedly until LOCK is displayed on the topside controls. Press the Temp button. When TEMP is displayed, press the Light button. When PANL is displayed, press the TEMP button. When OFF appears on the display, press the TEMP button. When ON is displayed, press the Light button to lock and save the changes. When the Temperature Lock is activated, the word LOCK will appear when the Temp button is pressed twice. Press and hold the Temp button. Slowly press the Light button twice. The control panel is unlocked when UNLK is displayed on the topside control panel. To lock the topside control panel and prevent use, press the Temp button once. While the display on the topside controls is flashing, press the Light button until LOCK is displayed on the topside controls. Press the Temp Button once. When TEMP appears on the display, press the Light button once. When PANL is displayed, press the Temp button. When OFF is displayed, press the Temp button. When ON is displayed, press the Light button save the change and lock the controls. When the panel lock is activated, LOCK will appear when any button is pressed. 14

15 Restricting Access Unlocking the Controls 15
16 Setting Preferences Selecting ºF OR ºC To change the water temperature reading from Fahrenheit to Celsius, Press the Temp button once. While the display is flashing, press the Light button until PREF is displayed. Press the Temp button. When F/C is displayed, press the Temp button to toggle between F and C. Press the Light button to set your preference. PREF will display on the control allowing you to set the next preference parameter. The system will automatically exit if the setting is not adjusted while PREF is flashing on the display. Selecting Standard or Military Time To change the clock setting to Military Time, press the Light button will be displayed on the topside control. Use the Temp button to toggle between 24 HR and 12 HR. Use the light button to set your preference. PREF will display on the control. Setting Maintenance Reminders To set maintenance reminders, press the Light button when RE-- MIN- DERS is displayed. Press the Temp button to toggle between Yes and No. Press the Light button to set your preference. 16
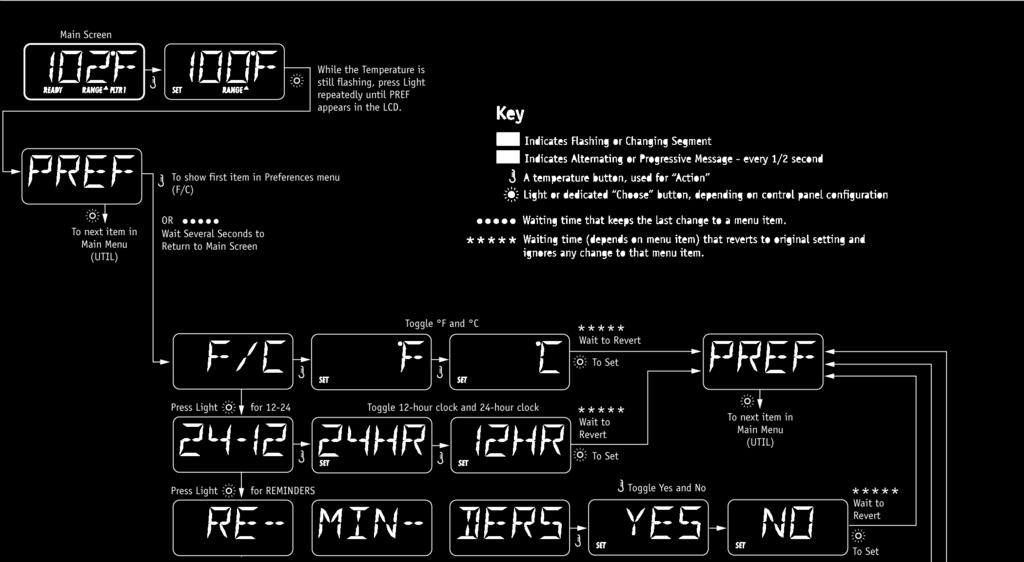
17 Setting Preferences 17
18 General Messages Too Cold - Freeze Protection A potential freeze condition has been detected and all pumps have been activated. Pumps will stay on for at least 4 minutes after the potential freeze condition has ended. Pumps may turn on and off automatically during freeze protection. Water is too Hot One of the temperature sensors has detected high temperature in the heater chamber and spa functions have been disabled. DO NOT ENTER THE WATER! The probable cause is pumps running excessively or high ambient temperatures. Remove the spa cover and add water allowing the water to cool. Reduce duration of filtration cycle. Operation will resume when the water temperature has fallen. 18
19 Heater Related Messages Reduced Heater Flow There may not be enough water flow away from the heater. DO NOT ENTER THE WATER! Water temperature readings in the heater chamber are too high. Heater will restart in approximately 1 minute. Reduced Heater Flow Not enough flow to carry water away from the heating element and the heater has been disabled. DO NOT ENTER THE WATER! Power off GFCI, make sure slice valves locked in open position, that water level is adequate and remove debris from filter, filter basket and suction drain cover. Press any button to resume operation. If problem is not resolved, call for assistance. Heater may be Dry There is not enough water in the heater. Add water to the spa if the water level is too low, check to be sure slice valves are locked in the open position, that pumps are primed and jets are open. When problem is resolved, press any button to resume operation. Heater is too Hot One of the temperature sensors has detected high temperature in the heater chamber and the spa is shut down. DO NOT ENTER THE WATER! Power off GFCI, make sure slice valves locked in open position, that water level is adequate and remove debris from filter, filter basket and suction drain cover. Press any button to resume operation. If problem is not resolved, call for assistance. 19
20 Reset GFCI When this message appears with another message, the GFCI must be turned off to reset the spa controls. After 10 minutes, turn the GFCI on. Sensor Related Messages Sensor Balance is Poor - Temperature sensors are out of balance by 2 to 3 Degrees. Call for assistance. Sensor Balance is Poor Temperature sensors are out of balance and fault has been established for at least 1 hour. Call for assistance Sensor A Failure Temperature sensor or sensor circuit (A) has failed. Call for assistance. Sensor A Failure Temperature sensor or sensor circuit (B) has failed. Call for assistance. 20


21 Miscellaneous Messages No Communication The topside control is not communicating with the spa controls. Call for assistance. Pre-Production Software The spa controls is operating with test controls. Call for assistance. ºF or ºC replaced by ºT Spa controls are operating in Test Mode. Call for assistance. Memory Failure When the spa was powered on the system failed the Program Checksum Test. There is a problem with the firmware. Call for assistance. Memory Warning - Persistent Memory Reset Message appears after system set up change. If this message appears on more than one power up, or it appears after operating normally for a period of time, call for assistance. 21
22 Memory Failure - Clock Error Call for assistance. Configuration Error - Spa will not Power On Call for assistance. GFCI Failure - System could not Test/Trip GFCI Take pictures of the GFCI and the main power supply and have them ready to to technical support. Call for assistance. Pump appears to be stuck on Water may be overheating. Pump appears to have been stuck ON when the spa was last powered on DO NOT ENTER THE WATER. Turn the GFCI off and call for assistance. 22
23 If Reminders are Programmed, These Messages will Appear on a Regular Basis Alternating with Current Water Temperature Check ph and adjust if required. Check sanitizer and adjust if required. Clean or replace the filter if necessary. Test the GFCI. The manufacturer requires installation of a Ground Fault Circuit Interrupter by a qualified, licensed electrician. The GFCI is an extremely important safety device and must be checked on a regular basis to verify its reliability. Change water to maintain chemical balance and sanitary conditions. Clean and condition cover for maximum life. Clean and condition cabinet for maximum life. Change filter to ensure adequate water flow, optimal performance and sanitary conditions. Install new mineral cartridge to ensure adequate sanitation. 23


24 Memory Failure - Clock Error Call for assistance. Configuration Error - Spa will not Power On Call for assistance. GFCI Failure - System could not Test/Trip GFCI Take pictures of the GFCI and the main power supply and have them ready to to technical support. Call for assistance. Pump appears to be stuck on Water may be overheating. Pump appears to have been stuck ON when the spa was last powered on DO NOT ENTER THE WATER. Turn the GFCI off and call for assistance. 24
25 If Reminders are Programmed, These Messages will Appear on a Regular Basis Alternating with Current Water Temperature Check ph and adjust if required. Check sanitizer and adjust if required. Clean or replace the filter if necessary. Test the GFCI. The manufacturer requires installation of a Ground Fault Circuit Interrupter by a qualified, licensed electrician. The GFCI is an extremely important safety device and must be checked on a regular basis to verify its reliability. Change water to maintain chemical balance and sanitary conditions. Clean and condition cover for maximum life. Clean and condition cabinet for maximum life. Change filter to ensure adequate water flow, optimal performance and sanitary conditions. Install new mineral cartridge to ensure adequate sanitation. 25
26 General Messages Too Cold - Freeze Protection A potential freeze condition has been detected and all pumps have been activated. Pumps will stay on for at least 4 minutes after the potential freeze condition has ended. Pumps may turn on and off automatically during freeze protection. Water is too Hot One of the temperature sensors has detected high temperature in the heater chamber and spa functions have been disabled. DO NOT ENTER THE WATER! The probable cause is pumps running excessively or high ambient temperatures. Remove the spa cover and add water allowing the water to cool. Reduce duration of filtration cycle. Operation will resume when the water temperature has fallen. 26
27 Heater Related Messages Reduced Heater Flow There may not be enough water flow away from the heater. DO NOT ENTER THE WATER! Water temperature readings in the heater chamber are too high. Heater will restart in approximately 1 minute. Reduced Heater Flow Not enough flow to carry water away from the heating element and the heater has been disabled. DO NOT ENTER THE WATER! Power off GFCI, make sure slice valves locked in open position, that water level is adequate and remove debris from filter, filter basket and suction drain cover. Press any button to resume operation. If problem is not resolved, call for assistance. Heater may be Dry There is not enough water in the heater. Add water to the spa if the water level is too low, check to be sure slice valves are locked in the open position, that pumps are primed and jets are open. When problem is resolved, press any button to resume operation. Heater is too Hot One of the temperature sensors has detected high temperature in the heater chamber and the spa is shut down. DO NOT ENTER THE WATER! Power off GFCI, make sure slice valves locked in open position, that water level is adequate and remove debris from filter, filter basket and suction drain cover. Press any button to resume operation. If problem is not resolved, call for assistance. 27
Topside Control Instructions for Single Pump Spas
 Topside Control Instructions for Single Pump Spas For technical support and assistance, call 844-894-6659 1 15vs300vl24002 POWERING ON YOUR SPA After filling the spa through the filter assembly to the
Spa Touch Control Panel with BP2100, BP6013 spa controllers. (Spa Owner s Manual insert)
") Spa Touch Control Panel with BP2100, BP6013 spa controllers. (Spa Owner s Manual insert) P.N. 7876C (export) February 12, 2015 For Spas equipped with BP2100, BP6013 controllers and Spa Touch panel. Spa
Spa Touch Control Panel with BP2100, BP6013 spa controllers. (Spa Owner s Manual insert) P.N. 7876C (export) February 12, 2015 For Spas equipped with BP2100, BP6013 controllers and Spa Touch panel. Spa
Spa Touch Control Panel with 2000, 2100 controllers. (Spa Owner s Manual insert)
") Spa Touch Control Panel with 2000, 2100 controllers (Spa Owner s Manual insert) P.N. 7876B February 11, 2015 For Spas equipped with BP2000, BP2100 controllers and Spa Touch panel. Spa Touch Control Panel
Spa Touch Control Panel with 2000, 2100 controllers (Spa Owner s Manual insert) P.N. 7876B February 11, 2015 For Spas equipped with BP2000, BP2100 controllers and Spa Touch panel. Spa Touch Control Panel
Owner s Manual for. Spas with Multiple Pumps
 Owner s Manual for Spas with Multiple Pumps Service and Technical Support For technical assistance or warranty service requests, please call a technical support representative at 844-894-6659. Factory
TP600 and TP400 Control Panels
 TP600 and TP400 Control Panels Balboa Water Group Revolution Series User Interface and Programming Reference Simplified Menus System Model: BP1500 / BP1600 - Other BP-Series Systems as required. Software
spatouch Menued Control Panels
 spatouch Menued Control Panels Balboa Water Group BP Series Systems User Interface and Programming Reference The spatouch menued panel is compatible with all BP systems that already support the TP800 and/or
TP800 and TP900 Series Control Panels
 TP800 and TP900 Series Control Panels Balboa Water Group User Interface and Programming Reference System Model: BP2500 / 2600 Software Version: 5.0 and later Panel Model: TP900 Series TP800 Series Software
TP600 and TP400 Control Panels
 TP600 and TP400 Control Panels Balboa Water Group Revolution Series User Interface and Programming Reference System Model: BP1500 / BP1600 - Other BP-Series Systems as required. Software Version: 5.0 and
spatouch Icon Driven Control Panels
 spatouch Icon Driven Control Panels Balboa Water Group BP Series Systems User Interface and Programming Reference The spatouch Icon Driven panel is compatible with all BP systems that already support the
2017 Spa Touch Control Panel with 2000, 2100, 501, 6013 controllers (Spa Owner s Manual insert)
") 2017 Spa Touch Control Panel with 2000, 2100, 501, 6013 controllers (Spa Owner s Manual insert) P.N. 7876E July 2017 spatouch Icon Driven Control Panels Balboa Water Group BP Series Systems User Interface
2017 Spa Touch Control Panel with 2000, 2100, 501, 6013 controllers (Spa Owner s Manual insert) P.N. 7876E July 2017 spatouch Icon Driven Control Panels Balboa Water Group BP Series Systems User Interface
User Guide. Balboa Water Group
 User Guide Balboa Water Group The SpaTouch2 Contents Settings Screen 04 Utilities Screen 11 Panel, Demo, Fault, GFCI Test, Units Screen, Reminders, Cleanup Cycle, Language Getting Started 01 Fill it up!
Vitality Series. E-8 and S-12 Swim Spas. Owner s Guide for. For technical support and assistance, call
 Vitality Series Owner s Guide for E-8 and S-12 Swim Spas 1 Service and Technical Support For technical assistance or warranty service requests, please call a technical support representative at 844-894-6659.
Equipment Booklet. Sousou SPA. for
 Equipment Booklet for Sousou SPA 2800 Richter Ave. Suite C, Oroville, CA 95965 z voice: (530)534-9910 fax: (530)534-9915 z email: sales@tiledspas.com z website: www.tiledspas.com 6/17/2016 Nespa Tiled
99 F PREHEAT. C d. Topside Controls for Spas with Three Pumps
 < < Saving Energy The Topside Controls Think of your spa as you would a computer. The spa pack is like the hard drive and the topside controls are like the mouse and keyboard. Your computer is connected
Control Panel Operation (for additional information, please see the Special Operating Instructions for your specific hot tub)
") Control Panel Operation (for additional information, please see the Special Operating Instructions for your specific hot tub) TS702 Main Control Panel F2 PL F1 TL Pump 1 Pump 1 is a 2 speed pump. Pressing
Control Panel Operation (for additional information, please see the Special Operating Instructions for your specific hot tub) TS702 Main Control Panel F2 PL F1 TL Pump 1 Pump 1 is a 2 speed pump. Pressing
BULLFROG SPAS OWNERS MANUAL
 BULLFROG SPAS OWNERS MANUAL QUICK REFERENCE To assist you with the installation and maintenance service of your new spa, please fill out the following information and keep it on hand for future reference.
OWNERS MANUAL. Design Line - Premium Line - Comfort Line - X-Series
 Villeroy&Boch OWNERS MANUAL Design Line - Premium Line - Comfort Line - X-Series QUICK REFERENCE To assist you with installation and maintenance service of your new spa, please fill out following information
BULLFROG SPAS OWNERS MANUAL
 BULLFROG SPAS OWNERS MANUAL QUICK REFERENCE To assist you with the installation and maintenance service of your new spa, please fill out the following information and keep it on hand for future reference.
INSTRUCTION MANUAL. Blue Whale Spa Ltd, 11 Glaisdale Drive East Nottingham, NG8 4GU
 INSTRUCTION MANUAL Balboa 500Z-Series Operation Guide Initial Start-up Your spa will enter Priming Mode ( ) when it is energized. During Priming Mode, press Jets button(s) repeatedly and be sure all pumps
EL/GL Series - Mach 3 MLM990S User Guide
 EL/GL Series - Mach 3 MLM990S User Guide Panel Software Version 1.1.0 J1 Jets 1 Jets 2 102º F HT FC J2 OZ BL LT Blower Light Enter J1 Jets 1 Jets 2 39.0º C HT FC J2 OZ BL LT Blower Light Enter Note regarding
EL/GL Series - Mach 3 ML550 User Guide
 EL/GL Series - Mach 3 ML550 User Guide Heat Cool Warm Jets 1 Jets 2 Blower Light Mode Note regarding EL and GL systems: Mach 3 EL and GL systems function identically, but conform to different International
IMPORTANT SAFETY INSTRUCTIONS READ ENTIRE MANUAL BEFORE INSTALLING SPA. PLEASE SAVE THIS MANUAL. OWNER S MANUAL. 8 Button Controller & Pack
 PostScript Picture IMPORTANT SAFETY INSTRUCTIONS READ ENTIRE MANUAL BEFORE INSTALLING SPA. PLEASE SAVE THIS MANUAL. OWNER S MANUAL 8 Button Controller & Pack These instructions apply to: D, DC, DE, & DEC
BP501G3 Tech Sheet. Part Number: Incoloy Incoloy Titanium. Custom Box Overlay Box Overlay Part Number N/A
 BP501G3 Tech Sheet Customer: Balboa Water Group Part Number: 56582 800 Incoloy 56583 825 Incoloy 56584 Titanium Custom Box Overlay Box Overlay Part Number N/A UL System Model: BP501-BP501G3-AU Software
Check that connection to main board is clean and sound at J8
 1 of 6 22/10/2012 3:15 PM. Home Products What's New Support MINI MAX DIGITAL SPA PAK rev: 04 USING CT250 Printed Circuit Board TROUBLE SHOOTING GUIDE No display at topside Check miss-wire fuse between
PART B BRAND SPECIFIC MANUAL
 SPA OWNER S MANUAL IMPORTANT SAFETY INSTRUCTIONS PART B BRAND SPECIFIC MANUAL ELECTRICAL CONNECTION KEYPAD OPERATION SRS-M-B Read in conjunction with Part A General Manual to form a complete Owner s Manual
CERTIFICATE OF AUTHENTICITY
 CERTIFICATE OF AUTHENTICITY Thank you for your purchase. This certificate hereby verifies that the spa you have purchased from an Artesian Spas (May Manufacturing, LLC) authorized dealer is authentic,
Owner s Manual for. Single Pump Spas
 Owner s Manual for Single Pump Spas Service and Technical Support For technical assistance or warranty service requests, please call a technical support representative at 844-894-6659. Factory trained
champion spas OWNERS MANUAL
 champion spas OWNERS MANUAL Model: Serial Number: Date Installed: Dealer: Address: Telephone: Note: The serial number/identification label is located within the equipment compartment and skimmer housing.
EL/GL Series - Mach 3 ML900 User Guide
 EL/GL Series - Mach 3 ML900 User Guide Time Warm Jets 1 Jets 2 Jets 3 Option F1 F2 PL TL Mode/Prog Cool Invert Fiber Light Blower Note regarding EL and GL systems: Mach 3 EL and GL systems function identically,
CERTIFICATE OF AUTHENTICITY
 CERTIFICATE OF AUTHENTICITY Thank you for your purchase. This certificate hereby verifies that the spa you have purchased from an Artesian Spas (May Manufacturing, LLC) authorized dealer is authentic,
Bullfrog Spas Owners Manual
 Bullfrog Spas Owners Manual QUICK REFERENCE To assist you with the installation and maintenance service of your new spa, please fill out the following information and keep it on hand for future reference.
CERTIFICATE OF AUTHENTICITY
 CERTIFICATE OF AUTHENTICITY Thank you for your purchase. This certificate hereby verifies that the spa you have purchased from an Artesian Spas (May Manufacturing, LLC) authorized dealer is authentic,
INSTRUCTION MANUAL. Blue Whale Spa Ltd, 11 Glaisdale Drive East Nottingham, NG8 4GU
 INSTRUCTION MANUAL Balboa 500DZ-Series Operation Guide Initial Start-up Your spa will enter Priming Mode ( ) when it is energized. During Priming Mode, press Jets button(s) repeatedly and be sure all pumps
Owner s Guide. for. Single Pump Spas 1
 Owner s Guide for Single Pump Spas 1 Customer Support and Warranty Service We are delighted to welcome you to the Signature Spas family of owners. Every Signature Spa is handcrafted in the United States
INSTRUCTION MANUAL. Blue Whale Spa Ltd, 11 Glaisdale Drive East Nottingham, NG8 4GU
 INSTRUCTION MANUAL MVP260 Control Reference Card Non-Circ Operation Initial Start-up When your spa is first actuated, it will go into Priming mode, indicated by Please see the M-7 Installation Instruction
O W N E R S M A N U A L
 cottage spas OW N E R S M A N UA L Model: Serial Number: Date Installed: Dealer: Address: Telephone: Note: The serial number/identification label is located within the equipment compartment and skimmer
This manual covers your new TidalFit
 This manual covers your new TidalFit Table of Contents Certificate of Authenticity... Important Safety Instructions... 1 TidalFit Specifications... 5 Electrical Requirements and Installation... 6 Electrical
HT-2 / 9600 Series Control Contents
 HT-2 / 9600 Series Control Contents Tools & Parts Tools Required Parts Required Error Messages 3 Flashing Dots Pressure or Flow Switch Not Activated Pressure or Flow Switch Activated Temperature Sensor
BP2100G1 Tech Sheet. Customer: Balboa Water Group
 BP2100G1 Tech Sheet Customer: Balboa Water Group Part Number: 56389-01 800 Incoloy 56390-01 8250 Incoloy 56391-01 Titanium Custom Box Overlay Box Overlay Part Number N/A UL System Model: BP21-BP2100G1-RCA3.0K
Part #
 Notes: WWW.ARTESIANSPAS.COM Part # 11-1310-11 2013 Artesian Spas (May Manufacturing, LLC) Last Revised1/31/2013 Subject to change without notice. TABLE OF CONTENTS Congratulations... Important Safety Instructions...
CERTIFICATE OF AUTHENTICITY
 CERTIFICATE OF AUTHENTICITY Thank you for your purchase. This certificate hereby verifies that the spa you have purchased from an Artesian Spas (May Manufacturing, LLC) authorized dealer is authentic,
ML550, 551, 554 Panel Operation
 ML550, 551, 554 Panel Operation Please refer to the following User Guides for more detailed information: ML551/ML554 User Guide: P/N 40632-99 ML 550 User Guide: P/N 40569-99 Light Mode Warm Light Mode
CLEARLY ADVANCED SPA SYSTEMS! OWNER'S MANUAL MC-MP-SBD SPA SYSTEMS INSTALLATION, INSTRUCTIONS & MORE! TAKING OVER THE WAVES!
 CLEARLY ADVANCED SPA SYSTEMS! OWNER'S MANUAL MC-MP-SBD SPA SYSTEMS INSTALLATION, INSTRUCTIONS & MORE! TAKING OVER THE WAVES! Contents Warning Important Warning Instructions 3 General Information Preliminary
OnCommand. Automation. Operation Manual ONCOM ONCOM-ACT ONCOM-RC ONCOM-ACT-RC ONCOM-POD2 ONCOM-ACT-POD2
 092442A RevC OnCommand Automation \ Operation Manual Contents Introduction...2 Operation...3 Troubleshooting...29 Warranty...34 ONCOM ONCOM-ACT ONCOM-RC ONCOM-ACT-RC ONCOM-POD2 ONCOM-ACT-POD2 Hayward Pool
NVENT NUHEAT HOME THERMOSTAT Operating Manual
 NVENT NUHEAT HOME THERMOSTAT Operating Manual 2 nvent.com TABLE OF CONTENTS INTRODUCTION... 4 SYSTEM TESTS... 5 SETUP WIZARD... 5 GFCI... 5 SECTION 1: HOME SCREEN... 6 1.1 TEMPORARY BYPASS AND HOLD OPTIONS...
USER MANUAL PILATUS SPA SYSTEM
 USER MANUAL PILATUS SPA SYSTEM - 2x3HP Hydromassage pumps - Energy-efficient LAING circulation pump - 42 jets - Hot air blower pump - UV-C water sanitizer - WiPod sound system Version: 01.2014 www.wellis.eu
User Guide ems25plus. Page 1. Normal operation. Product interface
 Page 1 Product interface rmal operation During normal operation, EMS controllers display the information below. Assuming the product temperature is correct when the outlet is open, this means that the
552_U 09/14. tekmarnet Thermostat 552 Zoning Replaces: 08/11. User Manual. 1 of 12. A Watts Water Technologies Company _U - 09/14
 552_U 09/14 tekmarnet Thermostat 552 Zoning Replaces: 08/11 User Manual 1 of 12 This brochure will provide you with the information you need to benefit the most from your tekmarnet thermostat. Please visit
C.A.I. Customer Service Department 1462 East Ninth Street Pomona, CA Toll Free: CAL-SPAS Fax:
 LTR20051000, Rev E CONTACT INFORMATION For customer service, please contact your authorized dealer immediately. If you need additional information and/or assistance, please contact: C.A.I. Customer Service
Lifestyle Series. Designed with assistance from medical professionals to. Improve Well Being with Relaxation Therapy
 Lifestyle Series Designed with assistance from medical professionals to Improve Well Being with Relaxation Therapy Service and Technical Support For technical assistance or warranty service requests, please
MSPA-MP METAPACK SERVICE MANUAL. Visual step-by-step guide to easily identify & correct technical problems! Gecko Electronics Inc.
 MSPA-MP METAPACK SERVICE MANUAL Gecko Electronics Inc. Visual step-by-step guide to easily identify & correct technical problems! Table of Contents Power & Ground Check Tools and Parts 3 Electrical Wiring
OWNER S MANUAL. Vintage Classic HEAT COOL models. Proudly Made in the USA
 OWNER S MANUAL Vintage Classic HEAT COOL models Proudly Made in the USA support@aquacomfort.com www.aquacomfort.com/service-and-support 888-475-7443 Manufacturing High Quality, High Efficiency Heat Pump
Follett Performance Plus
 Follett Performance Plus touchscreen user guide The next level of control in undercounter refrigeration Controller Operation - Performance Plus touchscreen Use and care of the LCD Performance Plus touchscreen
DistributedBy. 7215BermudaRoadLasVegas,NV89119 TolFree: Fax:
 DistributedBy 7215BermudaRoadLasVegas,NV89119 TolFree:800-237-9937 Fax:866-909-7278 www.aliedinnovations.com Y Series Total flexibility, total compatibility, total satisfaction. This product is the simplest,
CS027 User Instructions
 CS027 User Instructions Battery Powered 7 Day Programmable Room Thermostat Programmable room thermostats are widely recognised as one of the best ways in which to control central heating. The CS027 programmable
Aqua Logic. Operation Manual. Automation and Chlorination AQL-P CON TROLS. for model
 Aqua Logic Automation and Chlorination (actuators, cell & remote display not included - order separately) Operation Manual for model AQL-P-4 G LDLINE CON TROLS www.goldlinecontrols.com 888-921-7665 IMPORTANT
SV SERIES USER MANUAL
 SV SERIES USER MANUAL TABLE OF CONTENTS SYSTEM OPERATING MANUAL Time/Date and Water Chemistry Warning... 3 SV Series Features Overview.. 4 SV2.T Overview... 5 SV3.T Overview... 6 SV4.T Overview... 7 Water
RELAX. REVITALIZE. RESTORE. LUXURY SPA UNIT Installation Manual. English. For Model Numbers 2848, 2853, 3153 and 3255
 RELAX. REVITALIZE. RESTORE. LUXURY SPA UNIT Installation Manual For Model Numbers 2848, 2853, 3153 and 3255 English RELAX. REVITALIZE. RESTORE. Thank you for choosing a Secure Spa Luxury Spa Unit. Secure
Thermostat TP42H01 User Manual
 Thermostat TP42H01 User Manual 1 of 12 This brochure will provide you with the information you need to benefit the most from your HydroLogic thermostat. Please visit your product manufacturers website
BACK WASH INSIDE THE SPA
 BACK WASH INSIDE THE SPA Lower the temperature to 90 degrees and let the unit run approximately 10-15 minutes. This gives the heating element the chance to cool down. Now unplug the power pack Using a
SOLO User Guide. Description. Installation. Programmable Dual Voltage Thermostat 240 V (120 V)
") SOLO User Guide Programmable Dual Voltage Thermostat Description The SOLO thermostat is designed to control the temperature of a floor heating system for both 120-volt and 240-volt applications. The thermostat
SOLO User Guide Programmable Dual Voltage Thermostat Description The SOLO thermostat is designed to control the temperature of a floor heating system for both 120-volt and 240-volt applications. The thermostat
Water s Edge Spas. Owner s Guide Book
 Owner s Guide Book Dealer Support and Service For technical assistance or warranty service requests, contact your local dealer. Please take pictures of your area of concern and have them ready if the dealer
User s Manual
 997-060180-4e User s Manual 8403-060 Menu Driven Display 1120-445 I. CONTROLLER OPERATION ADJUSTING TEMPERATURE (Temporary Override when in Programmable mode) 1. Before you can adjust the temperature,
USER MANUAL. ACAPULCO deep-in SPA SYSTEM
 USER MANUAL ACAPULCO deep-in SPA SYSTEM - 3x2 HP hydromassage pumps - Filter grid - For 6 persons - 40 pcs massage jets - Hot air SILENT blower - 0,3HP circulation pump - UV-C water desinfection Version:
Warning: 230V / 1ph / 50Hz V / 3ph / 50Hz. Remarks: Make sure that you have enough power. (See page 15 Cable table)
") 1 2 Warning: - Do not place your hand or any other objects into the air outlet and fan. It could damage the heat pump and cause injuries; - In case of any abnormality with the heat pump, cut off the power
1 2 Warning: - Do not place your hand or any other objects into the air outlet and fan. It could damage the heat pump and cause injuries; - In case of any abnormality with the heat pump, cut off the power
Wiring Diagram for Nuheat SIGNATURE, HOME & Element Thermostats
 Wiring Diagram for Nuheat SIGNATURE, HOME & Element Thermostats Line (Black) Line White (120V) or Red (240V) Nuheat White (120V) or Red (240V) Nuheat (Black) Terminals for the floor sensor are located
Focus 4010\ Focus 4010 HT porcelain firing furnace
 INSTRUCTION MANUAL Focus 4010\ Focus 4010 HT porcelain firing furnace Warning You have available one of the most precise dental furnaces equipped with a heating muffle made by the original manufacturer
OWNERS OPERATION GUIDE
 4220/6220/9220 SERIES OWNERS OPERATION GUIDE CONTENTS Important Safety Instructions 2 INTRODUCTION Major Component Illustration 4 SYSTEM OPERATION Features & Function Visual Diagnostic System (VDS) Spaside
Lifestyle Series. Designed with assistance from medical professionals to. Improve your Well Being with Relaxation, Massage & Hydro Therapies
 Lifestyle Series Designed with assistance from medical professionals to Improve your Well Being with Relaxation, Massage & Hydro Therapies Service and Technical Support For technical assistance or warranty
Factory Direct Walk-In Tubs WALK-IN TUB. Installation Manual. For Model Numbers VT2848, VT2853, VT3153 and VT3255
 Factory Direct Walk-In Tubs WALK-IN TUB Installation Manual For Model Numbers VT2848, VT2853, VT3153 and VT3255 FACTORY DIRECT WALK-IN TUBS Thank you for choosing an Vitality Tubs Walk-In Tub. Vitality
SmartVent. Keypad Controller User Guide Manual. NZ s Home Ventilation Specialists
 SmartVent NZ s Home Ventilation Specialists Keypad Controller User Guide Manual www.smartvent.co.nz Introducing... SmartVent Keypad Control Panel 12x2 LCD Display with Backlight On/Off Button Mode Button
SmartVent. Digital Controller User Guide Manual. NZ s Home Ventilation Specialists
 SmartVent NZ s Home Ventilation Specialists Digital Controller User Guide Manual www.smartvent.co.nz Introducing... SmartVent Digital Control Panel 12x2 LCD Display with Backlight On/Off Button Button
ULT L IMAT A E SERIES SOLID-STA T T A E SYSTEM OPERAT A ION MANUAL 8600
 ULTIMATE SERIES SOLID-STATE SYSTEM OPERATION MANUAL 8600 CONTENTS Important Safety Instructions 2 INTRODUCTION Major Component Illustration 4 SYSTEM OPERATION Heater Operation Spaside Control Spa Light
UNIVERSAL AIR SERIES SYSTEM OPERATION MANUAL
 UNIVERSAL AIR SERIES SYSTEM OPERATION MANUAL CONTENTS Important Safety Instructions 2 INTRODUCTION Major Component Illustration 4 SYSTEM OPERATION Illustration System Mis-Wire System Over Temperature System
! WARNING To avoid risk of electrical shock, personal injury or death; disconnect power to range before servicing, unless testing requires power.
 Technical Information Electric Slide-In Range JES8850BC* JES9900BC* JES9860BC* Due to possibility of personal injury or property damage, always contact an authorized technician for servicing or repair
! WARNING To avoid risk of electrical shock, personal injury or death; disconnect power to range before servicing, unless testing requires power.
 Technical Information Electric Slide-In Range JES9750BA* JES9860BA* Due to possibility of personal injury or property damage, always contact an authorized technician for servicing or repair of this unit.
CT224 Setup Tutorial
 CT224 Setup Tutorial Table of Contents 1. Introduction 2. Configuring Controller for Operation A. Example 1 Over Temp Operation with Hysteresis @ 5º F. B. Example 2 Under Temp Operation with Hysteresis
C-Stat 17-ZW User Instructions
 C-Stat 17-ZW User Instructions 7 Day Wireless Programmable Room Thermostat and ASR-ZW Receiver Programmable room thermostats are widely recognised as one of the best ways in which to control central heating.
TechBook. in.k300tm. Bright LCD screen Spa function icons Affordable. the essential spa keypad
 TechBook in.k00tm the essential spa keypad Bright LCD screen Spa function icons Affordable in.k00 TechBook Table of contents Warnings 2 Introduction in.k00 keypad layout 4 Installation of in.k00 4 Drilling
Fridge-tag 2 OPERATION MANUAL ENGLISH PAGE 1-34 GEBRAUCHSANWEISUNG DEUTSCH SEITE with internal sensor
 with internal sensor OPERATION MANUAL ENGLISH PAGE -34 GEBRAUHSANWEISUNG DEUTSH SEITE 35-68 ontent ) Display explanations ) State of delivery / Sleep Mode 3) Gathering information prior to device activation
Installation Instructions / User s Manual TSTAT0406 and TSTAT0408
 997-060180-5 Installation Instructions / User s Manual TSTAT0406 and TSTAT0408 4 HEAT 2 COOL DUAL FUEL TSTAT0406 & TSTAT0408-4 WIRE CAPABLE THERMOSTAT (NAXA00201DB Daughter Board sold separately) LEFT
Type UCG/UDG. English...1 Français...7 Español Up button. OK button. Down button
 USER MANUAL Type UCG/UDG 57116D 06/12 (MBC) 1.10 2012 OJ Electronics A/S...1 Français...7 Español... 14 Type UCG/UDG Contents Introduction...1 First Time Settings...1 Ground Fault Circuit Interrupter (GFCI)...1
Cylinder Ironers. Operating Supplement. 320 mm Diameter, OPL Insertion width 1664 mm, 2080 mm Refer to Page 5 for Model Identification
 Cylinder Ironers 320 mm Diameter, OPL Insertion width 1664 mm, 2080 mm Refer to Page 5 for Model Identification Operating Supplement Original Instructions Keep These Instructions for Future Reference.
Oven Control System Operation - Ver 2.8
 Version 2.8 - Pg:1 - Ver 2.8 This operation manual contains important information about your oven. All operators should review this manual before operating the oven. When you turn on the switch, the control
Guardian II Pipeline Washer B Instruction Supplement
 Guardian II Pipeline Washer B Instruction Supplement P.O. Box 8050 Madison, WI 53708 608-222-3484 Contents Introduction... 2 1. New Features... 2 1.1 Password For Setup... 2 1.2 Delay... 2 1.3 Date & Time
Table Of Contents. Key To Symbols
 Owner s Manual 1 Table Of Contents Service and Support... 1 Understanding Symbols...1 Warnings and Safety Information... 2 Site Preparation and Installation Recommendations...4 Electrical Requirements
Table of Contents. V.1704 Page 2
 Table of Contents WARNINGS... 3 ELECTRICAL INSTALLATION... 4 Wiring Diagram (Mini 1)... 4 Wiring Diagram (Mini 2)... 5 DIP SWITCHES... 5 TOPSIDE PANELS... 6 SV Mini 1 Layout... 6 SV Mini 2 Layout... 6
Dryer Controller M720
 User Manual Dryer Controller M720 Hardware version 2.00 Software version 2.00 Manual M720 Dryer controller Page 1 of 60 Document history Preliminary version: - Created in April, 2009 Hardware Version 2.00,
RGR150 USER S MANUAL. Wireless Rain Gauge with Thermometer and Clock
 RGR150 manual-final-091908:layout 1 9/19/08 8:59 AM Page 1 RGR150 USER S MANUAL Wireless Rain Gauge with Thermometer and Clock INTRODUCTION Thank you for selecting this Wireless Rain Gauge. This device
CONTENTS CONSIDERATIONS. General Plumbing Component Connection ILLUSTRATION. Control System CONFIGURATION. Voltage Verification CONNECTION
 AIR SERIES SYSTEM INSTALLATION MANUAL CONTENTS CONSIDERATIONS General Plumbing Component Connection 2 2 2 ILLUSTRATION Control System 3 CONFIGURATION Voltage Verification 4 CONNECTION Component Connection
PORTABLE ENGINE HEATER AND EXTERNAL BATTERY CHARGER. Specifications: Benefits: IN: NC:
 ENGINEERING THE UNFAIR ADVANTAGE 61-10003 PORTABLE ENGINE HEATER AND EXTERNAL BATTERY CHARGER Benefits: Increased battery capacity Independent of generator power One of the fastest engine heaters on the
QD-ENG-68 Controller for Thermoelectric Thermal Management
 INSTALLING THE CONTROLLER QD-ENG-68 Controller for Thermoelectric Thermal Management The Ice Qube TMS controller is shipped complete with mounting hardware and electrical cables for easy installation.
! WARNING To avoid risk of electrical shock, personal injury or death; disconnect power to range before servicing, unless testing requires power.
 Technical Information Electric Downdraft Slide-In Range JES9800BA* JES9900BA* Due to possibility of personal injury or property damage, always contact an authorized technician for servicing or repair of
FOR SERVICE TECHNICIAN ONLY DO NOT REMOVE OR DESTROY WARNING
 WARNING Electrical Shock Hazard Disconnect power before servicing. Replace all parts and panels before operating. Failure to do so can result in injury or death. IMPORTANT Electric Discharge (ESD) Sensitive
Quick Start Guide. For product manuals and further installation / operation procedures visit
 Quick Start Guide For product manuals and further installation / operation procedures visit www.aquacal.com Important Read This Guide Before Installing or Operating Heat Pump LTP0093 Rev 1 03/21/2014 Page
User Manual. Dryer Controller M720
 User Manual Dryer Controller M720 Hardware version 1.00 Software version 1.00 Preliminary version Manual M720 Dryer controller Page 1 of 42 Document history Preliminary version: - Created in April, 2009
User s Manual ELITE PROGRAMMABLE THERMOSTAT WITH MENU DRIVEN DISPLAY
 User s Manual ELITE PROGRAMMABLE THERMOSTAT WITH MENU DRIVEN DISPLAY Customizable programming options for every day, weekdays, weekends, or individual days. Smart recovery gradually adjusts indoor temperatures
6500/7500 SERIES OWNERS OPERATION GUIDE
 6500/7500 SERIES OWNERS OPERATION GUIDE CONTENTS Important Safety Instructions Introduction 2 4 FEATURES & FUNCTION Ground Fault Circuit Interrupter (GFCI) Heater On Indicator Spaside Control Setting Filtration
OWNER S MANUAL HIGH WALL INVERTER. (English) (BSHVD1S SERIES)
 (BSHVD1S SERIES)") OWNER S MANUAL HIGH WALL INVERTER (English) (BSHVD1S SERIES) IMPORTANT As with any product that has moving parts or is subject to wear and tear, it is VERY IMPORTANT that you maintain your air conditioner
OWNER S MANUAL HIGH WALL INVERTER (English) (BSHVD1S SERIES) IMPORTANT As with any product that has moving parts or is subject to wear and tear, it is VERY IMPORTANT that you maintain your air conditioner
4100/6100/7100 SERIES OWNERS OPERATION GUIDE
 4100/6100/7100 SERIES OWNERS OPERATION GUIDE CONTENTS Important Safety Instructions 2 INTRODUCTION Major Component Illustration 4 SYSTEM OPERATION Features & Function Visual Diagnostic System (VDS) Spaside