Installation, Operation and Maintenance Instructions
|
|
|
- Bertram Kelley
- 6 years ago
- Views:
Transcription


1 Installation, Operation and Maintenance Instructions Gas Euro Range Model : Model : NGER Gas Burner NGER Gas Burner NGER Gas Burners NGER Gas Burners NGER Gas Burners NGER Gas Burners NGER Gas Burners NGER Gas Burners NGER Gas Burners Note: The picture is illustration only. We reserved the right to make technical changes in the interest in progress without prior notice. NYT/R&D/ 1
2 Dear customer, Thank you for choosing our product as your trusted partner. We ensure you that we always give our best as we produce this appliance by using the finest materials. Gas Euro Range is excellent choice to cook. In order to obtain maximum benefits of this appliance, please read this manual instruction carefully. Please notice the warnings and safety instructions to keep your safety. DO NOT use this appliance except its utility. If you have any questions or difficulties in operating this appliance, please contact your dealer or to acquire mechanic assistance. TEAM Preface 2
3 Table of Contents Page Preface. 2 Table of Contents 3 General Information 4 Information for the Reader 4 Warning, Signs and Symbols... 4 General Information of the Appliance 6 Procedure for Requesting Service and Warranty. 6 Safety Instruction 7 Technical Data 8 Data Table.. 8 Data Plate 11 Overall Dimension. 15 Components List 24 Handling and Installing Packaging and Transport 29 Handling and Lifting.. 29 Safety Devices and Accessories 29 Position and Fixing 30 Gas Supply Connection Checking Gas Pressure and Nominal Heat Input 31 Gas Conversion.. 32 Adjustment 33 Use and Operation. 36 Control Panel Description 36 Switch ON/OFF. 38 Routine Cleaning and Maintenance 39 Trouble Shooting 40 CE Certificate.. 41 Addresses 42 3 Table of Contents
4 General Information Information for the Reader Please read this manual instruction carefully before operating this appliance. To find the specific topics of interest to you quickly, refer to the index at the start of the manual. This manual is written to: All the information is instructed to general readers, i.e for users of the appliance. All the information is instructed for special categories of reader, i.e. all skilled operators authorized to handle, transport, install, service, repair and scrap the appliance The skilled operators may also read the information for the general readers for a more complete picture of the information provided if necessary. Warning, Signs and Symbols Warning Warnings are indicated with a pictogram and a signal word. The type and source of the risk as well as the consequences are described together with instructions for avoiding the danger. The margins of the pictograms and signal words used are explained in section Signs and Symbols Signs Electric Shock Hazard or High Voltage Imminent danger Non-observance leads to death or serious injury (caused by electric shock) Hot Surface Dangerous situation Non-observance can lead to slight or semi-serious injury (caused by hot surface) Warning Damage Non-observance can lead damage Pace Maker (Especially for Induction) Possible Danger Non-observance can lead to death or serious injury 4 General Information
5 Injury Risk Possible Danger Non-observance can lead to death or serious injury PE Connect wire to the earth Important non-observance can lead damage Note Note for special appliance Attention Non-observance can lead damage User sign information must be read by user Technician sign information must be read by technician CE Certification The appliance have a license of CE Certificate Symbols Symbols Meaning Explanation Bullet points, such as, _, etc Instruction, single step Instruction, multiple steps Instruction must be followed in the order given Instruction can be carried out in any sequence Instruction, multiple steps An action is required here 5
6 General Information of the Appliance Nayati Gas Euro Range is an excellent cooking appliance made of stainless steel. This appliance is used for cooking both Oriental and Western cuisine like sautéing, shallow frying, frying, until boiling. With Dual function, the cooking ring can accommodate pan and wok. This appliance equipped with Safety device Thermocouple for user s safety. It is very important to keep this instruction book together with the appliance for future consultation. If this appliance sold or transferred elsewhere, make sure this book goes with it. Therefore, the new user can read about its functions and other relevant information. Procedure for Requesting Service and Warranty Requesting Service Contact one of the authorized service centers or for all requirements. When requesting service, state the data provide on the nameplate and provide a description of the fault. Warranty gives 12 months guarantee with certain conditions. will decline any claims of accidents caused by improper use, disobey rules, and/ or disobey warnings. Below are cases, which invalidate the guarantee: 1. Improper use by untrained person(s) 2. Disobey local regulation(s) related to installation and safety standards 3. Not doing routine maintenance 4. Replace certain parts with non-genuine spare part 5. Do not follow the manual instructions properly If you have any doubts or questions related to our product, please call your nearest dealer or call. 6
7 Safety Instruction Important! Before installing, place the appliance on solid, flat, stable and horizontal surface and connection availability. Read this manual instruction carefully before using Gas Euro Range. This appliance is for food preparation only. Below are safety instructions that strictly conformed: 1. Improper installation, maintenance, cleaning, or modification to the appliance could lead to severe injury or death and could damage the appliance. 2. The mechanics must instruct staff regularly to avoid accident and damage of the appliance. 3. Gas Euro Range may be used for skilled staff only. 4. DO NOT place the appliance in a toxic area or have a risk of explosion. 5. DO NOT place the appliance near flammable materials such gasoline, fat, clothes, liquid gas, paper, etc. 6. DO NOT place the appliance in wet or humid room or condition such in rain or near water leaks, etc. 7. DO NOT use the appliance for drying clothes, paper, or living animals. 8. DO NOT use the appliance to heat non-food products. 9. Put the appliance in a good ventilated room. 10. Before cleaning or maintaining the appliance, detach the gas line and allow it to cool. 11. DO NOT touch the area this sign means hot surface. Beware of severe burning injury. 12. DO NOT attempt to dismantle or repair the appliance. The authorized mechanics must do all jobs. INJURY RISK! - DO NOT cover the burners or drawers below or the air holes on the sidewalls with Aluminum or silver foil or similar materials. This may cause a wrong air circulation and gas combustion and lead to overheat. - DO NOT lean to Main Burner during ignition process. High flames from the range may cause severe burning injury. - DO NOT USE POT WITH FLAT BOTTOM on the Wok Burner Ring. During Full Combustion with or without Wok pot on it, the flame extends to the side or over the Wok Ring. This may cause severe burning injury. 7 Safety Instruction
8 Technical Data Data Table Table 1 Technical Specification of Gas Euro Range 60 Seri Model NGER 4-60 NGER 9-60 Overall Dimension (mm) Width Depth Height Width Depth Height / /950 Cooking Surface Wok Ø 280 Ø 280 Gas Connection R ¾ R ¾ Number of Burners 1 2 Nominal Heat Input Gas Pressure Connection Direct Heat Emission (kw) G20 : 13 kw G30 : 11.5 kw G30/G31 : 28-30/37 mbar G30 G31 : 50 mbar G20 : 20 mbar G25 : mbar 3.25 (G20) 2.87 (G30) G20 : 26 kw G30 : 23 kw G30/G31 : 28 30/37 mbar G30 G31 : 50 mbar G20 : 20 mbar G25 : 25 mbar 6.50 (G20) 5.75 (G30) Latent Heat Emission (kw) 1.30 (G20) 2.60 (G20) 1.15 (G30) 2.30 (G30) Steam Emission (Kg/h) 1.91 (G20) 3.82 (G20) 1.69 (G30) 3.38 (G30) Ignition Manual Manual Model NGER NGER Overall Dimension (mm) Width Depth Height Width Depth Height / / 950 Cooking Surface Wok Ø 280 Ø 280 Gas Connection R ¾ R ¾ Number of Burners 3 4 Nominal Heat Input G20 : 39 kw G20 : 52 kw G30 : 34.5 kw G30 : 46 kw G30 / G31 : / 37 mbar G30 / G31 : / 37 mbar Gas Pressure Connection G30 G31 : 50 mbar G30 G31 : 50 mbar G20 : 20 mbar G20 : 20 mbar G25 : 25 mbar G25 : 25 mbar Direct Heat Emission (kw) Latent Heat Emission (kw) Steam Emission (Kg/h) 9.75 (G20) 8.62 (G30) 3.90 (G20) 3.45 (G30) 5.73 (G20) 5.07 (G30) (G20) (G30) 5.20 (G20) 4.60 (G30) 7.64 (G20) 6.76 (G30) Ignition Manual Manual 8 Technical Data
9 Table 2 Technical Specification of Gas Euro Range 70 Series Model NGER 7-70 NGER Overall Dimension (mm) Width Depth Height Width Depth Height / /1150 Pipe Diameter Drain (D) Gas Inlet (G) Water Inlet (S) Drain (D) Gas Inlet (G) Water Inlet (S) R 1 ¼ R ¾ R ½ R 1 ¼ R ¾ R ½ Cooking Surface Wok Ø 280 Ø 280 Number of Burners 1 2 Nominal Heat Input Gas Pressure Connection Direct Heat Emission (kw) Latent Heat Emission (kw) Steam Emission (Kg/h) G20 : 13 kw G30 : 11.5 kw G30 / G31 : / 37 mbar G30 G31 : 50 mbar G20 : 20 mbar G25 : mbar 3.25 (G20) 2.87 (G30) 1.30 (G20) 1.15 (G30) 1.91 (G20) 1.69 (G30) G20 : 26 kw G30 : 23 kw G30 / G31 : / 37 mbar G30 G31 : 50 mbar G20 : 20 mbar G25 : mbar 6.50 (G20) 5.75 (G30) 2.60 (G20) 2.30 (G30) 3.82 (G20) 3.38 (G30) Ignition Manual Manual Model NGER Overall Dimension (mm) Width Depth Height /1150 Pipe Diameter Drain (D) Gas Inlet (G) Water Inlet (S) R 1 ¼ R ¾ R ½ Cooking Surface Wok Ø 280 Number of Burners 3 Nominal Heat Input G20 : 39 kw G30 : 34.5 kw G30 / G31 : / 37 mbar Gas Pressure Connection G30 G31 : 50 mbar G20 : 20 mbar G25 : 25 mbar Direct Heat Emission (kw) 9.75 (G20) 8.62 (G30) Latent Heat Emission (kw) Steam Emission (Kg/h) Ignition 3.90 (G20) 3.45 (G30) 5.73 (G20) 5.07 (G30) Manual 9
10 Table 3: Technical Specification for Gas Euro Range 130 Series Model NGER NGER Overall Dimension (mm) Width Depth Height Width Depth Height Pipe Diameter Drain Gas Water Drain Gas Water (D) Inlet (G) Inlet (S) (D) Inlet (G) Inlet (S) R 1 ¼ R ¾ R ½ R 1 ¼ R ¾ R ½ Cooking Surface Wok Ø 280 Ø 280 Number of Burners 4 6 Nominal Heat Input G20 : 52 kw G20 : 78 kw G30 : 46 kw G30 : 69 kw Gas Pressure Connection Direct Heat Emission (kw) Latent Heat Emission (kw) Steam Emission (Kg/h) G30 / G31 : / 37 mbar G30 G31 : 50 mbar G20 : 20 mbar G25 : mbar (G20) (G30) 5.20 (G20) 4.60 (G30) 7.64 (G20) 6.76 (G30) G30 / G31 : / 37 mbar G30 G31 : 50 mbar G20 : 20 mbar G25 : mbar (G20) (G30) 7.80 (G20) 6.90 (G30) (G20) (G30) Ignition Manual Manual 10


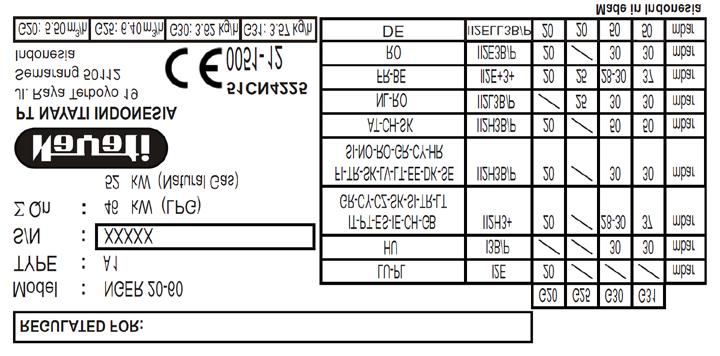
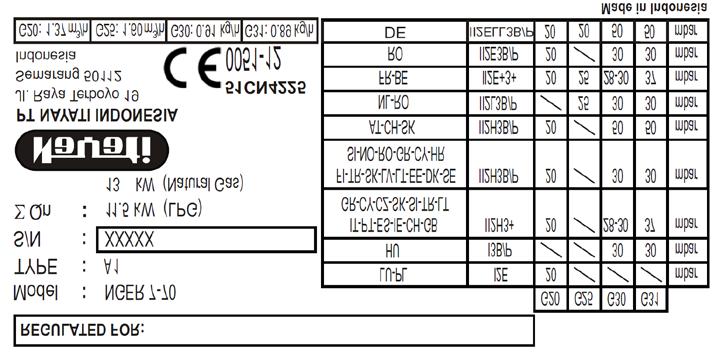
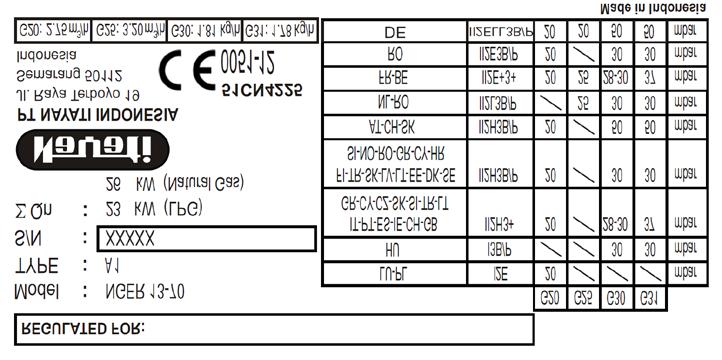
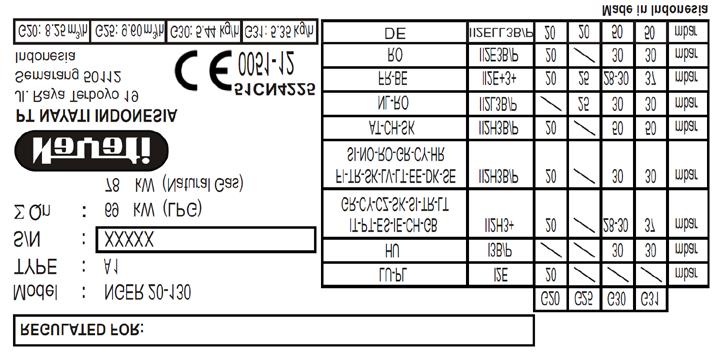
11 Data Plate Figure 1: Technical plate reports the current gas setting, nominal data, gases table, categories, and pressures for other CE countries. Fig. 1 11
12 12
13 13
14 Figure 2: Technical Plate reports warnings in European languages and destined languages. Fig. 2 Figure 3: Technical plate reports warning and current setting on appliance packaging. Fig. 3 14
15 Overall Dimension NGER 4-60 G : Gas Connection ¾ Fig. 4 15
16 NGER 9-60 G : Gas Connection ¾ Fig. 5 16
17 NGER G : Gas Connection ¾ Fig. 6 17
18 NGER G : Gas Connection ¾ Fig. 7 18
19 NGER 7-70 G : Gas Connection ¾ D : Drain W : Water Connection Fig. 8 19
20 NGER G : Gas Connection ¾ D : Drain W : Water Connection Fig. 9 20
21 NGER G : Gas Connection ¾ D : Drain W : Water Connection Fig
22 NGER G : Gas Connection ¾ D : Drain W : Water Connection Fig
23 NGER G : Gas Connection ¾ D : Drain W : Water Connection Fig
24 Component List NGER 60 SERIES Fig. 13 Table 4 NO PART CODE DESCRIPTION QTY (NGER 60 SERIES) GS.4023 Burner NS GS.4030 Burner Head NS GS.4357B Air Chamber Mixing Jumbo Burner GS.4358C Primary Air Adjuster Plate GS.2826 Air Chamber Pipe GS.283D Nozzle Jumbo D GS.283E Nozzle Jumbo Burner D GS.387D Gas Valve w/ Clamp PD.4052FD Gas Knob dia.8mm PD.4055O2 Ring Label Api Model GS.3851 Bunsen Pilot 3F/3H 0.20 LPG GS.3895B Thermocouple 600mm M9x GS.2720B Pot Holder dia GS.2718A Wok Holder
25 NGER 70 SERIES Fig. 14 Table 5 NO PART CODE DESCRIPTION QTY (NGER 70 SERIES) GS.4023 Burner NS GS.4030 Burner Head NS GS.4232 Plug 3/8 x ¼ mm GS.4357B Air Chamber Mixing Jumbo Burner GS.4358C Primary Air Adjuster Plate GS.2826 Air Chamber Mixing Jumbo Burner GS.283D Nozzle Jumbo D GS.283E Nozzle Jumbo Burner D GS.387D Gas Valve w/ Clamp PD.4052FD Gas Knob dia.8mm PD.4055O2 Ring Label Api Model GS.3851 Bunsen Pilot 3F/3H 0.20 LPG GS.3895B Thermocouple 600mm M9x GS.2720B Pot Holder dia GS.2718A Wok Holder GS.2305C Faucet Stop Tap PD.2458A2 Water Tap Head GS.8046S Short Faucet Wall Type Assy GS.3847 Nozzle Spryer
26 NGER 130 SERIES Fig. 15 Table 6 NO PART CODE DESCRIPTION QTY (NGER 130 SERIES) GS.4023 Burner NS GS.4030 Burner Head NS GS.4232 Plug 3/8 x ¼ mm GS.4357B Air Chamber Mixing Jumbo Burner 4 6 GS.4358C Primary Air Adjuster Plate 4 6 GS.2826 Air Chamber Mixing Jumbo Burner GS.283D Nozzle Jumbo D GS.283E Nozzle Jumbo Burner D GS.387D Gas Valve w/ Clamp PD.4052FD Gas Knob dia.8mm 4 6 PD.4055O2 Ring Label Api Model GS.3851 Bunsen Pilot 3F/3H 0.20 LPG GS.3895B Thermocouple 600mm M9x GS.2720B Pot Holder dia GS.2718A Wok Holder GS.2305C Faucet Stop Tap PD.2458A2 Water Tap Head GS.3847 Nozzle Spryer
27 Water System Components NGER 70 SERIES Fig. 16 Table 7 NO. PART CODE DESCRIPTION NGER 7-70 QTY NGER GS.2305C Faucet Stop tap w/ Plastic GS.2458A2 Water Tap Head GS.8046S Short Faucet Wall Type Assy GS.3847 Nozzle Spryer NGER NGER 130 SERIES Fig. 17 Table 8 NO. PART CODE DESCRIPTION QTY NGER NGER GS.2305C Faucet Soptap w/ Plastic Handle GS.2458A2 Water Tap Head GS.3847 Nozzle Spryer
28 Handling and Installing Important! Before installing, place the appliance on solid, flat, stable and horizontal surface and connection availability. The following instructions are intended for authorized and qualified installer. Before doing installation, adjustment, and maintenance operations, the installer must follow local and legal regulations. Cut the gas supply before doing any installation. 1. This appliance is using gas. Gas services should be installed according to: a. Local and international standards b. Local recommendation, such as building standards and recommendation concern with combustion c. Directions and regulations from the gas and power supply companies d. Regulation concern with prevention accident measures 2. Remove all packaging material and protective coatings. 3. Ensure gas supply is sufficient to operate this appliance. 4. Install the appliance by using Qualified Gas Filter. 5. Before testing, put the appliance in a good ventilated room and keep all flammable material away. 6. Take a leakage test by using soapy water solution. Spread the soapy solution on joints and pipe fitting. A leakage will be indicated by bubbles comes from the joints or pipefitting. Another way is by looking at the gas counter. If there is no movement on the gas counter, it means no gas leakage. 7. Before cleaning or maintaining the appliance, please isolate gas supply to the safe place. 8. Install the appliance by following Safe International Gas Standards. WARNING! Do not use free flame to find gas leak! 28 Handling and Installing
29 Packaging and Transport Packaging The packaging is designed to reduce space and as appropriate to the type of transport used. To simplify transport, some components may be removed and suitably protected and packed for transport. The packaging carries all information necessary for loading and unloading. When unpacking, check that all components are present in the correct quantities and are undamaged. The packaging material must be properly disposed of in accordance with legal requirements Transport Different means of transport may be used, depending partly on the destination. During transport, fix the packaging to the means of transport securely to prevent undesirable shifting. Handling and Lifting The appliance can be handled using fork-lift or hook equipment of suitable load-carrying capacity. Before lifting, check the position of the load s centre of gravity. Important! When engaging with the lifting equipment, watch out for the gas supply. Safety Devices and Accessories The appliance is provided with safety devices. The additional devices must be added if necessary to comply with the relevant legal requirement during the installation. Important! Make the daily check that the safety devices are properly install and in good working order. The appliance is equipped with the included or optional accessories. There are Ignition Hand Lighter and Wok Holder as included accessories. 29
30 Position and Fixing 1. Authorized personnel must do the installation. 2. Install the appliance according to National Safety Standard about gas-range standard. 3. Place the appliance in good ventilated room with permanent ventilation ducts to guarantee sufficient exchange of air and keep the work place healthy. 4. If the Gas Euro Range not connected to a flue, it is recommended to install it under efficient hood, which could evacuate burned gases and cooking steams. Below is construction type according to National Regulations: A 1: Appliance without fan and does not have connection to a flue or to a device for evacuating combustion products outside the room. The combustion air and burned gas mixed in one room. 5. Make sure that any object around or under Gas Euro Range does not obstruct air volume required for combustion. 6. Put away any flammable materials near Gas Euro Range. 7. When the appliance is freestanding, keep a distance at least 10 cm from side, and rear walls. Especially when the appliance close to wall and does not protected with fire-resistant materials made. 8. Install the appliance separately or side by side with other appliance according to recommended range. 9. Put Gas Euro Range on solid, flat, and horizontal floor. 10. Adjust the height of the four feet by using brackets. 11. Before turn the appliance ON, remove the protective film. Remove any adhesive with appropriate solvent. Eliminate all packaging material according to national laws. Gas Supply Connection 1. Before installing and connecting Gas Euro Range to gas supply, carefully control the fixed part of gas system, which conformed to National Building Regulation. 2. Verify gas pipes sections to guarantee sufficient supply for all gas heated appliances. Install it in similar condition to avoid excessive pressure drops. 3. The pipes must be made of steel (with junctions made using white cast iron, or galvanized steel fittings, or autogenously welded joints) or copper pipes (with mechanical joints and couplings without seals or mastics or brazed joints). 4. Control the gas bottle (if any) placed correctly and protected in dry area. 5. Check whether the gas pipes can easily inspected. If the pipes installed in floor and wall, make sure that this work done according to professional standard with reference points that make it possible to find the pipes. 30
31 6. Before installing Gas Euro Range, make sure that it is set for the gas and pressure (see Technical Data Plates). Consult the paragraph Gas Conversion. 7. Connect Gas Euro Range to gas supply using solid fittings or flexible steel pipes with suitable sections related to nominal power and length. 8. Check whether the flexible pipes does not pass or near hot surfaces, put under stress and traction, contact with sharp edges, or other things that could damage the pipe. 9. Install quick ON OFF valve between the gas mains and each single appliance where easy to reach. 10. After install Gas Euro Range safely, take a pressure test the whole gas circuit by using leak finder spray or non-corrosive foams. 11. The Gas Euro Range is equipped with ISO 7/ 1 screw thread, gas connection of ¾ inches diameter and suitable adapter for ISO 228/ 1 G screw thread gas connection are provided together with the appliance according to destined countries. Checking Gas Pressure and Nominal Heat Input At the first installation, specialized technician must control Gas Euro Range nominal heat input, maintenance, and gas conversion. DO NOT improve Gas Euro Range performance and increase nominal heat affirmed by the manufacturer. Control heat input by using gas counter and chronometer. Measure the exact amount of gas flow per unit of time which consumed by the appliance at maximum power. Compare the measurement to the consumption data on Data Technical Table 1, ± 5% tolerance is allowed. When you are measuring top deviations, carefully check the diameters and the quality of installed injectors and gas main pressure. If you want to measure the main pressure while Gas Euro Range is ON and using a pressure gauge for liquids (for example U manometer, with minimum resolution 0.1 mbar), please follow direction below: 1. Connect the flexible pipe E of the Manometer to the inlet pressure point C after unscrewing its cap. 2. Measure the connection pressure: if the reading is not within the values given in the following table, the appliance cannot work properly. The gas company must be informed to find out the supply pressure problems. If necessary, install a pressure regulator. 3. Once the connection pressure has been measured, disconnect flexible pipe E, retighten the screw cap of the inlet pressure point C. Restore the components inversely. 31
32 Table 9 Gas Type Gas Pressure (mbar) Normal Minimum Maximum Natural gas H G LPG G30/G31 28 / 37 20/25 35/45 C = D = E = G = M = R = Inlet pressure point Gas pipe Flexible pipe Inlet gas connection Manometer Gas tap Fig. 18 Gas Conversion 1. Only professional and qualified mechanic can do this job. 2. By looking Adjustment, replace Main Burner Injectors, Pilot Burner Injectors, and adjust correctly Primary Air Setting for each Main Burner. 3. Spare injectors are available with the appliance. 4. Make sure the diameter printed on each injector in 1/100 of a millimeter. 5. Convert the appliance after turn the gas OFF and in UP position and let Gas Euro Range cool. Important! On completion of the operation, make sure that there are no gas leaks or malfunctions 32
 from Nozzle. DO NOT lose the pressure ring. e. Remove the screw (5) and take the complete Nozzle unit. f. Remove the Nozzle from the Nozzle carrier and replace with the new one that suit to the table depend to the country and gas type.")
33 Adjustment Replacing Nozzle (Fig.19) a. Lift the Burner (1) about 10 mm and pull from mixing chamber (3) b. Remove the fixing screw (2). This screw can be reach from below. c. Remove the complete mixing chamber (3) by turn anticlockwise from the Nozzle. d. Turn the pressure ring (4) from Nozzle. DO NOT lose the pressure ring. e. Remove the screw (5) and take the complete Nozzle unit. f. Remove the Nozzle from the Nozzle carrier and replace with the new one that suit to the table depend to the country and gas type. g. Fix the Nozzle with a non-hardening sealing tape. h. Replace the burner by following instructions to opposite direction. Notice the Primary Air Adjustment Fig Replacing Pilot Nozzle (Fig. 20) Adjust the Pilot flame according to natural gas. Follow direction below: a. Remove the covering screw (10) with washer (11) by using small screwdriver. b. Adjust Nozzle (C) to make Main Burner ignites well. c. Turn clockwise to reduce gas flow. Otherwise, turn anticlockwise to increase gas quantity. d. When operated with liquid gas, turn Nozzle (C) clockwise. e. Fix gas after regulating washer (11) and covering screw (10). Fig
34 Primary Air Adjustment a. Unscrew the bolt with an appropriated screw driver b. Move Primary Air Adjuster in order to reach the distance which according to the table (H) c. Retighten the screw cap again. Fig. 21 Table 10 Nominal Heat Input Gas Type 11.5 kw G30/G31 13 kw Table 11 By-pass Pilot Primary Air Air Pressure Nozzle Screw Nozzle Adjustment Chamber (mbar) (mm) for Gas (mm) H (mm) for Nozzle Cock (mm) 28-30/37 Ø mm Full Ø 0.95 * Ø /50 Ø 1.60 Opened Opened Ø 0.85 G20 20 Ø 3.05 G25 20 Ø Ø 3.15 Adjusted 5 mm Opened Full Closed Adjusted or Adjusted Reduced Heat Input Consumption 3.00 kw G30 G31 G20 G20 G kg/h kg/h m/h m/h m/h 34
. - Take pressure test of gas circuit and check for leaks.")
35 WARNING! After doing conversion please remember to: - Attach an indelible sticker on technical data plate with the new installation data. - Fix the new seals on the regulated parts (Primary Air Bushes and Main Injector). - Take pressure test of gas circuit and check for leaks. - Properly control Gas Euro Range work according to these instructions. - Please check main burners cross-lighting, stability, and flame factor. Install Pipe Leg Fig Put 4 pipes on the under shelf Tightened with external tooth washer, flat washer and nut M8. 2. Install (2 pcs side, 1 pc front, 1 pc back) stopper leg at the top of the pipe leg. Tightened with external tooth washer, flat washer, and nut M6. 3. Install body (no.1) and table (no.2) Tightened with external tooth washer, flat washer, and hexa M6. 35

36 Use and Operation Warning This appliance is a gas cooker for professional use. It shall be used by authorized people only. Before starting, please make sure that the appliance is in good condition and put it in a good ventilated room. Below are several preliminaries warning that strictly conformed: 1. Check the gas supply whether it is in good condition and make sure that the air volume required for combustion is not obstruct by any object around or under the appliance. 2. If there is a persistent breakdown, please contact authorized mechanic. 3. User is only responsible for daily routine cleaning for maintenance. 4. Qualified mechanic must do operations related to installation and maintenance according to Regulation in force. 5. Use this Gas Euro Range only to COOK FOOD: SHALLOW FRYING, SAUTEING, FRYING, and BOILING. DO NOT use the Gas Euro Range for other purposes. Any other uses may be considered as improper and dangerous use. Please control the appliance when operating. 6. Before operating Gas Euro Range for the first time, carefully clean the appliance to remove industrial oil/ lubricant. 7. After using the Gas Euro Range, close the gas valve in UP position. Control Panel Description NGER 60 SERIES For example: NGER 9-60 A : Gas Valve Burner to turn ON-OFF the Gas Range 36 Fig. 23 Use and Operation

37 NGER 70 SERIES For example: NGER Fig. 24 A : Gas Valve Burner to turn ON-OFF the Gas Range B : Water Tap Faucet to turn ON-OFF the water faucet C : Water Tap Spryer to turn ON-OFF the water spryer NGER 130 SERIES For example: NGER A : Gas Valve Burner (on front and back side) to turn ON-OFF the Gas Range B : Water Tap Spryer (on front and back side) to turn ON-OFF the water spryer Fig
38 Switch ON/OFF Turn Burner ON 1. Open the Gas Valve Burner to supply gas. 2. Turn and hold the Gas Valve Burner anticlockwise until heard sound click. 3. Turn the Gas Valve Burner clockwise to adjust the flame until heard sound clicks for several times. 4. If the flame fails to ignite, turn the Gas Valve Burner to OFF position to stop the gas flow. 5. Repeat the above steps (1,2,3). Turn Burner OFF 1. To extinguish the flame, turn the Gas Valve Burner to OFF position. 2. Close the gas supply. Operating Water Faucet 1. Turn the Water Tap Faucet anticlockwise to open the Water Faucet on top panel. 2. Turn the Tap clockwise to close the Water Faucet. Operating Water Spryer 1. Turn the Water Tap Sprayer anticlockwise to open the Water Sprayer on top panel. 2. Turn the tap clockwise to close the Water Sprayer. ATTENTION! When you want to start the appliance in the cold condition (like in the morning after along time for not being used), you have to wait at least two minutes before turning the main burners on. Therefore, thermocouple can warm up and provide the voltage needed for the valve work. 38
39 Routine Cleaning and Maintenance Clean the appliance to keep the functionality and durability. In the case of any failures, do not attempt to solve the problem but call your dealer immediately to ask for help. Do not attempt to dismantle the appliance, specialized mechanics must do all job. For routine cleaning process, please follow procedure below and notice the warning: Cleaning the plate 1. Make sure the gas valve on UP position, the appliance is closed, and the entire burners are OFF. 2. Let the appliance cool. 3. Clean the steel part daily with warm soapy water, rinse and dry thoroughly. Please make sure that the cleaning product does not contain Chlorine (bleach, hydrochloric acid, etc), using steel wool, brushes, or scrappers that could leave ferrous particles. These materials could oxidize and causes rust on the appliance. 4. Spread a suitable degreaser on the plate and leave it to act for a few minutes. 5. Clean the plate thoroughly with a sponge, rinse with plenty of water and dry 6. Clean the burners with mild detergent or using soap and water. 7. Check the burners whether the holes are clogged. If necessary, use steel wool pad to remove deposits without damaging any parts of pilot unit. 8. DO NOT leave acid food such as vinegar, salt, lemon, etc on the stainless steel parts because it can ruin them. 9. NEVER wash the appliance with direct high-pressure jet water. 10. If the cooker will not used for a long time, briskly rub the steel part slightly with a damp cloth and Vaseline oil. After that, wrap with protective film and put the appliance in a good ventilated room. ATTENTION!! If you find the lighting and control devices are difficult to use, please contact the manufacturer immediately, which will provide you necessary assistance or call dealer.! Please check the appliance periodically for 6 months. Contact your dealer that will supply assistance to repair and set interval.! Authorized and qualified personnel must do all service. 39 Maintenance Routine Cleaning and
40 Trouble Shooting NO. PROBLEM CAUSE CORRECTIVE ACTION 1. The Pilot flame does not ignite Gas pipe to Pilot closed Pilot head clogged Pilot nozzle clogged Check and repair. Check the gas supply. Check and clean Check and replace 2. Burner flame yellow Primary Air setting incorrect Check and repair Burner dirty Check and clean 3. Burner does not ignite Gas valve damaged Check and replace 4. Pilot flame does not keep Thermocouple dirty Check and clean with fine lighting Thermocouple does not steel brush Check and repair produce voltage (mv) Thermocouple slacked Check and repair Thermocouple magnet Check and replace damaged 40 Trouble Shooting
41 CE Certificate CE Certificate 41
42 Addresses Head Office Jl. Raya Terboyo No. 15 Kawasan Industri Terboyo Megah Semarang 50112, Central Java Indonesia T F E nayati@nayati.com Service Center S Branch Offices Local Offices: JAKARTA Jl. Batu Ceper 55 A Jakarta Pusat Indonesia T F E resto.jkt@nayati.com International Offices: SINGAPORE Nayati (Singapore) Pte Ltd, 627A Aljunied Road, #07-02 Biztech Centre Singapore T E nayati@singnet.com.sg BANDUNG Jl. Martanegara No.26, Turangga Bandung 40264, Indonesia T F E resto.bdg@nayati.com SEMARANG Jl. Gajahmada NO.131 Semarang 50133, Indonesia T F E resto.smg@nayati.com SURABAYA Jl. Kertajaya No Surabaya 60281, Indonesia T , F E resto.sby@nayati.com SHANGHAI Rm B18, 8 Floor, Huaming Empire Plaza, 726 West Yanan Rd, Changning District, Shanghai City, PRC : T / F JIANGMEN Nayati Jiangmen Trading Ltd 88, Hong Xing Road, Block 3, Phai Shi Feng Shan Industrial Park, Third Floor, Jiangmen City, Guangdong. Postal Code People s Republic of China T +(86) / F +(86) DENPASAR Jl. Gunung Semeru No.26 A Denpasar 80119, Bali, Indonesia T , F E resto.dps@nayati.com Addresses 42
Group. Virtus Group GmbH Hüserstraße Hamm / Germany. Virtus s.r.l. via Milano 95/e Casteggio (PV) / Italy
 / Italy") Group Service Virtus s.r.l. via Milano 95/e 27045 Casteggio (PV) / Italy % +39 0 383890612 7 +39 0 383809601 w w w. v i r t u s n e t. e u Virtus Group GmbH Hüserstraße 53 59075 Hamm / Germany % +49 (0)2381/973
Group Service Virtus s.r.l. via Milano 95/e 27045 Casteggio (PV) / Italy % +39 0 383890612 7 +39 0 383809601 w w w. v i r t u s n e t. e u Virtus Group GmbH Hüserstraße 53 59075 Hamm / Germany % +49 (0)2381/973
Installation, Operation and Maintenance Instructions
 Installation, Operation and Maintenance Instructions Gas Wok Range Model : NGWR 7-90 W1 CE NGWR 9-90 W1S1 CE One Gas Wok Burner One Gas Wok Burner One Gas Soup Pot Burner NGWR 16-90 W2S1 CE Two Gas Wok
Proline GAS HOB Model TCG40IX Instruction Book
 Proline GAS HOB Model TCG40IX Instruction Book GB Operating and Installation Instructions Index Technical data and specifications...... 3 Installation...................... 3-6 Ventilation........................
HG 675 CX 60 HG 675 CN 60 HG 675 CW 60
 HG 675 X 60 HG 675 CX 60 HG 675 CN 60 HG 675 CW 60 1 2 1. : 93/68: 90/396: 2006/95/CE: 2004/108/CE: - 1935/2004:. 2002/95/CE: RoHS 2.,.,,,,...,. (,..)..,,.,. ( ),,, ;,,.,.....,.,,,,,,...,. (..),,.,..,.,,,,
NAYATI ELECTRIC TEPPANYAKI
 SPECIALIST FOOD AND SERVICE EQUIPMENT INSTALLATIONS, OPERATION and MAINTENANCE INSTRUCTION NAYATI ELECTRIC TEPPANYAKI MODEL : Carefully read the instruction booklet before installing and using the appliance
Installation and Operating Instructions
 Installation and Operating Instructions Models: Verso 4G Hob As part of Parmco Appliances commitment to improving and updating product ranges, we reserve the right to alter, change and update technical
INSTALLATION, OPERATION AND SERVICE MANUAL GAS COOKER MODEL CPG. Page 1 / 18
 INSTALLATION, OPERATION AND SERVICE MANUAL GAS COOKER MODEL CPG Page 1 / 18 CHAP 1 - INSTRUCTIONS TO PREVENT ACCIDENTS Keep this manual carefully to be able to refer to it in every case of need. Keep appliance
BUILT-IN GLASS HOB MODEL: EGH-G8592G(BK) EGH-G8593G(BK) Owner s Manual Please read this manual carefully before operating your set.
 EGH-G8593G(BK) Owner s Manual Please read this manual carefully before operating your set.") BUILT-IN GLASS HOB MODEL: EGH-G8592G(BK) EGH-G8593G(BK) Owner s Manual Please read this manual carefully before operating your set. Retain it for future reference. Record model number and serial number
BUILT-IN GLASS HOB MODEL: EGH-G8592G(BK) EGH-G8593G(BK) Owner s Manual Please read this manual carefully before operating your set. Retain it for future reference. Record model number and serial number
Contents. 1. Instructions for safe and proper use Positioning of hob Attachment to support structure Electrical connection 22
 Contents 1. Instructions for safe and proper use 19 2. Positioning of hob 20 2.1 Attachment to support structure 20 3. Electrical connection 22 4. Gas connection 23 4.1 Connection to LPG 24 4.2 Ventilation
USER MANUAL. 80 cm 2 burners, glass hob AKC 820C/BLM
 USER MANUAL 80 cm 2 burners, glass hob AKC 820C/BLM For your safety These instructions have been drawn up for your safety and that of others. You are therefore requested to read them carefully before installing
INSTRUCTION MANUAL BUILT-IN HOBS CIR900X
 INSTRUCTION MANUAL BUILT-IN HOBS CIR900X ENGLISH 3-19 Thank you for choosing our product. We advise you to read this manual carefully. It contains all necessary instructions for maintaining unaltered the
USER MANUAL. 60cm, 3 burners, Hob AKC 630
 USER MANUAL 60cm, 3 burners, Hob AKC 630 For your safety These instructions have been drawn up for your safety and that of others. You are therefore requested to read them carefully before installing
USER MANUAL AKC cm 4 Burners, Stainless Steel Hob
 USER MANUAL AKC 641 60 cm 4 Burners, Stainless Steel Hob For your safety These instructions have been drawn up for your safety and that of others. You are therefore requested to read them carefully before
Contents. 1. Instructions for safety and use 20
 Contents 1. Instructions for safety and use 20 2. Positioning in the counter top 21 2.1 Fixing to the supporting structure 21 2.2 Positioning the adhesive sponge 22 2.3 Positioning the fastening clips
installation and operating instructions OG63XA Cooktop
 installation and operating instructions OG63XA Cooktop Dear customer, We thank you and congratulate you on your choice. This new carefully designed product, manufactured with the highest quality materials,
Contents authorised persons
 Contents 1. INSTRUCTIONS FOR SAFE AND PROPER USE 4 2. POSITIONING OF THE HOB 6 3. GAS CONNECTION 10 4. ELECTRICAL CONNECTION 11 5. ADAPTATION TO DIFFERENT TYPES OF GAS 12 6. FINAL OPERATIONS 14 7. USING
Mod. ANBR9..G. CR DOC. NO. GAS-HEATED TILTING BRATT PAN. INSTRUCTIONS FOR INSTALLATION, ADJUSTMENT, USE AND MAINTENANCE...
 -HEATED TILTING BRATT PAN Mod. ANBR9..G. INSTRUCTIONS FOR INSTALLATION, ADJUSTMENT, USE AND MAINTENANCE...page 2-5 APPENDIX....pagina 6-7 Read the manual thoroughly and keep it in a safe place throughout
IMPORTANT SAFETY INSTRUCTIONS DANGER: WARNING:
 IMPORTANT SAFETY INSTRUCTIONS YOUR SAFETY AND THAT OF OTHERS IS PARAMOUNT This manual and the appliance itself provide important safety warnings, to be read and observed at all times. This is the attention
3gb53231b.fm5 Page 12 Friday, April 11, :21 PM
 3gb53231b.fm5 Page 12 Friday, April 11, 2003 12:21 PM INSTRUCTIONS FOR USE BEFORE USING THE COOKTOP SUGGESTIONS FOR ENVIRONMENT PROTECTION PRECAUTIONS AND GENERAL ADVICE ENERGY SAVING TIPS CARE AND MAINTENANCE
HVG620 & HVG720 Gas Hob Manual for Installation, Use and Maintenance
 HVG620 & HVG720 Gas Hob Manual for Installation, Use and Maintenance Customer Care Department The Group Ltd. Harby Road Langar Nottinghamshire NG13 9HY T : 01949 862 012 F : 01949 862 003 E : customer
Mastro GmbH Hüserstraße Hamm / Germany +49 (0)2381/ (0)2381/
2381/ (0)2381/") Service Mastro GmbH Hüserstraße 53 59075 Hamm / Germany +49 (0)2381/973 71 0 +49 (0)2381/97371 88 w w w. m a s t r o s h o p. c o m Cod. 252.157.10 ELECTRIC BAIN-MARIE MOD. 60/30 BME MOD. 60/60 BME INDEX
Service Mastro GmbH Hüserstraße 53 59075 Hamm / Germany +49 (0)2381/973 71 0 +49 (0)2381/97371 88 w w w. m a s t r o s h o p. c o m Cod. 252.157.10 ELECTRIC BAIN-MARIE MOD. 60/30 BME MOD. 60/60 BME INDEX
F900 SERIES BOILING PAN G9781. User, installation and servicing instructions. Read these instructions before use T REV.
 F900 SERIES User, installation and servicing instructions BOILING PAN G9781 Read these instructions before use DATE PURCHASED: MODEL NUMBER: SERIAL NUMBER: DEALER: SERVICE PROVIDER: T100915 REV. 1 Dear
F900 SERIES GAS CHARGRILL G9440, G9460, G9490, G User, installation and servicing instructions T Read these instructions before use
 F900 SERIES User, installation and servicing instructions GAS CHARGRILL G9440, G9460, G9490, G94120 Read these instructions before use DATE PURCHASED: MODEL NUMBER: SERIAL NUMBER: DEALER: SERVICE PROVIDER:
Porter & Charles OPERATION MANUAL. Gas Cooktop CG60S, CG76S, CG90S, CG60W, CG90W
 Porter & Charles OPERATION MANUAL Gas Cooktop CG60S, CG76S, CG90S, CG60W, CG90W Congratulations on the purchase of your Porter & Charles appliance. We are sure it will provide many years of great cooking
MHG201 Gas Hob Manual for Installation, Use and Maintenance
 MHG201 Gas Hob Manual for Installation, Use and Maintenance 1 Customer Care Department The Group Ltd. Harby Road Langar Nottinghamshire NG13 9HY T : 01949 862 012 F : 01949 862 003 E : customer.care@cda.eu
Synergy Grill User & Engineer Installation & Conversion Guide
 Synergy Grill 1300 User & Engineer Installation & Conversion Guide 1 Index: Description Page Number/Section Important Information 3 Installation 4-6 / Section 1 Commissioning 6 / Section 2 Converting Gas
GAS COOKER GAS OVEN SERIES. Owner s Manual Please read this manual carefully before operating your set. Retain it for future reference.
 GAS COOKER GAS OVEN SERIES Owner s Manual Please read this manual carefully before operating your set. Retain it for future reference. Record model number and serial number of the set. See the label attached
User Manual. 600mm, 700mm & 900mm Gas Cooktops Model No. CF6GS, CF6GW, CF7GS, CF9GS
 User Manual 600mm, 700mm & 900mm Gas Cooktops Model No. CF6GS, CF6GW, CF7GS, CF9GS For all product enquires, including warranty support, please contact our Customer Care team 1800 444 357 or email customercare@hapl.com.au
GAS STAINLESS COOKTOPS
 GAS STAINLESS COOKTOPS CG604D & CG905D models CG604DCG905D USER GUIDE HK SG Contents 1 EN Safety and warnings 2 Introduction 5 Using your cooktop 6 Cooking guidelines and cookware 8 Care and cleaning
UBGHFF60W 60cm Gas on Glass Gas Hob
 UBGHFF60W 60cm Gas on Glass Gas Hob GB [02] x 1 [03] x 2 [04] x 1 [01] x 1 [08] x 4 [05] x 2 [09] x 1 [06] x 1 [07] x 4 [10] x 4 [11] x 1 TEMPLATE TEMPLATE UBGHFF60W GB Built-in 60cm Gas on Glass Gas Hob
INSTRUCTIONS FOR HOBS PISL1CZI PISL20ZI PISL40ZI PISL40Z* PISL4CZI PISL904CZI PISL1004CZI PISL1163CZI PISF4CZI PISF904CZI PISF1004CZI PISF1163CZI
 Select-Abey.rev05 INSTRUCTIONS FOR INSTALLATION AND USE HOBS PISL1CZI PISL20ZI PISL40ZI PISL40Z* PISL4CZI PISL904CZI PISL1004CZI PISL1163CZI PISF4CZI PISF904CZI PISF1004CZI PISF1163CZI CONTROLS ZONE -
USER AND TECHNICAL MANUAL
 PASTA COOKER Model : AX-SPG & AX-DPG USER AND TECHNICAL MANUAL GAS TYPE/PRESSURE Natural gas Propane gas PRODUCTION YEAR: SERIAL NR: MVP GROUP CORPORATION 5659 ROYALMOUNT MONTREAL, QC. CANADA H4P 2P9 Tel:
PC 640 GB. Built-in cooking tables 60 Instructions for installation and use
 PC 640 GB Built-in cooking tables 60 Instructions for installation and use Congratualtions on choosing an Ariston appliance, which you will find is dependable and easy to use. We recommend that you read
Instructions for use. Gas hobs for installation in worktops GKS GWS GKS GKS
 Instructions for use Gas hobs for installation in worktops GKS 3920.0 GWS 3911.0 GKS 6940.0 GKS 9951.0 For use in: Hong Kong Issue: 2014-01-14 Version: 1.3_EN Identity no.: 073587_HK Welcome 2 Welcome
BUILT-IN / TABLE TOP HOB GAS COOKER USER MANUAL
 GB BUILT-IN / TABLE TOP HOB GAS COOKER USER MANUAL Dear Costumer, It is our ultimate desire that you achieve the best performance from our product, which has been passed through meticulous quality control
GAS STOVE TOP.
 GAS STOVE TOP www.anvilworld.com ALL ANVIL EQUIPMENT COMES WITH A ONE YEAR WARRANTY ON COMPONENTS AND DEFECTIVE WORKMANSHIP. www.anvilworld.com LIMITED WARRANTY All equipment which is sold under ANVIL
USER MANUAL ART cm Deluxe Gas Hob
 USER MANUAL ART28916 60cm Deluxe Gas Hob GB IE These instructions have been drawn up for your safety and that of others. You are therefore requested to read them carefully before installing and using the
Table Top Patio Heater
 Table Top Patio Heater INSTRUCTION MANUAL MODEL: HPS-B Certified by international recognized standards. The infra-red with heat wave outdoor heater. Variable control gas valve with electric push igniter.
PDG PDG4.1...A PDG5.0...A INSTRUCTION MANUAL IO 00450/2 ( )
") PDG4.0... PDG4.1...A PDG5.0...A INSTRUCTION MANUAL IO 00450/2 (11.2010) DEAR CUSTOMER, Outstanding user-friendliness and excellent efficiency make cooktops a perfect choice. Please read this manual thoroughly
PDG4.0... PDG4.1...A PDG5.0...A INSTRUCTION MANUAL IO 00450/2 (11.2010) DEAR CUSTOMER, Outstanding user-friendliness and excellent efficiency make cooktops a perfect choice. Please read this manual thoroughly
4 BURNER GAS HOB INSTRUCTION / INSTALLATION MANUAL CGHOBB12 CGHOBW12
 4 BURNER GAS HOB INSTRUCTION / INSTALLATION MANUAL CGHOBB12 CGHOBW12 Contents Unpacking... 5 Product Overview... 6 The Main Unit...6 Control Panel...6 Before Using Your New Hob... 7 Lighting the Hob...
Gas Cooktop Installation, User and Service Instructions GMS 955.1
 Gas Cooktop Installation, User and Service Instructions GMS 955.1 IMPORTANT: SAVE FOR LOCAL ELECTRICAL INSPECTOR S USE. READ AND SAVE THESE INSTRUCTIONS FOR FUTURE REFERENCE. OBSERVE ALL FEDERAL, STATE
ozti PASTA COOKER Model : OMFG 4090 S & OMFG 8090 S USER AND TECHNICAL MANUAL GAS TYPE/PRESSURE Natural gas Propan gas
 ozti PASTA COOKER Model : OMFG 4090 S & OMFG 8090 S USER AND TECHNICAL MANUAL GAS TYPE/PRESSURE Natural gas Propan gas PRODUCTION YEAR: SERIAL NR: MANUFACTURER : ÖZTİRYAKİLER MADENİ EŞYA SAN. VE TİC A.Ş.
GC2-43N GC2-43P GC2-48N GC2-48P GC1-28N GC1-28P
 User Guide For GC2-43N GC2-43P GC2-48N GC2-48P GC1-28N GC1-28P Ramblewood Green WWW.RAMBLEWOODGREEN.COM 1 GENERAL INFORMATION These high efficiency cooktops are designed for domestic household use. The
Instructions for use
 Instructions for use These instructions are also available on the website: www.kitchenaid.eu Important instructions for safety 4 Installation 6 Safeguarding the environment 6 Troubleshooting guide 7 After-sales
User and maintenance manual
 GB User and maintenance manual IMPORTANT SAFETY INSTRUCTIONS These instructions shall also be available on website: docs.whirlpool.eu. YOUR SAFETY AND THAT OF OTHERS IS HIGHLY IMPORTANT. This manual and
Built-in Gas Hob. Important - Please read these instructions fully before using. Operating Instructions -Please keep for future reference
 Built-in Gas Hob Operating Instructions -Please keep for future reference A70GCIS Important - Please read these instructions fully before using These instructions contain important information which will
HOW TO USE YOUR 2500 RANGE L.P.G. COOKER OR HOB UNIT
 HOW TO USE YOUR 2500 RANGE L.P.G. COOKER OR HOB UNIT CAUTION These instructions must be read and understood before proceeding with the installation and to avoid any possibility of accident it is essential
FLAME HEATER PYRAMID CLFH-10SS OPERATION INSTRUCTIONS
 FLAME HEATER PYRAMID CLFH-10SS OPERATION INSTRUCTIONS www.colorato.net For outdoors use only Uses propane, butane or LPG only Reflector: 47x47 mm Total Height: 2250 mm Regulator s external pressure: 28-30
Belling. Gas Hob GHU573 - GHU573T GHU70GE - GHU70TGE - GHU70GC GHU70TGC - GHU60GC INSTALLATION AND USER INSTRUCTIONS
 Belling Gas Hob GHU573 - GHU573T GHU70GE - GHU70TGE - GHU70GC GHU70TGC - GHU60GC INSTALLATION AND USER INSTRUCTIONS Note: This appliance is supplied for use with Natural Gas and can be converted to LPG
GB User and maintenance manual
 GB User and maintenance manual IMPORTANT SAFETY INSTRUCTIONS These instructions shall also be available on website: docs.whirlpool.eu. YOUR SAFETY AND THAT OF OTHERS IS VERY IMPORTANT This manual and
Installation, Operating and Servicing Instructions
 Installation, Operating and Servicing Instructions Opus 800 Gas Boiling Tops OG8003, OG8004 & OG8009 Please make a note of your product details for future use: Date Purchased: Model Number: Serial Number:
BUILT-IN GAS HOB THE BEAUTY OF SIMPLICITY USER MANUAL BATTERY IGNITION. Model:
 BUILT-IN GAS HOB BATTERY IGNITION Model: HB FG 3060 TN VSB [ 141252-11 ] HB FG 3070 TN VSB [ 141253-11 ] HB FG 4060 TN VSB [ 141250-11 ] HB FG 4090 TN VSB [ 141251-11 ] HB FG 5070 TN VSB HB FG 5090 TN
HOW TO USE YOUR 4500 RANGE L.P.G. COOKER OR HOB UNIT
 HOW TO USE YOUR 4500 RANGE L.P.G. COOKER OR HOB UNIT If the appliance does not operate correctly contact your supplier Or Leisure Products (Bolton) Ltd Holly Street, Bolton, BL1 8QR. England. ~~~~ For
Packaged Gas/Electric Units. Owner s Guide to Operating and Maintaining Your Gas/Electric Unit
 Packaged Gas/Electric Units Owner s Guide to Operating and Maintaining Your Gas/Electric Unit ELECTRICAL SHOCK HAZARD. FIRE OR EXPLOSION HAZARD Disconnect power at fuse box or service panel before performing
Using it in an enclosed space can kill you.
 38 X 56 GAS FIRE PIT - OWNER S MANUAL Carlisle Chat Fire Table Base Model # 00GBC7 (6877B) Fits 6877A Carlisle Chat Fire Table Top For Propane and *Natural Gas (*See Page 7) Certified to CSA International
USER MANUAL Gas Step Up Hot Plate
 USER MANUAL Gas Step Up Hot Plate MODELS: CK HPSU, CK HPSU, CK HPSU 0 / 07 IMPORTANT FOR FUTURE REFERENCE Please complete this information and retain this manual for the life of the equipment. For Warranty
21 20 LITER GAS FRYER FFA3200 INSTALLATION AND SERVICING.
 21 20 LITER GAS FRYER FFA3200 INSTALLATION AND SERVICING www.anvilworld.com 20 ALL ANVIL EQUIPMENT COMES WITH A ONE YEAR WARRANTY ON COMPONENTS AND DEFECTIVE WORKMANSHIP. www.anvilworld.com 19 20 LITER
Gas Fire Patio Heater Q9
 Gas Fire Patio Heater Q9 Instruction Manual Please read the manual BEFORE you unpack or install the fire TABLE OF CONTENTS Warning 3 Getting Started 4 What s Included 5 Assembly Procedures 6 Product Drawing
Specialist Deluxe Series II Built-In 4 & 6 Burner BBQ BQ8342B & BQ8362B
 Specialist Deluxe Series II Built-In 4 & 6 Burner BBQ BQ8342B & BQ8362B FEATURES Deluxe BBQ featuring vitreous enamel body and #304 stainless steel fascia #304 Stainless steel hood includes glass window
Installation and Operating Instructions
 Installation and Operating Instructions Models: HO-1 HO-2 HO-6 HO-7 As part of Parmco Appliances commitment to improving and updating product ranges, we reserve the right to alter, change and update technical
The Classeq under counter range
 Installation & Operators Manual The under counter range Part number 902.0011 Revision C Effective date January 2010 Language English Glasswashers Eco 1 Eco 2 Eco 3 Duo 2 Duo 3 Dishwasher Hydro 500 Hydro
PROF. RANGE COOKER MODEL: EPRC-A6456GE(SS) Owner s Manual Please read this manual carefully before operating your set. Retain it for future reference.
 Owner s Manual Please read this manual carefully before operating your set. Retain it for future reference.") PROF. RANGE COOKER MODEL: EPRC-A6456GE(SS) Owner s Manual Please read this manual carefully before operating your set. Retain it for future reference. Record model number and serial number of the set.
PROF. RANGE COOKER MODEL: EPRC-A6456GE(SS) Owner s Manual Please read this manual carefully before operating your set. Retain it for future reference. Record model number and serial number of the set.
HOW TO USE YOUR 2000 RANGE L.P.G. COOKER OR HOB UNIT
 HOW TO USE YOUR 2000 RANGE L.P.G. COOKER OR HOB UNIT CAUTION These instructions must be read and understood before proceeding with the installation and to avoid any possibility of accident it is essential
THE BEAUTY OF SIMPLICITY USER MANUAL
 LICITY BUILT-IN GAS HOB Model: EFH 3650 TN SB EFH 3760 TN VSB EFH 3760 TN VS EFH 3761 TN VSB THE BEAUTY OF SIMPLICITY USER MANUAL Congratulations on choosing appliance, which you will find is dependable
OWNER S MANUAL MOBILE GAS BARBECUE WITH SIDE BURNER
 OWNER S MNUL MOBILE GS BRBECUE WITH SIDE BURNER Picture of ppliance Read this instruction carefully and ensure that your grill is properly installed, assembled, maintained and serviced in accordance to
User, Installation and Servicing Instructions. Opus 700 Gas Griddle OG7201, OG7202, OG7203, OG7204, OG7207, OG7208 IS349 ECN3592
 User, Installation and Servicing Instructions Opus 700 Gas Griddle OG7201, OG7202, OG7203, OG7204, OG7207, OG7208 IS349 ECN3592 Dear Customer, Thank you for purchasing this Lincat product. This is just
Gas Cooktops (450mm Wide Hobs)
") Installation and Operation Manual Gas Cooktops (450mm Wide Hobs) Series RN8450G RNL8450G RNB8450G RNLB8450G RN8900G RNL8900G RNB8900G RNLB8900G Date Purchased Serial Number Dealer Service Provider For
Installation and Operation Manual Gas Cooktops (450mm Wide Hobs) Series RN8450G RNL8450G RNB8450G RNLB8450G RN8900G RNL8900G RNB8900G RNLB8900G Date Purchased Serial Number Dealer Service Provider For
Owner s Guide Installation & Operation
 Owner s Guide Installation & Operation Hot Top HHT Series Hestan Commercial Corporation 3375 E. La Palma Ave Anaheim, CA 92806 (888) 905-7463 RETAIN THIS MANUAL FOR FUTURE REFERENCE P/N 002130 REV 1 IMPORTANT
INSTRUCTIONS for installation and use
 x CVCS4EM PASTA COOKER FOR RESIDENTIAL AND PROFESSIONAL USE INSTRUCTIONS for installation and use TABLE OF CONTENTS WARNINGS & CAUTION...4 SAFETY INSTRUCTIONS...5 ELECTRICAL SCHEME...6 INSTALLATION INTRUCTIONS...7
INSTRUCTION MANUAL GAS COOKTOPS IL**604, IL**775, IL**905 (** = BV, WV and SS models)
") INSTRUCTION MANUAL GAS COOKTOPS IL**604, IL**775, IL**905 (** = BV, WV and SS models) OPEN 24/7 ILVE ACCESSORIES ONLINE SHOP Dear customer, We thank you and congratulate you on your choice. This new carefully
INSTRUCTION MANUAL GAS COOKTOPS IL**604, IL**775, IL**905 (** = BV, WV and SS models) OPEN 24/7 ILVE ACCESSORIES ONLINE SHOP Dear customer, We thank you and congratulate you on your choice. This new carefully
ELECTRIC DEEP FAT FRYERS Serie900. User manual
 ELECTRIC DEEP FAT FRYERS Serie900 TYPE: 92/04 FRE20L, 92/04 FRE15L, 93/04 FRE 10L, 94/04 FRE20L User manual S/N: Valid from:29. 06. 2004 Rev.: 1.0 Dear Customer, Congratulations on deciding to choose
User, Installation and Servicing Instructions. Silverlink 600 Gas Griddles GS4 and GS7 IS212 ECN3592
 User, Installation and Servicing Instructions Silverlink 600 Gas Griddles GS4 and GS7 IS212 ECN3592 INSTALLATION AND SERVICING INSTRUCTIONS Please read the following carefully before commencing work on
BUILT-IN GAS HOB. Important - Please read these instructions fully before using AG60GNSS AG60GNW
 BUILT-IN GAS HOB Operating & Installation Instructions -Please keep for future reference AG60GNSS AG60GNW Important - Please read these instructions fully before using These instructions contain important
Wok Cookers Instruction Manual
 Wok Cookers Instruction Manual Part No. DC100-09 Single Burner Wok Cooker Part No. DC200-09 Double Burner Wok Cooker IMPORTANT It is IMPORTANT that you read these instructions carefully and understand
FRANKE DESIGNER GAS COOKTOP 90CM
 page 1 of 7 510 880 45 480 Min 50 860 Min 600 SPECIFICATIONS Recommended use Material Colour availability Weight Dimensions Voltage Domestic Stainless Steel Stainless Steel 18.2kg 880 x 510 x 45mm 220-240V
NOTE: THIS APPLIANCE MUST BE INSTALLED SOLELY AND EXCLUSIVELY BY A QUALIFIED TECHNICIAN.
 Table of Contents 1. IMPORTANT SAFETY INSTRUCTIONS... 4 2. DESCRIPTION OF CONTROLS... 6 3. USING THE COOKTOP... 7 3.1 Ignition with safety device... 7 3.2 Practical advices to use the burners... 8 3.3
OG7302 Salamander Grill
 OG7302 Salamander Grill USER, INSTALLATION, SERVICING AND CONVERSION INSTRUCTIONS For use in GB & IE IS370 ECN3280 1 Dear Customer, Thank you for purchasing this Lincat product. This is just one of over
User, Installation, Servicing and Conversion Instructions. Opus 700 Gas Oven Ranges OG7001 & OG7002 IS431 ECN3592
 User, Installation, Servicing and Conversion Instructions Opus 700 Gas Oven Ranges OG7001 & OG7002 IS431 ECN3592 Dear Customer, Thank you for purchasing this Lincat product. This is just one of over 450
Gas Fire Patio Heater Lhotse-817
 Gas Fire Patio Heater Lhotse-817 Instruction Manual Please read the manual BEFORE you unpack or install the fire TABLE OF CONTENTS Warning 3 Getting Started 4 What s Included 5 Assembly Procedures 6 Product
INSTRUCTION MANUAL GAS HOB. Model:GH600
 INSTRUCTION MANUAL GAS HOB Model:GH600 1 Contents Important Information Description of Hob Operation Maintenance and cleaning Troubleshooting Instruction for installer Technical data Important safety requirements
PROF. RANGE COOKER MODEL: EPRC-9850FE/SS EPRC-9860E/SS. Owner s Manual Please read this manual carefully before operating your set.
 PROF. RANGE COOKER MODEL: EPRC-9850FE/SS EPRC-9860E/SS Owner s Manual Please read this manual carefully before operating your set. Retain it for future reference. Record model number and serial number
INSTALLATION & USER MANUAL
 INSTALLATION & USER MANUAL Scholtès Gas Domino Built-in Hob Index Important Safety Instruction, 1-2 Instructions for Use, 3 Usage Maintenance Instructions for Installer, 4-5 Installation Positioning Gas
INSTRUCTION AND MAINTENANCE MANUAL
 INSTRUCTION AND MAINTENANCE MANUAL Pasta Cooker (GAS) Professionally with Professionals DESCRIPTION The instructions in this manual contain important information on the safe mounting, usage, cleaning and
GAS GRIDDLE INSTRUCTIONS MODEL: PGF GRIDDLES PGF 300, 600, 800, 1200
 Page 1 of 17 GAS GRIDDLE INSTRUCTIONS MODEL: PGF GRIDDLES PGF 300, 600, 800, 1200 VALIDATE WARRANTY SAFETY INSTRUCTIONS INSTALLATION INSTRUCTIONS OPERATION INSTRUCTIONS MAINTENANCE INSTRUCTIONS CONVERSION
Instructions for use
 Instructions for use These instruction shall be available on website docs.kitchenaid.eu Important instructions for safety 4 Installation 6 Safeguarding the environment 6 Troubleshooting guide 7 After-Sales
Installation instructions. Gas cooktops. and User guide NZ AU. CG604 models
 1 Installation instructions and User guide Gas cooktops CG604 models NZ AU Contents 1 Safety and warnings 2 Installation instructions 6 Introduction 16 Using your cooktop 18 Care and cleaning 23 Troubleshooting
Gas Instantaneous Water Heater
 6 720 607 823 GB (06.06) SM Installation and Operating Instructions Gas Instantaneous Water Heater WR10..B... WR11..B... With electronic ignition and triple safety system consisting of ionisation detector,
INSTALLATION AND MANINTENANCE INSTRUCTIONS
 INSTALLATION AND MANINTENANCE INSTRUCTIONS Appr. Nr. A 9503 T - 0085 AQ 0765 PEGASUS F2 T HIGH EFFICIENCY GAS-FIRED CAST-IRON BOILERS Models 51-68 - 85-102 2 Contents 1. General technical data 2. Dimensional
HHG610SS 60cm 4 burner gas hob. HHG710SS 70cm 5 burner gas hob
 User Manual for your HHG610SS 60cm 4 burner gas hob HHG710SS 70cm 5 burner gas hob NOTE: This User Instruction Manual contains important information, including safety & installation points, which will
Hong Kong Town Gas. Gas Hobs. for installation in worktops GD LUX 30 1G GD LUX 30 2G
 Hong Kong Town Gas Gas Hobs for installation in worktops GD LUX 30 1G GD LUX 30 2G Welcome 2 Welcome Dear customer, We thank you for your confidence in our product. We are supplying you with a high-quality
IMPORTANT SAFETY INSTRUCTIONS Carefully read the following Important information redarding installation safety and maintenance.
 IMPORTANT SAFETY INSTRUCTIONS Carefully read the following Important information redarding installation safety and maintenance. Keep these instruction for future reference. USERS OPERATING INSTRUCTIONS
USER MANUAL Gas Countertop Charbroilers
 Gas Countertop Charbroilers REVISED 2/209 382799 LAVA BRIQUETTE MODELS: 35CLCPG5NL, 35CLCPG24NL, 35CLCPG36NL, 35CLCPG48NL, 35CLCPG60NL, 35CLCPG72NL Congratulations on your purchase of Cooking Performance
AUTOMATIC MODULAR ICE-CUBE MAKER WITH VERTICAL EVAPORATOR SYSTEM
 AUTOMATIC MODULAR ICE-CUBE MAKER WITH VERTICAL EVAPORATOR SYSTEM INSTRUCTIONS AND WARNINGS 24481 ed. 11-2007 It is strictly forbidden to reproduce this instruction manual or any part thereof. Dear
V SERIES HDR GAS RANGES
 SERVICE MANUAL ONE POWERFUL PACKAGE V SERIES HDR GAS RANGES TOPS Open Top Hot Top Griddle Top Work Surface BASES Standard Oven Convection Oven Cabinet Base - NOTICE - This manual is prepared for use by
VULCAN GAS RANGES RG-6 OPEN BURNER
 VULCAN GAS RANGES RG-6 OPEN BURNER Index: General data 2 Owner s Responsibility 3 authorised Vulcan catering Equipment Branches and dealers 3 Parts Ordering / Service Information 4 Prior to Installation
Failure to follow these instructions could result in fire or explosion which could cause property damage, personal injury or death.
 Failure to follow these instructions could result in fire or explosion which could cause property damage, personal injury or death. For use with outdoor LP gas appliances ONLY! Not recommended for use
Conversion Instructions Logano G234X. Gas boiler. Please read carefully before installing and servicing. Gas boiler
 Gas boiler UPON COMPLETION OF THE INSTALLATION THE INSTALLER MUST INSTRUCT THE OWNER AND OPERATOR ON THE FUNCTIONALITY AND THE PROPER OPERATION OF THE BOILER AND THE HEATING SYSTEM. INSTALLER MUST REVIEW
Gas Range Static Oven
 Installation and Operation Manual Gas Range Static Oven Series RN8910G RNL8910G RNB8910G RNLB8910G Date Purchased Serial Number Dealer Service Provider 1 For use in GB & IE 232779-8 MANUFACTURED BY Moffat
Installation & Operators Manual
 Installation & Operators Manual Eco, Hydro and Duo under counter range Part number 902.0011 Revision A Installation and Operation instructions For Classeq under counter range of glass and dishwashers.
SAFETY PRECAUTIONS 1 11/09 EOPI 33643
 Use and Care of your new AGA Gas Fired Range Models: GC Open Flue Range (2 Oven) GC Direct Vent Range (2 Oven) GE Open Flue Range (4 Oven) GE Direct Vent Range (4 Oven) For U.S. and Canadian Markets NOTE: