INSTALLATION AND OPERATIONS MANUAL KBM MILK CART
|
|
|
- Shawn Alexander
- 6 years ago
- Views:
Transcription


1 INSTALLATION AND OPERATIONS MANUAL KBML MILK CART KBMH MILK CART
2 THIS PAGE INTENTIONALLY LEFT BLANK PAGE 2 REV: 9/2013
3 1 BLU TECHNOLOGY MILK CARTS BLU REFRIGERATION THE SERIAL TAG READING THE SERIAL TAG RECEIVING INSPECTION UNIT SET UP AND ASSEMBLY UNPACKING KEYS NIGHT COVERS WIRE RACK ASSEMBLY (OPTIONAL) COMPRESSOR FILTER INSTALLING FILTER KBMH- 34 MODEL ONLY INSTALLING FILTER KBMH- 45 AND KBMH- 58 MODELS INSTALLING FILTER KBML MODELS GLYCOL LEVELS EQUIPMENT PLACEMENT ELECTRICAL CONNECTIONS CORD CONNECTION START UP PROCEDURE REFRIGERATION LINES CONTROL/TEMPERATURE SETTINGS STORAGE INSTRUCTIONS MILK STORAGE REMOVING MILK AT NIGHT OPERATION CHILLER MAINTENANCE PROCEDURES CLEANING CHILLER COMPARTMENT CLEANING CONDENSING UNIT CLEANING AIR FILTER KBMH MODELS CLEANING AIR FILTER KBML MODELS TROUBLESHOOTING GUIDE TIPS MIT CONTROLS WIRING DIAGRAM PARTS LIST KBMH KBMH KBMH KBML KBML KBML KBMH- DRAIN ASSEMBLY KBML- DRAIN ASSEMBLY CONDENSOR CONTROLS ASSEMBLY GLYCOL ASSEMBLY VALVE MIT CONTROLS WARRANTIES REV: 9/2013 PAGE 3

4 INSTALLATION AND OPERATIONS MANUAL 1 BLU TECHNOLOGY MILK CARTS Kairak BLU refrigeration milk carts are designed to provide consistent, uniform cooling to each individual milk carton to prevent spoilage. This new system provides inclined walls for trouble- free reach to milk cartons while keeping the chiller plates close to the milk cartons for efficient heat transfer. Our NSF7 approved BLU pan chilling system ensures milk always stay fresh without the need for fans, blower coils or other refrigeration enhancing components. Standard features on the KBM models include stainless steel construction, LED temperature display, lift off locking night covers, 4- inch heavy duty casters. Optional features include wire milk flat racks for use with cardboard trays. 1.1 BLU REFRIGERATION Kairak is committed to producing environmentally friendly and sustainable product offerings without sacrificing quality or reliability. Kairak BLU refrigeration system assures customers maximum energy savings and a substantially smaller environmental footprint. CAUTION: This equipment is intended for storage and/or display of prepackaged or bottled products only! 4401 Blue Mound Rd. Fort Worth, TX Phone: (714) Toll- Free: (800) Fax: (714) KAIRAK, a Division of ITW Food Equipment Group, LLC. All Rights Reserved PAGE 4 REV: 9/2013
5 2 THE SERIAL TAG The serial tag is a permanently affixed label that lists vital electrical and refrigeration data about your specific Kairak product. The model and serial number for your unit is recorded on your serial tag (See Figure 1). The tag is located inside the compressor compartment on all standard KBM models. Prior to installation, test the electrical service to ensure that it agrees with the specifications of the equipment as listed on the unit serial tag. WARNING: Refer to the amperage data on the SERIAL TAG and your local code or the National Electrical Code to be sure the unit is connected to the proper power source. A protected circuit of the correct voltage and amperage must be run for the connection to the unit. 2.1 READING THE SERIAL TAG SERIAL = The permanent identification number of your Kairak Milk Cart MODEL = The model number of your Kairak Milk Cart VOLTS = Voltage your Kairak Milk Cart requires Hz = Cycle PH = Phase TOTAL CURRENT = Maximum amp draw MINIMUM CIRCUIT = Minimum circuit ampacity LIGHTS = Light wattage (if applicable) HEATERS = Heater amperage (if applicable - Hot Food units only) REFRIGERANT = Refrigerant type used DESIGN PRESSURE = High & low side operating pressure AGENCY MARKS = Designates agency listings Figure 1 SAMPLE SERIAL TAG REV: 9/2013 PAGE 5


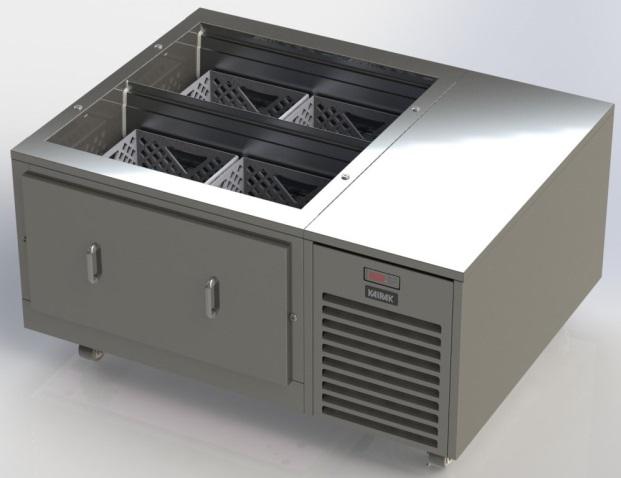
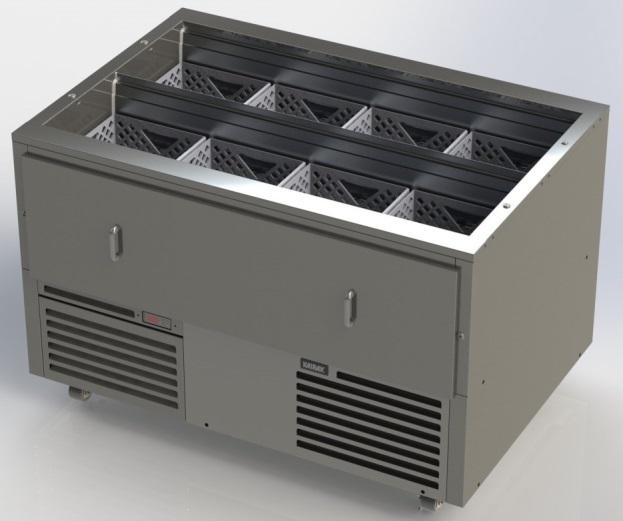
6 3 RECEIVING INSPECTION All Kairak products are factory tested for performance and are free from defects when shipped. The utmost care has been taken in crating your Milk Cart to protect it against damage in transit. Carefully inspect your Kairak Milk Cart for damage that may have occurred during delivery. If damage is detected, you should save all crating materials and make a note on the carrier s Bill of Lading describing the damage. A freight claim should be filed immediately with the freight carrier. If damage is later noted during or immediately after installation, contact the respective carrier and file a freight claim. There is a fifteen (15) day limit to file a freight damage claim with most carriers. Under no condition may a damaged unit be returned to Kairak without first obtaining written permission (return authorization). You may contact Kairak customer care at (800) UNIT SET UP AND ASSEMBLY 4.1 UNPACKING Some components for your Milk Cart are packed and shipped inside the chiller compartment to avoid damage during shipment. 4.2 KEYS Keys are attached to the night cover handle. Remove the keys and unlock the night covers to remove. Store the keys in a safe place. 4.3 NIGHT COVERS For shipment, Night Covers are locked in place on the top of the unit with a keyed locking mechanism standard on all units. During use, the night covers can be locked on the front and back of the unit for storage (See Figure 2 and Figure 3). The night covers are locked in place on top of the unit to secure product and provide energy efficient cooling during the night. KBMH KBML Figure 2 Figure 3 PAGE 6 REV: 9/2013
 833-1106. When using cardboard milk flats in your Milk Cart, place the optional wire racks on the bottom of the chiller compartment.")

7 4.4 WIRE RACK ASSEMBLY (OPTIONAL) NOTE: Wire racks (Optional) are used only with cardboard milk flats. Plastic milk crates do not require any additional equipment. To purchase wire racks contact Kairak parts and service at (800) When using cardboard milk flats in your Milk Cart, place the optional wire racks on the bottom of the chiller compartment. These racks help to maintain an air space between the chiller plates and the cardboard milk flat. (See Figure 4) Figure COMPRESSOR FILTER INSTALLING FILTER KBMH- 34 MODEL ONLY Remove the louvered panel by firmly lifting up and pulling out. Carefully lift the filter over the lower bracket and slide the filter along the side of the compressor compartment making sure the filter frame fits into the track at the top edge until the back frame of the filter is flush against the track at the rear (See Figure 5). Be careful not to catch the filter on any sharp edges when installing. Replace the louvered panel by installing top of panel into track and firmly pushing in the bottom so that the locking clips fit securely inside the slots. SLOT FOR CLIP FILTER LOWER FILTER BRACKET Figure 5 LOCKING CLIPS REV: 9/2013 PAGE 7

 screws (see Figure 6).")
8 4.5.2 INSTALLING FILTER KBMH- 45 AND KBMH- 58 MODELS Using a Phillips screw driver, remove the (2) screws securing the louvered panel in place at the bottom of the unit. Remove the louvered panel and set aside. Carefully lift the filter over the lower bracket and slide the filter along the side of the compressor compartment making sure the filter frame fits into the track at the top edge until the back frame of the filter is flush against the track at the rear. Be careful not to catch the filter on any sharp edges when installing. Replace the louvered panel with the (2) screws (see Figure 6). FILTER LOWER FILTER BRACKET SCREWS Figure INSTALLING FILTER KBML MODELS The filter on the KBML models is located on the right rear of the unit. There are no covers over the access cutout. Locate the access cutout on the rear of the unit and slide the filter into the tracks until it stops. Be careful not to catch the filter on sharp edges when installing. (See Figure 7) FILTER 4.6 GLYCOL LEVELS Figure 7 PAGE 8 REV: 9/2013
 (See Figure 8). A small amount of glycol may spill from tank during shipment.")
9 Remove the louvered access panel that covers the compressor compartment. This is your glycol system. The glycol used is a non- toxic food grade (propylene) glycol. Check the fill tank level to ensure the lever is within the operating range (small plastic tank) (See Figure 8). A small amount of glycol may spill from tank during shipment. Prior to startup, tank should be approximately 1/2 full. Add 35% non- toxic food grade Propylene Glycol if necessary. LABEL ON FILL TANK Figure 8 Reattach access panel. Cut zip- tie securing electrical cord. See Section 5 ELECTRICAL CONNECTIONS before plugging unit into outlet. 4.7 EQUIPMENT PLACEMENT Kairak Milk Carts do not require extra clearance at the back or either side of the unit for operation. 5 ELECTRICAL CONNECTIONS NOTE: Refer to the wiring diagram in this manual 5.1 CORD CONNECTION Plug the unit into a properly sized outlet. See serial tag located inside storage cabinet for circuit sizing requirements. WARNING: THIS UNIT IS PROVIDED WITH A THREE- PRONGED GROUNDING PLUG. THE OUTLET TO WHICH THIS PLUG IS CONNECTED MUST BE PROPERLY GROUNDED. IF THE OUTLET IS NOT THE PROPER GROUNDING TYPE, CONTACT AN ELECTRICIAN BEFORE INSTALLING THE PLUG. WARNING: DO NOT UNPLUG THE UNIT WITH THE SWITCH IN THE ON POSITION REV: 9/2013 PAGE 9

10 6 START UP PROCEDURE Ensure night covers are installed. Check that the plug is properly installed in the outlet. On the front side of the unit remove the louver panel. In the compressor compartment area, flip the main power switch ON. Replace louver panel to cover opening of compressor compartment. Observe the LED Temperature Display located just above the louver panel. (See Figure 9 for the KBMH model or Figure 10 for the KBML model) At start- up, the readout will read HI CAB. This signifies that the temperature is above normal operating range. The reading will alternate every 5 seconds, displaying the glycol liquid temperature. When the liquid temperature cools to 27 F, the unit is ready to load with milk. LED DISPLAY LED DISPLAY Figure 9 Figure 10 WARNING: MAXIMUM LOAD LEVEL TO BE 2 BELOW THE TOP SURFACE OF THE UNIT. 6.1 REFRIGERATION LINES WARNING: REFRIGERATION LINES IN CONDENSING UNIT AREA ARE SHIPPED UNDER PRESSURE. 6.2 CONTROL/TEMPERATURE SETTINGS Kairak BLU milk carts are designed with factory pre- set temperature settings. Temperature settings can only be adjusted by an Authorized Kairak Service Agent. The LED Display is located above the compressor compartment. Contact Kairak Parts and Service at (800) for assistance. PAGE 10 REV: 9/2013
11 7 STORAGE INSTRUCTIONS 7.1 MILK STORAGE Milk can be left in the Milk Cart throughout the night (recommended procedure). Night covers must be installed for overnight storage. This unit is preset at factory and does not require periodic shutdowns for a defrost cycle. This upgraded BLU refrigeration system eliminates the operational burden of removing milk prior to the defrost period or for overnight storage. No defrost cycle means that milk can be consistently cooled 100% of the time, day or night. 7.2 REMOVING MILK AT NIGHT If system runs only during normal working hours and milk needs to be removed from the chiller compartment at night: remove all milk, turn unit off and clean the chiller compartment. (See section 9 MAINTENANCE PROCEDURES for cleaning requirements). To turn the unit off, flip the ON/OFF switch to shut down entire unit. To turn unit back on, follow procedures as outlined in Section 6 START UP PROCEDURE. WARNING: THE NIGHT COVERS MUST ALWAYS BE INSTALLED WHEN MILK IS BEING LEFT IN THE CHILLER COMPARTMENT OVERNIGHT. 8 OPERATION 8.1 CHILLER To insure proper milk temperatures are maintained in the milk cart, the following conditions are recommended. All milk loaded into the milk cart must be less than 41ºF. No direct air blowing on compartment from air conditioning system or other equipment in the kitchen (max air velocity 50 FPM) Room ambient temperatures of 86 or less around working area of the milk cart. All shelving mounted over chiller compartment (with heated equipment above it) must be insulated. No line of sight from radiant heat sources to chiller compartment. 9 MAINTENANCE PROCEDURES WARNING: DISCONNECT ELECTRICAL POWER SUPPLY BEFORE PERFORMING ANY MAINTENANCE OR REPAIRING THE EQUIPMENT REV: 9/2013 PAGE 11


12 9.1 CLEANING CHILLER COMPARTMENT NOTE: The drain on/off valve and the flexible drain tubing are located behind the louver panel in front of the compressor. NOTE: Chiller compartment may be cleaned while still cooled. It is not necessary to wait for the compartment to become room temperature after unplugging from the outlet to clean. Attach the flexible drain tubing and route it to a suitable container or floor drain before opening the drain valve. Use warm water and a mild soap to wipe clean the chiller compartment. NEVER use cleaners containing grit, abrasive materials, bleach or harsh chemicals. Wipe all soap from chiller compartment with clean water. Dry chiller compartment with a clean soft cloth. Always rub in the same direction as the grain pattern on the stainless steel. When finished, CLOSE the drain valve and store the flexible drain tube. Failure to close the drain valve will allow condensate from normal operation or spilled milk to drip onto the floor and cause a potential safety hazard. (See Figure 11 or 12 for your Model) KBML MODELS KBMH MODELS DRAIN VALVE DRAIN VALVE Figure 11 Figure 12 WARNING: THE DRAIN IS A CONDENSATE DRAIN ONLY. DO NOT FLUSH THE UNIT WITH WATER OR CHEMICALS. NEVER USE A HIGH PRESSURE WATER WASH FOR ANY CLEANING PROCEDURE. PAGE 12 REV: 9/2013
13 9.2 CLEANING CONDENSING UNIT The condensing unit coil and filter must be cleaned regularly for optimal performance. The operating environment will affect the required frequency of cleaning however, both the coil and the filter should be cleaned a minimum of once every three months. Air must be able to freely circulate through the condenser. Unit performance and operating efficiency are significantly affected by the amount of air passing through the condenser. Condenser fins that are clogged with dirt and debris greatly reduce airflow and removal of heat. WARNING: FAILURE TO KEEP THE COIL FINS AND THE AIR FILTER CLEAN MAY CAUSE PREMATURE COMPRESSOR FAILURE, WHICH WILL NOT BE COVERED BY WARRANTY WARNING: OPERATING THE KAIRAK MILK CART WITHOUT THE FILTER PROPERLY INSTALLED WILL VOID WARRANTY. All Models: The condensing unit is located behind the louvered panel in the compressor compartment. Remove the louvered panel on the front of the cart by firmly pulling on the bottom of the panel then lifting up and out. Remove the rear access panel located in the back of unit. A Phillips head screwdriver is required to remove rear access panel. Carefully clean all dirt and lint from the condenser coil using a vacuum cleaner or soft brush. Do not use a wire brush to clean the condenser coil. A wire brush will cause damage to the condenser coil. 9.3 CLEANING AIR FILTER KBMH MODELS The filter is located behind the right front louvered access panel. A Phillips head screw driver is required to remove this panel. Remove air filter by carefully sliding out of the tracks. Carefully clean with vacuum or rinse with hot water exercising care not to bend or damage filter frame. Replace the filter and louvered access panel. Reconnect electrical supply. See Section 4.5 COMPRESSOR FILTER for filter removal and replacement procedures. 9.4 CLEANING AIR FILTER KBML MODELS The filter access cutout is on the lower rear of the unit on the right side. There are no covers over the access cutout. Remove the air filter by carefully sliding out of the tracks. Carefully clean the filter with a vacuum or rinse with hot water exercising care not to bend or damage the filter frame. Replace the filter. Reconnect the electrical supply. See Section 4.5 COMPRESSOR FILTER for filter removal and replacement procedures. NOTE: Replacement filters are available through Kairak Parts and Service Department (800) WARNING: THE UNIT MUST NEVER BE OPERATED WITH THE LOUVERED PANEL REMOVED. REV: 9/2013 PAGE 13
14 10 TROUBLESHOOTING GUIDE SYMPTOM POSSIBLE CAUSE RECOMMENDED ACTION No power to unit Plug in unit and check circuit breaker Unit doesn t run Main power switch in OFF position Remove louver panel, reach inside compressor compartment and flip switch to ON position Chiller compartment not maintaining temperature (glycol temperature warmer than 35 F) Chiller compartment overloaded with warm milk (milk temperature above 41 F) Air filter dirty Condenser coil dirty Remove warm milk and replace with properly chilled milk (milk must be colder than 41 F before placement into base cabinet) Clean or replace air filter Clean coil Chiller plates are coated in water and/or ice (thin layer), condensation Normal operation No action required. Condensation on the chiller plates will occur in most kitchen environments. Occasionally, a thin layer of ice may develop for a short period of time Temperature control set below standard factory settings Adjust temperature control to factory settings Chiller plates develop thick (1/8 or more) layer of ice Excessive compressor runtime Clean filter and clean condenser coil if necessary Clear water is dripping from unit Drain valve is open Remove louver panel. Close drain valve SERVICE For additional information, contact Kairak Parts and Service Department: (800) PAGE 14 REV: 9/2013
15 11 TIPS Tips to ensure long life and great performance for Kairak BLU milk carts Make certain air intake filters are cleaned or replaced regularly. Depending on the kitchen environment, this may be a monthly or quarterly procedure. Keep drain strainers clean and in place at all times. Make sure that compressor area covers are in place at ALL times Do not store anything in the compressor area Do not use sharp utensils to clean any parts. Wiping them down daily ensures easy cleaning. Make certain that casters get wiped down regularly, if they get clogged with grease, they will eventually flat spot and fail. Do not place trash receptacles or any other solid object in front of compressor areas; air flow is needed for proper breathing. Beware of conditions that hinder cooler operation. Items such as shelving with heat lamps above refrigerated rail and adjacent cooking equipment may radiate heat which could hinder the milk cart performance. Airflow, typically from a ventilation system, may dramatically increase milk temperature. These elements should be minimized to ensure proper holding temps. Carefully monitor milk temperatures. Milk must be below 41 F before loading into milk cart. Control display shows glycol temperature not milk temperature. REV: 9/2013 PAGE 15
16 12 MIT CONTROLS PAGE 16 REV: 9/2013
17 REV: 9/2013 PAGE 17
18 PAGE 18 REV: 9/2013

19 REV: 9/2013 PAGE 19
20 PAGE 20 REV: 9/2013
21 13 WIRING DIAGRAM REV: 9/2013 PAGE 21
22 14 PARTS LIST 14.1 KBMH- 34 ITEM NO. PART NUMBER DESCRIPTION 1 SK- KBM- KEY KIT, LOCK CYLINDER 2 SK- NCVR- BK101 ASSY NIGHT COVER, L/O, MILK CART 34 3 SK- KBMH- DRAIN KIT, DRAIN ASSY, MILK CART HIGHPROFILE AIR FILTER 5 SK- KBM34-4 KIT, WIRE RACK, MILK CART 34 (OPTIONAL) 6 SK KIT, CASTER, SWIVEL W/BRAKE STD 7 SK KIT, CASTER, SWIVEL STD 8 SK KIT, LOUVER TOP RAIL, MILK CART HIGHPROFILE 9 SK KIT, LOUVER PANEL BCK, MILK CART 34 HIGHPROFILE 10 SK KIT, SIDE PANEL HL/HR, MILK CART HIGHPROFILE 11 LUVR- KBMH- 34 ASSY LOUVER DOOR, MILK CART 34 HIGHPROFILE PAGE 22 REV: 9/2013
23 14.2 KBMH- 45 ITEM NO. PART NUMBER DESCRIPTION 1 SK- KBM- KEY KIT, LOCK CYLINDER 2 SK- NCVR- BK087 ASSY NIGHT COVER, L/O, MILK CART 45 3 LUVR- KBMH ASSY LOUVER DOOR, MILK CART HIGHPROFILE 4 SK- KBMH- DRAIN KIT, DRAIN ASSY, MILK CART HIGHPROFILE AIR FILTER 6 SK- KBM45-6 KIT, WIRE RACK, MILK CART 45 (OPTIONAL) 7 SK KIT, CASTER, SWIVEL W/BRAKE STD 8 SK KIT, CASTER, SWIVEL STD 9 SK KIT, LOUVER PANEL FRT HR, MILK CART 45 HIGHPROFILE 10 SK KIT, LOUVER PANEL CK, MILK CART 45 HIGHPROFILE 11 SK KIT, SIDE PANEL HL/HR, MILK CART HIGHPROFILE 12 SK EXT BTM LOUVER TOP TRAIL, MILK CART HIGHPROFILE REV: 9/2013 PAGE 23
24 14.3 KBMH- 58 ITEM NO PART NUMBER DESCRIPTION 1 SK- KBM- KEY KIT, LOCK CYLINDER 2 SK- NCVR- BK086 ASSY NIGHT COVER, L/O, MILK CART 58 3 LUVR- KBMH ASSY LOUVER DOOR, MILK CART HIGHPROFILE 4 SK- KBMH- DRAIN KIT, DRAIN ASSY, MILK CART HIGHPROFILE AIR FILTER 6 SK- KBM58-8 KIT, WIRE RACK, MILK CART 58 (OPTIONAL) 7 SK KIT, CASTER, SWIVEL W/BRAKE STD 8 SK KIT, CASTER, SWIVEL STD 9 SK KIT, LOUVER PANEL FRT HR, MILK CART 58 HIGHPROFILE 10 SK KIT, LOUVER PANEL BCK, MILK CART 58 HIGHPROFILE 11 SK KIT, SIDE PANEL HL/HR, MILK CART HIGHPROFILE 12 SK EXT BTM LOUVER TOP TRAIL, MILK CART HIGHPROFILE PAGE 24 REV: 9/2013
25 14.4 KBML- 51 ITEM NO. PART NUMBER DESCRIPTION 1 SK- KBM- KEY KIT, LOCK CYLINDER 2 SK- NCVR- BK101 ASSY NIGHT COVER, L/O, MILK CART 34 3 LUVR- KBML LOUVER DOOR ASSY, MILK CART LOWPROFILE 4 SK- KBML- DRAIN KIT, DRAIN ASSY, MILK CART LOWPROFILE FILTER, 14 3/8 X 29 1/4 X 1/4 6 SK- KBM34-4 KIT, WIRE RACK, MILK CART 34 (OPTIONAL) 7 SK KIT, CASTER, SWIVEL W/BRAKE STD 8 SK KIT, CASTER, SWIVEL STD 9 SK KIT, EXT BACK, COND SYS, MILK CART LOWPROFILE REV: 9/2013 PAGE 25
26 14.5 KBML- 62 ITEM NO PART NUMBER DESCRIPTION 1 SK- KBM- KEY KIT, LOCK CYLINDER HUDSON 2 SK- NCVR- BK087 ASSY NIGHT COVER, L/O, MILK CART 45 3 LUVR- KBML LOUVER DOOR ASSY, MILK CART LOWPROFILE 4 SK- KBML- DRAIN KIT, DRAIN ASSY, MILK CART LOWPROFILE FILTER, 14 3/8 X 29 1/4 X 1/4 6 SK- KBM45-6 KIT, WIRE RACK, MILK CART 45 (OPTIONAL) 7 SK KIT, CASTER, SWIVEL W/BRAKE STD 8 SK KIT, CASTER, SWIVEL STD 9 SK KIT, EXT BACK, COND SYS, MILK CART LOWPROFILE PAGE 26 REV: 9/2013
27 14.6 KBML- 75 ITEM NO. PART NUMBER DESCRIPTION 1 SK- KBM- KEY KIT, LOCK CYLINDER HUDSON 2 SK- NCVR- BK086 ASSY NIGHT COVER, L/O, MILK CART 58 3 LUVR- KBML LOUVER DOOR ASSY, MILK CART LOWPROFILE 4 SK- KBML- DRAIN KIT, DRAIN ASSY, MILK CART LOWPROFILE FILTER, 14 3/8 X 29 1/4 X 1/4 6 SK- KBM58-8 KIT, WIRE RACK, MILK CART 58 (OPTIONAL) 7 SK KIT, CASTER, SWIVEL W/BRAKE STD 8 SK KIT, CASTER, SWIVEL STD 9 SK KIT, EXT BACK, COND SYS, MILK CART LOWPROFILE REV: 9/2013 PAGE 27
28 14.7 KBMH- DRAIN ASSEMBLY ITEM NO PART NUMBER DESCRIPTION QTY ADAPTER, BARBED X MALE 3/4-14 NPT NIPPLE, PVC 3/4-14 NPT 3" TUBING, 3/4 ID X 7/8 OD, CLEAR 6 FT VALVE, BALL, 3/4" THREADED PVC, SCH 40 1 PAGE 28 REV: 9/2013
29 14.8 KBML- DRAIN ASSEMBLY ITEM NO PART NUMBER DESCRIPTION QTY VALVE, BALL, 3/4" THREADED PVC SCH ADAPTER, BARBED X MALE 3/4-14 NPT ADAPTOR, BARBED X MALE 3/4-14 NPT 90 ELBOW ADAPTOR, 90 ELBOW PVC, FEMALE 3/4 NPT ENDS TUBING, CLEAR, ¾ ID X 7/8 OD 1.5 FT TUBING, CLEAR, ¾ ID X 7/8 OD 6 FT REV: 9/2013 PAGE 29

30 14.9 CONDENSOR CONTROLS ASSEMBLY ITEM NO PART NUMBER DESCRIPTION QTY COND. UNIT, 3/4 HP TOGGLE SWITCH 20A 1.5 HP DPST DRIER, FILTER SOLENOID VALVE 120/ /4 O.D CORDSET, 20A 5-20P RELAY HYBRID W/SURGE DAMPER RELAY MODULE MIT II 110VAC HARNESS MIT II TO RELAY MODULE SENSOR GREEN CABINET TEMP 48 INCH SENSOR YELLOW LIQUID LINE 48 INCH SENSOR BLUE COIL TEMP 48 INCH BLU MIT PROTOTYPE HARNESS PRESSURE CONTROL,W/FLAIR CONNECTION HARNESS, BLU JJ COMPRESSOR CORD QUENCHARC HARNESS, BLU JJ SOLENOID CORD 1 PAGE 30 REV: 9/2013 5
 1 3 358-10051- 00 CAP EXPANSION TANK 1 4 2400725 VALVE, BALL 1/2 UNION END W/SS T- HANDLE 1")
31 14.10 GLYCOL ASSEMBLY ITEM NO PART NUMBER DESCRIPTION QTY HEAT EXCHANGER TANK EXPANSION (FILL) CAP EXPANSION TANK VALVE, BALL 1/2 UNION END W/SS T- HANDLE PUMP, CIRCULATION ADAPTER, 5/8 X 1/2 1 REV: 9/2013 PAGE 31


32 14.11 VALVE 1 ITEM NO PART NUMBER DESCRIPTION QTY TXV, I- 1/4", O- 3/8" MIT CONTROLS 1 ITEM NO PART NUMBER DESCRIPTION QTY ASSEMBLY CONTROL HEAD MIT II ES 1 PAGE 32 REV: 9/2013
33 15 WARRANTIES Kairak s warranty coverage warrants that Kairak- branded products are free of defects in materials and factory workmanship. The following applies to all Kairak Model and Serial numbers. Kairak s warranty is extended only to the original purchaser and shall not apply to any failures resulting from damage in transit, improper installation, alteration, normal wear, misuse, abuse, improper voltage, accident or negligence. The warranty excludes; T- stat adjustments, time clock adjustments, gaskets, cutting boards, filters, clogged drains, ice build- up with no mechanical failures, and the loss of contamination of food due to mechanical or electrical failure. Warranty does not apply outside the United States. In order to be covered under this warranty, prior authorization to perform the necessary and appropriate service must be obtained from the factory. Model and Serial number must be provided at the time of service request. Kairak does not assume responsibility for any expenses, including labor, parts or travel expenses incurred without such prior authorization. Kairak shall not be liable, whether in contract or in tort or under any other legal theory for loss of use, revenue or profit, substitute use or performance, incidental, indirect or special and/or consequential damages, loss of refrigerant or for any other loss or cost of similar type. Such related charges will be back charged to the responsible party. The decision of the Kairak Service and Warranty, as to whether a defect is within the terms of this warranty shall be final. Failure to object or provision contained in a customer s purchase order or other communication shall not be deemed as a waiver of terms or conditions of their warranty, nor shall it be considered acceptance of such provisions. This warranty supersedes and is in lieu of all other warranties, expressed or implied and of other obligations of liabilities, on the part of Kairak. In case of freight damage, do not refuse shipment, but call agent s attention to its condition, making careful note of the details on freight bill before freight charges are paid. File claim for damages with freight agent immediately. BLU fixtures manufactured by Kairak hold a 3- year parts and labor warranty. Kairak holds a 5- year compressor warranty, with a one- time compressor only replacement after the first year. Kairak will warranty the labor to replace the compressor for the first three years, 30 days from the ship date. After the first three years, labor, tax, shipping and miscellaneous parts will not be included. Please contact our warranty department for compressor replacement procedures during the warranty period. BLU remote Fixtures are designed to operate with Kairak remote systems only. Violation of these terms will void all warranty. Refrigerant fixtures manufactured by Kairak hold a 1- year parts and labor warranty. Kairak holds a 5- year compressor warranty, with a one- time compressor only replacement after the first year. Kairak will warranty the labor to replace the compressor for the first year, 30 days from the ship date. After the first year, labor, tax, shipping and miscellaneous parts will not be included. Please contact our warranty department for compressor replacement procedures during the warranty period. Remote systems manufactured by Kairak hold a 1- year parts and 90- day labor warranty on the remote system, with an option to purchase 1- year labor warranty at the time of purchase order receipt. This warranty does not apply to motors, switches, controls, accessories or parts manufactured by others and purchased by Kairak, unless the manufacturer warranties the same to Kairak. Kairak holds a 5- year compressor warranty, with a one- time compressor only replacement after the first year. Kairak will warranty the labor to replace the compressor for the first year, 30 days from the ship date. After the first year, labor, tax, shipping and miscellaneous parts will not be included. Please contact our warranty department for compressor replacement procedures during the warranty period. To request authorized service, call the Kairak Service and Warranty Hotline: (800) After- hour requests must be urgent in nature and documented with Kairak s after- hours service line prior to service being performed. Kairak is responsible for straight time only, unless otherwise approved by the warranty department. REV: 9/2013 PAGE 33
34 NOTES: PAGE 34 REV: 9/2013
35 NOTES: REV: 9/2013 PAGE 35
36 4401 Blue Mound Rd, Fort Worth, TX Phone: (714) KAIRAK, a division of ITW Food Equipment Group LLC. All Rights Reserved
INSTRUCTION MANUAL KBD DROP-IN PAN CHILLER
 INSTRUCTION MANUAL KBD DROP-IN PAN CHILLER INSTRUCTION MANUAL KBD SELF CONTAINED AND REMOTE MODELS BLU TECHNOLOGY Kairak BLU refrigeration Drop-in Pan Chillers are designed to provide consistent, uniform
InstructIon Manual KrEs EQuIPMEnt stands
 Instruction Manual Instruction Manual SELF-CONTAINED AND REMOTE Kairak KRES model refrigerated equipment stand units are available in many lengths from 36 to 120 inches long. These units are available
InstructIon Manual KBP PrEP table
 Instruction Manual KBP INSTRUCTION MANUAL KBP S SELF CONTAINED AND REMOTE MODELS BLU TECHNOLOGY S Kairak BLU refrigeration prep tables are designed to provide consistent, uniform cooling to each individual
INSTRUCTION MANUAL EQUIPMENT STAND
 INSTRUCTION MANUAL 2-Drawer Models KE036, KE048 & KE060 4-Drawer Models KE065, KE072 & KE084 6-Drawer Models KE096, KE110 & KE125 8-Drawer Model KE139 KAIRAK. 4401 Blue Mound Rd., Fort Worth, TX 76106
REFRIGERATED DROP-INS (2-6)FT-DI Installation and Operating Manual
FT-DI Installation and Operating Manual") REFRIGERATED DROP-INS (2-6)FT-DI Installation and Operating Manual For service information call 800-544-3057 Please have the following information available before calling. Information can be found on
REFRIGERATED DROP-INS (2-6)FT-DI Installation and Operating Manual For service information call 800-544-3057 Please have the following information available before calling. Information can be found on
ref. com Owner s Manual for models: A Step Above the Standard Thank you for choosing EVEREST
 www.everest ref. com Owner s Manual for models: Back Bar Coolers " Deep Back Bar Coolers Glass Door Back Bar Coolers " Deep Galss Door Back Bar Coolers " Deep Galss Sliding Door Back Bar Coolers EBB3,
RPI Industries, Inc.
 IMPORTANT: THE FOLLOWING INFORMATION SHOULD BE RETAINED FOR FUTURE REFERENCE RPI Industries, Inc. building a better case for sales BAKERY and DELI USE AND SERVICE MANUAL WARRANTY INFORMATION SPECIFICATIONS
RPI Industries, Inc.
 RPI Industries, Inc. AIR SCREEN and SELF-SERVE OPERATION AND SERVICE MANUAL WARRANTY INFORMATION For Models Stratus SCRFC48R-SSI SCRFC60R-SSI SCRFC72R-SSI SCRFC48R-SSII SCRFC72R-SSII SCRFC48R-SSIII SCRFC72R-SSIII
OWNER S MANUAL. Installation Operation Maintenance. Saturn Equipment
 OWNER S MANUAL Saturn Stainless Steel Sandwich/Salad Table & Mega Top Refrigerators Undercounter Refrigerators & Undercounter Freezers Installation Operation Maintenance Saturn Equipment www.saturnequipment.com
Horizontal Bottle Cooler Installation and Operation Manual
 Speeds Up the Pace of Innovation Horizontal Bottle Cooler Installation and Operation Manual Please read this manual completely before attempting to install or operate this equipment! TBC-50SD, 50SB/ TBC-95SD,
Quality Refrigeration OWNER S MANUAL. Instructions for the installation, operation and maintenance of Traulsen: Heated Banquet & Transport Carts
 Quality Refrigeration OWNER S MANUAL Instructions for the installation, operation and maintenance of Traulsen: Heated Banquet & Transport Carts This Traulsen unit is built to our highest quality standards.
Service Manual Models CPH2 & CPH3
 Plate Heater Service Manual Models CPH2 & CPH3 888-892-2213 alluserv.com Plate Heater Service Manual Models CPH2 & CPH3 Table of Contents Introduction...................................................2
OPERATING INSTRUCTIONS
 OPERATING INSTRUCTIONS SPECIALTY REFRIGERATED TRANSPORT CABINETS FOR SATELLITE LOCATIONS RBQ-96 Caution: Read the instructions before using the machine. CONGRATULATIONS......and thank you for purchasing
Turbo Air Speed up the Pace of Innovation TBB-4SB CAUTION! PLEASE KEEP POWER SWITCH ON BEFORE OPERATING THIS EQUIPMENT
 Turbo Air Speed up the Pace of Innovation CAUTION! PLEASE KEEP POWER SWITCH ON BEFORE OPERATING THIS EQUIPMENT Underbar Equipment Back Bars Installation and Operation Manual Please read this manual completely
Milk Coolers Installation and Operation Manual Please read this manual completely before attempting to install or operate this equipment!
 Turbo Air Speed up the Pace of Innovation CAUTION! PLEASE KEEP POWER SWITCH ON BEFORE OPERATING THIS EQUIPMENT Milk Coolers Installation and Operation Manual Please read this manual completely before attempting
CWR265SZ 26 Bottle Built-in Wine Cooler Owner s Manual
 CWR265SZ 26 Bottle Built-in Wine Cooler Owner s Manual This owner s manual provides instructions on safe installation use, and troubleshooting assistance. Please read it carefully and save it for reference
POLAR TEMP FARM MORTALITY UNIT OPERATION MANUAL
 POLAR TEMP FARM MORTALITY UNIT OPERATION MANUAL www.polartemp.com TABLE OF CONTENT Disclaimer.......................................... Page 3 Inspection, unpacking and FMU setup.................. Page
Wax Base Heater & Dispenser
 Wax Base Heater & Dispenser Service Manual Models: IDWB2/0900, IDWB2/0775, IDWB3/0900, IDWB3/0775, IDWB4/0900, IDWB4/0775 Introduction............................................................................
RPI Industries, Inc.
 IMPORTANT: THE FOLLOWING INFORMATION SHOULD BE RETAINED FOR FUTURE REFERENCE RPI Industries, Inc. building a better case for sales CONFECTIONERY USE & SERVICE MANUAL WARRANTY INFORMATION For Models Bradford
Professional Warming Drawer and Warming Drawer Cabinet
 Professional Warming Drawer and Warming Drawer Cabinet Care & Use/Installation Instructions Models: (C)VQEWD5300SS (C)VQEWD5420SS IMPORTANT SAFETY INSTRUCTIONS WARNING: Read this manual carefully and completely
DH07, DH07A /DH08, DH08A CONVECTED AIR DISH HEATERS
 DH07, DH07A /DH08, DH08A CONVECTED AIR DISH HEATERS DH07 shown INSTALLATION, OPERATION & MAINTENANCE MANUAL Manual P/N 92448 Rev. G 04/02/2009 Copyright 1998 Aladdin Temp-Rite Changes may be made to the
BLAST CHILLER / SHOCK FREEZER MODEL AP3BCF30-1
 REV. D Cooler is Better! TM USER S MANUAL BLAST CHILLER / SHOCK FREEZER MODEL AP3BCF30-1 American Panel Corporation 5800 S.E. 78th Street, Ocala, Florida 34472-3412 Phone: (352) 245-7055 Fax: (352) 245-0726
Blue Air. Commercial Refrigeration Inc. Installation & Operation Manual Ice Cream Freezers
 Blue Air Commercial Refrigeration Inc. Installation & Operation Manual Ice Cream Freezers Please read this manual completely before installing or operating this unit! BACF11 BACF15 BACRF14 Blue Air reserves
Installation & Operation Manual Ice Cream Freezers
 Installation & Operation Manual Ice Cream Freezers Please read this manual completely before installing or operating this unit! BACF11 BACF15 Blue Air reserves the right to make product modification at
MODEL 925W FEATURES: ELECTRICAL DATA: DIMENSIONS: SHIPPING INFORMATION: FOOD WARMING/ MERCHANDISING CABINET
 FOOD WARMING/ MERCHANDISING CABINET MODEL 925W This warmer/merchandiser provides heated circulating air to keep foods fresh and evenly warmed. It is constructed of stainless steel and tempered glass for
OPERATING INSTRUCTIONS
 OPERATING INSTRUCTIONS MOBILE HEATED DISH CABINET TM HDC Series Stores, heats, and holds dishes. CONGRATULATIONS... HDC-252-I Heated model shown with flip back top opened....and thank you for purchasing
This manual describes how to operate and care for your appliance to get the best, most efficient, performance. READ THIS BOOK!
 STANDARD LABORATORY REFRIGERATORS ABT-10B, ABT-12B, ABT-19B, ABT-23B, ABT-26B, ABT-33B, ABT-35B, ABT-37B, ABT-41B, ABT-45B, ABT-47B, ABT-49B, ABT-69B, ABT-72B, ABT-30RG OWNER S INSTRUCTIONS This manual
A910.8A Remote Water Chiller, 8 GPH A A / A A-220V TECHNICAL ASSISTANCE TOLL FREE TELEPHONE NUMBER:
 Remote Water Chiller, 8 GPH A9100080-A / A9100080-A-220V TECHNICAL ASSISTANCE TOLL FREE TELEPHONE NUMBER: 1.800.591.9360 Technical Assistance Fax: 1.626.855.4894 NOTES TO INSTALLER: 1. Please leave this
INSTALLATION AND OPERATING MANUAL
 INSTALLATION AND OPERATING MANUAL Refrigerated Merchandisers with Air-Over Displays Refrigerated Low-Profile Mobile Merchandiser Refrigerated High-Profile Mobile Merchandiser Refrigerated Grab-N-Go Merchandiser
RPI Industries, Inc.
 RPI Industries, Inc. AIR SCREEN and SELF-SERVE OPERATION AND SERVICE MANUAL WARRANTY INFORMATION For Models Olympus Bandit Bravo SCAS36R SCRFC3660R SCRFC3648R SCAS48R SCRFC4860R SCRFC4848R SCAS60R SCRFC6060R
ELECTRICAL DATA: FEATURES: SHIPPING INFORMATION: FOOD WARMING/ MERCHANDISING CABINET. 15 Width 7 Width
 FOOD WARMING/ MERCHANDISING CABINET MODEL 323HH MODEL 323HH-7 15 Width 7 Width With the ability to hold a point-of-purchase advertisement, these sleek, compact warmers are sure to draw eye catching attention.
User Manual. Commercial School Milk Cooler User s Manual. Commercial School Milk Coolers: MC34, MC49, MC58
 Commercial School Milk Cooler User s Manual Commercial School Milk Coolers: MC34, MC49, MC58 12/2015 Please read the manual thoroughly prior to equipment set-up, operation and maintenance. - 1 - Exploded
User Manual / Installation Instructions
 User Manual / Installation Instructions Outdoor Refrigerator MODEL: L24REF Lynx Professional Grills 5895 Rickenbacker Rd., Commerce, CA 90040 Service: (888) 289-5969 Tel: (323) 838-1770 Fax: (323) 838-1778
Xaact Spot. Xaact Hot Spot
 Xaact Spot & Xaact Hot Spot INFORMATION & OPERATING INSTRUCTIONS READ AND UNDERSTAND THESE INSTRUCTIONS BEFORE OPERATING THE MACHINE 78-00012 Rev. 101211 1 CONTENTS: Machine Specifications............
SERIES NAV S Display Merchandisers
 SERIES NAV S Display Merchandisers Medium Temperature Merchandisers PLEASE READ THIS MANUAL BEFORE USING THE PRODUCT Installation & Operation Manual P/N 2400204D NAV S Series May 2006 HUSSMANN CORPORATION
SPA BLOWER OWNER'S MANUAL XXXX, XXXX, XXXX, XXXX, XXXX, XXXX fax
 SPA BLOWER OWNER'S MANUAL 80015-XXXX, 80016-XXXX, 80017-XXXX, 80018-XXXX, 80019-XXXX, 80020-XXXX fax 888.610.3839 2015 323300-015 6/15 THIS PAGE INTENTIONALLY LEFT BLANK. 2 Operating Instructions and Parts
Refrigerator Freezer Installation and Operation Manual
 Speeds Up the Pace of Innovation CAUTION! Refrigerator Freezer Installation and Operation Manual PLEASE KEEP POWER SWITCH ON BEFORE OPERATING THIS EQUIPMENT Please read this manual completely before attempting
UNDERCOUNTER REFRIGERATORS AND FREEZERS Installation, Operation and Maintenance Instructions
 UNDERCOUNTER REFRIGERATORS AND FREEZERS Installation, Operation and Maintenance Instructions Please read this manual completely prior to installing and operating this equipment. This manual describes how
MAXUM 5 5 Gallon Box Extractor
 MAXUM 5 5 Gallon Box Extractor INTRODUCTION OPERATING & MAINTENANCE INSTRUCTIONS This operator s book has important information for the use and safe operation of this machine. Read this book carefully
DIRECT DRAW BEER COOLERS Installation, Operation and Maintenance Instructions
 DIRECT DRAW BEER COOLERS Installation, Operation and Maintenance Instructions INSPECTION When the equipment is received, all items should be carefully checked against the Bill of Lading to ensure all crates
Table of Contents Welcome and Thank You Note:
 TWR210EBL/TWR215ESS TWR320EBL/TWR325ESS Thermoelectric Wine Cooler Owner s Manual This owner s manual provides instructions on safe installation, use, and maintenance. Please read it carefully and save
REFRIGERATED PREP TABLES Installation, Operation and Maintenance Instructions
 REFRIGERATED PREP TABLES Installation, Operation and Maintenance Instructions Please read this manual completely prior to installing and operating this equipment. This manual describes how to install,
OPERATIONS MAINTENANCE MANUAL
 OPERATIONS MAINTENANCE MANUAL COOK & HOLD OVEN SYSTEMS WITTCO MODEL NUMBERS 1300-AD-SS 1300-AD-SS-SPLIT LIMITED WARRANTY Wittco warrants the Products that it manufactures to be free from defects in materials
ref. com Owner s Manual for models: A Step Above the Standard Thank you for choosing EVEREST
 www.everest ref. com Owner s Manual for models: Back Mount Sandwich Prep. Tables Drawered Sandwich Prep. Tables Sandwich Prep. Tables (mega-top) Back Mount Open top Prep. Tables Side Mount Sandwich Prep.
Model 2016, 2025, 2025BN, 2025ST Staging Cabinets Instruction Manual
 Model, 2025BN, 2025ST Staging Cabinets Instruction Manual Part No 53021 Revised: March 2010 Cincinnati, OH 45241-4807 USA SAFETY PRECAUTIONS Staging Cabinet Installation Instructions Inspection of Shipment:
CLIMAGUARD Air-to-Air Outdoor Heat Exchangers INSTRUCTION MANUAL. Rev. H 2015 Pentair Equipment Protection P/N
 CLIMAGUARD Air-to-Air Outdoor Heat Exchangers TX23, TX33, TX38, TX52 Model INSTRUCTION MANUAL Rev. H 2015 Pentair Equipment Protection P/N 10-1008-221 87976519 TABLE OF CONTENTS RECEIVING THE HEAT EXCHANGER...3
Operation Manual and Parts Directory
 Operation Manual and Parts Directory ST24, ST36, ST48, ST60, ST72 and ST96 Slide Top Coolers ST36-B ST48-SF Glastender, Inc. 5400 North Michigan Road Saginaw, MI 48604-9780 800.748.0423 989.752.4275 Fax
INSTALLATION & OPERATING INSTRUCTIONS MODEL #17900 KEGERATOR MANUAL
 INSTALLATION & OPERATING INSTRUCTIONS MODEL #17900 KEGERATOR MANUAL TABLE OF CONTENTS PAGE # SAFETY INSTRUCTIONS......... 2 INSTALLATION INSTRUCTIONS................... 3 CABINET LOCATION GUIDELINES...
TABLE OF CONTENTS. Safety Information...3. Installation Instructions...4. Reverse Refrigerator Door...5. Care and Maintenance... 9
 AB13582 TABLE OF CONTENTS Safety Information..........3 Installation Instructions.........4 Reverse Refrigerator Door.........5 Care and Maintenance.... 9 Troubleshooting.....11 Technical Data and Wiring
Panel Mounted Heat Exchangers by Dantherm, Inc.
 Panel Mounted Heat Exchangers by Dantherm, Inc. PRODUCT INFORMATION MANUAL C0028 003 Pinnacle OM Manual Rev AB Page 1 of 14 Dantherm, Inc. 110 Corporate Drive, Suite K Spartanburg, SC 29303 Tel # +1 864
OCH-SS series Direct Wired Units Indoor * and Outdoor Comfort Heaters
 1200 North Main Street Fostoria, OH 44830 Phone: 800-495-4525 Fax: 419-435-0842 A DIVISION OF www.fostoriaindustries.com OCH-SS series Direct Wired Units Indoor * and Outdoor Comfort Heaters *EXCLUDING
Instruction Manual. Nacho Cheese Dispenser and Warmer
 Instruction Manual Nacho Cheese Dispenser and Warmer 10700 Medallion Drive, Cincinnati, Ohio 45241-4807 USA 2013 Gold Medal Products Co. Part No. 36060 SAFETY PRECAUTIONS Page 2 INSTALLATION INSTRUCTIONS
Power Pack Service Manual
 Power Pack Service Manual MMPP4301-EP MMPP4301 MMPP4301-PKG MMPP4302 MMPP4302-PKG MMPP4305-PKG MMPP4301-WC MMPP4302-WC MMPP4305-PKG-WC www.micromatic.com 1 TABLE OF CONTENTS Equipment Specifications...
INSTALLATION AND OPERATING MANUAL
 INSTALLATION AND OPERATING MANUAL Refrigerated Cases with Air-Over Displays Refrigerated High Profile Grab-N-Go FOR PARTS & SERVICE Contact: Piper Products, Inc. Phone: (800) 544-3057 Ask for Service Department
UNDERCOUNTER LABORATORY REFRIGERATORS and FREEZERS Installation, Operation and Maintenance Instructions
 UNDERCOUNTER LABORATORY REFRIGERATORS and FREEZERS Installation, Operation and Maintenance Instructions INSPECTION When the equipment is received, all items should be carefully checked against the bill
Owner s Manual Refrigerated Compressed Air Dryers Model F-100
 Owner s Manual Refrigerated Compressed Air Dryers Model F-100 Read carefully before attempting to assemble, install, operate or maintain the product described. Protect yourself and others by observing
Intelligent Electronic Enclosure Thermal Management Systems
 Intelligent Electronic Enclosure Thermal Management Systems IQ27000V OPERATION AND INSTALLATION MANUAL *** IMPORTANT *** PLEASE READ this manual and follow the instructions for safe and satisfactory installation
INSTALLATION AND OPERATING MANUAL
 INSTALLATION AND OPERATING MANUAL Refrigerated Island Merchandiser FOR PARTS & SERVICE Contact: Piper Products, Inc. Phone: (800) 544-3057 Ask for Service Department IMPORTANT! This manual contains important
Power Pack Service Manual
 Power Pack Service Manual MMPP4301-EP MMPP4301 MMPP4301-WC MMPP4301-PKG MMPP4301-PKG-WC MMPP4302 MMPP4302-WC MMPP4302-PKG MMPP4302-PKG-WC MMPP4303-PKG MMPP4303-PKG-WC MMPP4303-PKG-3 MMPP4305-PKG MMPP4305-PKG-WC
CNH12LP CNH28 CNH40 CNH28LPC
 CRISP N HOLD FRIED FOOD HOLDING CABINET COUNTER-TOP MODELS: CNH14, CNH14XD, CNH18, CNH18XD, CNH28, CNH28LPC, CNH28XD CNH40 DROP-IN MODELS: CNH12LP, CNH18LP & CNH28LP OWNERS / OPERATORS MANUAL MANUFACTURED
Cincinnati, OH USA
 Heated Portion Pack Display Case Instruction Manual Model #5580BV1, Model #5588 and Model #5581 Part No. 74797 Revised April 2000 Cincinnati, OH 45241-4807 USA e-mail: goldme19@eos.net www.gmpopcorn.com
Ui REFRIGERATOR SPEC SHEET
 Ui REFRIGERATOR SPEC SHEET ISOMETRIC VIEW 19 7/8 20 1/2 32 3/4 FRONT VIEW NOTES: 1. CUTOUT DIMENSIONS: 20 1/2"W X 33"L X 20 3/4"D 2. CUTOUT DIMENSIONS ARE FOR REFRIGERATOR ONLY. REFER TO STAINLESS STEEL
5300, 5300CH, 5300EX, 5300FN
 Part No. 36060 Revised APRIL 2008 5300, 5300CH, 5300EX, 5300FN Instruction Manual SAFETY PRECAUTIONS FORWARD This manual covers the model # 5300, 5300FN, 5300CH & 5300EX NACHO CHEESE DISPENSER. You can
HOT DOG STEAMER Instruction Manual Models: 8007 & 8012
 Part No. 87202 Revised: November 2005 HOT DOG STEAMER Instruction Manual Models: 8007 & 8012 Model # 8012 Shown Cincinnati, OH 45241-4807 USA SAFETY PRECAUTIONS 2 Model# 8007 & 8012 INSTALLATION INSTRUCTIONS
Part No Revised January 30, 2007 SAFETY PRECAUTIONS
 DUAL ZONE STAGING CABINET Instruction Manual Part No. 44406 Revised January 30, 2007 SAFETY PRECAUTIONS SAFETY PRECAUTIONS INTRODUCTION This manual covers the model #2856. The unit is designed to provide
BACK BAR REFRIGERATION Installation, Operation and Maintenance Instructions
 BACK BAR REFRIGERATION Installation, Operation and Maintenance Instructions INSPECTION When the equipment is received, all items should be carefully checked against the Bill of Lading to ensure all crates
Owner s Manual Refrigerated Compressed Air Dryers Models F-200, 250, 300 & F350
 Owner s Manual Refrigerated Compressed Air Dryers Models F-200, 250, 300 & F350 Read carefully before attempting to assemble, install, operate or maintain the product described. Protect yourself and others
ICE CREAM TOPPING CABINETS REFRIGERATOR or FREEZER Installation, Operation and Maintenance Instructions
 ICE CREAM TOPPING CABINETS REFRIGERATOR or FREEZER Installation, Operation and Maintenance Instructions INSPECTION When the equipment is received, all items should be carefully checked against the bill
INSTRUCTIONN MANUAL. for Angle Curved MMF9106 MMF9109 MMF9112
 INSTRUCTIONN MANUAL for Angle Curved Top Chest Freezer MMF9106 MMF9109 MMF9112 Please read this user s manual thoroughly before using. Keep this manual handy for further reference. Email: Service@atosausa.com
Cincinnati, OH USA
 Heated Portion Pack Display Case Instruction Manual Model #5580BV1, Model #5588 and Model #5581 Part No. 74797 Revised April 2000 Cincinnati, OH 45241-4807 USA e-mail: goldme19@eos.net www.gmpopcorn.com
PROAIR Air Conditioner. CR23 Model INSTRUCTION MANUAL nvent Rev. D P/N
 PROAIR Air Conditioner CR23 Model INSTRUCTION MANUAL Rev. D P/N 89112522 TABLE OF CONTENTS Warranty and Return Policy...2 RECEIVING THE AIR CONDITIONER...3 HANDLING AND TESTING THE AIR CONDITIONER...3
Refrigerator Freezer Installation and Operation Manual
 Speeds Up the Pace of Innovation CAUTION! PLEASE KEEP POWER SWITCH ON BEFORE OPERATING FREEZER Refrigerator Freezer Installation and Operation Manual Please read this manual completely before attempting
IW-25-2 Dehumidifier Installation & Operations. Manual
 IW-25-2 Dehumidifier Installation & Operations Installation and Operation Manual Manual IW-25-1 Dehumidifier Please Read and Save These Instructions Please Read and Save These Instructions Innovative Dehumidifier
INSTALLATION AND OPERATING MANUAL
 INSTALLATION AND OPERATING MANUAL Salad Bars Olive Bars Food Prep Cases Refrigerated Cases with Air-Over Displays Refrigerated Cases with Coppered Cold Well Displays Cases with Under-Counter Refrigerators
INSTALLATION USE & CARE MANUAL ALL WEATHER SL-SERIES QUARTZ TUBE ELECTRIC INFRARED RADIANT HEATER
 INSTALLATION USE & CARE MANUAL ALL WEATHER SL-SERIES QUARTZ TUBE ELECTRIC INFRARED RADIANT HEATER TABLE OF CONTENTS IMPORTANT INFORMATION Warnings 2 Installation Instructions 3 Wiring Instructions 3 Outdoor
COMMERCIAL REFRIGERATOR INSTRUCTION MANUAL
 COMMERCIAL REFRIGERATOR INSTRUCTION MANUAL Model No.: TGM-69R FEATURE CHART ADVERTISING PANEL FLOURESCENT SWITCH COOLING FAN FLOURESCENT LAMP EVAPORATOR INNER DRAIN PAN SHELF DOOR HANDLE GLASS DOOR CONDENSER
READ AND UNDERSTAND THESE INSTRUCTIONS BEFORE OPERATING THE MACHINE
 XAACT Xtract 200 INFORMATION & OPERATING INSTRUCTIONS READ AND UNDERSTAND THESE INSTRUCTIONS BEFORE OPERATING THE MACHINE 78-00018 Rev B 032912 1 CONTENTS: Machine Specifications............ 2 Record Important
REFRIGERATED CONDIMENT RAIL
 REFRIGERATED CONDIMENT RAIL MODEL RCR-4 Installation and Operation Instructions 2M-Z19984 Rev. - 2/13/15 RCR-4 SAFETY SYMBOL These symbols are intended to alert the user to the presence of important operating
IMPORTANT INSTRUCTIONS - OPERATING MANUAL
 IMPORTANT INSTRUCTIONS - OPERATING MANUAL Models: AK80LSL, AK100LSL Exhaust Fan READ AND SAVE THESE INSTRUCTIONS READ CAREFULLY BEFORE ATTEMPTING TO ASSEMBLE, INSTALL, OPERATE OR MAINTAIN THE PRODUCT DESCRIBED.
Owner s Manual Refrigerated Compressed Air Dryers Models F-3528, F-3529, F-3530, F-3531 & F-3532
 Owner s Manual Refrigerated Compressed Air Dryers Models F-3528, F-3529, F-3530, F-3531 & F-3532 Read carefully before attempting to assemble, install, operate or maintain the product described. Protect
Instruction Manual. 36 in. and 42 in. Popcorn Staging Cabinets
 Instruction Manual 36 in. and 42 in. Popcorn Staging Cabinets Model Series 2856 and 2855 42 in. Model 2855-00-000 36 in. Model 2856-00-000 10700 Medallion Drive, Cincinnati, Ohio 45241-4807 USA 2016 Gold
e Bath Fan with Light User s Guide
 e Bath Fan with Light User s Guide abfl100rnl, BFL125RNL Item Stock Number(s): BFL100RNL, BFL125RNL IMPORTANT INSTRUCTIONS - OPERATING MANUAL READ AND SAVE THESE INSTRUCTIONS READ CAREFULLY BEFORE ATTEMPTING
Power Pack Service Manual
 Power Pack Service Manual MMPP4301-EP MMPP4301 MMPP4301-WC MMPP4301-PKG MMPP4301-PKG-WC MMPP4302 MMPP4302-WC MMPP4302-PKG MMPP4302-PKG-WC MMPP4303-PKG MMPP4303-PKG-WC MMPP4303-PKG-3 MMPP4305-PKG MMPP4305-PKG-WC
Owner s Manual Window Air Conditioner
 Owner s Manual Window Air Conditioner G17-5MCVWAC1 G16-5MCVWAC Write the model and serial numbers below for your records: Model # Serial # Date Purchased Please read the entire manual carefully to ensure
T-Series Air Conditioner T15 Model
 INSTRUCTION MANUAL T-Series Air Conditioner T15 Model Protecting Electronics. Exceeding Expectations. McLean Cooling Technology 11611 Business Park Blvd N Champlin, MN 55316 USA Tel 763-323-8200 Fax 763-576-3200
Instruction Manual. Astro Staging Cabinet
 Instruction Manual Astro Staging Cabinet 10700 Medallion Drive, Cincinnati, Ohio 45241-4807 USA 2017 Gold Medal Products Co. Part No. 40269 SAFETY PRECAUTIONS DANGER Machine must be properly grounded to
User Manual. Wine Cellar
 User Manual Wine Cellar MODEL: WWT060MB WWT080MB WWT100MB WWT120MB 1. READ these instructions carefully before installing and operating the Wine Cellar. Keep them for further reference. 2. Record in the
- 1 - Updated on 18 March, 2010
 - 1 - Updated on 18 March, 2010 TABLE OF CONTENTS 1. SPECIFICATION & PARTS IDENTIFICATION...3 2. OPERATION & FUNCTION OF PARTS...4, 5 A. Cooling Operation B. Heating Operation C. Function of Parts 3. LOCATION
Traulsen & Co., Inc. Quality Refrigeration
 Traulsen & Co., Inc. Quality Refrigeration OWNER S MANUAL Instructions for the installation and maintenance of most Traulsen models as well as instructions to operate the following special models: Pizza
Cincinnati, OH USA
 Part No 53021EX Revised: March 2010 Model 2016EX, 2025EX, 2025STX Staging Cabinets Instruction Manual Cincinnati, OH 45241-4807 USA SAFETY PRECAUTIONS Staging Cabinet Installation Instructions Inspection
Models: DB-2-HF, DB-3-HF, DB-4-HF, and DB-5-HF. For Service Information, Call
 Service Manual Design Basics Hot Food Tables Models: DB-2-HF, DB-3-HF, DB-4-HF, and DB-5-HF For Service Information, Call 800-544-3057 Please provide the following information: - Model number - Serial
CELDEK Evaporative Cooler Module Installation, Operation, and Maintenance Manual. CELDEK Evaporative Cooler
 CELDEK Evaporative Cooler Module Installation, Operation, and Maintenance Manual CELDEK Evaporative Cooler RECEIVING AND INSPECTION Upon receiving unit, check for any interior and exterior damage, and
GCG-10. Instruction Manual. G-Series Cooler. Manual is for the following models: GCG-10-N33EB G-10-N33EB UPRIGHT COOLER
 G-Series Cooler GCG-10 UPRIGHT COOLER Manual is for the following models: GCG-10-N33EB G-10-N33EB Instruction Manual Manual is for the following models: GCG-10-N33EB G-10-N33EB Instruction Manual GCG-10
Owner s Manual Refrigerated Compressed Air Dryer Model F-50
 Owner s Manual Refrigerated Compressed Air Dryer Model F-50 Read carefully before attempting to assemble, install, operate or maintain the product described. Protect yourself and others by observing all
BOTTLE COOLERS SLIDE TOP INSTALLATION AND OPERATION INSTRUCTION MANUAL MODEL SERIES BC24- BC36- BC48- BC72- BC96-
 BOTTLE COOLERS SLIDE TOP INSTALLATION AND OPERATION INSTRUCTION MANUAL MODEL SERIES BC24- BC36- BC48- BC72- BC96- Printed in the USA Rev. 11/2012 No. BC-1.02 WE RAISE THE BAR TABLE OF CONTENTS WARRANTY
e Bath Fan with Light User s Guide
 e Bath Fan with Light User s Guide abfl125rok Item Stock Number(s): BFL125ROK IMPORTANT INSTRUCTIONS - OPERATING MANUAL READ AND SAVE THESE INSTRUCTIONS READ CAREFULLY BEFORE ATTEMPTING TO ASSEMBLE, INSTALL,
User s Manual & Operating Instructions
 User s Manual & Operating Instructions Model Numbers REM-03-240-GH / REM-05-240-GH CONSUMER: READ AND SAVE THESE INSTRUCTIONS Use this heater only as described in this manual. Any other use not recommended
Model 2016, 2025, 2025BN, 2025ST Staging Cabinets Instruction Manual
 Model, 2025BN, 2025ST Staging Cabinets Instruction Manual Part No 53021 Cincinnati, OH 45241-4807 USA SAFETY PRECAUTIONS DANGER Machine must be properly grounded to prevent electrical shock to personnel.
PLEASE READ THIS MANUAL BEFORE USING YOUR APPLIANCE. KEEP THIS MANUAL IN A SAFE PLACE FOR FUTURE REFERENCE.
 File name: ARFG-42FB Care & Use Manual.pub Last revised: June 3rd 2008 PLEASE READ THIS MANUAL BEFORE USING YOUR APPLIANCE. KEEP THIS MANUAL IN A SAFE PLACE FOR FUTURE REFERENCE. ASSEMBLER / INSTALLER
POWER PACK SERVICE MANUAL
 POWER PACK SERVICE MANUAL MMPP4301-EP MMPP4301 MMPP4301-WC MMPP4301-PKG MMPP4301-PKG-WC MMPP4302 MMPP4302-WC MMPP4302-PKG MMPP4302-PKG-WC MMPP4303-PKG MMPP4303-PKG-WC MMPP4303-PKG-3 MMPP4305-PKG MMPP4305-PKG-WC