USA SERVICE OFFICE Dometic Corporation 2320 Industrial Parkway Elkhart, IN
|
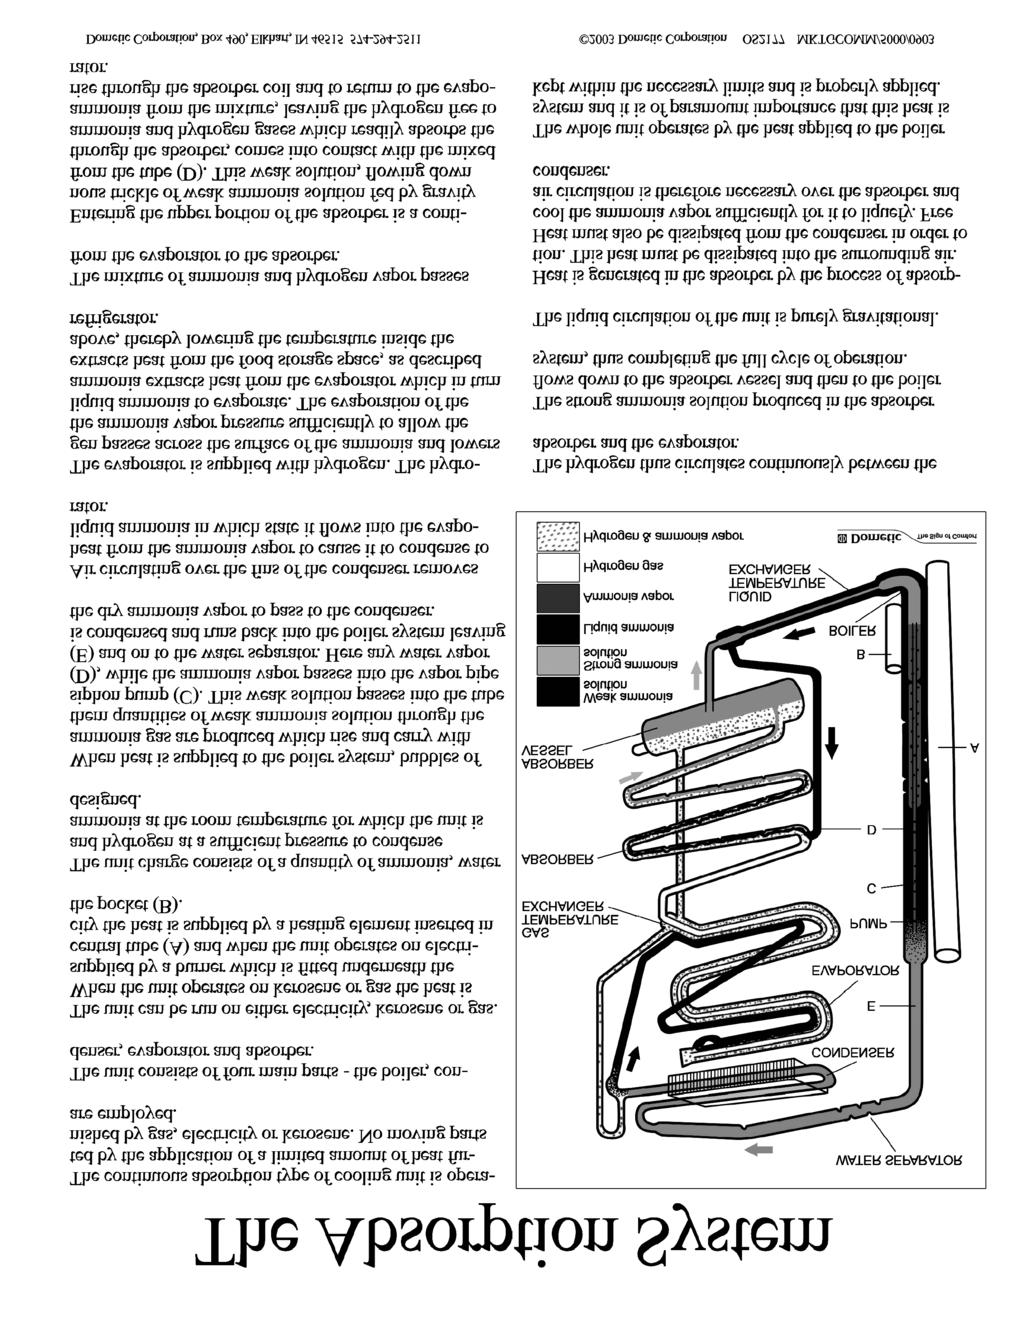
|
|
- Jemimah Watts
- 6 years ago
- Views:
Transcription

1 USA SERVICE OFFICE Dometic Corporation 2320 Industrial Parkway Elkhart, IN CANADA Dometic Distribution 46 Zatonski Unit 3 Brantford, Ontario CANADA N3T 5L For Service Center Assistance Call: DIAGNOSTIC SERVICE MANUAL AMERICANA & AMERICANA PLUS RM 2351, RM 2354, RM 2451, RM 2454 RM 2551, RM 2554, RM 2652, RM 2662 RM 2663, RM2852, RM2862 & NDR1062 Form No / Dometic Corporation LaGrange, IN 46761

2 Foreword This service manual is the result of the dedication of The Dometic Corporation Technical staff and its engineers in giving service people the necessary instruction for making accurate analyses of certain conditions. Provided is a diagnostic chart leading a qualified mechanic into the service manual pages to locate and solve symptoms which may occur. Dometic has continued its commitment in providing service people with this, the most up-to-date information about servicing Dometic RV accessories. Safety Instructions This manual has safety information and instructions to help users eliminate or reduce the risk of accidents and injuries. Recognize Safety Information This is the safety-alert symbol. When you see this symbol in this manual, be alert to the potential for personal injury. Follow recommended precautions and safe operating instructions. Understand Signal Words A signal word, WARNING OR CAUTION is used with the safety-alert symbol. They give the level of risk for potential injury. Indicates a potentially hazardous situation which, if not avoided, could result in death or serious injury. Indicates a potentially hazardous situation which, if not avoided may result in minor or moderate injury. When used without the safety alert symbol indicates, a potentially hazardous situation which, if not avoided may result in property damage. Read and follow all safety information and instructions. 1
3 CONTENTS PAGE NO. DIAGNOSTIC FLOW CHART... 4 SECTION 1 OPERATION Refrigerator Operation...6 SECTION 2 AC VOLTAGE AC Voltage Requirements...9 SECTION 3 AC COMPONENTS Heating Element...10 SECTION 4 DC VOLTAGE DC Voltage Requirements...10 SECTION 5 DC COMPONENTS 5.1 DC heating Element Thermistor Solenoid Valve Igniter High Voltage Cable Electrode DC Relay Upper Circuit Board Lower Circuit Board Door Switch Climate Control Heater & Switch Low Ambient Switch Fuses Thermofuse...18 SECTION 6 LP GAS LP Gas Requirements...19 SECTION 7 LP GAS COMPONENTS 7.1 Manual Gas Shut-Off Valve Orifice Thermocouple Burner
4 CONTENTS PAGE NO. SECTION Flue Baffle Flue Cap Flue Tube...20 SECTION 8 COOLING UNIT 8.1 Leveling Ventilation Air Leaks Interior Liner Seal to Frame Door Position Ambient Temperature Cooling Unit Food Storage High Humidity...26 SECTION 9 WIRING 9.1 Internal Wiring External Wiring Wiring Schematics...26 SECTION 10 ICE MAKER 10.1 Operation Mold Heater Ice Ejector Mold Thermostat Shut Off Arm Mold Switches Timing Motor Water Valve Ice Maker Replacement Water Fill Adjustment Water Supply Wiring Schematics
5 This program will address the most common system problems associated with the RM2351, RM2354, RM2451, RM2454, RM2551, RM2554, RM2652,RM2662,RM2663,RM2852and RM2862 refrigerators supplied by The Dometic Corporation. Our intent is to provide you with a guideline of checks to make, should you encounter one of the following symptoms. SYMPTOM 1. No operation - no panel lights CAUSE Operation DC Volts Fuse Wiring Upper Circuit Board Lower Circuit Board SECTION & PAGE 1, page 06 4, page 10 5, page 18 9, page 26 5, page 13 5, page No operation - has panel lights Operation DC Volts Thermistor Wiring Lower Circuit Board 1, page 06 4, page 10 5, page 11 9, page 26 5, page No AC operation - operates on gas mode Operation AC Volts Fuse Heating Element Wiring Lower Circuit Board 1, page 07 2, page 09 5, page 19 3, page 11 9, page 24 5, page No Gas operation - operates on AC mode 5. Insufficient cooling on all modes. 6. Insufficient cooling on AC - cools properly on gas mode. 7. Insufficient cooling on Gas - cools properly on AC mode. 8. Freezes. Operation LP Gas Manual Gas Valve Igniter High Voltage Cable Electrode Solenoid Wiring Lower Circuit Board Ventilation Leveling Ambient Temperature Air Leaks Thermistor Cooling Unit AC Volts Heating Element Lower Circuit Board LP Gas Orifice Flue Baffle Flue Tube Burner Lower Circuit Board Operation Thermistor Lower Circuit Board 1, page 06 6, page 19 7, page 19 5, page 11 5, page 12 5, page 12 5, page 11 9, page 24 5, page 13 8, page 21 8, page 21 8, page 24 8, page 23 5, page 11 8, page 25 2, page 09 3, page 10 5, page 13 6, page 19 7, page 19 7, page 20 7, page 20 7, page 20 5, page 13 1, page 06 5, page 12 5, page 14 4
6 SYMPTOM 9. Check light on 10. Interior light on when door is closed CAUSE DC Volts Wiring LP Gas Manual Gas Valve Solenoid Orifice Burner Thermocouple Lower Circuit Board Wiring Low Ambient Switch Door Switch Door Position SECTION & PAGE 4, page 10 9, page 26 6, page 19 7, page page page page page page page page page page Rapid formation of frost 12. Water on frame Food Storage Interior Liner to Frame High Humidity Air Leaks Interior Liner to Frame High Humidity Air Leaks Climate Control Heater 8. page page page page page page page page 18 5
7 SECTION 1 REFRIGERATOR OPERATION DISPLAY PANEL RM2351, RM2451, RM2551, RM2652, RM2852 AUTO TEMPERATURE CONTROL Refrigerator Control Panel RM2652 & RM2852 RM2662 & RM2862 AMERICANA 2-WAY MODEL 1. Main Power Button ON/OFF 2. AUTO/GAS Mode Selector Button RM2451 & RM2551 A. AUTO Mode indicator lamp B. CHECK indicator lamp (Gas Mode Only) C. Climate control switch only on RM2652 & RM2862 Travel Latch RM2351 6
8 DISPLAY PANEL RM2354, RM2454, RM2554 RM way DISPLAY PANEL RM2662, RM WAY Refrigerator Control Panels 3-WAY 2-WAY RM2454 & RM2554 Travel Latch RM WAY 1. Main Power Button ON/OFF 2. DC Mode Selector Button 3. AUTO/GAS Mode Selector Button 4. Temperature Selector Button A. DC Mode Indicator Lamp B. AC Mode Indicator Lamp C. GAS Mode Indicator Lamp D. AUTO Mode Indicator Lamp E. CHECK Indicator Lamp (Gas Operation Only) F. Temperature Indicator Lamps 2-WAY 1. Main Power Button ON/OFF 2. AUTO/GAS Mode Selector Button 3. Temperature Selector Button B. AC Mode Indicator Lamp C. GAS Mode Indicator Lamp D. AUTO Mode Indicator Lamp E. CHECK Indicator Lamp ( GAS Mode Only) F. Temperature Indicator Lamps 7
9 OPERATION INSTRUCTIONS IMPORTANCE OF LEVELING A REFRIGERATOR In an absorption refrigerator system, ammonia is liquefied in the finned condenser coil at the top rear of the refrigerator. The liquid ammonia then flows into the evaporator (inside the freezer section) and is exposed to a circulating flow of hydrogen gas, which causes the ammonia to evaporate, creating a cold condition in the freezer. When starting this refrigerator for the very first time, the cooling cycle may require up to four hours of running time before the cooling unit is fully operational. The tubing in the evaporator section is specifically sloped to provide a continuous movement of liquid ammonia, flowing downward by gravity through this section. If the refrigerator is operated when it is not level and the vehicle is not moving, liquid ammonia will accumulate in sections of the evaporator tubing. This will slow the circulation of hydrogen and ammonia gas, or in severe cases, completely block it, resulting in a loss of cooling. Any time the vehicle is parked for several hours with the refrigerator operating, the vehicle should be leveled to prevent this loss of cooling. The vehicle needs to be leveled only so it is comfortable to live in (no noticeable sloping of floor or walls). When the vehicle is moving, the leveling is not critical, as the rolling and pitching movement of the vehicle will pass to either side of level, keeping the liquid ammonia from accumulating in the evaporator tubing. OPERATION Before starting the refrigerator, check that all the manual gas valves are in the ON position. DO NOT forget the manual shutoff valve on the rear of the refrigerator. This refrigerator is equipped with a control system which can be set to automatically select either 120 volt AC or LP gas operation (AUTO mode), or if desired LP gas only (GAS mode) or DC volts (DC Heater) where applicable. Auto Thermostat In both AUTO mode and GAS mode operation, the temperature is controlled by a factory preset temperature setting. The refrigerator controls will work down to 9.6 volt DC. Most LP gas appliances used in recreational vehicles are vented to the outside of the vehicle. When parked close to a gasoline pump, it is possible that the gasoline fumes could enter this type of appliance and ignite from the burner flame, CAUSING A FIRE OR AN EXPLOSION. FOR YOUR SAFETY, when refueling, shut off all LP gas appliances which are vented to the outside. A. B. C. D. A. B. C. D. E. OPERATION Auto Thermostat A continuous 12 volt DC supply must be available for the electronic control to function. Press the main power ON/OFF button (1) to the DOWN position. In AUTO mode, the AUTO lamp A will be illuminated. The control system will automatically select between AC and GAS operation with AC having priority. The temperature is controlled by a factory preset temperature setting. In GAS mode operation, no lamps will be illuminated and the temperature is controlled by a factory preset temperature setting. OPERATION Adjustable Thermostat A continuous 12 volt DC supply must be available for the electronic control to function. Press the main power ON/OFF button (1) to the DOWN position. In AUTO mode, the AUTO lamp D will be illuminated. The control system will automatically select between AC and GAS operation with AC having priority. Temperature is selected by the user. In GAS mode operation, the GAS lamp C will be illuminated and only operate on LP only. Temperature is selected by user. In DC mode, the DC lamp A will be illuminated and the unit will only operate on DC until DC volts drops below 9.6 VDC. Auto Mode Press the AUTO/GAS button 2 (Auto Thermostat) or button 3 (Adjustable Thermostat) to the DOWN position. The AUTO mode indicator lamp (A auto or D adjustable thermostat) will illuminate. If 120 volts AC is available, the control system will select AC operation. If 120 volts AC is not available, the control system will automatically switch to GAS operation. Within 45 seconds the burner should be ignited and operating normally. If the CHECK indicator lamp (B auto or E adjustable thermostat) illuminates, the control has failed to ignite the burner on GAS. To reset when the CHECK indicator lamp, press the main power ON/OFF button (1) to the OFF then ON position. Systems with the new lower control board are a three (3) try system on gas. On the initial refrigerator start-up on gas (120 volts AC is not available), it may take longer than 45 seconds to allow air to be purged from the gas line. If the refrigerator has not been used for a long time or the LP tanks have just been refilled, air may be trapped in the supply lines. To purge the air from the lines may require resetting the main power ON/OFF button (1) three or four times. If repeated attempts fail to start the LP gas operation, check to make sure that the LP gas supply tanks are not empty and all manual shutoff valves in the lines are open. 8
10 Note: Do not continue to reset GAS operation if the CHECK indicator lamp continues to be illuminated after several tries. GAS Mode Move the AUTO/GAS button 2 (Auto Thermostat) or button 3 (Adjustable Thermostat) to the UP position. The AUTO mode indicator lamp (A) will go off. Within 45 seconds the burner should be ignited and operating normally. DC Mode 3 Way Units Only Press the DC mode indicator button (2) to the DOWN position. (Lamp [A] will light). Press the TEMPERATURE SELECTOR button (4) until the lamp (F) at the desired position is illuminated. The refrigerator will continue to operate in the DC mode until switch (2) is moved to the UP position or control voltage falls below 9.6 VDC. The DC mode overrides all the other operating modes. Discharging of the battery will occur if the vehicle engine is not running. Note: The DC mode is a holding mode not a full cooling mode. DC should be used once the unit is cooled down and constant supply of DC available (driving down the road). To Shut Off The Refrigerator The refrigerator may be shut off while in any mode of operation by pressing the main power ON/OFF button to the UP (OFF) position. This shuts off all DC power to the control system. Description Of Operating Modes Auto Mode When operating in the AUTO mode, the AUTO mode indicator lamp (A) will illuminate. The control system will automatically select between AC and GAS operation with AC having priority over GAS. If the control system is operating with AC energy and it then becomes unavailable, the system will automatically switch to GAS. As soon as AC becomes available again the control will switch back to AC operation. Gas operation (120 volts AC is not available). The control system will activate the ignition system and will make three attempts to light the burner for a period of approximately 45 seconds with two minutes rest (purge) interval. If unsuccessful, the CHECK indicator lamp (B) will illuminate. To restart an ignition attempt with the CHECK lamp illuminated or to clear (turn off) the CHECK lamp, press the main power ON/OFF button to the OFF position and wait a few seconds, then return to the ON position. The control system will attempt a new ignition sequence. If 120 volts AC becomes available while the CHECK indicator lamp is on, the CHECK lamp will not turn off until the main power ON/OFF button is pressed to the OFF then ON position but the unit will operate on AC. Gas Mode When operating in the GAS mode, the AUTO mode indicator lamp (A) will be off. This mode provides LP gas operation only. The control system will activate the ignition system and will make three attempts to light the burner for a period of approximately 45 seconds with two minutes 9 a period of approximately 45 seconds with two minutes (purge) interval after each trial. If unsuccessful, the CHECK indicator lamp (B) will illuminate. To restart GAS operation, press the main power ON/OFF button (1) to the OFF and then ON position. The control system will attempt a new ignition sequence. If the refrigerator has not been used for a long time or the LP tanks have just been refilled, air may be trapped in the supply lines. To purge the air from the lines may require resetting the main power ON/OFF button (1) three or four times. If repeated attempts fail to start the LP gas operation, check to make sure that the LP gas supply tanks are not empty and all manual shutoff valves in the lines are turned on. DC Mode 3 Way Units Only Press the DC mode indicator button (2) to the DOWN position. (Lamp [A] will light). Press the TEMPERATURE SELECTOR button (4) until the lamp (F) at the desired position is illuminated. The refrigerator will continue to operate in the DC mode until switch (2) is moved to the UP position or control voltage falls below 9.6 VDC. The DC mode overrides all the other operating modes. Discharging of the battery will occur if the vehicle engine is not running. Note: The DC mode is a holding mode not a full cooling mode. DC should be used once the unit is cooled down and constant supply of DC available (driving down the road). To Shut Off The Refrigerator The refrigerator may be shut off while in any mode of operation by pressing the main power ON/OFF button to the UP (OFF) position. This shuts off all DC power to the control system. Limp Mode This control system contains a feature where it will continue to operate the cooling system in event of a failure of a major operating component. If the control cannot read the temperature sensor and control to the preset temperature, then the control will run the cooling unit continuously at the energy source available. The refrigerator will continue to operate in this mode indefinitely or until a new sensor is installed and the system is reset. SECTION 2 AC VOLTAGE AC VOLTAGE REQUIREMENTS This is an energized circuit. Shock can occur if not tested properly. Testing is to be done by a qualified service technician. The proper operating range is 100 to 132 volts. If voltage drops below 100 volts, cooling efficiency will decrease with voltage decrease.
11 The refrigerator will not switch to another mode of operation until all AC power is lost. The refrigerator is equipped with a three-prong (grounded) plug for protection against shock hazards, and should be plugged directly into a properly grounded three-prong receptacle. SECTION 3 AC COMPONENTS Heating Element The heating element is designed to deliver a predetermined amount of heat to the cooling unit. To check a heating element, remove the heater leads from the printed circuit board and measure for proper resistance across the two leads with a properly calibrated ohm meter. This check is to be done with the heating element at room temperature. You should obtain the following readings ± 10%: Model WATTS OHMS AMPS RM RM RM RM RM RM RM Never over or under size the AC heater. SECTION 4 DC VOLTAGE DC Voltage Requirements Clean Direct Current (DC) power is mandatory for hightech circuits to operate as designed. A battery will provide straight line DC power. The converter and alternator produce DC power by a series of diodes that rectify alternating current to DC. The Dometic control system will only tolerate up to 6 AC volts on the DC line. AC ripple can be measured by a digital voltmeter set on the AC scale at the main DC terminal block connections at the refer. Six volts AC or less is acceptable. If AC volts exceed 6 on the DC incoming line the power source should be cleaned up. AC voltage in excess of 6 volts will affect the processor and create erratic operation. When testing for AC ripple on the DC line put a load on the converter. The operational range of the unit is a minimum of 9.6V DC to a maximum of 22V DC. The unit will automatically shut down until voltage has decreased to 18V DC. The refrigerator requires at least 9.6V DC for proper operation; however the panel lights will continue to illuminate until voltage has dropped to 4V DC or below. Do not use the body or chassis of the RV as a substitute for either of the two conductors. The refrigerator must be connected to the battery circuit with two wires of adequate capacity to avoid voltage drop. Proper polarity is crucial for refrigerator operation. No other electrical equipment or lighting should be connected to the refrigerator circuit. Just because you can read volts does not mean you have the amps to operate the control system. If relays buzz, lights go dim or out during operation, this could indicate there is a loose connection somewhere. Main Terminal Block Grounds The operation of the Dometic refrigerator is also dependent on good, clean ground connections. Loose or corroded ground terminals create an unknown resistance factor that can affect the voltage detected by the Power Module. A loose negative DC wire will create a negative millivolt signal that the control board will pick up and create erratic operation. Check the integrity of the grounds from the refrigerator all the way to the power source/battery. Clean or tighten any suspicious looking connections. Note: The DC terminal block below the control board should be cleaned and tightened at the 4 wires. 10
12 SECTION 5 DC COMPONENTS 5.1 DC Heating Element Remove the heater leads from the lower circuit board or relay and measure for proper resistance across the two leads. You should obtain the following readings ± 10%: Model Watts Amps Volts Ohms RM RM RM RM NOTE: The DC mode is a holding mode not a full cooling mode. DC should be used once the unit is cooled down on gas or AC and driving (constant supply of DC) down the road. A continuity reading will indicate an open or complete circuit. Never over or under size the DC heater. 5.2 Thermistor Disconnect the thermistor harness from the P2, 2-pin terminal on the lower circuit board. Place the thermistor in a glass of ice water (more ice than water), approximately 33 F to 35 F. Wait 8 to 10 minutes. You should get a reading of approximately 8,000 to 10,000 ohms. Always test from the wire side as shown with the meter as not to create a connection problem at the P2 connector. 5.3 Solenoid Valve Check the solenoid coil with a properly calibrated ohm meter. Remove the connectors from the solenoid and measure the resistance across the terminals. The proper reading would be 49 ohms with tolerance range of ten percent. Failure of the solenoid is very unlikely. Next, hook up a manometer at the test port. Then check for DC volts at gas valve terminals (Yellow + White -) while the unit is in trial-for-ignition. If DC volts are present and pressure is low, replace the valve. If DC volts are not present at the valve while the unit is in trial-for-ignition, verify that the wire at Plug 3, Terminal 2 on lower circuit board has DC volts (9 or more) Igniter The igniter used on Dometic model refrigerators operates on 12 volt DC. On gas operation the igniter senses the resistance through the flame between the electrode and burner. When there is no flame at the burner, the resistance is high and the igniter begins sparking to light the burner. As soon as the flame is lit, the resistance between the electrode and burner drops and the igniter stops sparking. The resistance is monitored by the igniter, and, if for any reason the flame goes out, the igniter begins sparking until the burner is lit. The resistance between the electrode and burner drops and the igniter stops sparking.
 and ground (Black ) terminals of the igniter. The reading should be within 1.")

 the 45 seconds trial for ignition period is started.")
13 This is an energized circuit. Shock can occur if not tested properly. Testing is to be done by a qualified service technician. This insures that the flame will always be lit when desired. First verify proper voltage at the positive (Yellow +) and ground (Black ) terminals of the igniter. The reading should be within 1.5 volt of incoming voltage at the main terminal block during trial-for-ignition. Next, remove the high voltage cable from the igniter. The igniter should produce a sparking sound during trial-for-ignition. If not, replace the igniter. While operation is in the gas mode, the power module and igniter are constantly monitoring the presence of flame. If the flame is blown out, the reignitor will immediately start sparking. When the power module senses the loss of flame (thermocouple voltage below 13 MVDC) the 45 seconds trial for ignition period is started. The igniter installed on the refrigerators as original equipment is part number (RV Gas Model 679). This igniter is rated 50 MA. This igniter may also be used on any other model. When replacing the igniter always provide the product number for proper replacement. DO NOT install the Channel Mark 6, Model 12 E igniter (shown below) as a service replacement part. Installation of the Channel Products, Inc., Gasliter Mark 6, Model 12 E, will VOID the Warranty on the refrigerator. To acquire the proper igniter always provide the product number. 5.5 High Voltage Cable If sparking starts during trial-for-ignition, the cable is good. If there is no sparking during trial-for-ignition, disconnect DC power at the refrigerator terminal block or switch unit off. Disconnect high voltage cable from electrode. Reconnect DC power. If there is a sparking sound from the igniter during trial-for-ignition, then replace high voltage cable or electrode. On newer units the electrode and high voltage cable are integrated into one component. 5.6 Electrode Do a visual check for cracks or breaks on the ceramic insulator. A hair line crack can be hard to see at the electrode. The spark gap must be set at three-sixteenths (3/16 ) of an inch and tip of electrode above the slots in the burner. When adjusting always loosen the screw and move into place, never try to move without loosing the screw. On newer units the electrode and high voltage cable are integrated into one component. To acquire the proper part always provide the product number. 5.7 DC Relay The relay controls the circuit to the DC heating element. The load (amps) of the DC heating element goes through the relay. Only used on newer 3 way units or units that have the UNIVERSAL POWER MODULE KIT ( ) installed. (+) 12 VDC Heater Element Wire 87 P3 Harness Blue Wire Red Battery Wire P3 Harness Blue Wire Verify that the following components are good: upper circuit board, thermistor, 5 or 6 wire harness and 30/3-amp fuses. In the DC mode Plug 3, Terminal 4 (positive 86) and Terminal 3 (negative 85) should have voltage to close the relay. If no voltage in the DC mode change the lower board.
14 Wires from control board P3 harness to relay. Terminal 85 P3-3 harness blue negative. Terminal 86 P3-4 harness blue positive. Wires to relay from DC source and DC heater. Terminal 87 to DC heater positive. Terminal 30 positive from DC power source. If DC voltage to terminals 85 & 86, but no continuity between 30 & 87 the relay will need to be changed. Refer to wiring diagram on the back of the product or check parts list for proper diagram. To acquire the proper wiring diagram always use the product number. 5.8 Upper Circuit Board With main ON/OFF switch on display panel in OFF position: Check for DC voltage at Plug 1, Terminal 4 (orange wire +) positive and terminal 5 (red wire -) negative DC on the lower circuit board. If no voltage, then check fuse condition. Check for DC voltage between J4 positive and J10 negative terminals on the lower circuit board (first generation) or J1 positive and J10 negative on the current board ( ). If no voltage on orange wire, fuse test OK and voltage into lower control, replace the lower board. Next, with main ON/OFF switch on check for DC voltage at the upper circuit board between terminal 4 (orange wire) and terminal 3 (red wire) which is negative ( ) DC. If no voltage and your previous check verified voltage at the lower circuit board between the wires, test and/or replace the cable assembly between the upper and lower controls. Upper Board Pin Connector Wire Location 5.9 Lower Circuit Board WIRING Original style control 3 way & 2 way Note: 2 Way will not have a J1 for DC heater P1 To upper control board P2 Thermistor P3 To gas valve, igniter J1 To DC heater J2 To interior light and climate control J3 Negative lead from thermocouple J4 Positive 12V DC from terminal block J5 AC line voltage (Black) J6 AC neutral line (White) J7 AC neutral out to AC heater J8 AC line out to AC heater Switched side J10 Positive lead from thermocouple Thermocouple positive lead may be on the ground strip on early units. Reference full wiring diagram next page. WIRING: Current style control 3/2 way, 2 way will not have wires from P3 to external DC relay Board part number P1 To upper control board P2 Thermistor P3 To gas valve, igniter and DC heater relay if 3 way J1 Positive 12V DC from terminal block J2 To interior light and climate control. J3 To auxiliary fan (S.) and/or ice maker heat tape J4 Negative lead from thermocouple J5 AC line voltage (Black) J6 AC neutral line (White) J7 AC neutral out to AC heater J8 AC line out to AC heater Switched side J9 Positive wire from thermocouple J10 Negative to Chassis ground Note: Terminals 9 and 10 could be reversed as both terminals are ground on control board. WIRING: Current style with integrated igniter Board part number P1 To upper control board P2 Thermistor P3 To gas valve J2 To interior light / climate control. J4 Positive 12V DC from terminal block J5 AC line voltage (black) J6 AC neutral line (white) J7 AC neutral out to AC heater J8 AC line out to AC heater Switched side J10 Negative to Chassis ground Note: Units that have integrated igniter do not use a thermocouple. 13
15 WIRING ORIGINAL STYLE CONTROL 3 / 2 WAY, 2 WAY WILL NOT HAVE A J1 TO DC HEATER 14
16 J1 J2 J3 J4 J5 J6 J7 J8 J9 J10 B BLACK BROWN RED ORANGE GREEN C WHITE WHITE N O T U S 7 CURRENT CONTROL SYSTEM WIRING 2 WAY WILL NOT HAVE DC RELAY & HEATER Part number P1 P2 P Q A 2 P3 2 BLUE BLUE WHITE YELLOW 2 7 E L 7 R V AC L F K D 12V DC M G A---CIRCUIT BOARD POWER MODULE B---CURCUIT BOARD DISPLAY C---THERMISTOR D---REIGNITER F---THERMOCOUPLE G---ELECTRODE H---RETAINER FOR BURNER I--- TERMINAL BLOCK J--- GROUND TERMINAL STRIP K--- ABSORPTION UNIT L--- HEATER 120V AC M-- HEATER 12V DC N-- LIGHT O-- SWITCH P-- FUSE 3 AMP Q-- FUSE 5 AMP R-- DC HEATER RELAY S-- HEATING CABLE T-- SWITCH U-- TERIMAL BLOCK 7 6 H 6 L N GND J 1 I V DC WHITE 2-- BLACK 3-- GREEN 4-- GREEN/YELLOW 5-- GRAY 6-- BROWN 7-- BLUE 8-- YELLOW 9-- RED 15
17 WIRING INTERGRATED IGNITER CONTROL Part number
18 Lower Board Testing ALL TESTS ARE TO BE DONE WITH THE RE- FRIGERATOR IN THE COOLING MODE. Unplug the thermistor from the control board during lower board testing to assure unit is calling for cooling. DC Volts Measure volts between terminal J4 positive (early control) and the ground and integrated igniter board. Current control board J1 positive and ground. Voltage should be the same as at the positive (+) and negative ( ) on DC input terminal block. 9.6 min to 22 max would be the operating range. Refer to wiring diagram on the product number unit you are currently working on. If voltage outside the 9.6 to 22 range, check power supply, terminal block and correct power source before going on with the test. AC Mode This is an energized circuit. Shock can occur if not tested properly. Testing is to be done by a qualified service technician. Test upper control board and harness between upper and lower before testing lower for proper AC operation. Check that incoming AC voltage is present at terminals J5 (black) and J6 (white) on the circuit board. With unit on AC operation, check for voltage at the heating element connection terminals J7 and J8 on the circuit board. If no voltage is present, check the 5 amp AC, 3 amp DC fuses, wiring harness and upper control. If AC volts are present at J5 and J6 and no voltage on J7 and J8 the AC voltage detection circuit is damaged and the control board will need to be changed. Gas Mode Note: All current Dometic control boards are 3 try systems in the gas mode. There is a 2 minute purge cycle between each trial for ignition. Flame failure will take 6 to 7 minutes. Verify that the following components are good: upper circuit board, thermistor, wire harness and 3-amp fuse. First, check for voltage during trial-for-ignition at Plug 3, Terminals 1 (white Wire -) and 2 (yellow wire +) to the igniter and solenoid. If no voltage is present change the circuit board. If voltage is present, check for voltage at the igniter and solenoid. If no voltage is present, check the wires. To check the flame sense circuit of the lower circuit board, operate the refrigerator on GAS and measure the millivolts between J3 (NEGATIVE) terminal original control or J4 current control and the other wire (POSITIVE) connection from the thermocouple. 17 The millivolts meter should read between 25 to 35 millivolts with the gas flame burning. When the power module senses the loss of flame (thermocouple voltage below 13 MVDC) the 45 seconds trial for ignition period is started. Turning the refrigerator OFF ON while operating in the gas mode may cause a check light. Note: A loose ground will create erratic or no gas operation on all systems. Gas Mode Integrated Igniter Verify that the following components are good: upper circuit board, electrode with cable, wire harness and 3-amp fuse. Units that have integrated igniter do not have a thermocouple. The igniter senses the flame thru the electrode and communicates with the lower main control. The integrated igniter used on certain Dometic model refrigerators operates on 12 volt DC thru the control board. On gas operation the igniter senses the resistance through the flame between the electrode and burner. When there is no flame at the burner, the resistance is high and the igniter begins sparking to light the burner. As soon as the flame is lit, the resistance between the electrode and burner drops and the igniter stops sparking. The resistance is monitored by the igniter, and, if for any reason the flame goes out, the igniter begins sparking until the burner is lit. This insures that the flame will always be lit when desired. The integrated ignition system is also a three try control. Turning the refrigerator OFF ON while operating in the gas mode may cause a check light. If you have voltage to the gas valve during trial-for-ignition but no spark and the electrode with cable checks good, change the lower control board. Note: Never engage the gas mode with the electrode cable unplugged from control board. This will damage the igniter on the board. DC Mode 3-Way Units Verify that the following components are good: upper circuit board, wire harness, DC heater and 3/30 amp DC fuse and relay. With the DC mode selected on the upper control, v erify voltage between terminals J4 positive and the ground strip early control or J1 positive current control and J10 negative is above 9.6 min. When the DC heater is activated it will draw approximately 12 to 18 amps and if the power source is weak the control voltage will drop below proper operating range and shut down. Check for DC volts from J1 (positive) early control to DC heater, if no DC volts change the control board. On late controls ( & [integrated igniter]) the DC heater load (amps) goes through a stand alone relay. In the DC mode Plug 3, Terminal 4 (positive) and Terminal 3 (negative) should have voltage to close the relay. If you have voltage coming in with unit in DC mode but nothing out to DC heater or relay, change the control board. Refer to wiring diagram on the back of the product or check parts list for proper diagram. To acquire the proper wiring diagram always use the product number.
19 5.10 Door Switch The door switch is an open switch when the switch arm is depressed (interior light should be off). When the refrigerator door is open the switch is closed (interior light should be on). Check that the switch assembly is properly aligned and that it is not broken. Check the switch assembly for continuity. To do a continuity check, first be sure all power is disconnected or OFF to the refrigerator. Second, remove all wires from the switch assembly, then check the switch. After the check, be sure the switch assembly is wired properly per the wiring diagram. When the switch is depressed, there should not be continuity. When the switch is NOT depressed, there should be continuity. If any of these checks are incorrect, replace the switch Climate Control Heater & Switch Not used on all units. Disconnect the wires from the switch and do a continuity check. In the OFF position, there should be no continuity. In the ON position, there should be a continuity reading. To check the heater itself, perform an ohms resistance reading on the heater wire by using a properly calibrated ohm meter. From the side of the switch that only has two wires, with switch off take an ohms reading to ground. The proper ohms reading will be 24 ohms ± 10%. The approximate amp draw is less than.5 (1/2) amp. Function During the summer months of high temperatures and humidity, the metal frame between the freezer and fresh food compartments may have water droplets forming. The number of water droplets will increase if the vehicle isn t air conditioned during these months. Some refrigerators come standard with a 12 volt (DC) climate control that will evaporate the water droplets when they form. To have the climate control on, you position the switch (normally located beneath the top decoration panel that houses the control panel) to ON. The approximate amp draw is less than.5 (1/2) amp. Note: The climate control will draw 12 volt DC power continuously when in the ON position on certain models. It should be turned OFF when a charging source is not available or unit is in storage Low Ambient Switch When the low ambient control is turned on it by-passes the interior light switch and turns on the interior light. The heat load of the 10 watt light bulb will cause the cooling unit to cycle approximate every 35 to 55 minutes. This will help keep the temperature in the freezer in the freezing zone. In low ambient temperatures the freezer will warm up because the refer box will not call for much cooling. When the refer calls for cooling it will cool the freezer first and then cool the refer box. When it is cool outside the refer box won t call for as much cooling and the freezer might warm up to normal food storage temperature (34 to 35). The second thing the control will do is keep the cooling unit from freezing up in low outdoor temperatures. (20 to 0 F) 5.13 Fuses The 3 amp DC fuse is designed to protect the circuit board from internal/external DC shorts. The 5 amp AC fuse is designed to protect the integrity of the AC detection and heater circuit from shorts. On 3-way models only, the 30 or 35- amp DC fuse is designed to protect the DC heater circuit integrity. All fuses can be checked for continuity. If a fuse blows don t replace it until the problem has been found. If a fuse blows there is a short or component that has created the problem Thermofuse Newer and replacement cooling units have a Thermofuse located on the boiler. The function of the thermofuse is to shut down the control system in the event the cooling unit has a problem. On certain units the fuse can be reset by pushing the button in the center. The thermofuse is a non-replaceable component of the cooling unit. When the fuse pops it is normally an indication the cooling unit has a problem and the cooling unit will have to be replaced. The fuse can be checked for continuity. Not used on all units. Disconnect the wires and do a continuity check. In the OFF position, there should be no continuity. In the ON position, there should be a continuity reading. All RV absorption refrigerators, while similar, operate a little differently than your home refrigerator. Dometic designers and engineers have equipped your refrigerator with an exclusive feature that allows for troublefree operation in low ambient temperature ( below 50 F) for extended periods of time. Simply turn on the low ambient switch located beneath the top decoration panel that houses the control panel. Once the outdoor temperature is above 50 F, the low ambient switch should be turned off. 18
20 SECTION 6 LP GAS REQUIREMENTS DO NOT use a flame to check for gas The LP gas pressure to the refrigerator should be 11 inches water column with half of all BTU s of the RV turned on. With all other appliances off, the pressure to the refrigerator should not exceed 12 inches water column. To check the gas pressure when the refrigerator is operating, there is a pressure test port below the solenoid valve assembly. SECTION 7 LP GAS COMPONENTS 7.1 Manual Gas Shutoff Valve The manual shutoff valve is a non-serviceable part. The valve is part of the solenoid valve assembly. It is very rare to have problems with the manual shutoff or the solenoid assemblies. If you have checked gas pressure and it is low, check pressure at input line to refer. If pressure is 11 inches at input and low at the pressure test port, change solenoid valve assembly. The valve is not opening all the way. TESTING LP GAS SAFETY SHUTOFF The gas safety shutoff must be tested after the refrigerator is connected to the LP gas supply. To test the gas safety shutoff, proceed as follows: 1. Start the refrigerator according to the instructions, and switch to GAS mode. 2. Check that the gas flame is lit and the GAS mode indicator lamp is on. 3. Close the manual gas shutoff valve at the back of the refrigerator. 4. Wait for one minute for units prior to 2003 and six to seven for units after 2003 (Three Try Board). The CHECK indicator lamp should be on and the GAS mode indicator lamp should be off. 5. Remove protection cover from burner and open the manual gas shutoff valve. Do not change any button positions on the control panel. Apply a non-corrosive commercial bubble solution to the burner jet orifice No bubbles should appear at the opening of the burner jet orifice. The presence of bubbles indicates a defective gas safety shutoff, and service is required. 7. If no bubbles were present at the burner jet orifice, it should be rinsed with fresh water. Be careful not to damage the burner jet orifice. Replace cover and press the main power ON/OFF button (1) OFF and back ON. Normal operation of the burner should return. Allow the burner to operate for a minimum of five minutes. 7.2 Orifice The Dometic orifice is a brass alloy with a man-made ruby pressed in the center that has been laser-beam drilled in a spiral pattern. The orifice is cleaned by using an alcohol based solvent. Soak the orifice for approximately 1 hour and allow to air dry. Don t insert anything in the center of the orfice it will harm the man-made ruby. Don t use an air nozzle to blow thru the orifice as the ruby could be moved. Never over or under size the orifice on a Dometic refrigerator. The cooling unit is designed to work with a predetermined amount of heat and modifying the orifice size will decrease cooling. If there is a lack of cooling on gas operation, verify the orifice is the proper size per the chart. DO NOT use a wire or pin when cleaning the burner jet as damage can occur to the precision opening. This can cause damage to the refrigerator or create a fire hazard. MODEL JET SIZE RM #39 RM #43 RM #43 RM2652 #58 RM #58 RM2852 #58 RM2862 #58 Always check the parts list with the model and product number to assure the right jet size.

21 7.3 Thermocouple The Thermocouple is a component that extends over the burner assembly so its tip is in the path of the flame. During normal gas operation, the thermocouple should produce 25 to 35 millivolts when connected to the lower circuit board. Any reading below 18 millivolts could cause erratic gas operation. Note: A reading of 18 or less could be caused by low gas pressure, carbon build up or improper thermocouple location. The thermocouple should be centered over the burner and extend over 3 slots. The control board reads negative millivolts from the thermocouple and the positive lead goes to the ground terminal on the control board or ground strip. Note: A rapid on/off of the switch or a brief interruption of DC power source does not allow the thermocouple time to cool. When the power is restored, the thermocouple has not cooled completely and the check light may come on. Turning the refrigerator OFF ON while operating in the gas mode may cause a check light. The new lower control has built-in delay when the unit is first turned on. If the lower control reads millivolts in excess of 6 MVDC the control will go into a 30 second gas delay before attempting to light on gas. To test the thermocouple set the meter to DC millivolts. Put the black lead from the meter to terminal J3 ( original board ) or J4 ( current board ) and the red lead from the meter to J10 or other lead from thermocouple. Start the unit on gas and measure the DC millivolts produced by the thermocouple. The thermocouple should produce 22 to 36 millivolts within 45 seconds. If the millivolts are 20 or below erratic operation will occur. Anything below 10 to 13 the control board will not keep the gas valve energized and turn on the check light after the 45 second trial-for-ignition. 7.4 Burner The slots in the burner should be directly below the flue tube. The burner should be cleaned periodically, at least once a year. Soak the burner in an alcohol based solvent and allow to air dry. If the burner does not have a good ground it can cause erratic gas operation. The electrode sparks to the burner tube and a erratic ground will cause erratic gas operation. 7.5 Flue Baffle The flue baffle ( spiral baffle ) is a twisted piece of metal that hangs in the flue tube to slow the heat from the flame to the proper location on the cooling unit. If the flue baffle is too high or low the heat will not be transferred to the cooling unit properly. MODEL ABOVE SIZE BURNER RM / /16X25/32 RM / /16X25/32 RM / /16X25/32 RM /8 5-1/8X13/16 RM /8 5-1/8X13/16 RM /8 5-1/8X13/16 RM /8 5-1/8X13/16 Lack of heat transfer to the cooling unit will cause low cooling performance in the gas mode. It should be cleaned periodically, at least once a year. The proper position of the baffle above the burner should be as shown in the chart : Always refer to parts list on the model/product number unit you are currently working on. 7.6 Flue Cap The flue cap is located at the top of the flue tube and is attached with a screw or pushed down over tube. Not all units will come with a flue cap. The design of the baffle wire in the flue tube will slow down a down draft. 7.7 Flue Tube Carbon build up will not allow the heat transfer to the cooling unit and cause lack of cooling on gas. The flue tube is welded to the boiler of the cooling unit. In a rough riding coach there have been rare cases where the weld will crack and create lack of cooling. The flue tube must be cleaned periodically, at least once a year. Clean by using a flue brush, Dometic Part No Baffle 20

22 SECTION 8 COOLING UNIT 8.1 Leveling Leveling is one of the requirements for proper operation of absorption refrigerators. The absorption design utilizes no mechanical pumps or compressors to circulate the refrigerant within the system, so proper leveling must be maintained to provide the correct refrigerant flow. Without proper leveling, refrigerant within the cooling unit will collect and stagnate at certain areas. Without proper refrigerant flow, the cooling process will stop. Absorption refrigerators have a type of cooling unit that utilizes an enclosed pump tube surrounded by a solution to protect the assembly. To ensure proper leveling, the vehicle needs to be leveled so it is comfortable to live in. (No noticeable sloping of floor or walls). When the vehicle is moving, leveling is not critical as the rolling and pitching movement of the vehicle will pass to either side of level, keeping the refrigerant from accumulating in the piping Typical Roof Vent and Side Wall Vent PERFECTLY LEVEL NOT REQUIRED MORE LEVEL = BETTER OPERATION 8.2 Ventilation The installation shall be made in such a manner as to separate the combustion system from the living space of the mobile home or recreational vehicle. Openings for air supply or for venting of combustion products shall have a minimum dimension of not less than 1/4 inch. Ventilation is a critical requirement for proper cooling unit operation. The coach vent system must be able to provide a way to direct the hot air, produced by the action of the cooling unit, out away from the installation of the refrigerator. The refrigerator extracts heat from the interior of the refrigerator cabinet and dissipates the heat out through the vent system. In a proper installation there should be zero (0 ) clearance surrounding the sides and top of the refrigerator to achieve proper air flow. Clearance from the back of the refer to the outside wall must be kept less than 1 inch. All potential dead air pockets should be blocked or baffled to ensure that heat won t be trapped in these spaces and reduce efficiency. Note: Refrigerators should be installed in accordance with appropriate installation instructions received with the refrigerator. FOR MORE UPDATED INFORMATION ON UNIQUE VENTILATION REQUIREMENTS, refer to Vent Installation Instructions, Form No XXX. 21 BAFFLE Typical Two Side Wall Vents TURNING VANE BAFFLE
23 Typical Two Side Wall Vent Application. Always Refer To Vent Instructions xxx 22
24 8.3 Air Leaks Check the gasket on the doors to be sure of a positive air seal. A simple method to check gaskets is to close the door on a dollar bill, then pull the dollar bill out. If no resistance is felt, the gasket in that place is not sealing properly. This should be done on all four sides of the door in several places. If a gasket is not sealing properly, lift up inside of door gasket and insert 1/4 ball of fiberglass insulation at all four corners on both doors. This is especially important to the top corners. Next warm the gasket material with a hair dryer. Then close the door and the magnetic strip should pull the gasket to the metal frame. Leave door closed until the material has cooled. Then recheck for a positive seal. If a positive seal cannot be achieved, replace the door gasket. Also check that the cooling unit is installed properly. The cooling unit s foam block, the portion that surrounds the evaporator coils, must be flush to the cabinet at the back of the refrigerator and have a positive seal. If the cooling unit is not installed properly, remove and install properly. Note: Air leaks will cause insufficient cooling as well as rapid formation of frost. 8.4 Interior Liner Seal To Frame There is a seal that is applied to the liner in the area where the metal frame makes contact with the interior liner. If this seal is incomplete, cold air can migrate out to the metal frame. If this happens, condensation could form on the frame and could promote rapid formation of frost. If you suspect an improper seal, apply a small bead of silicone all the way around the perimeter where the frame meets the interior liner. Next remove all screws securing the refrigerator into the cabinet and slide the refrigerator out approximately 2 4 inches. Clean the metal frame and foil-backed insulation around the refrigerator. Apply a foilbacked adhesive tape to the joint between outer frame and foil-backed refrigerator insulation. Make sure the refrigerator is dry and that the surface temperatures are above 50 F. Use a clear silicon caulking compound and seal the seam between the refrigerator s plastic liner and the metal frame. Apply the silicon in a continuous bead around both the refrigerator freezer and food compartments. CAULK SEAM BETWEEN PLASTIC LINER AND METAL FRAME ( R e f r i g e r a t o r shown with doors removed) DO NOT OVERHEAT AS YOU CAN MELT THE MATERIAL Another source for an air leaks could be the drain hose. When units are installed, there is a check valve at the end of the drain. At install the hose might be shortened and the check valve must be moved to the end of drain hose. Any time lack of performance or excessive frost is experienced, look for the check valve at the end of hose. 23 APPLY FOIL-BACKED OR ALUMINUM TAPE TO JOINT BETWEEN OUTER FRAME AND FOIL-BACKED REFRIG- ERATOR INSULATION. GO AROUND THE COMPLETE FRAME.
25 Note: To form a proper seal, it is important not to leave any gaps. 8.5 Door Position If the upper or lower door is closing too high or low against the frame, cold air leakage can occur. Adding or deleting a flat thin washer on top of the lower or middle hinge pin can raise or lower the door position. To correct the door alignment, loosen the hinge screws slightly and reorient the door in the proper position. Hold the door in its new position and carefully retighten the hinge screws. 8.6 Ambient Temperature This is the temperature surrounding the recreational vehicle, as well as the temperature of air at the back of the refrigerator. As the ambient temperature increases, the air temperature in the area of the cooling unit increases. Improper venting at this point will cause the cooling unit to have reduced efficiency. A refer that chases the out-side temperature is improperly vented or has a weak cooling unit. 24
26 25
27 8.7 Cooling Unit The cooling unit is a self-contained, hermetically sealed set of coils where the refrigeration process takes place. The chemicals involved in the cooling process include hydrogen, ammonia, water and a rust inhibiting agent. There are no repairs recommended on the cooling unit. If it is defective, replace with a new cooling unit. To check the cooling unit, first verify the AC heating element is good, proper ohms at room temperature, proper venting and unit is level. Then place approximately one gallon of water inside the refrigerator and place a thermometer in one of the containers of water. Next, unplug the thermistor from the lower control board. This will by-pass the thermostat control and operate for at least 12 hours. Then check the temperature on the thermometer. It should be at 43 degrees or lower depending on test conditions. If so, the cooling unit is good. If the temperature of the water is above 43 degrees, replace the cooling unit. The outside temperature will affect the cooling capacity of the unit. There is that rare occasion when the cooling unit will work OK for the first 12 hours and then start to warm up. If the customers complaint is works OK for 2 to 5 days and then warms up the unit may have an internal problem. To test this it would be necessary to operate the cooling unit for up to 24 to 48 hours in the test mode. 8.8 Food Storage Proper refrigeration requires free air circulation within the food storage compartment. Restricted air circulation within this compartment will cause higher cabinet temperatures. To remedy this situation, simply rearrange your foodstuffs. It is also essential that the shelves are not covered with paper or large storage containers. Always remember to allow for proper air circulation. Odorous or highly flavored foods should always be stored in covered dishes, plastic bags or wrapped in foil or waxed paper to prevent food odors. Vegetables, lettuce, etc., should be covered to retain their crispness. NEVER PUT HOT FOOD INTO THE REFRIG- ERATOR. To reduce frost formation in and on the freezing compartment, cover stored liquids and moist foods and do not leave the door open longer than necessary. When the refrigerator is heavily loaded, it takes a longer time for refrigerator temperatures to lower, also increasing the ice making time. A very heavy load may also cause defrosting. Defrosting every 7 to 21 days would be normal, depending on the humidity level. SECTION 9 WIRING 9.1 Internal Wiring Check all wires and the connectors to ensure a proper and tight connection. Also verify the refrigerator is wired per the wiring diagram for the model you are working on. (See applicable wiring diagrams for your model refrigerator). A loose connection can create erratic operation. Always check the wires at the DC terminal block, two wires in and two wires out. 9.2 External Wiring 120 Volts AC Connection: The refrigerator is equipped with a three prong (grounded) plug for protection against shock hazards and should be plugged directly into a properly grounded three prong receptacle. DO NOT cut or remove the grounding prong from this plug. 12 Volt Connection : The connection is made to the terminal block marked 12 volts DC. The control system is connected to a battery/converter circuit and could draw about 3 amps at 12 volts DC. The refrigerator must be connected to the battery circuit with two wires of adequate capacity to avoid voltage drop. Proper polarity is crucial for refrigerator operation. Don t use the chassis for the ground circuit. No other electrical equipment or lighting should be connected to refrigerator circuit. A loose connection will create erratic operation. On three way units the DC heater will draw up to 18 AMPS and size of wires should follow installation instructions for the model unit you are working on. 9.3 Wiring Schematics To view typical wiring schematics look in the Lower Circuit board testing section 5, pages 14, 15 and 16. All units should have a specific schematic on the rear of that unit. To acquire the proper one always have the product number when you call or . SECTION 10 ICE MAKER 10.1 Operation The refrigerator must be allowed to precool properly before starting the ice maker. The refrigerator has to be connected to 120 volts AC before the ice maker can operate. The water line manual shutoff valve (not part of Dometic unit) must be open. To start making ice, move the ice level bail arm to DOWN position. 8.9 High Humidity High humidity may cause a small amount of condensation to form on the frame of the refrigerator. In some cases it can develop to such a degree that it will run off the frame. As the humidity is reduced, the sweating will decrease. High humidity can also be a factor in rapid formation of frost. 26

28 When the ice maker thermostat senses the preset temperature for ejection of the ice cubes, the fingers will start to rotate, dumping any ice cubes and filling the mold with water. When the storage container is full of ice, the ice level bail arm cannot return to the DOWN position. This will stop further production of ice until the container is emptied and the bail arm is returned to the down position. The absorption system will keep the compartment at the proper temperature for storage of ice. Ice making is accelerated if the thermostat is set to the coldest position. It is a good idea to do this a few hours before you anticipate a need for ice. The first few cycles may have small cubes due to air trapped in the water lines. The first container of ice cubes should be dumped if the water system has been winterized or not used for several weeks Mold Thermostat This is a single-pole, single-throw, bimetal switch. It starts an ejection cycle by closing at 15º F ± 5º. The reset temperature is 50º F ± 5º. The thermostat is in series with the mold heater and acts as a safety against overheating in case of a mechanical failure. If the thermostat is defective, replace it. The mold thermostat starts the ice ejection cycle. The freezer must be down to proper temperature for the mold thermostat to start the cycle. The cycle can be started by turning the large gear clock wise 1/8 to 1/4 of a turn. Note: if the ice maker was cleaned and drained, no ice cubes will be dumped into the storage container during the first few cycles Mold Heater The mold heater uses 165 watts to thaw the ice free from the mold. It is wired in series with the thermostat which also acts as a safety device. With power to the appliance off, check for resistance between the two leads to the heater element. You should obtain a reading of approximately 80 ohms +/- 10%. If the heater is found to be defective, the manufacturer recommends replacement of the entire ice making unit for proper operation Shut Off Arm The shutoff arm is cam driven. It operates a switch to control the quantity of ice produced. During the ejection cycle the arm is raised and lowered during each of the two revolutions of the timing cam. If the shutoff arm comes to rest on top of the ice in the storage bin during either revolution, the switch will remain open and stop the ice maker at the end of that revolution. The arm has a manual shutoff built into the linkage; by raising the arm as high as possible, it will lock in that position until forced down. If the arm and switch do not operate properly, check for damage and repair or replace parts as necessary Ice Ejector The ice ejector blades sweep the ice from the mold cavities during the ejection cycle. The drive end of the ejector is D shaped for positive coupling. The bearings at both ends are lubricated with silicone grease. If the ejector blades are frozen into the ice, defrost the ice maker and manually cycle the ice making unit, making sure the ejector stops at the right location Mold Switches The three switches are single-pole, double-throw style. They are identical and interchangeable. The holding switch assures completion of a revolution once a cycle has started. The water valve switch opens the water valve during the fill stage of the cycle. NOTE: This is the only adjustable component of the ice maker. If you use a double throw switch, DO NOT use the N.O. terminal. The shutoff switch stops the ice maker s operation when the storage bin is full.

29 10.9 Ice Maker Replacement 10.7 Timing Motor This is a low-wattage, stall-type motor which is geared to the timing cam and ice ejector. It is a one RPM motor. To check the motor, disconnect power to the appliance and test for continuity between the two leads. If you DO NOT have continuity, replace the motor. If you have continuity and the motor runs, DO NOT replace. This is an energized circuit. Shock can occur if not tested properly. Testing is to be done by a qualified service technician. It may be necessary to replace the entire ice maker assembly. Disconnect power to the appliance. Disconnect the 4 pin connector from the ice maker unit. Check each wire for continuity to make sure the wiring is good before replacing the ice maker unit. If there is no continuity on any of these wires, replace or repair them as necessary and recheck the ice maker unit to determine whether the problem was in the wiring or the unit itself. Remove the three screws holding the unit to the plate. Before replacing the ice maker assembly check the temperature in the freezer. For the unit to cycle it should be 12 degrees or cooler as the mold thermostat starts the cycle Water Valve This valve is solenoid operated. When it is open it releases water from the source to the mold. The amount of water is proportional to the length of time the water valve switch is held closed by its timing cam. Disconnect power to the appliance, remove the wires to the water valve solenoid coil, and check for continuity between the two terminals. The ohms should be between 200 to 500. If you have continuity, the solenoid is good. It takes watts to energize the solenoid coil. The mold heater and coil are in series. When the mold heater is activated, this causes the voltage to drop to about 105 VAC at the coil. The valve has a flow washer inside which acts as a pressure regulator. A strainer is installed to prevent dirt, rust, etc, from entering the valve. Check for any debris which might obstruct the flow of water, or prevent the valve from closing completely when the circuit is not energized. Remove any obstructions. If the valve still fails to operate properly, replace it. If the valve has been cracked from freezing this would not be a warranty item Water Fill Adjustment The correct water level in the mold is important for the proper production of ice. The size of the ice cubes depends on the amount of water which enters the mold. The cubes should be approximately 1/2 wide, 3/4 high and 2-1/2 long. If the water overflows in the mold, first check to see if the ice maker unit is level in the appliance. Next ensure that the appliance is installed level in the RV. If there is still water overflow, adjustment of the water fill screw is necessary. Locate the screw on the ice maker assembly. Turn the screw as necessary toward the + or side. One full turn of the screw will make an 18 cc change in the amount of water. DO NOT turn the screw more than one full turn at a time. If the water level is too high, it can also cause the ejector blades to become frozen in the ice. Follow the procedures above to correct the problem.

30 12 VDC POSITIVE J2 OR J3 HEATER WATER LINE WHITE AC NEUTRAL TO BOARD J6 BLACK AC LINE TO BOARD J Water Supply To operate properly, the water pressure in the water supply line must be between 15 lbs. PSI and 125 lbs. PSI. Lower water pressure, water turned off, or obstructions or air in the water line can cause low or no ice production. First check to see that the water supply is fully turned on. Visually check the line for kinks, etc. which might obstruct the flow of water. To remove trapped air, loosen the connection at the water solenoid valve of the appliance. Ensure that pressurized water is reaching this point, and bleed off any air in the line. Retighten the connection, making sure there are no leaks Wiring Schematics This is an energized circuit. Shock can occur if not tested properly. Testing is to be done by a qualified service technician. Refer to the wiring diagram supplied with the unit you are working on, and make sure all wiring connections are correct and tight. There are 4 wires coming from the ice maker. BLACK: Connected to incoming hot from AC power source. This could be split wire at the AC BLACK at the circuit board or a separate power cord. WHITE: Connected to either side of the water valve and will split at the valve and hook-up to the incoming WHITE from the power source. GREEN/YELLOW : Connected to chassis ground. BROWN: Connected to either side of water valve. 29
Dometic Manual Refrigerators
 This section addresses the most common system problems associated with supplied by The Dometic Corporation. Our intent is to provide you with a guideline of checks to make, should you encounter one of
Foreword OS /94. Diagnostic Service Manuals
 Foreword This service manual is the result of the dedication of The Dometic Corporation and its engineers in giving service people the necessary instruction for making accurate analyses of certain conditions.
Northwest RV Supply Manual Compliments of Printed From Foreword
 Foreword This service manual is the result of the dedication of The Dometic Corporation and its engineers in giving service people the necessary instruction for making accurate analyses of certain conditions.
SERVICE TIPS. 81 Dometic. AMES/AES/ROYALE/ELlTE REFRIGERATORS. Models. Refrigerator Start-Up Information
 SERVICE TIPS 81 Dometic AMES/AES/ROYALE/ELlTE REFRIGERATORS Models SILHOUETTE AMES/AES S1521 S1531 S1621 S1631 S1821 S1831 DOMETIC AMES/AES RM2607 RM2611 RM2807 RM2811 RM3607 RM3807 DOMETIC ROYALE RM3662
Service Manual For model N260 - a 2.4 cu. ft., 2-way refrigerator. For model N a 2.4 cu. ft., 3-way refrigerator.
 Service Manual For model N260 - a 2.4 cu. ft., 2-way refrigerator. For model N260.3 - a 2.4 cu. ft., 3-way refrigerator. NORCOLD, Inc. P.O. Box 4248 Sidney, OH 45365-4248 Part No. 619260A (4-98) Table
Northwest RV Supply Manual Compliments of Printed From 900 & 9100 Series
 900 & 9100 Series Service Manual & Parts List for Models 9182 9183 9162 9163 982 983 962 963 Safety Information............... 1 Introduction................... 2 Specifications.................. 3 Operating
Model: Dometic RM2453
 Model: Dometic RM2453 Part Number: RM2453 Index Wide metal mounting flanges for built-in application - no exterior skin Door reversing kit available, part number 2932750-02 Gross Capacity: 20 litres approx.
Frost Checklist and Troubleshooting Guide for NDA1402 & NEA1402
 Frost Checklist and Troubleshooting Guide for NDA1402 & NEA1402 REFRIGERATOR BULLETIN R82-7A NOVEMBER 2007 USA SERVICE OFFICE Dometic Corporation 2320 Industrial Parkway Elkhart, IN 46516 574-294-2511
Service Manual Model 3163
 Service Manual Model 3163 Contents Important Safety Information.......... 1 Specifications.................. 2 General Information.............. 2 Direct Vent Requirements........... 2 Propane System................
INSTALLATION AND OPERATING INSTRUCTIONS
 INSTALLATION AND OPERATING INSTRUCTIONS REFRIGERATOR FOR LP-GAS AND ELECTRIC OPERATION RM2652 RM2852 Contents: Page Installation 4 Operating Instructions 8 Maintenance & Service 12 If you smell gas: FOR
Installation Requirements for Models:
 900 & 9100 Series Refrigerators Installation Requirements for Models: 9162 9163 9182 9183 962 963 982 983 WARNING Improper installation, adjustment, alteration, service, or maintenance can cause injury
Installation Manual. For Australian refrigerator models: N304M.3 (93 liter 3-way operation with LP gas, 240 volts AC, or 12 volts DC )
") Installation Manual For Australian refrigerator models: N304M.3 (93 liter 3-way operation with LP gas, 240 volts AC, or 12 volts DC ) N404M.3 (128 liter 3-way operation with LP gas, 240 volts AC, or 12
Installation Manual For Australian refrigerator models: N304M.3 (93 liter 3-way operation with LP gas, 240 volts AC, or 12 volts DC ) N404M.3 (128 liter 3-way operation with LP gas, 240 volts AC, or 12
INSTALLATION AND OPERATING INSTRUCTIONS
 INSTALLATION AND OPERATING INSTRUCTIONS REFRIGERATOR FOR LP-GAS AND ELECTRIC OPERATION RM2451 Contents: Page Installation 4 Operating Instructions 8 Maintenance & Service 12 If you smell gas: FOR YOUR
INSTALLATION AND OPERATING INSTRUCTIONS
 INSTALLATION AND OPERATING INSTRUCTIONS REFRIGERATOR FOR LP-GAS AND ELECTRIC OPERATION RM2620 RM2820 Contents: Page Installation 4 Operating Instructions 7 Maintenance & Service 11 If you smell gas: FOR
Owner s Manual. For Australian refrigerator models: N304.3 (93 liter 3-way operation with LP gas, 240 volts AC, or 12 volts DC )
") Owner s Manual For Australian refrigerator models: N304.3 (93 liter 3-way operation with LP gas, 240 volts AC, or 12 volts DC ) N404.3 (128 liter 3-way operation with LP gas, 240 volts AC, or 12 volts
Owner s Manual For Australian refrigerator models: N304.3 (93 liter 3-way operation with LP gas, 240 volts AC, or 12 volts DC ) N404.3 (128 liter 3-way operation with LP gas, 240 volts AC, or 12 volts
RM2612 RM2812 REFRIGERATOR MODEL INSTALLATION & OPERATING INSTRUCTIONS REFRIGERATOR FOR LP/GAS AND ELECTRIC OPERATION
 RECORD THIS INFORMATION FOR FUTURE REFERENCE BEFORE INSTALLING THE UNIT: Model No. Serial No. Date Purchased Place of Purchase USA SERVICE OFFICE The Dometic Corp. 509 So. Poplar St. LaGrange, IN 46761
Norcold Repair Guide for Ice Maker
 Norcold Repair Guide for Ice Maker Section 10 Table of Contents Page: 10-2 General Description 10-2 Refrigerator Specifications 10-2 Refrigerator Operating Limits 10-2 Refrigerator Current Draws 10-2 Ice
12.0 cu.ft., 2 way, 4-door, R.V. refrigerator with ice maker.
 Installation Manual For 1200ACXX models: For 120XAC-IMXX models: 12.0 cu.ft., 2-way, 4-door, R.V. refrigerator. 12.0 cu.ft., 2 way, 4-door, R.V. refrigerator with ice maker. The letter X, in the model
Electronic Ignition Water Heater
 Electronic Ignition Water Heater TROUBLE SHOOTING GUIDE Effective: 5/26/98 Guides are only intended for use on Atwood products by service technicians who have successfully completed Atwood training. This
RM7030 Product No REFRIGERATOR MODEL INSTALLATION & OPERATING INSTRUCTIONS MODEL RM7030
 RECORD THIS INFORMATION FOR FUTURE REFERENCE BEFORE INSTALLING THE UNIT: Model No. Serial No. Date Purchased Place of Purchase USA SERVICE OFFICE The Dometic Corp. 509 So. Poplar St. LaGrange, IN 4676
INSTALLATION AND OPERATING INSTRUCTIONS
 INSTALLATION AND OPERATING INSTRUCTIONS REFRIGERATOR FOR LP-GAS AND ELECTRIC OPERATION NDR1062 Contents: Page Installation 4 Operating Instructions 8 Maintenance & Service 12 If you smell gas: FOR YOUR
RV REFRIGERATOR LP-GAS & ELECTRIC
 LITERATURE NUMBER MPD 4003333 RV REFRIGERATOR LP-GAS & ELECTRIC HE-0601, HE-0801 PROTECTED BY US PATENTS PENDING avoid possible injury or death SAFETY ALERT SYMBOLS Safety Symbols alerting you to potential
installation manual DM3862 RM2554 DM2663 RM2551 Refrigerator for LP-gas & electric operation DM2852 ! AVERTISSEMENT ! WARNING FOR YOUR SAFETY
 RM25 RM254 RM245 RM2454 RM255 RM2554 DM2652 DM2662 DM266 DM2852 DM2862 DM862 NDM062 NDR292 installation manual Refrigerator for LP-gas & electric operation FOR YOUR SAFETY If you smell gas:. Open windows.
WMHP Series R410a Heat Pump INSTALLATION INSTRUCTIONS
 WMHP Series R410a Heat Pump INSTALLATION INSTRUCTIONS **WARNING TO INSTALLER, SERVICE PERSONNEL AND OWNER** Altering the product or replacing parts with non authorized factory parts voids all warranty
MODEL 1082 FREE-STANDING REFRIGERATOR
 Service Manual MODEL 1082 FREE-STANDING REFRIGERATOR Specifications AC.............. 120 VAC, 60 Hertz......... 132 VAC Max. - 108 VAC Min. Heater............ Power - 300 Watt............. Current - 2.7-2.9
REFRIGERATOR MODEL RM7732 MODEL RM7732 AND ELECTRIC OPERATION
 RECORD THIS INFORMATION FOR FUTURE REFERENCE BEFORE INSTALLING THE UNIT: Model No. Serial No. Date Purchased Place of Purchase USA SERVICE OFFICE The Dometic Corp. 509 So. Poplar St. LaGrange, IN 46761
RM2604 & RM2804 Gas Controls
 RM2604 & RM2804 Gas Controls Before attempting any repairs or testing, check out the gas safety and electrical safety pages. Before going further on this page, take a look at the older Dometic gas system
INSTALLATION & OPERATING INSTRUCTIONS. Roof Top Unit. Model. USA SERVICE OFFICE Dometic Corporation 2320 Industrial Parkway Elkhart, IN 46516
 RECORD THIS INFORMATION FOR FUTURE REFERENCE: Model Number Serial Number ADB Model Number ADB Serial Number Date Purchased USA SERVICE OFFICE Dometic Corporation 2320 Industrial Parkway Elkhart, IN 46516
21D83M-843 Integrated Single Stage Furnace Control Replacement Kit INSTALLATION INSTRUCTIONS
 21D83M-843 Integrated Single Stage Furnace Control Replacement Kit INSTALLATION INSTRUCTIONS FAILURE TO READ AND FOLLOW ALL INSTRUCTIONS CAREFULLY BEFORE INSTALLING OR OPERATING THIS CONTROL COULD CAUSE
Freightliner Refrigerator Troubleshooting Guide For (TJ18F) (TJ22F) (TJ18FP3)
 (TJ22F) (TJ18FP3)") www.dometic.com Freightliner Refrigerator Troubleshooting Guide For Before initiating troubleshooting, the following equipment is recommended: Multimeter, 20 gauge (min) wires to use as jumpers, and 12Vdc
www.dometic.com Freightliner Refrigerator Troubleshooting Guide For Before initiating troubleshooting, the following equipment is recommended: Multimeter, 20 gauge (min) wires to use as jumpers, and 12Vdc
Internet Version for Reference Only INDUCED DRAFT COMMERCIAL WATER HEATERS SUPPLEMENT INSTRUCTIONS TO PART #
 INDUCED DRAFT COMMERCIAL WATER HEATERS SUPPLEMENT INSTRUCTIONS TO PART #238-39387-00 THIS INSTRUCTION SUPPLEMENT IS ONLY INTENDED TO GIVE INSTALLATION INSTRUCTIONS AND INFORMATION RELATED TO THE INDUCED
ATCO How a Cooling Unit Works
 G A L V A N I Z E D Contents of this PDF How a Cooling Unit Works pages 1 2 pages 3 6 How a Cooling Unit Works RV refrigeration manufacturers have known the value of zinc protection for decades. In fact,
OPERATING INSTRUCTIONS MANUAL (Please retain for future reference) FVN/P-400 INDIRECT FIRED SPACE HEATERS
 FVN/P-400 INDIRECT FIRED SPACE HEATERS") OPERATING INSTRUCTIONS MANUAL (Please retain for future reference) For FVN/P-400 INDIRECT FIRED SPACE HEATERS CERTIFIED FOR USE IN CANADA AND U.S.A. As per Standard ANSI Z83.7/CSA 21.4 2000 Gas Fired Construction
OPERATING INSTRUCTIONS MANUAL (Please retain for future reference) For FVN/P-400 INDIRECT FIRED SPACE HEATERS CERTIFIED FOR USE IN CANADA AND U.S.A. As per Standard ANSI Z83.7/CSA 21.4 2000 Gas Fired Construction
Operator: Save these instructions for future use!
 50A66-743 Integrated Furnace Control Operator: Save these instructions for future use! FAILURE TO READ AND FOLLOW ALL INSTRUCTIONS CAREFULLY BEFORE INSTALLING OR OPERATING THIS CONTROL COULD CAUSE PERSONAL
PARTS LIST Series REFRIGERATOR PARTS LIST MODEL NDR1292
 USA SERVICE OFFICE Dometic Corporation 2320 Industrial Parkway Elkhart, IN 46516 574-294-2511 CANADA Dometic Corporation 46 Zatonski, Unit 3 Brantford, ON N3T 5L8 CANADA 519-720-9578 For Service Center
OPERATING INSTRUCTIONS MANUAL (Please retain for future reference) FVN/P-400 INDIRECT FIRED SPACE HEATERS
 FVN/P-400 INDIRECT FIRED SPACE HEATERS") OPERATING INSTRUCTIONS MANUAL (Please retain for future reference) For FVN/P-400 INDIRECT FIRED SPACE HEATERS CERTIFIED FOR USE IN CANADA AND U.S.A. As per Standard ANSI Z83.7/CSA 21.4 2000 Gas Fired Construction
OPERATING INSTRUCTIONS MANUAL (Please retain for future reference) For FVN/P-400 INDIRECT FIRED SPACE HEATERS CERTIFIED FOR USE IN CANADA AND U.S.A. As per Standard ANSI Z83.7/CSA 21.4 2000 Gas Fired Construction
DF400/DF600. Construction Heaters. Installation and Maintenance Manual
 342 N. Co. Rd. 400 East Valparaiso, IN 46383 219-464-8818 Fax 219-462-7985 www.heatwagon.com Installation and Maintenance Manual Please retain this manual for future reference. DF400/DF600 Construction
OWNER S MANUAL Manufactured Home Downflow Gas Furnace: MGD-B Series
 OWNER S MANUAL Manufactured Home Downflow Gas Furnace: MGD-B Series Heat Controller, Inc. 1900 Wellworth Ave. Jackson, MI 49203 (517)787-2100 www.heatcontroller.com Owner s Manual MGD-B SERIES GAS FURNACE
SERIES VAC Microprocessor-Based Direct Spark Ignition Control FEATURES APPLICATIONS SPECIFICATIONS DESCRIPTION. Export Information (USA)
") R SERIES 35-70 120 VAC Microprocessor-Based Direct Spark Ignition Control F-35-70 November 2015 FEATURES Safe start with DETECT-A-FLAME flame sensing technology Custom pre-purge and inter-purge timings
R SERIES 35-70 120 VAC Microprocessor-Based Direct Spark Ignition Control F-35-70 November 2015 FEATURES Safe start with DETECT-A-FLAME flame sensing technology Custom pre-purge and inter-purge timings
OPERATING INSTRUCTIONS MANUAL (Please retain for future reference) FVO-400 INDIRECT FIRED SPACE HEATERS
 FVO-400 INDIRECT FIRED SPACE HEATERS") OPERATING INSTRUCTIONS MANUAL (Please retain for future reference) For FVO-400 INDIRECT FIRED SPACE HEATERS CERTIFIED FOR USE IN CANADA AND U.S.A. As per CSA B140.8 Portable Oil Fired Heaters / CSA B140.02003
OPERATING INSTRUCTIONS MANUAL (Please retain for future reference) For FVO-400 INDIRECT FIRED SPACE HEATERS CERTIFIED FOR USE IN CANADA AND U.S.A. As per CSA B140.8 Portable Oil Fired Heaters / CSA B140.02003
Hot Surface Ignition (HSI) System Booklet
 System Booklet") Hot Surface Ignition (HSI) System Booklet American Dryer Corporation 88 Currant Road Fall River MA 02720-4781 Telephone: (508) 678-9000 / Fax: (508) 678-9447 E-mail: techsupport@amdry.com 010298MFM/abe
Hot Surface Ignition (HSI) System Booklet American Dryer Corporation 88 Currant Road Fall River MA 02720-4781 Telephone: (508) 678-9000 / Fax: (508) 678-9447 E-mail: techsupport@amdry.com 010298MFM/abe
FURNACE OPERATION OVERVIEW
 You ve had a fun day but now it s getting chilly, so you decide to fire up the RV furnace. You flip the thermostat on, set the temperature and wait expectantly, but no heat comes from the outlets. It s
WARNING WARNING TROUBLESHOOTING GUIDE INTEGRATED FURNACE CONTROL MODULE
 TROUBLESHOOTING INTEGRATED FURNACE Failure to read and follow all instructions carefully before installing or operating this control, could cause personal injury and/ or property damage. 50A55 INTEGRATED
AXIAL HEATER TROUBLE SHOOTING GUIDE. Models: AX24 N/PV, AX24 N/PV LT, AX24 LP AX26 N/PV, AX26 N/PV LT, AX26 LP AX28 N/PV, AX28 N/PV NT, AX28 LP
 AXIAL HEATER TROUBLE SHOOTING GUIDE Page 1 July 2009 Table of Contents Frequently Asked Questions... 3 Axial Heater CONTROL (Siemens LME69) Troubleshooting Chart... 4 Axial Heater BURNER Troubleshooting
50M Integrated Single or Two-Stage HSI Integrated Furnace Control Kit INSTALLATION INSTRUCTIONS
 50M56-743 Integrated Single or Two-Stage HSI Integrated Furnace Control Kit INSTALLATION INSTRUCTIONS FAILURE TO READ AND FOLLOW ALL INSTRUCTIONS CAREFULLY BEFORE INSTALLING OR OPERATING THIS CONTROL COULD
OPERATING INSTRUCTIONS MANUAL (Please retain for future reference) FVO-200 INDIRECT FIRED SPACE HEATERS
 FVO-200 INDIRECT FIRED SPACE HEATERS") OPERATING INSTRUCTIONS MANUAL (Please retain for future reference) For FVO-200 INDIRECT FIRED SPACE HEATERS CERTIFIED FOR USE IN CANADA AND U.S.A. As per CSA B140.8 Portable Oil Fired Heaters / CSA B140.02003
OPERATING INSTRUCTIONS MANUAL (Please retain for future reference) For FVO-200 INDIRECT FIRED SPACE HEATERS CERTIFIED FOR USE IN CANADA AND U.S.A. As per CSA B140.8 Portable Oil Fired Heaters / CSA B140.02003
Installation Instructions Part No
 Heat Exchanger Cell Kit Cancels: New Installation Instructions Part No. 326600-751 IIK-310A-45-6 6-02 NOTE: Read the entire instruction manual before starting the installation. SAFETY CONSIDERATIONS Installing
2008 DOUBLE DRAWER UNDER COUNTER REFRIGERATOR / FREEZER PRODUCTS
 TECHNICAL EDUCATION R-107 2008 DOUBLE DRAWER UNDER COUNTER REFRIGERATOR / FREEZER PRODUCTS KDDC24RVS KDDO24RVX KDDC24CVS KDDO24CVX KDDC24FVS KDDO24FVX JUD248RCRS JUD248RCCX JUD248CCRS JUD248CCCR JUD248FCRS
- 12 VDC. HHE M - 12 VDC.
 R OWNER S MANUAL Model Number HHE-200-09E - 12 VDC. HHE-500-09M - 12 VDC. OWNER S INFORMATION Owner s Name: Address: City: State: Zip Code: CUT HERE AND MAIL IN Telephone: E-mail Address: Motorhome Model:
PARTS LIST Series REFRIGERATOR PARTS LIST MODEL NDA1402. USA SERVICE OFFICE Dometic Corporation 2320 Industrial Parkway Elkhart, IN
 When ordering parts, always state: MODEL NO. - PRODUCT NO. - QUANTITY - PART NUMBER - DESCRIPTION For Electric Details also state: VOLTAGE - WATTAGE REFRIGERATOR PARTS LIST MODEL NDA1402 USA SERVICE OFFICE
REFRIGERATOR SAFETY. Your safety and the safety of others are very important.
 REFRIGERATOR SAFETY Your safety and the safety of others are very important. We have provided many important safety messages in this manual for your appliance. Always read and obey all safety messages.
Operator: Save these instructions for future use!
 50A65-843 Universal Integrated Furnace Control INSTALLATION INSTRUCTIONS Operator: Save these instructions for future use! FAILURE TO READ AND FOLLOW ALL INSTRUCTIONS CAREFULLY BEFORE INSTALLING OR OPERATING
INSTRUCTION MANUAL (UNIT APPEARANCE MAY VARY FROM IMAGE) BEFORE USE, PLEASE READ AND FOLLOW ALL SAFETY RULES AND OPERATING INSTRUCTIONS.
 BEFORE USE, PLEASE READ AND FOLLOW ALL SAFETY RULES AND OPERATING INSTRUCTIONS.") INSTRUCTION MANUAL Model Number: FR551 REFRIGERATOR-FREEZER (UNIT APPEARANCE MAY VARY FROM IMAGE) BEFORE USE, PLEASE READ AND FOLLOW ALL SAFETY RULES AND OPERATING INSTRUCTIONS. Igloo has a policy of continuous
INSTRUCTION MANUAL Model Number: FR551 REFRIGERATOR-FREEZER (UNIT APPEARANCE MAY VARY FROM IMAGE) BEFORE USE, PLEASE READ AND FOLLOW ALL SAFETY RULES AND OPERATING INSTRUCTIONS. Igloo has a policy of continuous
Dometic. AMERICANA Model RM2652 & RM2852 REFRIGERATOR MODEL RM2652 RM2852 INSTALLATION & OPERATING INSTRUCTIONS
 Dometic RECORD THIS INFORMATION FOR FUTURE REFERENCE BEFORE INSTALLING THE UNIT: Model No. Serial No. Date Purchased Place of Purchase USA SERVICE OFFICE The Dometic Corp. 509 So. Poplar St. LaGrange,
IFT-RC150 IntelliFire Touch Remote Control Installation Instructions
 IFT-RC150 IntelliFire Touch Remote Control Installation Instructions Leave this manual with party responsible for use and operation. 1. Introduction The IFT-RC150 is a wall mounted device that is designed
installation & operating instructions
 installation & operating instructions RGE 410 RA/RM-2D 822706106 MO-M 0740 INTRODUCTION We are pleased that you have chosen this refrigerator and hope you will derive much satisfaction from using it.
Technical Training Prodigy Undercounter Cubers. Models CU1526, CU2026 and CU3030
 Technical Training Prodigy Undercounter Cubers Models CU1526, CU2026 and CU3030 List of Major Topics Introduction Installation Operation Maintenance Diagnosis Service Prodigy with a Bin 3 models CU1526
INSTALLATION OPERATING, AND SERVICE INSTRUCTIONS FOR SUBURBAN DIRECT VENT SEALED COMBUSTION GAS HEATER MODEL GT-10D
 INSTALLATION OPERATING, AND SERVICE INSTRUCTIONS FOR SUBURBAN DIRECT VENT SEALED COMBUSTION GAS HEATER MODEL GT-10D FOR YOUR SAFETY FOR YOUR SAFETY IF YOU SMELL GAS: DO NOT STORE OR USE GASOLINE 1. OPEN
II. General Operating Instructions. A. Lighting Instructions
 II. General Operating Instructions A. Lighting Instructions Gas and Electric - Read all safety information first. Turn gas cock clockwise to "OFF" position and temperature indicator to the lowest setting.
G-7s. Instruction Manual. G-Series Cooler COUNTERTOP COOLER. Part No.11IPA
 G-Series Cooler COUNTERTOP COOLER Part No.11IPA-061000 Instruction Manual FOR YOUR FUTURE REFERENCE This easy-to-use manual will guide you in getting the best use of your cooler. Remember to record the
OPERATING INSTRUCTIONS MANUAL (Please retain for future reference) FVN/P-400 INDIRECT FIRED SPACE HEATERS
 FVN/P-400 INDIRECT FIRED SPACE HEATERS") OPERATING INSTRUCTIONS MANUAL (Please retain for future reference) For FVN/P-400 INDIRECT FIRED SPACE HEATERS CERTIFIED FOR USE IN CANADA AND U.S.A. As per Standard ANSI Z83.7/CSA 21.4 2000 Gas Fired Construction
OPERATING INSTRUCTIONS MANUAL (Please retain for future reference) For FVN/P-400 INDIRECT FIRED SPACE HEATERS CERTIFIED FOR USE IN CANADA AND U.S.A. As per Standard ANSI Z83.7/CSA 21.4 2000 Gas Fired Construction
HOUSEHOLD FREEZER 048-GM-48303/048-GM-48304/048-GM-48305
 HOUSEHOLD FREEZER 048-GM-48303/048-GM-48304/048-GM-48305 TABLE OF CONTENTS NAMES OF THE PARTS 2 IMPORTANT SAFETY INSTRUCTIONS 3 INSTALLATION INSTRUCTIONS BEFORE USING YOUR FREEZER. 3 INSTALLING YOUR FREEZER
AHE S -12 VDC AHE S - 24 VDC
 Owner s Manual Model Numbers AHE-100-02S -12 VDC AHE-200-02S - 24 VDC OWNER S INFORMATION Owner s Name: Address: City: State: Zip Code: CUT HERE AND MAIL IN Telephone: Coach Model: Coach Date of Purchase:
prestige Condensing Water Boiler SERVICE TECHNICIAN S TROUBLE SHOOTING GUIDE TSG-SOLO-9/04
 prestige Condensing Water Boiler SERVICE TECHNICIAN S TROUBLE SHOOTING GUIDE 2004-28 TSG-SOLO-9/04 Table of Contents INTRODUCTION Page 1 SERVICING TIPS AND INSTRUCTIONS Page 3 CONTROL MODULE DISPLAY -
2245 Wyecroft Road #5, Oakville, Ontario Canada L6L 5L7 Ph: Toll Free: Fax:
 2245 Wyecroft Road #5, Oakville, Ontario Canada L6L 5L7 Ph: 905-827-6157 Toll Free: 1-877-427-2266 Fax: 905-827-2027 Instructions for Installation, Operation & Service Manufacturer: Zero Appliances, Chloorkop
PROAIR Air Conditioner. CR29 Model INSTRUCTION MANUAL nvent Rev. I P/N
 PROAIR Air Conditioner CR29 Model INSTRUCTION MANUAL Rev. I P/N 89104461 TABLE OF CONTENTS Warranty and Return Policy...2 RECEIVING THE AIR CONDITIONER...3 HANDLING AND TESTING THE AIR CONDITIONER...3
8 cu.ft., 2-way, R.V. refrigerators.
 Owner s Manual For N61X models: For N81X models: 6 cu.ft., 2-way, R.V. refrigerators. 8 cu.ft., 2-way, R.V. refrigerators. WARNING: Improper installation, adjustment, alteration, service or maintenance
2245 Wyecroft Road #5, Oakville, Ontario Canada L6L 5L7 Ph: Toll Free: Fax:
 2245 Wyecroft Road #5, Oakville, Ontario Canada L6L 5L7 Ph: 905-827-6157 Toll Free: 1-877-427-2266 Fax: 905-827-2027 Instructions for Installation, Operation & Service Manufacturer: Zero Appliances, Chloorkop
DRAFT. Northwest RV Supply. Manual Compliments of. Printed From. Service Manual NOT FOR PUBLIC RELEASE
 Service Manual Gas/Electric Refrigerators MODELS N500 N510! WARNING DO T install this refrigerator in below deck marine applications. Do not install this refrigerator in fixed indoor cabin or other dwelling
ZG Shown READ ALL INSTRUCTIONS IN THIS MANUAL AND RETAIN FOR FUTURE REFERENCE WARNING
 See unit nameplate for manufacturer and address. 507258-04 7/2018 Supersedes 10/2017 ZG 036, 048, 060, 072, 074 (3, 4, 5 and 6 Tons) ZG 092, 102, 120, 150 (7-1/2, 8-1/2, 10 and 12 Tons) ROOFTOP UNITS ZG
50M56U-843 INSTALLER MUST READ DESCRIPTION PRECAUTIONS WARNING CAUTION
 50M56U-843 Universal Single Stage HSI Integrated Furnace Control Kit INSTALLATION INSTRUCTIONS INSTALLER MUST READ PAGE 3 CONTAINS WIRING HARNESS AND BLOWER CONNECTION INSTRUCTIONS FOR ALL APPLICATIONS
SERVICE AND INSTALLATION MANUAL MODELS HDO(H) OIL FOR YOUR SAFETY
 OIL FOR YOUR SAFETY") Bousquet Technologies Inc. 2121, Nobel, Ste Julie, Quebec, Canada, J3E1Z9 SERVICE AND INSTALLATION MANUAL MODELS HDO(H) OIL Oil-Fired air heater for industrial and commercial use. FOR YOUR SAFETY Do not
Bousquet Technologies Inc. 2121, Nobel, Ste Julie, Quebec, Canada, J3E1Z9 SERVICE AND INSTALLATION MANUAL MODELS HDO(H) OIL Oil-Fired air heater for industrial and commercial use. FOR YOUR SAFETY Do not
DUAL VOLTAGE REFRIGERATORS 220/240 VOLTS AC AND 12/24 VOLTS DC INSTALLATION AND OWNER S MANUAL
 DUAL VOLTAGE REFRIGERATORS 220/240 VOLTS AC AND 12/24 VOLTS DC INSTALLATION AND OWNER S MANUAL Service Information If service or parts are required, contact the nearest Norcold Service Center. To find
Operator: Save these instructions for future use!
 031-01284-000/50A55-241 Integrated Furnace Control INSTALLATION INSTRUCTIONS Operator: Save these instructions for future use! FAILURE TO READ AND FOLLOW ALL INSTRUCTIONS CAREFULLY BEFORE INSTALLING OR
Bosch 80% AFUE Gas Furnace BGS80 Model
 Bosch 80% AFUE Gas Furnace BGS80 Model 4-Way Multipoise Category I Fan-Assisted Furnace User's Information Manual 3124627 2 Bosch 80% AFUE Gas Furnace User's Information Manual Data subject to change 06.2018
Prodigy Eclipse Cuber Technical Training
 Prodigy Eclipse Cuber Technical Training 600 800 1000 1200 1400 1800 2000 In This Presentation What Eclipse is Components and their functions Installation Operation Maintenance Service Diagnosis The Prodigy
INSTALLATION INSTRUCTIONS FOR MOUNTING KIT
 RV Products Division INSTALLATION INSTRUCTIONS FOR 8330-5501 MOUNTING KIT 8330-752 CONTROL BOX KIT (12 VDC COOL ONLY) 9330B755 CONTROL BOX KIT (12 VDC HEAT/COOL) 8530-750 CONTROL BOX KIT (24 VAC COOL ONLY)
3500 SERIES CONVECTION STEAM COOKER PARTS AND SERVICE MANUAL
 3500 SERIES CONVECTION STEAM COOKER PARTS AND SERVICE MANUAL EFFECTIVE JULY 30, 2014 Superseding All Previous Parts Lists. The Company reserves the right to make substitution in the event that items specified
SERIES VAC Microprocessor-Based Direct Spark Ignition Control with Inducer Blower Relay FEATURES APPLICATIONS SPECIFICATIONS DESCRIPTION
 R SERIES 35-61 24 VAC Microprocessor-Based Direct Spark Ignition Control with Inducer Blower Relay F-35-61 August 2015 FEATURES Safe start with DETECT-A-FLAME flame sensing technology Custom pre-purge
OPERATING INSTRUCTIONS MANUAL (Please retain for future reference) FVN/P-400 INDIRECT FIRED SPACE HEATERS
 FVN/P-400 INDIRECT FIRED SPACE HEATERS") OPERATING INSTRUCTIONS MANUAL (Please retain for future reference) For FVN/P-400 INDIRECT FIRED SPACE HEATERS CERTIFIED FOR USE IN CANADA AND U.S.A. As per Standard ANSI Z83.7/CSA 21.4 2000 Gas Fired Construction
OPERATING INSTRUCTIONS MANUAL (Please retain for future reference) For FVN/P-400 INDIRECT FIRED SPACE HEATERS CERTIFIED FOR USE IN CANADA AND U.S.A. As per Standard ANSI Z83.7/CSA 21.4 2000 Gas Fired Construction
INSTALLATION INSTRUCTIONS FOR 8330*5511 MOUNTING KIT
 RV Products Division INSTALLATION INSTRUCTIONS FOR 8330*5511 MOUNTING KIT 8330-752 CONTROL BOX KIT (12 VDC COOL ONLY) 9330A755 CONTROL BOX KIT (12 VDC HEAT/COOL) 8530-750 CONTROL BOX KIT (24 VAC COOL ONLY)
Indirect gas-fired air heater
 Indirect gas-fired air heater SERIES HD INSTALLATION AND SERVICE MANUAL MANUFACTURED BY : BROTHERS LIMITED WARNING Improper installation, modification, adjustment or maintenance may cause damage, injury
Certified to ANSI Z / CSA4.3
 ciapmo-t 11 Sunnybrook Drive Cincinnati, OH. 45237 Certified to ANSI Z21.10.3 / CSA4.3 Phone: 513-641-4446 * 800-934-9690 Fax: 513-641-0733 www.precisiontemp.com LPG GAS ON DEMAND WATER HEATER Model RV-550
THC-175DF INDUSTRIAL / COMMERCIAL SPACE HEATER. Certified to / Certifié à CGA 2.14 M2011 Conforms to / Conforme à ANSI std Z83.
 THC-175DF INDUSTRIAL / COMMERCIAL SPACE HEATER Certified to / Certifié à CGA 2.14 M2011 Conforms to / Conforme à ANSI std Z83.7 2011 Suitable for indoor or outdoor installation / Unvented / Unattended
INSTALLATION GUIDE Dual Fuel Ranges
 INSTALLATION GUIDE Dual Fuel Ranges Contents Wolf Dual Fuel Ranges......................... 3 Safety Instructions............................ 4 Dual Fuel Range Specifications.................. 5 Dual Fuel
50A Integrated Furnace Control
 Goodman White-Rodgers 0130F00005 PCBBF110 PCBBF123 50A55-743 0130F00005S PCBBF110S PCBBF123S 50A55-289 B1809926 PCBBF112 50T55-289 B1809926S PCBBF112S 50A55-743 Integrated Furnace Control INSTALLATION
Operator: Save these instructions for future use!
 WHITE-RODGERS 50A55-286 Integrated Furnace Control INSTALLATION INSTRUCTIONS Operator: Save these instructions for future use FAILURE TO READ AND FOLLOW ALL INSTRUCTIONS CAREFULLY BEFORE INSTALLING OR
Installation Instructions
 Installation Instructions For Fully Integrated NoFrost Combined Refrigerator-Freezers HC 2060/2061 7082 485-00 Important PLEASE READ AND FOLLOW THESE INSTRUCTIONS These instructions contain Warning and
TECH SHEET DO NOT DISCARD PAGE 1. If unsuccessful entry into diagnostic mode, actions can be taken for specific indications:
 TECH SHEET DO NOT DISCARD PAGE 1 WARNING Electrical Shock Hazard Disconnect power before servicing. Replace all parts and panels before operating. Failure to do so can result in death or electrical shock.
SERIES 35-63J APPLICATIONS FEATURES SPECIFICATIONS AGENCY CERTIFICATIONS
 SERIES 35-63J INSTALLATION INSTRUCTIONS FOR REPLACING JOHNSON CONTROLS G77X AND OTHER MODELS WITH FENWAL SERIES 35-63J IP IGNITION CONTROL APPLICATIONS The Fenwal 35-63J series Intermittent Pilot Ignition
Operator: Save these instructions for future use!
 50V64-743 Integrated Furnace Control for Furnaces with Variable Fan Speed INSTALLATION INSTRUCTIONS Operator: Save these instructions for future use FAILURE TO READ AND FOLLOW ALL INSTRUCTIONS CAREFULLY
Please read this manual completely before attempting to install, operate or service this equipment.
 Service Manual POWER OVEN OFF COOL DOWN COOK LIGHT OFF OVEN READY TEMPERATURE GAS CONVECTION OVEN TIME GAS SHUTOFF ON OFF MODELS 6/13 THE OVEN E SERIES Please read this manual completely before attempting
LGB Gas fired boiler
 LGB Gas fired boiler Control Supplement LGB-5 Series 2 Propane gas CSD-1 Control System Part Number 550-110-682/0304 Please read this page first Hazard definitions To the installer... The following terms
CHEST FREEZER INSTRUCTION MANUAL. Model No.: EWCF5WBX EWCF7WBX
 CHEST FREEZER INSTRUCTION MANUAL Model No.: EWCF5WBX EWCF7WBX To ensure proper use of this appliance and your safety, please read the following instructions completely before operating this appliance.
PROBLEM CAUSE SOLUTION
 ------------------------------------------------------------------------------------------------------------------------------------------------- Troubleshooting Installer Only PROBLEM CAUSE SOLUTION Delayed
USER S, MAINTENANCE and SERVICE INFORMATION MANUAL
 CONTENTS SAFETY INFORMATION................ 2 FOR YOUR SAFETY...................... 2 SYSTEM OPERATION.................. 2 THERMOSTATS.......................... 2 INTERMITTENT IGNITION DEVICE..........
USER S, MAINTENANCE and SERVICE INFORMATION MANUAL
 CONTENTS SAFETY INFORMATION................ 2 FOR YOUR SAFETY....................... 2 SYSTEM OPERATION.................. 2 THERMOSTATS.......................... 2 INTERMITTENT IGNITION DEVICE...........
Suburban RV FURNACES SERVICE MANUAL
 Suburban RV FURNACES SERVICE MANUAL DD-17DSI DD-17DSIW NT-12S/SE NT-16S/SE NT-20S/SE NT-24SP NT-30SP NT-34SP NT-40 P-30S/40 SF-20 SF-25 SF-30 SF-35 SF-42 SF-20F SF-25F SF-30F SF-35F SF-42F SH-35 SH-42
OPERATING INSTRUCTIONS MANUAL (Please retain for future reference) FVO-200 INDIRECT FIRED SPACE HEATERS
 FVO-200 INDIRECT FIRED SPACE HEATERS") OPERATING INSTRUCTIONS MANUAL (Please retain for future reference) For FVO-200 INDIRECT FIRED SPACE HEATERS CERTIFIED FOR USE IN CANADA AND U.S.A. As per CSA B140.8 Portable Oil Fired Heaters / CSA B140.02003
OPERATING INSTRUCTIONS MANUAL (Please retain for future reference) For FVO-200 INDIRECT FIRED SPACE HEATERS CERTIFIED FOR USE IN CANADA AND U.S.A. As per CSA B140.8 Portable Oil Fired Heaters / CSA B140.02003
REFRIGERATOR FOR LP-GAS AND ELECTRIC OPERATION RA1302. quality leisure line products Corporate Office 2320 Industrial Parkway Elkhart, IN 46515
 REFRIGERATOR FOR LP-GAS AND ELECTRIC OPERATION RA1302 FOR YOUR SAFETY If you smell gas: 1. Open windows. 2. Don t touch electrical switches. 3. Extinguish any open flame. 4. Immediately call your gas supplier.