Pro-Kool 42" Evaporative Cooler USER'S MANUAL
|
|
|
- Briana Stevens
- 6 years ago
- Views:
Transcription

1 Pro-Kool 42" Evaporative Cooler USER'S MANUAL
2 Table of Contents INTRODUCTION...3 Why use evaporative coolers in your work place...3 How evaporative cooling works...3 ABOUT THIS MANUAL...3 SAFETY INFORMATION...4 SAFETY RECOMMENDATIONS...5 SPECIFICATIONS...5 DESCRIPTION...5 WATER SUPPLY SYSTEM...6 CONTROL...7 COOLING PAD ASSEMBLY...7 OPERATION AND MAINTENANCE...8 Unit placement and other considerations...8 Unpacking and initial setup...8 Regular cleaning...9 Normal startup...9 Normal shutdown...9 TROUBLESHOOTING...10 Cooling pads not wetting...10 Foaming...10 Line clogs or obstructions...10 Odor control...10 Scale buildup...10 Splattering in front...10 Leaking from the bottom...10 OPTIONS AND ACCESSORIES...11 Pneumatic wheels...11 Water conditioner and cleaner...11 PARTS LIST PERFORMANCE CHART...14 HUMIDITY CHART...15 PRODUCT SUPPORT...16 WARRANTY
3 Introduction WHY USE EVAPORATIVE COOLERS IN YOUR WORKPLACE The Pro-Kool evaporative cooler requires little space, has a low initial cost, is inexpensive and simple to operate and requires minimal scheduled maintenance. Due to the design and construction of the cooling pads, cooling efficiency is normally maintained near optimum throughout the life of the pads (approximately two seasons). In many cases, evaporative coolers are a better solution than mechanical refrigeration systems because they are more economical to operate and maintain and do not use environmentally sensitive and costly refrigerants. HOW EVAPORATIVE COOLING WORKS Evaporative cooling is the same process your body uses to cool itself. When you perspire, and air moves across your skin, a portion of the perspiration (water) evaporates. Evaporation requires heat to change liquid water to water vapor and this heat is taken from your skin, producing the cooling effect. In an evaporative cooler, the cellulose cooling pads take the place of your skin, water instead of perspiration wets them and a fan moves the air. The air blows across the cooling pads and evaporates moisture. Heat is drawn from the pads and the air, dropping the air temperature and producing the cooling effect. The cooled air is then forced through a building or space and displaces the warm air out building openings, cooling the surroundings. In addition, air velocity increases the cooling effect as it moves over the skin of people in the airflow path. Pro-Kool evaporative coolers are portable and use the latest technology to provide large volumes of cool air, efficiently and inexpensively for cooling small to medium size areas. Simply adding more units can accommodate larger areas. With proper sizing and application, a Pro-Kool evaporative cooler can lower the effective air temperature by up to 20. Even in high humidity, the efficiency of the Pro-Kool evaporative cooler provides effective cooling. About this Manual The intent of this manual is to help you in two ways: to provide you with step-by-step instructions for quick and easy assembly of your product and to serve as a reference for simple maintenance and questions regarding your product. Read ALL instructions carefully before starting your Pro-Kool. Optional equipment contains necessary instructions for assembly or operation. Pay particular attention to all SAFETY information. All information, illustrations and specifications in this manual are based on the latest product information available at the time of printing. Product specifications subject to change. We reserve the right to make changes at any time without notice. 3


4 Safety Information Warning and Danger Decals have been placed on the equipment to warn of potentially dangerous situations. Care should be taken to keep this information intact and easy to read at all times. Replace missing or damaged safety decals immediately. Using the equipment for purposes other than specified in this manual may cause personal injury and/or damage to the equipment. Safety Alert Symbol This is a safety alert symbol. When you see this symbol on your equipment, be alert to the potential for personal injury. This equipment is designed to be installed and operated as safely as possible however, hazards do exist. Signal words are used in conjunction with the safety-alert symbol to identify the severity of the warning. CAUTION indicates an imminently hazardous situation, which, if not avoided, COULD cause damage to your equipment or equipment failure. WARNING indicates a potentially hazardous situation, which, if not avoided, COULD result in death or serious injury. Follow Safety Instructions Carefully read all safety messages in this manual and on your equipment safety decals. Follow recommended precautions and safe operating practices. Keep safety decals in good condition. Replace missing or damaged safety decals. Decal Descriptions This diagram shows the proper location of the safety decals as shipped from the factory. Replace damaged or missing decals. Make sure the decals are easy to see at all times. PLEASE NOTE Minimum inlet pressure is 10 PSI. Maximum inlet pressure is 100 PSI. Never leave unit unattended while in operation. 4
5 Description The Pro-Kool evaporative cooler is a completely self-contained, portable unit capable of delivering 15 MPH velocity of air with a temperature drop of up to 20. The unit is composed of: Level-controlled water supply system Cooling pad assembly Motor-driven fan Frame and housing The bottom is made of high impact poly and holds approximately 40 gallons at normal operating level (about 6" deep). A float-operated valve automatically maintains proper water level when the unit is connected to a water supply. The bottom rests on, and is fixed to, a rugged steel support frame. Four casters (2 locking, 2 regular) are attached to the underside of the steel frame. A pump draws water from the bottom and discharges it through the vinyl hose to the PVC pipes located above the cooling pads. The PVC pipes distribute water onto the top of the cooling pads; saturating them. Excess water drips back into the bottom through the holes in the cooling pad support channels. The cellulose cooling pads sit in support channels and are held in place by the tray and pad support plate. The fan is powered by a belt drive 1hp electric motor. The fan draws room air through the cooling pads where it picks up moisture and cools by evaporation. The fan blade then discharges the cooled air. It is important the cooled space has sufficient air openings so the warmer air can flow out and be replaced by the cooled air. A closed-in space or high humidity will reduce the cooling effect. See UNIT PLACEMENT AND OTHER CONSIDERATIONS in the Operation and Maintenance section of this manual. Water weighs about eight pounds per gallon, so when the unit is full, it weighs over 500 pounds. During setup and before startup, place the unit in the desired location and then fill the bottom. Do not attempt to lift the unit once it is filled and be careful to avoid spills when moving it; even over smooth ground. Do not try to push it over rough or soft ground as you can overstress the wheels and frame and cause structural and component damage, which is not covered by warranty. 5 Safety Recommendations READ AND SAVE THESE INSTRUCTIONS! This is an electric device with moving components. There is the possibility of fire, electric shock, or injury to persons. Ensure all the safety recommendations are adhered to in order to minimize this risk. Disconnect all power and unplug the unit before you inspect, clean or perform maintenance on the components of the unit. Never reach into the unit when it is running; you could become entrapped by the V-belt or injured by the rotating fan blades. The frame edges may be sharp; do not run your hand along them. Be careful and wear gloves when you reach under the frame to inspect the PVC pipes and mesh socks. A GFCI (Ground Fault Circuit Interrupter) is recommended for use with this product. If pads and grates are removed for servicing, they must be replaced prior to operating unit. Specifications Length x Width x Height: 51" x 33" x 68" Shipping Weight: 300 pounds Fan Motor: 1 Hp, 115 volt, 2-speed, 60 Hz. (also available in 230V and 50/60 Hz), 12.4 amps, 12,480 CFM Pump - Little Giant 115 volt, 60 Hz, submersible, 1200 GPH Reservoir Capacity: 38 Gallons Optional Water Supply - Standard 3/4" hose connection (garden hose size) Housing - High impact poly w/uv protection Evaporation Media - Chemically treated cellulose paper to resist deterioration - 8" thick pads


6 Water Supply System Hose adapter The water can be supplied continuously with an ordinary garden hose by attaching it to the supplied hose adapter to the fill connection, or it can be filled manually. With a continuous water supply connected, the float valve in the bottom rises and falls with the water level. A linkage attaches the float to the shutoff valve in the fill connection. As the water level rises to normal operating level (about 5" deep), the float valve shuts off the water supply. When the water level drops, the float valve opens to maintain a normal operating level. After unplugging the unit, the bottom can also be manually filled with a hose or bucket; if a hose connection is impractical. Simply remove any of the pad sections and place the hose, or pour the water, directly into the bottom. When you fill the bottom manually it can be filled to a higher level, but make sure someone monitors the filling operation to avoid overfilling and flooding. Water damage due to overfilling is not covered by the warranty. When you run the unit and manually fill it, check the water level frequently so it does not run dry. Operating the pump without water will damage it or reduce its service life. This is not covered by the warranty. The cooling effect also stops if the pads are dry. Pads must be replaced before operating unit. A drain in the bottom allows you to drain the unit for cleaning and maintenance. A drain cap on the underside covers the drain during operation. Make sure the cap is in place before filling. The pump is attached to the fan housing. Plastic ties hold the pump in its proper position. The pump can be easily removed and replaced. A small plastic screen covers the pump inlet to prevent foreign matter from entering and damaging the pump impeller. A dirty water supply will quickly reduce the unit's performance and the unit will require more frequent cleaning to maintain cooling effectiveness. Always try to use a filtered, treated water supply. A clear vinyl hose connects the pump to the valve. From the valve, a T connector supplies two lines that run along the top of the pads and up to supply the PVC pipe with water. Each piece of vinyl hose connects to a PVC pipe, which run horizontally along the top of the inlet above the cooling pads. The PVC pipes have a series of holes that run the full length of the pipe. The holes direct the water inward at a 90 angle against a deflector plate to continuously saturate the cooling pads from the top down. Excess water drains back to the bottom through drainage holes in the bottom support channels which support the cooling pads. Water cleanliness has a major effect on the cooler's performance. Use a clean water supply and consider a water softener if your water is hard. Dissolved solids in hard water deposit on the cooling pad surfaces and reduce the airflow through the unit and therefore the amount of evaporation. 6

7 Control The Pro-Kool PROK142-2 control switch is mounted on the front of the unit in the upper right corner. It has the following positions: OFF - Power is off to the blower motor and the pump motor. LOW VENT - The fan runs at low speed and the pump is off. HIGH VENT - The fan runs at high speed and the pump is off. Use this setting to quickly dry the cooling pads for removal and cleaning. LOW COOL - The fan runs at low speed and the pump is on. Use this setting for low cooling loads. Pro-Kool Control Switch HIGH COOL - The blower runs at high speed and the pump is on. Use this setting for maximum cooling. PUMP ONLY - Pump is on and the fan is off. Use this setting to drain unit only. Cooling Pad Assembly The cooling pads are critical for proper, efficient cooler operation. They are made of laminated cellulose (paper) fibers and arranged to give a large surface area for evaporation and to provide a rigid structure. The shape of the cells allows high velocity airflow through the pad at a minimum pressure drop. At the same time, the air passages between the cells force the incoming air to impinge on the wet cell surfaces and maximize evaporation. The Pro-Kool evaporative cooler also acts as an air filter and removes dust and other particles from the air. This dirt collects on the cooling pads and lowers cooler efficiency. The pads should be cleaned at least weekly and more frequently in dusty conditions. See REGULAR CLEANING under Operation and Maintenance. The pump supplies a continuous flow of water over the pads causing a "sheet flow" which constantly replaces the water lost to evaporation and keeps the pads saturated. One cubic foot of the cooling pad material holds about a gallon of water during operation. One cubic meter holds about 100 liters of water. The cooling pads are relatively strong but are subject to crushing, especially when wet. Handle them carefully when you clean them. Crushed cells reduce the total airflow through the unit and therefore lowers it's cooling capacity. The cooling pad sections (four total) sit in plastic tray at the back and bottom of the unit. The tray holds the cooling pads in position and form a back to completely enclose the unit. Do not remove or handle the cooling pads when they are wet, as they damage easily. Run the fan without the pump until pads are dry. With normal care, the pads should last at least two seasons. Abuse or mishandling will reduce their effectiveness and shorten their life. 7

8 Operation and Maintenance UNIT PLACEMENT AND OTHER CONSIDERATIONS The Pro-Kool unit(s) should be placed at one end of the building and an appropriate exhaust fan should be at the opposite end to pull the cool air from the Pro-Kool unit and discharge the warm air out of the building. Try to get all the air flowing in the same direction. Do not direct other fans against the Pro-Kool unit. It will counter the Pro-Kool 's airflow and stop the cooling effect. Obstructing the airflow from the Pro-Kool unit severely reduces the cooling effect. Avoid using ceiling fans as they disrupt the airflow from the Pro-Kool unit. Use as many exhaust fans as possible to create a natural draft through the building. This will enhance the Pro-Kool 's performance. Pro-Kool Pro-Kool UNPACKING AND INITIAL SETUP The Pro-Kool 1HP Evaporative Cooler is shipped upright on a pallet. The Pro-Kool is fully assembled and ready for service except for thoroughly cleaning manufacturing dust from the cooling pads before running it for the first time. Typical Pro-Kool Unit Arrangement CAUTION Be careful when you move the unit. Avoid jarring or dropping the unit to prevent damage to the bottom. 1. Cut the straps that wrap the unit. 2. Remove the shrink wrap. 3. Ensure the switch is OFF and the unit remains unplugged. 4. Remove the pad support plate from the back of the unit by removing all the set screws. 5. Remove the cooling pads from the unit. Pull pad out and then lift out of drain rail. With one pad out, the rest can be easily removed in the same manner. 6. Inspect the entire unit for shipping damage. 7. Ensure the fan belt is attached to the motor and fan pulleys. To ensure it is correct, press your finger on the belt about halfway between each pulley. It should have about a half-inch of play. If it is too loose, the V-belt will slap around while running. If it is too tight, it will cause the pulley bearings to wear and fail prematurely. If you notice any damage to your unit, contact your dealer immediately. 8. Thoroughly clean all four cooling pad sections using a garden hose. Pro-Kool assembly Do not use cleaning fluids or other chemicals to clean the pads as they can cause foaming during operation. Use only clean water. Refer to page 9 for approved cleaners. 9. Remove the drain cap from the underside and rinse with a hose to flush any manufacturing dust, etc. from the unit. 10. Replace the drain cap. 11. Replace the pads. 12. Proceed to NORMAL SETUP. 8
9 Operation and Maintenance cont'd REGULAR CLEANING The frequency with which the Pro-Kool is cleaned will depend on the environment in which it is used. The more dirty the environment the more often it will need cleaning. In most cases the Pro-Kool will need to be cleaned weekly. CAUTION The pads should be dry before you handle them, as they are stronger when dry than when they are wet and less susceptible to damage. If they are wet, run the unit in the HIGH VENT position until they are dry. After cleaning, let the pads air dry before you replace them. 1. Turn the switch to OFF and unplug the unit. 2. Check the pads for cleanliness. If they are dirty, remove and clean by spraying with a garden hose, water only. If they are not dirty you will still need to remove the cooling pads to clean the inside of the unit. Dirty cooling pads reduce the unit's effectiveness. 3. Use a garden hose to rinse out the bottom and the inside of the unit. The dirt that accumulates is removed from the air during operation, as the Pro-Kool unit also acts as an air filter. 4. Remove the drain cap from the underside of the unit and let the unit drain completely. Rinse out any remaining dirt. 5. Replace the drain cap (finger tighten only). 6. Replace the cooling pads once they are dry. With proper use and regular cleaning, the cooling pads will last about two seasons. If you handle them wet and are abusive, however, they will be easily damaged. Refer to page 15 for recommended conditioning and cleaning chemicals. NORMAL STARTUP Some splattering may occur until pads are conditioned (may take several uses). 1. Move the unit to the place where it will be run. Do not attempt to lift or move the unit once it is filled as damage to the unit or a large spill may occur. When you decide where to place the unit, make sure there are no obstructions in the way that will disrupt or block the airflow. Make sure the unit is level at all times. Keep the unit at least three feet away from walls or other obstructions that will interfere with airflow into the unit. 2. Check to insure the drain cap is in place and secure. 3. Connect the garden hose to the brass hose adapter. Check that there is a washer in the hose connection's female end. 4. Open the water supply valve and check that water enters the bottom through the float valve by removing one cooling pad. Allow the unit to fill and check that the float valve completely shuts off the water. 5. If you are manually filling, remove one or more cooling pads and fill the bottom with a bucket or hose. 6. Visually monitor the filling operation to avoid overflowing and causing spill damage. 7. Plug the unit into an outlet. 8. Turn the switch to the low cool position, then to high cool if more air is desired. CAUTION Do not run the pump without water in the bottom or you will damage the pump. Running the pump dry will void the warranty on the pump. NORMAL SHUTDOWN 1. Turn the switch to the HIGH VENT position, and let the unit run until the cooling pads are dry. This will maximize the life of the pads. 2. Turn the switch to the OFF position. Unplug the unit if you are going to clean the pads or inspect the components. 3. Shut off the water supply. 4. Drain the bottom if you are going to clean it or store it. It can be done two ways: a) Remove drain cap from bottom of unit. b) Attach garden hose to hose fitting labeled DRAIN. Place valve handle in the DRAIN position and put switch to PUMP ONLY. Monitor water level and shut pump off when unit is empty. DO NOT RUN PUMP DRY. 5. If the unit will be stored for the season, insure the cooling pads are completely dry, and then remove them. Wrap them in plastic bags or store them in a clean place where they will not be damaged or get dirty. The unit should be cleaned thoroughly before storing. 9
10 Troubleshooting COOLING PADS NOT WETTING 1. Make sure the unit has water. 2. Check to insure the control switch is in the proper position. 3. Make sure the pump is running. 4. Pump is running but no water: a. Ensure hose is connected. b. Ensure the impeller on the inside of the pump turns freely. 5. Pump is not running: a. A certified electrician must check wiring from pump to pump selector switch. b. If the wiring is correct, replace the pump. FOAMING Foaming is generally caused by a dirty water supply or contaminated water in the bottom. 1. If foaming occurs, stop the unit, drain it and flush the bottom and insides thoroughly with clean water. 2. Clean the pads and do not use any kind of chemical cleaners. Refer to the REGULAR CLEANING section for proper procedure for cleaning the pads. 3. Reassemble, refill and restart. LINE CLOGS OR OBSTRUCTIONS (little or no water flow) Depending on the cleanliness of the water and the amount of dirt, dust, etc. in the supply air, you may have to clean the PVC pipes from time to time. Your own experience will dictate the frequency. 1. Turn off the unit and unplug it. 2. Remove the pads. 3. Locate the two PVC pipes in the top housing. Each PVC pipe is secured to an elbow connector by a hose. Remove this clamp from both PVC pipes. 4. Grip the opposite end of each PVC pipe with pliers and gently twist it out of its Y connector. 5. Direct a jet of water at the series of outlet holes in the PVC pipes to blow them clear. 6. Direct the water nozzle into the end of each pipe and blow them clear. Inspect them for cleanliness and repeat if necessary. 7. Replace the PVC pipes taking care to ensure the water outlet holes are facing inwards at 90 towards deflector plate. Be sure you push the PVC pipes fully onto the elbow, and attach hose clamps. ODOR CONTROL Ensure water source is of good quality and regular maintenance is being conducted. Pro-Kool Water Conditioner is available from the manufacturer. See page 9. LIME OR SCALE BUILDUP Ensure water source is of good quality and regular maintenance is being conducted. Pro-Kool Water Conditioner is available from the manufacturer. See page 9. SPLATTERING IN FRONT If more or less water is desired, adjust PVC ball valve (see page 13, item 22). LEAKING FROM THE BOTTOM Check for cracks in the reservoir. If a crack is found, repair it by using a Pro-Kool Repair Kit or replace the entire bottom. Be sure the drain cap is installed and hand tightened (drain cap must have gasket inside). 10


11 Options and Accessories Your Pro-Kool Evaporative cooler can be purchased with certain options and/or accessories, and some of these can be retrofitted to your Pro-Kool after the initial purchase. Instructions are included with all equipment purchased separately from your Pro-Kool. Options and accessories available at time of purchase or after purchase: Pneumatic Wheels Water Conditioner and Cleaner PNEUMATIC WHEELS Pneumatic wheels are available at the time of your Pro-Kool purchase or as a retrofit kit on a previously purchased Pro-Kool. The pneumatic wheel options includes two locking and two non-locking wheels. Pneumatic wheels are designed to allow for easy rolling on rough or uneven surfaces. WATER CONDITIONER Pro-Kool Water Condition is recommended to control odors found to be present in some water sources. Place the tab under the float valve water outlet for fast, effictive odor control. Place the tab next to the pump for longer lasting odor control. CLEANER Pro-Kool Cleaner is recommended to remove scale buildup from the water supply system. Follow the instructions on page 9 to clean the unit. Refill with water and add one pint of Cooler Cleaner Treatment to the reservoir. Operate the Pro-Kool in PUMP ONLY mode for approximately 20 minutes. Drain, clean and refill the Pro-Kool with fresh water. Repeat steps if necessary. Repeat treatment when scale buildup becomes evident. 11

12 Parts List Item Schaefer P/N Description 1 42PKTH Top housing 2 42PKBH Bottom housing 3 WC-CASTER5 5" caster 4 WC-CASTERLGLK 5" locking caster 5 42PKSF Support frame 6 42PKFG Front guard 7 WC-SWITCH 6-position switch 12

 20 DFV Float valve 21")
13 Parts List cont'd Actual Pro-Kool may vary slightly from unit shown here. Item Schaefer P/N Description 8 VH58ID 5/8" ID vinyl hose 9 SSFB-426 Stainless steel 42" 6-wing fan blade 10 AK-94C 9.25" diameter composite pulley 11 A55 55" V-belt 12 WC-SWITCHCORDLG Switch to motor electrical pigtail 13 WC-PUMPCORD Switch to pump electrical pigtail 14 WC-1HPMTR 1 HP 2-speed evap. cooler motor 15 WC-MTRCORD Electrical motor cord 16 PK-PCB15 Black 15' power cord 17 PK-PUMP1200A 1200 GPH pump 18 42PKDR Drain rail 19 PVCCAP /2" drain cap (under unit) 20 DFV Float valve 21 GV12 1/2" gate valve 22 BDV12 1/2" MPT drain valve 23 42PKMFMB Motor/fan mounting bracket 24 PBBA Pillow block bearings 25 FS1X14 Fan shaft 26 PK-PVCP12X4512 1/2" PVC pipe 27 42PK-SDP Spray deflector plate 28 42PKPAD Evaporative cooling pad
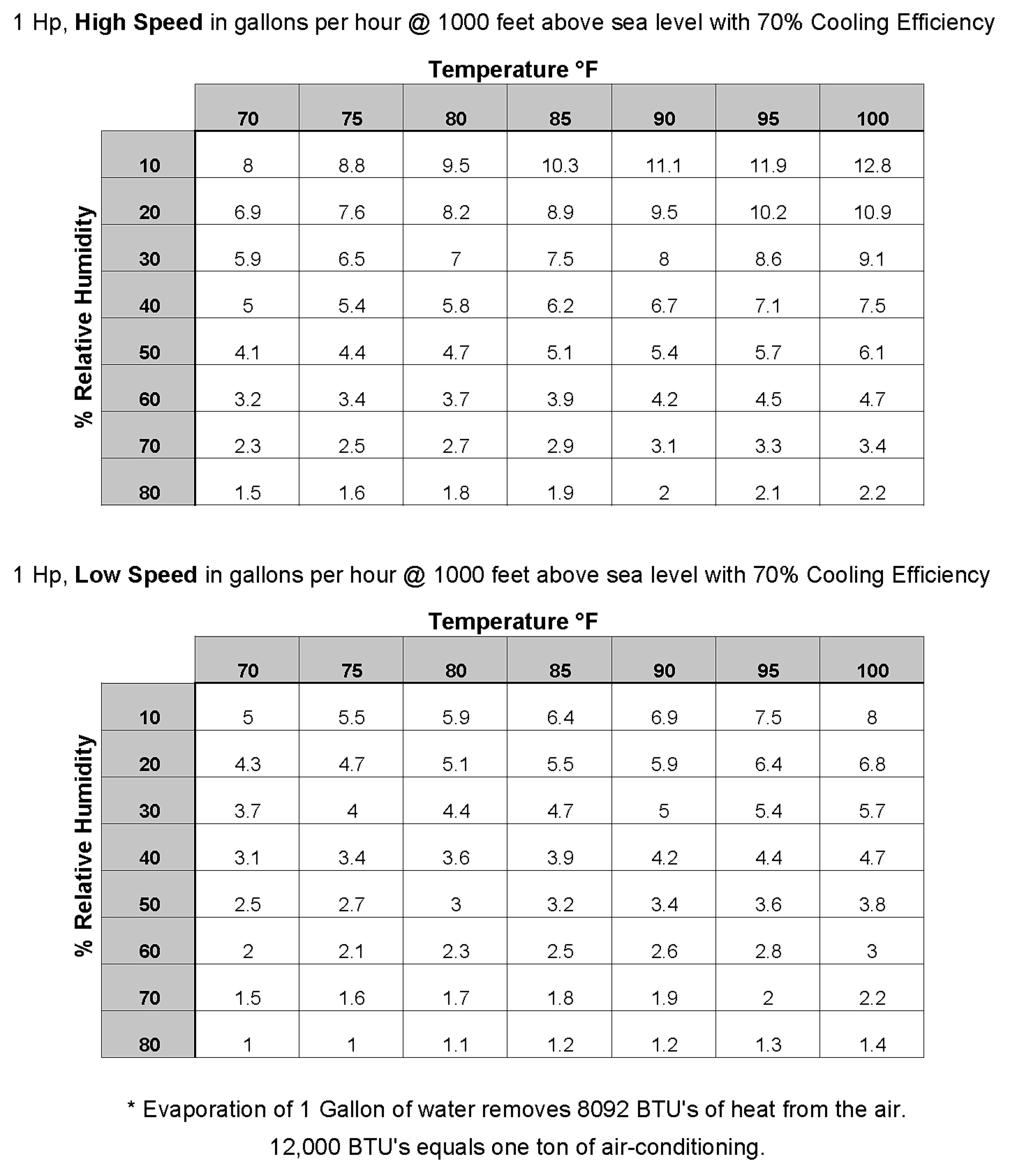

14 Performance Chart 14

15 Humidity Chart Wet Bulb Temperature = Wet Bulb Current Relative Humidity Dry Bulb Temperature = Current Ambient Air Temperature Temperature Difference = Dry Bulb Temperature Minus Wet Bulb Temperature Temperature Drop = Temperature Difference Multiplied by 72% Output Temperature = Dry Bulb Temperature Minus Temperature Drop 15
16 Warranty Schaefer Ventilation Equipment, LLC Schaefer Limited Warranty Policy Schaefer Ventilation Equipment, LLC (SVE) provides the following limited warranty from the date of purchase to the original purchaser of our products: I. Two-year coverage (unless otherwise indicated below) applies to all products, components and assemblies provided by SVE that prove to be defective in material or workmanship. Any such defective product will be repaired or replaced at SVE's option, with the defective product returned upon approval to SVE, F.O.B Schaefer Ventilation Equipment, LLC, Sauk Rapids, Minnesota. II. This warranty does not cover: a. Failure, damage or malfunction as a result of: i. Improper installation or installation not in accordance with installation instructions. ii. Operating conditions that vary from SVE's operating instructions. iii. Misuse, abuse, negligence, alteration, or accident. iv. Transporting the product. v. Improper operation or lack of appropriate or regular maintenance of the product. b. Loss of time, inconvenience, loss of use of the product or other consequential or incidental damages. c. Parts that need replacement due to normal wear and tear. d. Superficial or cosmetic rust or corrosion. e. Any product whose name plate has been removed. Products with warranty periods that differ from the standard 2-year warranty are as follows: Poly Housings 25 years Fiberglass Housings 15 years Low-intensity Tube Heater Exchange Tubes 5 years K-Series, 2-Stage, Compact and Stainless Steel Tube Heaters 1 year Quartz and Zubri Heaters 1 year Shutter Motors and Aluminum Riveted Fan Blades 1 year HotZone Electric Elements 120 days Quartz Bulbs 90 days Evaporative Cooling Pads 90 days Economy Line Fans 90 days Any product or part noted as an exception to the standard 2-year warranty in the product's operating manual. SVE reserves the right to add or delete products from this exception list at any time. THERE ARE NO WARRANTIES OF MERCHANTABILITY OR FITNESS OF USE. SVE reserves the right to change product design and specification without prior notice or liability. The above constitutes the sole warranty offered by Schaefer Ventilation Equipment, LLC. Effective Date: February 1, 2009 All information, illustrations and specifications provided here are based on the latest product information available at the time of printing. Product specifications subject to change Schaefer Ventilation Equipment
Pro-Kool Evaporative Cooler USER'S MANUAL. Pro
 Pro-Kool Evaporative Cooler USER'S MANUAL Pro Table of Contents INTRODUCTION...1 Why use evaporative coolers in your work place? How evaporative cooling works? ABOUT THIS MANUAL...1 SAFETY INFORMATION...1-2
Pro-Kool 42" Evaporative Cooler USER'S MANUAL
 Pro-Kool 42" Evaporative Cooler USER'S MANUAL www.schaeferventilation.com TABLE OF CONTENTS INTRODUCTION...3 Why use evaporative coolers in your work place...3 How evaporative cooling works...3 ABOUT THIS
WayCool 1HP MFA Series
 Portable Evaporative Cooler WayCool 1HP MFA Series USER'S MANUAL WC-1HPMFAOSC WC-1HPMFA WC-1HPMFA360 WCG-1HPMFA Using this equipment for any other purpose than it was intended or in a way not within the
User Manual Box Exhaust Fan Series (Belt Drive)
") User Manual Box Exhaust Fan Series (Belt Drive) 36" Box Exhaust Fan with Three Wing Blade Box with Aluminum Shutter 54" Box with Cone 800-779-3267 sales@schaeferfan.com www.schaeferfan.com 2013 Schaefer
User Manual Box Exhaust Fan Series (Belt Drive) 36" Box Exhaust Fan with Three Wing Blade Box with Aluminum Shutter 54" Box with Cone 800-779-3267 sales@schaeferfan.com www.schaeferfan.com 2013 Schaefer
IMPORTANT SAFETY INFORMATION INSIDE
 Self-Contained Power Mister USER'S MANUAL PVM18C PVM18 Serious injury or death is possible. Retain these instructions for future reference. WARNING IMPORTANT SAFETY INFORMATION INSIDE Read, understand
Panel Fan Series Operators Manual (Galvanized and Polymer)
") Panel Fan Series Operators Manual (Galvanized and Polymer) 52" Belt Drive, Galvanized Panel Fan with Three Wing Blade IMPORTANT: READ AND SAVE THESE INSTRUCTIONS Read all instructions carefully before
Panel Fan Series Operators Manual (Galvanized and Polymer) 52" Belt Drive, Galvanized Panel Fan with Three Wing Blade IMPORTANT: READ AND SAVE THESE INSTRUCTIONS Read all instructions carefully before
PANEL FAN SERIES OPERATORS MANUAL (Galvanized and Polymer)
") PANEL FAN SERIES OPERATORS MANUAL (Galvanized and Polymer) Galvanized Panel Fan IMPORTANT: READ AND SAVE THESE INSTRUCTIONS Read all instructions carefully before attempting to assemble, install, operate
PANEL FAN SERIES OPERATORS MANUAL (Galvanized and Polymer) Galvanized Panel Fan IMPORTANT: READ AND SAVE THESE INSTRUCTIONS Read all instructions carefully before attempting to assemble, install, operate
Portable Evaporative Air Cooler for Outdoor, Indoor & Commercial Use. OWNER'S MANUAL Read and save these instructions before use.
 1 Portable Evaporative Air Cooler for Outdoor, Indoor & Commercial Use OWNER'S MANUAL Read and save these instructions before use ON 0 3 2 OFF ON OFF COOL SPEED SWING Model: CO60PM Power rating: 220 Watts
57" Fiberglass Exhaust Fan with Cone
 OPERATORS MANUAL Fiberglass Exhaust Fan IMPORTANT: READ AND SAVE THESE INSTRUCTIONS Read all instructions carefully before attempting to assemble, install, operate or service the product described. Failure
Manual for MC91 SETUP INSTRUCTIONS
 Manual for MC91 SETUP INSTRUCTIONS Evaporative cooling works on the principle of heat absorption by moisture evaporation. Simply put, heat is removed from the air as water evaporates. You feel this principle
Manual update 2016 MC37/MFC3600
 Manual update 2016 MC37/MFC3600 SETUP INSTRUCTIONS Evaporative cooling works on the principle of heat absorption by moisture evaporation. Simply put, heat is removed from the air as water evaporates. You
Manual for MC21A SETUP INSTRUCTIONS
 Manual for MC21A SETUP INSTRUCTIONS Evaporative cooling works on the principle of heat absorption by moisture evaporation. Simply put, heat is removed from the air as water evaporates. You feel this principle
Manual for MC37/MFC3600
 Manual for MC37/MFC3600 SETUP INSTRUCTIONS Evaporative cooling works on the principle of heat absorption by moisture evaporation. Simply put, heat is removed from the air as water evaporates. You feel
Operation and Maintenance Manual BLIZZARD50 CS6-50-VD 120V/60HZ
 Operation and Maintenance Manual BLIZZARD50 CS6-50-VD 120V/60HZ CS6-50-VD Operation & Maintenance Manual Table of Contents: 1.0 Introduction 1 2.0 Unpacking your COOL- SPACE 1 3.0 Set-up of COOL-SPACE
18 MaxxAir Portable Evaporative Cooler Owner s Manual This Manual covers the EC18DVS MaxxAir Portable Evaporative Cooler.
 18 MaxxAir Portable Evaporative Cooler Owner s Manual This Manual covers the EC18DVS MaxxAir Portable Evaporative Cooler. File this owner s manual in a safe place for future reference. It contains operating
Mobile Evaporative Cooler. Use & Care Guide MC18M INDEX
 INDEX Safety Rules... 1 Quick Start.... 2 Features...3 Maintenance......4 Cooler Parts......5 Warranty......6 Trouble Shooting...7 Mobile Evaporative Cooler Use & Care Guide MC18M Safety Safety Rules 1.
48 MaxxAir Portable Evaporative Cooler Owner s Manual
 48 MaxxAir Portable Evaporative Cooler Owner s Manual This Manual covers all of the following MaxxAir Portable Evaporative Coolers. EC48D1 MaxxAir 48 Belt Drive 2 Speed File this owner s manual in a safe
Port-A-Cool unit. Pneumatic Owner s Manual. series manufactured by port-a-cool, llc FOR PNEUMATIC MODELS PAC2K36AD, PAC2K24AD, PAC2K16AD
 Port-A-Cool unit series 2000 Pneumatic Owner s Manual FOR PNEUMATIC MODELS PAC2K36AD, PAC2K24AD, PAC2K16AD manufactured by port-a-cool, llc PORT-A-COOL unit OWNERS MANUAL PNEUMATIC MODELS PAC2K36AD, PAC2K24AD,
Mobile Evaporative Cooler. Use & Care Guide MC37 / MC61 INDEX
 INDEX Safety Rules... 1 Quick Start.... 2 Features...3 Maintenance......4 Cooler Parts......5 Warranty......6 Trouble Shooting...7 Mobile Evaporative Cooler Use & Care Guide MC37 / MC61 Safety Safety Rules
Because you re not like everyone else. EVAPORATIVE COOLER EC220W OWNER S MANUAL
 Because you re not like everyone else. EVAPORATIVE COOLER EC220W OWNER S MANUAL 2 BECAUSE YOU RE NOT LIKE EVERYONE ELSE. And neither are we. Always at the forefront of our industry, our goal is to offer
Xaact Spot. Xaact Hot Spot
 Xaact Spot & Xaact Hot Spot INFORMATION & OPERATING INSTRUCTIONS READ AND UNDERSTAND THESE INSTRUCTIONS BEFORE OPERATING THE MACHINE 78-00012 Rev. 101211 1 CONTENTS: Machine Specifications............
Operation and Maintenance Manual 120V/60HZ
 Operation and Maintenance Manual 120V/60HZ GLACIER CS5-16-VD CS5-16-VD-TB CS5-18-VD CS5-18-VD-TB AVALANCHE CS6-36-1D CS6-36-VD BLIZZARD CS6-50-VD Operation & Maintenance Manual 60HZ Models Table of Contents:
Operation and Maintenance Manual GLACIER TALL BASE CS5-16-VD-TB CS5-18-VD-TB2 120V/60HZ
 Operation and Maintenance Manual GLACIER TALL BASE CS5-16-VD-TB CS5-18-VD-TB2 120V/60HZ Operation & Maintenance Manual Table of Contents: 1.0 Introduction 1 2.0 Unpacking your COOL- SPACE 1 3.0 Set-up
Air Storm Fans. Air Storm 18 Fiberglass Fan Installation and Operation Manual
 Air Storm 18 Fiberglass Fan Installation and Operation Manual Table of Contents GrowerSELECT General Page...3 Safety...4 Warning Labels...4 Installation...5 Operation Safety...5 Maintenance Safety...5
If you have any problems with this product, please call BEFORE returning it to your retailer.
 CP35 PORTABLE EVAPORATIVE COOLER USE & CARE GUIDE Read and Save These Instructions If you have any problems with this product, please call 1-800-643-8341 BEFORE returning it to your retailer. NOTICE: This
READ AND UNDERSTAND THESE INSTRUCTIONS BEFORE OPERATING THE MACHINE
 XAACT Xtract 200 INFORMATION & OPERATING INSTRUCTIONS READ AND UNDERSTAND THESE INSTRUCTIONS BEFORE OPERATING THE MACHINE 78-00018 Rev B 032912 1 CONTENTS: Machine Specifications............ 2 Record Important
Portable Evaporative Cooling System
 Portable Evaporative Cooling System User s Manual Manufactured by HH Technologies, Inc. 1733 County Road 68 Bremen, Alabama 35033 256-287-7000 Part No 4801-5035 Rev 03-2017 User s Manual PolarCool Table
TURBO Fiberglass Cone Fan and Grill Fan 48'' Belt Drive. Installation & Operator s Instruction Manual
 TURBO Fiberglass Cone Fan and Grill Fan 48'' Belt Drive Installation & Operator s Instruction Manual July 1998 MV1383B Chore-Time TURBO TM Fan Extended Warranty Chore-Time Equipment warrants new TURBO
C-Box 100, H-Box 200 & H-Box 500
 C-Box 100, H-Box 200 & H-Box 500 Table of Contents Technical specifications... 3 Safety precautions... 4 Grounding instructions... 4 Machine components... 5-6 lectrical requirements... 6 Machine set-up...
PUREPOWER SERIES CENTRAL VACUUM POWER UNITS PP500, PP600 & PP650
 USER GUIDE PUREPOWER SERIES CENTRAL VACUUM POWER UNITS PP500, PP600 & PP650 AB0039 FOR RESIDENTIAL USE ONLY!! BROAN-NUTONE LLC; HARTFORD, WISCONSIN WWW.NUTONE.COM 1-888-336-3948 REGISTER YOUR PRODUCT ONLINE
Air Storm Fans. Air Storm 24 Fiberglass Fan Installation and Operation Manual
 Air Storm 24 Fiberglass Fan Installation and Operation Manual Hog Slat Inc. Newton Grove, NC USA May 2015 Table of Contents GrowerSELECT General Page...3 Safety...4 Warning Labels...4 Installation...5
Portable Evaporative Air Cooler for Indoor Use. OWNER S MANUAL Read and save these instructions before use. Model: CL30XC
 Portable Evaporative Air Cooler for Indoor Use OWNER S MANUAL Read and save these instructions before use Model: CL30XC Power rating: 252 Watts Voltage rating: 110 Volt AC, 60Hz For product inquiries or
Owner s. Coolerr. comply. To view
 Owner s Manual EC220W Evaporative Coolerr IMPORTANT SAFETY INFORMATION: Please carefully read this manual before attempting to install or use this evaporative cooler. For your safety, comply with all safety
READ MANUAL BEFORE OPERATING SYSTEM Read the owner s manual thoroughly before operating to ensure the most efficient use of the system.
 READ MANUAL BEFORE OPERATING SYSTEM Read the owner s manual thoroughly before operating to ensure the most efficient use of the system. Attention Installer: Please be sure this manual and warranty information
Portable Evaporative Air Cooler. OWNER S MANUAL Read and save these instructions before use. Model: CL30XC
 Portable Evaporative Air Cooler OWNER S MANUAL Read and save these instructions before use Model: CL30XC For product enquiry or support contact: CUSTOMER CARE: 1300 7108 60 www.honeywellaircoolers.com
FiberPRO 2.5 H. Heated Spot Extractor. Operator and Parts Manual E
 E29976-00 FiberPRO 2.5 H Heated Spot Extractor Operator and Parts Manual 1001 Brown Avenue Toledo, Ohio 43607-0127 Customer Service: 888-GO-BETCO Fax: 800-445-5056 Technical Service: 877-856-5954 www.betco.com
Standard and CELDEK Evaporative Cooler Modules Installation, Operation, and Maintenance Manual
 Standard and CELDEK Evaporative Cooler Modules Installation, Operation, and Maintenance Manual Standard Evaporative Cooler CELDEK Evaporative Cooler RECEIVING AND INSPECTION Upon receiving unit, check
48 Vanguard Belt Drive Fans Installation and Operators Instruction Manual
 8 Vanguard Belt Drive Fans Installation and Operators Instruction Manual Thank You The employees of Chore-Time Equipment would like to thank your for your recent Chore-Time purchase. If a problem should
Lime Buster III. Model LB-300P IMS # (CIC1-LB300P) INSTRUCTION MANUAL
 INSTRUCTION MANUAL") Lime Buster III Model LB-300P IMS # 110226 (CIC1-LB300P) INSTRUCTION MANUAL October, 2007 IMS Company 10373 Stafford Road Chagrin Falls, OH 44023-5296 Telephone: (440) 543-1615 Fax: (440) 543-1069 Email:
Lime Buster III Model LB-300P IMS # 110226 (CIC1-LB300P) INSTRUCTION MANUAL October, 2007 IMS Company 10373 Stafford Road Chagrin Falls, OH 44023-5296 Telephone: (440) 543-1615 Fax: (440) 543-1069 Email:
e Bath Fan with Light User s Guide
 e Bath Fan with Light User s Guide abfl100rnl, BFL125RNL Item Stock Number(s): BFL100RNL, BFL125RNL IMPORTANT INSTRUCTIONS - OPERATING MANUAL READ AND SAVE THESE INSTRUCTIONS READ CAREFULLY BEFORE ATTEMPTING
Portable Evaporative Cooling System
 Portable Evaporative Cooling System User s Manual Manufactured by HH Technologies, Inc. 1733 County Road 68 Bremen, Alabama 35033 256-287-7000 Part No 4801-5035 Rev 03-2017 User s Manual PolarCool Table
WET/DRY VACUUM. QUEST for Continuous Improvement Windsor s Quality Management System is Certified ISO MODEL: T1. Operating Instructions (ENG)
") WET/DRY VACUUM Operating Instructions (ENG) MODEL: T1 y QUEST for Continuous Improvement Windsor s Quality Management System is Certified ISO 9001. Read these instructions before operating the machine.
WET/DRY VACUUM Operating Instructions (ENG) MODEL: T1 y QUEST for Continuous Improvement Windsor s Quality Management System is Certified ISO 9001. Read these instructions before operating the machine.
Air Storm Fans. Air Storm 54 Fiberglass Fan Installation and Operation Manual
 Air Storm 54 Fiberglass Fan Installation and Operation Manual Table of Contents GrowerSELECT General Page... 3 Safety... 4 Warning Labels... 4 Installation... 5 Operation Safety... 5 Maintenance Safety...
Operation and Maintenance Manual 120V/60HZ
 Operation and Maintenance Manual 120V/60HZ GLACIER CS5-18-VD CS5-18-VD-TB AVALANCHE CS6-36-1D CS6-36-VD BLIZZARD CS6-50-VD Contents 1.0 INTRODUCTION... 1 2.0 UNPACKING YOUR COOL-SPACE UNIT... 1 3.0 SET-UP
Standard and CELDEK Evaporative Cooler Modules Installation, Operation, and Maintenance Manual
 Standard and CELDEK Evaporative Cooler Modules Installation, Operation, and Maintenance Manual Standard Evaporative Cooler CELDEK Evaporative Cooler RECEIVING AND INSPECTION Upon receiving unit, check
Portable Air Conditioner. OWNER S MANUAL Read these instructions before use. Model: MM14CHCS. Voltage rating: 115V~60Hz Power rating : 1400W
 Portable Air Conditioner OWNER S MANUAL Read these instructions before use Model: MM14CHCS Customer Support : 1-800-474-2147 Voltage rating: 115V~60Hz Power rating : 1400W For product inquiries or support
Sanitaire. Owner s Guide. 10 GALLON Box Extractor SC6088 Series IMPORTANT
 Sanitaire 10 GALLON Box Extractor SC6088 Series Part No. SC6088 Rev 2 (3/14) Owner s Guide IMPORTANT Do not return this product to the store. Call 1-800-800-8975* Monday - Friday 8:00 AM to 7:30 PM and
EVAPORATIVE AIR COOLER SERVICE MANUAL
 EVAPORATIVE AIR COOLER SERVICE MANUAL CAUTION: Before servicing the unit, read the Safety Precautions in this manual. Only for authorized service. MODEL NO.: CL30XC & CHL30XC (INDOOR USE ONLY) CONTENT
48 Vanguard Belt Drive Fans Installation and Operators Instruction Manual
 8 Vanguard Belt Drive Fans Installation and Operators Instruction Manual Thank You The employees of Chore-Time Equipment would like to thank your for your recent Chore-Time purchase. If a problem should
READ AND UNDERSTAND THESE INSTRUCTIONS BEFORE OPERATING THE MACHINE
 XAACT Xtract 500 INFORMATION & OPERATING INSTRUCTIONS READ AND UNDERSTAND THESE INSTRUCTIONS BEFORE OPERATING THE MACHINE 78-00015 Rev B 032912 1 CONTENTS: Machine Specifications............ 2 Record Important
Ultra Lightweight Household & Commercial Vacuums
 Owner s Manual Ultra Lightweight Household & Commercial Vacuums Save These Instructions Index Important Safety Instructions............................................................. 2 Polarization Instructions................................................................
ULTRASONIC HUMIDIFIER
 To Buy: Visit www.sylvane.com or call (800) 934-9194 For Product Support: Contact Sunpentown at 1-800-330-0388 ULTRASONIC HUMIDIFIER [ADORABLE MONKEY] To prolong the life of this humidifier, using distilled
Panel Fan Series Operators Manual (Galvanized and Polymer)
") Panel Fan Series Operators Manual (Galvanized and Polymer) Galvanized Panel Fan with Three Wing Blade IMPORTANT: READ AND SAVE THESE INSTRUCTIONS Read all instructions carefully before attempting to assemble,
Panel Fan Series Operators Manual (Galvanized and Polymer) Galvanized Panel Fan with Three Wing Blade IMPORTANT: READ AND SAVE THESE INSTRUCTIONS Read all instructions carefully before attempting to assemble,
OPERATOR'S MANUAL. IMPORTANT: READ OPERATOR'S MANUAL CAREFULLY Please fill out & return your warranty card! DP80405
 CARBON SPOT 30 EXTRACTOR OPERATOR'S MANUAL IMPORTANT: READ OPERATOR'S MANUAL CAREFULLY Please fill out & return your warranty card! DP80405 Diamond Products www.diamondproductsus.com Printed in the U.S.A.
MRS-6 Maxi-Guard II. Model: C , 12, 13, 14 OPERATION SERVICE PARTS CARE. Revised 2/02
 MRS-6 Maxi-Guard II Model: C86006-11, 12, 13, 14 OPERATION SERVICE PARTS CARE Revised 2/02 OPERATING INSTRUCTIONS INSPECTION Carefully unpack and inspect your machine for shipping damage. Each unit is
e Bath Fan with Light User s Guide
 e Bath Fan with Light User s Guide abfl50uq, BFL60UQ, BFL70, BFL85 Item Stock Number(s): BFL50UQ, BFL60UQ, BFL70, BFL85 IMPORTANT INSTRUCTIONS - OPERATING MANUAL READ AND SAVE THESE INSTRUCTIONS READ CAREFULLY
SELF-CONTAINED POWER MISTER
 00 North Main St. Fostoria, OH 0 Phone: 00-95-55 Fax: 9-5-0 www.tpicorp.com If you have questions about the product you have purchased or would like to leave us feedback please contact us via our website
FiberPRO. 15 Series. High Pressure Carpet Extractors. Operator and Parts Manual E E E
 E29977-00 E29979-00 E29978-00 FiberPRO 15 Series High Pressure Carpet Extractors Operator and Parts Manual 1001 Brown Avenue Toledo, Ohio 43607-0127 Customer Service: 888-GO-BETCO Fax: 800-445-5056 Technical
PORTABLE DEHUMIDIFIER
 PORTABLE DEHUMIDIFIER User s Manual For information or assistance, please contact: Soleus International 9451 Telstar Ave. El Monte, CA 91731 Tel: 1-888-876-5387 www.soleusair.com POWERED BY: KEEP THESE
e Bath Fan with Light User s Guide
 e Bath Fan with Light User s Guide abfl125rok Item Stock Number(s): BFL125ROK IMPORTANT INSTRUCTIONS - OPERATING MANUAL READ AND SAVE THESE INSTRUCTIONS READ CAREFULLY BEFORE ATTEMPTING TO ASSEMBLE, INSTALL,
CELDEK Evaporative Cooler Module Installation, Operation, and Maintenance Manual. CELDEK Evaporative Cooler
 CELDEK Evaporative Cooler Module Installation, Operation, and Maintenance Manual CELDEK Evaporative Cooler RECEIVING AND INSPECTION Upon receiving unit, check for any interior and exterior damage, and
Canister Vacuums S6EVO. Operations and Parts Manual. Models: S6EVO
 Canister Vacuums S6EVO Operations and Parts Manual Models: S6EVO 2 IMPORTANT SAFETY INSTRUCTIONS When using an electrical appliance, basic precaution must always be followed, including the following: READ
OPERATING INSTRUCTIONS
 OPERATING INSTRUCTIONS FOR CARPET PRO UPRIGHT VACUUMS MODELS : CPU-75, CPU-75T, CPU-85, CPU-85T Before operating the vacuum, please read these instructions completely. Index Important Safety Instructions.............................................................2
36 & 48 E-Z Cone Fan. Installation & Operator s Instruction Manual (Direct Drive)
") 36 & 48 E-Z Cone Fan Installation & Operator s Instruction Manual (Direct Drive) September 1997 MV1433C Chore-Time Warranty Chore-Time Equipment warrants each new product manufactured by it to be free
36 & 48 E-Z Cone Fan Installation & Operator s Instruction Manual (Direct Drive) September 1997 MV1433C Chore-Time Warranty Chore-Time Equipment warrants each new product manufactured by it to be free
PUREPOWER SERIES CENTRAL VACUUM POWER UNITS PP500, PP600 & PP650
 USER GUIDE PUREPOWER SERIES CENTRAL VACUUM POWER UNITS PP500, PP600 & PP650 AB0039 FOR RESIDENTIAL USE ONLY!! MODELS SFDB-DQ, SFDB-DR AND SFDB-DS 30042509E IMPORTANT SAFETY INSTRUCTIONS SAVE THESE INSTRUCTIONS
SAFETY PRECAUTIONS. 2) Before operating machine: - Make sure all safety devices are in place and operate properly.
 Before operating machine: - Make sure all safety devices are in place and operate properly.") TABLE OF CONTENTS Machine Components Safety Precautions Machine Set Up Machine Operation Machine Maintenance & Storage Troubleshooting Technical Specifications Parts Lists Wiring Diagram 1 2 3 3-4 5 6
TABLE OF CONTENTS Machine Components Safety Precautions Machine Set Up Machine Operation Machine Maintenance & Storage Troubleshooting Technical Specifications Parts Lists Wiring Diagram 1 2 3 3-4 5 6
MC MC MC MC MC833130
 Pic-A-Vac Model: MC832085 MC833085 MC832105 MC833105 MC832130 MC833130 OPERATION SERVICE PARTS CARE Revised 8/01 FOR COMMERCIAL USE ONLY IMPORTANT SAFETY INSTRUCTIONS When using an electrical appliance,
user manual Model #: BLZ-WVH-42
 user manual Model #: BLZ-WVH-42 ii Table of Contents Table of Contents 1 Safety Notice III-V 2 Diagrams 1-3 Hood Dimensions............ 1 Control Panel.............. 2 Clearance............... 3 3 Installation
ADVANTAGE SERIES KXRP28 AIR-TO-AIR HEAT EXCHANGER
 Keep This Manual With Heat Exchanger Find additional information on this model at kooltronic.com or use the Technical Documents QR code below. Technical Documents ADVANTAGE SERIES KXRP28 AIR-TO-AIR HEAT
Upholstery and Drapery Cleaner. Operator and Parts Manual. Model No.: gal Extractor. MNL32506 Rev. 00 (08-98)
") 32506 Upholstery and Drapery Cleaner Model No.: 32506 3 gal Extractor Operator and Parts Manual KLEENRITE 1122 MAPLE STREET MADERA CA 93637 U.S.A. FAX: 1-559-673-5725 CUSTOMER SERVICE: 1-800-241-4865 MNL32506
32506 Upholstery and Drapery Cleaner Model No.: 32506 3 gal Extractor Operator and Parts Manual KLEENRITE 1122 MAPLE STREET MADERA CA 93637 U.S.A. FAX: 1-559-673-5725 CUSTOMER SERVICE: 1-800-241-4865 MNL32506
120V CAUTION: DO NOT OPERATE MACHINE UNTIL YOU HAVE READ ALL SECTIONS OF THIS INSTRUCTION MANUAL IMPROPER USE OF THE MACHINE WILL VOID THE WARRANTY
 KING COBRA 1200 120V INFORMATION & OPERATING INSTRUCTIONS CAUTION: DO NOT OPERATE MACHINE UNTIL YOU HAVE READ ALL SECTIONS OF THIS INSTRUCTION MANUAL IMPROPER USE OF THE MACHINE WILL VOID THE WARRANTY
INSTALLATION INSTRUCTIONS TXV Horizontal Duct Coils EHD
 TXV Horizontal Duct s EHD These instructions must be read and understood completely before attempting installation. It is important that the Blower and Duct System be properly sized to allow the system
INSTRUCTIONS FOR USE PORTABLE VACUUM SYSTEM LEI Part # s / , , , IMPORTANT INFORMATION
 INSTRUCTIONS FOR USE PORTABLE VACUUM SYSTEM LEI Part # s / 27-009, 27-010, 27-015, 27-020 IMPORTANT INFORMATION UNATHORIZED CHANGES OR ALTERATIONS TO ANY LINCOLN PORTABLE VACUUM SYSTEM WILL AUTOMATICALLY
Operations and Parts Manual
 Canister Vacuums Hospital Vac Operations and Parts Manual Models: S9HOSPITAL 2 IMPORTANT SAFETY INSTRUCTIONS When using an electrical appliance, basic precaution must always be followed, including the
Getz Equipment Innovators 450 lb Dual Portable Dry Chemical Fill System
 Getz Equipment Innovators 450 lb Dual Portable Dry Chemical Fill System 1 Revised 11/18/10 2320 Lakecrest Drive, Pekin IL 61554 PH. (888) 747-4389 Fax (309) 495-0625 Website: www.getzequipment.com LIMITED
BIOCIDE ANTIMICROBIAL DRY VACUUM
 BIOCIDE ANTIMICROBIAL DRY VACUUM Model: ATIBCV IMPORTANT SAFETY INSTRUCTIONS When using an electrical appliance, basic precaution must always be followed, including the following: READ ALL INSTRUCTIONS
π H-2268 SANITAIRE UPRIGHT VACUUM SAFETY uline.com
 π H-2268 SANITAIRE UPRIGHT VACUUM 1-800-295-5510 uline.com SAFETY PAGE 1 OF 7 NOTE: When using an electrical appliance, basic precautions should always be followed, including the following: READ ALL INSTRUCTIONS
Pump Out Vacuums Polyethylene & Steel
 Pump Out Vacuums Polyethylene & Steel Operations and Parts Manual 110 volt receptacle on single motor only Models: 415P-AD 429P-AD 415DS IMPORTANT SAFETY INSTRUCTIONS When using an electrical appliance,
Operation & Maintenance Manual for
 Operation & Maintenance Manual for CS5-16, CS5-36 & CS5-48 Series 12910 Ford Drive Fishers, IN 46038 Phone: 317-577-0417 Fax: 317-842-3989 1-800-557-5716 www.cool-space.com sales@cool-space.com Operation
INSTALLATION INSTRUCTIONS TXV Horizontal Slab Coils WLSH
 TXV Horizontal Slab Coils WLSH These instructions must be read and understood completely before attempting installation. It is important that the Blower and Duct System be properly sized to allow the system
(The chances are you re never going to read me) Owner s Manual. Model S10E.
 Owner s Manual. Model S10E.") (The chances are you re never going to read me) Owner s Manual Model S10E www.simplicityvac.com 1 Contents Getting Started Important Safety Instructions 2 Polarization Instructions 3 State of California
(The chances are you re never going to read me) Owner s Manual Model S10E www.simplicityvac.com 1 Contents Getting Started Important Safety Instructions 2 Polarization Instructions 3 State of California
As part of the V.I.P. family, you are entitled to the best protection by one of the most comprehensive warranties in the industry.
 CONGRATULATIONS on your purchase of a Viper product, and welcome to the V.I.P. family. We appreciate your business and will do everything in our power to keep you happy with your purchase for many years
Operator s Manual. Histology Bath
 Operator s Manual Histology Bath 110-827 05.09.12 Table of Contents Introduction... 2 General Safety Information... 2 Safety Recommendations... 3 Unpacking Your Histology Bath...4 Contents...4 Components
L24TWS. Beverage Tower Kit Components. L24TWD Lynx Beverage Kits Model L24TWS Single Tower and L24TWD Double Tower
 Installation, Care and Use of Your Lynx Beverage Tower Kits MOM FRIENDLY. DAD READY. L24TWS Beverage Tower Kit Components L24TWD Lynx Beverage Kits Model L24TWS Single Tower and L24TWD Double Tower Introduction:
Flood Pumper Plus. Water Transfer Machine. Operator and Parts Manual. Model No.: Rev. 00 (11-99)
") Flood Pumper Plus Water Transfer Machine Model No.: 607841 Operator and Parts Manual NOBLES 12875 RANSOM STREET HOLLAND MI 49424 U.S.A. CUSTOMER SERVICE: 1-800-365-6625 FAX: 1 800 678 4240 608468 Rev.
Flood Pumper Plus Water Transfer Machine Model No.: 607841 Operator and Parts Manual NOBLES 12875 RANSOM STREET HOLLAND MI 49424 U.S.A. CUSTOMER SERVICE: 1-800-365-6625 FAX: 1 800 678 4240 608468 Rev.
Technical Details. Important Safety Instructions READ ALL INSTRUCTIONS BEFORE USING THIS MACHINE
 SEBO ET-1 Owner's Manual Technical Details Brush motor - 175 watts, 1.6 amps Width: 12 in Weight: 5.4 lbs Brush roller: replaceable Brush drive: toothed belt with electronic overload protection Important
Installation Electric Dryers Instructions 01
 Installation Electric Dryers Instructions 01 Questions? Call 800.GE.CARES (800.432.2737) or visit our Web site at: GEAppliances.com This is the safety alert symbol. This symbol alerts you to potential
ADVANTAGE-100H-SC EXTRACTOR
 ADVANTAGE-100H-SC EXTRACTOR 120V INFORMATION & OPERATING INSTRUCTIONS CAUTION: DO NOT OPERATE MACHINE UNTIL YOU HAVE READ ALL SECTIONS OF THIS INSTRUCTION MANUAL IMPROPER USE OF THE MACHINE WILL VOID THE
Quest Dry 150 Dual. quest Asset Protection and IAQ Solutions. Read and Save These Instructions. Installation, Operation and Maintenance Instructions
 Quest Dry 150 Dual Read and Save These Instructions This manual is provided to acquaint you with the dehumidifier so that installation, operation and maintenance can proceed successfully. Ultimate satisfaction
BLAST-IT-ALL BUMPER BLASTER
 LARRY HESS AND ASSOCIATES, INC 185 PIPER LANE / SALISBURY, NC 28147 PHONE: 1-800-535-2612 / FAX: 1-704-638-9311 WWW.BLAST-IT-ALL.COM BLAST-IT-ALL BUMPER BLASTER SUCTION BLAST CABINET NOTE: It is the responsibility
Operating Instructions
 Operating Instructions BA-003 Read and understand this manual before use. Keep this manual for future reference. CONFORMS TO UL STD.No.1017 Certified to CSA STD C22.2 No.243-10 For questions or concerns
Quest Dry. Quest 110 Dual. Read and Save These Instructions. Installation, Operation and Maintenance Instructions
 Quest Dry Quest 110 Dual Read and Save These Instructions This manual is provided to acquaint you with the dehumidifier so that installation, operation and maintenance can proceed successfully. Ultimate
Owner s Guide. Powerhead Canister Vacuum Cleaner
 Owner s Guide Powerhead Canister Vacuum Cleaner INDEX 1. Important Safety Instructions 2. Components & Accessories 3. Assembly 4. How to Operate a. On/Off Switch b. Check bag indicator c. Variable suction
Industrial Vacuums, Inc
 Instructions/Spare Parts Manual Nilfisk Model GWD255 Drum Top Vacuum CAUTION: This Nilfisk vacuum cleaner is not to be used in explosion-hazardous areas, as serious injury could result. Under no circumstances
Installation and Operation Manual
 1645 Lemonwood Dr. Santa Paula, CA 93060 USA Toll Free: 1 (800) 253-2363 Tel: 1 (805) 933-9970 Fax: 1 (805) 933-9160 www.thecoolboss.com Cool Boss Portable Evaporative Air Cooler Installation and Operation
KPHE24 SERIES WATER-TO-AIR HEAT EXCHANGER
 Keep This Manual With Heat Exchanger Find additional information on this model at kooltronic.com or use the Technical Documents QR code below. Technical Documents KPHE24 SERIES WATER-TO-AIR HEAT EXCHANGER
5) Do not start or stop the unit by inserting or pulling out the power plug.
 Do not start or stop the unit by inserting or pulling out the power plug.") 3058080 V170306 PURCHASE INFORMATION Thank you for choosing a Soleus Air Portable Air Conditioner. This Owner s Manual will provide you with valuable information necessary for the proper care and maintenance
3058080 V170306 PURCHASE INFORMATION Thank you for choosing a Soleus Air Portable Air Conditioner. This Owner s Manual will provide you with valuable information necessary for the proper care and maintenance
All about the Use &Care
 All about the Use &Care of your Dehumidifier TABLE OF CONTENTS Important Safety Instructions... 2 Care And Cleaning... 6 Location... 3 Storage... 6 How It Works... 3 Before You Call... 7 Operating Instructions...
User Manual AIR HOG. Vacuum Booster REV. 3/20/ Stowe Dr. Poway, CA P: (858) F: (858)
 F: (858)") User Manual AIR HOG Model: 7303L Vacuum Booster REV. 3/20/18 13655 Stowe Dr. Poway, CA 92064 P: (858) 679-1191 F: (858) 726-6005 INTRODUCTION Dear Customer: Congratulations on the purchase of your new
User Manual AIR HOG Model: 7303L Vacuum Booster REV. 3/20/18 13655 Stowe Dr. Poway, CA 92064 P: (858) 679-1191 F: (858) 726-6005 INTRODUCTION Dear Customer: Congratulations on the purchase of your new
Earn BISSELL Rewards! Register your
 Earn BISSELL Rewards! Register your product today! See details on back page page 2 USER'S GUIDE 81L2 SERIES 2 Thank You 2 Product Registration 3 Safety Instructions 4 Product View 5 Assembly 5 Operations