QETTLE 3 IN1 INSTANT HOT WATER SYSTEM INSTALLATION & USER GUIDE
|
|
|
- George Pierce
- 6 years ago
- Views:
Transcription


1 QETTLE 3 IN1 INSTANT HOT WATER SYSTEM INSTALLATION & USER GUIDE
2 Introduction Thank you for purchasing a Qettle Tap instant hot water appliance. This product has been designed and manufactured to the very highest quality standards. Correctly installed and properly maintained in accordance with the following instructions, it will provide you with many years of reliable service. This guide explains how to install a Qettle Tap 3 in 1 instant hot water appliance. DO NOT ATTEMPT TO INSTALL THIS PRODUCT WITHOUT REFERENCE TO THIS GUIDE. FOR THE PRODUCT TO FUNCTION CORRECTLY IT MUST BE INSTALLED STRICTLY IN ACCORDANCE WITH THESE INSTRUCTIONS. PARTICULAR ATTENTION MUST BE PAID TO ENSURING THE WATER PRESSURE, WATER FLOW AND ELECTRICAL SUPPLY ARE WITHIN THE STATED PARAMETERS. THE MANUFACTURER RESERVES THE RIGHT TO RECOVER ANY COSTS INCURRED AS A CONSEQUENCE OF INCORRECT INSTALLATION. The Qettle Tap System must only be installed using only the genuine components supplied with the system. Substituting any of them with other manufacturers alternatives or failing to install and maintain the unit in strict accordance with these instructions will invalidate your product warranty. Qettle will not accept liability for damage or accidents resulting from the use of non-genuine components, incorrect installation or operation. Application This product is a boiling water device intended for domestic use only. The water supply pressure must be between minimum 1.5 BAR (22 psi) maximum 4 BAR (58psi) Please Note: This diagram is for guidance only COLD HOT
3 Safety Important Note: Instant hot water is potentially dangerous. It is the responsibility of the owner to take sensible precautions when operating the instant hot water function of the Qettle Tap and to instruct other family members and other new users to operate it safely. The installation must be carried out by a suitably qualified professional in strict accordance with the instructions provided and comply with the UK Water Supply (Water Fittings) Regulations 1999 and safety standards. If a new electrical power supply is required you must seek the services of a qualified electrician. The heater tank must only be connected to the 230V mains electricity supply through either an earthed independent wall socket or a fused spur. It is advisable to check the circuit to establish whether or not the addition of Qettle Tap will overload the circuit. The heater tank is fitted with an electrical lead terminating in a fused plug for connection to the 230 volt 13 amp domestic electricity supply. It is important to use a socket with a built in switch and position it to provide convenient access to switch off the heater tank. The electrical lead or plug must not be modified in any way. Turn off the mains water supply before commencing installation. Never lift the heater tank by the flexible hoses. The power to the heater tank must only be switched on once the installation is complete and the tank is full of water. Always turn off the electricity supply to the boiler before you close the mains stop valve. Restore power to the heater tank after the mains stop valve has been opened. Heater tank technical data Description Voltage Power Load Min Water Pressure Max Water Pressure Heating up time ( T=90 C) Recovery time ( T=60 C) Capacity Tank Dimensions Before you begin 1. Check the mains water pressure. The pressure must not be below 1.5 BAR (22 psi) or above 4 BAR (58psi), measured during a low demand period (mid-morning or midafternoon). If the pressure exceeds 4 BAR a pressure reducing valve must be installed in the cold mains supply to protect both the boiler and the water filter housing. A suitable pressure reducing valve can be purchased at 2. The unit must be installed in a frost free environment. 3. Ensure that the cabinet is well ventilated. If in doubt it is advisable to improve the circulation of air by drilling some holes in the top and bottom of the rear panel. 4. Be careful when making the various connections to the mains water stop valve and the heater tank. Do not be tempted to over-tighten the connections. 5. Locate the existing hot and cold water supply pipes. 6. Shut off the mains water supply. Value 230 Volts 1350 Watts 10 Amps 2 Bar (29psi) 4 Bar (58psi) 20 Minutes 10 Minutes 2.4 Litres 20(w) x 22(d) x 31(h) cm 7. Switch off the mains electricity supply at the socket. Young people and potentially vulnerable users must be instructed how to operate the boiling water function safely by a responsible adult. This is a domestic appliance and must not be installed in a commercial environment.
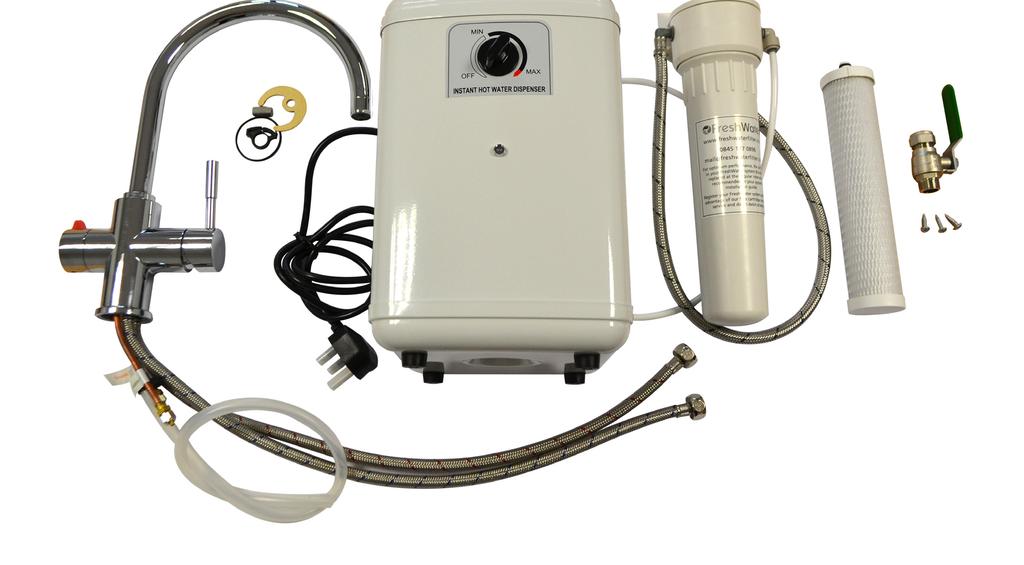
4 Components List 1. Qettle 3 in 1 Tap 2. Tap Clamp 3. Tap Clamping Nut 4. Box Spanner for tap clamp nut 5. Heater Tank Supplied in box with Tap 6. 1/4 Straight Push-Fit connector 7. Water Filter Housing Assembly 8. FW07A Water Filter Cartridge 9. Stop Valve 10. Water Filter retaining screws. Supplied in box with Heater Tank A Hose Clip 3 B G1/2" x2 4 A B Supplied in box with Filter System A FLOW A G1/2" 10 x3 THE INSTALLATION PROCEDURE Installing the Qettle 3 in 1 Kitchen Tap Carrying out this operation first will make it easier to plan the layout inside the cabinet. For safety it is advisable to locate the tap out of the reach of smaller children. 250mm 1. The tap will require a standard 35mm diameter hole cut in the kitchen work surface. Important Note: before cutting the hole make sure that there is sufficient clearance between the tap handles and the back splash when the handles are in the fully open position. Min 100mm 2. Insert the hoses and the through the 35mm hole. 355mm 3. Working inside the cabinet, slide the clamp plate (2) over the threaded tap shank and screw the clamp nut (3) on to the shank using the box spanner (4). 225mm 60mm Max 4. Check the alignment of the tap then tighten the clamp nut using the box spanner to firmly secure it on the work surface. 40mm
5 Plan the layout inside the cabinet Determine the best positions for the hot and cold mains water supply. Determine the best positions for the heater tank and the filter unit, making sure that the heater power cable and the hoses are all within comfortable reach of their respective connection points without them being compressed, stretched or kinked. The heater must be installed upright with the hose connections at the top, never on its side. Allow a minimum clearance of 80mm at the top of the boiler for the connecting hoses. Choose a location for the filter housing (7) and the stop valve (9) to allow convenient access for future filter cartridge changes. The plumbing 1. Provide a hot and cold water supply for the tap. (We recommend that service stop-valves are fitted in both the hot and cold water supplies to the tap.) 2. Tee off the cold mains water supply to provide an independent feed to the water filter. 3. Install the stop-valve (9) inline on the independent feed to the filter. Important note: the ends of the stop valve are not the same. One end has an internal chamfer to connect to compression pipework; the opposite end has a flat washer face to suit the G1/2 (1/2 BSP) nut and washer of a flexible hose (refer to diagram (9) in component list.) 4. Connect the hot and cold G1/2 flexible hoses to the respective hot and cold supplies and tighten them firmly to make a watertight seal. The tap hoses are colour coded, blue for the cold water inlet hose and red for the hot water inlet hose. Install the filter unit Important Note: The filter unit must be installed inside a cupboard. Long term exposure to direct light can degrade the plastic sump leading to eventual failure. 1. Position the filter housing (7) vertically with the hoses at the top, in its previously determined location. 2. Mark the positions for the two filter unit support screws (10) using the holes in the filter bracket as a guide. 3. Set the filter unit aside and screw in the two screws leaving the heads slightly proud (approximately 4mm). 4. Take the G1/2 nut (7.A) at the free end of the filter inlet hose and screw it on the G1/2 male outlet thread of the stop valve (9). Do not overtighten. 5. Take the hose connected to the tap labelled Mains supply in and push it firmly into the elbow in the outlet of the filter housing. Important Note Regarding the push-fit connections Initial resistance will be felt as the internal O seal is engaged continue to push past the seal to the final stop. The hose should push into the fitting 10mm (3/8 ). Failure to fully engage the connector may result in subsequent failure of the joints. In order to check the joint is secure pull the hose gently away from the connector. 6. Hang the filter unit on the two screws. If the panel is too thin to mount the filter securely strengthen the panel with a wooden batten. Cold water inlet from filter stop valve Filtered water outlet to tap
6 Install the heater tank Moisten to aid tube connection. Important note: Do not plug the heater tank into the power supply at this stage. 1. Remove the plastic bag covering the heater tank and the protective caps from the two connections on the top of the heater tank. 2. Place the heater tank (5) in position upright on a flat surface inside the cabinet with the connections to the top. 3. Locate the 1/4 straight push-fit connector (6). Take the hose connected to the tap labelled To tank inlet and engage into the 1/4 push-fit connector. In order to check the joint is secure pull the hose gently away from the connector. Squeeze clip firmly and pull over tube and outlet into position shown. 4. Take the free end of the 1/4 straight connector and push it firmly on to the 1/4 tank inlet stem. In order to check the joint is secure pull the hose gently away from the connector. 5. Take the silicone tube connected to the tap, moisten the tank outlet stem and push the silicone tube firmly over the stem. 6. Pinch the hose clip (1.A) and slide it down over the connection between the silicone hose and tank outlet stem. Commissioning the system 1. Install the filter cartridge into the filter housing. (Refer to Cartridge Change Instructions in the Care and Maintenance section overleaf). 2. Turn on the water supply. 3. Operate the instant hot water function for 3 minutes to flush the system. (Please see the OPERATING THE QETTLE TAP overleaf). 4. Turn the tap off and check all the connections for leaks. 5. Plug the heater tank into the mains electricity supply socket. 6. Remove the warning strip covering the dial on the front of the tank and rotate the dial to the midway position. 7. Wait for the tank to reach maximum temperature. This should take between minutes. After this time the temperature control knob can be turned up. Important note: the temperature control knob must not be turned beyond the MAX into the red section on the label. 8. Gurgling noises or perking sounds are normal during the initial heat-up stage, and the product may discharge some hot water from the tap spout until it settles down. 9. The system is now ready for use. Please demonstrate to the homeowner the procedure for replacing the water filter cartridge and explain the importance of scheduled cartridge changes to maintain the quality of the filtered water and the boiler warranty.
7 OPERATING THE QETTLE TAP Normal unfiltered mains Hot and Cold water FILTERED BOILING MAINS COLD MAINS HOT The hot and cold water is controlled in the normal manner by the lever opposite the boiling/cold filtered water lever. Instant Hot Filtered Water Slide the red safety lock out and away from the tap to disengage the safety lock, then rotate the handle forwards. The correct way to dispense the instant hot water. Position the outlet of the spout as close as possible to the receptacle you are about to fill (saucepan, cup or jug for example). Operate the instant hot water while gradually lowering the receptacle as it fills. CARE AND MAINTENANCE Cleaning the Qettle tap To maintain the appearance of this fitting, ensure it is cleaned only using a clean, soft damp cloth. A solution of warm water and mild liquid detergent may be used where necessary, and then the fitting rinsed thoroughly. Abrasive cleaners or acidic cleaners MUST NOT BE USED under any circumstances. Avoid contact with all solvents. Removing the heater tank 1. Disconnect the electricity supply to the heater tank. 2. Operate the instant hot water function and run the water until the water flowing from the spout runs cold. 3. Shut off the water supply to the heater tank. 4. Operate the instant hot water for a second time until the water stops flowing to release the pressure in the boiler. 5. Disconnect the hoses from the boiler using a suitable container to catch residual water. 6. Remove the heater tank carefully Water Filter Maintenance The water filter supplied with this unit is designed to both protect the boiler and provide high quality drinking water free of sediment, chlorine and other potentially harmful contaminants. Changing the filter cartridge every 6 months will keep the boiler in good condition. Qettle will not accept responsibility for boiler failures due to the build-up of lime-scale if the filter cartridge has not been replaced at the recommended 6 month intervals. The occasional wash in warm soapy water is sufficient to keep the plastic housing clean. Under no circumstances should the plastic filter housing come into contact with any proprietary cleaners such as kitchen sprays, bleach etc. as contact with certain chemicals can degrade the plastic and cause it to fail. The plastic housing must be replaced every 10 years due to the tendency of plastic materials to degrade and weaken over time. A smear of WRAS approved silicon grease applied to the filter sump thread and to the rubber sealing ring in the head of the filter at each cartridge change will make it easier to unscrew the sump. Only a WRAS approved alternative grease must be used for this purpose. Non-approved greases may degrade both the seal and the plastic housing and lead to eventual failure. Small tubes of WRAS approved silicone grease are available at
8 Changing the filter cartridge 1. Operate the switch on the front of the boiler to switch off the boiler power supply. 2. Shut off the water supply to the filter using the adjacent stop-valve. 3. Turn the Qettle tap boiling water handle to the ON position for a few seconds to release the pressure in the system. Important note. If the pressure is not released it will not be possible to unscrew the filter housing sump from the head. 4. Place a shallow container in the cabinet to catch any water residues when removing the filter sump. Grip the sump firmly and turn it firmly to the left to break the seal. Unscrew the sump by hand until it separates from the head of the filter. 5. If the old cartridge does not automatically fall free press down on the top mount of the cartridge to release it. Remove the old cartridge and discard the remaining water in the sump. 6. Remove the new filter cartridge from its packaging, wet the O seal and place it in the filter sump. Position the sump, with the cartridge inside, under the filter head and screw it in place. The cartridge should engage automatically. Tighten the sump, sufficient to make a water tight seal. 7. Turn the water supply on and check the system carefully for leaks. 8. Operate the system and run the instant hot water for a few moments until the water runs clear. 9. Turn the heater tank power supply back on. Sensible precautions If you are planning to leave the premises for an extended period (over a week) it is a sensible precaution to turn off both the electricity supply and the water supply to your Qettle system. FREQUENTLY ASKED QUESTIONS AND TROUBLESHOOTING GUIDE How to safely operate the instant hot water function. Position the vessel over the outlet of the tap spout then activate the instant hot water. Gradually lower the vessel while keeping the spout just above the surface of the water. Hot water continuously drips and sputters or steam discharges from the spout For safety reasons the system is designed to relieve the pressure build up in the tank directly through the tap to the outlet. Consequently the occasional drip and splutter from the spout is normal. If the discharge appears excessive first check the tubes connecting the tap to the storage tank are not kinked. If these are ok then check the dial on the front of the heater tank. It must not be set beyond the max in the red section on the label. If the discharge from the spout is particularly violent disconnect the electricity supply and contact Tapspares UK on The hot water flow from the tap is slow (not the boiling water) Check the Hot water pressure. A minimum of 1.5 bar pressure is required. The filtered instant hot water flow from the tap is slow. Generally this indicates that the filter cartridge is clogged with contaminants and needs replacing. You can check by operating the filtered water with no cartridge in the filter housing.
9 The flow of filtered water has slowed to an unacceptable level inside the 6 months change period. The period between cartridge replacements is not guaranteed; it is an estimate based on filtering mains water of average quality. Please bear in mind that water quality varies from locality to locality and situation to situation. In areas with higher than average turbidity (particle contamination) more frequent cartridge changes may be necessary. The instant hot water function is dispensing cold water instead of boiling water - Check that the electrical supply is correctly connected. - Check the 13amp fuse in the plug. - If you are still experiencing problems after completing these steps please contact Tapspares UK on Unsightly deposits on the surface of a cup of tea In hard water areas a scum can appear on the surface of hot tea. Although unsightly it is completely harmless. The cause is related to the precipitation of calcium and magnesium in hard water regions and a reaction with the tea bag material. Changing tea bags will often remedy the problem. Alternatively you can consider switching to a Carbon Dealk cartridge which will remove the calcium and magnesium however please note this filter will need to be change more frequently, perhaps every 2-3 months. The life of the Carbon Dealk cartridge is dependent on the hardness of the water supply and the volume of water passed through it, so is impossible to predict, however the return of the scum on hot drinks is an indication it should be replaced. Foam or a film is forming on the surface of hot drinks. This is caused by a combination of the agitation of the boiling water creating millions of tiny air bubbles, the ph of the water and the amount of oil in the teabag material. Experimenting with different tea bags is worth a try. To reduce the problem try filling the teapot or cup with instant water before dropping the tea bag in rather than running the boiling water directly onto the teabag or perhaps experiment with different brands of tea bag. Milky or cloudy appearance of the filtered water A new filter cartridge has a significant amount of air trapped in the microporous structure of the cartridge. This will form tiny bubbles and give the water in the glass a milky appearance that will soon disperse when left to stand for a few moments. This may continue for 2 to 3 weeks until the cartridge is fully conditioned. Tiny black specks in the water Tiny black specs may appear initially in the water. These are harmless particles of carbon; residues from the manufacturing process. Allow the filtered water to continue flowing for a while until they are completely flushed through. Condensation is dripping from exposed copper pipes adjacent to the heater tank. This can be reduced by wrapping insulation around the pipes in question.
10 GUARANTEE This Qettle product carries the following warranties against material and manufacturing defects: Qettle 3 in 1 Tap - 1 Year on finish, 5 years on working parts Qettle Heater Tank - 2 Years Water Filter complete with a FW07A filter cartridge - 2 Years The warranty will be valid from the date of purchase as shown on the sales invoice. Please keep the invoice for your records. This appliance is intended for domestic use only. The warranty does not apply to products installed outside a domestic environment. WARRANTY What is covered by the Qettle guarantee? The repair or replacement of all or part of your system if your system is found to be defective due to faulty materials or manufacture within the relevant warranty periods at Qettle s discretion. If any part is no longer available, or out of manufacture, Qettle reserve the right to replace it with a suitable alternative. Terms and conditions of the Qettle guarantee The guarantee is valid for the UK. The guarantee becomes effective at the date of purchase or at the date of delivery if this is later. Proof of purchase is required under the terms of the guarantee. The guarantee provides benefits in addition to your statutory consumer rights. Qettle does not guarantee the repair or replacement of a product that has failed for any of the following reasons: Faulty installation, repairs or alterations not in accordance with the installation guide. Normal wear and tear. Accidental damage or faults caused by negligent use or care; misuse; neglect; careless operation and failure to use the system in accordance with the Qettle operating guidelines. Failure to maintain the water filter in accordance with the instructions. The use of anything other than genuine Qettle replacement parts, including the water filter cartridge. The use of the filter system for anything other than normal domestic household purposes. Failures of, or failures caused by, parts not supplied as part of the genuine Qettle system. How do I make a claim under my guarantee? If you are in doubt about what is covered by your guarantee, or wish to discuss a claim, please call Tapspares UK on Monday to Friday between the hours of 9.00am and 5.00pm.
11 DECLARATION OF CONFORMITY The Qettle heater tank complies to and is in accordance with the following directives: 2006/95/EC Low Voltage Directive 2011/65/EU RoHS Directive 2009/125/EC Eco Design Directive The Qettle heater tank conforms to the requirements of the relevant EU guidelines. The symbol on the product or on its packaging indicates that this product may not be treated as household waste. Instead it shall be handed over to the applicable collection point for the recycling of electrical and electronic equipment. By ensuring this product is disposed of correctly, you will help prevent potential negative consequences for the environment and human health, which could otherwise be caused by inappropriate waste handling of this product. For more detailed information about recycling of this product, please contact your local city office, your household waste disposal service or the shop where you purchased the product. Greg Rowe Ltd All Rights Reserved.
12 TapSpares UK Old Winery Business Park Chapel Street Cawston, Norfolk NR10 4FE Phone +44 (0) Part No: Tapspares UK is a trading name of Greg Rowe Limited
INSTALLATION & USER GUIDE
 QETTLE 3-IN-1 BOILING WATER TAP 4 LITRE BOILER INSTALLATION & USER GUIDE Introduction Thank you for purchasing a Qettle boiling and filtered water appliance. This product has been designed and manufactured
FRANKE OMNI and OMNI CLASSIC 4-in-1 BOILING WATER SYSTEM
 FRANKE OMNI and OMNI CLASSIC 4-in-1 BOILING WATER SYSTEM Installation instructions Omni 4-in-1 119.0380.520 Omni Classic 4-in-1 119.0438.426 Introduction This guide explains how to install a new Franke
FRANKE MINERVA 3-IN-1 HOT WATER TAP HEATING TANK INSTALLATION GUIDE
 FRANKE MINERVA 3-IN-1 HOT WATER TAP HEATING TANK INSTALLATION GUIDE Introduction Thank you for purchasing this Franke product, which has been designed and manufactured to the highest quality standards.
FRANKE MINERVA 3-IN-1 HOT WATER TAP HEATING TANK INSTALLATION GUIDE
 FRANKE MINERVA 3-IN-1 HOT WATER TAP HEATING TANK INSTALLATION GUIDE Introduction Thank you for purchasing this Franke product, which has been designed and manufactured to the highest quality standards.
TH100 Three in One Instant Hot Water Tap
 TH100 Three in One Instant Hot Water Tap Installation, Use and Maintenance Customer Care Department The Group Ltd. Harby Road Langar Nottinghamshire NG13 9HY T : 01949 862 012 F : 01949 862 003 E : customer.care@cda.eu
Parenzo Range. Basin Mixer, Bath Filler & Bath Shower Mixer. Assembly instructions
 Parenzo Range Basin Mixer, Bath Filler & Bath Shower Mixer Assembly instructions We have designed these products with your enjoyment in mind. To ensure that they work to their full potential, they need
Where the tap has a removable aerator on the spout exit it can be removed and cleaned periodically to maintain optimum flow performance.
 TAP6000 3 in Hot Tap Guarantee (UK only): 04-7 Your tap has the benefit of a comprehensive manufacturer s guarantee, details of which are shown on your Proof of Purchase Document. Any claim during the
Decade Tap Range. Installation Instructions & User Guide. Please keep these instructions for future reference and request of replacement parts
 Decade Tap Range Installation Instructions & User Guide Please keep these instructions for future reference and request of replacement parts Contents Thank you for choosing Bristan, the UK s leading taps
Cinnamon Kitchen Sink Tap
 Cinnamon Kitchen Sink Tap Installation Instructions & User Guide Please keep these instructions for future reference and request of replacement parts Contents Thank you for choosing Bristan, the UK s leading
Pear Kitchen Sink Tap
 Pear Kitchen Sink Tap Installation Instructions & User Guide Please keep these instructions for future reference and request of replacement parts Contents Thank you for choosing Bristan, the UK s leading
BASIN MIXERS INSTALLATION & AFTERCARE INSTRUCTIONS
 BASIN MIXERS INSTALLATION & AFTERCARE INSTRUCTIONS This guide covers the installation of all Tavistock basin mixer varients. Please select the installation diagram suited to the basin mixer you have purchased.
Blueberry Kitchen Sink Tap
 Blueberry Kitchen Sink Tap Installation Instructions & User Guide Please keep these instructions for future reference and request of replacement parts Contents Thank you for choosing Bristan, the UK s
BOILING UNIT REDITAP. Installation and User Guide. IMPORTANT: This booklet should be left with the user after installation and demonstration
 in tap Boiling water to in tap sink Drain Valve (as high as possible) REDITAP CONNECTION SUMMARY Amp mains supply cold mains water into in tap optional filter cold water in hot water BOILING UNIT Installation
SCHWAN INSTALLATION GUIDE
 SCHWAN INSTALLATION GUIDE For Schwan Versatap SC52E Instant Hot Cold Filtered Water FOR SERVICE OR ASSISTANCE CALL MERQUIP ON 0800 636 0 636. Schwan recommends that a qualified tradesperson installs your
Monza Easyfit Kitchen Sink Mixer
 Monza Easyfit Kitchen Sink Mixer Installation Instructions & User Guide Please keep these instructions for future reference Contents Thank you for choosing Bristan, the UK s leading taps and showers expert.
Smile Tap Range. Installation Instructions & User Guide. Please keep these instructions for future reference and request of replacement parts
 Smile Tap Range Installation Instructions & User Guide Please keep these instructions for future reference and request of replacement parts Contents Thank you for choosing Bristan, the UK s leading taps
INSTALLATION MANUAL LITTLE BUTLER HOT WATER AND DRINKING WATER FILTRATION FAUCETS LB13250 LB13150 DW13050
 INSTALLATION MANUAL LITTLE BUTLER HOT WATER AND DRINKING WATER FILTRATION FAUCETS LB13250 LB13150 DW13050 1 2 TECHNICAL DATA Recommended Water Pressure 35-75PSI Max. Water Pressure 145 PSI Recommended
UBBU60LFA. Built-under Fridge Manual for Installation, Use and Maintenance IM UBBU60LFA_
 UBBU60LFA Built-under Fridge Manual for Installation, Use and Maintenance IM UBBU60LFA_20131023 Before first use You must allow the fridge to settle for at least twenty four hours prior to switching the
Zip Econoboil. Installation and Operating Instructions. Budget priced instant boiling water for canteens and kitchens.
 Installation and Operating Instructions Zip Econoboil Budget priced instant boiling water for canteens and kitchens. 103592 Zip Econoboil 3.0 litre White HS503 105592 Zip Econoboil 5.0 litre White HS505
OWNER S MANUAL AND INSTALLATION GUIDE PLEASE READ THIS MANUAL CAREFULLY BEFORE ATTEMPTING INSTALLATION
 ClearChoice Economy Under Sink Drinking Water System OWNER S MANUAL AND INSTALLATION GUIDE PLEASE READ THIS MANUAL CAREFULLY BEFORE ATTEMPTING INSTALLATION Congratulations on the purchase of your ClearChoice
MW001 Integrated Dishwasher. Manual for Installation, Use and Maintenance
 MW001 Integrated Dishwasher Manual for Installation, Use and Maintenance Important The CDA Group Ltd cannot be held responsible for injuries or losses caused by incorrect use or installation of this product.
SCHWAN INSTALLATION GUIDE
 1 SCHWAN INSTALLATION GUIDE For Schwan SC60 FOR SERVICE OR ASSISTANCE CALL MERQUIP ON 0800 636 0 636. Schwan recommends that a qualified tradesperson installs your Schwan system. 2 INFORMATION AND SAFETY
X62 Tap Range. Please keep these instructions for future reference
 X62 Tap Range This instruction booklet covers: X625205CP, X625215CP, X625255CP, X625265CP, X625122CP, X625126CP, X625135CP Please keep these instructions for future reference 02 For latest prices and delivery
Installation and Operating Instructions. Budget priced instant boiling water heater for beverages.
 Installation and Operating Instructions Zip Econoboil Budget priced instant boiling water heater for beverages. Model No. Description Reg.No. Part No. HS503 Zip Econoboil 3.0 litre White EB003 103592 HS505
Autofill wall mounted water. boiler. Getting the best from your water. boiler. Please read and keep these instructions
 Autofill wall mounted water boiler Please read and keep these instructions For Burco wall mounted boilers 76700 (SKU 444448534), 76702 (SKU 444448546), & 76704 (SKU444448548) Getting the best from your
Blitz Tap Range. Installation Instructions & User Guide. Please keep these instructions for future reference and request of replacement parts
 Blitz Tap Range Installation Instructions & User Guide Please keep these instructions for future reference and request of replacement parts Contents Thank you for choosing Bristan, the UK s leading taps
PRESSURE WASHER MODEL NO: JETSTAR 1750 OPERATION & MAINTENANCE INSTRUCTIONS. WARNING Read the instructions before using the machine PART NO:
 WARNING Read the instructions before using the machine PRESSURE WASHER MODEL NO: JETSTAR 1750 PART NO: 7333230 OPERATION & MAINTENANCE INSTRUCTIONS LS0711 INTRODUCTION Thank you for purchasing this CLARKE
Retro Teasmade. Model: STM202N v1.3. For service call
 Retro Teasmade Model: STM202N v1.3 For service call 0871 200 0003 STM202_IM.indd 1 02/09/2015 08:15 IMPORTANT INFORMATION - RETAIN FOR FUTURE USE IMPORTANT INFORMATION - RETAIN FOR FUTURE USE When using
Built-in Gas Hob CZ55554 CZ55571
 Built-in Gas Hob CZ55554 CZ55571 INSTALLATION AND OPERATING INSTRUCTIONS The product may differ from the one illustrated but the installation and operation procedure remains the same The product may differ
Prism Thermostatic Recessed Shower with Integral 2 Outlet Diverter
 Prism Thermostatic Recessed Shower with Integral 2 Outlet Diverter Installation Instructions & User Guide Please keep these instructions for future reference and request of replacement parts Thank you
Installation guide Billi B-3000 Sparkling Dual levered slimline tap option
 Installation guide Billi B-3000 Sparkling Dual levered slimline tap option Installation requirements. IMPORTANT: This Billi appliance is to be installed by a licensed trades person in accordance with AS/NZS
Installation & Operating Guide
 5-036 HOT WATER TANK Installation & Operating Guide Read all instructions thoroughly. Keep this guide for future reference. Proof of purchase is required for Warranty. Staple receipt or proof of purchase
The Professional s Choice
 CPF Series Models: CPF2100, CPF210, CPF310, CPF4100-3, CPF4100-6 & CPF6100 Auto-Fill Catering Water Boiler With Integrated Multi-Filter Installation And User Instructions The Professional s Choice INSTANTA
4L Instant Water Boiler Instructions for Use
 Power Details: 220-240Va.c. 50Hz-60Hz 2200-2600W Capacity: 4.0L Accessories: 2 Water aid trays Water Filters are not included and can be purchased separately Item Code 10747 IMPORTANT NOTES FOR YOUR INSTANT
Zip Hydroboil. Installation and Operating Instructions. Filtered instant boiling water
 Installation and Operating Instructions Zip Hydroboil Filtered instant boiling water 01552 Zip Hydroboil 1.5 Litre White 01551 Zip Hydroboil 1.5 Litre Stainless Steel 03552 Zip Hydroboil 3 Litre White
GENERAL FITTING GUIDE THERMOSTATIC BAR SHOWER MIXER with RIGID RISER KIT
 GENERAL FITTING GUIDE THERMOSTATIC BAR SHOWER MIXER with RIGID RISER KIT GUARANTEE & AFTERCARE When installing or using tools, extra care must be taken to avoid damaging the finish or fitting. To maintain
Capri Tap Range. Installation Instructions & User Guide. Please keep these instructions for future reference and request of replacement parts
 Capri Tap Range Installation Instructions & User Guide Please keep these instructions for future reference and request of replacement parts Thank you for choosing Bristan, the UK s leading taps and showers
Target Monobloc Kitchen Mixer Chrome
 Target Monobloc Kitchen Mixer Chrome Installation Instructions & User Guide Please keep these instructions for future reference and request of replacement parts Contents Thank you for choosing Bristan,
Beeline Monobloc Kitchen Mixer Tap
 Beeline Monobloc Kitchen Mixer Tap Installation Instructions & User Guide Please keep these instructions for future reference and request of replacement parts Contents Thank you for choosing Bristan, the
Singulier Spout Tube Basin Mixer Installation and User Guide
 Singulier Spout Tube Basin Mixer Installation and User Guide MODEL NUMBERS 10862W-CP Important! Please quote the above model number(s) when ordering spares IMPORTANT Installer: This manual is the property
Help line: Model: STM201N v1.5
 Help line: 0871 200 0003 Model: STM201N v1.5 When using any electrical appliance, basic safety precautions should always be followed including the following: Always ensure that the voltage on the rating
FW422. Integrated In Column Larder Fridge. Installation, use and maintenance.
 FW422 Integrated In Column Larder Fridge Installation, use and maintenance www.cda.eu Contents: 3 Important information 5 Important safety warnings 6 Before first use 7 Setting the temperature 7 Guidance
MW402 Integrated Dishwasher
 MW402 Integrated Dishwasher Manual for Installation, Use and Maintenance 1 Customer Care Department The Group Ltd. Harby Road Langar Nottinghamshire NG13 9HY T : 01949 862 012 F : 01949 862 003 E : customer.care@cda.eu
Installation and Operating Instructions. Models: T4-12LOW-9IS
 Installation and Operating Instructions Models: T4-12LOW-9IS Dear Valued Customer, Thank you and congratulations on purchasing your new Parmco appliance. All Parmco products are made to the highest quality
Model pictured: ST6001
 ST6001 Issue: 1 Description: ROBINHOOD SUPERTUB SGL DRW Model Number: ST6001 All dimensions in mm Model may vary slightly from images pictured Model pictured: ST6001 1 Overview Contents of packaging: 1
Zip Chilltap Extra. Affix Model Number Label Here UK. Installation and Operating Instructions
 Installation and Operating Instructions Zip Chilltap Extra Filtered Chilled and Ambient drinking water for the home Affix Model Number Label Here 800043UK Chill Tap - Installation & Operating Instructions
INSTRUCTIONS AND WARRANTY
 INSTRUCTIONS AND WARRANTY MODEL NO. SCK 35/SCK 35G SALTON CORDLESS KETTLES Congratulations on purchasing our Salton Cordless Kettles. Each unit is manufactured to ensure safety and reliability. Before
Zen Boiling Tap Range
 Product Instruction Manual Zen Boiling Tap Range Zen Solo, Zen Spa, Zen Life Tap Range v16.10/3 Version 3.2 Jan 2015 Overview The Zen Boiling Tap Range delivers elegant practical solutions for your domestic
Safety and Instruction Manual
 T10004 Safety and Instruction Manual PLEASE READ CAREFULLY *Subject to registering Your Extended Guarantee online at www.towerhouswares.co.uk. 1.7 Litre Illuminated Glass Kettle 1912 Midland Metal Spinners
Installation and Operating Instructions for Microlene Underbench System
 Installation and Operating Instructions for Microlene Underbench System WARNING : Microlene underbench system installation must be in compliance with all local legislative requirements, and installed by
wc431 Slimline Integrated Dishwasher Manual for Installation, Use and Maintenance
 wc431 Slimline Integrated Dishwasher Manual for Installation, Use and Maintenance Contents Contents... 2 Important... 3 Important Notes... 4 Recommendations... 5 Before First Use... 5 Control Panel...
METRO BASIN MONO MIXER CHR
 METRO BASIN MONO MIXER CHR 20004010020 This product should only be fitted by a qualified plumber to NVQ (National Vocational Qualification) or SNVQ (Scottish National Vocational Qualification) Level 3.
HW3 Handwash Installation and Operating Instructions
 HW3[16]instructions 10/12/15 14:05 Page 1 HW3 Handwash Installation and Operating Instructions IMPORTANT SAFEGUARDS SPECIFICATION: HW3 RATING: 230-240V, 3000W, ~50Hz; DIMENSIONS: 170w x 190h x 80d mm;
Refresh & Clean Carpet Washer
 Refresh & Clean Carpet Washer Model Number: RHCC5001 220-240 V~, 50/60Hz, 500-600W For Customer Services & Spare Parts please call 0345 209 7461 Opening times: Monday - Friday 8am 8pm & Saturday 9am 1pm
TEASMADE. model: STM Swan Products Limited, PO Box 3117, Stoke on Trent, Staffordshire, ST4 9GD
 TEASMADE 1.2 model: STM101 Swan Products Limited, PO Box 3117, Stoke on Trent, Staffordshire, ST4 9GD INTRODUCTION Thank you for purchasing this Swan TEASMADE. With this iconic product, you are joining
Installation Instructions Flute Tap Range
 Installation Instructions Flute Tap Range Models covered: FLT BAS C, FLT 1HBF C, FLT 2HBSM C, FLT TBAS C Please keep this booklet for future reference. Installer, when you have read these instructions
CROWN WATER HEATERS CPU10 - CPU15 CPOS10 - CPOS15
 CROWN WATER HEATERS CPU10 - CPU15 CPOS10 - CPOS15 COMPACT PLUS 10 and 15 Litre Unvented Under and Over Sink Water Heater INSTALLATION AND USER GUIDE 1 DIMENSIONS 10L - 250mm 15L - 310mm 100mm 80mm 410mm
THE BOILING WATER DISPENSER INSTALLATION & OPERATING INSTRUCTIONS IMPORTANT: READ AND SAVE THESE INSTRUCTIONS FOR THE BENEFIT OF THE USER
 THE BOILING WATER DISPENSER INSTALLATION & OPERATING INSTRUCTIONS IMPORTANT: READ AND SAVE THESE INSTRUCTIONS FOR THE BENEFIT OF THE USER Thank you for choosing a quality Redring product manufactured by
INSTANTANEOUS ELECTRIC SHOWER
 GUARANTEE / SERVICE POLICY INSTANTANEOUS ELECTRIC SHOWER GUARANTEE Designa guarantee this DS3000 product for a period of two years, from date of purchase, against mechanical and electrical defects arising
Hot-1 Hot Water Dispenser
 The Installation, Care and Use of Your New Hot-1 Hot Water Dispenser Valve lever design may vary How your hot water dispenser works Water is electrically heated to a brewing/cooking hot 190 F (88 C)* by
Enzo Safe Touch Thermostatic Shower EZ10010CP & EZ10014CP
 Enzo Safe Touch Thermostatic Shower EZ10010CP & EZ10014CP Installation and Maintenance Instructions In this procedure document we have endeavoured to make the information as accurate as possible. We cannot
Operating instructions
 Operating instructions for automatic detergent dispensing unit AWD 10 To avoid the risk of accidents en - AU, NZ or damage to the appliance, it is essential to read these operating instructions before
Installation guide COMBI E. Before installing read this guide first
 Installation guide COMBI E Before installing read this guide first Introduction The operation of the Quooker COMBI E The Quooker COMBI E supplies boiling water and hot water. The tank is vacuuminsulated
air pump 2700/4500 ? 2YEAR GUARANTEE UK AIRPUMP _33435 CASC /10/ :16 Page 1
 33719-000 UK AIRPUMP 2700-4500_33435 CASC.450 13/10/2011 09:16 Page 1 2823 1820 1380 air pump 2700/4500 Hozelock Ltd. Midpoint Park, Birmingham B76 1AB. England Tel: +44 (0) 121 313 1122 info@hozelock.com
User and Installation Instructions. Wall Mounted Water Boiler WMB3F/B and WMB3F/W IS435 ECN3461
 User and Installation Instructions Wall Mounted Water Boiler WMB3F/B and WMB3F/W IS435 ECN3461 Dear Customer Thank you for purchasing this Lincat product. With correct use and careful maintenance as described
User Guide. Please read carefully before use. Your Hoover Guarantee. Your Hoover Guarantee. Contents. IMPORTANT Safety Reminders
 Your Hoover Guarantee Contents Your Hoover Guarantee During year 1 HOOVER engineers will replace or repair all defective parts free of charge, except for parts subject to fair wear and tear such as belts,
EXPOSED BATH SHOWER MIXER INSTRUCTION MANUAL W INST 300. Please note: Tap heads shown is for illustration purposes only.
 EXPOSED BATH SHOWER MIXER INSTRUCTION MANUAL W INST 300 Please note: Tap heads shown is for illustration purposes only. CONTENTS GUARANTEE GENERAL SAFETY INSTRUCTIONS PARTS SUPPLIED HOW TO INSTALL AFTER
Multifunctional Food Processor User guide
 Multifunctional Food Processor User guide Model No: AMFP4001 For Customer Services & Spare Parts please call 0345 209 7461 Opening times: Monday - Friday 8am 6pm & Saturday 9am 1pm Or visit us at www.productcareuk.com
Enzo Concealed Shower Mixing Valve
 Enzo Concealed Shower Mixing Valve EZ40010CP, EZ40013CP & EZ40014CP Installation and Maintenance Instructions In this procedure document we have endeavoured to make the information as accurate as possible.
2 IN 1 JUICER AND BLENDER
 YOUR SAFETY & INSTRUCTION MANUAL PLEASE READ CAREFULLY 2 IN 1 JUICER AND BLENDER MODEL N19001 TECHNICAL DATA Description: Model: Rated Voltage: Frequency: Power consumption: 2 in 1 Juicer and Blender N19001
Installation & Operating Guide
 HOT WATER DISPENSER Installation & Operating Guide Read all instructions thoroughly. Keep this guide for future reference. Proof of purchase is required for Warranty. Staple receipt or proof of purchase
METIS. Installation instructions. Riser rail kit INSTALLERS PLEASE NOTE THESE INSTRUCTIONS ARE TO BE LEFT WITH THE USER.
 METIS Riser rail kit Installation instructions INSTALLERS PLEASE NOTE THESE INSTRUCTIONS ARE TO BE LEFT WITH THE USER 2180531A September 2006 CONTENTS Page General installation notes 1 Main components
Franke Specialist Range Pilatus Tap
 FR100611-Pilatus Install 20/10/06 15:47 Page 3 Franke Specialist Range Pilatus Tap Installation Instructions 303 162 50 192 205 For kitchens without compromise. FR100611-Pilatus Install 20/10/06 15:47
MK 8706 / MB 8706 CONCEALED THERMOSTATIC SHOWER VALVE INSTALLATION GUIDE
 MK 8706 / MB 8706 CONCEALED THERMOSTATIC SHOWER VALVE INSTALLATION GUIDE DIMENSIONS 150mm 55mm 200mm 67mm Hot water ¾ BSP Parallel Cold water ¾ BSP Parallel 160mm x 120mm aperture behind face plate for
User Instruction Manual
 User Instruction Manual Export Electric Catering Urn Please read and keep these instructions These instructions cover the Burco 10, 20 and 30 litre electric catering urns for export SKU s 444441912, 444441913
Read the instructions and keep them safe. Pass them on if you pass the kettle on. Remove all packaging, but keep it till you know the kettle works.
 instructions 2 Read the instructions and keep them safe. Pass them on if you pass the kettle on. Remove all packaging, but keep it till you know the kettle works. important safeguards Follow basic safety
- 2 - IMPORTANT SAFETY REMINDERS IT IS IMPORTANT THAT YOU:
 USER MANUAL IMPORTANT SAFETY REMINDERS This cleaner should only be used for domestic cleaning, as described in this user guide. Please ensure that this guide is fully understood before operating the appliance.
Zip Econoboil 1.5 litre White Zip Econoboil 3.0 litre White Zip Econoboil 5.0 litre White Zip Econoboil 7.
 Zip Econoboil Installation and Operating Instructions 301042 Zip Econoboil 1.5 litre White 303042 Zip Econoboil 3.0 litre White 305042 Zip Econoboil 5.0 litre White 307042 Zip Econoboil 7.5 litre White
MW401 Integrated Dishwasher
 MW401 Integrated Dishwasher Manual for Installation, Use and Maintenance Customer Care Department The Group Ltd. Harby Road Langar Nottinghamshire NG13 9HY T : 01949 862 012 F : 01949 862 003 E : service@cda.eu
YOUR SAFETY & INSTRUCTION MANUAL PLEASE READ CAREFULLY SLOW JUICER MODEL N23001
 YOUR SAFETY & INSTRUCTION MANUAL PLEASE READ CAREFULLY SLOW JUICER MODEL N23001 TECHNICAL DATA Description: Model: Rated Voltage: Frequency: Power consumption: Slow Juicer N23001 220-240V 50/60Hz 400W
Installation and Operating Instructions MODEL: MSE46W
 Installation and Operating Instructions MODEL: MSE46W MSE50W MODEL: Free Standing Electric ElectricOven Oven Free Standing Please read these instructions carefully before attempting to install or use this
HOT WASHER MODEL NO: KING150
 WARNING: Do not use the hot washer without reading this manual HOT WASHER MODEL NO: KING150 PART NO: 7320175 OPERATION & MAINTENANCE INSTRUCTIONS LS1215 INTRODUCTION Thank you for purchasing this CLARKE
SUBMERSIBLE DIRTY WATER PUMP
 SUBMERSIBLE DIRTY WATER PUMP MODEL NO: DWP100A, DWP150A, DWP200A PART NO: 7230098, 7230099, 7230100 OPERATION & MAINTENANCE INSTRUCTIONS ORIGINAL INSTRUCTIONS LS1117 - ISS 2 INTRODUCTION Thank you for
EZT90BL Extractor. Installation, Use and Maintenance.
 EZT90BL Extractor Installation, Use and Maintenance Customer Care Department The Group Ltd. Harby Road Langar Nottinghamshire NG13 9HY T : 01949 862 012 F : 01949 862 003 E : customer.care@cda.eu W : www.cda.eu
EXTRACTOR HOOD. Please read all the instructions carefully before starting the installation. 230 / 240V 50Hz
 abc EXTRACTOR HOOD Please read all the instructions carefully before starting the installation Model Stock Ref Napoli 120812 Napoli Plus (white) 436083 Napoli Plus (Silver) 436084 230 / 240V 50Hz PLEASE
INSTRUCTIONS MODEL: MWBT
 Page 1 of 15 INSTRUCTIONS MODEL: MWBT SAFETY INSTRUCTIONS INSTALLATION INSTRUCTIONS OPERATION INSTRUCTIONS MAINTENANCE INSTRUCTIONS WIRING DIAGRAM EXPLODED VIEW / PARTS LIST WARRANTY INFORMATION DISPOSAL
Safety and Instruction Manual
 T12009 Safety and Instruction Manual PLEASE READ CAREFULLY 550ml Spice Grinder & Chopper T12009 550ml Spice Grinder & Chopper WHAT S IN THE BOX Instruction Manual 1. Motor unit 2. Control switch 3. Lid
Oblo Basin and Bidet Monobloc Installation and User Guide
 Oblo Basin and Bidet Monobloc Installation and User Guide MODEL NUMBERS 10085W-CP, 10088W-CP Important! Please quote the above model number(s) when ordering spares IMPORTANT Installer: This manual is the
Compact Cyclonic Bagless Upright Vacuum Cleaner
 Compact Cyclonic Bagless Upright Vacuum Cleaner Model Number: RHUV20MR05 For Customer Services & Spare Parts please call 0345 209 7461 Opening times: Monday - Friday 8am 8pm & Saturday 9am 1pm Or visit
MHG201 Gas Hob Manual for Installation, Use and Maintenance
 MHG201 Gas Hob Manual for Installation, Use and Maintenance 1 Customer Care Department The Group Ltd. Harby Road Langar Nottinghamshire NG13 9HY T : 01949 862 012 F : 01949 862 003 E : customer.care@cda.eu
Water Distillation System Instruction Manual Nutriteam TC-501
 Water Distillation System Instruction Manual Nutriteam TC-501 Thank you for purchasing the Nutriteam TC-501 Water Distillation System. It will provide your household with freshly made, ultra clean, great
Installation, Operating and Servicing Instructions
 Installation, Operating and Servicing Instructions Wall Mounted Water Boiler WMB3F/B,WMB3F/W Please make a note of your product details for future use: Date Purchased: Model Number: Serial Number: Dealer:
INSTRUCTIONS MODEL: MFBU WET WELL BAIN MARIE
 Page 1 of 12 INSTRUCTIONS MODEL: MFBU WET WELL BAIN MARIE SAFETY INSTRUCTIONS TECHNICAL DATA INSTALLATION INSTRUCTIONS OPERATION INSTRUCTIONS MAINTENANCE INSTRUCTIONS EXPLODED VIEW / PARTS LIST FAULT DIAGNOSTICS
FW422 Integrated In Column Larder Fridge Manual for Installation, Use and Maintenance
 FW422 Integrated In Column Larder Fridge Manual for Installation, Use and Maintenance 1 Customer Care Department The Group Ltd. Harby Road Langar Nottinghamshire NG13 9HY T : 01949 862 012 F : 01949 862
Aqua & Instantaneous Electric Shower Installation Instructions SERVICE POLICY
 SERVICE POLICY In the event of you needing to contact the Galaxy Customer Service Department, the following procedure should be followed:- 3 5 Before telephoning the Galaxy Customer Service Department
Installation guide PRO7-VAQ E. Before installing read this guide first
 Installation guide PRO7-VAQ E Before installing read this guide first Introduction The operation of the Quooker PRO7-VAQ E The Quooker system consists of a small tank under the sink which is connected
CPE RANGE PUMPS CPE RANGE PUMPS. MODEL Nos: CPE15A1 15A3 20A1 20A3 30A1 30A3 PART Nos:
 CPE RANGE PUMPS CPE RANGE PUMPS MODEL Nos: CPE15A1 15A3 20A1 20A3 30A1 30A3 PART Nos: 7120305 7120310 7120315 7120320 7120325 7120330 OPERATION & MAINTENANCE INSTRUCTIONS GC0514 Contents Specifications...
Autofill counter top water boiler
 Autofill counter top water boiler Please read and keep these instructions For Burco counter top water boilers 76500 (SKU 444448531) and 76502 (SKU 444448533) Getting the best from your water boiler Remove
Traditional Kettle CTK17U CPT445U
 Traditional Kettle CTK17U CPT445U Congratulations on your purchase of the Cuisinart Traditional Kettle. For over 30 years Cuisinart s aim has been to produce the very finest kitchen equipment. All Cuisinart
UB110DNC/L/U/B BASIN MONOBLOC WITH NO POP-UP WASTE BASIN MONOBLOC TALL WITH NO POP-UP WASTE UB112DNC/L/U/B INSTALLATION INSTRUCTIONS
 BASIN MONOBLOC WITH NO POP-UP WASTE BASIN MONOBLOC TALL WITH NO POP-UP WASTE UB110DNC/L/U/B UB112DNC/L/U/B INSTRUCTIONS INTRODUCTION DIMENSIONS Please read these instructions carefully and keep in a safe