INSTRUCTION MANUAL SOLVENT RECYCLER MODEL PART # SR 20
|
|
|
- Annice Golden
- 6 years ago
- Views:
Transcription


1 INSTRUCTION MANUAL SOLVENT RECYCLER MODEL PART # SR 20 ETL Listed Mark - Canada/United States Conforms to UL2208 Certified to CSA C22.2 No. 30 Warranty Service Parts Safety Accessory Information Operation Registration Form 1
2 TABLE OF CONTENTS WARRANTY INFORMATION... 3 SOLVENT RECYCLER SPECIFICATIONS... 4 SAFETY AND WARNING... 5 General Safety... 5 Danger and Warning Labels... 5 General Safety Rules... 6 Personal Safety... 6 Unit Use and Care... 7 Safety Rules OPERATING PRINCIPLES OF THE DISTILLATION UNIT... 9 AIMS WARNING FOR THE DISTILLATION UNIT PROTECTION OF THE NATURAL ENVIRONMENT INSTALLATION INSTALLATION OF THE BAG OPERATIONS NFPA DRAWINGS STARTING PROCEDURES FLAMMABLE SOLVENTS THERMIC OIL CHANGING PROCEDURES DEFECTS, CAUSES AND REMEDIES (Distillation at Atmospheric Pressure) SCHEMATIC OF UNIT SPARE PARTS NUMBERS FOR SR20 RECYCLER ELECTRICAL DRAWING SR WARRANTY INFORMATION / TECHNICAL ASSISTANCE WARRANTY REGISTRATION PAGE 2
3 ECO Industry inc. LIMITED WARRANTY ECO Industry Inc. (ECO) warrants all equipment listed in this manual which is manufactured by ECO and bearing its name, to be free from defects in material and workmanship on the date of sale by an authorized ECO distributor to the original purchaser for use. Notwithstanding any special, extended or limited warranty published by ECO will, for a period of TWENTY FOUR (24) months from the date of sale, repair or replace any part of the equipment determined by ECO to be defective. This warranty applies only when the equipment is installed, operated and maintained in accordance with ECO s written recommendations. This warranty does not cover, and ECO shall not be liable for general wear and tear, or any malfunction, damage or wear caused by faulty installation, misapplication, abrasion, corrosion, inadequate or improper maintenance, negligence, accident, tampering, or substitution of non-eco component parts. Nor shall ECO be liable for malfunction, damage or wear caused by the incompatibility with IST equipment with structures, accessories, equipment or materials not supplied by ECO, or the improper design, manufacture, installation, operation or maintenance of structures, accessories, equipment or materials not supplied by ECO. This warranty is conditioned upon the prepaid return of the equipment claimed to be defective to an authorized ECO distributor for verification of the claimed defect. If the claimed defect is verified, ECO will repair or replace free of charge any defective parts. The equipment will be returned to the original purchaser, transportation prepaid. If the inspection of the equipment does not disclose any defect in material or workmanship, repairs will be made at a reasonable charge, which charges may include the costs of parts, labor, and transportation. THIS WARRANTY IS EXCLUSIVE, AND IS IN LIEU OF ANY OTHER WARRANTIES, EXPRESSED OR IMPLIED, INCLUDING BUT NOT LIMITED TO WARRANTY OF MERCHANTABILITY OR WARRANTY OF FITNESS FOR A PARTICULAR PURPOSE. ECO s sole obligation and the buyer s sole remedy for any breach of warranty shall be as set forth above. The buyer agrees that no other remedy (including, but not limited to, incidental or consequential damages for lost profits, lost sales, injury to person or property, or any other incidental or consequential loss) shall be available. Any action for breach of warranty must be brought forward within one (1) year of the date of sale. ECO MAKES NO WARRANTY, AND DISCLAIMS ALL IMPLIED WARRANTIES OF MERCHANTABILITY AND FITNESS FOR A PARTICULAR PURPOSE, IN CONNECTION WITH ACCESSORIES, EQUIPMENT, MATERIALS OR COMPONENTS SOLD BUT NOT MANUFACTURED BY ECO. These items sold, but not manufactured by ECO (such as electric motors, switches, hose, etc.), are subject to the warranty, if any, of their manufacturer. ECO will provide the purchaser with reasonable assistance in making any claim for breach of these warranties. LIMITATION OF LIABILITY In no event will ECO be liable for indirect, incidental, special or consequential damages resulting from ECO supplying equipment hereunder, or the furnishing, performance, or use of any products or other goods sold hereto, whether due to a breach of contract, breach of warranty, the negligence of ECO, or otherwise. Report all accidents or near misses which involve ECO products to: - Technical Assistance The following items are not covered under the ECO warranty policy: - Seal or packing replacement due to normal wears. Defective material or workmanship is not considered normal wear. 3
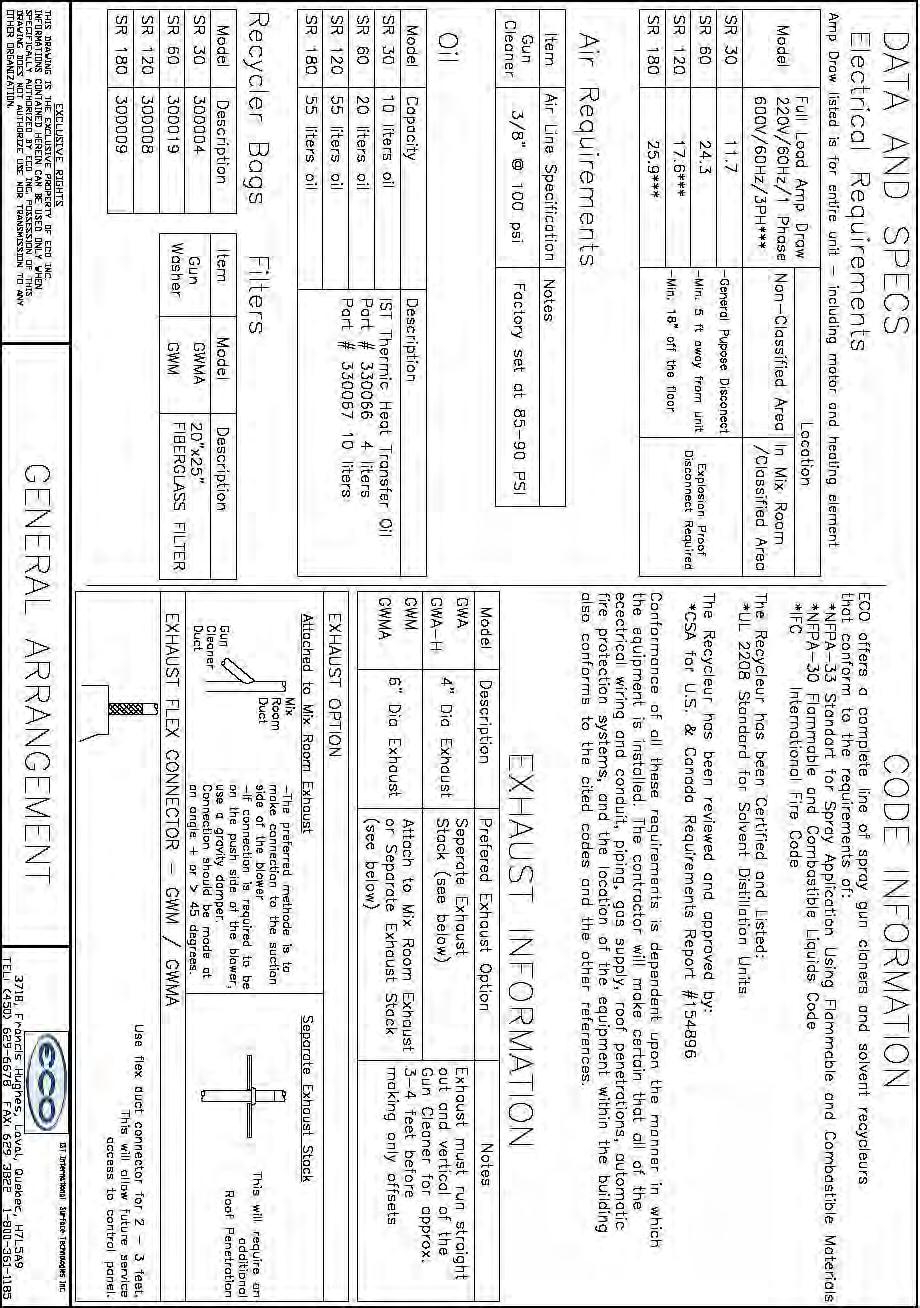
4 SOLVENT RECYCLER SPECIFICATIONS SPECIFICATIONS SR 20 Imperial Metric Geometrical capacity of boiler 5.28 Gals 20 Liters Useful capacity of boiler 7.5 Gals 30 Liters Operating temperature 104º-379ºF 40º-193ºC Solvent protection Class 1, Div. 1, Group D Solvent temperature class 310 ºC Absolute operating pressure 223 1,000 hpa mmhg bar Relative operating pressure hpa mmhg bar Time per cycle of distillation 6 10 Hours (estimate) Yield 97% Boiler material Stainless steel AISI 304 Cover material Stainless steel AISI 304 Voltage Power consumtion 110 V 1 ph 60hz 1200 Watts Amperage 13 Thermic oil capacity 2.6 Gallons 10 Litres Dimensions 22" L x 16" d x 36" h 550 x 400 x 900 Weight 252 lbs 114 kg Warranty 12 months standard warranty additional 4

5 SAFETY AND WARNING GENERAL SAFETY 1. Carefully inspect the shipping carton for any signs of transport damage. The damage to the carton often indicates possibility of transport damage to the equipment inside. 2. Carefully remove your ECO Solvent Recycler from the shipping carton. 3. Check your equipment immediately to ensure that it is free of transport damage. Report any transport damage to the carrier without delay for possible claim procedures.eco INDUSTRY inc. is not responsible for damage to equipment after it leaves our warehouse. 4. Check the equipment list and compare it with the parts you have received. If any parts are missing, contact the supplier you purchased the equipment from. Before operating the ECO SOLVENT RECYCLER, read this Instruction Manual completely. All ECO products are engineered and manufactured to the highest performance standards and have been subjected to detail testing before shipment from the factory. DANGER AND WARNING LABELS 1. Presence of flammable vapors and solvents. 2. No smoking or metal grinding nearby. 3. Keep away from open flames. 4. Wear breathing mask 5. Observe warnings at all times. 6. Read the Instruction Manual carefully. 7. Wear solvent-proof rubber gloves. 8. Wear protective eyewear before use. 5
6 SAFETY AND WARNING (cont d) WARNING «READ ALL INSTRUCTIONS» Failure to follow the SAFETY RULES identified by a BULLET ( ) symbol listed BELOW and other safety precautions may result in serious personal injury. «SAVE THESE INSTRUCTIONS» GENERAL SAFETY RULES KEEP WORK AREA CLEAN. KEEP CHILDREN AWAY. Do not let visitors come in contact with the equipment. All visitors should be kept away from the work area. PERSONAL SAFETY GUARD AGAINST ELECTRIC SHOCK. Prevent body contact with grounded surfaces, for example: pipes, radiators. Solvent resisting rubber gloves and non-skid footwear is recommended where damp or wet ground may be encountered. A ground fault circuit interrupter protected power line must be used for these conditions. DRESS PROPERLY. Do not wear loose clothing or jewelry. They can be caught in the moving parts. Wear protective hair covering to contain long hair. USE SAFETY EQUIPMENT. WEAR SAFETY GOGGLES or glasses with side shields. STAY ALERT. USE YOUR COMMON SENSE. Concentrate on what you are doing. Do not operate the unit when you are tired or under the influence of drugs. DO NOT OVERREACH. Keep proper footing and balance at all times. BEFORE CONNECTING THE UNIT be sure the power is the same as that specified on the nameplate of the Solvent Recycler. With power greater than that specified on the Solvent Recycler can seriously injure the user as well as damage the Solvent Recycler. 6
7 SAFETY AND WARNING (cont d) UNIT USE AND CARE DO NOT FORCE THE UNIT. It will perform better and safer at the rate for which it was designed. THE USE OF ANY OTHER ACCESSORIES not specified in this manual may create a hazard. CLOSE THE MAIN BREAKER SWITCH BEFORE SERVICING or when not in use. DO NOT ALTER OR MISUSE THE UNIT. These units are precision built. Any alteration or modification not specified is misuse and may result in a dangerous situation. Only trained repairmen should attempt ( ) ALL REPAIRS, electrical or mechanical. Contact the nearest ECO repair service facility. Use only IST replacement parts, any other parts may create a hazard. SAFETY RULES THE OPERATOR MUST WEAR protective solvent-proof rubber gloves to prevent contact between his hands and the products used for washing. THE OPERATOR MUST WEAR protective eyewear to prevent spatter from coming in contact with his eyes. STAY ALERT at the start of the wash cycle. Make sure the solvent is not «corrosive». Immediately stop the recycler and replace the solvent whenever you note signs of corrosion on the unit. IF EYES COME IN CONTACT WITH SOLVENTS rinse thoroughly with water. BEFORE USING the Solvent Recycler, make sure that all safety devices are in perfect operating condition. BECOME FAMILIAR WITH THE CONTROLS and their functions before commencing work. BE CAREFUL when you load or unload the solvent in the unit. Make sure you do not splash or spill the contents on the workshop floor. THE OPERATOR MUST PERIODICALLY check the level of the clean solvent contained in the collection pail to prevent it from overflowing. DO NOT USE ELECTRICAL OR PNEUMATICAL TOOLS WITH THE UNIT. AVOID GASEOUS AREAS. Do not operate portable electric tools in explosive atmospheres in the presence of flammable liquids or gases. Motors in these tools normally spark, and do not scrape or scratch the machine with metal objects; the sparks might ignite fumes. 7

8 SAFETY AND WARNING (cont d) DO NOT ALLOW FAMILIARITY GAINED FROM FREQUENT USE OF YOUR SOLVENT RECYCLER TO BECOME COMMONPLACE. Always remember that a careless fraction of a second is sufficient to inflict severe injury. DO NOT ALTER OR MISUSE THE UNIT. Any alteration or modifications is a misuse and may result in serious personal injuries. FIRE EXTINGUISHING SYSTEMS must be installed in the same room or close to the unit in case of emergency. These appliances must be kept efficient and inspected every year by a certified person. THE INSTALLATION SITE MUST PERMIT PERSONNEL TO EASILY AND QUICKLY MOVE AWAY FROM DANGER ZONES IN CASE OF AN EMERGENCY. DO NOT USE THE UNIT TO wash or degrease objects designed to come in contact with food. COMPLY WITH LAWS IN THE COUNTRY where the Solvent Recycler is installed regarding the use and disposal of the products used to wash clean objects. DO NOT USE UNSTABLE REACTIVE avoid distilling solvent that may include unstable reactives, such as nitrocellulose. THINK SAFETY! SAFETY IS A COMBINATION OF THE OPERATOR S COMMON SENSE, KNOWLEDGE OF THE SAFETY AND OPERATING INSTRUCTIONS AND ALERTNESS AT ALL TIMES WHEN THE UNIT IS BEING USED. 8
9 OPERATING PRINCIPLES OF THE DISTILLATION UNIT This PLC controlled solvent recycler, will recycle many different types of solvents that have been contaminated by paints, pigments, inks, greases, oils, etc. Through the simple distillation process, the distiller separates the contaminants from the original solvent. The boiling of the polluted solvents consists of a boiler surrounded by a reservoir containing thermal oil, heated by an electrical resistance. The solvent vapors produced in the boiler are eventually conveyed in an solvent cooled drum and then brought back to their liquid state. The cooled solvent is gathered in a clean stainless steel collecting tank, ready to be re-used again. The process does not alter the characteristics of the distilled solvent. Consequently, the operation can be performed endlessly. The residues remains inside the boiler and can be unloaded when cold. It is recommended to use a liner bag (Part # for SR 20, for information contact the authorized reseller) to be placed inside the boiler. These bags facilitate the unloading of residues at the end of the distillation cycle. The cycle is completely automatic. The operator only has to close the lid, touch the START button and remove the residues at the end of the cycle. In case of malfunction, abnormal increase of temperature or power failure, the cycle is automatically STOPPED and the recycler CANNOT be re-started until the problem has been resolved. AIMS The aims that can be achieved with ECO distillation units are: 1. Solvent recycling with the highest yield possible. 2. Obtaining "special" and not "toxic and noxious" residues. 3. Reducing intervention times and operator discomforts. As "Solvent / Contamination product" topologies are so different that there is no such rule valid for all cases, we will try to summarize providing general information that may be useful to you. Experience will later on help you find the most adequate method of meeting your requirements. 9
10 AIMS (cont d) The products to be recycled normally consist of: Solvent or Reducer + Contaminated Products Solvent "Solvent" defines the liquid, which, without reacting chemically, dissolves other substances (solutes), forming a solution. As every solvent has its own boiling temperature, we must (in order to distill the solvents) set the thermostat at a higher working temperature of about 10 C to 50 C (30 F to 80 F) than the boiling point. Reducer A mixture of solvent is defined as a "reducer". As every solvent component in the mixture has its own boiling temperature, in order to proceed to the distillation of a reducer, set the thermostat at a working temperature of about 10 C to 50 C (30 F to 80 F) higher than the boiling point of the most high-boiling solvent. Chlorinated Solvents (these solvents can be recycled with the SR30V-SR60V-SR120V or SR180V only) Chlorinated Solvents are non-flammable solvents, generally utilized for cleaning and degreasing metal surfaces. Normally, these types of solvents are polluted by oil, grease, etc. Atmospheric pressure distillation of chlorinated solvents will result in a partial recovery, leaving a distillation residue containing about 20% of solvents. This occurs when the oil contents in the boiling solution increases; therefore the mixture distillation temperature rises. These solvents are thermalable, meaning that when they exceed their specific critical temperature they decompose causing the formation of hydrochloric acid. This acidifies the product and therefore cannot be reused. When operating with atmospheric pressure, and reaching this critical temperature, we shall have distilled only 80% of the solvent. Operating with a vacuum will allow you to achieve a yield of 100%, as you do not reach the critical temperature (vacuum kit is optional). 10
11 AIMS (cont d) Liquid Polluting Products The most common liquid contamination products are: Oil, Ink and Water The presence of liquid contamination may (in the distillation phase) drag contaminants into the clean product, leaving traces in the distillate. For different types of oil and ink with particularly high boiling temperature, this problem normally does not occur and the process of separation may be obtained with a simple distillation. If there is "water" in the contaminated product, you must recycle with a fractional distillation. This operation is not possible with a simple distillation process. Unloading a liquid polluting product from the distiller presents no problem. It is possible to obtain a complete separation of the polluting product from the reducer. This complete separation is not possible when Chlorinated Solvents are to be distilled under atmospheric pressure. For these solvents it is necessary to proceed with a "vacuum" distillation. This process allows you to obtain a residue without solvent. Solid Polluting Products The most common solid polluting products are: Resins, Pigments, Paints, Polymers, Glue, Powder, Grease, etc. Solid polluting products, according to their nature, already classified as "toxic and noxious" have the advantage (in comparison to liquid contamination products). They can be unloaded into controlled waste dumps, as they do not release toxic substances into the ground. However, this is on the condition that the percentage of solvent will not exceed that of the Concentration Limit (CL) a value legally stabilized for different types of solvents used in different Countries. By distillation, and this is another considerable advantage, you can obtain an extremely pure distilled product as there will be no contaminants dragged into the distilled product. The disadvantage, in comparison with liquid polluting products, is a greater difficulty in cleaning the distillation unit. Leave a minimal percentage of solvent (3-10%) with the contaminants in the solution of residue, in order to obtain a semi-solid residue, and therefore will be easily discharged. These percentages, however, are greater than the Concentration Limit (CL) accepted for the disposal in controlled dumps. 11
12 WARNING FOR THE DISTILLATION UNIT The operating staff must be fully instructed on the use and function of the unit as well as on the correct application of the protection devices. The instructions must be repeated in regular intervals. It is essential to keep the Instruction Manual inside the door slot or close to the unit. Operator must wear anti-static clothes, avoiding clothes made of synthetic material (nylon, rayon, etc.). Open the cover only after the unit has cooled down, with the control board indicating less than 100 C (212 F). When unloading residues, it is recommended to use solvent resistant gloves and an anti-vapor mask. Do not use any metallic tools as they could provoke sparks. The unit must undergo a revision and control according to its grade of use. Maintenance must be carried out by qualified personnel and according to the indications of the Manufacturer. It is important to pay attention to the control of the security installations: thermostats, flow controls, thermocouple detectors, switches of safety levels, aspirators, etc. Before using a distillation unit, which has been out of use for a long time, it must be checked and brought back into optimal condition in order to guarantee the operator s security at all times. According to the type of liquid to be distilled and the kind of operation to be performed, it is important to adopt adequate personal protection rules. If you are not using plastic bags, the residues must be cleaned with tools that do not provoke sparks. The cover works as a safety valve. If you notice steam leaking from the cover, immediately shut down the recycler and consult page 25, "Defects, Causes and Remedies". In any case, never modify in any way the parts on top of the cover or block the cover in order to avoid the steam from leaking. Nitrocellulose which is an ester of cellulose and nitric acid and is a component in many lacquers, inks, adhesives and cements cannot be recycled. It automatically ignites at C ( F) and can be extremely volatile. It is important to clean the boiler thoroughly after each cycle, as a build up of residue will stop the transmission of heat and cause a malfunction. If repairs are necessary shut off the power supply IMMEDIATELY. Do not smoke, cause sparks or use open flames near the recycler. 12
13 WARNING FOR THE DISTILLATION UNIT (cont d) This unit is for use in a 40 C (104 F) environment with no forced ventilation. Under these conditions, the unit shall be spaced a minimum space according to national regulation from potential sources of ignition such as electrical receptacles, switches, pilot light fixtures, contacts and other similar equipment that can produce sparks. If the equipment is used in higher ambient temperatures an increase in spacing from sources of ignition shall be considered. This unit has been tested for use with the solvents indicated in the Instruction Manual (see tables on page 23, "Flammable Solvents and Non-Flammable Chlorinated Solvents"). PROTECTION OF THE NATURAL ENVIRONMENT The user must provide protection of the environment so that the recycler may not be the cause for emission of vapors or odors and that the residues are treated and disposed of in a correct way as per local laws reguarding waste residues. INSTALLATION Placing your ECO SOLVENT RECOVERY SYSTEM in accordance with the following procedures is of vital importance. If the unit is installed in a small closed room like 10 x 10 than it have sufficient natural or artificial air ventilation. If installed in ex plosion proof room or mixing room for paint ink there is no need to had additional ventilation. Places and zones with sufficient artificial air ventilation are those with such ventilation capacity as to change air circulation ten times per hour. The outlet of the unloading air channels must be placed in a way that the evacuation of emerging vapors does not cause any form of danger. Complete air circulation should be provided in case of artificial air ventilation. Air ventilators or their motors should be explosion proof. Make sure that the emergency exit is easily accessible. The distillation unit must be positioned near one door that leads to an exit door. Place a fire extinguisher near the unit (for fire type B and C). Keep a distance of at least 24 inches between the unit and any object to allow the recycler to cool off, and be able to perform the maintenance if necessary. Place the unit on a flat surface away from heat, sparks and any source of flames. Connect permennatly the unit to an efficient grounding pole. 13


: Remove lid to collection drum. Attach float to rod by screwing it on.")
14 INSTALLATION (cont d) The power outlet is located on the back of the unit. The SR20 unit should be permently connected into a 110 volt single phase, 15 amps explosion proof electrical line. When service or maintenance work is required, disconnect the main breaker switch before servicing or for maintenance work. Note: This unit may come equipped with a non-hazardous industrial plug but if installed into a hazardous location, the proper connection must be implemented in accordance with the local authority. 1. OIL AIR RELEASE VALVE: Remove back-panel and replace oil cap marked with an X with oil cap found in distillation chamber. The oil cap in distillation chamber has a hole in center of cap. 2. FITTING CONDENSATION COLUMN (Note: Column may already be installed): Screw it into position on the collection drum. Gently tighten by hand, do not use spanner. 3. FITTING ROD TO FLOAT (Note: float may already be installed): Remove lid to collection drum. Attach float to rod by screwing it on. Slide rod through the bottom center hole of the condensation column until exiting the top hole. Screw nut to the end of the rod above condense column. (See picture below). 4. TOPPING UP COLLECTION DRUM: Top up with the type of solvent the recycler is intended to be used for. Please note that if solvent is water, a specialized drum is required. Top up with solvent until the level reaches the tap on the side of the drum (Approx US Gallons). Fit lid back, making sure that the 2 bung is at 6 o clock, and vapor pipe is at 12 o clock. 14
. Connect the vessel on the right side of the machine (facing machine). See picture below for proper installation of hose assembly from the cabinet to the collection vessel.")
15 INSTALLATION (cont d) 5. ATTACHING COLLECTION DRUM: The collection vessel provided with unit is the only vessel to be used for collection of distilled solvent. This vessel holds a maximum of US Gallons (66 Litres). Connect the vessel on the right side of the machine (facing machine). See picture below for proper installation of hose assembly from the cabinet to the collection vessel. Once installation of hose assembly is complete, tighten both clamps as demonstrated in picture. (Clamps are located at both ends of hose assembly were they meet the brass fittings, see Picture below). Tighten by turning clockwise using a wrench. VERY IMPORTANT NOTE: Make sure Bulkhead does not turn. Tighten nut of clamp. Repeat procedure on other clamp located at other end of hose. GETTING READY: Connect power. Press START button and green light will come on. The green light signifies the unit is ready to work and is safe to open. 15
16 INSTALLATION OF OVEFLOW ASSEMBLY The over flow assembly is a safety feature intended to prevent solvent from overflowing in the event of the recycler being overfilled or of the C.C. drum not being properly drained. In accordance with UL 2208, this unit must be provided with a minimum overflow capacity of 5 gallons. This unit supplies a ½ hose barb fitting with a 2 male thread. Hose and overflow container are to be provided by the customer. ½ hose barb Drawing of hose barb fitting If unit is being installed with the docking station and gunwasher: The parts required for this installation are as follows: a hose barb fitting, a length of ½ hose, a ½ hose clamp. 1. Unscrew the 2 plug in the lid of the C.C. drum. 2. Screw the hose barb assembly into lid of C.C. drum. 3. Attach one end of hose to hose barb using a hose clamp. 4. Insert other end of hose into docking station. 5. Ensure that all connections are tight. IF UNIT IS BEING INSTALLED IN STAND ALONE APPLICATIONS The parts required for this installation are as follows: a hose barb fitting, a length of ½ hose, a ½ hose clamp, an empty 5 gallon collection can. 1. Unscrew the 2 plug in the lid of the C.C. drum. 2. Screw the hose barb assembly into lid of C.C. drum. 3. Attach one end of hose to hose barb using a hose clamp. 4. Insert other end of hose into empty 5 gallon collection can. 5. Ensure that all connections are tight. INSTALLATION OF BAG 1. Open cover. 2. Remove bag holder. 3. Open bag and place inside bag holder. 4. Fold top of bag over the top ring of bag holder. 5. Squeezing top ring, fit bag holder and bag into unit making sure bag is held open once installed. 6. Make sure bag is under the vapor manifold, and waste intake valve making sure they are not blocked or covered. 16


17 7. Pour solvent waste into receptacle bag. Maximum level is 3.1 Inches (8 cm) below bottom of vapor manifold. The unit is designed for a maximum volume of 5.28 US Gallons (20 litres). Over filling will result in overflow into vapor manifold resulting in dirty recycled solvent. Over filling will also cause paint getting in behind the bag. This will make it difficult to remove the bag, as the paint will act as glue making the bag stick to the bottom. If sticking happens press START and let unit warm up for 5 minutes. Press OFF and gently pull bag out. We recommend the use of ECO BAGS; other types of bags may deteriorate during cycle and create a hard residue at the bottom of distillation chamber that will be difficult to remove. OPERATION OF THE UNIT 1. Connect power. 2. Press START button and green light will come on. The green light signifies the unit is ready to begin a new batch and is safe to open. 3. Remove lock 4. Open cover. 5. Remove bag holder. 6. Place new bag inside holder. 7. Fold overlap of bag over the top of the holder. 8. Place bag and holder inside distillation chamber. 9. Pour a maximum of 5.28 US Gallons (20 litres) of waste solvent into bag, making sure not to pour any liquid into outlet manifold or overfill. The maximum level is 3.1 Inches (8 cm) below the bottom of elbow (elbow being the outlet manifold). 10. Close cover and secure. 11. Re-insert lock into handle and close lock. 12. Ensure collection drum is properly connected and full to the tap. 13. Open tap making sure collection drum is empty to the level of the tap. 14. Press START, yellow light and digital display will come on. The display shows the temperature of the thermic oil. 17
18 15. Green light will stay on with yellow light until temperature of the thermic oil reaches 140 degrees Fahrenheit (60 degrees Celsius). At this point the green light will turn off. Unit will automatically set temperature and time in accordance to the solvent or solvents to be recycled. 16. Once distillation is complete the unit will automatically shut off and the yellow light will begin flashing indicating the unit is OFF and is cooling down. The yellow light will flash until the unit has cooled to degrees Fahrenheit (57 Celsius). At this point the yellow light and the digital display will turn OFF. The green light will come on indicating the unit is safe to open and is ready to do the next cycle. 17. Open cover and remove bag residue. Place residue bag into proper collection drum. * Please note that by using bags in the distillation chamber, you eliminate the cleaning process. ** Please use necessary safety precautions when following these steps. *** Very Important: Eye wear, boots, gloves and masks should be worn at all times. ****CAUTION: Unit surfaces will be hot when in use. *****Cover should not be open unless green light is on. ******Bag should be changed between each cycle. WATER MODE Operation of unit in water mode is the same as above. In order to switch unit into water mode the steps are as follows: 1. Disconnect power. 2. Reconnect power 3. Press START button for 10 seconds. The unit will display LLLL. 4. Press START button 10 times. The green and blue lights will come on. You are now in water mode. The unit will remain in water mode until power is disconnected. NOTE: A specialized drum is required for water mode distillation. COLLECTION VESSEL The collection vessel provided with unit is the only vessel to be used for collection of distilled solvent. This vessel holds a maximum of US Gallons (66 litres). A specialized drum is required for water mode distillation. 18
19 19
20 20
21 STARTING PROCEDURES 1. Preparation NOTE: All ECO recyclers are pre-tested and are shipped with thermic oil in it and are ready to be used. A. Install a clean container ( twice the capacity or greater than the boiler) on the left end side where the clear tube comes from the outlet of the condenser. B. The clean container must have an air vent to allow normal fill-up. C. You must use a metallic container, and it must be connected to the ground clip supplied with the unit. 2. Plastic bag installation steps 3 A. Pull the bottom corner of the bag inwards. B. Insert the plastic bag in the boiler # 1 2 C. Insert the retaining ring # 2 (Part # ) D. Optional foam grill # 3, SR20 (Part # ) 1 21
22 STARTING PROCEDURES (cont d) 3. Filling up the Recycler A. Open the cover and fill the boiler with dirty solvents up to approximately 1 inch (25 mm) below the grooved slot mark indicating the maximum level. You can also use the automatic loading option to fill up the recycler. The recycler can also be connected to any of the ECO Spray Gun Washers. B. Before closing the cover, verify the condition of the lid gasket. C. According to the type of solvent to be distilled, you must use the proper cover gasket. Part # (5 Gal./20 Liters) Gasket Orange Color Using a non-suitable gasket will cause vapors to leak from the cover. Some solvents, during the boiling phase, create a quantity of foam that a correct separation of the solvent from the polluting product is not possible; in fact, in these cases, the distillate will still be dirty. To avoid this inconvenience, it is necessary to use the anti-foam kit (and Part #3240XX for Model SR20) Pay the utmost attention while the residues are drying. Some polluting products with an increase of temperature tend to carbonize with a considerable discharge of smoke from the distiller. In case this occurs, press the (START / STOP) button to end the cycle. In this case it is not possible to dry the residues at atmospheric pressure; proceeding to the vacuum distillation phase may solve the problem. This technique allows you to operate at a much lower temperature. Opening the cover before the distillation cycle is complete will cause the gasket to swell. You must wait at least one hour. D. Close and secure the cover properly. Your cover acts as a safety valve. NEVER modify the cover mechanism and NEVER use any tools to tighten the cover. E. DO NOT SHAKE OR TILT the load recycler during operation. 22
23 FLAMMABLE SOLVENTS Distillation Temperature Temp. Class Ignition Temperature Seal Condenser Type SOLVENT TYPE Silicone cop s/st Acetone T A A A Alcohol Amyl T2 A B Alcohol Butyl T2 A A A Alcohol Ethyl T2 362 A A A Amyl Acetate T A A A Benzol (Benzene) T A B B Butanol (Butyl Alcohol) T A A A Butyl Acetate T A B A Cabinol T A B A Cellosolve Acetate T A B A Cyclohexanone T A B A Ethyl Acetate T A A A Ethyl Alcohol (Ethanol) T-2 A A A Ethyl Benzene T A A A Ethyl Glycol Acetate T A A A Iso Amyl Acetate T A A Iso Butyl Acetate T A Iso Butyl Alcohol T A Iso Propane T A B A Iso Propyl Acetate T A A A Iso Propyl Alcohol T A A Iso Propyl Glycol T A Lacquer Solvents T A A A Methyl Acetate T A B A Methyl Cellosolve Acetate T A B A Methyl Ethyl Ketone T A A A (M.E.K.) Methyl Glycol Acetate T A A A Methyl Isobutyl Ketone T A B A (M.I.B.K.) N. Butyl T A A Pentanol T A A Propanol T A A Propyl Alcohol T A A A Propyle Acetate T A A A Paint Thinner T A B B Sec. Butyl Alcohol T A A Toluol T A A A Xylol (Xylene) 144* 291* T A A B 23
. Caution: Make sure when emptying oil that the unit is completely cold 4. Place collection pan under Oil OUT TAKE valve (3). 5.")
24 THERMIC OIL CHANGING PROCEDURES It is recommended to change the oil for SR20 & the cover seal for SR20 every 2000 hours of work or every year wich ever comes first. 1. Disconnect power. 2. Remove back panel. 3. Remove Oil intake cap (1). Caution: Make sure when emptying oil that the unit is completely cold 4. Place collection pan under Oil OUT TAKE valve (3). 5. Remove Oil OUT TAKE cap (3) & drain. 6. Re-insert OUT TAKE cap (3). 7. Remove Breathing cap (2) to make refill easier, Refill oil with ECO Heating Oil through Oil intake (1). (2 ¾ US Gallons or Liters) when oil goes up to breating cap (2) stop and replace the cap, then empty the rest of the oil from the plastic container & Re-cap Oil Intake valve. 8. Reconnect power. 9. Press the START button for 20 seconds. All lights will come on and the screen will display Clr and then 8888, indicating self-diagnostic and reset of unit is complete. 10. Disconnect power. 11. Reconnect power and you are ready to set the unit for solvent or water mode. The unit will automatically indicate when oil requires to be changed. If oil is not changed within a safe time period, the unit will automatically shut down indicating the word OIL on its display panel until oil is changed. This ensures proper and safe operation of the unit for years to come
25 DEFECTS, CAUSES AND REMEDIES Problem Reason Solution Bag hard to pull out. - Dirty Inner Bucket. - Turn machine on until it reaches 131 degrees Fahrenheit (55 degrees Celsius), remove bag and clean. Machine will not come on. - Surge in power. - Replace fuse or fuses in explosion proof box. Dirty Distillate. Rust colored solvent. Gasket swelling and dislocating. Control panel error message. - Dirty manifold. - Dirty collection drum. - Rusty drum. - Lid was opened before unit finished its cool down mode. - Clean manifold. - Replace or clean drum. - Replace collection drum. - Replace gasket immediately with spare provided. - Order new gasket so that you have two gaskets on hand. - System failure. - Make sure the ambient temperature is greater then 10 degrees Celsius. - Take note of error message number i.e.) Er01. - See error code section on following page. - Contact ECO immediately. ERROR MESSAGES CODE ERROR ER01 1 fault (Invalid temperature values). Room temperature is less then 50 Fahrenheit ER02 Probe 2 value too different from probe 1. ER03 Probe 1 value too different from probe 2. ER04 Over temperature fault (Hardware overtemp trip). ER05 Over temperature fault (From A/D read). 25
26 SCHEMATIC OF UNIT


27 SCHEMATIC OF UNIT
28 SPARE PARTS NUMBERS FOR SR 30 V SOLVENT RECYCLER INDEX PART # DESCRIPTION QUANTITY 1 1 2A Cover 1 2B Orage seal 1 3 Control board 1 4 ECO logo 1 5 Lock 1 6 Vapour manifold 1 7 Vapour tube 1 8 Used solvent inlet gallons drum 1 10 Drain valve 1 11 Control board 1 12 Heater 1 13 Oil Sensor 1 14 Power Supply 1 15 Fuse 1 16 Teck connector 1 17A Fuse holder 1 17B Fuse 1 OPTIONAL ACCESSORIES Plastic liner bags 25 per box Plastic liner bags 100 per box Thermic oil 4 liters 1 gallons Thermic oil 10 liters 2.5 gallons 28
 629-6706 Fax: (450) 629-3822 www.ecoind.")
29 WARRANTY INFORMATION / TECHNICAL ASSISTANCE For more information, prices or technical assistance, contact your local ECO distributor or call / fax our Consumer Information Numbers: Tel.: (450) Fax: (450) info@ecoind.com 29
30 ECO INDUSTRY Inc. WARRANTY REGISTRATION ECO INDUSTRY Inc. would like to thank you for your recent purchase of our product line. Please complete the card below and either mail or fax it to our office so that we may start the warranty of your product and keep you up to date on the EPA regulations by fax. Again, thank you for your purchase and if you have any suggestions or comments, please feel free to contact our office. COMPANY NAME: ADDRESS: CITY: STATE/PROV.: COUNTRY: ZIP CODE: CONTACT: TEL. NUMBER: - FAX NUMBER: - PURCHASE FROM: DATE OF PURCHASE: Month Day Year SERIAL NUMBER: - - MODEL NUMBER: TYPE OF SOLVENT USED: Which factors most influenced your decision to purchase this ECO unit? SUGGESTIONS ABOUT THE EQUIPMENT: IMPORTANT! Please complete and return within 30 days after purchase to activate the warranty. PLEASE SEND THE COMPLETED FORM TO: ECO Industry inc Francis Hughes Laval, QC, H7L 5A9 CANADA Tel.: (450) or (877) Fax: (514)
MODEL A5-2 SOLVENT & WATER RECOVERY SYSTEMS (EXPLOSION PROOF UNITS)
") MODEL A5-2 SOLVENT & WATER RECOVERY SYSTEMS (EXPLOSION PROOF UNITS) FOR PROPER AND SAFE USE OF THIS CHEMCHAMP EQUIPMENT, PLEASE FOLLOW THIS DOCUMENT AND LOCAL AUTHORITY. KEEP THIS DOCUMENT FOR FUTURE REFERENCE.
MODEL A5-2 SOLVENT & WATER RECOVERY SYSTEMS (EXPLOSION PROOF UNITS) FOR PROPER AND SAFE USE OF THIS CHEMCHAMP EQUIPMENT, PLEASE FOLLOW THIS DOCUMENT AND LOCAL AUTHORITY. KEEP THIS DOCUMENT FOR FUTURE REFERENCE.
MODEL A18 SOLVENT RECOVERY SYSTEMS (EXPLOSION PROOF UNITS)
") MODEL A18 SOLVENT RECOVERY SYSTEMS (EXPLOSION PROOF UNITS) FOR PROPER AND SAFE USE OF THIS CHEMCHAMP EQUIPMENT, PLEASE FOLLOW THIS DOCUMENT AND LOCAL AUTHORITY. KEEP THIS DOCUMENT FOR FUTURE REFERENCE.
MODEL A18 SOLVENT RECOVERY SYSTEMS (EXPLOSION PROOF UNITS) FOR PROPER AND SAFE USE OF THIS CHEMCHAMP EQUIPMENT, PLEASE FOLLOW THIS DOCUMENT AND LOCAL AUTHORITY. KEEP THIS DOCUMENT FOR FUTURE REFERENCE.
FOR PROPER AND SAFE USE OF THIS CHEMCHAMP EQUIPMENT, PLEASE FOLLOW THIS DOCUMENT AND LOCAL AUTHORITY. KEEP THIS DOCUMENT FOR FUTURE REFERENCE.
 CHEMCHAMP MODEL A5-2(220V) & A5-2LV (110V) OPERATOR S MANUAL SOLVENT & WATER RECOVERY SYSTEMS (EXPLOSION PROOF UNITS) FOR PROPER AND SAFE USE OF THIS CHEMCHAMP EQUIPMENT, PLEASE FOLLOW THIS DOCUMENT AND
FOR PROPER AND SAFE USE OF THIS CHEMCHAMP EQUIPMENT, PLEASE FOLLOW THIS DOCUMENT AND LOCAL AUTHORITY. KEEP THIS DOCUMENT FOR FUTURE REFERENCE.
 CHEMCHAMP MODEL A18 OPERATOR S MANUAL SOLVENT & WATER RECOVERY SYSTEMS (EXPLOSION PROOF UNITS) FOR PROPER AND SAFE USE OF THIS CHEMCHAMP EQUIPMENT, PLEASE FOLLOW THIS DOCUMENT AND LOCAL AUTHORITY. KEEP
Annual Tune-Up Procedure
 Annual Tune-Up Procedure SOLVENT SAVER RECYCLER MODELS SC (9711) AND HC (9725) 1 TABLE OF CONTENTS PAGE SPECIFICATIONS... 3 SAFETY & WARNINGS... 4-6 OVERVIEW... 7 CLEANING THE BOILER... 8-9 CHANGING THE
INSTRUCTION MANUAL. Spray Gun Cleaner. Patent Pending. Warranty Service Parts Safety Troubleshooting Guide Operation Accessory Information
 INSTRUCTION MANUAL S10A Spray Gun Cleaner Patent Pending Warranty Service Parts Safety Troubleshooting Guide Operation Accessory Information 1 TABLE OF CONTENTS PAGE WARRANTY INFORMATION... 3 SPRAY GUN
INSTRUCTION MANUAL SOLVENT SAVER RECYCLER. STANDARD CAPACITY (SC) 3 GAL MODELS (1100 or 9711) & HIGH CAPACITY (HC) 6 GAL MODELS (25000 or 9725)
 3 GAL MODELS (1100 or 9711) & HIGH CAPACITY (HC) 6 GAL MODELS (25000 or 9725)") INSTRUCTION MANUAL SOLVENT SAVER RECYCLER STANDARD CAPACITY (SC) 3 GAL MODELS (1100 or 9711) & HIGH CAPACITY (HC) 6 GAL MODELS (25000 or 9725) Warranty Service Parts Safety Troubleshooting Guide Operation
INSTRUCTION MANUAL SOLVENT SAVER RECYCLER STANDARD CAPACITY (SC) 3 GAL MODELS (1100 or 9711) & HIGH CAPACITY (HC) 6 GAL MODELS (25000 or 9725) Warranty Service Parts Safety Troubleshooting Guide Operation
WARNING. Pro Pack Portable Spray Pack 3A1292C. Operation. Model 24F893 Maximum Working Pressure 12 psi (0.83 bar, MPa)
") Operation Pro Pack Portable Spray Pack - For use with Graco hand-held sprayers (except Fine-Finish sprayers) - - For portable spray applications of water-based and oil-based (mineral spirit-type) architectural
Operation Pro Pack Portable Spray Pack - For use with Graco hand-held sprayers (except Fine-Finish sprayers) - - For portable spray applications of water-based and oil-based (mineral spirit-type) architectural
55-Gallon Dispenser Package
 INSTRUCTIONS-PARTS LIST INSTRUCTIONS This manual contains important warnings and information. READ AND KEEP FOR REFERENCE. 308 666 Rev. A Husky 715 55-Gallon Dispenser Package 100 psi (6.9 bar) Maximum
LS-JRE OPERATION & INSTRUCTION MANUAL
 SOLVENT RECYCLING SYSTEM LS-JRE OPERATION & INSTRUCTION MANUAL Now with adjustable temperature control! TABLE OF CONTENTS Description Page Introduction 1 Safety Precautions 1 Installation / Set-up 1 Supplied
High-Velocity Floor Fan
 High-Velocity Floor Fan Owner s Manual WARNING: Read carefully and understand all ASSEMBLY AND OPERATION INSTRUCTIONS before operating. Failure to follow the safety rules and other basic safety precautions
55-Gallon Dispenser Package
 INSTRUCTIONS-PARTS LIST Husky 515 55-Gallon Dispenser Package 08666 Rev.C INSTRUCTIONS This manual contains important warnings and information. READ AND KEEP FOR REFERENCE. 100 psi(6.9 bar) Maximum Air
INSTRUCTION MANUAL E100M Waterborne Spray Gun Cleaner Featuring Clarifier Recycling System
 INSTRUCTION MANUAL E100M Waterborne Spray Gun Cleaner Featuring Clarifier Recycling System Warranty Service Parts Safety Troubleshooting Guide Operation Accessory Information 1 featuring Clarification
60In. Ceiling Fan. Owner s Manual
 60In. Ceiling Fan Owner s Manual WARNING: Read carefully and understand all ASSEMBLY AND OPERATION INSTRUCTIONS before operating. Failure to follow the safety rules and other basic safety precautions may
installation Guide
 solvent Recyclers SR30-30V & SR60-60V installation Guide 2018-02-01 Table of contents Page general safety... 3 Tools required for installation of vacuum... 4 option vaccum : List of parts included in the
AeroVent 3X Product Manual
 Product Manual AeroVent 3X TABLE OF CONTENTS Precautionary Warning... Page 1 Assembly... Page 2 Assembly Drawing... Page 3 Parts List... Page 3 Operation... Page 4 Maintenance... Page 5 Cobalt Point Replacement...
1 HP Air Mover. Owner s Manual
 1 HP Air Mover Owner s Manual WARNING: Read carefully and understand all ASSEMBLY AND OPERATION INSTRUCTIONS before operating. Failure to follow the safety rules and other basic safety precautions may
AeroVent 1 Product Manual
 Product Manual AeroVent 1 Manual / 4290.0416 TABLE OF CONTENTS Precautionary Warning... Page 1 Assembly.. Page 2 Operation. Page 3 Maintenance Page 4 Parts List... Page 4 Cobalt Point Replacement... Page
22In. Oscillating Pedestal Fan. Owner s Manual
 22In. Oscillating Pedestal Fan Owner s Manual WARNING: Read carefully and understand all ASSEMBLY AND OPERATION INSTRUCTIONS before operating. Failure to follow the safety rules and other basic safety
20-GALLON MOBILE PARTS WASHER OWNER S MANUAL
 20-GALLON MOBILE PARTS WASHER OWNER S MANUAL WARNING: Read carefully and understand all INSTRUCTIONS before operating. Failure to follow the safety rules and other basic safety precautions may result in
Water-Jacket Heated Hose Kit
 Instructions Water-Jacket Heated Hose Kit 309525H EN Part No. 245866 Includes parts needed to assemble heated hose system. Heated hose assembly and VISCON HP heater must be ordered separately. See Technical
WET/DRY VACUUM. QUEST for Continuous Improvement Windsor s Quality Management System is Certified ISO MODEL: T1. Operating Instructions (ENG)
") WET/DRY VACUUM Operating Instructions (ENG) MODEL: T1 y QUEST for Continuous Improvement Windsor s Quality Management System is Certified ISO 9001. Read these instructions before operating the machine.
WET/DRY VACUUM Operating Instructions (ENG) MODEL: T1 y QUEST for Continuous Improvement Windsor s Quality Management System is Certified ISO 9001. Read these instructions before operating the machine.
Heater Installation Kit
 Instructions - Parts Heater Installation Kit 30677B Part No. 248428 Includes parts needed to install VISCON HP heater onto cart. Order VISCON HP heater separately. Important Safety Instructions Read all
AeroVent Standard Product Manual
 Product Manual AeroVent Standard Manual / / 4840.1117 January 2, 2018 Attn: Purchaser s of the Newstripe, AeroVent 1X, 3X or Standard Aerosol Can Recycling units Respirator Required Decal Dear Customer:
Rules for Safe Operation
 Rules for Safe Operation Important: Do not attempt to operate the CleanStation until you have read thoroughly and understand all instructions and safety rules contained in this manual. Failure to comply
Upholstery and Drapery Cleaner. Operator and Parts Manual. Model No.: gal Extractor. MNL32506 Rev. 00 (08-98)
") 32506 Upholstery and Drapery Cleaner Model No.: 32506 3 gal Extractor Operator and Parts Manual KLEENRITE 1122 MAPLE STREET MADERA CA 93637 U.S.A. FAX: 1-559-673-5725 CUSTOMER SERVICE: 1-800-241-4865 MNL32506
32506 Upholstery and Drapery Cleaner Model No.: 32506 3 gal Extractor Operator and Parts Manual KLEENRITE 1122 MAPLE STREET MADERA CA 93637 U.S.A. FAX: 1-559-673-5725 CUSTOMER SERVICE: 1-800-241-4865 MNL32506
LS Series Solvent Recovery Systems
 Why Recycle? LS Series Solvent Recovery Systems Profitability is measured in many ways. Looking toward the future of your business is as important as having an environment in which to do business. Finish
Industrial Vacuums, Inc
 Instructions/Spare Parts Manual Nilfisk Model GWD255 Drum Top Vacuum CAUTION: This Nilfisk vacuum cleaner is not to be used in explosion-hazardous areas, as serious injury could result. Under no circumstances
MRS-6 Maxi-Guard II. Model: C , 12, 13, 14 OPERATION SERVICE PARTS CARE. Revised 2/02
 MRS-6 Maxi-Guard II Model: C86006-11, 12, 13, 14 OPERATION SERVICE PARTS CARE Revised 2/02 OPERATING INSTRUCTIONS INSPECTION Carefully unpack and inspect your machine for shipping damage. Each unit is
User s Manual and Operating Instructions
 User s Manual and Operating Instructions Model Numbers: CL-30P-DDF, CL-20F-DDF, CL-24O-DDF, CL-30-DDF READ AND SAVE THESE INSTRUCTIONS IMPORTANT: Read and understand all of the directions in this manual
User s Manual and Operating Instructions
 User s Manual and Operating Instructions Model Numbers: CL-36-BDF-A, CL-42-BDF-A, CL-48-BDF-A READ AND SAVE THESE INSTRUCTIONS IMPORTANT: Read and understand all of the directions in this manual before
INSTRUCTIONS PARTS LIST For President, Monark, Standard, and Fast-Flo Pumps, and Agitator
 INSTRUCTIONS PARTS LIST 308 466 KEEP FOR REFERENCE STAINLESS STEEL, PASSIVATED Drum Covers Part No. 37 306 Drum Cover, Series A For President, Monark, Standard, and Fast-Flo Pumps, and 06 758 Agitator
Enspeco RMS. The Enspeco Refrigerant Management. The following instructions will INSTRUCTIONS
 Enspeco AUTOMOTIVE REFRIGERANT MANAGEMENT SYSTEMS RMS 5000 INSTRUCTIONS The Enspeco Refrigerant Management System 5000 provides fast and efficient recovery, recycling and charging of automotive air conditioning
Operating Instructions
 Operating Instructions BA-003 Read and understand this manual before use. Keep this manual for future reference. CONFORMS TO UL STD.No.1017 Certified to CSA STD C22.2 No.243-10 For questions or concerns
3.5-GALLON PARTS WASHER OWNER S MANUAL
 3.5-GALLON PARTS WASHER OWNER S MANUAL WARNING: Read carefully and understand all INSTRUCTIONS before operating. Failure to follow the safety rules and other basic safety precautions may result in serious
READ AND UNDERSTAND THESE INSTRUCTIONS BEFORE OPERATING THE MACHINE
 XAACT Xtract 200 INFORMATION & OPERATING INSTRUCTIONS READ AND UNDERSTAND THESE INSTRUCTIONS BEFORE OPERATING THE MACHINE 78-00018 Rev B 032912 1 CONTENTS: Machine Specifications............ 2 Record Important
Quest PowerHeat HFC 100 Pro
 Quest PowerHeat HFC 100 Pro Installation, Operation and Maintenance Instructions Read and Save These Instructions This manual is provided to acquaint you with the portable fan coil so that installation,
PORTABLE AIR CONDITIONER OWNER S MANUAL
 PORTABLE AIR CONDITIONER OWNER S MANUAL ASSEMBLY AND OPERATING INSTRUCTIONS MODELS: JHS-A018-10KR SKU#: 130004 JHS-A018-12KRH SKU#: 130005 WARNING: Read and follow all warnings and instructions in this
D O U B L E A U G E R M O R TA R M I X E R OWNER S MANUAL
 D O U B L E A U G E R M O R TA R M I X E R OWNER S MANUAL WARNING: Read carefully and understand all INSTRUCTIONS before operating. Failure to follow the safety rules and other basic safety precautions
100In. High Volume Ceiling Fan. Owner s Manual
 100In. High Volume Ceiling Fan Owner s Manual WARNING: Read carefully and understand all ASSEMBLY AND OPERATION INSTRUCTIONS before operating. Failure to follow the safety rules and other basic safety
WATLOW IND. WATROD Modular Duct Heater Installation & Maintenance Manual I&M NUMBER: Page: 1 Date:6/11/2008 Rev: 2
 I&M NUMBER: 316-42-15-1 Page: 1 _ Pre Installation Check to make sure that heater received is the same as that ordered. Elements may come in contact with each other during shipment. Minor adjustments to
Instruction Manual Hydraulic Crimping Tool
 Instruction Manual Hydraulic Crimping Tool 902-480 Due to continuing improvements, actual product may differ slightly from the product described herein. Read this material before using this product. Failure
FLCH4R Garage and Utility Electric Heater
 FLCH4R Garage and Utility Electric Heater Installation, Operation & Maintenance Instructions Model No. Volts Amps Watts BTU/HR Phase High Low High Low High Low Min Fuse Size* FLCH4R 208 17.3 8.66 3600
Owner s Manual Phoenix Aquadry TX 200
 4201 Lien Rd. Madison, WI 53704 Owner s Manual Phoenix Aquadry TX 200 Installation, Operation & Service Instructions Read and Save These Instructions The Phoenix Aquadry TX 200, like the TX 80, can be
7165 Dust Collector Owner s Manual
 7165 Dust Collector Owner s Manual Oliver Machinery M-7165 12/2016 Seattle, WA Copyright 2003-2017 info@olivermachinery.net www.olivermachinery.net CONTENTS IMPORTANT SAFETY RULES----------------------------------------------------------------
OCH-SSE series Direct Wired Units Indoor * and Outdoor Comfort Heaters
 TPI Corporation P.O. Box 4973 Johnson City, TN 37601 www.tpicorp.com OCH-SSE series Direct Wired Units Indoor * and Outdoor Comfort Heaters *EXCLUDING RESIDENCES IMPORTANT SAFETY INFORMATION INSIDE possible
Instructions Parts List. 150 psi (1.03 MPa, 10.3 bar) Maximum Air Inlet Working Pressure
 Maximum Air Inlet Working Pressure") Instructions Parts List Air Dryer 307548H Model 217341 150 psi (1.03 MPa, 10.3 bar) Maximum Air Inlet Working Pressure Removes oil and other contaminants from compressed air, then dries the air to 45 F
Instructions Parts List Air Dryer 307548H Model 217341 150 psi (1.03 MPa, 10.3 bar) Maximum Air Inlet Working Pressure Removes oil and other contaminants from compressed air, then dries the air to 45 F
TrueClean ToteCleaner
 TrueClean ToteCleaner Installation, Operation, and Maintenance Manual www.trueclean.us TrueClean Check Valve Table of Contents Introduction.... 1 About... 1 Warranty... 2 Safety... 3 Important Safety Information....
USER MANUAL. COMBO605/606 and COMBO655/656 UNI-RAM CORPORATION ONTARIO CANADA COMBO605. Revision
 USER MANUAL COMBO605/606 and COMBO655/656 COMBO605 UNI-RAM CORPORATION ONTARIO CANADA Revision 2012-09 INTRODUCTION Uni-ram holds many patents on designs used in its innovative products. Every machine
690 Power Fishing System
 INSTRUCTION MANUAL 3N51 690 Power Fishing System Read and understand all of the instructions and safety information in this manual before operating or servicing this tool. Register this product at www.greenlee.com
INSTRUCTION MANUAL. E300A Waterborne Spray Gun Cleaner Featuring Clarifier Recycling System
 INSTRUCTION MANUAL E300A Waterborne Spray Gun Cleaner Featuring Clarifier Recycling System Warranty Service Parts Safety Troubleshooting Guide Operation Accessory Information 1 featuring Clarification
Use and Care Manual. Flammable Material Storage Refrigerator LRBFS06W1HC
 Use and Care Manual Flammable Material Storage Refrigerator LRBFS06W1HC 7085 471-00 Table of Contents Table of Contents Page Please Read and Follow these Instructions... 2 California Proposition 65...
Air Pump Up to 800 gallons
 Air Pump Up to 800 gallons REMINDER CALL 1-888-755-6750 BEFORE RETURNING TO STORE. PACKAGE CONTENTS ITEM #PBPAPK40W Questions, problems, missing parts? Before returning to your retailer, call our customer
ELECTRIC FIREPLACE HEATER WITH SINGLE GLASS DOOR
 ELECTRIC FIREPLACE HEATER WITH SINGLE GLASS DOOR Model 91797 ASSEMBLY and Operating Instructions Visit our website at: http://www.harborfreight.com Read this material before using this product. Failure
Xaact Spot. Xaact Hot Spot
 Xaact Spot & Xaact Hot Spot INFORMATION & OPERATING INSTRUCTIONS READ AND UNDERSTAND THESE INSTRUCTIONS BEFORE OPERATING THE MACHINE 78-00012 Rev. 101211 1 CONTENTS: Machine Specifications............
OPERATOR S MANUAL FOR YOUR SAFETY. 4 Gallon / Liter Part No. PB408SV
 120 VOLT WET / DRY VAC 4 Gallon / 15.14 Liter Part No. PB408SV FOR YOUR SAFETY Read and understand this manual before use. Keep this manual for future reference. OPERATOR S MANUAL TABLE OF CONTENTS SECTION
PORTABLE AIR CONDITIONER OWNER S MANUAL
 PORTABLE AIR CONDITIONER OWNER S MANUAL ASSEMBLY AND OPERATING INSTRUCTIONS MODELS: JHS-A018-10KR SKU#: 130004 JHS-A018-12KRH SKU#: 130005 JHS-A018-14KRH SKU#: 130009 WARNING: Read and follow all warnings
Operator s Manual. 6 Gallon Model No. VQ607SFD FOR YOUR SAFETY. Read and understand this manual before use Keep this manual for future reference
 Wet/Dry Vacuums Operator s Manual 6 Gallon Model No. VQ607SFD FOR YOUR SAFETY Read and understand this manual before use Keep this manual for future reference www.vacmaster.com Cleva North America 44 Parkway
Operator s Manual. Wet/Dry Vacuum with Detachable Blower 12 Gallon Model No. VBV1210 FOR YOUR SAFETY
 Wet/Dry Vacuums Operator s Manual Wet/Dry Vacuum with Detachable Blower 12 Gallon Model No. VBV1210 FOR YOUR SAFETY Read and understand this manual before use Keep this manual for future reference www.vacmaster.com
3-1/2 Gallon Parts Washer
 3-1/2 Gallon Parts Washer Model 38347 Assembly and Operating Instructions 3491 Mission Oaks Blvd., Camarillo, CA 93011 Copyright 1998 by Harbor Freight Tools. All rights reserved. No portion of this manual
PWASH Gallon Parts Washer Assembly & Operating Instructions
 PWASH20 20 Gallon Parts Washer Assembly & Operating Instructions READ ALL INSTRUCTIONS AND WARNINGS BEFORE USING THIS PRODUCT. SAVE THESE INSTRUCTIONS FOR FUTURE REFERENCE. This manual provides important
MC MC MC MC MC833130
 Pic-A-Vac Model: MC832085 MC833085 MC832105 MC833105 MC832130 MC833130 OPERATION SERVICE PARTS CARE Revised 8/01 FOR COMMERCIAL USE ONLY IMPORTANT SAFETY INSTRUCTIONS When using an electrical appliance,
Models: DB-2-HF, DB-3-HF, DB-4-HF, and DB-5-HF. For Service Information, Call
 Service Manual Design Basics Hot Food Tables Models: DB-2-HF, DB-3-HF, DB-4-HF, and DB-5-HF For Service Information, Call 800-544-3057 Please provide the following information: - Model number - Serial
PUREPOWER SERIES CENTRAL VACUUM POWER UNITS PP500, PP600 & PP650
 USER GUIDE PUREPOWER SERIES CENTRAL VACUUM POWER UNITS PP500, PP600 & PP650 AB0039 FOR RESIDENTIAL USE ONLY!! BROAN-NUTONE LLC; HARTFORD, WISCONSIN WWW.NUTONE.COM 1-888-336-3948 REGISTER YOUR PRODUCT ONLINE
English. Your Model Number is: HD1500 IMPORTANT
 Your Model Number is: HD1500 IMPORTANT Attention Valued Customer: The serial number of your machine and date of purchase is necessary information to facilitate warranty claims and the ordering of replacement
30 Misting/Oscillating Fan Model Number 01030
 30 Misting/Oscillating Fan Model Number 01030 READ AND SAVE THESE INSTRUCTIONS CAUTION: Before using this product read this manual and follow all safety rules and operating instructions. Failure to comply
5HP CYCLONE DUST COLLECTOR MANUAL
 5HP CYCLONE DUST COLLECTOR MANUAL LAGUNA TOOLS 2072 Alton Parkway Irvine, California 92606 Ph: 800.234.1976 www.lagunatools.com 2018, Laguna Tools, Inc. LAGUNA and the LAGUNA Logo are the registered trademarks
OPERATING MANUAL UG2000D SERIES SPRAY GUN CLEANERS UG2000D, UG2000DM UNI-RAM CORPORATION ONTARIO CANADA UG2000DM UG2000D REVISION
 OPERATING MANUAL UG2000D SERIES SPRAY GUN CLEANERS UG2000D, UG2000DM UG2000D UG2000DM UNI-RAM CORPORATION ONTARIO CANADA REVISION 2015-08 INTRODUCTION Uni-ram holds many patents on designs used in its
PRO-WASH Gun Washer. Instructions Parts List J. With Husky 307 Pump. Model Model Model
 Instructions Parts List PRO-WASH Gun Washer 308393J With Husky 307 Pump 100 psi (0.7 MPa, 7 bar) Maximum Working Pressure Read warnings and instructions. See page 2 for List of Models and page 5 for Gun
TrueClean ToteCleaner
 TrueClean ToteCleaner Installation, Operation, and Maintenance Manual www.trueclean.us TrueClean Check Valve Table of Contents Introduction.... 1 About... 1 Warranty... 2 Safety... 3 Important Safety Information....
20In. Oscillating Wall-Mount Fan. Owner s Manual
 20In. Oscillating Wall-Mount Fan Owner s Manual WARNING: Read carefully and understand all ASSEMBLY AND OPERATION INSTRUCTIONS before operating. Failure to follow the safety rules and other basic safety
CINCINNATI, OH USA
 INSTRUCTION MANUAL Part No. 89731 Revised October 1997 CINCINNATI, OH 45241-4807 USA GAS SAFETY PRECAUTIONS Instructions on what to do when a user smells gas can be obtained from the local gas supplier.
20 GALLON PARTS WASHER
 20 GALLON PARTS WASHER 94702 ASSEMBLY & OPERATING INSTRUCTIONS Due to continuing improvement, actual product may differ slightly from the product described herein. 3491 Mission Oaks Blvd., Camarillo, CA
Flat Line Spray Systems Kits
 Instructions/Parts Flat Line Spray Systems Kits 3A03B EN Heated or non-heated fluid circulation kits for Merkur, Merkur Bellows, and NXT Dura-Flo Pumps. For professional use only. Maximum Fluid Working
OWNER S MANUAL. Models: Herkules Equipment Corporation 2760 Ridgeway Court Walled Lake, MI USA Fax
 Part# 1000692 7/12/99 tn INSTRUCTIONS This manual contains important information concerning the installation and operation of the gun washers listed at the right. Read manual thoroughly and keep for future
Operator s Manual. Model G32-S Model G32-E Disinfection Soak Stations
 Model G32-S Model G32-E Disinfection Soak Stations Operator s Manual CIVCO Medical Solutions 102 First Street South Kalona, IA 52247 USA Tel: 1-800-445-6741 Fax: 1-877-329-2482 Website: WWW.CIVCO.COM Copyright
CAUTION UM120W (RIGHT TANK) FOR WATER BORNE PAINTS ONLY UM120W (RIGHT TANK) SECTION IS NOT DESIGNED FOR USE WITH SOLVENT BASED PAINT
 FOR WATER BORNE PAINTS ONLY UM120W (RIGHT TANK) SECTION IS NOT DESIGNED FOR USE WITH SOLVENT BASED PAINT") OPERATING MANUAL SOLVENT AND WATER BASE SPRAY GUN CLEANER UG5000W and UG5500W CAUTION UM120W (RIGHT TANK) FOR WATER BORNE PAINTS ONLY UM120W (RIGHT TANK) SECTION IS NOT DESIGNED FOR USE WITH SOLVENT BASED
OPERATING MANUAL SOLVENT AND WATER BASE SPRAY GUN CLEANER UG5000W and UG5500W CAUTION UM120W (RIGHT TANK) FOR WATER BORNE PAINTS ONLY UM120W (RIGHT TANK) SECTION IS NOT DESIGNED FOR USE WITH SOLVENT BASED
Model No: Little Devil II (inc ss)
") GAS HEATER Model No: Little Devil II (inc ss) PART NO: 6926020, 6926025 (SS) OPERATION & MAINTENANCE INSTRUCTIONS LS1213 INTRODUCTION Thank you for purchasing this CLARKE Gas Heater. Before attempting
GAS HEATER Model No: Little Devil II (inc ss) PART NO: 6926020, 6926025 (SS) OPERATION & MAINTENANCE INSTRUCTIONS LS1213 INTRODUCTION Thank you for purchasing this CLARKE Gas Heater. Before attempting
INSTALLATION USE & CARE MANUAL ALL WEATHER SL-SERIES QUARTZ TUBE ELECTRIC INFRARED RADIANT HEATER
 INSTALLATION USE & CARE MANUAL ALL WEATHER SL-SERIES QUARTZ TUBE ELECTRIC INFRARED RADIANT HEATER TABLE OF CONTENTS IMPORTANT INFORMATION Warnings 2 Installation Instructions 3 Wiring Instructions 3 Outdoor
PARAFFIN/DIESEL HEATER
 PARAFFIN/DIESEL HEATER MODEL NO: XR60 PART NO: 6931002 OPERATION & MAINTENANCE INSTRUCTIONS LS0813 INTRODUCTION Thank you for purchasing this CLARKE product. Before attempting to use this product, please
INSTALLATION & OPERATING INSTRUCTIONS MODEL #17900 KEGERATOR MANUAL
 INSTALLATION & OPERATING INSTRUCTIONS MODEL #17900 KEGERATOR MANUAL TABLE OF CONTENTS PAGE # SAFETY INSTRUCTIONS......... 2 INSTALLATION INSTRUCTIONS................... 3 CABINET LOCATION GUIDELINES...
OPERATING MANUAL/ INSTALLATION
 NHW- 15 HOT WATER MACHINE OPERATING MANUAL/ INSTALLATION 120/240 V 1650/6600 W US 120/240 V 1350/5500 W CAN CONVERTIBLE 2 GA LLON DRIP TRAY INCLUDED ADVANCED TEMPERATURE CONTROL TVT TECHNOLOGY NEWCO ENTEPRISES
DIESEL/PARAFFIN HEATERS
 DIESEL/PARAFFIN HEATERS MODEL NO: XR80, XR110, XR160, XR210 PART NO: 6931004, 6931006, 6931008, 6931012 OPERATION & MAINTENANCE INSTRUCTIONS LS0814 INTRODUCTION Thank you for purchasing this CLARKE product.
CONGRATULATIONS! TABLE OF CONTENTS
 CONGRATULATIONS! Thank you for choosing Mytee Products for your supply needs. By doing so, you have joined thousands of your fellow cleaning professionals in choosing quality, service, and value in your
Tornado Operations & Maintenance Manual
 TORNADO INDUSTRIES 7401 W. LAWRENCE AVENUE CHICAGO, IL 60706 (708) 867-5100 FAX (708) 867-6968 www.tornadovac.com Tornado Operations & Maintenance Manual MODEL NO. 99690 BD 22/14, 99720 BD 26/14 L9722
30 Professional Cooling Unit. Model Number: XC3000. Owner s Manual READ AND SAVE THESE INSTRUCTIONS
 30 Professional Cooling Unit Model Number: XC3000 Owner s Manual READ AND SAVE THESE INSTRUCTIONS CAUTION: Before using this product, read this manual and follow all safety rules and operating instructions.
WALLPAPER STEAMER. Model ASSEMBLY AND OPERATING INSTRUCTIONS
 WALLPAPER STEAMER Model 91098 ASSEMBLY AND OPERATING INSTRUCTIONS 3491 Mission Oaks Blvd., Camarillo, CA 93011 Visit our Web site at: http://www.harborfreight.com Copyright 2004 by Harbor Freight Tools.
Ui REFRIGERATOR SPEC SHEET
 Ui REFRIGERATOR SPEC SHEET ISOMETRIC VIEW 19 7/8 20 1/2 32 3/4 FRONT VIEW NOTES: 1. CUTOUT DIMENSIONS: 20 1/2"W X 33"L X 20 3/4"D 2. CUTOUT DIMENSIONS ARE FOR REFRIGERATOR ONLY. REFER TO STAINLESS STEEL
6-Gallon Carpet Extractor Series
 Limited Warranty CleanFreak warrants new equipment against defects in material and workmanship under normal use and service to the original purchaser. Any statutory implied warranties, including any warranty
YOUR AROMATHERAPY DIFFUSER
 YOUR AROMATHERAPY DIFFUSER This booklet contains important information. CAUTION: Read manual carefully for proper procedures and operation. Thank you for purchasing your new Aromatherapy Diffuser from
IMPORTANT SAFETY INSTRUCTIONS EC-AG1-25 EC-AG1, EC-AG2 SAVE THESE INSTRUCTIONS.
 IMPORTANT SAFETY INSTRUCTIONS 2 1. Read and Follow All Instructions 2. Read this manual completely before attempting installation. 3. All permanent electrical connections should be made by a qualified
Getz Equipment Innovators 450 lb Dual Portable Dry Chemical Fill System
 Getz Equipment Innovators 450 lb Dual Portable Dry Chemical Fill System 1 Revised 11/18/10 2320 Lakecrest Drive, Pekin IL 61554 PH. (888) 747-4389 Fax (309) 495-0625 Website: www.getzequipment.com LIMITED
OKB, OKD, & OKH Series
 ISO 9001 Infrared Radiant Heaters OKB, OKD, & OKH Series Installation, Operation, Maintenance Instructions & Spare Parts CE Certified HIGH TEMPERATURE, RISK OF FIRE, FIRE/EXPLOSION HAZARD. During operation,
36 IN. ELECTIC FIREPLACE FMI MODEL # LEF36 Mounting Base Feet and Wall Mounting Bracket Included
 F3610G FMI PRODUCTS, LLC 36 IN. ELECTIC FIREPLACE FMI MODEL # LEF36 Mounting Base Feet and Wall Mounting Bracket Included FMI Products, LLC TABLE OF CONTENTS Safety Information... 3 Operating Instructions...
Instructions Parts List
 Instructions Parts List HYDRAULIC POWERED Agitator 307331F 1500 psi (10.5 MPa, 105 bar) Maximum Hydraulic Input Pressure Model 214853, Series B Mounts on 55 gal (208 liter) drum cover. Read warnings and
Model: C C Ambassador 20. Automatic Carpet Scrubber OPERATION SERVICE PARTS CARE
 Ambassador 20 Automatic Carpet Scrubber Model: C8420-115 C8420-240 OPERATION SERVICE PARTS CARE This manual is furnished with each new Minuteman Ambassador 20. This provides the necessary operating and
Desiccant Air Drying System
 Instructions - Parts List Desiccant Air Drying System 3099D Model 30 Maximum Operating Pressure 0 psi (. MPa, bar) Maximum Temperature 50 F (5 C) Includes: Part No. Description 30 Stage - Air Filter with
Automatic Water System Pump SERIES
 Automatic Water System Pump 42755 SERIES Automatic Water System Pump Purpose of this manual The purpose of this manual is to provide necessary information for product installation, operation and maintenance.
Model BIO436R-A and BIO536R-A BIOMATIC Heated Bioremediation Parts Cleaner Operations and Maintenance Instructions
 Graymills Model BIO436R-A and BIO536R-A BIOMATIC Heated Bioremediation Parts Cleaner Operations and Maintenance Instructions Be sure anyone operating this unit reads and understands all warnings and instructions.
20-GALLON PARTS WASHER OWNER S MANUAL
 20-GALLON PARTS WASHER OWNER S MANUAL WARNING: Read carefully and understand all INSTRUCTIONS before operating. Failure to follow the safety rules and other basic safety precautions may result in serious