Please take not of the warranty section at the back of this manual and retain all documents related to the purchase of this product.
|
|
|
- Paul Small
- 6 years ago
- Views:
Transcription
1
2 Dear Customer: Thank you for choosing our product. Please read this manual carefully before using and installing the appliance. The instructions in this manual are for the best installation, use and care of the appliance. You will find that the clean lines and modern look of your oven blends in perfectly with your kitchen decor. The oven is easy to use and performs to a high standard. We also make a range of products that will enhance your kitchen, such as cooker hoods, built in hobs, built in ceramic hobs and built in ovens, microwaves, washing machines, tumble dryers, dishwashers and refrigerators. We make every effort to ensure that our products meet all your requirements. Our service department is at your disposal to answer all your questions and to listen to your suggestions. Please take not of the warranty section at the back of this manual and retain all documents related to the purchase of this product. We are committed to providing increasingly efficient products that are easy to use, environmentally friendly, attractive and reliable. 1
3 Index CAUTIONS pag.3-4 Instructions for installation: Dimensions and installation features pag. 5 Electrical connection pag. 6 Ventilation and gas connection pag. 6 Adaptation to different types of gas pag. 7 Setting the minimum flame pag. 7 Burner and injector characteristic table pag. 8 Instructions for use Description of the main parts of the appliance pag. 8 Ignition and operation of the burners pag. 9 Advice on the use of gas burners pag. 9 Oven function pag. 10 Electronic programmer pag. 11 Instructions for cooking pag. 12 Maintenance and cleaning pag. 14 2
4 CAUTIONS: This Appliance should be installed in accordance with local gas regulations and only used in a well ventilated space. Read the instructions before installing or using this appliance. Before using the oven we suggest: Heat the oven at maximum temperature for 45 minutes to remove unpleasant odours and smoke caused by working residues and thermal insulation. Carefully clean the oven with warm, soapy water and rinse it. Do not use a hose or spray water onto the appliance. Very important: Keep this instruction booklet safe for useful references. This appliance is designed for use in private homes. This appliance is not intended for use by young children. Do not touch the heating elements inside the oven. When the grill is on, all the accessible elements are hot, hence, keep children away from these elements. This appliance should be installed by an authorised person and in accordance with the manufacturer s installation instructions, local gas fitting regulations, municipal building codes, electrical wiring regulations and local water supply regulations. Before switching this appliance on, check that it is correctly regulated for the type of gas available (see relevant section). Before maintenance or cleaning, disconnect the appliance from the mains and wait for it to cool down. Do not use harsh abrasive cleaners or sharp metal scrapers to clean the oven door glass as they can scratch the surface, which may result in the glass shattering. When the burners are lit, make sure that the flame is always regular. Before removing the saucepan/pot, turn the burners off. Servicing of this appliance should only be carried out by authorised personnel. If the electricity supply cord is damaged, it must be replaced by authorised personnel or qualified person in order to avoid hazard. The use of a gas appliance produces heat and humidity in a room. Make sure that the room is well ventilated, keeping natural ventilation outlets open or installing a cooker hood. If a gas appliance is used for a long period of time then it may require extra ventilation (opening a window or increasing the volume of the cooker hood). Never line the oven with aluminium sheets. Be careful not to use saucepans/pots with unstable or deformed bottoms on the burners to avoid overturning or spilling. If the mains of a burner is turned off accidentally, turn off the control knob. Only light the oven again after waiting at least a minute. Keep packaging out of reach of children at all times. Always use oven gloves when removing and replacing food in the oven. 3
5
6 UnRegistered
7 ELECTRICAL CONNECTION The appliance is fitted with an Australian approved 15 Amp flexible cord and plug which must be connected to a correctly earthed socket outlet. The manufacturer is not liable for any direct or indirect damage caused by faulty installation or connection. It is therefore necessary that all installation and connection operations are carried out by qualified personnel complying with the local and general regulations in force. The wire section on the cable must not be less 2 Than1.5mm (3 1.5cable).Use only the special cables available at our service centers. L N CONNECTION OF THE FEEDING CABLE TO THE MAINS Connect the feeding cable to a plug suitable for the load indicated on the rating plate of the product. In case of a direct connection to the mains (cable without plug), it is necessary to insert a suitable omnipolar switch before the appliance, with minimum opening between contacts of 3 mm (the grounding wire should not be interrupted by the switch). Before connecting to the mains, make sure that: The electrical counter, the safety valve, the feeding line and the socket are ade quate towithstand the maximum load required(see rating plate). The supply system is regularly grounded, according to the regulations in force. The socket or the omnipolar switch can easily be reached after the installation of the oven. After carrying out the connection to the mains, check that the supplying cable does not come into contact with parts subject to heating. Never use reductions, shunts, adaptors which can cause overheating or burning. The manufacturer is not liable for any direct or indirect damage caused by faulty installation or connection. It is therefore necessary that all installation and connection operations are carried out by qualified personnel complying with the local and general regulations in force. Electrical features Oven light 25W Spit motor 4W Upper heating element 1950W Bottom heating element 1800W Grill heating element 2250W Circular heating element 1800W Ventilator motor 30W Cooling fan 11W This appliance shall be installed only by authorised persons and in accordance with the manufacturer's installation instructions, local gas fitting regulations, municipal building codes, electrical wiring regulations, local water supply regulations. Ventilation In general, the appliance should have adequate ventilation for complete combustion of gas, proper flueing and to maintain temperature of immediate surroundings within safe limits. Combustible Surfaces Any adjoining wall surface situated within 200mm from the edge of any hob burner must be a suitable noncombustible material for a height of 150mm for the entire length of the hob. Any combustible construction above the hotplate must be at least 600mm above the top of the burner and no construction shall be within 450mm above the top of the burner. Zero clearance is permitted on side and rear adjoining surfaces below the hob. Gas connection The appliance must be connected to the gas supply or the cylinder according to the specifications of the standards and after checking that it is adjusted for the type of gas available. The gas connection is male 1/2" BSP and is situated 55mm from the right and 560mm from the floor. It's necessity of changing the flexible tube whenthe national conditions require it. There are two ways to carry out the connection to the main gas line: A. The Cooker can be connected with the cuprum material. Loosen the tie-in down and connect one terminal of the pipe with the gas elbow B. The cooker can be connected with a Flexible Hose, which is 10mm ID, class B or D, 6
8 between 1-1.2m long. The hose should not be subjected to abrasion, kinking or permanent deformation and should be able to be inspected along its entire length. Unions compatible with the hose fittings must be used and connections tested for gas leaks. The flexible tube shall be fitted in such a way that it cannot come into contact with a moveable part of the housing unit (e.g. a drawer)and does not pass through any space susceptible of becoming congested.the fixed consumer piping outlet should be at approximately the same height as the cooker connection point, pointing downwards and approximately 150mm to the side of the cooker. The hose should be clear of the floor when the cooker is in the installed position. Fix one end of the chain on the screw next to the gas inlet connection and the other end should be anchored to the floor/wall so that the chain prevents strain on the hose connections when he cooker is pulled forward. The appliance is factory set for Natural gas. The test point pressure should be adjusted to 20mbar with the Wok burner operating at maximum. The appliance is set up to operate with the gas specified on the gas type label placed on the back of the appliance. To perform these operations the qualified installer will follow the indications given in the "Adaptation to the various types of gas" section. For safer operation make sure that the supply pressure respects the values given in the "Table of burner and injector characteristics". If installing for use with LPG gas, ensure a gas regulator suitable for a supply pressure of 29mbar is part of the gas tank supply and the test point pressure is adjusted to 29mbar. Once the appliance has been installed, make sure that the gas pipe is neither squashed or damaged by moving parts. Before Leaving - Check all connections for gas leaks with soap and water. DO NOT use a naked flame for detecting leaks. Ignite all burners both individually and separately to ensure correct operation of gas valves, burners and ignition. Turn gas taps to low flame position and observe stability of the flame for each burner individually and separately. When satisfied with the operation of the cooker, please instruct the user on the correct method of operation. In case the appliance fails to operate correctly after all checks have been carried out, refer to the authorised service provider in your area. Adaptation to different types of gas When converting from Universal LPG to Natural Gas ensure that the LPG test point is removed and replaced with the CE Approved NG Regulator supplied in this kit. The test point pressure must be adjusted to 20mbar with the largest burner operating on maximum flame. When converting from Natural Gas to Universal LPG ensure that the NG regulator is removed and replaced with the Test Point Assembly supplied in this kit. An CE Approved gas regulator suitablefor a supply pressure of 29mbar should be part of the gas tank supply and the test point pressure must be adjusted to 29mbar. To adapt the appliance to a gas different from that for which it was set up (see gas type label inside the warming compartment door) proceed as follows: lremove the grids lremove the burners caps and burner heads lwith a 7 mm socket spanner unscrew and remove the injectors. lreplace the injectors with those supplied corresponding to the gas available (see burner and injector characteristics Table) lreplace the various parts proceeding in reverse. When converting from Natural Gas to LPG ensure that theng regulator is removed and replaced with the Test Point Assembly. A gas regulator suitable for a supply pressure of should be part of the gas tank supply and the test point pressure should be adjusted to the pressure according to the data plate. Setting the minimum flame The flame on the small output is regulated by the factory. When the injectors have been replaced or there are special mains pressure conditions, it may be necessary to regulate the minimum flame again. The operations necessary to set the minimum flame are as following: light the burner ; lturn the knob to the minimum position ; ltake out the knob (and gasket if there is one) ; 7
9 l LPG TO NG:Use a thin blade screwdriver to turn the by-pass screw located above left of the gas valve,shaft as shown right. Turn gently the by-pass screw clockwise to the end completely then turn it anti-clockwise 1 turn for the Triple ring,7/8 turn for the Fish,3/4 turn for the Rapid,1/2 turn for the Semi- Rapid and 3/8 turn for the Auxiliary. lng TO LPG: Use a thin blade screwdriver to turn the by-pass screw located above left of the gas valve shaft as shown right.turn gently the by-pass screw clockwise to the end. lput the knob back on and turn it quickly from the maximum position to the minimum position, checking that the flame does not go out ; lfor burners with safety valve make sure that the regulation obtained is sufficient to maintain heating of the thermocouple. If it is not, increase the minimum THE BURNERS REQUIRE NO REGULATION OF THE PRIMARY AIR. ABNORMAL OPERATION ANY OF THE FOLLOWING ARE CONSIDERED TO BE ABNORMAL OPERATION AND MAY REQUIRE SERVICING: lyellow tipping of the hob burner flame. lsooting up of cooking utensils. lburners not igniting properly. lburners failing to remain alight. lburners extinguished by oven door. lgas valves, which are difficult to turn. IN CASE THE APPLIANCE FAILS TO OPERATE CORRECTLY, CONTACT THE AUTHORISED SERVICE PROVIDER IN YOUR AREA. 8
10
11
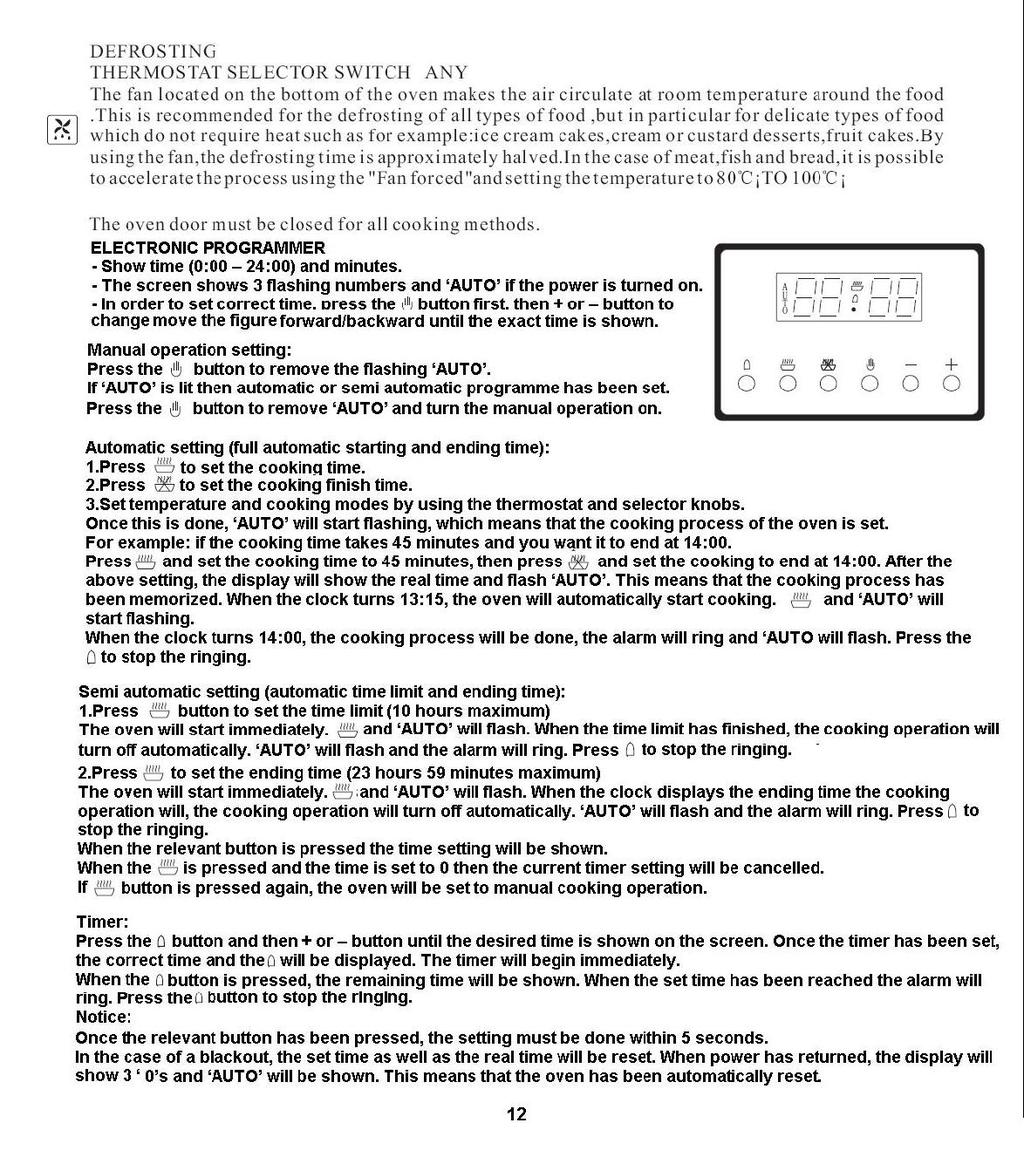
12
13
14
15
16
 +27-10-207-3000 (International Customers) Help us to help you Please determine your type of enquiry before writing or telephoning.")
17 Service and Spares In the event of your appliance requiring service, or if you wish to purchase spare parts, contact your local Kelvinator Service Centre by telephoning: (South African Customers) (International Customers) Help us to help you Please determine your type of enquiry before writing or telephoning. When you contact us we need to know: Your name Telephone Number Physical Address where appliance is located Model and Serial Number of the appliance Clear and concise details of the fault Customer Care For general enquiries or information regarding Kelvinator appliances contact: Customer Care Department Kelvinator P.O. Box 3657 Johannesburg 2000 South African Customers: International Customers:
18 Guarantee Conditions 1. The guarantee is valid for Twenty Four (24) months commencing when the appliance is handed over to the first retail purchaser, which must be verified by purchase invoice or similar documentation. 2. Kelvinator guarantees the equipment against defective material or faulty manufacture, provided it is used for domestic use from the date of purchase by the original purchaser. If not used as above-mentioned, the warranty period will limited. 3. If the appliance is used or installed more than Fifty (50) kilometres from the nearest Kelvinator Authorised Service Agent, the additional distance covered shall be for the account of the purchaser. 4. The risk in regard to appliances to be repaired shall at all times remain with the purchaser. 5. This guarantee is given on condition that only genuine Kelvinator parts and accessories are used at all times in the appliance. 6. Kelvinator shall not be responsible for damage of any kind resulting from electricity fluctuations, faults in the building wiring, faulty installations, improper use of controls or failure to use the appliance in accordance with the operating instructions and/or general misuse and/or abuse, which would include unforeseen accidents, wear and tear, and/or earthquake, flood, lightning or any other natural disaster beyond the control of Kelvinator. 7. Any attempt by an unauthorised person to repair or tamper with the appliance shall render this guarantee null and void. 8. This guarantee does not include bulbs, loose glass, glass oven doors, enamelled surfaces, discolouring of stainless steel surfaces, filters and other parts subject to wear and tear. 9. Kelvinator shall not be responsible in terms of this guarantee for the replacement or repair of any parts of the appliance if damaged during transit, where packaging damage is visible. 10. Repairs carried out under guarantee do not extend the guarantee period for the appliance. Parts removed during guarantee repairs become the property of Kelvinator. 11. This guarantee shall be available only to a purchaser of Kelvinator appliances from an authorised Electrolux Home Products/Kelvinator Dealer or Distributor in and where the appliance has been retained for use in the Republic South Africa, Namibia, Swaziland, Lesotho and Zimbabwe. 12. Failure to produce documentary proof of the date or original acquisition by the original purchaser will result in normal charges being levied for the work carried out and the parts supplied. 13. The liability of Kelvinator under this guarantee is limited to the replacement and/or repair of the defective parts within the guarantee period and does not extend to be installation or removal of the appliance. Furthermore, Kelvinator does not accept responsibility or liability to compensate for any consequential loss or damage of any kind caused by or due to the failure of operation or malfunction of any equipment to which this guarantee applies. 14. It is at the sole discretion of Kelvinator that, in terms of guarantee, consideration be given to replace the appliance due to various parts failing of a similar nature or in the event of the appliance being in a state of beyond repair.
PROF. RANGE COOKER MODEL: EPRC-9850FE/SS EPRC-9860E/SS. Owner s Manual Please read this manual carefully before operating your set.
 PROF. RANGE COOKER MODEL: EPRC-9850FE/SS EPRC-9860E/SS Owner s Manual Please read this manual carefully before operating your set. Retain it for future reference. Record model number and serial number
Instruction Manual. Chest Freezer MODEL: KI130CF2
 Instruction Manual Chest Freezer MODEL: KI130CF2 INSTALLATION INSTRUCTIONS Before Using Your Freezer Remove the exterior and interior packing. Check to be sure you have all of the following parts: Storage
GAS COOKER GAS OVEN SERIES. Owner s Manual Please read this manual carefully before operating your set. Retain it for future reference.
 GAS COOKER GAS OVEN SERIES Owner s Manual Please read this manual carefully before operating your set. Retain it for future reference. Record model number and serial number of the set. See the label attached
PROF. RANGE COOKER MODEL: EPRC-A6456GE(SS) Owner s Manual Please read this manual carefully before operating your set. Retain it for future reference.
 Owner s Manual Please read this manual carefully before operating your set. Retain it for future reference.") PROF. RANGE COOKER MODEL: EPRC-A6456GE(SS) Owner s Manual Please read this manual carefully before operating your set. Retain it for future reference. Record model number and serial number of the set.
PROF. RANGE COOKER MODEL: EPRC-A6456GE(SS) Owner s Manual Please read this manual carefully before operating your set. Retain it for future reference. Record model number and serial number of the set.
Installation and Operating Instructions
 Installation and Operating Instructions Models: Verso 4G Hob As part of Parmco Appliances commitment to improving and updating product ranges, we reserve the right to alter, change and update technical
Installation and Operating Instructions
 Installation and Operating Instructions Models: HO-1 HO-2 HO-6 HO-7 As part of Parmco Appliances commitment to improving and updating product ranges, we reserve the right to alter, change and update technical
CONTENTS. Welcome to Think Letter page 3. General Information page 4-5. Warning and Safety Instructions page 5-6. Instructions for Use pages 7 10
 Instruction manual GAS COOKTOPS CONTENTS Welcome to Think Letter page 3 General Information page 4-5 Warning and Safety Instructions page 5-6 Instructions for Use pages 7 10 Instructions for Installation
User Manual. 600mm, 700mm & 900mm Gas Cooktops Model No. CF6GS, CF6GW, CF7GS, CF9GS
 User Manual 600mm, 700mm & 900mm Gas Cooktops Model No. CF6GS, CF6GW, CF7GS, CF9GS For all product enquires, including warranty support, please contact our Customer Care team 1800 444 357 or email customercare@hapl.com.au
INSTRUCTION MANUAL BUILT-IN HOBS CIR900X
 INSTRUCTION MANUAL BUILT-IN HOBS CIR900X ENGLISH 3-19 Thank you for choosing our product. We advise you to read this manual carefully. It contains all necessary instructions for maintaining unaltered the
FRANKE DESIGNER GAS COOKTOP 90CM
 page 1 of 7 510 880 45 480 Min 50 860 Min 600 SPECIFICATIONS Recommended use Material Colour availability Weight Dimensions Voltage Domestic Stainless Steel Stainless Steel 18.2kg 880 x 510 x 45mm 220-240V
INSTALLATION and SERVICE INSTRUCTIONS USE and CARE INSTRUCTIONS BUILT-IN GAS HOB. Model: DEGH90WF. distributed by. DèLonghi.
 INSTALLATION and SERVICE INSTRUCTIONS USE and CARE INSTRUCTIONS BUILT-IN GAS HOB Model: DEGH90WF distributed by DèLonghi Pty Ltd Dear Customer, Thank you for having purchased and given your preference
HG 675 CX 60 HG 675 CN 60 HG 675 CW 60
 HG 675 X 60 HG 675 CX 60 HG 675 CN 60 HG 675 CW 60 1 2 1. : 93/68: 90/396: 2006/95/CE: 2004/108/CE: - 1935/2004:. 2002/95/CE: RoHS 2.,.,,,,...,. (,..)..,,.,. ( ),,, ;,,.,.....,.,,,,,,...,. (..),,.,..,.,,,,
Contents. 1. Instructions for safe and proper use Positioning of hob Attachment to support structure Electrical connection 22
 Contents 1. Instructions for safe and proper use 19 2. Positioning of hob 20 2.1 Attachment to support structure 20 3. Electrical connection 22 4. Gas connection 23 4.1 Connection to LPG 24 4.2 Ventilation
Contents authorised persons
 Contents 1. INSTRUCTIONS FOR SAFE AND PROPER USE 4 2. POSITIONING OF THE HOB 6 3. GAS CONNECTION 10 4. ELECTRICAL CONNECTION 11 5. ADAPTATION TO DIFFERENT TYPES OF GAS 12 6. FINAL OPERATIONS 14 7. USING
BUILT-IN GAS HOB. Important - Please read these instructions fully before using AG60GNSS AG60GNW
 BUILT-IN GAS HOB Operating & Installation Instructions -Please keep for future reference AG60GNSS AG60GNW Important - Please read these instructions fully before using These instructions contain important
INSTRUCTION MANUAL GAS COOKTOPS IL**604, IL**775, IL**905 (** = BV, WV and SS models)
") INSTRUCTION MANUAL GAS COOKTOPS IL**604, IL**775, IL**905 (** = BV, WV and SS models) OPEN 24/7 ILVE ACCESSORIES ONLINE SHOP Dear customer, We thank you and congratulate you on your choice. This new carefully
INSTRUCTION MANUAL GAS COOKTOPS IL**604, IL**775, IL**905 (** = BV, WV and SS models) OPEN 24/7 ILVE ACCESSORIES ONLINE SHOP Dear customer, We thank you and congratulate you on your choice. This new carefully
BESTLINK INTERNATIONAL. User instructions Maintenance instructions Installation & service instructions
 GMK 10023 AS 4551 BESTLINK INTERNATIONAL User instructions Maintenance instructions Installation & service instructions Cooktop models: BLGSW905CF BLGSW905C BLGSW705CF BLGSW705C BLGSW704CF BLGSW704C BLGSW60CF
Belling. Gas Hob GHU573 - GHU573T GHU70GE - GHU70TGE - GHU70GC GHU70TGC - GHU60GC INSTALLATION AND USER INSTRUCTIONS
 Belling Gas Hob GHU573 - GHU573T GHU70GE - GHU70TGE - GHU70GC GHU70TGC - GHU60GC INSTALLATION AND USER INSTRUCTIONS Note: This appliance is supplied for use with Natural Gas and can be converted to LPG
Installation and Operating Instructions
 Installation and Operating Instructions TILTA MODELS: T1-6-2 T1-6HT T1-9HT As part of Parmco Appliances Ltd commitment to improving and updating product ranges, we reserve the right to alter, change and
Contents. 1. Instructions for safety and use 20
 Contents 1. Instructions for safety and use 20 2. Positioning in the counter top 21 2.1 Fixing to the supporting structure 21 2.2 Positioning the adhesive sponge 22 2.3 Positioning the fastening clips
Instruction Manual JLHDA cm Cooker hood
 Contents 3 Introduction 3 Safety is important 3 In the box 4 Safety information 4 Important safety information 4 Warnings 5 Cautions 5 Electrical information 6 Remote control 6 Programming the remote control
INSTRUCTIONS FOR HOBS PISL1CZI PISL20ZI PISL40ZI PISL40Z* PISL4CZI PISL904CZI PISL1004CZI PISL1163CZI PISF4CZI PISF904CZI PISF1004CZI PISF1163CZI
 Select-Abey.rev05 INSTRUCTIONS FOR INSTALLATION AND USE HOBS PISL1CZI PISL20ZI PISL40ZI PISL40Z* PISL4CZI PISL904CZI PISL1004CZI PISL1163CZI PISF4CZI PISF904CZI PISF1004CZI PISF1163CZI CONTROLS ZONE -
Cooking Collection. Instructions for Use and Warranty Details. Gas Cooktops
 Cooking Collection Instructions for Use and Warranty Details Gas Cooktops CONTENTS General Information.. Page 3 Warning and Safety Instructions. Page 4 Instructions for Use... Page 5 7 Installation Instructions.
MHG201 Gas Hob Manual for Installation, Use and Maintenance
 MHG201 Gas Hob Manual for Installation, Use and Maintenance 1 Customer Care Department The Group Ltd. Harby Road Langar Nottinghamshire NG13 9HY T : 01949 862 012 F : 01949 862 003 E : customer.care@cda.eu
3gb53231b.fm5 Page 12 Friday, April 11, :21 PM
 3gb53231b.fm5 Page 12 Friday, April 11, 2003 12:21 PM INSTRUCTIONS FOR USE BEFORE USING THE COOKTOP SUGGESTIONS FOR ENVIRONMENT PROTECTION PRECAUTIONS AND GENERAL ADVICE ENERGY SAVING TIPS CARE AND MAINTENANCE
HVG620 & HVG720 Gas Hob Manual for Installation, Use and Maintenance
 HVG620 & HVG720 Gas Hob Manual for Installation, Use and Maintenance Customer Care Department The Group Ltd. Harby Road Langar Nottinghamshire NG13 9HY T : 01949 862 012 F : 01949 862 003 E : customer
USER MANUAL AKC cm 4 Burners, Stainless Steel Hob
 USER MANUAL AKC 641 60 cm 4 Burners, Stainless Steel Hob For your safety These instructions have been drawn up for your safety and that of others. You are therefore requested to read them carefully before
User manual Installation instruction Conversion instruction. BG6xA BG6xB BG6xC BG6xD BG6xE BG6xF
 User manual Installation instruction Conversion instruction BG6xA BG6xB BG6xC BG6xD BG6xE BG6xF Pictograms used: Important information Tip Gas connection Electrical connection Right Wrong Safety regulations
INSTALLATION GUIDE NZ AU E
 GAS COOKTOP CG604DX & CG905DX models INSTALLATION GUIDE NZ AU 590447E 08.17 1 SAFETY AND WARNINGS Electrical shock hazard WARNING! Before carrying out any work on the electrical section of the appliance,
Instructions and installation manual
 Instructions and installation manual MODELS: BSGH95-ANZ / BSGH75-ANZ BSGH64-ANZ / BSGH32-ANZ BSGH30-ANZ PLEASE READ THIS MANUAL BEFORE INSTALLING THE COOKTOP. COD. 04067IR 26.02.2013 DESCRIPTION OF COOKTOP
USER MANUAL UPRIGHT COOKER
 USER MANUAL UPRIGHT COOKER TFGC919X IMPORTANT // Please ensure that you read through this user manual prior to installation and use. This manual contains important information to ensure optimal performance
USER MANUAL. 80 cm 2 burners, glass hob AKC 820C/BLM
 USER MANUAL 80 cm 2 burners, glass hob AKC 820C/BLM For your safety These instructions have been drawn up for your safety and that of others. You are therefore requested to read them carefully before installing
User Manual Freezer A62710GNX1
 EN User Manual Freezer A62710GNX1 2 www.aeg.com CONTENTS 1. SAFETY INFORMATION...3 2. SAFETY INSTRUCTIONS... 4 3. OPERATION... 6 4. DAILY USE...8 5. CARE AND CLEANING... 8 6. TROUBLESHOOTING...9 7. INSTALLATION...
Contents THESE INSTRUCTIONS ARE VALID ONLY FOR THE DESTINATION COUNTRIES WHOSE IDENTIFYING SYMBOLS ARE INCLUDED ON THE COVER OF THIS MAN- UAL.
 Contents 1. INSTRUCTIONS FOR USE... 4 2. SAFETY PRECAUTIONS... 6 3. ENVIRONMENTAL RESPONSIBILITY... 8 4. USING THE HOB... 9 5. CLEANING AND MAINTENANCE... 12 6. POSITION NEAR THE COUNTER TOP... 15 7. ADAPTATION
BUILT-IN GLASS HOB MODEL: EGH-G8592G(BK) EGH-G8593G(BK) Owner s Manual Please read this manual carefully before operating your set.
 EGH-G8593G(BK) Owner s Manual Please read this manual carefully before operating your set.") BUILT-IN GLASS HOB MODEL: EGH-G8592G(BK) EGH-G8593G(BK) Owner s Manual Please read this manual carefully before operating your set. Retain it for future reference. Record model number and serial number
BUILT-IN GLASS HOB MODEL: EGH-G8592G(BK) EGH-G8593G(BK) Owner s Manual Please read this manual carefully before operating your set. Retain it for future reference. Record model number and serial number
GUH52SD 52 cm GUH75 75 cm Canopy Hood
 User Manual for your GUH52SD 52 cm GUH75 75 cm Canopy Hood NOTE: This User Instruction Manual contains important information, including safety & installation points, which will enable you to get the most
USER MANUAL. 60cm, 3 burners, Hob AKC 630
 USER MANUAL 60cm, 3 burners, Hob AKC 630 For your safety These instructions have been drawn up for your safety and that of others. You are therefore requested to read them carefully before installing
Cooker Hood Instruction Manual
 Cooker Hood Instruction Manual Model number(s): RHSCH601SS/B & RHSCH901SS/B IMPORTANT: RETAIN FOR FUTURE REFERENCE Contents Safety Instructions. 3-6 Product Overview. 7 Positioning. 8 Operational modes.
Built-in Gas Hob. Important - Please read these instructions fully before using. Operating Instructions -Please keep for future reference
 Built-in Gas Hob Operating Instructions -Please keep for future reference A70GCIS Important - Please read these instructions fully before using These instructions contain important information which will
JLBIHD624 60cm Cooker Hood
 JLBIHD624 60cm Cooker Hood User guide 2 Cooker hood user guide Contents Contents 3 Introduction 4 Safety is important 4 In the box 4 Safety information 5 Important safety information 5 Warnings 5 Cautions
Proline GAS HOB Model TCG40IX Instruction Book
 Proline GAS HOB Model TCG40IX Instruction Book GB Operating and Installation Instructions Index Technical data and specifications...... 3 Installation...................... 3-6 Ventilation........................
BUILT-IN / TABLE TOP HOB GAS COOKER USER MANUAL
 GB BUILT-IN / TABLE TOP HOB GAS COOKER USER MANUAL Dear Costumer, It is our ultimate desire that you achieve the best performance from our product, which has been passed through meticulous quality control
INSTRUCTION MANUAL GAS HOB. Model:GH600
 INSTRUCTION MANUAL GAS HOB Model:GH600 1 Contents Important Information Description of Hob Operation Maintenance and cleaning Troubleshooting Instruction for installer Technical data Important safety requirements
Operating Instructions HOB Contents
 THP 641 W/IX/I English Operating Instructions HOB Contents Operating Instructions,1 Warnings,2 Assistance,2 Description of the appliance,3 Installation,4 Start-up and use,7 Precautions and tips,7 Maintenance
GUH90 90 cm Canopy Hood
 User Manual for your GUH90 90 cm Canopy Hood NOTE: This User Instruction Manual contains important information, including safety & installation points, which will enable you to get the most out of your
montpellier Installation and Operating Instructions MODELS: MR90GOK, MR90GOX, RMC90GOK & RMC90GOC 90cm Range Cooker Gas
 montpellier Installation and Operating Instructions MODELS: MR90GOK, MR90GOX, RMC90GOK & RMC90GOC 90cm Range Cooker Gas (Picture indicative of model supplied) Please read these instructions carefully before
ERR627SA ERR927SA. Rangehood Installation manual
 ERR627SA ERR927SA Rangehood Installation manual 2 WELCOME TO ELECTROLUX Thank you for purchasing an Electrolux appliance. You ve chosen a product that brings with it decades of professional experience
Cooking c o l l e c t i o n
 Cooking c o l l e c t i o n Instructions for Use and Warranty Details RH60-600mm Fixed Rangehood RH90-900mm Fixed Rangehood ongratulations on the purchase of your new C appliance. This appliance has been
Cooker Hood Instruction Manual
 Cooker Hood Instruction Manual Model number(s): RHGCH702B IMPORTANT: RETAIN FOR FUTURE REFERENCE Contents Safety Instructions. 3-6 Product Overview. 7 Positioning. 8 Operating modes. 9 Installation. 10-15
installation and operating instructions OG63XA Cooktop
 installation and operating instructions OG63XA Cooktop Dear customer, We thank you and congratulate you on your choice. This new carefully designed product, manufactured with the highest quality materials,
This guarantee is subject to the terms and conditions stated in this brochure.
 Appliances Everyday life at home puts high demands on appliances. IKEA appliances are rigorously tested to comply with our strict standards for quality and safety as well as with the highest standards
Installation and Operating Instructions
 Installation and Operating Instructions Model: HOB2S-2E-1 For your convenience, we recommend to attach the serial number label HERE. As part of Parmco Appliances commitment to improving and updating product
USER MANUAL AGHD60GG BUILT-IN 60CM GAS ON GLASS HOB CUSTOMER CARE
 USER MANUAL BUILT-IN 60CM GAS ON GLASS HOB CUSTOMER CARE 0 44 800 1128 IMPORTANT INFORMATION CONTENTS Important Information Before you start 2 Safety information 3 Environment information 4 Technical and
Instruction Manual for Electric Warming Drawer BWD14B
 Instruction Manual for Electric Warming Drawer BWD14B Contents Appliance Description... 6 Main Components... 6 How the warming drawer works... 6 Use... 7 Before using for the first time... 7 Control Panel...
GAS GRIDDLE INSTRUCTIONS MODEL: PGF GRIDDLES PGF 300, 600, 800, 1200
 Page 1 of 17 GAS GRIDDLE INSTRUCTIONS MODEL: PGF GRIDDLES PGF 300, 600, 800, 1200 VALIDATE WARRANTY SAFETY INSTRUCTIONS INSTALLATION INSTRUCTIONS OPERATION INSTRUCTIONS MAINTENANCE INSTRUCTIONS CONVERSION
SAFETY INSTRUCTIONS IMPORTANT TO BE READ
 SAFETY INSTRUCTIONS EN IMPORTANT TO BE READ AND OBSERVED Before using the appliance read these safety instructions. Keep them nearby for future reference. These instructions are valid if the country symbol
GAS-ON-GLASS COOKTOP
 GAS-ON-GLASS COOKTOP CG301D, CG302D, CG451D, CG603D, CG604D, CG752D, CG903D & CG905D models INSTALLATION GUIDE GB IE IN PH 590657D 08.17 1 SAFETY AND WARNINGS! WARNING! Electrical shock hazard Disconnect
INSTALLATION & OPERATING INSTRUCTIONS GAS HOBS MODELS
 INSTALLATION & OPERATING INSTRUCTIONS GAS HOBS MODELS OG30XA, OG60XA, OG60WA, OG61XA, OG61WA, OG62XA, OG63XA, OG64XA, OG65XA, OG66XA, OG67XA, OG70XA, OG71XA, OG72XA, OG90XA, OG91XA, OG92XA, OGG64A, OGG75A,
BUILD-IN COOKING HOB MODELS H200F, H250F, H400F, 756 & 854F FOR USE WITH LIQUIFIED PETROLEUM GAS
 CO UN T RY L E I S U R E BUILD-IN COOKING HOB MODELS H200F, H250F, H400F, 756 & 854F FOR USE WITH LIQUIFIED PETROLEUM GAS USER AND INSTALLATION INSTRUCTIONS WARNING This appliance must be installed by
Built-in Gas Hob CZ55554 CZ55571
 Built-in Gas Hob CZ55554 CZ55571 INSTALLATION AND OPERATING INSTRUCTIONS The product may differ from the one illustrated but the installation and operation procedure remains the same The product may differ
PC 640 GB. Built-in cooking tables 60 Instructions for installation and use
 PC 640 GB Built-in cooking tables 60 Instructions for installation and use Congratualtions on choosing an Ariston appliance, which you will find is dependable and easy to use. We recommend that you read
JLBIHD920 90cm Chimney Hood
 JLBIHD920 90cm Chimney Hood User guide 2 Cooker hood user guide Contents Contents 3 Introduction 4 Safety is important 4 In the box 4 Safety information 5 Important safety information 5 Warnings 5 Cautions
60cm Chimney Extractor
 60cm Chimney Extractor LAM2401 HJA2480 User & Installation Guide Contents Page Environmental note 3 IMPORTANT SAFETY INFORMATION 4 6 Specifications of your extractor 7 8 Dimensions 7 Specifications 7-8
OWNERS MANUAL ELECTRIC STOVES
 OWNERS MANUAL ELECTRIC STOVES Electrolux Home Products 1. READ these instructions carefully before installing and operating the oven. Keep them for further reference. 2. Record in the space below the MODEL
INSTALLATION INSTRUCTIONS
 INSTALLATION INSTRUCTIONS Gas-on-glass cooktop CG302D, CG451D, CG603D, CG604D, CG752D, CG903D & CG905D models GB IE IN 590657A 02.14 1 SAFETY AND WARNINGS 3 WARNING! Electrical shock hazard Before carrying
INSTRUCTION MANUAL FOR GAS COOKTOP MODEL ILGP64BV & ILGP64WV
 INSTRUCTION MANUAL FOR GAS COOKTOP MODEL ILGP64BV & ILGP64WV OPEN 24/7 ILVE ACCESSORIES ONLINE SHOP Dear customer, We thank you and congratulate you on your choice. This new carefully designed product,
OVENS AUS. Installation - Use - Maintenance. Oven models: 60cm Built in Ovens
 OVENS Installation - Use - Maintenance AUS Oven models: 60cm Built in Ovens 539.07.031 539.07.041 GENERAL INFORMATION Please read this booklet thoroughly before you use this appliance. It is important
Gas Fire Patio Heater Lhotse-817
 Gas Fire Patio Heater Lhotse-817 Instruction Manual Please read the manual BEFORE you unpack or install the fire TABLE OF CONTENTS Warning 3 Getting Started 4 What s Included 5 Assembly Procedures 6 Product
EGG9363NOX EN HOB USER MANUAL
 EGG9363NOX...... EN HOB USER MANUAL 2 www.electrolux.com CONTENTS 1. SAFETY INFORMATION................................................... 3 2. SAFETY INSTRUCTIONS..................................................
Gas Fire Patio Heater Q9
 Gas Fire Patio Heater Q9 Instruction Manual Please read the manual BEFORE you unpack or install the fire TABLE OF CONTENTS Warning 3 Getting Started 4 What s Included 5 Assembly Procedures 6 Product Drawing
Installation and Operating Instructions
 Installation and Operating Instructions Models: HO-4-6S-CER-T HO-4-6NF-CER-T For your convenience, we recommend to attach the serial number label HERE. As part of Parmco Appliances commitment to improving
Installation and Operating Instructions
 Installation and Operating Instructions Models: RBOX-6S-1000 RBOX-9S-1000 RCAN-6S-1000 RCAN-6S-500 RCAN-6W-1000 RCAN-6W-500 RCAN-9S-1000 RCAN-9S-500 RCAN-9W-1000 RCAN-9W-500 RLCD-9G-1000 RLOW-9S-1000 T4-11GLA
CLGOGUIT
 CLGOGUIT5 3663602842217 V10617 1 2 IMPORTANT - Please read carefully the separate safety guide before use. x1 [02] x1 [03] x1 [06] x2 [07] x1 [08] x1 [09] x4 [01] x1 [04] x2 [05] x1 [10] x1 [11] x5 (G30
Installation and Operating Instructions
 Installation and Operating Instructions Model: PPOV-6S-DT-2 For your convenience, we recommend to attach the serial number label HERE. As part of Parmco Appliances commitment to improving and updating
Installation and Operating Instructions. Models: T4-12LOW-9IS-1
 Installation and Operating Instructions Models: T4-12LOW-9IS-1 727626032017 p: 09 573 5678 f: 09 573 5699 e: sales@parmco.co.nz w: www.parmco.co.nz Parmco Appliances extended 7 year warranty 7 New Zealand
Installation and Operating Instructions Models: HO-4-6S-CER-T HO-4-6NF-CER-T
 Installation and Operating Instructions Models: HO-4-6S-CER-T HO-4-6NF-CER-T For your convenience, we recommend to attach the serial number label HERE. 727626032017 p: 09 573 5678 f: 09 573 5699 e: sales@parmco.co.nz
T-60cm-OVEN-SS T-60cm-OVEN-CM T-60cm-OVEN-BL
 T-60cm-OVEN-SS T-60cm-OVEN-CM T-60cm-OVEN-BL USER INSTRUCTIONS GENERAL WARNINGS Read carefully all the instructions contained in this booklet. It provides you with important information regarding the safe
Operating Instructions HOB Contents
 PAA 642 /I(WH) PAA 642 /I(BK) UK English Operating Instructions HOB Contents Operating Instructions,1 Warnings,2 Assistance,2 Description of the appliance,3 Installation,4 Start-up and use,7 Precautions
Built-in Conventional Oven
 Built-in Conventional Oven LAM3204 User & Installation Guide using this manual Thank you for choosing LAMONA Built - In Oven. This user Manual contains important information on safety and instructions
Slider hood Grey metal/stainless steel panel JLHDA601
 60cm Slider hood Grey metal/stainless steel panel JLHDA601 User guide 2 Cooker hood user guide Contents Contents 3 Introduction 4 Safety is important 4 In the box 4 Safety information 5 Important safety
STEAM WALLPAPER STRIPPER MODEL HTW5
 STEAM WALLPAPER STRIPPER MODEL HTW5 From Serial Number 75154 (110 Volt North America only) OWNERS MANUAL & OPERATING INSTRUCTIONS 2016/11 Hiretech Part # 007717 WARNING For safe operation of this machine,
INSTALLATION GUIDE NZ AU D
 GAS COOKTOP CG905DW models INSTALLATION GUIDE NZ AU 590684D 08.17 1 SAFETY AND WARNINGS! WARNING! Electrical Shock Hazard Before carrying out any work on the electrical section of the appliance, it must
INSTRUCTIONS AND WARRANTY
 INSTRUCTIONS AND WARRANTY MODEL NO. SHHD120 SALTON 1200W HAIR DRYER Congratulations on purchasing our Salton Hair Dryer. Each unit is manufactured to ensure safety and reliability. Before using this appliance
Installation and Operating Instructions. Models: T4-12LOW-9IS
 Installation and Operating Instructions Models: T4-12LOW-9IS Dear Valued Customer, Thank you and congratulations on purchasing your new Parmco appliance. All Parmco products are made to the highest quality
RETAIL MERCHANDISING UNITS
 V RETAIL MERCHANDISING UNITS AMBIENT MAGH2W MAGH3W MAGH4W MODEL NUMBERS MAGH2 MAGH3 MAGH4 MAGL2W MAGL3W MAGL4W MAGL2 MAGL3 MAGL4 HEATED MHPL2W MHPL3W MHPL4W MODEL NUMBERS MHPL2 MHPL3 MHPL4 MHBM2 MHBM3
INSTALLATION INSTRUCTIONS
 INSTALLATION INSTRUCTIONS Gas Cooktop CG905DW models NZ AU www.fisherpaykel.com 590684B 11.14 1 Safety and warnings! WARNING! Electrical Shock Hazard Before carrying out any work on the electrical section
HOW TO USE YOUR 2500 RANGE L.P.G. COOKER OR HOB UNIT
 HOW TO USE YOUR 2500 RANGE L.P.G. COOKER OR HOB UNIT CAUTION These instructions must be read and understood before proceeding with the installation and to avoid any possibility of accident it is essential
Installation and Operating Instructions
 Installation and Operating Instructions All models 5 and 8 function, stainless steel and white: OV-1 Dimoda OV-2 Optima OV-3 Davanti OV-4 Elegante For your convenience, we recommend to attach the serial
BUILT-IN GAS ON GLASS HOBS
 INSTALLATION and SERVICE INSTRUCTIONS USE and CARE INSTRUCTIONS BUILT-IN GAS ON GLASS HOBS Models: DEGH60BG - DEGH70BG - DEGH90BG distributed by DèLonghi Pty Ltd 2 Dear Customer, Thank you for having purchased
Instruction Manual JLCHDD601/JLCHDD901 60cm/90cm Cooker hood
 Contents 3 Introduction 3 Safety is important 3 In the box 4 Safety information 4 Important safety information 4 Warnings 5 Cautions 5 Electrical information 6 Operation 6 Automatic shut-down 7 Care and
This cooktop is for use with Natural Gas and Universal LPG Leave this instructions with the owner PCD345DA
 This cooktop is for use with Natural Gas and Universal LPG Leave this instructions with the owner PCD345DA USER INSTRUCTIONS INSTALLATION INSTRUCTIONS MAINTENANCE INSTRUCTIONS Ú Table of contents[es] Inst
RV921 Range Cooker Installation, Use and Maintenance
 RV921 Range Cooker Installation, Use and Maintenance Customer Care Department The Group Ltd. Harby Road Langar Nottinghamshire NG13 9HY T : 01949 862 012 F : 01949 862 003 E : customer.care@cda.eu W :
INSTRUCTIONS AND WARRANTY
 INSTRUCTIONS AND WARRANTY MODEL NO. SHM30E SALTON ELITE HAND MIXER Congratulations on purchasing our Salton Elite Hand Mixer with Bowl. Each unit is manufactured to ensure safety and reliability. Before
Operating Instructions
 Operating Instructions HOB IT Italiano, 1 English, 11 FR Français, 20 Contents Installation, 12-14 Positioning Electrical connection Gas connection Burner and nozzle specifications BE Nederlands, 30 PT
HOW TO USE YOUR 2000 RANGE L.P.G. COOKER OR HOB UNIT
 HOW TO USE YOUR 2000 RANGE L.P.G. COOKER OR HOB UNIT CAUTION These instructions must be read and understood before proceeding with the installation and to avoid any possibility of accident it is essential
BUILT-IN GAS HOB THE BEAUTY OF SIMPLICITY USER MANUAL BATTERY IGNITION. Model:
 BUILT-IN GAS HOB BATTERY IGNITION Model: HB FG 3060 TN VSB [ 141252-11 ] HB FG 3070 TN VSB [ 141253-11 ] HB FG 4060 TN VSB [ 141250-11 ] HB FG 4090 TN VSB [ 141251-11 ] HB FG 5070 TN VSB HB FG 5090 TN
87cm. Cooker hood. Stainless steel JLCEILHD87. User guide
 87cm Cooker hood Stainless steel JLCEILHD87 User guide 2 Cooker hood user guide Contents Contents 3 Introduction 4 Safety is important 4 In the box 4 Safety information 5 Important safety information 5
BWT6.3GL Cooker Hood 60 cm Glass chimney hood
 User Manual for your BWT6.3GL Cooker Hood 60 cm Glass chimney hood NOTE: This User Instruction Manual contains important information, including safety & installation points, which will enable you to get
EGG6343NOR EGG6343NOX EGG6343NOW EGG6343NDX...
 EGG6343NOR EGG6343NOX EGG6343NOW EGG6343NDX...... EN HOB USER MANUAL 2 www.electrolux.com CONTENTS 1. SAFETY INFORMATION................................................... 3 2. SAFETY INSTRUCTIONS..................................................
User Manual. Hob ZGX65414BA
 EN User Manual Hob ZGX65414BA GB Contents Safety information 2 Safety Instructions 3 Product description 6 Daily use 6 Hints and tips 7 Care and cleaning 8 Troubleshooting 9 Installation 10 Technical information