Owner's Manual PRODUCE SOAK
|
|
|
- Elaine Lynch
- 6 years ago
- Views:
Transcription


1 Owner's Manual PRODUCE SOAK
2 Table of Contents Introduction and Conventions... 1 Product Introduction...2 Produce Washing Chemicals and Antimicrobials...2 Explanation of Warning Messages...3 Danger...3 Warning...3 Chemical Hazard...3 Operating Instructions... 5 Preparing the Produce Soak...6 Placing the Wash Components...6 Rib sets...7 Partitions...9 Flow Guides Filling the Produce Soak Washing Tips Emptying the Produce Soak Preventive Maintenance Troubleshooting Installation Electrical Requirements Plumbing Requirements... 37
3 Introduction and Conventions Produce Soak 1
4 Product Introduction Thank you for purchasing a Produce Soak fruit and vegetable washing system. Your new Produce Soak washing system will provide years of dependable, efficient and trouble-free service. As a Produce Soak owner, you will benefit in numerous ways: Your produce washing operation will be more efficient. Your produce will more free of soil. Your produce will harbor fewer microbes. Your water usage will decrease. Your produce washing hours will decrease and your employee morale will increase. Every system is manufactured to last, with only high-quality, heavy-duty, 14 gauge stainless steel used in its construction. All electrical components used in a Produce Soak system are of the highest quality. The faucet and drain are designed for quick filling and emptying of the system's sink. At Power Soak Systems, we take pride in manufacturing the Produce Soak and are committed to standing behind our customers and products 100%. Should you ever need assistance, please contact us directly at the factory by dialing or fax Produce Washing Chemicals and Antimicrobials The produce wash product you select is best if it: Requires a minimal wash time, ideally, two minutes or less Requires no rinsing Is non-corrosive when properly diluted Is dispensed through fixed dilution rate equipment Is FDA and/or EPA approved for both whole and cut fruit and vegetables. Consult your chemical provider for a suitable product. 2
5 Explanation of Warning Messages Be sure to read, understand and follow all DANGER and WARNING messages located in this guide and on the equipment. Danger Personal Injury and Property Damage hazard. May result in serious injury or death. May cause extensive equipment damage Warning Property Damage Hazard. May result in property or equipment damage. Chemical Hazard May result in serious injury or death. Instructions, labels and Material Safety Data Sheets (MSDSs) should be supplied with all produce treating chemicals. The manufacturers, importers and distributors of your treating chemicals are responsible for providing this information. Power Soak Systems is not a manufacturer, importer, or distributor of antimicrobials. Power Soak Systems, Inc. will not make specific brand recommendations these chemicals. 3
6 - -This page left intentionally blank - - 4
7 Operating Instructions Produce Soak 5

8 Preparing the Produce Soak Placing the Wash Components Begin by removing any debris left from previous batches of produce. Disinfect all work surfaces according to the standard practices of your institution. 6


9 Rib sets Once the system is clean, the wash components can be installed. Begin by placing a rear rib set against one of the rear corners of the sink. Place the other rear rib sets against the back wall of the sink leaving a finger-size gap between them. 7


10 When you have placed all of the rear rib sets, begin placing front rib sets against the front wall of the sink. As with the rear rib sets, place the first front rib set against a corner, and leave a finger-size gap between it and the next front rib set. 8

11 Partitions Next, place partitions in the gaps between the front and rear pairs of rib sets. Make sure the partitions go all the way down and are not snagged on the ends of the rib sets. 9
12 Bottom of partition Gap between front rib sections Continue until all three partitions are in place. It will be necessary to push all previously placed components together to make room for the final partition. 10
13 11
14 Flow Guides Once all the partitions are in place, the flow guides can be installed. Start by positioning a notched end of the flow guide adjacent to the hooks of the rear rib set. Begin bending the flow guide to the shape of the front rib set, and allow the notches of the flow guide to engage the hooks of the rear rib set. Flow guide Rear hook 12
15 Rear hook Rear hook Continue to push the flow guide down against the rib sets until the notched end of the flow guide nearest you is adjacent to the hooks of the front rib set. Front hook Notch 13
16 While holding the flow guide against the front rib set, rock the front rib set and the end of the flow guide away from you until the notches in the flow guide engage the hooks of the front rib set. Gently release the components until the front rib set is once again touching the front wall of the sink. 14
17 Repeat the process until all four flow guides are in place. The wash components are now in place, and the Produce Soak is ready for use. 15
18 Filling the Produce Soak Produce treating chemicals are dispensed into the wash water as the Produce Soak is filled. Consult your chemical provider for details about the equipment they can offer. A typical dispensing system is shown: Treated water entering the wash sink 16
19 Fill the sink until the solution has reached the water level mark in the sink. Embossed water level mark Turn the switch to the ON position to start the pump. 17

20 When the pump is running, the water will become turbulent, and a strong front-to-back current will be established. Do not place knives or other sharp objects in the Produce Soak. Allowing knives or other sharp objects to tumble freely in the Produce Soak tank may cause damage to the equipment and bodily injury to the user. 18
21 Begin placing produce in the Produce Soak. Since there are four compartments, you may place a different type of produce in each one. 19
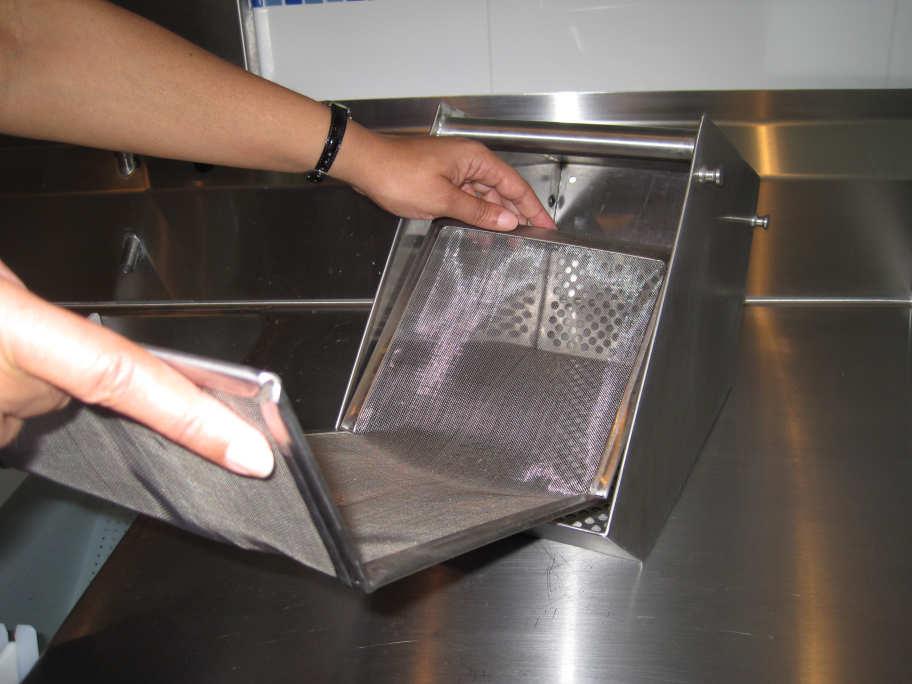
22 After the necessary time for soil removal and disinfection, the produce may be removed by inserting a collection basket. Holding the basket as shown, angle the basket so its leading edge is aligned with the flow in the sink. As you swing the basket into position, produce will begin flowing into the basket. 20
23 Rest the basket on the top edges of the partitions or the sink edges until all the produce is collected. Lift the full basket out when ready. Always observe safe lifting procedures. 21

24 Washing Tips Conserve water and washing chemicals by planning your produce washing. For example: Wash more durable items like oranges and apples first, because those items are less likely to foul the water. Wash less durable items like lettuce and greens later because of their tendency release small green bits into the water. Wash heavily soiled items like potatoes and radishes last because of their tendency to cloud the water. Consider the effect of flavor mixing and color mixing with certain combinations of produce. For example, it might be better to wash cut cauliflower before washing blueberries. Were the blueberries to be washed first, a very small number of bruised blueberries could "dye" the water. Also, blueberry seeds might be released which are dark in color. The cut surfaces of the cauliflower pieces may absorb the blueberry flavor and color, and the dark seeds could easily get caught in the cauliflower florets. A little planning will reduce the number of washing solution changes to save time and money. 22

25 Emptying the Produce Soak When all produce washing is finished and all produce has been removed, collect the larger waste particles suspended in the wash water. This can be done by placing a filter screen in a basket and then placing the basket in each of the four wash sections. 23
26 24
27 Allow a few minutes of collection time in each position. When finished, empty the contents of the filter into a suitable waste container, and wash out the filter and basket. When you have completed the particle collection, turn off the pump by turning the switch to the OFF position. 25
28 Open the drain valve by turning it counterclockwise 1/4 turn. 26
29 Do not run the motor without water in the sink. Doing so could damage the seals in the pump. Remove each Produce Soak component (flow guides, partitions, and rib sets) in the reverse order they were assembled. Wash each component to remove all traces of produce debris. Position each component so that it dries quickly. Pay particular attention to the flow guides; provide airflow between each of them and do not stack them together wet. 27
30 - -This page left intentionally blank
31 Preventive Maintenance Produce Soak 29
32 Your system requires minimal, routine preventive maintenance. As such, the following should be done on a routine basis to ensure that your system remains reliable. IMPORTANT: Turn off the power to the unit at the main breaker prior to performing the following task! About once per month, clean the pump motor fan shroud with a damp, soapy rag. The motor shroud is the "vented" cover located at the end of the motor (closest to the control panel). This will prevent grease and dust from accumulating in the cover's openings, which can obstruct the airflow that cools the motor. About once per month, de-lime the wash sink. Simply add a de-liming agent to a sink of warm, fresh water and run the system overnight. Ask your chemical sales representative to recommend a specific de-liming agent. You need not be concerned about greasing the motor bearings, as they are permanently sealed. There are no other preventive maintenance procedures that you will need to perform on your Produce Soak system. If you have any questions regarding the preventive maintenance procedures, please contact the factory at
33 Troubleshooting Produce Soak 31
34 Only a limited number of troubleshooting and repair procedures may be performed by the facility owner or manager. Any troubleshooting or repair that requires the removal of fasteners or that entails electrical service must not be attempted by anyone other than an authorized service agency. To obtain the name of a recommended service agent in your area, please call the Power Soak Service Department at Symptom Possible cause Remedy Pump motor Circuit breaker Turn breaker on will not run accidentally turned off Circuit breaker tripped Wall mounted disconnect is turned off Motor thermal overload tripped Start capacitor defective (single phase motors) Investigate reason for tripping, e.g. damaged wiring, undersized breaker. CONTACT POWER SOAK SERVICE OR AN AUTORIZED SERVICE AGENCY. Turn disconnect on Investigate reason for overload tripping, e.g. debris stuck in pump impeller. If debris removal requires that you remove any fasteners, YOU MUST CONTACT POWER SOAK SERVICE OR AN AUTORIZED SERVICE AGENCY. Once rectified, reset thermal overload by pressing button on bottom of motor junction box. Replace capacitor. To do this, YOU MUST CONTACT POWER SOAK SERVICE OR AN AUTORIZED SERVICE AGENCY. 32
35 Symptom Possible cause Remedy Pump motor runs, but water flow is inadequate Motor is running on the wrong voltage Confirm that the house wiring supply is appropriate for the motor nameplate data. Reconnect motor internal leads according to the motor nameplate instructions. YOU MUST CONTACT POWER SOAK SERVICE OR AN AUTORIZED SERVICE AGENCY to make these changes. Unit makes a loud, steady noise when running Motor is running the wrong direction Debris caught in the motor's cooling fan Motor seal running dry Debris caught in the pump impeller For three phase motors, reverse any two motor leads. For single phase motors, reconnect motor internal leads according to the motor nameplate instructions. YOU MUST CONTACT POWER SOAK SERVICE OR AN AUTORIZED SERVICE AGENCY to safely change the rotation. Lock and tag out the electrical power from the unit, remove the motor fan cover, and remove the debris. Replace the fan cover and restore the power. For this task, YOU MUST CONTACT POWER SOAK SERVICE OR AN AUTORIZED SERVICE AGENCY. Lock and tag out the electrical power from the unit, remove the motor fan cover, and squirt some low viscosity oil such as WD40 between the fan and the motor end bell. Replace the fan cover and restore the power. YOU MUST CONTACT POWER SOAK SERVICE OR AN AUTORIZED SERVICE AGENCY for service of this nature. Lock and tag out the electrical power from the unit. Remove the three 3/8-16 adapter plate retaining screws adjacent to the motor. Slide the motor, adapter plate, and impeller out of the pump housing. Remove debris from the impeller and reassemble. YOU MUST CONTACT POWER SOAK SERVICE OR AN AUTORIZED SERVICE AGENCY for this service. 33
36 - -This page left intentionally blank
37 Installation Produce Soak 35
38 The installation and initial operational check of your new system must be performed only by licensed and certified plumbers and electricians. Be sure to follow all applicable national and local electrical codes when installing the electrical supply and/or a new circuit breaker. DO NOT connect the system using a power cord and plug or an extension cord of any kind. Please refer to the detailed installation instructions that were sent with your Produce Soak system. Electrical Requirements The electrical requirements of your new system are on the serial number plate located on the end of the wash sink near the front, adjacent to the control panel enclosure. They are also shown inside the control panel enclosure itself. All Produce Soak systems have a single point electrical connection, and a dedicated circuit is required. The system is completely pre-wired and tested at the factory, and a hardwired connection from an appropriate power source is all that is required. The installer is to provide a NEMA 3X disconnect that should be incorporated in the fixed wiring. Properly sized watertight conduit, fittings and parts are required, as well as the appropriate gauge wire. 36
39 If your system is a left-to-right unit, you should locate the disconnect at the left end of the system. (The opposite would be true for a right-to-left system.) Ideally, the disconnect should be located on the wall directly behind the pump motor and control panel provided this location is easily accessible by the operator and does not interfere with the faucet. A wiring diagram is located in the system s control panel enclosure. Specific part numbers and parts information can be obtained from the factory by calling Plumbing Requirements Your unit requires the following plumbing connections: 3/4 (19mm) or 1/2 (12 mm) hot and cold water supply lines. One waste water connection (minimum 1 1/2 / 38mm). 37
40 by Power Soak and Produce Soak are registered trademarks of Cantrell Industries, Inc. The Produce Soak design and concept are fully patented. Power Soak Systems. Inc. 903 East 104 th Street, Suite 130 Kansas City, MO Phone (816) Fax (816) (800) Part#: Rev: B Rev Date: C.E.P. 06/05/
Owner's Manual SILVERWARE PRE-WASHING SYSTEM
 Owner's Manual SILVERWARE PRE-WASHING SYSTEM 2 Table of Contents Introduction and Conventions... 5 Product Introduction... 6 Products Covered by this Manual... 7 Free-standing Stationary... 7 Mobile...
Owner s Manual PS-50. Document Number: Revision: Draft
 Owner s Manual PS-50 Document Number: 33019 Revision: Draft Table of Contents Product Introduction Page 3 Explanation of Warning Messages Page 4 Danger Warning Personal Injury Chemical Hazard Requirements
Owner s Manual PS-200
 Owner s Manual PS-200 Table of Contents Product Introduction Page 1 Explanation of Warning Messages Page 2 Danger Warning Chemical Hazard Personal Injury Requirements for Detergents and Sanitizers Page
Table of Contents. Product Introduction. Explanation of Warning Messages. Requirements for Detergents and Sanitizers
 Owner s Manual Table of Contents Product Introduction Page 3 Explanation of Warning Messages Page 4 Danger Warning Chemical Hazard Personal Injury Requirements for Detergents and Sanitizers Detergents
Silverware Pre-washing System INSTALLATION
 Silverware Pre-washing System INSTALLATION 1 WARNING! Be sure to follow all applicable national and local electrical codes when installing the electrical supply for this system. All field connections must
Table of Contents. Product Introduction. Explanation of Warning Messages. Requirements for Detergents and Sanitizers
 Owner s Manual Table of Contents Product Introduction Page 3 Explanation of Warning Messages Page 4 Danger Warning Chemical Hazard Personal Injury Requirements for Detergents and Sanitizers Detergents
Installation Manual PS-200 & PS-201
 Installation Manual PS-200 & PS-201 Table of Contents Pre-Uncrating Checklist... 1 Verifying System Requirements... 2 Verifying System Direction... 2 Verifying the Electrical Requirements... 2 Removal
Installation Manual PS-225 & PS-275
 Installation Manual PS-225 & PS-275 Table of Contents Pre-Uncrating Checklist... 1 Verifying System Requirements... 2 Verifying System Direction... 2 Verifying the Electrical Requirements... 2 Removal
DISPOSER CONTROL CENTER
 DISPOSER CONTROL CENTER Installation Manual Model CC-202D WARNING indicates a hazardous situation which, if not avoided, could result in death or serious injury. CAUTION indicates a hazardous situation
GREASE INTERCEPTORS. Z1192 GREASE RECOVERY APPLIANCE (GRA) INSTALLATION and OPERATION INSTRUCTIONS
 INSTALLATION and OPERATION INSTRUCTIONS") Z1192 GREASE RECOVERY APPLIANCE (GRA) INSTALLATION and OPERATION INSTRUCTIONS Note: Zurn Grease Interceptors with grease recognizing sensors are efficient appliances designed to separate grease from water.
Z1192 GREASE RECOVERY APPLIANCE (GRA) INSTALLATION and OPERATION INSTRUCTIONS Note: Zurn Grease Interceptors with grease recognizing sensors are efficient appliances designed to separate grease from water.
Installation & Operating Guide
 5-036 HOT WATER TANK Installation & Operating Guide Read all instructions thoroughly. Keep this guide for future reference. Proof of purchase is required for Warranty. Staple receipt or proof of purchase
INSTANT HOT WATER DISPENSER
 INSTANT HOT WATER DISPENSER Tank Installation Materials required (not provided) 2 mounting bracket screws (and 2 plastic anchors if attaching to drywall) Shut-Off valve and T fitting Components When you
VADA - V80-H PRODUCT OVERVIEW CONSTRUCTION USAGE LIMITATIONS MOTOR WARRANTY
 PRODUCT OVERVIEW The VADA horizontal multistage centrifugal pumps combine the functional benefits of centrifugal pumps and the practical benefits of self priming pumps. They warrant high hydraulic and
DISPOSER CONTROL CENTER
 DISPOSER CONTROL CENTER Installation Manual Model CC-202D The Danger signal indicates an immediately hazardous situation which, if not avoided, will result in death or serious injury. The Warning signal
V80-H Multistage Pump Instruction Manual
 V80-H Multistage Pump Instruction Manual PRODUCT OVERVIEW The VADA horizontal multistage centrifugal pumps combine the functional benefits of centrifugal pumps and the practical benefits of self priming
READ AND SAVE THESE INSTRUCTIONS READ CAREFULLY BEFORE ATTEMPTING TO ASSEMBLE, INSTALL, OPERATE OR MAINTAIN THE PRODUCT DESCRIBED. PROTECT YOURSELF AN
 READ AND SAVE THESE INSTRUCTIONS READ CAREFULLY BEFORE ATTEMPTING TO ASSEMBLE, INSTALL, OPERATE OR MAINTAIN THE PRODUCT DESCRIBED. PROTECT YOURSELF AND OTHERS BY OBSERVING ALL SAFETY INFORMATION. FAILURE
The Danger signal indicates an immediately hazardous situation which, if not avoided, will result in death or serious injury.
 The Danger signal indicates an immediately hazardous situation which, if not avoided, will result in death or serious injury. The Warning signal alerts you to potential hazards or unsafe practices which,
TURBOWASH TM... Pot and Pan Sink
 TURBOWASH TM... Pot and Pan Sink MODEL TW ML-110644 701 S. RIDGE AVENUE TROY, OHIO 45374-0001 FORM 33800 Rev. A (4-98) Installation, Operation, and Care of TurboWash TM Pot and Pan Sink SAVE THESE INSTRUCTIS
GALAXY FLOOR MACHINE
 OPERATION MANUAL GALAXY FLOOR MACHINE IMPORTANT SAFETY INSTRUCTIONS WARNING: Failure to observe these instructions can cause personal injury to machine operator or bystanders. WARNING: Shock or electrocution
Food Waste Disposer Instruction Manual
 Food Waste Disposer Instruction Manual See insert for specific information about your new disposer NOTE: IMPORTANT: CAUTION: This Food Waste Disposer has been designed to operate on 110-120 Volt, 60 Hz
Panel Fan Series Operators Manual (Galvanized and Polymer)
") Panel Fan Series Operators Manual (Galvanized and Polymer) Galvanized Panel Fan with Three Wing Blade IMPORTANT: READ AND SAVE THESE INSTRUCTIONS Read all instructions carefully before attempting to assemble,
Panel Fan Series Operators Manual (Galvanized and Polymer) Galvanized Panel Fan with Three Wing Blade IMPORTANT: READ AND SAVE THESE INSTRUCTIONS Read all instructions carefully before attempting to assemble,
DISPOSER CONTROL CENTER
 DISPOSER CONTROL CENTER Installation Manual Model MS The Danger signal indicates an immediately hazardous situation which, if not avoided, will result in death or serious injury. The Warning signal alerts
DISPOSER CONTROL CENTER
 DISPOSER CONTROL CENTER Installation Manual Model CC-101K WARNING indicates a hazardous situation which, if not avoided, could result in death or serious injury. CAUTION indicates a hazardous situation
Installation GUIDE VDWU524SS VDWU524WSSS FDWU524WS FDWU524 VDWU324SS FDWU324
 Installation GUIDE VDWU524SS VDWU524WSSS FDWU524WS FDWU524 VDWU324SS FDWU324 To prevent accidents, which could cause serious injury or death, as well as machine damage read these instructions before installation
SERVING CANADA INSTALLATION INSTRUCTIONS REVISED: AUGUST 2014
 SERVING CANADA INSTALLATION INSTRUCTIONS REVISED: AUGUST 2014 INDEX: UNPACKING INSTRUCTIONS page 2 INSTALLATION INSTRUCTIONS page 3 CONNECTIONS page 6 Equipment must be installed in compliance with all
PrecisionTemp Shower-Mate
 Shower-Mate Instantaneous Gas Water Heater Installation and Operating Instructions The Shower-Mate is a power vented automatic instantaneous water heater designed to be installed in ventilated marine applications.
THE READY RACK 2 GEAR PPE DRYING CABINET. Operator s Manual & Installation Guide. Installation/Operation/Maintenance/Part Number I
 THE READY RACK 2 GEAR PPE DRYING CABINET Operator s Manual & Installation Guide Installation/Operation/Maintenance/Part Number 820220I Copy right 2016 Forward We are pleased that you have selected a Ready
Viking Installation Guide
 Viking Installation Guide Viking Range Corporation 111 Front Street Greenwood, Mississippi 38930 USA (662) 455-1200 For product information, call 1-888-VIKING1 (845-4641) or visit the Viking Web site at
Single Phase Simplex SXL21=3, SXL24=3, SXH21=3, and SXH24=3
 Single Phase Simplex SXL21=3, SXL24=3, SXH21=3, and SXH24=3 Manufactured by SJE-Rhombus Installation Instructions and Operation/Troubleshooting Manual 7000 Apple Tree Avenue Bergen, New York 14416 Phone:
HOSHIZAKI ICE DISPENSING BIN/ WATER DISPENSER MODEL DM-90A SERVICE MANUAL
 NO.: ISSUED: REVISED: 73091 DEC. 21, 1999 DEC. 17, 2003 HOSHIZAKI ICE DISPENSING BIN/ WATER DISPENSER MODEL DM-90A SERVICE MANUAL IMPORTANT Only qualified service technicians should attempt to service
Installation. 324 Series Built-In Dishwashers U L. Viking Range, LLC 111 Front Street Greenwood, Mississippi USA (662)
") Installation Viking Range, LLC Front Street Greenwood, Mississippi 890 USA (66) 455-00 For product information, call -888-845-464 or visit the Viking Website at vikingrange.com U L C U L 4 Series Built-In
Installation Viking Range, LLC Front Street Greenwood, Mississippi 890 USA (66) 455-00 For product information, call -888-845-464 or visit the Viking Website at vikingrange.com U L C U L 4 Series Built-In
π H-2268 SANITAIRE UPRIGHT VACUUM SAFETY uline.com
 π H-2268 SANITAIRE UPRIGHT VACUUM 1-800-295-5510 uline.com SAFETY PAGE 1 OF 7 NOTE: When using an electrical appliance, basic precautions should always be followed, including the following: READ ALL INSTRUCTIONS
TURBOWASH TM... Pot and Pan Sink
 TURBOWASH TM... Pot and Pan Sink MODEL TWII ML-110971 701 S. RIDGE AVENUE TROY, OHIO 45374-0001 937 332-3000 www.hobartcorp.com FORM 34504 Rev. B (June 2002) Installation, Operation, and Care of TurboWash
User s Information Manual
 48AJ,AK,AW,AY020-060 Single-Package Rooftop Gas Heating Units with COMFORTLINK Controls and Scroll Compressors User s Information Manual NOTE TO INSTALLER This manual should be left with the equipment
IMPORTANT INSTRUCTIONS - OPERATING MANUAL
 IMPORTANT INSTRUCTIONS - OPERATING MANUAL Models: AK80LSL, AK100LSL Exhaust Fan READ AND SAVE THESE INSTRUCTIONS READ CAREFULLY BEFORE ATTEMPTING TO ASSEMBLE, INSTALL, OPERATE OR MAINTAIN THE PRODUCT DESCRIBED.
NSS STANDARD-SPEED FLOOR MACHINES
 OPERATION MANUAL NSS STANDARD-SPEED FLOOR MACHINES IMPORTANT SAFETY INSTRUCTIONS Read all instructions before using or servicing machine. WARNING: Fire or explosion hazard. NEVER use with flammable or
DISHWASHER. Models DW2432 and DW2432SS. Installation Manual. Write Serial Number (on inner door of unit) here:
 here:") DISHWASHER Models DW2432 and DW2432SS Installation Manual Write Serial Number (on inner door of unit) here: Felix Storch, Inc. Summit Appliance Division 770 Garrison Avenue Bronx, New York 10474 www.summitappliance.com
DISHWASHER Models DW2432 and DW2432SS Installation Manual Write Serial Number (on inner door of unit) here: Felix Storch, Inc. Summit Appliance Division 770 Garrison Avenue Bronx, New York 10474 www.summitappliance.com
PUREPOWER SERIES CENTRAL VACUUM POWER UNITS PP500, PP600 & PP650
 USER GUIDE PUREPOWER SERIES CENTRAL VACUUM POWER UNITS PP500, PP600 & PP650 AB0039 FOR RESIDENTIAL USE ONLY!! MODELS SFDB-DQ, SFDB-DR AND SFDB-DS 30042509E IMPORTANT SAFETY INSTRUCTIONS SAVE THESE INSTRUCTIONS
SKY Stainless Steel Compact Dishwasher. Instructions
 SKY4313 - Stainless Steel Compact Dishwasher Instructions Please retain these instructions for future reference. Notice: Do not allow children to operate this appliance. Keep appliance out of reach of
ANYWHERE. U.S. Patent(s) Pending INSTRUCTION MANUAL WARRANTY CERTIFICATE
 Pending INSTRUCTION MANUAL WARRANTY CERTIFICATE") TM ANYWHERE BY U.S. Patent(s) Pending INSTRUCTION MANUAL WARRANTY CERTIFICATE 2017 Minka Lighting Inc. Manual design and all elements of manual design are protected by United States Federal and/or State
TM ANYWHERE BY U.S. Patent(s) Pending INSTRUCTION MANUAL WARRANTY CERTIFICATE 2017 Minka Lighting Inc. Manual design and all elements of manual design are protected by United States Federal and/or State
SWP. (Models SWP08 through SWP20) IMPORTANT! Read before proceeding! OPERATION & MAINTENANCE MANUAL
 IMPORTANT! Read before proceeding! OPERATION & MAINTENANCE MANUAL") SWP (Models SWP08 through SWP20) OPERATION & MAINTENANCE MANUAL IMPORTANT! Read before proceeding! Read carefully before attempting to assemble, install, operate or maintain the product described. Protect
SWP (Models SWP08 through SWP20) OPERATION & MAINTENANCE MANUAL IMPORTANT! Read before proceeding! Read carefully before attempting to assemble, install, operate or maintain the product described. Protect
Register at
 Power Shovel Model No. 38361 Serial No. 313000001 and Up Register at www.toro.com. If, after carefully reading this manual, you still have questions or problems, call toll free 1-800-808-2963 (US) or 1-800-808-3072
Hoshizaki America, Inc.
 Hoshizaki America, Inc. Self-Contained Cubelet Models C-100BAE-AD C-100BAE-ADDS A Superior Degree of Reliability INSTRUCTION MANUAL www.hoshizaki.com Issued: 3-25-2008 Revised: 5-20-2009 IMPORTANT Only
SS1095 Ice Maker.
 Installation Guide SS1095 Ice Maker www.u-lineservice.com Phone (414) 354-0300 FAX (414) 354-7905 Service & Parts Tech Lines Phone (800) 779-2547 FAX (414) 354-5696 OnlineService@U-Line.com 2008 U-Line
AquaSaver DISPOSER CONTROL CENTER Installation Manual. Model AS-101K
 AquaSaver DISPOSER CONTROL CENTER Installation Manual Model AS-1K The Danger signal indicates an immediately hazardous situation which, if not avoided, will result in death or serious injury. The Warning
Installation & Operating Guide
 HOT WATER DISPENSER Installation & Operating Guide Read all instructions thoroughly. Keep this guide for future reference. Proof of purchase is required for Warranty. Staple receipt or proof of purchase
Dishwasher Installation Manual
 Dishwasher Installation Manual DW 51600 SS DW 51600 FBI DWT 51600 SS DWT 51600 FBI DWT 81800 FBI DWT 81800 SS DWT 81800 SSIH DWT 81800 SSWS DWT 52600 WIH DWT 52600 SSIH DWT 52600 BIH DWT 52800 WIH DWT
Operation Manual NEMA 4X Controls
 Operation Manual NEMA 4X Controls Douglas Machines Corp. Page 1 of 25 Douglas Machines Corp. Page 2 of 25 PREAMBLE We congratulate you on the purchase of your new rack, pan, and utensil washer. In order
Model 4146 Chopper. This manual replaces and should be used instead of form (9-84) FORM (September 2012)
 FORM (September 2012)") Model 4146 Chopper ML-33607 (Painted) (RH) ML-33609 (SST) (RH) This manual replaces and should be used instead of form 15437 (9-84) 701 S. RIDGE AVENUE TROY, OHIO 45374-0001 937 332-3000 www.hobartcorp.com
Model 4146 Chopper ML-33607 (Painted) (RH) ML-33609 (SST) (RH) This manual replaces and should be used instead of form 15437 (9-84) 701 S. RIDGE AVENUE TROY, OHIO 45374-0001 937 332-3000 www.hobartcorp.com
Installation Instructions
 GE Consumer & Industrial Appliances Installation Instructions Junction Box Cover Within this user bag, you will find a junction box cover and a #10 hex head screw used to attach the junction box cover
WARNING. Electrical Shock Hazard FOR SERVICE TECHNICIAN ONLY DO NOT REMOVE OR DESTROY L WASHER. Pub # /18/10 GE
 L WASHER WARNING Electrical Shock Hazard Disconnect power before servicing. Replace all parts and panels before operating. Failure to do so can result in injury or death. IMPORTANT Electric Discharge (ESD)
IMPORTANT SAFETY INSTRUCTIONS
 Power Shovel Form No. 3362-567 Rev A Model No. 38361 Serial No. 310000001 and Up Operator's Manual If you have questions or problems, call toll free 1-800-808-2963 (US) or 1-800-208-3072 (Canada) before
DISHWASHER INSTALLATION GUIDE SPECIFICATIONS, INSTALLATION, AND MORE
 DISHWASHER INSTALLATION GUIDE SPECIFICATIONS, INSTALLATION, AND MORE COVE DISHWASHER Contents 3 Cove Dishwasher 4 Specifications 7 Door Panel 9 Installation 15 Troubleshooting Features and specifications
LC Series - Light Commercial Pump Station Installation and Operation Manual
 LC Series - Light Commercial Pump Station Installation and Operation Manual Please keep this manual with the pump station Content Rain Bird LC Series Overview... Safety Instruction... Operation... 3 Pump
Panel Fan Series Operators Manual (Galvanized and Polymer)
") Panel Fan Series Operators Manual (Galvanized and Polymer) 52" Belt Drive, Galvanized Panel Fan with Three Wing Blade IMPORTANT: READ AND SAVE THESE INSTRUCTIONS Read all instructions carefully before
Panel Fan Series Operators Manual (Galvanized and Polymer) 52" Belt Drive, Galvanized Panel Fan with Three Wing Blade IMPORTANT: READ AND SAVE THESE INSTRUCTIONS Read all instructions carefully before
INSTRUCTION MANUAL POWER DRIVE UNIT MODEL PAD-350 ONE YEAR LIMITED WARRANTY
 ONE YEAR LIMITED WARRANTY The original registered owner of this product should contact SKYFOOD EQUIPMENT LLC at 305-868-1603 for any warranty problems or service. SKYFOOD EQUIPMENT LLC will repair or replace
Installation and User's Manual for Refrigerator Model SCR33
 Installation and for Refrigerator Model SCR33 Introduction Congratulations on your purchase of a Scotsman refrigeration product. For future reference, keep this guide in a safe, accessible location. If
SECTION 1-1 SAFETY PRECAUTIONS DOUGH CONVEYOR CHAPTER 1: SAFETY
 SECTION 1-1 SAFETY PRECAUTIONS Peerless dough conveyors are designed and built to operate as safely as possible. However, if the precautions and procedures explained in this manual are not followed at
OPERATING AND MAINTENANCE MANUAL FOR ELECTRIC STAINLESS STEEL HEATER FOR DEIONIZED (DI) WATER ELECTRIC HEATER COMPANY BASE MODEL D
 WATER ELECTRIC HEATER COMPANY BASE MODEL D") OPERATING AND MAINTENANCE MANUAL FOR ELECTRIC STAINLESS STEEL HEATER FOR DEIONIZED (DI) WATER ELECTRIC HEATER COMPANY BASE MODEL D HUBBELL ELECTRIC HEATER COMPANY P.O. BOX 288 STRATFORD, CT 06615 PHONE:
OPERATING AND MAINTENANCE MANUAL FOR ELECTRIC STAINLESS STEEL HEATER FOR DEIONIZED (DI) WATER ELECTRIC HEATER COMPANY BASE MODEL D HUBBELL ELECTRIC HEATER COMPANY P.O. BOX 288 STRATFORD, CT 06615 PHONE:
Installation Instructions. For the 18 Built-In Dishwasher and Front Color Panels
 Installation Instructions For the 18 Built-In Dishwasher and Front Color Panels Printed in USA 154232102 Before You Begin DO NOT INSTALL DISHWASHER UNTIL YOU HAVE READ ALL INSTRUCTIONS. FOR YOUR SAFETY,
DOMINATOR IT - ISTRUZIONI ORIGINALI IN LINGUA ITALIANA
 DOMINATOR IT - ISTRUZIONI ORIGINALI IN LINGUA ITALIANA IT PAGE 1 EN PAGE 5 F PAGE 9 D PAGE 13 E PAGE 17 NL PAGE 21 P PAGE 25 DK PAGE 29 FIN PAGE 33 N PAGE 37 S PAGE 41 GR PAGE 45 PL PAGE 49 RO PAGE 53
Operation Manual SCT14B and SCT18B. Inspection. 3 General Description. 3 General Requirements. 3 Standard Features.
 Spot Cooling Systems, Inc. 120 Century Drive Suite 00 Carrollton, TX 7006 00-6-776 Operation Manual SCT1B and SCT1B Warning! Improper installation, adjustment, alteration, service, or maintenance can cause
installation and operation manual for Hunter Ceiling Fans
 For Your Records and Warranty Assistance Model Name: Catalog/Model No.: Serial No.: Date Purchased: Where Purchased: For reference also attach your receipt or a copy of your receipt to the manual. installation
USER'S MANUAL PGE Single Package Rooftop
 USER'S MANUAL PGE Single Package Rooftop Gas Heating/Electric Cooling Units Sizes 036-150 3 to 12-1/2 Tons NOTE TO INSTALLER: This manual should be left with the equipment owner. WARNING: If the information
PANEL FAN SERIES OPERATORS MANUAL (Galvanized and Polymer)
") PANEL FAN SERIES OPERATORS MANUAL (Galvanized and Polymer) Galvanized Panel Fan IMPORTANT: READ AND SAVE THESE INSTRUCTIONS Read all instructions carefully before attempting to assemble, install, operate
PANEL FAN SERIES OPERATORS MANUAL (Galvanized and Polymer) Galvanized Panel Fan IMPORTANT: READ AND SAVE THESE INSTRUCTIONS Read all instructions carefully before attempting to assemble, install, operate
e Bath Fan with Light User s Guide
 e Bath Fan with Light User s Guide abfl100rnl, BFL125RNL Item Stock Number(s): BFL100RNL, BFL125RNL IMPORTANT INSTRUCTIONS - OPERATING MANUAL READ AND SAVE THESE INSTRUCTIONS READ CAREFULLY BEFORE ATTEMPTING
DRYER USER INSTRUCTIONS
 If you need assistance or service, first see the Troubleshooting section. Additional help is available by calling our Customer experience Center at 1-800-253-1301 from anywhere in the U.S.A., or write:
RSH2455G OPERATOR S MANUAL ELECTRIC QUIET CHIPPER SHREDDER
 RSH2455G ELECTRIC QUIET CHIPPER SHREDDER OPERATOR S MANUAL Important! It is essential that you read the instructions in this manual before mounting and operating this machine. Subject to technical modifications.
Owner / Operator Use and Care Guide I SERIES 224 ICE CUBE MACHINE
 Owner / Operator Use and Care Guide I SERIES 224 ICE CUBE MACHINE THE HOTTEST MACHINES ON ICE CORNELIUS INC www.cornelius.com IMPORTANT: TO THE INSTALLER. It is the responsibility of the Installer to ensure
PROFESSIONAL AIR MOVER OWNER S MANUAL
 X-600/ X-600A/ X-630 P-600/ P-630 (115V/230V) PROFESSIONAL AIR MOVER OWNER S MANUAL X-600 / X-600A / X-630 P-600 / P-630 XPOWER MANUFACTURE, INC. 220 Clary Avenue San Gabriel, CA 91776, USA Tel: 626-285-3301,
CH250 AND CH251 CHILLERS
 CH250 AND CH251 CHILLERS Operator s & Installation Manual Release Date: April 19, 2004 Publication Number: 620914801 Revision Date: May 15, 2015 Revision: G Visit the Cornelius web site at www.cornelius.com
OIL FURNACE USER S INFORMATION MANUAL FOR THE OPERATION AND MAINTENANCE OF YOUR NEW OIL-FIRED FURNACE
 58CLA OIL FURNACE USER S INFORMATION MANUAL FOR THE OPERATION AND MAINTENANCE OF YOUR NEW OIL-FIRED FURNACE NOTE TO INSTALLER: THIS MANUAL MUST BE LEFT WITH THE EQUIPMENT USER. WELCOME TO A NEW GENERATION
CONTENTS CONSIDERATIONS. General Plumbing Component Connection ILLUSTRATION. Control System CONFIGURATION. Voltage Verification CONNECTION
 AIR SERIES SYSTEM INSTALLATION MANUAL CONTENTS CONSIDERATIONS General Plumbing Component Connection 2 2 2 ILLUSTRATION Control System 3 CONFIGURATION Voltage Verification 4 CONNECTION Component Connection
IMPORTANT INSTRUCTIONS
 IMPORTANT INSTRUCTIONS W Fan Force Electric Space Heater DANGER ELECTRIC SHOCK OR FIRE HAZARD Figure 1 Covers all W Series models WARNING Read Carefully - These instructions are written in an effort to
Ceiling Mount Air Purification System
 Ceiling Mount Air Purification System HA-CMP-G2-R/HA-CMP-G2-OV Owner s Manual Table of Contents HealthyAir Series 1219 Filters 1 Important Safety Instructions 2 Technical Specifications 3 Packaging Reference
User Manual. 40 Tower Fan MODEL: WFTR40W
 User Manual 40 Tower Fan MODEL: WFTR40W 1. READ these instructions carefully before installing and operating the appliance. Keep them for further reference. 2. Record in the space below the SERIAL/MODEL
MINIATURE THERMOSTATIC VALVE
 SS-TH500-1/2 Features: Ability to pre-select water temperature thus conserving water Compensates for water pressure fluctuations preventing scalding Safety button at 100 F prevents accidental scalding
TECHNICAL INFORMATION Touchtronic Clothes Dryers
 TECHNICAL INFORMATION Touchtronic Clothes Dryers Includes: T1302, T1303, T1322, T1329ci T1403 & T1405 2004 Miele This page intentionally left blank. Table of Contents GENERAL INFORMATION A. Warning and
Installation, Operation, and Maintenance Manual
 READ AND SAVE THESE INSTRUCTIONS PART # 538 Model BCF Belt Drive Centrifugal Cabinet Fans Installation, Operation, and Maintenance Manual Please read and save these instructions for future reference. Read
UHIR Series. Horizontal or Vertical Mounting Industrial / Commercial Electric Unit Heater. Owner s Manual
 UHIR Series Horizontal or Vertical Mounting Industrial / Commercial Electric Unit Heater Owner s Manual This manual covers installation, maintenance and repair parts. Read carefully before attempting to
e Bath Fan with Light User s Guide
 e Bath Fan with Light User s Guide abfl125rok Item Stock Number(s): BFL125ROK IMPORTANT INSTRUCTIONS - OPERATING MANUAL READ AND SAVE THESE INSTRUCTIONS READ CAREFULLY BEFORE ATTEMPTING TO ASSEMBLE, INSTALL,
INSTRUCTION MANUAL FOR DUTCHESS MODEL 260 BAGEL & BUN SLICER
 INSTRUCTION MANUAL FOR DUTCHESS MODEL 260 BAGEL & BUN SLICER Table of Contents Safety Information I thru VII Uncrating Instructions 1 Introduction 2 Adjustment Instructions 3 Operating Instructions, Cleaning,
HOT TANK INSTALLATION INSTRUCTIONS
 HOT TANK INSTALLATION INSTRUCTIONS Model #: 5000 4500 (PRV) 5000 INSTALLATION GUIDE BEFORE YOU BEGIN YOUR INSTALLATION: 1 2 3 4 Turn off water supply. Observe all local plumbing codes. Inspect waste and
Plumbline 1000 Series Timered Softeners Owners Manual Water Softener Models
 Plumbline 1000 Series Timered Softeners Owners Manual Water Softener Models PS1000T PS1500T Table of Contents How to Use Soft Water 3 Product Line Overview 5 System Operation 6 System Maintenance and Install
π H-6621 INDUSTRIAL DEHUMIDIFIER WARNINGS SPECIFICATIONS uline.com WATER REMOVAL ELECTRICAL REQUIREMENTS BUILT-IN ELECTRICAL SAFETY
 π H-6621 INDUSTRIAL DEHUMIDIFIER 1-800-295-5510 uline.com WARNINGS Plug into a grounded 3 prong outlet. Do not remove ground prong. Do not use an adapter. Do not use an extension cord if possible. Failure
IMpORTANT SAFETy INSTRUcTIONS
 Table of contents SAFETy SETUp OpERATION MAINTENANcE Safety... 2 Specifications... 4 Setup... 4 Operating Instructions... 6 WARNING SyMBOLS AND DEFINITIONS Maintenance... 9 Parts List and Diagram... 11
Installation Instructions
 GE Consumer & Industrial Appliances Installation Instructions Junction Box Cover Within this user bag, you will find a junction box cover and a #10 hex head screw used to attach the junction box cover
INSTALLATION, OPERATION AND MAINTENANCE MANUAL FOR COMMERCIAL INDIRECT POWERED WATER HEATER
 INSTALLATION, OPERATION AND MAINTENANCE MANUAL FOR COMMERCIAL INDIRECT POWERED WATER HEATER ELECTRIC HEATER COMPANY BASE MODEL T Edition 0 HUBBELL ELECTRIC HEATER COMPANY P.O. BOX 88 STRATFORD, CT 0665
e Bath Fan with Light User s Guide
 e Bath Fan with Light User s Guide abfl50uq, BFL60UQ, BFL70, BFL85 Item Stock Number(s): BFL50UQ, BFL60UQ, BFL70, BFL85 IMPORTANT INSTRUCTIONS - OPERATING MANUAL READ AND SAVE THESE INSTRUCTIONS READ CAREFULLY
Use & Care Manual. Electric Tankless Water Heaters. With Installation Instructions for the Installer AP15447 (10/10)
") Use & Care Manual With Installation Instructions for the Installer Electric Tankless Water Heaters The purpose of this manual is twofold: one, to provide the installer with the basic directions and recommendations
Use & Care Manual With Installation Instructions for the Installer Electric Tankless Water Heaters The purpose of this manual is twofold: one, to provide the installer with the basic directions and recommendations
Built-In Dishwasher. Installation Instructions. BEFORE YOU BEGIN Read these instructions completely and carefully. IMPORTANT The dishwasher MUST be
 Installation Instructions Built-In Dishwasher If you have questions, call 800.GE.CARES (800.432.2737) or visit our website at: www.ge.com BEFORE YOU BEGIN Read these instructions completely and carefully.
Table of Contents What to Expect with. Tools Needed. Mounting Options. Wiring. Downrod. Canopy.
 Table of Contents Congratulations on purchasing your new Hunter ceiling fan! It will provide comfort and performance in your home or office for many years. This installation and operation manual contains
INSTALLATION MANUAL CT-200
 INSTALLATION MANUAL CT-200 1 CHILLER SAFETY Your safety and the safety of others are very important. We have provided many important safety messages in this manual and on your appliance. Always read and
CHILLER. Model CH3000. Operator s & Installation Manual
 CHILLER Model CH3000 Operator s & Installation Manual Release Date: February 14, 2011 Publication Number: 620054173OPR Revision Date: May 08, 2014 Revision: B Visit the Cornelius web site at www.cornelius.com
Table of Contents What to Expect with Your Installation. Top Housing. Ceiling Plate. Tools Needed.
 Table of Contents Congratulations on purchasing your new Hunter ceiling fan! It will provide comfort and performance in your home or office for many years. This installation and operation manual contains
User Manual Box Exhaust Fan Series (Belt Drive)
") User Manual Box Exhaust Fan Series (Belt Drive) 36" Box Exhaust Fan with Three Wing Blade Box with Aluminum Shutter 54" Box with Cone 800-779-3267 sales@schaeferfan.com www.schaeferfan.com 2013 Schaefer
User Manual Box Exhaust Fan Series (Belt Drive) 36" Box Exhaust Fan with Three Wing Blade Box with Aluminum Shutter 54" Box with Cone 800-779-3267 sales@schaeferfan.com www.schaeferfan.com 2013 Schaefer
Installation Instructions
 Salvajor S914 Scrap Collector A Scrapping, Pre-flushing and Food Waste Collecting System 2 Table Installation and Location 3 Plumbing 4 Electrical 5 Operating Instructions 6 Typical Installations 8 Warranty
INSTALLATION INSTRUCTIONS REVISED: JUNE 2014
 INSTALLATION INSTRUCTIONS REVISED: JUNE 2014 INDEX: UNPACKING INSTRUCTIONS page 2 INSTALLATION INSTRUCTIONS page 3 CONNECTIONS page 6 Equipment must be installed in compliance with all applicable local
portable mini photo studio 65797
 portable mini photo studio 65797 Cleaning, Assembly, And Operation Instructions Distributed exclusively by Harbor Freight Tools. 3491 Mission Oaks Blvd., Camarillo, CA 93011 Visit our website at: http://www.harborfreight.com
RiteTemp. Evaporative Cooler. Information Brochure (internal) RiteTemp. RiteTemp. Date: 03/30/05. Cool-Air 5051
 RiteTemp. RiteTemp. Date: 03/30/05. Cool-Air 5051") Evaporative Cooler Information Brochure (internal) Cool-Air 5051 Introduction to use of Evaporative Cooler Benefits of Unit Basic Operation and Maintenance Frequently Asked Questions Atlanta, Ga Phone:
Evaporative Cooler Information Brochure (internal) Cool-Air 5051 Introduction to use of Evaporative Cooler Benefits of Unit Basic Operation and Maintenance Frequently Asked Questions Atlanta, Ga Phone: