IB450SSP. Built-in Ice Maker with Internal Pump. Owner s Manual
|
|
|
- Linette Charlotte Butler
- 6 years ago
- Views:
Transcription


1 Built-in Ice Maker with Internal Pump IB450SSP Owner s Manual For more information on other great EdgeStar products on the web, go to
2 Important Safety Information Improper handling can cause serious damage to the EdgeStar ice maker and/or injury to the user. This ice maker is designed for domestic indoor use only. Do not use the unit for industrial or commercial use. Any other use may invalidate the warranty. Please review the ratings label located on the rear panel of the unit for electrical and other technical data related to this unit. The unit must be used in a properly grounded wall outlet. Please read and follow the safety information listed below to reduce the risk of fire, electric shock or injury. Installation should only be done by a licensed plumber. Electrical Safety Do not exceed the power outlet ratings. It is recommended the ice maker be connected on its own circuit. The unit must be installed in accordance with state and local electrical, water and drain codes. A standard electrical supply (115 V, 60Hz), that is properly grounded in accordance with the National Electrical Code and local codes and ordinances is required. Use outlets that cannot be turned off by a switch or pull chain. Always turn the unit off and unplug it from the outlet when cleaning. Unplug the unit if it is not going to be used for an extended period of time. Do not operate the unit with a power plug missing the ground plug, a damaged cord or a loose socket. Be sure the ice maker is properly grounded. Never plug or unplug the unit with wet hands. Do not bypass, cut or remove the grounding plug. Do not use extension cords or power strips with this unit. You may need to contact your electrician if it is necessary to use a longer cord or if you do not have a grounded outlet. Do not modify the power cord s length or share the outlet with other appliances. Do not start or stop the unit by switching the circuit s power on and off. If the power cord is damaged, it must be replaced by the manufacturer or a qualified technician. Never open the unit while it is plugged in. Immediately unplug the unit if it makes strange sounds, emits smells or smoke comes out of it, and contact customer service. Do not remove any part of the casing unless instructed by an authorized technician. You should never attempt to repair the unit yourself. Contact a customer service for service options if the unit needs service. General Safety To prevent back and other types of injuries, use at least two people to move and install the ice maker. Install the ice maker in a well ventilated area where the ambient temperature is above 50 F and below 100 F. This unit is designed to be installed indoors, and protected from rain, sleet, snow, etc. This unit is not intended to be used by children. Children should be supervised to ensure that they do not play with this product. Never allow children to crawl inside the ice maker. Do not use this appliance near flammable gas or combustibles, such as gasoline, benzene, thinner, etc. Do not place the unit near heat sources such as ovens, and grills. Only use in an upright position on a flat, level surface and provide proper ventilation. Do not pinch or kink the water or power supply lines between the unit and cabinet. Unit installation must be in accordance with local plumbing code requirements. Make sure that the water supply lines and pipes are not pinched or kinked. Check for leaks after installation. Discard the first batch of cubes produced by the ice maker. Never turn the water supply tap off while the ice maker is running. If the unit has not been used for an extended period, thoroughly clean it before using it. Do not leave any cleaning solutions in the unit Do not use solvent-based cleaning agents or abrasive solutions on the interior as they may transmit taste to the ice cubes and damage the interior. Only connect a potable water supply. This appliance is not intended for use by persons, including children, with reduced physical, sensory or mental capabilities, unless they have been given supervision or instruction concerning the use of the appliance by the person(s) responsible for their safety. i
3 Table of Contents IMPORTANT SAFETY INFORMATION... I INTRODUCTION... 1 PARTS IDENTIFICATION... 2 BACK VIEW... 2 FRONT VIEW... 2 INSTALLING THE ICE MAKER... 3 TYPES OF INSTALLATION... 3 Freestanding installation:... 3 Recessed installation:... 3 Built-in installation:... 3 INSTALLATION CLEARANCE REQUIREMENTS... 4 ELECTRICAL REQUIREMENTS... 5 Recommended grounding method... 5 LEVELING THE ICE MAKER... 6 REVERSING THE DOOR SWING... 6 WATER SUPPLY CONNECTIONS... 8 OPERATION... 9 FINAL CHECK LIST BEFORE OPERATION... 9 OPERATING METHOD HOW THE MACHINE MAKES ICE HOW THE MACHINE USES THE WATER HOW THE DRAIN PUMP OPERATES NORMAL SOUNDS PREPARING THE ICEMAKER FOR LONG STORAGE CLEANING AND MAINTENANCE EXTERIOR CLEANING INTERIOR CLEANING CONDENSER CLEANING WATER DISTRIBUTION TUBE CLEANING ICE-MAKING SYSTEM CLEANING TROUBLESHOOTING SPECIFICATIONS Installation should only be done by a licensed plumber. This owner s manual is provided for reference use only. Specifications may change without prior notice. Refer to the product label on the back of your ice maker for the latest technical information. EdgeStar Built-in Ice Maker ii
4 Introduction Thank you for purchasing this EdgeStar ice maker. We are glad you chose us. We believe that your purchase of this product opens a relationship between you and EdgeStar. We will provide the customer support needed to nurture that relationship. This manual contains important information regarding the proper installation, use and maintenance of your ice maker. Following this manual will ensure that your product will work at its peak performance and efficiency. Please save the original product packaging in case you need to safely transport your ice maker. For Your Records: Please write down the model number and serial number below for future reference. Both numbers are located on the ratings label on the back of your unit and are needed to obtain warranty service. You may also want to staple your receipt to this manual as it is the proof of your purchase, and is also needed for service under your warranty. Model Number: Serial Number: Date of Purchase: To better serve you, please do the following before contacting customer service: If you received a damaged product, immediately contact the dealer that sold you the product. Read and follow this instruction manual carefully to help you install, use and maintain your ice maker. Read the troubleshooting section of this manual as it will help you diagnose and solve common issues. Visit us on the web at to register your product, download product guides, additional troubleshooting resources and up-to-date information. If you need warranty service, our friendly customer service representatives are available via at service@edgestar.com or by telephone at 1 (866)
 Leveling Leg Back View Ice Scoop Power Cord Water inlet Drain outlet Water Supply Hose Drain Hose EdgeStar Built-in Ice")
5 Parts Identification Front View Water distribution Evaporator (ice mold) Door Water trough Float Ice storage bin Control panel Front louver panel (Kickplate) Leveling Leg Back View Ice Scoop Power Cord Water inlet Drain outlet Water Supply Hose Drain Hose EdgeStar Built-in Ice Maker 2
6 Installing the Ice Maker WARNING: Use two or more people to move and install the ice maker. Failure to do so can result in back or other injury. The ice maker should be installed by a licensed plumber in accordance with local electrical and plumbing code requirements. Before you plug the ice maker, be sure to let it stand upright for at least 24 hours to allow the compressor s oils to settle. Unpacking the Ice Maker Important: Don not remove any safety, warning or product information labels from your ice maker. Carefully remove the packaging materials. Remove any shipping tape and glue from your ice maker before using. Do not use sharp instruments, rubbing alcohol, flammable fluids, or abrasive cleaners to remove tape or glue. These products can damage the surface of your icemaker. Types of Installation This ice maker has been designed for freestanding, recessed, or built-in installation. In each case, there must be adequate ventilation and access for service. Freestanding installation: Freestanding installation will allow you to install the icemaker in any place with access to a water supply and a drain. You must follow the instructions for electrical requirements, water supply and drain, and leveling the icemaker. Recessed installation: Recessed installation will allow you to install the icemaker under a counter or in a kitchen cabinet provided the required clearance space around the ice maker is followed. This installation has the same requirements as a built-in installation. Built-in installation: Ensure there is adequate ventilation space around the unit. The following additional items must be observed. 1. Place the ice maker in front of the installation location. Remove the feet and place the unit flat on the floor or on a platform depending on your installation requirements. 2. The water supply pipe must be plumbed before connecting to the ice maker. Install the drain line into your drain. 3. Turn on main water supply and tap. Check for water connection leaks. Tighten any connections (including connections at the tie-in). 4. If the electrical outlet for the ice maker is behind the cabinet, plug in the ice maker 5. Push the ice maker into position. 6. Seal all around the cabinet to the floor with an approved caulking compound. 3
7 Installation Clearance Requirements * This icemaker should be installed by a licensed plumber only. * To ensure proper service access and ventilation, allow more 4 clearance at rear, and 1 at top and 1 at sides. The installation should allow the icemaker to be pulled forward for servicing if necessary. * When installing the ice maker under a counter, follow the recommended spacing dimensions shown. Place electrical and water supplies and drain fixtures in the recommended locations as shown. * Choose a well ventilated area with temperatures above 50 F and below 100 F.This unit MUST be installed in an area protected from the elements, e.g., wind, rain, water spray or drips. * The icemaker should not be located next to ovens, grills or other high heat resources. * The ice maker requires a continuous water supply with a minimum pressure of 0.05Mpa and a static pressure not to exceed 0.8Mpa. The temperature of the water feeding into the ice maker should be between 41 F and 90 F for proper operation. The ambient operational temperature should be between 50 F and 100 F. Operation outside these temperatures may result in lowered production or other adverse effects. Top View 2/5 1/5 1/5 Side View 1 Back of unit Door Hinge IMPORTANT: Don t kink or pinch the power supply cord between the ice maker and wall or cabinet. The unit should be located on a firm and level surface. It is important for the ice maker to be level in order to work properly. If needed, you can adjust the height of the ice maker by rotating the feet. See the Leveling the Ice Maker section. A standard electrical supply (115 VAC only, 60 Hz, 15 A), properly grounded in accordance with National Electrical Code and local codes and ordinances is required. EdgeStar Built-in Ice Maker 4
8 Electrical Requirements Electrical Shock Hazard Plug into a grounded 3-prong outlet. Never remove the grounding prong from the plug. Never use an adapter. Never use an extension cord. Failure to follow these instructions can result in fire, electrical shock, or death Before you move your icemaker into its final location, it is important to make sure you have the proper electrical connection: A standard electrical supply (115 V, 60Hz.), properly grounded in accordance with the National Electrical Code and local codes and ordinances, is required. It is recommended that a separate circuit, serving only your icemaker, be provided. Use receptacles that cannot be turned off by a switch or pull chain. The fuse (or circuit breaker) size should be 3 amps. Recommended grounding method For your personal safety, this appliance must be grounded. It is equipped with a power supply cord having a 3-prong grounding plug. To minimize possible shock hazard, the cord must be plugged into a mating 3-pronged and grounding-type wall receptacle, grounded in accordance with the National Electrical Code and local codes and ordinances. If a mating wall receptacle is not available, it is the personal responsibility of the customer to have a properly grounded, 3-prong wall receptacle installed by a qualified electrician. 5
9 Leveling the Ice Maker It is important for the icemaker to be leveled in order to work properly. It can be raised or lowered by rotating the plastic sheaths around each of the four feet on the bottom of the machine.if you find that the surface is not level, rotate the feet until the ice maker becomes level.you may need to make several adjustments to level it. We recommend using a carpenter s level to check the machine. 1. Place a carpenter s level on top of the product to see if the ice maker is level from front to back and side to side. 2. Adjust the height of the feet as follows: Turn the leveling feet to the right to lower. Turn the leveling feet to the left to raise. IMPORTANT: Once you are ready to install it in a cabinet or directly on the floor, you must adjust the feet to level the ice maker. If the floor is level, just revolve the two front feet to touch the floor. IMPORTANT: Before you begin, unplug the ice maker or disconnect the power. Reversing the Door Swing Tools needed: flathead screwdriver, Phillips screwdriver Removing the door 1. Using a flathead screwdriver, separate the hinge axis from hinge 1 (the top hinge). See picture on the following page. 2. Remove the three screws securing the top hinge to the cabinet. Place hinge, screws and hinge axis safely aside. 3. Open the door about 20 degrees, then lift the door off hinge 2 (the bottom hinge) and set door aside. 4. Repeat step 2 for the bottom hinge. Replacing the door 1. Rotate the door 180 degrees from its original position. Note: the handle should be installed opposite the door hinges. 2. Fasten the two hinges securely to the cabinet opposite their original installed location. For example, the top left hinge will now be the bottom right hinge. Reference the diagram on the next page. 3. Install the hinge axis through the bottom supporting hinge. Gently place the door on the supporting hinge. The door should be open approximately 20 degrees. 4. Install the top hinge axis. Tighten firmly. Replace any hinge covers, when applicable. EdgeStar Built-in Ice Maker 6
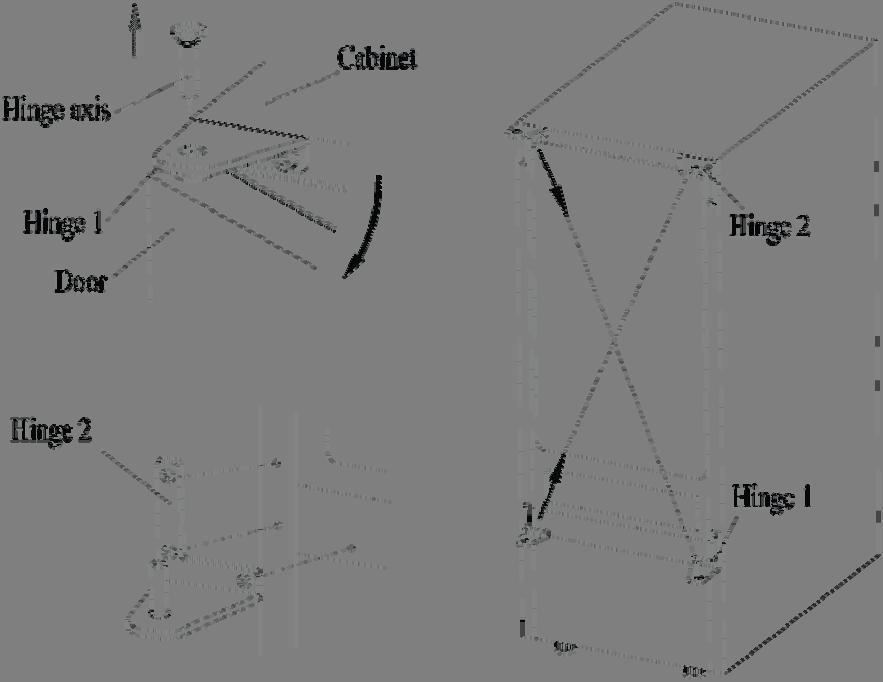
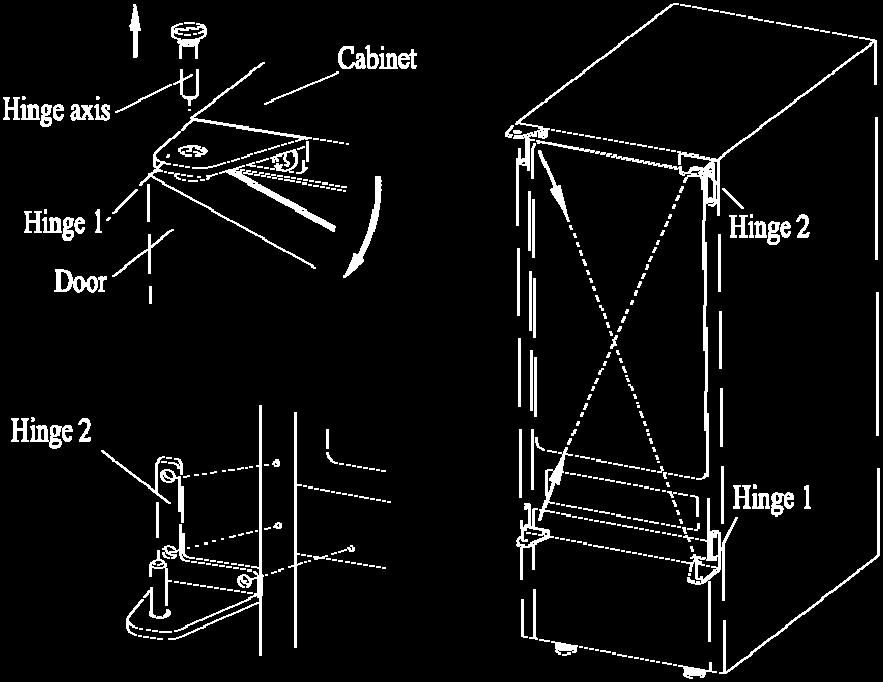
10 7
11 Water Supply Connections The water supply should be ready at the point of installation. The water supply pressure should be a minimum of 15 psig with a static pressure not more than 80 psig. (A wall outlet directly behind the ice maker will make installation easier.) IMPORTANT: 1. All installations must be in accordance with local plumbing code requirements. 2. Make certain that the pipes are not pinched or kinked or damaged during installation. 3. Check for leaks after connection. Tools required: ½ in. open-end wrench, Phillips screwdriver Connecting the water line: 1. Turn off main water supply. Turn on nearest faucet long enough to clear line of water. 2. Find a ½ in. to ¾ in. vertical cold water pipe near the installation location. The distance should be less than 9 feet. The water supply hose provided with the ice maker is about 9 feet long. 3. A shut-off valve must be installed to the main water supply. If the water pipe has a plain piece of copper tubing, attach a ¼ O.D. compression union to the tubing and remove the nut. 4. Connect nuts of the water supply hose to tap and water inlet valve. Tighten firmly by hand, then one-half turn with wrench. 5. Turn on main water supply and tap. Check for water supply connection leaks. Tighten every connection (including connections at the water inlet). IMPORTANT: When you connect the water supply hose, pay attention to the indications of Water inlet on the machine. In general, it is always a good idea to filter the water. A water filter can remove taste and odors as well as particles. Where water is very hard, softened water may result in white, mushy cubes that stick together. Deionized water is not recommended. EdgeStar Built-in Ice Maker 8
12 Connecting the drain line: There are two choices for drain operation: one that drains by gravity and one that utilizes an internal drain pump. The unit can pump out water up to 5ft vertically or 5ft horizontally. NOTE: There is a drain line on the ice maker. Please drain water through the drain line provided with ice maker. 1. Locate the floor drain near the ice maker. The distance should be less than 5 feet since the length of the long drain hose provided with the ice maker is about 5 feet. 2. Find the drain hose on the back of ice maker, then insert the other side of the hose into the drain line. NOTE: Never allow the drain hose to hang or loop higher than the floor of the ice storage bin. IMPORTANT: This ice maker is not a freezer. Infrequent drainage will cause a high rate of melting in the ice storage bin. 3. All horizontal runs of drain lines must have a fall of 1/4 per foot. An air gap will likely be required between the ice maker drain hose and the drain/waste receptacle. A stand pipe with a trap below it would be acceptable for the drain/waste receptacle. A floor drain is also acceptable. 4. Pour 1 gallon of water into the ice storage bin to check for proper drainage. OPERATION Final Check List before Operation 1. Have all packing materials and tape been removed from the interior and exterior of the ice maker? 2. Did you clean the ice storage bin? 3. Have the installation instructions been followed, including connecting the machine to water and electricity? Does the unit have proper drainage? 4. Has the machine been leveled? 5. Is the ice maker in a site where the ambient temperature is between 50º F and 100ºF and the water temperature between 41º F and 90º F all year round? 6. Has the water supply pressure been checked to ensure a minimum of 15 psig with a static pressure not to exceed 80 psig? 7. Is there a clearance of at least 4 at the rear, 1 at the top and 1 at the sides for proper air circulation? 9
13 8. Has the power supply voltage been checked or tested against the nameplate rating? And has proper grounding been installed for the ice maker? 9. Is the ice maker plugged in? 10. Have you turned on the main water supply and the tap? 11. Have you checked for leaks at all water supply connectionsand at the drain? Operating Method 1. Turn on the water tap, let the water trough fill, then find the control panel and press the ON/OFF button. When the unit is powered on, it will produce ice. 2. After three minutes, the machine will automatically go to the ice making stage, and the sound of flowing water will be heard. 3. When the batch of ice has been fully formed, ice will automatically be harvested to the ice storage bin. 4. When the ice storage bin is full, the sheet of cubes will not fall completely and will hold the ice-full probe open. The machine stops making ice and automatically progresses to the cold preservation stage. During this stage, the compressor works regularly to keep the temperature lower to reduce ice melting. 5. The unit will start making ice again after the ice cubes are removed. At that time, the ice-full probe swings back to operating position. 6. Internal LED light (If present): The internal LED light will be controlled by a magnetic reed switch that is installed on the inside of the door. It will turn On and Off automatically when the door opens and closes, respectively. 7. Water Pump Drain system (when equipped): as soon as the melted ice water or other surplus water in the reservoir reaches the maximum level, the water level switch closes and transmits a low voltage current to the circuit board. The circuit board activates the water drain pump for 20 seconds, pumping out most of the water contained in the reservoir. EdgeStar Built-in Ice Maker 10
14 IMPORTANT: Although the unit has been tested and cleaned at the factory, due to long-term transit and storage, the first batch of cubes must be discarded. Never turn the water supply tap off when the ice maker is working. Never touch the evaporator when the machine is running. Except to take ice from the unit, keep the door closed to reduce melting and ensure proper ice formation. How the machine Makes Ice Turn the unit on by pressing the ON/OFF button on the control panel. The machine will automatically start the ice making stage. There are two distinct cycles: freeze and harvest. During the freeze cycle, water flows to the evaporator surface. In the harvest cycle, the ice is released and water enters the machine. A complete cycle can take 15 to 40 minutes, depending on temperature and operating conditions. Freeze: During the freeze cycle the compressor is pumping refrigerant, the fan motor is blowing air and the water pump is circulating water. When the batch of ice has been fully formed, the ice maker stops the freeze cycle and begins the harvest cycle. Harvest: During the harvest cycle the compressor is still operating, but the water pump has stopped. The hot gas valve opens, diverting hot refrigerant gas into the evaporator. The gas warms the evaporator, causing the cubes to slide, as a unit, off the evaporator and into the storage bin. The freeze cycle will restart when all the cubes have been harvested. How the machine uses the water The ice maker begins with a fixed charge of water that is contained in the water trough. As the water flows to the freezing evaporator surface, the portion of water that does not contain mineral impurities will freeze and stick to the ice cube molds. The water containing impurities falls back into the trough. During the ice-making process, fresh water enters the water trough continuously as the water from the trough freezes continuously on the evaporator. 11

15 How the drain pump operates The components of the drain pump are the: Water reservoir Circuit Board Water lever switches 1 & 2 Water Drain Pump OPERATION All water coming from the overflow, and from the melted ice is collected inside the water reservoir. As soon as the water in the reservoir reaches the maximum level, the water lever switch 1 will close, transmitting a low voltage current to the circuit board. The circuit board activates the water drain pump for 20 seconds, pumping out most of the water contained in the reservoir. Water lever switch 2 Water lever switch 1 If the water lever switch 2 closes, it will transmit a low voltage current to the circuit board. The circuit board activates the buzzer alarm, informing the user that the drain pump, water lever switch or drain tube is malfunctioning. If this happens, power the unit off and back on. If the problem persists, contact customer service. EdgeStar Built-in Ice Maker 12


16 VERTICAL The water can be pumped out up to 5ft vertically or 5ft horizontally. NOTE: The outlet of the drain hose must be raised higher than the water surface to prevent the drained water from the flowing back into the reservoir. WARNING! If alarm buzzer sounds, turn off the ice maker and the water supply. Remove all ice from storage bin, and wipe up any water that may have overflowed. HORIZONTAL Check if there is any water in water trough at back of unit. If no water is present, the drainage pump may not be receiving the proper amount of power. Check power source. If the problem can be corrected, turn on the unit again. Also check that none of the water lines are kinked. If the problem remains, contact Customer Service. 13
17 SCHEMATIC SYSTEM EdgeStar Built-in Ice Maker 14
18 Normal Sounds Your new icemaker may make sounds that are not familiar to you. Most of the new sounds are normal. Hard surfaces like the floor, walls can make the sounds seem louder than they actually are. The following describes the kinds of sounds that might be new to you and what may be making them. Ratting noises may come from the flow of the refrigerant or the water line, Items stored on top of the icemaker can also make noises. The high efficiency compressor may make a pulsating or highpitched sound. Water running from the evaporator to the water bin may make a splashing sound. As each cycle ends, you may hear a gurgling sound due to the refrigerant flowing in your icemaker. You may hear air being forced over the condenser by the condenser fan. During the harvest cycle, you may hear the of ice cubes falling into the ice storing bin. Preparing the Icemaker for Long Storage If the ice maker will not be used for a long time, or is to be moved to another place, it will be necessary to drain the system of water. 1. Shut off the water supply at the main water source. IMPORTANT Don t touch the power plug when your hands are wet. Never unplug the unit by pulling on the plug. 2. Disconnect the water supply line from the water inlet. 3. Shut off the electric supply at the main electrical power source. 4. Take out the ice storage bin to remove ice and water. Dry it. 6. Pull off the drainage tube of the water trough to drain off all water. 7. Leave the door open to allow for circulation and to prevent mold and mildew. 8. Leave the water supply line and power cord disconnected until ready to reuse. 15

19 CLEANING AND MAINTENANCE The icemaker must be thoroughly cleaned if it has been left unused for a long time. Follow carefully any instructions provided for cleaning or use of sanitizing solution. Do not leave any solution inside the icemaker after cleaning. Periodic cleaning and proper maintenance will ensure efficiency, top performance, and long life. The maintenance intervals listed are based on normal conditions. You may want to shorten the intervals if you have pets, or there are other special considerations. Note: Never keep anything in the ice storage bin that is not ice: objects like wine or beer bottles are not only unsanitary, but the labels may slip off and plug up the drain. What should be kept clean? There are 5 things to keep clean: 1. The exterior. 2. The interior. 3. The condenser 4. Water distribution tube 5. The ice-making system Exterior Cleaning The door and cabinet may be cleaned with a mild detergent and warm water solution such as 1 oz of dishwashing liquid mixed with 2 gallons of warm water. Do not use solvent based or abrasive cleaners. Use a soft sponge and rinse with clean water. Wipe with a soft clean towel to prevent water spotting. If the door panel is stainless finish, it can discolor when exposed to chlorine gas and moisture. Clean stainless finish with a cloth dampened with a mild detergent and warm water solution. Never use an abrasive cleaning agent. EdgeStar Built-in Ice Maker 16
20 Interior Cleaning The ice storage bin should be sanitized occasionally. Clean the water trough before the ice maker is used for the first time and reused after stopping for an extended period of time. It is usually convenient to sanitize the trough after the ice making system has been cleaned and the ice storage bin is empty. 1. Disconnect power to the unit. 2. Open the door and take out the removable storage bin. With a clean cloth, wipe down the interior of the unit with a sanitizing solution made of 1 ounce of household bleach and 2 gallons of hot water (95º to 115ºF). 3. Pull the drain hose through to drain off all water. 4. Rinse thoroughly with clean water. 5. After draining off all water, put back the drain hose back in its original location. 6. Put the cleaned and empty ice storage bin back inside the unit. 7. Reconnect power to the unit. The ice scoop should be washed regularly. Wash it just like any other utensil. DO NOT use solvent-based cleaning agents or abrasives on the interior. These cleaners may transmit taste to the ice cubes, or damage or discolor the interior. Condenser Cleaning A dirty or clogged condenser prevents proper airflow, reduces ice making capacity, and causes higher than recommended operating temperatures that may lead to component failure. Have the condenser cleaned at least once every six months. 1. Unplug the ice maker or disconnect power. 2. Remove the 2 screws at the bottom of the front cover and gently pull it off. 3. Locate the condenser filter. This can be lifted out and cleaned with a brush or flowing water. 17
21 4. Remove dirt and lint from condenser fans and the unit compartment with a brush attachment on a vacuum cleaner. 5. Put back the filter and reassemble the front cover. 6. Plug in the icemaker or reconnect power. DO NOT touch the condenser fins. They are sharp and can be damaged easily. Water Distribution Tube Cleaning When you find that the ice cubes are incompletely formed or the output of ice cubes is low, the water distribution tube may be blocked. Turn off the power button, gently take out the water distribution tube, and locate the holes in the distribution tube. Using a toothpick or similar tool, dredge the holes, then rotate the water distribution tube back to its original position. If the tube is badly blocked, clean it as follows: 1. Shut off the water supply. 2. Disconnect the water hose from the distribution tube. 3. Gently take out the distribution tube. Many ice machine cleaners contain acids. DO NOT use or mix with any other solvent-based cleaner products. Use rubber gloves to protect your hands. Carefully read all safety instructions printed on the container of the ice machine cleaner. Discard the first batch of ice produced after cleaning. 4. With a brush, clean the tube with a dilute solution of warm water and a mild detergent such as dishwashing liquid. After removing the dirt and lint from the surface, rinse the tube with clean water. 5. Replace the distribution tube. 6. Reconnect the water supply. Ice-making System Cleaning Minerals that are removed from water during the freezing cycle will eventually form a hard scaly deposit in the water system. Cleaning the system regularly helps remove the mineral scale buildup. How often you need to clean the system depends upon how hard your water is or how effective your filtration may be. With hard water of 15 to 20 grains/gal. (4 to 5 grains/liter), you may need to clean the system as often as every 6 months. 1. Make sure that all the ice is off of the evaporator. If ice is being made, wait for cycle completion, then press the machine s ON/OFF switch on the control panel. 2. Remove all ice from the storage bin. EdgeStar Built-in Ice Maker 18
22 3. Keep the ice maker connected to the water supply, Pour 200g of Nickel-Safe Ice Maker Cleaner Solution into the water trough. After about 5 minutes, press the ON/OFF button and the CLEAN button, initiating the wash cycle. The machine will run the Automatic Clean Mode. 4. Allow 30 minutes for proper cleaning. After cleaning, press the ON/OFF button again. Drain off the waste water to some container by drain pipe in the left of the water trough. 5. Repeat steps 3 and 4 (without Ice Maker Cleaning Solution) to rinse the ice making system 3 times. Note: The use of the Ice Maker Cleaner Solution in the water bin during the rinse is not needed. 6. Prepare a sanitizing solution made of 1 ounce of household bleach and 2 gallons of hot water (95º to 115º F). Wipe the entire bin inside and out, covering every wall surface. 7. Fill a spray bottle with the sanitizing solution and spray all corners and edges making sure to cover all surfaces with the solution. 8. Allow the solution to be in contact for at least 3 minutes, then dry. 9. Repeat step 5 to rinse the ice making system one more time. 10. Turn the unit on by pressing the ON/OFF button on the control panel. The machine will return to the regular ice making mode. Discard the first batch of ice. 19
23 Control Panel IMPORTANT It s not recommended that the ice size be adjusted unnecessarily since this could damage the machine s controls. Do not let water contact the control panel. _ + Description of LEDs and buttons: 1. Bin Full (Red) LED: Bin full indicator light. When this is lit, the ice storage bin is full of ice or there is something blocking the bin-full probe. The unit will stop producing ice. When ice cubes are removed from the ice storage bin, freeing the bin-full probe, the red LED will remain flashing for 3 minutes, then the unit will restart and return to the ice making mode. 2. Ice Making (Green) LED: Ice making indicator light. When this is lit, the unit is working in the ice making mode, controlled by a temperature probe on the evaporator. When the green LED flashes, the unit is working in the ice making mode controlled by a fixed timer. 3. Ice Harvest (Yellow) LED: Ice harvest indicator light. When this is lit, the unit is working in the ice harvest mode controlled by the ice-full probe. 4. Mode button: Mainly for service. When this is pressed, the ice making mode changes to the ice harvest mode or vice versa. The mode can be determined from the status of the green and yellow LEDs. 5. Adjust button: Mainly for service. When it is pressed over 3 seconds, the unit will enter the Ice Size Adjustment mode. The mode can be judged from the status of the yellow LED. EdgeStar Built-in Ice Maker 20
24 TROUBLESHOOTING Before Calling for Service If the unit appears to be malfunctioning, read through the OPERATION section of this manual first. If the issue persists, check the troubleshooting section below. The issue could be solved by following the suggestions in the Solution column. Issue Possible Cause Solution The machine won't The icemaker is unplugged. Plug the ice maker in. operate. The fuse is blown. Replace fuse. The icemaker power switch is Switch the ice maker power switch to ON. OFF. The ice storage bin is full of ice. Take away some ice cubes; make the icefull probe is free of ice. The water doesn't The water supply tap is turn off. Turn on the water supply tap. feed in after the ice The water supply pipe is not Reconnect the water supply pipe. maker starts. proper connected. Machine makes The condenser may be dirty. Clean the condenser. ice, but bin does The air flow to the ice maker Check the installation. not fill up with ice may be obstructed. The ambient temperature and Check the installation. water temperature are high, or it is near with some heat source. Water is leaking out the unit. A few water droplets are on the door. Under some conditions, humidity may condense on the door. Consider moving the unit or just be more careful when you open the door. The water supply connection is Tighten fitting. See Connecting the water Cubes are partially formed--are white at the bottom. Noise during operation The icemaker stops suddenly while making ice. 21 leaking. Not enough water in the water bin. The feet are not leveled and locked Certain sounds are normal. The electricity is off. The room temperature is out of the stated range. line. Check if the water supply pressure is below 0.05Mpa. Check water supply--filter may be restricted. Check for a water leak at the water trough. Level and lock the feet. See Leveling the Ice Maker. See Normal Sounds. Reconnect the power supply line. Cut off the electricity and let the ice maker stop working until the temperature returns within the stated range. The body of the ice The ground line isn't in the Use the correct plug and outlet. maker is electrified socket. Scale builds up quickly inside the The calcium level in the water is too high. Use a water-softening apparatus installed in front of the water inlet valve. machine. Buzzer alarm Problem in pumping out water Check to make sure the water is pumping out correctly by checking the pump, water lever switch and drain tube.
25 Specifications Description of product Built-in Ice Maker Model IB450SSP Voltage/Frequency AC 115V~60Hz Ice-Making / Ice-Harvest rated current Color Ice Storage capacity 3.0A / 3.6A Black Cabinet; Stainless Steel Door 25 lbs. maximum Ice-making capability 50 lbs. / day * Refrigerant R134a, 3.88 oz. High / Low side pressure 350psig / 130psig Dimensions (Width x Depth x Height) Net Weight 14.6 x 23.6 x lbs. Note: Technical data and performance information provided for reference only. Specifications are subject to change. Check the rating label on the ice maker for the most accurate information. * The actual quantity of ice produced per day will vary with ambient and water conditions. Notes on ice storage The ice maker will automatically shut off when the ice bin is full. The ice bin compartment is insulated, but not refrigerated and the ice in the bin will slowly melt and go out the drain. Once enough of the ice has melted, the ice maker will automatically start making more ice. EdgeStar Built-in Ice Maker 22
Automatic Undercounter Ice Maker
 Automatic Undercounter Ice Maker User s Manual Be sure ice maker is standing upright 24 hours prior to plug-in. Model: HI50IB20SS TABLE OF CONTENTS Page ICE MAKER SAFETY... 2 IMPORTANT SAFEGUARDS...3-5
Full Size Ice Maker IB650SS. Owner s Manual. For more information on other great EdgeStar products on the web, go to
 Full Size Ice Maker IB650SS Owner s Manual For more information on other great EdgeStar products on the web, go to http://www.edgestar.com Important Safety Information Improper handling can cause serious
Automatic Ice Maker User s Manual Be sure the ice maker has been standing upright at least 24 hours prior to plug-in.
 Automatic Ice Maker User s Manual Model:BC450/BC600 Be sure the ice maker has been standing upright at least 24 hours prior to plug-in. TABLE OF CONTENTS Page ICE MAKER SAFETY... 2 IMPORTANT SAFEGUARDS...
Automatic Outdoor Ice Maker User Manual
 Automatic Outdoor Ice Maker User Manual Model: BLZ-ICEMKR-50GR Be sure ice maker is standing upright 24 hours prior to plug-in. TABLE OF CONTENTS Page ICE MAKER SAFETY... 2 IMPORTANT SAFEGUARDS... 3-5
Ice Cube Machine. User s Manual. Be sure the ice machine has been standing upright for at least 24 hours prior to plug-in.
 Ice Cube Machine User s Manual Be sure the ice machine has been standing upright for at least 24 hours prior to plug-in. Franklin Industries, LLC 4100 First Avenue Brooklyn, NY 11232-3321 Tel.: 1-888-424-8278
CWF840SZ. Free Standing Wine Refrigerator. Owner s Manual
 Free Standing Wine Refrigerator CWF840SZ Owner s Manual For more information on other great EdgeStar products on the web, go to http://www.edgestar.com Important Safety Information Improper handling can
Ice Cube Machine. User s Manual. Be sure the ice machine has been standing upright for at least 24 hours prior to plug-in.
 Ice Cube Machine User s Manual Be sure the ice machine has been standing upright for at least 24 hours prior to plug-in. Franklin Industries, LLC 4100 First Avenue Brooklyn, NY 11232-3321 Tel.: 1-888-424-8278
Dual Zone Wine Refrigerator CWR5631FD. Owner s Manual. For more information on other great EdgeStar products on the web, go to
 Dual Zone Wine Refrigerator CWR5631FD Owner s Manual For more information on other great EdgeStar products on the web, go to http://www.edgestar.com Important Safety Information Improper handling can cause
Built-in Beverage Cooler CBR901SG. Owner s Manual. For more information on other great EdgeStar products on the web, go to
 Built-in Beverage Cooler CBR901SG Owner s Manual For more information on other great EdgeStar products on the web, go to http://www.edgestar.com Important Safety Information Improper handling can cause
Beverage Cooler BWC120SSLT. Owner s Manual. For more information on other great EdgeStar products on the web, go to
 Beverage Cooler BWC120SSLT Owner s Manual For more information on other great EdgeStar products on the web, go to http://www.edgestar.com Important Safety Information Improper handling can cause serious
Wine Refrigerator CWR1101DZ. Owner s Manual. For more information on other great EdgeStar products on the web, go to
 Wine Refrigerator CWR1101DZ Owner s Manual For more information on other great EdgeStar products on the web, go to http://www.edgestar.com Important Safety Information Improper handling can cause serious
CWF340DZ. Freestanding Wine Refrigerator. Owner s Manual
 Freestanding Wine Refrigerator CWF340DZ Owner s Manual For more information on other great EdgeStar products on the web, go to http://www.edgestar.com Important Safety Information Improper handling can
Built-in Wine Refrigerator CWR460DZ. Owner s Manual. For more information on other great EdgeStar products on the web, go to
 Built-in Wine Refrigerator CWR460DZ Owner s Manual For more information on other great EdgeStar products on the web, go to http://www.edgestar.com Important Safety Information Improper handling can cause
CWB2150FD. Built-in Wine and Beverage Cooler. Owner s Manual
 Built-in Wine and Beverage Cooler CWB2150FD Owner s Manual For more information on other great EdgeStar products on the web, go to http://www.edgestar.com Important Safety Information Improper handling
Whynter 14" Undercounter Automatic Stainless Steel Marine Ice Maker 23lb Daily Output INSTRUCTION MANUAL. Model # : MIM-14231SS
 Whynter 14" Undercounter Automatic Stainless Steel Marine Ice Maker 23lb Daily Output Model # : MIM-14231SS INSTRUCTION MANUAL Congratulations on your new Whynter product. To ensure proper operation, please
ICE MAKER Use & Care Guide. Table of Contents... 2
 ICE MAKER Use & Care Guide Table of Contents... 2 2217247 ICE MAKER SAFETY...2 ICE MAKER INSTALLATION...3 Unpacking...3 Location Requirements...3 Electrical Requirements...3 Leveling...4 Water Supply Connection...4
Thermoelectric Wine Cooler
 Thermoelectric Wine Cooler TWR160S Owner s Manual For more information on other great Koldfront by EdgeStar products on the web, go to http://www.edgestar.com Important Safety Information Improper handling
Portable Ice Maker IP210SS. Owner s Manual. For more information on other great EdgeStar products on the web, go to
 Portable Ice Maker IP210SS Owner s Manual For more information on other great EdgeStar products on the web, go to http://www.edgestar.com Important Safety Information Improper handling can cause serious
BR7000SS Fridge for the KC7000SS Kegerator
 Built-In Kegerator BR7000SS Fridge for the KC7000SS Kegerator Owner s Manual For more information on other great EdgeStar products on the web, go to http://www.edgestar.com Important Safety Information
CWB8420DZ. Built-in Wine and Beverage Cooler. Owner s Manual
 Built-in Wine and Beverage Cooler CWB8420DZ Owner s Manual For more information on other great EdgeStar products on the web, go to http://www.edgestar.com Important Safety Information Improper handling
Portable Ice Maker KIM202W. Owner s Manual. For more information on other great KoldFront products on the web, go to
 Portable Ice Maker KIM202W Owner s Manual For more information on other great KoldFront products on the web, go to http://www.edgestar.com Important Safety Information Improper handling can cause serious
EdseStar. Built-in Wine Refrigerator CWR461DZ. For more information on other great EdgeStar products on the web, go to
 EdseStar @ Built-in Wine Refrigerator CWR461DZ Owner's Manual For more information on other great EdgeStar products on the web, go to http://www.edgestar.com Important Safety Information Improper handling
WHYNTER FREE-STANDING ICE MAKER
 0 WHYNTER FREE-STANDING ICE MAKER MODEL # : FIM-450HS Instruction Manual Congratulations on your new WHYNTER product. To ensure proper operation, please read this Instruction Manual carefully before using
Installation and User's Manual for Residential Ice Machine. Models SCCG30 and SCCP30
 Installation and User's Manual for Residential Ice Machine Models SCCG30 and SCCP30 Introduction: This ice machine is the result of Scotsman s decades of experience in the design and manufacturing of both
IM-440C IM-660C IM-1108C
 IM-440C IM-660C IM-1108C Thank you for selecting SPT Automatic Ice Maker! To ensure the proper operation of this ice maker, please read the instruction manual carefully before use and keep it in a safe
USER S GUIDE. Installation, Operation, and Maintenance for your product. BUILT-IN WINE COOLER Model - AWC241DZ.
 USER S GUIDE Installation, Operation, and Maintenance for your product. BUILT-IN WINE COOLER Model - AWC241DZ www.avallon.com 1-866-471-7427 Important Safety Information Improper handling can cause serious
USER S GUIDE. Installation, Operation, and Maintenance for your product. OUTDOOR REFRIGERATOR Model AFR151SSOD.
 USER S GUIDE Installation, Operation, and Maintenance for your product. OUTDOOR REFRIGERATOR Model AFR151SSOD www.avallon.com 1 866 471 7427 Important Safety Information Improper handling can cause serious
INSTRUCTION MANUAL. Model Number: DX K Wine Cooler BEFORE USE, PLEASE READ AND FOLLOW ALL SAFETY RULES AND OPERATING INSTRUCTIONS.
 INSTRUCTION MANUAL Model Number: DX-48.130K Wine Cooler CAUTION: BEFORE USE, PLEASE READ AND FOLLOW ALL SAFETY RULES AND OPERATING INSTRUCTIONS. TABLE OF CONTENTS 1. WINE COOLER SAFETY...114 2. IMPORTANT
 Installation Guide BI-98 Ice Maker www.u-lineservice.com Phone (414) 354-0300 FAX (414) 354-7905 Service & Parts Tech Lines Phone (800) 779-2547 FAX (414) 354-5696 OnlineService@U-Line.com 2005 U-Line
Ice Maker. Model BIM25. Instruction Manual. Write Serial Number of unit here:
 Ice Maker Model BIM25 Instruction Manual Write Serial Number of unit here: Felix Storch, Inc. Summit Appliance Division An ISO 9001:2008 registered company 770 Garrison Avenue Bronx, New York 10474 www.summitappliance.com
BULL INSTRUCTION MANUAL. Model Number: BC-130 REFRIGERATOR BEFORE USE, PLEASE READ AND FOLLOW ALL SAFETY RULES AND OPERATING INSTRUCTIONS.
 BULL INSTRUCTION MANUAL Model Number: BC-130 REFRIGERATOR BEFORE USE, PLEASE READ AND FOLLOW ALL SAFETY RULES AND OPERATING INSTRUCTIONS. 1 REFRIGERATOR SAFETY Your safety and the safety of others are
SELF-CONTAINED CRESCENT CUBER
 Reliability is a beautiful thing TM SELF-CONTAINED CRESCENT CUBER KM-250BAF KM-250BWF INSTRUCTION MANUAL ISSUED: March 14, 2000 REVISED: December 22, 2004 IMPORTANT Only qualified service technicians should
Installation and User's Manual for Outdoor Model Residential Ice Machine. Models SCCG50M-1SS and SCCP50M-1SS
 Installation and User's Manual for Outdoor Model Residential Ice Machine Models SCCG50M-1SS and SCCP50M-1SS SCCG50 & SCCP50 - Outdoor Model Introduction: This ice machine is the result of Scotsman s decades
Portable Fridge/Freezer
 Portable Fridge/Freezer KF430 Owner s Manual For more information on other great Koldfront products on the web, go to http://www.edgestar.com Important Safety Information Improper handling can cause serious
Hoshizaki America, Inc.
 Hoshizaki America, Inc. Self-Contained Crescent Cuber Models KM-255BAH KM-255BWH A Superior Degree of Reliability INSTRUCTION MANUAL www.hoshizaki.com Issued: 10-4-2006 IMPORTANT Only qualified service
SAVE THESE INSTRUCTIONS HOUSEHOLD USE ONLY
 IMPORTANT SAFEGUARDS When using electrical appliances, basic safety precautions should always be followed, including the following: 1. Read all instructions carefully. 2. DANGER! To protect against risk
Hoshizaki America, Inc.
 Hoshizaki America, Inc. Modular Crescent Cuber Models KM-900MAH50 KM-900MRH50 A Superior Degree of Reliability INSTRUCTION MANUAL www.hoshizaki.com Issued: 6-25-2008 IMPORTANT Only qualified service technicians
REFRIGERATOR SAFETY. Your safety and the safety of others are very important.
 REFRIGERATOR SAFETY Your safety and the safety of others are very important. We have provided many important safety messages in this manual for your appliance. Always read and obey all safety messages.
Viking Use & Care Manual
 Viking Use & Care Manual Viking Range Corporation 111 Front Street Greenwood, Mississippi 38930 USA (662) 455-1200 For product information, call 1-888-VIKING1 (845-4641) or visit the Viking Web site at
Installation and User's Manual for Residential Ice Machine. Models SCCG50 and SCCP50
 Installation and User's Manual for Residential Ice Machine Models SCCG50 and SCCP50 SCCG50 & SCCP50 Introduction: This ice machine is the result of Scotsman s decades of experience as an industry leader
Model:WHS-109FB1/WHS-109FW1/WHS-109FSS1
 Model:WHS-109FB1/WHS-109FW1/WHS-109FSS1 WHS-109FB1/WHS-109FW1 WHS-109FSS1 R600a,1.59Oz 21.26 When using, please use scissors to cut out the plastic cable ties in the picture from top to bottom, a total
SELF-CONTAINED FLAKER
 Reliability is a beautiful thing TM SELF-CONTAINED FLAKER F-500BAF(-C) INSTRUCTION MANUAL ISSUED: April 13, 1998 REVISED: December 30, 2004 IMPORTANT Only qualified service technicians should attempt to
INSTRUCTION MANUAL (UNIT APPEARANCE MAY VARY FROM IMAGE) BEFORE USE, PLEASE READ AND FOLLOW ALL SAFETY RULES AND OPERATING INSTRUCTIONS.
 BEFORE USE, PLEASE READ AND FOLLOW ALL SAFETY RULES AND OPERATING INSTRUCTIONS.") INSTRUCTION MANUAL Model Number: FR551 REFRIGERATOR-FREEZER (UNIT APPEARANCE MAY VARY FROM IMAGE) BEFORE USE, PLEASE READ AND FOLLOW ALL SAFETY RULES AND OPERATING INSTRUCTIONS. Igloo has a policy of continuous
INSTRUCTION MANUAL Model Number: FR551 REFRIGERATOR-FREEZER (UNIT APPEARANCE MAY VARY FROM IMAGE) BEFORE USE, PLEASE READ AND FOLLOW ALL SAFETY RULES AND OPERATING INSTRUCTIONS. Igloo has a policy of continuous
Hoshizaki America, Inc.
 Hoshizaki America, Inc. Self-Contained Flaker Model F-330BAH(-C) A Superior Degree of Reliability INSTRUCTION MANUAL www.hoshizaki.com Issued: 5-4-2007 Revised: 1-15-2013 WARNING Only qualified service
Hoshizaki America, Inc.
 Hoshizaki America, Inc. Modular Crescent Cuber Models KM-1340MAH KM-1340MWH KM-1340MRH A Superior Degree of Reliability INSTRUCTION MANUAL www.hoshizaki.com Issued: 8-11-2005 IMPORTANT Only qualified service
MEDICAL FREEZER. Model FS24L INSTRUCTION MANUAL. Write Serial Number (on back of unit) here:
 here:") MEDICAL FREEZER Model FS24L INSTRUCTION MANUAL - Write Serial Number (on back of unit) here: FELIX STORCH, INC. 770 Garrison Avenue Bronx, New York 10474 www.medicalrefrigerators.com TABLE OF CONTENTS
MEDICAL FREEZER Model FS24L INSTRUCTION MANUAL - Write Serial Number (on back of unit) here: FELIX STORCH, INC. 770 Garrison Avenue Bronx, New York 10474 www.medicalrefrigerators.com TABLE OF CONTENTS
Whynter Portable Ice Maker 33 lb capacity - White
 Whynter Portable Ice Maker 33 lb capacity - White Model # : IMC-330WS INSTRUCTION MANUAL Congratulations on your new Whynter product. To ensure proper operation, please read this Instruction Manual carefully
A PROUD HERITAGE OF EXPERIENCE & QUALITY AUTOMATIC ICE MAKER VT-ICEMAKER15
 A PROUD HERITAGE OF EXPERIENCE & QUALITY AUTOMATIC ICE MAKER VT-ICEMAKER15 O W N E R S M A N U A L W W W. V I N O T E M P. C O M General Operating Instructions Remove all external and internal packaging
Installation and User's Manual for Refrigerator Model SCR33
 Installation and for Refrigerator Model SCR33 Introduction Congratulations on your purchase of a Scotsman refrigeration product. For future reference, keep this guide in a safe, accessible location. If
Thank you for buying this refrigerator-freezer. To ensure that you get the best
 Dear customer: Thank you for buying this refrigerator-freezer. To ensure that you get the best results from your new refrigerator-freezer, please take time to read through the simple instructions in this
INSTALLATION MANUAL. Series 322 Ice Cube Machine SPECIFICATIONS UNPACKING. Series 322 Ice Cube Machine Installation Instructions
 INSTALLATION MANUAL Series 322 Ice Cube Machine SPECIFICATIONS 7.00 15.00 C A 6 ft electrical cord 1.00 2.00 22.00 5.00 Front 16.38 11.25 5.00 F E Air In D 2.75 2.25 14.75.75 B 23.50 21.00 Opening 23.50
HT-MOSEL-51D PLEASE READ THIS MANUAL CAREFULLY BEFORE USING THE WINE CHILLER
 HT-MOSEL-51D PLEASE READ THIS MANUAL CAREFULLY BEFORE USING THE WINE CHILLER This appliance is intended to be used exclusively for the storage of wine PRODUCT RANGE PRODUCT TYPE PRODUCT SERIAL NUMBER :
PERLICK PRODUCT MANUAL SELF-CONTAINED ICE MAKER MODELS: H50IMS-R H50IMS-L H50IMW H50IMS-ADL H50IMS-ADR H50IMW-AD
 PERLICK SELF-CONTAINED ICE MAKER MODELS: H50IMS-R H50IMS-L H50IMW H50IMS-ADL H50IMS-ADR H50IMW-AD PRODUCT MANUAL Issued: 11-2-2009 IMPORTANT This manual should be read carefully before the icemaker is
Whynter Countertop Direct Connection Ice Maker and Water Dispenser - Silver
 Whynter Countertop Direct Connection Ice Maker and Water Dispenser - Silver Model # : IDC-221SC INSTRUCTION MANUAL Congratulations on your new Whynter product. To ensure proper operation, please read this
BEFORE USE, PLEASE READ AND FOLLOW ALL SAFETY RULES AND OPERATING INSTRUCTIONS
 WINE CELLAR Model SWC1840 Owner s Manual BEFORE USE, PLEASE READ AND FOLLOW ALL SAFETY RULES AND OPERATING INSTRUCTIONS Write the Serial Number here Felix Storch, Inc. Summit Appliance Division An ISO
Dual Zone Wine Cellar
 Dual Zone Wine Cellar Instruction Booklet Model: WC-2012 IMPORTANT SAFEGUARDS Before the appliance is used, it must be properly positioned and installed as described in this manual. To reduce the risk
OUTDOOR ICE MAKER Model BIM24OS
 OUTDOOR ICE MAKER Model BIM24OS Write Serial Number of Unit Here: SUMMIT APPLIANCE DIVISION FELIX STORCH, INC. 770 Garrison Avenue Bronx, NY 10474 USA TEL 718-893-3900 FAX 718-842-3093 www.summitappliance.com
INSTRUCTION MANUAL COMPRESSOR DRIVEN WINE COOLER
 INSTRUCTION MANUAL COMPRESSOR DRIVEN WINE COOLER DX-7.22SK DX-19.58SK DX-24.56BBK DX-24.56BSK DX-41.130BBK DX-41.130BSK DX-46.145BK DX-46.145SK DX-94.270DBK DX-94.270DSK DX-181.490DBK DX-181.490DSK This
Reliability is a beautiful thing TM MODULAR FLAKER F-800MAH(-C) F-800MWH(-C) INSTRUCTION MANUAL
 F-800MWH(-C) INSTRUCTION MANUAL") Reliability is a beautiful thing TM MODULAR FLAKER F-800MAH(-C) F-800MWH(-C) INSTRUCTION MANUAL ISSUED: FEB. 28, 2001 REVISED: DEC. 11, 2003 IMPORTANT Only qualified service technicians should attempt
Reliability is a beautiful thing TM MODULAR FLAKER F-800MAH(-C) F-800MWH(-C) INSTRUCTION MANUAL ISSUED: FEB. 28, 2001 REVISED: DEC. 11, 2003 IMPORTANT Only qualified service technicians should attempt
READ ALL INSTRUCTIONS CAREFULLY BEFORE STARTING INSTALLATION OR OPERATION.
 ICE MAKER INSTALLATION INSTRUCTIONS & OWNER S MANUAL INSTALLER: Leave these instructions with consumer. CONSUMER: Retain for future reference. Model # 3592 IMPORTANT: READ ALL INSTRUCTIONS CAREFULLY BEFORE
WHYNTER PORTABLE ICE MAKER 49 LB CAPACITY - STAINLESS STEEL
 WHYNTER PORTABLE ICE MAKER 49 LB CAPACITY - STAINLESS STEEL Model # : IMC-490SS INSTRUCTION MANUAL Congratulations on your new Whynter product. To ensure proper operation, please read this Instruction
HOSHIZAKI MODULAR CRESCENT CUBER MODELS KM-280MAH KM-280MWH INSTRUCTION MANUAL
 ISSUED: FEB. 21, 2001 REVISED: SEPT. 24, 2001 TM HOSHIZAKI MODULAR CRESCENT CUBER MODELS KM-280MAH KM-280MWH INSTRUCTION MANUAL IMPORTANT Only qualified service technicians should attempt to install, service
USER MANUAL WATER DISPENSER WITH ICE MAKER
 USER MANUAL WATER DISPENSER WITH ICE MAKER Model:048-GM-48200 Please read this owner s manual carefully before operating the unit. TABLE OF CONTENTS INTRODUCTIONS... 3 IMPORTANT SAFETY INSTRUCTIONS.. 3
Hoshizaki America, Inc.
 Hoshizaki America, Inc. Low-Profile Modular Crescent Cuber Models KML-451MAH KML-451MWH A Superior Degree of Reliability INSTRUCTION MANUAL www.hoshizaki.com Issued: 2-7-2006 Revised: 8-5-2009 IMPORTANT
Hoshizaki America, Inc.
 Hoshizaki America, Inc. Modular Crescent Cuber Models KM-461MAH KM-461MWH KM-461MRH A Superior Degree of Reliability INSTRUCTION MANUAL www.hoshizaki.com Issued: 2-13-2006 Revised: 1-28-2008 IMPORTANT
Outdoor Refrigerator USER S MANUAL
 Outdoor Refrigerator USER S MANUAL MODEL Number:BLZ-SSRF-40DH IMPORTANT:READ THIS USER S MANUAL PRIOR TO CONNECTING POWER AND USE Before the refrigerator is used, it must be PROPERLY POSITIONED, LEVELED
Table of Contents SPECIFICATIONS Page 2. FOR THE INSTALLER Page 3. FOR THE PLUMBER Page 4. INSTALLATION Page 5. INITIAL START UP Page 6
 INTRODUCTION This service manual covers the installation, operation, maintenance and service of this ice machine. Table of Contents SPECIFICATIONS Page 2 FOR THE INSTALLER Page 3 FOR THE PLUMBER Page 4
BEFORE USE, PLEASE READ AND FOLLOW ALL SAFETY RULES AND OPERATING INSTRUCTIONS.
 INSTRUCTION MANUAL Model Number: BLZ-SSRF130 BEFORE USE, PLEASE READ AND FOLLOW ALL SAFETY RULES AND OPERATING INSTRUCTIONS. 1 TABLE OF CONTENTS REFRIGERATOR SAFETY 3 IMPORTANT SAFEGUIDES 4 PARTS AND FEATURES
Hoshizaki America, Inc.
 Hoshizaki America, Inc. Modular Crescent Cuber Models KM-501MAH KM-501MWH KM-501MRH A Superior Degree of Reliability INSTRUCTION MANUAL www.hoshizaki.com Issued: 2-13-2006 IMPORTANT Only qualified service
Automatic Ice Maker. Service Manual VT ICEMAKER 15
 Automatic Ice Maker Service Manual VT ICEMAKER 15 Table of contents How the Icemaker works 3 10 Cooling System 3 Water System 4 5 Wiring Connections and Controller 6 8 Exploding Drawing 9 10 TroubleShooting
GDDEM10 DEHUMIDIFIER
 GDDEM10 DEHUMIDIFIER SOCIABLE REMARK When using this dehumidifier in the European countries, the following information must be followed: DISPOSAL: Do not dispose this product as unsorted municipal waste.
SS1095 Ice Maker.
 Installation Guide SS1095 Ice Maker www.u-lineservice.com Phone (414) 354-0300 FAX (414) 354-7905 Service & Parts Tech Lines Phone (800) 779-2547 FAX (414) 354-5696 OnlineService@U-Line.com 2008 U-Line
Use & Care. 15 W. Undercounter/Freestanding Ice Machine FGIM515 / CFGIM515 FPIM515 / CFPIM515
 Use & Care 15 W. Undercounter/Freestanding Ice Machine FGIM515 / CFGIM515 FPIM515 / CFPIM515 CONGRATULATIONS Congratulations and welcome to the elite world of appliance ownership. We hope you will enjoy
Installation & Operating Guide
 5-036 HOT WATER TANK Installation & Operating Guide Read all instructions thoroughly. Keep this guide for future reference. Proof of purchase is required for Warranty. Staple receipt or proof of purchase
Bar Fridge USER MANUAL MB46W
 Bar Fridge USER MANUAL MB46W CONTENTS Safety information... 2-3 Identifying parts of the fridge... 4 Transporting... 5 Installation... 5 Reversing the door... 6 Operating instructions... 7 Cleaning &
ICE MAKER. Use & Care Guide B. Table of Contents... 2
 IE MKER Use & are Guide Table of ontents... 2 2313687 TLE OF ONTENTS IE MKER SFETY...2 INSTLLTION INSTRUTIONS...3 Unpack the Ice Maker...3 Location Requirements...3 Electrical Requirements...3 Water Supply
STRUCTURE ILLUSTRATION...3 IMPORTANT SAFETY INSTRUCTIONS 4 INSTALLATION INSTRUCTION..4 OPERATING YOUR REFRIGERATOR...5-6
 TABLE OF CONTENTS STRUCTURE ILLUSTRATION....3 IMPORTANT SAFETY INSTRUCTIONS 4 INSTALLATION INSTRUCTION..4 OPERATING YOUR REFRIGERATOR...5-6 FREEZER COMPARTMENT OPERATION 6 CARE & MAINTENANCE..7 CHANGING
MODULAR REFRIGERATOR. Français p. 16 Español p. 31 ITEM # MODEL #BG179B
 ITEM #0103339 Master Forge & M Design is a registered trademark of LF, LLC. All rights reserved. IMPORTANT READ THIS USER'S MANUAL PRIOR TO CONNECTING POWER AND USE. MODULAR REFRIGERATOR MODEL #BG179B
FP430 / FP630 / FP861
 Portable Fridge / Freezer FP430 / FP630 / FP861 Owner s Manual For more information on other great EdgeStar products on the web, go to http://www.edgestar.com To use the EdgeStar self-diagnostic tool,
Installation and User's Manual for Residential Nugget Ice Machine. Model SCN60
 Installation and for Residential Nugget Ice Machine Model SCN60 Introduction This manual includes information for the installation, operation and maintenance of the SCN60 residential ice machine. The SCN60
USER MANUAL ICE MAKER
 USER MANUAL ICE MAKER Model:SPP15AIM IMPORTANT SAFETY INSTRUCTIONS 2 PREPARING YOUR ICE MAKER FOR USE IMPORTANT SAFETY TIPS.. 3 GETTING TO KNOW YOUR UNIT 4 OPERATING PROCEDURES & MAINTENANCE UNPACKING
MODULAR CRESCENT CUBER
 Reliability is a beautiful thing TM MODULAR CRESCENT CUBER KMD-700MAH KMD-700MWH KMD-700MRH KMD-900MAH KMD-900MWH KMD-900MRH INSTRUCTION MANUAL ISSUED: APRIL 24, 2003 REVISED: JAN. 3, 2008 IMPORTANT Only
KM-900MAH KM-900MWH KM-900MRH KM-900MRH3
 ISSUED: FEB. 21, 2001 REVISED: SEPT. 25, 2001 TM HOSHIZAKI MODULAR CRESCENT CUBER MODELS KM-900MAH KM-900MWH KM-900MRH KM-900MRH3 INSTRUCTION MANUAL IMPORTANT Only qualified service technicians should
BEFORE USE, PLEASE READ AND FOLLOW ALL SAFETY RULES AND OPERATING INSTRUCTIONS
 FROST-FREE FREEZER Model: SCFF1842 Owner s Manual BEFORE USE, PLEASE READ AND FOLLOW ALL SAFETY RULES AND OPERATING INSTRUCTIONS Write the Serial Number here: Felix Storch, Inc. Summit Appliance Division
Hoshizaki America, Inc.
 Hoshizaki America, Inc. Cubelet Icemaker / Dispenser Models DCM-270BAH DCM-270BAH-OS A Superior Degree of Reliability INSTRUCTION MANUAL www.hoshizaki.com Issued: 5-6-2009 IMPORTANT Only qualified service
30-pint Dehumidifier User Guide
 30-pint Dehumidifier User Guide IVADH30PW Thank you for purchasing the Ivation 30 Pint Dehumidifier. This User Guide is intended to provide you with guidelines to ensure that operation of this product
Hoshizaki America, Inc.
 Hoshizaki America, Inc. Self-Contained Flaker Model F-500BAF A Superior Degree of Reliability INSTRUCTION MANUAL www.hoshizaki.com Issued: 4-13-1998 Revised: 3-22-2010 IMPORTANT Only qualified service
Hoshizaki America, Inc.
 Hoshizaki America, Inc. Self-Contained Cuber Models AM-50BAE AM-50BAE-DS AM-50BAE-AD AM-50BAE-ADDS A Superior Degree of Reliability INSTRUCTION MANUAL www.hoshizaki.com Issued: 3-10-2006 Revised: 4-15-2009
GS-1. Instruction Manual. G-Series Cooler. Manual is for the following models: GS-1-N14NF GS-1-N14NG GS-1-N14NI COUNTERTOP COOLER
 G-Series Cooler GS-1 COUNTERTOP COOLER Manual is for the following models: GS-1-N14NF GS-1-N14NG GS-1-N14NI Instruction Manual Manual is for the following models: GS-1-N14NF GS-1-N14NG GS-1-N14NI Instruction
9.9 CU.FT. TOP MOUNT REFRIGERATOR INSTRUCTION MANUAL. Model No.: HVDR1040W HVDR1040B HVDR1040S
 9.9 CU.FT. TOP MOUNT REFRIGERATOR INSTRUCTION MANUAL Model No.: HVDR1040W HVDR1040B HVDR1040S To ensure proper use of this appliance and your safety, please read the following instructions completely before
WHYNTER PORTABLE ICE MAKER 49 LB CAPACITY - STAINLESS STEEL
 WHYNTER PORTABLE ICE MAKER 49 LB CAPACITY - STAINLESS STEEL Model # : IMC-490SS INSTRUCTION MANUAL Congratulations on your new Whynter product. To ensure proper operation, please read this Instruction
INSTRUCTION & USER MANUAL
 INSTRUCTION & USER MANUAL GRAND CRU BUILT-UNDER SERIES WINE COOLERS GC46D BUILT-UNDER SERIES BEVERAGE COOLERS GC46BC This manual contains important information including safety and installation instructions
FR-1020ARW FR-1020ARS
 FR-1020ARW FR-1020ARS Dear customer: Thank you for buying this refrigerator-freezer. To ensure that you get the best results from your new refrigerator-freezer, please take time to read through the simple
DCE33 INTRODUCTION. Table of Contents. Parts lists and wiring diagrams are located in the center of the manual.
 INTRODUCTION The Scotsman is a restaurant type ice machine designed for home use. It produces the same high quality ice as large Scotsman commercial ice cube machines, and stores that ice in a heavily
INSTRUCTION & USER MANUAL
 INSTRUCTION & USER MANUAL GRAND CRU FREE-STANDING SERIES WINE COOOLERS GC96 GC166 GC181 This manual contains important information including safety and installation instructions of the appliances. Please
Hoshizaki America, Inc.
 Hoshizaki America, Inc. Modular Flaker Models F-1500MAH(-C) F-1500MWH(-C) F-1500MRH(-C) A Superior Degree of Reliability INSTRUCTION MANUAL www.hoshizaki.com Issued: 10-9-2003 Revised: 12-30-2004 IMPORTANT
Outdoor/Commercial Refrigerator USER S MANUAL
 Outdoor/Commercial Refrigerator USER S MANUAL MODEL Number:BLZ-SSRF40D IMPORTANT:READ THIS USER S MANUAL PRIOR TO CONNECTING POWER AND USE Before the refrigerator is used, it must be PROPERLY POSITIONED,
USER MANUAL. Vino 160 Vino 440. Wine Coolers
 Wine Coolers USER MANUAL Vino 160 Vino 440 This manual contains important information including safety and installation instructions of the appliances. Please read it carefully before use and follow all
ISSUED: FEB. 23, 1998 REVISED: OCT. 15, 1999 HOSHIZAKI MODULAR FLAKER MODEL F-450MAF(-C)
") ISSUED: FEB. 23, 1998 REVISED: OCT. 15, 1999 HOSHIZAKI MODULAR FLAKER MODEL F-450MAF(-C) INSTRUCTION MANUAL FOREWORD IMPORTANT Only qualified service technicians should attempt to install, service or maintain
ISSUED: FEB. 23, 1998 REVISED: OCT. 15, 1999 HOSHIZAKI MODULAR FLAKER MODEL F-450MAF(-C) INSTRUCTION MANUAL FOREWORD IMPORTANT Only qualified service technicians should attempt to install, service or maintain
Hoshizaki America, Inc.
 Hoshizaki America, Inc. Stackable Crescent Cuber Models KM-1301SAH/3 KM-1301SWH/3 KM-1301SRH/3 A Superior Degree of Reliability INSTRUCTION MANUAL www.hoshizaki.com Issued: 9-4-2008 Revised: 2-5-2013 IMPORTANT