Installation Manual for M-G014 & M-G015
|
|
|
- Jonathan Hudson
- 5 years ago
- Views:
Transcription

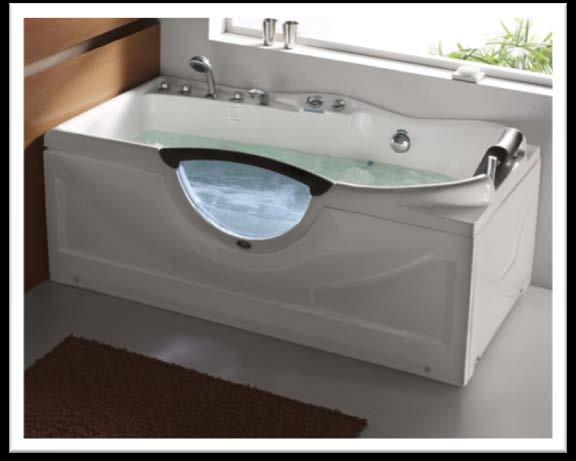

1 Installation Manual for M-G014 & M-G015 M-G014 M-G015 1
2 Contents 1. Electrical specifications 2. Plumbing 3. Installation of Water connections 4. Installation of Drain 5. Operation of Bathtub 6. Troubleshooting 7. Cleaning and Maintenance GENERAL INFORMATION Note: All tubs need to be leveled in its final resting position and have all feet touching the ground. It is advised to have tub onsite before preparing drain location. Manufacturer reserves the right to change specs or features at anytime. Please check to confirm details NOTICE TO INSTALLERS THE FLEXIBLE DRAIN HOSE THAT IS INCLUDED WITH THIS UNIT IS FOR INSTALLATION INTO AN OPEN FLOOR DRAIN ONLY. SUBSTITUTING THE EXISTING DRAIN SHOE FOR A DIFFERENT ONE WILL NOT VOID THE WARRANTY AS LONG AS THERE NO DAMAGE OR EVIDENCE OF MISUSE TO THE BASE 2
 110 volt, 15-20 amp GFCI breaker There is a length of wire")
.")
3 Electrical Parameters Rated Voltage Frequency Motor Power 110V~120v 60HZ 0.745KW(1HP)/1.0KW Amps Voltage of Control Circuit DC12V Electrical Requirements 1 dedicated 12-2 or 12-3 line for water pump (line 1, ground and neutral) 110 volt, amp GFCI breaker There is a length of wire supplied to connect to power source Optional: inline heater 110V/12-15 Amp / 30AMP total REQUIRED for Motor & Heater Plumbing Requirements The unit is equipped with hot and cold, metal braided ½ inch water supply hose with ½ national pipe thread. Need to install hot and cold shutoffs with ½ -male national pipe thread (not included). Supply hoses are to connect from the faucet manifold on the unit to the shutoff valves. All water jet features are pre plumbed with reinforced braided flexible supply hose All fixtures and fittings should be checked for tightness as they may have been loosened during transport. Access panel area advised. Tub Installation A. Water Head: One cold water supply pipe, one hot water supply pipe. B. Drainage: The diameter of the drain should be (greater than or equal to) 40mm. This drainage can be at a distance of mm from the location we show on the chart. 1. Unpack the bathtub and move it into the desired position. Adjust the floor bolts to completely remove water from the drainer and secure the nut. All feet need to be touching the floor and tub needs to be level. 2. Insert the skirt into the upper slot of the bathtub, then press the flat-head on the bathtub rack onto the skirt. Tighten bolts. 3. Install and fix the sprayer, storage rack, and other external parts. 4. Carefully ground the bathtub. 3


4 Installation of Water Inlet Connect one T-piece in the bathroom near the bathtub and then install two switches. Connect the outlet of the switches with the cold and hot water pipes of the water heater. Refer to the below diagram. Below is a diagram if flexible hose is used: Installation of Drain 4


5 Operation of Bathtub 1. Check the power supply and GFCI protection. Insert the bathtub plug into an interior power supply socket or hardwire in a work box. 2. Please turn on the cold and hot water pipes, and then turn on the handle of the cold and hot water faucet to mix the water to a desirable temperature. 3. Operation of the faucets: an on/off valve has been set for the shower and whirlpool bath. Turn diverter to switch between water faucet and sprayer functions. 4. Whirlpool bath massage: Turn valve on. Turn off the water when it reaches the water level. Water pump valve controls the whirlpool massage pump and jets. 1. Drain water for about 10 minutes after installation to clear drain lines and test for water leaks. 2. After using, cut off water and power supply. No Power Supply Water pipe leaks Troubleshooting Trouble Reason Solution 1. Power plug is not connected to the socket 2. Protection switch is cut off Water lamp doesn t work 1. Poor seal ring 2. Poor joint connection 3. Water pipe is broken 1. Bulb is damaged 2. Wires are cut off 1. Tightly connect the plug with the socket. 2. Find and remove short circuit, connect the protection switch. 1. Replace 2. Connect it again 3. Replace 1. Replace (remove the nut and install a new bulb, then tighten it) 2. Connect the wire 5
6 Cleaning and Maintenance 1. Clean the bathtub with ordinary liquid detergent and a soft cloth. Don t sterilize the bathtub with cleaning products containing acetone or ammonia. Do not disinfect using agents with formic acid or formaldehyde. 2. If scratched treat the surface with an acrylic rubbing polish. 3. Wipe off the dirt and stains on surface with toothpaste and a soft cloth. 4. Grind the light scratches or stains with 2000# sand paper, and then polish with polishing wax. 5. If water is hard, it is suggested to clean the massage the device twice a year according to this following method: a. Feed 40 C warm water into the bathtub until it reaches the lowest water level. b. Mix 2g of liquid detergent for every liter of water, pour in and start the water force massage device and allow it to run for about 5 minutes. c. Stop the water pump and drain out the water. d. Fill the bathtub again with cold water and start the massage jets for about for 3 more minutes. e. Stop the water pump, drain out the water, and clean the bathtub. 6
Installation and Operation Manual MG-304. Please read this manual carefully before use.
 Installation and Operation Manual MG-304 Please read this manual carefully before use. 1 P a g e Important Safety Instructions: Warning! Use this unit only for its intended purposes or as described in
STEAM ROOM with TUB. Installation & Operation Manual MK547
 By STEAM ROOM with TUB Installation & Operation Manual MK545 MK557/33 MK547 Note: You must read all installation & operation instructions prior to assembly and use of this unit. 1 P a g e Table of Contents
Installation and Operation Manual
 ! Please read this manual carefully before use. M-G301 Installation and Operation Manual! 1 Table of Contents 1. Important Notice------------------------------------------------------2 2. Technical parameters
Massage Bathtub Instructions of Installation. MODEL: TOCOA SIZE: 1380*1380*610mm
 Massage Bathtub Instructions of Installation MODEL: TOCOA SIZE: 1380*1380*610mm Dear Customer, Thank you for choosing our product. For your safe concern, please take a few minutes to read this manual before
Massage Bathtub Instructions of Installation. MODEL:MT-RT1708 SIZE:1700*800*620mm
 Massage Bathtub Instructions of Installation MODEL:MT-RT1708 SIZE:1700*800*620mm Preparations Dear Customer, Thank you for choosing our product. For your safe concern, please take a few minutes to read
Massage Bathtub Instructions of Installation. MODEL:MT-NR1502(1504) SIZE:1500*1500*610mm
 SIZE:1500*1500*610mm") Massage Bathtub Instructions of Installation MODEL:MT-NR1502(1504) SIZE:1500*1500*610mm Preparations Dear Customer, Thank you for choosing our product. For your safe concern, please take a few minutes
Massage Bathtub Instructions of Installation MODEL:MT-NR1502(1504) SIZE:1500*1500*610mm Preparations Dear Customer, Thank you for choosing our product. For your safe concern, please take a few minutes
Avenue (HY) Series Installation & Operation Manual
 Series Installation & Operation Manual") Avenue (HY) Series Installation & Operation Manual Note: You must read all installation & operation instructions prior to assembly and use of this unit. 1 P a g e Table of Contents Warnings. 3 HY Series
Avenue (HY) Series Installation & Operation Manual Note: You must read all installation & operation instructions prior to assembly and use of this unit. 1 P a g e Table of Contents Warnings. 3 HY Series
Preparations MT-RT1806. Cleaning & Maintenance. Precautions
 Preparations Cleaning & Maintenance 1. Use general liquid detergent and soft cloth for daily cleaning. Don't use detergent that with acetone or ammonia. Disinfector with formic acid and formaldehyde is
INSTALLTION MANUAL FOR M-A011
 INSTALLTION MANUAL FOR M-A011 Thank you for choosing our computerized shower room. Our best wishes are to warm your lovely life by our elaborate design. It is such an honor to have you enjoyed. For your
INSTALLTION MANUAL FOR M-A6012
 INSTALLTION MANUAL FOR M-A6012 Make the most of your shower, make the best for your home! Thank you for choosing our computerized steam rooms. Our best wishes are to warm your lovely life by our elaborate
Unity 180 Premium Whirlpool 180/80/62 cm
 Unity 180 Premium Whirlpool 180/80/62 cm Operating and installation instructions Is there a problem with your product or do you have any questions? Please feel free to contact our hotline: 020-8528 1729
CONTEMPORARY STEAM ROOM
 by CONTEMPORARY STEAM ROOM Installation & Operation Manual Note: You must read all installation & operation instructions prior to assembly and use of this unit. 1 P a g e Table of Contents Notice to Installers..
RESIN FREESTANDING TUB
 RESIN FREESTANDING TUB INSTALLATION INSTRUCTIONS AND CARE GUIDE CONTENTS Tub Installation...2 Rough-In...2 Drain Installation...3 Air Tub Installation...4 Electrical Installation...4 Remote Control Installation...5
Acrylic Claw Foot Tub
 Acrylic Claw Foot Tub Wrench or socket Drill & Bits Parts Recommended 2-2 x12 boards 4 Lag Bolts 4 Flat Washers Be sure to re-inforce the floor before securing tub. We recommend 2-2 x12 s securely fastened
LEVENS STEAM SHOWER ENCLOSURE
 LEVENS STEAM SHOWER ENCLOSURE INSTALLATION AND USER MANUAL CONTENTS Steam Shower Enclosure Installation...2 Technical Information...2 Plumbing Requirements...2 Assembly...3 Tools and Materials...3 Installation...3
FREWIN STEAM SHOWER ENCLOSURE
 FREWIN STEAM SHOWER ENCLOSURE INSTALLATION AND USER MANUAL CONTENTS Steam Shower Enclosure Installation...2 Technical Information...2 Plumbing Requirements...2 Assembly...3 Tools and Materials...3 Installation...3
AM 213 Installation Introduction
 EAGO Sanitary Ware Co.,Ltd. Factory Add:Shiling Development Zone,Xiaotang Town,Nanhai District,Foshan City,Guangdong,China E-mail:sales@eago.com.cn Http://www.eago.com.cn National Service Hotline:+86 800-8301359
Murano Shower Cabin Installation Instruction
 Murano Shower Cabin Installation Instruction IMPORTANT Please read carefully the following instructions before installing your shower cabin. If you have any questions on this shower cabin installation
Diamond Whirlpool/Air pool INSTALLATION & OPERATION INSTRUCTION
 Diamond Whirlpool/Air pool INSTALLATION & OPERATION INSTRUCTION WARNING When using this unit, precautionary steps should be followed to prevent electrical shock or personal injury. 1. Do not permit children
Cascade Premier and Elite Premier Bathing Systems with Aqua-Aire Installation / Assembly Instructions
 Cascade Premier and Elite Premier Bathing Systems with Aqua-Aire Installation / Assembly Instructions Premier Elite Premier PENNER PATIENT CARE, INC Box 523 / 102 Grant St. Aurora, NE 68818 360745P Revision
STOP RESIN TUB WITH INTEGRAL DRAIN PLANNING BEFORE YOU BEGIN TOOLS AND MATERIALS: GETTING STARTED INSTALLATION INSTRUCTIONS.
 BEFORE YOU BEGIN We recommend consulting a professional if you are unfamiliar with installing bathroom fixtures and plumbing. Signature Hardware accepts no liability for any damage to the floor, walls,
ARLEY STEAM SHOWER ENCLOSURE
 ARLEY STEAM SHOWER ENCLOSURE INSTALLATION AND USER MANUAL CONTENTS Steam Shower Enclosure Installation...2 Technical Information...2 Plumbing Requirements...2 Assembly...3 Tools and Materials...3 Installation...3
Massage Bathtub. Instructions of installation and usage. Instructions of Installation and Use TLP-632. Cleaning&Maintenance
 Cleaning&Maintenance Massage Bathtub Instructions of installation and usage Instructions of Installation and Use 1. During the transportation or installation do not pull the pipe or hold accessories to
Europa Shower Cabinet
 Installation Instructions Europa Shower Cabinet traditional contemporary bathrooms Installation Instructions Europa Shower Cabinet Parts 1 M5x20 Screw x20 2 1 2 Transformer x1 3 Control Electronic Box
Factory Direct Walk-In Tubs WALK-IN TUB. Installation Manual. For Model Numbers VT2848, VT2853, VT3153 and VT3255
 Factory Direct Walk-In Tubs WALK-IN TUB Installation Manual For Model Numbers VT2848, VT2853, VT3153 and VT3255 FACTORY DIRECT WALK-IN TUBS Thank you for choosing an Vitality Tubs Walk-In Tub. Vitality
Acrylic Claw Foot Tub
 Acrylic Claw Foot Tub Wrench or socket Drill & Bits Parts Recommended 2-2 x12 boards 4 Lag Bolts 4 Flat Washers Be sure to re-inforce the floor before securing tub. We recommend 2-2 x12 s securely fastened
Aquapeutics GENERAL INSTALLATION GUIDE. Toll Free Customer Service line 1 (800)
") Aquapeutics GENERAL INSTALLATION GUIDE Toll Free Customer Service line 1 (800) 290-6812 Thank you for choosing an Aquapeutics product. Please read the following guide in its entirety before assembling
Aquapeutics GENERAL INSTALLATION GUIDE Toll Free Customer Service line 1 (800) 290-6812 Thank you for choosing an Aquapeutics product. Please read the following guide in its entirety before assembling
NEPTUNE Steam Room Installation Instructions
 NEPTUNE Steam Room Installation Instructions IMPORTANT Please read carefully the following instructions before installing your shower cabin. If you have any questions on this shower cabin installation
RELAX. REVITALIZE. RESTORE. LUXURY SPA UNIT Installation Manual. English. For Model Numbers 2848, 2853, 3153 and 3255
 RELAX. REVITALIZE. RESTORE. LUXURY SPA UNIT Installation Manual For Model Numbers 2848, 2853, 3153 and 3255 English RELAX. REVITALIZE. RESTORE. Thank you for choosing a Secure Spa Luxury Spa Unit. Secure
AWP 3260 CWH Installation Instructions Hydro-massage Bathtub - UL 1795
 Tools you might need for proper installation galvanized nails or screws large level hammer or screw gun shims adhesive Thank you for purchasing Praxis Bathware. For best results, please read and follow
1-866-PENNERS
 Cascade Premier and Elite Premier Bathing Systems with Aqua-Aire Installation / Assembly Instructions Premier Elite Premier PENNER PATIENT CARE, INC Box 523 / 102 Grant St. Aurora, NE 68818 360745P Revision
AQUARITE DELUXE Model: HW Installation Manual
 AQUARITE DELUXE Model: HW205930 Installation Manual Table of Contents Diagrams. 1 Tools Needed for Installation. 1 Notice to Installers. 2 Packing List. 2 Hinge Assembly. 2 Drain assembly Information.
AirBath Hydro-Massage Tubs UL1795 Installation and Operating Instructions
 Tools you might need for proper installation Galvanized Nails or Screws - For Units with a Tiling Flange Four Foot Level Shims Caulking Gun Screw Gun Adhesive Thank you for purchasing the Praxis AirBath
Aqua-Aire Sit-Bath System 6300 Installation / Assembly Instructions
 Aqua-Aire Sit-Bath System 6300 Installation / Assembly Instructions PENNER PATIENT CARE, INC Box 523 / 102 Grant St. Aurora, NE 68818 350745 Rev F 02/23/11 1-866-PENNERS 1-866-736-6377 1-800-732-0717 E-mail
COPPER FREESTANDING TUB
 COPPER FREESTANDING TUB INSTALLATION INSTRUCTIONS AND CARE GUIDE CONTENTS Tub Installation...2 Rough-In...2 Drain Installation...3 Drain without Overflow...3 Waste and Overflow Drain...3 Trimming Drain
Massage Bathtub. Instructions of Installation and Use. Preparations MT-RT1804. Cleaning & Maintaining
 Preparations Cleaning & Maintaining 1. During the transportation or installation do not pull the pipe or hold accessories to avoid the water leakage. 2. After long time use if there are some dirt on product
Installation Instruction of AM124ETL-L TS-series Control panel
 Installation Instruction of AM124ETL-L TS-series Control panel Safety Information 1. Please read carefully and follow all instructions when operating. 2. Qualified earth leakage circuit-breaker must be
ELLA MASSAGE WALK IN BATHS OWNERS MANUAL
 2016 ELLA MASSAGE WALK IN BATHS OWNERS MANUAL REPRESENTING THESE MODEL NUMBERS: 93057 L / 93058 R Deluxe Dual Massage 93107 LNF / 93108 RNF Elite Dual No Faucet 93167 L / 93168 R Petite Dual Massage 93057
Installation Instruction of AM168 TS-series Control panel
 Installation Instruction of AM168 TS-series Control panel Safety Information 1. Please read carefully and follow all instructions when operating. 2. Qualified earth leakage circuit-breaker must be installed
SHOWER COLUMN WITH RAIN HEAD
 SHOWER COLUMN WITH RAIN HEAD OWNER S MANUAL. INTRODUCTION This owner manual will help you to enjoy your new Dreamshower Shower column by HS-WorldLink as well as to show you how to install, clean and maintain
User manual Whirlpool
 User manual Whirlpool Serial number: Foreword: This manual is general for all whirlpools in the BT-series. The user manual describes safety procedures, operating instructions and general maintenance. Please
Claw Feet & Pedestal Assembly
 Classique & Hotel Collection Soak & Jetted Tubs Baths of Distinction Inc. 5843 Carrier St, St. Petersburg, Florida, USA 33714 1.866.938.3880 Claw Feet & Pedestal Assembly All Tubs meet or exceeds ANSI
Minor Home Repairs. November 4, County of Henrico Department of Community Revitalization
 Minor Home Repairs 1 November 4, 2017 County of Henrico Department of Community Revitalization Educate homeowners on basic technical skills that will help the homeowner understand daily operations of different
INSTALLATION MANUAL FOR MODELS: SOVANNA, BREZZA, TERRACINA, VENADO
 INSTALLATION MANUAL FOR MODELS: SOVANNA, BREZZA, TERRACINA, VENADO 1 STRADA, TERCERA, SEDONA, MARVIN STEAM SHOWERS SPECIFICATION SHEET 87.8 30 24 SOVANNA, VENADO, BREZZA, TERRACINA STEAM SHOWER UNIT DIMENSIONS
STAINLESS STEEL TUB INSTALLATION
 BEFORE YOU BEGIN We recommend consulting a professional if you are unfamiliar with installing plumbing fixtures. Signature Hardware accepts no liability for any damage to the faucet, plumbing, sink, counter
M-K STEAM ROOM
 M-K557-33 STEAM ROOM Installation Manual Left Side Drain Model Note: You must read all installation & operation instructions prior to assembly and use of this unit. 1 P a g e Table of Contents Part 1 1.
Installation Guide BUBBLEMASSAGE. English page T01-A
 Installation Guide BUBBLEMASSAGE BATH 368 201419 English page 1-9 10-17 Before You Begin Please read these instructions carefully to familiarize yourself with the required tools, materials, and installation
Important Installation Guide & Operating Instruction
 Important Installation Guide & Operating Instruction Email: MobilityBathworks@gmail.com WARRANTY & REGISTRATION Important : 1. To ensure that your warranty is granted please fill out the product registration
Important Safety Instruction
 WARNING: To reduce the risk of drowning, electrical shock, or injury, read the following important precautions before using the unit. If you do not fully understand the meaning of any of the precautions
O W N E R S MANUAL ROUGE
 O W N E R S MANUAL ROUGE INSTALLATION OPERATION MAINTENANCE BATHTUB REPAIR ONE-PIECE FREESTANDING BATHTUB INSTALLATION Do not discard. Save these instructions for further use. Table of Content INTRODUCTION
IMPORTANT LEAVE THESE INSTRUCTIONS WITH THIS UNIT
 IMPORTANT LEAVE THESE INSTRUCTIONS WITH THIS UNIT HYDROLUX ACRYLIC DROP-IN BATHTUB INSTALLATION INSTRUCTIONS GENERAL INFORMATION HYDROLUX bathtubs are designed with the floor of the tub as the weight carrier,
INSTALLATION AND OWNER'S MANUAL
 INSTALLATION AND OWNER'S MANUAL Steam Shower Model Number: ZA218 Please carefully read these instructions before you begin to install the products. 07/11 Rev A P/N: 100053-01 Thank you for purchasing your
Whirlpool Bathtub Model Number: MT618
 INSTALLATION AND OWNER'S MANUAL Whirlpool Bathtub Model Number: MT618 Please carefully read these instructions before you begin to install the products. 07/11 Rev A P/N:100056-03 Thank you for purchasing
No advanced advice will be submit before we change our design and size. The pictures may be a little different from the real products.
 1. The daily maintenance of computerized steam room should be cleaned with ordinary detergent and wet cloth with toothpaste. Please do not use the detergent of disinfection which contains acetone or formaldehyde
AQUAPEUTICS MONACO INSTALLATION MANUAL
 AQUAPEUTICS MONACO INSTALLATION MANUAL Monaco schmatic diagram Cross sectional illustration of gaskets Recommended tools 4 5 5 5 5 Installation steps Steam generator hook-ups Troubleshooting n Steam dispenser
AIR MASSAGE KIT INSTALLATION INSTRUCTIONS
 BEFORE YOU BEGIN We recommend consulting a professional if you are unfamiliar with installing bathroom fixtures and plumbing. Signature Hardware accepts no liability for any damage to the floor, walls,
L6D S OW6R PAN6L MANvlAL
 L6D SOW6R PAN6L MANvlAL OWNER S MANUAL. INTRODUCTION This owner manual will provide you with information regarding your NEZZA shower panel including installation instructions, cleaning recommendations,
ELLA OUTWARD SWING DOOR WALK IN BATHS OWNERS MANUAL
 2016 ELLA OUTWARD SWING DOOR WALK IN BATHS OWNERS MANUAL REPRESENTING THESE MODEL NUMBERS: O2SA3060 Tub4Two OA3052 Dealer Exclusive OAF2639 Tiny Front Entry O2SA3671 Big4Two OA2652 Slim OA2660 Lounger
1PIECE FREESTANDING BATHTUB
 INSTALLATION INSTRUCTIONS 1PIECE FREESTANDING BATHTUB A two person installation is recommended. Read all instructions carefully before proceeding. SAVE THIS GUIDE FOR FUTURE REFERENCE. IMPORTANT Record
Important Installation Guide & Operating Instruction
 Important Installation Guide & Operating Instruction To be removed for use by the occupant Packing Slip Included: 1. Faucets & Valves 2. Riser Rod 3. Shower Rod & Curtain 4. Grab Bar 5. Quick Hose 6. Front
Assembly instructions. Alexandria Pedicare System ALEXANDRIA. Perfect design. Personal service.
 R Assembly instructions Alexandria Pedicare System ALEXANDRIA Perfect design. Personal service. IMPORTANT SAFETY PRECAUTIONS 1. Read and follow all instructions.. Danger: To reduce the risk of injury,
A301 SHOWER PANEL INSTALLATION GUIDE
 A301 SHOWER PANEL INSTALLATION GUIDE Shower Panel Installation Read Before Using Your New Shower Panel Congratulations on purchasing an Ariel Shower Panel. Your new shower panel will be a great addition
Ella Acrylic Outward Swing Walk In Tub OWNER'S MANUAL
 Ella Acrylic Outward Swing Walk In Tub OWNER'S MANUAL REPRESENTING THESE MODEL NUMBERS: Kai 30 in. x 57 in. OW5130SL / OW5130SR SOAKING OW5130AL / OW5130AR AIR MASSAGE OW5130DL / OW5130DR DUAL MASSAGE
ODEON OVE. A. Ordering Information. B. Required Electrical Service T01-C INSTALLATION INSTRUCTIONS
 ODEON OVE INSTALLATION INSTRUCTIONS BUBBLE MASSAGE BATH K-18212T-G1/G2, K-1709T-G1/G2 BEFORE YOU BEGIN Please read these instructions carefully to familiarize yourself with the required tools, materials,
EcoSmart Troubleshooting Guide
 EcoSmart Troubleshooting Guide Models POU 3.5 & 6 kw This guide is designed for installers or homeowners to help troubleshoot any issues experienced during the lifetime of the tankless water heater. For
Parenzo Range. Basin Mixer, Bath Filler & Bath Shower Mixer. Assembly instructions
 Parenzo Range Basin Mixer, Bath Filler & Bath Shower Mixer Assembly instructions We have designed these products with your enjoyment in mind. To ensure that they work to their full potential, they need
Chilipepper CP9000. Installation Instructions READ BEFORE INSTALLING:
 Chilipepper CP9000 Installation Instructions READ BEFORE INSTALLING: * The Chilipepper is not designed to be connected with rigid piping like copper or galvanized pipes. *Flexible hoses MUST be used. *
Destination Collection Whirlpool Bath Installation Instructions
 Tools you might need for proper installation Galvanized Nails or Screws Large Level Hammer or Screw Gun Shims Adhesive Thank you for purchasing Praxis Bathware. For best results, please read and follow
DRAFT INSTALLATION INSTRUCTIONS. Solid-State Series !! NOTE!! Covers the following models: Refer to INSERT for additional information
 INSTALLATION INSTRUCTIONS Solid-State Series!! NOTE!! Covers the following models: " CS6100 - CS7100 " CS6200 - CS9200 " CS6220 - CS9220 " CS6230 - CS9230 " CS6500 - CS7500 " CS6330 - CS9300 " CS9400 -
READ AND SAVE THESE INSTRUCTIONS
 READ AND SAVE THESE INSTRUCTIONS CEILING FAN INSTALLATION AND OPERATION INSTRUCTION FAN RATING AC 120V. 60Hz UL LISTED MODEL: AC-552OD WEIGHT OF FAN: 6.82 KGS 1. TOOLS AND MATERIALS REQUIRED Philips screw
s l it l on for Infrared Heaters
 Installation and Instruction Manual for Infrared Heaters Contents Safety and operating instructions... 3 Scope of supply... Installation instructions... 4 5 Initial operation... 10 Cleaning instructions...
Luckdrops. Technical Spec Sheet. Studio+ Modular Home
 Luckdrops Technical Spec Sheet Studio+ Modular Home Base Structure Container Type 40 Foot HC ISO Container Upcycled Container made from corten steel with marine grade enamel finish. Square Footage Interior:
PARISIAN ARCHITECTURAL BRASSERIE PENDANT 9
 PARISIAN ARCHITECTURAL BRASSERIE PENDANT 9 PARTS ENCLOSED (A) Mounting Strap (1) (B) Threaded Nipple (1) (C) Mounting Screws (2) (D) Mounting Loop (1) (E) Canopy (1) (F) Canopy Ring (1) (G) Chain (1) (H)
Product Description and Measurements. Thank You. Prior To Installation Steps. Waterfall Faucet Installation
 Product Description and Measurements Exclusive Kraus Collection Waterfall Faucet Glass Thickness: 12mm-19mm Diameter: 14 17 For Above Counter Installation Thank You Dear Valued Customer, Kraus would like
52 CEILING FAN READ AND SAVE THESE INSTRUCTIONS FAN RATING AC 120V.
 Irene 52 CEILING FAN READ AND SAVE THESE INSTRUCTIONS FAN RATING AC 120V. 60Hz TABLE OF CONTENTS Tools and Materials Required... 1 Package Contents... 1 Safety Rules... 2 Mounting Options... 3 Hanging
Operating and Maintenance Instruction Manual. Combination Whirlpool and Air Bath Systems with Chromatherapy Lights
 Operating and Maintenance Instruction Manual Combination Whirlpool and Air Bath Systems with Chromatherapy Lights T h a n k y o u fo r c h o o s i n g A m e r i c a n S t a n d a rd ATTENTION INSTALLER:
Classic 6 & 18 Prep Procedure Tables Owner s Manual
 Classic 6 & 18 Prep Procedure Tables Owner s Manual Durable, heli-arc welded, stainless steel Variety of styles for your convenience 48-in. and 60-in. widths to suit your needs Removable prep rack SSCI
1 L Rotary Vacuum Evaporator Instruction Manual
 1 L Rotary Vacuum Evaporator Instruction Manual Important This manual is designed for safe and optimal performance of this unit Please read manual carefully before operating this unit Keep this manual
No advanced advice will be submit before we change our design and size. The pictures may be a little different from the real products.
 1. The daily maintenance of computerized steam room should be cleaned with ordinary detergent and wet cloth with toothpaste. Please do not use the detergent of disinfection which contains acetone or formaldehyde
Artisan Thermostatic Bath Filler
 Artisan Thermostatic Bath Filler Installation Instructions & User Guide Please keep these instructions for future reference and request of replacement parts General Information Thank you for choosing Bristan,
ACRYLIC PEDESTAL TUB
 BEFORE YOU BEGIN We recommend consulting a professional if you are unfamiliar with installing bathroom fixtures and plumbing. Signature Hardware accepts no liability for any damage to the floor, walls,
K-870-JA-AA K-872-JA-AA
 Seawall 6 Whirlpool Baths: K-870-AA K-872-AA K-870-H-AA K-872-H-AA K-870-JA-AA K-872-JA-AA 111818-BA (1093) Copyright 1993 Kohler Co. IMPORTANT SAFETY INSTRUCTIONS ATTENTION INSTALLER: INSTRUCTIONS PERTAINING
INSTALLATION AND USER MANUAL
 INSTALLATION AND USER MANUAL HYDROMASSAGE CABIN SILVER DIAMOND LUX www.kerra.pl INSTALLATION AND USER MANUAL HYDROMASSAGE CABIN SILVER DIAMOND LUX Thank you for purchasing our product. Please read this
Meditub. Installation & operating instructions. Operating instructions
 Installation & OPERATING INSTRUCTIONS ditub Installation & operating instructions structions MODEL 3260 Page 25 Meditub 5701 NW 35 Avenue Miami, FL 33142 Phone 866-633-4882 Fax 866-560-1060 info@meditub.com
Hanson LED C e i l i n g F a n
 Hanson LED C e i l i n g F a n model no. 052-8398-2 Toll-free 1-866-827-4985 IMPORTANT: For your safety please read and understand this manual before installing or operating this product. OWNER S MANUAL
americanstandard.com Phone: Fax:
 Walk-In Baths americanstandard.com Phone: 800.963.8827 Fax: 847.358.4710 www.bciacrylic.com TABLE OF CONTENTS About Us... 1 FAQ s... 2 Model ASA2848 Acrylic Features and Specifi cations... 3-4 Model ASA3051
INSTALLATION MANUAL FOR MODELS: TERAZZA, TRACCIO, MILANO, CERRATO
 INSTALLATION MANUAL FOR MODELS: TERAZZA, TRACCIO, MILANO, CERRATO TABLE OF CONTENTS ROOM SPECIFICATIONS ELECTRICAL SPECIFICATIONS PLUMBING SPECIFICATIONS TECHNICAL SPECIFICATIONS INTRODUCTION ASSEMBLY
Welcome! Today s topic: Small Home Repairs. November 14, 2015
 Welcome! Today s topic: Small Home Repairs November 14, 2015 Small Home Repairs Course Presented by Monique Johnson Environmental Green Solutions, LLC Objective Educate homeowners on basic technical skills
Kallista Bath Flip Drain
 P21586 Page 1 of 7 THANK YOU FOR CHOOSING KALLISTA We appreciate your commitment to Kallista quality products. Please take a moment to review this manual before you install your Kallista product. If you
The Classeq under counter range
 Installation & Operators Manual The under counter range Part number 902.0011 Revision C Effective date January 2010 Language English Glasswashers Eco 1 Eco 2 Eco 3 Duo 2 Duo 3 Dishwasher Hydro 500 Hydro
Installation & operating instructions
 Installation & OPERATING INSTRUCTIONS Installation & operating instructions MODEL 2747SEN Meditub 5701 NW 35 Avenue Miami, FL 33142 Phone 866-633-4882 Fax 866-560-1060 info@meditub.com http://www.meditub.com
ELLA SOAKING WALK IN BATHS OWNERS MANUAL. Representing these model numbers: L / R Elite Soaking L / R Royal Soaking
 Representing these model numbers: 03057 L / 03058 R Deluxe Soaking 03107 L / 03108 R Elite Soaking 03167 L / 03168 R Petite Soaking 03085 Companion Soaking 03117 L / 03118 R Royal Soaking ELLA SOAKING
WALK-IN BATH INSTALLATION INSTRUCTIONS AND OWNER S MANUAL
 WALK-IN BATH INSTALLATION INSTRUCTIONS AND OWNER S MANUAL CONGRATULATIONS! You are now the owner of a walk-in bathtub from the most trusted name in plumbing. We thank you for your purchase. Your American
WALK-IN BATH INSTALLATION INSTRUCTIONS AND OWNER S MANUAL
 WALK-IN BATH INSTALLATION INSTRUCTIONS AND OWNER S MANUAL CONGRATULATIONS! You are now the owner of a walk-in bathtub from the most trusted name in plumbing. We thank you for your purchase. Your American
#PSBTWE1000 INSTALLATION GUIDE
 Electronic Bidet with Integrated Toilet #PSBTWE1000 INSTALLATION GUIDE INSTALLATION MANUAL Thank you for choosing our product! Please read and carefully follow the instructions before installation. Secure
BURWELL BIDET TOILET SEAT INSTALLATION
 BEFORE YOU BEGIN We recommend consulting a professional if you are unfamiliar with installing plumbing fixtures. Signature Hardware accepts no liability for any damage to the product, plumbing, toilet,
Whirlpool Baths INSTALLATION, OPERATION, AND MAINTENANCE
 TO BE REMOVED FOR USE BY THE OCCUPANT. Jason International, Inc. 8328 MacArthur Drive North Little Rock, AR 728 www.jasoninternational.com 49-000-209 Date 07/0 Integrity INSPECTION Inspect the unit prior
Chilipepper CP8000. Installation Instructions READ BEFORE INSTALLING:
 Chilipepper CP8000 Installation Instructions READ BEFORE INSTALLING: * The Chilipepper is not designed to be connected with rigid piping like copper or galvanized pipes. *Flexible hoses MUST be used. *
OPERATING and MAINTENANCE INSTRUCTIONS Models: H138NPSCLCMCQRL Merchandising Hot Cabinets
 Rev. (/) Page of 0 OPERATING and MAINTENANCE INSTRUCTIONS Models: H8NPSCLCMCQRL Merchandising Hot Cabinets Cabinet model number: Cabinet serial number: Authorized Service Agency: Ph: Fax: Keep this manual
Product Description and Measurements MODEL-FVS-1000 MODEL-FVS-1002 MODEL-KBF-1300 MODEL-FVS Thank You
 Glass Vessel Sink and Faucet ombo Product escription and Measurements Exclusive Kraus ollection Glass Vessel Sink & Faucet ombo Glass Thickness: 12mm-19mm iameter: 14 17 For Above ounter Installation A