Installation and operation manual
|
|
|
- Clement Ford
- 5 years ago
- Views:
Transcription
1 Installation and operation manual Drying cabinet FC 18
2 PODAB
3 Contents Safety regulations 5 Specification 6 Dimensions 6 Technical information 6 Assembly instructions 7 Installation of the cabinet 19 Step 1: Put the cabinet in place 19 Step 2: Fasten the cabinet to the wall 19 Step 3: Connect the cabinet to the ventilation channel 19 Step 4: Connect the drying cabinet to the main switch 19 Step 5: Control that the heating relay is working 19 Requirements for ventilation 20 Ventilation channel choice of material 20 Requirements for incoming air 20 Ventilation channel design 20 Evacuated amount of air and pressure fall 21 User manual 22 Manual programme mode 22 Automatic programme mode 22 Maintenance 23 3 PODAB 2009
4 Thank you for choosing the drying cabinet FC 18 from PODAB. We hope that it will be of great use for you and ask you kindly to read the instructions carefully. IMPORTANT! FOR YOUR SAFETY, the information in this manual must be followed to prevent property damage and personal injury. NOTE: The paragraphs marked WARNING and CAUTION appearing in this manual are not meant to cover all possible conditions and situations that may occur. It is very important that water and electricity are handled with great care and respect, by both installation technicians and end users. PODAB
5 Safety regulations Throughout this manual you will find text warnings in text boxes: WARNING and CAUTION. In these boxes you ll find the safety measurements you ll have to take; end user, service staff or installation staff. CAUTION WARNING To minimize the risk of fire, electrical shock, personal injuries or death when the cabinet is in use the following precautions must be followed: Indicates hazardous situation that, if not avoided, could cause minor personal injury or property damage. WARNING Indicates hazardous situation that, if not avoided, could cause severe personal injury. You will also find precautions marked: IMPORTANT and NOTE. These are followed by information of what should be considered Read the instruction before using the drying cabinet. Follow the instructions in step 4 for proper grounding. Never dry textiles that have been washed, dipped or exposed to fire dangerous substances or fluids. Never add fire dangerous or explosives substances to the cabinet. The cabinet is not a toy. Look after children who are around the cabinet. Never connect the cabinet with an extension cable. Only use the cabinet for what it is designed for: drying clothes. Always turn off the main switch before performing any service on the cabinet. Only authorized service technicians should perform service. Always follow the installation manual. The electrical connections must be installed by authorized personnel. IMPORTANT: to inform the reader of special steps that must be taken in order to prevent injuries on the cabinet. NOTE: to inform what is important to know, but it cannot cause personal injuries or injury on the cabinet. 10. Keep after the cabinet. If it is exposed to violence there is a risk that certain security functions will stop working. Please contact your nearest service partner if you are unsure of the cabinet s status. 11. If the electrical cable is damaged, it must immediately be changed by a person with electrical authorization. 12. The doors shall always be shut when the cabinet is in use. Do not try to manipulate the lock of the doors. It can lead to personal injuries. If the cabinet does not stop when the doors are opened during the drying phase, call for service. The cabinet shall not be used if the drying program is active when the doors are open! Look after the area around the evacuating pipe so it is clean from dust and dirt. To get the best drying result, follow the garments washing and drying advice. Never use the cabinet if any panel is broken or removed. Never use the cabinet if any parts are broken or if the inside is broken. Never try to manipulate or connect past any safety functions. 18. If the cabinet is not assembled after the manufacturer s instructions, there is a risk that the cabinet can cause personal injuries or injuries on property. 5 PODAB 2009
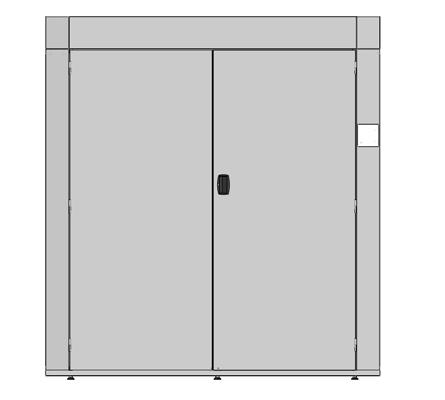
6 Specification Dimensions Technical information Loading Capacity, Number of Suits quantity 6 Air Flow cu m/min cu ft/min Heating Power Electrical Requirements kw 12 kw 240V, 50/60Hz, 1PH Amp Breaker V, 50/60Hz, 3PH Amp Breaker V, 50/60Hz, 3PH Amp Breaker PODAB


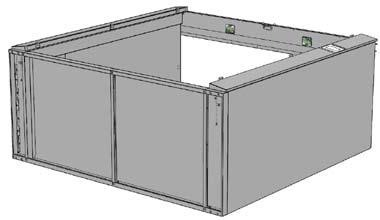
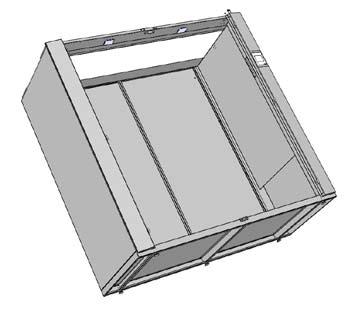
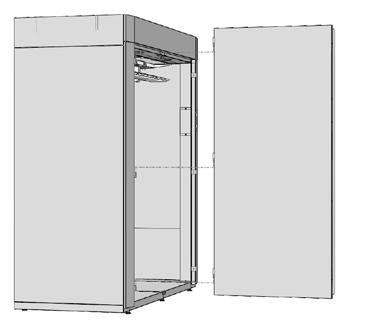
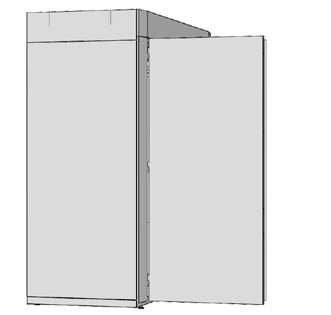
7 Assembly instructions Tools You need the following tools to easily install the drying cabinet, FC 18: Cordless screwdriver Wrench Hex key 3 and 5 mm Level Torx screwdriver bit no x 7 PODAB 2009

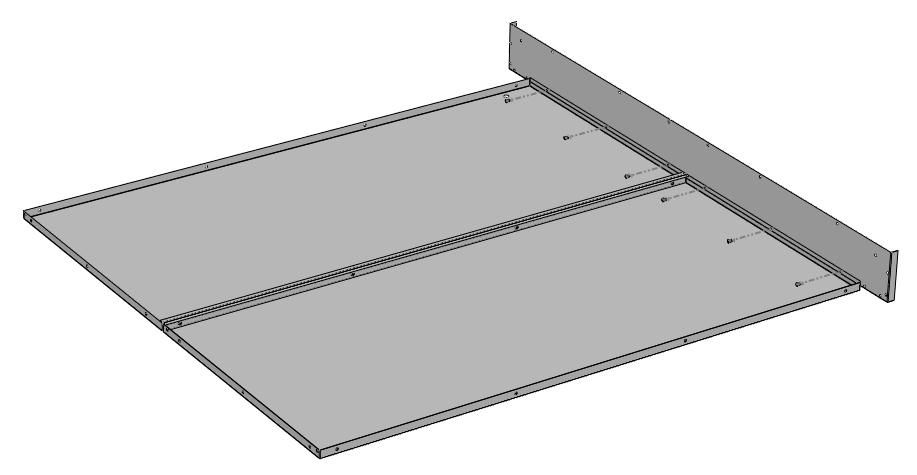
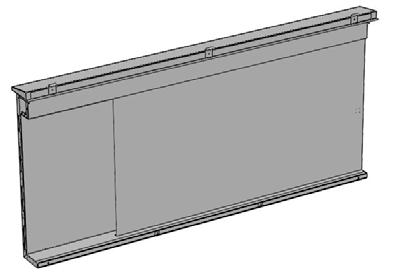
8 2 6x 3a 3b PODAB


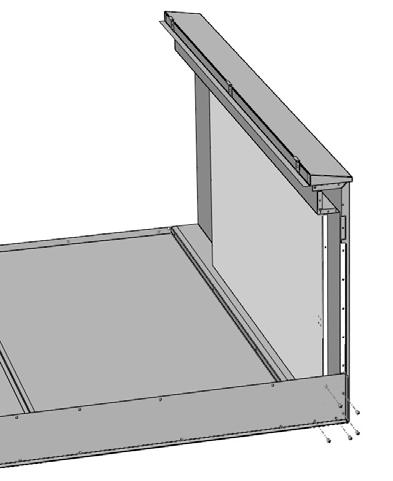
9 4 5 5x 6 4x 9 PODAB 2009
 9x 8")

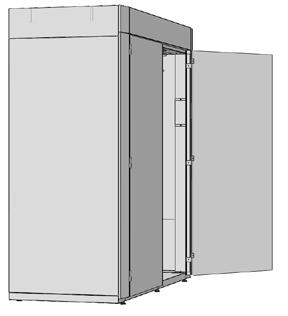
10 7(repeat 4-6) 9x 8 6x 9 1x PODAB


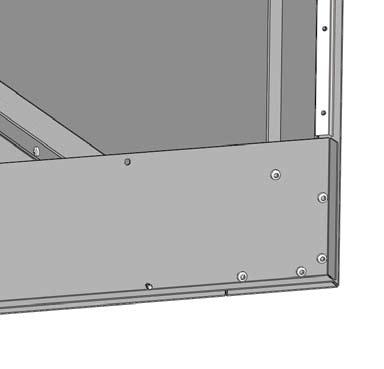
11 10 6x 11 1x 12 2x 11 PODAB 2009


12 x 15 26x PODAB


13 16 2x 17 6x 18 4x 13 PODAB 2009


14 19 2x PODAB


15 x 15 PODAB 2009


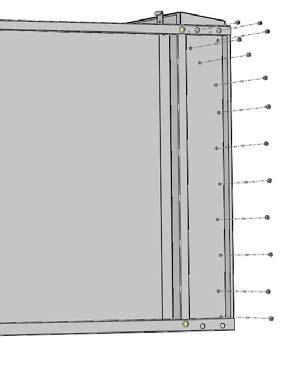
16 25 8x 26 8x 27 PODAB


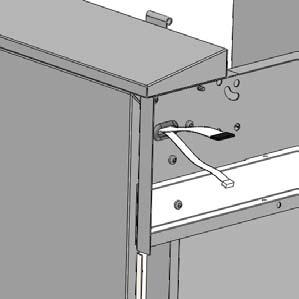
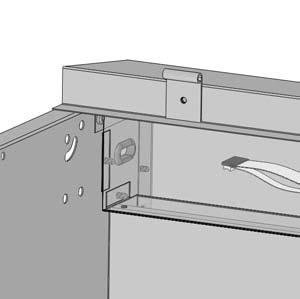
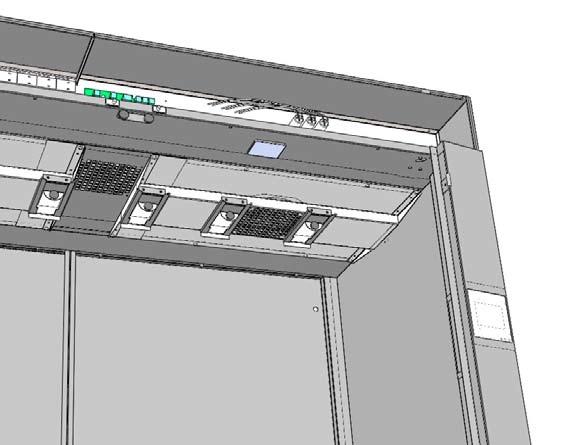
17 28 4x 29 Connect the cables Keypad LCD The side without hole pattern to the left. Lights Door switch 17 PODAB 2009

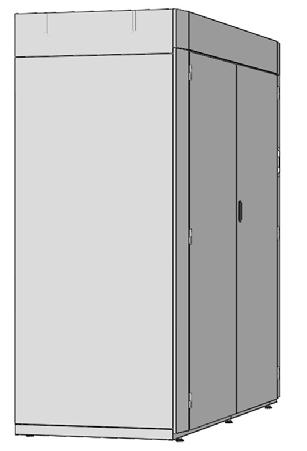
18 30 4x 31 PODAB

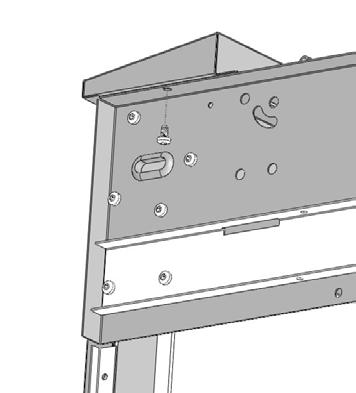
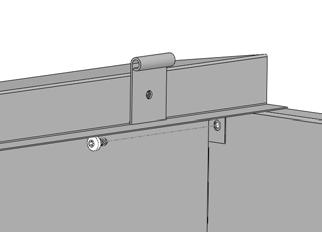
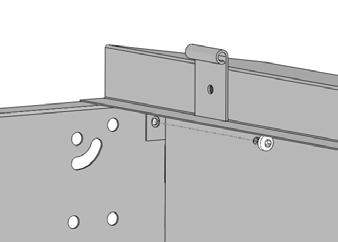
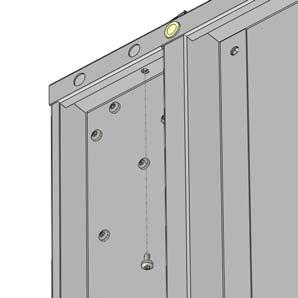
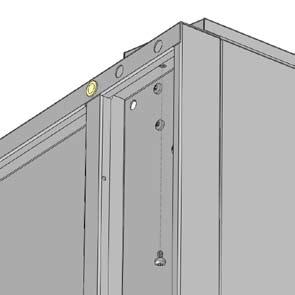
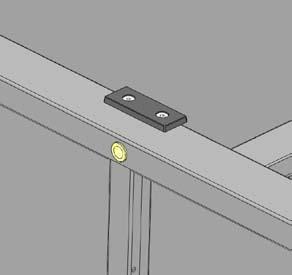
19 Installation of the cabinet Step 1: Put the cabinet in place Place the cabinet with enough space in front of the cabinet and on the sides to be able to open the doors. The feet of the cabinet can be adjusted from the inside with the help of a Hex key. The feet must stand free on the floor and have an even weight distribution. Use a leveler and control that the cabinet is leveled; horizontally and vertically. NOTE: We recommend that the cabinet is installed on a firm and leveled floor. Step 2: Fasten the cabinet to the wall Use the stoppers, screws and washers to secure the cabinet through the back plates. (See picture.) NOTE: Please control that the cabinet is leveled and cannot be tilted. NOTE: If the cabinet is not connected according to these recommendations, the warranty is no longer valid. Step 4: Connect the drying cabinet to the main switch NOTE: Only an authorized electrician is allowed to install the electrical connection. The cabinet is prepared for electrical connections: 400 V, 3-N, 50 Hz. WARNING To prevent that fire and electric shock appear, the cabinet MUST be connected according to the color codes on the cables. It is always the buyer that has the responsibility to check that an authorized electrician makes the electrical connections of the cabinet. Fastening points WARNING ATTENTION Never place the cabinet in direct contact with wooden material. Always use the stoppers to prevent the cabinet from direct contact to a wooden wall. Leave a security distance of at least 30 mm. Step 3: Connect the cabinet to the ventilation channel For further instructions, se page 20: Requirements for ventilation. To prevent personal injuries, the cabinet shall always be connected permanently through an all pole main switch. Always ground the cabinet! Also check that the connecting cable has a strain relief bushing. If not, there is a risk that the cabinet will be live. Step 5: Control that the heating relay is working Shut the doors and start the cabinet, after about 3 seconds you can hear when the heat relays hit. Wait a couple of minutes and control that the outgoing air channel becomes warm. If the outgoing air channel does not get warm, go back to step 4 and control that the electrical connection is installed correctly. Do not use ventilation channels made of plastic or foil. Place the cabinet so that the ventilation channel is as short as possible. Make sure that the ventilation channel is cleaned when a new cabinet is installed. Use a 160 mm rigid or flexible metal duct to the evacuation connection. If you use rigid ducts, it is important that the male connector of the ventilation tube on each section follows the air direction. The construction shall be as straight as possible. Always isolate ducts that go through non-isolated areas. The condensation makes dust and dirt get stuck in the channel. 19 PODAB 2009
20 Requirements for ventilation WARNING A drying cabinet produces inflammable dust. To minimize the risk for fire, the evacuation of the cabinet must be connected to a ventilation channel that evacuates the air. Never let the evacuated air into a room or a surrounding where there is a risk for ignition. Do not use ventilation channels in plastic or fire dangerous material. Ventilation channel choice of material Ventilation channel, ducts, connections etc are not included. The ventilation channels shall be at least 160 mm in diameter and should not have channels or similar on the inside. We recommend that the ventilation system is built with rigid metal ducts for best result. Flexible evacuating ducts for drying cabinets can also be used. NOTE: Never use flexible ducts through walls or other covered areas. NOTE: Do not screw or nit the ventilation channel, so that the screws will come through the inside of the pipe. This construction will gather dust and impaire the cabinet s performance. The channel shall always be separated from the other ventilation in the house. Requirements for incoming air In order to make the cabinet work properly, it is very important that there is enough incoming air in the room. The incoming air must be at least 4 00 m³/hour. If the cabinet is placed in a room where the incoming air is not enough, we recommend that you install an air exchanger. Contact PODAB for more information. Ventilation channel design IMPORTANT: Always make the channels as short as possible. NOTE: If a drying cabinet is installed in an old ventilation channel, please clean the channel properly. In order to make the cabinet work properly, the incoming airflow must be enough. The amount of evacuated air per hour is depending on how high the pressure fall in the ventilation channel is. Material, the design and the length of the channel have a large impact on the air flow. In order to get the best possible performance, the pressure fall shall be as low as possible. When the air is transported through the channel, it is exposed to different kind of resistance. Factors that give a low pressure fall: Smooth inner walls on the pipe Large diameter on the pipe Short length on the pipe Few curves Few angels (90 degrees) PODAB
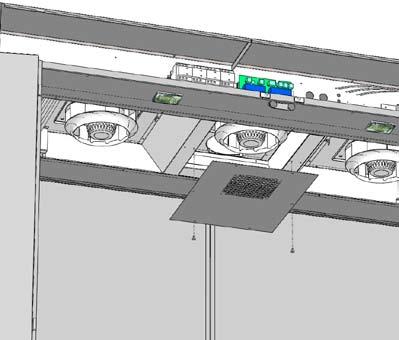
21 Evacuated amount of air and pressure fall In order to get FC 18 to work properly, the ventilation channel shall be designed to get an out coming air flow from the cabinet of about 300 m³/h. When the cabinet is installed to an existing channel system, the cabinet can be calibrated to optimize the air flow. In order to gain this air flow, the pressure fall must not exceed 210 Pa. By an airflow of 300 m³/h and a diameter of the pipe of 160 mm, this corresponds to a straight, smooth ventilation channel of 140 m. Decrease the outgoing air flow The cabinets function and automatic programs are optimized for the recommended air flow of 300 m3/h. If the design of the ventilation is made so that evacuated air flow exceeds 300 m3/h, the evacuation can be throttled with help of a damper. Contact a ventilation expert in order to find a proper solution for your ventilation. Pressure fall estimation The counter pressure in the ventilation channel can be measured with a pressure meter. The measuring point shall be placed by the cabinets evacuating outlet. In order to estimate the pressure fall without meter equipment we recommend the following: Identify the ventilation channel s incoming components in the air flow direction. Check the part pressure fall for each component in the table. Calculate the total amount of pressure fall by adding each parts pressure fall. The table shows the most common components in a ventilation system. The information shall be considered as approximate data. For more information, contact the manufacturer of the parts of the system. Please note that the data in the table is for an air flow of 300 m³/h. Component Pressure fall Circular channel ø, mm Pa/m Ø 125 4, ,5 Pipe bends 90º ø, mm r, mm Pa/bend Ø r Reduction Transition, mm Pa/reduction 125 to to Example: 10 m long 160 mm channel with 3 pipe curves which gives an estimated pressure fall of (6 x 1,5) + (3 x 4) = 21 Pa. Increase the outgoing air flow The drying cabinet gets its air from the small space between the doors and the cabinet. An increased incoming air flow gives automatically an increased outflow. The doors are kept in place by two magnets, which both are assembled to a bracket. To increase the incoming air flow, loosen the two screws on the bracket and push it forward. 21 PODAB 2009

22 User manual Fill the cabinet To get the best drying result: try to dry the same type of firefighting suits at the same time. Distribute the clothing evenly in the cabinet. If less than six suits are dried, remove the hangers not used. The dampers are closed automatically. Close the doors The drying cabinet will not start until the doors are completely closed. 1 2 Increase or reduce the temperature with the arrow buttons 3 and 4. There are three levels: Minimum (MIN) = 40ºC Medium (MED) = 60ºC Maximum (MAX) = 80ºC The degrees stated above, show the maximum temperature of the warm air stream. Set the time Increase or reduce the drying time with the arrow buttons 6 and 7. The drying time can be increased to maximum 4 h. Lower temperature requires longer drying time. 8 Start Push button 5 to start the cabinet. Keypad 1. Manual programme mode Automatic programme mode* Reduce the temperature Increase the temperature Start/stop the programme Reduce the time Increase the time LCD-display *Will also change programme when you are in the automatic programme mode. Manual programme mode In order to set the time and temperature, push key no 1. LCDdisplay shows the settings for manual programmes. The cabinet is preset on average temperature 80ºC and 1h and 30 minutes drying time. Pause programme To pause a working programme, open the doors. The drying time is paused. The cabinet will start again when the doors are closed and the start button is pushed. If the doors are left open longer than 10 minutes, the programme is interrupted. Change temperature or time during drying Temperature and time can be adjusted during the drying process and the programme is in the heating phase. When the cabinet switches to cool down, neither time nor temperature can be changed. Interrupt a programme To interrupt a working programme, push the START/STOP. Automatic programme mode The drying cabinet is equipped with the function HTS Humidity Tracking System. This function is activated in the automatic programme mode. The drying time adjusts to the laundry in the cabinet and is controlled by a humidity sensor. To choose automatic programme mode Choose automatic programme mode by pushing button 2. Set the temperature PODAB
23 The FC 18 have three different automatic programmes: Membrane, Cotton wool and Stationwear. For these programmes the drying time is adjusted automatically. Programme: Membrane When automatic mode is activated, the programme Membrane is set as first choice. Membrane should be used for firefighting suits with membrane fabric. Drying temperature is 80ºC. Programme: Cotton wool To change automatic program, push button no 2 once more. The programme Cotton wool should be used for firefighting suits with cotton wool stuffing. Drying temperature is 80ºC. Programme: Stationwear For station and sportswear like T-shirts, sweat-shirts, pants etc. Drying temperature is 60ºC. Reactivation of impregnation The programmes Membrane and Cotton wool have a unique function. By the end of the drying cycle the cabinets goes into reactivation mode. During 30 minutes the evacuation of air is stopped and the temperature is maximized. This hardens the impregnation of the suits. Start programme Push button 5 to start the cabinet. Pause programme To pause a working programme, open the doors. The cabinet will start automatically when the doors are closed, and the start button is pushed. Interrupt a programme To interrupt a working programme, push START/STOP. CAUTION If a program is interrupted before the cool down has finished, the ceiling of the cabinet could be very hot. Maintenance Installation during winter If the cabinet is installed a cold winter day (below 0 C) and has been out in the cold, we recommend that it is kept inside a few hours before use. Take good care of the cabinet Only use a damp cloth with a mild detergent when cleaning the cabinet. Never use solvent to clean the display. Ventilation system Loosen the ventilation pipe on the cabinet every year and clean if necessary around the evacuating channel. IMPORTANT: Always switch off the electricity before starting to work with the cabinet. Inspect with set intervals the complete ventilation channel; don t forget the outer wall. There can easily be leafs and other rubbish that chokes. We recommend that you once a year, take down the service doors and vacuum clean around the fans and elements. Keep your cabinet efficient and economical The ventilation channels shall be as short as possible. If possible, dry the same type of textiles at the same time. Do not dry with maximum temperature if you do not need to. Cool down All programmes, both manual and automatic, have a cool down phase of 15 minutes. During cool down the textiles are reconditioned and the drying cabinet is cooled down. Time and temperature cannot be changed. If the doors are opened during the cool down, the fans will continue. This is normal procedure. 23 PODAB 2009
24 SERVICE/SUPPORT Phone Fax AB PODAB, Ekonomivägen 9, Askim, SWEDEN Tel +46 (0) , Fax +46 (0) E-post: PODAB
Drying Cabinet. ProLine FC 20 - for Protective Garments. PODAB - Professional Laundry Products
 Drying Cabinet ProLine FC 20 - for Protective Garments PODAB - Professional Laundry Products 1 Drying Cabinets for Protective Garments PODAB has developed custom made drying cabinets for fire stations
Installation and Operating Manual Drying Cabinet
 Drying Cabinet TS-4175 WW CONTENTS THIS USER MANUAL & DATA PLATE DETAILS Page 2 IMPORTANT SAFETY INSTRUCTIONS Page 3 INSTALLATION INSTRUCTIONS Page 4 OPERATING INSTRUCTIONS Page 8 MAINTENANCE INSTRUCTIONS
Air heater/cooler in combination with ground source heat pump
 Swegon CASA Air heater/cooler in combination with ground source heat pump Installation, operation and maintenance instructions for design engineers, installation engineers and service personnel SDHWM_c_EN
Installation manual. Tumble dryers T4130. Compass Control
 Installation manual Tumble dryers T4130 Type N1130 Compass Control Installation manual in original language 487 05 41 61/EN 2011.09.16 Contents 3 Contents Safety precautions... 5 Technical data... 7 Setup...
OPERATING INSTRUCTIONS. Drying cabinet DC 7774 DC Read the instructions before using the machine.
 OPERATING INSTRUCTIONS Drying cabinet DC 7774 DC 7784 Read the instructions before using the machine. Dear ASKO customer, Congratulations on making an excellent choice, and welcome to the ASKO family,
TraceTek Sensing Module Installation, Operation and Maintenance Instructions DESCRIPTION SPECIFICATIONS APPROVALS TYPE NM
 TTC-1 TraceTek Sensing Module Installation, Operation and Maintenance Instructions DESCRIPTION The nvent RAYCHEM TraceTek TTC-1 sensing module is used with TraceTek sensing cables to detect liquid leaks.
INSTRUCTION & USER MANUAL
 INSTRUCTION & USER MANUAL GRAND CRU FREE-STANDING SERIES WINE COOOLERS GC96 GC166 GC181 This manual contains important information including safety and installation instructions of the appliances. Please
Installation Electric Dryers Instructions 01
 Installation Electric Dryers Instructions 01 Questions? Call 800.GE.CARES (800.432.2737) or visit our Web site at: GEAppliances.com This is the safety alert symbol. This symbol alerts you to potential
WAILEA OWNER S MANUAL
 WAILEA OWNER S MANUAL The blades in each pack are matched for equal weight to assure smooth fan operation. If more than one fan is being installed, be careful not to mix blades from different cartons.
INFORMATION ONLY READ AND SAVE THESE INSTRUCTIONS SAFETY FIRST
 This information guide will help you with converting the electronics on the Comfort- Touch to Advan-Touch technology. Within this guide you will find step by step instruction on how to convert the fan,
WASHING MACHINE READ THIS MANUAL CAREFULLY TO DIAGNOSE TROUBLE CORRECTLY BEFORE OFFERING SERVICE.
 website : http://www.lgeservice.com e-mail : http://lgeservice.com/techsup.html WASHING MACHINE SERVICE MANUAL CAUTION READ THIS MANUAL CAREFULLY TO DIAGSE TROUBLE CORRECTLY BEFORE OFFERING SERVICE. MODEL
DISHWASHER. Models DW2432 and DW2432SS. Installation Manual. Write Serial Number (on inner door of unit) here:
 here:") DISHWASHER Models DW2432 and DW2432SS Installation Manual Write Serial Number (on inner door of unit) here: Felix Storch, Inc. Summit Appliance Division 770 Garrison Avenue Bronx, New York 10474 www.summitappliance.com
DISHWASHER Models DW2432 and DW2432SS Installation Manual Write Serial Number (on inner door of unit) here: Felix Storch, Inc. Summit Appliance Division 770 Garrison Avenue Bronx, New York 10474 www.summitappliance.com
Installation Instructions. For the 18 Built-In Dishwasher and Front Color Panels
 Installation Instructions For the 18 Built-In Dishwasher and Front Color Panels Printed in USA 154232102 Before You Begin DO NOT INSTALL DISHWASHER UNTIL YOU HAVE READ ALL INSTRUCTIONS. FOR YOUR SAFETY,
GRANDE OWNER S MANUAL
 LE GRANDE OWNER S MANUAL The blades in each pack are matched for equal weight to assure smooth fan operation. If more than one fan is being installed, be careful not to mix blades from different cartons.
Drying Cabinet Installation and Operating Manual
 Drying Cabinet Installation and Operating Manual Model:- ECO Dryer 2.0 HP Heat Pump Technology CONTENTS THIS USER MANUAL 3 DATA PLATE DETAILS 3 ADVICE ON SAFE OPERATION 3 DESCRIPTION OF THE CABINET 4 AIR
52 CEILING FAN READ AND SAVE THESE INSTRUCTIONS FAN RATING AC 120V.
 Irene 52 CEILING FAN READ AND SAVE THESE INSTRUCTIONS FAN RATING AC 120V. 60Hz TABLE OF CONTENTS Tools and Materials Required... 1 Package Contents... 1 Safety Rules... 2 Mounting Options... 3 Hanging
PORT700CF Portable Fume Collector
 11975 Portland Ave. S. Suite 104 Burnsville, MN 55337 Phone: 952-894-6637 Fax: 952-894-0750 Email: info@ventaire.com Website: www.ventaire.com PRODUCT GUIDE FOR PORT700CF Portable Fume Collector REV:110314
Installation GUIDE VDWU524SS VDWU524WSSS FDWU524WS FDWU524 VDWU324SS FDWU324
 Installation GUIDE VDWU524SS VDWU524WSSS FDWU524WS FDWU524 VDWU324SS FDWU324 To prevent accidents, which could cause serious injury or death, as well as machine damage read these instructions before installation
Dishwasher Installation Manual
 Dishwasher Installation Manual DW 51600 SS DW 51600 FBI DWT 51600 SS DWT 51600 FBI DWT 81800 FBI DWT 81800 SS DWT 81800 SSIH DWT 81800 SSWS DWT 52600 WIH DWT 52600 SSIH DWT 52600 BIH DWT 52800 WIH DWT
INSTRUCTION MANUAL COMPRESSOR DRIVEN WINE COOLER
 INSTRUCTION MANUAL COMPRESSOR DRIVEN WINE COOLER DX-7.22SK DX-19.58SK DX-24.56BBK DX-24.56BSK DX-41.130BBK DX-41.130BSK DX-46.145BK DX-46.145SK DX-94.270DBK DX-94.270DSK DX-181.490DBK DX-181.490DSK This
USER MANUAL AND TECHNICAL MANUAL
 USER MANUAL AND TECHNICAL MANUAL Kanmed Universal Warming Cabinets Kanmed Blanket Warming Cabinets Kanmed Combination Cabinet GE-2300-070 / 4 2014-05-12 NOTE: This manual contains important information
Owner s Guide and Installation Manual
 For Your Records and Warranty Assistance For reference, also attach your receipt or a copy of your receipt to the manual. Model Name Type 2A Models Owner s Guide and Installation Manual Model No. Date
Cooktop Chimney Ventilation Hoods
 INSTALLATION GUIDE Cooktop Chimney Ventilation Hoods Contents Wolf Cooktop Chimney Ventilation Hoods.......... 3 Cooktop Chimney Hood Specifications............ 4 Cooktop Chimney Hood Installation.............
Owner s Guide and Installation Manual
 For Your Records and Warranty Assistance For reference, also attach your receipt or a copy of your receipt to the manual. Model Name Type 2A Models Owner s Guide and Installation Manual Model No. Date
Turin LED Ceiling Fan
 Turin LED Ceiling Fan model no. no. 052-6972-6 Instruction Manual Toll-free: -866-827-4985 IMPORTANT: Please read and understand this manual before any assembly. Before beginning assembly of product, make
High Power Range Hood
 High Power Range Hood Pictured Model: CW500 Installation and Operating Instructions Please read all instructions before installing and operating. All wiring and installation must be in accordance with
Installation Instructions
 Installation Instructions For the 18" Built-In Dishwasher Sears, Roebuck and Co. Sears Canada, Inc. Hoffman Estates, IL 60179 U.S.A. Toronto, Ontario, Canada M5B 2B8 154435201 Before You Begin DO NOT INSTALL
Retrofit Instructions CLEARVIEW DAY COVER CAUTION: Please read this manual completely before attempting to install, operate or service this equipment
 Retrofit Instructions CLEARVIEW DAY COVER CAUTION: Please read this manual completely before attempting to install, operate or service this equipment This manual is Copyright 2019 Duke Manufacturing Co.
SERVICE MANUAL WASHING MACHINE MODEL : WD-10120FD WD-12120(5)FD WD-14120(5)FD FWD-12120(5)FD FWD-14120(5)FD CAUTION
FD WD-14120(5)FD FWD-12120(5)FD FWD-14120(5)FD CAUTION") website : http://www.lgeservice.com e-mail : http://lgeservice.com/techsup.html WASHING MACHINE SERVICE MANUAL CAUTION READ THIS MANUAL CAREFULLY TO DIAGSE TROUBLE CORRECTLY BEFORE OFFERING SERVICE. MODEL
website : http://www.lgeservice.com e-mail : http://lgeservice.com/techsup.html WASHING MACHINE SERVICE MANUAL CAUTION READ THIS MANUAL CAREFULLY TO DIAGSE TROUBLE CORRECTLY BEFORE OFFERING SERVICE. MODEL
Questions? Call 800.GE.CARES ( ) or visit our Web site at: GEAppliances.com In Canada, call or visit
 or visit our Web site at: GEAppliances.com In Canada, call or visit") Installation Instructions Electric Dryer 01 Questions? Call 800.GE.CARES (800.432.2737) or visit our Web site at: GEAppliances.com In Canada, call 1.800.561.3344 or visit www.geappliances.ca BEFORE YOU
Installation Instructions Electric Dryer 01 Questions? Call 800.GE.CARES (800.432.2737) or visit our Web site at: GEAppliances.com In Canada, call 1.800.561.3344 or visit www.geappliances.ca BEFORE YOU
Summer Breeze Heater Service Manual
 Summer Breeze Heater Service Manual RSBH RSBH-SB RSBHP Revision: 1.0 Issued: 12-18-2012 Table of Contents I. Basic Assembly and Operation A. Safety Instructions... 2 B. Grounding Instructions... 3 C.
COOKER HOOD INSTRUCTIONS MANUAL MODEL
 390 3300 COOKER HOOD INSTRUCTIONS MANUAL MODEL INTRODUCTION OF DEVICE 3 4 5 390 390 0 3 Min 80/Max 060 6 5 3300 ) Chimney ) Body 3) Control Panel 4)Aluminum Cassette Filter 5) Lighting 6) Split Extraction
IMPORTANT SAFETY INFORMATION:
 Owner s Manual Model CUH05B31T IMPORTANT SAFETY INFORMATION: Always read this manual first before attempting to install or use this heater. For your safety, always comply with all warnings and safety instructions
OFF. 20 min. 60 min. 30 min. 60 min OFF. 100 min Start. 200 min 150 min
 Cool Warm HDY-M60 HDY-M60 HDY-M40 20 min 30 min 200 min 150 min 100 min Start Please read this manual carefully before operating your dryer. Retain this for future reference. Record the model and serial
Questions on Installation? Call: GECARES (US) or Visit our Web site at: (US) 4" DUCT CLAMPS (2) OR 4" SPRING CLAMPS (2)
 or Visit our Web site at: (US) 4 DUCT CLAMPS (2) OR 4 SPRING CLAMPS (2)") Installation Instructions Questions on Installation? Call: 1-800-GECARES (US) or Visit our Web site at: www.geappliances.com (US) Electric Dryer 49 37 BEFORE YOU BEGIN Read these instructions completely
Installation Instructions Questions on Installation? Call: 1-800-GECARES (US) or Visit our Web site at: www.geappliances.com (US) Electric Dryer 49 37 BEFORE YOU BEGIN Read these instructions completely
C-IV 60 CEILING FAN READ AND SAVE THESE INSTRUCTIONS. FAN RATING AC 120V. 60Hz
 C-IV 60 CEILING FAN READ AND SAVE THESE INSTRUCTIONS FAN RATING AC 120V. 60Hz Please do not use any electric or battery powered tools in the assembly and installation of this or any Matthews Fan Company
Please read the following installation instructions first after purchasing this product or transporting it to another location.
 0 INSTALLATION INSTALLATION Installation Overview Please read the following installation instructions first after purchasing this product or transporting it to another location. Check and choose the proper
Please read and save these instructions. Should you have any questions or difficulty installing your fan, call us first!
 IC/Air2 and IC/Air3 Installation Instructions and Owners Manual Please read and save these instructions. Should you have any questions or difficulty installing your fan, call us first! Customer Service
CEILING FAN OWNER'S MANUAL
 CEILING FAN OWNER'S MANUAL READ AND SAVE THESE INSTRUCTIONS MODEL: 52-135-5WA-13 FAN RATING AC 120V. 60Hz CUL LISTED MODEL : AC-552OD 1. TOOLS AND MATERIALS REQUIRED Philips screw driver Blade screw driver
Drying Cabinet Installation and Operating Manual
 Drying Cabinet Models:- ETS-1900H ETS-1900TR CONTENTS ABOUT THE USER MANUAL Page 2 IDENTIFICATION DATA PLATE Page 2 IMPORTANT SAFETY INSTRUCTIONS Page 3 INSTALLATION INSTRUCTIONS Page 4 OPERATING INSTRUCTIONS
Owner s Manual READ AND SAVE THESE INSTRUCTIONS
 16 Outdoor Misting / Oscillating Fan Model Number: AMMF16R-1 Owner s Manual READ AND SAVE THESE INSTRUCTIONS CAUTION: Before using this product, read this manual and follow all safety rules and operating
DAILY REFERENCE GUIDE
 DAILY REFERENCE GUIDE EN THANK YOU FOR PURCHASING A WHIRLPOOL PRODUCT To receive more comprehensive help and support, please register your product at www. whirlpool. eu / register WWW You can download
Instruction Manual. Window AC 12000BTU. Energy- Saving Mode. Wards.com MODEL: 12000BTU Item No.: V~, 60Hz, 1060W
 Energy- Saving Mode Window AC 12000BTU MODEL: 12000BTU 11.2 Montgomery Ward Customer Service 1112 7th Avenue, Monroe, WI 53566 8:00 am to Midnight, Monday through Friday Wards.com 1 888 557 3848 Instruction
Operating instructions Rotary iron HM
 Operating instructions Rotary iron HM 21-140 To prevent accidents and machine damage read these instructions en - US, CA before installation or use. M.-Nr. 07 660 861 Contents Important Safety Instructions.................................................................3
Operating Instructions (ENG) MODEL: 115 V UL LISTING FOR 1/2 HP MODELS ONLY. Read instructions before operating the machine J 07/05/07
 MODEL: 115 V UL LISTING FOR 1/2 HP MODELS ONLY. Read instructions before operating the machine J 07/05/07") Operating Instructions (ENG) MODEL: 115 V UL LISTING FOR 1/2 HP MODELS ONLY Read instructions before operating the machine. 86038980-J 07/05/07 PRV NO. 98946 MACHINE DATA LOG/OVERVIEW MODEL DATE OF PURCHASE
Operating Instructions (ENG) MODEL: 115 V UL LISTING FOR 1/2 HP MODELS ONLY Read instructions before operating the machine. 86038980-J 07/05/07 PRV NO. 98946 MACHINE DATA LOG/OVERVIEW MODEL DATE OF PURCHASE
WHHR Midi & Midi Lite
 WHHR Midi & Midi Lite Residential Whole House Heat Recovery Units with Low Energy EC Motors Optional - Integral LCD Installation, Operating and Maintenance Instructions Image of model with LCD screen Page
DUKA S7. Bathroom fan and Heat mover 8-11 User and Installation instructions. 2 Mounting illustrations 3 Parts. dukaventilation.dk
 DUKA S7 2 Mounting illustrations 3 Parts Bathroom fan and Heat mover 8-11 User and Installation instructions DUKA00001 45 Serie nr.: DUKA00001 Model: S7 230V AC 50Hz, 3W, Class II, IP44 45 Serie nr.: DUKA00001
SERVICE MANUAL WASHING MACHINE FWD-12120(5)FD FWD-14120(5)FD FWD-16120(5)FD DWD-12120(5)FD DWD-14120(5)FD DWD-16120(5)FD
FD FWD-14120(5)FD FWD-16120(5)FD DWD-12120(5)FD DWD-14120(5)FD DWD-16120(5)FD") website : http://www.lgeservice.com e-mail : http://lgeservice.com/techsup.html WASHING MACHINE SERVICE MANUAL CAUTION READ THIS MANUAL CAREFULLY TO DIAGSE TROUBLE CORRECTLY BEFORE OFFERING SERVICE. MODEL
website : http://www.lgeservice.com e-mail : http://lgeservice.com/techsup.html WASHING MACHINE SERVICE MANUAL CAUTION READ THIS MANUAL CAREFULLY TO DIAGSE TROUBLE CORRECTLY BEFORE OFFERING SERVICE. MODEL
WASHING MACHINE READ THIS MANUAL CAREFULLY TO DIAGNOSE TROUBLE CORRECTLY BEFORE OFFERING SERVICE.
 website : http://www.lgeservice.com e-mail : http://lgeservice.com/techsup.html WASHING MACHINE SERVICE MANUAL CAUTION READ THIS MANUAL CAREFULLY TO DIAGSE TROUBLE CORRECTLY BEFORE OFFERING SERVICE. MODEL
Swedish design and manufacture since 1967
 Swedish design and manufacture since 167 PVP MA20-14 rev.2 Manual User manual Copyright 2017 Pahlén AB, Box 728, SE-14 27 Upplands Väsby, Sweden Tel. +46 8 54 110 50, Fax +46 8 50 868 80, e-mail: info@pahlen.se,
Installation and Operation Manual CLEARVIEW DAY COVER CAUTION: To view a video scan the QR code above
 Installation and Operation Manual CLEARVIEW DAY COVER To view a video scan the QR code above CAUTION: Please read this manual completely before attempting to install, operate or service this equipment
Owner s Guide and Installation Manual
 Tribeca Owner s Guide and Installation Manual English Form# M6001-01 20120416 2012 Casablanca Fan Co. Welcome Your new Casablanca ceiling fan is an addition to your home or office that will provide comfort
Questions? Call 800.GE.CARES ( ) or visit our Web site at: GEAppliances.com In Canada, call or visit
 or visit our Web site at: GEAppliances.com In Canada, call or visit") Installation Instructions Electric Dryer 01 Questions? Call 800.GE.CARES (800.432.2737) or visit our Web site at: GEAppliances.com In Canada, call 1.800.561.3344 or visit www.geappliances.ca BEFORE YOU
Installation Instructions Electric Dryer 01 Questions? Call 800.GE.CARES (800.432.2737) or visit our Web site at: GEAppliances.com In Canada, call 1.800.561.3344 or visit www.geappliances.ca BEFORE YOU
FDT11 FDT15 FDT18. DUCTED TYPE SPLIT SYSTEMS (3 Phase, Fixed Speed)
") OPERA TION & I NSTALLAT I O N FDT11 FDT15 FDT18 MANUAL DUCTED TYPE SPLIT SYSTEMS (3 Phase, Fixed Speed) Read this operating & installation instruction carefully and keep it for future reference DUCTED
OPERA TION & I NSTALLAT I O N FDT11 FDT15 FDT18 MANUAL DUCTED TYPE SPLIT SYSTEMS (3 Phase, Fixed Speed) Read this operating & installation instruction carefully and keep it for future reference DUCTED
OWNERS INSTRUCTION MANUAL
 OWNERS INSTRUCTION MANUAL 132CM/52 Classic INSTALLATION OPERATION MAINTENANCE CAUTION READ INSTRUCTIONS CAREFULLY FOR SAFE INSTALLATION AND FAN OPERATION. IF UNSURE CONSULT A QUALIFIED ELECTRICIAN SUITABLE
DryAire DRYING CABINET
 CONSUMER SERVICES TECHNICAL EDUCATION GROUP PRESENTS L-72 DryAire DRYING CABINET Model LMA1053L JOB AID Part No. 8178202 FORWARD This Whirlpool Job Aid, DryAire Drying Cabinet, (Part No. 8178202), provides
Manifold Installation Controller MIC-180. Installation and Operation Instructions
 Manifold Installation Controller MIC-180 Installation and Operation Instructions For Use With Rheem-Ruud and Paloma Commercial Tankless Water Heaters Table of Contents Safety Information... 1-2 Manifold
Installation instructions for vented tumble dryer DOMESTIC. Dear Customer,
 Dear Customer, Read these instructions carefully and completely before you install the machine. The installation should be carried out by a qualified person who is familiar with all local codes and ordinances
User Manual. Tumble Dryer ZDC8202P
 EN User Manual Tumble Dryer ZDC80P Contents Safety information Safety instructions 3 Product Description 4 Control Panel 5 Programme table 5 Options 6 Settings 7 Before First Use 8 Daily Use 8 Hints and
washing machine contents
 washing machine contents WARNINGS SPECIFICATIONS INSTALLATION AND ASSEMBLY USING THE APPLIANCE. PRACTICAL TIPS MAINTENANCE AND CLEANING SAFETY AND TROUBLESHOOTING ENVIRONMENTAL WARNINGS 4 5 6 10 20 22
CEILING FAN OWNER'S MANUAL
 CEILING FAN OWNER'S MANUAL MODEL: Pelham HVFC# 2299 Old Bronze Satin Nickel Polished Nickel READ AND SAVE THESE INSTRUCTIONS FAN RATING AC 120V. 60Hz. CUL LISTED MODEL: AC-554SY05-7S WEIGHT OF THE FAN:
ST E /ST E / ST E / ST E ST E / ST E / ST E
 ST-5-3-E /ST-5-4-E / ST-53-3-E / ST-53-4-E ST-533-40-E / ST-55-40-E / ST-59-40-E Turbo Electric Heater 800083-4 ENGLISH...-0 Read The Instruction manual: When this symbol is marked on a product, it means
ARLEY STEAM SHOWER ENCLOSURE
 ARLEY STEAM SHOWER ENCLOSURE INSTALLATION AND USER MANUAL CONTENTS Steam Shower Enclosure Installation...2 Technical Information...2 Plumbing Requirements...2 Assembly...3 Tools and Materials...3 Installation...3
FREWIN STEAM SHOWER ENCLOSURE
 FREWIN STEAM SHOWER ENCLOSURE INSTALLATION AND USER MANUAL CONTENTS Steam Shower Enclosure Installation...2 Technical Information...2 Plumbing Requirements...2 Assembly...3 Tools and Materials...3 Installation...3
R32. Installation Manual Split Type Wall Mounted Air Conditioner. This appliance shall be installed in accordance with: REFRIGERANT
 SWING LRSWING Installation Manual Split Type Wall Mounted Air Conditioner COOL RUN C SPEED TURBO ON/OFF FAN COOL HEAT SWING SWING Rinnai Systems Models System Indoor Outdoor HSNRQ25B HINRQ25B HONRQ25B
RV Products Division INSTALLATION INSTRUCTIONS FOR SERIES PACKAGE AIR CONDITIONER
 RV Products Division INSTALLATION INSTRUCTIONS FOR 46413 SERIES PACKAGE AIR CONDITIONER 1. WARNINGS IMPORTANT NOTICE These instructions are for the use of qualified individuals specially trained and experienced
Canister Vacuums S6EVO. Operations and Parts Manual. Models: S6EVO
 Canister Vacuums S6EVO Operations and Parts Manual Models: S6EVO 2 IMPORTANT SAFETY INSTRUCTIONS When using an electrical appliance, basic precaution must always be followed, including the following: READ
INSTALLATION MANUAL. Split-type Air Conditioner (Cooling and Heating) Outdoor Unit UQB09JJWC UQB12JJWC. Indoor Unit AQB09JJWC AQB12JJWC
 Outdoor Unit UQB09JJWC UQB12JJWC. Indoor Unit AQB09JJWC AQB12JJWC") AQB09JJ6WC_IM_E_2585 2006.4.17 4:26 PM Page 17 INSTALLATION MANUAL Indoor Unit AQB09JJWC AQB12JJWC Outdoor Unit UQB09JJWC UQB12JJWC ENGLISH FRANÇAIS ESPAÑOL Split-type Air Conditioner (Cooling and Heating)
AQB09JJ6WC_IM_E_2585 2006.4.17 4:26 PM Page 17 INSTALLATION MANUAL Indoor Unit AQB09JJWC AQB12JJWC Outdoor Unit UQB09JJWC UQB12JJWC ENGLISH FRANÇAIS ESPAÑOL Split-type Air Conditioner (Cooling and Heating)
OPERATING and MAINTENANCE INSTRUCTIONS Models: H138NPS36CLCMQRL i7 Hot Cabinet
 Rev. 0 (/) Page of 9 OPERATING and MAINTENANCE INSTRUCTIONS Models: HNPS6CLCMQRL i7 Hot Cabinet Cabinet model number: Cabinet serial number: Authorized Service Agency: Ph: Fax: Keep this manual for future
Dryer. User manual DV22K6800** DV22K A-00_EN (US)_ indd :15:41
_ indd :15:41") Dryer User manual DV22K6800** DV22K6800-03650A-00_EN (US)_151211.indd 1 2015-12-11 7:15:41 Before installation Read through the following instructions before installing the dryer, and keep this manual
Dryer User manual DV22K6800** DV22K6800-03650A-00_EN (US)_151211.indd 1 2015-12-11 7:15:41 Before installation Read through the following instructions before installing the dryer, and keep this manual
Installation Instructions
 Installation Instructions For NoFrost Combined Refrigerator-Freezers CS 1400 PC CS 1400 R CS 1410 7085 589-00 Important Please Read and Follow these Instructions These instructions contain Danger, Warning
Installation plan Commercial Washing Machine PW 413 PW 418
 Installation plan Commercial Washing Machine PW 413 PW 418 To avoid the risk of accidents or damage to the machine, it is essential to read these instructions before it is installed and used for the first
INSTALLATION INSTRUCTIONS ELECTRIC DRYER
 INSTALLATION INSTRUCTIONS ELECTRIC DRYER Table of Contents... 2 IMPORTANT: Save for local electrical inspector s use. 3397627C DRYER SAFETY... 2 INSTALLATION INSTRUCTIONS... 4 Tools and Parts... 4 Location
51AKS I S O OWNER S MANUAL
 LLOYD'S REGISTER QUALITY ASSURANCE 51AKS I S O 9 00 1 OWNER S MANUAL This manual applies to the following models Stand-alone Split 51AKS 085--- 51AKS 010--- 51AKS 185--- 51AKS 013--- 51AKS 113--- 51AKS
29 IN. (73.7 CM) ELECTRIC DRYER INSTALLATION INSTRUCTIONS DRYER SAFETY
 ELECTRIC DRYER INSTALLATION INSTRUCTIONS DRYER SAFETY") 9 IN. (7.7 CM) ELECTRIC DRYER INSTALLATION INSTRUCTIONS DRYER SAFETY... INSTALLATION INSTRUCTIONS... Tools and Parts... Location Requirements... Electrical Requirements... Electrical Connection...4 Venting
9 IN. (7.7 CM) ELECTRIC DRYER INSTALLATION INSTRUCTIONS DRYER SAFETY... INSTALLATION INSTRUCTIONS... Tools and Parts... Location Requirements... Electrical Requirements... Electrical Connection...4 Venting
INSTRUCTION & USER MANUAL
 INSTRUCTION & USER MANUAL GRAND CRU BUILT-UNDER SERIES WINE COOLERS GC46D BUILT-UNDER SERIES BEVERAGE COOLERS GC46BC This manual contains important information including safety and installation instructions
Installation Instructions
 GE Consumer & Industrial Appliances Installation Instructions Junction Box Cover Within this user bag, you will find a junction box cover and a #10 hex head screw used to attach the junction box cover
IMPORTANT INSTRUCTIONS READ & SAVE
 5000W Ceiling/Wall Mounted Garage Heater OWNER S MANUAL Model: PH-950N IMPORTANT INSTRUCTIONS READ & SAVE PET OWNERS WARNING: The health of some small pets including birds are extremely sensitive to the
INSTRUCTIONS FOR CARBON INFRARED HEATER
 INSTRUCTIONS FOR CARBON INFRARED HEATER Model: ECOSTRAD THERMAGLO ASSEMBLY & OPERATING INSTRUCTIONS Please read carefully and keep these instructions safe Warning THESE INSTRUCTIONS SHOULD BE READ CAREFULLY
Operating Instructions Vented Dryer T 1413 T To prevent accidents and machine damage, read these instructions before Installation or use.
 Operating Instructions Vented Dryer T 1413 T 1415 To prevent accidents and machine damage, read these instructions before Installation or use. UV M.-Nr. 06 610 720 Table of Contents IMPORTANT SAFETY INSTRUCTIONS
USER MANUAL. Vino 160 Vino 440. Wine Coolers
 Wine Coolers USER MANUAL Vino 160 Vino 440 This manual contains important information including safety and installation instructions of the appliances. Please read it carefully before use and follow all
W Model 1RKU2 w/optional Wall mount. Unit Model Weight (Lbs) Kilowatts Volts- Phase Amps Fan Output Heat Output
 Kilowatts Volts- Phase Amps Fan Output Heat Output") Operating Instructions & Parts Manual 1RKT2, 1RKT3, 1RKT4, 1RKT5, 1RKT9 and 1RKU2 Please read and save these instructions. Read carefully before attempting to assemble, install, operate or maintain the
Operating Instructions & Parts Manual 1RKT2, 1RKT3, 1RKT4, 1RKT5, 1RKT9 and 1RKU2 Please read and save these instructions. Read carefully before attempting to assemble, install, operate or maintain the
MALIBU STAR OWNER S MANUAL
 MALIBU STAR OWNER S MANUAL CONTENTS INTRODUCTION...................................................................... 1 MOUNTING RECOMMENDATIONS..........................................................
GARAGE HEATER WITH REMOTE INSTRUCTION MANUAL MODEL: HA24-100E HA24-150E. Figure 1
 GARAGE HEATER WITH REMOTE INSTRUCTION MANUAL MODEL: HA24-100E HA24-150E Figure 1 PET OWNERS WARNING: Health warning for some small pets, including birds, as they are extremely sensitive to the fumes produced
GETTING STARTED? EASY.
 User Manual GETTING STARTED? EASY. ZTE7100PZ EN User Manual Tumble Dryer SAFETY INFORMATION Before the installation and use of the appliance, carefully read the supplied instructions. The manufacturer
PARTS & ACCESSORIES INSTALLATION AND SAFETY INSTRCUTIONS ITEM NO.:60010BZGTGLD SAFETY PRECAUTION. Canopy. Downrod. Housing. Transmitter CR2032/3V
 L I G H T I N G INSTALLATION AND SAFETY INSTRCUTIONS ITEM NO.:000BZGTGLD SAFETY PRECAUTION PARTS & ACCESSORIES Canopy Downrod Housing WARNING To make sure power is off before attempting installation. WARNING
NON-CYCLING REFRIGERATED AIR/GAS DRYERS QPNC 75 to QPNC 250 OPERATOR S MANUAL
 NON-CYCLING REFRIGERATED AIR/GAS DRYERS QPNC 75 to QPNC 250 OPERATOR S MANUAL DATE OF PURCHASE: MODEL: SERIAL NO.: Record above information from nameplate. Retain this information for future reference.
INSTALLATION MANUAL. Split-type Air Conditioner (Cooling and Heating) Indoor Unit AQB18J6WC AQB24J2WC. Outdoor Unit UQB18J6WC UQB24J2WC
 Indoor Unit AQB18J6WC AQB24J2WC. Outdoor Unit UQB18J6WC UQB24J2WC") AQB8J6WC_IM_E_25864 2006.4.4 3:29 PM Page 7 INSTALLATION MANUAL Indoor Unit AQB8J6WC AQB24J2WC Outdoor Unit UQB8J6WC UQB24J2WC ENGLISH FRANÇAIS ESPAÑOL Split-type Air Conditioner (Cooling and Heating)
AQB8J6WC_IM_E_25864 2006.4.4 3:29 PM Page 7 INSTALLATION MANUAL Indoor Unit AQB8J6WC AQB24J2WC Outdoor Unit UQB8J6WC UQB24J2WC ENGLISH FRANÇAIS ESPAÑOL Split-type Air Conditioner (Cooling and Heating)
THE QUALITY BRAND IN FANS
 THE QUALITY BRAND IN FANS CAUTION! DO NOT THROW AWAY THIS BOOK! READ ALL INSTRUCTIONS CAREFULLY BEFORE INSTALLATION AND FAN OPERATION. Minor design changes or otherwise may result in slight variations
Installation and Operation Manual For Hunter Ceiling Fans
 Installation and Operation Manual For Hunter Ceiling Fans 1 2 CONGRATULATIONS! Your new Hunter ceiling fan is an addition to your home or office that will provide comfort and performance for many years.
Electric Patio Heater Ceiling Type. Operating Instruction. WARNING: This heater is not equipped with a device to control
 Electric Patio Heater Ceiling Type Model: ZHQ2068-RMLED Operating Instruction WARNING: This heater is not equipped with a device to control the room temperature. Do not use this heater in small rooms when
Installation Instructions
 Installation Instructions For Free Standing NoFrost Combined Refrigerator-Freezers CS 1660 7082 653-00 PLEASE READ AND FOLLOW THESE INSTRUCTIONS These instructions contain Warning and Caution statements.
Choosing the installation site. Installation. 07 Choosing the installation site
 Installation Installation warnings: 1. Carefully read the installation manual before beginning. 2. Follow each step as shown. 3. Observe all local, state, and national electrical codes and by qualified,
CEILING FAN OWNER'S MANUAL
 CEILING FAN OWNER'S MANUAL READ AND SAVE THESE INSTRUCTIONS MODEL: 52-771-5TK-13 52-771-5BW-SN 52-771-5WH-WH FAN RATING AC 120V. 60Hz CUL LISTED MODEL : AC-552A 1. TOOLS AND MATERIALS REQUIRED Philips
Installation Instructions
 Installation Instructions Before you begin... 2 Location... 2 Recommended grounding instructions... 2 Electrical requirements... 2 Exhaust requirements... 3 Water supply and drain requirements... 3 Please
Installation manual. Tumble dryers T4290, T4530, T4650. Selecta Control
 Installation manual Tumble dryers T4290, T4530, T4650 Type N4... Selecta Control Installation manual in original language 487 05 44 61/EN 2012.08.21 Contents Contents Safety precautions...5 Dimension
GETTING STARTED? EASY.
 User Manual GETTING STARTED? EASY. ZTE7102PZ EN User Manual Tumble Dryer SAFETY INFORMATION Before the installation and use of the appliance, carefully read the supplied instructions. The manufacturer
VENTILATION FAN. MFG Model : VFB80HLED2/VFB080C4L2 /VFB080C4LED2/ VFB100HLED2/VFB100C4LED1 READ AND SAVE THESE INSTRUCTIONS
 VENTILATION FAN MODEL 80HLED/80L/80LED/00HLED/00LED TABLE OF CONTENTS Package Contents General Safety Information 3 Preparation Assembly Instructions 5 New Construction 5 Existing Construction 6 Connect
SERVICE MANUAL. Ecoboiler Model range: T20 ( ) T30 ( )
 T30 ( )") SERVICE MANUAL Ecoboiler Model range: T20 (1000662) T30 (1000663) Marco Beverage Systems Ltd. 63d Heather Road, Sandyford Industrial Estate, Dublin 18, Republic of Ireland Ireland Tel: (01) 295 2674 Ireland
SERVICE MANUAL Ecoboiler Model range: T20 (1000662) T30 (1000663) Marco Beverage Systems Ltd. 63d Heather Road, Sandyford Industrial Estate, Dublin 18, Republic of Ireland Ireland Tel: (01) 295 2674 Ireland
Sealed Electric Wall & Floor Mounted Towel Warmers. heatingthroughinnovation. Installation, Operating, Maintenance and After Sales Manual.
 Installation, Operating, Maintenance and After Sales Manual. Sealed Electric Wall & Floor Mounted Towel Warmers heatingthroughinnovation. Part Number: TPLEA0036 Issue 3 Tested to UL & CSA Standards Contents