Can Am Commander 1000 Radiator Relocation Installation Instructions
|
|
|
- Rosalind Cain
- 5 years ago
- Views:
Transcription
1 Can Am Commander 1000 Radiator Relocation Installation Instructions What comes with the kit 2 CNC Machined Aluminum mounting brackets 2 pcs M6 x 1.0 x 60mm long SHCS 2 pcs M6 x 1.0 x75mm long SHCS 4 pc M8 x 30mm long SHCS 1 Powder coated Steel face plate 4 aluminum bushings (1.240" long) Face Plate & Screen Harware - 4 pcs 1/4" x 1" Carriage bolts - 8 pcs 1/4" nuts - 8 pcs 1/4" lock washer - 8 pcs 1/4" flat washers 1 powder coated perforated steel screen ($20 Option/upgrade) 20 feet of 1" heater hose 12 feet 1/4" clear overflow bottle hose 10 pcs - 1" Hose Clamps 2 pcs - 3/4" Hose Clamps 2 pcs -1" Hose Barbs 6 Feet of Heat Tape 6 Black Zip Ties 2 pcs 0f fan wire - 12 feet long each. 4 Heat Shrink butt connectors Installation Instructions -Remove the front splash guards under the front fender, they have 3 push pin rubber grommets, you just pull the cover off the posts at the 3 hole locations.


2 -Remove both sides to the center console, these are secured with the standard plastic push pins -Remove the bolts holding the fan to the radiator and unplug the fan and lean it

3 back towards the cab of the machine. -Disconnect the lower rad hose from the bottom of the radiator and allow the coolant to drain. Removing the fill cap may speed up the process -Disconnect the upper rad hose on the opposite side of the rad -Remove the top 2 bolts that hold the radiator in place, the bottom is only secured by 2 posts on the bottom of the radiator. With the 2 bolts removed, you can lean back and lift the radiator out of the 2 post holes at the bottom. You can now slide the radiator out the side towards the passenger side front tire, turn the tire all the way to the right for extra room. -With the radiator out and completely drained, now is a good time to fully clean it. A good aluminum spray cleaner and a garden hose work very well, make sure you get ALL of the mud out of the entire radiator. -There is a T Fitting between the thermostat and the top hole of the radiator, this is where the fill neck and cap are located, you need to remove the T fitting along with the fill neck/cap assembly and the piece of hose that went to the top of the radiator. The overflow tube also needs to be removed from the fill neck


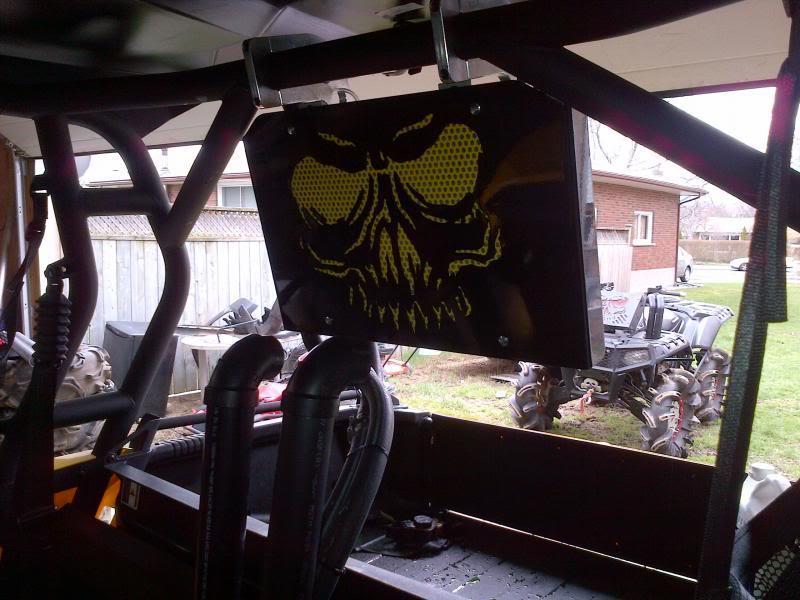
4 -You will need to re-use parts of the factory hoses so set them aside for now -You can now bolt the Steel face plate and optional screen to the front of the radiator by bolting it into the 4 oval holes on the radiator, see the picture below for the sequence of hardware while bolting the face plate to the radiator. -Install the 2 larger mounting brackets to the radiator using the supplied hardware and aluminum spacers. The bolts will thread right into the factory threaded clips on the radiator. -With the help of a second set of hands, you can how hold the radiator up to the roll cage cross bar and have someone install the bracket clamps. Be sure to tighten them evenly so you have an even gap on both sides of each clamp.

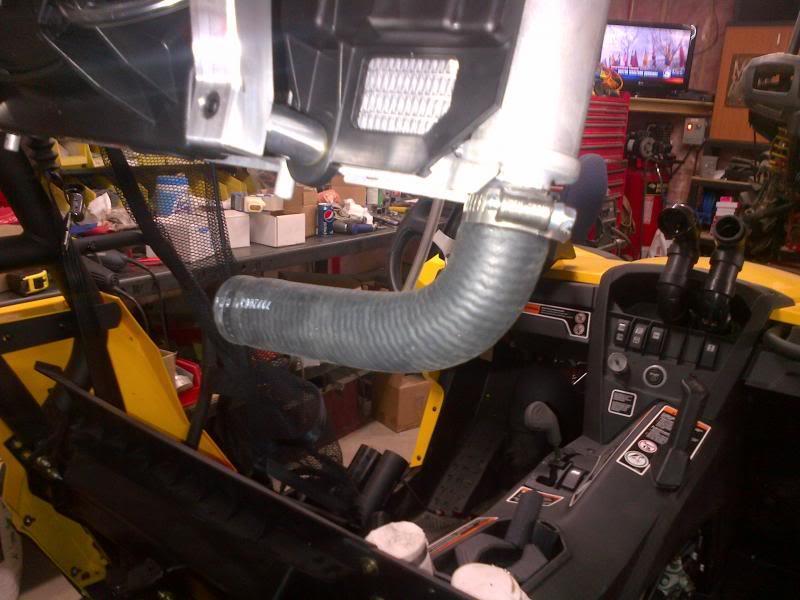
5 -You will now need to drill a hole or an oval large enough to run 2 pcs of 1" heater hose, 1 pcs of overflow hose and wire through the center console as pictured, however, this machine here has snorkels installed and we cut the hole between his snorkel tubes -Run the supplied heater hose from the back, through the hole you cut for the hoses, down and along the right side of the motor, connecting the end to the bottom of the thermostat housing, this hose will then be cut at the rear end of the machine, cut it off just long enough to connect to the bottom of the radiator on the right hand side. Use the supplied 1" hose clamps to secure the hose to the thermostat housing but do not attach it to the radiator

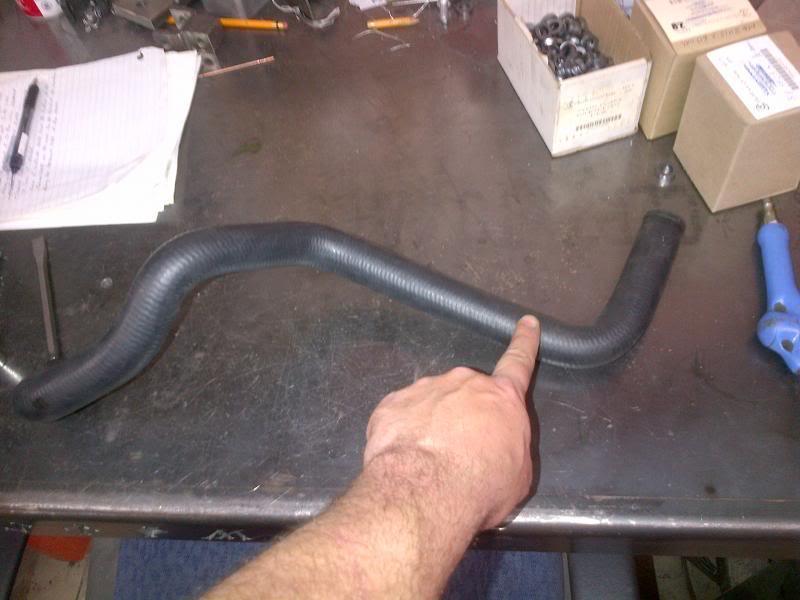
6 -Take one of the factory hoses that we removed and cut off a section as pictured below, then use this section on the bottom of the radiator, this will give us a nice smooth transition.
7

8 -Now you can join this lower factory section of hose with the 1" hose running to the thermostat using supplied hose barb and hose clamps. -Run the remaining length of 1" heat hose along side the hose you already ran to the front of the machine and it will attach to the left side under the front end where the T fitting was removed using a supplied barb and hose clamps. -Using the factory hose with the T fitting, attach this to the top of the radiator by feeding the factory bend through the large hole in the mounting bracket. Then take the other factory piece of hose that we cut apart earlier and connect it to the right side of the Tfitting and through the right side mounting bracket. And finally, cut the 1" supplied heater hose to the correct length and connect it to this factory hose with supplied hose barb and hose clamps. -With the dump box tilted back, use SOME of the supplied heat tape to protect the heater hose from the exhaust, I would recommend maybe using some zip ties to pull the hose all the way over to the side if possible for added protection. Save some of the heat tape for the new Fan Wire and Overflow line

9 to be used later in these instructions -You now need to remove the short factory overflow tube from the bottom of the overflow bottle, it will be much easier if you remove the overflow bottle from the machine as the hose seems to be siliconed onto the nipple. -Run the supplied clear tube along side the 2 new heater hoses so it can be connected to the overflow bottle and the fin neck and then re-attached your overflow bottle -Cut the plastic sleeve back on the fan plug wires at the fan and then cut the plug wires leaving enough room to strip and re-connect the wires. Using the shrinkable butt connectors, connect the end of each supplied wire to the wires on the fan assembly buy crimping them and then use a lighter to shrink them for a sealed connection. -At the front of the machine, do the same thing to connect the plug to the wires and then plug the fan plug back together.
10 Filling and BURPING the System There is a bleeder screw on the top of each cylinder, use an 8mm wrench to back this screw out a few turns and then fill the radiator with coolant. These bleeder screws will let the air escape from the system. -Once the system is full and coolant comes out of both bleeder screws, close them up and run the machine. As the coolant level lowers, top it up. After a few minutes put the fill cap back on. With the cap on, pressure will buildup in the system, loosen these 2 bleeder screws again to allow any air/stem to escape the system. Once you get coolant coming from the bleeder screws, close them back up, turn off the machine and let the machine cool down. -Once the machine is cool enough to open the fill cap, check the level and top it up as needed. Put the cap back on, run the machine for a few more minutes and bleed the system again. -Once both heater hoses are getting warm, you know the coolant is circulating and there are no air blockages in the system. ADDED BURBING TIPS 1 person sits in the drivers seat and press the gas pedal all the way to the floor and hold it there, then with the pedal all the way down turn the key to start the motor. The motor will NOT start as long as you have the pedal all the way down but it will circulate the water pump and turn over the engine. While person #1 is doing this, person # 2 needs to back out the bleeder screw until coolant comes out, do this on both cylinders with both bleeder screws. This will help but no promise it will be enough.

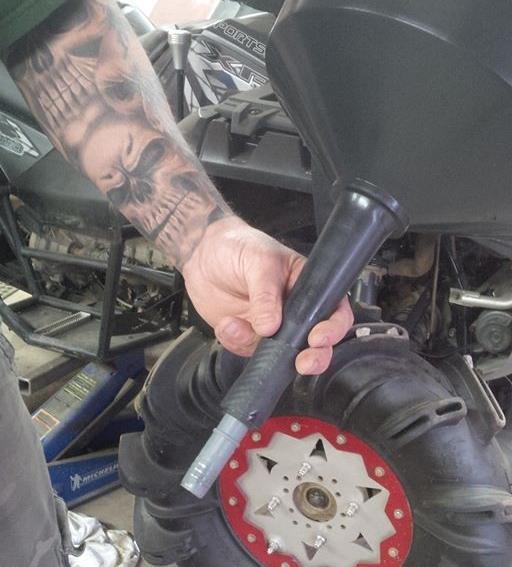
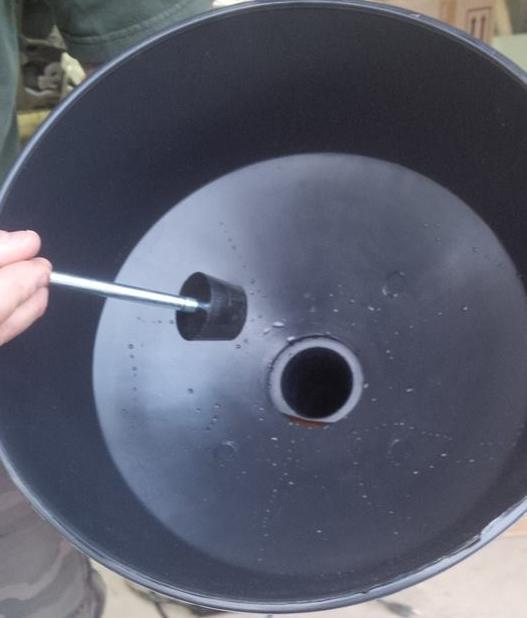
11 Next step, see the pictures below. I used a large funnel and a rubber stopper plug for this, it worked like a charm. A funnel with a shot off valve would also work just as good. Remove the actual fill cap fitting at the rad hose at the very top and put the funnel in place. Put coolant in the funnel and run the engine. Rev it up and down and work the hoses down below with your hands. As the air pukes out it pukes into the funnel and the air is instantly replaced with coolant. Do this for several minutes until it seems that it is no longer pushing air out of the system. Drop a plug of some sort into the funnel so you can remove it without spilling all of the excess coolant all over the place. Put the fill cap fitting back on and you should be finished.
12

13


14

15
JOHN DEERE GATOR HPX/XUV 2 PASSENGER HEATER INSTALLATION INSTRUCTIONS (p/n: 9PH20S30)
") P. 1 of 12 JOHN DEERE GATOR HPX/XUV 2 PASSENGER HEATER INSTALLATION INSTRUCTIONS (p/n: 9PH20S30) Item: Qty: Description: 1 2 1 x 1 x 5/8 Tee Fitting 2 2 Plastic Snap-in Hose Grommet 3 4 1-1/2" Hose Clamps
P. 1 of 12 JOHN DEERE GATOR HPX/XUV 2 PASSENGER HEATER INSTALLATION INSTRUCTIONS (p/n: 9PH20S30) Item: Qty: Description: 1 2 1 x 1 x 5/8 Tee Fitting 2 2 Plastic Snap-in Hose Grommet 3 4 1-1/2" Hose Clamps
JOHN DEERE X465, X475, X485, X495, X575, X585
 JOHN DEERE X465, X475, X485, X495, X575, X585 and X595 X700 SERIES (X700, X720, X720se, X724, X728, X728se, X729, X740, X744, X748, X748se, X749) CAB MOUNTING INSTRUCTIONS A-11271 Manufactured by: BOX
INSTALLATION INSTRUCTIONS John Deere One Series; 1023E, 1025R and 1026R Models A HEATER KIT. Figure 1 (General Layout and Parts I.D.
 A-11978 HEATER KIT Figure 1 (General Layout and Parts I.D.) Read these instructions and identify all components. Please retain these instructions for future reference and parts ordering information. Refer
How to Install a Mishimoto Radiator for a Mustang 5.0L
 How to Install a Mishimoto Radiator for a 1979-1993 Mustang 5.0L The below installation instructions work for the following products: Mishimoto Performance Aluminum Radiator - Manual (79-93 5.0L) Here
MOUNTING INSTRUCTIONS
 A-12093 JDX 2014 HEATER KIT With Gas Engine Connection Fittings 2014 and Newer ROPS Cabs A-12098 (Kit A-12092, Diesel Engine Connection Fittings are sold separately for diesel models) 12VDC, 2-Speed, 15,000
INSTALLATION INSTRUCTIONS
 INSTALLATION INSTRUCTIONS Accessory Application Publication No. HEATER KIT P/N 0SE01-HL3-102 (SXS700M2/M4) P/N 0SE01-HL3-103 (SXS700M2D/M4D) SXS700M2/M2D/M4/M4D MII 14607-15172 Issue Date REVISED: June
6. Cooling System XCITING 400i. This chapter covers the location and servicing of the cooling system components for the KYMCO XCITING 400i.
 6. Cooling System XCITING 400i Cooling System This chapter covers the location and servicing of the cooling system components for the KYMCO XCITING 400i. Coolant... 6-3~6-11 Radiator... 6-12~6-23 Thermostat...
INSTALLATION INSTRUCTIONS
 Accessory Application Publication No. INSTALLATION INSTRUCTIONS HEATER KIT P/N 0SE01-HL3-101 SXS700M4/M2 Honda Dealer: Please give a copy of these instructions to your customer. PARTS LIST REPAIR KIT (P/N
CURTIS/KUBOTA BX-1500, 1800, 2400, 1850, 2350, 25 BX1870, BX2370, BX25D & BX HEATER INSTALLATION (p/n: 9PH20S18)
") CURTIS/KUBOTA BX-1500, 1800, 2400, 1850, 2350, 25 BX1870, BX2370, BX25D & BX2370-1 HEATER INSTALLATION (p/n: 9PH20S18) HEATER INSTALLATION: A. The location for the heater unit is on the left side frame.
CURTIS/KUBOTA BX-1500, 1800, 2400, 1850, 2350, 25 BX1870, BX2370, BX25D & BX2370-1 HEATER INSTALLATION (p/n: 9PH20S18) HEATER INSTALLATION: A. The location for the heater unit is on the left side frame.
HEAT/ COOL/ DEFROST FORD THUNDERBIRD
 specializing in AIR CONDITIONING, PARTS AND SYSTEMS for your classic vehicle PERFECT FIT IN-DASH HEAT/ COOL/ DEFROST 1964-66 FORD THUNDERBIRD CONTROL & OPERATING INSTRUCTIONS The controls on your new Perfect
LG G2 Super Cool C7 Radiator
 LG G2 Super Cool C7 Radiator THE MOST POWERFUL HEADERS ON THE PLANET Brought to you by LG Motorsports 972-429-1963 Parts Inventory: 1. Radiator 2. 170 thermostat (optional) Tools Needed: 1. Drain pan 2.
A HEATER KIT With Diesel Engine Connection Fittings
 A-12142 HEATER KIT With Diesel Engine Connection Fittings Figure 1 (General Layout and Parts I.D.) Page 1 of 6 Read these instructions and identify all components. Please retain these instructions for
Heater for BRP Commander. Caution: Before using this product, read this manual and follow all safety instructions. Owner s Manual
 Owner s Manual Model: Can Am Commander Heater for BRP Commander Caution: Before using this product, read this manual and follow all safety instructions. Safety Instructions Kit Contents Tool Requirement
specializing in AIR CONDITIONING, PARTS AND SYSTEMS for your classic hi l PERFECT FIT SERIES IN-DASH HEAT/ COOL/ DEFROST FORD TRUCK
 specializing in AIR CONDITIONING, PARTS AND SYSTEMS for your classic hi l PERFECT FIT SERIES IN-DASH HEAT/ COOL/ DEFROST 1967-72 FORD TRUCK CONTROL & OPERATING INSTRUCTIONS The controls on your new Perfect
BMW E36 Thermostat Removal And Coolant Flush
 BMW E36 Thermostat Removal And Coolant Flush Disclaimer: The cooling system is critical to the proper operation of your car. Failure to properly install all of the components of the cooling system could
Kawasaki Teryx Firestorm Heater Kit Instructions.
 Please read all instructions before beginning installation. When working on cooling systems always allow vehicles to cool to avoid being burned or scalded by hot coolant. Always disconnect vehicle s negative
CABS/BLADES/ SPREADERS/ACCESSORIES
 JOHN DEERE 3000 SERIES (4200/4300/4400) (4210/4310/4410) (3120/3320/3520/3720) JOHN DEERE 4000 SERIES (4500/4600/4700) (4510/4610/4710) (4120/4320/4520/4720) OPTIONAL AUXILIARY HEATER INSTALLATION (p/n
INSTALLATION INSTRUCTIONS
 INSTALLATION INSTRUCTIONS Accessory ENGINE BLOCK Application 2010 INSIGHT Publications No. AII 40879 Issue Date MARCH 2009 PARTS LIST Engine Block Heater Kit P/N 08T44-SNA-101 Engine block heater Engine
Heater with Air Conditioning. E-Series Ford Aeromaster
 Service Guide Heater with Air Conditioning E-Series Ford Aeromaster Contents Blower Motor...2 Plenum Removal...3 Control Module...6 Servo Motors...8 Coolant Valve and Servo Motor...8 Evaporator Recirculation
PERFECT FIT IN-DASH HEAT/ COOL/ DEFROST FORD PICKUP
 specializing in AIR CONDITIONING, PARTS AND SYSTEMS for your classic vehicle PERFECT FIT IN-DASH HEAT/ COOL/ DEFROST 1960-66 FORD PICKUP CONTROL & OPERATING INSTRUCTIONS The controls on your new Perfect
This guide will be posted in several chunks so please don't post till im done, cheers.
 vx220.org.uk > General Discussion > VX220 Discussion Radiator Replacement Guide Options SteveA Jan 10 2007, 00:47 Post #1 This guide will be posted in several chunks so please don't post till im done,
PERFECT FIT IN-DASH HEAT/ COOL/ DEFROST PLYMOUTH BELVEDERE
 PERFECT FIT IN-DASH HEAT/ COOL/ DEFROST 1966-67 PLYMOUTH BELVEDERE CONTROL & OPERATING INSTRUCTIONS The controls on your new Perfect Fit system. Offers complete comfort capabilities in virtually every
INSTALLATION INSTRUCTIONS
 INSTALLATION INSTRUCTIONS Accessory Application Publications No. ENGINE BLOCK P/N 08T44-SNA-100 2008 MDX BII 37679 Issue Date AUG 2007 PARTS LIST Engine block heater Aluminum washer Heater harness Protective
Engine Block Heater Service Kits (Tank Type) 30RZ/33RZ/45RZ (CSG 649 Ford Powered) Standby Generator Sets
 30RZ/33RZ/45RZ (CSG 649 Ford Powered) Standby Generator Sets") TT 880 INSTRUCTIONS 7/92 Engine Block Heater Service Kits (Tank Type) 30RZ/33RZ/45RZ (CSG 649 Ford Powered) Standby Generator Sets Model Voltage Kit No. All Models 120 276380 All Models 240 276381 This
TT 880 INSTRUCTIONS 7/92 Engine Block Heater Service Kits (Tank Type) 30RZ/33RZ/45RZ (CSG 649 Ford Powered) Standby Generator Sets Model Voltage Kit No. All Models 120 276380 All Models 240 276381 This
INSTALLATION INSTRUCTIONS
 INSTALLATION INSTRUCTIONS Accessory Application Publications No. ENGINE BLOCK P/N 08T44-SNA-100 2007 MDX BII 32728 Issue Date OCT 2006 PARTS LIST Engine block heater Aluminum washer Heater harness Protective
pushing the tube into the rear of the water outlet housing with a slight twisting motion to evenly distribute the adhesive. After cleaning off any ext
 I chose an original FE expansion tank that had the filler neck on the driver's side of the tank but still had the radiator hose outlet facing the passenger side. I figured using such a tank would afford
PERFECT FIT IN-DASH HEAT/ COOL/ DEFROST 1968 CHEVROLET IMPALA
 specializing in AIR CONDITIONING, PARTS AND SYSTEMS for your classic vehicle PERFECT FIT IN-DASH HEAT/ COOL/ DEFROST 1968 CHEVROLET IMPALA CONTROL & OPERATING INSTRUCTIONS The controls on your new Perfect
MOUNTING INSTRUCTIONS
 John Deere HPX and XUV Heater Kit 4-14916 MOUNTING INSTRUCTIONS With replacement parts drawing BOX 70 LITCHFIELD, MINNESOTA 55355-0070 (320) 693-3221 Fax: (320) 693-7252 Visit our web site at: www.800cabline.com
Mishimoto Performance Aluminum Mustang Radiator - Automatic - (97-04 GT/Cobra/MACH1/Bullitt) - Installation Instructions
 - Installation Instructions") Mishimoto Performance Aluminum Mustang Radiator - Automatic - (97-04 GT/Cobra/MACH1/Bullitt) - Installation Instructions The below installation instructions work for the following products: Mishimoto Performance
Mishimoto Performance Aluminum Mustang Radiator - Automatic - (97-04 GT/Cobra/MACH1/Bullitt) - Installation Instructions The below installation instructions work for the following products: Mishimoto Performance
Universal Heater 20,000 B.T.U. - PN: 9PHWH20S. Installation & Mounting Instructions
 Universal Heater 20,000 B.T.U. PN: 9PHWH20S Installation & Mounting Instructions REV. C Curtis Industries Inc. LLC, 111 Higgins St., Worcester, MA 01606 TEL: (508) 852200 FAX: (508) 8577 For Parts and
INSTALLATION INSTRUCTIONS
 INSTALLATION INSTRUCTIONS Accessory ENGINE BLOCK Application 2012 FIT Publications No. AII 45993 Issue Date AUG 2011 PARTS LIST Engine Block Heater kit P/N 08T44-SNA-101 Engine Block Heater Bracket kit
Heating and ventilation system,
 Page 1 of 24 87-151 Heating and ventilation system, servicing Instrument panel air outlets and air guide ducts CAUTION! Before working on the electrical system: Obtain security code for anti-theft radio.
Product Support Bulletin
 MODEL: SUBJECT: CONVENTIONAL, W/ C7 CAT ENGINE WEBASTO TSL-17 HEATER Body DATE: APRIL 13, 2004 INDEX: 6 PAGE: 1 OF 16 Before you start this procedure, perform Freightliner Service Bulletin #20-7 first.
Engine Block Heater Service Kits (Tank Type) ROZJ 6076T and 6076A (John Deere Powered Standby Generator Sets)
 ROZJ 6076T and 6076A (John Deere Powered Standby Generator Sets)") TT 760 INSTRUCTIONS 8/91 Engine Block Heater Service Kits (Tank Type) 125 180ROZJ 6076T and 6076A (John Deere Powered Standby Generator Sets) Model Voltage Kit No. 125 150ROZJ 120 276511 125 150ROZJ 240
TT 760 INSTRUCTIONS 8/91 Engine Block Heater Service Kits (Tank Type) 125 180ROZJ 6076T and 6076A (John Deere Powered Standby Generator Sets) Model Voltage Kit No. 125 150ROZJ 120 276511 125 150ROZJ 240
INSTALLATION INSTRUCTIONS
 INSTALLATION INSTRUCTIONS Accessory ENGINE BLOCK Application 2014 INSIGHT Publications No. AII 50650 Issue Date OCT 2013 PARTS LIST Engine Block Heater Kit P/N 08T44-SNA-101 Engine block heater Engine
Heat Exchanger Block Replacement Instructions
 Series 1-4 Gas-fired water boiler Heat Exchanger Block Replacement Instructions Ultra-80 S1-4 Heat Exchanger Block Replacement Kit, Part No. 383-500-773 Ultra-105 S1-4 Heat Exchanger Block Replacement
SAN JUAN FRESH WATER COOLING SYSTEMS
 SAN JUAN FRESH WATER COOLING SYSTEMS 4.3-5.7 GI VOLVO Block Only Cooling, Mounted Off Engine Kit #V-111 Installation Instructions San Juan Engineering Heat Exchangers provide thermostatically controlled
Retrofit Instructions CLEARVIEW DAY COVER CAUTION: Please read this manual completely before attempting to install, operate or service this equipment
 Retrofit Instructions CLEARVIEW DAY COVER CAUTION: Please read this manual completely before attempting to install, operate or service this equipment This manual is Copyright 2019 Duke Manufacturing Co.
Parts List. RevA _85609INST
 Parts List (1) Air Oil Separator (1) Billet Clamp (1) Stainless Steel Mount (1) Stainless Steel Tab (1) 90 degree barbed fitting (1) Straight Barbed Fitting (2) 30 Long ½ I.D. Hose (4) ¼ x 20 x 5/8 SHCS
INSTALLATION INSTRUCTIONS
 INSTALLATION INSTRUCTIONS Accessory ENGINE BLOCK (L4) P/N 08T44-TA0-100 Application 2011 ACCORD 2- AND 4-DOOR Publications No. AII 43997 Issue Date AUG 2010 PARTS LIST Engine block heater 5 White wire
Installation Manual Mopar Engine Compartment Upgrade Kit
 Installation Manual 64-75 Mopar Engine Compartment Upgrade Kit Congratulations... You have just purchased the highest quality, best performing A/C system upgrade ever designed for your Classic Vehicle.
This site is based on a but applies to all 1971-on Saab 99 and Saab 900.
 by Mark Jeter updated: December 8, 2004 originally web-published June 27, 2001 This document shows how the original waterpump in a Saab "B" engine can be eliminated and replaced with a reliable, efficient
PERFECT FIT SERIES IN-DASH HEAT/ COOL/ DEFROST CHEVROLET CHEVELLE/ EL CAMINO NOTE: INSTRUCTIONS DEPICT CHEVELLE
 specializing in AIR CONDITIONING, PARTS AND SYSTEMS for your classic vehicle PERFECT FIT SERIES IN-DASH HEAT/ COOL/ DEFROST 1964-65 CHEVROLET CHEVELLE/ EL CAMINO NOTE: INSTRUCTIONS DEPICT CHEVELLE CONTROL
PERFECT FIT SERIES IN-DASH HEAT/ COOL/ DEFROST CHEVROLET NOVA
 specializing in AIR CONDITIONING, PARTS AND SYSTEMS for your classic PERFECT FIT SERIES IN-DASH HEAT/ COOL/ DEFROST 1966-67 CHEVROLET NOVA CONTROL & OPERATING INSTRUCTIONS The controls on your new Perfect
Technical Manual. VFD / Cabinet Heater Upgrade 110 VAC Heater to 12 VDC Heater. Provided by: Chart Inc.
 Technical Manual VFD / Cabinet Heater Upgrade 110 VAC Heater to 12 VDC Heater Provided by: Chart Inc. 407 7th Street NW New Prague, MN 56071 USA (800) 400-4683 Part Number 20977233 Rev. A 2016 Chart Inc.
Do not open the cooling system while it is hot or while the engine is running.
 Engine And Radiator 2003 Mazda B2300 2.3L Eng VIN D Base Print Date: 1/4/2019 WARNING: Do not open the cooling system while it is hot or while the engine is running. 1. Drain the cooling system. See ENGINE
INSTALLATION INSTRUCTIONS
 INSTALLATION INSTRUCTIONS Accessory Application Publications No. ENGINE BLOCK P/N 08T44-SVB-100 2011 CIVIC 4-DOOR Si All 44405 Issue Date AUG 2010 PARTS LIST Engine block heater Aluminum washer Heater
INSTALLATION INSTRUCTIONS
 INSTALLATION INSTRUCTIONS Accessory ENGINE BLOCK V6 P/N 08T44-SNA-101 Application 2008 ACCORD 2- AND 4-DOOR Publications No. AII 36800-38336 Issue Date NOV 2007 PARTS LIST ENGINE BLOCK Engine block heater
50 Disassembly and assembly Cab and its attachments
 When adjustment is needed after performing check in step 8; 3) Close front window assembly (1). 4) Loosen locknuts (26) of right and left rubber stoppers (24) and move the stoppers backward so that front
V-220 / V-320 Heater Kits Installation Instructions TK IM (Rev. 0, 06/17)
") Installation Manual V-220 / V-320 Heater Kits Installation Instructions TK 56340-18-IM (Rev. 0, 06/17) Installation Manual V-220 / V-320 Heater Kits Installation Instructions TK 56340-18-IM (Rev. 0, 06/17)
Installation Manual V-220 / V-320 Heater Kits Installation Instructions TK 56340-18-IM (Rev. 0, 06/17) Installation Manual V-220 / V-320 Heater Kits Installation Instructions TK 56340-18-IM (Rev. 0, 06/17)
Parts & Material Included
 O² Hydro Well System Installation, Use & Care Guide Parts & Material Included 1. Funnel 11. Drain Line 21. Air Head 2. Media Tank Distributer Tube 12. Air Release 22. Drain Fitting 3. Air Tank Distributer
Radiator Coolant Flush
 Radiator Coolant Flush Should be done every couple years. Fairly easy job, need a Phillips head screwdriver, 10mm deep socket, couple gallons of water, a gallon of silicate free anti-freeze, needle nose
PERFECT FIT SERIES IN-DASH HEAT/ COOL/ DEFROST MUSTANG
 specializing in AIR CONDITIONING, PARTS AND SYSTEMS for your classic vehicle PERFECT FIT SERIES IN-DASH HEAT/ COOL/ DEFROST 1965-66 MUSTANG CONTROL & OPERATING INSTRUCTIONS The controls on your new Perfect
INSTALLATION INSTRUCTIONS
 INSTALLATION INSTRUCTIONS Accessory Application Publications No. ENGINE BLOCK P/N 08T44-SNA-100 2007 CIVIC 2 AND 4-DOOR (DX, LX, EX) AII 33542 Issue Date AUG 2006 PARTS LIST Engine block heater Aluminum
F AN-ASPIRATED RADIATION SHIELD
 F AN-ASPIRATED RADIATION SHIELD I NSTALLATION MANUAL (For all models with Mfg. Code beginning with B or higher) The Fan-Aspirated Radiation Shield uses fan aspiration and passive shielding to minimize
INSTALLATION INSTRUCTIONS
 INSTALLATION INSTRUCTIONS Accessory Application Publications No. AII 41826 ENGINE BLOCK P/N 08T44-SNA-101 2010 ODYSSEY Issue Date JUNE 2009 PARTS LIST Engine block heater Aluminum washer NOTE Always use
An ibuy Stores Company
 REVISED STARTING SERIAL NO. 060604 PARTS MANUAL Model SK-4 4 DOWNCUT CONCRETE/ASPHALT WALK BEHIND SAWS SKU NO. MODEL POWER OPTION 45400D SK4-9H HONDA ENGINE 9 HP GX0 45600D SK4-H HONDA ENGINE HP GX40 4800D
FS Automatic Scrubber Fregadora Automática. Model No.: Pac. Operator and Parts Manual Manual de Operación y de Piezas
 FS-2000 Automatic Scrubber Fregadora Automática Model No.: 609541 609542 Pac Operator and Parts Manual Manual de Operación y de Piezas CASTEX 12875 RANSOM STREET HOLLAND MI 49424 U.S.A. FAX: 1 800 678
INSTALLATION & OWNER S MANUAL
 Rev. A, p. 1 of 8 INSTALLATION & OWNER S MANUAL HONDA PIONEER 700-2 AND 700-4 HEATER INSTALLATION p/n: 9PH20S64 The contents of this envelope are the property of the owner. Be sure to leave with the owner
FS Automatic Scrubber Fregadora Automática. Operator and Parts Manual Manual de Operación y de Piezas. Model No.: Pac
 FS-2000 Automatic Scrubber Fregadora Automática Model No.: 6097 60974 - Pac Operator and Parts Manual Manual de Operación y de Piezas CASTEX 12875 RANSOM STREET HOLLAND MI 49424 U.S.A. CUSTOMER SERVICE:
Thermo-Bob 4 Installation Manual KT5A Kit
 Thermo-Bob 4 Installation Manual KT5A Kit 2009-2016 KTM 400/450/500 EXC, XC-W 2008-2011 KTM 530 EXC-R 2011 Husaberg FS510 2013-2014 Husaberg FE501 2014-2016 Husqvarna FE501 IM TB4-KT5A V1 Watt-man.com
TC 222 TIRE CHANGER SPARE PART LIST 01
 TC 222 TIRE CHANGER SPARE PART LIST 0 No. on Part No. Name Qua. Spec. 699000736 Vertical arm 2 699000737 Hex shaft, vertical arm 3A 699000725 Assembly - locking cylinder 4 699000738 Lock plate horizontal
Pole Mounting System Installation & Certification Manual
 Pole Mounting System Installation & Certification Manual IronRidge Pole Mount Installation Guide... 2 IronRidge Certification Letter... 11 IronRidge Wet Stamped Drawing... 12 www.ironridge.com 800-227-9523
KIT CONTENTS Ref Qty Part Description Part Number
 CAB HEATER KIT P/N 2879967 APPLICATION RANGER 570 AND RANGER 570 CREW BEFORE YOU BEGIN Read these instructions thoroughly and make sure all parts and tools are accounted for. Please retain these installation
GETZ EQUIPMENT INNOVATORS PART NO.: 9G58619 MODEL: SV1 150 PR VACUFILL SYSTEM (Revised 2/25/14)
") GETZ EQUIPMENT INNOVATORS PART NO.: 9G58619 MODEL: SV1 150 PR VACUFILL SYSTEM (Revised 2/25/14) !!WARNING!! SEVERE DAMAGE AND/OR INJURY MAY RESULT DO NOT DISCHARGE ANY EXTINGUISHER CYLINDER EXCEEDING 195
GETZ EQUIPMENT INNOVATORS PART NO.: 9G58619 MODEL: SV1 150 PR VACUFILL SYSTEM (Revised 2/25/14) !!WARNING!! SEVERE DAMAGE AND/OR INJURY MAY RESULT DO NOT DISCHARGE ANY EXTINGUISHER CYLINDER EXCEEDING 195
General System Layout Sketch
 General System Layout Sketch EZ-37 Solar Panels PV panel Can use Standard Copper, CPVC or PEX Pipes Pump Existing Water Heater Bottom Feed Connector 1 Introduction This document describes how to install
BlueHeat Coolant Heater
 BlueHeat Coolant Heater Dodge Ram 500 / 3500 003 / 004-5. Liter Gasoline 003 / 006-5.9 Liter Diesel 00 6. Liter Diesel Installation Instructions DOC P/N 500068B KIT P/N 5000498C PRELIMINARY INFORMATION
SAAB 99 Series H Type Engine. Installation Guide Silicone Cooling System Hoses. Classic Silicone Hoses
 SAAB 99 Series 1981 1984 H Type Engine Installation Guide Silicone Cooling System Hoses Classic Silicone Hoses http://www.classicsiliconehoses.com/ Disclaimer This document is for reference purposes only.
INSTALLATION INSTRUCTIONS
 INSTALLATION INSTRUCTIONS Accessory Application Publications No. AII 30320 ENGINE BLOCK 2006 CIVIC HYBRID P/N 08T44-SVB-100 Issue Date SEP 2005 PARTS LIST Engine block heater Aluminium washer Heater harness
ASSEMBLY and INSTALLATION INSTRUCTIONS. Pipe wrench Ratchet 3/8 socket 9/16 socket 11/16 socket 3/16 Allen key 3/32 Allen key 9/64 Allen key
 ASSEMBLY and INSTALLATION INSTRUCTIONS Gas Conversion Kit Tube Heaters View these instructions online at www.lbwhite.com Kit Contents: DESCRIPTION QTY. Instructions 1 Burner orifi ce 1 Manifold pipe 1
 Spare Parts List (Kits) Model Ref.:- HM35 SERIES A Spare Parts List (Kits) Issue 8 Dated 10-February-2015 Reference Drawing 09-1108-0000 Issue B Dated 07-January 2014 Drawing Ref. Part Number DESCRIPTION
KIT NOTICE. These instructions are for replacing the three existing thermostats with a single new solid-state thermostat.
 KIT 06401-004-22-16 5 1 2 NOTICE 3 (3 PLC'S) These instructions are for replacing the three existing thermostats with a single new solid-state thermostat. 4 PREPARATION PARTS INCLUDED 6 1 7 5 8 2 4 (4
Owner s Manual FS-10/FreshSpa
 Owner s Manual FS-10/FreshSpa Table of Contents Product Features................ Page 2 Parts List....................... Page 3 Configuration................... Page 4 Installation.....................
TT /97 WARNING WARNING WARNING INSTALLATION INSTRUCTIONS
 TT-116 2/97 INSTALLATION INSTRUCTIONS Original Issue Date: 2/97 Model: 900/1000 kw Market: Industrial Subject: Block Heater Kits PA-28648, PA-28648-SD The block heater kit heats engine coolant, making
Chapter 3 Cooling, heating and ventilation systems
 3 1 Chapter 3 Cooling, heating and ventilation systems Contents Antifreeze mixture..............................see Chapter 1 Cooling fan assembly - testing, removal and refitting.............8 Cooling
GETZ MANUFACTURING PART NO.: MODEL: SV1 100 PR VACUFILL SYSTEM (Revised 6/7/05)
") GETZ MANUFACTURING PART NO.: 58616 MODEL: SV1 100 PR VACUFILL SYSTEM (Revised 6/7/05) GETZ SV1-100-PR VACU-FILL SYSTEM TABLE OF CONTENTS PAGE # 1... GETZ SV1-100-PR VACU-FILL SYSTEM 2... PARTS LIST 3...
GETZ MANUFACTURING PART NO.: 58616 MODEL: SV1 100 PR VACUFILL SYSTEM (Revised 6/7/05) GETZ SV1-100-PR VACU-FILL SYSTEM TABLE OF CONTENTS PAGE # 1... GETZ SV1-100-PR VACU-FILL SYSTEM 2... PARTS LIST 3...
Installation and Care Instructions
 Installation and Care Instructions 2" Horizontal Aluminum Blinds MagnaView Tilt Feature CONTENTS Getting Started................................................ 1 Mount the Installation s....................................
I had to remove front splash shield to drain the radiator.
 At the start of 2013, my cooling was losing significant coolant that seemed to be coming from the water pump. The car had about 107,000 miles on it at the time. I had to remove front splash shield to drain
INSTALLATION INSTRUCTIONS
 INSTALLATION INSTRUCTIONS Accessory ENGINE BLOCK P/N 08T44-SNA-101 Application 2011 ACCORD CROSSTOUR Publications No. AII 44661 Issue Date SEP 2010 PARTS LIST Engine Block Heater Kit Engine block heater
INSTALLATION INSTRUCTIONS
 INSTALLATION INSTRUCTIONS Accessory Application Publications No. ENGINE BLOCK P/N 08T44-SNA-101 2010 CIVIC 2 AND 4 DOOR (EXCEPT GX) AII 42477 Issue Date SEP 2009 PARTS LIST Engine block heater Aluminum
IMPORTANT INFORMATION. Revised Dishwasher Installation Instructions
 IMPORTANT INFORMATION Revised Dishwasher Installation Instructions To obtain a revised copy of the entire Dishwasher User s Manual, go to www.eurotechappliances.com. SPECIAL EDITION 11-20-02 SAVE THESE
 www.whitakerbrothers.com The Challenge Machinery Company provides owner's manuals on its products solely as a courtesy to its customers. See the information below before using this manual. These manuals
PRELIMINARY INSTALLATION. Operation & Service Manual. Carrier Transicold Europe 03/09/07 Viento - Installation/Rev- #1/56
 INSTALLATION Carrier Transicold Europe 03/09/07 Viento - Installation/Rev- #1/56 INSTALLATION Table of content Introduction...4 Preparation before installation...5 Vehicle partition... 6 Box preparation...7
Installation and Operation Manual CLEARVIEW DAY COVER CAUTION: To view a video scan the QR code above
 Installation and Operation Manual CLEARVIEW DAY COVER To view a video scan the QR code above CAUTION: Please read this manual completely before attempting to install, operate or service this equipment
PERFECT FIT IN-DASH HEAT/ COOL/ DEFROST EARLY 1955 CHEVROLET PICKUP
 specializing in AIR CONDITIONING, PARTS AND SYSTEMS for your classic vehicle PERFECT FIT IN-DASH HEAT/ COOL/ DEFROST 1947 - EARLY 1955 CHEVROLET PICKUP CONTROL & OPERATING INSTRUCTIONS The controls on
AIR OPERATED CLUTCH & BRAKE BLEEDING KIT. MODEL NO: CHT637 Part No: OPERATING & MAINTENANCE INSTRUCTIONS GC01/12
 AIR OPERATED CLUTCH & BRAKE BLEEDING KIT MODEL NO: CHT637 Part No: 1801637 OPERATING & MAINTENANCE INSTRUCTIONS GC01/12 INTRODUCTION Thank you for purchasing this CLARKE Clutch & Brake Bleeding Kit. Before
Nut & Bolt Faucet Installation
 Nut & Bolt Faucet Installation Nut & Bolt Faucet Installation STEP 1 Layout all faucet components that will be installed. STEP 2 Turn faucet head to expose water supply attachment plugs holes. Attach water
Installation Manual PS-200 & PS-201
 Installation Manual PS-200 & PS-201 Table of Contents Pre-Uncrating Checklist... 1 Verifying System Requirements... 2 Verifying System Direction... 2 Verifying the Electrical Requirements... 2 Removal
CABINET AND COIN BOX PARTS For Model: MFS18PDFTS (Stainless)
") CABINET AND COIN BOX PARTS COMMERCIAL INDUSTRIAL WASHER 12 11 Litho In U.S.A. (CMS)(bay) 1 Part No. Rev. B CABINET AND COIN BOX PARTS 1 23004302 Control Panel Coin 2 W10357106 Front To Back Reinforcement
CABINET AND COIN BOX PARTS COMMERCIAL INDUSTRIAL WASHER 12 11 Litho In U.S.A. (CMS)(bay) 1 Part No. Rev. B CABINET AND COIN BOX PARTS 1 23004302 Control Panel Coin 2 W10357106 Front To Back Reinforcement
M O D E L G W T OPERATIONS MANUAL TABLE OF CONTENTS
 M O D E L G W T - 202 OPERATIONS MANUAL TABLE OF CONTENTS INTRODUCTION... 1 SECTION 1 1.0 SAFETY... 1-1 1.1 EMERGENCY... 1-1 1.2 Know your machine... 1-1 1.3 Power Supply... 1-1 1.4 Keep guards in place....
INSIDE ENGINE COMPARTMENT TOYOTA AIR CONDITIONING ENGLISH EUROPE
 INSIDE ENGINE COMPARTMENT TOYOTA AIR CONDITIONING ENGLISH EUROPE INTRODUCTION IMPORTANT NOTICE This manual has been designed for technicians who are qualified and educated in the proper procedures of vehicle
Installation and Care Instructions
 Installation and Care Instructions 2" Horizontal Aluminum Blinds MagnaView Tilt Feature Thank you for your purchase. Your new blinds have been custom built for you from the highest quality materials. Properly
Installation Instructions
 Suzuki Samurai Coolant and Water Hose Kit (SKU# SER-CHK) Installation Instructions SER-HHCK SER-WPI SER-ROP CAUTION: Safety glasses should be worn at all times when working with vehicles and related tools
VICINITY G R EEN W A LL. Installation Guidelines
 VICINITY G R EEN W A LL Installation Guidelines System Hardware Overview Irrigation System Pot Rail Pot System Bag Inline Filter Inlet Pipe 6-15mm 0.24-0.6 Overflow Pipe Min 15mm Min 0.6 Tank Stopper
URBAN CRUISER AIR CONDITIONING (RHD) ENGLISH EUROPE
 ENGLISH EUROPE") URBAN CRUISER (RHD) AIR CONDITIONING ENGLISH EUROPE - 0 - IMPORTANT NOTICE DEFINITION OF TERMS INTRODUCTION This manual has been designed for technicians who are qualified and educated in the proper procedures
URBAN CRUISER (RHD) AIR CONDITIONING ENGLISH EUROPE - 0 - IMPORTANT NOTICE DEFINITION OF TERMS INTRODUCTION This manual has been designed for technicians who are qualified and educated in the proper procedures
ASTRO ENVELOPE FEEDER AMC FOR HEIDELBERG PRINTMASTER INSTALLATION AND OPERATING INSTRUCTIONS
 ASTRO ENVELOPE FEEDER AMC-2000-17 FOR HEIDELBERG PRINTMASTER INSTALLATION AND OPERATING INSTRUCTIONS INTRODUCTION Thank you for purchasing the Astro Envelope Feeder. It is fast, efficient, reliable, and
ET14JKXAW01, ET14JKXAN01, ET14JKYAW01, ET14JKYAN01
 DOOR PARTS REFRIGERATOR 9 97 Litho In U.S.A. 1 Part No. Rev.A DOOR PARTS 1 Refrigerator Door Panel (Also Order Item 11) 9790362 White 9791629 Almond 2 End Cap 9791773 White 9791774 Almond 3 Hole Plug (2)
Hakki Pilke Raven spare parts manual
 1 ENGLISH Hakki Pilke Raven spare parts manual Valimotie 1, FI-85800 Haapajärvi, FINLAND Tel. +358 8 772 7300, Fax +358 8 772 732 info@maaselankone.fi, www.maaselankone.fi 2 Table of contents 1 Upper section
CBT Bowl & wrap replacement
 CBT bowl & wrap replacement 2 CBT BOWL & WRAP REPLACEMENT Revision History rev. level 01_03.14.2012 rev. level 02_03.19.2012 rev. level 03_03.23.2012 rev. level 04_05.30.2013 NOTE: due to the fact that
Installation Instructions. For the 18 Built-In Dishwasher and Front Color Panels
 Installation Instructions For the 18 Built-In Dishwasher and Front Color Panels Printed in USA 154232102 Before You Begin DO NOT INSTALL DISHWASHER UNTIL YOU HAVE READ ALL INSTRUCTIONS. FOR YOUR SAFETY,