CHESNEY S. Bio-Ethanol Installation & User Manual. model: EFB1200 with resevoir. Issue 01
|
|
|
- Malcolm Farmer
- 5 years ago
- Views:
Transcription
1 CHESNEY S Bio-Ethanol Installation & User Manual model: EFB1200 with resevoir Issue 01 1
2 2 Thank you for choosing this Chesney s Bio-Ethanol fire. Please read this information guide carefully in order to safely install, use and maintain your product.
3 Contents Section A: Installation Guide Installation 4 Housing configurations 14 Section B: User Manual I. Safety 22 II. Operation 24 Operating Elements 24 Initial start-up of the device 26 Flame size regulation 29 SLEEP function 30 Extinguishing the appliance 30 Subsequent start-up 30 Switching off 31 Information and warning alert 32 III. Customer s Menu 35 Locking the appliance 35 Child lock 36 Set time 37 Device IP 37 Remote control 38 Fast start 39 Serial number 39 Software 39 IV. Cleaning and maintenance 40 V. Fuel 41 VI. Disposal and recycling 41 3
 L1 1000mm (39 3/8 ) L2 95mm (3 3/4 ) D 280mm (11 )")
4 H 237mm (9 5/16 ) H1 183mm (7 3/16 ) H2 180mm (7 1/16 ) H3 3mm (1/8 ) L 1190mm (46 7/8 ) L1 1000mm (39 3/8 ) L2 95mm (3 3/4 ) D 280mm (11 ) 4
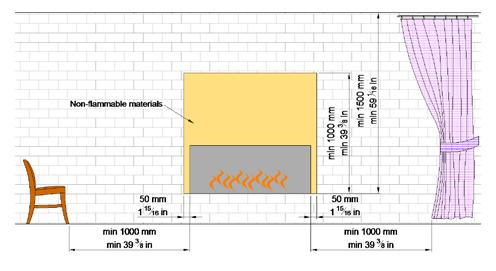
5 Section A: Installation Guide Do not install the appliance in areas with a cubic capacity of less than 178m 3 / 6286ft 3 (68m 2 / 732ft 2 with a height of less than 2.6m / 8.53ft). Do not install the appliance near fans, vents or anything that can cause significant draughts of air. Do not place in areas where there might be a potentially explosive atmosphere of paint vapours, industrial dusts, etc. No flammable items should be placed in direct contact or within a radius of 1m / 3.28ft of the appliance. Do not place near curtains, net curtains, etc. Do not expose to external weather conditions. The product is for internal use only. Do not place the appliance in close proximity to sources of humidity. It is obligatory to have a carbon-dioxide (CO 2 ) or dry chemical extinguisher placed nearby the appliance. Installation of the appliance must allow for easy removal of the appliance for servicing. The room in which the appliance is to be installed must have sufficient ventilation to ensure air exchange in the room at least once per hour. Do not start the appliance before full installation has been completed. Do not fill the fuel container before placing the appliance into its final position. 5
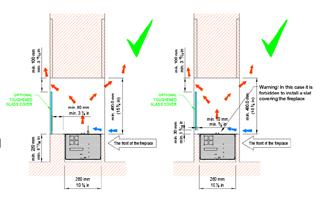
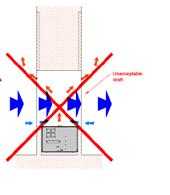
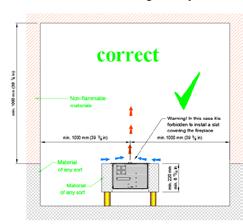
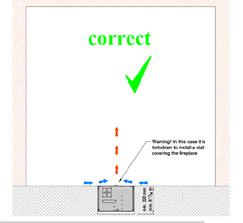
6 INSTALLATION NOTE! If you plan to operate the bio fireplace with a device that has a WI-FI connection (e.g. smartphone, tablet) please acquaint yourself with the content of the Configuration of the module with Wi-Fi and Smart Home System manual before installing the fireplace in the building. - After opening the packaging box leave the device inside the box for approx. 2 hours until it reaches room temperature. During this time familiarize yourself with the user s and installation manuals. - The elements of construction used over the appliance must be made of non-flammable materials. - Any recess below the appliance must be sealed. - A loose cable min. 3 x 1.5 mm 2, with power supply 230V, 50Hz must be provided to connect the appliance to the mains. - The device can be wired directly into a fused spur or alternatively a standard 3 pin 13 amp mains plug can be fitted (not supplied). - If there is going to be a cover over the appliance, it must be made of non-flammable materials and the minimum distance from the appliance must be no less than 40cm / 15 ¾. For reasons of safety, under no circumstances can there be any flammable material within a 1m radius of the appliance. The manufacturer does not recommend placing any heat sensitive materials or devices above the appliance as it can significantly affect the materials, properties and lifetime. The manufacturer will not bear any responsibility for the damage caused to any heat sensitive materials or devices installed above the appliance. 6

7 7
8 How to construct the housing for the appliance: Cavities need to be prepared for both the EFB1200 unit and the external tank and contol panel. The cavities need to be connected by a channel with a minimum 50mm diameter. Attention! The distance between the device A and External Tank B cannot exceed 1500mm. Maximum span between levels of the top of the furnce and the level of the external tank installed is 800mm. Make a cavity for the appliance following the diagram below. Ensure that the plane within the cavity on which the appliance is to be installed is level. The difference in level between the ends of the appliance must not exceed 2mm. Poor levelling may cause abnormal operation of the appliance and, in extreme cases, it can cause leaks of the bio-ethanol fuel and the danger of fire. 8
: I.")

9 How to prepare the housing for the external tank and control panel: Prepare the cavities (dimensions HxLxD): I. 350mm x 700mm x 350mm when the control panel is installed next to the external tank. II. 450mm x 500mm x 350mm when the control panel is installed above the external tank. 9
.")
10 Place the external tank B in the cavity and install external control panel C. In order to install the control panel use four screws D or two wall plugs E (depending on the material). Place the cable (indicated by the arrow) in the cavity where the external tank is situated. 10


11 Then connect the cable to the external tank B : and to the external control panel C : 11
12 Then connect the cable supplied with a connection block at the end of the cord. Note that connection to the mains must be made by a qualified electrician. Highlighted button indicates proper connection of the appliance to the power supply. Once connected to the power source the appliance should be placed in the prepared cavity, by using attached handles. Please make sure to remove the handles before starting the appliance and keep them for the lifetime of the appliance. If necessary, use the handles to remove the appliance. 12
13 Installing the glass shield to the appliance: 13

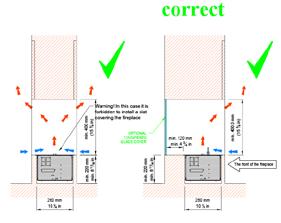
14 Situations where the installation of the glass shield with the appliance is necessary: Situations in which installation of a glass shield is forbidden: ATTENTION! Make sure that the appliance has been correctly installed and read the attached instruction manual. You must not fill the fuel tank and start the appliance before reading the instruction manual. If in the future it is necessary to take the appliance out of the housing, wait until the fuel has burned-up completely and the display shows NO FUEL, disconnect the power supply and take the appliance out of its housing. Keep this instruction manual throughout the lifetime of the appliance. 14


15 Guide for designing the housing for the appliance 15
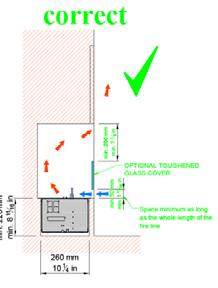
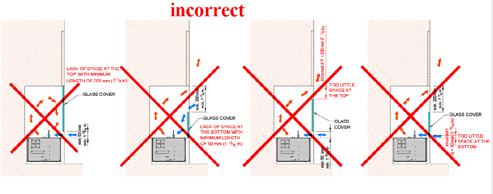
16 16 Installing an optional glass fascia


17 Mounting a heat sensitive item such as a TV above the fireplace 17
18 18 Installation with a two sided open setting

19 Free-standing installation of the appliance 19


20 20 Ventilation and air conditioning in the room in relation to installation of the appliance


21 Using an existing chimney flue 21
22 Section B: User Manual I. Safety This is a decorative appliance with real flames. In order to use the device properly and safely and in order to keep the warranty, the following safety rules should be observed. This is not a heating device. 22 The device should be installed in accordance with to the installation manual. While working, the device emits heat, water vapour and carbon dioxide, therefore it is necessary for the appliance to only be installed in a room of appropriate cubic capacity and with adequate ventilation. During the start-up sequence of the device, the characteristic smell of the liquid used in the device may be perceptible. It is obligatory to have a carbon-dioxide or dry chemical extinguisher placed nearby the device. A device that is in operation on must not be moved. Wait for complete fuel burn-out, disconnect the power supply and cool down the elements before moving the device. The device should not be left without adult supervision. Prevent handling of the device by persons not trained in its use. Do not attempt to make changes or repairs to the construction of the device. Repairs can be made only by a person trained to service the device. Do not attempt to pour fuel into the device when lit as it may cause damage to the device and cause fire. Pouring fuel into a lit device may cause a sudden ignition and can cause fire, burns and a risk to life. Do not heat the fuel before starting-up the device. Do not start up the device if any fuel has been spilt. Do not cover a working device as it may cause fire.
23 Keep the device and fuel away from children, pets and unauthorized persons. Bio-ethanol fuel is not suitable for consumption. Avoid contact with skin and eyes. Do not re-fuel when the device is lit. Do not tamper with the elements inside the device as this can cause burns, damage to the device or fire. Some elements of the device heat up to high temperatures. Do not touch areas of the device adjacent to the flames. Do not place any decorative elements on the burner s surface. WARNING! The glowing coil temperature heats up to 1300 C. Touching the device while it is turned on may cause burns. WARNING! Prior to moving the appliance burn the fuel out and move the appliance slowly, in the horizontal position, avoiding shaking. There is always some fuel left inside the device and if spilled the sensors might get wet. If that happens the appliance will not work until the liquid evaporates. WARNING! The first run can be made only after proper installation of the device and reading the manual instructions! 23


24 II. Operation The device is adjusted to work with Wi-Fi access (such as smartphone, tablet). If you are going to control the appliance by such means it is necessary to follow the instructions included in Configuration of the module with Wi-Fi and Smart Home System. Operating elements: Glowing coil Top of furnace Control panel display hidden under flap Filler flap Tempered glass Control Panel: Starts up the device from stand-by mode or turns off the device to stand-by mode Turns on to standby or completely turns off the device 24 USB port hidden under flap Control panel display Reduces flame level Increases flame level

25 Control Panel Display: Fuel level indicator Flame size indicator 25

26 Initial Start-up of the Device: 1. If button is flashing, the device is properly connected to the mains. 2. Press button on the control panel. The welcoming display will appear and after 3 seconds you will see the message. 3. NO FUEL lack of fuel. To fill it up: 3a. Open the filler bolt, message will change to FILL WITH FUEL. 26


27 3b. Insert the funnel and fill the reservoir with fuel. Fuel level indicator on the display will increase. ATTENTION! Pour the fuel into the funnel following these precautions: During pouring be careful not to spill fuel out of the filler. If 5L containers are used to fill up, twist on the cap with the tap onto the container and pour the fuel using the funnel. To fill up only use accessories provided by the manufacturer. 27
28 WARNING! ERROR 01 - the fuel has been spilt: stop filling the fuel instantly! remove the funnel dry the visible moisture with the use of the manual pump, supplied by the manufacturer, pump out at least 1 litre of fuel from the fuel filler close the filler flap turn off the device with the red button if the spillage is excessive the power supply needs to be disconnected wait at least 1 hour until the remaining moisture evaporates after 1 hour turn the device on with the red button if the ERROR 01 message appears, turn off the device and wait until the remaining moisture evaporates. 3c. When the message RESERVOIR FULL CLOSE THE LID appears on the display, stop pouring! Take the funnel out and close the filler flap. 28

29 4. When message changes to READY the appliance can be started: - press the START/STOP button on the control panel or the START button on the remote control or on the configured appliance. WARNING! The glowing coil starts to heat up to 1300 C, when you touch it you may be burnt! - If the function Child lock is turned on, you need to hold the START/ STOP button on the control panel or START button on the remote control for 3 seconds. It is also possible to push START button on the configured appliance. WARNING! The filament starts to heat up to 1300 C, when you touch it you may be burnt! 5. PLEASE WAIT message you need to wait a moment as it takes a few seconds for the appliance to ignite the flame. 6. WORKING message the device is in working mode. Flame size regulation: The appliance initially starts up at the 4th level of the flame size Adjust the flame size by pressing either the + or - button on the remote control, on the control panel or on the configured appliance. Flame size indicator displays the chosen flame size. There is also a number denoting the flame size visible above the flame size indicator. 29
30 SLEEP function: The appliance can be programmed to switch off after a given time. When the message WORKING is visible on the display, you need to hold + and - buttons simultaneously for a few seconds. The screen will appear: Using + button choose the desired time (not longer than 3 hours) and confirm with - button. WARNING! The device with SLEEP function turned on cannot be left without supervision! Extinguishing the appliance: Press the START/STOP button on the control panel or the STOP button on the remote control or on the configured appliance. WORKING message will change into COOLING THE DEVICE the device is too hot to be started again. To make the cooling process faster, the cooling fans start operating. When the device cools down the message on the display turns into READY. 30 Subsequent start-up of the appliance: NO FUEL message visible on the display - start the procedures as in point 3 of this manual. READY message visible on the display - start the procedures as in point 4 of this manual.
31 Switching off: To switch off the device completely press the red button control panel. on the ATTENTION! The appliance will automatically stop working when: the fuel burns out (The NO FUEL, REFUEL WHEN THE DEVICE IS COOLED message will change to the NO FUEL message once the device cools down), the temperature of the appliance is too high, (COOLING THE DEVICE TEMPERATURE TOO HIGH message) INFO! To avoid abrupt switching off when the temperature approaches critical level, the flame size will be diminished to 50% and will restrict the ability to increase the flame size when you try to increase the flame size, the message will appear: If the temperature of the device still increases, the device will switch off. When the temperature decreases to a safe level, flame size can be increased again. the device is moved or it senses seismic shocks (COOLING THE DEVICE. DEVICE HIT message) the device is tilted (COOLING THE DEVICE. DEVICE TILTED message) the allowed level of carbon dioxide is exceeded in the room (COOLING THE DEVICE CO 2 LEVEL TOO HIGH message) any occurrence takes place that evokes ERROR message 31
32 Information and warning alerts: NO FUEL No message, button is flashing READY The device is connected to the mains, but remains dormant. The device is connected to the mains and ready to start. To start operating the device, press the red button on the control panel. In this mode, the device does not respond to commands sent from the remote control, the configured device nor buttons on the control panel. You can start from point 3 and refuel or from point 4 and immediately start the device. NO FUEL The fuel reservoir is empty. Refill the fuel following the description in point 3 of the User s Manual. NO FUEL, REFUEL WHEN THE DEVICE IS COOLED RESERVOIR FULL CLOSE THE LID FILL WITH FUEL COOLING THE DEVICE COOLING THE DEVICE TEMP. TOO HIGH COOLING THE DEVICE DEVICE HIT COOLING THE DEVICE DEVICE TILTED COOLING THE DEVICE CO 2 LEVEL TOO HIGH The fuel has run out however the device is too hot to restart it. The fuel reservoir is full. The filler bolt is open. Protection against restart of the device when it is too hot. The acceptable device operation temperature has been exceeded. The device has been hit. The device has been tilted. The concentration of CO 2 has been exceeded. Please wait until the device displays the NO FUEL message. Only then can the fuel be replenished in accordance with the point no.3 of the User s Manual Close the filler bolt. You can start the device now. You can refill the fuel or close the bolt and start the device. Wait until the device cools down. The message will change to READY. When the message COOLING THE DEVICE is displayed, the fans that accelerate the cooling of the device switch on. Wait until the device cools down. The message will change to READY. When the message COOLING THE DEVICE is displayed, the fans that accelerate the cooling of the device switch on. Wait until the device cools down. The message will change to READY. When the message COOLING THE DEVICE is displayed the fans that accelerate the cooling of the device switch on. Wait until the device cools down. The message will change to READY. When the message COOLING THE DEVICE is displayed the fans that accelerate the cooling of the device switch on. Wait until CO 2 level in the room diminishes. It is advised to open the windows or open the door to adjacent rooms. 32
33 ERROR 1 ERROR 2 ERROR 3 ERROR 4 There was a fuel spill or leak detected. An error of the heater temperature sensor. An error of the fire temperature sensor. An error of the reservoir temperature sensor. Remove the funnel if it is placed in the fuel filler. Wipe visible moisture, pump out at least 1 litre of fuel using the attached manual pump then turn off the device using the red button on the control panel. If the spillage is excessive the source of power needs to be disconnected. Dry the visible moisture. Leave the device switched off for at least 1h. If the message is still displayed after restart, turn off the device for a longer time. If this does not solve the problem call SERVICE. Turn off the device using the red button on the control panel. Turn it on after a while. If the message does not disappear call SERVICE. ERROR 5 Movement sensor actuated. If the device was moved during operation. The message will disappear with the disappearance of the source of movement. ERROR 6 An error of the fuel level probe. Turn off the device using the red button on the control panel. Turn it on after a while. If the message does not disappear call SERVICE. ERROR 10 The heater is damaged. Turn off the device using the red button on the control panel. Turn it on after a while. If the message does not disappear call SERVICE. ERROR 14 Limiting switch K2. Call SERVICE. ERROR 15 ERROR 16 ERROR 17 ERROR 20 ERROR 21 The device is tilted (set on a non-levelled surface). Exceeded temperature of the heater sensor. Exceeded time of waiting for the appearance of flame. Too low temperature in the hearth while turning on. Too low temperature in the hearth during operation. Switch off the device using the red button on the control panel. Level the surface on which the device stands and restart the device. Turn off the device using the red button on the control panel. Turn it on after a while. If the message does not disappear call SERVICE. Turn off the device using the red button and try to restart the device. Turn off the device with the red button and wait until it cools down. Try to restart the device. 33
34 ERROR 31 Fuel spilled within fuel pump Turn off the device with the red button and wait at least 1h. Try to restart the device. If the message does not disappear wait longer until the moisture evaporates completely. If the message does not disappear call SERVICE. ERROR 98 Error occurred during remote control programming. Try to program the remote control again. ERROR 99 No connection between the control panel and microprocessor Try to restart the device.. If the message does not disappear call SERVICE. 34


 Locking the appliance: This function allows the device to be locked in order to avoid its use by unauthorized persons.")
35 III. Customer s Menu If READY or NO FUEL message is visible on the display, you may access Customer s menu. To do this, hold + button for 8s and menu will appear on the display. It is possible to operate the menu only by means of the buttons on the control panel. To move between the categories use + and to choose a particular category use -. Leaving the menu unused for 5s will result in coming back to the main display. 1) Locking the appliance: This function allows the device to be locked in order to avoid its use by unauthorized persons. To turn this function on press - on the control panel. This screen appears: The device cannot be turned on either via remote control, configured device or according to the manual, without previously unlocking it. To unlock the device hold START/STOP button for 5s the message will disappear. 35

36 2) Child lock When the function is turned on it forces the user to hold START/STOP button on the control panel or remote control for 3s in order to start the device. If START/STOP button is only pressed quickly, the device will not start. To turn this function on press - on the control panel. This screen will appear: Using - button confirm ON option flashing in red. On the main display the information that Child lock function is turned on will be visible. To turn this function off, choose OFF option in the menu of Child lock function. 36
37 3) Set time This allows date and time to be set. Go to the menu s functions by means of - button. The hour starts to blink. Using + button set the appropriate hour and confirm with - button. Do the same to set minutes and date, using + for choosing the appropriate numbers and - for confirming them. When setting is finished, the device will automatically come back to the main display with time already visible. 4) Device IP This shows the device IP that is essential in operating the device via the configured appliance. Additional information can be found in the manual concerning Configuration of the module with Wi-Fi and Smart Home System. 37

38 5) Remote Control Remote control attached to the device is already programmed. This function allows for the remote control to be programmed if there is such a need at a future date or if one remote control is to control several units. To program the remote control press +, choose Remote Control and confirm with - button. This screen will appear: Press - button to confirm. Then press in sequence (hold until next message appears) START, STOP, PLUS, MINUS. After the remote control has been programmed the messages disappear and main display appears. Remote control is programmed. 6) Fast start When Fast start function is turned on, the time for the flame to appear is much shorter. The device is automatically programmed with Fast start function turned on. To turn it off press - button on the control panel. The screen will appear: 38
39 Using + button choose OFF option and confirm with - button. The device automatically returns to main display and Fast start function will be turned off. To restart this function choose ON option in menu of Fast start function. Warning! When Fast start function is turned on the device uses 100W of energy. Turning off the device with button prevents from using the energy but does not turn off Fast start function. 7) Serial number It displays serial number of the device. 8) Software It displays the version of an installed program. 39
40 IV. Cleaning and Maintenance Switch off the device before cleaning. Wait until the temperature of the device gets close to the ambient temperature. To maintain the device in good condition, please observe the following rules: To clean stainless steel surfaces, use only gentle cleaners which do not cause cracks or scratches, or use other means specifically designed for cleaning stainless steel. The inside of the device can only be cleaned by a person competent to service the appliance. The manufacturer does not foresee a situation where it will be necessary to clean elements not normally accessible. The manufacturer is not liable for damage resulting from: Improper operation (failure to follow procedures detailed in the User s Manual). Self-dismantling of the device. Attempts to modify the device. Using other liquids than those recommended in point V. Fuel. 40
41 V. Fuel In order for the unit to function correctly only fuel must be used that is a 86-96% denatured ethanol in accordance with the European Union guidelines (Directive No. 162/2013). Using other liquids is prohibited as it may lead to incorrect functioning of the device, damage of the device and/or may cause fire or and/or health risk. The manufacturer takes no responsibility for damage caused by using prohibited liquids such as absolute ethanol. VI. Disposal and recycling The product is equipped with parts made of aluminium, steel, plastics and electronics. If you need to dispose of the device, follow the terms of disposal and recycling in force in your country. Moreover, dispose of the empty fuel containers using appropriate plastic waste disposal. Most of the materials used can be recycled. If you have technical problems or other questions that require clarification, please contact the manufacturer. 41
42 42 Notes
43 43
44
CHESNEY S. Bio-Ethanol Installation & User Manual. model: EFB1200. Issue 01
 CHESNEY S Bio-Ethanol Installation & User Manual model: EFB1200 Issue 01 1 2 Thank you for choosing this Chesney s Bio-Ethanol fire. Please read this information guide carefully in order to safely install,
USER S MANUAL. Fire Line Automatic 3. Manufactured by Planika Sp. z o.o. ul. Bydgoska Brzoza Poland. I0773#05 of
 USER S MANUAL Fire Line Automatic 3 Manufactured by Planika Sp. z o.o. ul. Bydgoska 38 86-061 Brzoza Poland I0773#05 of 05.12.2014 Copyright Planika Sp. z o.o. www.planikafires.com 1 IT IS OBLIGATORY TO
CHESNEY S. Bio-Ethanol Installation & User Manual. model: EFB750. Issue 01
 CHESNEY S Bio-Ethanol Installation & User Manual model: EFB750 Issue 01 1 2 Thank you for choosing this Chesney s Bio-Ethanol fire. Please read this information guide carefully to be able to safely install,
USER S MANUAL. WallFire. Manufactured by: Planika Sp. z o.o. ul. Bydgoska Brzoza Poland
 USER S MANUAL WallFire Manufactured by: Planika Sp. z o.o. ul. Bydgoska 38 86-061 Brzoza Poland Edition I0731#01 as of 20.02.2014 IT IS OBLIGATORY TO READ AND KEEP THIS INSTRUCTION MANUAL TABLE OF CONTENTS
USER S MANUAL LINCOLN PF Manufactured by: Planika Sp. z o.o. ul. Bydgoska Brzoza Poland
 USER S MANUAL LINCOLN PF-0917-0075-000 Manufactured by: Planika Sp. z o.o. ul. Bydgoska 38 86-061 Brzoza Poland Edition i1266#00 as of 25.04.2017 Serial number greater than P5660 17 IT IS OBLIGATORY TO
INSTALLATION MANUAL. FLA 2 model E#4 L=1290 FLA 2 model E#4 REMOTE L=1290. Automatic fuel pump
 INSTALLATION MANUAL FLA 2 model E#4 L=1290 FLA 2 model E#4 REMOTE L=1290 A B C D x 3 x 3 x 1 E F G * x 1 Automatic fuel pump x 1 SERVICE KIT x 1 x 1 * only REMOTE Stainless steel Black [mm] [ ] [mm] [
TAB. Ventless Ethanol Fireplace. User s Manual
 TAB Ventless Ethanol Fireplace User s Manual What s in the box: Fireplace Body Tempered Side Glass Mounting Bolts Control Tool User s Manual 1pc 2pcs 4pcs 1pc 1pc Assembling Unpack the fireplace and accessories.
LIMA. Ventless Ethanol Fireplace. User s Manual Installation Instructions
 LIMA Ventless Ethanol Fireplace User s Manual Installation Instructions Fireplace Body Burner Mounting Bracket Wall Plugs & Screws Control Tool Tempered Glass User s Manual What s in the box: 1pc 1pc 1pc
LATA. Ventless Ethanol Fireplace. User s Manual Installation Instructions
 LATA Ventless Ethanol Fireplace User s Manual Installation Instructions Fireplace Body EB1200 Burner Mounting Bracket Wall Plugs & Screws Control Tool Tempered Glass (if equipped) User s Manual What s
ATER SS. Ventless Ethanol Fireplace. User s Manual Installation Instructions
 ATER SS Ventless Ethanol Fireplace User s Manual Installation Instructions Fireplace Body EB1200 Burner Mounting Bracket Wall Plugs & Screws Control Tool User s Manual What s in the box: 1pc 1pc 1pc 4pcs
REMOTE CONTROLLED BIOETHANOL BURNER USER GUIDE
 REMOTE CONTROLLED BIOETHANOL BURNER USER GUIDE Item Number: BIO332, BIO333, BIO334, BIO335, BIO336, BIO337, BIO338 1. Warning 2. Technical details 3. Preparation before use 4. Power supply connection 5.
User s Manual & Safety Instructions Read Carefully Before Use
 Thank you for choosing Sunnydaze Decor. If you have any questions, comments or concerns please feel free to contact us by phone at: 888-881-4668, by email: customerservice@serenityhealth.com, or you could
SMART BIO ETHANOL ELECTRONIC BURNER
 SMART BIO ETHANOL ELECTRONIC BURNER User s Manual What s in the box: Burner 1pc Remote Control 1pc AC Adapter 1pc Filling Hose 1pc User s Manual 1pc Connect & Install Plug in the Ethanol Burner by connecting
fire without limitation!
 afire USA / Lumina Products Inc v.4.5 FIRE SOLUTIONS FOR ARCHITECTS, INTERIOR DESIGNERS, MODERNISTS v.4.5 afire USA / Lumina Products Inc e: sales@afire.com : CREATE RIBBONS OF FIRE World s First Modular
Hand Held Steamer DF-A001 User Manual
 Hand Held Steamer DF-A001 User Manual PLEASE READ AND SAVE THESE INSTRUCTIONS FOR FUTURE REFERENCE Contents: Technical data Important safety instructions Description of the appliance Accessories Operation
ELECTRIC BOILERS FOR CENTRAL HEATING
 ELECTRIC BOILERS FOR CENTRAL HEATING TermoMax INSTRUCTIONS FOR INSTALLATION INSTRUCTIONS FOR INSTALLATION We reserve the right of alternations WE ARE NOT LIABLE FOR DAMAGES RESULTING FROM NON- OBSERVING
Instruction Manual for Wall Mounted Fireplace, Models: ARC 103A & VAGUE 101A
 110 rue Robinson Sud, Granby (Quebec) J2G 7L4 Tel. : (450) 372-8008 Fax : (450) 372-8009 www.decoflame.ca Instruction Manual for Wall Mounted Fireplace, Models: ARC 103A & VAGUE 101A CONTENTS : Safety
INSTRUCTIONS Français 2 Nederlands 15 English 28 Italien
 INSTRUCTIONS Français 2 Nederlands 15 English 28 Italien 41 INSTRUCTION BOOK Thank you for purchasing our product. Please read this owner s manual carefully before using the unit. It is important that
TECHNICAL INSTRUCTIONS USE AND MAINTENANCE
 TECHNICAL INSTRUCTIONS USE AND MAINTENANCE Cm Pelet-set For boilers CentroPlus 25/35 and CentroPlus-B 25/35 (solid fuel and wood pellets fuel firing) TUPSCP-K-11-2016-ENG CONTENTS 1.Introduction 2. Status
Installation/Instruction Manual
 1510876HC8902 Pressurized ventilators (for device cooling) Model Blade diameter (cm) Indoor or outdoor EF-20UYS-UL EF-25UAS-UL EF-30UBS-UL 20 25 30 Indoor Installation/Instruction Manual For customers
16 XD Mk2 Inset Electric Fire
 16 XD Mk2 Inset Electric Fire B-1005344 Packing Checklist Electric Fire Remote Control Handset 2 x AAA Batteries Log Set Ember Ice Crystal Set Instruction Manual Fascia IMPORTANT PLEASE READ THESE INSTRUCTIONS
15,000 BTU Portable Air Conditioner
 Instruction Manual 15,000 BTU Portable Air Conditioner Model: HYAC15 READ AND SAVE THESE INSTRUCTIONS Please read and follow the instructions in this user manual even if you feel you are familiar with
Model: PC600. Batch: PR3496. POWER:1000W AC V, 50/60Hz For your safety, always read the instruction book carefully before using.
 Model: PC600 Batch: PR3496 POWER:1000W AC220-240V, 50/60Hz For your safety, always read the instruction book carefully before using. Introduction-----------------------------------------------------------------------------------------------
WHE 2.24 / WHE 2.24 FF
 EN Wall-hung gas boilers WHE 2.24 WHE 2.24 FF User Guide 300011777-001-C . Contents 1 Introduction.............................................................................3 1.1 Symbols used...........................................................................................3
Warning: 230V / 1ph / 50Hz V / 3ph / 50Hz. Remarks: Make sure that you have enough power. (See page 15 Cable table)
") 1 2 Warning: - Do not place your hand or any other objects into the air outlet and fan. It could damage the heat pump and cause injuries; - In case of any abnormality with the heat pump, cut off the power
1 2 Warning: - Do not place your hand or any other objects into the air outlet and fan. It could damage the heat pump and cause injuries; - In case of any abnormality with the heat pump, cut off the power
PELLET BURNER PV 350
 PELLET BURNER PV 350 INSTRUCTION MANUAL v1.1 1 PRODUCT DESCRIPTION...3 2 SAFETY RULES...3 3 WARNINGS...4 4 INSTALLATION INSTRUCTIONS...5 4.1 BOILER REQUIREMENTS...5 4.2 PELLET CONTAINER...6 4.3 INSTALLATION
INFRARED PARAFFIN/KEROSENE/ DIESEL HEATER 28/37kW 230V
 instructions for INFRARED PARAFFIN/KEROSENE/ DIESEL HEATER 28/37kW 230V model no: IR37.V4 Thank you for purchasing a Sealey product. Manufactured to a high standard, this product will, if used according
wc431 Slimline Integrated Dishwasher Manual for Installation, Use and Maintenance
 wc431 Slimline Integrated Dishwasher Manual for Installation, Use and Maintenance Contents Contents... 2 Important... 3 Important Notes... 4 Recommendations... 5 Before First Use... 5 Control Panel...
SPECIFICATIONS PART NAME
 SPECIFICATIONS MODEL High HEAT RATING Low FUEL TANK CAPACITY BURNING TIME DIMENSIONS(W x D x H) WEIGHT VOLTAGE / FREQUENCY ELECTRICAL CONSUMPTION LC-S27 9,900 BTU / 2.9 kw 2,900 BTU / 0.8 kw 4.0 lit. 14.2~
Because you re not like everyone else. PORTABLE CLEAR ICE MAKER IM200SS OWNER S MANUAL. Manual v1.0
 Because you re not like everyone else. PORTABLE CLEAR ICE MAKER IM200SS OWNER S MANUAL Manual v1.0 2 BECAUSE YOU RE NOT LIKE EVERYONE ELSE And neither are we. Always at the forefront of our industry, our
WARNING! For your safety
 Manual GB WARNING! For your safety PLEASE READ THIS MANUAL CAREFULLY BEFORE USING THIS FIREPLACE! Warning: The appliance couldn't been ignite at hot state. Miscellaneous Congratulations! You purchased
ELECTRIC ASHCAN MODEL NO: ASHVAC1200 OPERATING & MAINTENANCE INSTRUCTIONS PART NO: ORIGINAL INSTRUCTIONS
 ELECTRIC ASHCAN MODEL NO: ASHVAC1200 PART NO: 6471133 OPERATING & MAINTENANCE INSTRUCTIONS ORIGINAL INSTRUCTIONS GC1216 INTRODUCTION Thank you for purchasing this CLARKE product which is designed for fast,
Countertop Clear Ice Maker
 Countertop Clear Ice Maker CLEARICE40 OWNERS MANUAL Read and save these instructions. Manual v1.1 2 READ AND SAVE THESE INSTRUCTIONS TABLE OF CONTENTS Register Your Product Online..3 Important Safety Instructions.
E-MAL1 E-AW1 E-NEO. Malvern Electric Astwood Electric NEO Electric T E C H N I C A L & U S E R M A N U A L
 Malvern Electric Astwood Electric NEO Electric ELECTRIC TRADITIONAL BLACK POWDER COAT FINISH To be retained by the user for future reference Thank you for purchasing an ACR Stove Serial Number: E-MAL1
Countertop Clear Ice Maker
 CLEARICE40 Countertop Clear Ice Maker OWNERS MANUAL Read and save these instructions. 2 A Name You Can Trust Trust should be earned and we will earn yours. Customer happiness is the focus of our business.
Fully-automatic Gas tankless Water Heater USER'S MANUAL FOR MODEL EZ-101 ISO9001 certified
 Fully-automatic Gas tankless Water Heater USER'S MANUAL FOR MODEL EZ-101 ISO9001 certified Thank you for purchasing our fully-automatic gas-fired tankless water heater. Please completely read this Manual
Antari X-310 ORDERCODE 60663
 Antari X-310 ORDERCODE 60663 Congratulations! You have bought a great, innovative product from Antari. The Antari X-310 fazer brings excitement to any venue. You now own a rugged and powerful state-of-the-art
26 LB CAPACITY ICE MAKER
 26 LB CAPACITY ICE MAKER INSTRUCTION MANUAL CATALOG NUMBER BIMY126S Thank you for choosing BLACK+DECKER! PLEASE READ BEFORE RETURNING THIS PRODUCT FOR ANY REASON. If you have a question or experience a
Portable Air-conditioner
 Use and Care Manual Portable Air-conditioner Thank you very much for selecting this new model of Portable Air Conditioner, please read this Use and Care Manual carefully before installing and using this
DÉCOFIRE. Contemporary CHIMENEA. Assembly, Safety & Operating Instructions FOR OUTDOOR USE ONLY READ INSTRUCTIONS CAREFULLY BEFORE ASSEMBLY OR USE.
 DÉCOFIRE Contemporary CHIMENEA Assembly, Safety & Operating Instructions FOR OUTDOOR USE ONLY READ INSTRUCTIONS CAREFULLY BEFORE ASSEMBLY OR USE. KEEP INSTRUCTIONS IN A SAFE PLACE FOR FUTURE REFERENCE
INSTALLATION & USER INSTRUCTIONS
 INSTALLATION & USER INSTRUCTIONS Skålvik LED Electric Stove Skålvik LED Electric Stove All instructions must be handed to the user for safekeeping. Revision A - 12/15 1 I N S TA L L AT I O N & U S E R
Because you re not like everyone else. PORTABLE CLEAR ICE MAKER IM200SS OWNER S MANUAL
 Because you re not like everyone else. PORTABLE CLEAR ICE MAKER IM200SS OWNER S MANUAL 2 BECAUSE YOU RE NOT LIKE EVERYONE ELSE. And neither are we. Always at the forefront of our industry, our goal is
Dehumidifier. Instruction Manual. Model DH-320/A
 Dehumidifier Instruction Manual Model DH-320/A CONTENTS Safety Warnings 2 Operation consideration 5 Construction & controls 6 Function selection 8 Preparation for use 10 Operation 12 Maintenance 14 Continuous
SMART EVO 2 - User Manual ELECTRICAL PANEL FOR 2 MOTORS
 SMART EVO 2 - User Manual ELECTRICAL PANEL FOR 2 MOTORS CONTENTS 1. INTRODUCTION... 5 2. WARNINGS... 6 3. GENERAL DESCRIPTION... 7 4. INSTALLATION... 8 5. LUMINOUS INDICATORS AND COMMANDS... 9 6. DIP-SWITCH
MW402 Integrated Dishwasher
 MW402 Integrated Dishwasher Manual for Installation, Use and Maintenance 1 Customer Care Department The Group Ltd. Harby Road Langar Nottinghamshire NG13 9HY T : 01949 862 012 F : 01949 862 003 E : customer.care@cda.eu
Operating Instructions
 Operating Instructions Air Conditioner Model No. Indoor Unit CS-E12QD3RW CS-E18QD3RW Single Split Outdoor Unit CU-E12QD3R CU-E18QD3R Multi Split Outdoor Unit CU-4E23QBR CU-4E27QBR CU-5E34QBR Operating
VASKA C11. gas-fireplace user manual. Saturnus 8 NL-8448 CC Heerenveen Postbus 219 NL-8440 AE Heerenveen T. +31(0) F.
 F.") VASKA C11 gas-fireplace user manual Saturnus 8 NL-8448 CC Heerenveen Postbus 219 NL-8440 AE Heerenveen T. +31(0)513 656500 F. +31(0)513 656501 40 010 458 01.51 DESCRIPTION OF THE FIREPLACE CONTENTS 1 2
VASKA C11 gas-fireplace user manual Saturnus 8 NL-8448 CC Heerenveen Postbus 219 NL-8440 AE Heerenveen T. +31(0)513 656500 F. +31(0)513 656501 40 010 458 01.51 DESCRIPTION OF THE FIREPLACE CONTENTS 1 2
50M Integrated Single or Two-Stage HSI Integrated Furnace Control Kit INSTALLATION INSTRUCTIONS
 50M56-743 Integrated Single or Two-Stage HSI Integrated Furnace Control Kit INSTALLATION INSTRUCTIONS FAILURE TO READ AND FOLLOW ALL INSTRUCTIONS CAREFULLY BEFORE INSTALLING OR OPERATING THIS CONTROL COULD
THERMAX Efficiency Monitor
 INSTALLATION & OPERATION INSTRUCTIONS THERMAX Efficiency Monitor Oil & Gas Fired Heating Equipment Efficiency Monitoring Instrument Important Safety Instructions Read and safe these instructions before
Electric Fireplace. Electric Fireplace
 Electric Fireplace Instruction Manual Electric Fireplace Packing List 1 1 2 1 1 Electric Fireplace Remote Control AAA battery Fastener Package Instruction Manual Yosemite Home Décor 1-800-305-9872 www.yosemitehomedecor.com
INSTRUCTION MANUAL KETTLE
 INSTRUCTION MANUAL KETTLE PT EL EL SV PT ES NL DE FR EN EN IT Dear Customer, Thank you for purchasing a Smeg 50 s Style kettle. By choosing one of our products, you have selected an appliance which combines
USE AND MAINTENANCE. Cm Pelet-set (60-90 kw) TECHNICAL INSTRUCTIONS
 TECHNICAL INSTRUCTIONS") CENTROMETAL d.o.o. Glavna 12 40306 Macinec Croatia tel: +385 40 372 600; fax : +385 40 372 611 TECHNICAL INSTRUCTIONS USE AND MAINTENANCE Cm Pelet-set (60-90 kw) For boilers: EKO-CK P 70-110 TUPS-90K-09-2015-E-N-eng
CENTROMETAL d.o.o. Glavna 12 40306 Macinec Croatia tel: +385 40 372 600; fax : +385 40 372 611 TECHNICAL INSTRUCTIONS USE AND MAINTENANCE Cm Pelet-set (60-90 kw) For boilers: EKO-CK P 70-110 TUPS-90K-09-2015-E-N-eng
USER INSTRUCTION MANUAL. Autofill Water Boiler
 USER INSTRUCTION MANUAL Autofill Water Boiler GH187 GC719 (FILTERED PRODUCT) Buffalo Warranty 1 Year Parts 1 Year Labour 083347300-03/06/14 Introduction Thank you for purchasing this Buffalo appliance.
INFRARED DIESEL HEATER
 INFRARED DIESEL HEATER MODEL NO: DEVIL IRD20B PART NO: 6925500 OPERATION & MAINTENANCE INSTRUCTIONS ORIGINAL INSTRUCTIONS GC0717 iss.1 INTRODUCTION Thank you for choosing this Clarke Infrared Heater which
USER MANUAL W EVAPORATIVE COOLER. Contents. I. Safety warnings and precautions II. Functions and Features 8
 EVAPORATIVE COOLER 972-1001-W USER MANUAL Thanks for your support and choice of our unique evaporative cooler, in order to help you use the product properly, please read this manual before using the product.
Induction Cooktop Product Guide (IC200B)
") Induction Cooktop Product Guide (IC200B) http://www.avalon-bay.com Customer Care Number: 1-844-528-2566 Introduction Congratulations on your purchase of a new Avalon Bay Induction Cooktop. Before using
Induction Cooktop Product Guide (IC200B) http://www.avalon-bay.com Customer Care Number: 1-844-528-2566 Introduction Congratulations on your purchase of a new Avalon Bay Induction Cooktop. Before using
OWNER GUIDE. Model 750. INSET LIVE FUEL EFFECT GAS FIRE Fitted with Harmony, Avignon or Style fascia. (GC No )
") 5112499/01 OWNER GUIDE Model 750 INSET LIVE FUEL EFFECT GAS FIRE Fitted with Harmony, Avignon or Style fascia (GC No. 32-032-58) THIS APPLIANCE IS FOR USE WITH NATURAL GAS (G20) WHEN CONVERTED USING CONVERSION
5112499/01 OWNER GUIDE Model 750 INSET LIVE FUEL EFFECT GAS FIRE Fitted with Harmony, Avignon or Style fascia (GC No. 32-032-58) THIS APPLIANCE IS FOR USE WITH NATURAL GAS (G20) WHEN CONVERTED USING CONVERSION
USER MANUAL ACQUAHOME 32 B BLU
 USER MANUAL ACQUAHOME 32 B BLU Dear Customer, Thank you for preferring a T heating unit, a modern, high-quality product that is able to guarantee your maximum well-being for a long period of time, with
Model No.: PS08-01 PS10-01 Ref: KY80 KY100
 8,000/10,000/12,000 BTU Portable Air Conditioner Operating Instructions Model No.: PS08-01 PS10-01 Ref: KY80 KY100 Model No.: PS12-03 Ref: KY120 3119233 V160310 Thank you for choosing a Soleus Air Portable
PAC12J. 12,000btu Cool & Heat Portable Air Conditioner. Please read this manual carefully prior to operating the product.
 USER MANUAL Portable Air Conditioner and Heater With Heat Pump Technology PAC12J 12,000btu Cool & Heat Portable Air Conditioner Please read this manual carefully prior to operating the product. Please
5) Do not start or stop the unit by inserting or pulling out the power plug.
 Do not start or stop the unit by inserting or pulling out the power plug.") 3058080 V170306 PURCHASE INFORMATION Thank you for choosing a Soleus Air Portable Air Conditioner. This Owner s Manual will provide you with valuable information necessary for the proper care and maintenance
3058080 V170306 PURCHASE INFORMATION Thank you for choosing a Soleus Air Portable Air Conditioner. This Owner s Manual will provide you with valuable information necessary for the proper care and maintenance
INSTRUCTION MANUAL. UNDERCOUNTER WINE & BEVERAGE COOLER (32 bottles capacity) MODEL:WC-30U
 MODEL:WC-30U") INSTRUCTION MANUAL UNDERCOUNTER WINE & BEVERAGE COOLER (32 bottles capacity) MODEL:WC-30U To ensure proper use of this appliance and your safety, please read the following instructions completely before
INSTRUCTION MANUAL UNDERCOUNTER WINE & BEVERAGE COOLER (32 bottles capacity) MODEL:WC-30U To ensure proper use of this appliance and your safety, please read the following instructions completely before
Owner's Manual TABLE OF CONTENTS
 40MAQ High Wall Ductless System Sizes 09 to 36 Owner's Manual TABLE OF CONTENTS PAGE A NOTE ABOUT SAFETY... 2 GENERAL... 2 PART NAMES... 3 FUNCTION BUTTONS... 4 DISPLAY PANELS... 5 REMOTE CONTROL... 6
INSTRUCTIONS MANUAL FOR USE AND MAINTENANCE
 INSTRUCTIONS MANUAL FOR USE AND MAINTENANCE Carbel models: C-60 Plus C-70 Plus C-80 Plus C-100 Plus C-70 Plus Double-sided C-80 Plus Double-sided C-100 Plus Double-sided CARBEL C/ Ciudad de Cartagena,
AI-215 Series Portable Ice Maker
 AI-215 Series Portable Ice Maker OWNERS MANUAL v1.0 Read and save these instructions. 2 A Name You Can Trust Trust should be earned and we will earn yours. Customer happiness is the focus of our business.
NO VENTING REQUIRED 120V AC;
 ELECTRIC FIREPLACE Model Number: Alice (EF172B-EF176B) OWNER S MANUAL WARNING Read and understand this entire owner s manual, including all safety information, before plugging in or using this product.
ELECTRIC ASH CAN Model: CVACASH500 Part No:
 ELECTRIC ASH CAN Model: CVACASH500 Part No: 6471132 OPERATING & MAINTENANCE INSTRUCTIONS GC0614 INTRODUCTION Thank you for purchasing this electrically powered Ash Can which is designed for fast, easy
WARNING/SAFETY PRECAUTIONS
 WARNING/SAFETY PRES To avoid any risk of personal injury, material damage or incorrect use of the appliance, be sure to observe the following safety precautions. (After reading these owner s instructions,
FR120RC/FR120RM FR120RR/FR120RB FN-153/FN-153C
 SAFETY WARNING (R-600a Models Only) This appliance contains a certain amount of isobutane refrigerant (R600a) a natural gas with high environmental compatibility that is, however, also combustible. when
INSTRUCTIONS FOR USE OF COMBINED BOILER INTENDED FOR COMBUSTION OF BOTH PELLETS AND SOLID FUEL ABC COMBO
 INSTRUCTIONS FOR USE OF COMBINED BOILER INTENDED FOR COMBUSTION OF BOTH PELLETS AND SOLID FUEL ABC COMBO .Technical specifications Boiler power DESCRIPTION Water content in a boiler Required draft Supply
Operating Instructions Air Conditioner
 F56579 Operating Instructions Air Conditioner Indoor Unit Outdoor Unit CS-E18GKR CS-E1GKR CS-E4GKR CS-E8GKR CU-E18GKR CU-E1GKR CU-E4GKR CU-E8GKR Before operating the unit, read these operating instructions
Read the entire manual before using this Machine.
 COLD SPARK MACHINE X-BLITZZX2 FIREWORKS SIMULATOR SAFE COLD BURN SPARK EFFECT MACHINE INDOOR / OUTDOOR SPARK FOUNTAIN NON-HAZARDOUS EFFECT - NO FIREWORK RISKS NO EXPLOSIVE CONTENT - NOT PYROTECHNIC ENVIRONMENTAL
Electric Fireplace Insert with Heater OWNER S MANUAL Model No. FP404R-Q
 Electric Fireplace Insert with Heater OWNER S MANUAL Model No. FP404R-Q PLEASE SAVE THESE INSTRUCTIONS WARNING: READ THIS OWNER S MANUAL CAREFULLY BEFORE USE. PET OWNERS WARNING: The health of some small
Operating Instructions
 Operating Instructions Air Conditioner Model No. Indoor Unit CS-PC9QKH CS-PC12QKH CS-PC18QKH CS-PC24QKH CS-PC28QKH Outdoor Unit CU-PC9QKH CU-PC12QKH CU-PC18QKH CU-PC24QKH CU-PC28QKH Operating Instructions
MW401 Integrated Dishwasher
 MW401 Integrated Dishwasher Manual for Installation, Use and Maintenance Customer Care Department The Group Ltd. Harby Road Langar Nottinghamshire NG13 9HY T : 01949 862 012 F : 01949 862 003 E : service@cda.eu
IMPORTANT SAFETY INFORMATION
 319252GB.fm Page 11 Wednesday, September 3, 28 4:5 PM IMPORTANT SAFETY INFORMATION This manual contains important information regarding safety, the use and maintenance of your new hob. Read the manual
200L Chest Freezer / GVATCS20Q. Instruction Manual
 200L Chest Freezer / GVATCS20Q Instruction Manual 1 200L Chest Freezer What your 12 months warranty means Great care has gone into the manufacture of this product and it should therefore provide you with
USE AND MAINTENANCE. Cm Pelet-set TECHNICAL INSTRUCTIONS. (14-35 kw) For boilers: EKO-CK P (EKO-CK 20-40) EKO-CKB P (EKO-CKB 20-40)
 For boilers: EKO-CK P (EKO-CK 20-40) EKO-CKB P (EKO-CKB 20-40)") TECHNICAL INSTRUCTIONS USE AND MAINTENANCE Cm Pelet-set (14-35 kw) For boilers: EKO-CK P 20-40 (EKO-CK 20-40) EKO-CKB P 20-40 (EKO-CKB 20-40) TUPS-K-02-2011-E-N-ENG CONTENTS 1. Introduction....... 2. Status
TECHNICAL INSTRUCTIONS USE AND MAINTENANCE Cm Pelet-set (14-35 kw) For boilers: EKO-CK P 20-40 (EKO-CK 20-40) EKO-CKB P 20-40 (EKO-CKB 20-40) TUPS-K-02-2011-E-N-ENG CONTENTS 1. Introduction....... 2. Status
I n s t r u c t i o n m a n u a l f o r b u i l t - i n h o o d. Model code: BORA600
 I n s t r u c t i o n m a n u a l f o r b u i l t - i n h o o d Model code: BORA600 Contact Caple on 0844 8003830 or for spare parts www.4caple.co.uk 1 Y O U R A P P L I A N C E Thank you for buying your
INSTRUCTION MANUAL EPH-121 CONTENTS
 INSTRUCTION MANUAL EPH-121 CONTENTS SAFETY PRECAUTIONS 1 NAME OF COMPONENT PARTS 5 HOW TO ASSEMBLE THE FRAME 6 OPEN AND CLOSE THE PANELS 7 OPERATION 9 TIMER OPERATION 10 SHUTDOWN 11 ROUTINE MAINTENANCE
IMPORTANT- RETAIN FOR FUTURE REFERENCE CALL:
 GENOA WALL FIREPLACE Assembly instructions Actual product size H56 x W96 x D4cm Need Help? With: Assembly instructions Missing or damaged parts IMPORTANT- RETAIN FOR FUTURE REFERENCE CALL: 0333 777 8999
Portable Air-conditioner Use and Care Manual
 Portable Air-conditioner Use and Care Manual Part Number: 048-GM-48266 Thank you very much for selecting this new model of Portable Air Conditioner, please read this Use and Care Manual carefully before
ELECTRONIC CONTROL AIR CONDITIONER
 USE & CARE MANUAL NOTE: This USE & CARE MANUAL provides specific operating instructions for your model. Use the room air conditioner only as instructed in this USE & CARE MANUAL. These instructions are
Fire Safety. Fire safety seminars. Fire safety plans
 Fire Safety Everyone is responsible for keeping Manitoba Housing homes and properties safe from fire. In an emergency, call 911 or your local emergency services to report problems: You see a fire being
E2000. Enfriador evaporativo. Evaporative cooler. Refroidisseur d'évaporation. Climatizador evaporativo. Manual de Usuario 1-9. User s manual 10-19
 Enfriador evaporativo Evaporative cooler Refroidisseur d'évaporation Climatizador evaporativo E2000 Manual de Usuario 1-9 User s manual 10-19 Manuel de l'utilisateur 20-29 Manual de usuário 30-39 MCONFORT
Portable Air Conditioner 6,000 BTU 8,000 BTU 10,000 BTU
 Portable Air Conditioner 6,000 BTU 8,000 BTU 10,000 BTU OPERATING INSTRUCTIONS PCR-06-01 PCR-08-01 PCR-10-01 3058080 V170223 PURCHASE INFORMATION Thank you for choosing a Chigo Portable Air Conditioner.
Setup Guide. Thank you very much for purchasing this product.
 Setup Guide Thank you very much for purchasing this product. To ensure correct and safe usage with a full understanding of this product's performance, please be sure to read through this manual completely
FAR INFRARED RAYS HEATER
 Wide IR Window FAR INFRARED RAYS HEATER USER S MANUAL MODEL : AH-1330 Thank you for purchasing AiRREX Far Infrared Rays heater. Please read this user s manual carefully before you operate this heater.
CB-CW-1 Cool/Warm Mattress Owner s Manual. Contents
 CB-CW-1 Cool/Warm Mattress Owner s Manual Contents I II Instructions Product list III Warning for usage IV Common malfunction and Methods of Exclusion V Daily maintenance and cleansing VI After-sales service
AI-215 Series Portable Ice Maker
 AI-215 Series Portable Ice Maker OWNERS MANUAL Read and save these instructions. 2 TABLE OF CONTENTS Table of Contents... 2 Safety Information & Warnings... 2 Safe Operation Guidelines... 2 Specifications...
Operating Instructions Air Conditioner
 F566113 Operating Instructions Air Conditioner Indoor Unit CS-E18HKR CS-E1HKR CS-E4HKR CS-E8HKR Outdoor Unit CU-E18HKR CU-E1HKR CU-E4HKR CU-E8HKR Before operating the unit, read these operating instructions
ecomax 200 W Boiler regulator FOR SOLID FUEL BOILERS WITH A FAN OPERATION AND MAINTENANCE MANUAL ISSUE:
 Boiler regulator ecomax 200 W FOR SOLID FUEL BOILERS WITH A FAN OPERATION AND MAINTENANCE MANUAL ISSUE: 1.3 APPLICABLE TO SOFTWARE 10.034 10.035 10.036 2010-04-14 TABLE OF CONTENTS 1 Safety... 4 2 General
CLASSIC WALL-MOUNTED PATIO HEATER
 CLASSIC WALL-MOUNTED PATIO HEATER User Manual English CONTENTS SAFETY FIRST Safety... 3 Introduction... 4 Installation... 5 Operation... 6 Specifications... 7 --- WARRANTY --- All our Patio Heaters come
the Quick Cook Instruction Book - LIC400
 the Quick Cook Instruction Book - LIC400 LIC400_ANZ_IB_B17.indd 1 BREVILLE RECOMMENDS SAFETY FIRST At Breville we are very safety conscious. We design and manufacture consumer products with the safety
Provided by Fire Safety Solutions for Oklahomans with Disabilities: A joint project of Oklahoma ABLE Tech & Fire Protection Publications at Oklahoma
 Provided by Fire Safety Solutions for Oklahomans with Disabilities: A joint project of Oklahoma ABLE Tech & Fire Protection Publications at Oklahoma State University Why Read This Guide? Research shows
OWNER S MANUAL DLFCAB / DLFCHB / DLFDAB / DLFDHB High Wall Ductless System Sizes 09 36
 OWNER S MANUAL DLFCAB / DLFCHB / DLFDAB / DLFDHB High Wall Ductless System Sizes 09 36 TABLE OF CONTENTS PAGE SAFETY PRECAUTIONS... 2 GENERAL... 2 INDOOR UNIT PART NAMES... 3 REMOTE CONTROL PART NAMES...
MODELS LFP4218/LFP6018 TOP VENT GAS FIREPLACE
 MODELS LFP4218/LFP6018 TOP VENT GAS FIREPLACE PFS APPROVED FOR NATURAL GAS OR PROPANE GAS Z21.50-2014 If your plans do not allow for the venting system as outlined previously in the installing chimney/vent
DIESEL/PARAFFIN HEATERS
 DIESEL/PARAFFIN HEATERS MODEL NO: XR80, XR110, XR160, XR210 PART NO: 6931004, 6931006, 6931008, 6931012 OPERATION & MAINTENANCE INSTRUCTIONS LS0814 INTRODUCTION Thank you for purchasing this CLARKE product.
Alice. In Wall Recessed Electric Fireplace Model Number: (EF172B, EF173B, EF174B, EF175B, EF176B) OWNER S MANUAL
 OWNER S MANUAL") Alice In Wall Recessed Electric Fireplace Model Number: (EF172B, EF173B, EF174B, EF175B, EF176B) OWNER S MANUAL WARNING Read and understand this entire owner s manual, including all safety information,
Alice In Wall Recessed Electric Fireplace Model Number: (EF172B, EF173B, EF174B, EF175B, EF176B) OWNER S MANUAL WARNING Read and understand this entire owner s manual, including all safety information,
COMPACT PORTABLE AIR CONDITIONER USER MANUAL
 COMPACT PORTABLE AIR CONDITIONER USER MANUAL Thank you for choosing ElectriQ Please read this user manual before using this innovative Air Conditioner and keep it safe for future reference. Visit our page