Set & $ave. Model Programmable Thermostat. installation and operation manual
|
|
|
- Lindsay Noreen Lindsey
- 5 years ago
- Views:
Transcription

1 Set & $ave Programmable Thermostat installation and operation manual Model
2 2
3 Table of Contents Important Information... 5 Tools... 6 Uninstalling the Existing Unit... 7 Installing the Thermostat installing the wall plate connecting the wires attaching the thermostat Settings Methods of Operation manual operation default programs creating custom programs Icons and Features Important Features Troubleshooting... 49
4 Congratulations! Set & Save Programmable Thermostat Model Thank you for choosing a Hunter programmable thermostat. Your new Hunter thermostat will provide years of reliable service and year-round energy savings. Please read this manual before beginning installation and save this booklet for complete operation instructions. The Hunter Technical Support Group is available from 7 am to 7 pm CST M-F and 8 am to 5 pm Saturday. They may be reached toll-free at
5 important information This thermostat is designed to work on the following heating and cooling systems: Gas Standing Pilot Gas Electronic Ignition Gas Fired Boilers Gas Milivolt Systems Oil Fired Boilers Oil Fired Furnace Electric Furnace Electric Air Conditioning This thermostat is not designed for heat pump systems or 110/220 V baseboard heating systems. If you are unsure what kind of heating and cooling system you have, please contact a qualified HVAC Technician for assistance.
6 Tools This thermostat includes two #8 slotted screws and two wall anchors for mounting. To install your new thermostat, you will need the following supplies: Flat-head screwdriver... Small Phillips-head screwdriver... Hammer... Electric drill and 3/16 bit... Two 1.5 Volt (AA) size alkaline batteries... 6
7 Y Y RC G W RC G W w NOTICE! Do not disconnect the wires from the existing thermostat before reading these instructions. The wires must be labeled prior to removal to ensure proper reconnection. 7
8 Y RC G W Y RC G W 8
9 uninstalling the existing unit 1. Turn the system power OFF from the existing thermostat. Turn the power to the HVAC system OFF at the main power panel or at the furnace. (Failure to turn off the power to the existing thermostat before removal could damage your system.) 2. Remove the existing thermostat cover to access the wires from the wall. (Some thermostats may have multiple covers, screws or other locking devices that must be removed or disengaged.) 3. Locate, but do not disconnect the wires. (If wires are not visible, they may be connected to the back of the wall plate. Some models may have doors that open to expose the wires and mounting screws.)

10 if your existing thermostat is marked... label the wire with this sticker: RH / R / VR / 4 RC / VC Y / C* / M W / H G / F 24 Volt 24 Volt cool air conditioning compressor heating fan RH RH RC RC Y Y W W G G 10
11 4. Using the provided stickers, label each wire according to the chart. (If the terminals are not labeled, contact a qualified HVAC technician.) Note: Wire colors do not always comply with Y uninstalling the existing unit, cont. RC G W W standards, so wire color should be ignored. Refer to the existing terminal designation for proper identification. *If wires marked Y & C are both present, C may be a Common wire and should not be used. If you have a wire marked C, do not connect it to any terminal. This wire is used only for nonbattery powered thermostats. 5. Do not let the wires slip back into the wall during disconnection. You may want to secure the wires to the wall as you disconnect them. After all wires are labeled, disconnect each wire and remove the existing wall plate. (Any unused wires should be capped with an approved electrical connector, such as electrical tape.) 11

12 G Y RC W 12
13 installing the thermostat INSTALLING THE WALL PLATE 1. Remove the wall plate from the new thermostat by pressing the release tab on the bottom of the thermostat. 2. Position the new wall plate on the wall and pull the labeled wires through the opening. 3. If the existing holes do not match those on the Hunter wall plate, or if there are no existing holes, visually level the wall plate and mark the wall for two holes. 13
14 G Y RC W 14
15 installing the thermostat, cont. 4. Remove the wall plate and drill two 3/16 holes where marked. 5. Tap the plastic anchors into the holes until they are flush with the wall. 6. Reposition the wall plate on the wall, pulling the wires through the opening. Insert the mounting screws through the wall plate and into the anchors. Verify that the wall plate is visually level and securely tighten both screws. 15


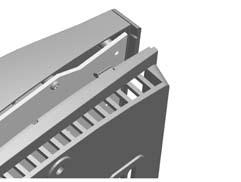
16 Y RC G W G RC RH Y W Terminal Shield 16
17 installing the thermostat, cont. CONNECTING THE WIRES 1. Loosen, but do not remove, the terminal screws. G RC RH Y W Jumper Note: A jumper wire has been provided, connecting the RC and RH terminals for systems that do not provide both an RH and RC wire. If you have both an RH and RC wire, remove this jumper. If you do not have both an RH and RC wire, leave the jumper in place. 2. Match and connect the wires from the wall to the terminals as shown. Wires should be inserted behind the black terminal shields. Tighten each screw after the connection has been made. (The ends of any extra wires should be individually wrapped in electrical tape and carefully pushed back into the wall.) 3. Push any excess wire length back into the wall to prevent interference. 17


18 HEAT T AM 4 Thermostat Cover System Switch Fan Switch DISABLE RECO- VERY ENABLE W/B Y/O RH RC G HG HE 18
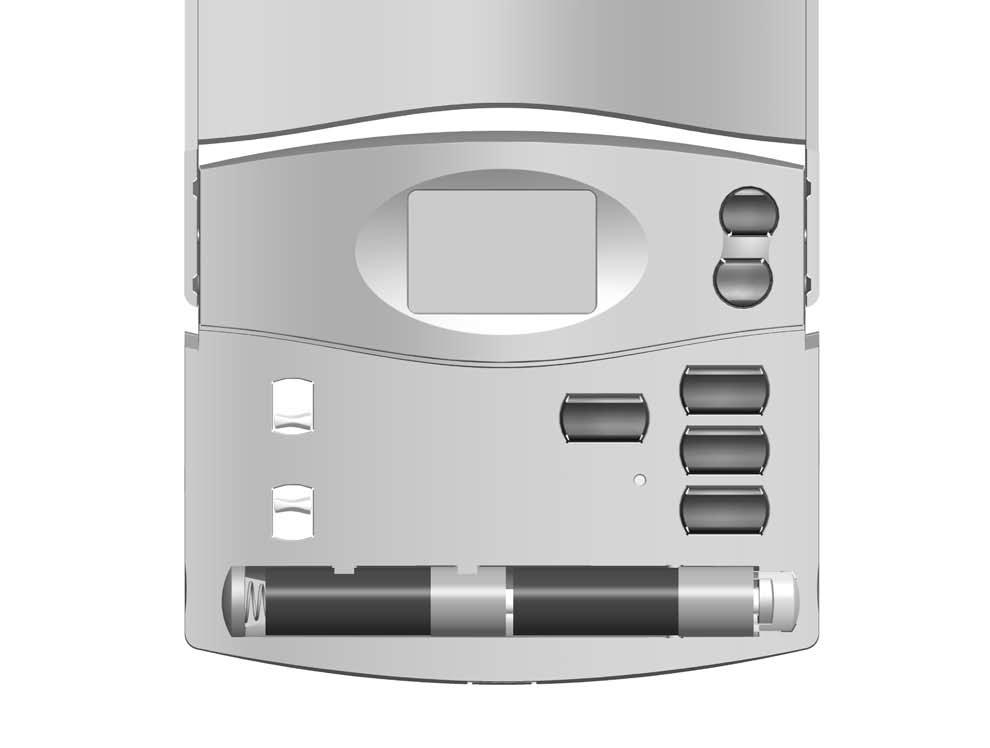
19 installing the thermostat, cont. ATTACHING THE THERMOSTAT 1. Lift the thermostat cover and set the SYSTEM switch to OFF and the FAN switch to AUTO. 2. Locate the HE/HG switch on the back of the thermostat. Set the switch to HG (default) for gas furnace and oil burners. Set the switch to HE for electric furnaces. (The switch has no effect when the system is set to cooling mode.) 3. Locate the Auto Recovery switch on the back of the thermostat. If you wish to use the Energy Star compliant Auto Recovery feature, verify that the switch is in the ENABLE position. If you do not wish to use this feature, simply change the switch to the DISABLE position. See pages for more information. 19

20 1 Tab 2 20
21 installing the thermostat, cont. 4. Place the top of the thermostat over the two tabs on the wall plate. Press the thermostat onto the wall plate and press to snap the bottom tab into place. Note: Do not force the thermostat onto the wall plate, as the terminal pins may be damaged. If the thermostat does not snap into place properly, the unit may not work. 5. Insert two AA alkaline batteries. 6. Restore power at the electrical panel or furnace. 21
22 reset 22
23 settings The default setting of the thermostat is Fahrenheit (F o ). (NOTICE: CHANGING THIS SETTING WILL RESET THE THERMOSTAT TO FACTORY DEFAULT PROGRAMS.) To change to Celsius (C o ): 1. Press and hold the Up button. 2. Use a paperclip to press the Reset button. 3. Continue to press the Up button, but release the Reset button when the LCD turns on. To reset the unit to F o, press only the Reset button. 23
24 AM PM day/time program 24
25 SETTINGS, cont. The default for this thermostat setting is in a 12 hour format. You can change the format to 24 hour format by pressing Day/ Time and then Program. The AM/PM indicator will be off when the thermostat is in 24 hour mode. Setting day and time: 1. Press Day/Time. (AM/PM and current hour will flash) Press Up or Down to adjust the setting. 2. Press Day/Time again to adjust the minute setting. Press Up or Down to adjust the setting. 3. Press Day/Time again to adjust the day of the week. Press Up or Down to adjust the setting. 4. Press Day/Time to return to the normal display. Press Up or Down to adjust the setting. You may also press Hold/Return at any time to return to the normal display. 25
26 T 4 AM HEAT 26
27 methods of operation This thermostat gives you the ability to program up to 4 custom temperature settings per day or utilize pre-programmed settings. For manual operation instructions, see pages To utilize the pre-programmed settings, see pages To create custom programs, see pages
28 TH AM 2 HEAT 28
29 methods of operation, CONT. 1. MANUAL OPERATION Many people prefer to operate their thermostats manually, adjusting settings as needed. You can either temporarily override the settings for the current program, or permanently override all settings and adjust temperatures manually. If you want to only override the current program: 1. Press and hold Up or Down for one second to enter Manual Override mode. (Release the button when the display flashes.) 2. Press the Up or Down buttons to adjust the temperature setting as desired. 29
30 HOLD system heat off cool 30 hold /return
31 methods of operation, CONT. MANUAL OPERATION, CONT. If you want to permanently override all settings and adjust the thermostat manually: 1. Press Hold/Return until the Hold icon appears. 2. Press and hold Up or Down for one second to enter Manual Override mode. (Release the button when the display flashes.) 3. Press the Up or Down buttons to adjust the temperature setting as desired. 4. Press and release Hold/Return to return to the normal display. 31
32 Default Programs Chart 10 pm Program 4 Heat : 60 o F (16 o C) Cool : 82 o F (28 o C) Program 3 Heat : 68 o F (20 o C) Cool : 78 o F (26 o C) 4 pm 6 am Program 1 Heat : 68 o F (20 o C) Cool : 78 o F (26 o C) 8 am Program 2 Heat : 60 o F (16 o C) Cool : 85 o F (29 o C) 32
33 methods of operation, CONT. 2. DEFAULT PROGRAMS This thermostat meets ENERGY STAR guidelines for energy efficiency. By using the pre-programmed settings, this thermostat can save you money by optimizing energy usage in heating and cooling. Refer to the Default Programs Chart for detailed information about the pre-programmed settings. 33
34 AM PM system heat off cool program 34 hold /return
35 methods of operation, CONT. 3. CREATING CUSTOM PROGRAMS Program times can be set in 10 minute increments. Program temperature can be set in increments of 1 o F (1 o C). After 15 seconds of inactivity during programming, the thermostat will return to Normal Display mode. When setting each program time, note the AM/PM indicator. Press Hold/Return at any time to exit Program mode. During normal operation, if no button is pressed for 5 seconds, the unit will return to the Normal Display mode. 1. Slide the system switch to HEAT or COOL to program the corresponding system. 2. Press Program to enter Program mode. (The LCD will begin to flash.) 35
36 M T W TH F AM PM SA SU HEAT COOL system heat off cool program 36 hold /return
37 methods of operation, CONT. 3. Press Up or Down to change the hour. Press Program to save the hour and adjust the minute setting. 4. Press Up or Down to change the minute. Press Program to save the minute setting and adjust the temperature. 5. Press Up or Down to change the temperature. Press Program again to move to the next program number. (There are 4 programs per day. If you do not wish to assign 4 programs per day, set up to 4, keeping in mind that the total program time must equal 24 hours.) 6. Repeat steps 2-5 for the remaining days. 7. To review your program settings, press Program repeatedly to review the customized programs. (You can make changes at any time when the thermostat is in Program mode.) 8. Slide the system selector switch to the opposite position and repeat steps
38 FILTER filter 38
39 ICONS AND FEATURES 1. Filter change indicator - will flash after 400 hours of system use as a reminder to check or change your filter. Press and hold the Filter button for 3 seconds after changing the filter to reset the filter timer. (Pressing the Filter button for less than 3 seconds will cause the Filter change indicator icon to appear. The filter timer will not be affected unless the button is held for more than 3 seconds.) 39
40 HEAT COOL system heat off cool reset 40
41 ICONS AND FEATURES, cont. 2. Span setting mode allows you to adjust the system ON/OFF cycle rate. The default setting is 2 (the system cycles ON or OFF when the temperature is within 1 o F (0.5 o C) above and below the set temperature). The span setting can be adjusted if your system is cycling too fast or too slowly. Press and hold both the Up and Down buttons until the word SPAN appears. Use the Up or Down button to adjust the span setting. (Up will increase your cycle time by allowing the system to run longer; down will decrease your cycle time by causing the system to run for a shorter length of time.) Span settings remain the same for HEAT and COOL system settings. When batteries are installed, or the unit is RESET, the span cycle will revert to 2. 41
42 M PM 4 COOL STAGE 1 42 STAGE 2
43 ICONS AND FEATURES, cont. 3. Low battery warning indicates two stages of battery power shortage. When the batteries are detected as weak, the icon will flash until new AA alkaline batteries are installed. If the batteries become too weak for normal operation, the thermostat enters the second battery power shortage mode. When no battery power is left, the battery icon will flash alone on the display and your system will turn off. The system will remain off until new batteries are installed. (Your programs and time settings will be lost if the batteries are not replaced within one minute.) The thermostat will resume normal operation after new batteries are installed. 43
44 44 hold /return
45 ICONS AND FEATURES, cont. 4. Auto recovery allows heating and cooling systems to gradually recover from an energy-saving setpoint temperature to a comfort setpoint temperature. Auto recovery calculates the time needed to adjust the temperature to the next program setting. When the thermostat is in Auto Recovery mode, the display will flash alternating messages of RECO and the time. Auto Recovery can be disabled by sliding the recovery switch on the back of the circuit board to the disable position. (Auto Recovery will not operate if Permanent or Temporary holds are on.) Press Hold/Return during the Auto Recovery process to manually cancel the recovery. 45
46 46
47 ICONS AND FEATURES, cont. 5. Error mode indicates an unexpected battery problem. The screen will flash an ERR message and shut your system off until the batteries are replaced with new AA alkaline batteries. You must Reset and reprogram the thermostat after replacing the batteries if the thermostat has entered Error mode. 6. Auto cut off automatically turns the system off if the temperature rises above 95 o F (35 o C) or drops below 40 o F (4 o C). (If your HVAC system has malfunctioned, the system will no longer respond to thermostat controls and the Auto cut off will have no effect.) 47
48 Important features 1. Temperature Range 30 o F 45 o F 95 o F 99 o F (0 o C) (37 o C) (7 o C) (35 o C) Out of Range "LO" < 30 o F Program Range Display Range 2. Compressor Protection After the system stops running in cooling mode, there will be a 3.5 minute delay before it can be restarted to prevent compressor damage due to rapid cycling. 3. Resetting the unit reset To restore the thermostat to the original factory settings, press the reset button with a paperclip. (This will erase any user-programmed settings.) 48 Out of Range "HI" > 99 o F
49 1. My display will not come on. troubleshooting 1 a. Check batteries and battery connections. 1 b. Reset the thermostat The auto fan feature will not operate properly. 2 a. Remove the thermostat from the wall plate and set the HG/HE switch to the correct position My display is erratic. 3 a. Reset the thermostat and reprogram your settings The program will not change at my desired setting. 4 a. Check that the time is set properly to AM or PM. 4 b. Make sure the thermostat is not in permanent override mode. 4 c. Check that the day setting is correct. 49
50 5. My heating or cooling will not turn on or off. 5 a. Check the Heat/Cool function switch to ensure it is set to the desired position. 5 b. Wait. There may be as much as a 4-minute delay before the system turns on or off to protect the compressor. 5 c. Check the circuit breakers and switches to ensure there is enough power to the system. 5 d. Replace the batteries. 5 e. If applicable, make sure the furnace blower door is closed properly. 5 f. If your system has 4 wires, ensure the jumper wire is installed between the RC and RH terminals The display will come on, but it will not stay illuminated. 6 a. Replace batteries. troubleshooting 50
51 troubleshooting 7. My system continues to operate when the thermostat is in the off position. 7 a. Replace unit The LCD screen permanently reads HI, LO, or ERR. 8 a. Replace unit How do I just operate my thermostat manually? 9 a. Manual operation instructions are on pages
52 Is there help on the web? Yes. Visit for more information.... Can t I just call someone? Sure. The Hunter Technical Support Group is available from 7 am to 7 pm CST M-F and 8 am to 5 pm Saturday. They may be reached toll-free at
Programmable Thermostat
 Set & $ave Programmable Thermostat Installation and Operation Manual English Model 44360 Form# 42710-01 20091204 2009 Hunter Fan Co. 2 Table of Contents Important Information... 5 Tools... 6 Uninstalling
HEAT PUMP PROGRAMMABLE THERMOSTAT
 HEAT PUMP PROGRAMMABLE THERMOSTAT SA PM 3 COOL TEMP Form 44014-01 r010408 Model 43168 Owners Manual 1 Congratulations! Heat Pump Programmable Thermostat Model 43168 THERMOSTAT CONTROLS Switches & Buttons...15
WARNING Important Safety Information
 1 Specifications 1 2 3 4 5 Builder Series Programmable Thermostats 2000 2000NC 2200 2200NC Single Stage Heat / Cool Conventional and Heat Pump Multi-Stage 2 Heat / 1 Cool Conventional and Heat Pump Before
USER MANUAL WARNING! CONTENTS MODEL 1 SPECIFICATIONS READ ALL INSTRUCTIONS BEFORE PROCEEDING 2 INSTALLATION. Premier Series
 Premier Series MODEL 5000 USER MANUAL 5-2 Day Programmable Single Stage Heat/Cool Digital Thermostat Compatible with low voltage single stage gas, oil or electric heating or cooling systems, including
USER MANUAL 2000NC MODEL READ ALL INSTRUCTIONS BEFORE PROCEEDING. Builder Series 5-2 Day Programmable Single Stage Heat/Cool Digital Thermostat
 MODEL 2000NC USER MANUAL Builder Series 5-2 Day Programmable Single Stage /Cool Digital Thermostat Compatible with low voltage single stage gas, oil or electric heating or cooling systems, including single
WARNING Important Safety Information
 Premier Series Programmable Thermostats MODEL 5000 1 2 3 Specifications Installation Testing Your New Thermostat Programming User Settings WARNING Important Safety Information Additional Operation Features
USER MANUAL MODEL READ ALL INSTRUCTIONS BEFORE PROCEEDING. 5-2 Day Programmable Multi-Stage 2 Heat/1 Cool Heat Pump Digital Thermostat
 WARNING! Important Safety Information Builder MODEL 2200 Series 5-2 Day Programmable Multi-Stage 2 Heat/1 Cool Heat Pump Digital Thermostat USER MANUAL Compatible with low voltage multi stage heat/cool
WARNING Important Safety Information
 Builder Series Non-Programmable Thermostats MODEL 1000 MODEL 0 1 2 3 4 Single Stage Heat / Cool Conventional and Heat Pump Multi-Stage 2 Heat / 1 Cool Conventional and Heat Pump Before Installing, Programming
Smart Temp. Model
 Smart Temp Model 42-160 SINGLE STAGE PROGRAMMABLE THERMOSTAT 1 Heat / 1 Cool Single Stage Thermostat. 5+2 Programmable, Compatible with Gas Heat & Heat Pump System Installation and Operation Manual SPECIFICATIONS:--------------------------------------------------------------------------------
OWNERS MANUAL YEAR LIMITED WARRANTY READ ALL INSTRUCTIONS BEFORE PROCEEDING. Store this booklet for future reference
 5100 Premier Series 7-Day Programmable 2-Heat / 2-Cool Heat /Cool Digital Thermostat OWNERS MANUAL Compatible with low voltage multi-stage heat / cool systems with up to two stages of heating and two stages
Operator: Save these instructions for future use!
 WHITE-RODGERS 1F81-51 Programmable Electronic Digital Multi-stage Thermostat INSTALLATION AND OPERATION INSTRUCTIONS Operator: Save these instructions for future use! FAILURE TO READ AND FOLLOW ALL INSTRUCTIONS
USER MANUAL WARNING! CONTENTS MODEL 1 SPECIFICATIONS READ ALL INSTRUCTIONS BEFORE PROCEEDING 2 INSTALLATION
 MODEL 5100 USER MANUAL Compatible with low voltage multi-stage heat/cool systems with up to two stages of heating and two stages of cooling. READ ALL INSTRUCTIONS BEFORE PROCEEDING 1 2 3 4 5 6 7 CONTENTS
USER MANUAL WARNING! CONTENTS MODEL SPECIFICATIONS READ ALL INSTRUCTIONS BEFORE PROCEEDING
 MODEL Premier Series 3000 USER MANUAL Non-Programmable Single Stage Heat/Cool Digital Thermostat Compatible with low voltage single stage gas, oil or electric heating or cooling systems, including single
WARNING Important Safety Information
 Builder Series Non-Programmable Thermostat MODEL 00NC Heat Only or Cool Only Thermostat Before Installing, Programming or Operating, PLEASE READ ALL INSTRUCTIONS Specifications Temperature Adjustment WARNING
WARNING Important Safety Information
 1 Specifications Premier Series Non-Programmable Thermostats MODEL 3000 MODEL 3200 1 2 3 4 5 Specifications Installation Testing Your New Thermostat Programming User Settings Temperature Adjustment WARNING
P200 Programmable Thermostat Installation Instructions & User Guide. For Installation Help. White-Rodgers.com
 P200 Programmable Thermostat Installation Instructions & User Guide For Installation Help 1-877-654-9394 White-Rodgers.com 2011 Printed in China White-Rodgers 8100 West Florissant Avenue St. Louis, MO
DAY/TIME Button: Selects hour, minute and day setting.
 CONTENTS MODEL 5400 USER MANUAL READ ALL INSTRUCTIONS BEFORE PROCEEDING For more information on energy savings, go to www.energystar.gov Premier Series Universal Auto Changeover Thermostat Up to 3 Heat
CT2800 Programmable Thermostat
 CT2800 Programmable Thermostat INSTALLATION AND PROGRAMMING INSTRUCTIONS Welcome to the world of comfort and energy savings with your new Honeywell Programmable Thermostat. Your new thermostat will automatically
OWNERS MANUAL YEAR LIMITED WARRANTY READ ALL INSTRUCTIONS BEFORE PROCEEDING. Store this booklet for future reference
 3000 Premier Series Non-Programmable Single Stage /Cool Digital Thermostat OWNERS MANUAL Compatible with low voltage single stage gas, oil or electric heating or cooling systems, including single stage
MagicStat CT3300 Programmable Thermostat
 MagicStat CT3300 Programmable Thermostat Installation and Programming Instructions Weekday/Weekend (5-day/2-day) Programmable Heat and/or Cool Low Voltage (20 to 30 Vac) Thermostat and Mounting Plate Model
WARNING Important Safety Information
 1 Specifications Premier Series Non-Programmable Thermostats MODEL 3000 MODEL 3200 1 2 3 4 Specifications Installation Testing Your New Thermostat Programming User Settings WARNING Important Safety Information
WARNING Important Safety Information
 Premier Series Programmable Thermostats MODEL 5200 1 2 3 4 5 Specifications Installation Programming Installer Settings Testing Your New Thermostat Programming User Settings WARNING Important Safety Information
Installer Guide. WARNING Important Safety Information. 1 Specifications
 1 Specifications cont. Premier Series Universal Auto Changeover Up to 3 Heat / 2 Cool Heat Pump or 2 Heat / 2 Cool Conventional Thermostat Installer Guide Before Installing, Programming or Operating, PLEASE
IT801 Thermostat. User s Manual. The complete guide to the set up and operation of your new smart Wi-Fi thermostat.
 IT801 Thermostat User s Manual The complete guide to the set up and operation of your new smart Wi-Fi thermostat. The smart Wi-Fi thermostat system learns your comfort preferences, then finds opportunities
RTH8500 Series. Quick Installation Guide. Included in your box. Programmable Thermostat. Quick Install Guide Screws and anchors. RTH8500 Thermostat
 RTH8500 Series Programmable Thermostat Quick Installation Guide Included in your box Quick Install Guide Screws and anchors UWP Mounting System (UWP) RTH8500 Thermostat Tools you will need Tools you may
DAY/TIME Button: Selects hour, minute and day setting.
 MODEL 5300 USER MANUAL READ ALL INSTRUCTIONS BEFORE PROCEEDING For more information on energy savings, go to www.energystar.gov Premier Series Universal Auto Changeover Thermostat Up to 2 Heat / 2 Cool
Operation GT7000. Time / Current Temp. TEMP UP button. Display. Fan. Switch. Set Temp. Display. Mode Switch. Backlight. TEMP DOWN button.
 Operation GT7000 Operation GT7000 TEMP UP button Time / Current Temp Display - Cover Closed - Control Panel SET CLOCK SDP HOME DAY PROGRAM TIME SLOT TIME SET TIME NEXT P TIME COPY HOLD REVIEW FILTER TEMP
Installer Guide. WARNING Important Safety Information. 1 Specifications
 1 Specifications cont. Premier Series Universal Auto Changeover Up to 3 Heat / 2 Cool Conventional and Heat Pump Thermostat Installer Guide Before Installing, Programming or Operating, PLEASE READ ALL
6 Setting Your Program Schedule 7 Operating Your Thermostat 8 Additional Operation Features 9 Thermostat Maintenance
 Programmable Thermostats Detailed User Guide 2020NC 2220NC Single Stage Heat / Cool Conventional and Heat Pump Up to 2 Heat / 1 Cool Conventional and Heat Pump Model number is located on back of thermostat
OWNERS MANUAL YEAR LIMITED WARRANTY READ ALL INSTRUCTIONS BEFORE PROCEEDING. Store this booklet for future reference
 3100 Premier Series Non-Programmable 2 Heat / 2Cool & Heat / Cool Digital Thermostat OWNERS MANUAL Compatible with low voltage multi-stage heat / cool systems with up to two stages of heating and two stages
Honeywell CT3550 PROGRAMMABLE THERMOSTAT. Table of Contents OWNER S GUIDE
 Weekday, Saturday and Sunday Programmable Heat and/or Cool Low Voltage (20 to 30 Vac) Thermostat and Wallplate Model CT3550 Honeywell CT3550 PROGRAMMABLE THERMOSTAT OWNER S GUIDE Para pedir estas instrucciones
6 Setting Your Program Schedule 7 Operating Your Thermostat 8 Additional Operation Features 9 Thermostat Maintenance
 Programmable Thermostats Detailed User Guide 2020NC 2220NC Single Stage Heat / Cool Conventional and Heat Pump Up to 2 Heat / 2 Cool Conventional Up to 2 Heat / 1 Cool Heat Pump Model number is located
Safety & Installation Instructions
 Model 8476 Thermostat with Event-Based Air Cleaning Safety & Installation Instructions READ AND SAVE THESE INSTRUCTIONS Table of contents Installation Installation location recommendations... 3 Outdoor
Digital Programmable
 www.geappliances.com Digital Programmable Thermostats Operating Instructions Auto Changeover..........10 Day/Time Setting Mode.....6 Default Mode...............4 Fan Control...............10 Hold and Temporary
Safety & Installation Instructions
 Model 8800 Universal Communicating Thermostat Safety & Installation Instructions READ AND SAVE THESE INSTRUCTIONS Table of contents Installation Installation location recommendations... 2 Thermostat mounting...
2 THERMOSTAT DETAILS 3 REMOVING OLD THERMOSTAT
 CONTENTS Installation Instructions for Heating & Air Conditioning 1F72 5/2 Day Programmable Heat Pump Thermostat Preparations... 1 Thermostat Details... 1 Removing Old Thermostat... 1-2 Mounting and Wiring...
Peak Partners Web-Programmable Thermostat Homeowner s Manual. Look inside for a complete guide to the setup and operation of your new thermostat.
 Peak Partners Web-Programmable Thermostat Homeowner s Manual Look inside for a complete guide to the setup and operation of your new thermostat. Table of Contents Step 1: Getting Started...4-6 A. Thermostat
ACONT600AF11MA Programmable Comfort Control
 ACONT600AF11MA Programmable Comfort Control Installation Instructions Pub. No. 11-HD02D10-4 69-1832-03 Product Application This Comfort Control provides electronic control of 24 VAC single-stage heating
Safety & Installation Instructions
 8400 Series Thermostats Safety & Installation Instructions READ AND SAVE THESE INSTRUCTIONS 61000652C 8400 Tstat Install.indd 1 10/13/09 11:08:56 AM Table of contents Installation Installation location
REMOVING OLD THERMOSTAT DETAILS. Model No CONTENTS YOUR THERMOSTAT REPLACES 0 PREPARATIONS. 5/2 Day Programmable Thermostat
 CONTENTS Installation Instructions for Heating & Air Conditioning Model. 47445 5/2 Day Programmable Thermostat Preparations...... 1 Thermostat Details... 1 Removing Old Thermostat... ~. 1 Mounting and
1F Non-programmable Electronic Digital Heat Pump Thermostat INSTALLATION AND OPERATION INSTRUCTIONS
 FAILURE TO READ AND FOLLOW ALL INSTRUCTIONS CAREFULLY BEFORE INSTALLING OR OPERATING THIS CONTROL COULD CAUSE PERSONAL INJURY AND/OR PROPERTY DAMAGE. DESCRIPTION Your new White-Rodgers Digital Thermostat
CT500 Electronic Thermostat
 CT500 Electronic Thermostat OWNER'S GUIDE MERCURY NOTICE If this control is replacing a control that contains mercury in a sealed tube, do not place your old control in the trash. Dispose of it properly.
Safety & Installation Instructions
 8400 Series Thermostats Safety & Installation Instructions READ AND SAVE THESE INSTRUCTIONS 61000652A 8400 Tstat Install.indd 1 7/23/09 2:20:45 PM Table of contents Installation Installation location recommendations...
Operator: Save these instructions for future use!
 WHITE-RODGERS 1F83-51 Non-Programmable Electronic Digital Multi-Stage Thermostat INSTALLATION AND OPERATION INSTRUCTIONS Operator: Save these instructions for future use! FAILURE TO READ AND FOLLOW ALL
Operator: Save these instructions for future use!
 WHITE-RODGERS 1F82-51 Programmable Electronic Digital Heat Pump Thermostat INSTALLATION AND OPERATION INSTRUCTIONS Operator: Save these instructions for future use! FAILURE TO READ AND FOLLOW ALL INSTRUCTIONS
1F Non-Programmable Electronic Digital Multi-Stage Thermostat INSTALLATION AND OPERATION INSTRUCTIONS
 1F83-261 Non-Programmable Electronic Digital Multi-Stage Thermostat INSTALLATION AND OPERATION INSTRUCTIONS Operator: Save these instructions for future use! FAILURE TO READ AND FOLLOW ALL INSTRUCTIONS
Honeywell CT8602 PROGRAMMABLE THERMOSTAT
 Honeywell CT8602 PROGRAMMABLE THERMOSTAT Seven Day Programmable Heat and/or Cool Low Voltage (20 to 30 Vac) Thermostat and Wallplate Model CT8602 OWNER S GUIDE Para obtener un documento con las instrucciones
7-DAY or 5/2-DAY PROGRAMMABLE, OR NON-PROGRAMMABLE THERMOSTAT INSTALLATION AND OPERATING INSTRUCTIONS
 TX100E 7-DAY or 5/2-DAY PROGRAMMABLE, OR NON-PROGRAMMABLE THERMOSTAT INSTALLATION AND OPERATING INSTRUCTIONS 52203 IMPORTANT! Please read all of these instructions carefully before beginning installation.
TCONT602AF22MA. Programmable Comfort Control. Installation Instructions 18-HD37D1-1
 TCONT602AF22MA Programmable Comfort Control Installation Instructions 18-HD37D1-1 Product Application This Comfort Control provides electronic control of 24 VAC single-stage and multistage heating and
ATP21W02 CONTENTS YOUR THERMOSTAT REPLACES 1 PREPARATIONS REMOVING OLD THERMOSTAT 2 THERMOSTAT DETAILS
 CONTENTS Installation Instructions for 97B0082N07 Heating & Air Conditioning 5/2 Day Programmable Heat Pump Thermostat Preparations...1 Thermostat Details...1 Removing Old Thermostat... 1-2 Mounting and
HEAT COOL 5+2 DAY PROGRAMMABLE 1-STAGE HEAT, 1-STAGE COOL. Installation Instructions TSTATCCPQ501 TSTATBBPQ501 P Digital Thermostat I2:00
 Installation Instructions TSTATCCPQ501 TSTATBBPQ501 P474-1035 Digital Thermostat NOTE: Read the entire instruciton manual before starting the installation. Tu AM SET I2:00 HEAT & COOL 5+2 DAY PROGRAMMABLE
Emerson Blue Easy Set 1H/1C
 Emerson Blue Easy Set 1H/1C Model: 1F86EZ-0251 Non-Programmable Thermostat with 3 Temperature Pre-Sets Home, Sleep and Away Installation Instructions and User Guide Message to Homeowner Congratulations
FOR BOTH CONVENTIONAL AND HEAT PUMP SYSTEMS INSTALLATION AND OPERATING INSTRUCTIONS IMPORTANT!
 PSP721U SMART TEMP UNIVERSAL PROGRAMMABLE THERMOSTAT FOR BOTH CONVENTIONAL AND HEAT PUMP SYSTEMS INSTALLATION AND OPERATING INSTRUCTIONS 52033 IMPORTANT! Please read all instructions carefully before beginning
PSPA711/PSPA _PSPA711_722_MAN_ENG5.qxd 2/8/05 9:45 AM Page 2 1 COMPATIBILITY 3 ELECTRICAL RATINGS 2 FEATURES
 14165_PSPA711_722_MAN_ENG5.qxd 2/8/05 9:45 AM Page 2 PSPA711/PSPA722 2 UP DOWN 1 COMPATIBILITY Temperature Offset (User Calibration) Your PSPA711 or PSPA722 is compatible with most 24 System or Battery
PECO. WavePRO Wireless System INSTALLATION GUIDE: T2500 THERMOSTAT AND R2500 RECEIVER. The Peco WavePRO Wireless System
 PECO WavePRO Wireless System INSTALLATION GUIDE: T2500 THERMOSTAT AND R2500 RECEIVER Wireless control for up to 3-HEAT/ 2-COOL heat pump and conventional systems (gas,oil,electric). Benefits: Reduced installation
IF79 CAUTION CONTENTS YOUR THERMOSTAT REPLACES 1 PREPARATIONS. Installation Instructions for. Heating & Air Conditioning
 CONTENTS Installation Instructions for Heating & Air Conditioning IF79 n- Programmable Heat Pump Thermostat Preparations... 1 Thermostat Details... 1 Removing Old Thermostat... 1-2 Mounting and Wiring...
Honeywell/36. Programmable Thermostat OWNER S GUIDE
 Honeywell/36 Programmable Thermostat OWNER S GUIDE Seven Day Programmable Heat and/or Cool Low Voltage (20 to 30 Vac) Thermostat and Wallplate Model CT3600 Para pedir estas instrucciones en español, llame
INSTALLATION MANUAL. * If using remote sensors the thermostat must be hardwired. Need Help?
 INSTALLATION MANUAL This manual covers the following models: T955W Master Thermostat Base Module Thermostat Applications Guide Description Gas or Oil Heat Electric Furnace Heat Pump (No Aux. or Emergency
CT2700 An Electronic Round Programmable Thermostat
 CT2700 An Electronic Round Programmable Thermostat USER S GUIDE MERCURY SWITCH TYPICAL LOCATION OF A MERCURY SWITCH IN A THERMOSTAT M064 RECYCLING THERMOSTAT If this thermostat is replacing a control that
INSTALLATION MANUAL. This manual covers TopTech models: TT-S-755H. Need Help? Thermostat Applications Guide. Power Type. Table of Contents.
 INSTALLATION MANUAL This manual covers TopTech models: TT-S-755H Thermostat Applications Guide Description Gas or Oil Heat Electric Furnace Heat Pump (No Aux. or Emergency Heat) Heat Pump (with Aux. or
2 THERMOSTAT DETAILS 3 REMOVING OLD THERMOSTAT
 CONTENTS Installation Instructions for Heating & Air Conditioning 1F79 n-programmable Heat Pump Thermostat Preparations... 1 Thermostat Details... 1 Removing Old Thermostat... 1-2 Mounting and Wiring...
1F Non-Programmable 5/1/1 Day 7 Day
 Save these instructions for future use! FAILURE TO READ AND FOLLOW ALL INSTRUCTIONS CAREFULLY BEFORE INSTALLING OR OPERATING THIS CONTROL COULD CAUSE PERSONAL INJURY AND/OR PROPERTY DAMAGE. APPLICATIONS
DP711. PurePro DP711 INSTALLATION AND OPERATING INSTRUCTIONS
 DP711 PurePro DP711 INSTALLATION AND OPERATING INSTRUCTIONS 52178 1 COMPATIBILITY........................................ 2 2 FEATURES.............................................. 2 3 ELECTRICAL RATINGS.................................
INSTALLATION MANUAL. Need Help? This manual covers the following models: T755. Power Type. Thermostat Applications Guide. Page.
 INSTALLATION MANUAL This manual covers the following models: T755 Thermostat Applications Guide Description Gas or Oil Heat Electric Furnace Heat Pump (No Aux. or Emergency Heat) Heat Pump (with Aux. or
1F60-22 INSTALLATION & OPERATING MANUAL SETBACK THERMOSTAT. Homeowner: Save this booklet for future use!
 INSTALLATION & OPERATING MANUAL SETBACK THERMOSTAT 1F60-22 PHOTO --POSITION ONLY! (For use on 24 Volt AC Heat/Cool and Heat-Only Systems) Homeowner: Save this booklet for future use! Congratulations! You
Owner s Manual. Part Number 33CSCPACHP-01
 Comfort Pro Programmable Commercial Thermostat Owner s Manual Part Number 33CSCPACHP-01 SAFETY CONSIDERATIONS Read and follow manufacturer instructions carefully. Follow all local electrical codes during
(-)HC-TST213UNMS 5/1/1 Day 5/2 Day Non-Programmable. Yes
HC-TST213UNMS 5/1/1 Day 5/2 Day Non-Programmable. Yes") Save these instructions for future use! FAILURE TO READ AND FOLLOW ALL INSTRUCTIONS CAREFULLY BEFORE INSTALLING OR OPERATING THIS CONTROL COULD CAUSE PERSONAL INJURY AND/OR PROPERTY DAMAGE. Universal Thermostat
Save these instructions for future use! FAILURE TO READ AND FOLLOW ALL INSTRUCTIONS CAREFULLY BEFORE INSTALLING OR OPERATING THIS CONTROL COULD CAUSE PERSONAL INJURY AND/OR PROPERTY DAMAGE. Universal Thermostat
Homeowner s Guide / 1
 Overview Options Programming Your Homeowner s / 1 Message to the Homeowners Your premium Comfort Control 2 HD Communicating is designed to give you and your family the indoor comfort you desire. It s easy
Programmable Electronic Thermostat
 INSTRUCTION MANUAL Programmable Electronic Thermostat We thank you for trusting Aube technologies and hope that you will be entirely satisfied. For any questions concerning the TH141A-HC-28 progammable
OPERATING MANUAL. Need Help? This manual covers the following models: T715. Table of Contents
 OPERATING MANUAL This manual covers the following models: T7 Congratulations on purchasing a new thermostat. This thermostat was designed to the highest reliability and ease of use standards. Thank you
Owner s Manual. Digital Thermostat
 Model Air Conditioning & Heating Heat Pump 5+2 Day Programmable Digital Thermostat Control up to 2-Heat & 1-Cool Battery or System Powered Backlit Digital Display Auxiliary Heat Indicator Fahrenheit or
EMERSON BLUE Wireless Comfor t Inter face 1F98EZ-1621 HOMEOWNER USER GUIDE
 EMERSON BLUE Wireless Comfor t Inter face 1F98EZ-1621 HOMEOWNER USER GUIDE Emerson Blue Wireless Comfort Interface - Homeowner User Guide Message to Homeowners Congratulations on choosing the Emerson Blue
Operator: SaVe these instructions forfuture use
 Whiter Rodgers 1F86-344 Non-Programmable Electronic Digital Thermostat INSTALLATION AND OPERATION INSTRUCTIONS Operator: SaVe these instructions forfuture use FAILURE TO READ AND FOLLOW ALL INSTRUCTIONS
For Quick Set-Up go to Page 14
 Talking Thermostat Model VT3000 Guide SmartWay Solutions, Inc. US Patent 6,608,560 & 7,62,253 For Quick Set-Up go to Page 4 Model VT3000, a universal thermostat for use on most Gas or Electric, Conventional
Indicates incorrect room temperature. No second stage or AUX heating. Emergency heat does not turn on
 Troubleshooting Poor Temperature Regulation This page lists problems that may affect the temperature performance of your LUX thermostat with suggested resolutions. For more detailed information please
Phone-A-Stat. MODEL Command Center With Thermostat Operation, Maintenance & Installation Manual. Introduction.
 Introduction The UL listed Phone-A-Stat (model # 7632 ) is designed and approved for the safe operation of remotely controlling four independent loads, such as a sprinkler system or a water heater via
Small Digital Thermostat Controller Temperature Control
 www.klimaireintl.com Small Digital Thermostat Controller Temperature Control Small-Fiac IOM Manual KLIMAIRE International +1.647. 477. 3333 +1.646. 808. 0240 klimaireintl@klimaireintl.com Digital Thermostat
T-32-TS Touchscreen Thermostat. Installation Manual
 T-32-TS Touchscreen Thermostat Installation Manual TABLE OF CONTENTS Introduction...4 Getting Started...5 Installing the Thermostat...6, 8 Disassembly...6 Thermostat Location...6 Mounting the Subbase...6,
Parts Diagram. Up button. Down button. Right (fan) button. Left (system) button. RC/RH Jumper. Field programming pins
 button. Left (system) button. RC/RH Jumper. Field programming pins") Table of Contents Parts Diagram........................................................... 1 Icon Descriptions......................................................... 2 Specifications...........................................................
Table of Contents Parts Diagram........................................................... 1 Icon Descriptions......................................................... 2 Specifications...........................................................
INSTALLATION MANUAL. Need Help? This manual covers the following models: T725. Power Type. Thermostat Applications Guide. Page.
 INSTALLATION MANUAL This manual covers the following models: T725 Thermostat Applications Guide Des cription Gas or Oil Heat Electric Furnace Heat Pump ( Aux. or Emergency Heat) Heat Pump (with Aux. or
Energy Plannersm Programmable Thermostat Customer Guide. Take control of your comfort and energy savings
 Energy Plannersm Programmable Thermostat Customer Guide Take control of your comfort and energy savings BLANK PLACEHOLDER FOR INSIDE FRONT COVER DO NOT PRINT Contents Introduction About this Guide... 1
INTRODUCTION Thank you for purchasing your new Comfort-Set 90 Series thermostat. Your new White-Rodgers Thermostat uses solid state microcomputer
 INTRODUCTI Thank you for purchasing your new Comfort-Set 90 Series thermostat. Your new White-Rodgers Thermostat uses solid state microcomputer technology to provide precise time/temperature control. This
1F90W-51 OPERATION GUIDE WHITE-RODGERS. Operator: Save this booklet for future use! 5 Day/2 Day Electronic Digital Thermostat WHITE-RODGERS
 OPERATION GUIDE 1F90W-51 5 Day/2 Day Electronic Digital Thermostat WHITE-RODGERS WHITE-RODGERS Operator: Save this booklet for future use! About Your New Thermostat... Your new White-Rodgers Digital Thermostat
Commercial Touchscreen Thermostat
 55,13M 1/27 Supersedes 12/25 Commercial Touchscreen Thermostat 25 Lennox Industries, Inc. Dallas, Texas, USA APPLICATION Page 1 INSTALLATION INSTRUCTIONS The Lennox Commercial Touchscreen Thermostat provides
1F90-71 OPERATION GUIDE WHITE-RODGERS. Operator: Save this booklet for future use! 5 Day/2 Day Electronic Digital Thermostat
 OPERATION GUIDE 1F90-71 5 Day/2 Day Electronic Digital Thermostat WHITE-RODGERS Operator: Save this booklet for future use! About Your New Thermostat... Your new White-Rodgers Digital Thermostat uses the
Installation Instructions
 Installation Instructions DIGITAL THERMOSTAT 53DFS250-SL Cooling Only, Heat Cool, and Heat Pump B. Assemble tools: o AUTO COOL HEAT o MULTI-STAGE SEVEN DAY PROGRAMMABLE Table of Contents STEP #1 PREPARATION
Operator: Save these instructions for future use!
 1F85-277 ing & Air Conditioning 7 Day/5-1-1 Programmable/Non-programmable, Auto Changeover, Multi-Stage/ Pump Thermostat INSTALLATION INSTRUCTIONS Operator: Save these instructions for future use! FAILURE
1F97-51 OPERATION GUIDE WHITE-RODGERS. Operator: Save this booklet for future use! 7-Day Programmable Electronic Digital Thermostat
 OPERATION GUIDE 1F97-51 7-Day Programmable Electronic Digital Thermostat WHITE-RODGERS Operator: Save this booklet for future use! About Your New Thermostat... Your new White-Rodgers Digital Thermostat
Thermostat Installation Best Practices
 Thermostat Installation Best Practices If this is to replace an existing thermostat, just use the existing thermostat location. If this is a new install follow these suggestions: Locate the thermostat
NP100 Non-Programmable Thermostat Installation Instructions & User Guide. For Installation Help. White-Rodgers.com
 NP100 Non-Programmable Thermostat Installation Instructions & User Guide For Installation Help 1-877-654-9394 White-Rodgers.com 2011 Printed in hina White-Rodgers 8100 West Florissant Avenue St. Louis,
Install Guide CT100. Caution. Caution
 PG 1 Install Guide CT100 Caution topcover Turn off electricity to the HVAC system before installing or servicing thermostat or any part of the system. Do not turn electricity back on until work is completed.
Owner s Manual. Digital Thermostat. Non-Programmable
 Model Air Conditioning & Heating Non-Programmable Digital Thermostat 1-Heat & 1-Cool Gas/Electric Heat Pump Battery or System Powered Fahrenheit or Celsius Fully Electronic Owner s Manual Thank goodness
INSTALLATION MANUAL. Need Help? This manual covers the following models: T915. Power Type. Thermostat Applications Guide. Page.
 INSTALLATION MANUAL This manual covers the following models: T915 Thermostat Applications Guide Des cription Gas or Oil Heat Electric Furnace Heat Pump (No Aux. or Emergency Heat) Heat Pump (with Aux.
SMART TEMP UNIVERSAL 7-DAY PROGRAMMABLE THERMOSTAT (FOR BOTH CONVENTIONAL AND HEAT PUMP SYSTEMS) INSTALLATION AND OPERATING INSTRUCTIONS
 INSTALLATION AND OPERATING INSTRUCTIONS") TX9100Uc SMART TEMP UNIVERSAL 7-DAY PROGRAMMABLE THERMOSTAT (FOR BOTH CONVENTIONAL AND HEAT PUMP SYSTEMS) INSTALLATION AND OPERATING INSTRUCTIONS 52174 IMPORTANT! Please read all of these instructions
TX9100Uc SMART TEMP UNIVERSAL 7-DAY PROGRAMMABLE THERMOSTAT (FOR BOTH CONVENTIONAL AND HEAT PUMP SYSTEMS) INSTALLATION AND OPERATING INSTRUCTIONS 52174 IMPORTANT! Please read all of these instructions
Microelectronic Programmable Thermostat Owner s Manual. 1 J.H Form Number
 Microelectronic Programmable Thermostat Owner s Manual 1 J.H. 5-94 Form Number 69-0819 Table of Contents Programmed Recovery... 3 Programming Your Thermostat... 6 Programming... 6 Program Schedule... 7
Installation Instructions
 T2 -PAC01 -A, T2 -NAC01 -A T2 -PHP01 -A, T2 -NHP01 -A LEGACYt SERIES THERMOSTATS Installation Instructions A07047 Legacy Series Programmable Thermostat A07046 Legacy Series Non-Programmable Thermostat
Operation and Maintenance Manual OM 897-3
 Operation and Maintenance Manual OM 897-3 Wireless Temperature Control Use with factory or field installed Daikin WSHP wireless RCN Group: WSHP Document PN: 910203510 Date: March 2017 Part No. 668898001
tcu.z Commercial Programmable Thermostat Installation Instructions
 Application Mercury Notice Installation The tcu.z Commercial Programmable Thermostat controls 24-VAC commercial single-zone heating, ventilating, and air conditioning (HVAC) equipment. It consists of a
Programmable Thermostat
 Programmable Thermostat with Humidity Control Auto Changeover Dual Power 7-Day, 5-2-Day, or 5-1-1- Day Programmable Configurable for Multiple Systems Large Display with Backlight Selectable Fahrenheit
User s Manual Quick Start Installation and Programming
 9720 DELUXE PROGRAMMABLE THERMOSTAT INTEGRATED COMFORT SOLUTIONS H HEAT PUMP 7 Day Programmable 3 Heat / 2 Cool User s Manual Quick Start Installation and Programming 110-662 W A R R T A N Y PRODUCT FEATURES