OPERATOR AND SERVICE MANUAL
|
|
|
- Philomena McKinney
- 5 years ago
- Views:
Transcription

 INA/2 DHT- (40,60) INA/2 D -")


1 IMPORTANT INFORMATION KEEP FOR OPERATOR OPERATOR AND SERVICE MANUAL Part Number Rev A IMPORTANT INFORMATION INA/2 DOMESTIC MODEL: INA/2 Inclined Agitator Mixer Assembly Stainless Steel Tilt Out Agitator Drive System Variable Speed Agitator Controls For 40, 60 & 80 Gallon Kettles DEE/4T- (40,60) INA/2 DHT- (40,60) INA/2 D - (40,60,80) INA/2 Model D INA/2 THIS MANUAL MUST BE RETAINED FOR FUTURE REFERENCE. READ, UNDERSTAND AND FOLLOW THE INSTRUCTIONS AND S CONTAINED IN THIS MANUAL.. DO NOT STORE OR USE GASOLINE OR OTHER FLAMMABLE VAPORS AND LIQUIDS IN THE VICINITY OF THIS OR ANY OTHER APPLIANCE. Information contained in this document is known to be current and accurate at the time of printing/creation. Unified Brands recommends referencing our product line websites, unifiedbrands.net, for the most updated product information and specifications.
2 CAUTION: DANGER: CAUTION: CAUTION: IMPORTANT READ FIRST IMPORTANT BE SURE ALL OPERATORS READ, UNDERSTAND AND FOLLOW THE OPERATING INSTRUCTIONS, CAUTIONS, AND SAFETY INSTRUCTIONS CONTAINED IN THIS MANUAL. THIS UNIT IS INTENDED FOR USE IN THE COMMERCIAL HEATING, COOKING AND HOLDING OF WATER AND FOOD PRODUCTS, PER THE INSTRUCTIONS CONTAINED IN THIS MANUAL. ANY OTHER USE COULD RESULT IN SERIOUS PERSONAL INJURY OR DAMAGE TO THE EQUIPMENT AND WILL VOID WARRANTY. THE KETTLE MUST BE INSTALLED BY PERSONNEL QUALIFIED TO WORK WITH ELECTRICITY. IMPROPER INSTALLATION CAN RESULT IN INJURY TO PERSONNEL AND/OR DAMAGE TO EQUIPMENT. ELECTRICALLY GROUND THE UNIT AT THE TERMINAL PROVIDED. FAILURE TO GROUND UNIT COULD RESULT IN ELECTROCUTION AND DEATH. AVOID ALL DIRECT CONTACT WITH HOT EQUIPMENT SURFACES. DIRECT SKIN CONTACT COULD RESULT IN SEVERE BURNS. AVOID ALL DIRECT CONTACT WITH HOT FOOD OR WATER IN THE KETTLE. DIRECT CONTACT COULD RESULT IN SEVERE BURNS. DO NOT OVER FILL THE KETTLE WHEN COOKING, HOLDING OR CLEANING. KEEP LIQUIDS A MINIMUM OF 2-3" (5-8 cm) BELOW THE KETTLE BODY RIM TO ALLOW CLEARANCE FOR STIRRING, BOILING AND SAFE PRODUCT TRANSFER. TAKE SPECIAL CARE TO AVOID CONTACT WITH HOT KETTLE BODY OR HOT PRODUCT WHEN ADDING INGREDIENTS, STIRRING OR TRANSFERRING PRODUCT TO ANOTHER CONTAINER. DO NOT STAND ON OR APPLY UNNECESSARY WEIGHT OR PRESSURE ON THE KETTLE FRONT OR POURING LIP. THIS COULD RESULT IN OVERLOAD AND FAILURE OF THE TILT MECHANISM, AND POSSIBLE SERIOUS INJURY AND BURNS TO THE OPERATOR AND OTHERS. WHEN TILTING KETTLE FOR PRODUCT TRANSFER: 1) WEAR PROTECTIVE OVEN MITT AND PROTECTIVE APRON. 2) USE CONTAINER DEEP ENOUGH TO CONTAIN AND MINIMIZE PRODUCT SPLASHING. 3) PLACE CONTAINER ON STABLE, FLAT SURFACE, AS CLOSE TO THE KETTLE AS POSSIBLE. 4) STAND TO LEFT OR RIGHT SIDE OF KETTLE (DEPENDING ON TILTING HANDLE PLACEMENT) WHILE POURING. DO NOT STAND DIRECTLY IN POUR PATH OF HOT CONTENTS. 5) POUR SLOWLY, MAINTAIN CONTROL OF KETTLE BODY HANDLE AT ALL TIMES, AND RETURN KETTLE BODY TO UPRIGHT POSITION AFTER CONTAINER IS FILLED OR TRANSFER IS COMPLETE. 6) DO NOT OVER FILL CONTAINER. AVOID DIRECT SKIN CONTACT WITH HOT CONTAINER AND ITS CONTENTS. KEEP FLOORS IN FRONT OF KETTLE WORK AREA CLEAN AND DRY. IF SPILLS OCCUR, CLEAN IMMEDIATELY, TO AVOID SLIPS OR FALLS. FAILURE TO CHECK PRESSURE RELIEF VALVE OPERATION PERIODICALLY COULD RESULT IN PERSONAL INJURY AND/OR DAMAGE TO EQUIPMENT. WHEN TESTING, AVOID ANY EXPOSURE TO THE STEAM BLOWING OUT OF THE PRESSURE RELIEF VALVE. DIRECT CONTACT COULD RESULT IN SEVERE BURNS. TO AVOID INJURY, READ AND FOLLOW ALL PRECAUTIONS STATED ON THE LABEL OF THE WATER TREATMENT COMPOUND. BEFORE REPLACING ANY PARTS, DISCONNECT THE UNIT FROM THE ELECTRIC POWER SUPPLY. TURN OFF POWER AT THE CIRCUIT BREAKER PRIOR TO INSTALLATION OR SERVICE. THE MIXER MUST BE INSTALLED BY PERSONNEL WHO ARE QUALIFIED TO WORK WITH ELECTRICITY, IMPROPER INSTALLATION CAN RESULT IN INJURY TO PERSONNEL AND/OR DAMAGE TO EQUIPMENT. ANY MECHANICAL OR ELECTRICAL CHANGE MUST BE APPROVED BY THE GROEN FOOD SERVICE ENGINEERING DEPARTMENT. TURN OFF AGITATOR BEFORE ADDING INGREDIENTS OR INSPECTING KETTLE CONTENTS. DO NOT WEAR LOOSE CLOTHING OR JEWELRY AROUND OPERATING MIXER KETTLE. KEEP WELL CLEAR OF ROTATING MIXER ARMS AND PADDLES AT ALL TIMES. 2
3 IMPORTANT READ FIRST IMPORTANT OM/INA/2 CAUTION: CAUTION: CAUTION: THE UNIT IS EQUIPPED WITH AN AUTOMATIC CUTOFF SWITCH. IF POWER IS ON WHEN A TILTED MIXER IS LOWERED INTO THE OPERATING POSITION, THE MIXER WILL AUTOMATICALLY START. STARTING WITH THE MIXER SET AT HIGH SPEED MAY CAUSE MATERIAL TO SPILL OUT OF THE KETTLE ON TWO SPEED AND VARIABLE SPEED UNITS. UNDER HEAVY LOAD DO NOT RUN THE MIXER CONTINUOUSLY AT SLOWER THAN 5% OF FULL SPEED. SLOWER OPERATION COULD DAMAGE THE SPEED CONTROL. BEFORE CLEANING ANY PART OF THE MIXER, OTHER THAN THE AGITATOR, DISCONNECT THE ELECTRICAL SUPPLY AT THE CIRCUIT BREAKER OR FUSE BOX TO AVOID POSSIBLE ELECTRICAL SHOCK. KEEP WATER AND SOLUTIONS OUT OF THE CONTROLS, ELECTRICAL WIRING, AND DRIVE MECHANISM. NEVER SPRAY OR HOSE THE MIXER. WHEN YOU CONNECT THE SCRAPER WITH THE YOKE, MAKE SURE THE SCRAPER IS CURVED THE SAME WAY AS THE KETTLE. A REVERSED SCRAPER WILL NOT SCRAPE AND CAN CAUSE SERIOUS DAMAGE. AVOID CONTACT WITH CLEANING PRODUCTS IN ACCORDANCE WITH SUPPLIER AND MANUFACTURER RECOMMENDATIONS. MANY CLEANERS ARE HARMFUL TO THE SKIN, EYES, MUCOUS MEMBRANES AND CLOTHING. READ THE S AND FOLLOW DIRECTIONS ON THE CLEANER LABEL. USE OF ANY REPLACEMENT PARTS OTHER THAN THOSE SUPPLIED BY GROEN OR THEIR AUTHORIZED DISTRIBUTOR VOIDS ALL WARRANTIES AND CAN CAUSE BODILY INJURY TO THE OPERATOR AND DAMAGE TO THE EQUIPMENT. SERVICE PERFORMED BY OTHER THAN FACTORY AUTHORIZED PERSONNEL WITH VOID ALL WARRANTIES. BEFORE REPLACING ANY PARTS, SHUT OFF ALL ELECTRIC POWER SUPPLIES TO THE COOKER/MIXER. USE ONLY GROEN-SUPPLIED PARTS. SUBSTITUTION OF UNAUTHORIZED OR GENERIC PARTS CAN RESULT IN BODILY INJURY TO THE OPERATOR AND DAMAGE TO THE EQUIPMENT. 3
4 OM/INA/2 DO NOT PLACE HANDS, TOOLS, OR HOSES IN KETTLE WHILE AGITATOR IS MOVING AGITATOR INSTRUCTIONS ** AGITATOR AREA MUST BE CLEAR OF OBSTRUCTION BEFORE OPERATION TO RUN AGITATOR ENSURE KETTLE IS FULLY UPRIGHT ENSURE MIXER HEAD IS FULLY DOWN AND LATCHED SET THE SPEED DIAL TO DESIRED SPEED TURN THE START SWITCH TO ON TO STOP AGITATOR PRESS THE RED STOP BUTTON OR TURN THE SWITCH TO OFF DO NOT PLACE HANDS, TOOLS, OR HOSES IN KETTLE WHILE AGITATOR IS MOVING 4
5 OM/INA/2 Table of Contents IMPORTANT OPERATOR S REFERENCES... 5 EQUIPMENT DESCRIPTION... 6 INSTALLATION AND START-UP... 6 OPERATION... 8 CLEANING... 9 MAINTENANCE TROUBLESHOOTING PARTS LIST ELECTRICAL SCHEMATIC SERVICE LOG WARRANTY References NATIONAL FIRE PROTECTION ASSOCIATION 60 Battery March Park Quincy, Massachusetts NFPA/70 The National Electrical Code 5

6 OM/INA/2 Equipment Description The Groen INA/2 assembly is an electrically powered mixer with an inclined agitator, which is incorporated into Groen kettles of 40 to 80 gallon capacity. The patented design provides a gentle lifting and folding action which avoids the build-up of heavy particles at the bottom of the kettle. This action is uniquely efficient in preparing such products as stews, ground meat, pie fillings, franks and beans, and similar items. The mixer has a variable speed drive with electrical speed control. For a description of the kettle component of your cooker/mixer, see the separate kettle manual. The agitator frame is constructed of tubular stainless steel and fitted with shovel-type scrapers. It is easily removed for cleaning. Installation and Start-Up could tip over if unit is provided with flanged feet. TURN OFF POWER AT THE CIRCUIT BREAKER PRIOR TO INSTALLATION. THE MIXER MUST BE INSTALLED BY PERSONNEL WHO ARE QUALIFIED TO WORK WITH ELECTRICITY. IMPROPER INSTALLATION CAN RESULT IN INJURY TO PERSONNEL AND/OR DAMAGE TO EQUIPMENT. ANY MECHANICAL OR ELECTRICAL CHANGE MUST BE APPROVED BY THE GROEN FOOD SERVICE ENGINEERING DEPARTMENT. Your Groen mixer has been test operated at the factory and is furnished with all internal wiring. It is complete and ready for final connection. A wiring diagram is furnished at the rear of this manual. A. Installation is as follows: 1. Set the cooker/mixer in place and level it. If the mixer is a tilting model, confirm that there is enough rear or side clearance, depending on model, and overhead clearance to tilt the mixer safely through its entire tilting range. Provide enough clearance to permit access for service as well. Fasten the cooker/mixer to the floor or deck to reduce chances that the unit 2. Provide the proper electric power supply as specified on the electrical information plate attached to the mixer. Observe local codes and/or The National Electrical Code in accordance with ANSI/NFPA 70 - latest edition. The installation must conform to the code that has the more strict requirements. 3. Your mixer requires a permanent connection with the electrical service. Use waterproof conduit and waterproof connectors for this connection. 4. Any electrical service for the kettle will require a separate connection. See the specific kettle manual. TO PREVENT POSSIBLE ELECTRIC SHOCK, GROUND THE UNIT AT THE TERMINAL PROVIDED. 5. Use the following check list to confirm that the installation is correct. Unit level 6


. Slip-On Coupling 3.")
7 OM/INA/2 Adequate clearance for tilting TURN OFF AGITATOR BEFORE ADDING INGREDIENTS OR INSPECTING KETTLE CONTENTS. DO NOT WEAR LOOSE CLOTHING OR JEWELRY AROUND OPERATING MIXER KETTLE. KEEP WELL CLEAR OF ROTATING MIXER ARMS AND PADDLES AT ALL TIMES. Access for service Unit fastened down Mixer power supply conforms to information plate and code Electrical conduit and connections are waterproof Mixer grounded For instructions on installing the kettle component of your cooker/mixer, see the separate kettle manual. B. Initial Start-Up After the mixer is installed, take the following actions to confirm that the equipment is operating correctly. 1. Tilt the mixer through its complete tilting range to ensure that there is no hazard or interference. 2. Make sure the agitator is properly coupled with its drive shaft. If the mixer has a slip-on coupling, the drive pin must be positioned at the end of the J-slot. If a bolted coupling is employed, the bolts must be turned to the proper position and the nuts must be tightened. (See photographs). Slip-On Coupling 3. When the mixer is in operating position, each scraper blade should touch the inside of the kettle during at least part of each revolution of the agitator. 4. At the circuit breaker or fuse box, turn on the electric power supply to the mixer. 5. Switch on the drive and confirm that the mixer operates smoothly throughout its speed range. 6. Make sure the agitator turns in the correct direction, so it pushes the nylon scraper blades ahead of the agitator bar. If the unit functions as described above, it is ready for use. If the unit does not function as intended, call your local Groen authorized service agency. Kettles with 100 Gallon capacity and larger For instructions on initial start-up of the kettle component of your cooker/mixer, see the separate kettle manual. 7

8 OM/INA/2 Operation TURN OFF AGITATOR BEFORE ADDING INGREDIENTS OR INSPECTING KETTLE CONTENTS. DO NOT WEAR LOOSE CLOTHING OR JEWELRY AROUND OPERATING MIXER KETTLE. KEEP WELL CLEAR OF ROTATING MIXER ARMS AND PADDLES AT ALL TIMES. 1. Before you operate the mixer, make sure that the agitator is firmly connected with the drive shaft and properly positioned in the kettle. The agitator must be positioned so every scraper blade touches the kettle during at least part of each revolution. To connect the agitator: CAUTION STARTING WITH THE MIXER SET AT HIGH SPEED MAY CAUSE MATERIAL TO SPILL OUT OF THE KETTLE ON VARIABLE SPEED UNITS. a. On a variable speed drive with electrical speed control, turn the speed adjustment knob. a. Slip-on Coupling: Slide the coupling up onto the shaft as far as it will go. Then turn the agitator and pull it down, so that the drive pin on the shaft becomes firmly seated against the end of the J-slot. CAUTION UNDER HEAVY LOAD DO NOT RUN THE MIXER CONTINUOUSLY AT SLOWER THAN 5% OF FULL SPEED. SLOWER OPERATION COULD DAMAGE THE SPEED CONTROL. b. Bolted Coupling: 1. Guide the two pins of the drive shaft into the holes in the coupling. 6. To stop the mixer, switch off the drive. If the cooker/mixer will be cleaned or serviced, or will not be used for a week or longer, cut off all power supplies to the unit at the circuit breaker or fuse box. 2. With the lobe of the cam pointing up, and while holding the two cam bolts, insert the bolts through the larger holes in the side of the coupling. The bolts must pass the flat part of the shaft, and through the smaller holes in the other side of the coupling. 7. Switch off the drive, before you tilt the mixer. To tilt the mixer, first unlatch it (See Photograph). For some units, you may need to tilt the kettle forward slightly to let the agitator clear the kettle wall as you tilt the mixer. 3. Turn the cam bolts toward the shaft 1/8 turn or until the lobe of the cam is snug against the flat side of the shaft. 8. As you tilt the mixer out of the kettle, clean any clinging product from the agitator, so product will not drip onto the outside of the kettle or surroundings, and so the weight of product will not make the mixer fall down. 4. Fasten the bolts in place with the supplied hex nuts, and tighten the nuts. To operate the kettle component of your cooker/mixer, see the separate kettle manual 2. If the mixer has been tilted up, lower it into operating position. THE UNIT IS EQUIPPED WITH AN AUTOMATIC TILT CUTOFF SWITCH. IF POWER IS ON WHEN A TILTED MIXER IS LOWERED INTO OPERATING POSITION, THE MIXER WILL AUTOMATICALLY START. 3. Turn on electric power to the unit at the circuit breaker or fuse box. ON/OFF Mixer Speed Switch Control Knob 4. Switch on the drive. Emergency Stop Switch 5. Set the desired mixing speed. 8
9 OM/INA/2 Cleaning blade (Figure 8). Position the loop of the locking clip, so the hairpin clip will pass through it, when the hairpin clip is i ( ohp A. Suggested Tools & Materials. 1. A good stainless steel cleaner. 2. Stiff brush. 3. Sanitizer Solution B. Precautions BEFORE CLEANING ANY PART OF THE MIXER, OTHER THAN THE AGITATOR, SHUT OFF ALL ELECTRIC POWER TO THE COOKER/MIXER AT THE CIRCUIT BREAKER OR FUSE BOX, TO AVOID POSSIBLE ELECTRIC SHOCK. There are four parts to each scraper blade. KEEP WATER AND SOLUTIONS OUT OF THE CONTROLS, ELECTRICAL WIRING, AND DRIVE MECHANISM. NEVER SPRAY OR HOSE THE MIXER. C. Procedure 1. Wash the agitator as soon as possible after use. If the unit is in continuous use, thoroughly clean and sanitize all parts of the mixer at least once every 12 hours 2. Disassemble the scrapers and clean them along with the rest of the agitator, then reassemble them. To disassemble a scraper: a. Pull the hairpin clip out of the yoke. To make this easier, squeeze the ends of the clip closer together. (See Photos). b. Remove the locking clip, then pull the plastic scraper blade out of its holder. To reassemble the scraper: a. Push the blade as far as it will go into the holder b. From the back or convex side of the holder (the side that will be facing the kettle wall), hook the locking clip through the slot in the 9
10 OM/INA/2 CAUTION WHEN YOU CONNECT THE SCRAPER WITH THE YOKE, MAKE SURE THE SCRAPER IS CURVED THE SAME WAY AS THE KETTLE. A REVERSED SCRAPER WILL NOT SCRAPE AND CAN CAUSE SERIOUS DAMAGE. c. Position the scraper in the yoke, then insert the hairpin clip. Squeeze the ends of the clip closer together to help them pass through the second side of the yoke. Make sure the hairpin clip has passed through the loop of the locking clip. AVOID CONTACT WITH ANY CLEANER, AS RECOMMENDED BY THE SUPPLIER. CAREFULLY READ THE S AND FOLLOW THE DIRECTIONS ON THE LABEL OF THE CLEANER. MANY CLEANERS ARE HARMFUL TO THE SKIN, EYES, MUCOUS MEMBRANES, AND CLOTHING. completely. It is recommended that the agitator be sanitized just before use. CAUTION NEVER LEAVE A SANITIZER IN CONTACT WITH THE SURFACE OF STAINLESS STEEL LONGER THAN 20 MINUTES. LONGER CONTACT CAN CAUSE CORROSION. 7. The exterior of the unit may be polished with a good quality stainless steel cleaner. Cleaning procedures for the kettle component of your cooker/mixer are described in the separate kettle manual. 3. Prepare a hot solution of the cleaning compound as instructed by the supplier. Wash the agitator parts and rinse them well. Use a cloth moistened with the cleaning solution to clean other parts of the mixer. 4. To remove materials stuck to the agitator, use a brush, sponge, cloth, plastic or rubber scraper, or plastic wool along with the cleaning solution. To make washing easier, let the cleaning solution soak into the residue. When you clean the stainless steel parts, do not use any abrasive material (like metal sponges or scouring powder) or metal implement (like a spoon, scraper, or wire brush) that might scratch the surface. Scratches make the surface hard to clean and provide places for bacteria to grow. Do not use steel wool, which may leave particles imbedded in the surface and cause eventual corrosion and pitting. 5. As part of the daily cleaning program, clean all surfaces that may have been soiled. Remember to check such parts as the back and underside of the drive housing. 6. When the agitator needs to be sanitized, use a sanitizing solution equivalent to one that supplies 100 parts per million available chlorine. Obtain advice on the best sanitizing agent from your supplier of sanitation products. Following the supplier s directions, apply the sanitizer after the agitator has been washed, then rinse off the sanitizer 10
11 Maintenance OM/INA/2 USE OF ANY REPLACEMENT PARTS OTHER THAN THOSE SUPPLIED BY GROEN OR THEIR AUTHORIZED DISTRIBUTOR VOIDS ALL WARRANTIES AND CAN CAUSE BODILY INJURY TO THE OPERATOR AND DAMAGE TO THE EQUIPMENT. SERVICE PERFORMED BY OTHER THAN FACTORY AUTHORIZED PERSONNEL WILL VOID ALL WARRANTIES. A. Periodic Service 1. The interior of control and drive housings should be kept clean and dry. 2. Electrical wiring should be kept securely connected and in good condition. 3. Regular service of the mixer should include cleaning the motor and checking the reducer gearcase. Check oil level at 3000 hrs of operation or every 6 months. Change oil completely every 3 years or 15,000 hrs. Lubricant type is GG Arctic SHC 23". Food grade lubricant (Mobil product) B. Component Replacement BEFORE REPLACING ANY PARTS, SHUT OFF ALL ELECTRIC POWER SUPPLIES TO THE COOKER/MIXER. All internal wiring is marked as shown on the schematic drawings in this manual. Be sure that new components are wired in the same manner as the old components. C. Service Records A Service Log is provided at the rear of this manual. Each time service is performed on this equipment, enter the date on which the work was done, what was done, and who did it. Keep this log with the equipment. Service procedures for the kettle component of the cooker/mixer are described in the separate kettle manual. 11
12 OM/INA/2 Troubleshooting Your Groen Mixer will operate smoothly and efficiently if properly maintained. However, the following is a list of checks to make in the event of a problem. If the actions suggested do not solve the problem, call your authorized Groen Service Representative. For the phone number of the nearest agency, check the Groen web site at ask your area Groen representative or call the Groen Parts and Service Department. If an item on the list is followed by X, the work should only be performed by a qualified service representative. USE OF ANY REPLACEMENT PARTS OTHER THAN THOSE SUPPLIED BY GROEN OR THEIR AUTHORIZED DISTRIBUTORS CAN CAUSE INJURY TO THE OPERATOR AND DAMAGE TO THE EQUIPMENT AND WILL VOID ALL WARRANTIES. SERVICE PERFORMED BY OTHER THAN FACTORY-AUTHORIZED PERSONNEL WILL VOID ALL WARRANTIES. SYMPTOM WHO WHAT TO CHECK X indicates items which must be performed by an authorized technician. Motor will not run. User a. Power supply to the unit. b. For a mechanical overload. c. Circuit breaker or fuse. Auth Service Rep Only d. That the tilt switch is closed. X e. For a ground or short in the motor. X f. Overload heaters. X Motor runs slowly. User a. For a mechanical overload. Motor speed varies rapidly. Motor overheats and/or sparks excessively. Circuit breaker or heater cuts out frequently. Auth Service Rep Only b. For open motor field circuit, by checking field current. X User a. For an oscillating load, by disconnecting the mixer drive from the agitator and checking motor speed. Auth Service Rep Only b. User a. For a mechanical overload. b. Ambient temperature is high. Auth Service Rep Only c. Incorrect supply voltage to motor. X d. Excessive variation (under voltage or over voltage) in supply voltage. X e. Single phasing due to loose connection in supply line or a blow fuse. X User a. For a mechanical overload. Auth Service Rep Only Variable speed controller. X (example: frozen product) b. Whether line voltage is too high. X c. Motor armature and wiring for ground or short. X d. For open motor field circuit, by checking field current. X e. f. For defective circuit breaker. X Motor is improperly connected. X Troubleshooting guidance for the kettle component of your cooker/mixer is contained in the separate kettle manual. 12


13 Parts List OM/INA/2 To order parts, contact your authorized Groen Service Agency. Supply the model designation, part description, part number and quantity required. Where applicable, provide the voltage and phase as well. USE ONLY GROEN-SUPPLIED PARTS. SUBSTITUTION OF UNAUTHORIZED OR GENERIC PARTS CAN RESULT IN BODILY INJURY TO THE OPERATOR AND DAMAGE TO THE EQUIPMENT. Key Description Part No. 1 Blade Assembly, Scraper Blade, Scraper, Nylon Holder, Blade Assembly Clip, Scraper Locking Clip, Hairpin Retaining
14 OM/INA/2 Parts List Description Part No. Description Part No. Switch Assembly Agitator Blade Scraper Switch Assembly Speed Control Holder Scraper Blade Switch Assembly Emergency Stop Spacer D/INA/2 Motor Enclosure Nema Plate Bridge Enclosure, 12" x 16" x8" Plate Pivot Inverter 230 Vac Breaker Bar For D/INA Inverter 380/460V Drive 208/360V 1.5HP Terminal Block 3 - Pole Drive 1.5 HP 240/480V Contactor 12Amp 4 Pole Drive 2 HP 240/480V Fuse Block Drive,2HP 360Volt B Fuse 20 Amp Control Mounting Bracket Transformer, 100 Va Connector Straight Lug, Ground 14-6 AWG Connector N58643 Wiring Kit, Variable Speed Bracket, Enclosure Mounting Relay, Control Mounting Plate Socket Relay Mounting Bracket Assembly Wiring Schematic Variable Ring Basic External Wiring Harness Limit Switch Wiring Harness Control Box Latch Wiring Harness Control Box to Agitator Handle & Latch Sub-Assy Fuse Block (Type M) 3 Pole Handle & Bracket Assy Cover Agitator Tilt Handle & Spring Rod Assy Switch Limit Handle 3/8" x 1" x 21" Mounting Tilt Switch Bracket Knob Red Ball Handle Latch Ting Tollerence Handle & Latch Bearing Cylindrical Handle & Spring Spring.162" Wire x.098" OD x3" Handle 3/8" x 1" x 12" Plunger/Spring MS17005 Handle & Bracket Insert handle & latch Assy Knob Red Ball Handle Cover Handle & Latch Assy Ring Tolerance Mounting Plate Shaft Drive INA Type Mount Arm Angle 3" x 3" x3" Shield Drip Shaft Drive INA Type Post Pivot Assy Shield Drip Power-Aid Assy Post Pivot Assy Agitator Assy 40Gal Power Aid Assy Agitator Assembly 60 Gal Coupling Agitator Agitator Assy 80Gal Plate Bridge Yoke Blade Plate Pivot Scraper Blade Assy Breaker Bar 3/16" x2 ½ x 2 ½ x 30" Pin Agitator Blade Bar Mounting Drive N56890 Clip Scraper Locking
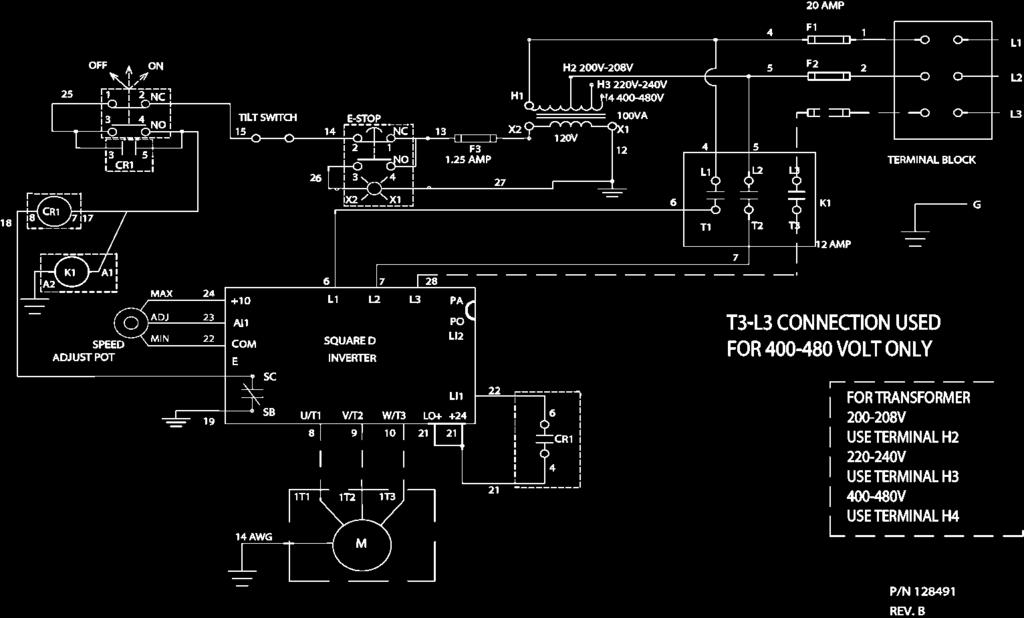
15 Electrical Schematics OM/INA/2 15
16 OM/INA/2 Service Log Model No. Serial No. Date Purchased Purchase Order No. Purchased From Location Date Installed For Service Call Date Maintenance Performed Performed by 16
17 OM/INA/2 LIMITED WARRANTY TO COMMERCIAL PURCHASERS* (U.S. & Canadian Sales Only.) Groen warrants to original commercial purchaser/users that foodservice equipment manufactured by Groen ( Groen Equipment ) (other than CapKold foodservice equipment) shall be free from defects in material and workmanship for (12) twelve months from the date of installation or fifteen (15) months from date of shipment from Groen, whichever date first occurs (the Warranty Period ), in accordance with the following terms and conditions: I. This warranty is limited to replacement parts and related labor for Groen Equipment located at its original place of installation in the United States and Canada. II. III. IV. Damage to Groen Equipment that occurs during shipment must be reported to the carrier, and is not covered under this warranty. The reporting of any damage during shipment is the sole responsibility of the commercial purchaser/user of such Groen Equipment. For Groen Convection Combo TM Steamer-Ovens, HyPerSteam TM Convection Steamers and HyPlus TM Pressureless Steamers, Groen further warrants to the original commercial purchaser/users of such Groen Equipment that the atmospheric steam generators or boilers contained in such Groen Equipment shall be free from defects in material and workmanship for twenty-four (24) months from the date of installation or twenty-seven (27) months from date of shipment from Groen, whichever date first occurs, provided that: (a) the original purchaser/user shall have also purchased and installed a Groen PureSteem Water Treatment System TM for use in connection with such Groen Convection Combo TM Steamer- Oven, HyPerSteam TM Convection Steamer or HyPlus TM Pressureless Steamer on or before the date such Groen Equipment was installed, (b) the original purchaser/user has continuously used suchwater Treatment System in connection with such Groen Equipment from the date of installation, and (c) the commercial purchaser/user shall have maintained such Water Treatment System in accordance with the maintenance and filter cartridge replacement recommendations of Groen, and otherwise maintained such Oven or Steamer in accordance with all other operational and maintenance recommendations of Groen. Groen further warrants to the original commercial purchaser/users of Groen Convection Combo TM Steamer-Ovens that the electronic relay and control board contained in such Groen Convection Combo TM Steamer-Oven shall be free from defects in material and workmanship for twenty-four (24) months from the date of installation or twenty-seven (27) months from date of shipment from Groen, whichever date first occurs. V. During the Warranty Period, Groen, directly or through its authorized service representative, will either repair or replace, at Groen s sole election, any Groen Equipment determined by Groen to have a defect in material or workmanship. As to any such warranty service during the Warranty Period, Groen will be responsible for related reasonable labor and portal to portal transportation expenses (time & mileage) incurred within the United States and Canada. VI. This warranty does not cover boiler maintenance, calibration, periodic adjustments as specified in operating instructions or manuals, consumable parts (such as scraper blades, gaskets, packing, etc.), and labor costs incurred for removal of adjacent equipment or objects to gain access to Groen Equipment. This warranty does not cover defects caused by improper installation, abuse, careless operation, or improper maintenance of Groen Equipment. This warranty does not cover damage to Groen Equipment caused by poor water quality or improper boiler maintenance. 17
18 OM/INA/2 VII. VIII. THIS WARRANTY IS EXCLUSIVE AND IS IN LIEU OF ALL OTHER WARRANTIES, EXPRESSED OR IMPLIED, INCLUDING ANY IMPLIED WARRANTY OF MERCHANTABILITY OR FITNESS FOR A PARTICULAR PURPOSE, EACH OF WHICH IS HEREBY EXPRESSLY DISCLAIMED. THE REMEDIES DESCRIBED ABOVE ARE EXCLUSIVE AND IN NO EVENT SHALL GROEN BE LIABLE FOR SPECIAL, CONSEQUENTIAL, OR INCIDENTAL DAMAGES FOR THE BREACH OR DELAY IN PERFORMANCE OF THIS WARRANTY. Groen Equipment is for commercial use only. If sold as a component of another (O.E.M.) manufacturer s equipment, or if used as a consumer product, such Equipment is sold AS IS and without any warranty. * (Covers all Groen Equipment (other than CapKold foodservice equipment) ordered after September 11, 2001). 18
19 1055 Mendell Davis Drive Jackson, MS Telephone FAX OM/INA/2 (Revised 3/03) Part Number Rev A
MODEL TA/3 INCLINED MIXER ASSEMBLY Domestic
 OPERATOR & SERVICE MANUAL IMPORTANT INFORMATION, KEEP FOR OPERATOR This manual provides information for: MODEL TA/3 INCLINED MIXER ASSEMBLY Domestic Stainless Steel Tilt-Out Drive System Speed Agitator
Part Number DOMESTIC. HyPerSteam Atmospheric Convection Steamer BETA 1.0
 ? IMPORTANT INFORMATION? KEEP FOR OPERATOR? IMPORTANT INFORMATION? OPERATOR MANUAL OM-HY-3E(S eta) Part Number 121026 DOMESTIC MODEL: Self-Contained Electric Heated Capacity: HY-3E/ HyPerSteam Atmospheric
THIS MANUAL MUST BE RETAINED FOR FUTURE REFERENCE. READ, UN DERSTAND AND FOLLOW THE INSTRUCTIONS AND WARNINGS CONTAINED IN THIS MANUAL.
 ? IMPORTANT INFORMATION? KEEP FOR OPERATOR? IMPORTANT INFORMATION? OPERATOR MANUAL Part Number 121064 OM-TD/FPC DOMESTIC MODEL: TD/FPC Braising Pan Stainless Steel Table Top Mounted Manual Tilting Electrically
OPERATOR MANUAL IMPORTANT INFORMATION IMPORTANT INFORMATION. Steam Jacketed Kettle
 IMPORTANT INFORMATION KEEP FOR OPERATOR OPERATOR MANUAL Part Number 147399 MODEL: IMPORTANT INFORMATION OM-EE DOMESTIC EE Steam Jacketed Kettle Self-Contained Electrically heated Floor mounted Stationary
CART & TROUGH ASSEMBLY for BRAISING PAN UNITS
 OPERATOR MANUAL IMPORTANT INFORMATION, KEEP FOR OPERATOR This manual provides information for: CART & TROUGH ASSEMBLY for BRAISING PAN UNITS Stainless Steel THIS MANUAL MUST BE RETAINED FOR FUTURE REFERENCE.
OPERATOR MANUAL. Applicable Model(s): HY-6SM HY-6SG HY-6SE. HyPlus Atmospheric Steamer CAVITIES
: HY-6SM HY-6SG HY-6SE. HyPlus Atmospheric Steamer CAVITIES") 3 IMPORTANT INFORMATION 3 KEEP FOR OPERATOR 3 IMPORTANT INFORMATION 3 OPERATOR MANUAL Part Number 121001 Rev. BC OM-HY-6CAV DOMESTIC Applicable Model(s): HY-6SM HY-6SG HY-6SE HyPlus Atmospheric Steamer
3 IMPORTANT INFORMATION 3 KEEP FOR OPERATOR 3 IMPORTANT INFORMATION 3 OPERATOR MANUAL Part Number 121001 Rev. BC OM-HY-6CAV DOMESTIC Applicable Model(s): HY-6SM HY-6SG HY-6SE HyPlus Atmospheric Steamer
OPERATOR AND SERVICE MANUAL
 IMPORTANT INFORMATION KEEP FOR OPERATOR IMPORTANT INFORMATION OPERATOR AND SERVICE MANUAL OM/SM-TDB/6 Part Number 148732 DOMESTIC MODEL: TDB/6 Steam Jacketed Kettle Self-Contained Electrically heated Table
TECHNICAL MANUAL TM... Fryer, Deep-Fat, Electric w/solid State Controls 440 Volt, 60 HZ, 3 Phase NSN:
 TM... TECHNICAL MANUAL MODEL USN-50 DESCRIPTION Fryer, Deep-Fat, Electric w/solid State Controls 440 Volt, 60 HZ, 3 Phase NSN: Commercial & Marine Cooking Equipment Gas & Electric Last Updated September
THIS MANUAL MUST BE RETAINED FOR FUTURE REFERENCE. READ, UNDERSTAND AND FOLLOW THE INSTRUCTIONS AND WARNINGS CONTAINED IN THIS MANUAL.
 IMPORTANT INFORMATION KEEP FOR OPERATOR OPERATOR MANUAL Part Number 148727 MODELS: IMPORTANT INFORMATION OM-BPM-E DOMESTIC BPM-30E, BPM-40E BPP-30E, BPP-40E Braising Pans Eclipse Ergonomic Tilting Braising
IMPORTANT INFORMATION KEEP FOR OPERATOR IMPORTANT INFORMATION. Steam Jacketed Kettle
 IMPORTANT INFORMATION KEEP FOR OPERATOR IMPORTANT INFORMATION OPERATOR MANUAL Part Number 121019 OM-EE & AE/1 DOMESTIC MODEL: EE & AE/1 Steam Jacketed Kettle Self-Contained Electrically heated Floor mounted
OPERATOR MANUAL. Steam Jacketed Kettle. Self-Contained Electrically heated Floor mounted Tilting
 OPERATOR MANUAL Part Number 148783 Rev. E DOMESTIC MODEL: DEE/4 Steam Jacketed Kettle Self-Contained Electrically heated Floor mounted Tilting THIS MANUAL MUST BE RETAINED FOR FUTURE REFERENCE. READ, UNDERSTAND
Installation, Operation, Maintenance, & Troubleshooting Model: CLG-36-S Electric Cruise Line Griddle Serial:
 Installation, Operation, Maintenance, & Troubleshooting Model: CLG-36-S Electric Cruise Line Griddle Serial: Lang Manufacturing Company 6500 Merrill Creek Parkway Everett, WA 98203 Phone: 425-349-2400
MODEL DEE/4 Domestic STEAM JACKETED KETTLE
 OPERATOR MANUAL IMPORTANT INFORMATION, KEEP FOR OPERATOR This manual provides information for: MODEL DEE/4 Domestic STEAM JACKETED KETTLE Self Contained Stainless Steel Floor Mounted Electrically Heated
OM-TDB / G OVE R NME NT
 IMPORTANT INFORMATION KEEP FOR OPERATOR IMPORTANT INFORMATION OPERATOR E R MANUAL Part P Number 148733 Rev. B DOME S T IC / G OVE R NME NT Models : TDB and TDB C S team J acketed K ettle S elf-c ontained
MODEL HY-6CAV DOMESTIC HYPLUS ATMOSPHERIC STEAMER CAVITIES
 WATER FILL LOW WATER HIGH PRESSURE READY ON OPERATOR MANUAL IMPORTANT INFORMATION, KEEP FOR OPERATOR This manual provides information for: MODEL HY-6CAV DOMESTIC HYPLUS ATMOSPHERIC STEAMER CAVITIES For
Water Jacketed Fudge Kettle
 IMPORTANTINFORMATION KEEPFOROPERATOR IMPORTANTINFORMATION OPERATOR MANUAL Part Number 121027 Rev. CB MODEL: TDB/8-20-CFC Water Jacketed Fudge Kettle Self-Contained Electrically heated Table top mounted
Installation, Operation, Maintenance, & Troubleshooting Model: EQS-AP Quarter Size Convection Oven
 Installation, Operation, Maintenance, & Troubleshooting Model: EQS-AP Quarter Size Convection Oven Lang Manufacturing Company 6500 Merrill Creek Parkway Everett, WA 98203 Part Number: 60800-34 Phone: 425-349-2400
MANUFACTURING NUMBERS: CORN CAROUSEL. Model CC-19 Series P/N /99. Owner s Manual
 MANUFACTURING NUMBERS: 9500410 9500412 C US Model CC-19 Series 9500400 P/N 1010730 10/99 Owner s Manual A.J. Antunes & Co. Owner Information...1 General...1 Warranty Information...1 Service/Technical Assistance...2
OM-FT DOMESTIC Part Number
 ? IMPORTANT INFORMATION? KEEP FOR OPERATOR? IMPORTANT INFORMATION? OPERATOR MANUAL MODELS: FT, MW/FT, PT (b Jacketed) GT, MW/GT, GPT (Full Jacketed) Steam Jacketed Kettles DOMESTIC Part Number 121008 Stainless
Vortex Atmospheric Connectionless Steamer
 IMPORTANTINFORMATION KEEPFOROPERATOR OPERATOR MANUAL Part Number 148673 Rev. B IMPORTANTINFORMATION OM-VRC-3E/VRC-6E DOMESTIC MODELS: VRC-3E, VRC-6E Vortex Atmospheric Connectionless Steamer Self-Contained
OPERATOR MANUAL Part Number
 IMPORTANT INFORMATION OPERATOR MANUAL Part Number 148668 Rev. C Part Number 148668 KEEP FOR OPERATOR IMPORTANT INFORMATION OM-HY-6E DOMESTIC Model: HY-6E HyPerSteam Atmospheric Convection Steamer (Re-Designed)
Operation Maintenance. Mobile Oil Caddy
 Mobile Oil Caddy Operation Maintenance W164 N9221 Water Street P.O. Box 450 Menomonee Falls, Wisconsin 53052-0450 USA PHONE: 262.251.3800 800.558.8744 usa/canada FAX: 262.251.7067 800.329.8744 u.s.a. only
FTM-L SERIES SINGLE OR TWIN DIRECT STEAM MIXER KETTLE COMPLETE WITH HYDRAULIC POWER TILT BRIDGE INSTALLATION - OPERATION - MAINTENANCE
 FTM-L ERIE INGLE OR TWIN DIRECT TEAM MIXER KETTLE COMPLETE WITH HYDRAULIC POWER TILT BRIDGE INTALLATION - OPERATION - MAINTENANCE INGLE MODEL FTM-40L FTM-60L FTM-80L FTM-100L TWIN MODEL FTM-(2)40L FTM-(2)60L
TDB/6 Domestic STEAM JACKETED KETTLE
 OPERATOR/SERVICE MANUAL IMPORTANT INFORMATION, KEEP FOR OPERATOR This manual provides information for: TDB/6 Domestic STEAM JACKETED KETTLE Self Contained Electrically Heated Table Top Mounted Tilting
IMPORTANT SAFETY INFORMATION:
 Owner s Manual Model DS7420 DS7425DLX IMPORTANT SAFETY INFORMATION: Always read this manual first before attempting to install or use this stove. For your safety, always comply with all warnings and safety
ELECTRIC COMPACT DECK OVEN INSTALLATION - OPERATION - MAINTENANCE
 1415 ELECTRIC COMPACT DECK OVEN INSTALLATION - OPERATION - MAINTENANCE BLODGETT OVEN COMPANY www.blodgett.com 44 Lakeside Avenue, Burlington, Vermont 05401 USA Telephone: (802) 658-6600 Fax: (802)864-0183
Water Boilers ME10EN, ME15EN. Table of Contents
 Water Boilers ME10EN, ME15EN Operator Manual Model ME15EN Model ME10EN Safety Information...2 Rough-In Drawing...3 Installation...4 Priming...5 Cleaning...5 Table of Contents Adjustments...6 Maintenance...7
Instruction Manual. Cheddar Easy All-In-One Cheese Corn Shop
 Instruction Manual Cheddar Easy All-In-One Cheese Corn Shop Model No. 2703-00-000 10700 Medallion Drive, Cincinnati, Ohio 45241-4807 USA 2017 Gold Medal Products Co. Part No. 110028 SAFETY PRECAUTIONS
OPERATOR MANUAL IMPORTANT INFORMATION KEEP FOR OPERATOR IMPORTANT INFORMATION
 IMPORTANT INFORMATION KEEP FOR OPERATOR IMPORTANT INFORMATION OPERATOR MANUAL Part Number 142253 Rev. C OM-HY-12G/24G DOMESTIC Model: HY-12GF, HY-24GF HyCapacity HyPerSteam Atmospheric Convection Steamer
TM... TECHNICAL MANUAL. Fryer, Deep-Fat, Electric w/solid State Controls NSN:
 TM... TECHNICAL MANUAL MODEL USN-50 150F-440VMN DESCRIPTION Fryer, Deep-Fat, Electric w/solid State Controls 440 Volt, 60 HZ, 3 Phase NSN: Star Manufacturing International 10 Sunnen Drive St. Louis, MO.63143-3800
5-Gallon Pail Mixer OWNERS MANUAL M-2000 SERIES MIXERS. Contents: Page: Safety, General & Receiving... 2 Operation... 3 Parts List...
 5-Gallon Pail Mixer OWNERS MANUAL M-2000 SERIES MIXERS Contents: Page: Safety, General & Receiving.... 2 Operation...... 3 Parts List...... 4 Warranty Our products are guaranteed against defective materials
DUAL VOLTAGE REFRIGERATORS 220/240 VOLTS AC AND 12/24 VOLTS DC INSTALLATION AND OWNER S MANUAL
 DUAL VOLTAGE REFRIGERATORS 220/240 VOLTS AC AND 12/24 VOLTS DC INSTALLATION AND OWNER S MANUAL Service Information If service or parts are required, contact the nearest Norcold Service Center. To find
55-Gallon Dispenser Package
 INSTRUCTIONS-PARTS LIST INSTRUCTIONS This manual contains important warnings and information. READ AND KEEP FOR REFERENCE. 308 666 Rev. A Husky 715 55-Gallon Dispenser Package 100 psi (6.9 bar) Maximum
Instruction Manual. Double Candy Apple Cooker
 Instruction Manual Double Candy Apple Cooker Model No. 4416 10700 Medallion Drive, Cincinnati, Ohio 45241-4807 USA 2014 Gold Medal Products Co. Part No. 46841 SAFETY PRECAUTIONS DANGER Machine must be
WET/DRY VACUUM. QUEST for Continuous Improvement Windsor s Quality Management System is Certified ISO MODEL: T1. Operating Instructions (ENG)
") WET/DRY VACUUM Operating Instructions (ENG) MODEL: T1 y QUEST for Continuous Improvement Windsor s Quality Management System is Certified ISO 9001. Read these instructions before operating the machine.
WET/DRY VACUUM Operating Instructions (ENG) MODEL: T1 y QUEST for Continuous Improvement Windsor s Quality Management System is Certified ISO 9001. Read these instructions before operating the machine.
KPT/KLT-DS Series DIRECT STEAM TILTING FLOOR KETTLE INSTALLATION - OPERATION - MAINTENANCE
 KPT/KLT-DS Series DIRECT STEAM TILTING FLOOR KETTLE INSTALLATION - OPERATION - MAINTENANCE BLODGETT OVEN COMPANY www.blodgett.com 44 Lakeside Avenue, Burlington, Vermont 05401 USA Manufacture Service Questions:
OPERATOR MANUAL Part Number
 IMPORTANT INFORMATION KEEP FOR OPERATOR OPERATOR OPERATOR MANUAL MANUAL Part Number 148667 Rev. D Part Number 148667 IMPORTANT INFORMATION OM-HY-12E/24E DOMESTIC Model: HY-12E and HY-24E HyCapacity HyPerSteam
B.I.C.A Built-In Coffee Appliance
 B.I.C.A Built-In Coffee Appliance Automatic Coffee Brewer Parts & Service Models: 1033510, 1033510S & 1033511 3828 S. Main St. Los Angeles, CA 90037-1491 800-421-6860 310-787-5444 Fax 310-787-5412 e-mail:
VENTLESS EXHAUST HOOD OPERATORS MANUAL AND PARTS LIST REV. MAY 2016
 VENTLESS EXHAUST HOOD OPERATORS MANUAL AND PARTS LIST REV. MAY 2016 HOODMART 172 REASER COURT ELYRIA, OH 44035 PHONE: (800)-715-1014 FAX: (800)-716-1214 1 THIS PAGE LEFT BLANK INTERNTIONALLY 2 LIMITED
KARMEL KING Instruction Manual Models: 2620 & 2621 (240 Volt) 2630 & 2631 (208 Volt) Part No Revised: February 2009
 2630 & 2631 (208 Volt) Part No Revised: February 2009") KARMEL KING Instruction Manual Models: 2620 & 2621 (240 Volt) 2630 & 2631 (208 Volt) Part No. 18736 Revised: February 2009 SAFETY PRECAUTIONS Mark 10, Karmel King (20 Gallon), and 2622 Rolling Truck Left
KARMEL KING Instruction Manual Models: 2620 & 2621 (240 Volt) 2630 & 2631 (208 Volt) Part No. 18736 Revised: February 2009 SAFETY PRECAUTIONS Mark 10, Karmel King (20 Gallon), and 2622 Rolling Truck Left
Operator s Manual Gelato Maker model VB 1
 Operator s Manual Gelato Maker model VB Section : Introduction 2INTRODUCTION Section : Introduction This manual is divided into the following six sections: INTRODUCTION A Parts of the Machine 5 B Specifications
Owner s Guide Installation & Operation
 Owner s Guide Installation & Operation Hot Top HHT Series Hestan Commercial Corporation 3375 E. La Palma Ave Anaheim, CA 92806 (888) 905-7463 RETAIN THIS MANUAL FOR FUTURE REFERENCE P/N 002130 REV 1 IMPORTANT
important information i keep for operator i important information
 important information i keep for operator i important information operator manual om-ssb-3g/5g/10gf Part Number 145144 Rev. D models: ssb-3g/5g/10gf, (2)ssb-3g/5g/10gf SmartSteam Boilerless Steamer Self-Contained
FLCH4R Garage and Utility Electric Heater
 FLCH4R Garage and Utility Electric Heater Installation, Operation & Maintenance Instructions Model No. Volts Amps Watts BTU/HR Phase High Low High Low High Low Min Fuse Size* FLCH4R 208 17.3 8.66 3600
OPERATION, SERVICE & PARTS MANUAL
 OPERATION, SERVICE & PARTS MANUAL BROASTER 620NXP & 621 EASY BREADER Be sure ALL installers read, understand, and have access to this manual at all times. MODEL 620NXP MODEL 621 Genuine Broaster Chicken,
Instruction Manual. Dogeroo, Super Dogeroo, and Mini Dogeroo
 Instruction Manual Dogeroo, Super Dogeroo, and Mini Dogeroo Model No. 8102, 8103, 8108 10700 Medallion Drive, Cincinnati, Ohio 45241-4807 USA Part No. 87793 SAFETY PRECAUTIONS Page 2 INSTALLATION INSTRUCTIONS
R Series B & T2 Model
 FRONT R Series B & T2 Model Fan Forced Wall Heaters 4-1/4 (108mm) NOTE: Knockouts in top same dimensions 3-1/4 3-1/4 (108mm) (108mm) as bottom 16-7/8 (429mm) 13-7/8 (352mm) BOTTOM 13-7/8 (352mm) 7-3/4
Pump Out Vacuums Polyethylene & Steel
 Pump Out Vacuums Polyethylene & Steel Operations and Parts Manual 110 volt receptacle on single motor only Models: 415P-AD 429P-AD 415DS IMPORTANT SAFETY INSTRUCTIONS When using an electrical appliance,
important information i keep for operator i important information
 important information i keep for operator i important information Operator OPERATOR Manual MANUAL Part Number 148666 Rev. D Part Number 148666 Rev. B OM-HY-5E/HY-3E DOMESTIC MODELS: HY-3E,(2)HY-3E, HY-5E,
MODELS SSB-3E/5E/10E & (2)SSB-3E/5E/10E Domestic SMARTSTEAM100 BOILERLESS STEAMER
SSB-3E/5E/10E Domestic SMARTSTEAM100 BOILERLESS STEAMER") OPERATOR MANUAL IMPORTANT INFORMATION, KEEP FOR OPERATOR This manual provides information for: MODELS SSB-3E/5E/10E & (2)SSB-3E/5E/10E Domestic SMARTSTEAM100 BOILERLESS STEAMER Self Contained Electric
OPERATOR MANUAL IMPORTANT INFORMATION, KEEP FOR OPERATOR This manual provides information for: MODELS SSB-3E/5E/10E & (2)SSB-3E/5E/10E Domestic SMARTSTEAM100 BOILERLESS STEAMER Self Contained Electric
PRACTICAL USER S GUIDE FOR THE ELECTRIC STOVE
 PRACTICAL USER S GUIDE FOR THE ELECTRIC STOVE MODEL NUMBERS: 23 Electric Stove Quality checked by: Valued Customer, We are pleased that you have chosen to purchase an electric stove manufactured by Dimplex
CL & CLG Clamp Mount Mixers
 CL & CLG Clamp Mount Mixers CL / CLG Series OWNERS MANUAL Warranty Our products are guaranteed against defective materials and workmanship, we will repair or replace such items as may prove defective at
OPERATION, SERVICE & PARTS MANUAL
 OPERATION, SERVICE & PARTS MANUAL BROASTER 620N & 621 EASY BREADER Be sure ALL installers read, understand, and have access to this manual at all times. MODEL 620N MODEL 621 Genuine Broaster Chicken, Broasted,
I N ST R UC T I ON HCM450 CUTTER MIXER MODEL. FORM (Apr. 2002) S. RIDGE AVENUE TROY, OHIO
 S. RIDGE AVENUE TROY, OHIO") I N ST R UC T I ON S HCM450 CUTTER MIXER MODEL HCM450 ML-134170 701 S. RIDGE AVENUE TROY, OHIO 45374-0001 937 332-3000 www.hobartcorp.com FORM 34772 (Apr. 2002) Installation, Operation and Care of Model
I N ST R UC T I ON S HCM450 CUTTER MIXER MODEL HCM450 ML-134170 701 S. RIDGE AVENUE TROY, OHIO 45374-0001 937 332-3000 www.hobartcorp.com FORM 34772 (Apr. 2002) Installation, Operation and Care of Model
IMPORTANT SAFETY INFORMATION:
 Owner s Manual Models CS4416 CS3311 CS2307 CS3311 Pictured IMPORTANT SAFETY INFORMATION: Always read this manual first before attempting to install or use this stove. For your safety, always comply with
MC MC MC MC MC833130
 Pic-A-Vac Model: MC832085 MC833085 MC832105 MC833105 MC832130 MC833130 OPERATION SERVICE PARTS CARE Revised 8/01 FOR COMMERCIAL USE ONLY IMPORTANT SAFETY INSTRUCTIONS When using an electrical appliance,
INSTALLATION & OPERATION MANUAL
 CHIP WARMERS MODELS: 500-CW 700-CW 500-CW-EX (New 2014) 700-CW-EX (New 2014) INSTALLATION & OPERATION MANUAL For additional information on WITTCO or to locate an authorized parts and service provider in
TURBO Fiberglass Cone Fan and Grill Fan 48'' Belt Drive. Installation & Operator s Instruction Manual
 TURBO Fiberglass Cone Fan and Grill Fan 48'' Belt Drive Installation & Operator s Instruction Manual July 1998 MV1383B Chore-Time TURBO TM Fan Extended Warranty Chore-Time Equipment warrants new TURBO
Service Manual Electric Cooktop
 Service Manual Electric Cooktop 318 202 105 (0311) THIS IS A BLANK PAGE Table of Contents I SAFE SERVICING PRACTICES... 1 PRODUCT FEATURES... 2 WIRING DIAGRAM... 3 SECTION A - INSTALLATION... 4 CUT-OUT
OWNER'S MANUAL IMPORTANT: READ OWNER'S MANUAL CAREFULLY MODEL : CHEETAH DC2000 FOR YOUR CONVENIENCE, RECORD THE FOLLOWING IMPORTANT INFORMATION MODEL:
 OWNER'S MANUAL IMPORTANT: READ OWNER'S MANUAL CAREFULLY MODEL : CHEETAH DC2000 FOR YOUR CONVENIENCE, RECORD THE FOLLOWING IMPORTANT INFORMATION MODEL: SERIAL NUMBER:-------- DATE PURCHASED: PURCHASED FROM:
Disposal Unit (BKSDU) Burger King Shortening. Operation, Service & Parts Manual BURGER KING BKSDU
 Burger King Shortening. Operation, Service & Parts Manual BURGER KING BKSDU") BURGER KING BKSDU Burger King Shortening Disposal Unit (BKSDU) Operation, Service & Parts Manual Frymaster, a member of the Commercial Food Equipment Service Association, recommends using CFESA Certified
BURGER KING BKSDU Burger King Shortening Disposal Unit (BKSDU) Operation, Service & Parts Manual Frymaster, a member of the Commercial Food Equipment Service Association, recommends using CFESA Certified
Professional Warming Drawer and Warming Drawer Cabinet
 Professional Warming Drawer and Warming Drawer Cabinet Care & Use/Installation Instructions Models: (C)VQEWD5300SS (C)VQEWD5420SS IMPORTANT SAFETY INSTRUCTIONS WARNING: Read this manual carefully and completely
MRS-6 Maxi-Guard II. Model: C , 12, 13, 14 OPERATION SERVICE PARTS CARE. Revised 2/02
 MRS-6 Maxi-Guard II Model: C86006-11, 12, 13, 14 OPERATION SERVICE PARTS CARE Revised 2/02 OPERATING INSTRUCTIONS INSPECTION Carefully unpack and inspect your machine for shipping damage. Each unit is
Installation. Operation. Maintenance LA 36 Deck Oven
 Installation Operation Maintenance LA 36 Deck Oven Lang Manufacturing Company 6500 Merrill Creek Parkway Everett, WA 98203 Part Number: 60804-01 Phone: 425-349-2400 Fax: 425-349-2483 03/30/00 TABLE OF
The Extraordinaire OWNER S MANUAL. Orbital Ceiling Fan. Model No. OF110** READ AND SAVE THESE INSTRUCTIONS. Net Weight 14.5 lbs. or 6.59 kg.
 The Extraordinaire Orbital Fan WARNING: Support Directly From Building Structure Net Weight 14.5 lbs. or 6.59 kg. Model No. OF110** OWNER S MANUAL READ AND SAVE THESE INSTRUCTIONS Important Safety Instructions
CRV Clean Room Vacuum
 CRV Clean Room Vacuum Model: C80704-01, 02 SS (115V) C80704-03, 04 Painted (115V) C80704-07, 12 Painted (240V) C80704-08, 09 SS (240V) OPERATION SERVICE PARTS CARE Revised 7/02 FOR COMMERCIAL USE ONLY
INSTALLATION and OPERATION MANUAL DIRECT STEAM KETTLES MOUNTED ON ELECTRIC BOILER BASE CABINET MODELS: EMT-6 EMT-10 EMT-12 EMT-6-6 EMT-10-6 EMT-10-10
 INSTALLATION and OPERATION MANUAL DIRECT STEAM KETTLES MOUNTED ON ELECTRIC BOILER BASE CABINET MODELS: EMT-6 EMT-10 EMT-12 EMT-6-6 EMT-10-6 EMT-10-10 CROWN FOOD SERVICE EQUIPMENT LTD. 70 OAKDALE ROAD,
OPERATION MANUAL COUNTERTOP ELECTRIC CHAR BROILERS. for. Models: B-40 B-44 B-50. includes: INSTALLATION, USE and CARE
 WELLS BLOOMFIELD, LLC 2 ERIK CIRCLE, P. O. Box 280 Verdi, NV 89439 telephone: 775-689-5703 fax: 775-689-5976 www.wellsbloomfield.com 161 Model B-40 OPERATION MANUAL for COUNTERTOP ELECTRIC CHAR BROILERS
Canister Vacuums S6EVO. Operations and Parts Manual. Models: S6EVO
 Canister Vacuums S6EVO Operations and Parts Manual Models: S6EVO 2 IMPORTANT SAFETY INSTRUCTIONS When using an electrical appliance, basic precaution must always be followed, including the following: READ
Instruction Manual. Cheese Warmer with Pump
 Instruction Manual Cheese Warmer with Pump 10700 Medallion Drive, Cincinnati, Ohio 45241-4807 USA 2013 Gold Medal Products Co. Part No. 38298 SAFETY PRECAUTIONS Page 2 INSTALLATION INSTRUCTIONS Inspection
MODELS VRC-3E & VRC-6E Domestic VORTEX100 CONNECTIONLESS STEAMER
 OPERATOR MANUAL IMPORTANT INFORMATION, KEEP FOR OPERATOR This manual provides information for: MODELS VRC-3E & VRC-6E Domestic VORTEX100 CONNECTIONLESS STEAMER Self Contained Electric Heated Capacity:
Parts and Instruction Manual ET Extraction Tool
 Parts and Instruction Manual ET Extraction Tool This manual is furnished with each new MINUTEMAN ET Extraction Tool. This provides the necessary operating and preventive maintenance instructions. Operators
User s Manual and Operating Instructions
 User s Manual and Operating Instructions Model Numbers: PT-18W-DDF-A, PT-20F-DDF-A, PT-20S-DDF, PT-24O-DDF, PT-24-DDF, PT-24-DDF-F, PT-30-DDF, PT-30P-DDF-A, PT-30P-DDF-AF READ AND SAVE THESE INSTRUCTIONS
F Rev. C (June 2010)
") HCM450 Cutter Mixer HCM450 CUTTER MIXER MODEL HCM450 ML-134170 ML-134172 ML-134207 ML-134208 ML-134209 ML-136137 ML-136138 701 S. RIDGE AVENUE TROY, OHIO 45374-0001 937 332-3000 www.hobartcorp.com F-34772
HCM450 Cutter Mixer HCM450 CUTTER MIXER MODEL HCM450 ML-134170 ML-134172 ML-134207 ML-134208 ML-134209 ML-136137 ML-136138 701 S. RIDGE AVENUE TROY, OHIO 45374-0001 937 332-3000 www.hobartcorp.com F-34772
Instruction Manual for the Globe Mixer. Model SP8-RL
 Model #: Serial #: Model SP8-RL Instruction Manual for the Globe Mixer Model SP8-RL For Service on Your Mixer, call Globe Technical Support at 1-866-260-0522. - IMPORTANT SAFETY NOTICE - This manual contains
(The chances are you re never going to read me) Owner s Manual HEAVY DUTY SHD-1T.
 Owner s Manual HEAVY DUTY SHD-1T.") (The chances are you re never going to read me) Owner s Manual HEAVY DUTY SHD-1T www.simplicityvac.com Index Important Safety Instructions............................................................ 2
(The chances are you re never going to read me) Owner s Manual HEAVY DUTY SHD-1T www.simplicityvac.com Index Important Safety Instructions............................................................ 2
User s Manual and Operating Instructions
 User s Manual and Operating Instructions Model Numbers: CL-30P-DDF, CL-20F-DDF, CL-24O-DDF, CL-30-DDF READ AND SAVE THESE INSTRUCTIONS IMPORTANT: Read and understand all of the directions in this manual
52 SAN LUCAS CEILING FAN
 52 SAN LUCAS CEILING FAN Owner s Manual Models #20551 If a problem cannot be remedied or you are experiencing difficulty in installation, please contact the Service Department: 1-877-459-3267, 9 a.m.-
ELECTRIC FIREPLACE HEATER WITH SINGLE GLASS DOOR
 ELECTRIC FIREPLACE HEATER WITH SINGLE GLASS DOOR Model 91797 ASSEMBLY and Operating Instructions Visit our website at: http://www.harborfreight.com Read this material before using this product. Failure
SBF Series ELECTRIC CONNECTIONLESS STEAMER INSTALLATION - OPERATION - MAINTENANCE
 SBF Series ELECTRIC CONNECTIONLESS STEAMER INSTALLATION - OPERATION - MAINTENANCE BLODGETT OVEN COMPANY www.blodgett.com 44 Lakeside Avenue, Burlington, Vermont 05401 USA Manufacture Service Questions:
HI Industrial Utility Heater HI Soleus Air International
 HI1-50-03 Industrial Utility Heater HI1-50-03 2010 Soleus Air International Thank you for choosing a Soleus Air Utility Heater. This owner s manual will provide you with valuable information necessary
Single Phase Simplex SXL21=3, SXL24=3, SXH21=3, and SXH24=3
 Single Phase Simplex SXL21=3, SXL24=3, SXH21=3, and SXH24=3 Manufactured by SJE-Rhombus Installation Instructions and Operation/Troubleshooting Manual 7000 Apple Tree Avenue Bergen, New York 14416 Phone:
Model: PS-2 ProSense II Item # OPERATION SERVICE PARTS CARE
 Model: PS-2 ProSense II Item # 49001 OPERATION SERVICE PARTS CARE FOR COMMERCIAL USE ONLY IMPORTANT SAFETY INSTRUCTIONS When using an electrical appliance, basic precautions should always be followed,
WARMING AND MERCHANDISING CABINET
 WARMING AND MERCHANDISING CABINET Above red graphics now replace green graphics shown in photo. MODEL 695 (Single door unit shown) MODEL 695-S (Single door unit shown) Snack foods have to be hot and moist
MODELS NHFP & NHFP(E) BRAISING PANS
 BRAISING PANS") OPERATOR MANUAL IMPORTANT INFORMATION, KEEP FOR OPERATOR This manual provides information for: MODELS NHFP & NHFP(E) BRAISING PANS Stainless Steel Power Tilting Gas Heated THIS MANUAL MUST BE RETAINED
OPERATOR MANUAL IMPORTANT INFORMATION, KEEP FOR OPERATOR This manual provides information for: MODELS NHFP & NHFP(E) BRAISING PANS Stainless Steel Power Tilting Gas Heated THIS MANUAL MUST BE RETAINED
Hot Dog Hutch. Models HDH-3, HDH-3DR, & HDH-4 owner s manual. Manufacturing Numbers:
 Hot Dog Hutch Models HDH-3,, & HDH-4 owner s manual Manufacturing Numbers: 9300100, 9300101, 9300102, 9300104, 9300106, 9300108, 9300112, 9300116, 9300118, 9300120, 9300124, 9300125, 9300130, 9300132 www.ajantunes.com
Installation, Operation, Maintenance, & Troubleshooting Model: CLS36-440V Electric Cruise Line Salamander Serial:
 Installation, Operation, Maintenance, & Troubleshooting Model: CLS36-440V Electric Cruise Line Salamander Serial: Lang Manufacturing Company 10 Sunnen Dr, St. Louis, MO 63143 Part No: 2M-W1257, Rev. -
Operations and Parts Manual
 Canister Vacuums Hospital Vac Operations and Parts Manual Models: S9HOSPITAL 2 IMPORTANT SAFETY INSTRUCTIONS When using an electrical appliance, basic precaution must always be followed, including the
Camarillo 52 Ceiling Fan
 Owner s Manual Camarillo 52 Ceiling Fan Part # 269263, 269259, 269287 Model # 32091, 32092, 32087 Exclusively Distributed by: HD Supply Facilities Maintenance, Ltd. Atlanta, GA 30339 2017 Made in China
INSTALLATION & OPERATION MANUAL
 INSTALLATION & OPERATION MANUAL VCD & VCW SERIES CHIP WARMERS MODELS: VCD22* ML-138037 VCD44 ML-138069 VCW26 VCW46 *Formerly VCD5 VULCAN 3600 NORTH POINT BLVD. DIVISION OF ITW FOOD EQUIPMENT GROUP, LLC
Eliza 56 CEILING FAN READ AND SAVE THESE INSTRUCTIONS. FAN RATING AC 120V. 60Hz
 Eliza 56 CEILING FAN READ AND SAVE THESE INSTRUCTIONS FAN RATING AC 120V. 60Hz Please do not use any electric or battery powered tools in the assembly and installation of this or any Matthews Fan Company
Model 53 Macerator Pump Installation, Operation, Repair Manual
 Model 53 Macerator Pump Installation, Operation, Repair Manual THE FOLLOWING ARE CAUTIONARY STATEMENTS THAT MUST BE READ AND FOLLOWED DURING BOTH INSTALLATION AND OPERATION WARNING: Raritan Engineering
60In. Ceiling Fan. Owner s Manual
 60In. Ceiling Fan Owner s Manual WARNING: Read carefully and understand all ASSEMBLY AND OPERATION INSTRUCTIONS before operating. Failure to follow the safety rules and other basic safety precautions may
Dogeroo & Super Dogeroo
 Dogeroo & Super Dogeroo Instruction Manual Model #8002EX and #8003EX Part No. 87154EX Revised June 1996 Cincinnati, OH 45241-4807 USA SAFETY PRECAUTIONS This equipment is designed and sold for commercial
55-Gallon Dispenser Package
 INSTRUCTIONS-PARTS LIST Husky 515 55-Gallon Dispenser Package 08666 Rev.C INSTRUCTIONS This manual contains important warnings and information. READ AND KEEP FOR REFERENCE. 100 psi(6.9 bar) Maximum Air
FOOD WARMING/MERCHANDISING CABINET
 FOOD WARMING/MERCHANDISING CABINET MODEL 323HH (15 ) & 323HH-7 (7 ) (*Above photo shows a 15 & 7 model side by side) With the ability to hold a point-of-purchase advertisement, these sleek, compact warmers
Your electrician must furnish sufficient voltage levels, and current for proper operation of your machine. We recommend this machine be on a
 Table of Contents I. Safety Precautions..3 II. Installation Instructions...4 III. Operating Instructions..5 IV. Maintenance and Cleaning Instructions..... 6-7 V. System Parts Location Guide..8-11 VI. Ordering
OPERATIONS MAINTENANCE MANUAL
 OPERATIONS MAINTENANCE MANUAL COOK & HOLD OVEN SYSTEMS WITTCO MODEL NUMBERS 1300-AD-SS 1300-AD-SS-SPLIT LIMITED WARRANTY Wittco warrants the Products that it manufactures to be free from defects in materials
16 Stand Fan with Remote Control Model No: FS3-40R-30
 16 Stand Fan with Remote Control Model No: FS3-40R-30 FEATURES Remote Control 3 Speed Settings 4 Hour Auto-off Timer Oscillation LED Display Panel Adjustable Height Adjustable Tilt Head Whisper Quiet Operation
48 TAYLOR CEILING FAN
 48 TAYLOR CEILING FAN Owner s Manual Models #20554 If a problem cannot be remedied or you are experiencing difficulty in installation, please contact the Service Department: 1-877-459-3267, 9 a.m.- 5 p.m.