Modernist Warming Drawer
|
|
|
- August Pierce
- 5 years ago
- Views:
Transcription
1 Modernist Warming Drawer DWR30M977WS, DWR30M977WM Installation Instructions Part No Rev B
2 Contents Before you begin... 3 Important 3 Contents Customer-service information 4 If You Need Help... 4 Important safety instructions 5 Related equipment safety 5 Important information about safety instructions 5 Installation requirements 8 Checklist 8 Prepare to install drawer 9 Installation planning 9 Warming drawer dimension 10 Installation instructions 14 Install support platform in cabinet 14 Electrical connection 15 Remove and reinstall drawer 17 Verify warming drawer operation 20 2 English

3 Before you begin... Important Installer In the interest of safety and to minimize problems, read these installation instructions completely and carefully before you begin the installation process. Leave these installation instructions with the customer. Customer Keep these installation instructions for future reference and the local electrical inspector s use. Before you begin... English 3
4 Customer-service information Customer-service information If You Need Help... For answers to general questions or installation issues, call your Dacor dealer or Dacor Customer Service. For repairs to Dacor appliances under warranty, call the Dacor Distinctive Service line. Before calling, have available the appliance's model and serial numbers, which are on the Product Data Label (drawer front, interior side). Dacor Modernist Service (repairs under warranty only) Phone: (800) ex (USA, Canada) Mon Fri, 6:00 a.m. to 4:00 p.m. Pacific Time Dacor Customer Service Phone: (800) ex (USA, Canada) Mon Fri, 6:00 a.m. to 5:00 p.m. Pacific Time Website: Specifications may be changed without notice. Dacor assumes no liability for such changes Dacor. All rights reserved. 4 English
5 Important safety instructions Related equipment safety Remove all tape and packaging before using the unit. Dispose of the packaging after unpacking the unit. Never let children play with packaging material. Never alter the the appliance (e.g., do not remove panels, wire covers, or screws). DANGER ELECTRICAL SHOCK HAZARD To avoid risk of electrical shock, personal injury or death; verify your appliance has been properly grounded in accordance with local codes or in absence of codes, with the National Electrical Code (NEC). ANSI/NFPA 70-latest edition. WARNING MOVING HAZARD To avoid risk of severe personal injury, this appliance should be moved by two or more people. Transport by appliance dolly is recommended. Important information about safety instructions The Important Safety Instructions and warnings in these instructions are not meant to cover all potential issues. Use common sense when installing, maintaining, and operating this appliance. Always contact the Dacor Customer Service Team about problems and conditions that you do not understand. Important safety instructions English 5
6 Important safety instructions Important safety instructions To reduce risk of fire, electric shock, serious injury or death when using your appliance, follow basic precautions, including the following: WARNING Clean the warming drawer thoroughly before operating it for the first time. Do not use harsh scrubbers, cleaners, or detergents, which may permanently mar the unit's finish. Do not use aerosol cleaners, which may be flammable and corrode metal. Use the warming drawer only as instructed in this manual: to warm food, dishes, and utensils. The drawer is not designed for commercial, industrial, or laboratory use. Do not install or operate a damaged or malfunctioning unit. Take such an appliance to the nearest authorized servicer for repair or replacement. Do not repair or replace any part of the warming drawer unless as instructed in the accompanying literature. All other service should be done by a qualified technician. Use unauthorized accessories may cause injuries and damage the drawer. DO NOT TOUCH THE UNIT ANYWHERE DURING OR DIRECTLY AFTER USE. Let the unit cool before touching it. (Heating elements may still be hot, though they have darkened in color.) Keep clothing (especially loose/hanging clothing), potholders, towels, and rags away from all warming drawer surfaces during and directly after use. Do not use combustible materials in the warming drawer. When opening the drawer while the unit is in use, let hot air and steam escape before looking or reaching inside. Use only dry pot holders to remove items from the drawer. Do not heat such items as whole eggs or sealed containers, which may burst and possibly cause personal and property damage. When operating in Continuous mode ( ), the drawer must be turned off manually. Do not place more than 50 total pounds (cookware, food) in the drawer. Clean and maintain the unit regularly as instructed in the User Manual. Clean only those parts listed, in the manner specified. 6 English
7 Ensure that anyone who uses the unit knows how to operate it properly. Do not tamper with the controls. Never let anyone sit, stand, or climb on the open drawer. Do not leave children unattended near the unit. Do not let children play with the controls or other components. Do not store items of interest to children above the drawer. DANGER Ensure the unit is properly installed and grounded by a qualified installer as instructed in this manual. Have the installer show you the outlet so you know where to disconnect power to the unit. Before cleaning or service, unplug the drawer, and wait for it to cool. If items in the unit ignite, leave the drawer closed, and shut off power at the circuit-breaker panel or fuse box. Important safety instructions English 7
8 Installation requirements Checklist WARNING To ensure proper installation, the installer should complete this checklist. The owner shall verify proper installation, the importance of which cannot be overstated. Was the mounting platform installed as instructed Was a properly grounded, dedicated, three-prong outlet installed for the appliance by a licensed electrician? Was the drawer properly installed? Was proper function verified? Was the warranty activated online or the warranty card completed and mailed? Installation requirements 8 English
9 Necessary Tools Phillips Screwdriver Drill Verifying Package Contents The items in this section are provided with the warming drawer. If these items are not with the unit, contact your Dacor Service Center or Dacor Customer Service (pg. 4). 7 mounting screws (PN83569) Half Shelf (PN110346) Product Literature (Installation and User Guides, Planning Guide Installation planning A qualified technician must install the unit. The owner shall verify proper installation. Carefully review the unit's installation site. Access should be convenient. Verify that electrical power can be provided. Install the warming drawer in wood cabinets only. All minimum clearances must be met or exceeded. Dimensions show minimum clearances unless otherwise noted. Ensure the drawer can be opened fully unhindered. The specified minimum cabinet depth and width must be provided and must completely enclose the recessed portion of the appliance. Follow the cabinet cutout dimensions (pg. 12). All contact points between the unit and cabinet must be solid and level. The support platform and cutout opening must be flush. Gather all equipment needed for proper installation before beginning. Installation requirements English 9
 Installation requirements Model No.")
 (B) Chassis Width 27 7/8\" (70.8 cm) (C) Chassis Depth 22 7/8\" (57.")
10 Installation requirements Warming drawer dimensions Overall dimensions (top view) Chassis (drawer removed) Installation requirements Model No. DWR30M977WS DWR30M977WM (A) Chassis Face Width 29 5/8" (75.2 cm) (B) Chassis Width 27 7/8" (70.8 cm) (C) Chassis Depth 22 7/8" (57.7 cm) (D) Drawer Depth 20" (58.1 cm) (E) Chassis Height (with feet) 9 3/4" (24.8 cm) 10 English
11 Drawer and Chassis dimensions 10" (25.5 cm) 29 3/4" (75.6 cm) 1 3/8 (3.5 cm) 10 1/4" (26.0 cm) 1 3/8 (3.5 cm) Installation requirements 1 13/16" (4.6 cm) English 11
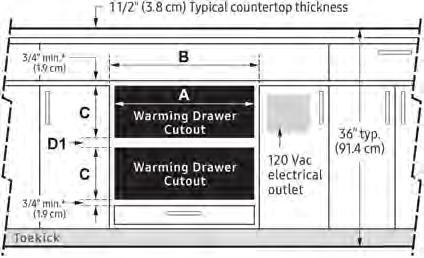
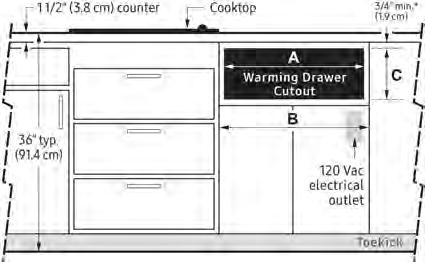
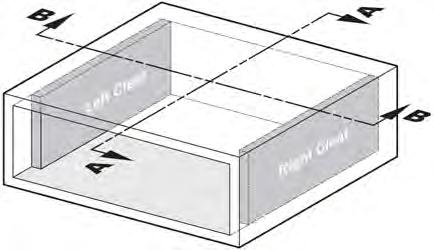
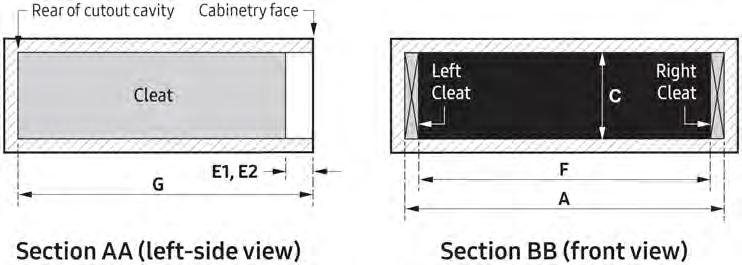

12 Installation requirements Cutout & Cleat dimensions Installation requirements 12 English
13 Model No. DWR30M977WS DWR30M977WM (A) Cut out Width 30 1/4 (76.8 cm) (B) Min. Width to Adjacent Doors/ Drawer 30 1/4 (76.8 cm) (C) Cutout Height 10 1/2 (26.7 cm) (D1) Min. Vertical Gap Between Warming Drawer cutouts 1 ¼ (3.2 cm) (D2) Min. Vertical Gap Between Dacor Wall Oven 1 ½ (3.8 cm) (E1)+ Flush to Drawer Front 1 1/8 (2.9 cm) (E2)++ Flush to Cabinet Frame 1 13/16" (4.6 cm) (F) Min. Width Inside Cleats 28" (71.0 cm) (G) Min. Cutout Depth 24" (61.0 cm) for E1; 24 3/4" (62.9 cm) for E2 + Dimension with 11/16 in. (1.75 cm) appliance face to cabinet frame face; adjust (E1) depth for a different cabinet drawer thickness. ++Requires the cabinet depth dimension G to be 24 3/4 (62.9 cm) Installation requirements English 13
 There is no way to level the warming drawer after installation. 3/4 (1.9 cm) thick plywood is recommended.")

14 Installation instructions Install support platform in cabinet Provide a platform (100 lb. load capacity) within the cabinet to support the unit. The platform must be installed level and straight. The platform must be flush with the cutout at the front of the cabinet. (See the graphic.) There is no way to level the warming drawer after installation. 3/4 (1.9 cm) thick plywood is recommended. NOTE If the unit is not installed level, the drawer may slide open on its own or may not seal tightly, causing inefficient performance. Securing the Warming drawer to the cabinet 1. Insert the unit in the cutout until the back of the faceplate stops at the cleats. 2. Keeping the chassis centered side to side, attach inner cabinet side screws starting with mounting hole #1 through mounting Hole #7. (See the graphic below.) 3. Re-install the warming drawer. Installation instructions 14 English
15 Electrical connection WARNING Electrical Shock Hazard IMPORTANT: The unit has a three-prong, grounding plug to prevent possible electric shock. If a two-prong electrical outlet is available, the owner must have it replaced with a dedicated, properly grounded, three-prong electrical outlet. To avoid an electric shock hazard, DO NOT: remove the cord's third (ground) prong. use an adapter plug. use a worn/damaged cord. immerse the cord or plug in liquid. Connect the appliance to an extension cord. NOTE You should not use a ground fault interrupter (GFI). Three-prong plug Three-prong grounded outlet Minimum ambient operating temperature: 32 F (0 C). The correct voltage, frequency, and amperage (see the product data label, interior drawer face) must be supplied to the outlet from a grounded, singlephase circuit protected by a properly sized circuit breaker or time-delay fuse. The power-supply requirements on pg. 16 are for reference only. If they do not agree with those on the data label, follow the data on the label. Installation instructions English 15
16 Installation instructions Nominal Electrical Supply Requirements 120 Vac, 60 Hz, 15 Amp., dedicated circuit The warming drawer is supplied with a 40 (101.6 cm) power cord with a three-prong grounded plug. Total Connected Load 0.5 kw (4 Amp.) The owner shall ensure that a qualified electrician performs the installation, which must comply with the latest revision of the National Electric Code ANSI/NFPA 70, and local codes and ordinances. If the home's electrical service does not meet product specifications or does not conform to the NEC or local standards, do not proceed until a licensed electrician has upgraded the electrical service. Ensure the electrical outlet is easily accessible so the warming drawer may be unplugged for service. Keep the power cord away from hot surfaces. Installation instructions 16 English
17 Remove and re-install drawer WARNING To avoid personal injury caused by the unit being pulled from its cutout when the drawer is opened, secure the chassis to the cabinet as instructed. (See pg. 14.) The unit should be secured to the cabinet cutout while the drawer out of the unit. Unplug the unit before removing the drawer. Disconnect the Control wire harness Remove one screw from the clamp, locate the control wire harness, and disconnect it before removing the drawer. Installation instructions English 17
18 Installation instructions Remove the drawer from the appliance 1. Open the drawer fully, and remove the clamp screw. 2. Pull out the clamp, and detach the connector. Connector 3. Remove the screw from the Drawer (both sides, near the front. 4. Remove the drawer. Installation instructions 18 English
19 Re-installing the drawer 1. Extend both rails, and pull out the cable (right side) so the connector hangs outside the frame. Put the drawer on both rails, and slide it in until it engages under the rails' rear clips. Clip on slide Slide 2. Fasten the screws on both sides. 3. Re-attach the connector. Connector 4. With the cable under the cable cover, insert the clamp through the square hole, and fasten the screw. Installation instructions English 19
20 Installation instructions Verify warming drawer operation 1. Plug in the unit. 2. Open the drawer, and press POWER on the control panel. 3. (Temperature section) One after the other, press Bread Proof, Low, Med, and High. As you press each function, the indicator above it should light. 4. Leave the control panel set to High. 5. (Duration section) Press -, +, and +1hr. Verify that the timer display is correct. 6. Within 5 10 minutes, you should feel heat from the drawer interior. 7. Having determined that the heating element works, press POWER to shut off the unit. If the unit does not operate properly, verify that the circuit breaker is on and the unit is plugged in, then repeat the above procedure. If the unit still does not work, contact an authorized Dacor servicer: (800) Do not try to repair the unit yourself. Dacor is not responsible for service required to correct a faulty installation. Installation instructions 20 English
21 MEMO
22 MEMO
23 MEMO
24 Dacor Clark Avenue, City of Industry, CA Phone: (800) Fax: (626)
Installation Instructions. Warming Drawer
 Warming Drawer Models: Installation Instructions ERWD30, EWD24, EWD27, EWD30, EWD36, IWD24, IWD27, IWD30, MRWD27, MRWD30, MWDH27, MWDH30, MWDV27, MWDV30, OWD24, PWD27, PWD30 Part No. 102345 Rev. N All
Installation Instructions. Warming Drawer. Preliminary - For Review Only
 Warming Drawer Models: Installation Instructions DWD30, ERWD27, ERWD30, EWD24, EWD27, EWD30, EWD36, IWD24, IWD27, IWD30, MRWD27, MRWD30, MWDH27, MWDH30, MWDV27, MWDV30, OWD24, RWDV30 Preliminary - For
Installation Instructions. Warming Drawer
 Warming Drawer Models: Installation Instructions ERWD30, EWD24, EWD27, EWD30, EWD36, IWD24, IWD27, IWD30, MRWD27, MRWD30, MWDH27, MWDH30, MWDV27, MWDV30, OWD24, PWD27, PWD30 Part No. 102345 Rev. J All
Installation Instructions. Warming Drawer. Models: EWD24, EWD27, EWD30, EWD36, IWD24, IWD27, IWD30, MWDV27, MWDH27, MWDV30, MWDH30 PWD27, PWD30
 Warming Drawer Models: EWD24, EWD27, EWD30, EWD36, IWD24, IWD27, IWD30, MWDV27, MWDH27, MWDV30, MWDH30 PWD27, PWD30 Installation Instructions Part No. 102345 Rev. All specifications are subject to change
Ins t a l l a t i o n In s t r u c t i o n s Wa r m i n g Ov e n For use with models: EW, EWO MW, MWO PW, PWO IWO, IOWO
 Ins t a l l a t i o n In s t r u c t i o n s Wa r m i n g Ov e n For use with models: EW, EWO MW, MWO PW, PWO IWO, IOWO Part No. 65034 Rev. K Important Safety Instructions...1 Design Specifications...2-3
Installation Instructions Built-In Wine Coolers, Beverage Centers
 Installation Instructions Built-In Wine Coolers, Beverage Centers For use with models: EF24LBCSS, EF24LWCZ1SS, EF24LWCZ2SS, EF24RBCSS, EF24RWCZ1SS, EF24RWCZ2SS Part No. 100961 Rev. C 7081 621-01 Important
Installation Instructions Outdoor Refrigerator
 Installation Instructions Outdoor Refrigerator For use with models: OF24LS, OF24RS Part No. 103609 Rev. C All specifications subject to change without notice. Dacor assumes no liability for changes to
Installation Instructions Induction Cooktop
 Installation Instructions Induction Cooktop Models: RNCT304 and RNCT365 Part No. 107240 Rev. A Table of Contents Important Safety Instructions... 1 Important Information About Safety Instructions... 1
Installation Instructions. Discovery Wall Oven. EO, MOH and MOV Series. Part No Rev. M
 Discovery Wall Oven EO, MOH and MOV Series Installation Instructions Part No. 65433 Rev. M All specifications are subject to change without notice. Dacor assumes no liability for changes to specifications.
Installation Instructions Wall Ovens
 Installation Instructions Wall Ovens TESTED IN ACCORDANCE WITH THE LATEST EDITION OF UL858 STANDARD FOR HOUSEHOLD ELECTRIC COOKING APPLIANCES. IMPORTANT 1. Before beginning installation, please thoroughly
Integrated Ventilation System
 Integrated Ventilation System For use with models: IVS1, IVSR1, IVS2, IVSR2 Installation Instructions Part No. 65278 Rev. K Table of Contents Important Safety Instructions... 1 Important Information About
Installation Instructions Remote Blowers
 Installation Instructions Remote Blowers Models: REMP3, REMP16 Suitable for use in a household cooking area. Suitable for use with solid state controls. To complete this blower, a Dacor hood assembly or
Downdraft Raised Vent
 Downdraft Raised Vent Model ERV3615 Installation Instructions Use these downdraft raised vents only with approved Dacor appliances. See the installation instructions for the particular appliance model
Installation Instructions Preference. Cooktop. Models: SGM304, SGM365, SGM466. Part No Rev. K
 Installation Instructions Preference Cooktop Models: SGM304, SGM365, SGM466 Part No. 65141 Rev. K Table of Contents Important Safety Instructions... 1 Important Information About Safety Instructions...
ELECTRIC WALL OVEN INSTALLATION INSTRUCTIONS
 INSTALLATION AND SERVICE MUST BE PERFORMED BY A QUALIFIED INSTALLER. IMPORTANT: SAVE FOR LOCAL ELECTRICAL INSPECTOR'S USE. READ AND SAVE THESE INSTRUCTIONS FOR FUTURE REFERENCE. FOR YOUR SAFETY: Do not
Integrated Hood Liner
 Integrated Hood Liner Covers models IHL30, IHL36, IHL42, IHL48 and IHL54 Installation Instructions Part No. 65268 Rev. F 2007 Dacor, all rights reserved. Table of Contents Before You Begin... 1 Important
Installation Instructions Millennia Cooktops
 Installation Instructions Millennia Cooktops TESTED IN ACCORDANCE WITH THE LATEST EDITION OF ANSI Z21.1 STANDARD FOR HOUSEHOLD COOKING APPLIANCES. IMPORTANT WARNINGS: IMPORTANT: NOTES: 1. Before beginning
Installation Instructions Preference Wall Mount Range Hood
 Installation Instructions Preference Wall Mount Range Hood For use with models PHW30 and PHW36 Part No. 101745 Rev. D Table of Contents Important Safety Instructions... 1 Important Information About Safety
Installation Instructions Distinctive. Series Cooktop. Models DCT305, DCT365. Part No Rev. L
 Installation Instructions Distinctive Series Cooktop Models DCT305, DCT365 Part No. 106927 Rev. L Table of Contents Important Safety Instructions... 1 Important Information About Safety Instructions...
Installation Instructions. Discovery Wall Oven. Preliminary - For Review Only No Scheduled Release Date. For use with models EO, MO and PO
 Discovery Wall Oven For use with models EO, MO and PO Installation Instructions Preliminary - For Review Only No Scheduled Release Date Part No. 65433 Rev. H All specifications are subject to change without
Installation Instructions Renaissance Built-in Dishwasher
 Installation Instructions Renaissance Built-in Dishwasher Models RDW24S and RDW24I Part No. 105671 Rev. D Table of Contents Important Safety Instructions... 1 About Safety Instructions...1 Safety Symbols
GAS COOKTOP INSTALLATION INSTRUCTIONS
 INSTALLATION AND SERVICE MUST BE PERFORMED BY A QUALIFIED INSTALLER. IMPORTANT: SAVE FOR LOCAL ELECTRICAL INSPECTOR'S USE. READ AND SAVE THESE INSTRUCTIONS FOR FUTURE REFERENCE. WARNING If the information
Installation Instructions. Discovery Wall Oven. Preliminary - For Review Only No Scheduled Release Date. For use with models: EO, MO and PO
 Discovery Wall Oven For use with models: EO, MO and PO Installation Instructions Preliminary - For Review Only No Scheduled Release Date Part No. 65433 Rev. G All specifications are subject to change without
For use with models: PGM304-1, versions M-B PGM365-1, versions M-E, M-F & M-G
 PGM-1 Cooktops For use with models: PGM304-1, versions M-B PGM365-1, versions M-E, M-F & M-G Install ation Instructions Part No. 65476 Rev. B Table of Contents Appliance Safety...1 Important Safety Instructions...2
Installation Instructions. Millennia Island (Ceiling Mount) Range Hoods. Models: DHI361, DHI421, DHI482 and DHI542
 Range Hoods. Models: DHI361, DHI421, DHI482 and DHI542") Millennia Island (Ceiling Mount) Range Hoods Models: DHI361, DHI421, DHI482 and DHI542 Installation Instructions Approved for use with all dacor ranges and cooktops. IMPORTANT: INSTALLATION OF THIS HOOD
Millennia Island (Ceiling Mount) Range Hoods Models: DHI361, DHI421, DHI482 and DHI542 Installation Instructions Approved for use with all dacor ranges and cooktops. IMPORTANT: INSTALLATION OF THIS HOOD
Advantium TM. Built-In. Speedcook Ovens. Installation. Instructions
 Advantium TM Built-In Speedcook Ovens Installation Instructions SCB2000, SCB2001 ZSC2000, ZSC2001 Before you begin Read these instructions completely and carefully. IMPORTANT - Save these instructions
Installation Instructions Epicure. Cooktop. Models: ESG366, ESG486. Part No Rev. K
 Installation Instructions Epicure Cooktop Models: ESG366, ESG486 Part No. 65162 Rev. K Table of Contents Important Safety Instructions... 1 Important Information About Safety Instructions... 1 General
Installation Instructions for Models: HES232U, HES236UHES246U, HES247U, HES245U, HES242U, HES256U, HES255U, HES252U
 Freestanding Electric Range Household Appliances 2U Installation Instructions for Models: HES232U, HES236UHES246U, HES247U, HES245U, HES242U, HES256U, HES255U, HES252U PLEASE READ ENTIRE INSTRUCTIONS BEFORE
ELECTRIC COOKTOP INSTALLATION INSTRUCTIONS
 INSTALLATION AND SERVICE MUST BE PERFORMED BY A QUALIFIED INSTALLER. IMPORTANT: SAVE FOR LOCAL ELECTRICAL INSPECTOR'S USE. READ AND SAVE THESE INSTRUCTIONS FOR FUTURE REFERENCE. WARNING FOR YOUR SAFETY:
ELECTRIC COOKTOP INSTALLATION INSTRUCTIONS
 INSTALLATION AND SERVICE MUST BE PERFORMED BY A QUALIFIED INSTALLER. IMPORTANT: SAVE FOR LOCAL ELECTRICAL INSPECTOR'S USE. READ AND SAVE THESE INSTRUCTIONS FOR FUTURE REFERENCE. WARNING FOR YOUR SAFETY:
Installation Guide. 15 W./24 W. Undercounter Refrigeration U L. Viking Range Corporation. 111 Front Street. Greenwood, Mississippi USA
 Installation Guide Viking Range Corporation 111 Front Street Greenwood, Mississippi 38930 USA (662) 455-1200 For product information, call 1-888-845-4641 U L C U L 15 W./24 W. Undercounter Refrigeration
INSTALLATION & OPERATING INSTRUCTIONS
 INSTALLATION & OPERATING INSTRUCTIONS MODEL #85747 WARMING DRAWER MANUAL TABLE OF CONTENTS PAGE # SAFETY INSTRUCTIONS.........2 INSTALLATION INSTRUCTIONS......................3 ISLAND INSTALLATION...3
READ AND SAVE THESE INSTRUCTIONS
 INSTALLATION INSTRUCTIONS CLASSIC WALL OVENS FOR MODELS: ECD227, ECD230, ECS127, ECS130, ECS136, ECS227, ECS230, MCD227, MCD230, MCS127, MCS130 MCS227, MCS230, PCD230, PCS130, PCS230 Part No 65030 Rev
Installation Instructions Dual Fuel Ranges
 Installation Instructions Dual Fuel Ranges E30DF74EPS E36DF76EPS E48DF76EPS 5995447082 2 Safety IMPORTANT SAFETY INSTRUCTIONS Safety Precautions Do not attempt to install or operate your unit until you
Installation Guide. 15 W./24 W. Undercounter Refrigeration
 Installation Guide 15 W./24 W. Undercounter Refrigeration Table of Contents Warnings & Important Information 3 Proper Disposal 4 Dimensions (15 W. Professional) 5 Dimensions (24 W. Professional) 6 Dimensions
Integrated Hood Liner
 Integrated Hood Liner Covers models IHL30, IHL36, IHL42, IHL48 and IHL48 Installation Instructions Part No. 65268 Rev. D 2007 Dacor, all rights reserved. Before You Begin... 1 Important Safety Instructions...
Multi-Function Cooktop
 INSTALLATION GUIDE Multi-Function Cooktop Contents Wolf Multi-Function Cooktop.................... 3 Multi-Function Cooktop Specifications............ 4 Multi-Function Cooktop Installation...............
Installation Instructions. Discovery Gas Cooktop. Models DYCT304G, DYCT365G. Part No Rev. A
 Discovery Gas Cooktop Models DYCT304G, DYCT365G Installation Instructions Part No. 108861 Rev. A Important Safety Instructions...1 Important Information About Safety Instructions...1 General Safety Precautions...2
INSTALLATION GUIDE Warming Drawers
 INSTALLATION GUID Warming Drawers Contents Wolf Warming Drawers......................... 3 Installation Considerations...................... 4 Warming Drawer Specifications.................. 8 Warming
Installation Instructions 30 French Door Built-in Wall Ovens
 Installation Instructions 30 French Door Built-in Wall Ovens Questions? Call 1.800.GE.CARES (1.800.432.2737) or visit www.geappliances.com In Canada, call 1.800.561.3344 or visit www.geappliances.ca DESIGN
Read these instructions carefully and completely. NOTE This appliance must be properly grounded.
 Built-In Wall Oven Installation Instructions 24 (61 cm) model SEW24SS If you are in need of service, please either fill out a service request on our website, http://www.summitappliance.com/support, or
Installation Instructions
 Installation Instructions 30 Electric Cooktop JP346, JP356, PP9, PP93, PP94, PP945, PP950 If you have questions, call 800.GE.CARES or visit our website at: ge.com BEFORE YOU BEGIN Read these instructions
2 PREPARE THE OPENING
 Installation Instructions 27 & 30 Electric Built-In Wall Ovens Questions? Call 1.800.GE.CARES (1.800.432.2737) or visit www.geappliances.com In Canada, call 1.800.561.3344 or visit www.geappliances.ca
Installation. 15 W. / 24 W. Undercounter Refrigeration
 Installation 15 W. / 24 W. Undercounter Refrigeration VRCI5240G / CVRCI5240G / VRCO5240D / CVRCO5240D VRDI5240D / CVRDI5240D / VRDO5240D / CVRDO5240D VBCI5150G / CVBCI5150G / VBCI5240G / CVBCI5240G VWCI5150G
INSTALLATION MANUAL. Double Electric Wall Oven
 INSTALLATION MANUAL Double Electric Wall Oven 799258 BLUESTAR INSTALLATION INSTRUCTIONS FOR THE RESIDENTIAL ALL ELECTRIC WALL OVEN FOR THE HOME MODELS DEWO THIS APPLIANCE WAS DESIGNED FOR EASE OF INSTALLATION
Installation Instructions. Distinctive Electric Cooktop. Françis : voir page 11 Español: consulte la página Rev. A. Models DECT304, DECT365
 Distinctive Electric Cooktop Models DECT304, DECT365 Installation Instructions 105643 Rev. A Françis : voir page 11 Español: consulte la página 21 Table of Contents Page Special Warnings... Product Dimensions
DESIGN CLASS FUNCTION
 PROFESSIONAL QUALITY COOKING EQUIPMENT INSTALLATION MANUAL FOR LEGACY BUILT-IN ELECTRIC,GAS AND HYBRID SINGLE AND DOUBLE WALL OVENS MODEL NUMBERS: GAS MODELS: AROFG-30, AROSG-30, AROFFG-230, AROSSG-230,
Professional Warming Drawer and Warming Drawer Cabinet
 Professional Warming Drawer and Warming Drawer Cabinet Care & Use/Installation Instructions Models: (C)VQEWD5300SS (C)VQEWD5420SS IMPORTANT SAFETY INSTRUCTIONS WARNING: Read this manual carefully and completely
Installation Instructions
 Installation Instructions 30 Electric Cooktop JP340, JP350, JP930, JP93, JP938, JP939 If you have questions, call 800.GE.CARES or visit our website at: www.geappliances.com BEFORE YOU BEGIN Read these
Installation Instructions
 Installation Instructions 30 Electric - Radiant Excludes Down-Draft Models If you have questions, call 800.GE.CARES or visit our website at: GEAppliances.com. In Canada, call 800.561.3344 or visit our
Installation Instructions Renaissance Integrated Hood Liner
 Installation Instructions Renaissance Integrated Hood Liner Models RNIHL30, RNIHL36, and RNIHL48 Part No. 109394 Rev. A Table of Contents Before You Begin... 1 Important Safety Instructions... 2 Important
Distinctive Series Cooktop
 Distinctive Series Cooktop Models: DRT304S, DRT366S Installation Instructions THIS APPLIANCE HAS EEN TESTED IN ACCORDANCE ITH THE LATEST EDITION OF ANSI Z21.1 STANDARD FOR HOUSEHOLD GAS APPLIANCES. Part
Installation Instructions 36 Inch Refrigerator
 Installation Instructions 36 Inch Refrigerator For Use With Models: EF36BNNF, IF36BNNF, PF36BNNF Francis - Voir Page 9 Part No. 106177 Rev. B/13036906 Refrigerator Safety...1 Proper Disposal of Your Refrigerator...1
DESIGN CLASS FUNCTION
 PROFESSIONAL QUALITY COOKING EQUIPMENT INSTALLATION MANUAL FOR MEDALLION DUAL FUEL RANGES MODEL NUMBERS: ARR-304DF, ARR-366DF, ARR-364GDDF, ARR-364GRDF, ARR-486GDDF, ARR-486GRDF, ARR-4822GDDF, ARR-484X2GRDF,
MODEL NO: WD Warming Drawer, Rated 120V, 60 Hz,450W, 4A. Certificate Project Figure No. Version A
 MODEL NO: WD256103 30 Warming Drawer, Rated 120V, 60 Hz,450W, 4A TABLE OF CONTENTS P A G E SAFETY INSTRUCTIONS... 2 INSTALLATION INSTRUCTIONS... 5 OPERATING INSTRUCTIONS 6 CLEANING & MAINTENANCE 7 TROUBLE
Installation. Guide. 7 SERIES Professional TurboChef Speedcook Double Oven VDOT730
 Installation Guide 7 SERIES Professional TurboChef Speedcook Double Oven VDOT730 Table of Contents Warnings and Important Information 3 Dimensions 6 Specifications 7 Cutout Dimensions 8 General Information
130"ElectricCooktop. nstructlons _,0, JP355, JP910, JP930, JP940, JP950. I Iinstallation. -&WARNING - This appliance must be properly grounded.
 I Iinstallation 130"ElectricCooktop nstructlons _,0, JP355, JP910, JP930, JP940, JP950 I r_ www.geappliances.com",,if you have questions, call 800.GE.CARES or visit our website at: I BEFORE YOU BEGIN MATERIALS
Installation Instructions
 Installation Instructions Electric Drop-In Range JDS28, JDP39 Questions? Call 800.GE.CARES (800.432.2737) or Visit our Website at: ge.com BEFORE YOU BEGIN Read these instructions carefully and completely.
Downdraft Ventilation
 INSTALLATION GUIDE Downdraft Ventilation Contents Wolf Downdraft Ventilation...................... 3 Installation Considerations...................... 4 Downdraft Specifications.......................
Installation. Professional Built-In Electric Warming Drawers (Indoor and Outdoor Models)
") Installation Professional Built-In Electric Warming Drawers (Indoor and Outdoor Models) VEWD527 / CVEWD527 / VEWD530 / CVEWD530 VEWDO530 / CVEWDO530 / VEWDO536 / CVEWDO536 Table of Contents Warnings &
Installation Professional Built-In Electric Warming Drawers (Indoor and Outdoor Models) VEWD527 / CVEWD527 / VEWD530 / CVEWD530 VEWDO530 / CVEWDO530 / VEWDO536 / CVEWDO536 Table of Contents Warnings &
Viking Installation Guide
 Viking Installation Guide Viking Range Corporation 111 Front Street Greenwood, Mississippi 38930 USA (662) 455-1200 For product information, call 1-888-VIKING1 (845-4641) or visit the Viking Web site at
Installation Instructions
 Installation Instructions Full Size Tumble Action Washers Before beginning installation, carefully read these instructions. This will simplify the installation and ensure the washer is installed correctly
INSTALLATION GUIDE Induction Cooktops
 INSTALLATION GUIDE Induction Cooktops Contents Wolf Induction Cooktops....................... 3 Induction Cooktop Specifications................ 4 Induction Cooktop Installation.................. 12 Service
USER MANUAL. Warming Drawer _ Earthlite, All Rights Reserved
 USER MANUAL Warming Drawer 2015 Earthlite, All Rights Reserved 050415_0400 Legal Notice The information provided in this document is intended for informational purposes only and is subject to change without
Installation Instructions Renaissance. Rangetop. Models: EG366, EG486
 Installation Instructions Renaissance Models: EG366, EG486 Rangetop THIS APPLIANCE HAS EEN TESTED IN ACCORDANCE ITH THE LATEST EDITION OF ANSI Z21.1 STANDARD FOR HOUSEHOLD GAS APPLIANCES. Part No. 102025
Service Manual Electric Cooktop
 Service Manual Electric Cooktop 318 202 105 (0311) THIS IS A BLANK PAGE Table of Contents I SAFE SERVICING PRACTICES... 1 PRODUCT FEATURES... 2 WIRING DIAGRAM... 3 SECTION A - INSTALLATION... 4 CUT-OUT
Installation Instructions
 Installation Instructions Self-Cleaning Radiant Electric Drop-In Range JDP47, JD968, JD900 If you have questions, call 1.800.GE.CARES or visit our website at: ge.com Before You Begin Read these instructions
Table of Contents. Important Safety Instructions. WARNING: If the instructions contained in this manual are not followed
 Table of Contents 1 Installation 6 1.1 General installation instructions 6 1.2 Electrical requirements 7 1.3 Electrical connection 8 1.4 Cable replacement 10 1.5 Positioning 10 EN Important Safety Instructions
136"ElectricCooktop. nstructlons. I Iinstallation. -&WARNING - This appliance must be properly grounded.
 nstructlons I Iinstallation 136"ElectricCooktop I =_ www.g If you have EAp plia questions, nces.co m" call 800.GE.CARES or visit our website at: BEFORE YOU BEGIN MATERIALS YOU WILL NEED Read these instructions
Installation Guide. 15 W. Undercounter/Freestanding Nugget Ice Machine U L. Viking Range, LLC. 111 Front Street
 Installation Guide Viking Range, LLC 111 Front Street Greenwood, Mississippi 38930 USA (662) 455-1200 For product information, call 1-888-(845-4641) or visit our web site at vikingrange.com in the US or
Warming Drawer Installation Guide
 Warming Drawer Installation Guide WARMING DRAWER Contents 3 Warming Drawer 4 Specifications 7 Installation 7 Troubleshooting Features and specifications are subject to change at any time without notice.
Gallery Electric Fireplaces
 Gallery Electric Fireplaces Homeowner s Installation Instructions & Operating Manual Model: GBI-34, GBI-41 Only use this heater as described in this manual. Any other use is not recommended by the manufacturer,
Installation GUIDE 6 SERIES. Built-in Electric Single and Double Wall Ovens MVSOE630 / CMVSOE630 MVDOE630 / CMVDOE630
 Installation GUIDE 6 SERIES Built-in Electric Single and Double Wall Ovens MVSOE630 / CMVSOE630 MVDOE630 / CMVDOE630 1 Table of Contents Warnings & Important Safety Information 2 Dimensions 4 Specifications
Viking Installation Guide
 Viking Installation Guide Viking Range Corporation 111 Front Street Greenwood, Mississippi 38930 USA (662) 455-1200 For product information, call 1-888-VIKING1 (845-4641) or visit the Viking Web site at
Warming Drawer Use and Care Manual
 Warming Drawer Use and Care Manual Models: ERWD30, EWD24, EWD27, EWD30, EWD36, IWD24, IWD27, IWD30, MRWD27, MRWD30, MWDH27, MWDH30, MWDV27, MWDV30, OWD24, PWD27, PWD30 Style varies, model EWD27 shown Table
Warming Drawer Use and Care Manual
 Warming Drawer Use and Care Manual Models: EWD24, EWD27, EWD30, EWD36 MWDV27, MWDH27, MWDV30, MWDH30 PWD27, PWD30, IWD27, IWD30 Table of Contents Important Safety Instructions... 1 Getting to Know Your
Installation GUIDE 5 SERIES. Warming Drawer VWD527 VWD530
 Installation GUIDE 5 SERIES Warming Drawer VWD527 VWD530 1 Table of Contents Important Safety Instructions 2 Dimensions 3 Specifications 4 Cutout Dimensions 4 Electrical Requirements 5 General Information
TWIN EAGLES WARMING DRAWERS INSTALLATION, USE, AND CARE MANUAL
 TWIN EAGLES WARMING DRAWERS INSTALLATION, USE, AND CARE MANUAL P/N: 19143B 05/18 MODELS: TEWD30-C TEWD42C-C A special message Congratulations on your purchase of TWIN EAGLES Warming Drawer. In addition
Installation. 324 Series Built-In Dishwashers U L. Viking Range, LLC 111 Front Street Greenwood, Mississippi USA (662)
") Installation Viking Range, LLC Front Street Greenwood, Mississippi 890 USA (66) 455-00 For product information, call -888-845-464 or visit the Viking Website at vikingrange.com U L C U L 4 Series Built-In
Installation Viking Range, LLC Front Street Greenwood, Mississippi 890 USA (66) 455-00 For product information, call -888-845-464 or visit the Viking Website at vikingrange.com U L C U L 4 Series Built-In
ELECTRIC COOKTOP INSTALLATION INSTRUCTIONS
 INSTALLATION AND SERVICE MUST BE PERFORMED BY A QUALIFIED INSTALLER. IMPORTANT: SAVE FOR LOCAL ELECTRICAL INSPECTOR'S USE. READ AND SAVE THESE INSTRUCTIONS FOR FUTURE REFERENCE. U.S.A. WARNING FOR YOUR
Installation Instructions
 Installation Instructions Important Save for local electrical inspector s use. Electric Cooktop Keep instructions for future reference. Be sure manual stays with cooktop. Read entire instruction and Owner
INSTALLATION INSTRUCTIONS INSTRUCTIONS D INSTALLATION INSTRUCCIONES DE INSTALACIÓN
 EN FRONT LOAD DRYER FR SÉCHEUSE Á CHARGEMENT FRONTAL ES SECADORA DE CARGA FRONTAL INSTALLATION INSTRUCTIONS INSTRUCTIONS D INSTALLATION INSTRUCCIONES DE INSTALACIÓN 2 IMPORTANT SAFETY INSTRUCTIONS For
136"ElectricCooktop. nstructlons _,00, JP961, JP968, JP969, ZEU769. I Iinstallation. -&WARNING - This appliance must be properly grounded.
 I Iinstallation 136"ElectricCooktop nstructlons _,00, JP961, JP968, JP969, ZEU769 I "?-I www.g "If you have EAp plia questions, nces.co m" call 800.GE.CARES or visit our website at: BEFORE YOU BEGIN MATERIALS
Viking Installation Guide
 Viking Installation Guide Viking Range, LLC 111 Front Street Greenwood, Mississippi 38930 USA (662) 455-1200 For product information, call 1-888-(845-4641) or visit the Viking Web site at vikingrange.com
USE AND CARE GUIDE COMBINATION KITCHENS. C301 Series C301 AUTO Series C39 Series C39 AUTO Series C48 Series C60 Series
 Page SUMMIT SPECIALTY APPLIANCES DIV. USE AND CARE GUIDE COMBINATION KITCHENS C301 Series C301 AUTO Series C39 Series C39 AUTO Series C48 Series C60 Series If you need service or call with a question,
INSTALLATION INSTRUCTIONS
 INSTALLATION INSTRUCTIONS PROFESSIONAL RANGE MODELS 48 ALL GAS, CONVECTION WITH SEALED BURNERS** 48 NATURAL GAS MODELS *TN531-7BW *TN531-7W **THESE MODELS ARE NOT FIELD CONVERITBLE FOR LP/PROPANE GAS.
INSTALLATION INSTRUCTIONS
 INSTALLATION INSTRUCTIONS BUILT-IN ELECTRIC COOKTOP VIKING RANGE CORPORATION 111 Front Street Greenwood, Mississippi 38930 USA (662) 455-1200 IMPORTANT: PLEASE READ AND FOLLOW Before beginning, please
OWNER S MANUAL ELECTRIC FLAT PANEL FIREPLACE. AC V 60Hz. Model# : /60 - Built-in & Wall Mounted Electric Fireplace WARNING CAUTION
 ELECTRIC FLAT PANEL FIREPLACE Model# :80017 OWNER S MANUAL 50/60 - Built-in & Wall Mounted Electric Fireplace AC 110-120V 60Hz WARNING Read and understand this entire owner s manual, including all safety
CAPITAL COOKING EQUIPMENT MAESTRO 30 WALL OVEN INSTALLATION INSTRUCTIONS
 CAPITAL COOKING EQUIPMENT MAESTRO 30 WALL OVEN INSTALLATION INSTRUCTIONS MODELS: MWOV301ES. MWOV302ES SPECIAL MESSAGE TO CUSTOMERS Dear Valued Customer, Congratulations on making a smart choice! You have
Installation Guide. 5 Series Professional Built-In Electric Single and Double Ovens 7 Series Professional Built-in Electric Double French Door Oven
 Installation Guide 5 Series Professional Built-In Electric Single and Double Ovens 7 Series Professional Built-in Electric Double French Door Oven Table of Contents Warnings & Important Safety Instructions
Wall Mount Electric Fireplace
 Wall Mount Electric Fireplace User Guide Thank you for purchasing the Ivation Wall Mount Electric Fireplace. This User Guide is intended to provide you with guidelines to ensure that operation of this
Installation Instructions
 Installation Instructions Advantium 240V Built-In SpeedCook Ovens PSB2200 PSB2201 ZSC2200 ZSC2201 ZSC2202 49-40574-1 MFL06213302 02-08 JR Safety Information BEFORE YOU BEGIN Read these instructions completely
Viking Installation Guide
 Viking Installation Guide Viking Range Corporation 111 Front Street Greenwood, Mississippi 38930 USA (662) 455-1200 For product information, call 1-888-VIKING1 (845-4641) or visit the Viking Web site at
Installation Instructions
 Installation Instructions IMPORTANT: Read and save these instructions. IMPORTANT: Installer: Leave Installation Instructions with the homeowner. Homeowner: Keep Installation Instructions for future reference.
INSTALLATION INSTRUCTIONS
 INSTALLATION INSTRUCTIONS PROFESSIONAL RANGE MODELS 48 ALL GAS, CONVECTION WITH SEALED BURNERS** 48 NATURAL GAS MODELS *TN531-7BW *TN531-7W **THESE MODELS ARE NOT FIELD CONVERITBLE FOR LP/PROPANE GAS.
I NDUCTION C OOKTOP INSTALLATION INSTRUCTIONS
 I NDUCTION C OOKTOP INSTALLATION INSTRUCTIONS CONTACT INFORMATION Wolf Customer Service: 800-332-9513 Website: wolfappliance.com As you follow these instructions, you will notice WARNING and CAUTION symbols.
INSTALLATION INSTRUCTIONS
 INSTALLATION INSTRUCTIONS TM DishDrawer dishwasher DD4S 7 & DD4ST 7 models US CA 59004D 04.3 FOLLOW THE INSTALLATION SEQUENCE RELEVANT TO YOUR MODEL STANDARD HEIGHT SINGLE MODELS TALL HEIGHT SINGLE MODELS
Distinctive TM Electric Cooktop
 Installation Instructions Distinctive TM Electric Cooktop Models DECT304, DECT365 _D PJ eo _o Lr) O Fran_:is voir page 1 1 Espa_ol: consuhe la p6gina 21 Table of Contents Page Special Warnings... 3 Product
INSTALLATION INSTRUCTIONS
 INSTALLATION INSTRUCTIONS TM DishDrawer dishwasher DD36SDFTX (Designer) & DD36STI (Integrated) models US CA 59008D 04.3 a SAFETY AND WARNINGS Electrical hazard WARNING! Before installing the dishwasher,
Menumaster. Commercial Microwave Oven Use and Care Manual CFSP70 GSAND-7D SAND-7D SAND-700
 Menumaster Commercial Microwave Oven Use and Care Manual CFSP70 GSAND-7D SAND-7D SAND-700 Keep these instructions for future reference. If the microwave oven changes ownership, be sure this manual accompanies