Owner s Manual PS-200
|
|
|
- Eric Gallagher
- 5 years ago
- Views:
Transcription

1 Owner s Manual PS-200
2 Table of Contents Product Introduction Page 1 Explanation of Warning Messages Page 2 Danger Warning Chemical Hazard Personal Injury Requirements for Detergents and Sanitizers Page 3 Detergents Sanitizers Factory Assistance Operating Instructions Page 4-6 Filling The System Rinse Water Sanitizer Water Detergents & Sanitizers Adding Detergents and Sanitizers Manual Dispensing Auto Dispensing Controls & Features Page 7-12 Starting and Stopping the Wash Action Introducing Pots and Pans to the Power Soak Properly Scrapping Pots and Pans Loading and Using the Wash Sink Loading and Washing Utensils Unloading the Wash Sink Rinsing Pots & Pans Sanitizing Pots & Pans Drying of Pots & Pans Deep Cleaning and Night Washing Wash, Rinse and Sanitizer Clean-up Preventive Maintenance Page Routine Preventive Maintenance Daily Monthly
3 Table of Contents - Continued Troubleshooting Facility Owner/Manager Section LED Status on Control Panel Overlay Green LED Blue LED Red LED Authorized Service Agency Section Installation Electrical Requirements Providing Proper Electrical Service Plumbing Requirements Page Page Page 26-28
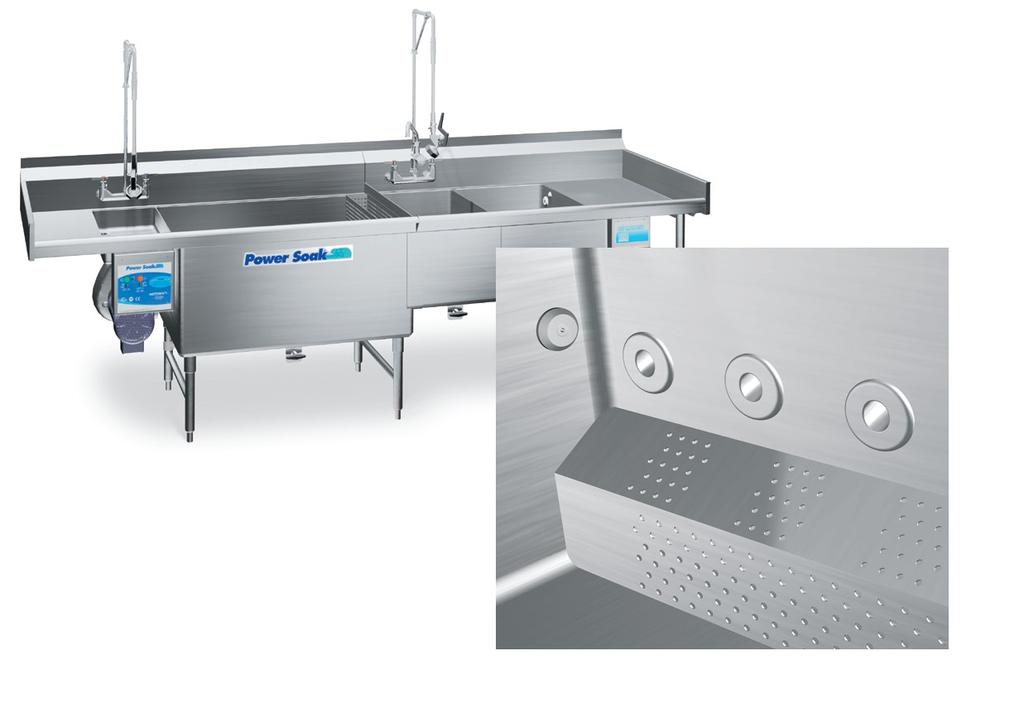
4 Product Introduction Thank you for purchasing a Power Soak warewashing system. Your new Power Soak pot, pan and utensil washing system will provide years of dependable, efficient and trouble-free service. As a Power Soak owner, you will benefit in numerous ways: Your warewashing operation will be more efficient. Pots, pans and utensils will be cleaner. The overall level of sanitation in your scullery area will improve. Warewashing hours will decrease as employee morale increases. Chemical and water usage will decrease. Every system is manufactured to last, with only high-quality, heavy-duty, 14 gauge stainless steel used in its construction. All electrical components used in a Power Soak system are of the highest quality. The faucets and drains are designed for quick filling and emptying of the system s sinks. At Power Soak Systems, we take pride in manufacturing the Power Soak line and are committed to standing behind our customers and products 100%. Should you ever need assistance, please contact us directly at the factory by dialing or fax:
5 Explanation of Warning Messages Be sure to read, understand and follow all DANGER, WARNING, and CAUTION messages located in this guide and on the equipment. Danger Personal Injury and Property Damage hazard. May result in serious injury or death. May cause extensive equipment damage. Warning Property Damage Hazard. May result in property or equipment damage. Chemical Hazard May result in serious injury or death. Instructions, labels and Material Safety Data Sheets (MSDSs) should be supplied with all detergents and sanitizing chemicals. The manufacturers, importers and distributors of your cleaning chemicals are responsible for providing this information. Power Soak Systems is not a chemical manufacturer, importer or distributor. Power Soak Systems, Inc., can assist your chemical representative but will not make specific brand recommendations. Personal Injury Hazard Hazard from sharp objects. May result in serious injury or death. 2

6 Requirements for Detergents and Sanitizers Detergents Remember, improper detergents may damage equipment! Use of the correct detergent in your Power Soak system is critical to its washing performance. If you are having problems with cleaning results, please contact the factory. Your new system requires a low-foaming, metal/aluminum-safe detergent that is safe for the hands. The detergent should have good grease cutting abilities but not have an excessively high ph level. Sanitizers The method of sanitizing used in your Power Soak system is a chemical sanitizing method. There are a number of products on the market that work well. Your chemical sales representative should assist you in selecting the proper sanitizer for your application. Check with your cleaning chemical provider to determine detergent concentration, sanitizer parts per million (ppm) and sanitizer submersion times to meet local health codes. Factory Assistance If your chemical sales representative is having difficulty selecting a detergent or sanitizer, or if you are getting poor results with the chemicals your representative has recommended, please contact the factory at
7 Operating Instructions 4
8 Preparing the System Filling the System At the beginning of each day or shift, fill the sinks with water that is metered to approximately the correct operating temperatures: Wash sink (115 F / 46 C) Rinse sink (75 F / 24 C) Sanitizer sink (75 F / 24 C) All sinks should be filled to, but not above, the waterline marks. Fill the wash sink (the sink with the water jets) with water that is approximately 115 F / 46 C. You can use the hot and cold taps on the faucet to adjust the water to the appropriate temperature. A good rule of thumb is that the water should be hot to the touch but not so hot that it is uncomfortable. Rinse Water If your method for rinsing wares is of the submersion type, fill the rinse sink (middle sink) with water that is approximately room temperature, 75 F / 24 C. There is no need to fill the rinse sink if your location uses a sprayer for rinsing wares. Sanitizer Water Fill the sanitizer sink (the last sink) with water that is approximately room temperature, 75 F / 24 C. Your Chemical Company Should Be Aware of the Following: The detergent must be low foaming, metal/aluminum-safe and not excessively caustic. Most standard sanitizers are acceptable. 5
9 Adding Detergents & Sanitizers Manual Chemical Dispensing After the sinks have been filled with water, add the proper amount of detergent and sanitizer. The detergent goes into the wash sink (the sink with the water jets) and the sanitizer goes into the sanitizer sink. Be sure to add the proper amount of chemicals to each sink. The amount used should be provided by your chemical supplier. Do not add the detergent or sanitizer to the sink prior to or during filling. Automatic Chemical Dispensing Your Power Soak may be equipped with an automatic chemical dispensing system. Be sure to follow the chemical company s instructions regarding the use and care of the dispenser. The dispensing cycles for the wash tank and sanitizer tank are activated independently from each other. For each fill cycle of the wash tank, when the level of water reaches the upper liquid level sensor, after a ten-second delay and after the green start button is pushed, the dispenser will inject the proper amount of detergent into the tank. For each fill cycle of the sanitizer tank, when the level of water reaches the upper liquid level sensor and after a 10 second delay, the dispenser will automatically inject the proper amount of sanitizer into the tank. The wash and/or sanitizer tank(s) must be filled to the waterline in order to initiate the automatic chemical dispensing. 6

10 Controls & Features Green Button Starts the washing action. If cycle does not start, refer to troubleshooting section. Red Button Stops the washing action. Green Light Slow Flashing POWER ON the Power Soak system is energized and ready to fill. Solid Illumination RUNNING wash sink is full, system is running. (Will not become solid until after start button is pushed.) Blue Light Solid Illumination CHANGE WASH WATER after a standard four-hour wash cycle, the system becomes disabled and the wash sink must be drained and refilled. Red Light Slow Flashing FILL SANITIZER TANK Solid Illumination CHANGE SANITIZER SOLUTION after two hours, the sanitizer sink must be drained and refilled. 7
11 Controls & Features - Continued Starting and stopping the wash action To start the wash action, press the green START button. A strong rolling wash action should be present. To stop the wash action, press the red STOP button. Introducing Pots and Pans to the Power Soak Dirty pots and pans should be brought to the Power Soak in a timely manner. Do not allow items to sit and air dry. The quicker that items are brought to the Power Soak and put in the wash tank, the easier they are to clean! Properly Scrapping Pots and Pans Excess soils should be removed from the pots and pans prior to dropping them in the wash sink. Deposit the excess soils into a garbage can. Some systems may have an optional pre-scrapping area with a pre-rinse spray. If so, soils may be deposited into the scrapper sink. 8
12 Controls & Features - Continued Loading and Using the Wash Sink The Power Soak is a random loading system. This means that Power Soak items are not racked for washing. Instead, they are randomly loaded one at a time. As items are brought to the system and scrapped, they should be immediately dropped directly into the wash sink. If there is no movement of items in the wash sink, or if items are stationary above the waterline, the system has been overloaded and some items must be removed. It is very important not to overload the wash sink, as it reduces the effectiveness of the wash action. Some pots and pans stack for storage. This is referred to as nesting when it occurs during a Power Soak wash cycle. Make sure that nested items are separated and loaded one at a time. Nested items in the wash sink will not be properly washed. Power Soak is a continuous motion system. This means that the system does not operate on a set cycle time like cabinet-type washing systems. Instead, during normal operating hours where washing is required, the system is (normally) left running. The Power Soak is energy efficient, and it does not cause excessive wear to leave it running continuously. Typically, it takes between three to fifteen minutes to wash items. Some heavily soiled or burnt-on items may take longer to clean. 9
13 Controls & Features - Continued Loading and Washing Utensils Each Power Soak system comes with a utensil basket that hangs in the wash sink. All utensils and other small wares should be loaded into and washed inside this basket. Do not place knives or other sharp objects in the Power Soak. Allowing knives or other sharp objects to tumble freely in the Power Soak wash tank may cause bodily injury. Knives and other sharp objects must be washed by hand with the pump motor turned OFF. Wash, rinse and sanitize the knife or sharp object and immediately place the item into proper storage. Unloading the Wash Sink The employee responsible for pot washing should routinely pass by the Power Soak and remove clean items from the wash sink. Items that are not 100% clean can be quickly finished off with a scrub pad or dropped back into the wash sink for additional cleaning. Remember: it is not necessary to turn the wash action off to load or unload items from the wash sink. There are no moving parts within the wash sink that could cause bodily harm. 10
14 Controls & Features - Continued Rinsing Pots and Pans Clean items that have been removed from the wash sink should be thoroughly rinsed. This is achieved by spraying them off or dipping them in the (center) rinse sink. It is important that any remaining detergent residue is removed from the items prior to sanitizing. If items are rinsed by the dipping method, it is important to keep the water fresh by frequently draining and filling the rinse sink. Sanitizing Pots & Pans After items have been properly rinsed they must be sanitized in the (last) sanitizing sink. It is necessary for each item to remain submersed in the sanitizing solution for a specific amount of time. The amount of time varies according to the type of sanitizer being used and local health codes. Be sure to follow your chemical sales representative s instructions to ensure that all items are properly sanitized. Drying of Pots & Pans After items have been sanitized, they should be thoroughly dried on a clean drain board or on adjacent drying shelves. Be sure to adhere to all local health codes and recommendations for proper drying and stacking of items. 11
15 Controls & Features - Continued Deep Cleaning and Night Washing Extremely soiled items and pieces of cooking equipment that require regular, intensive cleaning can be washed in the Power Soak system overnight. Load the items to be deep cleaned into the Power Soak s wash sink, turn the system on and leave it running overnight. The Power Soak will automatically shut down after the four hour wash cycle. Items that have been cleaned overnight can be removed, rinsed, sanitized (if necessary) and put away or back in place. Use your Power Soak as a total cleaning system! Remember, any item in your operation that can be submersed for cleaning and is not fragile can be washed without labor in your Power Soak! Here are some examples of items that are typically deep-cleaned overnight in the Night Wash cycle: Hood Filters Roasting Pans Stove Tops Frying Equipment Many other items in your operation may qualify. Be creative and set up a regular Night Wash program for improved sanitation. Wash, Rinse and Sanitizer Clean-Up Between each water change and at the end of each night, all tanks and drain boards should be thoroughly cleaned with hot, soapy water. It is also recommended to wipe down all the tanks and drain boards with a sanitizing agent. Ask your chemical provider to recommend a sanitizer for this application. 12
16 13
17 Preventive Maintenance 14
18 Preventive Maintenance Your system requires minimal, routine preventive maintenance. As such, the following should be done on a routine basis to ensure that your system remains reliable: Daily Clean the liquid level sensors. These sensors are located on the side walls of the wash and sanitizer tanks. They are the white plastic discs with metal centers. Clean the sensor faces thoroughly. If cleaned regularly, a wash cloth and soapy water are all that is required. If the liquid level sensors are not cleaned regularly, the machine may fail to operate; or it may be possible to run it without water, which may cause serious damage to the unit. Monthly IMPORTANT: Turn off the power to the unit at the main breaker prior to performing the following task! Clean the pump motor fan shroud with a damp, soapy rag. The motor shroud is the vented cover located at the end of the motor (closest to the control panel). This will prevent grease and dust from accumulating in the cover s openings, which can obstruct the airflow that cools the motor. De-lime the wash sink. Simply add a de-liming agent to a sink of warm, fresh water and run the system overnight. Ask your chemical sales representative to recommend a specific de-liming agent. There are no other preventive maintenance procedures that you will need to perform on your Power Soak system. You need not be concerned about greasing the motor bearings, as they are permanently sealed. If you have any questions regarding the preventive maintenance procedures, please contact the factory at
19 Notes 16
20 17
21 Troubleshooting 18
22 Facility Owner/Manager Section The only troubleshooting procedures that the facility owner or manager can perform are listed immediately below. All other procedures must be performed by an authorized service agency. To obtain the name of a recommended service agent in your area, please call Power Soak Systems, Inc. at LED Status on Control Panel Overlay It is recommended that the condition of the system be verified by first observing the STATUS LEDs on the front of the control panel. If necessary, take corrective action prior to performing any further troubleshooting. Green Light (under the green Start button) Slow Flashing POWER ON system is energized and ready to fill. Solid Illumination READY wash sink is full; system is running. Blue Light (between the green Start and red Stop buttons) Solid Illumination CHANGE WASH WATER After a standard four-hour wash cycle, the system becomes disabled until the wash sink is drained and refilled. Red Light (under the red Stop button) Slow Flashing FILL SANITIZER TANK sanitizer tank must be filled to the waterline. Solid Illumination CHANGE SANITIZER SOLUTION After two hours, the sanitizer tank must be drained and refilled. 19
23 Facility Owner/Manager Section - Continued If, after reviewing the status of the control panel LEDs, there is still an operating problem, refer to the following troubleshooting guidelines: Problem: Wash Pump and/or Wash Sink Heater Will Not Operate Check to make sure the main electrical power breaker for the Power Soak system is in the ON position. Check to make sure the wash sink is filled to the waterline. Check to make sure that the liquid level sensors are clean and free of any debris or grease. The liquid level sensors are located on the side walls of the wash and sanitizer sinks (the white plastic disc with a metal center). If the above troubleshooting procedures do not correct the problem, you must contact Power Soak Systems, Inc., or an authorized service agency at
24 Authorized Service Agency Section Hazard to untrained or unauthorized personnel. The following procedures are provided for use only by an authorized service agency. No facility owner, manager, employee or other unauthorized person should attempt to perform any of these procedures. To obtain the name of a recommended service agent in your area, please call Power Soak Systems, Inc. at When performing troubleshooting procedures, the authorized service agency will need to open the Power Soak system s main electrical enclosure. Properly close the control panel before reconnecting the circuits. Explanation of LED Sequence To verify the proper operation of the Power Soak system, the operating logic of the controls should be verified. To verify the logic, the control box will need to be opened. The Universal Programming Module (UPM) is mounted to the inside of the control enclosure cover. The UPM has six LEDs mounted on its top edge. The meaning of each LED is as follows, starting from the right-most LED: #1 Power On #2 Error Code #3 Wash Tank Low-level Sensor #4 Wash Tank Upper-level Sensor #5 Sanitizer Tank Low-level Sensor #6 Sanitizer Tank Upper-level Sensor 21
25 Authorized Service Agency Section - Continued Problem: Wash Pump and/or Wash Sink Heater Will Not Operate Refer to the previous checklist under the Facility Owner / Manager Section before proceeding to the following checklist items: Verify that LED #1 (Power On) is illuminated. If LED #1 is not illuminated, check: Main power connection and wiring Fuse inside the control enclosure Bi-metallic disc switch for water temperature (switch must be closed if water temperature is below 120 F) Bi-metallic disc switch for motor temperature (switch must be closed if motor temperature is below 150 F) Check to see that the Liquid Level LEDs #3 and #4 are illuminated when the wash tank is filled to the waterline. If either one or both of the lights are not illuminated: Clean the liquid level sensors as described in the Preventive Maintenance section of this manual. Be sure that all connections to and from the liquid level sensors are secure and that there is no physical damage to the wiring. If damage to connectors and/or wiring is found, contact Power Soak Systems, Inc. at
26 Authorized Service Agency Section - Continued If the above troubleshooting guidelines do not correct the problem, it will be necessary to contact Power Soak Systems, Inc. at Prior to calling, please note the Error Code (if any) that can be identified by observing LED #2 on the UPM. If there is a control logic error, LED #2 will flash with a blinking pattern. The definitions for the patterns are as follows: A _ symbol represents a long flash A. symbol represents a short flash _. => Water Level Problem _.. => Temperature Sensor Problem _... => Over-Current Problem Please have this Error Code information available prior to calling the Power Soak Systems. 23
27 Notes 24
28 25
29 Installation 26
30 Installation Guide The installation and initial operational check of your new system must be performed only by licensed and certified plumbers and electricians. Be sure to follow all applicable national and local electrical codes when installing the electrical supply and/or a new breaker. DO NOT connect the system using a power cord and plug or an extension cord of any kind. Electrical Requirements The electrical requirements of your new system are on the serial number plate located on the front of the wash sink, adjacent to the control panel enclosure and inside the enclosure itself. All Power Soak systems have a single point electrical connection, and a dedicated circuit is required. 27
31 Installation Guide Please refer to the detailed installation instructions that were sent with your Power Soak system. Providing Proper Electrical Service The system is completely pre-wired and tested at the factory, and a hard-wired connection from an appropriate power source junction box is all that is required. The installer is to provide a disconnect that should be incorporated in the fixed wiring. Properly sized watertight conduit, fittings and parts are required, as well as the appropriate gauge wire. If your system is a left-to-right unit, you should locate the power source junction box at the left end of the system. (The opposite would be true for a right-to-left system.) Ideally, the junction box should be located on the wall directly behind the pump motor and control panel. A wiring diagram is located in the system s control panel enclosure. Specific part numbers and part information can be obtained from the factory by calling Plumbing Requirements Your unit requires the following plumbing connections: 3/4 (19mm) or 1/2 (12 mm) hot and cold water supply lines. One waste water connection (minimum 1 1/2 / 38mm). 28
32 PS-200 Power Soak is a registered trademark of Cantrell Industries, Inc. The Power Soak design and concept is fully patented. Power Soak Systems, Inc. 903 East 104th Street, Suite 130 Kansas City, MO Phone: (816) Fax: (816) (800) Part #
Owner s Manual PS-50. Document Number: Revision: Draft
 Owner s Manual PS-50 Document Number: 33019 Revision: Draft Table of Contents Product Introduction Page 3 Explanation of Warning Messages Page 4 Danger Warning Personal Injury Chemical Hazard Requirements
Table of Contents. Product Introduction. Explanation of Warning Messages. Requirements for Detergents and Sanitizers
 Owner s Manual Table of Contents Product Introduction Page 3 Explanation of Warning Messages Page 4 Danger Warning Chemical Hazard Personal Injury Requirements for Detergents and Sanitizers Detergents
Owner's Manual SILVERWARE PRE-WASHING SYSTEM
 Owner's Manual SILVERWARE PRE-WASHING SYSTEM 2 Table of Contents Introduction and Conventions... 5 Product Introduction... 6 Products Covered by this Manual... 7 Free-standing Stationary... 7 Mobile...
Table of Contents. Product Introduction. Explanation of Warning Messages. Requirements for Detergents and Sanitizers
 Owner s Manual Table of Contents Product Introduction Page 3 Explanation of Warning Messages Page 4 Danger Warning Chemical Hazard Personal Injury Requirements for Detergents and Sanitizers Detergents
Owner's Manual PRODUCE SOAK
 Owner's Manual PRODUCE SOAK Table of Contents Introduction and Conventions... 1 Product Introduction...2 Produce Washing Chemicals and Antimicrobials...2 Explanation of Warning Messages...3 Danger...3
TURBOWASH TM... Pot and Pan Sink
 TURBOWASH TM... Pot and Pan Sink MODEL TW ML-110644 701 S. RIDGE AVENUE TROY, OHIO 45374-0001 FORM 33800 Rev. A (4-98) Installation, Operation, and Care of TurboWash TM Pot and Pan Sink SAVE THESE INSTRUCTIS
Operation Manual NEMA 4X Controls
 Operation Manual NEMA 4X Controls Douglas Machines Corp. Page 1 of 25 Douglas Machines Corp. Page 2 of 25 PREAMBLE We congratulate you on the purchase of your new rack, pan, and utensil washer. In order
TURBOWASH TM... Pot and Pan Sink
 TURBOWASH TM... Pot and Pan Sink MODEL TWII ML-110971 701 S. RIDGE AVENUE TROY, OHIO 45374-0001 937 332-3000 www.hobartcorp.com FORM 34504 Rev. B (June 2002) Installation, Operation, and Care of TurboWash
Power Soak Generation 3 HIGH VELOCITY WASH
 Power Soak Generation 3 HIGH VELOCITY WASH Streamline your operation with Power Soak a uniform wash action, improved sanitation, more efficient workforce. In 1987, Power Soak was introduced as the first
eware Handling & Cleaning Procedures
 Procedures Best practice in ware washing, equipment and hard surfaces Why am I doing this program? An important part of your job is to enhance the safety and satisfaction of your customers and co-workers.
UNDERCOUNTER DISHWASHER
 OWNER S MANUAL BLAKESLEE Division of The Legacy Companies UNDERCOUNTER DISHWASHER UC20 Blakeslee Division of The Legacy Companies 1228 Capitol Drive Addison, IL 60101 Phone (630) 532-5021 Fax (630) 532-5020
Installation Manual PS-200 & PS-201
 Installation Manual PS-200 & PS-201 Table of Contents Pre-Uncrating Checklist... 1 Verifying System Requirements... 2 Verifying System Direction... 2 Verifying the Electrical Requirements... 2 Removal
High Temperature Sanitizing Pot and Pan Washer (USA Version)
") MODEL FV 130.2 High Temperature Sanitizing Pot and Pan Washer (USA Version) OWNER S INSTALLATION, OPERATION AND MAINTENANCE MANUAL Meiko 917 Airpark Center Drive Nashville, TN 37217 Phone: (615) 399-6600
MODEL FV 130.2 High Temperature Sanitizing Pot and Pan Washer (USA Version) OWNER S INSTALLATION, OPERATION AND MAINTENANCE MANUAL Meiko 917 Airpark Center Drive Nashville, TN 37217 Phone: (615) 399-6600
Silverware Pre-washing System INSTALLATION
 Silverware Pre-washing System INSTALLATION 1 WARNING! Be sure to follow all applicable national and local electrical codes when installing the electrical supply for this system. All field connections must
HA SERIES. CVap Holding Cabinet Owner s Manual
 1 HA SERIES CVap Holding Cabinet Owner s Manual Series Includes: HA4002 HA4003 HA4005 HA4503 HA4507 HA4508 HA4009 HA4509 HA4511 HA4519 HA4022 HA4522 HL4022 HL4522 HMA018 4272X294 R35 wp 06-07-18 2 HOLDING
SKY Stainless Steel Compact Dishwasher. Instructions
 SKY4313 - Stainless Steel Compact Dishwasher Instructions Please retain these instructions for future reference. Notice: Do not allow children to operate this appliance. Keep appliance out of reach of
PERFORM Operating Document. Use and Maintenance of Undercounter High Temperature Dishwasher
 PERFORM Operating Document Use and Maintenance of Undercounter High Temperature Dishwasher PC-POD-NS-004-v02 Revision History Version Reason for Revision Date 02 Name change in Authorization manager Change
Installation/Operation Manual with Service Replacement Parts. Undercounter Dishwashers M4 Series
 Installation/Operation Manual with Service Replacement Parts Undercounter Dishwashers M4 Series 201HT High Temperature Wash Refresh with built-in booster and Pumped Final Rinse 201HT 201LT Low Temperature
FAVORIT W0P. EN User manual
 FAVORIT 88419 W0P EN User manual 2 www.aeg.com CONTENTS 1. SAFETY INSTRUCTIONS...................................................... 3 2. PRODUCT DESCRIPTION.....................................................
Installation Manual PS-225 & PS-275
 Installation Manual PS-225 & PS-275 Table of Contents Pre-Uncrating Checklist... 1 Verifying System Requirements... 2 Verifying System Direction... 2 Verifying the Electrical Requirements... 2 Removal
OPERATOR S MODEL HCN-5 HHC-136 HEATED HOLDING CABINET REGISTER WARRANTY ONLINE AT
 OPERATOR S M A N U A L HEATED HOLDING CABINET MODEL HCN-5 HHC-136 REGISTER WARRANTY ONLINE AT WWW.HENNYPENNY.COM TABLE OF CONTENTS Section Page Section 1. INTRODUCTION... 1-1 1-1. Heated Holding Cabinet...
Service Parts
 GL Operator Manual !!!! WARNING Before installation and commisioning, you must read the safety instructions and warnings carefully and all the warning labels attached to the equipment. IMPORTANT Failure
OWNER'S MANUAL. FRY Holding Unit (FHU) MODELS FHU1 FHU2. Duke Manufacturing Company
 MODELS FHU1 FHU2. Duke Manufacturing Company") OWNER'S MANUAL FRY Holding Unit (FHU) Patent(s) Pending MODELS FHU FHU IMPORTANT INFORMATION, READ BEFORE USE. PLEASE SAVE THESE INSTRUCTIONS. This manual is Copyright 04 Duke Manufacturing Company. All
OWNER'S MANUAL FRY Holding Unit (FHU) Patent(s) Pending MODELS FHU FHU IMPORTANT INFORMATION, READ BEFORE USE. PLEASE SAVE THESE INSTRUCTIONS. This manual is Copyright 04 Duke Manufacturing Company. All
MW001 Integrated Dishwasher. Manual for Installation, Use and Maintenance
 MW001 Integrated Dishwasher Manual for Installation, Use and Maintenance Important The CDA Group Ltd cannot be held responsible for injuries or losses caused by incorrect use or installation of this product.
User Manual. Dishwasher ZDM17301SA ZDM17301WA
 EN User Manual Dishwasher ZDM17301SA ZDM17301WA Contents Safety information 2 Safety instructions 3 Product description 4 Control panel 5 Programmes 6 Daily Use 7 Hints and tips 10 Care and cleaning 11
Operating and installation instructions. Except as noted, this manual can be used for V500
 ALFA MODEL V500DP Manufactured by ELVIOMEX Ltd. for ULTIMO STAINLESS PRODUCTS INC. www.ultimostainless.com Operating and installation instructions Except as noted, this manual can be used for V500 CONTENTS
GREASE INTERCEPTORS. Z1192 GREASE RECOVERY APPLIANCE (GRA) INSTALLATION and OPERATION INSTRUCTIONS
 INSTALLATION and OPERATION INSTRUCTIONS") Z1192 GREASE RECOVERY APPLIANCE (GRA) INSTALLATION and OPERATION INSTRUCTIONS Note: Zurn Grease Interceptors with grease recognizing sensors are efficient appliances designed to separate grease from water.
Z1192 GREASE RECOVERY APPLIANCE (GRA) INSTALLATION and OPERATION INSTRUCTIONS Note: Zurn Grease Interceptors with grease recognizing sensors are efficient appliances designed to separate grease from water.
OIL FURNACE USER S INFORMATION MANUAL FOR THE OPERATION AND MAINTENANCE OF YOUR NEW OIL-FIRED FURNACE
 58CLA OIL FURNACE USER S INFORMATION MANUAL FOR THE OPERATION AND MAINTENANCE OF YOUR NEW OIL-FIRED FURNACE NOTE TO INSTALLER: THIS MANUAL MUST BE LEFT WITH THE EQUIPMENT USER. WELCOME TO A NEW GENERATION
Mechanical Ware Washing
 Mechanical Ware Washing 1 Objectives At the end of the reading, students should be able to: List correctly the ways in which sanitization may be achieved using a ware washing machine Differentiate between
NOTE TO INSTALLER: THIS MANUAL MUST BE LEFT WITH THE EQUIPMENT USER.
 c_::_':_-_:_ r'" _" "_1 WARNING: If the information in this manual is not followed exactly, a fire or explosion may Iresult causing property damage, personal injury or [loss of life. m m m Do not store
Use & Care Manual. Electric Tankless Water Heaters. With Installation Instructions for the Installer AP15447 (10/10)
") Use & Care Manual With Installation Instructions for the Installer Electric Tankless Water Heaters The purpose of this manual is twofold: one, to provide the installer with the basic directions and recommendations
Use & Care Manual With Installation Instructions for the Installer Electric Tankless Water Heaters The purpose of this manual is twofold: one, to provide the installer with the basic directions and recommendations
FRYMASTER TCF. Chicken Fryer
 Hardee s Food Systems, Inc. FRYMASTER TCF Chicken Fryer EQUIP 501 Chicken Fryer October 1, 1994 CALIBRATION EQUIPMENT and TOOLS Digital Thermometer Flat Blade or Phillips w/immersion Probe Screwdriver
FAVORIT W0P. EN User manual
 FAVORIT 77000 W0P EN User manual 2 www.aeg.com CONTENTS 1. SAFETY INSTRUCTIONS...................................................... 3 2. PRODUCT DESCRIPTION.....................................................
USER S INFORMATION MANUAL (2,4)SG13B
SG13B") USER S INFORMATION MANUAL (2,4)SG13B Series Gas Heating/Electric Cooling Package Unit Congratulations......your outdoor heating/cooling package unit is a valuable piece of equipment, designed and manufactured
USER S INFORMATION MANUAL (2,4)SG13B Series Gas Heating/Electric Cooling Package Unit Congratulations......your outdoor heating/cooling package unit is a valuable piece of equipment, designed and manufactured
GAS RACK OVENS WITH ELECTRONIC OVEN CONTROL
 GAS RACK OVENS WITH ELECTRONIC OVEN CONTROL MODELS DRO2G DRO2GH GAS GAS 701 S. RIDGE AVENUE TROY, OHIO 45374-0001 937-332-3000 www.hobartcorp.com FORM 19202 Rev. D (Dec. 2003) IMPORTANT FOR YOUR SAFETY
Cleaning and Sanitation Procedures Module Cafe/Dining Restroom
 Cafe/Dining Restroom Restrooms Materials Requirement Planning A. Materials requirement planning (MRP) a. Clean rags b. Mop buckets and wringers c. Cotton wet mops and handles d. Dust mop and dustpan e.
3-in-1 Cooking System
 MC750 OWNER S GUIDE 3-in-1 Cooking System www.ninjakitchen.com IMPORTANT SAFETY INSTRUCTIONS For Household Use Only WHEN USING ELECTRICAL APPLIANCES, BASIC SAFETY PRECAUTIONS SHOULD ALWAYS BE FOLLOWED,
INSTRUCTION MANUAL. Blue Whale Spa Ltd, 11 Glaisdale Drive East Nottingham, NG8 4GU
 INSTRUCTION MANUAL Balboa 500DZ-Series Operation Guide Initial Start-up Your spa will enter Priming Mode ( ) when it is energized. During Priming Mode, press Jets button(s) repeatedly and be sure all pumps
Job Hazard Analysis Analysis by:
 Cfee Maker Remove filter basket. Insert cfee filter and cfee grinds into basket. Replace filter basket. Pour water into reservoir. Place pot on element under basket. Turn on cfee maker and allow cfee to
MC510 Series OWNER S GUIDE. 2-in-1 Slow Cooker. ninjakitchen.com
 MC510 Series OWNER S GUIDE 2-in-1 Slow Cooker 1-877-646-5288 IMPORTANT SAFEGUARDS For Household Use Only WHEN USING ELECTRICAL APPLIANCES, BASIC SAFETY PRECAUTIONS SHOULD ALWAYS BE FOLLOWED, INCLUDING
Packaged Air Conditioning Units. Owner s Guide to Operating and Maintaining Your Air Conditioner. This manual should be left with the owner.
 Packaged Air Conditioning Units Owner s Guide to Operating and Maintaining Your Air Conditioner ELECTRICAL SHOCK HAZARD. Failure to follow this warning could result in personal injury, Disconnect power
CONTINUOUS MOTION WAREWASHING SILVERWARE PREWASHING, SKEWER WASHING FRUIT & VEGETABLE WASHING, SEAFOOD DEGLAZING, PROTEIN THAWING
 CONTINUOUS MOTION WAREWASHING SILVERWARE PREWASHING, SKEWER WASHING FRUIT & VEGETABLE WASHING, SEAFOOD DEGLAZING, PROTEIN THAWING Power Soak a continuous motion pot, pan and sheet pan washing system that
INSTRUCTIONS FOR USE. Deep Fryer. Model : EW-3K043 Voltage: 120V~60Hz Wattage: 1600W
 INSTRUCTIONS FOR USE Deep Fryer Model : EW-3K043 Voltage: 120V~60Hz Wattage: 1600W THIS PRODUCT IS ONLY FOR HOUSEHOLD USE ONLY. READ AND SAVE THESE SAFETY INSTRUCTIONS BEFORE USE IMPORTANT SAFEGUARDS When
Operating Instructions
 Operating Instructions Fryer KM 403 To prevent accidents and reduce machine damage, read these lnstructions before installation or use. UV M.-Nr. 05 825 170 2 Contents IMPORTANT SAFETY INSTRUCTIONS.................................
DETAILED SPECIFICATIONS
 Pre-Rinse/ Add-A-Faucet Soiled End Drain Board Scrapper Pre-Rinse Detergent Injector Liquid Level Sensor JBZ Non-Welded Field Joint Powered Utensil Basket Backsplash Liquid Level Sensor Sanitizer Injector
HX-30/40 and HX-30/40 S Glass and Dishwashers
 HX-30/40 and HX-30/40 S Glass and Dishwashers INSTALLATION OPERATION VERSION 18/01/00 2 Installation and Operation Instructions for Model HX-30/40 and HX-30/40 S (with built-in softener) Content Page 1
Installation GUIDE 6 SERIES. Built-in Electric Single and Double Wall Ovens MVSOE630 / CMVSOE630 MVDOE630 / CMVDOE630
 Installation GUIDE 6 SERIES Built-in Electric Single and Double Wall Ovens MVSOE630 / CMVSOE630 MVDOE630 / CMVDOE630 1 Table of Contents Warnings & Important Safety Information 2 Dimensions 4 Specifications
Cleaning & Sanitizing
 2016-2017 Food Safety and Sanitation Monthly Training September 2016 Cleaning & Sanitizing October 2016 Food Services Division In This Issue Training Guide & Requirements This training packet includes:
MW402 Integrated Dishwasher
 MW402 Integrated Dishwasher Manual for Installation, Use and Maintenance 1 Customer Care Department The Group Ltd. Harby Road Langar Nottinghamshire NG13 9HY T : 01949 862 012 F : 01949 862 003 E : customer.care@cda.eu
MW401 Integrated Dishwasher
 MW401 Integrated Dishwasher Manual for Installation, Use and Maintenance Customer Care Department The Group Ltd. Harby Road Langar Nottinghamshire NG13 9HY T : 01949 862 012 F : 01949 862 003 E : service@cda.eu
BUILT-IN OVEN MODEL: EBO-D7080D(SS) Owner s Manual Please read this manual carefully before operating your set. Retain it for future reference.
 Owner s Manual Please read this manual carefully before operating your set. Retain it for future reference.") BUILT-IN OVEN MODEL: EBO-D7080D(SS) Owner s Manual Please read this manual carefully before operating your set. Retain it for future reference. Record model number and serial number of the set. See the
BUILT-IN OVEN MODEL: EBO-D7080D(SS) Owner s Manual Please read this manual carefully before operating your set. Retain it for future reference. Record model number and serial number of the set. See the
Operation, Cleaning and Maintenance Manual
 Operation, Cleaning and Maintenance Manual PRO Series Rack Conveyor Dishwashers Models: 44 PRO 66 PRO 70FF PRO 80HD PRO 44 PRO LISTED www.championindustries.com Issue Date: 2.2.17 Manual P/N 116113 rev.
User manual. Dishwasher ZDT15010FA
 EN User manual Dishwasher ZDT15010FA Contents Safety instructions 2 Control panel 3 Programmes _ 4 Options _ 5 Before first use _ 6 Daily use _ 7 Hints and tips 9 Care and cleaning _ 10 Troubleshooting
2 Finding Information
 2 Finding Information PLEASE READ AND SAVE THIS GUIDE Attach your sales receipt to this page for future reference. Thank you for choosing Electrolux, the new premium brand in home appliances. This Use
Ecomiser SR-04 / SR-04T DOOR TYPE DISHWASHER
 Ecomiser SR-04 / SR-04T DOOR TYPE DISHWASHER Safety Instructions ---------------- 4-5 Dishwasher Features ------------- 6-7 Installation Instructions -------- 8-14 Machine Operation ------------- 15-20
Viking Installation Guide
 Viking Installation Guide Viking Range Corporation Front Street Greenwood, Mississippi 38930 USA (66) 455-00 For product information, visit the Viking Web site at vikingrange.com Professional Built-In
User manual. Dishwasher ZDI12001
 EN User manual Dishwasher ZDI12001 Contents Safety information 2 Product description _ 3 Control panel 3 Programmes 4 Before first use _ 4 Daily use 7 Care and cleaning 9 Troubleshooting 9 Technical information
Safety and Sanitation. Safety and Sanitation
 Safety and Sanitation Safety and Sanitation When working with electric appliances, the safety rules are: 1. Keep your hands dry. Never use wet hands to shut off or handle electric switches. 2. Stand on
Viking Installation Guide
 Viking Installation Guide Viking Range Corporation 111 Front Street Greenwood, Mississippi 38930 USA (662) 455-1200 For product information, call 1-888-VIKING1 (845-4641) or visit the Viking Web site at
THE READY RACK 2 GEAR PPE DRYING CABINET. Operator s Manual & Installation Guide. Installation/Operation/Maintenance/Part Number I
 THE READY RACK 2 GEAR PPE DRYING CABINET Operator s Manual & Installation Guide Installation/Operation/Maintenance/Part Number 820220I Copy right 2016 Forward We are pleased that you have selected a Ready
Installation & Operating Guide
 5-036 HOT WATER TANK Installation & Operating Guide Read all instructions thoroughly. Keep this guide for future reference. Proof of purchase is required for Warranty. Staple receipt or proof of purchase
FOOD SAFETY EVALUATION REPORT
 (559) 584-4586 PR0009484 June 01, 2018 None Noted The operator has requested a follow-up inspection to verify compliance with the violations noted on May 31, 2018. The following observations were made:
Cleaning and Sanitation Procedures Module Deli
 Deli Triple Sink System (Clean, Rinse, Sanitize) A. Preparation 1) Wash your hands with anti-microbial soap before and after cleaning and whenever hands are dirty. 2) Dawn appropriate PPE s 3) Place safety
GETTING STARTED? EASY.
 User Manual GETTING STARTED? EASY. ZDF26001WA ZDF26001XA EN User Manual Dishwasher SAFETY INFORMATION Before the installation and use of the appliance, carefully read the supplied instructions. The manufacturer
IW-25-2 Dehumidifier Installation & Operations. Manual
 IW-25-2 Dehumidifier Installation & Operations Installation and Operation Manual Manual IW-25-1 Dehumidifier Please Read and Save These Instructions Please Read and Save These Instructions Innovative Dehumidifier
SEARious Slow Cooker
 SEARious Slow Cooker MC501 MC501C OWNER S GUIDE HELP LINE 1 877 646-5288 IMPORTANT SAFETY INSTRUCTIONS For Household Use Only WHEN USING ELECTRICAL APPLIANCES, BASIC SAFETY PRECAUTIONS SHOULD ALWAYS BE
MODEL 598A TWO-SPEED PLUS CENTRAL AIR CONDITIONER
 USER S INFORMATION MANUAL MODEL 598A TWO-SPEED PLUS CENTRAL AIR CONDITIONER NOTE TO INSTALLER: This manual must be left with the equipment user. WELCOME TO EFFICIENT HOME COOLING COMFORT Congratulations
User manual. Dishwasher ZDT15002
 EN User manual Dishwasher ZDT15002 Contents Safety information 2 Product description _ 3 Control panel 4 Programmes 4 Options _ 5 Before first use _ 5 Daily use 7 Care and cleaning 9 Troubleshooting 10
USER S, MAINTENANCE and SERVICE INFORMATION MANUAL
 CONTENTS SAFETY INFORMATION................ 2 FOR YOUR SAFETY...................... 2 SYSTEM OPERATION.................. 2 THERMOSTATS.......................... 2 INTERMITTENT IGNITION DEVICE..........
RESTROOMS. Proper daily cleaning procedures. Custodial Best Practices
 RESTROOMS Proper daily cleaning procedures Custodial Best Practices Cleaning tools Toilet bowl brush stiff bristle brush used for basic scrubbing and cleaning of toilets Toilet bowl swab soft nylon applicator
User manual. Dishwasher ZDF14001WA ZDF14001KA ZDF14001SA
 EN User manual Dishwasher ZDF14001WA ZDF14001KA ZDF14001SA Contents Safety instructions 2 Control panel 4 Programmes _ 4 Options _ 5 Before first use _ 6 Daily use _ 7 Hints and tips 9 Care and cleaning
Conveyor Washer Operation Manual
 Douglas Machines Corp. Conveyor Washer Operation Manual Douglas Machines Corp. 2101 Calumet Street Clearwater, FL 33765 Ph. (727) 461-3477 Fax (727) 449-0029 Do s and Don ts DO Wear Safety Glasses Wear
Cooker Hood User Manual
 Cooker Hood User Manual HCB93042X EN 01M-8850803200-0116-02 Please read this manual first! Dear Customers! Thank you for preferring a Beko product. We hope that you get the best results from your product
OWNER'S MANUAL R-410A Duct Free Split System Air Conditioner and Heat Pump
 R-10A Duct Free Split System Air Conditioner and Heat Pump Product Family: DFF(A/H)H, DFC(A/H) Please read the operating instructions and safety precautions carefully and thoroughly before installing and
Dishwasher. Use & Care Manual HDW2401ST. Table of Contents. Important Safety Instructions Features of your new dishwasher...
 Dishwasher Use & Care Manual HDW2401ST Table of Contents Important Safety Instructions... 1 Features of your new dishwasher.... 2-4 Operating Instructions... 5-10 Preparing and loading dishes... 11-13
PRICE BOOK EFFECTIVE JUNE 15, 2017
 20 17 PRICE BOOK EFFECTIVE JUNE 15, 2017 WARE WASHING FRUIT & VEGETABLE WASHING, SEAFOOD DEGLAZING, PROTEIN THAWING SILVERWARE PREWASHING Power Soak Streamline your operation with a uniform wash action,
User Manual. Countertop Tortilla/Portion Steamer. Models: QuickShot QS /2018. Please read and keep these instructions. Indoor use only.
 Countertop Tortilla/Portion Steamer Models: QuickShot QS-1800 09/2018 Please read and keep these instructions. Indoor use only. www.avantcoequipment.com 1 Index Specifications... 3 Important Safety Information...
ULTRASONIC HUMIDIFIER
 To Buy: Visit www.sylvane.com or call (800) 934-9194 For Product Support: Contact Sunpentown at 1-800-330-0388 ULTRASONIC HUMIDIFIER [ADORABLE MONKEY] To prolong the life of this humidifier, using distilled
wc431 Slimline Integrated Dishwasher Manual for Installation, Use and Maintenance
 wc431 Slimline Integrated Dishwasher Manual for Installation, Use and Maintenance Contents Contents... 2 Important... 3 Important Notes... 4 Recommendations... 5 Before First Use... 5 Control Panel...
User Manual Dishwasher FAVORIT 56302MO FAVORIT 56302WO
 EN User Manual Dishwasher FAVORIT 56302MO FAVORIT 56302WO 2 www.aeg.com CONTENTS 1. SAFETY INFORMATION...3 2. SAFETY INSTRUCTIONS... 4 3. PRODUCT DESCRIPTION... 5 4. CONTROL PANEL...6 5. PROGRAMMES...
Restrooms. Proper daily cleaning procedures. Custodial Best Practices
 Restrooms Proper daily cleaning procedures Custodial Best Practices Cleaning tools Bowl brush stiff bristle brush used for basic scrubbing and cleaning of toilets and urinals. Bowl swab soft nylon applicator
FAVORIT 34502VI0. EN User manual
 FAVORIT 34502VI0 EN User manual 2 www.aeg.com CONTENTS 1. SAFETY INSTRUCTIONS...................................................... 3 2. PRODUCT DESCRIPTION.....................................................
FAVORIT DISHWASHER USER MANUAL
 FAVORIT 77000 DISHWASHER USER MANUAL 2 CONTENTS 4 SAFETY INFORMATION 6 PRODUCT DESCRIPTION 7 CONTROL PANEL 8 PROGRAMMES 10 OPTIONS 11 BEFORE FIRST USE 14 DAILY USE 17 CARE AND CLEANING 18 TROUBLESHOOTING
DESIGN CLASS FUNCTION
 PROFESSIONAL QUALITY COOKING EQUIPMENT INSTALLATION MANUAL FOR MEDALLION DUAL FUEL RANGES MODEL NUMBERS: ARR-304DF, ARR-366DF, ARR-364GDDF, ARR-364GRDF, ARR-486GDDF, ARR-486GRDF, ARR-4822GDDF, ARR-484X2GRDF,
PRICE BOOK EFFECTIVE JANUARY 1, 2018
 20 18 PRICE BOOK EFFECTIVE JANUARY 1, 2018 WARE WASHING SILVERWARE PREWASHING FRUIT & VEGETABLE WASHING, SEAFOOD DEGLAZING, PROTEIN THAWING Power Soak Streamline your operation with a uniform wash action,
BUILT-IN OVEN MODEL: EBO-E7081D(SS) Owner s Manual Please read this manual carefully before operating your set. Retain it for future reference.
 Owner s Manual Please read this manual carefully before operating your set. Retain it for future reference.") BUILT-IN OVEN MODEL: EBO-E7081D(SS) Owner s Manual Please read this manual carefully before operating your set. Retain it for future reference. Record model number and serial number of the set. See the
BUILT-IN OVEN MODEL: EBO-E7081D(SS) Owner s Manual Please read this manual carefully before operating your set. Retain it for future reference. Record model number and serial number of the set. See the
Please read this manual completely before attempting to install, operate or service this equipment
 Your Solutions Partner IH-1 CONTROL SYSTEM RECOMMENDED FILL TEMPERATURE IS 120 F OFF ON LOW HEAT START! WARNING Hazardous voltage. Disconnect power before servicing machine. FAILED HEAT LOW HEAT: Temp
Seaward Products. OWNER S MANUAL Installation Operation - Maintenance. Princess Gourmet Model 345. Built-in Electric Oven ELECTRIC WALL OVEN
 Seaward Products ELECTRIC WALL OVEN OWNER S MANUAL Installation Operation - Maintenance Princess Gourmet Model 345 Built-in Electric Oven IMPORTANT: Read all instructions before operating Oven. Save the
Undercounter High Temperature Sanitizing Dishwasher (USA Version)
") M-iClean Undercounter High Temperature Sanitizing Dishwasher (USA Version) OWNER S INSTALLATION, OPERATION AND MAINTENANCE MANUAL Model UM with GiO Module Accessory MEIKO 1349 Heil Quaker Blvd. La Vergne,
M-iClean Undercounter High Temperature Sanitizing Dishwasher (USA Version) OWNER S INSTALLATION, OPERATION AND MAINTENANCE MANUAL Model UM with GiO Module Accessory MEIKO 1349 Heil Quaker Blvd. La Vergne,
Jon Peacock, 880 FOOD ESTABLISHMENT INSPECTION REPORT. 10:07am 4:05pm Colton's Steakhouse Missouri Acquisitions Group Lewis Fugate
 10:07am 4:05pm 5-11-17 8 Colton's Steakhouse Missouri Acquisitions Group Lewis Fugate 1300 Maple Street 4682 187 Farmington, 63640 573-756-9500 573-756-9505 Risk factors Public health interventions 1507
FAVORIT VI DISHWASHER USER MANUAL
 FAVORIT 55002 VI DISHWASHER USER MANUAL 2 CONTENTS 4 SAFETY INFORMATION 6 PRODUCT DESCRIPTION 7 CONTROL PANEL 8 PROGRAMMES 9 OPTIONS 10 BEFORE FIRST USE 13 DAILY USE 16 CARE AND CLEANING 17 TROUBLESHOOTING
* * English. Operator Manual. Carpet Cleaner Rev. 01 ( ) Model V
 Model V") R3 Carpet Cleaner English Operator Manual Model 9004199-230V R For the latest Parts manuals and other language Operator manuals, visit: www.tennantco.com/manuals 9003707 Rev. 01 (07-2016) *9003707* OPERATION
R3 Carpet Cleaner English Operator Manual Model 9004199-230V R For the latest Parts manuals and other language Operator manuals, visit: www.tennantco.com/manuals 9003707 Rev. 01 (07-2016) *9003707* OPERATION
NOTE: All the illustrations in this manual are for explanation purposes only. Your air conditioner may be slightly different.
 RADS-51J RADS-61J Owner s Manual Room Air Conditioner with R-410A Heat Controller, Inc. 15 16 Contact an authorized service technician for repair or maintenance of this unit. Contact an authorized installer
FAVORIT34502VIO. EN User Manual
 FAVORIT34502VIO EN User Manual 2 www.aeg.com CONTENTS 1. SAFETY INFORMATION...3 2. SAFETY INSTRUCTIONS... 4 3. PRODUCT DESCRIPTION... 6 4. CONTROL PANEL...6 5. PROGRAMMES... 7 6. SETTINGS... 8 7. BEFORE
GETTING STARTED? EASY.
 User Manual GETTING STARTED? EASY. ZDT24001FA EN User Manual Dishwasher SAFETY INFORMATION Before the installation and use of the appliance, carefully read the supplied instructions. The manufacturer is
Owner / Operator Use and Care Guide I SERIES 224 ICE CUBE MACHINE
 Owner / Operator Use and Care Guide I SERIES 224 ICE CUBE MACHINE THE HOTTEST MACHINES ON ICE CORNELIUS INC www.cornelius.com IMPORTANT: TO THE INSTALLER. It is the responsibility of the Installer to ensure
OWNER S MANUAL. R 410A Ductless Split System Air Conditioner and Heat Pump
 R 410A Ductless Split System Air Conditioner and Heat Pump Models DLC4(A/H) Outdoor Unit, DLF4(A/H) Indoor Unit Sizes 9K, 12K, 18K, 24K, 30K and 36K Please read the operating instructions and safety precautions
WC141 Integrated Dishwasher Installation, Use and Maintenance
 WC141 Integrated Dishwasher Installation, Use and Maintenance Customer Care Department The Group Ltd. Harby Road Langar Nottinghamshire NG13 9HY T : 01949 862 012 F : 01949 862 003 E : customer.care@cda.eu
Instruction Manual. Bottle Cooler. Models HBC-50 (-S) HBC-65 (-S) HBC-80 (-S) HBC-95 (-S) hoshizakiamerica.com. Issued: Revised:
 HBC-65 (-S) HBC-80 (-S) HBC-95 (-S) hoshizakiamerica.com. Issued: Revised:") Instruction Manual Bottle Cooler Models HBC-50 (-S) HBC-65 (-S) HBC-80 (-S) HBC-95 (-S) hoshizakiamerica.com Issued: 06-11-2018 Revised: WARNING Only qualified service technicians should install and service
Instruction Manual Bottle Cooler Models HBC-50 (-S) HBC-65 (-S) HBC-80 (-S) HBC-95 (-S) hoshizakiamerica.com Issued: 06-11-2018 Revised: WARNING Only qualified service technicians should install and service