Tap Master Artesian Hydro Gardener Series Installation & Service Manual
|
|
|
- Dina Pearson
- 5 years ago
- Views:
Transcription

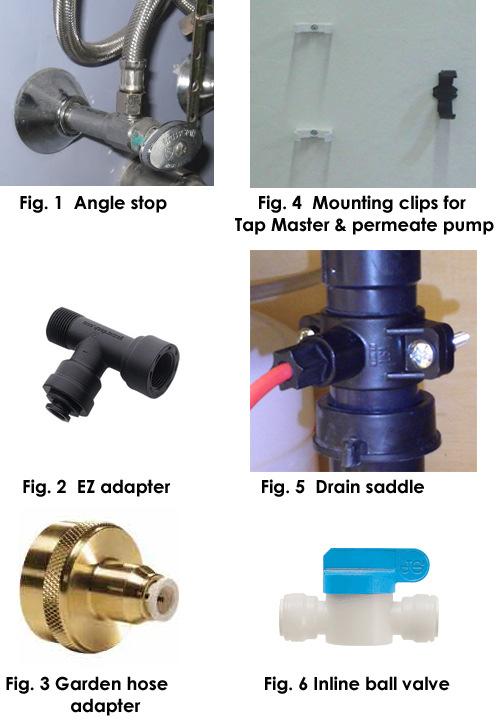
1 Perfect Water Technologies 7 Tips for an Easy and Successful Installation 1. Keep it simple - there are 3 connections to make, and the tubing is color coded. 2. Have plenty of time, light, space, and towels before getting started. If everything goes well, you should be done in 45 minutes. However, it can take somewhat longer. 3. NEVER use plumber s putty, thread-lock, or anything else you wouldn t eat on any part of this system. You may use as much white Teflon plumber s tape as you like. If you use plumber s putty on your fittings, you will have disgusting and potentially toxic water for the life of the system Tap Master Artesian Hydro Gardener Series Installation & Service Manual 4. Mount the Tap Master vertically so that the back cap is on top. There is only one black cap and it has one grey fitting at its top. Mount the permeate pump (pro model) correctly or nothing will work. There is a big arrow on the permeate pump, make sure it points up. 5. Mount the drain saddle on a vertical section of drain pipe. IF you must mount the drain saddle on a horizontal section, then drill the drain hole on the top side of the pipe or at least at an angle where the drain water from the Tap Master drops down into the drain pipe. [Think of a manhole passage into the sewer] When making the connection from the system to the drain saddle - wrap the tubing around the drain pipe a few times, so that some loops of tubing are higher than the fitting. Tap Master Artesian Hydro Gardener Tap Master Artesian Hydro Gardener Pro 6. Read the instructions thoroughly before beginning. There is a lot of information here, some of which you may not need for your application. If you have questions call or . will usually be answered within hours even at night. 7. Have patience. Your new Tap Master may take some time to break in and start flowing. Make sure you produce and flush out 10 gallons of water before use. TUBING COLOR CODING ORANGE FEED WATER IN BLUE PURIFIED WATER OUT RED TO DRAIN Perfect Water Technologies, Inc. Copyright 2010 Page 12
2 Page 2
 10 Artesian post filter: 5 micron granular activated coconut shell carbon with advanced remineralization media (1) Thin Film Composite")
3 Tap Master Artesian Hydro Gardener Contents: (1) Instruction book: detailed descriptions, photos and troubleshooting guide (1) 10 Sediment pre-filter: 5 micron bonded spun poly depth (1) 10 Carbon pre filter: 5 micron granular activated coconut shell carbon (1) 10 Artesian post filter: 5 micron granular activated coconut shell carbon with advanced remineralization media (1) Thin Film Composite membrane micron ultra-fine pore, 150 gallon per day, 10,000 gallon service life. GPD performance based upon 70psi and 77 F input. (1) Flow restriction architecture: integrated flow restrictor and water check valve, and central auto shut-off valve or permeate pump (pro model). (1) Drain saddle; all fittings and connecting hardware (1) EZ adapter feed water adapter ⅜ mc x ⅜ fc x ¼ tube (1) Garden Hose Adapter feed water adapter ¾ x ¼ tube (1) Inline Ball valve ¼ tube x ¼ tube Maintenance Schedule Sediment filter 3,900 gallons or as needed Carbon filter 3,900 gallons or annual replacement Membrane (150 gpd TFC) 10,000 gallons or as needed Artesian filter 2,500 gallons or annual replacement PERMEATE PUMP MOUNTING Permeate pump should be mounted with inlet and outlet ports to the sides, and the center indicating arrow pointing up. (Also see Fig. 4) General System Specifications Feed water: PSI PSI Feed water Temperature: (F) Max. Total Dissolved Solids (TDS): 2000 ppm Max. Hardness: 10 gpg ph limits: 4-10 System Location The Tap Master should be installed indoors or protected from the elements such as under a sink, or in a basement. If the Tap Master is exposed to freezing it will burst. If the Tap Master is exposed to the elements it can lead to premature wear and/or contamination. For best results the Tap Master should be mounted vertically where the drain line out is found at the bottom of the system. Page 10 Page 3
4 Tools Required Safety glasses Towels Phillips screwdriver Scissors Medium Crescent wrench Medium pliers Teflon tape Page 4 TUBING COLOR CODING ORANGE FEED WATER IN BLUE PURIFIED WATER OUT RED WASTE WATER READ ALL INSTRUCTIONS THOROUGHLY PRIOR TO INSTALLATION Installing The Tap Master Artesian Hydro Gardener Reverse Osmosis System 1a. UNDERSINK INSTALLATION: Install feed water EZ adapter on COLD water line - Always wear protective eyewear while under sink. Locate the COLD angle-stop (the main water lines under the sink one hot water, one cold water, see Fig. 1), and turn clock-wise to shut off the water. Locate ⅜ fitting, typically found on the line out of the angle-stop or where the existing line connects to the kitchen faucet. Disconnect the ⅜ fitting on either the angle-stop, or the kitchen faucet. Use Teflon tape on the EZ adapter (see Fig. 2) and the angle-stop male threads, and make sure o-rings are properly seated. Fit the EZ adapter to the threads and HAND tighten. Locate inline ball valve (see Fig. 6) in parts bag and its accompanying length of tubing. Insert one end of the tubing into the EZ adapter and the other end into the inline ball valve. Have a bowl or cup nearby to catch water, and position the bowl near the inline ball valve. Turn ON water by rotating angle-stop counter-clockwise until water is seen, then close the ball valve by turning the handle perpendicular to the ball valve body. Dry all parts, check for leaks, and snugness. FOR ADDITIONAL INFORMATION ON USING QUICK CONNECT FITTINGS SEE PAGE 7 1b. GARDEN HOSE INSTALLATION: Install garden hose adapter on garden hose - Locate the brass garden hose adapter (see Fig. 3) in the parts bag. Fit the garden hose adapter onto the garden hose. Use Teflon tape on the garden hose threads if necessary to make a leak proof seal, and make sure o-ring is properly seated. Fit the garden hose adapter to the garden hose threads and HAND tighten. Locate inline ball valve (see Fig. 6) in parts bag and its accompanying length of tubing. Insert one end of the tubing into the garden hose adapter and the other end into the inline ball valve. Have a bowl or cup nearby to catch water, and position the bowl near the inline ball valve. Turn ON the Weak pressure at RO sink faucet & storage tank filling slowly NOTE: Seasonal changes in temperature can cause pressure imbalances within the system resulting in slow water production. Oftentimes the imbalance will correct itself on its own within a few days. You may also restore the internal system pressure balance by draining the tank, removing a tube to relieve system pressure, then shut off the system overnight. Turn it back on, and allow the tank to refill, then shut it off again when full for another night. 1. Make sure the angle-stop or garden hose valve is fully open. 2. Check all tubing for kinks or sharp bends - this can impede the flow of water. 3. Check household water pressure. System performance based upon 70psi and 77 F input., max hardness 171mg/L, <0.3 mg/l iron. 4. Check flow to the membrane housing. Turn off the water at the EZ adapter, and briefly turn on the RO faucet or user supplied point of use to relieve any system pressure. Then pull the black tube out of the top of the black membrane housing at the quick connect fitting. (There is only one fitting on the top of the membrane housing, the bottom has two - one white, one grey). Point the tube you have just disconnected into a pitcher and open the feed adapter valve. The water flow from the tube should be fairly strong about a gallon per minute. 5. If the flow to the membrane housing is weak, then check the water flow at each point in the system backwards to the feed valve until the blockage is found. 6. If the flow to the membrane housing is strong (#5), then check flow at the RED ¼ drain tube ensuring that it is unobstructed. The water flow from the ⅜ BLUE tube should be a thin, steady or pulsing trickle. Discoloration of water The first batch of water produced from your purification system may be discolored due to the presence of carbon from the carbon filters, and a small amount of preservative. This is normal. DO NOT drink the first 10 gallons of water. Drinking from un-flushed system may cause gastrointestinal discomfort, colic and/or diarrhea. Consult a physician if discomfort persists. Running out 10 gallons of water will effectively flush out the system, and make it ready for use. Air Bubbles Tiny air bubbles may be present in product water for some time after installation and filter changes and will dissipate when left to stand for a few seconds. The air bubbles are harmless oxygenation and should not be mistaken for sedimentation or a defect in filtration. Page 9
5 Troubleshooting IMPORTANT NOTE: Before performing service on the Tap Master RO at any time, and for any reason: first switch to the OFF position all under-sink water valves, except for the RO faucet or your user supplied point of use which you should switch OPEN to relieve system pressure and drain away excess water from the lines. Pushpull and quick connect fittings are nearly impossible to remove when under pressure. Leaks from metal fittings Unscrew fittings and re-tape male fitting. Tape should be wound 5-7 times around male thread. Tape should not cover opening. Use only Teflon tape. Re-tighten fitting securely. Over tightening can crush the tubing insert and cause a water blockage. Leaks from plastic fittings Plastic fittings should be firmly finger tightened. Under tightening can result in leaks, over tightening can crush the tubing and result in a water blockage. For plastic fittings only; make sure the plastic tubing has an insert in the tube end, and a feral (o-ring which compresses the tubing around the insert) in the plastic female fitting. Drain tubing does not need an insert. Leaks from quick connect, push-pull or Speedfit fittings Disconnect fitting by pushing in the tubing with one hand and depressing the ring on the fitting with the other hand. Then pull out tubing while the ring is still depressed. Tubing cannot be pulled out without depressing the fitting ring, and relieving system pressure. Make sure the tubing is cut is straight, the edge is completely smooth, and the tube is rounded. Scratched, gouged, damaged, or oblong tubing end will leak. Re-insert the tubing into the push-pull fitting. Push tubing all the way in, then pull back gently, to check fit. Most push-pull fittings take about a 1/3 of tubing inserted into them. No water from Tap Master RO System Make sure all valves are on the ON position. Check for over tightening of fittings. Eliminate possible blockage points by disconnecting each system component and checking for pressure. Check for blockage in drain saddle and drain tubing. Have a bowl and towel at hand. Hissing, clicking or flowing sounds from Tap Master RO are normal during the water purification process. Sounds may last for approximately 1 hour per gallon of water used. Sounds should stop once the reserve tank is full. Permeate pump equipped systems will click and whoosh. water to the garden hose, then close the ball valve by turning the handle perpendicular to the ball valve body after the air is purged and water flows. Failure to purge the air can lead to system damage and/or diminished performance and/or air bubbles in the product water for months. Dry all parts, check for leaks, and snugness. 2. Mount the Tap Master Artesian Hydro Gardener Reverse Osmosis System - Identify a location for installing the Tap Master RO unit mounting clips. The location should allow enough room for the for connecting and disconnecting the unit, and for performing general service on the unit. (see Fig. 4) For undersink installation typical locations are on either right or left side, near the back wall. Use supplied mounting clips and mounting template located inside the back cover of this manual. The Tap Master should be mounted vertically where the drain line out is on the bottom. Insert ORANGE ¼ tubing from the Tap Master into feed water adapter inline ball valve used in step 1. 2a. Mounting Permeate Pump (Pro model) - Mount the permeate pump on the right side of the tap master using supplied mounting clip and screws. IMPORTANT: permeate pump must be mounted with indicator arrow pointing up. Indicator arrow is the large, center arrow. See page 10 for mounting orientation diagram. 3a. UNDERSINK INSTALLATION: Install drain saddle clamp and drain line Identify a vertical section of drainpipe with enough space to mount the drain saddle clamp. (See Fig. 5) A horizontal section of drain pipe may be use to locate the drain saddle, but you must be sure to drill the drain hole downward into the pipe so that the waste water from the Tap Master drips down into the pipe. Drainpipe material can be either metal or plastic. Locate drain hole template/gasket supplied with drain saddle clamp, peel off its backing, and discard the perforated center piece. Affix the sticky side of the template/gasket on the previously identified location of drainpipe. Place ¼ drill bit inside template hole, and drill a hole into the drainpipe. Drill through one side only. DO NOT drill a hole clean through both sides of the drainpipe. This will result in a leak, and require replacement of that piece of drainpipe. Mount the drain saddle clamp on top of the template with the holes aligned. You may use a screwdriver to align the holes. Fit drain saddle clamp back-plate and screws. Alternate tightening screws on each side of the drain saddle clamp to ensure an even, snug fit. (See Fig. 5) Locate RED ¼ drain tubing and push on black plastic nut found in drain saddle bag onto the tubing, then wrap excess tubing around the drainpipe before hand tightening black plastic nut onto the drain saddle male fitting until it is snug. Page 8 Page 5

6 3b. Floor drain installation Affix the RED ¼ drain tubing above the floor drain such that the drain tubing is at least 3 above the high point of any standing water. Do not allow the opening of the RED ¼ drain tubing to come in contact with the ground or any standing water. 4. Water line out to point of use Locate BLUE ⅜ tubing and connect to the user supplied point of use using a user supplied fitting. Do not allow the opening of the BLUE ⅜ tubing to come in contact with the ground or any standing water. 5a. UNDERSINK INSTALLATION: Pressurize the Tap Master Artesian Hydro Gardener Reverse Osmosis System - Make sure unit exterior and fittings are dry. Water should flow normally from your sink s cold and hot faucet. Double check to make sure all valves are in the CLOSED position, except for the main angle-stop valves, which should be OPEN. SLOWLY open the inline ball valve at the EZ adapter. You should hear water flowing through the system. Check for leaks at all fittings. Allow 5-15 minutes for system pressure to build. A thin steady (or pulsing in Pro model) trickle of water should be present after 2-20 minutes from the BLUE ⅜ tubing or your point of use. Some blackening of the water may present due to loose carbon being flushed out. Allow 10 gallons of water to be produced to flush the system and make it ready for use. Membrane contains a mild preservative. System must be flushed prior to use. Enjoy! 5b. GARDEN HOSE INSTALLATION: Pressurize the Tap Master Artesian Hydro Gardener Reverse Osmosis System - Make sure unit is dry. SLOWLY open the garden hose water valve. SLOWLY open the inline ball valve at the EZ adapter. You should hear water flowing through the system. Check for leaks at all fittings. Allow 5-15 minutes for system pressure to build. A thin steady (or pulsing in Pro model) trickle of water should be present after 2-20 minutes from the BLUE ⅜ tubing or your point of use. Some blackening of the water may present due to loose carbon being flushed out. Allow 10 gallons of water to be produced to flush the system and make it ready for use. Membrane contains a mild preservative. System must be flushed prior to use. Enjoy! USING QUICK CONNECT FITTINGS Page 6 Page 7
Tap Master Series Reverse Osmosis System Installation & Service Manual
 Perfect Water Technologies 10 Tips for an Easy and Successful Installation 1. Keep it simple - there are 4 connections to make, and the tubing is color coded. VIDEO INSTRUCTIONS ARE AVAILABLE ONLINE (6
Home Master Reverse Osmosis System Installation & Service Manual
 Perfect Water Technologies 10 Tips for an Easy and Successful Installation 1. Keep it simple - there are 4 connections to make, and the tubing is color coded. VIDEO INSTRUCTIONS ARE AVAILABLE ONLINE (6
Home Master Reverse Osmosis System Installation & Service Manual
 Perfect Water Technologies Home Master Reverse Osmosis System Installation & Service Manual Home Master Standard RO Home Master Artesian Full Contact Home Master IRON Home Master UV Home Master ULTRA Home
ULTIMATE REVERSE OSMOSIS SYSTEM
 ULTIMATE REVERSE OSMOSIS SYSTEM INSTALLATION INSTRUCTION & OWNER S MANUAL Ver 3.1 All Rights Reserved APEC Water Systems Please keep this Owner s Manual for future reference. It contains useful information
INSTALLATION & SERVICE MANUAL
 INSTALLATION & SERVICE MANUAL Countertop Reverse Osmosis Systems Series CT CT-315 CT-315TFC CT-445 CT-445P CT-D425 CT-D425P CT-550UP 3 STAGE CTA RO SYSTEM 3 STAGE TFC RO SYSTEM 4 STAGE TFC RO SYSTEM 4
APEX Water Filters MODEL RO 5. Treat your body to pure goodness with Apex filtered water INSTRUCTION MANUAL. pure water in every drop
 APEX Water Filters pure water in every drop MODEL RO 5 INSTRUCTION MANUAL Treat your body to pure goodness with Apex filtered water A Water supply adapter valve B Cold water shut-off valve C Hot water
Installation Instructions for:
 Installation Instructions for: Home II Reverse Osmosis System Home II Reverse Osmosis System COMBO Installation Instructions Pre-amble. This Aquasafe Reverse Osmosis System has been specifically designed
TANKLESS REVERSE OSMOSIS SYSTEMS USER S MANUAL
 Water Systems, LLC www.123filter.com Email: sales@123filter.com TANKLESS REVERSE OSMOSIS SYSTEMS USER S MANUAL Model #RCB4T ABOUT THE SYSTEM Reverse Osmosis process is a separation process. Tap water enters
1 P a g e. G4 Counter Top OPERATION MANUAL
 1 P a g e G4 Counter Top OPERATION MANUAL Table of Contents Introduction. 3 Receiving....4 Description Model G3 & G4...5/6 Water Production Flow Chart...7 Positioning the Cooler...8 Water Cooler Connections..9
Installation & Service Guide
 Reverse Osmosis Ontario Soft Water.ca Kitchener, Canada 519-579-0500 Installation & Service Guide Pentair 75 gpd Encapsulated Membrane System Standard System 75gpd Membrane Your New Reverse Osmosis System
Table of Contents. List of Figures
 1 P a g e Table of Contents Introduction. 3 Receiving....4 Description Model G3 & G4...5/6 Water Production Flow Chart...7 Positioning the Cooler...8 Water Cooler Connections..9 Feed Water Connection....10
475 PRO SERIES Reverse Osmosis System Installation & Operation Manual
 PLEASE READ ALL INSTRUCTIONS BEFORE INSTALLING AND USING THIS SYSTEM 475 PRO SERIES Reverse Osmosis System Installation & Operation Manual Model STAGE 1 STAGE 2 STAGE 3 STAGE 4 OUTPUT 475 SEDIMENT CARBON
OWNER S MANUAL AND INSTALLATION GUIDE PLEASE READ THIS MANUAL CAREFULLY BEFORE ATTEMPTING INSTALLATION
 ClearChoice Economy Under Sink Drinking Water System OWNER S MANUAL AND INSTALLATION GUIDE PLEASE READ THIS MANUAL CAREFULLY BEFORE ATTEMPTING INSTALLATION Congratulations on the purchase of your ClearChoice
INSTALLATION INSTRUCTION Ver
 ispring Reverse Osmosis Water Filter Systems INSTALLATION INSTRUCTION Ver 2005-6 Copyright 2005-2015 ISPRING WATER SYSTEMS, LLC. All rights reserved. Please keep this owner s manual for future reference.
INSTALLATION & SERVICE MANUAL
 INSTALLATION & SERVICE MANUAL Countertop Reverse Osmosis Systems Series CT System Tested and Certified by WQA against NSF/ANSI Standard 58 for the reduction of Arsenic, Barium, Cadmium, Copper, Cyst, Hexavalent
Installation Instructions for:
 Installation Instructions for: Maximus II Reverse Osmosis System with Remineralization Maximus II Reverse Osmosis System COMBO with Remineralization Installation Instructions Pre-amble. This Aquasafe Reverse
MKTF CRO-Series 5-Stage Reverse Osmosis System Installation and Maintenance Manual
 MKTF - 215 CRO-Series 5-Stage Reverse Osmosis System Installation and Maintenance Manual Please fill out the following information at the time of installation. Save for future reference. Model: Date Code:
PRF-RO Pentair Reverse Osmosis System Installation and Maintenance Manual SAFETY GUIDES THE BASIC REVERSE OSMOSIS SYSTEM. Tools and Materials Required
 PRF-RO Pentair Reverse Osmosis System Installation and Maintenance Manual SAFETY GUIDES Read and follow all steps and guides carefully before installing and using your reverse osmosis system. Do not use
Alkaline RO System INSTALLATION MANUAL
 Alkaline RO System INSTALLATION MANUAL 1-800-992-8876 Customer Support Disclaimer All rights reserved. All material published on this site by Express Water Inc., including all portions of the website,
INSTALLATION AND OPERATIONS MANUAL
 MODEL 6001 REVERSE OSMOSIS High Purity Water Production System THREE STAGE Filtration for the reduction of: Organic Matter Total Dissolved Solids (TDS) Suspended Solids Chemical Contaminants Bad Taste
MODEL FW-2000 OPERATION MANUAL
 MODEL FW-2000 OPERATION MANUAL 1 P a g e Table of Contents Introduction...pg.3 Receiving..pg.4 Description Model H2O- 2000....pg.5 Operation. pg.6,7 Drain Container Operation. p.g.8 Cup Dispenser Operation.p.g.9
Installation and Operation Manual
 How To Install, Operate and Maintain Your Reverse Osmosis System FILTER CARTRIDGE CONFIGURATION MAY BE SUBJECT TO CHANGE. 475 PRO SERIES 475BP PRO SERIES INSTALLERS: PLEASE READ ALL INSTRUCTIONS BEFORE
REVERSE OSMOSIS WATER FILTRATION SYSTEM MODEL PB-TLRO4H50T INSTRUCTION MANUAL
 REVERSE OSMOSIS WATER FILTRATION SYSTEM MODEL PB-TLRO4H50T INSTRUCTION MANUAL Pure Blue H20, LLC 13813 Monroes Business Park Tampa, FL 33635 USA www.pureblueh2o.com (844) 787-3148 (844) PURE-1-4-U 2015.02.25
US Water American Revolution 5-Stage RO System The ONLY RO system on the market that is totally American made!
 US Water American Revolution 5-Stage RO System The ONLY RO system on the market that is totally American made! MEMBRANE POST CARBON PRE SEDIMENT TUBING FAUCET AND MOUNTING KIT FILTER WRENCH DRAIN SADDLE
USER S MANUAL. For use with the following systems: Flow Diagram for 5, 6 or 7-Stage Reverse Osmosis Water Systems (no pump)
") USER S MANUAL Version 2013-1 For use with the following systems: Residential Units (no pump) Residential Units with Booster Pump Commercial Units (with Booster Pump) RCC7, RCC7D, RCC7U, RCC7AK, RCC7AKUV
USER S MANUAL Version 2013-1 For use with the following systems: Residential Units (no pump) Residential Units with Booster Pump Commercial Units (with Booster Pump) RCC7, RCC7D, RCC7U, RCC7AK, RCC7AKUV
GROWMAX WATER Perfect Water for Plants and Gardens
 GROWMAX WATER Perfect Water for Plants and Gardens WATER SYSTEMS FOR HYDROPONICS AND GARDENING GROWMAX 3000 Ultra-Pure Reverse Osmosis Water System Up to 3000 L/D of Pure Water Don't forget to register
Owner s Manual AQ-RO-BASE. Aquasana OptimH2O Drinking Water System Reverse Osmosis Filtration Technology
 Owner s Manual AQ-RO-BASE Aquasana Drinking Water System Reverse Osmosis Filtration Technology Welcome to the Aquasana experience. You are about to enjoy clean, clear water and the peace of mind that comes
WATER FILTRATION SYSTEM (USF3) OWNER S MANUAL
 OWNER S MANUAL") WATER FILTRATION SYSTEM (USF3) OWNER S MANUAL 1 INTRODUCTION Congratulations on choosing Permatech to improve the quality of your water. You will immediately begin to notice the numerous benefits of having
WATER FILTRATION SYSTEM (USF3) OWNER S MANUAL 1 INTRODUCTION Congratulations on choosing Permatech to improve the quality of your water. You will immediately begin to notice the numerous benefits of having
DWSB-TFC-50 DWSB-50-PUMP
 INSTALLATION MANUAL DWSB-TFC-50 DWSB-50-PUMP 12630 US 33 N. Churubusco, IN 46723 Ph. (260)693-1972 Fax (260)693-0602 www.sterlingwatertreatment.com 1 TABLE OF CONTENTS: SECTION I. SECTION II. INTRODUCTION...3
WATERSHIELIJrM REVERSE OSMOSIS INSTALLA TION MANUAL ~ ~ ~ ~ ~ l ~ TO INSURE THIS PRODUCT AND THE INSTALLATION THEREOF. ~ ~ ~ ~ ~
 WATERSHIELIJrM REVERSE OSMOSIS SYSTEM INSTALLA TION MANUAL p 1 ~ -~ I IMPORTANT I ITHIS REVERSE OSMOSIS SYSTEM WAS SOLD IN KIT FORM. IT HAS ~ INOT BEEN PRESSURE TESTED IN ANY WAY. UPON INSTALLATION IT
AquaLiv Water System - Usage & Installation Instructions
 AquaLiv Water System - Usage & Installation Instructions Congratulations on your purchase of an AquaLiv Water System the most complete and comprehensive water purification and enhancement system available
Clean Water Made Easy. CWS Time Clock Softener Installation & Start Up Guide. Questions?
 Clean Water Made Easy www.cleanwaterstore.com CWS Time Clock Softener Installation & Start Up Guide Thank you for purchasing a Clean Water System! With proper installation and a little routine maintenance
1 P a g e MODEL G5CT COUNTER TOP OPERATION MANUAL
 1 P a g e MODEL G5CT COUNTER TOP OPERATION MANUAL Table of Contents Introduction...pg.3 Receiving..pg.4 Description Model G5CT Counter Top.......pg.5 Operation. pg.6,7 Positioning the Cooler....pg.8 Water
INSTALLATION MANUAL CRS-3
 INSTALLATION MANUAL CRS-3 12630 US 33 N. Churubusco, IN 46723 Ph. (260)693-1972 Fax (260)693-0602 www.sterlingwatertreatment.com 1 TABLE OF CONTENTS: SECTION I. SECTION II. INTRODUCTION...3 SPECIFICATIONS...3
Installation and Operation Manual
 How To Install, Operate and Maintain Your Reverse Osmosis System INSTALLERS: PLEASE READ ALL INSTRUCTIONS BEFORE IN- STALLING AND USING THIS SYSTEM. IT IS RECOMMENDED TO WAIT UNTIL THE ENTIRE SYSTEM IS
Parts & Material Included
 O² Hydro Well System Installation, Use & Care Guide Parts & Material Included 1. Funnel 11. Drain Line 21. Air Head 2. Media Tank Distributer Tube 12. Air Release 22. Drain Fitting 3. Air Tank Distributer
IMPORTANT! ank You! Model: Twist-In 100 GPD, 3-Stage RO Unit. Installation, Operation & Maintenance Guide
 Twist-In 00 GPD, 3-Stage RO Unit WARNING: Please read carefully before proceeding with installation. Your failure to follow any attached instructions and operating parameters may lead to the product s
AQUA ONE. Reverse Osmosis System Model ARO5000. Installation and Service Guide PLEASE READ THIS MANUAL CAREFULLY BEFORE ATTEMPTING INSTALLATION
 AQUA ONE Reverse Osmosis System Model ARO5000 Congratulations on your purchase of the most sophisticated water purifier system available! Installation and Service Guide PLEASE READ THIS MANUAL CAREFULLY
Installing the Turbo Floor Model System
 Installing the Turbo Floor Model System Location 1. Locate as close as possible to water supply source. 2. Locate as close as possible to a three-prong grounding receptacle. 3. Locate the System on a smooth
Reverse Osmosis Filter Change Guide
 Reverse Osmosis Filter Change Guide Written by 602abcWATER Start Here Con irm Your ilter order. Open your packages and confirm that you have received all the correct filters. If you are missing or sent
WATER FILTRATION SYSTEM (RO5) OWNER S MANUAL
 OWNER S MANUAL") WATER FILTRATION SYSTEM (RO5) OWNER S MANUAL 1 INTRODUCTION Congratulations on choosing Permatech to improve the quality of your water. You will immediately notice the numerous benefits of having quality
WATER FILTRATION SYSTEM (RO5) OWNER S MANUAL 1 INTRODUCTION Congratulations on choosing Permatech to improve the quality of your water. You will immediately notice the numerous benefits of having quality
Reverse Osmosis System OWNERS MANUAL
 APS Water Services Corporation Quick Change, Twist & Loc Reverse Osmosis System OWNERS MANUAL Installation, Operation & Maintenance Sold By : APS Water Services Corp 818-786-0600 NOTE: Please read through
REVERSE OSMOSIS DRINKING WATER SYSTEM
 REVERSE OSMOSIS DRINKING WATER SYSTEM INSTALLATION, OPERATION & SERVICE MANUAL Drink With Confidence! TABLE OF CONTENTS SECTION I. Page INTRODUCTION...3 SECTION II. SPECIFICATIONS...4 SECTION III. SECTION
Reverse Osmosis Install Guide
 Reverse Osmosis Install Guide Written by 602abcWATER Start Here Step 1 Con irm All Product Components Open your packages and con irm that you have received all the correct components. If you are missing
The Coffee Professor Reverse Osmosis System Model Genesis Cafe
 The Coffee Professor Reverse Osmosis System Model Genesis Cafe Congratulations on your purchase of the most advanced water purifier system available! Installation and Service Guide PLEASE READ THIS MANUAL
Owner s Manual AQ-RO-3. Aquasana OptimH2O Drinking Water System. Reverse Osmosis plus Claryum Filtration Technology
 Owner s Manual AQ-RO-3 Aquasana OptimHO Drinking Water System Reverse Osmosis plus Claryum Filtration Technology Welcome to the Aquasana experience. You are about to enjoy clean, clear water and the peace
WATER FILTRATION SYSTEM (RO6) OWNER S MANUAL
 OWNER S MANUAL") WATER FILTRATION SYSTEM (RO6) OWNER S MANUAL 1 INTRODUCTION Congratulations on choosing Permatech to improve the quality of your water. You will immediately notice the numerous benefits of having quality
WATER FILTRATION SYSTEM (RO6) OWNER S MANUAL 1 INTRODUCTION Congratulations on choosing Permatech to improve the quality of your water. You will immediately notice the numerous benefits of having quality
R.O. DRINKING WATER SYSTEM
 R.O. DRINKING WATER SYSTEM INSTALLATION, OPERATION & SERVICE MANUAL IMPORTANT NOTICES: This reverse osmosis system contains replaceable treatment components critical for effective performance. It is the
Parasitic Cysts - Cryptosporidium and Giardia, Chemicals, Heavy Metals, Dissolved Salts, Offensive Tastes and Odours, Sediment, Dirt,
 Aqua-Pure is a market leader in water filtration. In addition to our comprehensive range of Domestic Water Purifiers, we design and manufacture an extensive commercial and industrial range of purification
PRO-RO 6-Stage Reverse Osmosis System
 PRO-RO 6-Stage Reverse Osmosis System Rev: 1016 Introduction to the PRO-RO Congratulations on your purchase of the PRO-RO six stage reverse osmosis system. The PRO-RO features a four-stage prefilter,
INSTALLATION INSTRUCTIONS
 Please read carefully and retain for future reference. CONTENTS 1. Important Information 2. Included Parts 3. Filter Head Assembly Instructions 4. Installation Instructions 4.1. Auxiliary Tap Connection
Installation and Operation Manual
 Installation and Operation Manual Canature North America Inc. How To Install, Operate and Maintain Your Reverse Osmosis System FILTER CARTRIDGE CONFIGURATION MAY BE SUBJECT TO CHANGE. 475 PRO SERIES 475BP
WM-450-PT WM-900-PT Commercial Wall Mounted Reverse Osmosis
 WM-450-PT WM-900-PT Commercial Wall Mounted Reverse Osmosis Installation And Service Manual Watts Pure Water 1725 W. Williams Dr. C-20., Phoenix, Arizona 85027 Phone: 888-774-7405 Fax: 602-588-0356 www.wattspurewater.com
ispring Whole House Water Filter Systems USER S MANUAL
 ispring Whole House Water Filter Systems USER S MANUAL Version 2014-5 Introduction Congratulations on your purchase of the ispring Whole House Water Filter system. Featuring a three-stage filtration process,
Clean Water Made Easy
 Clean Water Made Easy http://www.cleanwaterstore.com Pro-OX 1650 Iron Filter Installation & Start-Up Guide Thank you for purchasing a Clean Water System! With proper installation and a little routine maintenance
Installation and Operation Manual
 Model EP-RO25 How to install, operate and maintain your Reverse Osmosis Drinking Water System Do not return unit to store If you have any questions or concerns when installing, operating or maintaining
Clean Water Made Easy
 Clean Water Made Easy http://www.cleanwaterstore.com Pro-OX 2510 Iron Filter Installation & Start- Up Guide Thank you for purchasing a Clean Water System! With proper installation and a little routine
QCRO-50 QCRO-50-PUMP SRO-100 INSTALLATION MANUAL
 INSTALLATION MANUAL QCRO-50 QCRO-50-PUMP SRO-100 1260 US N. Churubusco, IN 4672 Ph. (260)69-1972 Fax (260)69-0602 www.sterlingwatertreatment.com 1 QCRO Manual 180212.docx TABLE OF CONTENTS: SECTION I.
7800 Neutralizer Installation & Start-Up Guide
 Clean Water Made Easy www.cleanwaterstore.com 7800 Neutralizer Installation & Start-Up Guide Thank you for purchasing a Clean Water System! With proper installation and a little routine maintenance your
by Water Purification Supplies
 REVERSE OSMOSIS PURIFIER With Booster Pump by Water Purification Supplies Member, Water Quality Association Read these instructions carefully before using the purifier. Retain these instructions in safe
General System Layout Sketch
 General System Layout Sketch EZ-37 Solar Panels PV panel Glycol Fill Valve Expansion Tank ` 1 Introduction This document describes how to install a Heliatos GH type solar water heating system. These systems
phd Countertop UltraWater Owner s Manual Delicious Great Tasting Antioxidant Alkaline Energized
 Owner s Manual UltraWater phd Countertop Delicious Great Tasting Antioxidant Alkaline Energized Warning: Incorrect installation and/or operation could void your valuable warranty. Please protect your investment!
IMPORTANT! ank You! Model: Twist-In 100 GPD 4-Stage RO/DI Unit. Installation, Operation & Maintenance Guide
 Model: 54037 Twist-In 00 GPD 4-Stage RO/DI Unit WARNING: Please read carefully before proceeding with installation. Your failure to follow any attached instructions and operating parameters may lead to
ERO-175. Undersink REVERSE OSMOSIS DRINKING WATER SYSTEM. u Safety Guides u Installation u Operation u Maintenance u Repair Parts
 Undersink REVERSE OSMOSIS DRINKING WATER SYSTEM ERO-175 u Safety Guides u Installation u Operation u Maintenance u Repair Parts EcoWater Systems LLC P.O. Box 64420 St. Paul, MN 55164 TEL (651) 739-5330
26/06/2018 USER MANUAL HOBBY 100 GPH REVERSE OSMOSIS. All Rights reserved Les Équipements d Érablière CDL inc.
 26/06/2018 USER MANUAL HOBBY 100 GPH REVERSE OSMOSIS All Rights reserved Les Équipements d Érablière CDL inc. Thank you for purchasing a CDL Hobby reverse osmosis system. This document will help you make
VECTAPURE NX Residential Reverse Osmosis Water System
 VECTAPURE NX Residential Reverse Osmosis Water System INSTALLATION AND OWNER S MANUAL VERSION B THIS MANUAL IS TO BE LEFT WITH THE OWNER OF THE EQUIPMENT FOR REFERENCE PURPOSES AND TECHNICAL GUIDANCE.
Fleck 5600 Carbon Filter Installation & Start Up Guide
 Clean Water Made Easy www.cleanwaterstore.com Fleck 5600 Carbon Filter Installation & Start Up Guide Thank you for purchasing a Clean Water System! With proper installation and a little routine maintenance
5-Stage Reverse Osmosis System
 5-Stage Reverse Osmosis System 41840 McAlby Court, Suite A Murrieta, CA 92562 800-451-9343, FAX 951-894-2801 www.nimbuswater.com 02/09 1 Introduction to the WaterMaker Five Congratulations on your purchase
Installation Instructions Residential Reverse Osmosis Drinking Water System
 Your Reverse Osmosis System has been tested to ensure it will operate correctly. The following periodic maintenance is recommended so your system will provide years of trouble-free service: Replacement
Installation & Service Manual. Reverse Osmosis Drinking Water Systems 75 GPD with Fully Automatic Noiseless Booster Pump
 Installation & Service Manual Reverse Osmosis Drinking Water Systems 75 GPD with Fully Automatic Noiseless Booster Pump Distributed by: Serial # Please read this entire service guide prior to beginning
J-PRO-24 Soda Ash Injection Installation & Start-Up Guide
 J-PRO-24 Soda Ash Injection Installation & Start-Up Guide Thank you for purchasing a Clean Water System! With proper installation and a little routine maintenance, your system will be ph neutral water
Standard Downrod for ceilings 8-10 feet high. Longer Downrod for ceilings 10 feet or higher
 Table of Contents www.casablancafanco.com To register your fan, please visit: www.casablancafanco.com/register What to Expect with Your Installation Save your receipt for proof of purchase. Ceiling Bracket??
J-PRO-24 Pump Chlorinator. Installation & Start-Up Guide
 J-PRO-24 Pump Chlorinator Installation & Start-Up Guide Thank you for purchasing a Clean Water System! With proper installation and a little routine maintenance, your system will be providing treated water
2-Stage Under Counter Filtration System Model: WP-2 LCV
 INSTALLATION, OPERATION AND MAINTENANCE MANUAL Save manual for future reference 2-Stage Under Counter Filtration System Model: WP-2 LCV IMPORTANT If you are unsure about installing your WATTS water filter,
NSRO42C4. How to Install, operate and maintain your Reverse Osmosis Drinking Water System
 NSRO42C4 How to Install, operate and maintain your Reverse Osmosis Drinking Water System If you have any questions or concerns when installing, operating or maintaining your Reverse Osmosis System call
Installation, Operation & Service Instructions with Part List. Quick Change Reverse Osmosis Drinking Water System
 Installation, Operation & Service Instructions with Part List Quick Change Reverse Osmosis Drinking Water System Model No. QCRO4V-50 www.pura.com This system certified by WQA according to NSF/ANSI 58 for
Model #: PT3000T36-GOLD
 Good Water Warehouse Inc. 1700 E Walnut Ave Fullerton CA 92831 (714) 441-2893 (714) 441-0525 FAX Reverse Osmosis System Installation & Service Guide Model #: PT3000T36-GOLD Do not use with water that is
Drinking Water Purification Systems
 supersedes 200695Cx-2i&o SEAGULL IV X-2KB and X-2KF Drinking Water Purification Systems SEAGULL IV X-2KB SEAGULL IV X-2KF INSTALLATION AND PRODUCT USE GUIDE INSTALLATION INSTRUCTIONS NOTE: Read instructions
VECTAPURE NX Residential Reverse Osmosis Water System
 R2 VECTAPURE NX Residential Reverse Osmosis Water System INSTALLATION AND OWNER S MANUAL FOR MODELS RO4053HNX, RO405400TNX AND RO405400NX THIS MANUAL IS TO BE LEFT WITH THE OWNER OF THE EQUIPMENT FOR REFERENCE
INSTALLATION AND OWNER S MANUAL
 INSTALLATION AND OWNER S MANUAL For VECTAPURE 360 Drinking Water Systems THIS MANUAL IS TO BE LEFT WITH THE OWNER OF THE EQUIPMENT FOR REFERENCE PURPOSES AND TECHNICAL GUIDANCE. IT IS STRONGLY RECOMMENDED
Installation & Operating Guide
 5-036 HOT WATER TANK Installation & Operating Guide Read all instructions thoroughly. Keep this guide for future reference. Proof of purchase is required for Warranty. Staple receipt or proof of purchase
INSTALLATION MANUAL DWSB-TFC-50
 INSTALLATION MANUAL DWSB-TFC-50 12630 US 33 N. Churubusco, IN 46723 Ph. (260)693-1972 Fax (260)693-0602 www.sterlingwatertreatment.com DWSB Manual 180822.docx TABLE OF CONTENTS: SECTION I. SECTION II.
Installation Instructions
 Installation Instructions SELECTRONIC Hard-Wired AC Powered ICU Lavatory Proximity Faucet PRODUCT NUMBER 0. Certified to comply with ASME A..M 0 American Standard M 0. ICU Faucet shown Installed on American
The High Efficiency Reverse Osmosis Drinking Water System Installation, Operation And Service Manual. + -DLX
 The High Efficiency Reverse Osmosis Drinking Water System Installation, Operation And Service Manual. + -DLX TABLE OF CONTENTS Section I. Section II. Section III. Section IV. Section V. Section VI. Section
Fleck 7000 Sediment Filter Installation & Start-Up Guide
 Clean Water Made Easy www.cleanwaterstore.com Fleck 7000 Sediment Filter Installation & Start-Up Guide Thank you for purchasing a Clean Water System! With proper installation and a little routine maintenance
SuperKlean Washdown Products
 February 2012 DURAMIX 8000 INSTALLATION AND MAINTENANCE INSTRUCTIONS **DO NOT THROW AWAY AFTER INSTALLATION** **SAVE AND DISPLAY PROMINENTLY WHERE THIS EQUIPMENT IS USED** WARNING HIGH PRESSURE AND HOT
RO.. DRINKING WATER SYSTEM
 MICROLINE RO.. DRINKING WATER SYSTEM MODEL C. T. A. - 3 INSTALLATION, OPERATION & SERVICE MANUAL IMPORTANT NOTICES: This reverse osmosis system contains replaceable treatment components critical for effective
Clean Water Made Easy
 Clean Water Made Easy www.cleanwaterstore.com CWS Plus Neutralizer/Birm Blend Installation & Start-Up Guide Thank you for purchasing a Clean Water System! With proper installation and a little routine
3-STAGE WATER FILTRATION SYSTEM INSTALLATION INSTRUCTION & OWNER S MANUAL
 3-STAGE WATER FILTRATION SYSTEM INSTALLATION INSTRUCTION & OWNER S MANUAL Ver 1.2 All Rights Reserved APEC Water Systems Please keep this Owner s Manual for future reference. It contains useful information
Aquaversa. Installation Guide
 Aquaversa Installation Guide About the Aquaversa Drinking Water System The Multipure Aquaversa Drinking Water System (MP750) is designed for use on the countertop next to the sink, below the sink, or inline
Kinetico 2060f OD Sulfur Guard Installation Instructions
 SAFETY GUIDELINES Read all steps, guides, and rules carefully before installing and using the Kinetico 2060f OD Sulfur Guard. Check your local building and sanitation codes for installation compliance.
5700-E Sediment Filter Installation & Start-Up Guide
 Clean Water Made Easy www.cleanwaterstore.com 5700-E Sediment Filter Installation & Start-Up Guide Thank you for purchasing a Clean Water System! With proper installation and a little routine maintenance
TABLE OF CONTENT WARNING: READ ENTIRE MANUAL. FAILURE TO FOLLOW ALL GUIDES AND RULES COULD CAUSE PERSONAL INJURY OR PROPERTY DAMAGE.
 TABLE OF CONTENT I. COMPONENTS AND TOOLS IDENTIFICATION... 3 II. PRE-INSTALLATION... 3 System Location... 4 Site Preparation... 4 Unit Preparation... 4 III. INSTALLATION INSTRUCTIONS... 4 Faucet Installation...
J-PRO V 230V Dual Voltage Hydrogen Peroxide Pump Installation & Start-Up Guide
 J-PRO-22 110V 230V Dual Voltage Hydrogen Peroxide Pump Installation & Start-Up Guide Thank you for purchasing a Clean Water System! With proper installation and a little routine maintenance, your system
REVERSE OSMOSIS DRINKING WATER SYSTEM
 REVERSE OSMOSIS DRINKING WATER SYSTEM 10/10 1 2 Introduction To The Sierra Congratulations on your purchase of the Nimbus Sierra reverse osmosis system. When properly maintained, this system will provide
Owners Manual FOR REVERSE OSMOSIS SYSTEMS MODEL ET6500 (P/N )
") Owners Manual FOR REVERSE OSMOSIS SYSTEMS MODEL ET6500 (P/N 10-02-1330) Includes: Installation and Service Procedures, Specifications and Operation Guidelines 07\15 RO Manual A TABLE OF CONTENTS Introduction
Owners Manual FOR REVERSE OSMOSIS SYSTEMS MODEL ET6500 (P/N 10-02-1330) Includes: Installation and Service Procedures, Specifications and Operation Guidelines 07\15 RO Manual A TABLE OF CONTENTS Introduction
Installation Instructions AS-WH Whole House Water Filter
 Installation Instructions AS-WH Whole House Water Filter Contents The AS-WH Whole House System is tested to NSF standards to reduce 97% of chlorine. It can also reduce sediment, synthetic chemicals and
INSTALLATION. Glass Panel Doors (select models) CAUTION
 CAUTION") Location Do not install refrigerator near oven, radiator or other heat source. If not possible, shield refrigerator with cabinet material. Do not install where temperature falls below 55 F (13 C) or rises
Location Do not install refrigerator near oven, radiator or other heat source. If not possible, shield refrigerator with cabinet material. Do not install where temperature falls below 55 F (13 C) or rises
INSTALLATION AND INSTRUCTION MANUAL
 BATH PRO TM 5.1 UNIT INSTALLATION AND INSTRUCTION MANUAL INSTALLATION & INSTUCTION INDEX PAGE HydroSurge Bath Pro TM 5.1Unit Components...3 Before Starting...3 Installing the HydroSurge Bath Pro TM 5.1
PWC-500/1000/1010/1500
 SERVICE MANUAL for by Vertex Model PWC-500/1000/1010/1500 P/N man-7008 Table of Contents 1. Introduction 2. Cooler Set-up 3. Remove Top Cover 4. Remove/Replace Float 5. Remove/Replace Hot Tank 6. Faucet