AUTOMATIC MODULAR ICE FLAKER
|
|
|
- Britney Greene
- 5 years ago
- Views:
Transcription

1 AUTOMATIC MODULAR ICE FLAKER INSTRUCTIONS AND WARNINGS rev. 08 It is strictly forbidden to reproduce this instruction manual or any part thereof.

2 Mod. N. V. W 2 2 M M8 M8

")

")

3 3 ~ 200 mm (W) (W) (W) (W)
4 5 17 6
5 Dear Customer, Congratulations on having chosen a top-quality product, which is sure to live up to your expectations. Please read this instruction manual carefully before using your new modular automatic granular ice flaker. TABLE OF CONTENTS 1 IMPORTANT ADVICE AND RECOMMENDATIONS 2 TECHNICAL SPECIFICATIONS 3 ADVICE ABOUT TRANSPORTATION 4 UNPACKING 5 INSTALLATION 5.1 CONNECTION DIAGRAM 5.2 POSITIONING 5.3 CONNECTION TO WATER MAINS 5.3.a WATER SUPPLY 5.3.b DRAIN 5.4 CONNECTION TO THE ELECTRICITY MAINS 6 START-UP 6.1 CLEANING INTERNAL PARTS 6.2 START-UP 7 MAIN CAUSES OF OPERATING FAILURE 8 OPERATION 9 MAINTENANCE 9.1 CLEANING THE FILTER OF WATER SUPPLY SOLENOID VALVE 9.2 AIR-COOLED MODELS 9.3 CLEANING AND SANITIZING OPERATIONS 10 PERIODS AT A STANDSTILL The figures in this manual are of a general nature. Some details may therefore differ depending on the specific model. The Manufacturer declines all liability for any inaccuracies in this instruction manual due to printing or transcription errors. The Manufacturer also reserves the right to make any modifications to the products that may be necessary or useful, also in the interests of the user, without impairing the products essential features of functionality and safety.
6 1 IMPORTANT ADVICE AND RECOMMENDATIONS This instruction manual forms an integral part of the modular automatic granular ice flaker (subsequently referred to as the appliance ), and should be kept for possible future consultation. In the event of the appliance being sold or transferred to another person, this manual must be handed over to the new user, in order to enable him to become familiar with the operation of the equipment and the corresponding advice and recommendations.!! Before installing and using the appliance, read the advice and recommendations contained in this instruction manual very carefully. They are given in order to ensure safe installation, use and maintenance of the appliance. always remove the plug from the power socket before proceeding with any cleaning or maintenance operations to ensure the appliance operates efficiently and correctly, it is essential to comply with the Manufacturer s instructions and to make sure that maintenance is performed by specially qualified personnel do not remove any of the panels or grilles do not rest objects on the appliance or in front of the ventilation grilles always lift the appliance to move it, even slightly. Do not push or pull it any use of the appliance other than the ice production using cold drinking water will be deemed improper do not obstruct the ventilation and heat-dissipation grilles, since poor aeration - in addition to reducing efficiency and causing poor operation - may also cause serious damage to the appliance if the appliance breaks down and/or operates in a faulty way, switch it off by means of the main switch fitted during the installation phase, remove the plug from the socket (if any), and turn off the water tap(s). Do not make any attempt to repair the appliance yourself. Contact only professionally qualified and authorized personnel in addition to rendering any form of warranty null and void, modifying (or attempting to modify) this appliance is extremely dangerous do not use the ice bin to cool or store food or drinks, because these operations could obstruct the drainage outlet, causing the bin to fill up with water and overflow in the event of a failure, contact the dealer who sold you the appliance; he will be able to give you the address of your nearest Authorized Technical Service Centre. Always insist on having original spare parts mounted any specific information or diagrams regarding particular models will be attached to this instruction manual are available accessories that allow to switch on and off the appliance from remote location, por that allow to adjust the leve of stored ice. The liability for damages to persons, animals, objects or to the appliance itself caused by improper installation, is of those who performed the installation!! Use of this electrical appliance requires compliance with certain fundamental rules; in particular: do not touch the appliance with wet or damp hands or feet do not use the appliance when you are barefoot do not use extensions in premises such as bathrooms or shower rooms do not tug on the power supply cable to disconnect it from the mains this appliance can be used by children aged from 8 years and above and persons with reduced physical, sensory or mental capabilities or lack of experience and knowledge, if they have been given supervision or instruction concerning use of the appliance in a safe way and understand the hazards involved. Children shall not play with the appliance. Cleaning and user maintenance shall not be made by children without supervision supervise children to ensure that they do not play with the appliance
7 Should you decide to scrap appliance, first disconnect the power cable from the mains, and then cut the cable off. In addition, proceed as follows: do not allow the coolant gas and oil in the compressor to disperse into the environment dispose of or recover the various materials according to the provisions established by the current laws in force in your Country This symbol means that this product should not be treated as a household waste. To prevent potential negative consequences for the environment and health, be sure this product is correctly disposed of and recycled. For information on the disposal and recycling of this product, contact your Distributor or the Waste Treatment Service. This appliance does not contain coolant that damages the ozone layer. It contains fluorinated greenhouse gases covered by the Kyoto Protocol.!! The Manufacturer shall not be liable for any damage to the environment, animals, persons or objects caused by incorrect installation. 2 TECHNICAL DATA (Fig. 1) The voltage and frequency are given on the data plate on the appliance. Refer to this data plate to check compliance. Voltage (1), power (2), model (3), serial No. (4), Manufacturer (5). The weighted equivalent continuous sound level A of this appliance is less than 70 db(a). The measurements were taken 1 metre from the surface of the appliance and 1.60 metres above ground, during ice production. The wiring diagram is stuck inside front panel or on the rear panel of the appliance. 3 ADVICE ABOUT TRANSPORTATION The net weight and the weight including packaging of the appliance are given on the cover of this instruction manual. Please refer to the instructions on the packaging in order to correctly transport and lift the appliance. To prevent the oil in the compressor from flowing back into the coolant circuit, always make sure that the appliance is kept upright during transport, storage, and handling. Follow the instructions given on the packaging. 4 UNPACKING The appliance must be installed by authorized personnel, in compliance with the current laws in force and the Manufacturer s instructions. Once you have removed the packaging according to the instructions on the box, MAKE SURE THAT THE APPLIANCE IS IN A PERFECTLY GOOD CONDITION. IF IN DOUBT, DO NOT USE IT AND IMMEDIATELY CONTACT THE DEALER who sold it to you. All the packaging items (plastic bags, cardboard, polystyrene foam, nails, etc.) must be removed and put out of the reach of children, as they are potential sources of danger. With the pallet resting completely on the ground, lift the appliance with lifting gear suited to its weight and separate it from the wooden pallet.
8 NOTE FOR INSTALLER: This operation must only be performed by professionally qualified and authorized personnel. The appliances contain threaded holes for hooking eyebolts (Fig. 2). To prevent damage to the appliance, the lifting bolts should be kept vertical during lifting. 5 INSTALLATION 5.1 CONNECTION DIAGRAM (Fig. 3) 6. electrical connection controlled by omnipolar circuit-breaker with residual current device 7. water tap(s) 8. water supply pipe for ice making 9. water supply pipe for water cooling (W) 10. water drainage pipe 11. cooling water drainage pipe (W) 5.2 POSITIONING!! The appliance must be installed in a hygienically clean location; it is advisable to avoid rooms like cellars and store-rooms, because failure to meet hygiene requirements is likely to lead to the formation and proliferation of bacteria in the appliance. The appliance can operate at an ambient temperature of between 10 C and 43 C. The best performance will be obtained by installing the appliance in a place with an ambient temperature of between 10 C and 35 C and a water temperature of between 3 C and 25 C. Avoid direct exposure to sunlight and do not install near heat sources.!! This appliance: must be installed in a place where it can be supervised by skilled personnel must not be used outdoors must not be installed in damp places or where it is liable to be sprayed with water must not be cleaned with jets of water must be allowed a clearance of least 20 cm all around!! The connection of the appliance with the accessories must be carried out by professionally skilled and qualified personnel. The accessories are supplied with instructions showing the correct connection to the appliance The liability for damages to persons, animals, objects or to the appliance itself caused by improper installation of the accessories, is exclusevely of those who performed the installation.!! The manufacturer declines all liability for installation of accessories supplied by other manufacturers.!! The appliance must be installed on a bin. For correct installation on our bins, see the diagrams supplied with the bins. In any event the instructions and advice contained in this manual must be complied with, especially those relating to connection to the electricity and water supply. Use a spirit level to ensure that the appliance is standing perfectly level. If necessary, adjust the legs fitted to our bins.!! The manufacturer declines all liability for installation on bins made by other manufacturers.
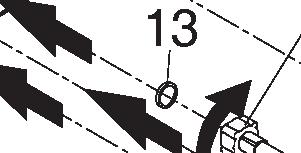
9 5.3 CONNECTION TO THE WATER MAINS!! IMPORTANT: the appliance must be connected to the water mains by professionally qualified personnel in accordance with the Manufacturer s instructions this appliance must be only be supplied with cold water for human consumption (drinking water) the operating pressure must be between 0.1 and 0.6 MPa a tap must be installed between the water mains and each feed pipe of the appliance, so that the water supply may be shut off if necessary where the feed water is particularly hard, you are advised to install a polyvalent cartridge filter. Any solid particles (e.g. sand) may be eliminated by installing a mechanical filter, which must be periodically inspected and cleaned. These devices must comply with the standards in force in the Country of use never turn the water supply tap(s) off when the appliance is working only new hose-sets supplied with the appliance are to be used to connect the appliance to water mains, old hose-sets should not be reused 5.3.a FILLING WITH WATER (Fig. 4) Insert the special seals provided (13) in the two threaded ring nuts (12) of the water supply pipe (8) supplied with the appliance. Without exerting excessive force (otherwise the unions could crack), firmly tighten one of the threaded ring nuts on the outlet of the solenoid valve located in the rear of the appliance. The other threaded ring nut must be screwed to the water tap (7); this too must be provided with a thread. For water-cooled models, connect union (15) to a tap (7) with a water supply pipe (9). 5.3.b DRAIN (Fig. 4) Fix the water drain pipe (10) in the housing provided on the rear of the appliance. Make sure that: the pipe is a hose the internal diameter is 22 mm, as required the water drain hose is not throttled at any point throughout its length the drain hose slopes downwards by at least 15% For water-cooled models connect union (16) to a drain with a water drainage pipe (11). It is advisable to drain the water straight into an open drain trap. 5.4 CONNECTION TO THE ELECTRICITY MAINS!! IMPORTANT: the appliance must be connected to the electricity mains by professionally qualified personnel in accordance with the Manufacturer s instructions before connecting the appliance to the electricity mains, make sure that the mains voltage rating corresponds to the value indicated on the rating plate make sure that the appliance is connected to an efficient earthing system make sure that the capacity of the power supply system suits the maximum power value indicated on the rating plate of the appliance if the appliance comes supplied with a plug, prepare a socket controlled by an omnipolar circuit-breaker (6 in Fig.3), with a contact-opening gap of not less than 3 mm, that provides full disconnection under overvoltage category III conditions, in accordance with national safety standards currently in force. This switch must be equipped with fuses, with the associated residual current device positioned in such a way as to be readily accessible. Insert the plug into the socket controlled by the switch
10 the plug must only be replaced by professionally qualified and authorized personnel, and the new plug must comply with current national safety standards if the appliance comes supplied without a plug and you wish to connect it permanently to the power supply, prepare an omnipolar circuit-breaker, with a contact-opening gap of not less than 3 mm, that provides full disconnection under overvoltage category III conditions, in accordance with national safety standards currently in force. This switch must be equipped with fuses, with the associated residual current device positioned in such a way as to be readily accessible. This operation must be carried out by a specialized technician make sure that you fully uncoil the power supply cable and check that it is not crushed in any way should the supply cable be damaged, it must be replaced by a specialized technician using a special cable available from the Manufacturer or from the Technical Service Centres 6 START-UP 6.1 CLEANING INTERNAL PARTS The appliance will have already been cleaned in the factory. However, you are advised to wash the internal parts again before using the appliance. Make sure that the power supply cable is unplugged before carrying out the above cleaning operation. See cleaning and sanitizing manual for information regarding cleaning operations. Use ordinary washing-up liquid or a water and vinegar solution for cleaning operations; after cleaning, rinse thoroughly with cold water and discard the ice produced during the first 30 minutes after cleaning, together with any ice present in the bin. It is advisable to avoid using abrasive detergents or powders, since these might damage the finish. 6.2 START-UP Once the appliance has been correctly connected to the electricity mains, water mains and water drain system, it can be started up as follows: a) turn on the water supply tap(s) (7 in Fig. 3) b) insert the plug (if any) in the socket and switch on the power supply by means of the relative switch fitted during the installation phase (6 in Fig. 3) For appliances that are connected permanently to the electricity mains, turn on by means of the switch on the outside of the appliance, fitted during the installation phase. Switch on appliance by pressing the luminous switch (18 in Fig. 2).!! The appliance will begin to produce ice 10 minutes after start-up. Every time the appliance is started up, the rotation sensor will perform a preliminary check on its operation during this period. 7 MAIN CAUSES OF OPERATING FAILURE Should the appliance fail to produce ice, before calling on the Authorized Technical Service Centre, first check carefully that: the water supply tap(s) (7 in Fig. 3), fitted during the installation phase, has/have been turned on check that there is no power cut, the plug (if any) is correctly inserted in the socket, the switch (6 in Fig. 3) is in the ON position, and the pushbutton (18 in Fig 2) is illuminated check that the rotation sensor is not signalling an alarm Furthermore: if there is excessive noise, make sure that the appliance is not touching furniture or sheet metal which can give rise to noise or vibrations should any trace of water appear, check the drain hole of the bin to ensure that it is not clogged, that the water fill and drain pipes are correctly connected and are not throttled or damaged make sure that the temperature of the air or water does not exceed the installation limit values (see paragraph 5.2) make sure that the water inlet filter is not clogged (see paragraph 9.1)
11 If the fault still persists after the above inspections have been made, turn off the electric power source by means of the switch fitted during the installation phase, pull out the plug (if any) from its socket, turn off the tap(s) connecting the appliance to the water mains, and contact the nearest Authorized Technical Service Centre. To obtain a faster and more efficient reply when you call the Centre, state the model of the appliance precisely, together with its serial number or manufacturing number. This information is given on the serial N plate (Fig. 1) affixed to the rear of the appliance and on the cover of this instruction manual. 8 OPERATION The appliance has a thermostat which stops ice production when the ice accumulated in the bin reaches the probe connected to the thermostat. When ice is taken from the bin, the thermostat will automatically reactivate ice-cube production, thus creating a new supply of ice. The appliance is equipped with a rotation sensor which guarantees its correct operation; when the appliance is switched on, it is necessary to wait for 10 minutes while the rotation sensor performs a preliminary check on its correct operation. NOTE FOR MODELS WITH PRODUCTION OF 280 kg/24h, 510 kg/24h and 1000 kg/24h: The key to the rotation sensor s error signals is affixed to the appliance. The appliance is equipped with a safety pressure switch that stops production in the event of a malfunction of the cooling circuit; to restart the appliance, firmly press the reset button (if any). If the fault still persists, turn off the electric power source by means of the switch (6 in Fig. 3) fitted during the installation phase, pull out the plug (if any) from its socket, turn off the water supply tap(s) (7 in Fig. 3), and contact the nearest Authorized Technical Service Centre. 9 MAINTENANCE F 9.1 CLEANING THE FILTER OF WATER SUPPLY SOLENOID VALVE (Fig. 5) All the operations described in this paragraph must be carried out only after the electric power and water supplies have been disconnected, as described previously, by professionally qualified and authorized personnel.!! At least every two months, clean the filter (17) located on the water inlet solenoid valve, proceeding as follows: switch off the electric power supply by means of the switch (6 in Fig. 3), fitted during installation, and disconnect the plug of the appliance from its socket (if any) shut off the water supply by turning the tap (7 in Fig. 3) fitted during installation unscrew the threaded ring nut (12 in Fig. 4) of the water feed hose, located at the outlet of the solenoid valve at the rear of the appliance using a pair of pliers, remove the filter (17) from its seat without damaging the water feed pipe connector place the filter under a strong jet of water to remove residue, but replace the filter if it is excessively dirty After having carried out the cleaning operations, refit the filter and hose pipe, taking the necessary precautions described earlier in this instruction maual. When the operations have terminated, turn on both the electricity supply and water supply. 9.2 AIR-COOLED MODELS (Fig. 6) For air-cooled models, it is very important to keep the finned condenser and its external filter (if any) clean. Have the finned condenser cleaned at least once every two months by an Authorized Technical Service Centre, which can include this operation in the scheduled maintenance programme.
12 The external filter must be cleaned at least once a month, as follows: switch off appliance and cut off power supply with the switch (6 in Fig. 3) fitted at the installation stage remove filter and keep it at a distance from the appliance remove dust from filter by blowing with compressed air replace filter in its seat 9.3 CLEANING AND SANITIZING OPERATIONS A cleaning and sanitizing kit specifically designed for this appliance is available from your dealer.!! Do not use corrosive substances to remove limescale from the appliance, because this will invalidate the warranty, and may cause serious damage to the materials and components of the appliance. Do not use jets of water to clean the appliance.!! All cleaning operations must be carried out only after the electric power and water supplies have been disconnected, as described previously, by professionally qualified and authorized personnel. Follow the instructions given in the cleaning and sanitizing manual supplied with the appliance.!! IMPORTANT: all the ice produced during the first 30 minutes after cleaning and sanitizing operations, together with any ice present in the bin, must be discarded when the appliance is cleaned and sanitized, its bin must also be cleaned and sanitized Complete sanitizing can only be carried out only by the Authorized Technical Service Centres, and must be done regularly depending on the conditions of use of the appliance, the chemical and physical features of the water, and after every period in which the appliance has remained at a standstill for any length of time. You are advised to ask your dealer to draw up a scheduled maintenance contract that will cover the following: cleaning the condenser cleaning the filter located on the water supply solenoid valve cleaning and sanitizing the ice-tray checking the charge of coolant gas checking the operating cycle cleaning and sanitizing the appliance 10 PERIODS AT A STANDSTILL If you do not intend to use the appliance for a certain period of time, proceed as follows: switch off the electric power source by means of the switch (6 in Fig. 3), and remove the plug of the appliance from its socket (if any) shut off the water supply by turning off the water supply tap(s) (7 in Fig. 3) carry out all the operations envisaged for scheduled maintenance of the appliance (see chapter 9) clean filter of water supply solenoid valve as described in chapter 9.1 clean filter of air condenser (if any) as described in chapter 9.2
MODULAR AUTOMATIC GRANULAR ICE FLAKER
 MODULAR AUTOMATIC GRANULAR ICE FLAKER INSTRUCTIONS AND WARNINGS 24479 rev. 03 It is strictly forbidden to reproduce this instruction manual or any part thereof. Dear Customer, Congratulations on having
AUTOMATIC GRANULAR ICE FLAKER
 AUTOMATIC GRANULAR ICE FLAKER INSTRUCTIONS AND WARNINGS 24480 rev. 01 It is strictly forbidden to reproduce this instruction manual or any part thereof. Dear Customer, Congratulations on choosing a
AUTOMATIC ICE-CUBE MAKER - INSTRUCTIONS AND WARNINGS
 AUTOMATIC ICE-CUBE MAKER - INSTRUCTIONS AND WARNINGS Dear Customer, Congratulations on having chosen a quality product which will certainly fully meet your expectations. Thank you for having purchased
AUTOMATIC MODULAR ICE-CUBE MAKER
 AUTOMATIC MODULAR ICE-CUBE MAKER INSTRUCTIONS AND WARNINGS 24851 ed. 06-2012 It is strictly forbidden to reproduce this instruction manual or any part thereof. Dear Customer, Congratulations on having
AUTOMATIC MODULAR ICE-CUBE MAKER WITH VERTICAL EVAPORATOR SYSTEM
 AUTOMATIC MODULAR ICE-CUBE MAKER WITH VERTICAL EVAPORATOR SYSTEM INSTRUCTIONS AND WARNINGS 24481 ed. 11-2007 It is strictly forbidden to reproduce this instruction manual or any part thereof. Dear
AUTOMATIC ICE-CUBE MAKER
 AUTOMATIC ICE-CUBE MAKER INSTRUCTIONS AND WARNINGS 24478 ed. 11-2007 It is strictly forbidden to reproduce this instruction manual or any part thereof. Dear Customer, Congratulations on having chosen
AUTOMATIC MODULAR SCALE ICE MAKER
 AUTOMATIC MODULAR SCALE ICE MAKER INSTRUCTIONS AND WARNINGS 24850 ed. 06-2012 It is strictly forbidden to reproduce this manual or any part thereof. Dear Customer, Congratulations on having chosen
 Dear Customer, Congratulations on having chosen a top-quality product, which is sure to live up to your expectations. Thank you for having purchased one of our products. Please read this instruction manual
INSTALLATION INSTRUCTIONS: these are intended for the qualified technician who must carry out the installation, hook-up and testing of the appliance.
 Contents 1. Safety and operating instructions 2 2. Installation and hook-up 14 You are advised to read this manual carefully; it contains all the information you need about the right conditions for the
Fundamental safety warnings
 INTRODUCTION Read these instructions carefully before using the appliance. Failure to follow these instructions may result in injuries and equipment damage. The manufacturer is not liable for damages resulting
C C C-600 INSTRUCTION MANUAL ICE CUBES MACHINE. (including: exploded views, part list & diagrams) CUISIMAT
 CUISIMAT") C-250 - C-400 - C-600 INSTRUCTION MANUAL ICE CUBES MACHINE (including: exploded views, part list & diagrams) Art.no.: *706.025 / *706.040 / *706.060 1 CONTENTS PRECAUTIONS... 2 INSTALLATION... 3-4 OPERATION...
C-250 - C-400 - C-600 INSTRUCTION MANUAL ICE CUBES MACHINE (including: exploded views, part list & diagrams) Art.no.: *706.025 / *706.040 / *706.060 1 CONTENTS PRECAUTIONS... 2 INSTALLATION... 3-4 OPERATION...
Health & Safety and Installation guide
 Health & Safety and Installation guide EN ENGLISH Health and Safety guide... 3 Installation guide... 6 2 SAFETY INSTRUCTIONS EN IMPORTANT TO BE READ AND OBSERVED Before using the appliance carefully read
CTA15-2 warming drawer. operating and installation instructions
 CTA15-2 warming drawer operating and installation instructions Table of Contents GB-IE 1 PRECAUTIONS FOR USE...4 2 DISPOSAL INSTRUCTIONS - OUR ENVIRONMENT POLICY...5 3 SAFETY PRECAUTIONS...6 4 GET TO KNOW
User and maintenance manual
 GB User and maintenance manual IMPORTANT SAFETY INSTRUCTIONS These instructions shall also be available on website: docs.whirlpool.eu. YOUR SAFETY AND THAT OF OTHERS IS HIGHLY IMPORTANT. This manual and
Instructions for Use Warming Drawer. Bedienungsanweisung Wärmeschublade. Notice d'utilisation Chauffe-vaisselle. Gebruiksaanwijzing Servieswarmer
 Instructions for Use Warming Drawer Bedienungsanweisung Wärmeschublade Notice d'utilisation Chauffe-vaisselle Gebruiksaanwijzing Servieswarmer Table of Contents GB-IE 1 PRECAUTIONS FOR USE...4 2 DISPOSAL
Installation and Operating Instructions
 Installation and Operating Instructions Models: Verso 4G Hob As part of Parmco Appliances commitment to improving and updating product ranges, we reserve the right to alter, change and update technical
GB User and maintenance manual
 GB User and maintenance manual IMPORTANT SAFETY INSTRUCTIONS These instructions shall also be available on website: docs.whirlpool.eu. YOUR SAFETY AND THAT OF OTHERS IS VERY IMPORTANT This manual and
Instructions for use
 Instructions for use These instructions are also available on the website: www.kitchenaid.eu Important instructions for safety 4 Installation 6 Safeguarding the environment 6 Troubleshooting guide 7 After-sales
User manual. Washing Machine ZWP 581 ZWQ 5102 ZWQ 5103 ZWQ 5122
 EN User manual Washing Machine ZWP 58 ZWQ 502 ZWQ 503 ZWQ 522 Contents Safety information 2 Product description _ 3 How to run a wash cycle? 4 Daily use _ 5 Washing programmes 6 Care and cleaning 8 Safety
IMPORTANT SAFETY INSTRUCTIONS DANGER: WARNING:
 IMPORTANT SAFETY INSTRUCTIONS YOUR SAFETY AND THAT OF OTHERS IS PARAMOUNT This manual and the appliance itself provide important safety warnings, to be read and observed at all times. This is the attention
Mobile Air Conditioner Instruction Manual Model TC-N9KM
 Mobile Air Conditioner Instruction Manual Model TC-N9KM Please read and retain these instructions for future reference SPECIFICATION Model no. Cooling capacity Power/Ampere consumption for cooling* Air
Instruction Manual Model: IM03A
 Ice Maker Instruction Manual Model: IM03A 1. Important Safety Instructions Please read these instructions thoroughly before using this product and retain them for future use. WARNING: This appliance must
INSTRUCTIONS AND ADVICE FOR THE USE, INSTALLATION AND MAINTENANCE OF BUILT-IN ELECTRIC HOBS
 INSTRUCTIONS AND ADVICE FOR THE USE, INSTALLATION AND MAINTENANCE OF BUILT-IN ELECTRIC HOBS Dear Customer, Thank you for having purchased one of our products. We are certain that this new, modern, functional
Bar Fridge USER MANUAL MB46W
 Bar Fridge USER MANUAL MB46W CONTENTS Safety information... 2-3 Identifying parts of the fridge... 4 Transporting... 5 Installation... 5 Reversing the door... 6 Operating instructions... 7 Cleaning &
User Manual GV25 GV35 GV702. Company information: Original instructions GV12066 (1)
") User Manual Original instructions GV25 GV35 GV702 Company information: www.vipercleaning.eu info-eu@vipercleaning.com GV12066 (1) 2012-04-10 USER MANUAL ENGLISH TABLE OF CONTENTS Introduction... 4 Manual
User Manual Original instructions GV25 GV35 GV702 Company information: www.vipercleaning.eu info-eu@vipercleaning.com GV12066 (1) 2012-04-10 USER MANUAL ENGLISH TABLE OF CONTENTS Introduction... 4 Manual
Local air conditioner
 Instruction Manual Local air conditioner LAC08C16 Contents Safety Warnings...4 Unpacking...7 Product Overview...8 Front View...8 Rear View...8 Control Panel...9 Remote Control... 10 Moving the Unit...10
T-60cm-OVEN-SS T-60cm-OVEN-CM T-60cm-OVEN-BL
 T-60cm-OVEN-SS T-60cm-OVEN-CM T-60cm-OVEN-BL USER INSTRUCTIONS GENERAL WARNINGS Read carefully all the instructions contained in this booklet. It provides you with important information regarding the safe
MILK FROTHER INSTRUCTIONS FOR USE
 MILK FROTHER MODEL: HM250A INSTRUCTIONS FOR USE SAFETY WARNINGS - After removing the packaging, check that the appliance is intact. If in doubt do not use the appliance and contact your sales agent. -
INSTALLATION AND MAINTENANCE INSTRUCTIONS
 Draft copy only INSTALLATION AND MAINTENANCE INSTRUCTIONS Manufacturer is not responsible for any transcription errors or misprints contained in this handbook furthermore the manufacturer reserves the
Read this manual through carefully before installing/using the cleaner, paying special attention to the SAFETY INSTRUCTIONS
 PW1370TD 2 EN Read this manual through carefully before installing/using the cleaner, paying special attention to the SAFETY INSTRUCTIONS 3 E3 E1 C3 A1-A2-A3-A4 B4 B1 B5 B2 C1 B3 D 1 4 1 2 3 4 5 6 7 Ø13
The Professional s Choice
 SureFlow compact range: 1000-C & 1000-M Auto-Fill Catering Water Boiler Installation And User Instructions The Professional s Choice CONTENTS CONTENTS & INTRODUCTION 2 SAFETY & ENVIRONMENTAL INFORMATION
Contents. For your safety About your product Installing your appliance Using your appliance Care & cleaning...
 USER GUIDE TF5517S Contents For your safety..................................................... 1 About your product.................................................. 3 Installing your appliance...............................................
GB User manual. Washing machine ZWQ 5130
 GB User manual 2 Washing machine ZWQ 5100 ZWQ 5101 ZWQ 5130 Product description 1 1. The control panel 2. Lid handle 3. Adjustable levelling feet 2 3 The control panel 1 2 3 4 5 6 1. Programme selector
51AKS I S O OWNER S MANUAL
 LLOYD'S REGISTER QUALITY ASSURANCE 51AKS I S O 9 00 1 OWNER S MANUAL This manual applies to the following models Stand-alone Split 51AKS 085--- 51AKS 010--- 51AKS 185--- 51AKS 013--- 51AKS 113--- 51AKS
CLIM9000CE PORTABLE AIR CONDITIONER USER MANUAL
 CLIM9000CE PORTABLE AIR CONDITIONER USER MANUAL Please read this user manual before using this innovative Air Conditioner and keep it safe for future reference. SAFETY INSTRUCTIONS Important! Carefully
User manual. Washing machine ZWQ 590 SO ZWQ 585 SO ZWQ 580 SO ZWQ 575 SO ZWQ 570 SO
 EN User manual Washing machine ZWQ 590 SO ZWQ 585 SO ZWQ 580 SO ZWQ 575 SO ZWQ 570 SO Product description 1 The control panel 2 Lid handle 3 Filter access cover 4 Adjustable levelling feet Control panel
Tornado Operations & Maintenance Manual
 TORNADO INDUSTRIES 7401 W. LAWRENCE AVENUE CHICAGO, IL 60706 (708) 867-5100 FAX (708) 867-6968 www.tornadovac.com Tornado Operations & Maintenance Manual MODEL NO. 99690 BD 22/14, 99720 BD 26/14 L9722
Instruction Manual 1.1 CU. FT. Upright Freezer UF-114W (WHITE) UF-114SS (STAINLESS STEEL)
 UF-114SS (STAINLESS STEEL)") Instruction Manual 1.1 CU. FT. Upright Freezer UF-114W (WHITE) UF-114SS (STAINLESS STEEL) SAFETY WARNINGS 1) WARNING Keep ventilation openings, in the appliance enclosure or in the built-in structure,
Instruction Manual 1.1 CU. FT. Upright Freezer UF-114W (WHITE) UF-114SS (STAINLESS STEEL) SAFETY WARNINGS 1) WARNING Keep ventilation openings, in the appliance enclosure or in the built-in structure,
REFRIGERAT A OR USE DF1-15 F ridge
 REFRIGERATOR USE DF1-15 Fridge BEFORE USING THE APPLIANCE. Your new appliance is designed exclusively for domestic use. To ensure best use of your appliance, carefully read the operating instructions which
The Classeq pass Through range
 Installation & Operators Manual The Classeq pass Through range Part number 902.0005 Revision D July 2011 English HYDRO 857 HYDRO 957 Service Telephone 0844 2259245 Email : service@classeq.co.uk Spares
High-Pressure Washer BY02-VBP-WTR BY02-VBP-WTH. CAUTION : Do not use this device before reading the instructions.
 High-Pressure Washer BY02-VBP-WTH BY02-VBP-WTR CAUTION : Do not use this device before reading the instructions. 1 1. Safety Instructions The appliance has been designed solely for private use outdoors
AIRGOCLEAN 10 E OPERATING MANUAL AIR CLEANER TRT-BA-AIRGOCLEAN10E-TC-001-EN
 AIRGOCLEAN 10 E EN OPERATING MANUAL AIR CLEANER TRT-BA-AIRGOCLEAN10E-TC-001-EN Table of contents Notes regarding the operating manual... 1 You can download the current version of the operating manual and
MW001 Integrated Dishwasher. Manual for Installation, Use and Maintenance
 MW001 Integrated Dishwasher Manual for Installation, Use and Maintenance Important The CDA Group Ltd cannot be held responsible for injuries or losses caused by incorrect use or installation of this product.
VALUE SERIES SLIMLINE MULTIDECKS
 VALUE SERIES SLIMLINE MULTIDECKS GB OPERATING INSTRUCTIONS NO CFC - HCFC Code. 26.23.247 25-01-2008 Rev. 00 ENGLISH Thank you for having chosen one of our products. You certainly have made a good investment
HG 675 CX 60 HG 675 CN 60 HG 675 CW 60
 HG 675 X 60 HG 675 CX 60 HG 675 CN 60 HG 675 CW 60 1 2 1. : 93/68: 90/396: 2006/95/CE: 2004/108/CE: - 1935/2004:. 2002/95/CE: RoHS 2.,.,,,,...,. (,..)..,,.,. ( ),,, ;,,.,.....,.,,,,,,...,. (..),,.,..,.,,,,
MW402 Integrated Dishwasher
 MW402 Integrated Dishwasher Manual for Installation, Use and Maintenance 1 Customer Care Department The Group Ltd. Harby Road Langar Nottinghamshire NG13 9HY T : 01949 862 012 F : 01949 862 003 E : customer.care@cda.eu
CONTENTS QUICK REFERENCE GUIDE INSTRUCTIONS FOR USE BOOKLET PROGRAMME CHART
 CONTENTS QUICK REFERENCE GUIDE PROGRAMME CHART PREPARING THE LAUNDRY SELECTING A PROGRAMME AND OPTIONS STARTING AND COMPLETING A PROGRAMME CHANGING A PROGRAMME INTERRUPTING A PROGRAMME DAILY MAINTENANCE
User and Installation Instructions. Wall Mounted Water Boiler WMB3F/B and WMB3F/W IS435 ECN3461
 User and Installation Instructions Wall Mounted Water Boiler WMB3F/B and WMB3F/W IS435 ECN3461 Dear Customer Thank you for purchasing this Lincat product. With correct use and careful maintenance as described
DEHUMIDIFIER USER MANUAL 11 PINT FOR MODEL: 3PAD11 COMFORT...BUILT TO LAST
 COMFORT...BUILT TO LAST 11 PINT DEHUMIDIFIER USER MANUAL FOR MODEL: 3PAD11 Before using your dehumidifier, please read this manual carefully and keep it for future reference, along with your receipt. CONTENTS
User Manual. Chest Freezer ZFC26500WA
 EN User Manual Chest Freezer ZFC26500WA Contents Safety information 2 Safety instructions 3 Operation 5 Before first use 5 Daily use 5 Hints and tips 6 Care and cleaning 7 Troubleshooting 8 Installation
TK 806 Z. Bedienungs- und Wartungshandbuch. Livret d instructions et d entretien. Manuale uso e manutenzione. User instructions and maintenance
 DE Bedienungs- und Wartungshandbuch FR Livret d instructions et d entretien IT Manuale uso e manutenzione User instructions and maintenance TK 806 Z Dipl.Ing. www..ch Service - Telefon: 0848 559 111 ENGLISH
NON-CYCLING REFRIGERATED AIR/GAS DRYERS QPNC 75 to QPNC 250 OPERATOR S MANUAL
 NON-CYCLING REFRIGERATED AIR/GAS DRYERS QPNC 75 to QPNC 250 OPERATOR S MANUAL DATE OF PURCHASE: MODEL: SERIAL NO.: Record above information from nameplate. Retain this information for future reference.
INSTRUCTIONS AND ADVICE FOR THE USE, INSTALLATION AND MAINTENANCE OF BUILT-IN ELECTRIC HOBS
 INSTRUCTIONS AND ADVICE FOR THE USE, INSTALLATION AND MAINTENANCE OF BUILT-IN ELECTRIC HOBS Dear Customer, Thank you for having purchased one of our products. We are certain that this new, modern, functional
INSTRUCTIONS FOR USE. To make the most of your new oven, read the user's instructions carefully and keep them on hand for consultation in the future.
 INSTRUCTIONS FOR USE INSTALLATION...4 SAFEGUARDING THE ENVIRONMENT... 7 IMPORTANT NOTES... 7 BEFORE USING THE OVEN... 8 OVEN ACCESSORIES... 9 CARE AND MAINTENANCE... 10 TROUBLESHOOTING GUIDE... 12 AFTER
OXYVD8WCOUS OXYVG8WCOUS OXY2TVD6COUS. User manual. - A brand of EuroCave Group -
 OXYVD8WCOUS OXYVG8WCOUS OXYTVD6COUS User manual - A brand of EuroCave Group - Welcome Contents You have just purchased an ARTEVINO product thank you for your custom. We take particular care in manufacturing
The Classeq under counter range
 Installation & Operators Manual The under counter range Part number 902.0011 Revision C Effective date January 2010 Language English Glasswashers Eco 1 Eco 2 Eco 3 Duo 2 Duo 3 Dishwasher Hydro 500 Hydro
PC 640 GB. Built-in cooking tables 60 Instructions for installation and use
 PC 640 GB Built-in cooking tables 60 Instructions for installation and use Congratualtions on choosing an Ariston appliance, which you will find is dependable and easy to use. We recommend that you read
h is ngl E ASSISTANCE CENTRE AUTHORIZED RETAILER
 Softcooker_03 Ed. 09/2015 Roner R FOREWORD - This manual was drawn up to provide the Customer with information concerning the machine and applicable standards, as well as instructions on operation and
MW401 Integrated Dishwasher
 MW401 Integrated Dishwasher Manual for Installation, Use and Maintenance Customer Care Department The Group Ltd. Harby Road Langar Nottinghamshire NG13 9HY T : 01949 862 012 F : 01949 862 003 E : service@cda.eu
TH100 Three in One Instant Hot Water Tap
 TH100 Three in One Instant Hot Water Tap Installation, Use and Maintenance Customer Care Department The Group Ltd. Harby Road Langar Nottinghamshire NG13 9HY T : 01949 862 012 F : 01949 862 003 E : customer.care@cda.eu
UBGHFF60W 60cm Gas on Glass Gas Hob
 UBGHFF60W 60cm Gas on Glass Gas Hob GB [02] x 1 [03] x 2 [04] x 1 [01] x 1 [08] x 4 [05] x 2 [09] x 1 [06] x 1 [07] x 4 [10] x 4 [11] x 1 TEMPLATE TEMPLATE UBGHFF60W GB Built-in 60cm Gas on Glass Gas Hob
INSTALLATION AND USER INSTRUCTIONS BUILT-IN ELECTRIC DEEP FAT FRYER DF-Z01
 INSTALLATION AND USER INSTRUCTIONS BUILT-IN ELECTRIC DEEP FAT FRYER DF-Z01 Dear Customer, thank you for purchasing one of our products. We are confident that this practical and modern appliance, made with
IMPORTANT Read this manual thoroughly before using the appliance. This will ensure optimum results and maximum safety.
 GB IMPORTANT Read this manual thoroughly before using the appliance. This will ensure optimum results and maximum safety. Save these instructions for future reference. IMPORTANT SAFEGUARDS Read the following
User manual: Stainless steel CGN range Storage Refrigerators and FGN Storage Freezers
 User manual: Stainless steel CGN range Storage Refrigerators and FGN Storage Freezers To ensure safe operation, please read this user manual thoroughly before use. 2017 Husky. Husky reserve the right to
CONTENTS SAFETY INFORMATION. Electrical connection 6. Safety information 1. Environmental concerns. Customer service and spare parts
 CONTENTS Safety information 1 Control panel 3 Operation 3 Maintenance Customer service and spare parts 5 6 SAFETY INFORMATION It is most important that this instruction book should be retained with the
User Manual. Refrigerator ZRG16605WA
 EN User Manual Refrigerator ZRG16605WA Contents Safety information 2 Safety instructions 3 Operation 4 First use 5 Daily use 5 Hints and tips 5 Care and cleaning 6 Troubleshooting 7 Installation 9 Technical
CONTENTS QUICK REFERENCE GUIDE PROGRAMME CHART
 1 CONTENTS Please read instruction for use QUICK REFERENCE GUIDE PREPARING THE LAUNDRY SELECTING A PROGRAMME AND OPTIONS STARTING AND COMPLETING A PROGRAMME CHANGING A PROGRAMME PROGRAMME CHART INTERRUPTING
CONTENTS QUICK REFERENCE GUIDE INSTRUCTIONS FOR USE PROGRAMME CHART BOOKLET
 CONTENTS QUICK REFERENCE GUIDE PROGRAMME CHART PREPARING THE LAUNDRY SELECTING A PROGRAMME AND OPTIONS STARTING AND COMPLETING A PROGRAMME CHANGING A PROGRAMME INTERRUPTING A PROGRAMME DAILY MAINTENANCE
SAFEGUARDING THE ENVIRONMENT IMPORTANT NOTES BEFORE USING THE OVEN OVEN ACCESSORIES CARE AND MAINTENANCE TROUBLESHOOTING GUIDE AFTER SALES SERVICE
 INSTRUCTIONS FOR USE SAFEGUARDING THE ENVIRONMENT IMPORTANT NOTES BEFORE USING THE OVEN OVEN ACCESSORIES CARE AND MAINTENANCE TROUBLESHOOTING GUIDE AFTER SALES SERVICE To make the most of your new oven,
Installer manual AG-AA10. Air/air heat pump IHB GB AG-AA10-30 AG-AA10-40/50
 -30 Installer manual Air/air heat pump -40/50 IHB GB 1516-1 331554 Table of Contents 1 Important information 2 5 Installation 7 Safety information 2 Model combinations 7 Read before starting the installation
Health & Safety, Use & Care and Installation guide. Οδηγ ς Υγείας, και Ασφάλειας, Χρήσης και Συντήρησης
 Health & Safety, Use & Care and Installation guide Οδηγ ς Υγείας, και Ασφάλειας, Χρήσης και Συντήρησης االستخدام والعناية و التركيب دليل الصحة والسالمة EN ENGLISH Health and Safety guide... 3 Installation
PORTABLE AIR CONDITIONER (LOCAL)
") EN PORTABLE AIR CONDITIONER (LOCAL) OPERATING INSTRUCTIONS Read the instructions carefully before operating the appliance or carrying out maintenance work. Observe all the safety instructions; failure
EN PORTABLE AIR CONDITIONER (LOCAL) OPERATING INSTRUCTIONS Read the instructions carefully before operating the appliance or carrying out maintenance work. Observe all the safety instructions; failure
USER MANUAL SILENT16 PORTABLE AIR CONDITIONER
 USER MANUAL SILENT16 PORTABLE AIR CONDITIONER Thank you for choosing electriq Please read this user manual before using this innovative Air Conditioner and keep it safe for future reference. Visit our
OPERATING INSTRUCTIONS
 EN DEHUMIDIFIER LILIUM 11 LILIUM 13 OPERATING INSTRUCTIONS Read the instructions carefully before operating or servicing the dehumidifier. Observe all the safety instructions; failure to observe the instructions
Operating Instructions. Accessory Units Melitta Cafina XT Series. Melitta Professional Coffee Solutions
 Operating Instructions Accessory Units Melitta Cafina XT Series Melitta Professional Coffee Solutions Contents General... 4. Manufacturer information... 4.2 About these instructions... 4.3 Explanation
Instructions for use
 Instructions for use These instruction shall be available on website docs.kitchenaid.eu Important instructions for safety 4 Installation 6 Safeguarding the environment 6 Troubleshooting guide 7 After-Sales
Utopian Split A/C. Thank you for purchasing this quality Split A/C system!
 Utopian Split A/C Thank you for purchasing this quality Split A/C system! Please read through this manual completely, and keep it in case you need to reference the information in the future. Any operation
3 In 1 AIR CONDITIONER with REMOTE CONTROL MODEL NO: CA9000 PART No: OPERATION & MAINTENANCE INSTRUCTIONS
 3 In 1 AIR CONDITIONER with REMOTE CONTROL MODEL NO: CA9000 PART No: 32305600 OPERATION & MAINTENANCE INSTRUCTIONS 0304 Parts List Item Part No Description Qty 1 FT900001 Top Cover 1 2 FT900002 Filter
VL FOREVER 600 INOX - VL FOREVER 600
 7 10 8 3a 11 9 3 7 11 6 4 5 2 1 10 8 6a 3a 9 3 Fig.1 2 Fig.2 1 Fig.3 Fig.4 Fig.5 VL FOREVER 600 /600 INOX M0S08218 1O07 Read these instructions carefully before using the appliance. KEY 1) Cable winder
INSTRUCTIONS FOR USE... 2
 5095109600 Rev. 1 19-03-2012 825440 INSTRUCTIONS FOR USE... 2 De Longhi Australia Pty Ltd ABN 49 104 012 857 Po Box 4540 Casula Mall NSW 2170 Australia Phone: 1800 126 659 Fax: 1800 007 289 www.kenwood-australia.com
BEFORE USING THE REFRIGERATOR PAG. 9 PROTECTING THE ENVIRONMENT PAG. 9 PRECAUTIONS AND GENERAL SUGGESTIONS PAG. 9
 GB CONTENTS BEFORE USING THE REFRIGERATOR PAG. 9 PROTECTING THE ENVIRONMENT PAG. 9 PRECAUTIONS AND GENERAL SUGGESTIONS PAG. 9 HOW TO USE THE REFRIGERATOR COMPARTMENT PAG. 10 HOW TO USE THE LOW TEMPERATURE
User manual. - A brand of EuroCave Group -
 OXYVD7WCOUS OXY2TVD6COUS User manual - A brand of EuroCave Group - Welcome You have just purchased an ARTEVINO product thank you for your custom. We take particular care in manufacturing our products in
11/2012. Mod: D281/EKA-NP. Production code:
 11/2012 Mod: D281/EKA-NP Production code: 916658 INSTRUCTION MANUAL FOR DISHWASHERS UK CONTENTS CHAP 1 PREFACE... 2 CHAP 2 INSTALLATION... 2 2.1 UNPACKING... 2 2.2 POSITIONING... 3 2.3 ELECTRICAL CONNECTION...
User manual PRO range display chillers and display freezers
 User manual PRO range display chillers and display freezers To ensure safe operation, please read this user manual thoroughly before use. 2017 Husky. Husky reserve the right to change specifications at
Nabucco Island Hood. Installation & User Instructions. Please read these instructions carefully before installing and operating this appliance
 Nabucco Island Hood Installation & User Instructions Please read these instructions carefully before installing and operating this appliance 1 Contents 1. Introduction 3 2. Health and Safety 3-4 3. Installation
G-7s. Instruction Manual. G-Series Cooler COUNTERTOP COOLER. Part No.11IPA
 G-Series Cooler COUNTERTOP COOLER Part No.11IPA-061000 Instruction Manual FOR YOUR FUTURE REFERENCE This easy-to-use manual will guide you in getting the best use of your cooler. Remember to record the
Koolbreeze. Portable Air-conditioner User s Manual. For Model : CLIMATEASY 14 P14HCP. Downloaded from manuals search engine
 Koolbreeze Portable Air-conditioner User s Manual For Model : CLIMATEASY 14 P14HCP Table of Contents 1. Installation.. 2 2. General Safety Reqirements.. 4 3. Product safety.... 5 4. Safety Awareness....
User Instruction &)+ 4: CFH110QB
+ 4: CFH110QB") User Instruction &)+ 4: CFH110QB 10 Safety Information In the interest of your safety and to ensure the correct use, before installing and first using the appliance, read this user manual carefully, including
User Instruction &)+ 4: CFH110QB 10 Safety Information In the interest of your safety and to ensure the correct use, before installing and first using the appliance, read this user manual carefully, including
INSTRUCTIONS AND WARRANTY
 INSTRUCTIONS AND WARRANTY MODEL NO. RHHD22 RUSSELL HOBBS HAIR DRYER Congratulations on purchasing our Russell Hobbs Hair dryer. Each unit is manufactured to ensure safety and reliability. Before using
Rigoletto 60,90 & 120 Built-In Cupboard Hood
 Rigoletto 60,90 & 120 Built-In Cupboard Hood Installation & User Instructions Please read these instructions carefully before installing and operating this appliance 1 Contents 1. Introduction 3 2. Health
User manual. Washing machine ZWQ 6120 ZWQ 6100
 EN User manual Washing machine ZWQ 6120 ZWQ 6100 Product description 1 1. The control panel 2. Lid handle 3. Adjustable levelling feet 2 3 The control panel 1 2 3 4 5 6 1. Programme selector 2. Pushbuttons
SAFEGUARDING THE ENVIRONMENT IMPORTANT NOTES BEFORE USING THE OVEN OVEN ACCESSORIES CARE AND MAINTENANCE TROUBLESHOOTING GUIDE AFTER SALES SERVICE
 31002018GB.fm Page 11 Tuesday, December 2, 2008 10:29 PM INSTRUCTIONS FOR USE SAFEGUARDING THE ENVIRONMENT IMPORTANT NOTES BEFORE USING THE OVEN OVEN ACCESSORIES CARE AND MAINTENANCE TROUBLESHOOTING GUIDE
FWC153, FWC304, FWC604 & FWC624
 FWC153, FWC304, FWC604 & FWC624 Wine Coolers Installation, use and maintenance www.cda.eu Important The CDA Group Ltd cannot be held responsible for injuries or losses caused by incorrect use or installation
General safety precautions English
 English A min (m 2 ) 550 530 540 510 520 490 500 470 480 450 460 430 440 410 420 390 400 370 380 350 360 330 340 310 320 290 300 270 280 250 260 230 240 210 220 190 200 170 180 150 160 130 140 110 120
General safety precautions English
 English A min (m 2 ) 550 530 540 510 520 490 500 470 480 450 460 430 440 410 420 390 400 370 380 350 360 330 340 310 320 290 300 270 280 250 260 230 240 210 220 190 200 170 180 150 160 130 140 110 120
/04.14_00. De Longhi Appliances via Seitz, Treviso Italia
 De Longhi Appliances via Seitz, 47 31100 Treviso Italia www.delonghi.com 5711010841/04.14_00 TRDS4 0820E - TRDS4 1025E DRAGON 4 OIL FILLED RADIATOR DESCRIPTION A L M B C D I F G H E N O 2 INSTRUCTIONS
BSF60WH / BSF60SS BUILT IN ELECTRIC FAN OVEN. Instruction Manual. Please read these instructions carefully before use and retain for future reference
 BSF60WH / BSF60SS BUILT IN ELECTRIC FAN OVEN Instruction Manual Please read these instructions carefully before use and retain for future reference SAFETY INSTRUCTIONS Important: This appliance is not
ensure Ensure Single inlet Dual inlet - only and cold
 X08060026A NOTE The manufacturer reserves the right for any modifications on the product which might be deemed necessary or useful without informing about it in this IFU. Thank you for choosing a Hisense
FWC152, FWC303, FWC603 & FWC623 Wine Coolers Installation, Use and Maintenance
 FWC152, FWC303, FWC603 & FWC623 Wine Coolers Installation, Use and Maintenance Customer Care Department The Group Ltd. Harby Road Langar Nottinghamshire NG13 9HY T : 01949 862 012 F : 01949 862 003 E :
DUCTED AIR CONDITIONER. Owner s Manual. KD Series KD24. Kaden Owner s Manual 1
 DUCTED AIR CONDITIONER Owner s Manual KD Series KD24 Kaden Owner s Manual 1 Table of Contents 1. Safety Precautions 4 2. Indoor Unit Parts and Major Functions 6 3. Care and Maintenance 8 4. Troubleshooting