MXT ROTARY RACK OVEN SET UP AND OPERATION INSTRUCTIONS (With programming instructions)
|
|
|
- Rose Walters
- 5 years ago
- Views:
Transcription
1 Enter Serial No. here. In the event of an enquiry please quote this serial number. MXT ROTARY RACK OVEN SET UP AND OPERATION INSTRUCTIONS (With programming instructions) ECOTOUCH CONTROL 1 FILE 69
2 2
3 CONTENTS PAGE Section Introduction 6 Section Overall Dimensions 7 Section Specifications 8 Section Safety 10 Section Installation 11 Section Isolation 13 Section Daily Cleaning Instructions 13 Section Weekly Maintenance Instructions 13 Section General Maintenance 14 (Including bulb changing) Section OPERATION baking using favourites baking using manual menu baking using programmes creating a program setting 7-day timer settings using usb port/stick diagnostics 44 ENGINEERS SECTION Section Element Bank Removal 45 Section Element bank Replacement 45 Section Maintenance (rack drive/turntable) 48 Section Spares and Services 51 Section Electrics (without pump) 52 Section Electrics (with pump) 63 Section Spares 75 3
4 Failure to adhere to the cleaning and maintenance instructions detailed in this booklet could affect the warranty of this machine. 4

5 NOTE All reference to LEFT HAND ovens means that main door is hinged on the left and the control panel is on the right. All reference to RIGHT HAND ovens means that main door is hinged on the right and the control panel is on the left. 5


6 1.0 INTRODUCTION The MONO MXT rotary rack oven is a compact, electrically fired oven with a computerized touch control panel. The oven is designed to accommodate a single rotating rack of up to eighteen trays capacity. Ecotouch ovens are supplied with TOUCH displays for the user-friendly control panels. This can show pictures of product types or program numbers that have been set by the user. When not being used, the screen can show your company logo. A voice prompt facility is also available for the basic instructions like Bake over. ECOTOUCH SCREEN CONTROLS The oven is of stainless steel construction, with easily cleaned interior and exterior surfaces and smart appearance. The fan and rack rotator have generously rated, totally enclosed, motors and a sealed for life gearbox. The high-speed fan and 45 kw element array (36kW on low power version) give good, efficient air circulation via a diagonal cross-flow system. Steam is generated within the oven chamber by means of a multi-point, water injection cascade. Programmed damper control is provided as part of the programming controls. 6
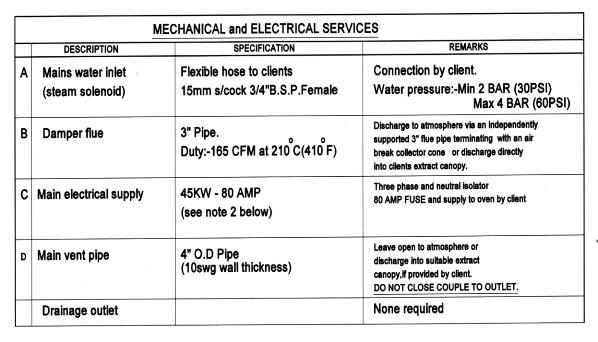
7 2.0 OVERALL DIMENSIONS A Mains water inlet B Damper flue C Main electrical supply D Main vent pipe (No drainage required) Minimum door entry required:- 2000mm (78 ) high x 760mm (30 ) wide Minimum operational ceiling height:- 3000mm (118 ) Total floor area: sq. Mtrs 7
8 3.0 SPECIFICATIONS OVERALL WIDTH: 1480mm (58 1/4") OVERALL DEPTH: 1290mm (50 3/4") OVERALL HEIGHT: 2580mm (101 1/2") INSIDE CLEAR DIAMETER: 1000mm nominal (39 3/8") HEIGHT: INSIDE 1920mm (75 1/2") VOLUME: 1.5 cu. M FOOTPRINT WIDTH: 1480mm (58 1/4") FOOTPRINT DEPTH: 1290mm (50 3/4") FOOTPRINT AREA: 1.85 sq. m TOTAL POWER: 50kW (41kW on low power version available) ELECTRICAL SUPPLY: 415V. 3pH. 50Hz.,70amps per phase HEATING ELEMENTS: Finned hairpin type HEATING ELEMENTS LOADING: 3kW. each HEATING ELEMENTS NUMBER: 15 (12 on low power version available) FAN MOTOR: 3kW. Totally enclosed fan cooled Squirrel cage. Class F 2860 rpm FAN: 200mm dia x 82mm (8" dia x 3 1/4") FAN SPEED: 2860 rpm FAN DRIVE: Direct Coupled RACK DRIVE MOTOR: TURNTABLE: RACK SIZE: RACK CARRIER: STEAMER SYSTEM:.37 kw. Geared Motor Unit with Squirrel cage, enclosed fan cooled, class F motor: and sealed-for-life spur/worm reduction unit. Output speed, 6rpm: Single row ball bearing 410mm (16") 30" x 18" (760mm x 460mm) tray size MONO system 4 roller. Top hung. High mass 2-point water injection and solenoid operated supply: 8
9 WATER PRESSURE MAXIMUM: MINIMUM: WATER FLOW WEIGHT DAMPER ELECTRICAL SYSTEM: CONTROL PANEL: ELECTRICAL PANEL: NOISE LEVEL: 4.0bar (60 psi) 2.0bar (30 psi) 6 litres/minute (at minimum pressure) Approx. 1100kg (2420lbs) Solenoid operated trapdoor type. Semi-automatic. Membrane operated dedicated. Microprocessor integrated system, with umbilical to main electrical panel 415V 3pH 50Hz mains, 24V DC auxiliaries. Less than 85 db OPTIONAL EXTRACTION CANOPY DIMENSIONS (CANOPY PT.No.M ) Extraction rate of 1000 cu ft./min is easily sufficient to extract the air from the canopy whilst the oven is in use. Customers are responsible for make-up air. 9
10 4.0 SAFETY In the interests of safety and efficient operation of this oven, it is essential that this manual should be made available to all personnel who may be required to operate the oven, before work is commenced. The following points should be closely observed and rigorously pursued at all times. 1 This oven is designed for baking bread, confectionery and savoury bakery products. Do not use the oven for baking other items without consulting the manufacturers. 2 All repairs and maintenance of electrical units should only be carried out by authorised electricians. 3 Electrical panels and electrical distributor boxes should not be opened until the main supply to the oven has been turned off. 4 When choosing and installing a flue, the precautions and instructions in this manual must be observed. 5 All connections to this oven must be made in accordance with the statutory and technical regulations of the country in which the oven is installed. 6 When work is being carried out inside the oven, the electrical mains isolator must be turned off and locked. 7 Whenever there is someone working inside the oven, the baking compartment door should be wedged open and a suitable warning notice hung on the door to prevent it being accidentally closed. 8 While the oven is in operation, and for some time after having been in operation, it is dangerous to touch the window glass or the metal surfaces in its vicinity. 9 The oven should be operated and maintained as described in this manual. 10 Use only MONO spare parts for this oven. 11 The construction of the oven must not be changed. 12 The owner of the oven is legally obliged to instruct staff using the oven in its operation and in these safety regulations. The instruction manual for the oven must not be removed from the oven work area. WARNING: KEEP CLEAR OF LARGE FLUE PIPE ON ROOF OF OVEN WHEN DOING ANY MAINTENANCE ON TOP. VERY HOT AIR IS EJECTED. 10

11 EMERGENCY INTERNAL-DOOR RELEASE PEDAL THE MAIN DOOR CAN BE OPENED FROM INSIDE BY PUSHING DOWN ON THE PEDAL LOCATED ON THE LOWER RIGHT HAND SIDE OF THE DOOR 5.0 INSTALLATION 1 The MONO MXT oven is designed to operate as a freestanding unit, and must not be bolted down or fixed to the floor in any way. It can be installed flush against walls on two sides as access is only required at the top and one side. 2 The concrete floor beneath the oven must be smooth, flat and clear of any obstructions, and must be at least 150mm (6") thick. 3 The foundation must be flush with the overall bakery floor because racks are wheeled up a ramp (supplied with the oven) into the baking chamber. 4 A minimum headroom clearance of 3 metres (180") between the floor and the bakery ceiling must be maintained at all times. 5 Connect to a suitable water supply, making sure that the pipes are flushed out to remove all foreign bodies i.e. flux or solder. NOTE : Customers in hard water areas must ensure that an efficient water treatment device protects the supply to the oven. It is the customers responsibility to install and maintain an adequate water supply to the oven, which should comply with local water regulations. 11
12 12


13 6.0 ISOLATION In case of an emergency, switch oven off at mains isolator switch. NOTE: IF WORKING ON ELECTRICAL BOX AND PANEL, ensure oven is DISCONNECTED from CONSUMER POWER SUPPLY. NOT ONLY OVEN ISOLATOR ABOVE, AS SOME PARTS STAY LIVE AFTER ISOLATOR SWITCH IS OPERATED 7.0 DAILY CLEANING INSTRUCTIONS The oven has been designed with sealed components, which are used wherever possible. The minimum of routine cleaning is required, but it is essential that it be properly and regularly carried out. Clean up spillages of product on the oven floor. Wipe off splashes on door window. Note: build up of spillages may result, because of incorrect rack rotation. Check for damage to door seals, particularly if operators are careless with rack handling. 8.0 WEEKLY MAINTENANCE INSTRUCTIONS Grease rack drive bearings. The remote point for greasing is located in the door post (A). Two shots per week are required. Note, over greasing may cause over heating in the bearing and leakage of grease. A 13
14 9.0 GENERAL MAINTENANCE Check for frayed or bare cables. The oven should not be used if any are found. Follow cleaning and greasing instructions in sections 7.0 and 8.0 Check condition of main door seals and replace if required. Check all lights are in working order. If not, replace as shown in the next section. 14

 and take glass, frame and gasket off lamp unit.")


15 TO REPLACE LIGHTING BULBS 12.0 BULB REPLACEMENT In the event of a bulb failure, Instructions on how to change a bulb are as follows: - Ensure oven is isolated from mains supply and allow to cool. Remove screws (4 per light) and take glass, frame and gasket off lamp unit. SCREWS DO NOT TOUCH BULBS WITH BARE HANDS. USE A CLOTH OR GLOVES TO STOP ANY MARKS THAT WILL CAUSE HOT SPOTS AND PREMATURE BULB FAILURE. Remove bulb by pulling in direction of arrow and replace with new bulb. LIGHT FITTING GASKET GLASS AND FRAME Pt. No.B Pt. No.B Pt. No.B Pt. No.B Refit glass front, take care that gasket is in position around stainless steel frame. Re-connect oven and test. 15

16 Section 10 TOUCH SCREEN OPERATING INSTRUCTIONS 16


17 BASIC OPERATION ALL OPERATIONS ARE ACTIVATED BY TOUCHING AREAS ON THE SCREEN, WHICH WILL PASS YOU ON TO THE NEXT INFORMATION PANEL. DO NOT USE EXCESSIVE FORCE. (THE PRESSURE REQUIRED TO OPERATE THE PANEL CAN BE ALTERED IN THE SETTINGS SECTION) TOUCH THE SCREEN ON THE AREA YOU REQUIRE TO ACTIVATE STANDBY THE OVEN TURNS OFF. TOUCH THE SCREEN TO GO TO THE OPTION SCREEN. SLEEP THE OVEN STAYS AT 100c AND HEATS TO LAST PROGRAM TEMPERATURE WHEN THE SCREEN IS TOUCHED. OPTION SCREEN THEN SHOWS. 17


18 10-1 BAKING USING FAVOURITES MENU TOUCH TO OPEN THE FAVOURITES SELECT SCREEN 1 OPTION SCREEN TOUCH THE NAME OF THE PRODUCT REQUIRED 2 SELECT SCREEN TOUCH THE FULL LOAD OR HALF LOAD AS REQUIRED 3 TO RETURN TO THE PREVIOUS SCREEN TOUCH THE BACK BUTTON AT ANY TIME LOAD SCREEN 18
19 IF THE OVEN IS NOT UP TO TEMPERATURE IT WILL SHOW THE HEATING SCREEN. WAIT FOR THE OVEN TO REACH TEMPERATURE IF THE OVEN IS TOO HOT FOR THE TEMPERATURE CHOSEN, THE SCREEN WILL TELL YOU TO OPEN THE DOOR TO AID COOLING. View HEATING SCREEN READY SCREEN WHEN OVEN IS AT THE CORRECT TEMPERATURE THE READY SCREEN WILL SHOW OPEN DOOR AND LOAD PRODUCT. 2. CLOSE THE DOOR FULLY. 3. TOUCH START View TIP TO HELP TO KEEP THE OVEN HOT, TRY NOT TO KEEP THE DOOR OPEN MORE THAN NEEDED BAKE IN PROGRESS SCREEN THIS SCREEN WILL SHOW WHILE THE PRODUCT IS BAKING BAKE PHASE (WHEN USED) ACTUAL OVEN TEMPERATURE SET TEMPERATURE TEMPERATURE PROFILE BAR BAKE TIME PROGRESS BAR NOTE The actual temperature shown will rise and fall above and below the set temperature as the oven cools and reheats. This is not a fault BAKE TIME LEFT 19 View

20 BAKE OVER SCREEN AT THE END OF THE BAKE TIME A SOUNDER WILL BE HEARD AND BAKE OVER WILL FLASH. TOUCH STOP AND OPEN THE DOOR TO REMOVE THE PRODUCT. TO KEEP THE OVEN BAKING FOR EXTRA MINUTES THE + 10 MIN BUTTON CAN BE TOUCHED. (THIS TIME CAN BE ALTERED IN SET UP) 5 View TOUCHING VIEW BUTTON DURING A BAKE TOUCHING VIEW BUTTON DURING A BAKE WILL SHOW THE SETTINGS FOR THE BAKE IN PROGRESS. TOUCH CANCEL TO GO BACK TO THE PREVIOUS SCREEN. View View VIEW SCREEN 20


21 10-2 BAKING USING MANUAL MENU TOUCH TO OPEN MANUAL BAKE SCREEN 1 OPTION SCREEN SET BAKE TIME AND TEMPERATURE MANUAL BAKE SCREEN SET BAKE TEMPERATURE TOUCH TEMPERATURE ON THE SCREEN TO ACTIVATE THE KEYBOARD SCREEN. KEY IN REQUIRED TEMPERATURE 2 SET BAKE TIME TOUCH TIME ON THE SCREEN TO ACTIVATE THE KEYBOARD SCREEN. KEY IN REQUIRED TIME AND TOUCH DONE 3 NOTE: TIME DOES NOT HAVE TO BE SET IN MANUAL MODE. (ONLY TEMPERATURE) WHEN START IS PRESSED, THE TIME WILL COUNT UP INSTEAD OF DOWN. TOUCH STOP TO FINISH BAKE. 21
 DAMPER TOUCH TO OPEN THE DAMPER.")
 CANCEL TOUCH AT ANYTIME TO GO BACK TO THE SETTING SCREEN.")
22 USE STEAM TIME AND DAMPER IF REQUIRED STEAM TOUCH AND HOLD FOR THE TIME (SECONDS) STEAM IS REQUIRED. (THIS CAN BE USED BEFORE OR DURING THE BAKE) DAMPER TOUCH TO OPEN THE DAMPER. (SYMBOL IS GREEN) 4 5 TOUCH TO CLOSE THE DAMPER. (SYMBOL IS RED) CANCEL TOUCH AT ANYTIME TO GO BACK TO THE SETTING SCREEN. MANUAL BAKE SCREEN 2 START TOUCH START TO START BAKE 6 TOUCH STOP WHEN END OF BAKE BUZZER SOUNDS OR WHEN REQUIRED IF NO TIME WAS ENTERED 22 7
23 SAVE MANUAL PROGRAM, IF REQUIRED MANUAL BAKE SCREEN 3 SAVE SETTINGS IF NO TIME WAS ENTERED AT THE START OF THE BAKE, WHEN STOP IS TOUCHED SAVE WILL APPEAR AT THE BOTTOM OF THE SCREEN. SAVE CAN BE TOUCHED AND AN OPTION SCREEN WILL APPEAR. 7 TOUCH ADD TO FAVOURITES OR SAVE AS USE KEYBOARD TO TYPE THE REQUIRED NAME AND TOUCH SAVE NOTE: In manual mode, only one operation of the steam or damper is saved. 23
. 1. PICTORIAL VERSION SHOWS CHOICES OF PRODUCT CATERGORIES 2.")


24 10-3 BAKING USING PROGRAMMES NOTE : THIS COVERS TWO VERSIONS OF FIRMWARE. (THE OVEN CAN BE PRE-SET TO SHOW ONLY ONE OF THEM). 1. PICTORIAL VERSION SHOWS CHOICES OF PRODUCT CATERGORIES 2. NUMERICAL VERSION SHOWS RANGES OF PROGRAM NUMBERS. TOUCH TO OPEN CATEGORY or PROGRAM CHOICE SCREEN 1 CATEGORY SCREEN PICTORIAL OR OPTION SCREEN PROGRAM CHOICE NUMERICAL TOUCH THE TYPE OF PRODUCT OR PROGRAM RANGE CHOICE WANTED AND SELECT SCREEN OPENS 2 MORE TOUCH THE NAME OR NUMBER OF THE PRODUCT REQUIRED 3 OR SCROLL DOWN FOR MORE PRODUCTS IF AVAILABLE SELECT SCREEN TOUCH THE FULL LOAD OR HALF LOAD AS REQUIRED 4 TOUCH THE BACK BUTTON AT ANY TIME TO RETURN TO THE PREVIOUS SCREEN LOAD SCREEN 24

25 IF THE OVEN IS NOT UP TO TEMPERATURE IT WILL SHOW THE HEATING SCREEN. WAIT FOR THE OVEN TO REACH TEMPERATURE IF THE OVEN IS TOO HOT FOR THE TEMPERATURE CHOSEN, THE SCREEN WILL TELL YOU TO OPEN THE DOOR TO AID COOLING. View HEATING SCREEN READY SCREEN WHEN THE OVEN IS AT THE CORRECT TEMPERATURE, THE READY SCREEN WILL SHOW OPEN DOOR AND LOAD PRODUCT. 2. CLOSE THE DOOR FULLY. 3. TOUCH START View TIP TO HELP TO KEEP THE OVEN HOT, TRY NOT TO KEEP THE DOOR OPEN MORE THAN NEEDED THIS SCREEN WILL SHOW WHILE THE PRODUCT IS BAKING BAKE PHASE (WHEN USED) ACTUAL OVEN TEMPERATURE SET TEMPERATURE TEMPERATURE PROFILE BAR BAKE TIME PROGRESS BAR NOTE The actual temperature shown will rise and fall above and below the set temperature as the oven cools and reheats. This is not a fault View BAKE TIME LEFT 25

26 BAKE OVER SCREEN AT THE END OF THE BAKE TIME A SOUNDER WILL BE HEARD AND BAKE OVER WILL FLASH. TOUCH STOP AND OPEN THE DOOR TO REMOVE THE PRODUCT. TO KEEP THE OVEN BAKING FOR EXTRA MINUTES THE + 10 MIN BUTTON CAN BE TOUCHED. (THIS TIME CAN BE ALTERED IN SET UP) 6 View TOUCHING VIEW BUTTON DURING BAKE TOUCHING VIEW BUTTON DURING BAKE WILL SHOW THE SETTINGS FOR THE BAKE IN PROGRESS. TOUCH CANCEL TO GO BACK TO THE PREVIOUS SCREEN. View VIEW SCREEN 26

27 " 10-4 CREATING A PROGRAM TOUCH TO OPEN CATEGORY SCREEN 1 OPTION SCREEN TOUCH THE TYPE OF PRODUCT WANTED AND THE SELECT SCREEN OPENS 2 CATEGORY SCREEN TOUCH THE DOWN ARROW UNTIL A BLANK PROGRAM IS REACHED. 3 TOUCH I BUTTON NEXT TO THE BLANK PROGRAM TO OPEN NEXT SCREEN 4 SELECT SCREEN 27

28 INFORMATION SCREEN TOUCH OPTION TO GO TO PASS CODE SCREEN 5 PASS CODE SCREEN ENTER SUPERVISOR PASS CODE AND THEN TOUCH OK. (DEFAULT CODE = ) 6 28


29 CHANGE PRODUCT OPTION SCREEN TOUCH CHANGE PRODUCT 7 LOAD TYPE VALUE CHANGE SCREEN BAKE PHASE (IF REQUIRED) INCREASE OR USE KEYS DECREASE POWER LEVEL ENTER AMOUNT REQUIRED AND TOUCH DONE TOUCH EACH ITEM AND CHANGE THE VALUE BY USING THE UP AND DOWN KEYS OR BY USING THE KEY PAD. 8 TOUCH FULL LOAD TO CHANGE TO HALF LOAD SETTINGS IF REQUIRED. TOUCH AGAIN TO GO BACK TO FULL LOAD TOUCH SAVE WHEN SATISFIED WITH THE SETTINGS OF EACH LOAD TYPE. 29

30 CHANGE TRAY LAYOUT OPTION SCREEN TOUCH CHANGE TRAY LAYOUT 9 TOUCH TO ADJUST NUMBER OF PRODUCTS ACROSS THE TRAY TOUCH TO ADJUST NUMBER OF PRODUCTS DOWN THE TRAY INCREASE VALUE D DECREASE VALUE W WHEN SATISFIED WITH THE TRAY LAYOUT TOUCH SAVE TO RETURN TO THE OPTIONS SCREEN 10 30

31 SAVE OPTION SCREEN TOUCH SAVE AS 11 KEYBOARD SCREEN TYPE IN THE NEW NAME AND TOUCH SAVE 12 31

32 ADD A PRODUCT TO THE FAVOURITES LIST TOUCH THE TYPE OF PRODUCT WANTED AND THE SELECT SCREEN OPENS 1 CATEGORY SCREEN TOUCH THE i (INFORMATION) BUTTON NEXT TO THE PRODUCT YOU WANT AS A FAVOURITE. THIS OPENS THE OPTION SCREEN 2 SELECT SCREEN TOUCH ADD TO FAVOURITES 3 THE PRODUCT WILL NOW SHOW ON THE FAVOURITES LIST OPTION SCREEN 32

33 10-5 SETTING 7 DAY TIMER TOUCH TO OPEN 7-DAY TIMER SCREEN 1 OPTION SCREEN CHOOSE DAY SET ON TIME SET OFF TIME 2 4 INCREASE VALUE 3 DECREASE VALUE TIMER SETUP SCREEN NOTE Up to four on/off times can be set for each day. Touch clear to clear the settings on the day shown. Touch save to activate the times set. 33
34 10-6 SETTINGS TOUCH TO OPEN THE SETTINGS SCREEN OPTION SCREEN PASS CODE SCREEN ENTER SUPERVISOR PASS CODE AND THEN PRESS OK. (DEFAULT CODE = ) 1 SETTINGS SCREEN CHOOSE THE SETTING TO ALTER 2 34

35 TIME AND DATE INCREASE DECREASE TOUCH THE SCREEN TO HIGHLIGHT THE ITEM TO CHANGE USE THE INCREASE / DECREASE BUTTONS TO ALTER THE SETTINGS 1 2 TIME AND DATE SCREEN WHEN ALL INFORMATION IS CORRECT, TOUCH SAVE. THIS WILL RETURN TO THE SETTINGS SCREEN 3 SETTINGS SCREEN 35


36 OVEN SETTINGS (GENERAL) SELECT WALLPAPER. TOUCH BACK TO CONFIRM SETTINGS SCREEN TOUCH GENERAL SETTINGS AND THE FOLLOWING SCREEN WILL APPEAR. SCROLL DOWN TO MOVE THROUGH ALL CHOICES AND ADJUST EACH ONE AS REQUIRED, USING THE ARROW KEYS. 36
37 OVEN SETTINGS EXPLAINED - GENERAL LEVEL SCREEN BRIGHTNESS Adjusts the brightness of the viewing screen for user comfort. TOUCHSCREEN SENSITIVITY Adjusts the pressure required to operate the touch screen. (5 settings) TEMPERATURE UNIT OF MEASURE Centigrade (Celsius) or Fahrenheit BAKE EXTENSION (mins) Adjusts the extra time at the end of a bake for each extra time button touch. (10mins max) BAKE START ON DOOR CLOSE This will start the set bake program as soon as the door closes. SLEEP MODE DELAY Oven will go into sleep mode after the set minutes, providing it is up to temperature and has been through at least one bake cycle. 8 HOUR COUNTDOWN TIMER After 8 hours the oven gives a warning and then turns off. Touch any button for an extra hour if required. POWER LEVEL (1-4) Set these as required for each level to be used. CHART INTERVAL Time interval in seconds that the bars show on the heat and bake time progress charts. SOUNDER SELECT Set as external or onboard. SOUNDER TONE Select a tone Voice or Off SOUNDER VOLUME Adjust to suit the volume required. (onboard sounder only) SHORTCUT BUTTONS 1 fn 2 fn 3 fn 4 fn 5 fn Gives the choice of what buttons are active and in which order they appear on the options screen. Options available = Favourites, Programs, Manual bake, Multi bake, 7-day timer. (Settings at 6fn cannot be changed) 37


 SCROLL DOWN")
38 `````````````````````````` OVEN SETTINGS (HIGH LEVEL) TOUCH HIGH LEVEL SETTINGS AND THE FOLLOWING SCREEN WILL APPEAR. 1 SETTINGS SCREEN ENTER HIGH LEVEL PASS CODE AND THEN TOUCH OK. 2 THE FOLLOWING SCREEN WILL APPEAR. CHANGE SUPERVISOR PASSWORD HERE CHANGE HIGH LEVEL PASSWORD HERE RESTORES ALL SCREENS BACK TO ORIGINAL DEFAULT SETTINGS (NOT PASSCODES) SCROLL DOWN TO MOVE THROUGH ALL CHOICES AND ADJUST EACH ONE AS REQUIRED, USING THE ARROW KEYS. 3 38
39 OVEN SETTINGS EXPLAINED - HIGH LEVEL OVEN TYPE Set this to MX. MAX. BAKE TEMPERATURE Can be set up to 300C, (depending on the oven type) TEMPERATURE OFFSET Can be used to adjust the display to the actual temperature in the oven. BAKE HYSTERISIS Sets bake temperature cycling around a set point. (Above and below). SLEEP FALLBACK Temperature of the oven in sleep mode (100C is suggested). SLEEP HYSTERISIS Sets sleep mode temperature cycling around a set point. (Above and below). READY ACCEPT HIGH Highest temperature for the oven to display READY READY ACCEPT LOW Lowest temperature for the oven to display READY FAN DELAY AFTER STEAM Delay before fan starts after the oven has steamed. (60 seconds max) LIGHT OUTPUT SOFT START On/Off Some lights need this for cold start up to stop them blowing. AUTO FAN CYCLE TIME (MINS) Set time required.only used in manual and multibake modes. AUTO FAN DWELL TIME Set time required.only used in manual and multibake modes. HEATER CONTROL Contactor or solid state. Defaults to contactor. (solid state not used at the moment) I/O DIAGNOSTIC Displays outputs and inputs at the top of the screen to aid fault finding if needed. 39
40 DEFAULT PASSCODES SUPERVISOR (LOW LEVEL) HIGH LEVEL MASTER (This is fixed) SUGGESTION To stop unauthorised changes to the oven setup, it is suggested that this page is removed from this manual and kept in a safe place for future reference. If tampering could be a problem, It is a good idea to change the passcodes at regular intervals,. 40


41 10-7 USING THE USB PORT Ensure the Start screen is showing 1 START SCREEN Insert the USB memory stick into the socket on the oven panel. (Rubber plug may have to be removed first). 2 NOTE The USB stick will only fit in one way. Do not force into the socket. Wait for the USB symbol to finish moving 3 If old firmware is found, the firmware version screen will appear. 4 Touch OK to update firmware -Wait- Remove USB stick OR Touch CANCEL to choose other items to update or change. (see next page) 41


42 Choose action you would like to do. 5 Select the file required. 6 When confirmation of file loaded ok Shows, remove the usb stick. 7 42
43 For a USB stick to function correctly it must have the following folder in the root folder. Mono Then into that folder add the following: Firmware Products Skins Sounds Startup Place your recipe/product files in the products folder. The oven will find the "Mono" folder automatically when the stick is plugged into the oven. Any stick can be used (does not have to be blank) but the Mono folder must be in the root folder. The most used folders are explained below: NOTES ON USING USB STICKS SKINS These control the way the screen looks in different modes. Pictorial is when the screen displays catergories using pictures. Numerical is when the screen displays program numbers. STARTUP SCREENS This is the picture/logo you see when the oven is started. PRODUCT FILES (PROGRAM FILES) These are the files that contain the information for baking each product e.g. bread,buns,cakes etc. 43


44 10-8 DIAGNOSTICS SETTINGS SCREEN TOUCH DIAGNOSTICS AND THE FOLLOWING SCREEN WILL APPEAR. DIAGNOSTICS SCREEN INPUTS HIGHLIGHT WHEN A SIGNAL IS Received. e.g. DOOR OPEN TOUCH THE REQUIRED OUTPUT AND A SIGNAL IS SENT TO THAT ITEM. THE OUTPUT BEING CHECKED IS HIGHLIGHTED WHEN ACTIVE. TO STOP THE OUTPUT, PRESS AGAIN. 44
45 11.0 ELEMENT BANK REMOVAL (SEE DRAWINGS ON NEXT PAGES) 1 Ensure oven is DISCONNECTED from consumer power supply. ----(DO NOT ONLY USE OVEN ISOLATOR) Disconnect two plug connectors from sockets at the top of main electrical box and one plug connector from the bottom of the box. 3 Disconnect element supply cables from inside the box. 4 Disconnect cables from mains isolator. 5 Unscrew cable guide plate and slide away down heat sensor tubing. 6 Remove insulation material from cable guide plate area. 7 Unscrew retainer screw on heat sensor holder and slide out sensor tube leaving holder in place. 8 Loosen nuts clamping conduit tube to main isolator bracket. 9 Loosen bottom electrical box holding nuts. 10 Remove top electrical box holding nuts. 11 Pull top of box forward, disengaging conduit from bracket and lift slots off studs at bottom. (Be careful not to damage heat sensor tube.). 12 Slide insulation covers and insulation boards out of chamber to reveal element carrier front face. 13 Bolt on two handles (part no. M ) to fixing lugs on front face of carrier assembly. 14 Remove 14 hex. head bolts from around front face of carrier and slide complete assembly out of heater ELEMENT BANK REPLACEMENT This is the reversal of , but ensure all insulation is replaced and that the insulation ladder tape on heater chamber front face is in good condition 45
46 46
47 47
48 13.0 Rack Drive/Turntable parts WARNING: KEEP CLEAR OF LARGE FLUE PIPE ON ROOF WHEN DOING ANY MAINTENANCE ON TOP OF OVEN. VERY HOT AIR IS EJECTED. MONO MXT OVEN TURNTABLE DRIVE COMPONENTS 48
49 MONO MXT OVEN TURNTABLE DRIVE COMPONENTS DESCRIPTION (see drawing on previous page) Item Part no Description Qty 1 B Gearmotor unit (Varvel MRA70) 1 2 A M10 Plain washer 4 3 A M10 Spring washer 5 4 A M12 x 45LG Hex.Hd. setscrew Drive shaft assy (shaft key pin) 1 6 A M8 x 25LG Hex.Hd.setscrew 8 7 A M8 Plain washer 16 8 A M8 Spring washer 16 9 A M8 x 50LG Hex.Hd.setscrew Turntable drive (lower) 1 11 A M10 x 45LG. Hex.Hd.setscrew Top plate Insulation packing piece Bearing support plate assy Drive spider Turntable bearing Turntable drive (upper) Insulation disc M10 Stud 6 20 A M10 Dome nut Rack hanger. (ref. only) 1 23 A ½" Plain washer 8 24 A ½" Spring washer 8 25 A M12 Nut Spacer 7 27 A M6 x 10LG Grub screw Washer (drive shaft) 1 29 A M10 x 16LG hex.hd. setscrew Direction of rotation label 1 31 A M4 x 6LG slotted pan ho. screw Packing shim for rack hanger (14swg) as required (20swg) A M6 x 12LG Hex.Hd. setscrew 1 34 A M6 Shakeproof washer 1 49
 securing the rack hanger to its shaft and remove the hanger (D). Release the screws securing the ring plate and remove the plate (E).")
50 To renew the rack drive seal E D C This seal is situated inside the oven above the ring plate surrounding the Rack hanger shaft. 1 Release the six dome nuts (C) securing the rack hanger to its shaft and remove the hanger (D). Release the screws securing the ring plate and remove the plate (E). 2 Pick out the rubber ring seal and coiled rope seal from within the cavity and carefully coil in the new seal, ensuring that it is not distorted. Replace the rubber ring seal. 3 Refit the ring plate and the rack hanger. ROPE SEAL PT No. A RUBBER SEAL PT No A
51 14.0 SPARES AND SERVICE If a fault arises, please do not hesitate to contact the Customer Service Department, quoting the machine serial number on the silver information plate of the machine and on the front cover of this manual. MONO Queensway Swansea West Industrial Estate Swansea. SA5 4EB UK spares@monoequip.com Web site: Tel Spares +44(0) Fax
52 15.0 ELECTRICS (WITHOUT PUMP) 52
53 53
54 54
55 55
56 56
57 57
58 58
59 59
60 60
61 61
62 62
63 16.0 ELECTRICS (WITH PUMP) 63
64 64
65 65
66 66
67 67
68 68
69 69
70 70
71 71
72 72
73 73
74 74
75 WIRING CONNECTIONS WATER PUMP (GODWIN) DIAGRAM (IF FITTED) 75

76 17.0 SPARES 76
77 77
78 78
79 79
80 80
81 81
82 82
83 ROPE SEAL PT No. A (NOT SHOWN) RUBBER SEAL PT No. A (NOT SHOWN) 83

84 MAIN DOOR COMPONENTS 84
85 WIRING CONNECTIONS WATER PUMP (GODWIN) DIAGRAM (IF FITTED) 85
86 86
87 87
88 DAMPER ASSEMBLY LOOSEN SOLENOID FIXINGS. HOLD DAMPER FLAP (3) FLAT ON TOP OF DAMPER TUBE AND TIGHTEN SOLENOID. 88

89 MX OVEN AIR DOOR DEFAULT SETTINGS 8.0mm ALL TOP HOLES 5.9mm 4.9mm 4.5mm 4.0mm 4.0mm 4.0mm 89

90 MONO Equipment Queensway, Swansea West Industrial Park, Swansea, SA5 4EB UK Tel Fax As it is our policy to improve our machines continuously, we reserve the right to change specifications without prior notice. DISPOSAL CARE SHOULD BE TAKEN WHEN THE MACHINE COMES TO THE END OF ITS WORKING LIFE. ALL PARTS SHOULD BE DISPOSED OF IN THE APPROPRIATE PLACE, EITHER BY RECYCLING OR OTHER MEANS OF DISPOSAL THAT COMPLIES WITH LOCAL REGULATIONS. (IN UK, ENVIRONMENTAL PROTECTION ACT 1990 APPLIES) 90
SET UP, OPERATION AND PROGRAMMING INSTRUCTIONS
 Enter Serial No. here. In the event of an enquiry please quote this serial number. www.monoequip.com SET UP, OPERATION AND PROGRAMMING INSTRUCTIONS MX ROTARY RACK OVEN ELECTRIC VERSION (STANDARD 45Kw heating
MONO ECOTOUCH DECK OVEN
 Enter Serial No. here. In the event of an enquiry please quote this serial number. www.monoequip.com OPERATION AND MAINTENANCE MANUAL MONO ECOTOUCH DECK OVEN 1 2 IMPORTANT NOTES TO REDUCE RISK OF FIRE
OVEN ECOTOUCH CONTROL
 OVEN SERIAL NO. OVEN CODE 149 150 153 156 158 159 www.monoequip.com CONDENSER SERIAL No. (IF FITTED) In the event of an enquiry please quote these numbers. Bx OVEN ECOTOUCH CONTROL OPERATION AND MAINTENANCE
CONDENSER SERIAL No. (IF FITTED) In the event of an enquiry please quote these numbers.
 In the event of an enquiry please quote these numbers.") OVEN SERIAL NO. OVEN CODE 149 150 153 156 158 159 MANUAL No.Y-BX-34E CONDENSER SERIAL No. (IF FITTED) In the event of an enquiry please quote these numbers. Store this document safely and ensure it is
OVEN SERIAL NO. OVEN CODE 149 150 153 156 158 159 MANUAL No.Y-BX-34E CONDENSER SERIAL No. (IF FITTED) In the event of an enquiry please quote these numbers. Store this document safely and ensure it is
MODULAR DECK OVEN. OPERATING AND MAINTENANCE MANUAL ECOTOUCH CONTROL. In the event of an enquiry please quote these serial numbers.
 In the event of an enquiry please quote these serial numbers. Enter Serial Nos. here. www.monoequip.com DECK 1 DECK 2 DECK 3 DECK 4 DECK 5 FAN (IF FITTED) MODULAR DECK OVEN OPERATING AND MAINTENANCE MANUAL
MXn RACK OVEN SPARES MANUAL MACHINE NO.FG164
 www.monoequip.com MXn RACK OVEN SPARES MANUAL MACHINE NO.FG164 When ordering spares please quote the machine serial number which can be found on the silver information plate of the machine and on the front
Bx OVEN SET UP AND OPERATION OF OVEN AND CONDENSER UNIT (IF FITTED) CLASSIC
 CLASSIC") www.monoequip.com OVEN SERIAL NO. OVEN CODE 149 150 153 156 158 159 180 CONDENSER SERIAL No. (IF FITTED) In the event of an enquiry please quote these numbers. Bx OVEN SET UP AND OPERATION OF OVEN AND
www.monoequip.com OVEN SERIAL NO. OVEN CODE 149 150 153 156 158 159 180 CONDENSER SERIAL No. (IF FITTED) In the event of an enquiry please quote these numbers. Bx OVEN SET UP AND OPERATION OF OVEN AND
DECK 1 DECK 2 DECK 3 DECK 4 DECK 5. In the event of an enquiry please quote these serial numbers.
 MANUAL No. Y-DXT UL Enter Serial Nos. here DECK 1 DECK 2 DECK 3 FAN (IF FITTED) DECK 4 DECK 5 In the event of an enquiry please quote these serial numbers. Store this document safely and ensure it is available
OPERATING AND MAINTENANCE MANUAL
 Enter Serial No. here. In the event of an enquiry please quote this serial number. www.monoequip.com OPERATING AND MAINTENANCE MANUAL COMPACT SERIES 644 4 TRAY OVEN FILE 98 644 compact 4 tray RevA18 11-01-18
OPERATING AND MAINTENANCE MANUAL
 Enter Serial No. here. In the event of an enquiry please quote this serial number. www.monoequip.com OPERATING AND MAINTENANCE MANUAL COMPACT SERIES 643 3 TRAY OVEN FILE 52 643 compact 3 TRAY RevA17 10-4-17
LED (CLASSIC) DECK OVEN
 DECK OVEN") Enter Serial No. here. In the event of an enquiry please quote this serial number. www.monoequip.com OPERATION AND MAINTENANCE MANUAL LED (CLASSIC) DECK OVEN 1 Failure to adhere to the cleaning and maintenance
Enter Serial No. here. In the event of an enquiry please quote this serial number. www.monoequip.com OPERATION AND MAINTENANCE MANUAL LED (CLASSIC) DECK OVEN 1 Failure to adhere to the cleaning and maintenance
OVEN SERIAL NO. OVEN CODE CONDENSER SERIAL No. (IF FITTED) In the event of an enquiry please quote these numbers.
 In the event of an enquiry please quote these numbers.") www.monoequip.com OVEN SERIAL NO. OVEN CODE 149 150 153 156 158 159 CONDENSER SERIAL No. (IF FITTED) In the event of an enquiry please quote these numbers. Bx OVEN SET UP AND OPERATION OF OVEN AND CONDENSER
www.monoequip.com OVEN SERIAL NO. OVEN CODE 149 150 153 156 158 159 CONDENSER SERIAL No. (IF FITTED) In the event of an enquiry please quote these numbers. Bx OVEN SET UP AND OPERATION OF OVEN AND CONDENSER
Bx OVEN SET UP AND OPERATION OF OVEN WITH CLASSIC CONTROLLER
 Enter Serial No. here. In the event of an enquiry please quote this serial number. www.monoequip.com Store this document safely and ensure it is available at all times. Non-availability may affect the
CONDENSER SERIAL No. (IF FITTED) In the event of an enquiry please quote these numbers. Bx OVEN
 In the event of an enquiry please quote these numbers. Bx OVEN") OVEN SERIAL NO. OVEN CODE 149 150 153 156 158 159 MANUAL No.Y-BX-01E CONDENSER SERIAL No. (IF FITTED) In the event of an enquiry please quote these numbers. Store this document safely and ensure it is
OVEN SERIAL NO. OVEN CODE 149 150 153 156 158 159 MANUAL No.Y-BX-01E CONDENSER SERIAL No. (IF FITTED) In the event of an enquiry please quote these numbers. Store this document safely and ensure it is
TABLE TOP DOUGHNUT FRYER
 Enter Serial No. here. In the event of an enquiry please quote this serial number. www.monoequip.com OPERATION AND MAINTENANCE MANUAL TABLE TOP DOUGHNUT FRYER FG030 TABLETOP DNUT FRYER 3-4-17 Rev A17 2
OPERATION AND MAINTENANCE MANUAL MOBILE PROVER CABINET
 Enter Serial No. here. In the event of an enquiry please quote this serial number. www.monoequip.com OPERATION AND MAINTENANCE MANUAL MOBILE PROVER CABINET FILE 20 FG132 PROVER 6-09-16 RevA16 Failure to
AZTEC DOUGHNUT FRYER (PLC / MK3)
") Enter Serial No. here. In the event of an enquiry please quote this serial number. www.monoequip.com OPERATING AND MAINTENANCE MANUAL AZTEC DOUGHNUT FRYER (PLC / MK3) FG059 Aztec plc RevA18 05-01-18 FILE
Enter Serial No. here. In the event of an enquiry please quote this serial number. www.monoequip.com OPERATING AND MAINTENANCE MANUAL AZTEC DOUGHNUT FRYER (PLC / MK3) FG059 Aztec plc RevA18 05-01-18 FILE
DEPOSITOR (400, 450,)
") Enter Serial No. here. MANUAL No.Y-OM-03E In the event of an enquiry please quote this serial number. Store this document safely and ensure it is available at all times. Non-availability may affect the
Enter Serial No. here. MANUAL No.Y-OM-03E In the event of an enquiry please quote this serial number. Store this document safely and ensure it is available at all times. Non-availability may affect the
OPERATION AND MAINTENANCE MANUAL
 Enter Serial No. here. In the event of an enquiry please quote this serial number. www.monoequip.com OPERATION AND MAINTENANCE MANUAL TWIN WATER METER 1 2 INDEX 1.0 Introduction 2.0 General Dimensions
DXm MODULAR DECK OVEN
 Enter Serial Nos. here DECK 1 DECK 2 DECK 3 FAN (IF FITTED) DECK 4 DECK 5 In the event of an enquiry please quote these serial numbers. Store this document safely and ensure it is available at all times.
E32M CONVECTION OVEN SERVICE MANUAL. Revision 1/F
 E32M CONVECTION OVEN SERVICE MANUAL -- WARNING: ALL INSTALLATION AND SERVICE REPAIR WORK MUST BE CARRIED OUT BY QUALIFIED PERSONS ONLY. -2- CONTENTS This manual is designed to take a more in depth look
30DSERIES E32D4. (Digital Operation) Installation and Operation Manual
 Installation and Operation Manual") 30DSERIES E32D4 (Digital Operation) Installation and Operation Manual 234781-12 MANUFACTURED BY Moffat Limited Christchurch New Zealand INTERNATIONAL CONTACTS AUSTRALIA Moffat Pty Limited Web: www.moffat.com.au
30DSERIES E32D4 (Digital Operation) Installation and Operation Manual 234781-12 MANUFACTURED BY Moffat Limited Christchurch New Zealand INTERNATIONAL CONTACTS AUSTRALIA Moffat Pty Limited Web: www.moffat.com.au
E32 CONVECTION OVEN SERVICE MANUAL -1- Revision 1/F3508
 E32 CONVECTION OVEN SERVICE MANUAL -1- WARNING: ALL INSTALLATION AND SERVICE REPAIR WORK MUST BE CARRIED OUT BY QUALIFIED PERSONS ONLY. -2- CONTENTS This manual is designed to take a more in depth look
Patterson/AMT Inline Circulator Pump Refer to pump manual for General Operating and Safety Instructions.
 Please read and save this Repair Parts Manual. Read this manual and the General Operating Instructions carefully before attempting to assemble, install, operate or maintain the product described. Protect
PARTS & ACCESSORIES INSTALLATION AND SAFETY INSTRCUTIONS ITEM NO.:60010BZGTGLD SAFETY PRECAUTION. Canopy. Downrod. Housing. Transmitter CR2032/3V
 L I G H T I N G INSTALLATION AND SAFETY INSTRCUTIONS ITEM NO.:000BZGTGLD SAFETY PRECAUTION PARTS & ACCESSORIES Canopy Downrod Housing WARNING To make sure power is off before attempting installation. WARNING
User Instruction Manual
 User Instruction Manual Counter Top Convection Oven Please read and keep these instructions These instructions cover the Burco counter top convection oven model CTCO01, SKU 444440542 CTCO01 SKU 444440542
Patterson/AMT Inline Circulator Pump Refer to pump manual for General Operating and Safety Instructions.
 Please read and save this Repair Parts Manual. Read this manual and the General Operating Instructions carefully before attempting to assemble, install, operate or maintain the product described. Protect
User and Installation Instructions. Wall Mounted Water Boiler WMB3F/B and WMB3F/W IS435 ECN3461
 User and Installation Instructions Wall Mounted Water Boiler WMB3F/B and WMB3F/W IS435 ECN3461 Dear Customer Thank you for purchasing this Lincat product. With correct use and careful maintenance as described
Parts and Service Manual
 Section II Parts and Service Manual (70241A) CLARKE TECHNOLOGY Operator's Manual - MINI MAX Page -29- Frame and Front Cover Assembly Drawing 2/01 Page -30- CLARKE TECHNOLOGY Operator's Manual -MINI MAX
SERVICE MANUAL VC3ED FULL SIZE ELECTRIC CONVECTION OVEN - NOTICE -
 SERVICE MANUAL VC3ED FULL SIZE ELECTRIC CONVECTION OVEN VC3ED ML-137013 - NOTICE - This Manual is prepared for the use of trained Vulcan Service Technicians and should not be used by those not properly
E32 CONVECTION OVEN SERVICE MANUAL
 E32 CONVECTION OVEN SERVICE MANUAL Applies to units from S/N 40256-1- WARNING: ALL INSTALLATION AND SERVICE REPAIR WORK MUST BE CARRIED OUT BY QUALIFIED PERSONS ONLY. -2- CONTENTS This manual is designed
569, 570, 571, 572 Series
 Please read and save this Repair Parts Manual. Read this manual and the General Operating Instructions carefully before attempting to assemble, install, operate or maintain the product described. Protect
569, 570, 571, 572 Series
 Please read and save this Repair Parts Manual. Read this manual and the General Operating Instructions carefully before attempting to assemble, install, operate or maintain the product described. Protect
E25 CONVECTION OVEN E25MS CONVECTION OVEN SERVICE MANUAL
 E25 CONVECTION OVEN E25MS CONVECTION OVEN SERVICE MANUAL E25 Convection Oven -- WARNING: ALL INSTALLATION AND SERVICE REPAIR WORK MUST BE CARRIED OUT BY QUALIFIED PERSONS ONLY. E25 Convection Oven -2-
PARTS & ACCESSORIES INSTALLATION AND SAFETY INSTRCUTIONS ITEM NO.:60006PC SAFETY PRECAUTION. Canopy. Downrod. Housing. Blade. Transmitter CR2032/3V
 L I G H T I N G INSTALLATION AND SAFETY INSTRCUTIONS ITEM NO.:000PC SAFETY PRECAUTION PARTS & ACCESSORIES Canopy Downrod Housing IMPORTANT : PLEASE READ BEFORE INSTALLATION.. Do not connect this remote
ECOJET EJ-10E & EJ-7E ELECTRIC CONVECTION STEAMER W/TWIN GENERATORS PARTS AND SERVICE MANUAL
 ECOJET EJ-10E & EJ-7E ELECTRIC CONVECTION STEAMER W/TWIN GENERATORS PARTS AND SERVICE MANUAL EFFECTIVE JULY 31, 2014 Superseding All Previous Parts Lists. The Company reserves the right to make substitution
Technical Data. Name: ERIKA Automat fully automatic machine to divide and to round dough pieces of the same size
 AUTOMAT MANUAL 1 Technical Data Name: ERIKA Automat fully automatic machine to divide and to round dough pieces of the same size Type Divisions Dough Portions (in ounces) Plate Nos. 3 30 1.0 3.5 #35 4/40A
CATALOG OF REPLACEMENT PARTS HSROG SERIES SINGLE RACK OVEN. A product of HOBART CORPORATION 701 S. RIDGE AVENUE TROY, OHIO
 CATALOG OF REPLACEMENT PARTS HSROG SERIES SINGLE RACK OVEN HSROG ML-111148 A product of HOBART CORPORATION 701 S. RIDGE AVENUE TROY, OHIO 45374-0001 FORM 43003 (June 2001) HOT SECTION 26 OVEN TOP SECTION
Installation, Operating and Servicing Instructions
 Installation, Operating and Servicing Instructions Electric Convection Oven ECO8, ECO9 Please make a note of your product details for future use: Date Purchased: Model Number: Serial Number: Dealer: IS
Stainless Steel and Glass Angled Extractor
 Stainless Steel and Glass Angled Extractor HJA2600 User & Installation Guide CONTENTS Environmental Note 3 Product information 4 4 Parts List 4 Method of Extraction 5 Installation 6 Hanging Your Extractor
O PE R AT I ON HO851G REVOLVING TRAY OVEN. MODEL HO851G GAS ML Pan ML Pan ML Pan ML Pan
 O PE R AT I ON HO851G REVOLVING TRAY OVEN MODEL HO851G GAS ML-132160 24 Pan ML-132161 18 Pan ML-132258 36 Pan ML-132259 30 Pan 701 S. RIDGE AVENUE TROY, OHIO 45374-0001 937-332-3000 www.hobartcorp.com
568X, 587X, 588X Series
 Please read and save this Repair Parts Manual. Read this manual and the General Operating Instructions carefully before attempting to assemble, install, operate or maintain the product described. Protect
Replacement Parts List For Models COS-101 COS-101S
 Replacement Parts List For Models COS-101 COS-101S (Ovens with s/n HD, HE, HG, HJ) Contents: Page # Front View: Control Panel, Door, Exterior Components 2-4 Oven Interior: 5 Bottom Section: Plumbing Components
Installation and Operating Manual Drying Cabinet
 Drying Cabinet TS-4175 WW CONTENTS THIS USER MANUAL & DATA PLATE DETAILS Page 2 IMPORTANT SAFETY INSTRUCTIONS Page 3 INSTALLATION INSTRUCTIONS Page 4 OPERATING INSTRUCTIONS Page 8 MAINTENANCE INSTRUCTIONS
EAGLE 2000B EAGLE 2000BE EAGLE 2000EBT MUST READ MANUAL PRIOR TO INSTALLING MACHINE
 EAGLE 2000B EAGLE 2000BE EAGLE 2000EBT MUST READ MANUAL PRIOR TO INSTALLING MACHINE Contents 1 Machine Safety Information 3 1.5 Safety Precautions Prior to Operating Machine 6 2 Machine Installation 7
RHGN-H: COMMERCIAL AIR HANDLER WITH VARIABLE FREQUENCY DRIVE (VFD) NOMINAL 10 TONS R-410A REFRIGERANT 2-STAGE AIR-FLOW
 NOMINAL 10 TONS R-410A REFRIGERANT 2-STAGE AIR-FLOW") INSTALLATION INSTRUCTIONS RHGN-H: COMMERCIAL AIR HANDLER WITH VARIABLE FREQUENCY DRIVE (VFD) NOMINAL 10 TONS R-410A REFRIGERANT 2-STAGE AIR-FLOW 92-106595-01-00 TABLE OF CONTENTS Introduction.......................................
INSTALLATION INSTRUCTIONS RHGN-H: COMMERCIAL AIR HANDLER WITH VARIABLE FREQUENCY DRIVE (VFD) NOMINAL 10 TONS R-410A REFRIGERANT 2-STAGE AIR-FLOW 92-106595-01-00 TABLE OF CONTENTS Introduction.......................................
OG7302 Salamander Grill
 OG7302 Salamander Grill USER, INSTALLATION, SERVICING AND CONVERSION INSTRUCTIONS For use in GB & IE IS370 ECN3280 1 Dear Customer, Thank you for purchasing this Lincat product. This is just one of over
E35 CONVECTION OVEN SERVICE MANUAL
 E35 CONVECTION OVEN SERVICE MANUAL -1- WARNING: ALL INSTALLATION AND SERVICE REPAIR WORK MUST BE CARRIED OUT BY QUALIFIED PERSONS ONLY. -2- CONTENTS This manual is designed to take a more in depth look
Effective october 14, 2014
 COS-101 & COS-101S COMBI OVEN STEAMER REPLACEMENT PARTS LIST Effective october 14, 2014 Superseding All Previous Parts Lists. The Company reserves the right to make substitution in the event that items
HORIZONTAL COOKING SERIES: 700 / 900 S.A.V MAINTENANCE & AFTER SALES WORK PPS-3WE711911CH
 SERIES: 700 / 900 S.A.V MAINTENANCE & AFTER SALES WORK PPS-3WE711911CH GENERAL Tools Every time you se this symbol it is vital that you have the tool indicated to ensure correct and compliant work is undertaken
VK902 Compact Combination Microwave Oven Installation, Use and Maintenance
 VK902 Compact Combination Microwave Oven Installation, Use and Maintenance Customer Care Department The Group Ltd. Harby Road Langar Nottinghamshire NG13 9HY T : 01949 862 012 F : 01949 862 003 E : customer.care@cda.eu
INSTALLATION, OPERATION & MAINTENANCE MANUAL
 CENTRAL FANS COLASIT LTD Unit 12A, Palmers Road, East Moons Moat, Redditch. Worcs. B98 0RF Tel: 01527-517200 Fax: 01527-517195 Edition 04_13 INSTALLATION, OPERATION & MAINTENANCE MANUAL CIV Fan Range Valid
TECHNICAL MANUAL TRAY DRYER
 TECHNICAL MANUAL FOR TRAY DRYER MODEL TD321-3 TRAYDRYER MODEL: TD 321-3 Table of Contents Part 1 - Technical Information * Introduction * Catalogue Cut-sheet and Installation Drawing * Warranty Part 2
Manual / Handbuch Spare parts list / Ersatzteilliste
 Manual / Handbuch Spare parts list / Ersatzteilliste Equipment Imp.-Exp. GmbH Zitterpappelweg 9 D - 22391 Hamburg Tel.: + 49 40 60009468-0 Fax: + 49 40 536 75 01 E - M a i l : i n f o @ w e s c o - n a
OPERATING MANUAL. for the modular heat presses. Secabo TC5 SMART and TC7 SMART
 OPERATING MANUAL for the modular heat presses Secabo TC5 SMART and TC7 SMART Congratulations on the purchase of your Secabo heat press! Please read this operating manual carefully to ensure a smooth production
900 Quadrant Steam Shower Cabin with 6 Body Jets
 Product Specification Working Pressure 1.5 to 4 bar Pressure MUST be balanced Dimensions 2250 H x 900 D x 900 W Door Opening 480mm Steam Generator 2.8Kw Fuse size: 13 amp fuse spur 900 Quadrant Steam Shower
INSTALLATION INSTRUCTION for ceiling fan
 INSTALLATION INSTRUCTION for ceiling fan F8203 Installation & Operating Instructions for the Parrotuncle Owner s Installation,Manual Motor is core parts of the fan and the most expensive in all the components.
SP-RANGE INSTALLATION AND OPERATING MANUAL PLEASE LEAVE WITH OPERATOR SP12 & SP25 SERIES 4
 SP-RANGE INSTALLATION AND OPERATING MANUAL PLEASE LEAVE WITH OPERATOR SP12 & SP25 SERIES 4 Imperial Machine Company Limited Unit 1, Abbey road Wrexham Industrial Estate Wrexham, LL13 9RF Tel: +44 (0)1978
BSM60SS / BSM60WH BUILT IN MULTI-FUNCTION ELECTRIC FAN OVEN. Instruction Manual
 BSM60SS / BSM60WH BUILT IN MULTI-FUNCTION ELECTRIC FAN OVEN Instruction Manual Please read these instructions carefully before use and retain for future reference CONTENTS Safety Instructions 2 Specifications
OWNER S MANUAL MODELS: ELECTRIC COMPACT CONVECTION OVEN. FORM NO.: S-2374 REV: A 02/07 An Employee Owned Company
 OWNER S MANUAL ELECTRIC COMPACT CONVECTION OVEN MODELS: 4200 4292 FORM NO.: S-2374 REV: A 02/07 An Employee Owned Company PRINTED IN U. S. A. 35 Garvey Street Everett MA 02149 Tel: (617) 387-47100 Fax:
! WARNING To avoid risk of electrical shock, personal injury or death; disconnect power to range before servicing, unless testing requires power.
 Technical Information Electric Slide-In Range JES9750BA* JES9860BA* Due to possibility of personal injury or property damage, always contact an authorized technician for servicing or repair of this unit.
E26 CONVECTION OVEN SERVICE MANUAL. Revision 1/F
 E26 CONVECTION OVEN SERVICE MANUAL -1- WARNING: ALL INSTALLATION AND SERVICE REPAIR WORK MUST BE CARRIED OUT BY QUALIFIED PERSONS ONLY. -2- CONTENTS This manual is designed to take a more in depth look
Installation, Operating and Servicing Instructions
 Installation, Operating and Servicing Instructions Wall Mounted Water Boiler WMB3F/B,WMB3F/W Please make a note of your product details for future use: Date Purchased: Model Number: Serial Number: Dealer:
I n s t r u c t i o n m a n u a l f o r b u i l t - i n h o o d. Model code: BORA600
 I n s t r u c t i o n m a n u a l f o r b u i l t - i n h o o d Model code: BORA600 Contact Caple on 0844 8003830 or for spare parts www.4caple.co.uk 1 Y O U R A P P L I A N C E Thank you for buying your
CONTROLS INSTRUCTIONS MANUAL ENGLISH
 CONTROLS INSTRUCTIONS MANUAL ENGLISH Table of Contents 1. Introduction of the Innova Controls 3 1.1 Precautions 3 2. Direction of Use 2.1 Turning on the Control Unit 4 4 2.2 Switching the Heater or Steamer
COS-101 NON SELF FLUSHING COMBI REPLACEMENT PARTS LIST
 COS-101 NON SELF FLUSHING COMBI REPLACEMENT PARTS LIST EFFECTIVE FEBRUARY 16, 2012 Superseding All Previous Parts Lists. The Company reserves the right to make substitution in the event that items specified
HOTPLATE COUNTERTOP AND OVEN RANGE
 F900 SERIES User, installation and servicing instructions HOTPLATE COUNTERTOP AND OVEN RANGE E9042, E9084, E9184 Read these instructions before use DATE PURCHASED: MODEL NUMBER: SERIAL NUMBER: DEALER:
KSSS42QDW05, KSSS42QDX05
 CABINET PARTS 42" BUILT IN REFRIGERATOR 4 97 Litho In U.S.A. (mek) 1 Part No. CABINET PARTS 1 Cabinet (Not A Serviceable Part) 3 2005004 Grommet, Tube Crossover 4 1112023 Roller, Front & Rear (4) 5 Support,
16 XD Mk2 Inset Electric Fire
 16 XD Mk2 Inset Electric Fire B-1005344 Packing Checklist Electric Fire Remote Control Handset 2 x AAA Batteries Log Set Ember Ice Crystal Set Instruction Manual Fascia IMPORTANT PLEASE READ THESE INSTRUCTIONS
OWNER S MANUAL. High-Wall Fan Coil Unit CONTENTS
 OWNER S MANUAL High-Wall Fan Coil Unit Page GENERAL 2,3 OPERATING MODES 2 REMOTE CONTROL 2 OPERATION 3-9 REMOTE CONTROL OPERATION 3 INDOOR UNIT DISPLAY 5 EMERGENCY OPERATION 5 PRESSING THE ON/OFF BUTTON
OPERATION AND MAINTENANCE MANUAL ELC-810 AUTOMATIC WATER LEVEL CONTROLLER. AquatiControl Technology
 OPERATION AND MAINTENANCE MANUAL ELC-810 AUTOMATIC WATER LEVEL CONTROLLER AquatiControl Technology 3820 South Federal Blvd Sheridan, Colorado 80110 Toll Free: 877.755.8817 Fax: 303.761.1499 www.aquaticontrol.com
OPERATING INSTRUCTIONS
 OPERATING INSTRUCTIONS BAKE-KING KING OVEN BEDIENUNGSANLEITUNG MODE D EMPLOI GEBRUIKSAANWIJZING PLEASE READ CAREFULLY (Rev 1; 01/03/2012 INSTALLATION INSTRUCTIONS We recommend that wherever possible, the
Installation, Operating and Servicing Instructions
 Installation, Operating and Servicing Instructions Panther Hot Cupboards P6B2, P6B3, P6B4, P6B5, P6P2, P6P3, P6P4, P6P5, P8B3,P8B3PT, P8B4, P8B4PT, P8B5, P8B5PT, P8B6, P8B6PT, P8P3, P8P3PT, P8P4, P8P4PT,
EFFECTIVE: MAY, American Dish Service ADS MODEL: ASQ GLASSWASHER PARTS MANUAL. 900 Blake Street Edwardsville, Kansas (913) /08
 /08") EFFECTIVE: MAY, 2014 American Dish Service ADS MODEL: ASQ GLASSWASHER PARTS MANUAL 900 Blake Street Edwardsville, Kansas 66111 (913)422-3700 05/08 The American Dish Service part numbers contained in this
EFFECTIVE: MAY, 2014 American Dish Service ADS MODEL: ASQ GLASSWASHER PARTS MANUAL 900 Blake Street Edwardsville, Kansas 66111 (913)422-3700 05/08 The American Dish Service part numbers contained in this
Product Information. Brushes. Drum brace cable
 Product Information Mega-Polisher Washing & Polishing Equipment Top cover Sliding door Infeed chute Drum drive belt Drum motor gearbox Brush motor gearbox Brush drive belt Synchronous belt Drum Brushes
Effective october 14, 2014
 COS-20G combi oven-steamer REPLACEMENT PARTS LIST Effective october 14, 2014 Superseding All Previous Parts Lists. The Company reserves the right to make substitution in the event that items specified
Installation, Operating and Servicing Instructions
 Installation, Operating and Servicing Instructions Silverlink 600 Electric Fryers DF33, DF36, DF39, DF46, DF49, DF66, DF66/ST, DF612, DF618, J6, J12, J9, J18 Please make a note of your product details
Installation Instructions Part No , Part No Part No
 Torsion-Flex Motor mount for PSC motors and Rigid-Mount for ECM motors Replacement Kit Cancels: New Installation Instructions Part No. 327752-401, Part No. 327753-401 Part No. 327754-401 IIK-310A-45-11
CABINET PARTS For Model: KSSS48QJX00 (Stainless Steel)
") CABINET PARTS 48" BUILT IN REFRIGERATOR 10 02 Litho In U.S.A. (mek) 1 Part No. 1 LITERATURE PARTS LIT2209249 Use & Care Guide LIT2006651 Energy Label LIT2006748 Service & Wiring Sheet LIT628370 Modular
CABINET PARTS 48" BUILT IN REFRIGERATOR 10 02 Litho In U.S.A. (mek) 1 Part No. 1 LITERATURE PARTS LIT2209249 Use & Care Guide LIT2006651 Energy Label LIT2006748 Service & Wiring Sheet LIT628370 Modular
D3000. Installation and Operating Manual SAFETY D3000 SPECIFICATIONS PRODUCT DESCRIPTION
 D3000 Installation and Operating Manual SAFETY Always wear the required Personal Protective Equipment (such as safety glasses, gloves, face shields, and aprons) when potentially exposed to any hazardous
PRO 2000i LOW LEVEL DEPOSITOR
 DEPOSITORS AND AUTOMATED CAKE PRODUCTION SYSTEMS PRO 2000i LOW LEVEL DEPOSITOR OPERATION AND SPARE PARTS MANUAL Serial No. PR2L- (Please quote this number when ordering spares, and making service calls)
EBAC MODEL WM150 INDUSTRIAL DEHUMIDIFIER OWNER S MANUAL
 EBAC MODEL WM150 INDUSTRIAL DEHUMIDIFIER OWNER S MANUAL WM150 OWNERS MANUAL Page 1 of 9 INTRODUCTION Designed for a wide range of applications, the WM150 is a rugged, industrial unit, which utilizes an
Installation, Operating and Servicing Instructions. Opus 700 Electric Salamander Grill OE7304
 Installation, Operating and Servicing Instructions Opus 700 Electric Salamander Grill OE7304 Please make a note of your product details for future use: Date Purchased: Model Number: Serial Number: Dealer:
Chiltrix 5.1 Thin DC - Inverter Water Fan Coil Unit Floor, Wall or Ceiling Universal Mount Manual
 Chiltrix 5.1 Thin DC - Inverter Water Fan Coil Unit Floor, Wall or Ceiling Universal Mount Manual Version 1.5 1 CONTENTS CHAPTER 1 GENERAL INTRODUCTION...3 1. Preface... 3 2. Product Introduction... 3
Installation, Operating and Servicing Instructions
 Installation, Operating and Servicing Instructions Opus 700 Electric Oven Ranges OE7008, OE7010 Please make a note of your product details for future use: Date Purchased: Model Number: Serial Number: Dealer:
Service Instructions
 BASIC EXCELLENT PERFECT U Universal ovens I Incubators S Sterilisers Service Instructions Mo Tu We Th Fr Sa Su t3 on off h t2 t1 t4 loop 4 3 2 1 STERI DEFRO C MIN MAX C IN 1 IN 2 OUT IN 1 IN 2 OUT % rh
Suits all KPF849 models
 Kambrook - Australia Ground Floor, Suite 2, 170-180 Bourke Rd Alexandria NSW 2015, Australia Locked Bag 2000 Botany NSW 1455 Customer Service Line 1300 139 798 Customer Service Fax 1800 621 337 www.kambrook.com.au
Commercial Fan Heater
 Commercial Fan Heater Installation and Operating Manual Catalogue Numbers: CH06CSiRX, CH06CPiRX, CH09iRX, CH12iRX, CH15iRX. INDEX Section General Information -----------------------------------------------------------
Tornado Operations & Maintenance Manual
 TORNADO INDUSTRIES 7401 W. LAWRENCE AVENUE CHICAGO, IL 60706 (708) 867-5100 FAX (708) 867-6968 www.tornadovac.com Tornado Operations & Maintenance Manual MODEL NO. 99690 BD 22/14, 99720 BD 26/14 L9722
Dynapac Chip Spreader is an accessory that enables the spreading of stone chippings, gravel or other similiar granulates in conjunction with the
 Accessories Manual (E2022) Operation & Maintenance Dynapac Chip spreader CC224HF - CC334HF CC2200 - CC3300 CG2300 Dynapac Chip Spreader is an accessory that enables the spreading of stone chippings, gravel
Installation, Operating and Servicing Instructions
 Installation, Operating and Servicing Instructions Opus 800 Electric Oven Ranges OE8015 Please make a note of your product details for future use: Date Purchased: Model Number: Serial Number: Dealer: IS
! WARNING To avoid risk of electrical shock, personal injury or death; disconnect power to range before servicing, unless testing requires power.
 Technical Information Electric Slide-In Range JES8850BC* JES9900BC* JES9860BC* Due to possibility of personal injury or property damage, always contact an authorized technician for servicing or repair
INSTALLATION & OPERATING INSTRUCTIONS FOR THE GARLAND 1/2-SIZE ELECTRIC MOISTURE PLUS, MODEL MPOE5L
 INSTALLATION & OPERATING INSTRUCTIONS FOR THE GARLAND 1/2-SIZE ELECTRIC MOISTURE PLUS, MODEL MPOE5L FOR YOUR SAFETY DO NOT STORE OR USE GASOLINE OR OTHER FLAMMABLE VAPORS OR LIQUIDS IN THE VICINITY OF
INFRARED IP55 HEATER INSTRUCTIONS FOR: MODEL:- QZWP45N 1. SAFETY INSTRUCTIONS
 INSTRUCTIONS FOR: INFRARED IP55 HEATER MODEL:- QZWP45N Thank you for purchasing a Consort Claudgen product. Manufactured to a high standard this product will, if used according to these instructions and
Installation, Operating and Servicing Instructions
 Installation, Operating and Servicing Instructions Opus 700 Electric Pasta Boiler OE7701, OE7702 Please make a note of your product details for future use: Date Purchased: Model Number: Serial Number:
Nilfisk Inc Winnetka Avenue North Minneapolis, MN REV.03( ) VF80189
 VF80189") Nilfisk Inc. 9435 Winnetka Avenue North Minneapolis, MN 55445 www.usviper.com REV.03(05-) VF8089 SAFETY PRECAUTIONS This machine is intended for commercial use. It is constructed for use in an indoor
Nilfisk Inc. 9435 Winnetka Avenue North Minneapolis, MN 55445 www.usviper.com REV.03(05-) VF8089 SAFETY PRECAUTIONS This machine is intended for commercial use. It is constructed for use in an indoor
CEILING FAN OWNER'S MANUAL
 Style that revolves around you. CEILING FAN OWNER'S MANUAL VANTAGE with DC motor 12/14 WARNING: Read and follow these instructions carefully and be mindful of all warnings shown throughout. GENERAL INSTALLATION
Optional Optional. Min 20W, max 100W. Only resistive load or dimmable (phase control compatible) light bulb. Dimmer optional
 light bulb. Dimmer optional") Description Power Rating Remarks Control Rated Power 3 Phases Rated Voltage 3 Phases Rated Power Single Phase Rated Voltage Single Phase Frequency Switching capacity per phase Sauna temperature range Maximum
Description Power Rating Remarks Control Rated Power 3 Phases Rated Voltage 3 Phases Rated Power Single Phase Rated Voltage Single Phase Frequency Switching capacity per phase Sauna temperature range Maximum
CABINET PARTS For Model: KSSC42QTS02 (Stainless Steel)
") CABINET PARTS 42" BUILT IN REFRIGERATOR 10 11 Litho In U.S.A. (jdc)(psw) 1 Part No. Rev. A 1 Literature Parts W10161714 Use & Care Guide W10164072 Energy Guide W10159832 Service & Wiring Sheet 2306424
CABINET PARTS 42" BUILT IN REFRIGERATOR 10 11 Litho In U.S.A. (jdc)(psw) 1 Part No. Rev. A 1 Literature Parts W10161714 Use & Care Guide W10164072 Energy Guide W10159832 Service & Wiring Sheet 2306424