Domestic Pump Vacuum and Boiler Feed Units Series VCMD TM INSTRUCTION MANUAL DN0137 REVISION F
|
|
|
- Lee Rice
- 5 years ago
- Views:
Transcription


1 Domestic Pump Vacuum and Boiler Feed Units Series VCMD TM INSTRUCTION MANUAL DN0137 REVISION F
2
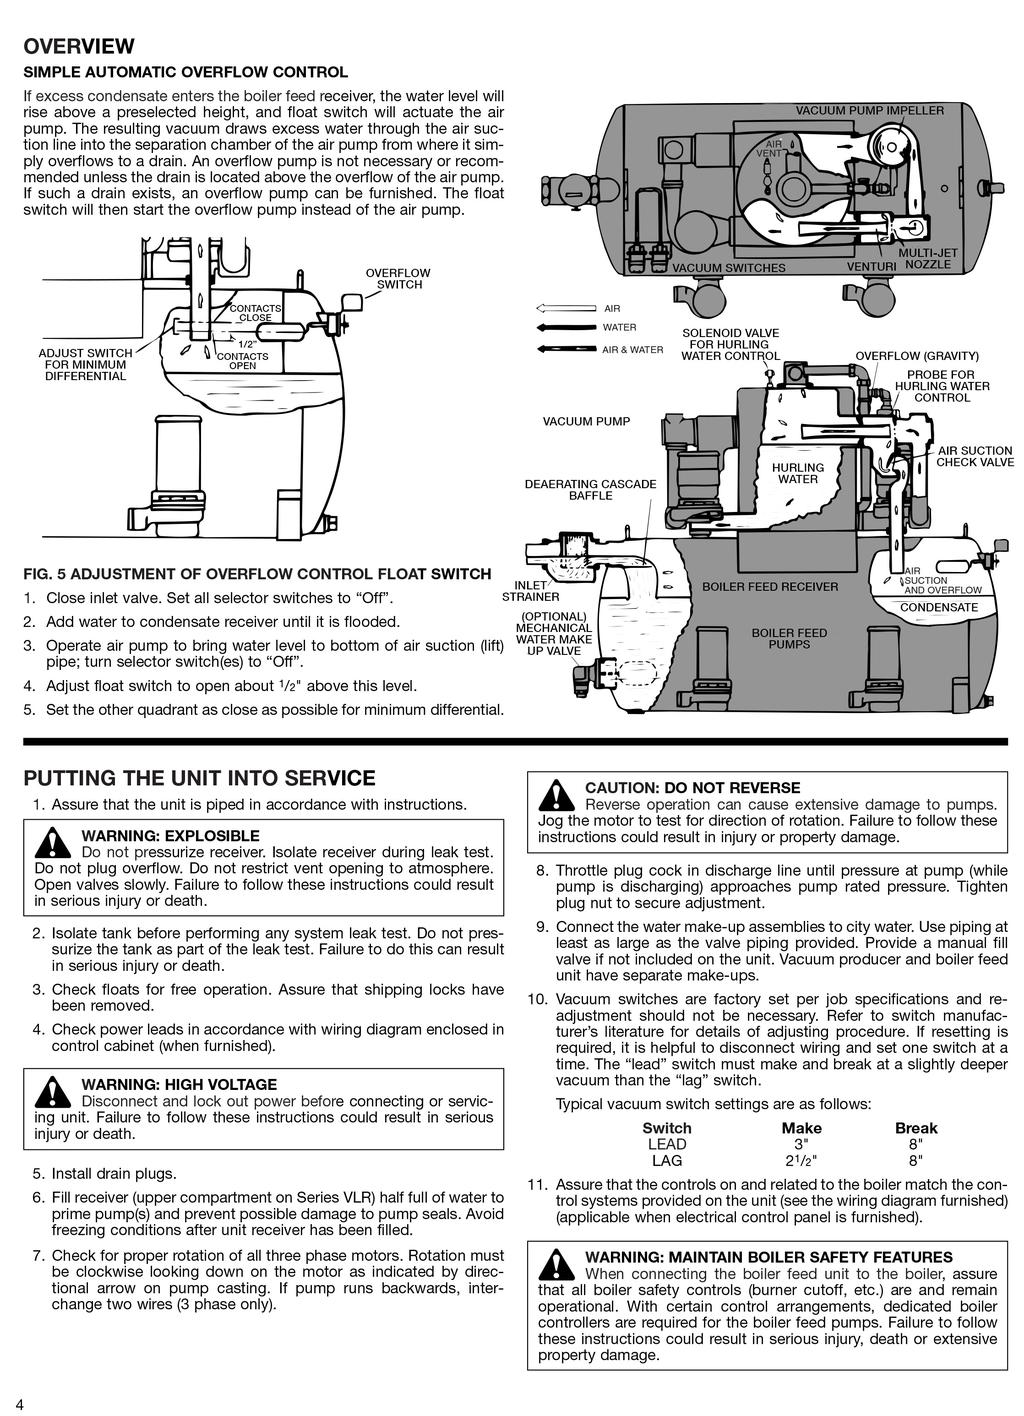
3 DESCRIPTION The Series VCMD family of units consists of various combinations of boiler feed units combined with Domestic Series MJ vacuum producers. The vacuum producer may be mounted directly on the boiler feed unit (STyle A) or the units may be independently mounted with field piping between the units (Style B). The boiler feed units can be constructed with cast iron or steel receivers in many of the standard configurations offered as Domestic boiler feed units. The vacuum producer acts in response to selector switch settings and system vacuum also functions to remove excess water from the boiler feed tank. Various controls are supplied in accordance with system specifications and system requirements. Electrical panels are normally supplied and specific wiring diagrams are supplied with each vacuum producer electrical panel. The boiler feed system functions like a standard vented boiler feed system. Again, various control options are available to match system specifications. Electrical panels and electrical diagrams are normally furnished. The boiler feed units are designed to pump water into an operating boiler. The pumps are controlled by level controls on the boiler. Low water cut-off switches and alarms are often supplied (optional). Receivers are non-code cast iron or steel. WARNING: EXPLOSIBLE Do not pressurize receiver. Isolate receiver during leak test. Do not plug overflow. Do not restrict vent opening to atmosphere. Open valves slowly. Failure to follow these instructions could result in serious injury or death. PRELIMINARY INSPECTION Assure that there is no shipping damage. Assure that nameplate ratings agree with job specifications and actual conditions. HANDLING Use caring in installing unit. CAUTION: UNIT LIFTING EYE Use unit lifting eyes only to lift unit as shipped from factory. Unit must be empty and disconnected from pipes, anchors and other restraints. Use proper rigging procedures. Failure to follow these instructions could result in injury or property damage. LOCATION Place unit for easy access to all parts. Allow adequate space for servicing. Check ambient conditions. NOTICE/TEMPERATURE LIMITS Motors are designed to operate in 104 F max. ambient. Insulate or ventilate as required. BOILER FEED SYSTEM CAUTION: NOT A CHEMICAL PUMP Inject boiler feed compounds from chemical feed tank into boiler feed piping never into condensate tank. Failure to follow these instructions could result in injury or property damage. PIPING (General) Pipe the unit per the Piping Diagram. Locate and support piping so as to not load the pump discharge. PIPING (Return) Gravity return lines from the system must be properly pitched down to unit inlet. Returns must also be trapped to prevent steam entry into the unit. An inlet basket strainer is recommended. FLOAT SWITCHES Floats are locked in place to prevent damage during shipment. Remove shipping locks. Check factory settings. Floats are adjustable for various levels of operation. The water make-up float switch should make at a higher level than low water cut-off switch breaks. VACUUM SYSTEM PIPING (General) Pipe the unit per the Piping Diagram shipped with the unit or as shown herein. Locate and support piping so as to not load the pump discharge. PIPING (Suction) (Style B) Use a suction line at least as large as the unit inlet fitting. Vacuum storage tanks will reduce system surges or short cycling and a vertical tank can trap liquids and solids. PIPING (Vent) Install a vent pipe to atmosphere. Pipe to be size of vent port on unit. Do not restrict or reduce vent opening or exceed 20 feet vertical height unless an overflow connection is provided. PIPING (Overflow) Pipe overflow port to drain. VACUUM SWITCH ADJUSTMENTS Vacuum switches, when furnished, are factory adjusted and tested for the specified operating range. If settings must be readjusted, refer to manufacturer s instructions. HURLING WATER MAKE-UP AND CONTROL The hurling water level is automatically controlled by a solenoid valve actuated by a float switch. Connect the water make-up assemblies to city water. Use piping at least as large as the valve piping provided. Install a manual fill valve if not included on the unit. The vacuum producer and the boiler feed unit have separate make-ups. To operate at a high vacuum, the hurling water must be at a low temperature resulting in a low vapor pressure. Cooling water can be automatically admitted by using an optional temperature limit switch. This switch actuates the solenoid valve if the temperature rises above a preset point. The optional condensate Temperature Limit Switch will stop normal operation of the vacuum unit when condensate exceeds the set point temperature (usually 160ºF). Vacuum is not normally required when the system is up to temperature and operation of the vacuum pumps with hot condensate results in condensate loss due to evaporation. INTERCONNECTING PIPING On style B units, the interconnecting piping between the boiler feed unit and the vacuum producer must be the size of the vacuum producer inlet. The two vacuum inlets on duplex vacuum producers must be connected to the boiler feed tank. ELECTRICAL WIRING & CONTROLS Connect power wiring per NEC. Recheck nameplate vs. Specifications and conditions. All single phase motors have internal thermal protection. WARNING: HIGH VOLTAGE ELECTRICITY Disconnect and lock out power before connecting or servicing unit. Failure to follow these instructions could result in injury or property damage. Three phase motors must be use starters with properly sized overload relays. Overload relays furnished are designed for manual reset. EQUALIZING LINE A vacuum may be formed on radiation side of system when steam stops flowing in mains. This vacuum may be higher than return line vacuum, which would prevent condensate from flowing back to pump. To correct this in an unzoned system, install equalizer line as shown in Figures 1 thru 3. To correct this in a zoned system, also install equalizer line for each zoned section or install a vacuum breaker on supply line on radiation side of each zone valve. ZONE CONTROL VALVE M TO ZONE STEAM MAIN RETURN MAIN FIG. 4 EQUALIZING CONNECTIONS FOR ZONED SYSTEMS 3
4

5 12. Check that the pump discharge pressure exceeds the maximum operating pressure of the boiler. 13. Manually move the make-up water float indicator and assure that the make-up solenoid admits water. 14. Manually move the low water cut-off float switch indicator to check for pump shut-off. 15. Make sure that the make-up valve on the vacuum producer has operated and filled the hurling chamber to 2" to 6" below the overflow (recommended). CAUTION: DO NOT RUN DRY. SEAL DAMAGE MAY OCCUR Inspect pump seal regularly for leaks. Replace as required. Failure to follow these instructions could result in injury or property damage. 16. Remove start-up label (below) from panel (if applicable) after complying with instructions. ELECTRICIAN/INSTALLER/OPERATOR REMOVE AND DESTROY THIS TAG AFTER 1. ASSURING THAT ALL PUMPS ROTATE CLOCKWISE PER ARROWS CAST ON VOLUTES. (JOG PUMP MOMENTARILY TO TEST INTERCHANGE ANY TWO MOTOR POWER WIRES TO REVERSE 3PH MOTORS.) 2. ASSURING THAT SHIPPING LOCKS HAVE BEEN REMOVED FROM ALL FLOAT SWITCHES. 17. If possible, observe operation thru several cycles. OPERATION AND MAINTENANCE Operators must be familiar with all sections of this manual to understand the operation of the unit. Hot water, steam and electricity can be hazardous. WARNING: EXPLOSIBLE Do not pressurize receiver. Isolate receiver during leak test. Do not plug overflow. Do not restrict vent opening to atmosphere. Open valves slowly. Failure to follow these instructions could result in serious injury or death. LUBRICATION SAFETY INSTRUCTIONS SEE COVER OF THIS MANUAL WARNING: HIGH VOLTAGE Disconnect and lock out power before connecting or servicing unit. Failure to follow these instructions could result in serious injury or death. The only pump bearing requiring lubrication is the ball bearing in the motor support just below the flexible coupling. It has a reservoir, which is filled with moisture resistant high temperature grease. Remove pipe plug in motor support and add approximately 3 ounces of Shell Alvania RL 2 grease (or equivalent) from once a year (normal) to twice a year for extremely hot conditions. Do not use ordinary grease. NOTICE/AUTO RESTART Single phase motors will restart automatically after thermal overload protector trips. Overload thermal relays in starters must be reset manually. GAGE GLASS MAINTENANCE (Vented Systems) Clean gage glass as required using commercial glass cleaner. Dilute muratic acid may be used if required (observe handling precautions). Never clean gage glass with wire brushes, scrapers or harsh abrasives. Do not reuse gage glass or packing or seals. Immediately replace glass which is broken, cracked, chipped, scratched or otherwise damaged. Inspect periodically with a bright concentrated light. Anything which glistens and catches the fingernail or any star-shaped or crescent-shaped mark which glistens is cause for replacement. Any gage glass which appears cloudy or roughened and will not respond to cleaning procedures should be replaced. When replacing gage glass, use new packings specified for this use. Install glass with sufficient end clearance for expansion (keep glass to metal clearance at each end) and tighten nuts just enough to avoid leakage (do not over tighten). INSPECTIONS A properly installed unit should function unattended for long periods of time. Periodic checks to assure proper operation are highly recommended. Refer to trouble shooting section when necessary. A variety of control options are available and are furnished in accordance with user specifications. Refer to wiring diagrams (when furnished) to determine control switch settings. The inlet strainer (when furnished) is intended to protect the pump and system. Periodic cleaning should be included in the maintenance schedule. Check frequently in new systems. CAUTION: SUBSEQUENT DAMAGE A unit showing symptoms of possible problems (overflow, noise, leaks, vibrations, continual operation, etc.) must be corrected immediately. Failure to follow these instructions may result in full liability for subsequent injury or property damage. WARNING: EXPLOSIBLE The installer boiler feed unit becomes an integral part of the boiler system. Boiler operation and maintenance requires specific skills and training and may require licensing or certification. The boiler feed unit must be operated and maintained so as not to jeopardize the boiler operation. Failure to follow these instructions could result in serious injury or death. HURLING CHAMBER FLOAT SWITCH ADJUSTMENT The switch which controls the hurling water makeup valve is located inside the float housing near the vacuum unit overflow. The switch is under a triangular cover plate which is retained by one #6 screw (loosen bolts retaining the cover edges only if necessary). The actuating cam can be rotated for testing by using a screwdriver in the slot provided. Adjusting the switch location so that the switch snaps at approximately mid-range of the cam travel. The #6 screw near the cam goes thru a slot in the switch mounting plate. Loosen this screw (and the farthermost screw thru the switch) to permit adjustment of the switching position. Tighten screws and recheck operation after making any adjustment. The cam should be positioned on the shaft for maximum switch roller movement in operation. The cam is retained by a socket set screw. Replacement seal tube assemblies are available in case of leakage around the float pivot shaft. FLOAT BALL FLOAT ROD MICRO SWITCH CAM SET SCREW CAM 5
6 TROUBLE SHOOTING PROCEDURES - BOILER FEED SYSTEM All units are thoroughly tested at the factory before shipment. They should operate satisfactorily without further adjustment if properly installed and providing they have not been damaged by rough handling in transit. If system or unit performance is not satisfactory, refer to the following check list. PUMP WILL NOT START 1. The power supply has been interrupted, disconnect switch is open, or selector switch is improperly positioned. 2. Incorrect voltage for motor. Check voltage and wiring with motor characteristics. 3. Incorrect starter coil for power supply. 4. The overload relays in the starter have tripped out and must be reset. Ambient temperature may be too high. 5. Check pump controls or other controls for proper operation. 6. Wiring to control cabinet is incorrect or connections are loose. 7. The strainer is dirty thus retarding flow. Clean periodically. 8. Boiler is full or boiler control switch is defective. 9. The low water cut-off float switch is open due to low water, incorrect adjustment or failure of makeup system. PUMP RUNS CONTINUOUSLY 1. Pump is running backward. Rotation of three phase motor may be corrected by interchanging any two of the three wires. Rotation should be clockwise looking down on motor. 2. Steam traps are blowing through causing condensate to return at excessive temperatures. This may reduce the capacity of pump below its rating, depending on the unit and type of pump furnished. Traps should be repaired or replaced. 3. Pump discharge pressure is less than operating pressure of the boiler. 4. The total required pressure at the pump discharge is greater than the pressure for which the pump was designed. Check the total pressure which includes atmospheric pressure, the friction head and static head. 5. A valve in the discharge line is closed or throttled too tightly. Check valve is installed backwards. 6. The impeller eye is clogged. 7. Pump is too small for system. PUMP IS NOISY 1. The pump is working against a lower pressure than designed for. While pump is discharging, adjust plug cock in discharge line until pressure at pump approaches pump rated pressure. 2. Excessive condensate temperature. Correct system conditions. However, this applies to certain units only; others are designed to handle boiling water. 3. The piping is too small to drain properly. 4. A defective trap is holding condensate in steam supply line. 5. Pump is running backward. THE SYSTEM IS NOISY 1. Banging in the steam mains is usually caused by steam imploding in condensate lying in low points in lines. These problems can be eliminated by dripping low points, properly supporting the pipe, or by increasing the pitch of the line. 2. Improper dripping of the steam mains and risers; where there is a rise in the steam main, or where it branches off into a riser, a drip trap must be installed in the drain line. 3. The piping is too small to drain properly. 4. A defective trap is holding condensate in steam supply line. 5. Defective check valve permits steam to vent thru pump into the boiler feed tank. 6. Steam blowing thru a defective trap. 7. A priming boiler is discharging water with the steam. Consult boiler manufacturer. TROUBLE SHOOTING PROCEDURES - VACUUM PRODUCER PUMP WILL NOT START 1. The power supply has been interrupted, disconnect switch is open, or selector switch is improperly positioned. 2. Incorrect voltage for motor. Check voltage and wiring with motor characteristics. 3. Incorrect starter coil for power supply. 4. The overload relays in the starter have tripped out and must be reset. Ambient temperature may be too high. 5. Check pump controls or other controls for proper operation. 6. Wiring to control cabinet is incorrect or connections are loose. 7. System has vacuum and vacuum switches are open. 8. Temperature limit switch open due to high condensate temperature. 9. Temperature limit switch improperly wired. PUMP RUNS CONTINUOUSLY 1. Pump is running backward. Rotation of three phase motor may be corrected by interchanging any two of the three wires. Rotation should be clockwise looking down on motor. 2. System flow or leaks prevent the unit from developing design vacuum. Vacuum system must be tight. 3. System is drawing vacuum greater than the vapor pressure of liquid the liquid is being boiled and then condensed in the vacuum unit. 4. Holes in the nozzle plate are plugged or worn and the system will not develop vacuum. Inspect and clean nozzle plates. SYSTEM OVERFLOWS 1. System may be normal. Cooling water is required to lower vapor pressure of hurling water to be able to draw deep vacuum. 2. Temperature limit switch is set lower than required and adds unnecessary water. 3. The design vacuum is greater than the vapor pressure of a liquid within the system. The liquid is being boiled from the system and condensed in the hurling chamber. 4. Temperature limit switch is wired incorrectly. 5. Float switch is improperly adjusted. Remove float switch cover plate and readjust the cam activating the electrical switch. 6. Boiler feed receiver sized too small to accommodate system surges. 7. water make-up valve open or float switch set too high. 8. Water make-up valve leaks. SYSTEM STARTS AND STOPS RAPIDLY 1. Pumping against a small closed system. Add vacuum storage tank or reset vacuum switches. BOTH PUMPS RUN 1. Improper vacuum switch adjustment. Readjust lead vacuum switch to make and break at deeper vacuums than the lag switch. Refer to manufacturers literature. 2. Low vacuum in system causing lag system switch to be closed. 6
7 PUMP SERVICE INSTRUCTIONS FOR SERIES C35, MODEL 609PF CENTRIFUGAL PUMPS These close coupled vertical centrifugal pumps are equipped with mechanical seals. If system has not been properly cleaned prior to installation of pump, foreign matter such as dirt, pipe scale, core sand, etc. may clog the impeller and damage the seal. A strainer is recommended in return line to pump. Pump must not be operated dry. Seals may be damaged if operated without water present. 1. Close inlet line gate valve and operate pump momentarily to remove as much liquid as possible from pump. Close discharge line gate valve. 1 CAUTION / HOT SURFACES: Surfaces are hot when system is in operation. Do not touch hot receiver, let unit cool before servicing. Failure to follow these instructions could result in injury or property damage Shut-off and lock-out power. 9 3 WARNING / HIGH VOLTAGE: Disconnect and lock out power before connecting or servicing unit. Failure to follow these instructions could result in serious injury or death Disconnect wiring to motor. 4. Make sure unit is cool enough that pump can be handled safely. Open receiver drain to remove remaining liquid. 5. Loosen the motor to pump volute fasteners. Assure that pressure is relieved per caution note. CAUTION / PRESSURIZED SYSTEM: Operating system may contain very hot water under pressure. Close inlet and open drains before servicing. When servicing, loosen screws and move components to assure pressure is relieved before removing screws. Keep drains open during servicing. Failure to follow these instructions could result in injury or property damage. 6. Remove four capscrews (7) holding pump case to motor and lift motor and impeller out of pump case. 7. Remove pump/motor assembly and place on work bench. 8. Prevent the motor shaft from turning by inserting a large screwdriver into the screwdriver slot located under the plug on the rear motor endbell. Back the impeller off (counter clockwise) using a rectangular bar or other flat tool inserted between the impeller vanes. 9. Remove the rotating part of the mechanical seal from the end of the shaft. 10. Remove seal holder (2) with stationary ceramic part of mechanical seal and cup rubber from the end of the shaft. 11. Remove stationary ceramic part of mechanical seal and cup rubber from recess in seal holder. 12. To install new seal, proceed as follows: Clean recess in seal holder thoroughly. Orient motor so that conduit opening on motor is to the left midway between motor lugs. Replace seal holder on the face of the motor maintaining concentricity with motor face. Place new ceramic part of seal in the cup rubber over motor shaft and press firmly into recess of seal holder by hand, making certain both parts bottom evenly. If assembly cannot be bottomed with fingers place a wooden or cardboard tube over shaft onto ceramic and push into place. Using a clean, lint-free cloth, wipe the mating surfaces of the seal clean of any foreign matter. Moisten the carbon section of the rotating part of the seal and place onto shaft to seat against the ceramic. Place seal spring onto shaft. 13. Hold motor shaft as described in #8 and replace the impeller on the shaft (clockwise rotation) making sure it is tight. 14. Orient motor for pump reassembly with conduit opening to the left. When mounting the pump case, discharge should be 90 to the right of the conduit opening on motor. Use care to insure tight gasket fit to prevent water leakage. When replacing pump case, the wire spacer eye should seat in pump case notch for fit up. If this does not occur inspect for proper alignment and reassemble. 1. Motor 2. Seal Holder 3. Seal 4. Impeller 5. Gasket 6. Case 7. Capscrew (motor to volute) 15. Replace four capscrews (7). Tighten down capscrews evenly to avoid damage. 16. Reconnect pump bleed line (where applicable) and motor wiring. 17. Close drain and slowly open inlet valves. See warning. 18. Jog to check motor rotation. See caution. 19. Observe operation thru several cycles Wear Ring 9. Pipe Plug 10. Slinger 2DPF01 CAUTION / DO NOT RUN DRY. SEAL DAMAGE MAY OCCUR: Inspect pump seal regularly for leaks. Replace as required. Failure to follow these instructions could result in injury or property damage. WARNING: EXPLOSIBLE Do not pressurize receiver. Isolate receiver during leak test. Do not plug overflow. Do not restrict vent opening to atmosphere. Open valves slowly. Failure to follow these instructions could result in serious injury or death. CAUTION / DO NOT REVERSE: Reverse operation can cause extensive damage to pumps. Jog the motor to test for direction of rotation. Failure to follow these instructions could result in injury or property damage. 7
8 PUMP SERVICE INSTRUCTIONS FOR CENTRIFUGAL PUMPS (EXCEPT B OR 609) Vertical mounting puts motor above floor direct and water Close coupled centrifugal pumps are designed for years of trouble free service. Units have mechanical shaft seals. 1. Close inlet gate valve and operate pump momentarily to remove as much liquid as possible from pump. Close discharge line gate valve. CAUTION: HOT SURFACE Surfaces are hot when system is in operation. Do not touch hot receiver, let unit cool before servicing. Failure to follow these instructions could result in serious injury or death. 2. Shut-off and lock out power. WARNING: HIGH VOLTAGE Disconnect and lock out power before connecting servicing unit. Failure to follow these instructions could result in serious injury or death. VIEW OF THREADED IMPELLER WATER SLINGER MECHANICAL SEAL MOTOR BRACKET WEAR RING 3. Make sure unit is cool enough that pump can be handled safely. Open drain to remove remaining liquid. 4. Carefully remove pump drain plug and bleed line. Wait for complete drainage. 5. Loosen the motor bracket to pump volute capscrews. Assure that the pressure is relieved per caution note. CAUTION: PRESSURIZED SYSTEM Operating system may contain very hot water. Close inlet and open drains before servicing. When servicing, loosen screws and move components to assure pressure is relieved before removing screws. Keep drains open during servicing. Failure to follow these instructions could result in injury or death. 6. Complete the removal of the hardware. Remove pump/motor assembly and place on work bench. 7. Remove self locking stainless steel capscrews and stainless steel washer (or self locking brass cap nut and washer) that secure the impeller in place. 8. To remove impeller from motor shaft proceed as follows: (1) Keyed Shafts. Remove impeller with gear puller or other means which will not damage impeller or bend motor shaft. (2) Threaded Shafts. Hold end of motor shaft opposite pump with large screwdriver or other suitable tool and back impeller off with a rectangular bar or other flat tool inserted between the vanes of the impeller. 9. Remove rotating part of seal from shaft, being careful not break carbon face. 10. Remove capscrews holding motor bracket to motor and remove bracket. 11. Remove stationary part of seal assembly, being careful not to chip or break ceramic seal. 12. To install seal proceed as follows: (1) Clean recess in bracket thoroughly. Coat recess and rubber portion of seat with soap solution. Press seat into recess firmly by hand making certain both parts bottom evenly. If seal cannot be bottomed with fingers place cardboard shipping disc on ceramic and force into place with tool. VOLUTE IMPELLER (2) Carefully place bracket in position on motor shaft without displacing ceramic seat and secure bracket to motor with capscrews. (3) Place motor vertically with pump end up. Do not attempt assembly of seal and impeller with shaft horizontal. (4) The carbon of rotating part of seal should not be loose. If it is, hold in place with grease, Using clean, lint free cloth, wipe mating surfaces perfectly clean. Soap shaft and push seal onto shaft so that carbon will contact ceramic seal. If spacer is required, use grease to cause spacer to adhere to bottom of seal after seal has been put on shaft, Be sure spacer is on larger diameter of shaft so that will not catch between shoulder and impeller. 13. Replace impeller on shaft. Replace stainless steel washer and secure impeller with capscrew or cap nut. 14. Place new gasket on pump volute and reassemble motor and pump subassembly on pump volute. 15. Reconnect pump bleed line and motor wiring. 16. Close drain and slowly open inlet valves. See warning. 17. Jog to check motor rotation. See caution. 2DPF03 CAUTION: DO NOT RUN DRY. SEAL DAMAGE MAY OCCUR Inspect pump seal regularly for leaks Replace as required. Failure to follow these instructions could result in serious injury or death. WARNING: EXPLOSIBLE Do not pressurize receiver. Isolate receiver during leak test. Do not plug overflow. Do not restrict vent opening to atmosphere. Open valves slowly. Failure to follow these instructions could result in serious injury or death. CAUTION: DO NOT REVERSE Reverse operation can cause extensive damage to pumps. Jog the motor to test for direction of rotation. Failure to follow these instructions could result in serious injury or death. 18. Observe operation thru several cycles. 8
9 1. Close pump isolation valve or system return line valve. Operate pump momentarily to discharge as much water as possible. Close pump discharge valve. CAUTION: HOT SURFACE Surfaces are hot when system is in operation. Do not touch hot receiver, let unit cool before servicing. Failure to follow these instructions could result in serious injury or death. 2. Shut-off and lock out power. WARNING: HIGH VOLTAGE Disconnect and lock out power before connecting servicing unit. Failure to follow these instructions could result in serious injury or death. 3. Make sure unit is cool enough that pump can be handled safely. Open drain to remove remaining liquid. 4. Carefully remove pump drain plug and bleed line. Wait for complete drainage. 5. Loosen both the discharge connection and the suction housing to pump volute fasteners. Assure that the pressure is relieved per caution note. CAUTION: PRESSURIZED SYSTEM Operating system may contain very hot water. Close inlet and open drains before servicing. When servicing, loosen screws and move components to assure pressure is relieved before removing screws. Keep drains open during servicing. Failure to follow these instructions could result in injury or death. 6. Complete the removal of the hardware. Remove pump/motor assembly and place on work bench. 7a. Remove the suction housing capscrews and separate the pump/motor assembly from the suction housing. Note, the diffuser should separate from the suction housing to allow the pump/motor assembly to be removed. (1) Threaded Motor Shafts (3Hp and less). Remove propeller lock nut. Remove propeller with propeller stem as an assembly with the diffuser. To install a new propeller, remove the propeller set screws and separate from the stem. (2) Keyed Motor Shafts (5Hp and larger). Remove propeller set screws. Remove propeller, remove diffuser, and unscrew the propeller stem. 7b. Remove propeller, propeller stem and diffuser from the assembly as follows: 8. Remove capscrews holding motor bracket and pump volute together. Remove motor and bracket assembly from the volute by lifting straight away from volute. 9. To remove impeller from motor shaft proceed as follows: (1) Keyed Shafts. Remove impeller with gear puller or other means which will not damage impeller or bend motor shaft. (2) Threaded Shafts. Hold end of motor shaft opposite pump with large screwdriver or other suitable tool and back impeller off with a rectangular bar or other flat tool inserted between the vanes of the impeller. 10. Remove rotating part of seal from shaft, being careful not break carbon face. 11. Remove capscrews holding motor bracket to motor and remove bracket. 12. Remove stationary part of seal assembly, being careful not to chip or break ceramic seal. 13. To install seal proceed as follows: (1) Clean recess in bracket thoroughly. Coat recess and rubber portion of seat with soap solution. Press seat into recess firmly by hand making certain both parts bottom evenly. If seal cannot be bottomed with fingers place cardboard shipping disc on ceramic and force into place with flat tool. (2) Carefully place bracket in position on motor shaft without displacing ceramic seat and secure bracket to motor with capscrews. (3) Place motor vertically with pump end up. Do not attempt assembly of seal and impeller with shaft horizontal. (4) The carbon of rotating part of seal should not be loose. If it is, hold in place with grease, Using clean, lint free cloth, wipe mating surfaces perfectly clean. Soap shaft and push seal onto shaft so that carbon will contact ceramic seal. If spacer is required, use grease to cause spacer to adhere to bottom of seal after seal has been put on shaft, Be sure spacer is on larger diameter of shaft so that will not catch between shoulder and impeller. 14. Place impeller on shaft. Make sure impeller is seated. 15. Reassemble volute to bracket. 16. Install stem over drive pin in impeller eye. Tighten lock nut. 17. Set stem to.004 TIR. 9
10 Xylem Inc N. Austin Avenue Morton Grove, Illinois Phone: (847) Fax: (847) Bell & Gossett is a trademark of Xylem Inc. or one of its subsidiaries Xylem Inc. DN0137F March 2018
INSTRUCTION MANUAL DN0136 REVISION D
 INSTRUCTION MANUAL DN0136 REVISION D PIPING (Returns) Gravity return lines from system must be properly pitched down to unit inlet. Returns must also be trapped to prevent steam entry into the unit. An
DESCRIPTION AND INSTALLATION
 STRAINER VACUUM GAGE CONTROL PANEL CHECK VALVE SOLENOID DISCHARGE VALVE DISCHARGE VENTURI AIR VENT VALVE FLOAT SWITCH DISCHARGE MANIFOLD MULTI-JET NOZZLE CENTRIFUGAL PUMP MOUNTING PADS FOR DUPLEX CENTRIFUGAL
INSTALLER: PLEASE LEAVE THIS MANUAL FOR THE OWNER S USE. Condensate Return Systems General Installation, Operation, & Service Instructions !
 Condensate Return Systems General Installation, Operation, & Service Instructions INSTALLER: PLEASE LEAVE THIS MANUAL FOR THE OWNER S USE. SAFETY INSTRUCTIONS This safety alert symbol will be used in this
Hoffman Specialty Watchman Series WC & WCS Condensate Units Replacement Parts PART LISTS DN0436C
 Hoffman Specialty Watchman Series WC & WCS Condensate Units Replacement Parts PART LISTS DN06C PARTS LIST DN06 Index How To Use This Parts List.............................. Identifying Your Watchman Unit..........................-
J SERIES. Technical Specifications. Centrifugal Pumps for J Series Condensate & Boiler Feed Pumps. Features
 Steam Traps Condensate Boiler Feed Valves Strainers Pumps J SERIES Centrifugal Pumps for J Series Condensate & Boiler Feed Pumps Technical Specifications The Sterlco J Series Centrifugal Pumps are designed
SELF-PRIMING CENTRIFUGAL PUMPS BMLS-M & BMLS-H
 SELF-PRIMING CENTRIFUGAL PUMPS BMLS-M & BMLS-H INSTALLATION, OPERATION & MAINTENANCE INSTRUCTIONS HP Phase Medium Head High Head 3 1 BMLS 300 M BMLS 300 H 3 3 BMLS 300 M3 BMLS 300 H3 5 1 BMLS 500 M BMLS
Series 1140 and 1141 Temperature Regulators
 Hoffman Specialty Installation & Maintenance Instructions HS-504(E) Series 1140 and 1141 Temperature Regulators! CAUTION FOLLOW ALL INSTALLATION AND OPERATING INSTRUCTIONS. TURN OFF WATER OR STEAM BEFORE
OWNERS GUIDE TO INSTALLATION AND OPERATION
 OWNERS GUIDE TO INSTALLATION AND OPERATION SPM SERIES HIGH POWER CENTRIFUGALS READ THESE INSTRUCTIONS CAREFULLY Read these installation instructions in detail before installing your pump. Be sure to check
568X, 587X, 588X Series
 Please read and save this Repair Parts Manual. Read this manual and the General Operating Instructions carefully before attempting to assemble, install, operate or maintain the product described. Protect
Technical Data TYPE T14 & T14D TEMPERATURE PILOT SPENCE ENGINEERING COMPANY, INC. 150 COLDENHAM ROAD, WALDEN, NY SD 4511A T14 PILOT
 Technical Data SD 4511A SPENCE ENGINEERING COMPANY, INC. 150 COLDENHAM ROAD, WALDEN, NY 12586-2035 TYPE T14 & T14D TEMPERATURE PILOT PRINTED IN U.S.A. SD 4511A/9811 5 13 /16 D 4 7 /8 1 13 /16 T14 PILOT
INSTRUCTION AND REPAIR MANUAL
 SECTION 6 ITEM 390 DATED JANUARY 2003 SUPERSEDES SECTION 6 ITEM 390 DATED OCTOBER 2000 INSTRUCTION AND REPAIR MANUAL SERIES 390 6 The 390 Series is a superior commercial Multi-Stage Vertical In-Line Centrifugal
Domestic Pump Series VCMD TM Combination Vacuum & Boiler Feed Unit
 Custom engineered units to maintain optimum boiler levels and system vacuum requirements Four styles to choose from to minimize floor space requirements Multi-jet vacuum pumps for quiet, dependable and
Specifications Information and Repair Parts Manual 316A-95, 316B-95, 393A-95, 393B A-95 thru 394D-95, 399A-95
 Specifications Information and Repair Parts Manual 316A-95, 316B-95, 393A-95, 393B-95 394A-95 thru 394D-95, 399A-95 Please read and save this Repair Parts Manual. Read this manual and the General Operating
SECTION STEAM CONDENSATE PUMPS
 PART 1 - GENERAL 1.1 DESCRIPTION SECTION 23 22 23 STEAM CONDENSATE PUMPS SPEC WRITER NOTES: 1. Delete between // ---- // if not applicable to project. Also delete any other item or paragraph not applicable
AC6 & AC8 HORIZONTAL SERIES Sealed Metallic Centrifugal Pumps Installation and Maintenance Instructions
 AC6 & AC8 HORIZONTAL SERIES Sealed Metallic Centrifugal Pumps Installation and Maintenance Instructions ASSEMBLY PUMPS WITH MOTORS 1. No assembly required. Unpack the pump and motor and examine for any
LC Series - Light Commercial Pump Station Installation and Operation Manual
 LC Series - Light Commercial Pump Station Installation and Operation Manual Please keep this manual with the pump station Content Rain Bird LC Series Overview... Safety Instruction... Operation... 3 Pump
CHAMPION PUMP OWNER S MANUAL
 CHAMPION PUMP OWNER S MANUAL IMPORTANT SAFETY INSTRUCTIONS READ AND FOLLOW ALL INSTRUCTIONS SAVE THESE INSTRUCTIONS WARNING: Before installing this product, read and follow all warning notices and instructions
OWNER S MANUAL INSTALLATION AND OPERATING INSTRUCTIONS REPAIR PARTS LIST
 OWNER S MANUAL INSTALLATION AND OPERATING INSTRUCTIONS REPAIR PARTS LIST SCX1740 SERIES CENTRIFUGAL PUMP High Head - Noryl Impellers MODELS Model ODP MOTORS TEFC MOTORS HP Number 115/230/60/1 20-230/460/60/3
STAINLESS STEEL UNITS
 Please read and save this Repair Parts Manual. Read this manual and the General Operating Instructions carefully before attempting to assemble, install, operate or maintain the product described. Protect
PENGUIN SERIES HSC PUMPS INTRODUCTION
 PENGUIN Installation & Maintenance SERIES HSC PUMPS MODELS HSC-1/4 HSC-1/2 HSC-3/4 HSC-1 HSC-2 HSC-3 SEALS S - Single D - Double M - Single/Multi-Stage INTRODUCTION Penguin 316 stainless steel centrifugal
DENVER PUBLIC SCHOOLS DESIGN AND CONSTRUCTION STANDARDS This Standard is for guidance only. SECTION PUMPS
 PART 0 A/E INSTRUCTIONS 0.01 Design Requirements A. Pumping system design 1. A primary-secondary pumping system is preferred. Redundant pipes are required for chillers and boilers. 2. Select pumps to operate
Elite Primer Baldor Series External Pond Pump
 Elite Primer Baldor Series External Pond Pump ( 5250PPB21, 6440PPB23, 7550PPB26, 9600PPB28) Installation and User s Guide IMPORTANT SAFETY INSTRUCTIONS, READ AND FOLLOW ALL INSTRUCTIONS. SAVE THESE INSTRUCTIONS
489 & 490 Series CAST IRON UNITS BRONZE UNITS STAINLESS STEEL UNITS MAINTENANCE. Figure 1 - Mechanical Seal Replacement
 Please read and save this Repair Parts Manual. Read this manual and the General Operating Instructions carefully before attempting to assemble, install, operate or maintain the product described. Protect
INSTRUCTION MANUAL with Replacement Parts
 INSTRUCTION MANUAL with Replacement Parts MODEL FD500 FOOD WASTE DISPOSERS (INCLUDES MOTOR PARTS) ML-18978 A product of HOBART CORPORATION 701 S. RIDGE AVENUE TROY, OHIO 45374-0001 FORM 11394 Rev. G (10-98)
569, 570, 571, 572 Series
 Please read and save this Repair Parts Manual. Read this manual and the General Operating Instructions carefully before attempting to assemble, install, operate or maintain the product described. Protect
569, 570, 571, 572 Series
 Please read and save this Repair Parts Manual. Read this manual and the General Operating Instructions carefully before attempting to assemble, install, operate or maintain the product described. Protect
Patterson/AMT Inline Circulator Pump Refer to pump manual for General Operating and Safety Instructions.
 Please read and save this Repair Parts Manual. Read this manual and the General Operating Instructions carefully before attempting to assemble, install, operate or maintain the product described. Protect
SMF PUMP OWNER S MANUAL
 SMF PUMP OWNER S MANUAL IMPORTANT SAFETY INSTRUCTIONS READ AND FOLLOW ALL INSTRUCTIONS SAVE THESE INSTRUCTIONS WARNING: Before installing this product, read and follow all warning notices and instructions
ECONO FLO 2.7HP VARIABLE SPEED PUMP OWNER S MANUAL
 ECONO FLO 2.7HP VARIABLE SPEED PUMP OWNER S MANUAL IMPORTANT SAFETY INSTRUCTIONS READ AND FOLLOW ALL INSTRUCTIONS SAVE THESE INSTRUCTIONS WARNING: Before installing this product, read and follow all warning
MECHANICAL SEAL REPLACEMENT UNPACKING MAINTENANCE. Figure 1 & 2 - Mechanical Seal Replacement
 Please read and save this Repair Parts Manual. Read this manual and the General Operating Instructions carefully before attempting to assemble, install, operate or maintain the product described. Protect
ECONO FLO VSA 165 VARIABLE SPEED PUMP OWNER S MANUAL
 ECONO FLO VSA 165 VARIABLE SPEED PUMP OWNER S MANUAL IMPORTANT SAFETY INSTRUCTIONS READ AND FOLLOW ALL INSTRUCTIONS SAVE THESE INSTRUCTIONS WARNING: Before installing this product, read and follow all
489G DESCRIPTION CAST IRON UNITS BRONZE UNITS 316 STAINLESS STEEL UNITS. Maintenance. General Safety Information for 12 Volt DC Power
 Please read and save this Repair Parts Manual. Read this manual and the General Operating Instructions carefully before attempting to assemble, install, operate or maintain the product described. Protect
MECHANICAL SEAL REPLACEMENT UNPACKING MAINTENANCE. Figure 1 & 2 - Mechanical Seal Replacement
 Please read and save this Repair Parts Manual. Read this manual and the General Operating Instructions carefully before attempting to assemble, install, operate or maintain the product described. Protect
DESCRIPTION IMPELLER INSPECTION MAINTENANCE POWER CORD REPLACEMENT IMPELLER REPLACEMENT MECHANICAL SEAL REPLACEMENT IMPELLER INSPECTION /REPLACEMENT
 Please read and save this Repair Parts Manual. Read this manual and the General Operating Instructions carefully before attempting to assemble, install, operate or maintain the product described. Protect
Owner s Guide and Installation Manual
 For Your Records and Warranty Assistance For reference, also attach your receipt or a copy of your receipt to the manual. Model Name Type 8 Models Owner s Guide and Installation Manual Model No. Catalog
HORIZONTAL MULTISTAGE CENTRIFUGAL PUMP
 HORIZONTAL MULTISTAGE CENTRIFUGAL PUMP WWPPCHLFT260 Instructions WWPPCHLFT260_Horizontal Multistage Centrifugal Pump_IB.indd 1 READ THIS MANUAL CAREFULL BEFORE INSTALL, START THE PUMP 1. Suction 2. Plug
E.2 series high efficiency circulator. Installation and operating instructions
 E.2 series high efficiency circulator Installation and operating instructions File No: 10.84 Date: august 16, 2012 Supersedes: 10.84 Date: july 20, 2010 contents 1.0 Operating limits 4 2.0 Electrical
IMAGE V. Parts and Service Manual
 IMAGE 0V Section II Parts and Service Manual (88B) CLARKE TECHNOLOGY Image Operator's Manual Page AUTHORIZED PERSONNEL MAINTENANCE To Access Pump Motor. Remove brush housing from machine. See "Brush Motor
C-IV 60 CEILING FAN READ AND SAVE THESE INSTRUCTIONS. FAN RATING AC 120V. 60Hz
 C-IV 60 CEILING FAN READ AND SAVE THESE INSTRUCTIONS FAN RATING AC 120V. 60Hz Please do not use any electric or battery powered tools in the assembly and installation of this or any Matthews Fan Company
INSTALLATION, OPERATION, AND MAINTENANCE MANUAL
 INSTALLATION, OPERATION, AND MAINTENANCE MANUAL TUBE AXIAL FANS BTA, WTA, HTA, DDA The purpose of this manual is to aid in the proper installation and operation of the fans. These instructions are intended
Patterson/AMT Inline Circulator Pump Refer to pump manual for General Operating and Safety Instructions.
 Please read and save this Repair Parts Manual. Read this manual and the General Operating Instructions carefully before attempting to assemble, install, operate or maintain the product described. Protect
TIDALWAVE I/G POOL PUMP INSTRUCTION MANUAL
 TIDALWAVE I/G POOL PUMP INSTRUCTION MANUAL READ THIS MANUAL CAREFULLY BEFORE USING YOUR PUMP 88 PUMP PARTS BREAKDOWN REF # Order # Mfr # Description 1 NEP4 AC 348 Lid Knobs NEP AC 380 Strainer Lid 3 NEP6
INSTALLATION & OPERATING INSTRUCTIONS
 INSTALLATION & OPERATING INSTRUCTIONS WARNING RISK OF ELECTRIC SHOCK. CONNECT ONLY TO A CIRCUIT PROTECTED BY A GROUND-FAULT CIRCUIT-INTERRUPTER. THE UNIT SHOULD BE INSTALLED BY A QUALIFIED SERVICE REPRESENTATIVE.
SERIES 'HE' PLASTIC HORIZONTAL PUMP MODEL: H2 x1½
 SERIES 'HE' PLASTIC HORIZONTAL PUMP MODEL: H2 x1½ OPERATION AND SERVICE GUIDE O-820_R FEBRUARY 2013 Refer to Bulletin P-201 and Parts Lists: P-7200, P-7250. SAFETY PRECAUTIONS BEFORE STARTING PUMP 1. Read
Patterson/AMT Inline Circulator Pump Refer to pump manual for General Operating and Safety Instructions.
 Please read and save this Repair Parts Manual. Read this manual and the General Operating Instructions carefully before attempting to assemble, install, operate or maintain the product described. Protect
A. Operation and Maintenance Data: For pumps to include in emergency, operation, and maintenance manuals.
 SECTION 23 21 23 - HYDRONIC PUMPS PART 1 - GENERAL 1.1 RELATED DOCUMENTS A. Drawings and general provisions of the Contract, including General and Supplementary Conditions and Division 01 Specification
Installation and operating instructions. E.2 Series high efficiency circulator
 Installation and operating instructions E.2 Series high efficiency circulator File No: 10.84 Date: august 16, 2012 Supersedes: 10.84 Date: july 20, 2010 contents 1.0 Operating limits 4 2.0 Electrical
IMPORTANT SAFETY INSTRUCTIONS READ AND FOLLOW ALL INSTRUCTIONS SAVE THESE INSTRUCTIONS. Table of Contents WARNING.
 Eagle Pump Owners Manual IMPORTANT SAFETY INSTRUCTIONS READ AND FOLLOW ALL INSTRUCTIONS SAVE THESE INSTRUCTIONS Table of Contents SECTION I. INSTALLATION... 2 SECTION II. OPERATION & MAINTENANCE... 2 SECTION
installation and operation manual for Hunter Ceiling Fans
 For Your Records and Warranty Assistance Model Name: Catalog/Model No.: Serial No.: Date Purchased: Where Purchased: For reference also attach your receipt or a copy of your receipt to the manual. installation
Types TMUB, TMUAH and. J Jockey Pumps
 Multistage Diffuser Pumps Types TMUB, TMUAH and J Jockey Pumps Instructions Installation Operation Maintenance Read this entire book before attempting to install, operate or repair these controls. Properly
Owner s Guide and Installation Manual
 For Your Records and Warranty Assistance For reference, also attach your receipt or a copy of your receipt to the manual. Model Name Type 2 Models Owner s Guide and Installation Manual Model No. Date Purchased
INSTRUCTION MANUAL A REVISION A. Series e 3-4/e 3-6 Instant Hot Water Recirculating Systems
 INSTRUCTION MANUAL A-00-091-365 REVISION A Series e 3-4/e 3-6 Instant Hot Water Recirculating Systems Fig. 5 Remove the motor unit and o-ring from the pump housing into the plumbing line. Do not sweat
REF. NO Clamp Assembly 8 1 set Gasket (4 per set) S.S. Lock-washer 3/8 x 1/ Brass Impeller 3.
 S.S. Lock-washer 3/8 x 1/ Brass Impeller 3.") 4.4 SUPPLY PUMPAK ASSEMBLY NOTE: This section applies only to systems, which include a supply pumpak. Only the H6, XA, and XC series systems contain a supply pumpak. If your system is a single zone, H6
4.4 SUPPLY PUMPAK ASSEMBLY NOTE: This section applies only to systems, which include a supply pumpak. Only the H6, XA, and XC series systems contain a supply pumpak. If your system is a single zone, H6
40LM Hz INSTALLATION, START-UP AND SERVICE INSTRUCTIONS CHILLED WATER FAN COIL UNIT
 Carrier International Sdn. Bhd. Malaysia INSTALLATION, START-UP AND SERVICE INSTRUCTIONS CHILLED WATER FAN COIL UNIT 40LM 120-200 50Hz CONTENTS: Physical Data & Dimension 1-3 Safety Considerations 4 Rigging
SuperKlean Washdown Products
 February 2012 DURAMIX 8000 INSTALLATION AND MAINTENANCE INSTRUCTIONS **DO NOT THROW AWAY AFTER INSTALLATION** **SAVE AND DISPLAY PROMINENTLY WHERE THIS EQUIPMENT IS USED** WARNING HIGH PRESSURE AND HOT
E, F & G SERIES CENTRIFUGALS INSTALLATION INSTRUCTIONS
 E, F & G SERIES CENTRIFUGALS INSTALLATION INSTRUCTIONS These instructions have been provided so that the user can derive the optimum performance from his centrifugal pumps. Particular attention must be
Instruction Manual - Anti-Siphon Ejector Chlorine & Sulfur Dioxide 500 PPD (10 kg/h) Maximum Capacity
 Maximum Capacity") - Anti-Siphon Ejector Chlorine & Sulfur Dioxide 500 PPD (10 kg/h) Maximum Capacity 100 PPD (2 kg/h) Chlorine or Sulfur Dioxide 250 & 500 PPD (5 & 10 kg/h) Chlorine or Sulfur Dioxide Anti-Siphon Ejector
- Anti-Siphon Ejector Chlorine & Sulfur Dioxide 500 PPD (10 kg/h) Maximum Capacity 100 PPD (2 kg/h) Chlorine or Sulfur Dioxide 250 & 500 PPD (5 & 10 kg/h) Chlorine or Sulfur Dioxide Anti-Siphon Ejector
Installation and Operation Manual For Hunter Ceiling Fans
 Installation and Operation Manual For Hunter Ceiling Fans 1 2 CONGRATULATIONS! Your new Hunter ceiling fan is an addition to your home or office that will provide comfort and performance for many years.
sta-rite Call C and CC Series Installation/Operation/Parts For further operating, installation, or maintenance assistance:
 OWNER S MANUAL Centrifugal Pumps sta-rite C and CC Series 2791 0397 Installation/Operation/Parts For further operating, installation, or maintenance assistance: Call 1-888-782-7483 293 WRIGHT STREET, DELAVAN,
Owner s Guide and Installation Manual
 Tribeca Owner s Guide and Installation Manual English Form# M6001-01 20120416 2012 Casablanca Fan Co. Welcome Your new Casablanca ceiling fan is an addition to your home or office that will provide comfort
"S" SERIES IMMERSIBLE PUMP OWNER'S MANUAL INSTALLATION OPERATION PARTS Models S12 S16
 Webster Pumps "S" SERIES IMMERSIBLE PUMP OWNER'S MANUAL INSTALLATION OPERATION PARTS Models S12 S16 PLEASE READ THE FOLLOWING INFORMATION PRIOR TO INSTALLING AND USING Webster PUMPS or HAYWARD VALVES,
! WARNING. Replacement Head Mechanism INSTRUCTION MANUAL MM-413F
 INSTRUCTION MANUAL MM-413F Replacement Head Mechanism With Switch Assembly: 93-HD, 94-HD 93-M-HD, 94-M-HD 93-7B-HD, 94-7B-HD 93-7B-M-HD, 94-7B-M-HD Without Switch Assembly: 93-HDLS 94-HDLS Replacement
52 CEILING FAN READ AND SAVE THESE INSTRUCTIONS FAN RATING AC 120V.
 Irene 52 CEILING FAN READ AND SAVE THESE INSTRUCTIONS FAN RATING AC 120V. 60Hz TABLE OF CONTENTS Tools and Materials Required... 1 Package Contents... 1 Safety Rules... 2 Mounting Options... 3 Hanging
SWP. (Models SWP08 through SWP20) IMPORTANT! Read before proceeding! OPERATION & MAINTENANCE MANUAL
 IMPORTANT! Read before proceeding! OPERATION & MAINTENANCE MANUAL") SWP (Models SWP08 through SWP20) OPERATION & MAINTENANCE MANUAL IMPORTANT! Read before proceeding! Read carefully before attempting to assemble, install, operate or maintain the product described. Protect
SWP (Models SWP08 through SWP20) OPERATION & MAINTENANCE MANUAL IMPORTANT! Read before proceeding! Read carefully before attempting to assemble, install, operate or maintain the product described. Protect
Hoffman Specialty Pump Products
 Condensate Units Boiler Feed Units Vacuum Heating Units Hoffman Specialty Pump Products S-0692C INDEX Condensate Return Units Series WC Series WCS Series SCC Boiler Feed Units Stock Watchman Condensate
KC22/32 SERIES Sealless Non-Metallic Centrifugal Pumps Installation and Maintenance Instructions
 KC22/32 SERIES Sealless Non-Metallic Centrifugal Pumps Installation and Maintenance Instructions ASSEMBLY Unpack pump from carton and check for shipping damage. WARNING: Magnetic field hazard. This pump
Audi-Larm Audible Alarm
 Audi-Larm Audible Alarm MAINTENANCE AND REPAIR TAL 1706 (L) Rev. 7 MSA 2017 Prnt. Spec. 10000005389(I) Mat. 10093084 Doc. 10093084 REPLACEMENT KITS AND PARTS LIST TAL 1706 (L) Rev. 7-10093084 2 Exploded
Title: YALE OFFICE OF FACILITIES PROCEDURE MANUAL Chapter: 01 - Yale Design Standard Division: HVAC Standards
 Date Description of Change Pages / Sections Modified ID 6/15/16 Entire document - mgl44 PART 1 - INTRODUCTION 1.1 PURPOSE A. This section is intended to define the general installation and minimum product
QUIETFLO OWNER S MANUAL
 QUIETFLO OWNER S MANUAL INSTALLATION, OPERATION & PARTS To prevent potential injury and to avoid unnecessary service calls, read this manual carefully and completley. CAUTION - We highly recommend a qualified
Installation, Operation and Maintenance LOK-FLANGE Multitube Heat Exchangers
 Bulletin 1200/4 (Revised 5/12) Installation, Operation and Maintenance LOK-FLANGE Multitube Heat Exchangers INNOVATORS IN HEAT TRANSFER I. INSTALLATION OF HEAT EXCHANGERS A. HEAT EXCHANGER SETTINGS 1)
SuperKlean Washdown Products
 DURAREEL DR8 & DR8S INSTALLATION AND MAINTENANCE INSTRUCTIONS **DO NOT THROW AWAY AFTER INSTALLATION** **SAVE AND DISPLAY PROMINENTLY WHERE THIS EQUIPMENT IS USED** GENERAL WARNINGS High pressure and hot
Owner s Guide and Installation Manual
 For Your Records and Warranty Assistance For reference, also attach your receipt or a copy of your receipt to the manual. Model Name Type 2A Models Owner s Guide and Installation Manual Model No. Date
Owner s Guide and Installation Manual
 For Your Records and Warranty Assistance For reference, also attach your receipt or a copy of your receipt to the manual. Model Name Type 2A Models Owner s Guide and Installation Manual Model No. Date
Pumps SELECTION OF A PUMP
 Pumps SELECTION OF A PUMP A water system needs to move the water produced from the source to its customers. In almost all cases in Minnesota, the source is at a lower elevation than the user so the water
T-SERIES Air Conditioner. T50 Model INSTRUCTION MANUAL nvent Rev. F P/N
 T-SERIES Air Conditioner T50 Model INSTRUCTION MANUAL Rev. F P/N 10-1008-203 TABLE OF CONTENTS Warranty and Return Policy...2 RECEIVING THE AIR CONDITIONER...3 HANDLING AND TESTING THE AIR CONDITIONER...3
Installation and Operation Manual For Hunter Ceiling Fans /16/2004
 Installation and Operation Manual For Hunter Ceiling Fans 1 2 CONGRATULATIONS! Your new Hunter ceiling fan is an addition to your home or office that will provide comfort and performance for many years.
KQ Series. Multistage Booster Pump System. Installation Manual. ISO 9001 Certified KQ200/400 KQ800
 KQ Series Multistage Booster Pump System Installation Manual KQ200/400 KQ800 ISO 9001 Certified Description The KQ series booster pump is an all-in-one compact and reliable automatic multistage centrifugal
VSA SEWAGE PUMP. Capacities to 1600 gpm, Heads to 120, Horsepower range 3/4 thru 40, 3 thru 6 discharge, 1750 and 1150 operation.
 Brochure# 228E 122011 TYPE VSA SEWAGE PUMP Capacities to 100 gpm, Heads to 120, Horsepower range 3/ thru 0, 3 thru discharge, 1750 and 1150 operation. HIGHLIGHTS Wet-Pit Installations Pumps Suspend From
BSP4/BSPD4, BSP6/BSPD6 & BSPD8 Self-Priming Sewage and Trash Pumps. Installation and Service Manual
 BSP4/BSPD4, BSP6/BSPD6 & BSPD8 Self-Priming Sewage and Trash Pumps Installation and Service Manual 056255121 GENERAL INFORMATION The Berkeley self-priming centrifugal pump has a semiopen impeller and suction
PROAIR Air Conditioner. CR29 Model INSTRUCTION MANUAL nvent Rev. I P/N
 PROAIR Air Conditioner CR29 Model INSTRUCTION MANUAL Rev. I P/N 89104461 TABLE OF CONTENTS Warranty and Return Policy...2 RECEIVING THE AIR CONDITIONER...3 HANDLING AND TESTING THE AIR CONDITIONER...3
INSTRUCTIONS FOR USE PORTABLE VACUUM SYSTEM LEI Part # s / , , , IMPORTANT INFORMATION
 INSTRUCTIONS FOR USE PORTABLE VACUUM SYSTEM LEI Part # s / 27-009, 27-010, 27-015, 27-020 IMPORTANT INFORMATION UNATHORIZED CHANGES OR ALTERATIONS TO ANY LINCOLN PORTABLE VACUUM SYSTEM WILL AUTOMATICALLY
SERVICE MANUAL. 300 Series Motorized 35650, 35651, 35652, 36750, 36751, and Model
 Section: MOYNO 500 PUMPS Page: 1 of 4 Date: March 1, 1998 SERVICE MANUAL MOYNO 500 PUMPS 300 Series Motorized 35650, 35651, 35652, 36750, 36751, and 36752 Model DESIGN FEATURES Housing: Cast iron/316 SS
MODEL 6430T, 6460 & 6460T POTATO PEELER
 MODEL 6430T, 6460 & 6460T POTATO PEELER MODEL ML-137602 6430T ML-19630 6460 ML-137604 6460T ML-104562 6460C ML-137606 6460CT 701 S. RIDGE AVENUE TROY, OHIO 45374-0001 FORM 37005 (Apr. 2006) Installation,
UHIR Series. Horizontal or Vertical Mounting Industrial / Commercial Electric Unit Heater. Owner s Manual
 UHIR Series Horizontal or Vertical Mounting Industrial / Commercial Electric Unit Heater Owner s Manual This manual covers installation, maintenance and repair parts. Read carefully before attempting to
OPERATING AND MAINTENANCE MANUAL FOR PLATE HEAT EXCHANGER INDIRECT FIRED WATER HEATER. Electric Heater Company Base Model "BWXP"
 OPERATING AND MAINTENANCE MANUAL FOR PLATE HEAT EXCHANGER INDIRECT FIRED WATER HEATER Electric Heater Company Base Model "BWXP" HUBBELL ELECTRIC HEATER COMPANY P.O. BOX 288 STRATFORD, CT 06615 PHONE: (203)
T-SERIES Air Conditioner. T20 Model INSTRUCTION MANUAL nvent Rev. C P/N
 T-SERIES Air Conditioner T20 Model INSTRUCTION MANUAL Rev. C P/N 89114993 TABLE OF CONTENTS Warranty and Return Policy... 2 IMPORTANT NOTICE... 2 RECEIVING THE AIR CONDITIONER... 3 HANDLING AND TESTING
Explorer CleaningPartsDirect.com Carpet Extractor. Operator and Parts Manual. Home Find... Go To.. Model No.: Can.
 Explorer 1500 Carpet Extractor Model No.: 608808 609231 Can. Operator and Parts Manual CleaningPartsDirect.com 662-393-3045 NOBLES 12875 RANSOM STREET HOLLAND MI 49424 U.S.A. CUSTOMER SERVICE: 1-800-365-6625
PROAIR Air Conditioner. CR23 Model INSTRUCTION MANUAL nvent Rev. D P/N
 PROAIR Air Conditioner CR23 Model INSTRUCTION MANUAL Rev. D P/N 89112522 TABLE OF CONTENTS Warranty and Return Policy...2 RECEIVING THE AIR CONDITIONER...3 HANDLING AND TESTING THE AIR CONDITIONER...3
rev3 INSTALLATION & OPERATION MANUAL OIL CIRCULATING HEATING SYSTEM MODEL OSM
 216279-000 rev3 INSTALLATION & OPERATION MANUAL OIL CIRCULATING HEATING SYSTEM MODEL OSM IDENTIFYING YOUR SYSTEM IOM216279-000 The HOTSTART heating system is designed to heat fluids for use in marine
Owner s Guide and Installation Manual
 For Your Records and Warranty Assistance For reference, also attach your receipt or a copy of your receipt to the manual. Model Name Type 2 Models Owner s Guide and Installation Manual Model No. Catalog
T-Series Air Conditioner T53 Model
 INSTRUCTION MANUAL T-Series Air Conditioner T53 Model Protecting Electronics. Exceeding Expectations. McLean Cooling Technology 11611 Business Park Blvd N Champlin, MN 55316 USA Tel 763-323-8200 Fax 763-576-3200
THERMAPHASE INSTALLATION AND OPERATING INSTRUCTIONS
 Page 1 of 10 THERMAPHASE INSTALLATION AND OPERATING INSTRUCTIONS Purpose of Manual The purpose of this manual is to provide operating, servicing and repair instructions for the Summit standard models ThermaPhase
TITAN FLOW CONTROL, INC.
 PREFACE: TITAN FLOW This manual contains information concerning the installation, operation, and maintenance of Titan Flow Control (Titan FCI) Suction Diffusers. To ensure efficient and safe operation
SPECTRACOOL Air Conditioner. N21 Model INSTRUCTION MANUAL nvent Rev. G P/N
 SPECTRACOOL Air Conditioner N21 Model INSTRUCTION MANUAL Rev. G P/N 89115088 TABLE OF CONTENTS WARRANTY AND RETURN POLICY...2 RECEIVING THE AIR CONDITIONER...3 HANDLING AND TESTING THE AIR CONDITIONER...3
installation and operation manual for Hunter Ceiling Fans
 For Your Records and Warranty Assistance Model Name: Catalog/Model No.: Serial No.: Date Purchased: Where Purchased: For reference also attach your receipt or a copy of your receipt to the manual. installation
TABLE OF CONTENTS. NOTE: Read the entire instruction manual before starting the installation. TROUBLESHOOTING... 13
 R 410A Duct Free Split System Air Conditioner and Heat Pump Product Family: DFS4(A/H) System, DFC4(A/H)3 Outdoor, DFF4(A/H)H Indoor NOTE: Read the entire instruction manual before starting the installation.
WAILEA OWNER S MANUAL
 WAILEA OWNER S MANUAL The blades in each pack are matched for equal weight to assure smooth fan operation. If more than one fan is being installed, be careful not to mix blades from different cartons.
TECHNICAL DATA. Wet 26a. February 22, 2009
 February 22, 2009 Wet 26a 1. DESCRIPTION The Viking Alarm Check Valve serves as a check valve by trapping pressurized water above the clapper and preventing reverse flow from sprinkler piping. The valve
DESCRIPTION MAINTENANCE INSTALLATION OF NEW SEAL REMOVAL OF OLD SHAFT SEAL
 Please read and save this Repair Parts Manual. Read this manual and the General Operating Instructions carefully before attempting to assemble, install, operate or maintain the product described. Protect
T-SERIES Air Conditioner. T43 Model INSTRUCTION MANUAL nvent Rev. I P/N
 T-SERIES Air Conditioner T43 Model INSTRUCTION MANUAL Rev. I P/N 10-1008-145 TABLE OF CONTENTS Warranty and Return Policy...2 IMPORTANT NOTICE...2 RECEIVING THE AIR CONDITIONER...3 HANDLING AND TESTING