(UK) Date : February 2016 NOTE: PLEASE LEAVE COPIES OF THESE INSTRUCTIONS AND ANY DRAWINGS WITH THE END USER.
|
|
|
- Brett Montgomery
- 5 years ago
- Views:
Transcription
 www.dunham-bush.co.uk Date : February 2016 NOTE: PLEASE LEAVE COPIES OF THESE INSTRUCTIONS AND ANY DRAWINGS WITH THE END USER.")
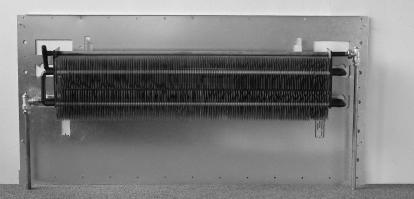
1 System LST Low Surface Temperature Natural Convector Installation Instructions Dunham-Bush Ltd, Downley Road, Havant, Hants PO9 2JD Tel Fax (Global) Document Ref: D (UK) Date : February 2016 NOTE: PLEASE LEAVE COPIES OF THESE INSTRUCTIONS AND ANY DRAWINGS WITH THE END USER. INTRODUCTION This booklet provides guidance for the site activities necessary to identify, handle, install, commission and service Dunham-Bush System LST Low Surface Temperature Natural Convector. The instructions refer to the standard product only: please refer to any additional drawings supplied for details of any special features. Please study all documentation carefully before commencing installation work. IDENTIFICATION Refer to diagrams for exploded views and identification of the main parts. Any reference given on the order will be marked on the casing, back plate and emitter packages for site identification. DESCRIPTION Each System LST natural convector consists of a back plate, emitter and casing components as shown in the Diagrams. Lock shield valves and TRV kits are optional accessories. HANDLING Casings, back plates and emitters are usually packed separately. Small orders may be packed in boxes and can usually be off-loaded by hand. Larger orders are usually palletised and lifting equipment should be provided by the buyer. Care should be taken when handling to avoid damage. STORAGE System LST components should be stored under dry, clean conditions. Any protective packing should not be removed until the components are required for installation, unless damage in transit is suspected. (Note: The buyer must examine the goods promptly upon arrival and is not entitled to make any claim against the Company in respect of damaged goods, unless at the time of delivery the delivery note is endorsed by the buyer and countersigned by the carrier or shipping agent with a note detailing the damage). PREPARATION A sound, flat, vertical surface is necessary. The screws fixing the casing to the vertical surface are integral to the structure of the casing hence suitable screws and if necessary, wall plugs must be provided by others, for fixing back plates to the vertical surface. Any obstructions or hazards within the wall such as live electrical cables and pipework must first be identified before installation commences. INSTALLATION Before commencing any work identify the correct LST radiator for the location. If a radiator reference was given on the order this will be marked on the packages for site identification. WARNING Some internal components have sharp edges. Care must be taken when installing this product and it is recommended that protective gloves are worn. Page 1 of 16
2 SYSTEM LST PRODUCT RANGE Dunham-Bush System LST low surface temperature radiators deliver efficient ambient heating in applications where safety is paramount. The hot central heating pipes and heat emitter are totally enclosed within the robust steel casing. The clever casing design permits secure key access for cleaning while TRV control valves can be selected for external or internal (tamperproof) functionality. By applying test results through a mathematical model, Dunham-Bush engineers have developed a Selection Program to help the heating designer optimise their radiator schedules for all conceivable LPHW conditions. BSRIA tested to BS EN 442 heating performance and NHS Guidance touch temperatures, System LST is a complete solution for safe efficient heating. FEATURES The Dunham-Bush System LST radiators comprise: - mild steel casing (stove finish to RAL 9010 white) - extruded aluminium grilles (pencil proof) - zinc coated steel backplate (heat reflective) - integral emitter brackets - choice of Element or Panel emitters - stock or custom RAL and BS colour finishes - available to order. BENEFITS NHS guidance compliance by design and test Optimum heating by natural convection Selection program for all LPHW flow/return conditions 1st and 2nd fix deliveries Rapid cost effective installation No special tools or fasteners required Pencil proof closure-lock grilles (no screws) Reflective backplate to enhance heating efficiency Compatible with all makes of TRV and LSV Lockable access panels Easy access for cleaning BS EN 442 verfied heat outputs Style A - for wet floor areas, or simply where casings are better sited above skirting. Style B for wet floor or dry floor areas where pipes approach from below or through walls. Style C for dry floor areas where the robust floor plinth also provides extra space for pipe runs. Style D vertical casings delivering high performance from confined spaces. Element emitters E11, E21, E12, E22, E23 low water content Cu/Al for unrivalled heating performance and rapid response TRV control, saving energy. Suitable for 2-pipe systems. Panels emitters P31, P41, P61, P32, P42, P62, P72 traditional steel panel design delivering excellent output for 2-pipe and 1-pipe systems. TEST AND WORKING PRESSURES/TEMPERATURES All emitters shall be suitable for maximum cold test pressure of 10.5 barg and maximum working pressure of 8.0 barg. Radiator emitters shall be limited to a maximum working temperature of 95 C. Element emitters shall be limited to a maximum working temperature of 110 C. Automatic airvents maximum cold test pressure is 8.5 barg; maximum working pressure / C. Manual airvents maximum cold test pressure is 10.5 bar, maximum working pressure C. System test and working pressures/temperatures shall be adjusted should fittings and valves supplied by others have test or service conditions lower than above. Page 2 of 16
3 INSTALLATION SEQUENCE Backplates (1 st Fix) Emitters &Valves (1 st Fix) Sideplates (2 nd Fix) Grilles (2 nd Fix) Casings (2 nd Fix) Page 3 of 16


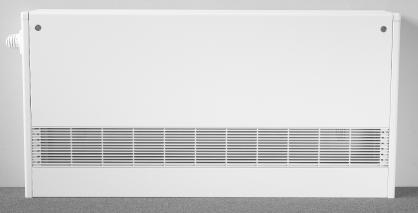
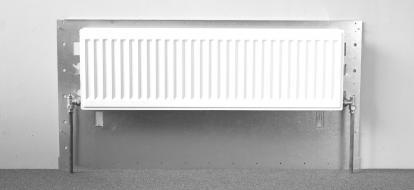
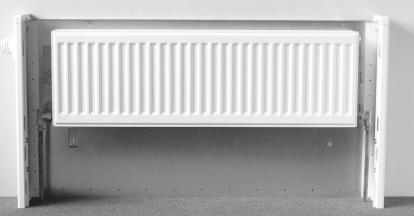
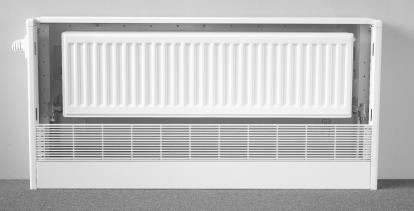
4 CASING STYLES Dunham-Bush System LST is available in four styles, A, B, C & D (pictured below). Style A casing Style B casing Style C casing Style D casing Page 4 of 16
5 Style A 97mm Element Emitter Style A 97mm Radiator Panel Style A 161mm Element Emitter Style A 161mm Radiator Panel Page 5 of 16
6 Style B 97mm Element Emitter Style B 97mm Panel Emitter Style B 161mm Element Emitter Style B 161mm Panel Emitter Page 6 of 16
7 Style C 97mm Element Emitter Style C 97mm Panel Emitter Style C 161mm Element Emitter Style C 161mm Panel Emitter Page 7 of 16
8 Style D 161mm Element Emitter Style D 161mm Panel Emitter Style D 260mm Element Emitter Page 8 of 16
, styles B, C & D can be fixed at FFL or onto pipe boxing/trunking.")
.")

9 System LST Installation - First Fix Mark positions of fixings on the wall using the back plate as a template. Note: recommended fixing height of 100mm above FFL (Style A), styles B, C & D can be fixed at FFL or onto pipe boxing/trunking. There are a large number of holes provided, as minimum we recommend fixing to every fourth hole along the top and bottom edges plus 2 to 3 fixings down the sides. B C A A C B C B A C A B Diagram 1 Drill holes to take the fixings in the wall and insert suitable wall plugs or anchors (by others). Screw the back plate to the wall using the top and bottom rows of screws holes only excluding the corners ( A in diagram 1 above). The side screw holes B are used for fixing the side plates and can be prepared ready but are not required at this stage. Alternatively the larger holes C may be used as these can be drilled and wall plugs or anchors affixed into them after the back plate has been fixed. X X Z Diagram 2 Using a large flat-bladed screw driver fold out the emitter brackets X. If the convector is to have a fitted internal TRV the phial brackets Z will also need to be folded out. See diagrams 2a & 2b for details on which brackets to fold out for each emitter. Page 9 of 16


10 Diagram 2a Styles A, B & C. Refer to bracket table for details of required brackets for each emitter type. Diagram 2b Style D. Refer to bracket table for details of required brackets for each emitter type. Page 10 of 16

.")

11 Diagram 3 Hang the panel radiator or finned element on the brackets as centrally as possible. Fit any lock shield valves and/or TRV valve body. (When fitting a Herz TRV; fit pipe insert (provided) and valve fittings must be assembled using spray silicone oil and compression nuts must be tightened clockwise ¾ of a turn / 270 degrees).note only casings styles B, C & D can accommodate integral flow & return pipework. With the system filled, vent the emitter to expel all air and check for leaks. If fitted adjust lock shield valve to give design water flow rate. Diagram 4 Style A unit fitted with emitters and internal Herz TRV valve/head. Page 11 of 16

.")

 in")
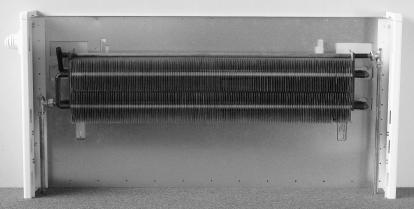
12 System LST Installation - Second Fix Ensure panel radiator is clean or that the finned element is clean and fins are not crushed, before fitting casing. Diagram 5 Position the side plates at either end of the back plate using the studs for alignment (see detail in Diagram 4). Please note that the studs are for alignment only and no fixings are required to be attached to these studs. Screw the side plates through the back plate into holes B prepared during first fix stage. Diagram 6 Fit the Bottom rail between the side plates. To do this you may need to gently push the side plate outward (being careful not to permanently deform it) in order to get the rail to clear the side plate (Detail 1 in Diagram 5). The bottom rail should be engaged with the studs (Detail 2). Two M4 nylock nuts, provided should be threaded onto the studs and screwed down to secure it. Page 12 of 16


13 Remove the TRV Blanking plate from the side plate nearest the TRV valve body. Diagram 6a Wind the surplus length of the capillary around the TRV dial into the groove provided ensuring that it will not be tight when fitted. Diagram 6b Insert the bellows housing through the aperture in the side plate of the casing. Diagram 6c Page 13 of 16


14 Affix the Sensor/Set point TRV Dial to the side of the casing using the screws provided. Diagram 7a Attach the bellows housing to the TRV valve body using the knurled nut. Diagram 7b Clip on the cover to the TRV dial Diagram 7c Page 14 of 16


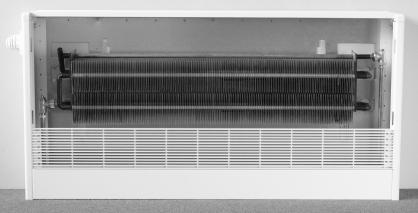
15 Fit the grilles. On the top grille insert the tab into the slot at an angle with the large rectangular notch towards the front of the heater. Diagram 8a Pull the grille towards you so that the edge of the slot is in the notch. Diagram 8b Then tilt the grille so it is level. Diagram 8c Finally slide the grille back to lock it into place. The bottom grille is fitted in a similar manner with the rectangular notches in the tabs facing upward. Note:- Casing style A Casing style B Casing style C Casing style D Inlet grille is the same as bottom plate. Inlet grille only. Inlet grille & plinth. Large grille. Diagram 8d Page 15 of 16

16 Diagram 9 Once the grilles are fitted the front plate can be put on. The corner tabs can be distorted in transit hence they may need to be straightened. Insert the tabs at the corners into the slots in the side plates then push the top of the access panel home and lock it into place using the two locks and key provided. MAINTENANCE Every 3-6 months the front panel should be removed, the grilles removed (in the reverse of the method on the previous pages) and the casing inspected for dust and debris. The casing and grilles should be cleaned using a soft brush, damp cloth and warm soapy water. Any dust and debris should be vacuumed from the casing, and the finned element. Care should be taken not to damage the finned element a soft brush attachment should be used. WARNING Some internal components may have sharp edges. Care must be taken when servicing this product and it is recommended that protective gloves are worn. SPARES/SERVICE Spare parts/service Please contact our office, contact information shown below. Manufacturer reserves the right to change any product specification without notice. Dunham-Bush Ltd, Downley Road, Havant, Hants, PO9 2JD Sales and Technical Support Spare Parts and Service Tel: Fax: Tel: Fax: info@dunham-bush.co.uk spares@dunham-bush.co.uk Page 16 of 16
Installation, Operation and Maintenance Instructions Document Ref:
 Leopard Fan Coil Units Installation, Operation and Maintenance Instructions Document Ref: Dunham-Bush Ltd, Downley Road, Havant, Hants PO9 2JD 023 9247 7700 info@dunham-bush.co.uk 129-000-001-A UK:www.dunham-bush.co.uk
Ocelot Fan Coil Units
 Ocelot Fan Coil Units Installation, Operation and Maintenance Instructions. Dunham-Bush Ltd, Downley Road, Havant, Hants PO9 2JD Tel. 023 9247 7700 Fax. 023 9245 3601 PDS-1200 1200-F-02 0258 58-00 (Global)
Panther Fan Coil Units
 Panther Fan Coil Units Installation, Operation and Maintenance Instructions. Dunham-Bush Ltd, Downley Road, Havant, Hants PO9 2JD Tel. 023 9247 7700 Fax. 023 9245 3601 PDS-1200 1200-F-02 0226-04 (Global)
WIRING DIAGRAMS AND OTHER RELAVENT LITERATURE WITH THE END USER. access panel Fan speed and on/off switches. Discharge spigot. Fan/motor.
 Puma Fan Coil Units Instructions.. Installation, Operation and Maintenance Instructions Dunham-Bush Ltd, Downley Road, Havant, Hants PO9 2JD Tel. 023 9247 7700 PDSPDS-12001200-F-02440244-02 Fax. 023 9245
Installation, Operation and Maintenance Instructions Document Ref:
 Panther Fan Coil Units Installation, Operation and Maintenance Instructions Document Ref: Dunham-Bush Ltd, Downley Road, Havant, Hants PO9 2JD 023 9247 7700 info@dunham-bush.co.uk 126-000-001-C UK:www.dunham-bush.co.uk
Installation, Operation & Maintenance Instructions Document Ref:
 Lynx Fan Coil Unit Installation, Operation & Maintenance Instructions Document Ref: Dunham-Bush Ltd, Downley Road, Havant, Hants PO9 2JD 023 9247 7700 info@dunham-bush.co.uk 131-000-001-B UK:www.dunham-bush.co.uk
Installation, Operation & Maintenance Instructions Document Ref:
 Series AM Fan Convectors Installation, Operation & Maintenance Instructions Document Ref: Dunham-Bush Ltd, Downley Road, Havant, Hants PO9 2JD 023 9247 7700 info@dunham-bush.co.uk 121-000-001-A UK:www.dunham-bush.co.uk
H Y D R O C O U R S E T R E N C H H E A T I N G
 H Y D R O C O U R S E T R E N C H H E A T I N G Natural convector trench heating system Modular design for bespoke applications Architectural floor grilles High efficiency finned tube element Contents
Series CM. Cased fan convector Sill-Line 600mm high 7 sizes and 3 heating coil options 1-13kW output with LPHW C heating medium
 Series CM Cased fan convector Sill-Line 6mm high 7 sizes and 3 heating coil options 1-13kW output with LPHW 5-13 C heating medium CONTENTS IDENTIFICATION Identification Introduction 2 Authority 2 Description
LOW SURFACE TEMPERATURE RADIATORS
 JULY 2017 LOW SURFACE TEMPERATURE RADIATORS www.qrl-radiators.com/lst Page 03 LST RANGE SUMMARY Page 0-0 LST RANGE SPECIFICATIONS Page 0 RESISTANCE DIAGRAM Page 0 MOUNTING DETAILS Page 10 DRILLING CHART
Pedestal Range. Installation and user manual. Kiosk. Trafalgar. Tube. Issue 001 September 2017 ENGLISH UK IRL SmithsEP.co.uk
 Pedestal Range Installation and user manual Kiosk Trafalgar Tube Issue 001 September 2017 ENGLISH UK IRL SmithsEP.co.uk Contents Introduction 2 Declaration of conformity 3 Symbols used in this guide 3
SERIES BM. Concealed Fan Convector
 SERIES BM Concealed Fan Convector Contents IDENTIFICATION Introduction Authority PAGE DESCRIPTION Range -4 Composition Features 3 Accessories 4-10 PERFORMANCE 11-13 Heat outputs-lthw Correction factors
Installation Instructions
 Aluminum Blinds Installation Instructions Echelon, Traditions & Integra Aluminum Blinds 2 Metro Aluminum Blinds *Click on any page to return to the Table of Contents* Echelon, Traditions & Integra Aluminum
Installation Instructions
 Wood Blinds Installation Instructions Heartland Woods Heartland Woods w/ Continuum *Click on any page to return to the Table of Contents* Heartland Woods Wood Blinds Mounting Inside or Outside Window Frame
Sovereign Double CC/DD
 Sovereign Double CC/DD Range of Low Surface Temperature radiator models to suit all budgets and applications Sales 01787 274135 www.autron.co.uk The Autron Sovereign DBL LST radiator range is designed
Efficient Cooling and Heating. Flexibility Is The Key
 Lynx Energy efficient fan coil unit Chilled water cooling & hot water heating Waterside control with variable air volume Commercially quiet with excellent acoustics Programmable communication control systems
Panther Fan Coil Unit
 Panther Fan Coil Unit Energy Efficient EC Motors 280mm Deep Chassis Horizontal Fan Coil Unit INTRODUCTION The Panther, manufactured by Dunham-Bush is an adaptable, easy to use fan coil unit, that performs
Installation and Care Instructions
 Installation and Care Instructions 2" Horizontal Aluminum Blinds MagnaView Tilt Feature CONTENTS Getting Started................................................ 1 Mount the Installation s....................................
Table of Contents What to Expect with Your Installation. Tools Needed. Wall Control
 Table of Contents Congratulations on purchasing your new Casablanca ceiling fan! It will provide comfort and performance in your home or office for many years. This installation and operation manual contains
Table of Contents What to Expect with Your Installation. Tools Needed. Wall Control
 Table of Contents Congratulations on purchasing your new Casablanca ceiling fan! It will provide comfort and performance in your home or office for many years. This installation and operation manual contains
Installation and Care Instructions. Wood Blinds and Alternative Wood Blinds. LiteRise Touch System. Getting Started
 Installation and Care Instructions Wood Blinds and THANK YOU for purchasing a Hunter Douglas product. Your new blind has been custom built for you from the highest quality materials. Once in your window,
Table of Contents. What to Expect with. Mounting Options. Tools Needed. Wall Control
 Table of Contents www.casablancafanco.com What to Expect with Your Installation Congratulations on purchasing your new Casablanca ceiling fan! It will provide comfort and performance in your home or office
XB-EFA-8L-BK & XB-EFA-8R-BK
 Supply & Extract Ventilation Unit with Heat Recovery The EMC Directive 2014/30/EU The Low Voltage Directive 2014/35/EU The information contained in this document provides details of installation, operation
Installation and Care Instructions
 Installation and Care Instructions 2" Horizontal Aluminum Blinds MagnaView Tilt Feature Thank you for your purchase. Your new blinds have been custom built for you from the highest quality materials. Properly
INSTALLATION. Glass Panel Doors (select models) CAUTION
 CAUTION") Location Do not install refrigerator near oven, radiator or other heat source. If not possible, shield refrigerator with cabinet material. Do not install where temperature falls below 55 F (13 C) or rises
Location Do not install refrigerator near oven, radiator or other heat source. If not possible, shield refrigerator with cabinet material. Do not install where temperature falls below 55 F (13 C) or rises
3RD GENERATION PANEL RADIATOR
 3RD GENERATION PANEL RADIATOR HIGHEST HEAT OUTPUT LOWEST RUNNING COST SMALLEST CARBON FOOTPRINT NI - April 2018 02 CONTENT Why choosing QRL Radiator Group? 01 The Future of Radiators, Today 02-03 HI-LO
3RD GENERATION PANEL RADIATOR
 3RD GENERATION PANEL RADIATOR HIGHEST HEAT OUTPUT LOWEST RUNNING COST SMALLEST CARBON FOOTPRINT ROI - April 2018 02 CONTENT Why choosing QRL Radiator Group? 01 The Future of Radiators, Today 02-03 HI-LO
UK PRICE GUIDE. January Complete with Technical Specifications for ROUND TOP, COMPACT, LST, AND TOWEL RADIATORS
 UK PRICE GUIDE January 2009 Complete with Technical Specifications for ROUND TOP, COMPACT, LST, AND TOWEL RADIATORS CONTENTS Introduction 2 Round Top Range 3 Compact Range 5 Low Surface Temperature Range
Standard Downrod for ceilings 8-10 feet high. Longer Downrod for ceilings 10 feet or higher
 Table of Contents www.casablancafanco.com To register your fan, please visit: www.casablancafanco.com/register What to Expect with Your Installation Save your receipt for proof of purchase. Ceiling Bracket??
Suits all KPF849 models
 Kambrook - Australia Ground Floor, Suite 2, 170-180 Bourke Rd Alexandria NSW 2015, Australia Locked Bag 2000 Botany NSW 1455 Customer Service Line 1300 139 798 Customer Service Fax 1800 621 337 www.kambrook.com.au
INSTALLATION INSTRUCTIONS. Aluminum Blinds - Standard - - Lift & Lock -
 1 INSTALLATION INSTRUCTIONS Aluminum Blinds - Standard - - Lift & Lock - 1 Deluxe 1 Traditional 1 Value & 1 Basic 2 Macro Thank you for your purchase. This blind has been custom built for you from the
Here is what comes in your box:
 Here is what comes in your box: We recommend that you pull everything out of the box and lay it out. We have grouped the drawn components below with the hardware you ll need for those parts. The screws
Installation Operation Care
 Installation Operation Care Skyline Gliding Window Panels CONTENTS Getting Started: Mounting Types And Window Terminology... 1 Unpack The Box... 1 Installation Components Required... 2 Optional Components...
Table of Contents. What to Expect with. Mounting Options. Tools Needed
 Table of Contents www.hunterfan.com What to Expect with Your Installation Congratulations on purchasing your new Hunter ceiling fan! It will provide comfort and performance in your home or office for many
S E R I E S B M C O M F O R T, A V A N T - G A R D E & L S T F A N C O N V E C T O R S
 S E R I E S B M C O M F O R T, A V A N T - G A R D E & L S T F A N C O N V E C T O R S Concealed chassis fan convector with range of 8 standard models Each model available in 9 sizes with 4 heating coil
Installation Instructions
 Installation Instructions Over the Range Microwave Oven PVM88 Questions? Call -800-56-44 or Visit our Website at: GEAppliances.ca BEFORE YOU BEGIN Read these instructions completely and carefully. IMPORTANT
Installation Instructions
 Installation Instructions Above the Cooktop Microwave Oven JVM60 and JVM65 Questions? Call -800-56- or Visit our Website at: GEAppliances.ca BEFORE YOU BEGIN Read these instructions completely and carefully.
2 Drawer Vehicle Storage System
 2 Drawer Vehicle Storage System Part No 51000 Installation: Includes: Mounting Kit: 4 x bolts 4 x washers 4 x locking nuts 1 Remove right hand side top section by undoing the 10 retaining screws and set
CONTENTS BEFORE YOU BEGIN
 Owner s Guide Wood Blinds Alternative Wood Blinds 2" Aluminum Horizontal Blinds Intelligence Interface Motor Clip Receiver Eye Battery Holder Battery Cover Remote PowerTilt Motorized Tilt System CONTENTS
INFRARED IP55 HEATER INSTRUCTIONS FOR: MODEL:- QZWP45N 1. SAFETY INSTRUCTIONS
 INSTRUCTIONS FOR: INFRARED IP55 HEATER MODEL:- QZWP45N Thank you for purchasing a Consort Claudgen product. Manufactured to a high standard this product will, if used according to these instructions and
60cm Chimney Extractor
 60cm Chimney Extractor LAM2401 HJA2480 User & Installation Guide Contents Page Environmental note 3 IMPORTANT SAFETY INFORMATION 4 6 Specifications of your extractor 7 8 Dimensions 7 Specifications 7-8
Turbo Vac Pro 18V 2 in 1 Cordless Cleaner
 Turbo Vac Pro 18V 2 in 1 Cordless Cleaner Model Number: RHSV1801 For Customer Services & Spare Parts please call 0345 209 7461 Opening times: Monday - Friday 8am 8pm & Saturday 9am 1pm Or visit us at www.productcare.co.uk
Table of Contents. What to Expect with Your Installation. Tools Needed. Mounting Options. Ceiling Bracket. Wiring.
 www.hunterfan.com Table of Contents What to Expect with Your Installation Congratulations on purchasing your new Hunter ceiling fan! It will provide comfort and performance in your home or office for many
750MM INDUSTRIAL PEDESTAL DRUM FAN
 750MM INDUSTRIAL PEDESTAL DRUM FAN 360 ROTATION & 2 ADJUSTABLE TILT CONSTRUCTION INCLUDES ANTI-TRIP BASE ENERGY EFFICIENT MOTOR KP1013 ED1 (JULY 15) 1 Table of Contents Know Your Product... 2 Fan Safety
INTRODUCTION Flexibility Is The Key Simple Access For Maintenance
 Cougar Energy efficient slimline 180mm fan coil unit Chilled water cooling & hot water heating Waterside control with variable air volume Commercially quiet with excellent acoustics Programmable communicating
WXC R134a. Nominal Cooling Capacity from 224 to 692kW
 WXC R134a Nominal Cooling Capacity from 224 to 692kW FEATURES AND BENEFITS Range of 12 models. Higher capacity and higher EER from the same compressor. High EER, low sound power level and high reliability.
Table of Contents What to Expect with. Mounting Options. Tools Needed. Downrod. Blades
 Table of Contents Congratulations on purchasing your new Hunter ceiling fan! It will provide comfort and performance in your home or office for many years. This installation and operation manual contains
DISHWASHER INSTALLATION GUIDE SPECIFICATIONS, INSTALLATION, AND MORE
 DISHWASHER INSTALLATION GUIDE SPECIFICATIONS, INSTALLATION, AND MORE COVE DISHWASHER Contents 3 Cove Dishwasher 4 Specifications 7 Door Panel 9 Installation 15 Troubleshooting Features and specifications
Installation and maintenance instructions
 6304 4995 0/004 GB For installer Installation and maintenance instructions Flue gas heat exchanger WT50/60 Please read thoroughly prior to installation and maintenance. Summary About this manual This equipment
21 20 LITER GAS FRYER FFA3200 INSTALLATION AND SERVICING.
 21 20 LITER GAS FRYER FFA3200 INSTALLATION AND SERVICING www.anvilworld.com 20 ALL ANVIL EQUIPMENT COMES WITH A ONE YEAR WARRANTY ON COMPONENTS AND DEFECTIVE WORKMANSHIP. www.anvilworld.com 19 20 LITER
Installation and Operating Manual Drying Cabinet
 Drying Cabinet TS-4175 WW CONTENTS THIS USER MANUAL & DATA PLATE DETAILS Page 2 IMPORTANT SAFETY INSTRUCTIONS Page 3 INSTALLATION INSTRUCTIONS Page 4 OPERATING INSTRUCTIONS Page 8 MAINTENANCE INSTRUCTIONS
Table of Contents. What to Expect with. Tools Needed. Mounting Options. Blades
 Table of Contents 1.888.830.1326 Ceiling Bracket 30 inches Ladder Downrod 3 Wiring 10 Operation, Maintenance & Cleaning Light Kit 11 Troubleshooting??? 17 15 1 13 5 Blades 9 Switch Housing 12 Canopy 6
Table of Contents What to Expect with Your Installation. Top Housing. Ceiling Plate. Tools Needed.
 Table of Contents Congratulations on purchasing your new Hunter ceiling fan! It will provide comfort and performance in your home or office for many years. This installation and operation manual contains
Thermostatic Concealed Shower Valve
 Thermostatic Concealed Shower Valve Product may differ from image. Please retain this booklet for future aftercare reference Component Breakdown - Three Handle Valve Component breakdown Two Handle Valve
Table of Contents What to Expect with Your Installation. Ceiling Plate. Tools Needed.
 Table of Contents Congratulations on purchasing your new Casablanca ceiling fan! It will provide comfort and performance in your home or office for many years. This installation and operation manual contains
BELGRAVIA Classic (Vertical Units) - Technical Data Sheet
 - Technical Data Sheet") S & P Coil Products Limited BELGRAVIA Classic (Vertical Units) - Technical Data Sheet BELGRAVIA CLASSIC: CONSTRUCTION Each Belgravia Classic unit comprises a sheet metal case, fitted with inlet and outlet
S & P Coil Products Limited BELGRAVIA Classic (Vertical Units) - Technical Data Sheet BELGRAVIA CLASSIC: CONSTRUCTION Each Belgravia Classic unit comprises a sheet metal case, fitted with inlet and outlet
EXTRACTOR HOOD. Please read all the instructions carefully before starting the installation. 230 / 240V 50Hz
 abc EXTRACTOR HOOD Please read all the instructions carefully before starting the installation Model Stock Ref Napoli 120812 Napoli Plus (white) 436083 Napoli Plus (Silver) 436084 230 / 240V 50Hz PLEASE
Installation & Operating Instructions. Models: York Midi & Serrano Electric Stoves
 Installation & Operating Instructions Models: York Midi & Serrano Electric Stoves PLEASE NOTE THAT THIS APPLIANCE USES A MOTOR TO OPERATE THE FLAME EFFECT AND THAT IT MAY BE POSSIBLE TO HEAR IT WHERE THE
POWER SHOWERS Models 4500M 5002M 4500T 5002T
 II POWER SHOWERS Models 4500M 5002M 4500T 5002T Performance Shower Products CUSTOMER SERVICE HELPLINE: 01883 730339 CONTENTS PLEASE READ THESE INSTRUCTIONS CAREFULLY: This booklet covers all models in
Enzo Safe Touch Thermostatic Shower EZ10010CP & EZ10014CP
 Enzo Safe Touch Thermostatic Shower EZ10010CP & EZ10014CP Installation and Maintenance Instructions In this procedure document we have endeavoured to make the information as accurate as possible. We cannot
FORCEFLOW. 900 Series Fan Convectors
 ORCELOW 900 Series an Convectors ORCELOW 900 SERIES WHY USE N CONVECTOR? an Convectors have three big advantages over similar heating solutions: they require little maintenance, they occupy much less wall
Please tape down. NewTeam Ltd. Customer Service Dept. Brunel Road Earlstrees Industrial Estate Corby Northants NN17 4JW
 3rd Fold 1st Fold NewTeam Ltd. Customer Service Dept. Brunel Road Earlstrees Industrial Estate Corby Northants NN17 4JW 2nd Fold Please tape down Please tape down Affix Stamp Installation Instructions
3DIR52XXD Series Fan. Owner s Guide and Installation Manual. UL Model NO. : 3DIR52XXD
 Owner s Guide and Installation Manual 3DIR52XXD Series Fan UL Model NO. : 3DIR52XXD Attach sales receipt to this card and retain as your proof of purchase DATE OF PURCHASE: MODEL NUMBER: RETAILER NAME:
HR200WK Through the wall Heat Recovery Ventilator
 HR200WK Through the wall Heat Recovery Ventilator Installation and Maintenance Instructions Stock Ref No:- HR200WK 14120020 PLEASE READ INSTRUCTIONS IN CONJUNCTION WITH ILLUSTRATIONS. PLEASE SAVE THESE
Table of Contents. What to Expect with. Tools Needed. Mounting Options. Blades
 www.hunterfan.com Table of Contents Ceiling Bracket 30 inches Downrod Ladder 3 Wiring Operation, Maintenance & Cleaning Light Kit 11 Troubleshooting??? 16 15 1 12 10 9 5 Blades Canopy 6 4 PÁGINA 2 7 feet
Please tape down. NewTeam Ltd. Customer Service Dept. Brunel Road Earlstrees Industrial Estate Corby Northants NN17 4JW
 3rd Fold 1st Fold NewTeam Ltd. Customer Service Dept. Brunel Road Earlstrees Industrial Estate Corby Northants NN17 4JW 2nd Fold Please tape down Please tape down Affix Stamp Installation Instructions
Table of Contents What to Expect with. Tools Needed. Mounting Options. Wiring. Downrod. Canopy.
 Table of Contents Congratulations on purchasing your new Hunter ceiling fan! It will provide comfort and performance in your home or office for many years. This installation and operation manual contains
Installation. Leveling
 Your refrigerator was packed carefully for shipment. Remove and discard shelf packaging and tape. Do not remove the serial plate. Location Do not install refrigerator near oven, radiator or other heat
5AZR56XX Series Fan. Owner s Guide and Installation Manual. UL Model NO. : 5AZR56XX
 Owner s Guide and Installation Manual 5AZR56XX Series Fan UL Model NO. : 5AZR56XX Attach sales receipt to this card and retain as your proof of purchase DATE OF PURCHASE: MODEL NUMBER: RETAILER NAME: RETAILER
5COM52XXD Series Fan. Owner s Guide and Installation Manual. UL Model NO. : 5COM52XXD
 Owner s Guide and Installation Manual 5COM52XXD Series Fan UL Model NO. : 5COM52XXD Attach sales receipt to this card and retain as your proof of purchase DATE OF PURCHASE: MODEL NUMBER: RETAILER NAME:
EcoBrite Smooth Light LED Light Fixtures
 Installation Guide EcoBrite Smooth Light LED Light Fixtures BEFORE YOU BEGIN INSTALLATION Read these instructions carefully. Failure to follow these instructions will invalidate the warranty on this product
BWT6.3GL Cooker Hood 60 cm Glass chimney hood
 User Manual for your BWT6.3GL Cooker Hood 60 cm Glass chimney hood NOTE: This User Instruction Manual contains important information, including safety & installation points, which will enable you to get
Aluminum Horizontal Blinds BOX BRACKET INSTALLATION
 Aluminum Horizontal Blinds BOX BRACKET INSTALLATION MOUNT THE INSTALLATION BRACKETS Mounting Options The installation brackets may be inside mounted, outside mounted or ceiling mounted. In all cases, level
Table of Contents. What to Expect with. Mounting Options. Tools Needed. Preparation. Wiring. Downrod.
 Table of Contents www.casablancafanco.com What to Expect with Your Installation Congratulations on purchasing your new Casablanca ceiling fan! It will provide comfort and performance in your home or office
BT16.4SS-HK BT19.4SS-HK Cooker Hood
 BT16.4SS-HK BT19.4SS-HK Cooker Hood User Manual for your Baumatic User Manual for your Baumatic BT16.4SS-HK 60 cm Chimney Hood BT19.4SS-HK 90 cm Chimney Hood NOTE: This User Instruction Manual contains
Installation Operation Care. Vertical Blind Collection Paramount, PermAlign, and PermaTrak Headrail Systems
 Installation Operation Care Vertical Blind Collection Paramount, PermAlign, and PermaTrak Headrail Systems CONTENTS Getting Started: Product View... 1 Tools and Fasteners Needed... 2 Installation: Installation
Installation and Care Instructions
 Installation and Care Instructions THANK YOU for purchasing a Hunter Douglas product. Your new blind has been custom built for you from the highest quality materials. Once in your window, it will provide
BWTC6510GL Cooker Hood 60 cm Glass cooker hood in stainless steel. BWTC9510GL Cooker Hood 90 cm Glass cooker hood in stainless steel
 User Manual for your BWTC6510GL Cooker Hood 60 cm Glass cooker hood in stainless steel BWTC9510GL Cooker Hood 90 cm Glass cooker hood in stainless steel NOTE: This User Instruction Manual contains important
OWNERS INSTRUCTION MANUAL
 OWNERS INSTRUCTION MANUAL 132CM/52 Classic INSTALLATION OPERATION MAINTENANCE CAUTION READ INSTRUCTIONS CAREFULLY FOR SAFE INSTALLATION AND FAN OPERATION. IF UNSURE CONSULT A QUALIFIED ELECTRICIAN SUITABLE
3VNR52/42XXD Series Fan. Owner s Guide and Installation Manual. UL Model NO. : 3VNR52XXD / 3VNR42XXD
 Owner s Guide and Installation Manual 3VNR52/42XXD Series Fan UL Model NO. : 3VNR52XXD / 3VNR42XXD Attach sales receipt to this card and retain as your proof of purchase DATE OF PURCHASE: MODEL NUMBER:
What to Expect with Your Installation. Tools Needed. 30 inches PA G E. To register your fan, please visit: 11 PA G E
 Table of Contents Tools Needed Mounting Options 1.888.227.2178 Ceiling Bracket 30 inches To register your fan, please visit: www.casablancafanco.com/register Wiring 11 Troubleshooting??? 15 14 1 13 Operation,
DARTMOUTH COLLEGE DESIGN March 15, 2003 & CONSTRUCTION GUIDELINES
 SECTION 15830 HEATING & COOLING TERMINAL UNITS PART 1 DESIGN DIRECTIVES 1.1 DESIGN CRITERIA A. All fan coil units shall be sized to meet design load while operating at medium speed. In extreme noise sensitive
MemoirsStately3HoleBasin Mixer Installation and User Guide
 P3907005 MemoirsStately3HoleBasin Mixer Installation and User Guide 454W 3S 454W 4S 454W-4V MODEL NUMBERS Important :- Please quote the above model number(s) when ordering spares. IMPORTANT! Installer:
INSTALLATION INSTRUCTIONS TOOLS YOU WILL NEED GETTING STARTED
 INSTALLATION INSTRUCTIONS HONEYCOMB SHADES STANDARD RECTANGULAR Thank you for your purchase. This shade has been custom built for you from the highest quality materials. To avoid errors and save valuable
Hydroflame. Flame-effect fan convectors Installation and User Guide Elite and Classic Models. Contents
 Hydroflame Flame-effect fan convectors Installation and User Guide Elite and Classic Models Contents Installation General Notes Inset and Inset Dual Freestanding and Freestanding Dual Commissioning Fault
Singulier Spout Tube Basin Mixer Installation and User Guide
 Singulier Spout Tube Basin Mixer Installation and User Guide MODEL NUMBERS 10862W-CP Important! Please quote the above model number(s) when ordering spares IMPORTANT Installer: This manual is the property
PLEASE READ INSTRUCTIONS IN CONJUNCTION WITH ILLUSTRATIONS. PLEASE SAVE THESE INSTRUCTIONS.
 Eclipse Installation and Wiring Instructions Models Eclipse 100X Eclipse 100XP Eclipse 100XT Eclipse 150X Eclipse 150XP Ref No. 42 73 10A 42 72 81A 42 72 82A 42 72 83A 42 73 13A 220-240V~50Hz PLEASE READ
Installation and Operation Manual For Hunter Ceiling Fans
 Installation and Operation Manual For Hunter Ceiling Fans 1 2 CONGRATULATIONS! Your new Hunter ceiling fan is an addition to your home or office that will provide comfort and performance for many years.
JANUS 3 CIRCULATOR WATER HEATER INSTALLATION, COMMISSIONING & SERVICING INSTRUCTIONS G.C. No
 JANUS 3 CIRCULATOR WATER HEATER INSTALLATION, COMMISSIONING & SERVICING INSTRUCTIONS G.C. No 53 416 06 Publication No. ZZ 180/17 May 2000 These appliances are tested and certified by B G Technology for
Owner s Guide and Installation Manual
 For Your Records and Warranty Assistance For reference, also attach your receipt or a copy of your receipt to the manual. Model Name Type 2A Models Owner s Guide and Installation Manual Model No. Date
s y ens Av Avensys FIN EST RUS SLO RUS UAE
 34 224 34 225 Avensys Avensys GB D...1...5 I...5 N...9 GR...13 TR...17 BG...21 RO...25 GB...2 NL...6 FIN...10 CZ...14 SK...18 EST...22 RUS CN...26 F...3 S...7 PL...11 H...15 SLO...19 LV...23 RUS...27 E...4
Instruction manual. Please keep safe for future reference
 16in / 40cm Eco Pedestal Fan with 30W DC motor, Digital Display & Remote Control Model: SFDC-40101RC WARNING: Keep Batteries Out of Reach of Children 1. Swallowing may lead to serious injury in as little
Table of Contents What to Expect with Your Installation. Tools Needed. Motor Housing.
 Table of Contents Congratulations on purchasing your new Casablanca ceiling fan! It will provide comfort and performance in your home or office for many years. This installation and operation manual contains
MK 8706 / MB 8706 CONCEALED THERMOSTATIC SHOWER VALVE INSTALLATION GUIDE
 MK 8706 / MB 8706 CONCEALED THERMOSTATIC SHOWER VALVE INSTALLATION GUIDE DIMENSIONS 150mm 55mm 200mm 67mm Hot water ¾ BSP Parallel Cold water ¾ BSP Parallel 160mm x 120mm aperture behind face plate for
Installation Instructions
 Installation Instructions Over the Range Microwave Oven BEFORE YOU BEGIN (Read these instructions completely and carefully.) IMPORTANT IMPORTANT Save these instructions for local inspector s use. Observe
installation and operation manual for Hunter Ceiling Fans
 For Your Records and Warranty Assistance Model Name: Catalog/Model No.: Serial No.: Date Purchased: Where Purchased: For reference also attach your receipt or a copy of your receipt to the manual. installation
Table of Contents. What to Expect with. Mounting Options. Tools Needed. Downrod. Blades. Maintenance & Cleaning.
 Table of Contents Tools Needed Mounting Options Ceiling Bracket 30 inches Downrod 3 4 Wiring Canopy 5 11 Ladder 2 7 feet We are proud of our work and appreciate the opportunity to supply you with the best
Vertical Blinds. Step by Step Installation Instructions
 Vertical Blinds Step by Step Installation Instructions Everything You Need A Smooth Set-Up We want you to love your new window coverings and that includes having a smooth installation experience. We recommend
Copperad. Copperad Fan Convectors (November 2005 onwards) Installation, Operation and Maintenance Instructions To be retained by the user
 Installation, Operation and Maintenance Instructions To be retained by the user") Copperad Fan Convectors (November 2005 onwards) Installation, Operation and Maintenance Instructions To be retained by the user Copperad QA/IOM/58 Issue 2 1 GENERAL 1.1 GENERAL DESCRIPTION This manual
Copperad Fan Convectors (November 2005 onwards) Installation, Operation and Maintenance Instructions To be retained by the user Copperad QA/IOM/58 Issue 2 1 GENERAL 1.1 GENERAL DESCRIPTION This manual
INSTALLATION INSTRUCTIONS FOR THROUGH-THE-WALL VENTING COMPONENTS
 OIL FIRED WATER HEATER INSTALLATION AND OPERATING INSTRUCTIONS Read these instructions thoroughly before starting INSTALLATION INSTRUCTIONS FOR THROUGH-THE-WALL VENTING COMPONENTS These instructions apply